AR 眼镜之-拍照/录像动效切换-实现方案
目录
📂 前言
AR 眼镜系统版本
拍照/录像动效切换
1. 🔱 技术方案
1.1 技术方案概述
1.2 实现方案
1)第一阶段动效
2)第二阶段动效
2. 💠 默认代码配置
2.1 XML 初始布局
2.2 监听滑动对 View 改变
3. ⚛️ 拍照/录像动效切换实现
3.1 第一阶段动效
1)左移右边部分的 View
2)放大右边部分的 View
3.2 第二阶段动效
1)动态调整右边部分的约束
2)缩小右边部分的 View
3)从左往右移动左边部分
4)从 0 到 1 透明度增加左边部分
5)动画集实现
6)还原默认约束
4. ✅ 小结
附录1:动效帮助类代码
📂 前言
AR 眼镜系统版本
W517 Android9。
拍照/录像动效切换

实现效果如上 GIF 的左下角所示,我们看到主要分为:两部分、两阶段。
两部分:左边部分为 Normal 状态 View,右边部分为带有文字描述的 View。
两阶段:右边部分,分为变大阶段、缩小阶段;在右边部分的第二缩小阶段时,会触发左边部分的从左往右移动阶段、从 0 到 1 透明度增加阶段。
1. 🔱 技术方案
1.1 技术方案概述
拍照/录像动效切换主要使用属性动画完成,同时对于放大和缩小的参考方向不同,所以需要动态调整约束,动态调整约束时还需注意 maigin 值,因为文字改变尺寸也会变化。
1.2 实现方案
1)第一阶段动效
-
左移右边部分的 View;
-
放大右边部分的 View。
2)第二阶段动效
-
动态调整右边部分的约束;
-
缩小右边部分的 View;
-
从左往右移动左边部分;
-
从 0 到 1 透明度增加左边部分。
2. 💠 默认代码配置
2.1 XML 初始布局
norIcon 是左边部分 View,focLayout 是右边部分 View。
<?xml version="1.0" encoding="utf-8"?>
<androidx.constraintlayout.widget.ConstraintLayout xmlns:android="http://schemas.android.com/apk/res/android"xmlns:app="http://schemas.android.com/apk/res-auto"xmlns:tools="http://schemas.android.com/tools"android:id="@+id/parent"android:layout_width="match_parent"android:layout_height="match_parent"android:keepScreenOn="true"><ImageViewandroid:id="@+id/norIcon"android:layout_width="80dp"android:layout_height="104dp"android:layout_marginStart="24dp"android:layout_marginBottom="24dp"android:background="@drawable/shape_34343a_corner_20dp"android:contentDescription="@null"android:paddingHorizontal="24dp"android:paddingVertical="36dp"android:src="@drawable/ic_camera_video_nor"app:layout_constraintBottom_toBottomOf="parent"app:layout_constraintStart_toStartOf="parent" /><LinearLayoutandroid:id="@+id/focLayout"android:layout_width="wrap_content"android:layout_height="104dp"android:layout_marginStart="110dp"android:background="@drawable/shape_34343a_corner_20dp"android:gravity="center"android:minWidth="200dp"android:orientation="vertical"android:paddingStart="12dp"android:paddingEnd="16dp"app:layout_constraintBottom_toBottomOf="@id/norIcon"app:layout_constraintStart_toStartOf="parent"><ImageViewandroid:id="@+id/focIcon"android:layout_width="32dp"android:layout_height="32dp"android:contentDescription="@null"android:src="@drawable/ic_camera_picture_foc" /><com.agg.ui.AGGTextViewandroid:id="@+id/focText"android:layout_width="wrap_content"android:layout_height="wrap_content"android:layout_marginTop="6dp"android:gravity="center"android:singleLine="true"android:text="@string/tap_to_photo"android:textColor="#FCC810"android:textSize="24sp"app:UITypeface="Bold" /></LinearLayout>
</androidx.constraintlayout.widget.ConstraintLayout>
2.2 监听滑动对 View 改变
/*** 往前滑动:切换为录像模式/拍照模式*/override fun scrollForward() {if (AnimatorSwitchHelper.isAnimating) {Log.e(TAG, "scrollForward: 滑动过快")return}Log.i(TAG, "scrollForward: model=$mIsVideoModel,isRecordingVideo=${isRecording()}")if (mIsVideoModel) {if (isRecording()) stopRecord()switchToPhoto()mIsVideoModel = falsebinding.tips.text = getString(R.string.swipe_forward_to_video_model)binding.norIcon.setImageResource(R.drawable.ic_camera_video_nor)binding.focIcon.setImageResource(R.drawable.ic_camera_picture_foc)binding.focText.text = getString(R.string.tap_to_photo)} else {switchToVideo()mIsVideoModel = truebinding.tips.text = getString(R.string.swipe_forward_to_photo_model)binding.norIcon.setImageResource(R.drawable.ic_camera_picture_nor)binding.focIcon.setImageResource(R.drawable.ic_camera_video_foc)binding.focText.text = getString(R.string.tap_to_record)}binding.tips.visibility = VISIBLEAnimatorSwitchHelper.startAnimator(binding)}3. ⚛️ 拍照/录像动效切换实现
3.1 第一阶段动效
1)左移右边部分的 View
binding.focLayout.x = binding.focLayout.x - 862)放大右边部分的 View
val defWidth = binding.focLayout.width
val focBgBigAnim = ValueAnimator.ofInt(defWidth, defWidth + 86).apply {addUpdateListener { animation ->val width = animation.animatedValue as Intval layoutParams = binding.focLayout.layoutParams as ViewGroup.LayoutParamslayoutParams.width = widthbinding.focLayout.layoutParams = layoutParams}}
3.2 第二阶段动效
1)动态调整右边部分的约束
第一阶段在 XML 中默认配置的是 layout_constraintStart_toStartOf="parent",能保证放大时以左边为锚点从左往右放大;而第二阶段缩小时需要以右边为锚点,此时需要动态改变约束如下:
private fun changeConstraint(binding: ActivityMainBinding) {Log.i(TAG, "changeConstraint: ")val focLayoutId = R.id.focLayoutval constraintLayout = binding.parentConstraintSet().apply {// 修改约束clone(constraintLayout)// 清除原有的约束clear(focLayoutId, ConstraintSet.START)// 设置新的约束connect(focLayoutId,ConstraintSet.END,ConstraintSet.PARENT_ID,ConstraintSet.END,(binding.focLayout.context.resources.displayMetrics.widthPixels - binding.focLayout.x - binding.focLayout.width - 86).toInt())// 自动播放过渡动画——取消播放,与自定义动画重复
//            TransitionManager.beginDelayedTransition(constraintLayout)// 应用新的约束applyTo(constraintLayout)}
}
2)缩小右边部分的 View
val focBgSmallAnim = ValueAnimator.ofInt(defWidth + 86, defWidth).apply {addUpdateListener { animation ->val width = animation.animatedValue as Intval layoutParams = binding.focLayout.layoutParams as ViewGroup.LayoutParamslayoutParams.width = widthbinding.focLayout.layoutParams = layoutParams}addListener(object : AnimatorListenerAdapter() {override fun onAnimationEnd(p0: Animator) {Log.i(TAG, "onAnimationEnd: focBgSmallAnim")isAnimating = false}})
}
3)从左往右移动左边部分
val norBgTransAnim = ObjectAnimator.ofFloat(binding.norIcon, "translationX", -80f, 0f)4)从 0 到 1 透明度增加左边部分
val norBgAlphaAnim = ObjectAnimator.ofFloat(binding.norIcon, "alpha", 0f, 1f)5)动画集实现
AnimatorSet().apply {playSequentially(focBgBigAnim, focBgSmallAnim)playTogether(focBgSmallAnim, norBgTransAnim, norBgAlphaAnim)duration = 1000start()
}
6)还原默认约束
动效做完后需要还原默认约束,保证下次动效的正常进行。
if (!isFirstSwitch) restoreConstraint(binding)private fun restoreConstraint(binding: ActivityMainBinding) {Log.i(TAG, "restoreConstraint: ")val focLayoutId = R.id.focLayoutval constraintLayout = binding.parentConstraintSet().apply {clone(constraintLayout)clear(focLayoutId, ConstraintSet.END)connect(focLayoutId, ConstraintSet.START, ConstraintSet.PARENT_ID, ConstraintSet.START, 110)applyTo(constraintLayout)}
}
具体动效类的代码,参考附录1。
4. ✅ 小结
对于拍照/录像动效切换,本文只是一个基础实现方案,更多业务细节请参考产品逻辑去实现。
另外,由于本人能力有限,如有错误,敬请批评指正,谢谢。
附录1:动效帮助类代码
object AnimatorSwitchHelper {private val TAG = AnimatorSwitchHelper::class.java.simpleNamevar isAnimating = falsevar isFirstSwitch = truefun startAnimator(binding: ActivityMainBinding) {Log.i(TAG, "startAnimator: isAnimating=$isAnimating,isFirstSwitch=$isFirstSwitch")isAnimating = trueval defWidth = binding.focLayout.widthif (!isFirstSwitch) restoreConstraint(binding)if (isFirstSwitch) binding.focLayout.x = binding.focLayout.x - 86// 1. 放大Foc的Viewval focBgBigAnim = ValueAnimator.ofInt(defWidth, defWidth + 86).apply {addUpdateListener { animation ->val width = animation.animatedValue as Intval layoutParams = binding.focLayout.layoutParams as ViewGroup.LayoutParamslayoutParams.width = widthbinding.focLayout.layoutParams = layoutParams}addListener(object : AnimatorListenerAdapter() {override fun onAnimationEnd(p0: Animator) {Log.i(TAG, "onAnimationEnd: focBgBigAnim")// 为绘制反向动画,需修改约束方向changeConstraint(binding)isFirstSwitch = false}})}// 2.1 缩小Foc的Viewval focBgSmallAnim = ValueAnimator.ofInt(defWidth + 86, defWidth).apply {addUpdateListener { animation ->val width = animation.animatedValue as Intval layoutParams = binding.focLayout.layoutParams as ViewGroup.LayoutParamslayoutParams.width = widthbinding.focLayout.layoutParams = layoutParams}addListener(object : AnimatorListenerAdapter() {override fun onAnimationEnd(p0: Animator) {Log.i(TAG, "onAnimationEnd: focBgSmallAnim")isAnimating = false}})}// 2.2 从左往右移动Nor的Viewval norBgTransAnim = ObjectAnimator.ofFloat(binding.norIcon, "translationX", -80f, 0f)// 2.3 透明度渐显Nor的Viewval norBgAlphaAnim = ObjectAnimator.ofFloat(binding.norIcon, "alpha", 0f, 1f)AnimatorSet().apply {playSequentially(focBgBigAnim, focBgSmallAnim)playTogether(focBgSmallAnim, norBgTransAnim, norBgAlphaAnim)duration = 1000start()}}private fun changeConstraint(binding: ActivityMainBinding) {Log.i(TAG, "changeConstraint: ")val focLayoutId = R.id.focLayoutval constraintLayout = binding.parentConstraintSet().apply {// 修改约束clone(constraintLayout)// 清除原有的约束clear(focLayoutId, ConstraintSet.START)// 设置新的约束connect(focLayoutId,ConstraintSet.END,ConstraintSet.PARENT_ID,ConstraintSet.END,(binding.focLayout.context.resources.displayMetrics.widthPixels - binding.focLayout.x - binding.focLayout.width - 86).toInt())// 自动播放过渡动画——取消播放,与自定义动画重复
//            TransitionManager.beginDelayedTransition(constraintLayout)// 应用新的约束applyTo(constraintLayout)}}private fun restoreConstraint(binding: ActivityMainBinding) {Log.i(TAG, "restoreConstraint: ")val focLayoutId = R.id.focLayoutval constraintLayout = binding.parentConstraintSet().apply {clone(constraintLayout)clear(focLayoutId, ConstraintSet.END)connect(focLayoutId, ConstraintSet.START, ConstraintSet.PARENT_ID, ConstraintSet.START, 110)applyTo(constraintLayout)}}}
相关文章:
AR 眼镜之-拍照/录像动效切换-实现方案
目录 📂 前言 AR 眼镜系统版本 拍照/录像动效切换 1. 🔱 技术方案 1.1 技术方案概述 1.2 实现方案 1)第一阶段动效 2)第二阶段动效 2. 💠 默认代码配置 2.1 XML 初始布局 2.2 监听滑动对 View 改变 3. ⚛️…...

2025年中科院分区大类划分公布!新增8155本
2025年中科院分区表变更情况 扩大收录范围 2025年的期刊分区表在原有的自然科学(SCIE)、社会科学(SSCI)和人文科学(AHCI)的基础上,增加了ESCI期刊的收录,并根据这些期刊的数据进行…...

S变换matlab实现
S变换函数 function [st,t,f] st(timeseries,minfreq,maxfreq,samplingrate,freqsamplingrate) % S变换 % Code by huasir Beijing 2025.1.10 % Reference is "Localization of the Complex Spectrum: The S Transform" % from IEEE Transactions on Signal Proc…...

Springboot——钉钉(站内)实现登录第三方应用
文章目录 前言准备1、创建钉钉应用,并开放网页应用2、配置网页应用各项参数发布版本 前端改造后端逻辑1、获取应用免登录 Access_token2、通过免登录 Access_token 和 Auth_Code 获取对应登录人信息 注意事项 前言 PC端的钉钉中工作台,增加第三方应用&a…...

基于深度学习算法的AI图像视觉检测
基于人工智能和深度学习方法的现代计算机视觉技术在过去10年里取得了显著进展。如今,它被广泛用于图像分类、人脸识别、图像中物体的识别等。那么什么是深度学习?深度学习是如何应用在视觉检测上的呢? 什么是深度学习? 深度学习是…...

cJson——序列化格式json和protobuf对比
cJson——序列化格式json和protobuf对比 1. 更小的消息体积2. 更快的序列化与反序列化速度3. 类型安全4. 向后和向前兼容性5. 更低的带宽消耗6. 高效的编码方式7. 易于跨语言支持8. 支持复杂的数据结构9. 更好的支持大型数据交换总结 Protocol Buffers (Protobuf) 和 JSON 都是…...

搭建一个fastapi的项目,调用ollama服务
1. 项目结构 my_project/ │ ├── app/ │ ├── main.py # FastAPI应用的入口 │ ├── services/ # 包含服务逻辑 │ │ └── ollama_service.py │ ├── models/ # 定义数据模型 │ │ └── response.py │ ├─…...
)
Wireshark编译手册(Windows)
以下是对 Wireshark 官方文档中“Windows 平台的设置和构建说明”部分的翻译和总结: 2.2. Windows 平台 本节提供了在 Windows 上进行 Wireshark 开发的快速设置指南,包含推荐的配置。 2.2.1. 使用 Microsoft Visual Studio 注意:除非您非…...

在高德地图上加载3DTilesLayer图层模型/天地瓦片
1. 引入必要的库 Three.js:一个用于创建和显示3D图形的JavaScript库。vuemap/three-layer:一个Vue插件,它允许你在高德地图中添加Three.js图层。vuemap/layer-3dtiles:一个用于处理3D Tiles格式数据的Vue插件,可以用来…...

深入浅出负载均衡:理解其原理并选择最适合你的实现方式
负载均衡是一种在多个计算资源(如服务器、CPU核心、网络链接等)之间分配工作负载的技术,旨在优化资源利用率、提高系统吞吐量和降低响应时间。负载均衡的实现方式多种多样,以下是几种常见的实现方式: 1. 硬件负载均衡&…...

STM32的存储结构
STM32F103 芯片是基于 ARM Cortex-M3 内核的微控制器,它集成了多种类型的存储器,每种存储器都有其特定的作用和存储对象。以下是关于 STM32F103 中 Flash、ROM 和 SRAM 的详细介绍: 1. Flash Memory (闪存) 作用:Flash 是非易失性…...

@SneakyThrows 注解详解
SneakyThrows 注解详解 1. 基本介绍 SneakyThrows 是 Lombok 提供的注解,用于简化异常处理,自动生成 try-catch 代码块,将检查型异常转换为非检查型异常。 2. 使用对比 2.1 传统写法 public String readFile(String path) {try {return …...

js监测页面可见性
监测切换页面 检测页面的可见性状态document.visibilityState:document.hiddenvisibilitychange 事件 js 检测页面切换至别的应用 检测页面的可见性状态 在JavaScript中,你可以使用Page Visibility API来检测页面的可见性状态。这个API提供了一组接口,允…...

Android wifi常见问题及分析
参考 Android Network/WiFi 那些事儿 前言 本文将讨论几个有意思的网络问题,同时介绍 Android 上常见WiFi 问题的分析思路。 网络基础Q & A 一. 网络分层缘由 分层想必大家很熟悉,是否想过为何需要这样分层? 网上大多都是介绍每一层…...

EFCore HasDefaultValueSql
今天小伙伴在代码中遇到了有关 HasDefaultValue 的疑问,这里整理澄清下... 在使用 Entity Framework Core (EFCore) 配置实体时,HasDefaultValue 方法会为数据库列设置一个默认值。该默认值的行为取决于以下条件: 1. 配置 HasDefaultValue 的…...

Win10微调大语言模型ChatGLM2-6B
在《Win10本地部署大语言模型ChatGLM2-6B-CSDN博客》基础上进行,官方文档在这里,参考了这篇文章 首先确保ChatGLM2-6B下的有ptuning AdvertiseGen下载地址1,地址2,文件中数据留几行 模型文件下载地址 (注意࿱…...

什么叫区块链?怎么保证区块链的安全性?
区块链(Blockchain)是一种分布式数据库或账本技术,它通过去中心化的方式记录交易或其他数据,并确保这些记录是安全、透明和不可篡改的。区块链最初是作为比特币(Bitcoin)加密货币的基础技术而被公众所知&am…...

一、智能体强化学习——强化学习基础
1.1 强化学习与深度学习的基本概念 1.1.1 强化学习的核心思想 什么是强化学习? 强化学习(Reinforcement Learning, RL):指在与环境(Environment)的反复交互中,智能体(Agent&#x…...

【DES加密】
什么是DES DES(Data Encryption Standard) 是一种对称加密算法。它的设计目标是提供高度的数据安全性和性能。 DES的概念 DES使用56位的密钥和64位的明文块进行加密。DES算法的分组大小是64位,因此,如果需要加密的明文长度不足64位,需要进…...

.NET中的框架和运行环境
在.NET生态系统中,框架和运行环境是两个不同的概念,它们各自扮演着重要的角色。 下面我将分别介绍.NET中的框架和运行环境,并解释它们之间的区别。 .NET 框架(Frameworks) 框架提供了一套预定义的类库、工具和服务&…...

ES6从入门到精通:前言
ES6简介 ES6(ECMAScript 2015)是JavaScript语言的重大更新,引入了许多新特性,包括语法糖、新数据类型、模块化支持等,显著提升了开发效率和代码可维护性。 核心知识点概览 变量声明 let 和 const 取代 var…...
)
IGP(Interior Gateway Protocol,内部网关协议)
IGP(Interior Gateway Protocol,内部网关协议) 是一种用于在一个自治系统(AS)内部传递路由信息的路由协议,主要用于在一个组织或机构的内部网络中决定数据包的最佳路径。与用于自治系统之间通信的 EGP&…...

深入理解JavaScript设计模式之单例模式
目录 什么是单例模式为什么需要单例模式常见应用场景包括 单例模式实现透明单例模式实现不透明单例模式用代理实现单例模式javaScript中的单例模式使用命名空间使用闭包封装私有变量 惰性单例通用的惰性单例 结语 什么是单例模式 单例模式(Singleton Pattern&#…...
【开发技术】.Net使用FFmpeg视频特定帧上绘制内容
目录 一、目的 二、解决方案 2.1 什么是FFmpeg 2.2 FFmpeg主要功能 2.3 使用Xabe.FFmpeg调用FFmpeg功能 2.4 使用 FFmpeg 的 drawbox 滤镜来绘制 ROI 三、总结 一、目的 当前市场上有很多目标检测智能识别的相关算法,当前调用一个医疗行业的AI识别算法后返回…...
springboot整合VUE之在线教育管理系统简介
可以学习到的技能 学会常用技术栈的使用 独立开发项目 学会前端的开发流程 学会后端的开发流程 学会数据库的设计 学会前后端接口调用方式 学会多模块之间的关联 学会数据的处理 适用人群 在校学生,小白用户,想学习知识的 有点基础,想要通过项…...

AI+无人机如何守护濒危物种?YOLOv8实现95%精准识别
【导读】 野生动物监测在理解和保护生态系统中发挥着至关重要的作用。然而,传统的野生动物观察方法往往耗时耗力、成本高昂且范围有限。无人机的出现为野生动物监测提供了有前景的替代方案,能够实现大范围覆盖并远程采集数据。尽管具备这些优势…...

NPOI操作EXCEL文件 ——CAD C# 二次开发
缺点:dll.版本容易加载错误。CAD加载插件时,没有加载所有类库。插件运行过程中用到某个类库,会从CAD的安装目录找,找不到就报错了。 【方案2】让CAD在加载过程中把类库加载到内存 【方案3】是发现缺少了哪个库,就用插件程序加载进…...
群晖NAS如何在虚拟机创建飞牛NAS
套件中心下载安装Virtual Machine Manager 创建虚拟机 配置虚拟机 飞牛官网下载 https://iso.liveupdate.fnnas.com/x86_64/trim/fnos-0.9.2-863.iso 群晖NAS如何在虚拟机创建飞牛NAS - 个人信息分享...

掌握 HTTP 请求:理解 cURL GET 语法
cURL 是一个强大的命令行工具,用于发送 HTTP 请求和与 Web 服务器交互。在 Web 开发和测试中,cURL 经常用于发送 GET 请求来获取服务器资源。本文将详细介绍 cURL GET 请求的语法和使用方法。 一、cURL 基本概念 cURL 是 "Client URL" 的缩写…...
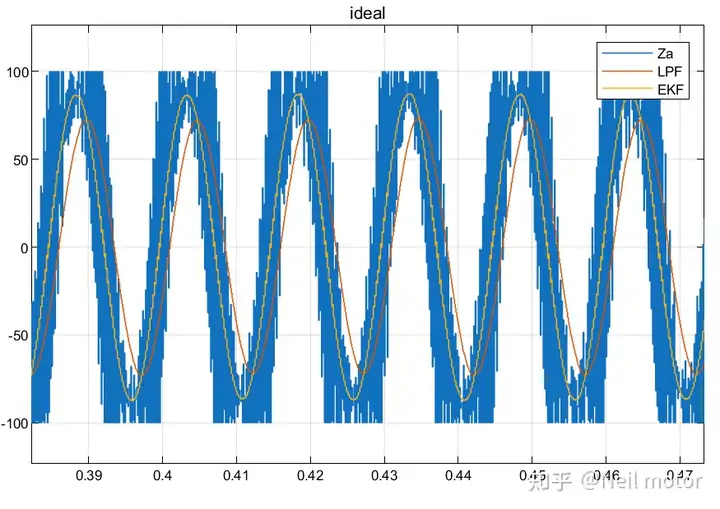
永磁同步电机无速度算法--基于卡尔曼滤波器的滑模观测器
一、原理介绍 传统滑模观测器采用如下结构: 传统SMO中LPF会带来相位延迟和幅值衰减,并且需要额外的相位补偿。 采用扩展卡尔曼滤波器代替常用低通滤波器(LPF),可以去除高次谐波,并且不用相位补偿就可以获得一个误差较小的转子位…...