kubernetes学习-配置管理(九)
一、ConfigMap
(1)通过指定目录,创建configmap
# 创建一个config目录
[root@k8s-master k8s]# mkdir config[root@k8s-master k8s]# cd config/
[root@k8s-master config]# mkdir test
[root@k8s-master config]# cd test
[root@k8s-master test]# vim db.properties
username=root
password=admin[root@k8s-master test]# vim redis.properties
host: 127.0.0.1
port: 6379[root@k8s-master test]# cd ..
# 创建configmap
[root@k8s-master config]# kubectl create configmap test-dir-config --from-file=test/
configmap/test-dir-config created# 查看configmap
[root@k8s-master config]# kubectl get cm
NAME               DATA   AGE
kube-root-ca.crt   1      32h
test-dir-config    2      18s[root@k8s-master config]# kubectl describe cm test-dir-config
Name:         test-dir-config
Namespace:    default
Labels:       <none>
Annotations:  <none>Data
====
db.properties:
----
username=root
password=adminredis.properties:
----
host: 127.0.0.1
port: 6379BinaryData
====Events:  <none>
(2)通过指定文件的方式创建configmap
[root@k8s-master config]# vim application.yaml
spring:application:name: test-app
server:port: 8080# 通过指定文件的方式,创建configmap
[root@k8s-master config]# kubectl create cm spring-boot-test-yaml --from-file=/opt/k8s/config/application.yaml
configmap/spring-boot-test-yaml created# 查看configmap
[root@k8s-master config]# kubectl get cm
NAME                    DATA   AGE
kube-root-ca.crt        1      32h
spring-boot-test-yaml   1      6s
test-dir-config         2      9m2s# 查看configmap内容
[root@k8s-master config]# kubectl describe cm spring-boot-test-yaml
Name:         spring-boot-test-yaml
Namespace:    default
Labels:       <none>
Annotations:  <none>Data
====
application.yaml:
----
spring:application:name: test-appserver:port: 8080BinaryData
====Events:  <none>
# 指定文件时,同时指定别名为app.yaml
[root@k8s-master config]# kubectl create cm spring-boot-test-alias-yaml --from-file=app.yaml=/opt/k8s/config/application.yaml
configmap/spring-boot-test-alias-yaml created
[root@k8s-master config]# kubectl get cm
NAME                          DATA   AGE
kube-root-ca.crt              1      32h
spring-boot-test-alias-yaml   1      5s
spring-boot-test-yaml         1      4m25s
test-dir-config               2      13m
[root@k8s-master config]# kubectl describe cm spring-boot-test-alias-yaml
Name:         spring-boot-test-alias-yaml
Namespace:    default
Labels:       <none>
Annotations:  <none>Data
====
app.yaml: # 这里的文件名称就被修改为了指定的别名
----
spring:application:name: test-appserver:port: 8080BinaryData
====Events:  <none>
# 通过key value的形式指定
[root@k8s-master config]# kubectl create cm test-key-value-config --from-literal=username=root --from-literal=password=root
configmap/test-key-value-config created
[root@k8s-master config]# kubectl get cm
NAME                          DATA   AGE
kube-root-ca.crt              1      32h
spring-boot-test-alias-yaml   1      3m29s
spring-boot-test-yaml         1      7m49s
test-dir-config               2      16m
test-key-value-config         2      5s
[root@k8s-master config]# kubectl describe cm test-key-value-config
Name:         test-key-value-config
Namespace:    default
Labels:       <none>
Annotations:  <none>Data
====
password:
----
root
username:
----
rootBinaryData
====Events:  <none>
(3)使用configmap
[root@k8s-master config]# kubectl create configmap test-env-config --from-literal=JAVA_OPTS_TEST='-Xms512m -Xmx512m' --from-literal=APP_NAME=springboot
configmap/test-env-config created
[root@k8s-master config]# kubectl describe configmap/test-env-config
Name:         test-env-config
Namespace:    default
Labels:       <none>
Annotations:  <none>Data
====
APP_NAME:
----
springboot
JAVA_OPTS_TEST:
----
-Xms512m -Xmx512mBinaryData
====Events:  <none># 创建配置文件
[root@k8s-master config]# vim env-test-pod.yaml
apiVersion: v1
kind: Pod
metadata:name: test-env-po
spec:containers:- name: env-testimage: alpinecommand: ["/bin/sh", "-c", "env;sleep 3600"]imagePullPolicy: IfNotPresentenv:- name: JAVA_VM_OPTSvalueFrom:configMapKeyRef:name: test-env-config # configMap的名字key: JAVA_OPTS_TEST # 表示从name 为 test-env-config配置中找到key为JAVA_OPTS_TEST的value,赋值给JAVA_VM_OPTS- name: APPvalueFrom:configMapKeyRef:name: test-env-configkey: APP_NAMErestartPolicy: Never[root@k8s-master config]# kubectl create -f env-test-pod.yaml
pod/test-env-cm created[root@k8s-master config]# kubectl get po
NAME                            READY   STATUS    RESTARTS       AGE
nginx-deploy-778cb6d6f7-hmhcx   1/1     Running   1 (2m7s ago)   2d21h
test-env-po                     1/1     Running   0              5s[root@k8s-master config]# kubectl logs -f test-env-po
NGINX_SVC_SERVICE_HOST=10.106.43.135
KUBERNETES_PORT=tcp://10.96.0.1:443
KUBERNETES_SERVICE_PORT=443
HOSTNAME=test-env-po
NGINX_SVC_EXTERNAL_SERVICE_HOST=10.96.11.222
SHLVL=1
HOME=/root
JAVA_VM_OPTS=-Xms512m -Xmx512m
NGINX_SVC_SERVICE_PORT=80
NGINX_SVC_PORT=tcp://10.106.43.135:80
NGINX_SVC_EXTERNAL_PORT=tcp://10.96.11.222:80
NGINX_SVC_EXTERNAL_SERVICE_PORT=80
NGINX_SVC_SERVICE_PORT_WEB=80
NGINX_SVC_PORT_80_TCP_ADDR=10.106.43.135
APP=springboot
NGINX_SVC_EXTERNAL_SERVICE_PORT_WEB=80
NGINX_SVC_PORT_80_TCP_PORT=80
NGINX_SVC_PORT_80_TCP_PROTO=tcp
NGINX_SVC_EXTERNAL_PORT_80_TCP_ADDR=10.96.11.222
KUBERNETES_PORT_443_TCP_ADDR=10.96.0.1
PATH=/usr/local/sbin:/usr/local/bin:/usr/sbin:/usr/bin:/sbin:/bin
NGINX_SVC_EXTERNAL_PORT_80_TCP_PORT=80
NGINX_SVC_EXTERNAL_PORT_80_TCP_PROTO=tcp
KUBERNETES_PORT_443_TCP_PORT=443
KUBERNETES_PORT_443_TCP_PROTO=tcp
NGINX_SVC_PORT_80_TCP=tcp://10.106.43.135:80
NGINX_SVC_EXTERNAL_PORT_80_TCP=tcp://10.96.11.222:80
KUBERNETES_SERVICE_PORT_HTTPS=443
KUBERNETES_PORT_443_TCP=tcp://10.96.0.1:443
KUBERNETES_SERVICE_HOST=10.96.0.1
PWD=/

上面的两个值就是之前创建的configmap文件中的值。环境变量被成功加载。
(4)通过文件使用configmap
[root@k8s-master config]# vim file-test-pod.yaml
apiVersion: v1
kind: Pod
metadata:name: test-configfile-po
spec:containers:- name: env-testimage: alpinecommand: ["/bin/sh", "-c", "env;sleep 3600"]imagePullPolicy: IfNotPresentenv:- name: JAVA_VM_OPTSvalueFrom:configMapKeyRef:name: test-env-config # configMap的名字key: JAVA_OPTS_TEST # 表示从name 为 test-env-config配置中找到key为JAVA_OPTS_TEST的value,赋值给JAVA_VM_OPTS- name: APPvalueFrom:configMapKeyRef:name: test-env-configkey: APP_NAMEvolumeMounts: # 加载数据卷- name: db-config # 表示要加载的volumes 的名字mountPath: "/usr/local/mysql/conf" # 想要将数据卷中的文件加载到哪个目录下readOnly: true # 是否只读volumes: # 数据卷挂载 configmap, secret- name: db-config # 数据卷的名字,自定义设置,使用时要和其对应configMap: # 数据类型为ConfigMapname: test-dir-config # configmap 的名字,需要和想加载的configmap的名字相同items: # 对configmap中的key进行映射,如果不指定,默认会将configmap中所有的key全部转换为一个个同名的文件- key: "db.properties" # configMap中的keypath: "db.properties" # 将该key的值转换为文件           restartPolicy: Never[root@k8s-master config]# kubectl create -f file-test-pod.yaml
pod/test-env-po created    [root@k8s-master config]# kubectl get po
NAME                            READY   STATUS    RESTARTS      AGE
nginx-deploy-778cb6d6f7-hmhcx   1/1     Running   1 (21m ago)   2d21h
test-configfile-po              1/1     Running   0             27s# 进入容器,查看数据
[root@k8s-master config]# kubectl exec -it test-configfile-po -- sh
/ # cd /usr/local/mysql/conf/
/usr/local/mysql/conf # ls
db.properties
/usr/local/mysql/conf # cat db.properties
username=root
password=admin
在test-dir-config configmap中,有两个文件,分别为db.properties和redis.properties

但是上面我们在容器test-configfile-po 中 查看到只有db.properties被写入到路劲/usr/local/mysql/conf下,这是因为在 file-test-pod.yaml 配置文件中,指定了items,所以只有明确指定了的才会被写入到容器中。
二、加密数据配置 Secret
[root@k8s-master www]# kubectl create secret generic orig-secret --from-literal=username=admin --from-literal=password="ddddddd"
secret/orig-secret created
[root@k8s-master www]# kubectl describe secret orig-secret
Name:         orig-secret
Namespace:    default
Labels:       <none>
Annotations:  <none>Type:  OpaqueData
====
password:  7 bytes
username:  5 bytes# 创建docker-registry
[root@k8s-master www]# kubectl create secret docker-registry harbor-secret --docker-username=admin --docker-password=wolfcode --docker-email=xxxx@qq.com
secret/harbor-secret created[root@k8s-master www]# kubectl describe secret harbor-secret
Name:         harbor-secret
Namespace:    default
Labels:       <none>
Annotations:  <none>Type:  kubernetes.io/dockerconfigjsonData
====
.dockerconfigjson:  136 bytes# 查看密文值
[root@k8s-master www]# kubectl edit secret harbor-secret
# Please edit the object below. Lines beginning with a '#' will be ignored,
# and an empty file will abort the edit. If an error occurs while saving this file will be
# reopened with the relevant failures.
#
apiVersion: v1
data:.dockerconfigjson: eyJhdXRocyI6eyJodHRwczovL2luZGV4LmRvY2tlci5pby92MS8iOnsidXNlcm5hbWUiOiJhZG1pbiIsInBhc3N3b3JkIjoid29sZmNvZGUiLCJlbWFpbCI6Inh4eHhAcXEuY29tIiwiYXV0aCI6IllXUnRhVzQ2ZDI5c1ptTnZaR1U9In19fQ==
kind: Secret
metadata:creationTimestamp: "2025-01-21T16:03:22Z"name: harbor-secretnamespace: defaultresourceVersion: "161226"uid: b997d28d-80a5-483f-bdd3-ac574a2be9ab
type: kubernetes.io/dockerconfigjson# 查看解码之后的数据
[root@k8s-master www]# echo "eyJhdXRocyI6eyJodHRwczovL2luZGV4LmRvY2tlci5pby92MS8iOnsidXNlcm5hbWUiOiJhZG1pbiIsInBhc3N3b3JkIjoid29sZmNvZGUiLCJlbWFpbCI6Inh4eHhAcXEuY29tIiwiYXV0aCI6IllXUnRhVzQ2ZDI5c1ptTnZaR1U9In19fQ==" | base64 --decode
{"auths":{"https://index.docker.io/v1/":{"username":"admin","password":"wolfcode","email":"xxxx@qq.com","auth":"YWRtaW46d29sZmNvZGU="}}}
三、SubPath 的使用
[root@k8s-master www]# kubectl get po
NAME                            READY   STATUS      RESTARTS      AGE
nginx-deploy-778cb6d6f7-hmhcx   1/1     Running     1 (13d ago)   15d
test-configfile-po              0/1     Completed   0             13d
[root@k8s-master www]# kubectl exec -it nginx-deploy-778cb6d6f7-hmhcx -- sh
# ls
bin  boot  dev  docker-entrypoint.d  docker-entrypoint.sh  etc  home  lib  lib64  media  mnt  opt  proc  root  run  sbin  srv  sys  tmp  usr  var# ls
conf.d  fastcgi_params  mime.types  modules  nginx.conf  scgi_params  uwsgi_params
# pwd
/etc/nginx# cat nginx.confuser  nginx;
worker_processes  auto;error_log  /var/log/nginx/error.log notice;
pid        /var/run/nginx.pid;events {worker_connections  1024;
}http {include       /etc/nginx/mime.types;default_type  application/octet-stream;log_format  main  '$remote_addr - $remote_user [$time_local] "$request" ''$status $body_bytes_sent "$http_referer" ''"$http_user_agent" "$http_x_forwarded_for"';access_log  /var/log/nginx/access.log  main;sendfile        on;#tcp_nopush     on;keepalive_timeout  65;#gzip  on;include /etc/nginx/conf.d/*.conf;
}[root@k8s-master config]# vim nginx.conf # 将上面的内容复制进去
[root@k8s-master config]# [root@k8s-master config]# kubectl create configmap nginx-conf-cm --from-file=./nginx.conf
configmap/nginx-conf-cm created[root@k8s-master config]# kubectl describe cm nginx-conf-cm
Name:         nginx-conf-cm
Namespace:    default
Labels:       <none>
Annotations:  <none>Data
====
nginx.conf:
----
user  nginx;
worker_processes  auto;error_log  /var/log/nginx/error.log notice;
pid        /var/run/nginx.pid;events {worker_connections  1024;
}http {include       /etc/nginx/mime.types;default_type  application/octet-stream;log_format  main  '$remote_addr - $remote_user [$time_local] "$request" ''$status $body_bytes_sent "$http_referer" ''"$http_user_agent" "$http_x_forwarded_for"';access_log  /var/log/nginx/access.log  main;sendfile        on;#tcp_nopush     on;keepalive_timeout  65;#gzip  on;include /etc/nginx/conf.d/*.conf;
}BinaryData
====Events:  <none>把nginx.conf配置放在configmap中,将来修改configmap时,容器里配置文件能够被修改
在nginx-deploy中配置数据卷,
[root@k8s-master config]# kubectl edit deploy nginx-deploy # 编辑内容如下截图
error: deployments.apps "nginx-deploy" is invalid
deployment.apps/nginx-deploy edited
[root@k8s-master config]# kubectl get deploy
NAME READY UP-TO-DATE AVAILABLE AGE
nginx-deploy 0/1 1 0 15d

发现容器没有启动起来,增加一个命令:
[root@k8s-master config]# kubectl edit deploy nginx-deploy
deployment.apps/nginx-deploy edited

[root@k8s-master config]# kubectl get po
NAME                            READY   STATUS      RESTARTS   AGE
nginx-deploy-747f54c94b-4h86h   1/1     Running     0          24s
test-configfile-po              0/1     Completed   0          13d# 进入到容器中的/etc/nginx目录下,发现配置文件只有一个nginx.conf了,其他的文件都被覆盖了
[root@k8s-master config]# kubectl exec -it nginx-deploy-747f54c94b-4h86h -- sh
# ls
bin  boot  dev  docker-entrypoint.d  docker-entrypoint.sh  etc  home  lib  lib64  media  mnt  opt  proc  root  run  sbin  srv  sys  tmp  usr  var
# cd /etc/nginx
# ls
nginx.conf此时,就需要使用subPath的配置,说明如下:使用 ConfigMap 或 Secret 挂载到目录的时候,会将容器中源目录给覆盖掉,此时我们可能只想覆盖目录中的某一个文件,但是这样的操作会覆盖整个文件,因此需要使用到 SubPath配置方式:
定义 volumes 时需要增加 items 属性,配置 key 和 path,且 path 的值不能从 / 开始
在容器内的 volumeMounts 中增加 subPath 属性,该值与 volumes 中 items.path 的值相同
containers:......volumeMounts:- mountPath: /etc/nginx/nginx.conf # 挂载到哪里name: config-volume # 使用哪个 configmap 或 secretsubPath: etc/nginx/nginx.conf # 与 volumes.[0].items.path 相同
volumes:
- configMap:name: nginx-conf # configMap 名字items: # subPath 配置key: nginx.conf # configMap 中的文件名path: etc/nginx/nginx.conf # subPath 路径
[root@k8s-master config]# kubectl edit deploy nginx-deploy
deployment.apps/nginx-deploy edited[root@k8s-master config]# kubectl get po # 正常运行起来了
NAME READY STATUS RESTARTS AGE
nginx-deploy-747f54c94b-4h86h 1/1 Terminating 0 9m46s
nginx-deploy-c57c8cd87-q554h 1/1 Running 0 8s
test-configfile-po 0/1 Completed 0 13d# 再次进入到容器中,查看配置文件
[root@k8s-master config]# kubectl exec -it nginx-deploy-c57c8cd87-q554h -- sh
# cd /etc/nginx
# ls
conf.d fastcgi_params mime.types modules nginx.conf scgi_params uwsgi_params可以看到此时,其他的配置文件也都存在,没有被覆盖
四、配置的热更新
我们通常会将项目的配置文件作为 configmap 然后挂载到 pod,那么如果更新 configmap 中的配置,会不会更新到 pod 中呢?这得分成几种情况:
默认方式:会更新,更新周期是更新时间 + 缓存时间
subPath:不会更新
变量形式:如果 pod 中的一个变量是从 configmap 或 secret 中得到,同样也是不会更新的对于 subPath 的方式,我们可以取消 subPath 的使用,将配置文件挂载到一个不存在的目录,避免目录的覆盖,然后再利用软连接的形式,将该文件链接到目标位置但是如果目标位置原本就有文件,可能无法创建软链接,此时可以基于前面讲过的 postStart 操作执行删除命令,将默认的吻技安删除即可1、 通过 edit 命令直接修改 configmap
2、 通过 replace 替换
由于 configmap 我们创建通常都是基于文件创建,并不会编写 yaml 配置文件,因此修改时我们也是直接修改配置文件,而 replace 是没有 --from-file 参数的,因此无法实现基于源配置文件的替换,此时我们可以利用下方的命令实现# 该命令的重点在于 --dry-run 参数,该参数的意思打印 yaml 文件,但不会将该文件发送给 apiserver,再结合 -oyaml 输出 yaml 文件就可以得到一个配置好但是没有发给 apiserver 的文件,然后再结合 replace 监听控制台输出得到 yaml 数据即可实现替换
kubectl create cm --from-file=nginx.conf --dry-run -oyaml | kubectl replace -f-视频参考:https://www.bilibili.com/video/BV1MT411x7GH?spm_id_from=333.788.player.switch&vd_source=d94e478a38d57da19b28f12887099880&p=58
五、不可变的 Secret 和 ConfigMap
对于一些敏感服务的配置文件,在线上有时是不允许修改的,此时在配置 configmap 时可以设置 immutable: true 来禁止修改相关文章:
kubernetes学习-配置管理(九)
一、ConfigMap (1)通过指定目录,创建configmap # 创建一个config目录 [rootk8s-master k8s]# mkdir config[rootk8s-master k8s]# cd config/ [rootk8s-master config]# mkdir test [rootk8s-master config]# cd test [rootk8s-master test…...

python 语音识别
目录 一、语音识别 二、代码实践 2.1 使用vosk三方库 2.2 使用SpeechRecognition 2.3 使用Whisper 一、语音识别 今天识别了别人做的这个app,觉得虽然是个日记app 但是用来学英语也挺好的,能进行语音识别,然后矫正语法,自己说的时候 ,实在不知道怎么说可以先乱说,然…...

一文速览DeepSeek-R1的本地部署——可联网、可实现本地知识库问答:包括671B满血版和各个蒸馏版的部署
前言 自从deepseek R1发布之后「详见《一文速览DeepSeek R1:如何通过纯RL训练大模型的推理能力以比肩甚至超越OpenAI o1(含Kimi K1.5的解读)》」,deepseek便爆火 爆火以后便应了“人红是非多”那句话,不但遭受各种大规模攻击,即便…...

[mmdetection]fast-rcnn模型训练自己的数据集的详细教程
本篇博客是由本人亲自调试成功后的学习笔记。使用了mmdetection项目包进行fast-rcnn模型的训练,数据集是自制图像数据。废话不多说,下面进入训练步骤教程。 注:本人使用linux服务器进行展示,Windows环境大差不差。另外࿰…...

1. Kubernetes组成及常用命令
Pods(k8s最小操作单元)ReplicaSet & Label(k8s副本集和标签)Deployments(声明式配置)Services(服务)k8s常用命令Kubernetes(简称K8s)是一个开源的容器编排系统,用于自动化应用程序的部署、扩展和管理。自2014年发布以来,K8s迅速成为容器编排领域的行业标准,被…...

linux下ollama更换模型路径
Linux下更换Ollama模型下载路径指南 在使用Ollama进行AI模型管理时,有时需要根据实际需求更改模型文件的存储路径。本文将详细介绍如何在Linux系统中更改Ollama模型的下载路径。 一、关闭Ollama服务 在更改模型路径之前,需要先停止Ollama服务。…...

本地Ollama部署DeepSeek R1模型接入Word
目录 1.本地部署DeepSeek-R1模型 2.接入Word 3.效果演示 4.问题反馈 上一篇文章办公新利器:DeepSeekWord,让你的工作更高效-CSDN博客https://blog.csdn.net/qq_63708623/article/details/145418457?spm1001.2014.3001.5501https://blog.csdn.net/qq…...

【自学笔记】Git的重点知识点-持续更新
提示:文章写完后,目录可以自动生成,如何生成可参考右边的帮助文档 文章目录 Git基础知识Git高级操作与概念Git常用命令 总结 Git基础知识 Git简介 Git是一种分布式版本控制系统,用于记录文件内容的改动,便于开发者追踪…...

[EAI-028] Diffusion-VLA,能够进行多模态推理和机器人动作预测的VLA模型
Paper Card 论文标题:Diffusion-VLA: Scaling Robot Foundation Models via Unified Diffusion and Autoregression 论文作者:Junjie Wen, Minjie Zhu, Yichen Zhu, Zhibin Tang, Jinming Li, Zhongyi Zhou, Chengmeng Li, Xiaoyu Liu, Yaxin Peng, Chao…...

实现数组的扁平化
文章目录 1 实现数组的扁平化1.1 递归1.2 reduce1.3 扩展运算符1.4 split和toString1.5 flat1.6 正则表达式和JSON 1 实现数组的扁平化 1.1 递归 通过循环递归的方式,遍历数组的每一项,如果该项还是一个数组,那么就继续递归遍历,…...
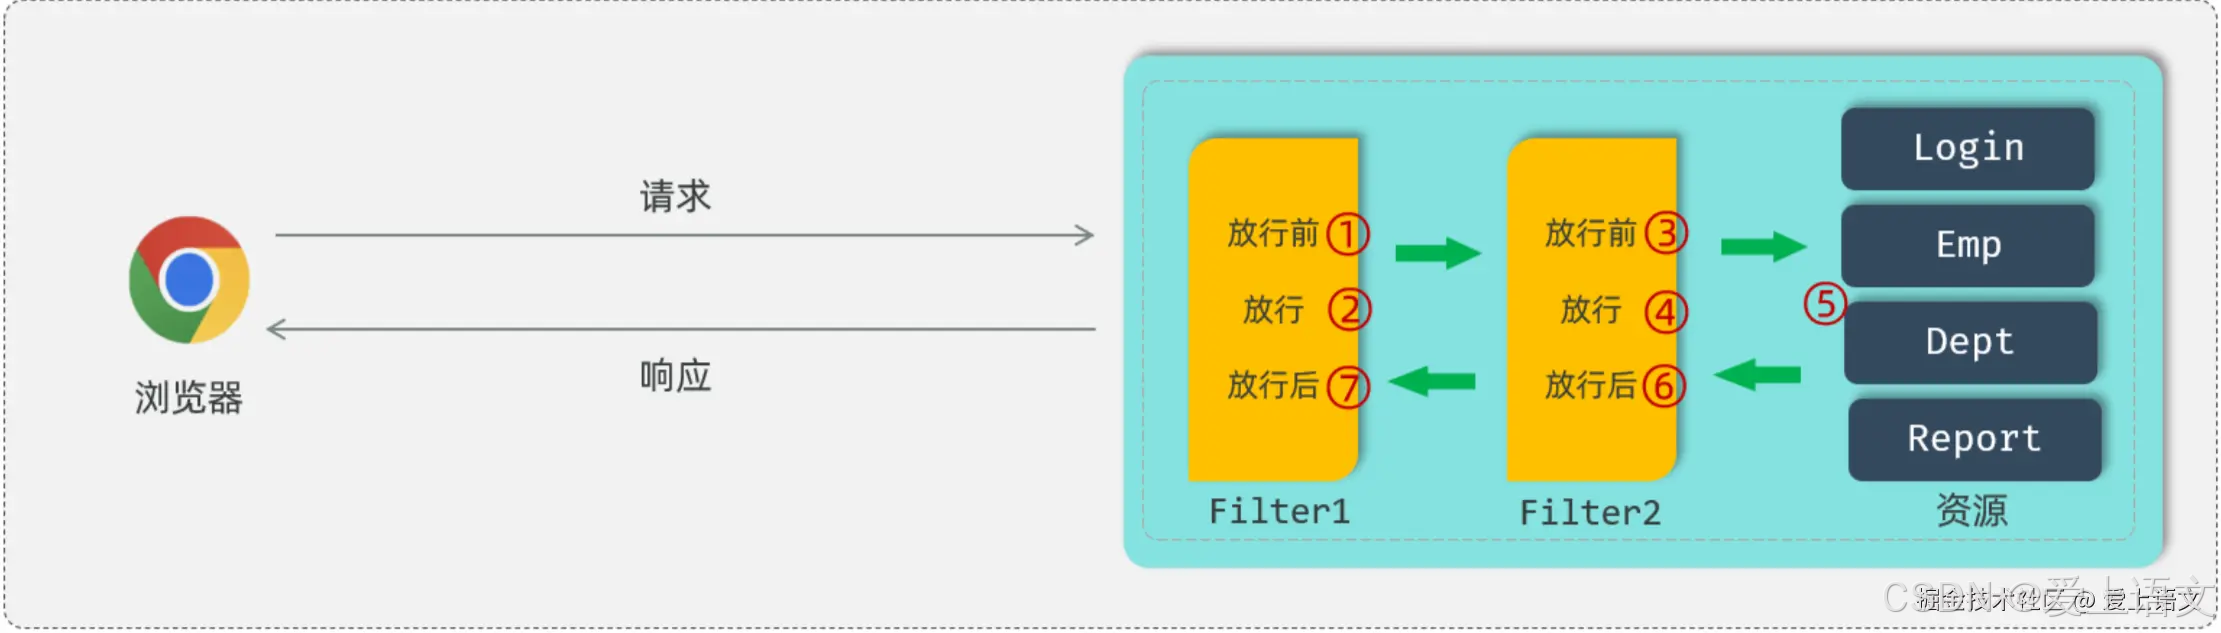
登录认证(5):过滤器:Filter
统一拦截 上文我们提到(登录认证(4):令牌技术),现在大部分项目都使用JWT令牌来进行会话跟踪,来完成登录功能。有了JWT令牌可以标识用户的登录状态,但是完整的登录逻辑如图所示&…...
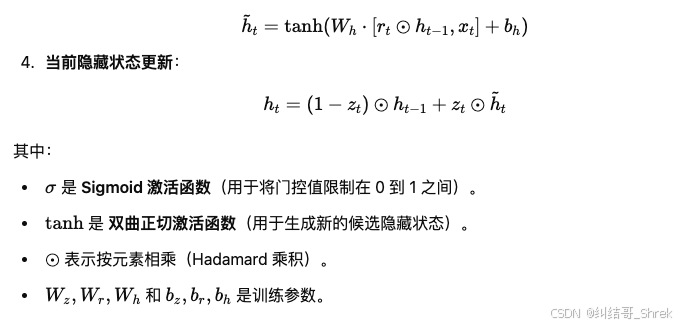
pytorch实现门控循环单元 (GRU)
人工智能例子汇总:AI常见的算法和例子-CSDN博客 特性GRULSTM计算效率更快,参数更少相对较慢,参数更多结构复杂度只有两个门(更新门和重置门)三个门(输入门、遗忘门、输出门)处理长时依赖一般适…...

Word List 2
词汇颜色标识解释 词汇表中的生词 词汇表中的词组成的搭配、派生词 例句中的生词 我自己写的生词(用于区分易混淆的词,无颜色标识) 不认识的单词或句式 单词的主要汉语意思 不太理解的句子语法和结构 Word List 2 英文音标中文regi…...

机器学习常用包numpy篇(四)函数运算
目录 前言 一、三角函数 二、双曲函数 三、数值修约 四、 求和、求积与差分 五、 指数与对数 六、算术运算 七、 矩阵与向量运算 八、代数运算 九、 其他数学工具 总结 前言 Python 的原生运算符可实现基础数学运算(加减乘除、取余、取整、幂运算&#…...

CSS in JS
css in js css in js 的核心思想是:用一个 JS 对象来描述样式,而不是 css 样式表。 例如下面的对象就是一个用于描述样式的对象: const styles {backgroundColor: "#f40",color: "#fff",width: "400px",he…...

TCP 丢包恢复策略:代价权衡与优化迷局
网络物理层丢包是一种需要偿还的债务,可以容忍低劣的传输质量,这为 UDP 类服务提供了空间,而对于 TCP 类服务,可以用另外两类代价来支付: 主机端采用轻率的 GBN 策略恢复丢包,节省 CPU 资源,但…...

面经--C语言——内存泄漏、malloc和new的区别 .c文件怎么转换为可执行程序 uart和usart的区别 继承的访问权限总结
文章目录 内存泄漏预防内存泄漏的方法: malloc和new的区别.c文件怎么转换为可执行程序uart和usart的区别继承的访问权限总结访问控制符总结1. **public**:2. **protected**:3. **private**:继承类型: 内存泄漏 内存泄漏是指程序在运行时动态分配内存后&…...

Denavit-Hartenberg DH MDH坐标系
Denavit-Hartenberg坐标系及其规则详解 6轴协作机器人的MDH模型详细图_6轴mdh-CSDN博客 N轴机械臂的MDH正向建模,及python算法_mdh建模-CSDN博客 运动学3-----正向运动学 | 鱼香ROS 机器人学:MDH建模 - 哆啦美 - 博客园 机械臂学习——标准DH法和改进MDH…...

力扣动态规划-20【算法学习day.114】
前言 ###我做这类文章一个重要的目的还是记录自己的学习过程,我的解析也不会做的非常详细,只会提供思路和一些关键点,力扣上的大佬们的题解质量是非常非常高滴!!! 习题 1.网格中的最小路径代价 题目链接…...

计算机视觉-边缘检测
一、边缘 1.1 边缘的类型 ①实体上的边缘 ②深度上的边缘 ③符号的边缘 ④阴影产生的边缘 不同任务关注的边缘不一样 1.2 提取边缘 突变-求导(求导也是一种卷积) 近似,1(右边的一个值-自己可以用卷积做) 该点f(x,y)…...

华为云AI开发平台ModelArts
华为云ModelArts:重塑AI开发流程的“智能引擎”与“创新加速器”! 在人工智能浪潮席卷全球的2025年,企业拥抱AI的意愿空前高涨,但技术门槛高、流程复杂、资源投入巨大的现实,却让许多创新构想止步于实验室。数据科学家…...

使用VSCode开发Django指南
使用VSCode开发Django指南 一、概述 Django 是一个高级 Python 框架,专为快速、安全和可扩展的 Web 开发而设计。Django 包含对 URL 路由、页面模板和数据处理的丰富支持。 本文将创建一个简单的 Django 应用,其中包含三个使用通用基本模板的页面。在此…...

Leetcode 3576. Transform Array to All Equal Elements
Leetcode 3576. Transform Array to All Equal Elements 1. 解题思路2. 代码实现 题目链接:3576. Transform Array to All Equal Elements 1. 解题思路 这一题思路上就是分别考察一下是否能将其转化为全1或者全-1数组即可。 至于每一种情况是否可以达到…...

大型活动交通拥堵治理的视觉算法应用
大型活动下智慧交通的视觉分析应用 一、背景与挑战 大型活动(如演唱会、马拉松赛事、高考中考等)期间,城市交通面临瞬时人流车流激增、传统摄像头模糊、交通拥堵识别滞后等问题。以演唱会为例,暖城商圈曾因观众集中离场导致周边…...
)
【位运算】消失的两个数字(hard)
消失的两个数字(hard) 题⽬描述:解法(位运算):Java 算法代码:更简便代码 题⽬链接:⾯试题 17.19. 消失的两个数字 题⽬描述: 给定⼀个数组,包含从 1 到 N 所有…...

1688商品列表API与其他数据源的对接思路
将1688商品列表API与其他数据源对接时,需结合业务场景设计数据流转链路,重点关注数据格式兼容性、接口调用频率控制及数据一致性维护。以下是具体对接思路及关键技术点: 一、核心对接场景与目标 商品数据同步 场景:将1688商品信息…...
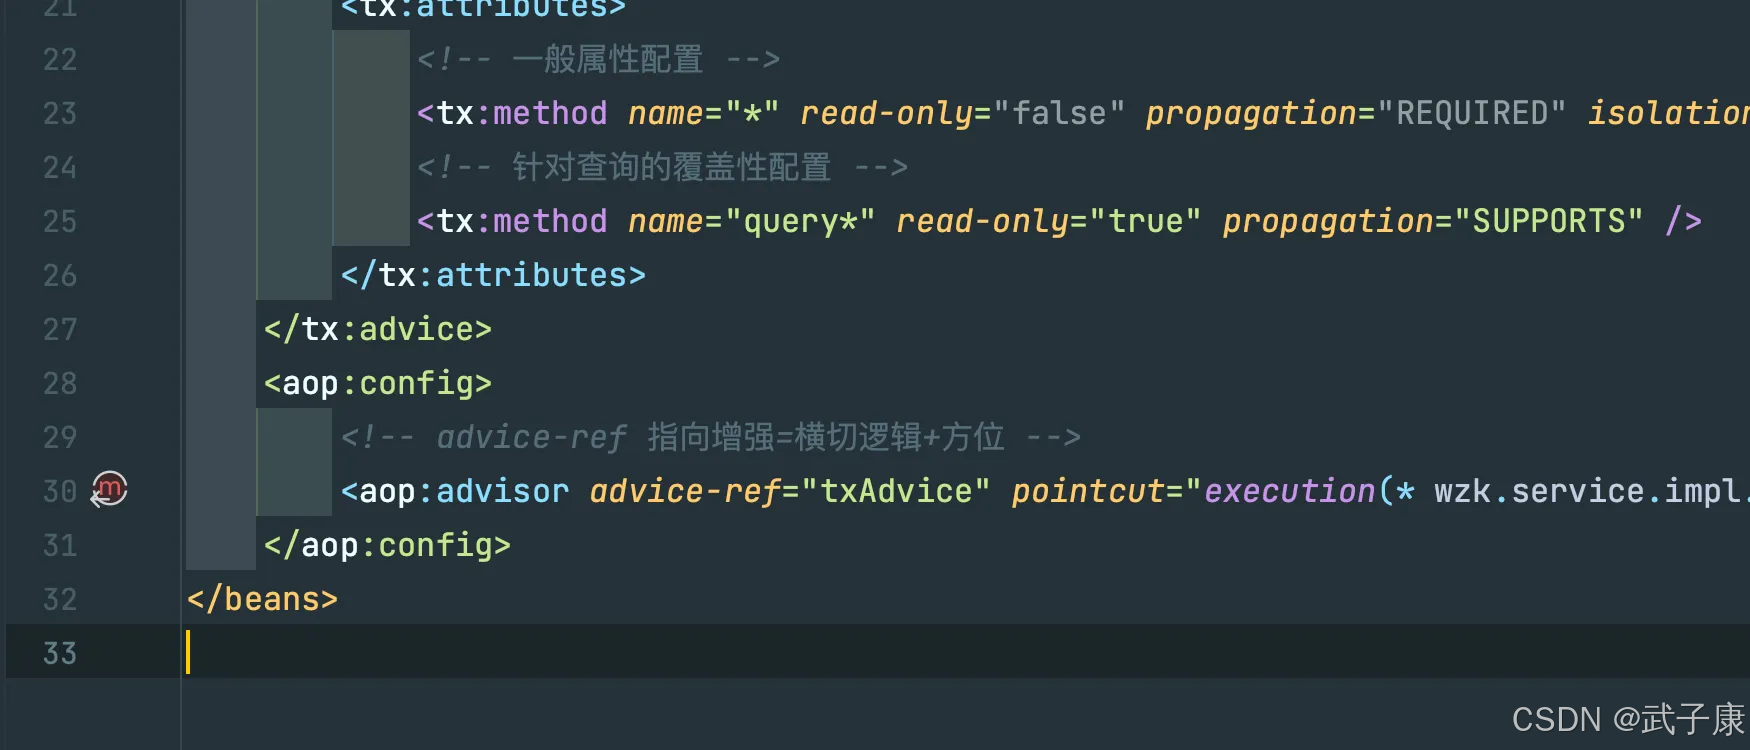
Java-41 深入浅出 Spring - 声明式事务的支持 事务配置 XML模式 XML+注解模式
点一下关注吧!!!非常感谢!!持续更新!!! 🚀 AI篇持续更新中!(长期更新) 目前2025年06月05日更新到: AI炼丹日志-28 - Aud…...

什么?连接服务器也能可视化显示界面?:基于X11 Forwarding + CentOS + MobaXterm实战指南
文章目录 什么是X11?环境准备实战步骤1️⃣ 服务器端配置(CentOS)2️⃣ 客户端配置(MobaXterm)3️⃣ 验证X11 Forwarding4️⃣ 运行自定义GUI程序(Python示例)5️⃣ 成功效果
【Linux】自动化构建-Make/Makefile
前言 上文我们讲到了Linux中的编译器gcc/g 【Linux】编译器gcc/g及其库的详细介绍-CSDN博客 本来我们将一个对于编译来说很重要的工具:make/makfile 1.背景 在一个工程中源文件不计其数,其按类型、功能、模块分别放在若干个目录中,mak…...

Vue ③-生命周期 || 脚手架
生命周期 思考:什么时候可以发送初始化渲染请求?(越早越好) 什么时候可以开始操作dom?(至少dom得渲染出来) Vue生命周期: 一个Vue实例从 创建 到 销毁 的整个过程。 生命周期四个…...