知识蒸馏教程 Knowledge Distillation Tutorial
来自于:Knowledge Distillation Tutorial
将大模型蒸馏为小模型,可以节省计算资源,加快推理过程,更高效的运行。
使用CIFAR-10数据集
import torch
import torch.nn as nn
import torch.optim as optim
import torchvision.transforms as transforms
import torchvision.datasets as datasetsdevice = "cuda" #CPU也可
transforms_cifar = transforms.Compose([transforms.ToTensor(),transforms.Normalize(mean=[0.485, 0.456, 0.406], std=[0.229, 0.224, 0.225]),
])# Loading the CIFAR-10 dataset:
train_dataset = datasets.CIFAR10(root='./data', train=True, download=True, transform=transforms_cifar)
test_dataset = datasets.CIFAR10(root='./data', train=False, download=True, transform=transforms_cifar)
#Dataloaders
train_loader = torch.utils.data.DataLoader(train_dataset, batch_size=128, shuffle=True, num_workers=2)
test_loader = torch.utils.data.DataLoader(test_dataset, batch_size=128, shuffle=False, num_workers=2)
定义模型
定义两个结构相似,只是在宽度和深度不同的模型。
教师模型DeepNN
# Deeper neural network class to be used as teacher:
class DeepNN(nn.Module):def __init__(self, num_classes=10):super(DeepNN, self).__init__()self.features = nn.Sequential(nn.Conv2d(3, 128, kernel_size=3, padding=1),nn.ReLU(),nn.Conv2d(128, 64, kernel_size=3, padding=1),nn.ReLU(),nn.MaxPool2d(kernel_size=2, stride=2),nn.Conv2d(64, 64, kernel_size=3, padding=1),nn.ReLU(),nn.Conv2d(64, 32, kernel_size=3, padding=1),nn.ReLU(),nn.MaxPool2d(kernel_size=2, stride=2),)self.classifier = nn.Sequential(nn.Linear(2048, 512),nn.ReLU(),nn.Dropout(0.1),nn.Linear(512, num_classes))def forward(self, x):x = self.features(x)x = torch.flatten(x, 1)x = self.classifier(x)return x
学生模型LightNN
# Lightweight neural network class to be used as student:
class LightNN(nn.Module):def __init__(self, num_classes=10):super(LightNN, self).__init__()self.features = nn.Sequential(nn.Conv2d(3, 16, kernel_size=3, padding=1),nn.ReLU(),nn.MaxPool2d(kernel_size=2, stride=2),nn.Conv2d(16, 16, kernel_size=3, padding=1),nn.ReLU(),nn.MaxPool2d(kernel_size=2, stride=2),)self.classifier = nn.Sequential(nn.Linear(1024, 256),nn.ReLU(),nn.Dropout(0.1),nn.Linear(256, num_classes))def forward(self, x):x = self.features(x)x = torch.flatten(x, 1)x = self.classifier(x)return x

训练并测试模型
def train(model, train_loader, epochs, learning_rate, device):criterion = nn.CrossEntropyLoss()optimizer = optim.Adam(model.parameters(), lr=learning_rate)model.train()for epoch in range(epochs):running_loss = 0.0for inputs, labels in train_loader:# inputs: A collection of batch_size images# labels: A vector of dimensionality batch_size with integers denoting class of each imageinputs, labels = inputs.to(device), labels.to(device)optimizer.zero_grad()outputs = model(inputs)# outputs: Output of the network for the collection of images. A tensor of dimensionality batch_size x num_classes# labels: The actual labels of the images. Vector of dimensionality batch_sizeloss = criterion(outputs, labels)loss.backward()optimizer.step()running_loss += loss.item()print(f"Epoch {epoch+1}/{epochs}, Loss: {running_loss / len(train_loader)}")def test(model, test_loader, device):model.to(device)model.eval()correct = 0total = 0with torch.no_grad():for inputs, labels in test_loader:inputs, labels = inputs.to(device), labels.to(device)outputs = model(inputs)_, predicted = torch.max(outputs.data, 1)total += labels.size(0)correct += (predicted == labels).sum().item()accuracy = 100 * correct / totalprint(f"Test Accuracy: {accuracy:.2f}%")return accuracy
torch.manual_seed(42)
nn_deep = DeepNN(num_classes=10).to(device)
train(nn_deep, train_loader, epochs=10, learning_rate=0.001, device=device)
test_accuracy_deep = test(nn_deep, test_loader, device)# Instantiate the lightweight network:
torch.manual_seed(42)
nn_light = LightNN(num_classes=10).to(device)
train(nn_light, train_loader, epochs=10, learning_rate=0.001, device=device)
test_accuracy_light_ce = test(nn_light, test_loader, device)
DeepNN的参数量为1,186,986,准确率为75.98%。
LightNN的参数量为267,738,准确率为70.65%。
total_params_deep = "{:,}".format(sum(p.numel() for p in nn_deep.parameters()))
print(f"DeepNN parameters: {total_params_deep}")
total_params_light = "{:,}".format(sum(p.numel() for p in nn_light.parameters()))
print(f"LightNN parameters: {total_params_light}")
print(f"Teacher accuracy: {test_accuracy_deep:.2f}%")
print(f"Student accuracy: {test_accuracy_light_ce:.2f}%")
知识蒸馏
教师模型和学生模型都输出了关于类别的概率分布,假设认为,经过训练的教师模型输出的softmax结果携带了更多的信息,有助于提高学生模型的准确率。例如,在默认情况下,汽车、火车、摩托车的对应的label为 [1,0,0],经过训练的教师模型输出结果可能是 [0.6,0.2,0.2],而对于汽车、狗、猫,教师模型输出的结果可能是[0.8,0.1,0.1],汽车和火车、摩托车要比狗、猫更相似。让学生模型学习到教师模型的这部分知识,就称为知识蒸馏。
学生模型与真实值的损失使用交叉熵损失。
学生模型与教师模型的损失使用KL散度损失。
在蒸馏过程中,冻结教师模型,只训练学生模型。
增加参数:
- T:温度,温度控制着输出分布的平滑度。较大的 T 会导致更平滑的分布,因此较小的概率会得到更大的提升。
- soft_target_loss_weight:学生模型与教师模型的损失的权重。
- ce_loss_weight:学生模型与真实值的损失的权重。
def train_knowledge_distillation(teacher, student, train_loader, epochs, learning_rate, T, soft_target_loss_weight, ce_loss_weight, device):ce_loss = nn.CrossEntropyLoss()optimizer = optim.Adam(student.parameters(), lr=learning_rate)teacher.eval()  # Teacher set to evaluation modestudent.train() # Student to train modefor epoch in range(epochs):running_loss = 0.0for inputs, labels in train_loader:inputs, labels = inputs.to(device), labels.to(device)optimizer.zero_grad()# Forward pass with the teacher model - do not save gradients here as we do not change the teacher's weightswith torch.no_grad():teacher_logits = teacher(inputs)# Forward pass with the student modelstudent_logits = student(inputs)#Soften the student logits by applying softmax first and log() secondsoft_targets = nn.functional.softmax(teacher_logits / T, dim=-1)soft_prob = nn.functional.log_softmax(student_logits / T, dim=-1)# Calculate the soft targets loss. Scaled by T**2 as suggested by the authors of the paper "Distilling the knowledge in a neural network"soft_targets_loss = torch.sum(soft_targets * (soft_targets.log() - soft_prob)) / soft_prob.size()[0] * (T**2)# Calculate the true label losslabel_loss = ce_loss(student_logits, labels)# Weighted sum of the two lossesloss = soft_target_loss_weight * soft_targets_loss + ce_loss_weight * label_lossloss.backward()optimizer.step()running_loss += loss.item()print(f"Epoch {epoch+1}/{epochs}, Loss: {running_loss / len(train_loader)}")# Apply ``train_knowledge_distillation`` with a temperature of 2. Arbitrarily set the weights to 0.75 for CE and 0.25 for distillation loss.
train_knowledge_distillation(teacher=nn_deep, student=new_nn_light, train_loader=train_loader, epochs=10, learning_rate=0.001, T=2, soft_target_loss_weight=0.25, ce_loss_weight=0.75, device=device)
test_accuracy_light_ce_and_kd = test(new_nn_light, test_loader, device)# Compare the student test accuracy with and without the teacher, after distillation
print(f"Teacher accuracy: {test_accuracy_deep:.2f}%")
print(f"Student accuracy without teacher: {test_accuracy_light_ce:.2f}%")
print(f"Student accuracy with CE + KD: {test_accuracy_light_ce_and_kd:.2f}%")#Test Accuracy: 70.49%
#Teacher accuracy: 75.98%
#Student accuracy without teacher: 70.65%
#Student accuracy with CE + KD: 70.49%
CosineEmbeddingLoss
蒸馏的目标是让学生模型学习教师模型的知识,那么不只是学习最终的输出分布,也可以学习教师模型的内部表示hidden states。
可以比较两个模型的中间输出向量,使用CosineEmbeddingLoss。
在前面的模型中,教师模型flatten输出维度为2048,而学生模型为1024,因此在教师模型中加入额外池化层,让两个模型在同一个维度。
class ModifiedDeepNNCosine(nn.Module):def __init__(self, num_classes=10):super(ModifiedDeepNNCosine, self).__init__()self.features = nn.Sequential(nn.Conv2d(3, 128, kernel_size=3, padding=1),nn.ReLU(),nn.Conv2d(128, 64, kernel_size=3, padding=1),nn.ReLU(),nn.MaxPool2d(kernel_size=2, stride=2),nn.Conv2d(64, 64, kernel_size=3, padding=1),nn.ReLU(),nn.Conv2d(64, 32, kernel_size=3, padding=1),nn.ReLU(),nn.MaxPool2d(kernel_size=2, stride=2),)self.classifier = nn.Sequential(nn.Linear(2048, 512),nn.ReLU(),nn.Dropout(0.1),nn.Linear(512, num_classes))def forward(self, x):x = self.features(x)flattened_conv_output = torch.flatten(x, 1)x = self.classifier(flattened_conv_output)flattened_conv_output_after_pooling = torch.nn.functional.avg_pool1d(flattened_conv_output, 2)return x, flattened_conv_output_after_pooling# Create a similar student class where we return a tuple. We do not apply pooling after flattening.
class ModifiedLightNNCosine(nn.Module):def __init__(self, num_classes=10):super(ModifiedLightNNCosine, self).__init__()self.features = nn.Sequential(nn.Conv2d(3, 16, kernel_size=3, padding=1),nn.ReLU(),nn.MaxPool2d(kernel_size=2, stride=2),nn.Conv2d(16, 16, kernel_size=3, padding=1),nn.ReLU(),nn.MaxPool2d(kernel_size=2, stride=2),)self.classifier = nn.Sequential(nn.Linear(1024, 256),nn.ReLU(),nn.Dropout(0.1),nn.Linear(256, num_classes))def forward(self, x):x = self.features(x)flattened_conv_output = torch.flatten(x, 1)x = self.classifier(flattened_conv_output)return x, flattened_conv_output# We do not have to train the modified deep network from scratch of course, we just load its weights from the trained instance
modified_nn_deep = ModifiedDeepNNCosine(num_classes=10).to(device)
modified_nn_deep.load_state_dict(nn_deep.state_dict())# Once again ensure the norm of the first layer is the same for both networks
print("Norm of 1st layer for deep_nn:", torch.norm(nn_deep.features[0].weight).item())
print("Norm of 1st layer for modified_deep_nn:", torch.norm(modified_nn_deep.features[0].weight).item())# Initialize a modified lightweight network with the same seed as our other lightweight instances. This will be trained from scratch to examine the effectiveness of cosine loss minimization.
torch.manual_seed(42)
modified_nn_light = ModifiedLightNNCosine(num_classes=10).to(device)
print("Norm of 1st layer:", torch.norm(modified_nn_light.features[0].weight).item())

训练函数和测试函数也随之发生变化。
def train_cosine_loss(teacher, student, train_loader, epochs, learning_rate, hidden_rep_loss_weight, ce_loss_weight, device):ce_loss = nn.CrossEntropyLoss()cosine_loss = nn.CosineEmbeddingLoss()optimizer = optim.Adam(student.parameters(), lr=learning_rate)teacher.to(device)student.to(device)teacher.eval()  # Teacher set to evaluation modestudent.train() # Student to train modefor epoch in range(epochs):running_loss = 0.0for inputs, labels in train_loader:inputs, labels = inputs.to(device), labels.to(device)optimizer.zero_grad()# Forward pass with the teacher model and keep only the hidden representationwith torch.no_grad():_, teacher_hidden_representation = teacher(inputs)# Forward pass with the student modelstudent_logits, student_hidden_representation = student(inputs)# Calculate the cosine loss. Target is a vector of ones. From the loss formula above we can see that is the case where loss minimization leads to cosine similarity increase.hidden_rep_loss = cosine_loss(student_hidden_representation, teacher_hidden_representation, target=torch.ones(inputs.size(0)).to(device))# Calculate the true label losslabel_loss = ce_loss(student_logits, labels)# Weighted sum of the two lossesloss = hidden_rep_loss_weight * hidden_rep_loss + ce_loss_weight * label_lossloss.backward()optimizer.step()running_loss += loss.item()print(f"Epoch {epoch+1}/{epochs}, Loss: {running_loss / len(train_loader)}")
def test_multiple_outputs(model, test_loader, device):model.to(device)model.eval()correct = 0total = 0with torch.no_grad():for inputs, labels in test_loader:inputs, labels = inputs.to(device), labels.to(device)outputs, _ = model(inputs) # Disregard the second tensor of the tuple_, predicted = torch.max(outputs.data, 1)total += labels.size(0)correct += (predicted == labels).sum().item()accuracy = 100 * correct / totalprint(f"Test Accuracy: {accuracy:.2f}%")return accuracy# Train and test the lightweight network with cross entropy loss
train_cosine_loss(teacher=modified_nn_deep, student=modified_nn_light, train_loader=train_loader, epochs=10, learning_rate=0.001, hidden_rep_loss_weight=0.25, ce_loss_weight=0.75, device=device)
test_accuracy_light_ce_and_cosine_loss = test_multiple_outputs(modified_nn_light, test_loader, device)
#Test Accuracy: 70.12%
Intermediate regressor run
对于高维度向量,余弦相似度通常比欧几里得距离效果更好,但我们处理的是每个具有 1024 个分量的向量,因此更难提取有意义的相似性。此外,正如我们所提到的,从理论上讲,推动教师和学生的隐藏表示相匹配是不被支持的。我们没有充分的理由应该追求这些向量的 1:1 匹配。
作者认为前面的蒸馏,学生模型和教师模型学习的是向量,即学习的是torch.flatten(x, 1),是一个向量,表达能力有限。因此选取 flatten 的前一层,学习卷积层的输出特征图。
教师模型的特征图shape为[128, 32, 8, 8],学生模型的特征图为[128, 16, 8, 8],需要添加一个卷积层,对齐维度。

在学生模型中加入了regressor层。
class ModifiedDeepNNRegressor(nn.Module):def __init__(self, num_classes=10):super(ModifiedDeepNNRegressor, self).__init__()self.features = nn.Sequential(nn.Conv2d(3, 128, kernel_size=3, padding=1),nn.ReLU(),nn.Conv2d(128, 64, kernel_size=3, padding=1),nn.ReLU(),nn.MaxPool2d(kernel_size=2, stride=2),nn.Conv2d(64, 64, kernel_size=3, padding=1),nn.ReLU(),nn.Conv2d(64, 32, kernel_size=3, padding=1),nn.ReLU(),nn.MaxPool2d(kernel_size=2, stride=2),)self.classifier = nn.Sequential(nn.Linear(2048, 512),nn.ReLU(),nn.Dropout(0.1),nn.Linear(512, num_classes))def forward(self, x):x = self.features(x)conv_feature_map = xx = torch.flatten(x, 1)x = self.classifier(x)return x, conv_feature_mapclass ModifiedLightNNRegressor(nn.Module):def __init__(self, num_classes=10):super(ModifiedLightNNRegressor, self).__init__()self.features = nn.Sequential(nn.Conv2d(3, 16, kernel_size=3, padding=1),nn.ReLU(),nn.MaxPool2d(kernel_size=2, stride=2),nn.Conv2d(16, 16, kernel_size=3, padding=1),nn.ReLU(),nn.MaxPool2d(kernel_size=2, stride=2),)# Include an extra regressor (in our case linear)self.regressor = nn.Sequential(nn.Conv2d(16, 32, kernel_size=3, padding=1))self.classifier = nn.Sequential(nn.Linear(1024, 256),nn.ReLU(),nn.Dropout(0.1),nn.Linear(256, num_classes))def forward(self, x):x = self.features(x)regressor_output = self.regressor(x)x = torch.flatten(x, 1)x = self.classifier(x)return x, regressor_output
def train_mse_loss(teacher, student, train_loader, epochs, learning_rate, feature_map_weight, ce_loss_weight, device):ce_loss = nn.CrossEntropyLoss()mse_loss = nn.MSELoss()optimizer = optim.Adam(student.parameters(), lr=learning_rate)teacher.to(device)student.to(device)teacher.eval()  # Teacher set to evaluation modestudent.train() # Student to train modefor epoch in range(epochs):running_loss = 0.0for inputs, labels in train_loader:inputs, labels = inputs.to(device), labels.to(device)optimizer.zero_grad()# Again ignore teacher logitswith torch.no_grad():_, teacher_feature_map = teacher(inputs)# Forward pass with the student modelstudent_logits, regressor_feature_map = student(inputs)# Calculate the losshidden_rep_loss = mse_loss(regressor_feature_map, teacher_feature_map)# Calculate the true label losslabel_loss = ce_loss(student_logits, labels)# Weighted sum of the two lossesloss = feature_map_weight * hidden_rep_loss + ce_loss_weight * label_lossloss.backward()optimizer.step()running_loss += loss.item()print(f"Epoch {epoch+1}/{epochs}, Loss: {running_loss / len(train_loader)}")# Notice how our test function remains the same here with the one we used in our previous case. We only care about the actual outputs because we measure accuracy.# Initialize a ModifiedLightNNRegressor
torch.manual_seed(42)
modified_nn_light_reg = ModifiedLightNNRegressor(num_classes=10).to(device)# We do not have to train the modified deep network from scratch of course, we just load its weights from the trained instance
modified_nn_deep_reg = ModifiedDeepNNRegressor(num_classes=10).to(device)
modified_nn_deep_reg.load_state_dict(nn_deep.state_dict())# Train and test once again
train_mse_loss(teacher=modified_nn_deep_reg, student=modified_nn_light_reg, train_loader=train_loader, epochs=10, learning_rate=0.001, feature_map_weight=0.25, ce_loss_weight=0.75, device=device)
test_accuracy_light_ce_and_mse_loss = test_multiple_outputs(modified_nn_light_reg, test_loader, device)
print(f"Teacher accuracy: {test_accuracy_deep:.2f}%")
print(f"Student accuracy without teacher: {test_accuracy_light_ce:.2f}%")
print(f"Student accuracy with CE + KD: {test_accuracy_light_ce_and_kd:.2f}%")
print(f"Student accuracy with CE + CosineLoss: {test_accuracy_light_ce_and_cosine_loss:.2f}%")
print(f"Student accuracy with CE + RegressorMSE: {test_accuracy_light_ce_and_mse_loss:.2f}%")#Teacher accuracy: 75.98%
#Student accuracy without teacher: 70.65%
#Student accuracy with CE + KD: 70.49%
#Student accuracy with CE + CosineLoss: 70.12%
#Student accuracy with CE + RegressorMSE: 70.61%
RegressorMSE的方法会比 CosineLoss 效果更好,因为在教师和学生之间允许了一个可训练的层,这在学习方面给了学生模型一些回旋的余地,而不是迫使学生模型复制教师模型的表示。包括额外网络是基于提示蒸馏背后的理念。(Including the extra network is the idea behind hint-based distillation.)
相关文章:

知识蒸馏教程 Knowledge Distillation Tutorial
来自于:Knowledge Distillation Tutorial 将大模型蒸馏为小模型,可以节省计算资源,加快推理过程,更高效的运行。 使用CIFAR-10数据集 import torch import torch.nn as nn import torch.optim as optim import torchvision.tran…...

DeepSeek各版本说明与优缺点分析
DeepSeek各版本说明与优缺点分析 DeepSeek是最近人工智能领域备受瞩目的一个语言模型系列,其在不同版本的发布过程中,逐步加强了对多种任务的处理能力。本文将详细介绍DeepSeek的各版本,从版本的发布时间、特点、优势以及不足之处࿰…...

java进阶专栏的学习指南
学习指南 java类和对象java内部类和常用类javaIO流 java类和对象 类和对象 java内部类和常用类 java内部类精讲Object类包装类的认识String类、BigDecimal类初探Date类、Calendar类、SimpleDateFormat类的认识java Random类、File类、System类初识 javaIO流 java IO流【…...

kamailio-osp模块
该文档详细讲解了如何在Kamailio中配置和使用OSP模块(Open Settlement Protocol Module),以实现基于ETSI标准的安全多边对等互联(Secure Multi-Lateral Peering)。以下是核心内容的总结: 1. 模块功能 OSP模…...

【TensorFlow】T1:实现mnist手写数字识别
🍨 本文为🔗365天深度学习训练营 中的学习记录博客🍖 原作者:K同学啊 1、设置GPU import tensorflow as tf gpus tf.config.list_physical_devices("GPU")if gpus:gpu0 gpus[0]tf.config.experimental.set_memory_g…...

Rapidjson 实战
Rapidjson 是一款 C 的 json 库. 支持处理 json 格式的文档. 其设计风格是头文件库, 包含头文件即可使用, 小巧轻便并且性能强悍. 本文结合样例来介绍 Rapidjson 一些常见的用法. 环境要求 有如何的几种方法可以将 Rapidjson 集成到您的项目中. Vcpkg安装: 使用 vcpkg instal…...

【React】受控组件和非受控组件
目录 受控组件非受控组件基于ref获取DOM元素1、在标签中使用2、在组件中使用 受控组件 表单元素的状态(值)由 React 组件的 state 完全控制。组件的 state 保存了表单元素的值,并且每次用户输入时,React 通过事件处理程序来更新 …...

Ollama+deepseek+Docker+Open WebUI实现与AI聊天
1、下载并安装Ollama 官方网址:Ollama 安装好后,在命令行输入, ollama --version 返回以下信息,则表明安装成功, 2、 下载AI大模型 这里以deepseek-r1:1.5b模型为例, 在命令行中,执行&…...

DEEPSEKK GPT等AI体的出现如何重构工厂数字化架构:从设备控制到ERP MES系统的全面优化
随着深度学习(DeepSeek)、GPT等先进AI技术的出现,工厂的数字化架构正在经历前所未有的变革。AI的强大处理能力、预测能力和自动化决策支持,将大幅度提升生产效率、设备管理、资源调度以及产品质量管理。本文将探讨AI体(…...

阿莱(arri)mxf文件变0字节的恢复方法
阿莱(arri)是专业级的影视产品软硬件供应商,很多影视作品都是使用阿莱(arri)的设备拍摄出来的。总体上来讲阿莱(arri)的文件格式有mov和mxf两种,这次恢复的是阿莱(arri)的mxf,机型是arri mini,素材保存在一个8t的硬盘上,使用的是e…...

初识 Node.js
在当今快速发展的互联网技术领域,Node.js 已经成为了一个非常流行且强大的平台。无论是构建高性能的网络应用、实时协作工具还是微服务架构,Node.js 都展示了其独特的优势。本文将带您走进 Node.js 的世界,了解它的基本概念、核心特性以及如何…...

debug-vscode调试方法
debug - vscode gdb调试指南 文章目录 debug - vscode gdb调试指南前言一、调试代码二、命令查看main反汇编查看寄存器打印某个变量打印寄存器,如pc打印当前函数栈信息(当前执行位置)打印程序栈局部变量x命令的语法如下所示:打印某…...

Cypher进阶(函数、索引)
文章目录 Cypher进阶Aggregationcount()函数统计函数collect()函数 unwindforeachmergeunionload csvcall 函数断言函数all()any()~~exists()~~is not nullnone()single() 标量函数coalesce()startNode()/endNode()id()length()size() 列表函数nodes()keys()range()reduce() 数…...

XML Schema 数值数据类型
XML Schema 数值数据类型 引言 XML Schema 是一种用于描述 XML 文档结构的语言。它定义了 XML 文档中数据的有效性和结构。在 XML Schema 中,数值数据类型是非常重要的一部分,它定义了 XML 文档中可以包含的数值类型。本文将详细介绍 XML Schema 中常用的数值数据类型,以及…...

Window获取界面空闲时间
GetLastInputInfo是一种Windows API函数,用于获取上次输入操作的时间。 该函数通过LASTINPUTINFO结构返回最后一次输入事件的时间。 原型如下 BOOL WINAPI GetLastInputInfo(PLASTINPUTINFO plii);那么可以利用GetLastInputInfo来得到界面没有操作的时长 uint…...

Java进阶(vue基础)
目录 1.vue简单入门 ?1.1.创建一个vue程序 1.2.使用Component模板(组件) 1.3.引入AXOIS ?1.4.vue的Methods(方法) 和?compoted(计算) 1.5.插槽slot 1.6.创建自定义事件? 2.Vue脚手架安装? 3.Element-UI的…...

Mac电脑上好用的压缩软件
在Mac电脑上,有许多优秀的压缩软件可供选择,这些软件不仅支持多种压缩格式,还提供了便捷的操作体验和强大的功能。以下是几款被广泛推荐的压缩软件: BetterZip 功能特点:BetterZip 是一款功能强大的压缩和解压缩工具&a…...

Ubuntn24.04安装
1.镜像下载 https://cn.ubuntu.com/download Ubuntu 24.04.1 (Noble Numbat) 进入下载即可 2.安装系统 打开虚拟机 选择语言 输入用户名和密码 安装ssh 安装完成重启即可。 3.可能出现的问题 关于Ubuntu系统虚拟机出现频繁闪屏,移动和屏幕适应大小问题_vmware安…...

基于ansible部署elk集群
ansible部署 ELK部署 ELK常见架构 (1)ElasticsearchLogstashKibana:这种架构是最常见的一种,也是最简单的一种架构,这种架构通过Logstash收集日志,运用Elasticsearch分析日志,最后通过Kibana中…...

解锁.NET Fiddle:在线编程的神奇之旅
在.NET 开发的广袤领域中,快速验证想法、测试代码片段以及便捷地分享代码是开发者们日常工作中不可或缺的环节。而.NET Fiddle 作为一款卓越的在线神器,正逐渐成为众多.NET 开发者的得力助手。它打破了传统开发模式中对本地开发环境的依赖,让…...

日语AI面试高效通关秘籍:专业解读与青柚面试智能助攻
在如今就业市场竞争日益激烈的背景下,越来越多的求职者将目光投向了日本及中日双语岗位。但是,一场日语面试往往让许多人感到步履维艰。你是否也曾因为面试官抛出的“刁钻问题”而心生畏惧?面对生疏的日语交流环境,即便提前恶补了…...

前端导出带有合并单元格的列表
// 导出async function exportExcel(fileName "共识调整.xlsx") {// 所有数据const exportData await getAllMainData();// 表头内容let fitstTitleList [];const secondTitleList [];allColumns.value.forEach(column > {if (!column.children) {fitstTitleL…...

基于Uniapp开发HarmonyOS 5.0旅游应用技术实践
一、技术选型背景 1.跨平台优势 Uniapp采用Vue.js框架,支持"一次开发,多端部署",可同步生成HarmonyOS、iOS、Android等多平台应用。 2.鸿蒙特性融合 HarmonyOS 5.0的分布式能力与原子化服务,为旅游应用带来…...

反射获取方法和属性
Java反射获取方法 在Java中,反射(Reflection)是一种强大的机制,允许程序在运行时访问和操作类的内部属性和方法。通过反射,可以动态地创建对象、调用方法、改变属性值,这在很多Java框架中如Spring和Hiberna…...

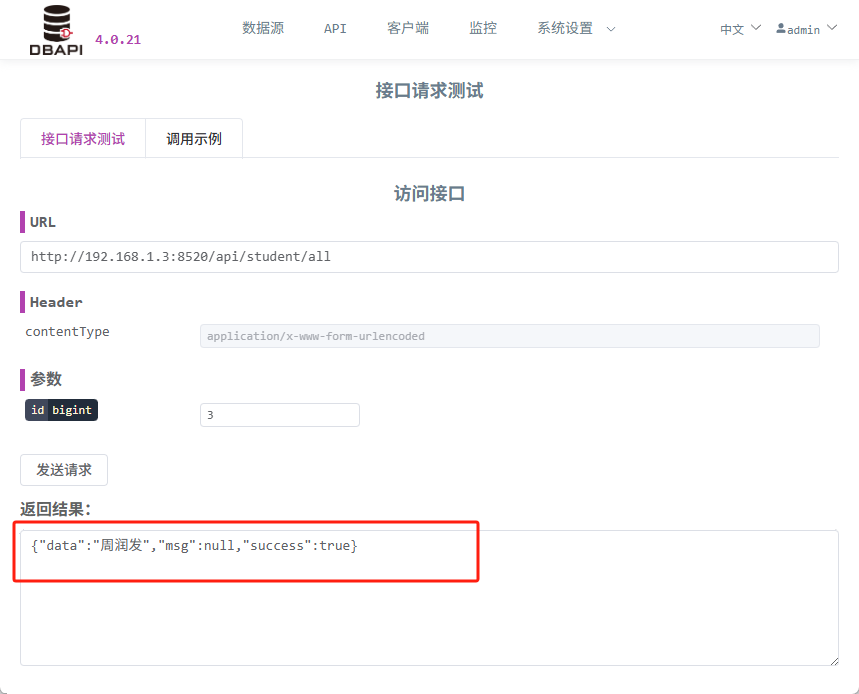
DBAPI如何优雅的获取单条数据
API如何优雅的获取单条数据 案例一 对于查询类API,查询的是单条数据,比如根据主键ID查询用户信息,sql如下: select id, name, age from user where id #{id}API默认返回的数据格式是多条的,如下: {&qu…...

Redis数据倾斜问题解决
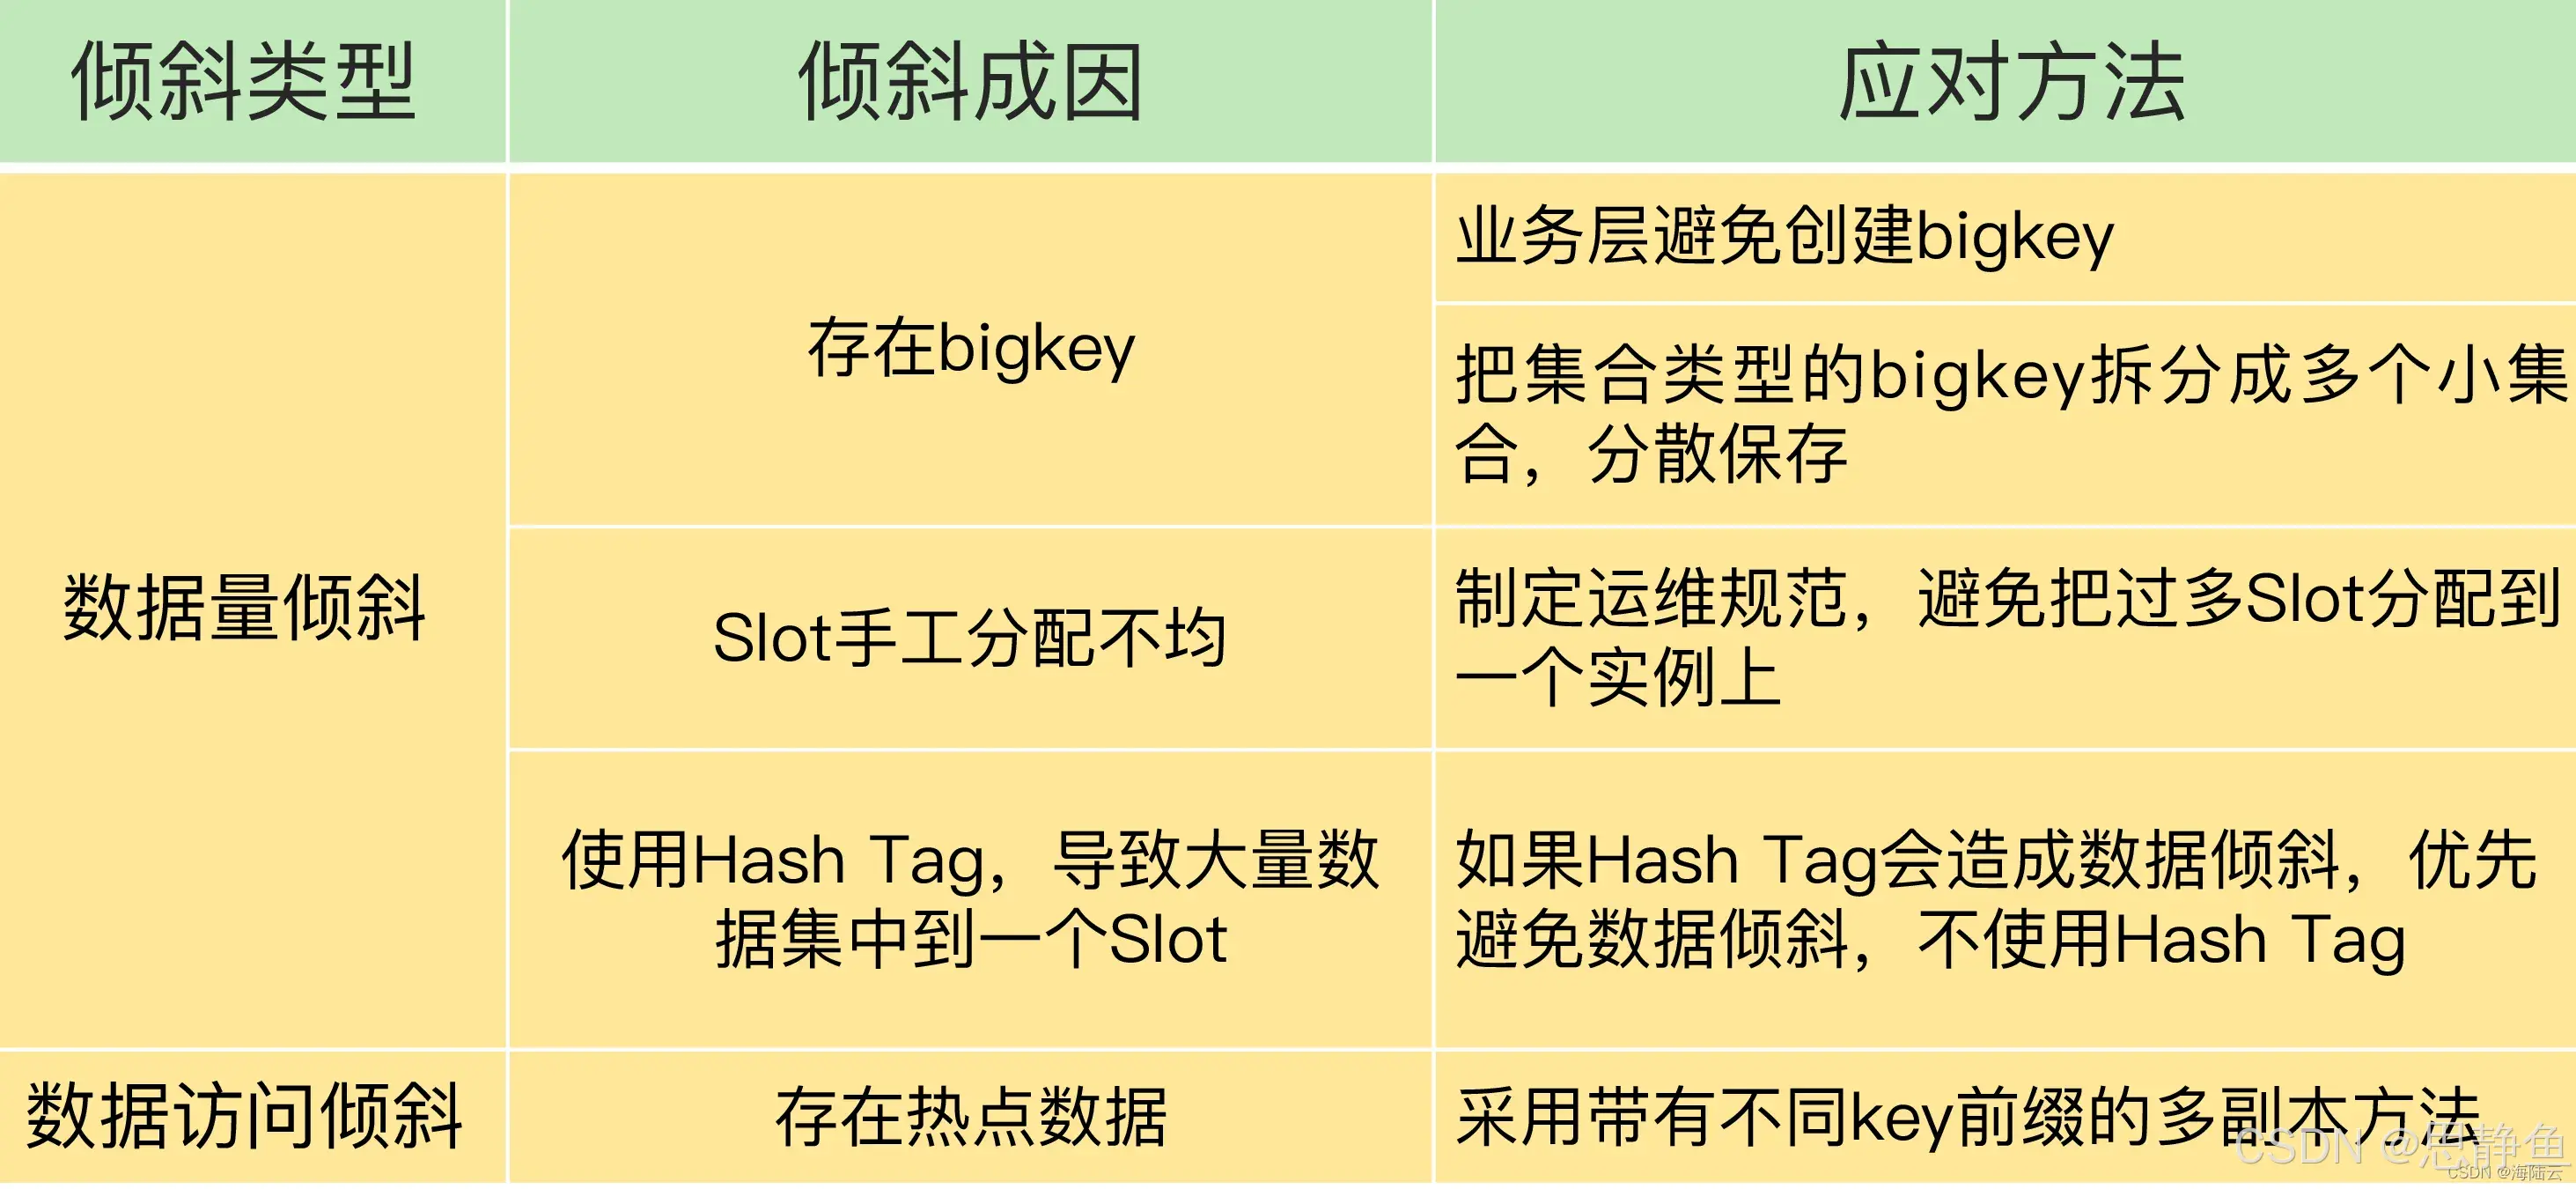
Redis 数据倾斜问题解析与解决方案 什么是 Redis 数据倾斜 Redis 数据倾斜指的是在 Redis 集群中,部分节点存储的数据量或访问量远高于其他节点,导致这些节点负载过高,影响整体性能。 数据倾斜的主要表现 部分节点内存使用率远高于其他节…...

C++八股 —— 单例模式
文章目录 1. 基本概念2. 设计要点3. 实现方式4. 详解懒汉模式 1. 基本概念 线程安全(Thread Safety) 线程安全是指在多线程环境下,某个函数、类或代码片段能够被多个线程同时调用时,仍能保证数据的一致性和逻辑的正确性…...
)
是否存在路径(FIFOBB算法)
题目描述 一个具有 n 个顶点e条边的无向图,该图顶点的编号依次为0到n-1且不存在顶点与自身相连的边。请使用FIFOBB算法编写程序,确定是否存在从顶点 source到顶点 destination的路径。 输入 第一行两个整数,分别表示n 和 e 的值(1…...

AspectJ 在 Android 中的完整使用指南
一、环境配置(Gradle 7.0 适配) 1. 项目级 build.gradle // 注意:沪江插件已停更,推荐官方兼容方案 buildscript {dependencies {classpath org.aspectj:aspectjtools:1.9.9.1 // AspectJ 工具} } 2. 模块级 build.gradle plu…...

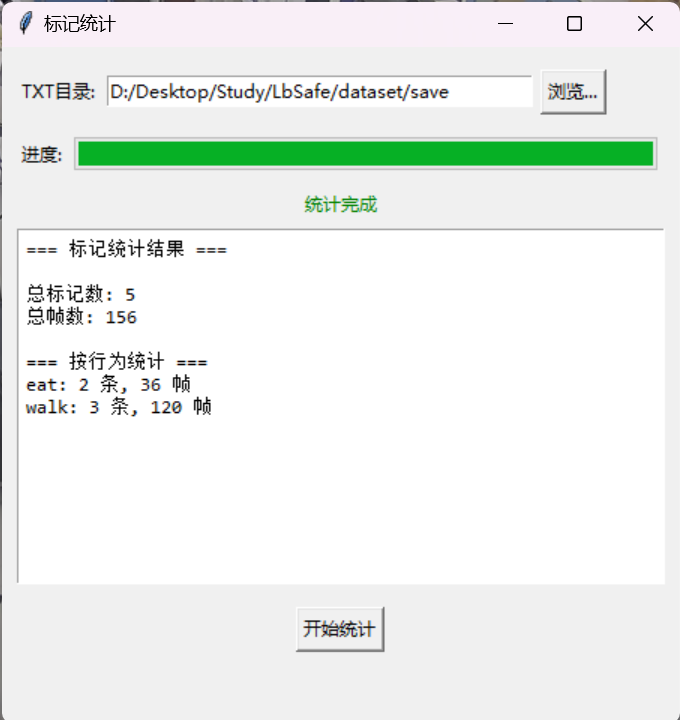
视频行为标注工具BehaviLabel(源码+使用介绍+Windows.Exe版本)
前言: 最近在做行为检测相关的模型,用的是时空图卷积网络(STGCN),但原有kinetic-400数据集数据质量较低,需要进行细粒度的标注,同时粗略搜了下已有开源工具基本都集中于图像分割这块,…...
