BetaFlight飞控启动运行过程简介
BetaFlight飞控启动&运行过程简介
- 1. 源由
- 2. 启动过程
- 2.1 main(主程序)
- 2.2 init (初始化)
- 2.3 run
- 3. 任务调度
- 3.1 任务定义
- 3.2 scheduler (调度器)
- 4. 总结
- 5. 参考资料
- 6. 附录 -- 问题汇总
- 6.1 Why desiredPeriodCycles is so important to Betaflight task?
- 6.2 What root cause has made gyro task to been overrun, so scheduler has to skip a gyro cycle?
- 6.3 What if serial task is running quite long, which corrupt gyro cycle, is it a problem?
- 6.4 What does the condition of "scheduleCount & SCHED_TASK_DEFER_MASK == 0" stand for in scheduler?
1. 源由
BetaFlight经过工程结构、代码框架、传感模块框架、统一硬件配置文件这一路的研读,让我们对BetaFlight飞控系统更多的了解。
- BetaFlight开源工程结构简明介绍
- BetaFlight开源代码框架简介
- BetaFlight深入传感设计:传感模块设计框架
- BetaFlight统一硬件配置文件研读
逐步领悟到结构化设计的优势的同时,为了更好的理解整体系统如何融合在一起,我们将会进入本章BetaFlight飞控启动和运行过程,这也是SOC系统初始化的主轴。
2. 启动过程
作为C语言级别启动过程的入口,相信大家都很容易就想到了Linux应用程序之Helloworld入门。
因此,我们这里就是从main入口开始分析的,详见下面代码走读。
2.1 main(主程序)
不错,C的入口就是main程序,而BetaFlight是用C语言开发的一款飞控项目,其入口当然亦是如此,详见:betaflight\src\main\main.c。
整体上分为两部分:初始化和运行。
main├──> init└──> run
注:飞控基本上电池拔掉就好了,没有复杂的去初始化过程。这也体现了航模的专属特性 _!
2.2 init (初始化)
整个初始化流程是比较长的,所以看这个初始化流程真的比较辛苦,但是从流程的角度来说,注意以下几点:
- 初始化步骤逐一自上而下执行;
- 初始化可能存在硬件初始化和应用初始化;
- 应用对应的硬件初始化应早于应用执行初始化;
- 应用之前有耦合的需要根据依赖关系初始化;
笔者阅读代码时,整个函数长度 1000 - 258 = 742 (代码行,含空行),非常可怕的一个函数。
注:如果能够进行归纳,整理,进行应用功能块区分就好了,可惜目前代码尚没有做到这点。
init├──> <SERIAL_PORT_COUNT> printfSerialInit├──> systemInit├──> tasksInitData├──> IOInitGlobal├──> <USE_HARDWARE_REVISION_DETECTION> detectHardwareRevision├──> <USE_TARGET_CONFIG> targetConfiguration├──> pgResetAll├──> <USE_SDCARD_SPI> configureSPIBusses(); initFlags |= SPI_BUSSES_INIT_ATTEMPTED;├──> sdCardAndFSInit; initFlags |= SD_INIT_ATTEMPTED;├──> <!sdcard_isInserted()> failureMode(FAILURE_SDCARD_REQUIRED)├──> [SD Card FS check] //while (afatfs_getFilesystemState() != AFATFS_FILESYSTEM_STATE_READY)│ ├──> afatfs_poll()│ └──> <afatfs_getFilesystemState() == AFATFS_FILESYSTEM_STATE_FATAL> failureMode(FAILURE_SDCARD_INITIALISATION_FAILED)├──> <CONFIG_IN_EXTERNAL_FLASH> || <CONFIG_IN_MEMORY_MAPPED_FLASH)>│ ├──> pgResetAll()│ ├──> <CONFIG_IN_EXTERNAL_FLASH> configureSPIBusses(); initFlags |= SPI_BUSSES_INIT_ATTEMPTED;│ ├──> configureQuadSPIBusses();configureOctoSPIBusses();initFlags |= QUAD_OCTO_SPI_BUSSES_INIT_ATTEMPTED;│ ├──> bool haveFlash = flashInit(flashConfig());│ ├──> <!haveFlash>failureMode(FAILURE_EXTERNAL_FLASH_INIT_FAILED)│ └──> initFlags |= FLASH_INIT_ATTEMPTED├──> initEEPROM├──> ensureEEPROMStructureIsValid├──> bool readSuccess = readEEPROM()├──> <USE_BOARD_INFO> initBoardInformation├──> <!readSuccess || !isEEPROMVersionValid() || strncasecmp(systemConfig()->boardIdentifier, TARGET_BOARD_IDENTIFIER, sizeof(TARGET_BOARD_IDENTIFIER))> resetEEPROM()├──> systemState |= SYSTEM_STATE_CONFIG_LOADED├──> <USE_DEBUG_PIN> dbgPinInit├──> debugMode = systemConfig()->debug_mode├──> <TARGET_PREINIT> targetPreInit├──> <!defined(USE_VIRTUAL_LED)> ledInit(statusLedConfig())├──> <!defined(SIMULATOR_BUILD)> EXTIInit├──> <USE_BUTTONS>│ ├──> buttonsInit│ └──> <EEPROM_RESET_PRECONDITION && defined(BUTTON_A_PIN) && defined(BUTTON_B_PIN)> //#define EEPROM_RESET_PRECONDITION (!isMPUSoftReset())│ └──> resetEEPROM/systemReset├──> <defined(STM32F4) || defined(STM32G4)> // F4 has non-8MHz boards, G4 for Betaflight allow 24 or 27MHz oscillator│ └──> systemClockSetHSEValue(systemConfig()->hseMhz * 1000000U)├──> <USE_OVERCLOCK> OverclockRebootIfNecessary(systemConfig()->cpu_overclock)├──> <USE_MCO>│ ├──> <defined(STM32F4) || defined(STM32F7)>│ │ └──> mcoConfigure(MCODEV_2, mcoConfig(MCODEV_2));│ └──> <defined(STM32G4)>│ └──> mcoConfigure(MCODEV_1, mcoConfig(MCODEV_1));├──> <USE_TIMER> timerInit├──> <BUS_SWITCH_PIN> busSwitchInit├──> <defined(USE_UART) && !defined(SIMULATOR_BUILD)> uartPinConfigure(serialPinConfig())├──> [serialInit]│ ├──> <AVOID_UART1_FOR_PWM_PPM> serialInit(featureIsEnabled(FEATURE_SOFTSERIAL), featureIsEnabled(FEATURE_RX_PPM) || featureIsEnabled(FEATURE_RX_PARALLEL_PWM) ? SERIAL_PORT_USART1 : SERIAL_PORT_NONE);│ ├──> <AVOID_UART2_FOR_PWM_PPM> serialInit(featureIsEnabled(FEATURE_SOFTSERIAL), featureIsEnabled(FEATURE_RX_PPM) || featureIsEnabled(FEATURE_RX_PARALLEL_PWM) ? SERIAL_PORT_USART2 : SERIAL_PORT_NONE);│ ├──> <AVOID_UART3_FOR_PWM_PPM> serialInit(featureIsEnabled(FEATURE_SOFTSERIAL), featureIsEnabled(FEATURE_RX_PPM) || featureIsEnabled(FEATURE_RX_PARALLEL_PWM) ? SERIAL_PORT_USART3 : SERIAL_PORT_NONE);│ └──> <else> serialInit(featureIsEnabled(FEATURE_SOFTSERIAL), SERIAL_PORT_NONE)├──> mixerInit(mixerConfig()->mixerMode)├──> uint16_t idlePulse = motorConfig()->mincommand├──> <featureIsEnabled(FEATURE_3D)> idlePulse = flight3DConfig()->neutral3d├──> <motorConfig()->dev.motorPwmProtocol == PWM_TYPE_BRUSHED> idlePulse = 0; // brushed motors├──> <USE_MOTOR> motorDevInit(&motorConfig()->dev, idlePulse, getMotorCount()); systemState |= SYSTEM_STATE_MOTORS_READY├──> <USE_RX_PPM> <featureIsEnabled(FEATURE_RX_PARALLEL_PWM)> pwmRxInit(pwmConfig())├──> <USE_BEEPER> beeperInit(beeperDevConfig())├──> <defined(USE_INVERTER) && !defined(SIMULATOR_BUILD)> initInverters(serialPinConfig())├──> [Hardware Bus Initialization]│ ├──> <TARGET_BUS_INIT> targetBusInit()│ └──> <else> │ ├──> <!(initFlags & SPI_BUSSES_INIT_ATTEMPTED)> configureSPIBusses();initFlags |= SPI_BUSSES_INIT_ATTEMPTED;│ ├──> <!(initFlags & QUAD_OCTO_SPI_BUSSES_INIT_ATTEMPTED)> configureQuadSPIBusses();configureOctoSPIBusses();initFlags |= QUAD_OCTO_SPI_BUSSES_INIT_ATTEMPTED;│ ├──> <defined(USE_SDCARD_SDIO) && !defined(CONFIG_IN_SDCARD) && defined(STM32H7)> sdioPinConfigure(); SDIO_GPIO_Init();│ ├──> <USE_USB_MSC>│ │ ├──> mscInit()│ │ └──> <USE_SDCARD> <blackboxConfig()->device == BLACKBOX_DEVICE_SDCARD> <sdcardConfig()->mode> <!(initFlags & SD_INIT_ATTEMPTED)> sdCardAndFSInit();initFlags |= SD_INIT_ATTEMPTED;│ ├──> <USE_FLASHFS> <blackboxConfig()->device == BLACKBOX_DEVICE_FLASH> emfat_init_files│ ├──> <USE_SPI> spiInitBusDMA│ ├──> <mscStart() == 0> mscWaitForButton();│ ├──> <mscStart() != 0> systemResetFromMsc()│ ├──> <USE_PERSISTENT_MSC_RTC>│ │ ├──> persistentObjectWrite(PERSISTENT_OBJECT_RTC_HIGH, 0);│ │ └──> persistentObjectWrite(PERSISTENT_OBJECT_RTC_LOW, 0);│ └──> <USE_I2C>│ ├──> i2cHardwareConfigure(i2cConfig(0));│ ├──> <USE_I2C_DEVICE_1> i2cInit(I2CDEV_1);│ ├──> <USE_I2C_DEVICE_2> i2cInit(I2CDEV_2);│ ├──> <USE_I2C_DEVICE_3> i2cInit(I2CDEV_3);│ └──> <USE_I2C_DEVICE_4> i2cInit(I2CDEV_4);├──> <USE_HARDWARE_REVISION_DETECTION> updateHardwareRevision ├──> <USE_VTX_RTC6705> bool useRTC6705 = rtc6705IOInit(vtxIOConfig());├──> <USE_CAMERA_CONTROL> cameraControlInit();├──> <USE_ADC> adcInit(adcConfig());├──> initBoardAlignment(boardAlignment());├──> <!sensorsAutodetect()>│ ├──> <isSystemConfigured()>│ │ └──> indicateFailure(FAILURE_MISSING_ACC, 2);│ └──> setArmingDisabled(ARMING_DISABLED_NO_GYRO);├──> systemState |= SYSTEM_STATE_SENSORS_READY;├──> gyroSetTargetLooptime(pidConfig()->pid_process_denom); // Set the targetLooptime based on the detected gyro sampleRateHz and pid_process_denom├──> validateAndFixGyroConfig();├──> gyroSetTargetLooptime(pidConfig()->pid_process_denom); // Now reset the targetLooptime as it's possible for the validation to change the pid_process_denom├──> gyroInitFilters();├──> pidInit(currentPidProfile);├──> mixerInitProfile();├──> <USE_PID_AUDIO> pidAudioInit();├──> <USE_SERVOS>│ ├──> servosInit();│ ├──> <isMixerUsingServos()> servoDevInit(&servoConfig()->dev) //pwm_params.useChannelForwarding = featureIsEnabled(FEATURE_CHANNEL_FORWARDING);│ └──> servosFilterInit();├──> <USE_PINIO> pinioInit(pinioConfig());├──> <USE_PIN_PULL_UP_DOWN> pinPullupPulldownInit();├──> <USE_PINIOBOX> pinioBoxInit(pinioBoxConfig());├──> [LED Oprations]├──> imuInit();├──> failsafeInit();├──> rxInit();├──> <USE_GPS> <featureIsEnabled(FEATURE_GPS)>│ ├──> gpsInit();│ └──> <USE_GPS_RESCUE> gpsRescueInit();├──> <USE_LED_STRIP>│ ├──> ledStripInit();│ └──> <featureIsEnabled(FEATURE_LED_STRIP)> ledStripEnable();├──> <USE_ESC_SENSOR> <featureIsEnabled(FEATURE_ESC_SENSOR)> escSensorInit();├──> <USE_USB_DETECT> usbCableDetectInit();├──> <USE_TRANSPONDER> <featureIsEnabled(FEATURE_TRANSPONDER)>│ ├──> transponderInit();│ ├──> transponderStartRepeating();│ └──> systemState |= SYSTEM_STATE_TRANSPONDER_ENABLED;├──> <USE_FLASH_CHIP> <!(initFlags & FLASH_INIT_ATTEMPTED)>│ └──> flashInit(flashConfig());initFlags |= FLASH_INIT_ATTEMPTED;├──> <USE_FLASHFS> flashfsInit();├──> <USE_SDCARD> <dcardConfig()->mode> <!(initFlags & SD_INIT_ATTEMPTED)>│ └──> sdCardAndFSInit();initFlags |= SD_INIT_ATTEMPTED;├──> <USE_BLACKBOX> blackboxInit();├──> <USE_ACC> <mixerConfig()->mixerMode == MIXER_GIMBAL> accStartCalibration();├──> gyroStartCalibration(false);├──> <USE_BARO> baroStartCalibration();├──> positionInit();├──> <defined(USE_VTX_COMMON) || defined(USE_VTX_CONTROL)> vtxTableInit();├──> <USE_VTX_CONTROL> │ ├──> vtxControlInit();│ ├──> <USE_VTX_COMMON> vtxCommonInit();│ ├──> <USE_VTX_MSP> vtxMspInit();│ ├──> <USE_VTX_SMARTAUDIO> vtxSmartAudioInit();│ ├──> <USE_VTX_TRAMP> vtxTrampInit();│ └──> <USE_VTX_RTC6705> <!vtxCommonDevice() && useRTC6705> vtxRTC6705Init();├──> <USE_TIMER> timerStart();├──> batteryInit(); // always needs doing, regardless of features.├──> <USE_RCDEVICE> rcdeviceInit();├──> <USE_PERSISTENT_STATS> statsInit();├──> [Initialize MSP]│ ├──> mspInit();│ └──> mspSerialInit();├──> <USE_CMS> cmsInit();├──> <defined(USE_OSD) || (defined(USE_MSP_DISPLAYPORT) && defined(USE_CMS))> displayPort_t *osdDisplayPort = NULL;├──> <USE_OSD>│ ├──> osdDisplayPortDevice_e osdDisplayPortDevice = OSD_DISPLAYPORT_DEVICE_NONE;│ └──> <featureIsEnabled(FEATURE_OSD)>│ ├──> osdDisplayPortDevice_e device = osdConfig()->displayPortDevice;│ ├──> <case OSD_DISPLAYPORT_DEVICE_AUTO:> FALLTHROUGH;│ ├──> <case OSD_DISPLAYPORT_DEVICE_FRSKYOSD:>│ │ ├──> osdDisplayPort = frskyOsdDisplayPortInit(vcdProfile()->video_system);│ │ └──> <osdDisplayPort || device == OSD_DISPLAYPORT_DEVICE_FRSKYOSD> osdDisplayPortDevice = OSD_DISPLAYPORT_DEVICE_FRSKYOSD; break;│ ├──> <case OSD_DISPLAYPORT_DEVICE_MAX7456:>│ │ └──> <max7456DisplayPortInit(vcdProfile(), &osdDisplayPort) || device == OSD_DISPLAYPORT_DEVICE_MAX7456> osdDisplayPortDevice = OSD_DISPLAYPORT_DEVICE_MAX7456;break;│ ├──> <case OSD_DISPLAYPORT_DEVICE_MSP:>│ │ ├──> osdDisplayPort = displayPortMspInit();│ │ └──> <osdDisplayPort || device == OSD_DISPLAYPORT_DEVICE_MSP> osdDisplayPortDevice = OSD_DISPLAYPORT_DEVICE_MSP; break;│ ├──> <case OSD_DISPLAYPORT_DEVICE_NONE:) default:│ ├──> osdInit(osdDisplayPort, osdDisplayPortDevice);│ └──> <osdDisplayPortDevice == OSD_DISPLAYPORT_DEVICE_NONE> featureDisableImmediate(FEATURE_OSD);├──> <defined(USE_CMS) && defined(USE_MSP_DISPLAYPORT)> <!osdDisplayPort> cmsDisplayPortRegister(displayPortMspInit());├──> <USE_DASHBOARD> <featureIsEnabled(FEATURE_DASHBOARD)>│ ├──> dashboardInit();│ ├──> <USE_OLED_GPS_DEBUG_PAGE_ONLY> dashboardShowFixedPage(PAGE_GPS);│ └──> <!USE_OLED_GPS_DEBUG_PAGE_ONLY> dashboardResetPageCycling();dashboardEnablePageCycling();├──> <USE_TELEMETRY> <featureIsEnabled(FEATURE_TELEMETRY)> telemetryInit();├──> setArmingDisabled(ARMING_DISABLED_BOOT_GRACE_TIME);├──> <defined(USE_SPI) && defined(USE_SPI_DMA_ENABLE_EARLY)> spiInitBusDMA();├──> <USE_MOTOR> │ ├──> motorPostInit();│ └──> motorEnable();├──> <defined(USE_SPI) && defined(USE_SPI_DMA_ENABLE_LATE) && !defined(USE_SPI_DMA_ENABLE_EARLY)>│ └──> spiInitBusDMA();├──> debugInit();├──> unusedPinsInit();├──> tasksInit();└──> systemState |= SYSTEM_STATE_READY;
2.3 run
初始化完成以后,我们来理解run运行的过程,它主要是一个BetaFlight自研的一个任务调度。
注:这个任务调度不会再任务运行过程中途被打断,与通常OS系统所描述的任务是不一样的。
run└──> loop: scheduler()
通俗点的理解:
可以认为BetaFlight是在一个bare-metal loop的基础上增加了对业务过程耗时统计+基于过程时间优先级调度的一个算法逻辑scheduler。
注:后面我们会重点针对BetaFlight自研的调度器进行研读和介绍。
3. 任务调度
系统启动后,接下来最为核心的就是任务调度。作为飞控自研的调度器,其BetaFlight设计有以下特点:
- 历史遗留问题:从性价比,开发历程等方面来思考,也许不难想象,为什么现在是一个基于bare-metal的一个自研任务调度器。
- 业务强耦合:鉴于IMU和PID业务对于飞行器飞行来说至关重要,因此该调度器在Gyro/Acc/PID的任务调用采用了精准时刻调度(+/-0.1us)。
- 任务优先级:MCU性能和业务逻辑复杂度,在至关重要任务调度之后剩余的时间片可能存在资源不够导致任务“饿死”得不到调度的情况。
- 边缘弹性任务时间优化:有限资源 + 非充分测试 + 资源可体感设计(OSD/CPU占用率等)
3.1 任务定义
这个结构体是一个优先级和任务配置的相关结构。当然因为BetaFlight自研调度器与飞控应用高度耦合(强耦合),这只是调度的一部分内容。
typedef struct {// Task static datatask_attribute_t *attribute;// Schedulinguint16_t dynamicPriority;           // measurement of how old task was last executed, used to avoid task starvationuint16_t taskAgePeriods;timeDelta_t taskLatestDeltaTimeUs;timeUs_t lastExecutedAtUs;          // last time of invocationtimeUs_t lastSignaledAtUs;          // time of invocation event for event-driven taskstimeUs_t lastDesiredAt;             // time of last desired execution// Statisticsfloat    movingAverageCycleTimeUs;timeUs_t anticipatedExecutionTime;  // Fixed point expectation of next execution timetimeUs_t movingSumDeltaTime10thUs;  // moving sum over 64 samplestimeUs_t movingSumExecutionTime10thUs;timeUs_t maxExecutionTimeUs;timeUs_t totalExecutionTimeUs;      // total time consumed by task since boottimeUs_t lastStatsAtUs;             // time of last stats gathering for rate calculation
#if defined(USE_LATE_TASK_STATISTICS)uint32_t runCount;uint32_t lateCount;timeUs_t execTime;
#endif
} task_t;
3.2 scheduler (调度器)
这就是大名鼎鼎的BetaFlight任务调度器。
scheduler├──> <gyroEnabled>│ ├──> [Realtime gyro/filtering/PID tasks get complete priority]│ │ ├──> task_t *gyroTask = getTask(TASK_GYRO)│ │ ├──> nowCycles = getCycleCounter()│ │ ├──> nextTargetCycles = lastTargetCycles + desiredPeriodCycles│ │ └──> schedLoopRemainingCycles = cmpTimeCycles(nextTargetCycles, nowCycles)│ ├──> <schedLoopRemainingCycles < -desiredPeriodCycles> //错过了一个desiredPeriodCycles周期,导致剩余时间负值(且大于一个运行周期)│ │ ├──> nextTargetCycles += desiredPeriodCycles * (1 + (schedLoopRemainingCycles / -desiredPeriodCycles)) //常见USB配置工具连接的时候,尽力挽救scheduler算法│ │ └──> schedLoopRemainingCycles = cmpTimeCycles(nextTargetCycles, nowCycles)│ ├──> <(schedLoopRemainingCycles < schedLoopStartMinCycles) && (schedLoopStartCycles < schedLoopStartMaxCycles)>│ │ └──> schedLoopStartCycles += schedLoopStartDeltaUpCycles│ └──> <schedLoopRemainingCycles < schedLoopStartCycles>│ ├──> <schedLoopStartCycles > schedLoopStartMinCycles>│ │ └──> schedLoopStartCycles -= schedLoopStartDeltaDownCycles│ ├──> currentTimeUs = micros()│ ├──> taskExecutionTimeUs += schedulerExecuteTask(gyroTask, currentTimeUs)│ ├──> <gyroFilterReady()> taskExecutionTimeUs += schedulerExecuteTask(getTask(TASK_FILTER), currentTimeUs)│ ├──> <pidLoopReady()> taskExecutionTimeUs += schedulerExecuteTask(getTask(TASK_PID), currentTimeUs)│ ├──> rxFrameCheck(currentTimeUs, cmpTimeUs(currentTimeUs, getTask(TASK_RX)->lastExecutedAtUs)) //检查是否有新的RC控制链路数据包收到│ ├──> <cmp32(millis(), lastFailsafeCheckMs) > PERIOD_RXDATA_FAILURE> //核查、更新failsafe状态│ ├──> lastTargetCycles = nextTargetCycles│ ├──> gyroDev_t *gyro = gyroActiveDev() //获取活跃的gyro设备│ └──> [Sync scheduler into lock with gyro] // gyro->gyroModeSPI != GYRO_EXTI_NO_INT, 这里指数级收敛,只要desiredPeriodCycles越精准,理论精度会越高│ ├──> [Calculate desiredPeriodCycles = sampleCycles / GYRO_RATE_COUNT and reset terminalGyroRateCount += GYRO_RATE_COUNT]│ └──> [Sync lastTargetCycles using exponential normalization by GYRO_RATE_COUNT/GYRO_LOCK_COUNT times iteration]├──> nowCycles = getCycleCounter();schedLoopRemainingCycles = cmpTimeCycles(nextTargetCycles, nowCycles);├──> <!gyroEnabled || (schedLoopRemainingCycles > (int32_t)clockMicrosToCycles(CHECK_GUARD_MARGIN_US))>│ ├──> currentTimeUs = micros()│ ├──> for (task_t *task = queueFirst(); task != NULL; task = queueNext()) <task->attribute->staticPriority != TASK_PRIORITY_REALTIME> //Update task dynamic priorities│ │ ├──> <task->attribute->checkFunc> //有属性检查函数│ │ │ ├──> <task->dynamicPriority > 0>│ │ │ │ ├──> task->taskAgePeriods = 1 + (cmpTimeUs(currentTimeUs, task->lastSignaledAtUs) / task->attribute->desiredPeriodUs);│ │ │ │ └──> task->dynamicPriority = 1 + task->attribute->staticPriority * task->taskAgePeriods;│ │ │ ├──> <task->attribute->checkFunc(currentTimeUs, cmpTimeUs(currentTimeUs, task->lastExecutedAtUs))>│ │ │ │ ├──> const uint32_t checkFuncExecutionTimeUs = cmpTimeUs(micros(), currentTimeUs);│ │ │ │ ├──> checkFuncMovingSumExecutionTimeUs += checkFuncExecutionTimeUs - checkFuncMovingSumExecutionTimeUs / TASK_STATS_MOVING_SUM_COUNT;│ │ │ │ ├──> checkFuncMovingSumDeltaTimeUs += task->taskLatestDeltaTimeUs - checkFuncMovingSumDeltaTimeUs / TASK_STATS_MOVING_SUM_COUNT;│ │ │ │ ├──> checkFuncTotalExecutionTimeUs += checkFuncExecutionTimeUs; // time consumed by scheduler + task│ │ │ │ ├──> checkFuncMaxExecutionTimeUs = MAX(checkFuncMaxExecutionTimeUs, checkFuncExecutionTimeUs)│ │ │ │ ├──> task->lastSignaledAtUs = currentTimeUs│ │ │ │ ├──> task->taskAgePeriods = 1│ │ │ │ └──> task->dynamicPriority = 1 + task->attribute->staticPriority│ │ │ └──> <else>│ │ │ └──> task->taskAgePeriods = 0│ │ ├──> <!task->attribute->checkFunc> //无属性检查函数│ │ │ ├──> task->taskAgePeriods = (cmpTimeUs(currentTimeUs, task->lastExecutedAtUs) / task->attribute->desiredPeriodUs)│ │ │ └──> <task->taskAgePeriods > 0>│ │ │ └──> task->dynamicPriority = 1 + task->attribute->staticPriority * task->taskAgePeriods│ │ └──> <task->dynamicPriority > selectedTaskDynamicPriority>│ │ ├──> timeDelta_t taskRequiredTimeUs = task->anticipatedExecutionTime >> TASK_EXEC_TIME_SHIFT│ │ ├──> int32_t taskRequiredTimeCycles = (int32_t)clockMicrosToCycles((uint32_t)taskRequiredTimeUs)│ │ ├──> taskRequiredTimeCycles += checkCycles + taskGuardCycles //增加守护时间(预留一些)│ │ └──> <taskRequiredTimeCycles < schedLoopRemainingCycles> || //剩余时间足够执行任务│ │ <(scheduleCount & SCHED_TASK_DEFER_MASK) == 0> || //???? 这里还不太清楚什么情况?│ │ <(task - tasks) == TASK_SERIAL)> //串行任务不阻塞│ │ ├──> selectedTaskDynamicPriority = task->dynamicPriority;│ │ └──> selectedTask = task; //选中任务│ ├──> checkCycles = cmpTimeCycles(getCycleCounter(), nowCycles) //优先级调整,以及checkFunc运行需要计算耗时时间│ └──> <selectedTask>│ ├──> timeDelta_t taskRequiredTimeUs = selectedTask->anticipatedExecutionTime >> TASK_EXEC_TIME_SHIFT // Recheck the available time as checkCycles is only approximate│ ├──> int32_t taskRequiredTimeCycles = (int32_t)clockMicrosToCycles((uint32_t)taskRequiredTimeUs)│ ├──> nowCycles = getCycleCounter()│ ├──> schedLoopRemainingCycles = cmpTimeCycles(nextTargetCycles, nowCycles)│ ├──> <!gyroEnabled || (taskRequiredTimeCycles < schedLoopRemainingCycles)>│ │ ├──> uint32_t antipatedEndCycles = nowCycles + taskRequiredTimeCycles;│ │ ├──> taskExecutionTimeUs += schedulerExecuteTask(selectedTask, currentTimeUs);│ │ ├──> nowCycles = getCycleCounter();│ │ ├──> int32_t cyclesOverdue = cmpTimeCycles(nowCycles, antipatedEndCycles);│ │ ├──> <(currentTask - tasks) == TASK_RX>│ │ │ └──> skippedRxAttempts = 0│ │ ├──> <(currentTask - tasks) == TASK_OSD>│ │ │ └──> skippedOSDAttempts = 0│ │ ├──> <(cyclesOverdue > 0) || (-cyclesOverdue < taskGuardMinCycles)> //超时,但可控在taskGuardMinCycles范围之内│ │ │ └──> <taskGuardCycles < taskGuardMaxCycles>│ │ │ └──> taskGuardCycles += taskGuardDeltaUpCycles //增加守护时间(预留更多一些)│ │ └──> <else if (taskGuardCycles > taskGuardMinCycles> //未超时│ │ └──> taskGuardCycles -= taskGuardDeltaDownCycles; //减少守护时间│ └──> <else <selectedTask->taskAgePeriods > TASK_AGE_EXPEDITE_COUNT>) ||│ <((selectedTask - tasks) == TASK_OSD) && (TASK_AGE_EXPEDITE_OSD != 0) && (++skippedOSDAttempts > TASK_AGE_EXPEDITE_OSD)> ||│ <((selectedTask - tasks) == TASK_RX) && (TASK_AGE_EXPEDITE_RX != 0) && (++skippedRxAttempts > TASK_AGE_EXPEDITE_RX)>│ └──> selectedTask->anticipatedExecutionTime *= TASK_AGE_EXPEDITE_SCALE└──> scheduleCount++;
注:这里讨论的是不包含UNIT_TEST和USE_LATE_TASK_STATISTICS的代码。
4. 总结
从当前最新4.4.x版本代码上看:
- BetaFlight整体代码可以分为两部分:初始化(init)和运行时(run)
- 应用功能代码已经通过宏定义,支持可剪裁编译;
- 整个调度器要了解存在一些背景知识需要澄清和讨论(已经在附录中整理,并正在与开发团队讨论中。。。。);
5. 参考资料
【1】BetaFlight开源工程结构简明介绍
【2】BetaFlight开源代码框架简介
【3】BetaFlight深入传感设计:传感模块设计框架
【4】BetaFlight统一硬件配置文件研读
6. 附录 – 问题汇总
6.1 Why desiredPeriodCycles is so important to Betaflight task?
Let’s say default desiredPeriodCycles is about 8K, which 125us. And the code still check desiredPeriodCycles by GYRO_RATE_COUNT interrupts, what’s the story here?
If sample rate is NOT sync with gyro task, there might be dirty/invalid data, is there any bad thing happens if just missed 1 or 2 valid samples?
Or this code only tends to logically eliminate this effective data sampling bias?
6.2 What root cause has made gyro task to been overrun, so scheduler has to skip a gyro cycle?
As scheduler comments "A task has so grossly overrun that at entire gyro cycle has been skipped, especially via USB as the serial.
Is there too much serial communication through bf configurator and FC or just USB-VCP code on FC side take a lot of resources?
It’ll be the same issue when switching to TTL comunication with FC (suggest test bf-configurator <> usb_serial convertor <> FC(UART1 for example)?
6.3 What if serial task is running quite long, which corrupt gyro cycle, is it a problem?
As previous discussion on “Why desiredPeriodCycles is so important during Betaflight task?”
e.g. use MSP protocol as communication channel with companion computer
==> there are lots of packets, result in long time processing.
==> if this happens, it seems mess up with the gyro cycle, am i right? is there any solution or way to overcome this issue?
Code
6.4 What does the condition of “scheduleCount & SCHED_TASK_DEFER_MASK == 0” stand for in scheduler?
Code
There are three scenarios for normal(except gyro/acc/pid) tasks to execute:
- taskRequiredTimeCycles < schedLoopRemainingCycles // there is time for task to execute.
- scheduleCount & SCHED_TASK_DEFER_MASK == 0 //???
- (task - tasks) == TASK_SERIAL // ok, special case for serial
So what’s for case #2 “scheduleCount & SCHED_TASK_DEFER_MASK == 0”
相关文章:

BetaFlight飞控启动运行过程简介
BetaFlight飞控启动&运行过程简介 1. 源由2. 启动过程2.1 main(主程序)2.2 init (初始化)2.3 run 3. 任务调度3.1 任务定义3.2 scheduler (调度器) 4. 总结5. 参考资料6. 附录 -- 问题汇总6.1 Why desiredPeriodCycles is so …...

智能汽车实验二(视觉传感器标定)
实验二 视觉传感器标定(实验报告) 【实验目的】 1、了解开源图像处理库OpenCV的结构,掌握OpenCV的基本使用方法。 2、了解开源图像处理库OpenCV的基本模块功能,掌握常用图像处理方法。 3、掌握摄像机标定算法,学会使用…...

计算机网络:HTTP
目录 HTTP 是什么?HTTP 常见的状态码有哪些HTTP 常见字段有哪些参考资料 HTTP 是什么? HTTP 是超文本传输协议,也就是HyperText Transfer Protocol。 1. 「协议」 「协」字,代表的意思是必须有两个以上的参与者。「议」字&…...

Go 语言接口
Go 语言接口 Go 语言提供了另外一种数据类型即接口,它把所有的具有共性的方法定义在一起,任何其他类型只要实现了这些方法就是实现了这个接口。 实例 实例 /* 定义接口 */ type interface_name interface { method_name1 [return_type] method_name2…...

常用的intellij的快捷键
ctrlshiftspace(new 后面自动提示) ctrlshift/ (注释) itar后面tab (for循环) it后面ctrlj(很多智能代码生成) AltInsert(自动生成构造函数,get,set方法) ctrlaltt(自动生成try,catch) altenter(创建测试类和子类) ctrlshiftbackspace(最后编辑的地方) ctrl…...
`)
Unity中的`SetPositionAndRotation()`
介绍 SetPositionAndRotation() 是Unity中的一个方法,用于同时设置物体的位置和旋转。它可以在不必分别调用 transform.position 和 transform.rotation 属性的情况下,直接设置物体的位置和旋转。 方法 以下是 SetPositionAndRotation() 方法的参数&a…...

API 接口的使用和功能
随着互联网的快速发展,API接口已经成为了现代开发中不可或缺的一部分。API接口可以让你的应用程序与其他应用程序、系统或服务进行数据交流和集成。如果你正在开发应用程序,那么最好的方法就是使用API接口来增强功能和性能。 我们的API接口是为您的应用…...

Vue插件
介绍 Vue插件是一种扩展Vue应用程序功能的方式。使用Vue插件,您可以在Vue应用程序中重复使用代码或添加新功能。更具体地说,Vue插件通常具有以下用途: 封装重复的功能或组件,以便在多个Vue组件中使用。 扩展Vue的核心功能并使其…...
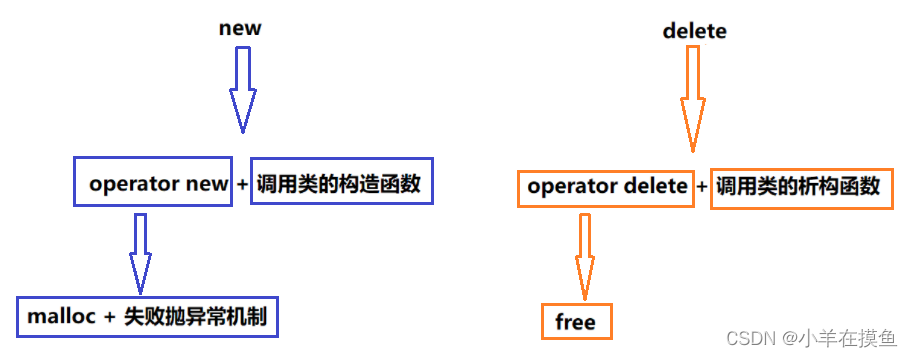
C++好难(5):内存管理
这一节学完,我们 C嘎嘎 就算是正式入门了,但是之后的课还会更上一阶d(ŐдŐ๑) 继续坚持! 【本节目标】 1. C/C内存分布 2. C语言中动态内存管理方式 3. C中动态内存管理 4. operator new与operator delete函数 5. new和delete的实现原…...
vue-admin-template中vue动态路由不显示问题解决
使用的的是vue-admin-template,这是一个极简的 vue admin 管理后台,它只包含了 Element UI & axios & iconfont & permission control & lint,这些搭建后台必要的东西。需要根据自己的需求二次开发。 线上地址:vue-admin-tem…...
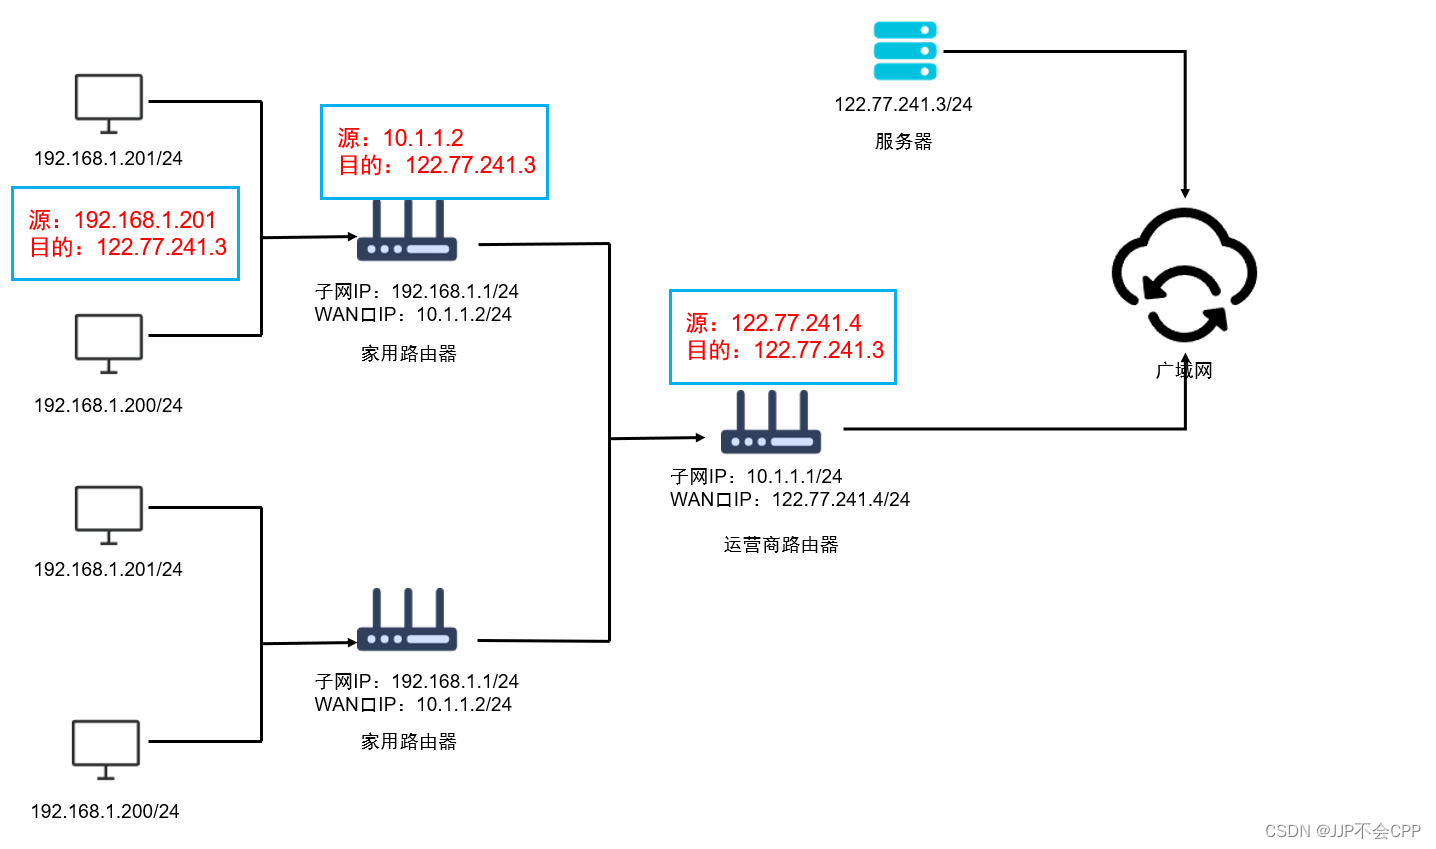
IP协议介绍
文章目录 一、IP协议的基本认识二、IP的协议头格式三、网段划分四、特殊的IP地址五、IP地址的数量限制六、私有IP地址和公网IP地址 一、IP协议的基本认识 IP在网络分层中属于网络层协议,传输层协议里的TCP协议解决的是可靠性问题,网络层协议里的IP协议能…...

将一个单体服务重构成微服务
将一个单体服务重构成微服务需要经过以下步骤: 1. 拆分服务:将单体服务拆分成多个小服务,每个服务只负责一个特定的功能。拆分的原则是将服务按照业务功能进行划分,每个服务都应该是相对独立的。 2. 设计API:为每个服务…...

SpringBoot项目如何打包成exe应用程序
准备 准备工作: 一个jar包,没有bug能正常启动的jar包 exe4j,一个将jar转换成exe的工具 链接: https://pan.baidu.com/s/1m1qA31Z8MEcWWkp9qe8AiA 提取码: f1wt inno setup,一个将依赖和exe一起打成一个安装程序的工具 链接:…...

一文读懂:客户管理系统平台是什么?有什么作用?
“客户管理系统平台是什么?” “客户管理系统平台有什么作用?在哪里可以应用?怎么用?” 经常可以听到企业内部关于客户管理系统平台的这些问题,本文将会为您一一解答: 一、客户管理系统平台是什么 顾名…...

Node.js 与 TypeScript
目录 1、什么是 TypeScript 2、运行TypeScript 3、TypeScript 在Node.js 生态中的情况 1、什么是 TypeScript TypeScript是一种流行的开源语言,由微软维护和开发。它受到了世界各地许多软件开发人员的喜爱和使用。 基本上,它是JavaScript的超集&…...
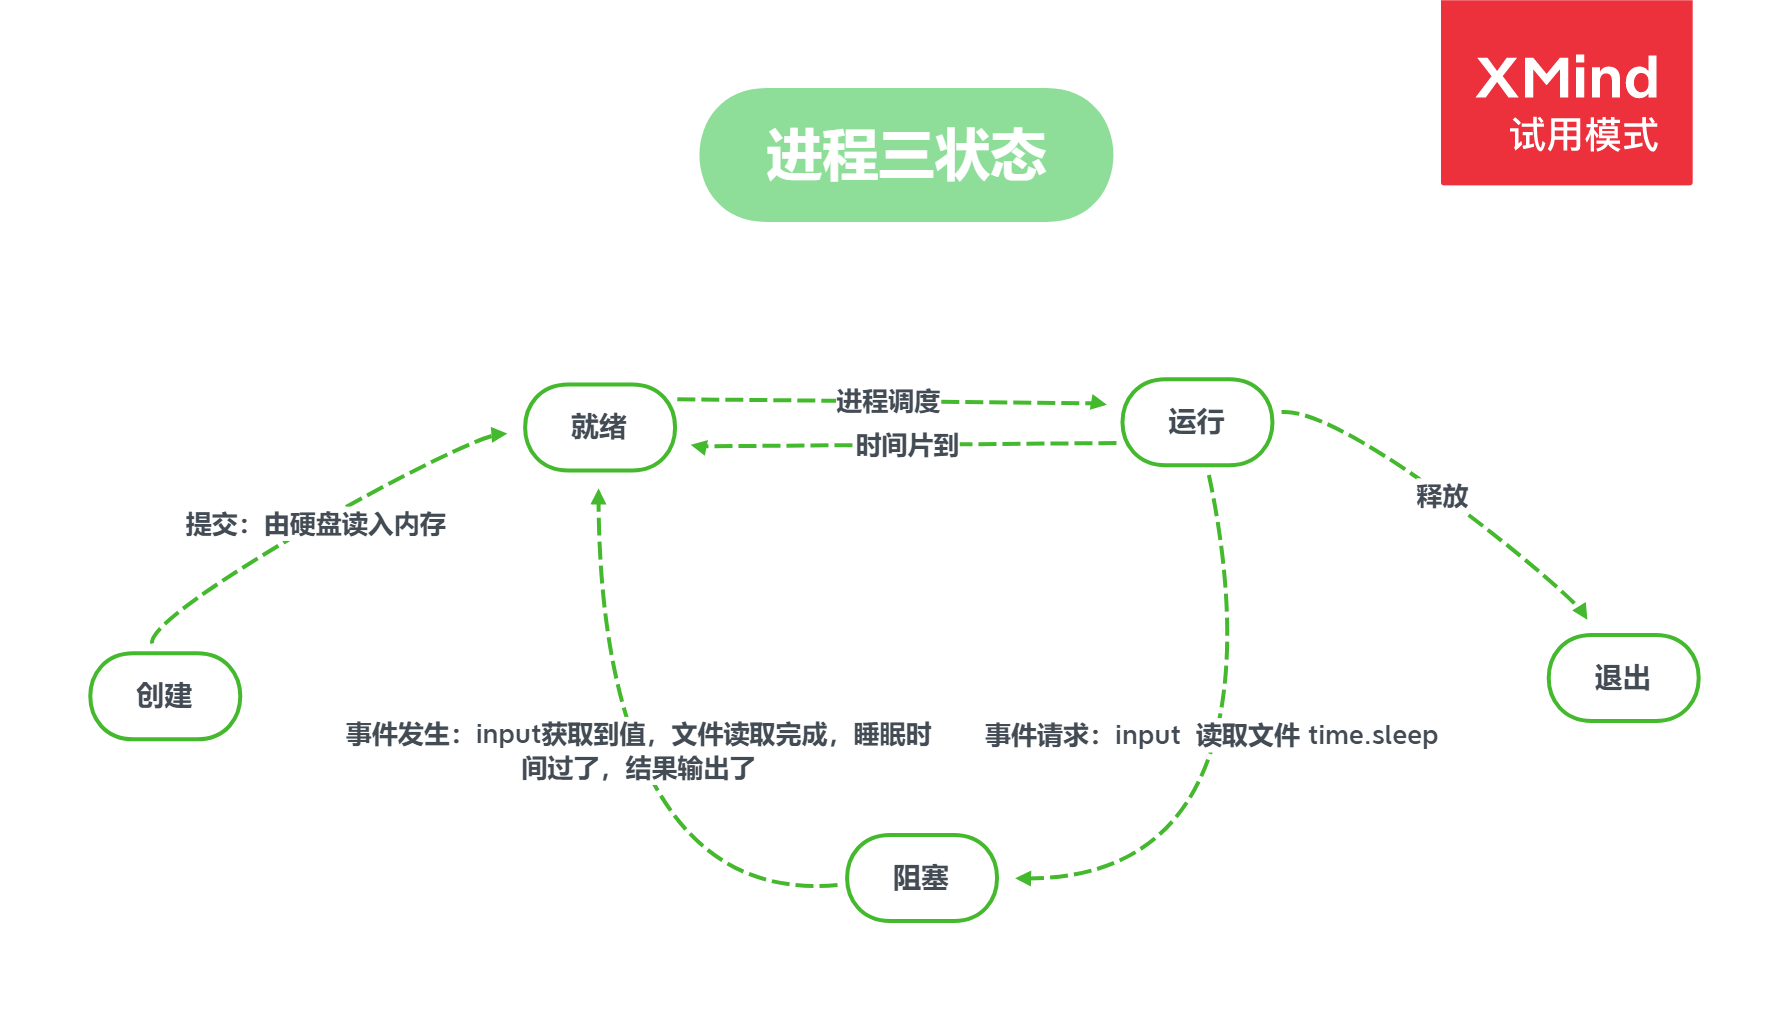
Python并发编程之进程理论
前言 本文将详细介绍进程相关概念。 进程和程序 计算机上的未运行的QQ、Wechat等都属于程序,但是一旦当这些程序运行起来的话,就可以被称为进程。因此可以如下定义程序和进程: 程序:就是存在硬盘上的一堆代码。 进程…...

超级详细的mysql数据库安装指南
MySql数据库 如果你的电脑是mac那么你看这位大佬的分享。 如果你的电脑是windows,参考下面的安装步骤。 一、下载mysql数据库? 进入MySQL官方网站(MySQL Community Downloads),按下图顺序点击 1、进入下载页面 2、…...
Java并发编程实践学习笔记(三)——共享对象之发布和异常
目录 1 公共静态变量逸出 2 非私有方法逸出私有变量 3 this引用逸出 4 构造函数中的可覆盖方法调用逸出 发布(publishing)一个对象的意思是:使对象能够在当前作用域之外的代码中使用。例如,将一个指向该对象的引用保存到其他代…...

Python学习之Image模块图片滤镜效果操作示例
前言 滤镜效果是图像处理中常用的一种技术,可以用来增强图像的视觉效果,实现不同的效果,比如增强对比度、饱和度、色彩等。滤镜效果可以帮助用户快速地调整图像的特性,从而使图像更加适合用户的需求。 Image模块对于图像处理的…...

Grafana 系列-统一展示-5-AWS Cloudwatch 仪表板
系列文章 Grafana 系列文章 👍️强烈推荐 强烈推荐使用 GitHub 上的 monitoringartist/grafana-aws-cloudwatch-dashboards 仪表板。该 repo 有一系列 AWS 资源的仪表板,包括但不限于: EC2EBSAPI GWAutoscalingBillingEKSLambdaLogsRDSS3…...

New-API数据导出功能:轻松管理AI模型使用记录与账单数据
New-API数据导出功能:轻松管理AI模型使用记录与账单数据 【免费下载链接】new-api A unified AI model hub for aggregation & distribution. It supports cross-converting various LLMs into OpenAI-compatible, Claude-compatible, or Gemini-compatible for…...

[具身智能-680]:ROS2 可视化与调试工具与示例
按日常开发必用分类,每条可直接复制运行,新手也能马上上手。一、3D 可视化工具1. rviz2(核心 3D 可视化)功能查看:机器人模型、激光雷达、点云、地图、TF 坐标、导航路径、相机图像、机械臂、代价地图等。启动bash运行…...
)
别再写面条代码了!用C语言状态机重构你的单片机项目(附51单片机HSM可移植框架)
从面条代码到优雅架构:用HSM状态机重构嵌入式系统的实战指南 当你面对一个智能家居设备的嵌入式项目,代码里充斥着数百行的if-else嵌套和switch-case分支,每次添加新功能都像是在一碗已经坨掉的面条上再浇一勺酱料——这样的开发体验…...

ai圈重大新闻xAI 被解散、并入 SpaceX 并改为 SpaceXAI 深度解读
xAI 被解散、并入 SpaceX 并改为 SpaceXAI,本质是:技术路线失败+团队彻底崩塌+巨额亏损难持续+商业变现无力+资本与IPO压力+马斯克战略转向,六重因素叠加下的“止损式重组”…...

STM32+EMMC+GL3227E固件调试:从扇区偏移到数据同步的实战解析
1. 问题现象与背景分析 最近在调试一个嵌入式存储系统时遇到了奇怪的现象:STM32主控将数据写入EMMC存储后,通过GL3227E桥接芯片连接电脑却无法识别。更诡异的是,电脑格式化后的EMMC,STM32写入的数据在电脑端又"消失"了。…...

HsMod终极指南:55项功能全面优化炉石传说游戏体验的完整方案
HsMod终极指南:55项功能全面优化炉石传说游戏体验的完整方案 【免费下载链接】HsMod Hearthstone Modification Based on BepInEx 项目地址: https://gitcode.com/GitHub_Trending/hs/HsMod HsMod是一款基于BepInEx框架开发的炉石传说模改插件,为…...

你的oh-my-zsh插件列表还缺它吗?深度体验autojump:不止是目录跳转
深度探索autojump:oh-my-zsh终端导航的智能记忆系统 终端操作效率一直是开发者关注的焦点。当你的命令行环境从基础功能升级到oh-my-zsh这样的强大框架后,如何进一步挖掘工具潜力成为提升工作流的关键。在众多效率插件中,autojump以其独特的&…...

【STM32H7实战】HRTIM高分辨率定时器在数字电源与电机控制中的高级应用与HAL库配置
1. HRTIM高分辨率定时器概述 HRTIM(High-Resolution Timer)是STM32H7系列中一个强大的定时器外设,专为数字电源转换、电机控制等高性能实时控制场景设计。相比普通定时器,它的分辨率高达184ps(在400MHz主频下ÿ…...
)
Cadence AMS Designer 保姆级教程:手把手教你搞定数模混合仿真(含Verilog模块导入避坑指南)
Cadence AMS Designer 保姆级教程:手把手教你搞定数模混合仿真(含Verilog模块导入避坑指南) 数模混合仿真一直是芯片设计中的关键环节,尤其对于刚接触Cadence环境的新手工程师或在校学生来说,从零开始搭建混合仿真环境…...

【信息科学与工程学】【通信工程】第四十三篇 骨干网方案设计-02跨境网络
一、方案 1.1 整体方案设计概要 设计的云网融合方案,综合考虑其全球互联需求、安全合规性、性能优化及跨国运营挑战: 1.1.1、需求分析 网络互联需求: 国内互通: 安全、稳定、低延迟连接中国大陆(严格合规要求)。 国际互通: 高性能连接美国(东西海…...