Git第一章、Git的原理与使用
目录
一、Git安装
1.1Linux Centos安装
二、Git基本操作
2.1创建 Git 本地仓库
2.2配置Git
三、认识工作区、暂存区、版本库
3.1添加文件(场景一)
3.2修改文件
3.3版本回退
四、撤销修改
4.1情况一:对于工作区的代码,还没有add
4.2情况二:已经add ,但没有commit
4.3情况三:已经add ,并且也commit 了
五、删除文件
六、分支管理
6.1理解分支
6.1创建分支
6.2切换分支
6.3合并分支
6.4删除分支
6.5合并冲突
七、分支管理策略
7.1分支管理策略
7.2分支策略
7.3bug 分支
7.4删除临时分支
7.5小结
八、远程操作
8.1理解分布式版本控制系统
九、远程仓库
9.1新建远程仓库
9.2克隆远程仓库
9.3向远程仓库推送
9.4拉取远程仓库
十、配置 Git
10.1忽略特殊文件
10.2给命令配置别名
十一、标签管理
11.1理解标签
11.2创建标签
11.3操作标签
背景知识:
我们在编写各种文档时,为了防止文档丢失,更改失误,失误后能恢复到原来的版本,不得不复制出一个副本。每个版本有各自的内容,但最终会只有一份报告需要被我们使用 。但在此之前的工作都需要这些不同版本的报告,于是每次都是复制粘贴副本,产出的文件就越来越多,文件多不是问题,问题是:随着版本数量的不断增多,你还记得这些版本各自都是修改了什么吗?文档如此,我们写的项目代码,也是存在这个问题的!!
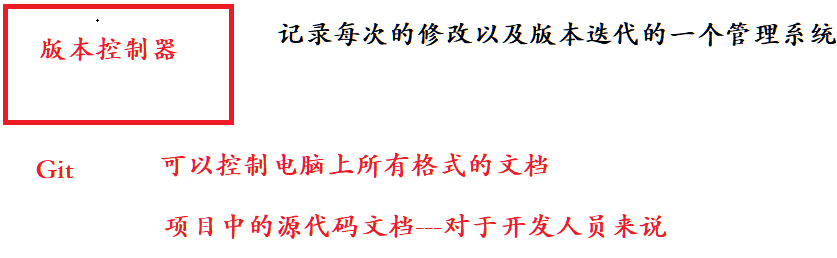
如何解决-->版本控制器:
为了能够更方便我们管理这些不同版本的文件,便有了版本控制器。所谓的版本控制器,就是能让你了解到一个文件的历史,以及它的发展过程的系统。通俗的讲就是一个可以记录工程的每一次改动和版本迭代的一个管理系统,同时也方便多人协同作业。目前最主流的版本控制器就是 Git 。Git 可以控制电脑上所有格式的文件,例如 doc、excel、dwg、dgn、rvt等等。对于我们开发人员来说,Git 最重要的就是可以帮助我们管理软件开发项目中的源代码
文件!
注意事项:
所有的版本控制系统,Git 也不例外,其实只能跟踪文本文件的改动,比如 TXT 文件,网页,所有的程序代码等等。版本控制系统可以告诉你每次的改动,比如在第5行加了一个单词“Linux”,在第8行删了一个单词 “Windows”。而图片、视频这些二进制文件,虽然也能由版本控制系统管理,但没法跟踪文件的变化,只能把二进制文件每次改动串起来,也就是只知道图片从100KB改成了120KB,但到底改了啥,版本控制系统不知道,也没法知道。
一、Git安装
1.1Linux Centos安装
安装 Git:
sudo 1 yum -y install git查看 Git 安装的版本:
git --version二、Git基本操作
2.1创建 Git 本地仓库
仓库是进行版本控制的一个文件目录。我们要想对文件进行版本控制,就必须先创建一个仓库出来。创建一个 Git 本地仓库对应的命令为 git init ,注意命令要在文件目录下执行,例如:
hyb@139-159-150-152:~/gitcode$ pwd
/home/hyb/gitcode
hyb@139-159-150-152:~/gitcode$ git init
Initialized empty Git repository in /home/hyb/gitcode/.git/
hyb@139-159-150-152:~/gitcode$ ll -a
total 12
drwxrwxr-x 3 hyb hyb 4096 May 5 15:49 ./
drwxr-xr-x 13 hyb hyb 4096 May 5 15:47 ../
drwxrwxr-x 7 hyb hyb 4096 May 5 15:49 .git/
我们发现,当前目录下多了一个.git 的隐藏文件, .git 目录是 Git 来跟踪管理仓库的,不要手动
修改这个目录里面的文件,不然改乱了,就把 Git 仓库给破坏了。
查看.git文件夹中的内容:
hyb@139-159-150-152:~/gitcode$ tree .git/
.git/
├── branches
├── config
├── description
├── HEAD
├── hooks
│ ├── applypatch-msg.sample
│ ├── commit-msg.sample
│ ├── fsmonitor-watchman.sample
│ ├── post-update.sample
│ ├── pre-applypatch.sample
│ ├── pre-commit.sample
│ ├── pre-merge-commit.sample
│ ├── prepare-commit-msg.sample
│ ├── pre-push.sample
│ ├── pre-rebase.sample
│ ├── pre-receive.sample
│ └── update.sample
├── info
│ └── exclude
├── objects
│ ├── info
│ └── pack
└── refs
├── heads
└── tags
9 directories, 16 files
2.2配置Git
当安装 Git 后首先要做的事情是设置你的 用户名称 和 e-mail 地址,这是非常重要的。配置命令为:
git config [--global] user.name "Your Name"
git config [--global] user.email "email@example.com"
# 把 Your Name 改成你的昵称
# 把 email@example.com 改成邮箱的格式,只要格式正确即可。
# --global:将配置项生效于所有当前机器的git仓库中(全局)
其中 --global(--global:将配置项生效于所有当前机器的git仓库中(全局)) 是一个可选项。如果使用了该选项,表示这台机器上所有的 Git 仓库都会使用这个配置。如果你希望在不同仓库中使用不同的 name 或 e-mail ,可以不要 --global 选项,但要注意的是,执行命令时必须要在仓库里。
查看配置是否成功:
git config -l删除对应的配置命令为:
git config [--global] --unset user.name
git config [--global] --unset user.email
三、认识工作区、暂存区、版本库
工作区:是在电脑上你要写代码或文件的目录。
暂存区:英文叫 stage 或 index。一般存放在 .git 目录下的 index 文件(.git/index)中,我们
把暂存区有时也叫作索引(index)。
版本库:又名仓库,英文名 repository 。工作区有一个隐藏目录 .git ,它不算工作区,而是 Git 的版本库。这个版本库里面的所有文件都可以被 Git 管理起来,每个文件的修改、删除,Git
都能跟踪,以便任何时刻都可以追踪历史,或者在将来某个时刻可以“还原”。
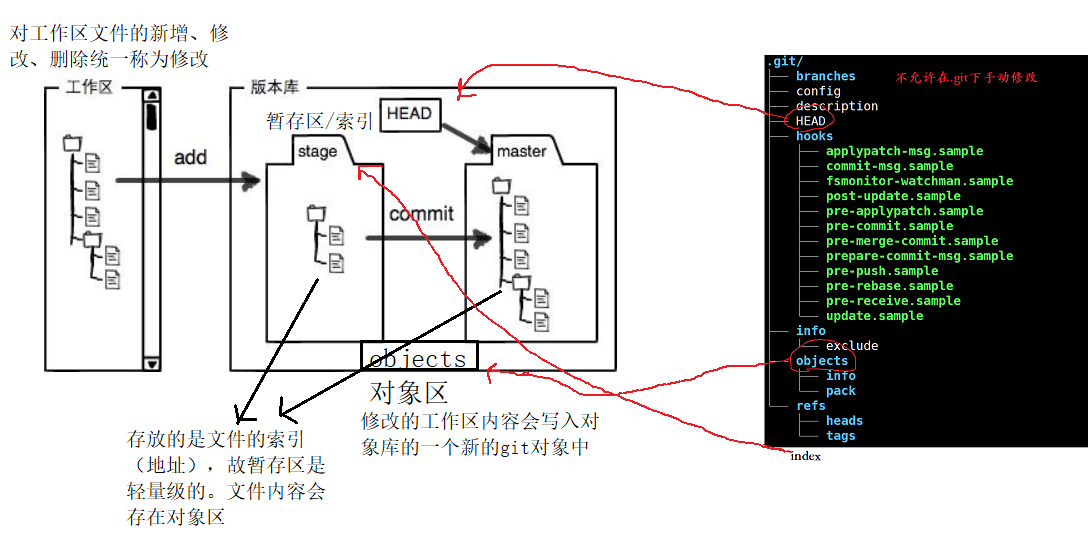
- 图中左侧为工作区,右侧为版本库。Git 的版本库里存了很多东西,其中最重要的就是暂存区。
- 在创建 Git 版本库时,Git 会为我们自动创建一个唯一的 master 分支,以及指向 master 的一个指针叫 HEAD。(分支和HEAD的概念后面再说)
- 当对工作区修改(或新增)的文件执行 git add 命令时,暂存区目录树的文件索引会被更新。
- 当执行提交操作git commit 时,master 分支会做相应的更新,可以简单理解为暂存区的目录
- 树才会被真正写到版本库中。
- 由上述描述我们便能得知:通过新建或粘贴进目录的文件,并不能称之为向仓库中新增文件,而只是在工作区新增了文件。必须要通过使用 git add 和 git commit 命令才能将文件添加到仓库中进行管理
3.1添加文件(场景一)
在包含 .git 的目录下新建一个 ReadMe 文件,我们可以使用 git add 命令可以将文件添加到暂存
区:
- 添加一个或多个文件到暂存区: git add [file1] [file2] ...
- 添加指定目录到暂存区,包括子目录: git add [dir]
- 添加当前目录下的所有文件改动到暂存区: git add .
- 再使用 git commit 命令将暂存区内容添加到本地仓库中:
- 提交暂存区全部内容到本地仓库中: git commit -m "message"
- 提交暂存区的指定文件到仓库区: git commit [file1] [file2] ... -m "message"
- 注意git commit 后面的-m 选项,要跟上描述本次提交的 message,由用户自己完成,这部分内容绝对不能省略,并要好好描述,是用来记录你的提交细节,是给我们人看的。
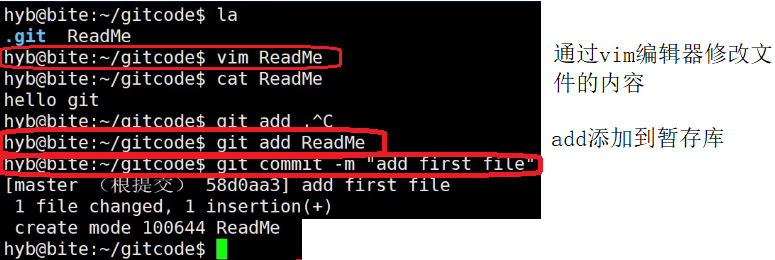
hyb@139-159-150-152:~/gitcode$ vim ReadMe
hyb@139-159-150-152:~/gitcode$ cat ReadMe
hello bit
hello bit
hyb@139-159-150-152:~/gitcode$ git add ReadMe
hyb@139-159-150-152:~/gitcode$ git commit -m "commit my first file"
[master (root-commit) c614289] commit my first file
1 file changed, 2 insertions(+)
create mode 100644 ReadMe
git commit 命令执行成功后会告诉我们,1个文件被改动(就是我们新添加的ReadMe文件),插
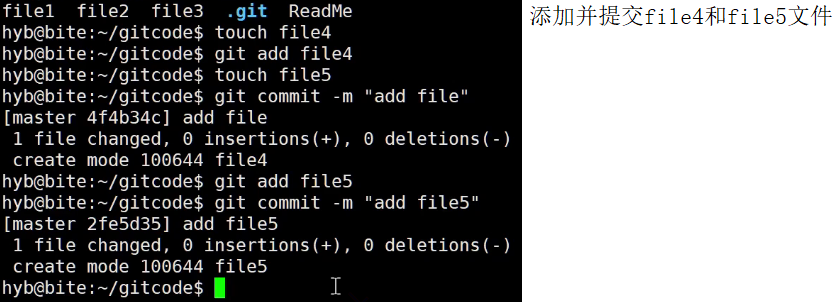
入了两行内容(ReadMe有两行内容)。我们还可以多次 add 不同的文件,而只 commit 一次便可以提交所有文件,是因为需要提交的文件是通通被 add 到暂存区中,然后一次性 commit 暂存区的所有修改。如:
hyb@139-159-150-152:~/gitcode$ touch file1 file2 file3
hyb@139-159-150-152:~/gitcode$ git add file1
hyb@139-159-150-152:~/gitcode$ git add file2
hyb@139-159-150-152:~/gitcode$ git add file3
hyb@139-159-150-152:~/gitcode$ git commit -m "add 3 files"
[master 23807c5] add 3 files
3 files changed, 0 insertions(+), 0 deletions(-)
create mode 100644 file1
create mode 100644 file2
create mode 100644 file3
截至目前为止,我们已经更够将代码直接提交至本地仓库了。我们可以使用 git log 命令,来查看
下历史提交记录:
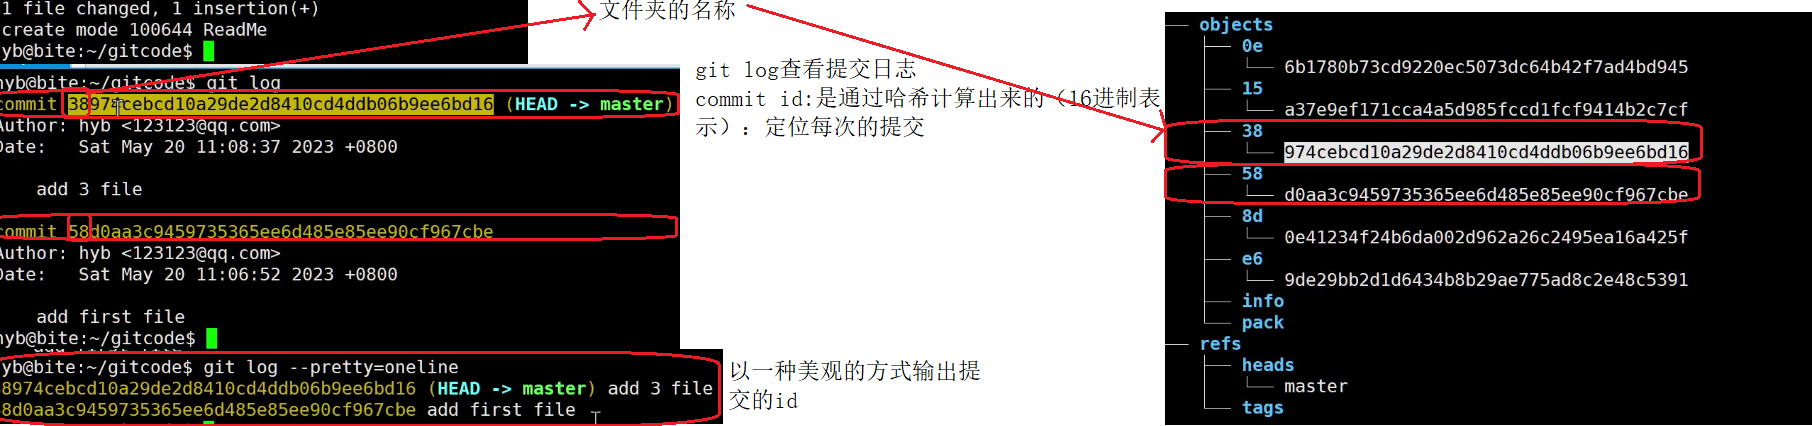
hyb@139-159-150-152:~/gitcode$ git log
commit 23807c536969cd886c4fb624b997ca575756eed6 (HEAD -> master)
Author: hyb91 <2689241679@qq.com>
Date: Sat May 6 11:27:32 2023 +0800
add 3 files
commit c61428926f3853d4ec6dde904415b0e6c1dabcc6
Author: hyb91 <2689241679@qq.com>
Date: Sat May 6 11:25:50 2023 +0800
commit my first file
该命令显示从最近到最远的提交日志,并且可以看到我们 commit 时的日志消息。
如果嫌输出信息太多,看得眼花缭乱的,可以试试加上--pretty=oneline 参数
yb@139-159-150-152:~/gitcode$ git log --pretty=oneline
23807c536969cd886c4fb624b997ca575756eed6 (HEAD -> master) add 3 files
c61428926f3853d4ec6dde904415b0e6c1dabcc6 commit my first file
需要说明的是,我们看到的一大串类似23807c5...56eed6 的是每次提交的 commit id (版本
号),Git 的commit id 不是1,2,3……递增的数字,而是一个 SHA1 计算出来的一个非常大的数
字,用十六进制表示(你看到的commit id 和我的肯定不一样,以你自己的为准)。
index 就是我们的暂存区
HEAD 就是我们的默认指向master分支的指针
hyb@139-159-150-152:~/gitcode$ cat .git/HEAD
ref: refs/heads/master
而默认的 master分支,就是:
hyb@139-159-150-152:~/gitcode$ cat .git/refs/heads/master
23807c536969cd886c4fb624b997ca575756eed6
 objects 为 Git 的对象库,里面包含了创建的各种版本库对象及内容。当执行 git add 命令
时,暂存区的目录树被更新,同时工作区修改(或新增)的文件内容被写入到对象库中的一个新的
对象中,就位于 ".git/objects" 目录下,让我们来看看这些对象有何用处:
hyb@139-159-150-152:~/gitcode$ ls .git/objects/
23 83 8f 9c c6 e6 info pack
查找 object 时要将 commit id 分成2部分,其前2位是文件夹名称,后38位是文件名称。
找到这个文件之后,一般不能直接看到里面是什么,该类文件是经过 sha (安全哈希算法)加密过的文件,好在我们可以使用 git cat-file 命令来查看版本库对象的内容:
hyb@139-159-150-152:~/gitcode$ git cat-file -p 23807c536969cd886c4fb624b997ca575
tree 830a8c9feefbdc098bbae2cdc25e5034ce1920d7
parent c61428926f3853d4ec6dde904415b0e6c1dabcc6
author hyb91 <2689241679@qq.com> 1683343652 +0800
committer hyb91 <2689241679@qq.com> 1683343652 +0800
add 3 files
# 这就是我们最近一次的提交!
其中,还有一行 tree 830a8c9feefbdc098bbae2cdc25e5034ce1920d7 ,我们使用同样的方
法,看看结果:
hyb@139-159-150-152:~/gitcode$ git cat-file -p 830a8c9feefbdc098bbae2cdc25e5034c
100644 blob 9c9e1f0f6bff3015df71a0963004476f5e6cfd54 ReadMe
100644 blob e69de29bb2d1d6434b8b29ae775ad8c2e48c5391 file1
100644 blob e69de29bb2d1d6434b8b29ae775ad8c2e48c5391 file2
100644 blob e69de29bb2d1d6434b8b29ae775ad8c2e48c5391 file3
在看 ReadMe 对应的 9c9e1f0f6bff3015df71a0963004476f5e6cfd54 :
hyb@139-159-150-152:~/gitcode$ git cat-file -p 9c9e1f0f6bff3015df71a0963004476f5
hello bit
hello bit
# 这是我们对ReadMe做的修改!!被git记录了下来!!
总结一下,在本地的 git 仓库中,有几个文件或者目录很特殊
- index: 暂存区, git add 后会更新该内容。
- HEAD: 默认指向 master 分支的一个指针。
- refs/heads/master: 文件里保存当前 master 分支的最新commit id 。
- objects: 包含了创建的各种版本库对象及内容,可以简单理解为放了 git 维护的所有修改。
3.2修改文件
Git 比其他版本控制系统设计得优秀,因为 Git 跟踪并管理的是修改,而非文件。
什么是修改?比如你新增了一行,这就是一个修改,删除了一行,也是一个修改,更改了某些字符,也是一个修改,删了一些又加了一些,也是一个修改,甚至创建一个新文件,也算一个修改。
 git diff [file] 命令用来显示暂存区和工作区文件的差异,显示的格式正是Unix通用的diff格式。也可以使用 git diff HEAD -- [file] 命令来查看版本库和工作区文件的区别。知道了对 ReadMe 做了什么修改后,再把它提交到本地仓库就放心多了。

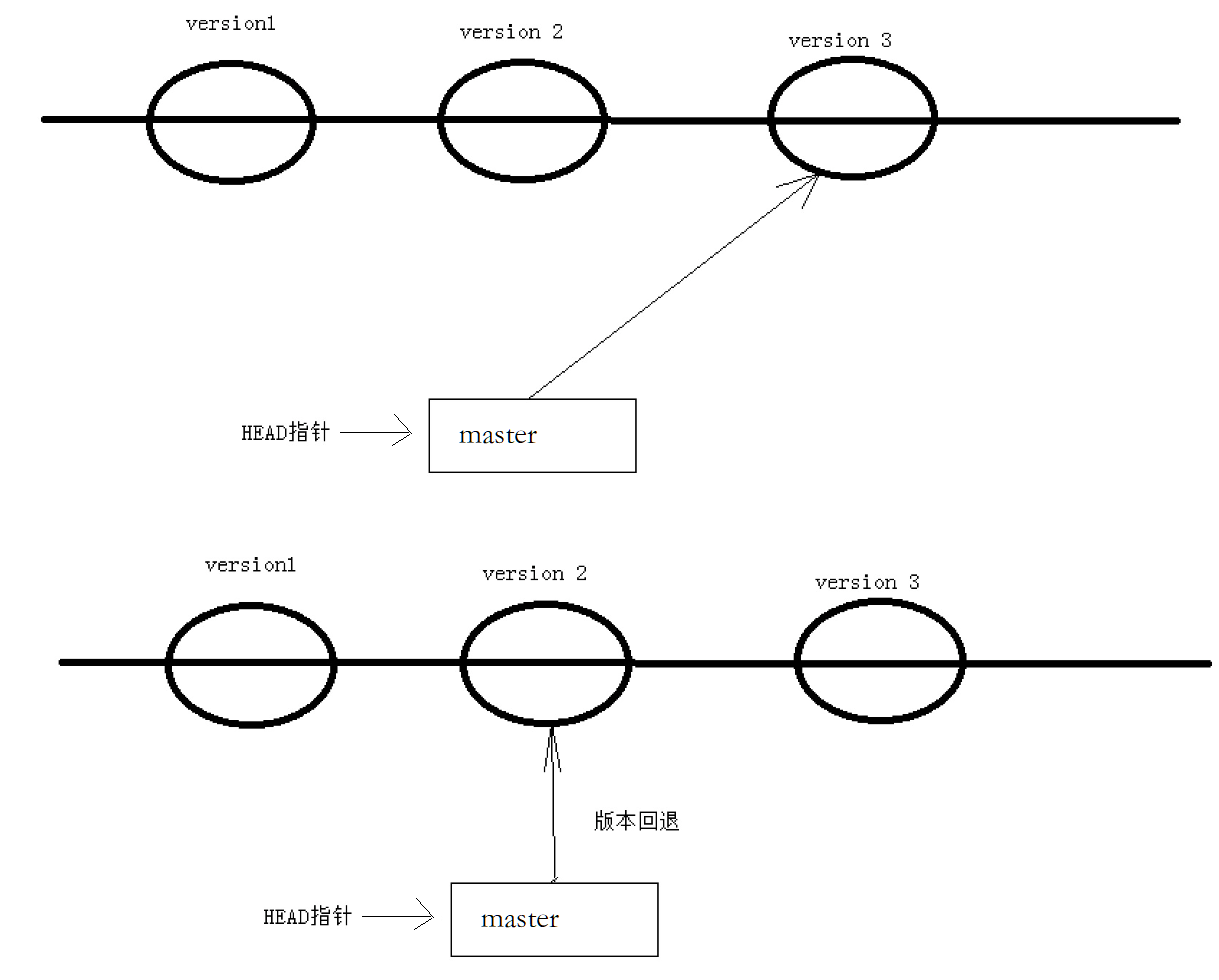
3.3版本回退
之前我们也提到过,Git 能够管理文件的历史版本,这也是版本控制器重要的能力。如果有一天你发现之前前的工作做的出现了很大的问题,需要在某个特定的历史版本重新开始,这个时候,就需要版本回退的功能了。
执行 git reset 命令用于回退版本,可以指定退回某一次提交的版本。要解释一下“回退”本质是
要将版本库中的内容进行回退,工作区或暂存区是否回退由命令参数决定:
git reset 命令语法格式为: git reset [--soft | --mixed | --hard] [HEAD]- --mixed 为默认选项,使用时可以不用带该参数。该参数将暂存区的内容退回为指定提交版本内容,工作区文件保持不变。
- --soft 参数对于工作区和暂存区的内容都不变,只是将版本库回退到某个指定版本。
- --hard 参数将暂存区与工作区都退回到指定版本。切记工作区有未提交的代码时不要用这个命令,因为工作区会回滚,你没有提交的代码就再也找不回了,所以使用该参数前一定要慎重。
HEAD 说明:
◦ 可直接写成 commit id,表示指定退回的版本
◦ HEAD 表示当前版本
◦ HEAD^ 上一个版本
◦ HEAD^^ 上上一个版本
◦ 以此类推...
• 可以使用 ~数字表示:
◦ HEAD~0 表示当前版本
◦ HEAD~1 上一个版本
◦ HEAD^2 上上一个版本
◦ 以此类推...
为了便于表述,方便测试回退功能,我们先做一些准备工作:更新3个版本的 ReadMe,并分别进行3次提交,如下所示:
# 第一次修改提交
hyb@139-159-150-152:~/gitcode$ cat ReadMe
hello bit
hello git
hello world
hello version1
hyb@139-159-150-152:~/gitcode$ git add ReadMe
hyb@139-159-150-152:~/gitcode$ git commit -m"add version1"
[master cff9d1e] add version1
1 file changed, 1 insertion(+)
# 第二次修改提交
hyb@139-159-150-152:~/gitcode$ cat ReadMe
hello bit
hello git
hello world
hello version1
hello version2
hyb@139-159-150-152:~/gitcode$ git add ReadMe
hyb@139-159-150-152:~/gitcode$ git commit -m"add version2"
1 file changed, 1 insertion(+)
# 第三次修改提交
hyb@139-159-150-152:~/gitcode$ cat ReadMe
hello bit
hello git
hello world
hello version1
hello version2
hello version3
hyb@139-159-150-152:~/gitcode$ git add ReadMe
hyb@139-159-150-152:~/gitcode$ git commit -m"add version3"
[master d95c13f] add version3
1 file changed, 1 insertion(+)
# 查看历史提交记录
hyb@139-159-150-152:~/gitcode$ git log --pretty=oneline
d95c13ffc878a55a25a3d04e22abfc7d2e3e1383 (HEAD -> master) add version3
14c12c32464d6ead7159f5c24e786ce450c899dd add version2
cff9d1e019333318156f8c7d356a78c9e49a6e7b add version1
...
现在,如果我们在提交完 version3 后, 发现 version 3 编写错误,想回退到 version2,重新基于
version 2 开始编写。由于我们在这里希望的是将工作区的内容也回退到 version 2 版本,所以需
要用到 --hard 参数,示例如下:
hyb@139-159-150-152:~/gitcode$ git log --pretty=oneline
d95c13ffc878a55a25a3d04e22abfc7d2e3e1383 (HEAD -> master) add version3
14c12c32464d6ead7159f5c24e786ce450c899dd add version2
cff9d1e019333318156f8c7d356a78c9e49a6e7b add version1
...
hyb@139-159-150-152:~/gitcode$ git reset --hard 14c12c32464d6ead7159f5c24e786ce4
HEAD is now at 14c12c3 add version2
hyb@139-159-150-152:~/gitcode$ cat ReadMe
hello bit
hello git
hello world
hello version1
hello version2
我们惊奇的发现,此时ReadMe 文件的内容,已经回退到 version2 了!,当前,我们再次用 git
log 查看一下提交日志,发现HEAD 指向了version2,如下所示:
hyb@139-159-150-152:~/gitcode$ git log --pretty=oneline
14c12c32464d6ead7159f5c24e786ce450c899dd (HEAD -> master) add version2
cff9d1e019333318156f8c7d356a78c9e49a6e7b add version1
...
到这里一般回退功能就演示完了,但现在如果我后悔了,想再回到 version 3 怎么办?我们可以继续使用 git reset 命令,回退到 version 3 版本,但我们必须要拿到 version 3 的 commit
id 去指定回退的版本。
但我们看到了 git log 并不能打印出 version 3 的commit id ,运气好的话我们可以从终端
上去找找之前的记录,运气不好的话 commit id 已经被我们搞丢了=。
Git 还提供了一个git reflog 命令能补救一下,该命令用来记录本地的每一次命令。
hyb@139-159-150-152:~/gitcode$ git reflog
14c12c3 (HEAD -> master) HEAD@{0}: reset: moving to 14c12c32464d6ead7159f5c24e78
d95c13f HEAD@{1}: commit: add version3
14c12c3 (HEAD -> master) HEAD@{2}: commit: add version2
cff9d1e HEAD@{3}: commit: add version1
94da695 HEAD@{4}: commit: add modify ReadMe file
23807c5 HEAD@{5}: commit: add 3 files
c614289 HEAD@{6}: commit (initial): commit my first file
这样,你就可以很方便的找到你的所有操作记录了,但d95c13f 这个是啥东西?这个是 version
3 的commit id 的部分。没错,Git 版本回退的时候,也可以使用部分commit id 来代表目标版
本。示例如下:
# 回退到v3
hyb@139-159-150-152:~/gitcode$ git reset --hard d95c13f
HEAD is now at d95c13f add version3
# 查看工作区
hyb@139-159-150-152:~/gitcode$ cat ReadMe
hello bit
hello git
hello world
hello version1
hello version2
hello version3
# 查看log
hyb@139-159-150-152:~/gitcode$ git log --pretty=oneline
d95c13ffc878a55a25a3d04e22abfc7d2e3e1383 (HEAD -> master) add version3
14c12c32464d6ead7159f5c24e786ce450c899dd add version2
cff9d1e019333318156f8c7d356a78c9e49a6e7b add version1
94da6950d27e623c0368b22f1ffc4bff761b5b00 add modify ReadMe file
23807c536969cd886c4fb624b997ca575756eed6 add 3 files
c61428926f3853d4ec6dde904415b0e6c1dabcc6 commit my first file
可往往是理想很丰满,现实很骨感。在实际开发中,由于长时间的开发了,导致 commit id 早就找
不到了,可突然某一天,我又想回退到 version3,那该如何操作呢?貌似现在不可能了。。。
值得说的是,Git 的版本回退速度非常快,因为 Git 在内部有个指向当前分支(此处是master)的
HEAD 指针, refs/heads/master 文件里保存当前 master 分支的最新commit id 。当我们
在回退版本的时候,Git 仅仅是给 refs/heads/master 中存储一个特定的version,可以简单理解
成如下示意图:
四、撤销修改
如果我们在我们的工作区写了很长时间代码,越写越写不下去,觉得自己写的实在是垃圾,想恢复到上一个版本。
4.1情况一:对于工作区的代码,还没有add
# 向ReadMe中新增一行代码
hyb@139-159-150-152:~/gitcode$ git status
On branch master
nothing to commit, working tree clean
hyb@139-159-150-152:~/gitcode$ vim ReadMe
hyb@139-159-150-152:~/gitcode$ cat ReadMe
hello bit
hello git
hello world
hello version1
hello version2
hello version3
This piece of code is like shit #新增代码
hyb@139-159-150-152:~/gitcode$ git status
On branch master
Changes not staged for commit:
(use "git add <file>..." to update what will be committed)
(use "git restore <file>..." to discard changes in working directory)
modified: ReadMe
no changes added to commit (use "git add" and/or "git commit -a")
# 直接删除代码
hyb@139-159-150-152:~/gitcode$ vim ReadMe
hyb@139-159-150-152:~/gitcode$ cat ReadMe
hello bit
hello git
hello world
hello version1
hello version2
hello version3
hyb@139-159-150-152:~/gitcode$ git status
On branch master
nothing to commit, working tree clean
辛亏我们工作效率不高,才写了一行代码就发现不行了,要是你写了3天,一直都没有提交,该怎么删掉呢?你自己都忘了自己新增过哪些,有同学说,我可以git diff xxx 一下,看看差别在删啊,
那你肯定又要花3天时间删代码了,并且很大的概率还会改出bug。一周过去了,你怎么向你的老板交代呢?
Git 其实还为我们提供了更好的方式,我们可以使用 git checkout -- [file] 命令让工作区的
文件回到最近一次 add 或 commit 时的状态。 要注意git checkout -- [file] 命令中的
-- 很重要,切记不要省略,一旦省略,该命令就变为其他意思了,后面我们再说。示例如下:
# 向ReadMe中新增一行代码
hyb@139-159-150-152:~/gitcode$ vim ReadMe
hyb@139-159-150-152:~/gitcode$ cat ReadMe
hello bit
hello git
hello world
hello version1
hello version2
hello version3
This piece of code is like shit #新增代码
# 恢复到上一次 add 或 commit
hyb@139-159-150-152:~/gitcode$ git checkout -- ReadMe
hyb@139-159-150-152:~/gitcode$ cat ReadMe
hello bit
hello git
hello world
hello version1
hello version2
hello version3
4.2情况二:已经add ,但没有commit
add 后还是保存到了暂存区呢?怎么撤销呢?
# 向ReadMe中新增一行代码
hyb@139-159-150-152:~/gitcode$ vim ReadMe
hyb@139-159-150-152:~/gitcode$ cat ReadMe
hello bit
hello git
hello world
hello version1
hello version2
hello version3
This piece of code is like shit #新增代码
# add 存入暂存区
hyb@139-159-150-152:~/gitcode$ git add ReadMe
hyb@139-159-150-152:~/gitcode$ git status
On branch master
Changes to be committed:
(use "git restore --staged <file>..." to unstage)
modified: ReadMe
让我们来回忆一下学过的git reset 回退命令,该命令如果使用 --mixed 参数,可以将暂存区
的内容退回为指定的版本内容,但工作区文件保持不变。那我们就可以回退下暂存区的内容了!!!示例如下:
# --mixed 是默认参数,使用时可以省略
hyb@139-159-150-152:~/gitcode$ git reset HEAD ReadMe
Unstaged changes after reset:
M ReadMe
hyb@139-159-150-152:~/gitcode$ git status
On branch master
Changes not staged for commit:
(use "git add <file>..." to update what will be committed)
(use "git restore <file>..." to discard changes in working directory)
modified: ReadMe
no changes added to commit (use "git add" and/or "git commit -a")
hyb@139-159-150-152:~/gitcode$ git checkout -- ReadMe
hyb@139-159-150-152:~/gitcode$ git status
On branch master
nothing to commit, working tree clean
hyb@139-159-150-152:~/gitcode$ cat ReadMe
hello bit
hello git
hello world
hello version1
hello version2
hello version3
4.3情况三:已经add ,并且也commit 了
不要担心,我们可以git reset --hard HEAD^ 回退到上一个版本!不过,这是有条件的,就是
你还没有把自己的本地版本库推送到远程。还记得Git是分布式版本控制系统吗?我们后面会讲到远程版本库,一旦你推送到远程版本库,你就真的惨了……
# 向ReadMe中新增一行代码
hyb@139-159-150-152:~/gitcode$ vim ReadMe
hyb@139-159-150-152:~/gitcode$ cat ReadMe
hello bit
hello git
hello world
hello version1
hello version2
hello version3
This piece of code is like shit #新增代码
# 提交
hyb@139-159-150-152:~/gitcode$ git add ReadMe
hyb@139-159-150-152:~/gitcode$ git commit -m"test quash"
[master 5f71ae1] test quash
1 file changed, 1 insertion(+)
# 回退
hyb@139-159-150-152:~/gitcode$ git reset --hard HEAD^
HEAD is now at 144a3f8 add file
hyb@139-159-150-152:~/gitcode$ cat ReadMe
hello bit
hello git
hello world
hello version1
hello version2
hello version3
五、删除文件
在 Git 中,删除也是一个修改操作,我们实战一下, 如果要删除file5 文件,怎么搞呢?如果你这样
做了:
hyb@139-159-150-152:~/gitcode$ ls
file1 file2 file3 file4 file5 ReadMe
hyb@139-159-150-152:~/gitcode$ rm file5
但这样直接删除是没有用的,反而徒增烦恼, git status 命令会立刻告诉你哪些文件被删除了:
hyb@139-159-150-152:~/gitcode$ git status
On branch master
Changes not staged for commit:
(use "git add/rm <file>..." to update what will be committed)
(use "git restore <file>..." to discard changes in working directory)
deleted: file5
no changes added to commit (use "git add" and/or "git commit -a")
此时,工作区和版本库就不一致了,要删文件,目前除了要删工作区的文件,还要清除版本库的文
件。
一般走到这里,有两种可能:
• 确实要从版本库中删除该文件
• 不小心删错了
对第二种情况,很明显误删,需要使用 git 来进行恢复,很简单,我们刚学过(删除也是修改):
hyb@139-159-150-152:~/gitcode$ git checkout -- file5
hyb@139-159-150-152:~/gitcode$ ls
file1 file2 file3 file4 file5 ReadMe
对于第一种情况,很明显是没有删完,我们只删除了工作区的文件。这时就需要使用 git rm 将文
件从暂存区和工作区中删除,并且 commit :
hyb@139-159-150-152:~/gitcode$ git rm file5
rm 'file5'
hyb@139-159-150-152:~/gitcode$ git status
On branch master
Changes to be committed:
(use "git restore --staged <file>..." to unstage)
deleted: file5
hyb@139-159-150-152:~/gitcode$ git commit -m"deleted file5"
[master 5476bde] deleted file5
1 file changed, 0 insertions(+), 0 deletions(-)
delete mode 100644 file5
hyb@139-159-150-152:~/gitcode$ git status
On branch master
nothing to commit, working tree clean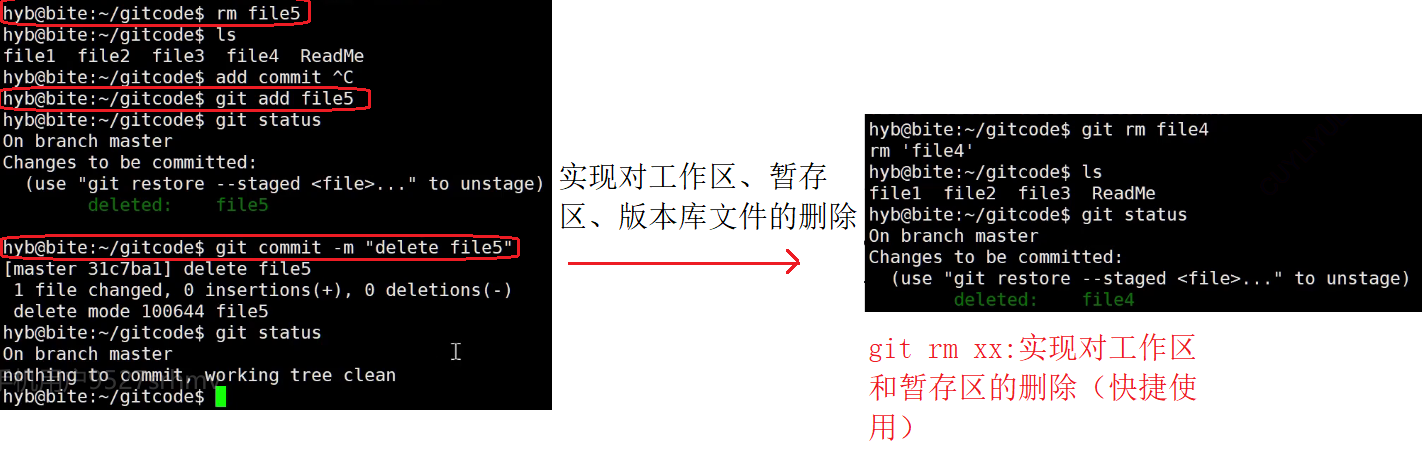 现在,文件就从版本库中被删除了。
六、分支管理
6.1理解分支
每次提交,Git都把它们串成一条时间线,这条时间线就可以理解为是一个分支。截止到目前,只有一条时间线,在Git里,这个分支叫主分支,即 master 分支。再来理解一下HEAD,HEAD 严格来说不是指向提交,而是指向master,master才是指向提交的,所以,HEAD 指向的就是当前分支。


 每次提交,master分支都会向前移动一步,这样,随着你不断提交,master分支的线也越来越长,而HEAD只要一直指向master分支即可指向当前分支。通过查看当前的版本库,我们也能清晰的理出思路:
hyb@139-159-150-152:~/gitcode$ cat .git/HEAD
ref: refs/heads/master
hyb@139-159-150-152:~/gitcode$ cat .git/refs/heads/master
5476bdeb12510f7cd72ac4766db7988925ebd302
6.1创建分支
![]()
通过git branch:查看当前分支(git会默认给我们创建一个主分支)

在这里我们来创建第一个自己的分支 dev ,对应的命令为:
hyb@139-159-150-152:~/gitcode$ git branch #查看当前本地所有分支
* master
hyb@139-159-150-152:~/gitcode$ git branch dev #新建分支dev
hyb@139-159-150-152:~/gitcode$ git branch
dev
* master
 (基于最新一次提交创建的分支)
6.2切换分支
那如何切换到 dev 分支下进行开发呢?使用 git checkout 命令即可完成切换,示例如下:
hyb@139-159-150-152:~/gitcode$ git checkout dev
Switched to branch 'dev'
hyb@139-159-150-152:~/gitcode$ git branch
* dev
master
hyb@139-159-150-152:~/gitcode$ cat .git/HEAD
ref: refs/heads/dev


我们发现 HEAD 已经指向了 dev,就表示我们已经成功的切换到了 dev 上!
接下来,在dev 分支下修改 ReadMe 文件,新增一行内容,并进行一次提交操作:
hyb@139-159-150-152:~/gitcode$ vim ReadMe
hyb@139-159-150-152:~/gitcode$ cat ReadMe
hello bit
hello git
hello world
hello version1
hello version2
hello version3
write aaa for new branch
hyb@139-159-150-152:~/gitcode$ git add .
hyb@139-159-150-152:~/gitcode$ git commit -m"modify ReadMe"
[dev 3740dce] modify ReadMe
1 file changed, 1 insertion(+)
现在,dev 分支的工作完成,我们就可以切换回 master 分支:
hyb@139-159-150-152:~/gitcode$ git checkout master
Switched to branch 'master'
hyb@139-159-150-152:~/gitcode$ cat ReadMe
hello bit
hello git
hello world
hello version1
hello version2
hello version3
切换回 master 分支后,发现ReadMe文件中新增的内容不见了!!!赶紧再切回 dev 看看:
hyb@139-159-150-152:~/gitcode$ git checkout dev
Switched to branch 'dev'
hyb@139-159-150-152:~/gitcode$ cat ReadMe
hello bit
hello git
hello world
hello version1
hello version2
hello version3
write aaa for new branch
在 dev 分支上,内容还在。为什么会出现这个现象呢?我们来看看 dev 分支和 master 分支指向,发现两者指向的提交是不一样的:
hyb@139-159-150-152:~/gitcode$ cat .git/refs/heads/dev
bdaf528ffbb8e05aee34d37685408f0e315e31a4
hyb@139-159-150-152:~/gitcode$ cat .git/refs/heads/master
5476bdeb12510f7cd72ac4766db7988925ebd302
看到这里就能明白了,因为我们是在dev分支上提交的,而master分支此刻的提交点并没有变,此时的状态如图如下所示。

当切换到 master 分支之时,HEAD 就指向了 master,当然看不到提交了!
6.3合并分支
为了在 master 主分支上能看到新的提交,就需要将dev 分支合并到master 分支,示例如下:
hyb@139-159-150-152:~/gitcode$ git branch
* dev
master
hyb@139-159-150-152:~/gitcode$ git checkout master # 切换到 master 上进行合并
Switched to branch 'master'
hyb@139-159-150-152:~/gitcode$ git merge dev # 合并 dev 分支
Updating 16623e1..3740dce
Fast-forward
ReadMe | 1 +
1 file changed, 1 insertion(+)
hyb@139-159-150-152:~/gitcode$ cat ReadMe
hello bit
hello git
hello world
hello version1
hello version2
hello version3
write aaa for new branch
git merge 命令用于合并指定分支到当前分支。合并后,master 就能看到 dev 分支提交的内容
了。此时的状态如图如下所示。
 Fast-forward 代表“快进模式”,也就是直接把master指向dev的当前提交,所以合并速度非常快。
当然,也不是每次合并都能 Fast-forward,我们后面会讲其他方式的合并。
6.4删除分支
合并完成后, dev 分支对于我们来说就没用了, 那么dev分支就可以被删除掉,注意如果当前正处于某分支下,就不能删除当前分支,如:
hyb@139-159-150-152:~/gitcode$ git branch
* dev
master
hyb@139-159-150-152:~/gitcode$ git branch -d dev
error: Cannot delete branch 'dev' checked out at '/home/hyb/gitcode'
而可以在其他分支下删除当前分支,如:
hyb@139-159-150-152:~/gitcode$ git checkout master
Switched to branch 'master'
hyb@139-159-150-152:~/gitcode$ git branch -d dev
Deleted branch dev (was bdaf528).
hyb@139-159-150-152:~/gitcode$ git branch
* master
此时的状态如图如下所示。

因为创建、合并和删除分支非常快,所以Git鼓励你使用分支完成某个任务,合并后再删掉分支,这和直接在master分支上工作效果是一样的,但过程更安全。
6.5合并冲突
可是,在实际分支合并的时候,并不是想合并就能合并成功的,有时候可能会遇到代码冲突的问题。为了演示这问题,创建一个新的分支 dev1 ,并切换至目标分支,我们可以使用 git checkout -
b dev1 一步完成创建并切换的动作,示例如下:
hyb@139-159-150-152:~/gitcode$ git checkout -b dev1
Switched to a new branch 'dev1'
hyb@139-159-150-152:~/gitcode$ git branch
* dev1
master
在dev1 分支下修改ReadMe 文件,更改文件内容如下,并进行一次提交,如:
hyb@139-159-150-152:~/gitcode$ cat ReadMe
hello bit
hello git
hello world
hello version1
hello version2
hello version3
write bbb for new branch # 将 aaa 该为 bbb
hyb@139-159-150-152:~/gitcode$ git add .
hyb@139-159-150-152:~/gitcode$ git commit -m"modify ReadMe"
[dev1 0854245] modify ReadMe
1 file changed, 1 insertion(+), 1 deletion(-)
切换至 master 分支,观察ReadMe 文件内容:
hyb@139-159-150-152:~/gitcode$ git checkout master
Switched to branch 'master'
hyb@139-159-150-152:~/gitcode$ cat ReadMe
hello bit
hello git
hello world
hello version1
hello version2
hello version3
write aaa for new branch
我们发现,切回来之后,文件内容由变成了老的版本,这种现象很正常,我们现在也完全能理解。
此时在 master 分支上,我们对 ReadMe 文件再进行一次修改,并进行提交,如下:
hyb@139-159-150-152:~/gitcode$ git branch
dev1
* master
hyb@139-159-150-152:~/gitcode$ vim ReadMe
hyb@139-159-150-152:~/gitcode$ cat ReadMe
hello bit
hello git
hello world
hello version1
hello version2
hello version3
write ccc for new branch
hyb@139-159-150-152:~/gitcode$ git add .
hyb@139-159-150-152:~/gitcode$ git commit -m"modify ReadMe"
[master c10f6d0] modify ReadMe
1 file changed, 1 insertion(+), 1 deletion(-)
现在, master 分支和dev1 分支各自都分别有新的提交,变成了这样:

这种情况下,Git 只能试图把各自的修改合并起来,但这种合并就可能会有冲突,如下所示:
hyb@139-159-150-152:~/gitcode$ git merge dev1
Auto-merging ReadMe
CONFLICT (content): Merge conflict in ReadMe
Automatic merge failed; fix conflicts and then commit the result.
hyb@139-159-150-152:~/gitcode$ git status
On branch master
You have unmerged paths.
(fix conflicts and run "git commit")
(use "git merge --abort" to abort the merge)
Unmerged paths:
(use "git add <file>..." to mark resolution)
both modified: ReadMe
no changes added to commit (use "git add" and/or "git commit -a")
发现 ReadMe 文件有冲突后,可以直接查看文件内容,要说的是 Git 会用 <<<<<<<,=======,
>>>>>>> 来标记出不同分支的冲突内容,如下所示:
hyb@139-159-150-152:~/gitcode$ cat ReadMe
hello bit
hello git
hello world
hello version1
hello version2
hello version3
<<<<<<< HEAD
write ccc for new branch
=======
write bbb for new branch
>>>>>>> dev1
此时我们必须要手动调整冲突代码,并需要再次提交修正后的结果!!(再次提交很重要,切勿忘
记)
hyb@139-159-150-152:~/gitcode$ cat ReadMe
hello bit
hello git
hello world
hello version1
hello version2
hello version3
write bbb for new branch
hyb@139-159-150-152:~/gitcode$ git add .
hyb@139-159-150-152:~/gitcode$ git commit -m"merge ReadMe"
[master 2976afc] merge ReadMe
到这里冲突就解决完成,此时的状态变成了

用带参数的 git log也可以看到分支的合并情况,具体大家可以自行搜索git log 的用法:
hyb@139-159-150-152:~/gitcode$ git log --graph --pretty=oneline --abbrev-commit
* 2976afc (HEAD -> master) merge ReadMe
|\
| * c594fd1 (dev1) modify ReadMe
* | c10f6d0 modify ReadMe
|/
最后,不要忘记 dev1 分支使用完毕后就可以删除了:
hyb@139-159-150-152:~/gitcode$ git branch
* master
hyb@139-159-150-152:~/gitcode$ git branch -d dev1
Deleted branch dev1 (was c594fd1).
七、分支管理策略
7.1分支管理策略
通常合并分支时,如果可能,Git 会采用 Fast forward 模式。还记得如果我们采用 Fast
forward 模式之后,形成的合并结果是什么呢?回顾一下

在这种Fast forward 模式下,删除分支后,查看分支历史时,会丢掉分支信息,看不出来最新提
交到底是 merge 进来的还是正常提交的。但在合并冲突部分,我们也看到通过解决冲突问题,会再进行一次新的提交,得到的最终状态为:

那么这就不是Fast forward 模式了,这样的好处是,从分支历史上就可以看出分支信息。例如我们现在已经删除了在合并冲突部分创建的dev1 分支,但依旧能看到 master 其实是由其他分支合并
得到:
hyb@139-159-150-152:~/gitcode$ git log --graph --pretty=oneline --abbrev-commit
* 2976afc (HEAD -> master) merge ReadMe
|\
| * c594fd1 modify ReadMe
* | c10f6d0 modify ReadMe
|/
Git 支持我们强制禁用 Fast forward 模式,那么就会在 merge 时生成一个新的commit ,这样,
从分支历史上就可以看出分支信息。下面我们实战一下--no-ff 方式的 git merge 。首先,创建新的分支 dev2 ,并切换至新的分支:
hyb@139-159-150-152:~/gitcode$ git checkout -b dev2
Switched to a new branch 'dev2'
修改ReadMe 文件,并提交一个新的commit :
hyb@139-159-150-152:~/gitcode$ cat ReadMe
hello bit
hello git
hello world
hello version1
hello version2
hello version3
write bbb for new branch
a,b,c,d
hyb@139-159-150-152:~/gitcode$ git add .
hyb@139-159-150-152:~/gitcode$ git commit -m"modify ReadMe"
[dev2 41b082f] modify ReadMe
1 file changed, 1 insertion(+)
切回master 分支,开始合并:
hyb@139-159-150-152:~/gitcode$ git checkout master
Switched to branch 'master'
hyb@139-159-150-152:~/gitcode$ git merge --no-ff -m "merge with no-ff" dev2
Merge made by the 'recursive' strategy.
ReadMe | 1 +
1 file changed, 1 insertion(+)
hyb@139-159-150-152:~/gitcode$ cat ReadMe
hello bit
hello git
hello world
hello version1
hello version2
hello version3
write bbb for new branch
a,b,c,d
请注意--no-ff 参数,表示禁用 Fast forward 模式。禁用 Fast forward 模式后合并会创建
一个新的commit ,所以加上-m 参数,把描述写进去。合并后,查看分支历史:
hyb@139-159-150-152:~/gitcode$ git log --graph --pretty=oneline --abbrev-commit
* 5bd16b4 (HEAD -> master) merge with no-ff
|\
| * 41b082f (dev2) modify ReadMe
|/
可以看到,不使用 Fast forward 模式,merge后就像这样:
 所以在合并分支时,加上--no-ff 参数就可以用普通模式合并,合并后的历史有分支,能看出来曾
经做过合并,而 fast forward 合并就看不出来曾经做过合并。
7.2分支策略
在实际开发中,我们应该按照几个基本原则进行分支管理:首先,master分支应该是非常稳定的,也就是仅用来发布新版本,平时不能在上面干活;那在哪干活呢?干活都在dev分支上,也就是说,dev分支是不稳定的,到某个时候,比如1.0版本发布时,再把dev分支合并到master上,在master分支发布1.0版本;你和你的小伙伴们每个人都在dev分支上干活,每个人都有自己的分支,时不时地往dev分支上合并就可以了。所以,团队合作的分支看起来就像这样:

7.3bug 分支
假如我们现在正在 dev2 分支上进行开发,开发到一半,突然发现master 分支上面有 bug,需要
解决。在Git中,每个 bug 都可以通过一个新的临时分支来修复,修复后,合并分支,然后将临时分支删除。可现在 dev2 的代码在工作区中开发了一半,还无法提交,怎么办?例如:
hyb@139-159-150-152:~/gitcode$ git branch
* dev2
master
hyb@139-159-150-152:~/gitcode$ cat ReadMe
hello bit
hello git
hello world
hello version1
hello version2
hello version3
write bbb for new branch
a,b,c,d
i am coding ...
hyb@139-159-150-152:~/gitcode$ git status
On branch dev2
Changes not staged for commit:
(use "git add <file>..." to update what will be committed)
(use "git restore <file>..." to discard changes in working directory)
modified: ReadMe
no changes added to commit (use "git add" and/or "git commit -a")
Git 提供了git stash 命令,可以将当前的工作区信息进行储藏,被储藏的内容可以在将来某个时
间恢复出来。
hyb@139-159-150-152:~/gitcode$ git stash
Saved working directory and index state WIP on dev2: 41b082f modify ReadMe
hyb@139-159-150-152:~/gitcode$ git status
On branch dev2
nothing to commit, working tree clean
用 git status 查看工作区,就是干净的(除非有没有被 Git 管理的文件),因此可以放心地创建分
支来修复bug。储藏dev2 工作区之后,由于我们要基于master分支修复 bug,所以需要切回master 分支,再新建临时分支来修复 bug,示例如下:
hyb@139-159-150-152:~/gitcode$ git checkout master # 切回master
Switched to branch 'master'
hyb@139-159-150-152:~/gitcode$ git checkout -b fix_bug # 新建并切换到 fix_bug 分支
Switched to a new branch 'fix_bug'
hyb@139-159-150-152:~/gitcode$ vim ReadMe
hyb@139-159-150-152:~/gitcode$ cat ReadMe
hello bit
hello git
hello world
hello version1
hello version2
hello version3
write bbb for new branch
a,b,c,d,e # 修复bug--忘记写e
hyb@139-159-150-152:~/gitcode$ git add ReadMe # 重新add,commit
hyb@139-159-150-152:~/gitcode$ git commit -m"fix bug"
[fix_bug 4bbc0c4] fix bug
1 file changed, 1 insertion(+), 1 deletion(-)
修复完成后,切换到master 分支,并完成合并,最后删除fix_bug 分支:
hyb@139-159-150-152:~/gitcode$ git checkout master
Switched to branch 'master'
hyb@139-159-150-152:~/gitcode$ git merge --no-ff -m"merge fix_bug branch" fix_bu
Merge made by the 'recursive' strategy.
ReadMe | 2 +-
1 file changed, 1 insertion(+), 1 deletion(-)
hyb@139-159-150-152:~/gitcode$ cat ReadMe
hello bit
hello git
hello world
hello version1
hello version2
hello version3
write bbb for new branch
a,b,c,d,e
hyb@139-159-150-152:~/gitcode$ git branch -d fix_bug
Deleted branch fix_bug (was 4bbc0c4).
至此,bug 的修复工作已经做完了,我们还要继续回到 dev2 分支进行开发。切换回dev2 分支:
hyb@139-159-150-152:~/gitcode$ git checkout dev2
Switched to branch 'dev2'
hyb@139-159-150-152:~/gitcode$ git status
On branch dev2
nothing to commit, working tree clean
工作区是干净的,刚才的工作现场存到哪去了?用 git stash list 命令看看:
hyb@139-159-150-152:~/gitcode$ git stash list
stash@{0}: WIP on dev2: 41b082f modify ReadMe
工作现场还在,Git 把 stash 内容存在某个地方了,但是需要恢复一下,如何恢复现场呢?我们可以使用 git stash pop 命令,恢复的同时会把 stash 也删了,示例如下:
hyb@139-159-150-152:~/gitcode$ git stash pop
On branch dev2
Changes not staged for commit:
(use "git add <file>..." to update what will be committed)
(use "git restore <file>..." to discard changes in working directory)
modified: ReadMe
no changes added to commit (use "git add" and/or "git commit -a")
Dropped refs/stash@{0} (4f873250b3503687b5efd26196776aee7e3724c2)
再次查看的时候,我们已经发现已经没有现场可以恢复了
hyb@139-159-150-152:~/gitcode$ git stash list
hyb@139-159-150-152:~/gitcode$
另外,恢复现场也可以采用 git stash apply 恢复,但是恢复后,stash内容并不删除,你需要
用 git stash drop 来删除;你可以多次stash,恢复的时候,先用 git stash list 查看,然后恢复指定的stash,用命令git stash apply stash@{0} ,这部分请同学们自行使用。恢复完代码之后我们便可以继续完成开发,开发完成后便可以进行提交,例如:
hyb@139-159-150-152:~/gitcode$ cat ReadMe
hello bit
hello git
hello world
hello version1
hello version2
hello version3
write bbb for new branch
a,b,c,d
i am coding ... Done!
hyb@139-159-150-152:~/gitcode$ git add .
hyb@139-159-150-152:~/gitcode$ git commit -m"modify ReadMe"
[dev2 ed0916d] modify ReadMe
1 file changed, 1 insertion(+)
但我们注意到了,修复 bug 的内容,并没有在 dev2 上显示。此时的状态图为:

Master 分支目前最新的提交,是要领先于新建dev2 时基于的master 分支的提交的,所以我们
在dev2 中当然看不见修复 bug 的相关代码。
我们的最终目的是要让master 合并dev2 分支的,那么正常情况下我们切回master 分支直接合
并即可,但这样其实是有一定风险的。是因为在合并分支时可能会有冲突,而代码冲突需要我们手动解决(在master 上解决)。我们无法保证对于冲突问题可以正确地一次性解决掉,因为在实际的项目中,代码冲突不只一两行那么简单,有可能几十上百行,甚至更多,解决的过程中难免手误出错,导致错误的代码被合并到master 上。此时的状态为:

解决这个问题的一个好的建议就是:最好在自己的分支上合并下master ,再让master 去合并
dev ,这样做的目的是有冲突可以在本地分支解决并进行测试,而不影响master 。此时的状态
为:

 对应的实操演示如下,要说明的是,以下演示的merge操作,没有使用 --no-ff ,但上述的图示是
禁用 Fast forward 了模式后得出的,主要是为了方便解释问题。
# dev 合并 master
hyb@139-159-150-152:~/gitcode$ git branch
* dev2
master
hyb@139-159-150-152:~/gitcode$ git merge master
Auto-merging ReadMe
CONFLICT (content): Merge conflict in ReadMe
Automatic merge failed; fix conflicts and then commit the result.
# 发生冲突
hyb@139-159-150-152:~/gitcode$ cat ReadMe
hello bit
hello git
hello world
hello version1
hello version2
hello version3
write bbb for new branch
<<<<<<< HEAD
a,b,c,d
i am coding ... Done!
=======
a,b,c,d,e
>>>>>>> master
# 解决冲突并重新提交
hyb@139-159-150-152:~/gitcode$ vim ReadMe
hyb@139-159-150-152:~/gitcode$ cat ReadMe
hello bit
hello git
hello world
hello version1
hello version2
hello version3
write bbb for new branch
a,b,c,d,e
i am coding ... Done!
hyb@139-159-150-152:~/gitcode$ git add .
hyb@139-159-150-152:~/gitcode$ git commit -m"merge master"
[dev2 447d29f] merge master
hyb@139-159-150-152:~/gitcode$ git status
On branch dev2
nothing to commit, working tree clean
# 切回master
hyb@139-159-150-152:~/gitcode$ git checkout master
Switched to branch 'master'
# master 合并 dev2---无需解决冲突!!
hyb@139-159-150-152:~/gitcode$ git merge dev2
Updating 193421f..447d29f
Fast-forward
ReadMe | 1 +
1 file changed, 1 insertion(+)
hyb@139-159-150-152:~/gitcode$ git status
On branch master
nothing to commit, working tree clean
# 删除 dev2 分支
hyb@139-159-150-152:~/gitcode$ git branch -d dev2
Deleted branch dev2 (was 447d29f).
7.4删除临时分支
软件开发中,总有无穷无尽的新的功能要不断添加进来。
添加一个新功能时,你肯定不希望因为一些实验性质的代码,把主分支搞乱了,所以,每添加一个新功能,最好新建一个分支,我们可以将其称之为 feature 分支,在上面开发,完成后,合并,最
后,删除该 feature 分支。可是,如果我们今天正在某个 feature 分支上开发了一半,被产品经理突然叫停,说是要停止新功能的开发。虽然白干了,但是这个 feature 分支还是必须就地销毁,留着无用了。这时使用传统的git branch -d 命令删除分支的方法是不行的。演示如下:
# 新增并切换到 dev3 分支
hyb@139-159-150-152:~/gitcode$ git checkout -b dev3
Switched to a new branch 'dev3'
# 开始开发新功能并提交
hyb@139-159-150-152:~/gitcode$ vim ReadMe
hyb@139-159-150-152:~/gitcode$ cat ReadMe
hello bit
hello git
hello world
hello version1
hello version2
hello version3
write bbb for new branch
a,b,c,d,e
i am coding ... Done!
i am writing new features ...
hyb@139-159-150-152:~/gitcode$ git add .
hyb@139-159-150-152:~/gitcode$ git commit -m"modify ReadMe for new features"
[dev3 cd2f149] modify ReadMe for new features
1 file changed, 1 insertion(+)
# 此时新功能叫停
# 切回master准备删除dev3
hyb@139-159-150-152:~/gitcode$ git checkout master
Switched to branch 'master'
# 常规删除dev3分支时失败
hyb@139-159-150-152:~/gitcode$ git branch -d dev3
error: The branch 'dev3' is not fully merged.
If you are sure you want to delete it, run 'git branch -D dev3'.
直接使用传统的删除分支的方法不行,按照提示,有了如下方式:
hyb@139-159-150-152:~/gitcode$ git branch -D dev3
Deleted branch dev3 (was cd2f149).
hyb@139-159-150-152:~/gitcode$ git branch
* master
7.5小结
分支在实际中有什么用呢?假设你准备开发一个新功能,但是需要两周才能完成,第一周你写了50%的代码,如果立刻提交,由于代码还没写完,不完整的代码库会导致别人不能干活了。如果等代码全部写完再一次提交,又存在丢失每天进度的巨大风险。现在有了分支,就不用怕了。你创建了一个属于你自己的分支,别人看不到,还继续在原来的分支上正常工作,而你在自己的分支上干活,想提交就提交,直到开发完毕后,再一次性合并到原来的分支上,这样,既安全,又不影响别人工作。并且 Git 无论创建、切换和删除分支,Git在1秒钟之内就能完成!无论你的版本库是1个文件还是1万个文件。
八、远程操作
8.1理解分布式版本控制系统
我们目前所说的所有内容(工作区,暂存区,版本库等等),都是在本地!也就是在你的笔记本或者计算机上。而我们的 Git 其实是分布式版本控制系统!什么意思呢?可以简单理解为,我们每个人的电脑上都是一个完整的版本库,这样你工作的时候,就不需要联网了,因为版本库就在你自己的电脑上。既然每个人电脑上都有一个完整的版本库,那多个人如何协作呢?比方说你在自己电脑上改了文件A,你的同事也在他的电脑上改了文件A,这时,你们俩之间只需把各自的修改推送给对方,就可以互相看到对方的修改了。

分布式版本控制系统的安全性要高很多,因为每个人电脑里都有完整的版本库,某一个人的电脑坏掉了不要紧,随便从其他人那里复制一个就可以了。
在实际使用分布式版本控制系统的时候,其实很少在两人之间的电脑上推送版本库的修改,因为可能你们俩不在一个局域网内,两台电脑互相访问不了。也可能今天你的同事病了,他的电脑压根没有开机。因此,分布式版本控制系统通常也有一台充当“中央服务器”的电脑,但这个服务器的作用仅仅是用来方便“交换”大家的修改,没有它大家也一样干活,只是交换修改不方便而已。有了这个“中央服务器”的电脑,这样就不怕本地出现什么故障了(比如运气差,硬盘坏了,上面的所有东西全部丢失,包括git的所有内容)
九、远程仓库
Git 是分布式版本控制系统,同一个 Git 仓库,可以分布到不同的机器上。怎么分布呢?最早,肯定只有一台机器有一个原始版本库,此后,别的机器可以 “克隆” 这个原始版本库,而且每台机器的版本库其实都是一样的,并没有主次之分。你肯定会想,至少需要两台机器才能玩远程库不是?但是我只有一台电脑,怎么玩?其实一台电脑上也是可以克隆多个版本库的,只要不在同一个目录下。不过,现实生活中是不会有人这么傻的在一台电脑上搞几个远程库玩,因为一台电脑上搞几个远程库完全没有意义,而且硬盘挂了会导致所有库都挂掉,所以我也不告诉你在一台电脑上怎么克隆多个仓库。实际情况往往是这样,找一台电脑充当服务器的角色,每天24小时开机,其他每个人都从这个“服务器”仓库克隆一份到自己的电脑上,并且各自把各自的提交推送到服务器仓库里,也从服务器仓库中拉取别人的提交。完全可以自己搭建一台运行 Git 的服务器,不过现阶段,为了学 Git 先搭个服务器绝对是小题大作。好在这个世界上有个叫 GitHub 的神奇的网站,从名字就可以看出,这个网站就是提供 Git 仓库托管服务的,所以,只要注册一个GitHub账号,就可以免费获得 Git 远程仓库。
9.1新建远程仓库


9.2克隆远程仓库
克隆/下载远端仓库到本地,需要使用 git clone 命令,后面跟上我们的远端仓库的链接,远端仓库
的链接可以从仓库中找到:选择“克隆/下载”获取远程仓库链接:

SH 协议和 HTTPS 协议是 Git 最常使用的两种数据传输协议。SSH 协议使用了公钥加密和公钥登陆机制,体现了其实用性和安全性,使用此协议需要将我们的公钥放上服务器,由 Git 服务器进行管理。使用 HTTPS 方式时,没有要求,可以直接克隆下来。
使用 HTTPS 方式:
hyb@139-159-150-152:~$ git clone https://gitee.com/hyb91/git_teaching.git
Cloning into 'git_teaching'...
Username for 'https://gitee.com': hyb91
Password for 'https://hyb91@gitee.com':
remote: Enumerating objects: 4, done.
remote: Counting objects: 100% (4/4), done.
remote: Compressing objects: 100% (4/4), done.
remote: Total 4 (delta 0), reused 0 (delta 0), pack-reused 0
Unpacking objects: 100% (4/4), 1.80 KiB | 1.80 MiB/s, done.
hyb@139-159-150-152:~$ ls
gitcode git_teaching
hyb@139-159-150-152:~$ ls git_teaching/
README.en.md README.md
使用 SSH 方式:
hyb@139-159-150-152:~$ git clone git@gitee.com:hyb91/git_teaching.git
Cloning into 'git_teaching'...
The authenticity of host 'gitee.com (212.64.63.215)' can't be established.
ECDSA key fingerprint is SHA256:FQGC9Kn/eye1W8icdBgrQp+KkGYoFgbVr17bmjey0Wc.
Are you sure you want to continue connecting (yes/no/[fingerprint])? yes
Warning: Permanently added 'gitee.com,212.64.63.215' (ECDSA) to the list of know
git@gitee.com: Permission denied (publickey).
fatal: Could not read from remote repository.
Please make sure you have the correct access rights
and the repository exists.
使用 SSH 方式克隆仓库,由于我们没有添加公钥到远端库中,服务器拒绝了我们的 clone 链接。需要我们设置一下:
第一步:创建SSH Key。在用户主目录下,看看有没有.ssh目录,如果有,再看看这个目录下有没有id_rsa 和id_rsa.pub 这两个文件,如果已经有了,可直接跳到下一步。如果没有,需要创建
SSH Key:
# 注意要输入自己的邮箱,然后一路回车,使用默认值即可
hyb@139-159-150-152:~$ ssh-keygen -t rsa -C "2689241679@qq.com"
Generating public/private rsa key pair.
Enter file in which to save the key (/home/hyb/.ssh/id_rsa):
Enter passphrase (empty for no passphrase):
Enter same passphrase again:
Your identification has been saved in /home/hyb/.ssh/id_rsa
Your public key has been saved in /home/hyb/.ssh/id_rsa.pub
The key fingerprint is:
SHA256:sepKZUwKIXjJxYcot49tvOW+Aa+pEhdsRqVDFSmgQZo 2689241679@qq.com
The key's randomart image is:
+---[RSA 3072]----+
|*+oB=+ |
|==Oo+ . |
|E*+o .. . |
| *o + o |
| o *o + S |
|. o ==.. |
| o ..++ |
|. ..+.. |
| ...+o+. |
+----[SHA256]-----+
顺利的话,可以在用户主目录里找到.ssh 目录,里面有id_rsa 和id_rsa.pub 两个文件,这两
个就是SSH Key的秘钥对, id_rsa 是私钥,不能泄露出去, id_rsa.pub 是公钥,可以放心地告
诉任何人。
hyb@139-159-150-152:~$ ls -a .ssh/
. .. id_rsa id_rsa.pub known_hosts
第二步:添加自己的公钥到远端仓库。
点击确认后,需要对你进行认证,输入你的账号密码即可。至此,我们的准备工作全部做完,欢快的clone吧。
hyb@139-159-150-152:~$ git clone git@gitee.com:hyb91/git_teaching.git
Cloning into 'git_teaching'...
Warning: Permanently added the ECDSA host key for IP address '212.64.63.190' to
remote: Enumerating objects: 4, done.
remote: Counting objects: 100% (4/4), done.
remote: Compressing objects: 100% (4/4), done.
remote: Total 4 (delta 0), reused 0 (delta 0), pack-reused 0
Receiving objects: 100% (4/4), done.
hyb@139-159-150-152:~$ ls
gitcode git_teaching
hyb@139-159-150-152:~$ ls git_teaching/
README.en.md README.md
done, 成功!如果有多个人协作开发,GitHub/Gitee 允许添加多个公钥,只要把每个人的电脑上的
Key 都添加到 GitHub/Gitee,就可以在每台电脑上往 GitHub/Gitee 上提交推送了。
当我们从远程仓库克隆后,实际上 Git 会自动把本地的 master 分支和远程的 master 分支对应起来,并且,远程仓库的默认名称是 origin 。在本地我们可以使用 git remote 命令,来查看远程库的
信息,如:
hyb@139-159-150-152:~/git_teaching$ git remote
origin
或者,用 git remote -v 显示更详细的信息:
hyb@139-159-150-152:~/git_teaching$ git remote -v
origin git@gitee.com:hyb91/git_teaching.git (fetch)
origin git@gitee.com:hyb91/git_teaching.git (push)
上面显示了可以抓取和推送的origin的地址。如果没有推送权限,就看不到 push 的地址。
9.3向远程仓库推送
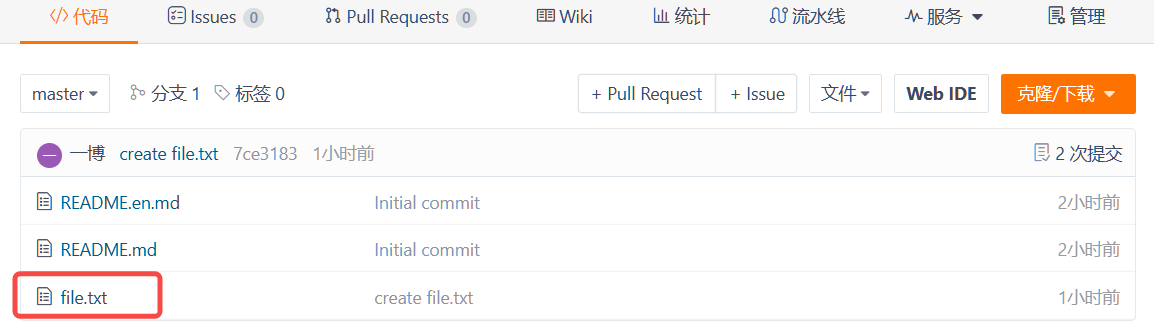
本地已经clone 成功远程仓库后,我们便可以向仓库中提交内容,例如新增一个file.txt 文件:
# 新建文件
hyb@139-159-150-152:~/git_teaching$ ls
README.en.md README.md
hyb@139-159-150-152:~/git_teaching$ vim file.txt
hyb@139-159-150-152:~/git_teaching$ cat file.txt
hello git
# 提交文件
hyb@139-159-150-152:~/git_teaching$ git add .
hyb@139-159-150-152:~/git_teaching$ git commit -m"create file.txt"
[master 7ce3183] create file.txt
1 file changed, 1 insertion(+)
create mode 100644 file.txt提交时要注意,如果我们之前设置过全局的 name 和 e-mail,这两项配置需要和 gitee 上配置的用户名和邮箱一致,否则会出错。
![]()
![]()
或者从来没有设置过全局的 name 和 e-mail,那么我们第一次提交时也会报错。这就需要我们重新配置下了,同样要注意需要和 gitee 上配置的用户名和邮箱一致。如何配置已讲过,在这里就不再赘述。到这里我们已经将内容提交至本地仓库中,如何将本地仓库的内容推送至远程仓库呢,需要使用 git push 命令,该命令用于将本地的分支版本上传到远程并合并,命令格式如下:
git push <远程主机名> <本地分支名>:<远程分支名>
# 如果本地分支名与远程分支名相同,则可以省略冒号:
git push <远程主机名> <本地分支名>
此时我们要将本地的 master 分支推送到 origin 主机的 master 分支,则可以:
hyb@139-159-150-152:~/git_teaching$ git push origin master
Enumerating objects: 4, done.
Counting objects: 100% (4/4), done.
Compressing objects: 100% (2/2), done.
Writing objects: 100% (3/3), 308 bytes | 308.00 KiB/s, done.
Total 3 (delta 0), reused 0 (delta 0)
remote: Powered by GITEE.COM [GNK-6.4]
To gitee.com:hyb91/git_teaching.git
c6ce3f0..7ce3183 master -> master
推送成功!这里由于我们使用的是 SSH 协议,是不用每一次推送都输入密码的,方便了我们的推送操作。如果你使用的是 HTTPS 协议,有个麻烦地方就是每次推送都必须输入口令。
接下来,看看码云远端:
 代码已经被推送至远端了:


9.4拉取远程仓库
在 gitee 上点击 README.md 文件并在线修改它:

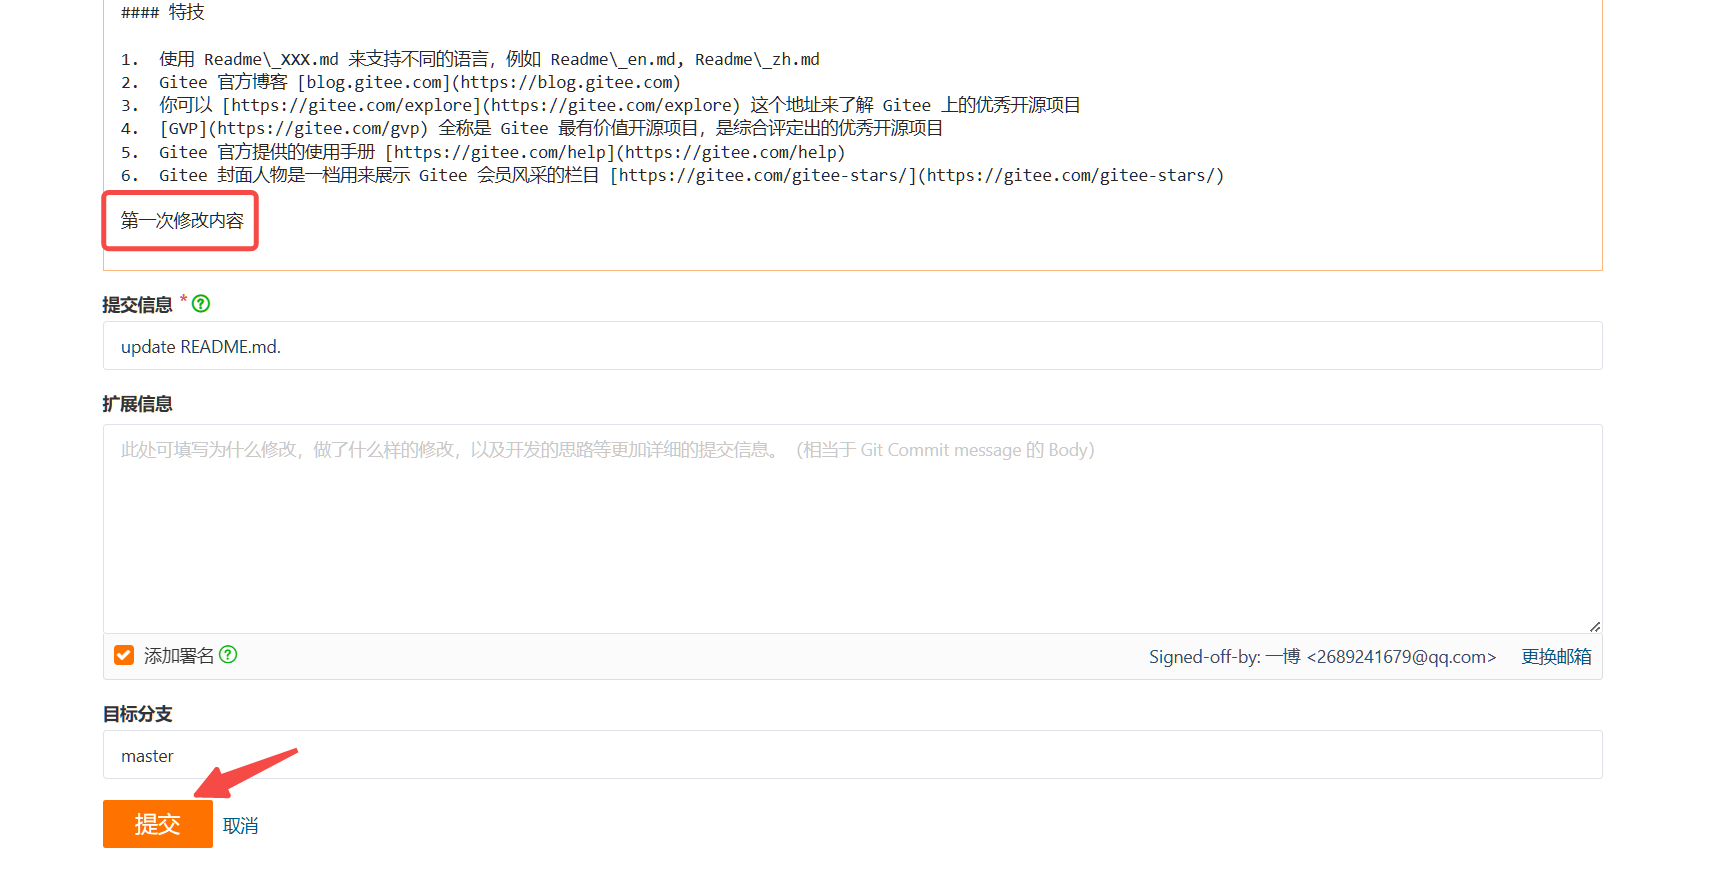
此时,远程仓库是要领先于本地仓库一个版本,为了使本地仓库保持最新的版本,我们需要拉取下远端代码,并合并到本地。Git 提供了git pull 命令,该命令用于从远程获取代码并合并本地的版
本。格式如下:
git pull <远程主机名> <远程分支名>:<本地分支名>
# 如果远程分支是与当前分支合并,则冒号后面的部分可以省略。
git pull <远程主机名> <远程分支名>
# 拉取远程分支,并与当前分支进行合并
hyb@139-159-150-152:~/git_teaching$ git pull origin master
remote: Enumerating objects: 5, done.
remote: Counting objects: 100% (5/5), done.
remote: Compressing objects: 100% (3/3), done.
remote: Total 3 (delta 1), reused 0 (delta 0), pack-reused 0
Unpacking objects: 100% (3/3), 1.02 KiB | 1.02 MiB/s, done.
From gitee.com:hyb91/git_teaching
* branch master -> FETCH_HEAD
7ce3183..60e6b0a master -> origin/master
Updating 7ce3183..60e6b0a
Fast-forward
README.md | 2 ++
1 file changed, 2 insertions(+)
hyb@139-159-150-152:~/git_teaching$ cat README.md
...
第一次修改内容
我们发现,拉取成功了!
十、配置 Git
10.1忽略特殊文件
在日常开发中,我们有些文件不想或者不应该提交到远端,比如保存了数据库密码的配置文件,那怎么让 Git 知道呢?在 Git 工作区的根目录下创建一个特殊的.gitignore 文件,然后把要忽略的文件
名填进去,Git 就会自动忽略这些文件了。不需要从头写.gitignore 文件,gitee 在创建仓库时就可以为我们生成,不过需要我们主动勾选一下:

如果当时没有选择这个选择,在工作区创建一个也是可以的。无论哪种方式,最终都可以得到一个完整的.gitignore 文件,例如我们想忽略以 .so 和 .ini 结尾所有文件, .gitignore 的内容
如下:
# 省略选择模本的内容
...
# My configurations:
*.ini
*.so
在.gitignore 文件中也可以指定某个确定的文件。
最后一步就是把.gitignore 也提交到远端,就完成了:
hyb@139-159-150-152:~/git_teaching$ vim .gitignore
hyb@139-159-150-152:~/git_teaching$ git add .
hyb@139-159-150-152:~/git_teaching$ git commit -m"add .gitignore"
[master 97811ab] add .gitignore
1 file changed, 3 insertions(+)
create mode 100644 .gitignore
hyb@139-159-150-152:~/git_teaching$ git push origin master
Enumerating objects: 4, done.
Counting objects: 100% (4/4), done.
Compressing objects: 100% (2/2), done.
Writing objects: 100% (3/3), 362 bytes | 362.00 KiB/s, done.
Total 3 (delta 0), reused 0 (delta 0)
remote: Powered by GITEE.COM [GNK-6.4]
To gitee.com:hyb91/git_teaching.git
60e6b0a..97811ab master -> master
接着我们就来验证一下.gitignore文件的能力,在工作区新增两个文件 a.so b.ini :
hyb@139-159-150-152:~/git_teaching$ touch a.so b.ini
hyb@139-159-150-152:~/git_teaching$ git status
On branch master
Your branch is up to date with 'origin/master'.
nothing to commit, working tree clean
检验.gitignore 的标准就是git status 命令是不是说working tree clean 。我们发现
Git 并没有提示在工作区中有文件新增,果然.gitignore 生效了!
但有些时候,你就是想添加一个文件到 Git,但由于这个文件被.gitignore 忽略了,根本添加不
了,那么可以用 -f 强制添加:
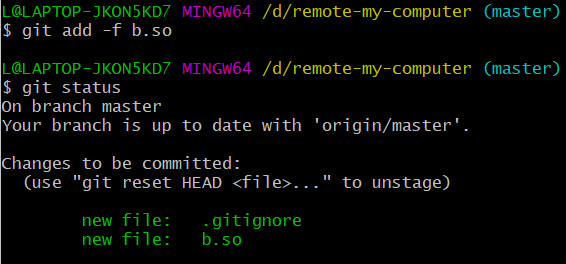
$ git 1 add -f [filename]或者你发现,可能是.gitignore 写得有问题,需要找出来到底哪个规则写错了,比如说 a.so 文件
是要被添加的,可以用 git check-ignore 命令检查:
hyb@139-159-150-152:~/git_teaching$ git check-ignore -v a.so
.gitignore:3:*.so a.so
Git 会告诉我们, .gitignore 的第3行规则忽略了该文件,于是我们就可以知道应该修订哪个规
则。还有些时候,当我们编写了规则排除了部分文件时,例如:
# 排除所有.开头的隐藏文件:
.*
但是我们发现.* 这个规则把.gitignore 也排除了。虽然可以用 git add -f 强制添加进去,但有强迫症的童鞋还是希望不要破坏.gitignore 规则,这个时候,可以添加一条例外规则:
# 排除所有.开头的隐藏文件:
.*
# 不排除.gitignore
!.gitignore
把指定文件排除在.gitignore 规则外的写法就是! +文件名,所以,只需把例外文件添加进去即
可。
10.2给命令配置别名
在我们使用 Git 期间,有些命令敲的时候着实让人头疼(太长了。。),幸运的是,git支持对命令进行简化!
举个例子,将git status 简化为git st ,对应的命令为:
$ git config --global 1 alias.st status--global 参数是全局参数,也就是这些命令在这台电脑的所有Git仓库下都有用。如果不加,那只
针对当前的仓库起作用。好了,现在敲git st 看看效果:
hyb@139-159-150-152:~/git_teaching$ git st
On branch master
Your branch is up to date with 'origin/master'.
nothing to commit, working tree clean
再来配置一个git last ,让其显示最后一次提交信息:
$ git config --global alias.last 'log -1'这样,用 git last 就能显示最近一次的提交:
hyb@139-159-150-152:~/git_teaching$ git last
commit 97811abd1d43774aeb54fee32bf4fc76b2b08170 (HEAD -> master, origin/master,
Author: hyb91 <2689241679@qq.com>
Date: Fri May 12 17:27:06 2023 +0800
add .gitignore
不过,我个人还是不推荐大家现在去使用他,等大家工作了,再去简化自己的工作吧.
十一、标签管理
11.1理解标签
标签tag ,可以简单的理解为是对某次 commit 的一个标识,相当于起了一个别名。例如,在项目
发布某个版本的时候,针对最后一次 commit 起一个 v1.0 这样的标签来标识里程碑的意义。这有什么用呢?相较于难以记住的commit id , tag 很好的解决这个问题,因为tag 一定要给一个让人容易记住,且有意义的名字。当我们需要回退到某个重要版本时,直接使用标签就能很快定位到。
11.2创建标签
在Git中打标签非常简单,首先,切换到需要打标签的分支上:
hyb@139-159-150-152:~/git_teaching$ git branch
* master
然后,敲命令git tag [name] 就可以打一个新标签:
hyb@139-159-150-152:~/git_teaching$ 1 git tag v1.0可以用命令git tag 查看所有标签:hyb@139-159-150-152:~/git_teaching$ git tag
v1.0默认标签是打在最新提交的commit 上的。那如何在指定的commit上打标签呢?方法是找到历史提
交的commit id,然后打上就可以了,示例如下:
# 历史记录
hyb@139-159-150-152:~/git_teaching$ git log --pretty=oneline --abbrev-commit
97811ab (HEAD -> master, tag: v1.0, origin/master, origin/HEAD) add .gitignore
60e6b0a update README.md.
7ce3183 create file.txt
c6ce3f0 Initial commit
# 对 Initial commit 这次提交打标签
hyb@139-159-150-152:~/git_teaching$ git tag v0.9 c6ce3f0
hyb@139-159-150-152:~/git_teaching$ git tag
v0.9
v1.0注意,标签不是按时间顺序列出,而是按字母排序的。可以用 git show [tagname] 查看标签信息。
hyb@139-159-150-152:~/git_teaching$ git show v1.0
commit 97811abd1d43774aeb54fee32bf4fc76b2b08170 (HEAD -> master, tag: v1.0, orig
Author: hyb91 <2689241679@qq.com>
Date: Fri May 12 17:27:06 2023 +0800
add .gitignore
diff --git a/.gitignore b/.gitignore
...Git 还提供可以创建带有说明的标签,用-a指定标签名,-m指定说明文字,格式为:
git tag -a [name] -1 m "XXX" [commit_id]另外,打完标签之后,使用 tree .git 命令查看一下你的本地库有什么变化,肯定能帮助你理解!
11.3操作标签
如果标签打错了,也可以删除:
hyb@139-159-150-152:~/git_teaching$ git tag
v0.9
v1.0
hyb@139-159-150-152:~/git_teaching$ git tag -d v0.9
Deleted tag 'v0.9' (was c6ce3f0)
hyb@139-159-150-152:~/git_teaching$ git tag
v1.0因为创建的标签都只存储在本地,不会自动推送到远程。所以,打错的标签可以在本地安全删除。
如果要推送某个标签到远程,使用命令git push origin <tagname>
hyb@139-159-150-152:~/git_teaching$ git tag
v1.0
hyb@139-159-150-152:~/git_teaching$ git push origin v1.0
Total 0 (delta 0), reused 0 (delta 0)
remote: Powered by GITEE.COM [GNK-6.4]
To gitee.com:hyb91/git_teaching.git
* [new tag] v1.0 -> v1.0
此时,查看远端码云,看到了标签已经被更新!完美!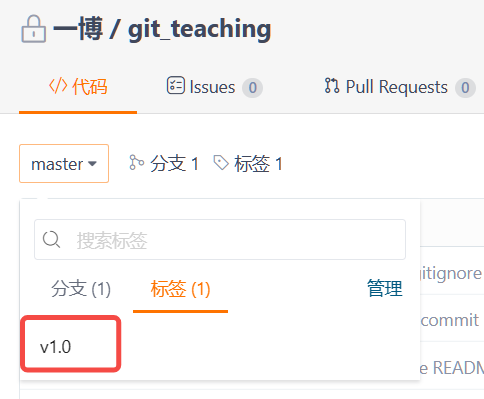
当然,如果你本地有很多标签,也可以一次性的全部推送到远端:
git 1 push origin --tags如果标签已经推送到远程,要删除远程标签就麻烦一点,先从本地删除:
hyb@139-159-150-152:~/git_teaching$ git tag
v1.0
hyb@139-159-150-152:~/git_teaching$ git tag -d v1.0
Deleted tag 'v1.0' (was 97811ab)
然后,从远程删除。删除命令也是push,但是格式如下:
hyb@139-159-150-152:~/git_teaching$ git push origin :refs/tags/v1.0
remote: Powered by GITEE.COM [GNK-6.4]
To gitee.com:hyb91/git_teaching.git
- [deleted] v1.0
在码云上查看确实删除成功:

相关文章:
Git第一章、Git的原理与使用
目录 一、Git安装 1.1Linux Centos安装 二、Git基本操作 2.1创建 Git 本地仓库 2.2配置Git 三、认识工作区、暂存区、版本库 3.1添加文件(场景一) 3.2修改文件 3.3版本回退 四、撤销修改 4.1情况一:对于工作区的代码,还…...
软件开发流程
目录 软件软件开发流程的演变 瀑布模型敏捷模型 XPSCRUMDevOps 1.软件 与计算机系统操作有关的计算机程序、可能有的文件、文档及数据。 软件可以分为两种主要类型: 独立软件:独立软件是一种完整的应用程序,可以直接在计算机或移动设备上…...

编程语言的优劣评选标准与未来发展趋势——探索最佳编程语言选择
编程语言的优劣评选标准与未来发展趋势——探索最佳编程语言选择 评判标准不同编程语言的优点与缺点分析对编程语言未来发展的猜测和未来趋势 💕 💕 💕 博主个人主页: 汴京城下君–野生程序员💕 💕 &#x…...

axios 发送请求请求头信息不包含Cookie信息
问题 axios 发送请求请求头信息不包含Cookie信息 详细问题 使用VueSpringBoot进行项目开发,axios进行网络请求,发送请求,请求头信息不包含Cookie信息 具体如下 实际效果 预期效果 解决方案 作用域 Vue项目全局配置 打开Vue项目的入口…...

正则表达式笔记
/你的正则表达式写在这里/ 1? 1出现0次或1次 1* 1出现0次或多次 1 1出现1次或多次 1{2} 1出现了2次 1{2,3} 1出现了2到3次 1{2,} 1出现了2次及以上 (5555){1} 5555出现了1次 (dog|cat) dog或者cat [a-zA-Z] a…...
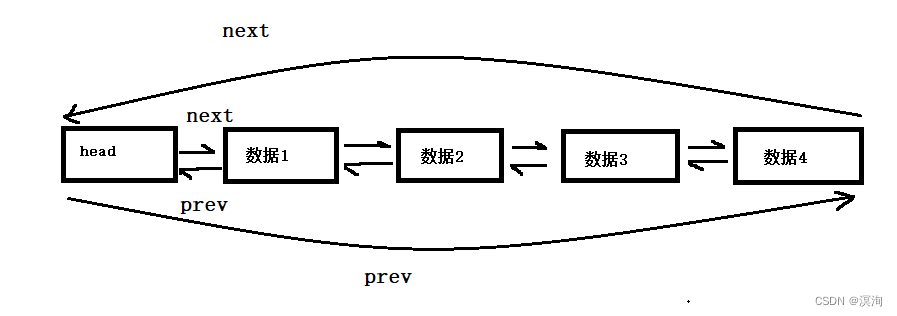
数据结构链表(C语言实现)
绪论 机遇对于有准备的头脑有特别的亲和力。本章将讲写到链表其中主要将写到单链表和带头双向循环链表的如何实现。 话不多说安全带系好,发车啦(建议电脑观看)。 附:红色,部分为重点部分;蓝颜色为需要记忆的…...

Springboot实现接口传输加解密
前言 先给大家看下效果,原本我们的请求是这样子的 加密后的数据传输是这样子的 加解密步骤: 1.前端请求前进行加密,然后发送到后端 2.后端收到请求后解密 3.后端返回数据前进行加密 4.前端拿到加密串后,解密数据 加解密算法&…...

TypeScript类型系统:强类型的优势和使用方式
目录 引言强类型的优势更好的代码可读性更好的代码可维护性更好的代码重构能力更好的代码可靠性更好的代码重用能力 使用方式声明变量类型函数参数和返回值类型类型别名泛型类型(了解) 总结 引言 在上一篇文章《TypeScript入门指南:从JS到TS的…...

有没有可以代替风铃系统的专业问卷工具?
风铃系统问卷是一种流行的调查和数据分析工具,已广泛应用于学术研究、市场营销和社会科学。然而,有几种替代产品提供了与风铃系统类似的特性和功能,可以被企业用来进行调查和分析数据。在这篇文章中,我们将介绍风铃系统的十大替代…...

【数字调制】数字调制技术FSK与PSK分析与研究(Matlab代码实现)
💥💥💞💞欢迎来到本博客❤️❤️💥💥 🏆博主优势:🌞🌞🌞博客内容尽量做到思维缜密,逻辑清晰,为了方便读者。 ⛳️座右铭&a…...

html实现好看的个人介绍,个人主页模板4(附源码)
文章目录 1.设计来源1.1 主界面1.2 我的文章界面1.3 我的相册界面1.4 关于我界面1.5 联系我界面 2.效果和源码2.1 动态效果2.2 源代码2.2 源代码目录 源码下载 作者:xcLeigh 文章地址:https://blog.csdn.net/weixin_43151418/article/details/131265259 …...
内存不够用,那你的内存去哪了?
一、前言 近几年开发了一些大型的应用程序,在程序性能调优或者解决一些疑难杂症问题的过程中,遇到最多的还是与内存相关的一些问题。例如glibc内存分配器ptmalloc,google的内存分配器tcmalloc都存在“内存泄漏”,即内存不归还操作…...
)
哈希表--day4--(leetcode202/leetcode1/leetcode454)
文章目录 leetcode202. 快乐数基本思路AC-code leetcode1. 两数之和基本思路AC-code 454.四数相加II基本思路AC-code leetcode202. 快乐数 链接 基本思路 实际上题目隐藏着一个小细节,就是告诉你会发生无限循环,那我们该如何跳出这个无限循环就是一个…...
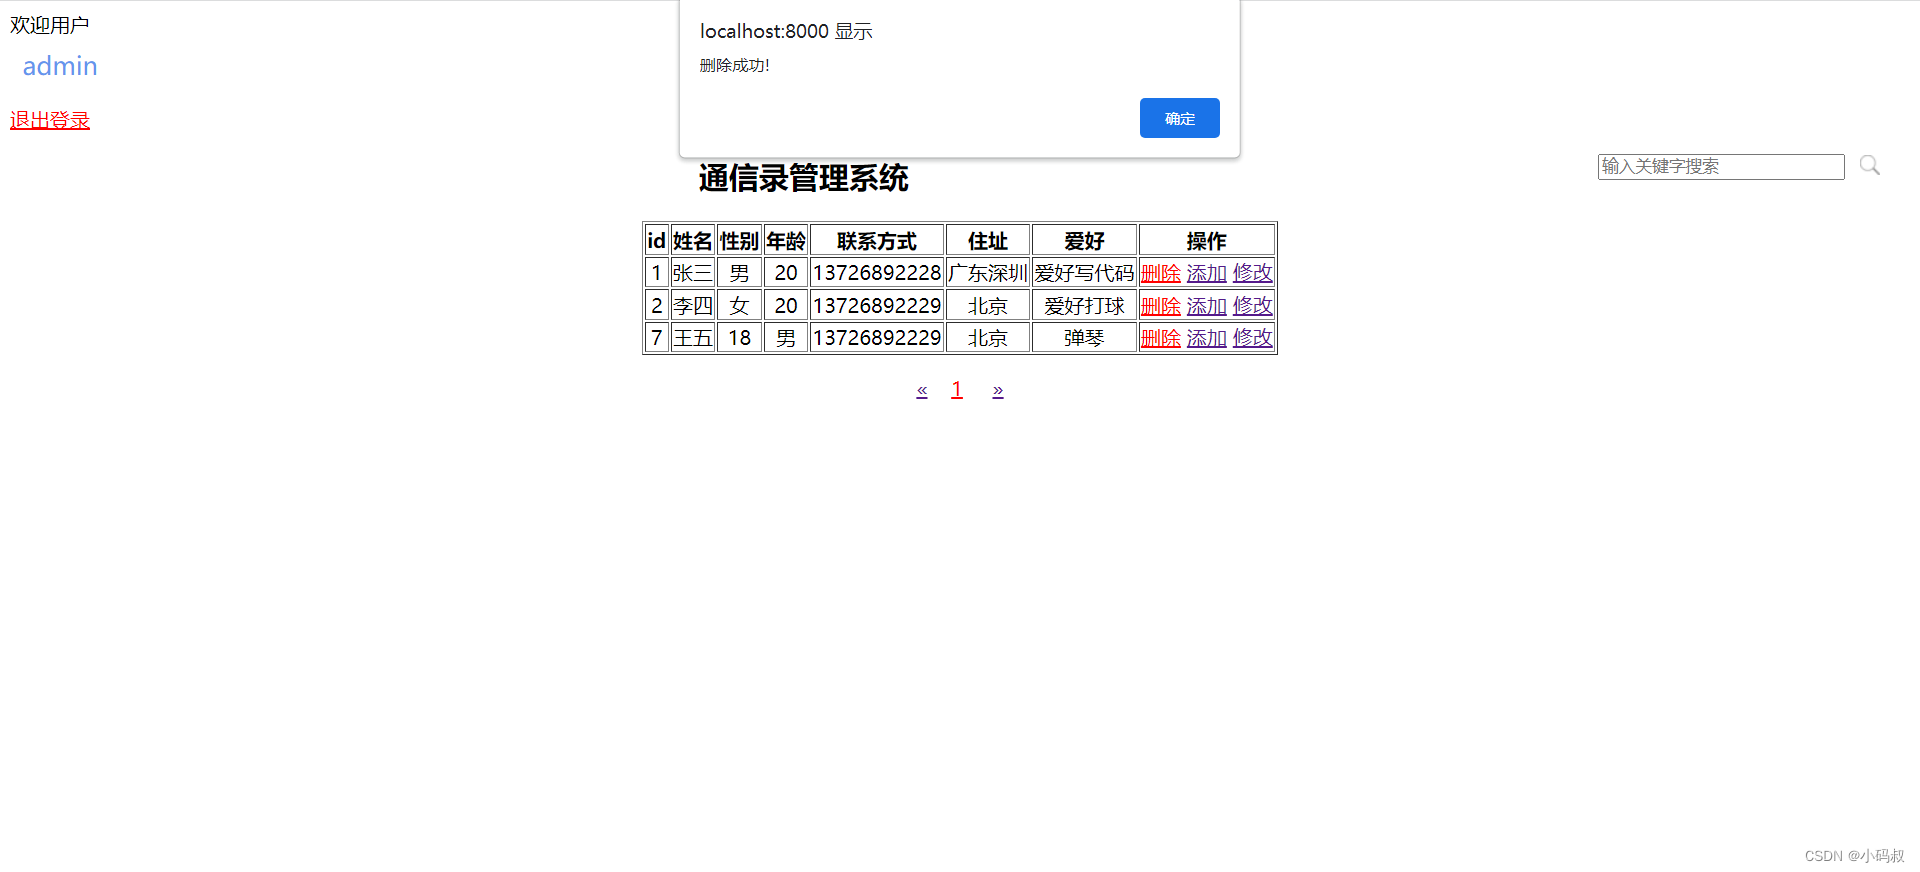
基于Python+Django+mysql+html通讯录管理系统
基于PythonDjangomysqlhtml通讯录管理系统 一、系统介绍二、功能展示1.用户登陆2.用户注册3.密码修改4.查询5.添加6.修改7.删除 三、其它系统四、获取源码 一、系统介绍 该系统实现了 用户登陆、用户注册、密码修改、查询信息、添加信息,修改信息、删除信息 运行环…...

Rabbitmq学习
文章目录 前言RabbitMQ 1 同步调用和异步调用2 常见的MQ对比3 安装RabbitMQ4 RabbitMQ学习4.1 helloworld学习 5 Spring AMQP5.1 AMQP的入门案例(使用rabbittemplate进行消息发送和接受)5.2 RabbitMQ的workquene5.3 发布订阅模型(exchange(广播fanout 路由direct 话题topic))5.…...

初识轻量级分布式任务调度平台 xxl-job
文章目录 前言xxl-job的目录结构项目依赖 (父 pom.xml)xxl-job-admin 启动xxl-job-executor-sample (项目使用示例)xxl-job-executor-sample-frameless : 不使用框架的接入方式案例xxl-job-executor-sample-springboot : springboot接入方案案例 xxl-job执行器器启动流程分析调…...
web 语音通话 jssip
先把封装好的地址安上(非本人封装):webrtc-webphone: 基于JsSIP开发的webrtc软电话 jssip中文文档:jssip中文开发文档(完整版) - 简书 jssip使用文档:(我没有运行过,但…...

随风摇曳的她——美蕨(matlab实现)
目录 1 随风摇曳的她 2 摇曳带来的哲思 3 Matlab代码实现 1 随风摇曳的她 梦幻的场景、浪漫的气息,带上心爱的人,拥抱在这片花海之下,便有了电影男女主角的氛围感; 就算阅尽了世间风貌,也抵不上和她在一起时锦短情长&a…...

时序数据库的流计算支持
一、时序数据及其特点 时序数据(Time Series Data)是基于相对稳定频率持续产生的一系列指标监测数据,比如一年内的道琼斯指数、一天内不同时间点的测量气温等。时序数据有以下几个特点: 历史数据的不变性数据的有效性数据的时效…...

springboot启动流程 (3) 自动装配
在SpringBoot中,EnableAutoConfiguration注解用于开启自动装配功能。 本文将详细分析该注解的工作流程。 EnableAutoConfiguration注解 启用SpringBoot自动装配功能,尝试猜测和配置可能需要的组件Bean。 自动装配类通常是根据类路径和定义的Bean来应…...

超短脉冲激光自聚焦效应
前言与目录 强激光引起自聚焦效应机理 超短脉冲激光在脆性材料内部加工时引起的自聚焦效应,这是一种非线性光学现象,主要涉及光学克尔效应和材料的非线性光学特性。 自聚焦效应可以产生局部的强光场,对材料产生非线性响应,可能…...
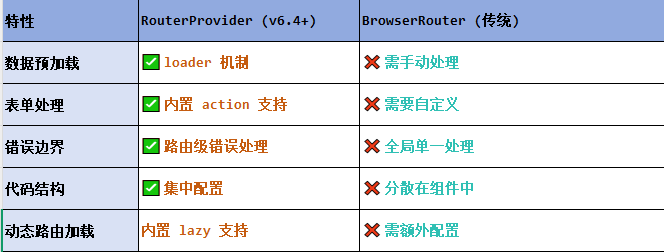
React第五十七节 Router中RouterProvider使用详解及注意事项
前言 在 React Router v6.4 中,RouterProvider 是一个核心组件,用于提供基于数据路由(data routers)的新型路由方案。 它替代了传统的 <BrowserRouter>,支持更强大的数据加载和操作功能(如 loader 和…...

【力扣数据库知识手册笔记】索引
索引 索引的优缺点 优点1. 通过创建唯一性索引,可以保证数据库表中每一行数据的唯一性。2. 可以加快数据的检索速度(创建索引的主要原因)。3. 可以加速表和表之间的连接,实现数据的参考完整性。4. 可以在查询过程中,…...

SpringBoot+uniapp 的 Champion 俱乐部微信小程序设计与实现,论文初版实现
摘要 本论文旨在设计并实现基于 SpringBoot 和 uniapp 的 Champion 俱乐部微信小程序,以满足俱乐部线上活动推广、会员管理、社交互动等需求。通过 SpringBoot 搭建后端服务,提供稳定高效的数据处理与业务逻辑支持;利用 uniapp 实现跨平台前…...

EtherNet/IP转DeviceNet协议网关详解
一,设备主要功能 疆鸿智能JH-DVN-EIP本产品是自主研发的一款EtherNet/IP从站功能的通讯网关。该产品主要功能是连接DeviceNet总线和EtherNet/IP网络,本网关连接到EtherNet/IP总线中做为从站使用,连接到DeviceNet总线中做为从站使用。 在自动…...

什么?连接服务器也能可视化显示界面?:基于X11 Forwarding + CentOS + MobaXterm实战指南
文章目录 什么是X11?环境准备实战步骤1️⃣ 服务器端配置(CentOS)2️⃣ 客户端配置(MobaXterm)3️⃣ 验证X11 Forwarding4️⃣ 运行自定义GUI程序(Python示例)5️⃣ 成功效果
视频行为标注工具BehaviLabel(源码+使用介绍+Windows.Exe版本)
前言: 最近在做行为检测相关的模型,用的是时空图卷积网络(STGCN),但原有kinetic-400数据集数据质量较低,需要进行细粒度的标注,同时粗略搜了下已有开源工具基本都集中于图像分割这块,…...

DingDing机器人群消息推送
文章目录 1 新建机器人2 API文档说明3 代码编写 1 新建机器人 点击群设置 下滑到群管理的机器人,点击进入 添加机器人 选择自定义Webhook服务 点击添加 设置安全设置,详见说明文档 成功后,记录Webhook 2 API文档说明 点击设置说明 查看自…...

Redis:现代应用开发的高效内存数据存储利器
一、Redis的起源与发展 Redis最初由意大利程序员Salvatore Sanfilippo在2009年开发,其初衷是为了满足他自己的一个项目需求,即需要一个高性能的键值存储系统来解决传统数据库在高并发场景下的性能瓶颈。随着项目的开源,Redis凭借其简单易用、…...

iview框架主题色的应用
1.下载 less要使用3.0.0以下的版本 npm install less2.7.3 npm install less-loader4.0.52./src/config/theme.js文件 module.exports {yellow: {theme-color: #FDCE04},blue: {theme-color: #547CE7} }在sass中使用theme配置的颜色主题,无需引入,直接可…...