SpringAMQP消息队列(SpringBoot集成RabbitMQ)
一、初始配置
1、导入maven坐标
<!--rabbitmq--><dependency><groupId>org.springframework.boot</groupId><artifactId>spring-boot-starter-amqp</artifactId></dependency>2、yml配置
spring:rabbitmq:host: 你的rabbitmq的ipport: 5672username: guestpassword: guest二、基本消息队列
1、创建队列
访问接口:http://localhost:15672,账号密码都为guest
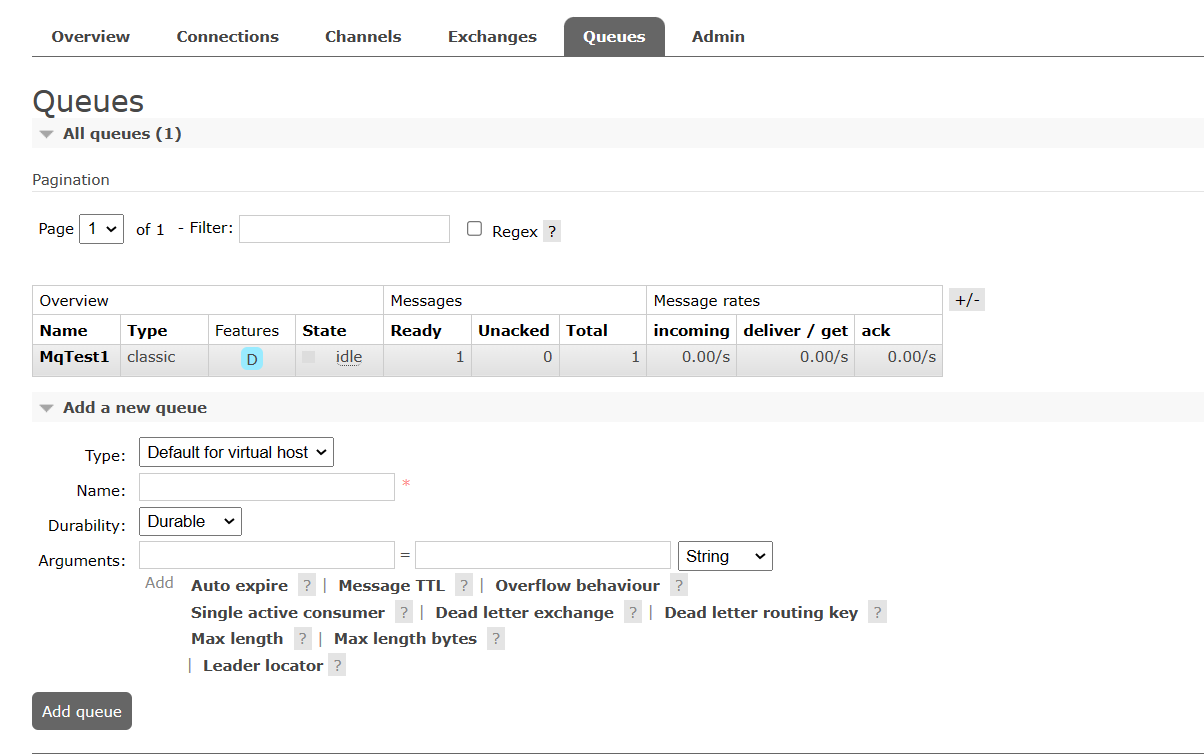
进入后左下角有Add queue添加队列,我已添加队列为MqTest1
2、发布消息
@SpringBootTest
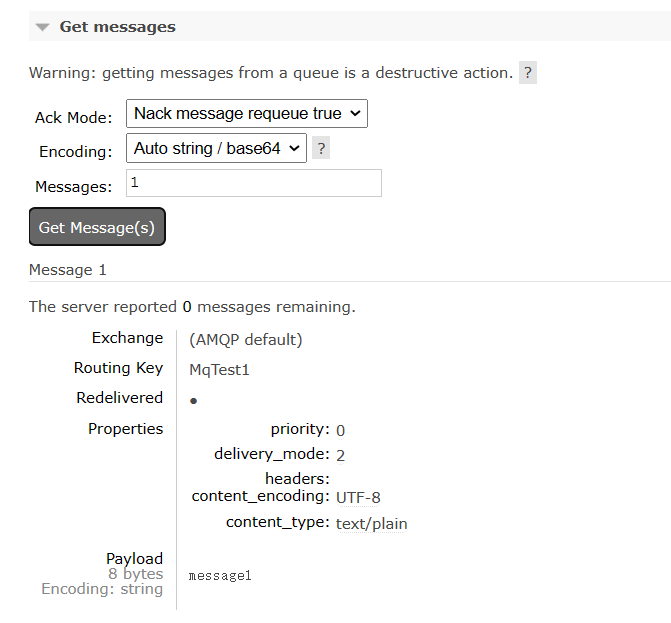
class RabbitMQDemoPublishApplicationTests {@Autowiredprivate RabbitTemplate rabbitTemplate;@Testvoid contextLoads() {String queue="MqTest1";String message="message1";rabbitTemplate.convertAndSend(queue,message);}}此时可以看到队列有一个消息
3、接受消息
package com.rabbitmqdemoconsumer.rabbitmq;import org.springframework.amqp.rabbit.annotation.RabbitListener;
import org.springframework.stereotype.Component;@Component
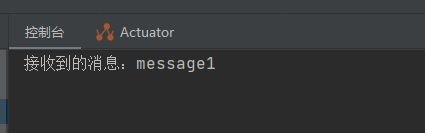
public class SpringRabbitLeistener {@RabbitListener(queues = "MqTest1")public void listenSimpleQueueMessage(String msg){System.out.println("接收到的消息:"+msg);}
}
此时控制台输出接收到的消息
三、工作消息队列(Work Queue)
可以提高消息处理速度,避免队列消息堆积
1、发布消息
@SpringBootTest
class RabbitMQDemoPublishApplicationTests {@Autowiredprivate RabbitTemplate rabbitTemplate;@Testvoid contextLoads() {String queue="MqTest1";String message="message1";for (int i=0;i<10;i++){rabbitTemplate.convertAndSend(queue,message);}}}
此时队列有10条消息
2、接受消息
package com.rabbitmqdemoconsumer.rabbitmq;import org.springframework.amqp.rabbit.annotation.RabbitListener;
import org.springframework.stereotype.Component;@Component
public class SpringRabbitLeistener {@RabbitListener(queues = "MqTest1")public void listenSimpleQueueMessage1(String msg){System.out.println("consume1接收到的消息:"+msg);}@RabbitListener(queues = "MqTest1")public void listenSimpleQueueMessage2(String msg){System.out.println("consume2接收到的消息:"+msg);}
}
控制台输出结果
consume1接收到的消息:message1
consume2接收到的消息:message1
consume1接收到的消息:message1
consume2接收到的消息:message1
consume1接收到的消息:message1
consume2接收到的消息:message1
consume1接收到的消息:message1
consume2接收到的消息:message1
consume1接收到的消息:message1
consume2接收到的消息:message1
4、消息预取问题
但是此时有一个问题就是消息预取,比如队列有10条消息,两个消费者各自直接先预取5个消息,如果一个消费者接受消息的速度慢,一个快,就会导致一个消费者已经完成工作,另一个还在慢慢处理,会造成消息堆积消费者身上,要解决这个问题需要在yml文件配置相关配置
rabbitmq:host: 43.140.244.236port: 5672username: guestpassword: guestvirtual-host: /listener:simple:prefetch: 1 #每次只能取一个,处理完才能取下一个消息这样可以避免消息预取导致堆积
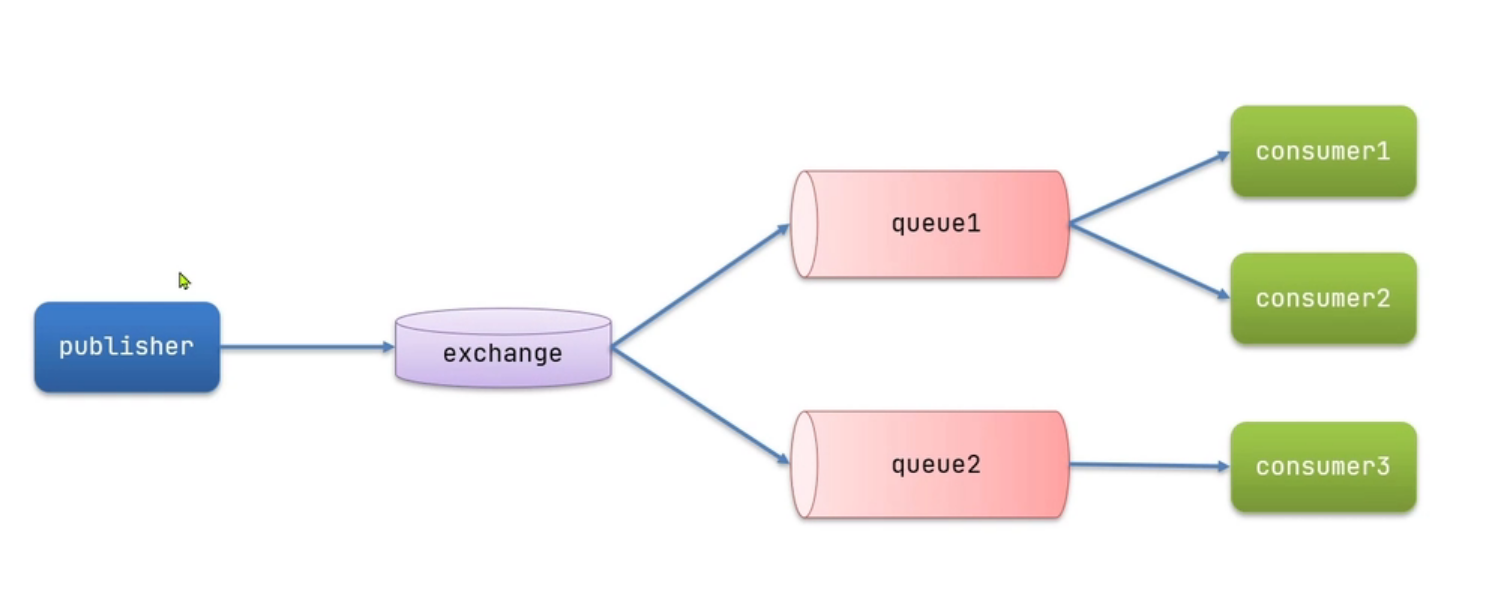
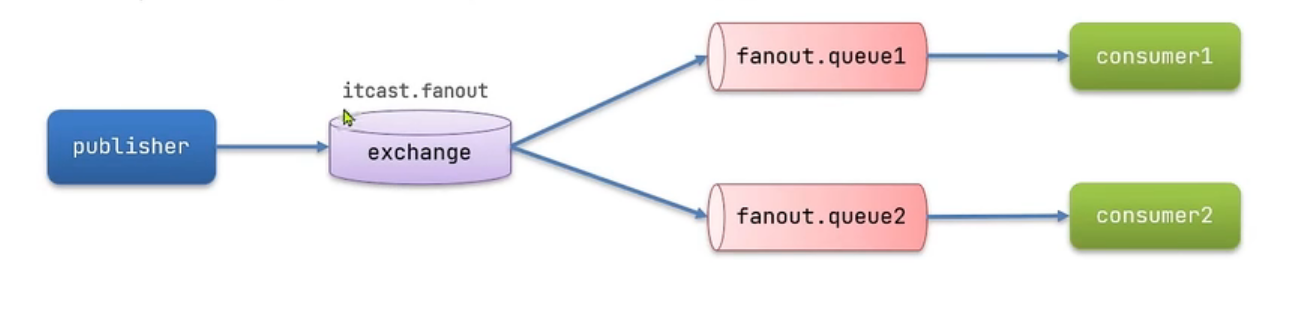
四、发布订阅模式
exchange是交换机,负责消息路由,但不存储消息,路由失败则消息丢失
五、发布订阅模式之广播模式(Fanout)
1、Fanout配置类(@Bean声明)
package com.rabbitmqdemoconsumer.config;import org.springframework.amqp.core.Binding;
import org.springframework.amqp.core.BindingBuilder;
import org.springframework.amqp.core.FanoutExchange;
import org.springframework.amqp.core.Queue;
import org.springframework.context.annotation.Bean;
import org.springframework.context.annotation.Configuration;@Configuration
public class FanountConfig {//交换机声明@Beanpublic FanoutExchange fanoutExchange(){return new FanoutExchange("FanountExchange");}//声明队列1@Beanpublic Queue Fanount_Qeueue1(){return new Queue("Fanount_Qeueue1");}//声明队列2@Beanpublic Queue Fanount_Qeueue2(){return new Queue("Fanount_Qeueue2");}//绑定交换机和队列@Beanpublic Binding bindingFanount_Qeueue1(Queue Fanount_Qeueue1,FanoutExchange fanoutExchange){return BindingBuilder.bind(Fanount_Qeueue1).to(fanoutExchange);}@Beanpublic Binding bindingFanount_Qeueue2(Queue Fanount_Qeueue2,FanoutExchange fanoutExchange){return BindingBuilder.bind(Fanount_Qeueue2).to(fanoutExchange);}
}
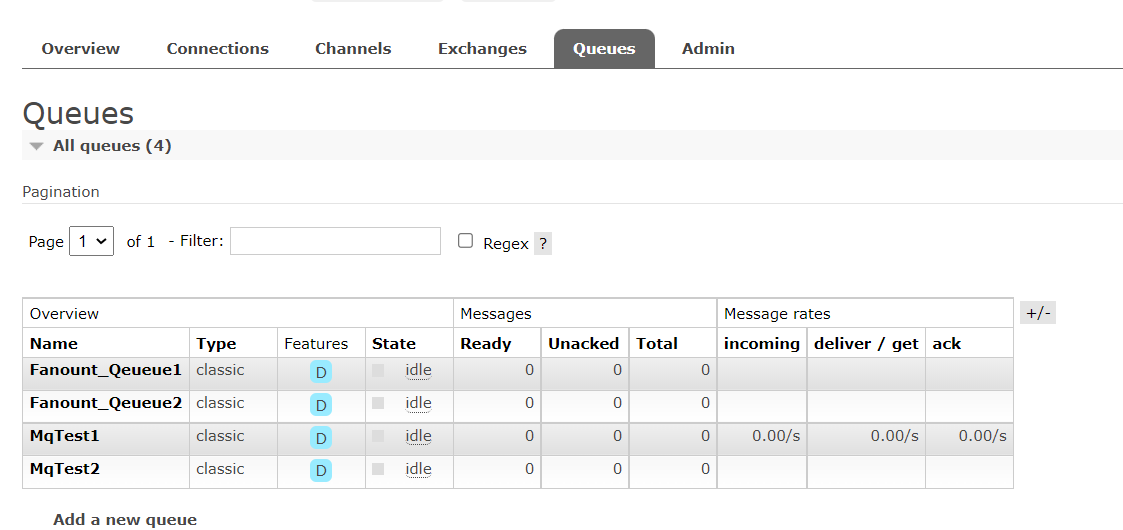
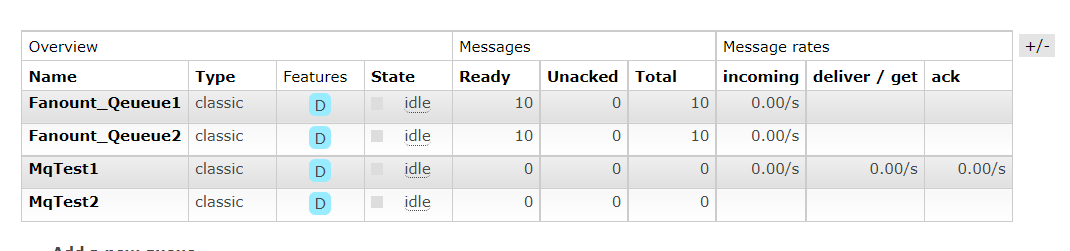
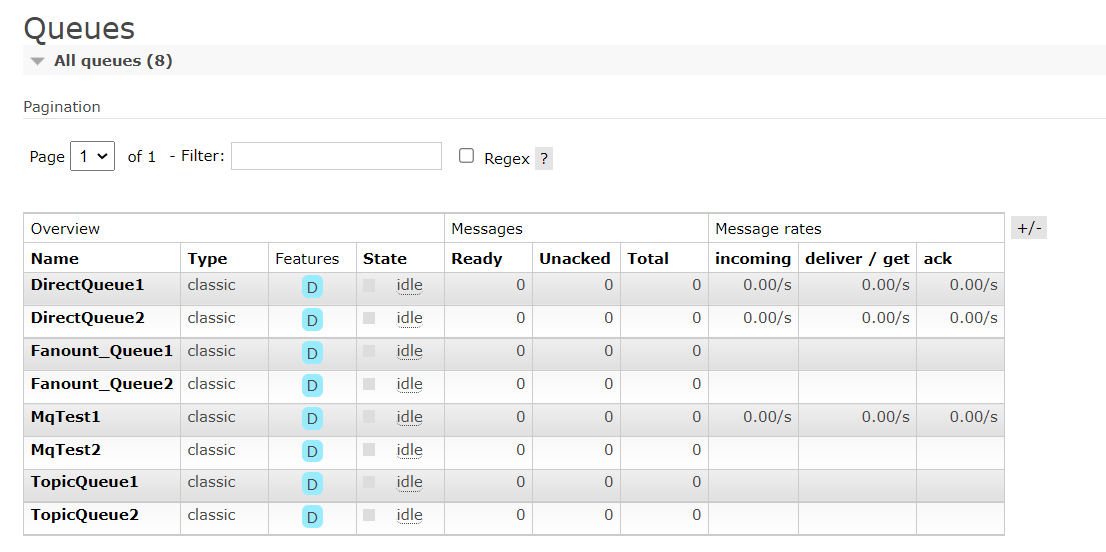
可以看到声明的队列
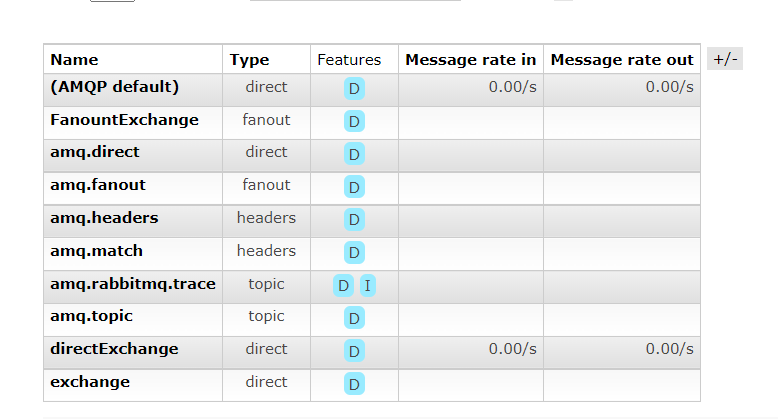
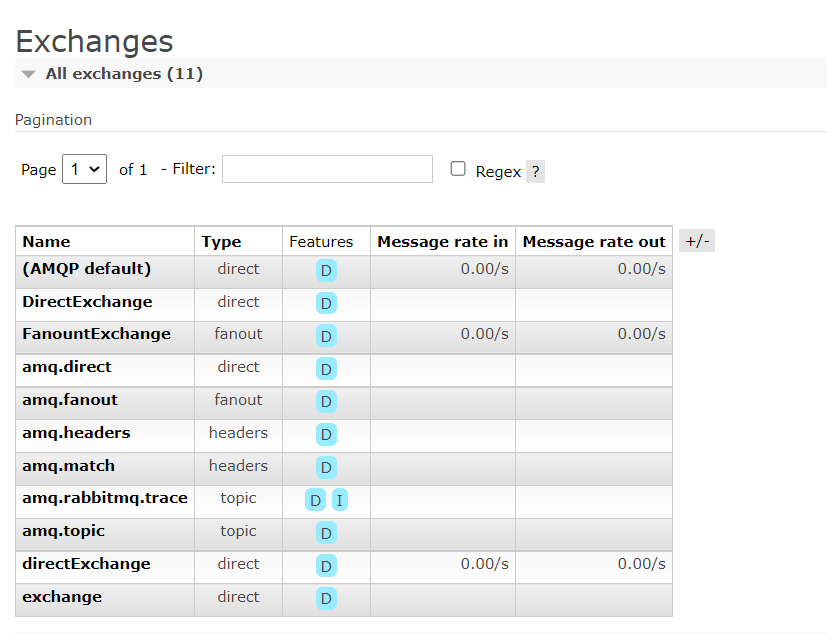
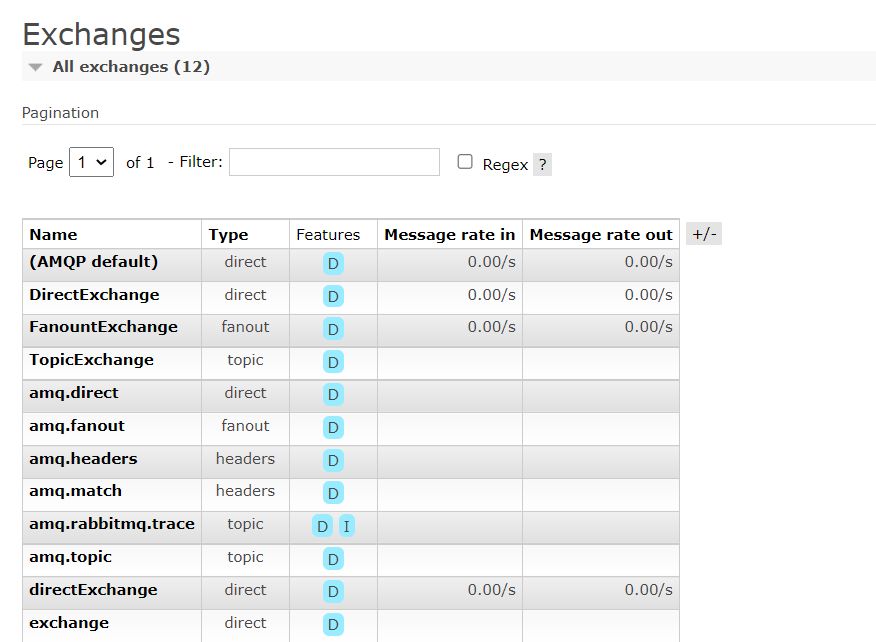
已经声明的交换机(第一个)
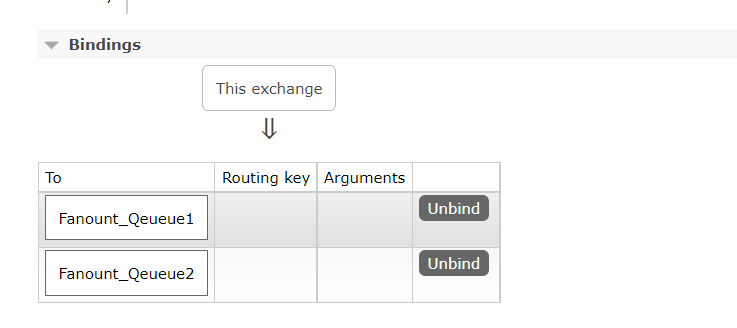
绑定关系
2、发送消息
首先发送10条消息,经过交换机转发到队列
@SpringBootTest
class RabbitMQDemoPublishApplicationTests {@Autowiredprivate RabbitTemplate rabbitTemplate;@Testvoid contextLoads2() {String exchange="FanountExchange";String message="message";for (int i=0;i<10;i++){rabbitTemplate.convertAndSend(exchange,"",message);}}}
此时可以看到两个队列各自有十条消息
3、接受消息
//监听交换机Fanount_Qeueue1@RabbitListener(queues = "Fanount_Qeueue1")public void listenFanountQeueue1(String msg){System.out.println("Fanount_Qeueue1接收到的消息:"+msg);}//监听交换机Fanount_Qeueue2@RabbitListener(queues = "Fanount_Qeueue2")public void listenFanountQeueue2(String msg){System.out.println("Fanount_Qeueue2接收到的消息:"+msg);}控制台结果如下(共发送20条,每个队列10条)
Fanount_Qeueue1接收到的消息:message
Fanount_Qeueue1接收到的消息:message
Fanount_Qeueue1接收到的消息:message
Fanount_Qeueue1接收到的消息:message
Fanount_Qeueue2接收到的消息:message
Fanount_Qeueue1接收到的消息:message
Fanount_Qeueue2接收到的消息:message
Fanount_Qeueue1接收到的消息:message
Fanount_Qeueue2接收到的消息:message
Fanount_Qeueue1接收到的消息:message
Fanount_Qeueue2接收到的消息:message
Fanount_Qeueue1接收到的消息:message
Fanount_Qeueue2接收到的消息:message
Fanount_Qeueue1接收到的消息:message
Fanount_Qeueue2接收到的消息:message
Fanount_Qeueue2接收到的消息:message
Fanount_Qeueue2接收到的消息:message
Fanount_Qeueue2接收到的消息:message
六、发布订阅模式之路由模式(Direct)
会将消息根据规则路由到指定的队列

1、声明(基于@RabbitListener声明)
package com.rabbitmqdemoconsumer.rabbitmq;import org.springframework.amqp.core.ExchangeTypes;
import org.springframework.amqp.rabbit.annotation.Exchange;
import org.springframework.amqp.rabbit.annotation.Queue;
import org.springframework.amqp.rabbit.annotation.QueueBinding;
import org.springframework.amqp.rabbit.annotation.RabbitListener;
import org.springframework.stereotype.Component;@Component
public class SpringRabbitLeistener {/*** 绑定交换机和队列,并为key赋值* @param msg*/@RabbitListener(bindings = @QueueBinding(value = @Queue(name = "DirectQueue1"),exchange = @Exchange(name = "DirectExchange",type = ExchangeTypes.DIRECT),key = {"red","blue"}))public void listenDirectQueue1(String msg){System.out.println("listenDirectQueue1接收到的消息:"+msg);}@RabbitListener(bindings = @QueueBinding(value = @Queue(name = "DirectQueue2"),exchange = @Exchange(name = "DirectExchange",type = ExchangeTypes.DIRECT),key = {"red","yellow"}))public void listenDirectQueue2(String msg){System.out.println("listenDirectQueue2接收到的消息:"+msg);}
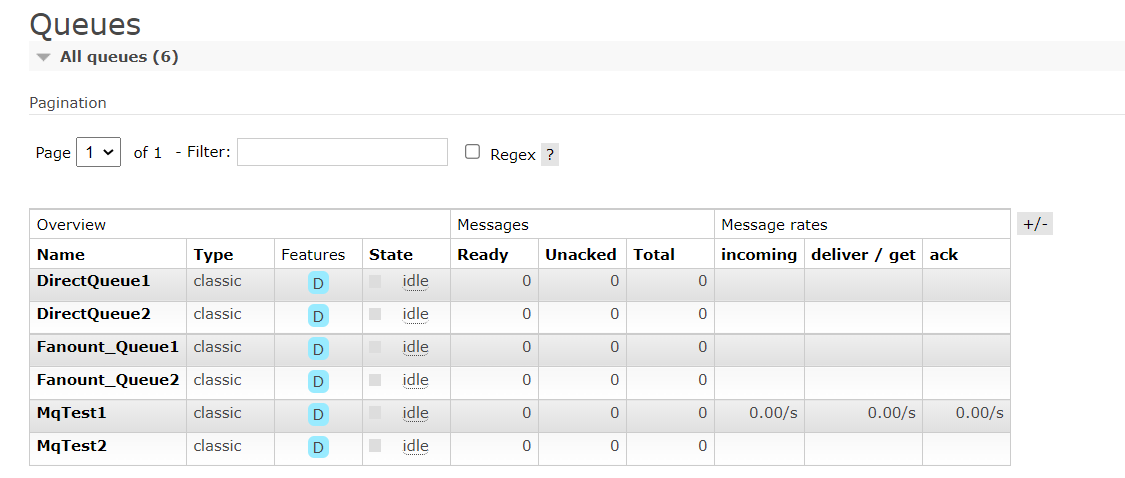
}此时可以看到声明的队列
声明的交换机(第一个)
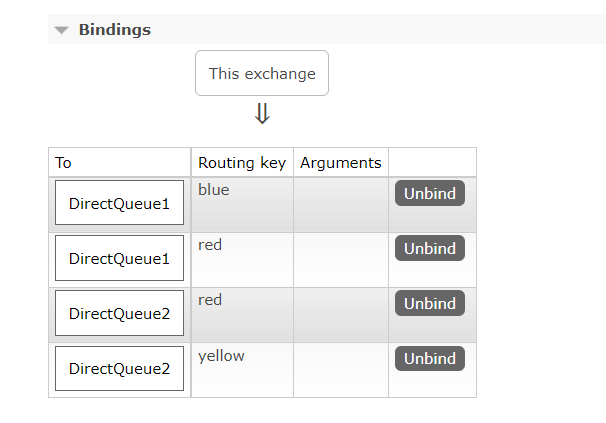
绑定关系
2、发送给blue
发送消息
@SpringBootTest
class RabbitMQDemoPublishApplicationTests {@Autowiredprivate RabbitTemplate rabbitTemplate;@Testvoid contextLoads2() {String exchange="DirectExchange";String message="HelloWorld";for (int i=0;i<10;i++){rabbitTemplate.convertAndSend(exchange,"blue",message);}}}
接收消息
listenDirectQueue1(red,blue)接收到的消息:HelloWorld
listenDirectQueue1(red,blue)接收到的消息:HelloWorld
listenDirectQueue1(red,blue)接收到的消息:HelloWorld
listenDirectQueue1(red,blue)接收到的消息:HelloWorld
listenDirectQueue1(red,blue)接收到的消息:HelloWorld
listenDirectQueue1(red,blue)接收到的消息:HelloWorld
listenDirectQueue1(red,blue)接收到的消息:HelloWorld
listenDirectQueue1(red,blue)接收到的消息:HelloWorld
listenDirectQueue1(red,blue)接收到的消息:HelloWorld
listenDirectQueue1(red,blue)接收到的消息:HelloWorld
3、发送给red
发送消息
@SpringBootTest
class RabbitMQDemoPublishApplicationTests {@Autowiredprivate RabbitTemplate rabbitTemplate;@Testvoid contextLoads2() {String exchange="DirectExchange";String message="HelloWorld";for (int i=0;i<10;i++){rabbitTemplate.convertAndSend(exchange,"blue",message);}}}
接收消息
listenDirectQueue1(red,blue)接收到的消息:HelloWorld
listenDirectQueue2(red,yellow)接收到的消息:HelloWorld
listenDirectQueue2(red,yellow)接收到的消息:HelloWorld
listenDirectQueue1(red,blue)接收到的消息:HelloWorld
listenDirectQueue1(red,blue)接收到的消息:HelloWorld
listenDirectQueue2(red,yellow)接收到的消息:HelloWorld
listenDirectQueue1(red,blue)接收到的消息:HelloWorld
listenDirectQueue2(red,yellow)接收到的消息:HelloWorld
listenDirectQueue2(red,yellow)接收到的消息:HelloWorld
listenDirectQueue1(red,blue)接收到的消息:HelloWorld
listenDirectQueue2(red,yellow)接收到的消息:HelloWorld
listenDirectQueue1(red,blue)接收到的消息:HelloWorld
listenDirectQueue2(red,yellow)接收到的消息:HelloWorld
listenDirectQueue1(red,blue)接收到的消息:HelloWorld
listenDirectQueue1(red,blue)接收到的消息:HelloWorld
listenDirectQueue2(red,yellow)接收到的消息:HelloWorld
listenDirectQueue2(red,yellow)接收到的消息:HelloWorld
listenDirectQueue1(red,blue)接收到的消息:HelloWorld
listenDirectQueue2(red,yellow)接收到的消息:HelloWorld
listenDirectQueue1(red,blue)接收到的消息:HelloWorld
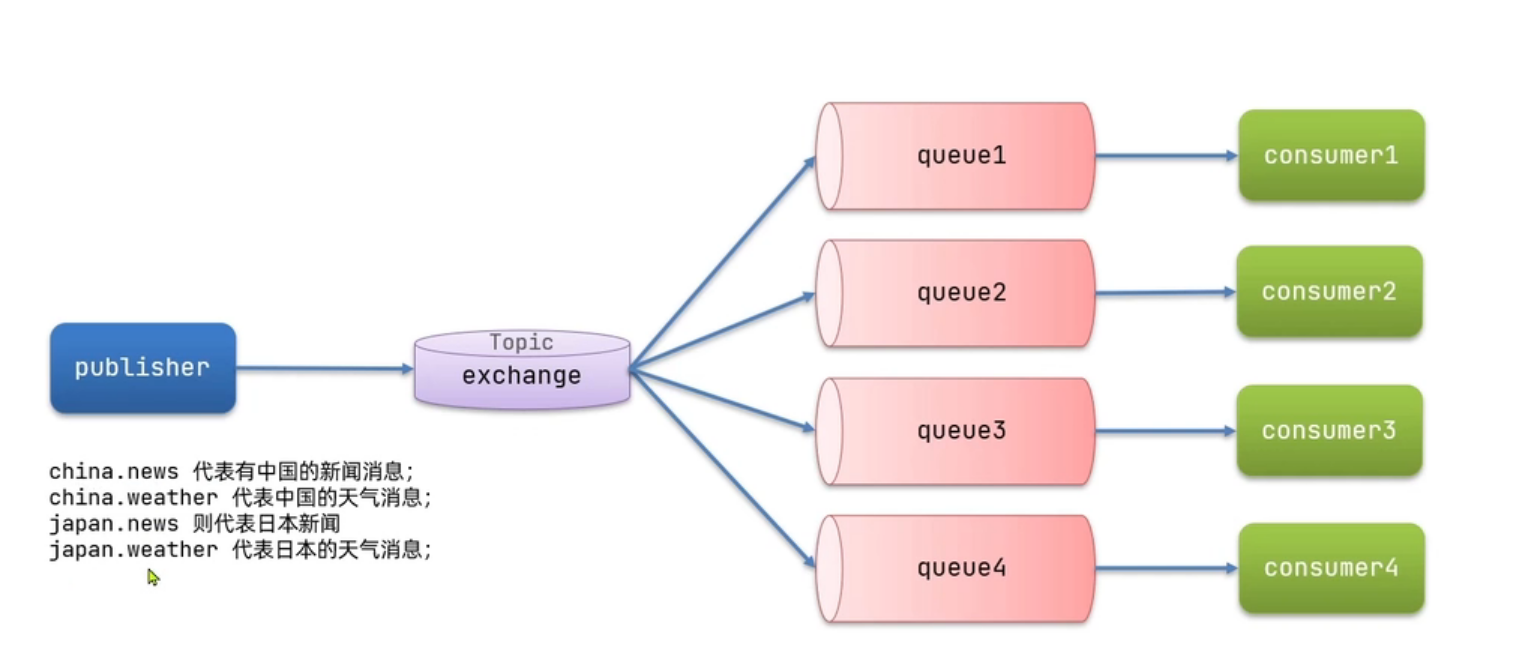
七、发布订阅模式之广播模式(Topic)
Queue与Exchange指定BindingKey可以使用通配符:
#:代指0个或多个单词
*:代指一个单词
比如:
bindingkey: china.# ->中国的所有消息
bindingkey: #.weather ->所以国家的天气
1、声明
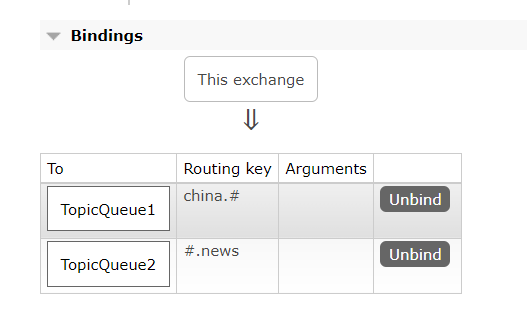
@RabbitListener(bindings = @QueueBinding(value = @Queue(name = "TopicQueue1"),exchange = @Exchange(name = "TopicExchange",type = ExchangeTypes.TOPIC),key = {"china.#"}))
public void listenTopicQueue1(String msg){System.out.println("listenTopicQueue1接收到的消息:"+msg);
}@RabbitListener(bindings = @QueueBinding(value = @Queue(name = "TopicQueue2"),exchange = @Exchange(name = "TopicExchange",type = ExchangeTypes.TOPIC),key = {"#.news"}
))
public void listenTopicQueue2(String msg){System.out.println("listenTopicQueue2接收到的消息:"+msg);
}
队列
交换机(第四个)
绑定关系
2、发送消息(测试1)
package com.rabbitmqdemo;import org.junit.jupiter.api.Test;
import org.springframework.amqp.rabbit.core.RabbitTemplate;
import org.springframework.beans.factory.annotation.Autowired;
import org.springframework.boot.test.context.SpringBootTest;@SpringBootTest
class RabbitMQDemoPublishApplicationTests {@Autowiredprivate RabbitTemplate rabbitTemplate;@Testvoid contextLoads2() {String exchange="TopicExchange";String message="HelloWorld";for (int i=0;i<10;i++){rabbitTemplate.convertAndSend(exchange,"china.news",message);}}}
接收消息
TopicQueue2接收到的消息:HelloWorld
TopicQueue1接收到的消息:HelloWorld
TopicQueue2接收到的消息:HelloWorld
TopicQueue1接收到的消息:HelloWorld
TopicQueue2接收到的消息:HelloWorld
TopicQueue1接收到的消息:HelloWorld
TopicQueue2接收到的消息:HelloWorld
TopicQueue1接收到的消息:HelloWorld
TopicQueue2接收到的消息:HelloWorld
TopicQueue1接收到的消息:HelloWorld
TopicQueue2接收到的消息:HelloWorld
TopicQueue1接收到的消息:HelloWorld
TopicQueue2接收到的消息:HelloWorld
TopicQueue1接收到的消息:HelloWorld
TopicQueue2接收到的消息:HelloWorld
TopicQueue1接收到的消息:HelloWorld
TopicQueue2接收到的消息:HelloWorld
TopicQueue1接收到的消息:HelloWorld
TopicQueue1接收到的消息:HelloWorld
TopicQueue2接收到的消息:HelloWorld
3、发送消息(测试2)
发送消息
package com.rabbitmqdemo;import org.junit.jupiter.api.Test;
import org.springframework.amqp.rabbit.core.RabbitTemplate;
import org.springframework.beans.factory.annotation.Autowired;
import org.springframework.boot.test.context.SpringBootTest;@SpringBootTest
class RabbitMQDemoPublishApplicationTests {@Autowiredprivate RabbitTemplate rabbitTemplate;@Testvoid contextLoads2() {String exchange="TopicExchange";String message="HelloWorld";for (int i=0;i<10;i++){rabbitTemplate.convertAndSend(exchange,"china.weather",message);}}}
接收消息
TopicQueue1接收到的消息:HelloWorld
TopicQueue1接收到的消息:HelloWorld
TopicQueue1接收到的消息:HelloWorld
TopicQueue1接收到的消息:HelloWorld
TopicQueue1接收到的消息:HelloWorld
TopicQueue1接收到的消息:HelloWorld
TopicQueue1接收到的消息:HelloWorld
TopicQueue1接收到的消息:HelloWorld
TopicQueue1接收到的消息:HelloWorld
TopicQueue1接收到的消息:HelloWorld
相关文章:
SpringAMQP消息队列(SpringBoot集成RabbitMQ)
一、初始配置1、导入maven坐标<!--rabbitmq--><dependency><groupId>org.springframework.boot</groupId><artifactId>spring-boot-starter-amqp</artifactId></dependency>2、yml配置spring:rabbitmq:host: 你的rabbitmq的ipport: …...
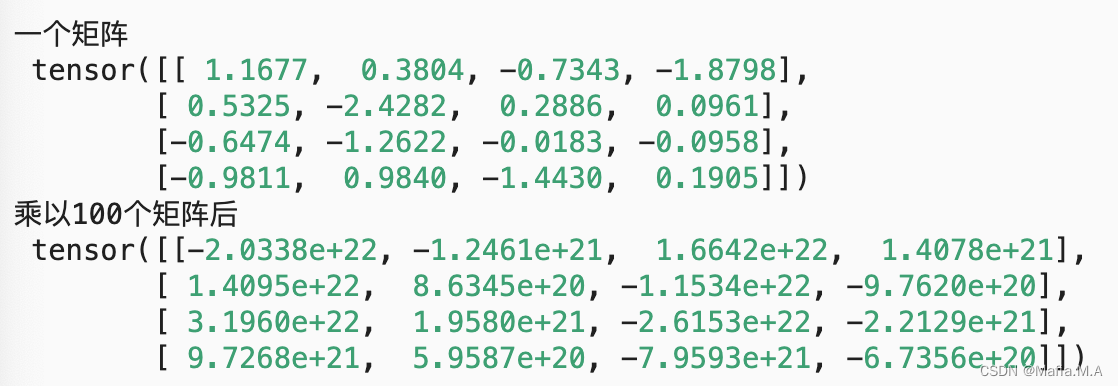
DIDL5_数值稳定性和模型初始化
数值稳定性和模型初始化数值稳定性梯度不稳定的影响推导什么是梯度消失?什么是梯度爆炸?如何解决数值不稳定问题?——参数初始化参数初始化的几种方法默认初始化Xavier初始化小结当神经网络变得很深的时候,数值特别容易不稳定。我…...

火狐浏览器推拽开新的窗口
今天我测试的时候,发现我拖拽一下火狐会打开了新的窗口,谷歌就不会,所以我们要阻止一下默认行为const disableFirefoxDefaultDrop () > {const isFirefox navigator.userAgent.toLowerCase().indexOf(firefox) ! -1if (isFirefox) {docu…...

vrrp+mstp+osfp经典部署案例
LSW1和LSW2和LSW3和LSW4上面启用vrrpmstp组网: vlan 10 全走LSW1出再走AR2到外网,vlan 20 全走LSW2出再走AR3到外网 配置注意:mstp实例的根桥在哪,vrrp的主设备就是谁 ar2和ar3上开nat ar2和ar3可以考虑换成两台防火墙来做&…...

AI_News周刊:第二期
2023.02.13—2023.02.17 1.ChatGPT 登上TIME时代周刊封面 这一转变标志着自社交媒体以来最重要的技术突破。近几个月来,好奇、震惊的公众如饥似渴地采用了生成式人工智能工具,这要归功于诸如 ChatGPT 之类的程序,它对几乎任何查询做出连贯&a…...

【C++的OpenCV】第一课-opencv的间接和安装(Linux环境下)
第一课-目录一、基本介绍1.1 官网1.2 git源码1.3 介绍二、OpenCV的相关部署工作2.1 Linux平台下部署OpenCV一、基本介绍 1.1 官网 opencv官网 注意:官网为英文版本,可以使用浏览器自带的翻译插件进行翻译,真心不推荐大家去看别人翻译的&am…...

为什么建议使用你 LocalDateTime ,而不是 Date
为什么建议使用你 LocalDateTime ,而不是 Date? 在项目开发过程中经常遇到时间处理,但是你真的用对了吗,理解阿里巴巴开发手册中禁用static修饰SimpleDateFormat吗 通过阅读本篇文章你将了解到: 为什么需要LocalDate…...
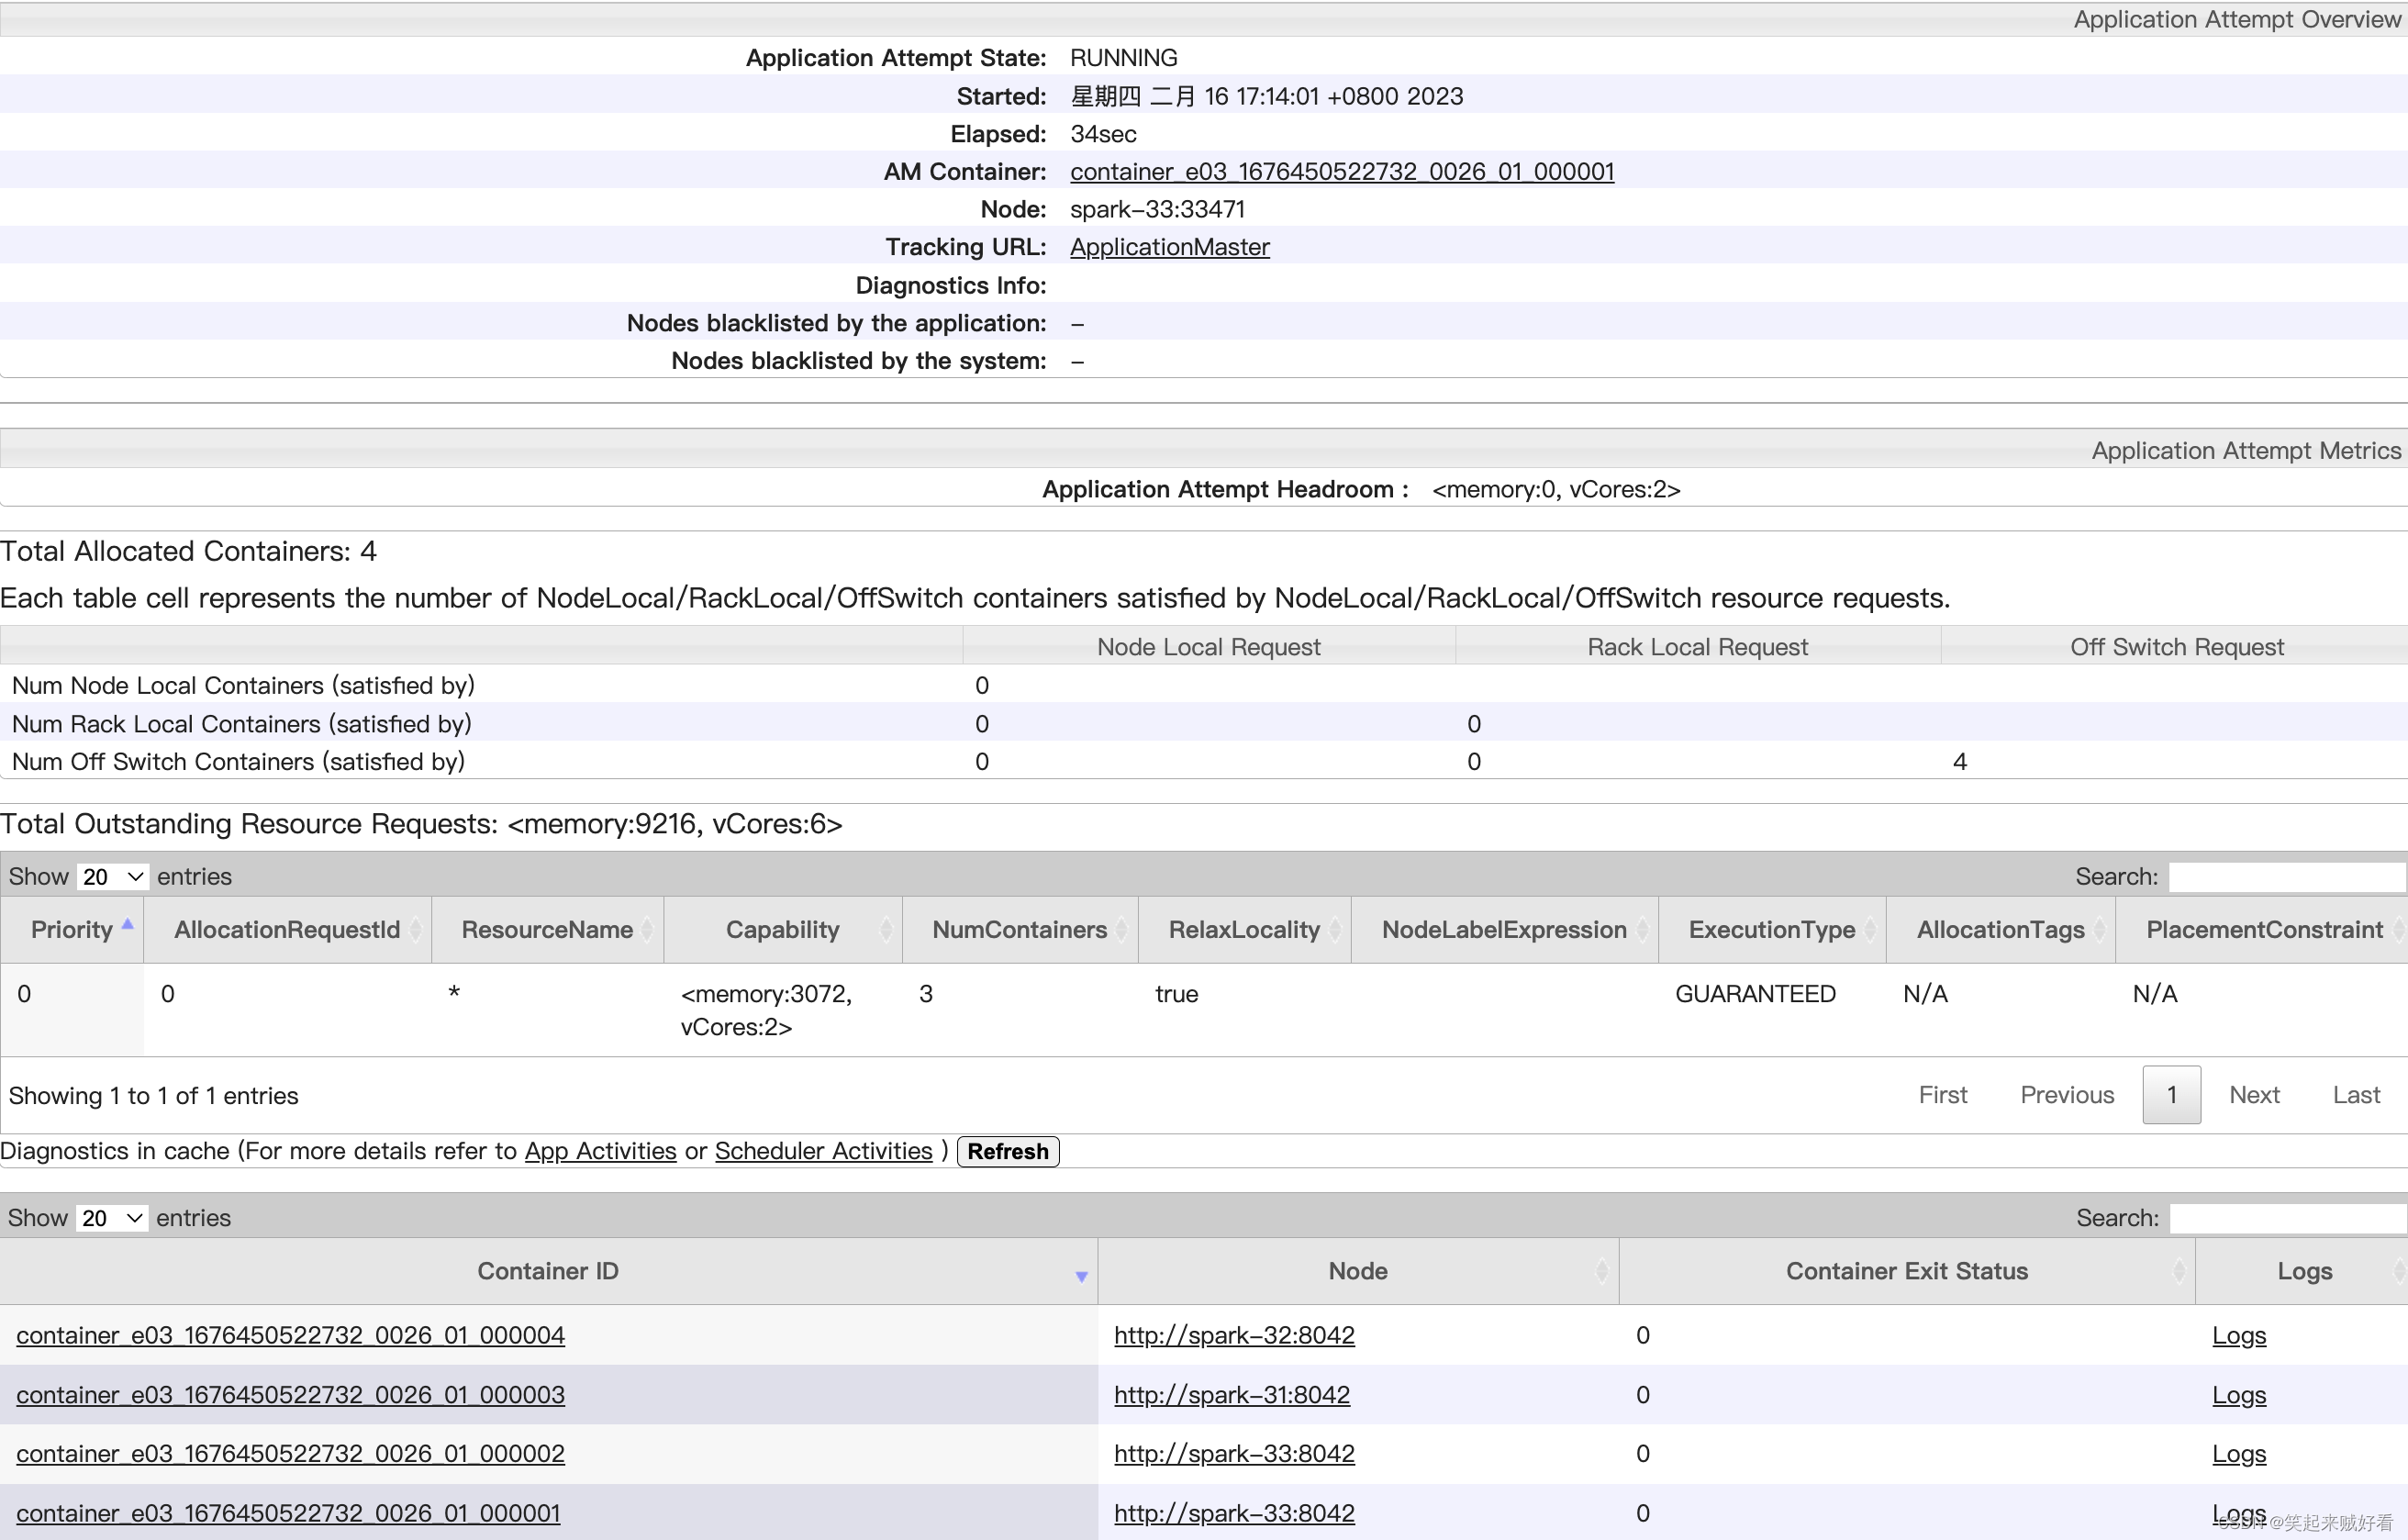
【大数据】HADOOP-YARN容量调度器Spark作业实战
目录需求配置多队列的容量调度器验证队列资源需求 default 队列占总内存的40%,最大资源容量占总资源的60% ops 队列占总内存的60%,最大资源容量占总资源的80% 配置多队列的容量调度器 在yarn-site.xml里面配置使用容量调度器 <!-- 使用容量调度器…...

平面及其方程
一、曲面和交线的定义 空间解析几何中,任何曲面或曲线都看作点的几何轨迹。在这样的意义下,如果曲面SSS与三元方程: F(x,y,z)0(1)F(x,y,z)0\tag{1} F(x,y,z)0(1) 有下述关系: 曲面 SSS 上任一点的坐标都满足方程(1)(1)(1)不在曲…...

7 配置的封装
概述 IPC设备通常有三种配置信息:一是默认配置,存储了设备所有配置项的默认值,默认配置是只读的,不能修改;二是用户配置,存储了用户修改过的所有配置项;三是私有配置,存储了程序内部使用的一些配置项,比如:固件升级的URL、固件升级标志位等。恢复出厂设置的操作,实际…...

03_Docker 入门
03_Docker 入门 文章目录03_Docker 入门3.1 确保 Docker 已经就绪3.2 运行我们的第一个容器3.3 使用第一个容器3.4 容器命名3.5 重新启动已经停止的容器3.6 附着到容器上3.7 创建守护式容器3.8 容器内部都在干些什么3.9 Docker 日志驱动3.10 查看容器内的进程3.11 Docker 统计信…...

Python 为什么要 if __name__ == “__main__“:
各位读者,你们知道以下两个Python文件有什么区别吗? main1.py def main():output Helloprint(output)if __name__ "__main__":main()main2.py output Hello print(output)当我们直接运行 main1.py 与 main2.py 的时候,程序都…...
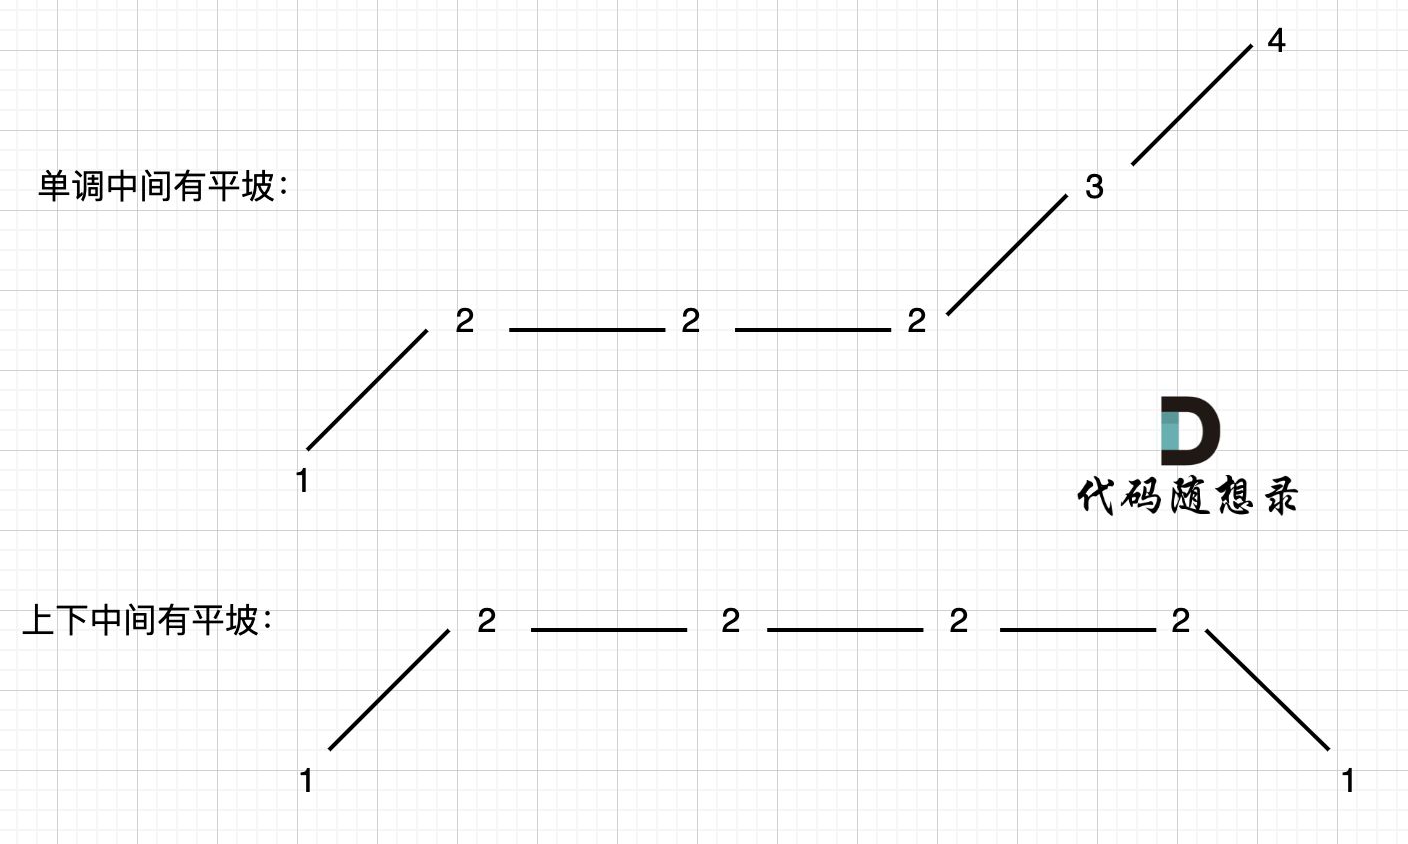
455. 分发饼干、376. 摆动序列、53. 最大子数组和
455.分发饼干 题目描述: 假设你是一位很棒的家长,想要给你的孩子们一些小饼干。但是,每个孩子最多只能给一块饼干。 对每个孩子 i,都有一个胃口值 g[i],这是能让孩子们满足胃口的饼干的最小尺寸;并且每块…...
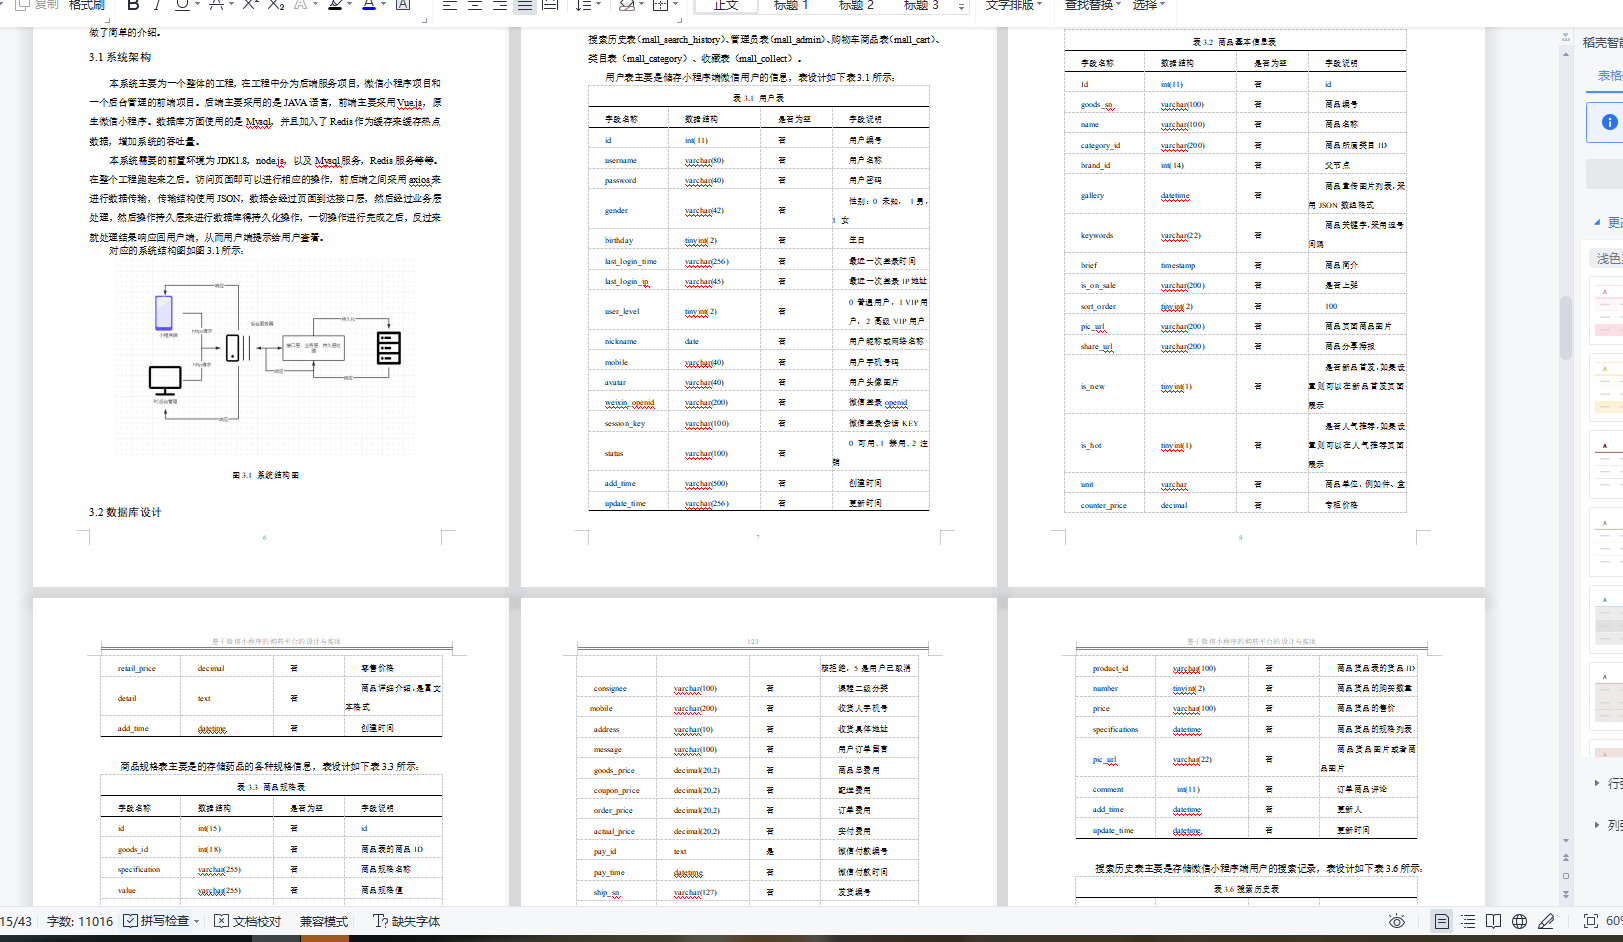
基于Springbot+微信小程序的购药平台的设计与实现
基于Springbot微信小程序的购药平台的设计与实现 ✌全网粉丝20W,csdn特邀作者、博客专家、CSDN新星计划导师、java领域优质创作者,博客之星、掘金/华为云/阿里云/InfoQ等平台优质作者、专注于Java技术领域和毕业项目实战✌ 🍅文末获取项目下载方式🍅 一、…...

aws lambda rust的sdk和自定义运行时
rust的aws sdk 参考资料 https://docs.aws.amazon.com/sdk-for-rust/latest/dg/getting-started.htmlhttps://awslabs.github.io/aws-sdk-rust/https://github.com/awslabs/aws-sdk-rusthttps://github.com/awsdocs/aws-doc-sdk-examples/tree/main/rust_dev_preview rus sd…...
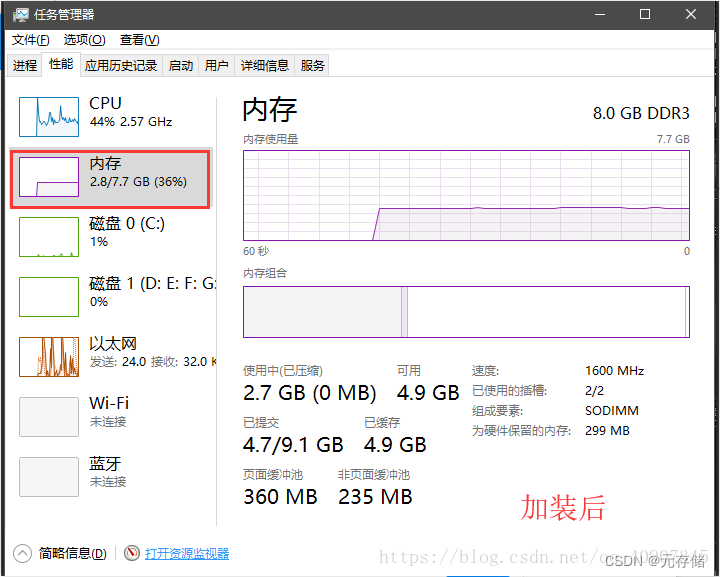
[安装之3] 笔记本加装固态和内存条教程(超详细)
由于笔记本是几年前买的了,当时是4000,现在用起来感到卡顿,启动、运行速度特别慢,就决定换个固态硬盘,加个内存条,再给笔记本续命几年。先说一下加固态硬盘SSD的好处:1.启动快 2.读取延迟小 3.写…...

极客时间左耳听风-高效学习
左耳听风——高效学习篇 P95 | 高效学习:端正学习态度 本人真实⬇️⬇️⬇️⬇️ “ 大部分人都认为自己爱学习,但是: 他们都是只有意识没有行动,他们是动力不足的人。 他们都不知道自己该学什么,他们缺乏方向和目标。…...
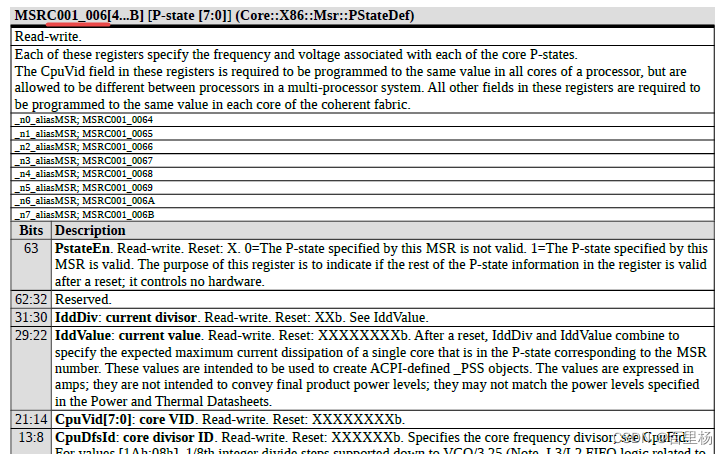
MSR寄存器访问
1.介绍 MSR是CPU的一组64位寄存器,每个MSR都有它的地址值(如下图所示),可以分别通过RDMSR 和WRMSR 两条指令进行读和写的操作。 如图中为8个P-state寄存器,地址分别为0xC001 0064 ~ 0xC001 006B,每个寄存…...
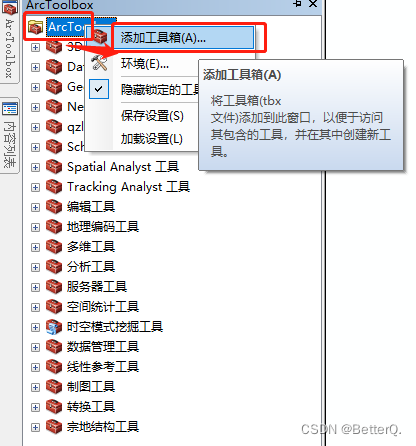
ArcGIS:模型构建器实现批量按掩膜提取影像
用研究区域的矢量数据来裁剪栅格数据集时,一般我们使用ArcGIS中的【按掩膜提取工具】。如果需要裁剪的栅格数据太多,处理起来非常的麻烦,虽然ArcGIS中有批处理的功能,但是还是需要手动选择输入输出数据。 如下图,鼠标…...

算法刷题打卡第94天: 找出给定方程的正整数解
找出给定方程的正整数解 难度:中等 给你一个函数 f(x, y) 和一个目标结果 z,函数公式未知,请你计算方程 f(x,y) z 所有可能的正整数 数对 x 和 y。满足条件的结果数对可以按任意顺序返回。 尽管函数的具体式子未知,但它是单调…...
:手搓截屏和帧率控制)
Python|GIF 解析与构建(5):手搓截屏和帧率控制
目录 Python|GIF 解析与构建(5):手搓截屏和帧率控制 一、引言 二、技术实现:手搓截屏模块 2.1 核心原理 2.2 代码解析:ScreenshotData类 2.2.1 截图函数:capture_screen 三、技术实现&…...

PHP和Node.js哪个更爽?
先说结论,rust完胜。 php:laravel,swoole,webman,最开始在苏宁的时候写了几年php,当时觉得php真的是世界上最好的语言,因为当初活在舒适圈里,不愿意跳出来,就好比当初活在…...
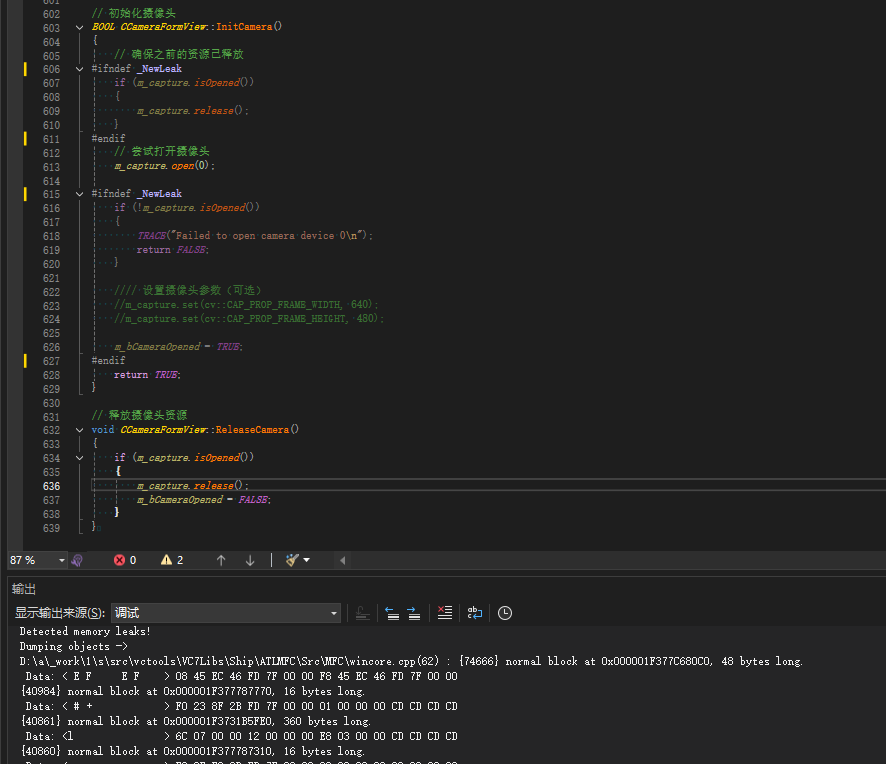
MFC内存泄露
1、泄露代码示例 void X::SetApplicationBtn() {CMFCRibbonApplicationButton* pBtn GetApplicationButton();// 获取 Ribbon Bar 指针// 创建自定义按钮CCustomRibbonAppButton* pCustomButton new CCustomRibbonAppButton();pCustomButton->SetImage(IDB_BITMAP_Jdp26)…...

在rocky linux 9.5上在线安装 docker
前面是指南,后面是日志 sudo dnf config-manager --add-repo https://download.docker.com/linux/centos/docker-ce.repo sudo dnf install docker-ce docker-ce-cli containerd.io -y docker version sudo systemctl start docker sudo systemctl status docker …...
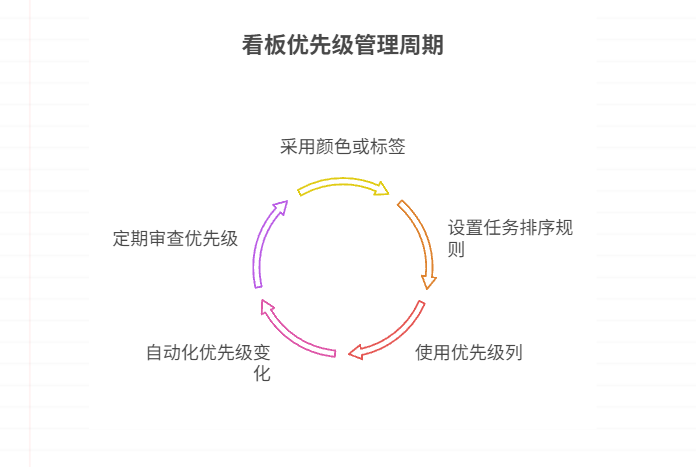
如何在看板中体现优先级变化
在看板中有效体现优先级变化的关键措施包括:采用颜色或标签标识优先级、设置任务排序规则、使用独立的优先级列或泳道、结合自动化规则同步优先级变化、建立定期的优先级审查流程。其中,设置任务排序规则尤其重要,因为它让看板视觉上直观地体…...

Qt Http Server模块功能及架构
Qt Http Server 是 Qt 6.0 中引入的一个新模块,它提供了一个轻量级的 HTTP 服务器实现,主要用于构建基于 HTTP 的应用程序和服务。 功能介绍: 主要功能 HTTP服务器功能: 支持 HTTP/1.1 协议 简单的请求/响应处理模型 支持 GET…...
Mac软件卸载指南,简单易懂!
刚和Adobe分手,它却总在Library里给你写"回忆录"?卸载的Final Cut Pro像电子幽灵般阴魂不散?总是会有残留文件,别慌!这份Mac软件卸载指南,将用最硬核的方式教你"数字分手术"࿰…...
ETLCloud可能遇到的问题有哪些?常见坑位解析
数据集成平台ETLCloud,主要用于支持数据的抽取(Extract)、转换(Transform)和加载(Load)过程。提供了一个简洁直观的界面,以便用户可以在不同的数据源之间轻松地进行数据迁移和转换。…...

【git】把本地更改提交远程新分支feature_g
创建并切换新分支 git checkout -b feature_g 添加并提交更改 git add . git commit -m “实现图片上传功能” 推送到远程 git push -u origin feature_g...

解决本地部署 SmolVLM2 大语言模型运行 flash-attn 报错
出现的问题 安装 flash-attn 会一直卡在 build 那一步或者运行报错 解决办法 是因为你安装的 flash-attn 版本没有对应上,所以报错,到 https://github.com/Dao-AILab/flash-attention/releases 下载对应版本,cu、torch、cp 的版本一定要对…...