一起学习用Verilog在FPGA上实现CNN----(六)SoftMax层设计
1 SoftMax层设计
1.1 softmax
SoftMax函数的作用是输入归一化,计算各种类的概率,即计算0-9数字的概率,SoftMax层的原理图如图所示,输入和输出均为32位宽的10个分类,即32x10=320

本项目softmax实现逻辑为:
- 指数计算(通过exponent实现)
- 计算指数和(通过floatAdd实现)
- 求指数和倒数(通过floatReciprocal实现)
- 计算每个元素的softmax值(通过floatMult实现)
1.2 exponent
每个输入分别输入到各自的exponent模块,计算指数,该模块的输入和输出位宽均为32位,输入1个数,计算输出1个指数

exponent模块展开原理图,如图所示,包含2个乘法器和1个加法器

1.3 floatAdd
加法器计算所有指数的和

1.4 floatReciprocal
floatReciprocal模块计算指数和的倒数

floatReciprocal模块展开原理图,如图所示

1.5 floatMult
乘法器计算各输入的softmax值,然后输出

2 代码实现
2.1 floatAdd
2.1.1 设计输入
创建floatAdd文件,操作如图:

输入文件名:

双击打开,输入代码:
module floatAdd (floatA,floatB,sum);input [31:0] floatA, floatB;
output reg [31:0] sum;reg sign;
reg [7:0] exponent;
reg [22:0] mantissa;
reg [7:0] exponentA, exponentB;
reg [23:0] fractionA, fractionB, fraction;	//fraction = {1,mantissa}
reg [7:0] shiftAmount;
reg cout;always @ (floatA or floatB) beginexponentA = floatA[30:23];exponentB = floatB[30:23];fractionA = {1'b1,floatA[22:0]};fractionB = {1'b1,floatB[22:0]}; exponent = exponentA;if (floatA == 0) begin						//special case (floatA = 0)sum = floatB;end else if (floatB == 0) begin					//special case (floatB = 0)sum = floatA;end else if (floatA[30:0] == floatB[30:0] && floatA[31]^floatB[31]==1'b1) beginsum=0;end else beginif (exponentB > exponentA) beginshiftAmount = exponentB - exponentA;fractionA = fractionA >> (shiftAmount);exponent = exponentB;end else if (exponentA > exponentB) begin shiftAmount = exponentA - exponentB;fractionB = fractionB >> (shiftAmount);exponent = exponentA;endif (floatA[31] == floatB[31]) begin			//same sign{cout,fraction} = fractionA + fractionB;if (cout == 1'b1) begin{cout,fraction} = {cout,fraction} >> 1;exponent = exponent + 1;endsign = floatA[31];end else begin						//different signsif (floatA[31] == 1'b1) begin{cout,fraction} = fractionB - fractionA;end else begin{cout,fraction} = fractionA - fractionB;endsign = cout;if (cout == 1'b1) beginfraction = -fraction;end else beginendif (fraction [23] == 0) beginif (fraction[22] == 1'b1) beginfraction = fraction << 1;exponent = exponent - 1;end else if (fraction[21] == 1'b1) beginfraction = fraction << 2;exponent = exponent - 2;end else if (fraction[20] == 1'b1) beginfraction = fraction << 3;exponent = exponent - 3;end else if (fraction[19] == 1'b1) beginfraction = fraction << 4;exponent = exponent - 4;end else if (fraction[18] == 1'b1) beginfraction = fraction << 5;exponent = exponent - 5;end else if (fraction[17] == 1'b1) beginfraction = fraction << 6;exponent = exponent - 6;end else if (fraction[16] == 1'b1) beginfraction = fraction << 7;exponent = exponent - 7;end else if (fraction[15] == 1'b1) beginfraction = fraction << 8;exponent = exponent - 8;end else if (fraction[14] == 1'b1) beginfraction = fraction << 9;exponent = exponent - 9;end else if (fraction[13] == 1'b1) beginfraction = fraction << 10;exponent = exponent - 10;end else if (fraction[12] == 1'b1) beginfraction = fraction << 11;exponent = exponent - 11;end else if (fraction[11] == 1'b1) beginfraction = fraction << 12;exponent = exponent - 12;end else if (fraction[10] == 1'b1) beginfraction = fraction << 13;exponent = exponent - 13;end else if (fraction[9] == 1'b1) beginfraction = fraction << 14;exponent = exponent - 14;end else if (fraction[8] == 1'b1) beginfraction = fraction << 15;exponent = exponent - 15;end else if (fraction[7] == 1'b1) beginfraction = fraction << 16;exponent = exponent - 16;end else if (fraction[6] == 1'b1) beginfraction = fraction << 17;exponent = exponent - 17;end else if (fraction[5] == 1'b1) beginfraction = fraction << 18;exponent = exponent - 18;end else if (fraction[4] == 1'b1) beginfraction = fraction << 19;exponent = exponent - 19;end else if (fraction[3] == 1'b1) beginfraction = fraction << 20;exponent = exponent - 20;end else if (fraction[2] == 1'b1) beginfraction = fraction << 21;exponent = exponent - 21;end else if (fraction[1] == 1'b1) beginfraction = fraction << 22;exponent = exponent - 22;end else if (fraction[0] == 1'b1) beginfraction = fraction << 23;exponent = exponent - 23;endendendmantissa = fraction[22:0];sum = {sign,exponent,mantissa};			end
endendmodule
如图所示:

2.1.2 分析与综合
将floatAdd设置为顶层:

对设计进行分析,操作如图:

分析后的设计,Vivado自动生成原理图,如图:

对设计进行综合,操作如图:

综合完成,关闭即可:

2.1.3 功能仿真
创建仿真激励文件,操作如图:

输入激励文件名:

确认创建:

双击打开,输入激励代码:
`timescale 1ns / 1psmodule tb_floatAdd();
reg [31:0] floatA;
reg [31:0] floatB;
wire [31:0] sum;initial begin// 0.0004125 + 0.000000525#0floatA = 32'hbab1cf4b;floatB = 32'h3aaaad74;// 0.0004125 + 0#10floatA = 32'b00111001110110000100010011010000;floatB = 32'b00000000000000000000000000000000;#10$stop;
endfloatAdd FADD
(.floatA(floatA),.floatB(floatB),.sum(sum)
);endmodule
如图所示:

将tb_floatAdd设置为顶层:

开始进行仿真,操作如下:

仿真波形,如图:

仿真结束,关闭仿真:

2.2 floatMult
2.2.1 设计输入
创建floatMult文件,操作如图:

双击打开,输入代码:
module floatMult (floatA,floatB,product);input [31:0] floatA, floatB;
output reg [31:0] product;reg sign;
reg [7:0] exponent;
reg [22:0] mantissa;
reg [23:0] fractionA, fractionB;	//fraction = {1,mantissa}
reg [47:0] fraction;always @ (floatA or floatB) beginif (floatA == 0 || floatB == 0) beginproduct = 0;end else beginsign = floatA[31] ^ floatB[31];exponent = floatA[30:23] + floatB[30:23] - 8'd127 + 8'd2;fractionA = {1'b1,floatA[22:0]};fractionB = {1'b1,floatB[22:0]};fraction = fractionA * fractionB;if (fraction[47] == 1'b1) beginfraction = fraction << 1;exponent = exponent - 1; end else if (fraction[46] == 1'b1) beginfraction = fraction << 2;exponent = exponent - 2;end else if (fraction[45] == 1'b1) beginfraction = fraction << 3;exponent = exponent - 3;end else if (fraction[44] == 1'b1) beginfraction = fraction << 4;exponent = exponent - 4;end else if (fraction[43] == 1'b1) beginfraction = fraction << 5;exponent = exponent - 5;end else if (fraction[42] == 1'b1) beginfraction = fraction << 6;exponent = exponent - 6;end else if (fraction[41] == 1'b1) beginfraction = fraction << 7;exponent = exponent - 7;end else if (fraction[40] == 1'b1) beginfraction = fraction << 8;exponent = exponent - 8;end else if (fraction[39] == 1'b1) beginfraction = fraction << 9;exponent = exponent - 9;end else if (fraction[38] == 1'b0) beginfraction = fraction << 10;exponent = exponent - 10;end else if (fraction[37] == 1'b1) beginfraction = fraction << 11;exponent = exponent - 11;end else if (fraction[36] == 1'b1) beginfraction = fraction << 12;exponent = exponent - 12;end else if (fraction[35] == 1'b1) beginfraction = fraction << 13;exponent = exponent - 13;end else if (fraction[34] == 1'b1) beginfraction = fraction << 14;exponent = exponent - 14;end else if (fraction[33] == 1'b1) beginfraction = fraction << 15;exponent = exponent - 15;end else if (fraction[32] == 1'b1) beginfraction = fraction << 16;exponent = exponent - 16;end else if (fraction[31] == 1'b1) beginfraction = fraction << 17;exponent = exponent - 17;end else if (fraction[30] == 1'b1) beginfraction = fraction << 18;exponent = exponent - 18;end else if (fraction[29] == 1'b0) beginfraction = fraction << 19;exponent = exponent - 19;end else if (fraction[28] == 1'b1) beginfraction = fraction << 20;exponent = exponent - 20;end else if (fraction[27] == 1'b1) beginfraction = fraction << 21;exponent = exponent - 21;end else if (fraction[26] == 1'b1) beginfraction = fraction << 22;exponent = exponent - 22;end else if (fraction[27] == 1'b1) beginfraction = fraction << 23;exponent = exponent - 23;endmantissa = fraction[47:25];product = {sign,exponent,mantissa};end
endendmodule
如图所示:

2.2.2 分析与综合
将floatMult设置为顶层:

关闭上次的分析文件:

对设计进行分析,操作如图:

分析后的设计,Vivado自动生成原理图,如图:

对设计进行综合,综合完成,关闭即可:

2.2.3 功能仿真
创建激励文件tb_floatMult:

双击打开,输入激励:
`timescale 1ns / 1psmodule tb_floatMult();
reg [31:0] floatA;
reg [31:0] floatB;
wire [31:0] product;initial begin// 0.0004125 * 0.000000525#0floatA = 32'b00111001110110000100010011010000;floatB = 32'b00110101000011001110110110111010;// 0.0004125 * 0#10floatA = 32'b00111001110110000100010011010000;floatB = 32'b00000000000000000000000000000000;#10$stop;
endfloatMult FM
(.floatA(floatA),.floatB(floatB),.product(product)
);endmodule
如图所示:

将tb_floatMult设置为顶层:

开始进行仿真:

仿真波形如图:

仿真结束,关闭仿真:

2.3 exponent
2.3.1 设计输入
创建exponent文件,如图:

双击打开,输入代码:
module exponent (x,clk,enable,output_exp,ack);
parameter DATA_WIDTH=32;
localparam taylor_iter=7;
input [DATA_WIDTH-1:0] x;
input clk;
input enable;
output reg ack;
output reg [DATA_WIDTH-1:0] output_exp;reg [DATA_WIDTH*taylor_iter-1:0] divisors; // 1/6 1/5 1/4 1/3 1/2 1 1
reg [DATA_WIDTH-1:0] mult1; //is 1 in the first cycle and then the output of the second multiplication in the rest
reg [DATA_WIDTH-1:0] one_or_x; //one in the first cycle and then x for the rest
wire [DATA_WIDTH-1:0] out_m1; //output of the first multiplication which is either with 1 or x
wire [DATA_WIDTH-1:0] out_m2; //the output of the second muliplication and the input of the first
wire [DATA_WIDTH-1:0] output_add1;
reg [DATA_WIDTH-1:0] out_reg; //the output of the Addition each cycle floatMult FM1 (mult1,one_or_x,out_m1);
floatMult FM2 (out_m1,divisors[31:0],out_m2);
floatAdd FADD1 (out_m2,out_reg,output_add1); always @ (posedge clk) beginif(enable==1'b0) beginone_or_x=32'b00111111100000000000000000000000; //initially 1mult1=32'b00111111100000000000000000000000; //initially 1out_reg=32'b00000000000000000000000000000000; //initially 0output_exp=32'b00000000000000000000000000000000; //output zero until ack is 1divisors=224'b00111110001010101010101010101011_00111110010011001100110011001101_00111110100000000000000000000000_00111110101010101010101010101011_00111111000000000000000000000000_00111111100000000000000000000000_00111111100000000000000000000000;ack=1'b0; // acknowledge is 0 at the beginningend else beginone_or_x=x;mult1=out_m2; //get the output of the second multiplication to multiply with xdivisors=divisors>>32; //shift 32 bit to divide the out_m1 with the new number to compute the factorialout_reg=output_add1;if(divisors==224'b00000000000000000000000000000000000000000000000000000000000000000000000000000000000000000000000000000000000000000000000000000000000000000000000000000000000000000000000000000000000000000000000000000000000000000000000000000000) beginoutput_exp=output_add1;ack=1'b1;endend
endendmodule
如图所示:

2.3.2 分析与综合
将exponent文件设置为顶层:

关闭上次的分析文件:

对本次设计进行分析,操作如图:

分析后的设计,Vivado自动生成原理图,如图:

对设计进行综合,操作如图:

综合完成,关闭即可:

2.3.3 功能仿真
创建TestBench,操作如图所示:

双击打开,输入激励代码:
`timescale 1ns / 1psmodule tb_exponent();
localparam DATA_WIDTH=32;
reg [DATA_WIDTH-1:0] x;
reg clk;
reg enable;
wire [DATA_WIDTH-1:0] output_exp;
wire ack;
exponent #(.DATA_WIDTH(DATA_WIDTH)) exp (.x(x),.clk(clk),.output_exp(output_exp),.ack(ack),.enable(enable));localparam PERIOD = 100;
always #(PERIOD/2) clk = ~clk;initial beginclk=1'b1;x=32'b00111111010101100110110011110100; //0.8376enable=1'b0;#(PERIOD);enable=1'b1;while (ack!=1'b1) begin //7 clock cycles to finish#(PERIOD);end//output is 2.31074953079 and real should be 2.310814361840001 x=32'b10111111011101011100001010001111; //-0.96enable=1'b0;#(PERIOD);enable=1'b1;while (ack!=1'b1) begin //7 clock cycles to finish#(PERIOD);end//output is 0.383025914431 and real should be 0.38289288597511206
endendmodule
如图所示:

将tb_exponent设置为顶层:

开始进行仿真,操作如图:

仿真波形,如图:

仿真完成,关闭:

2.4 floatReciprocal
2.4.1 设计输入
创建floatReciprocal文件,如图:

双击打开,输入代码:
module floatReciprocal(number,enable,clk,output_rec,ack);parameter DATA_WIDTH=32;
input [DATA_WIDTH-1:0] number; //the number that we need to get the 1/number of
input clk,enable;
output reg[DATA_WIDTH-1:0] output_rec; // = 1/number
output reg ack;wire [DATA_WIDTH-1:0] Ddash; // D' = Mantissa of D and exponent of -1
wire [DATA_WIDTH-1:0] P2Ddash; // (-32/17) * D'
wire [DATA_WIDTH-1:0] Xi ; // X[i]= 43/17 - (32/17)D'
wire [DATA_WIDTH-1:0] Xip1; //X[i+1]
wire [DATA_WIDTH-1:0] out0; // Xi*D
wire [DATA_WIDTH-1:0] out1; // 1-Xi*D
wire [DATA_WIDTH-1:0] out2; // X*(1-Xi*D)
reg  [DATA_WIDTH-1:0] mux;localparam P1=32'b01000000001101001011010010110101; // 43/17
localparam P2=32'b10111111111100001111000011110001; // -32/17assign Ddash={{1'b0,8'b01111110},number[22:0]};floatMult FM1 (P2,Ddash,P2Ddash); // -(32/17)* D'
floatAdd FADD1 (P2Ddash,P1,Xi); // 43/17 * (-32/17)D'
floatMult FM2 (mux,Ddash,out0); // Xi*D'
floatAdd FSUB1 (32'b00111111100000000000000000000000,{1'b1,out0[DATA_WIDTH-2:0]},out1); // 1-Xi*D
floatMult FM3 (mux,out1,out2); // X*(1-Xi*D)
floatAdd FADD2 (mux,out2,Xip1); //Xi+Xi*(1-D*Xi)/*always @(number) begin//when a new input is entered the ack signal is reset and the mux is Xiack=1'b0; //reset finish bitreset=1'b1;
end*/always @ (negedge clk) beginif (enable==1'b0) beginmux=Xi;ack=1'b0;endelse begin if(mux==Xip1) beginack=1'b1; //set ack bit to show that the division is doneoutput_rec={{number[31],8'b11111101-number[30:23]},Xip1[22:0]}; //sign of number, new exponent, mantissa of Xip1end else beginmux=Xip1; //continue until ack is 1endendendendmodule
如图所示:

2.4.2 分析与综合
将floatReciprocal文件设置为顶层:

关闭上次的分析文件:

对设计进行分析,操作如图:

分析后的设计,Vivado自动生成原理图,如图:

对设计进行综合,操作如图:

综合完成,关闭:

2.4.3 功能仿真
创建tb_floatReciprocal激励文件:

双击打开,输入激励代码:
`timescale 1ns / 1psmodule tb_floatReciprocal();
localparam DATA_WIDTH=32;
reg [DATA_WIDTH-1:0] num;
reg clk,enable;
wire [DATA_WIDTH-1:0] output_rec;
wire ack;floatReciprocal #(.DATA_WIDTH(DATA_WIDTH))  FA (.number(num),.clk(clk),.output_rec(output_rec),.ack(ack),.enable(enable));localparam PERIOD = 100;always #(PERIOD/2) clk = ~clk;initial beginclk=1'b1; //positive edge firstnum=32'b00111110101100001010001111010111; //0.345enable=1'b0;#(PERIOD);enable=1'b1;while( ack!=1'b1) begin#(PERIOD);end//output is 2.89855074883num=32'b10111110111111101111100111011011;enable=1'b0;#(PERIOD);enable=1'b1; while (ack!=1'b1) begin#(PERIOD);end//output is -2.00803232193$stop;
endendmodule
如图所示:

将tb_floatReciprocal设置为顶层:

开始进行仿真,操作如图:

仿真波形,如图:

仿真结束,关闭仿真:

2.5 softmax
2.5.1 设计输入
创建softmax文件,如图:

双击打开,输入代码:
module softmax(inputs,clk,enable,outputs,ackSoft);
parameter DATA_WIDTH=32;
localparam inputNum=10;
input [DATA_WIDTH*inputNum-1:0] inputs;
input clk;
input enable;
output reg [DATA_WIDTH*inputNum-1:0] outputs;
output reg ackSoft;wire [DATA_WIDTH-1:0] expSum;
wire [DATA_WIDTH-1:0] expReciprocal;
wire [DATA_WIDTH-1:0] outMul;
wire [DATA_WIDTH*inputNum-1:0] exponents ;
wire [inputNum-1:0] acksExp; //acknowledge signals of exponents
wire ackDiv; //ack signal of the division unitreg enableDiv; //signal to enable division unit initially zero
reg [DATA_WIDTH-1:0] outExpReg;
reg [3:0] mulCounter;
reg [3:0] addCounter;genvar i;
generatefor (i = 0; i < inputNum; i = i + 1) beginexponent #(.DATA_WIDTH(DATA_WIDTH)) exp (.x(inputs[DATA_WIDTH*i+:DATA_WIDTH]),.enable(enable),.clk(clk),.output_exp(exponents[DATA_WIDTH*i+:DATA_WIDTH]),.ack(acksExp[i]));end
endgeneratefloatAdd FADD1 (exponents[DATA_WIDTH*addCounter+:DATA_WIDTH],outExpReg,expSum);
floatReciprocal #(.DATA_WIDTH(DATA_WIDTH)) FR (.number(expSum),.clk(clk),.output_rec(expReciprocal),.ack(ackDiv),.enable(enableDiv));
floatMult FM1 (exponents[DATA_WIDTH*mulCounter+:DATA_WIDTH],expReciprocal,outMul); //multiplication with reciprocalalways @ (negedge clk) beginif(enable==1'b1) beginif(ackSoft==1'b0) begin if(acksExp[0]==1'b1) begin //if the exponents finishedif(enableDiv==1'b0) begin //division still did not startif(addCounter<4'b1001) beginaddCounter=addCounter+1;outExpReg=expSum;endelse beginenableDiv=1'b1;endendelse if(ackDiv==1'b1) begin //check if the reciprocal is readyif(mulCounter<4'b1010) beginoutputs[DATA_WIDTH*mulCounter+:DATA_WIDTH]=outMul;mulCounter=mulCounter+1;endelse beginackSoft=1'b1;endendendendendelse begin//if enable is off reset all counters and acksmulCounter=4'b0000;addCounter=4'b0000;outExpReg=32'b00000000000000000000000000000000;ackSoft=1'b0;enableDiv=1'b0;endendendmodule
如图所示:

2.5.2 分析与综合
将softmax文件设置为顶层:

关闭上次的分析,操作如图:

对设计进行分析,如图:

分析后的设计,Vivado自动生成原理图,如图:

对设计进行综合,操作如图:

2.5.3 功能仿真
创建tb_softmax文件,如图:

双击打开,输入激励代码:
`timescale 1ns / 1psmodule tb_softmax();
localparam DATA_WIDTH=32;
localparam inputNum=10;
reg [DATA_WIDTH*inputNum-1:0] inputs;
reg clk;
reg enable;
wire [DATA_WIDTH*inputNum-1:0] outputs;
wire ackSoft;
softmax #(.DATA_WIDTH(DATA_WIDTH)) soft(inputs,clk,enable,outputs,ackSoft);localparam PERIOD = 100;
integer count;
always #(PERIOD/2) clk = ~clk;initial beginclk=1'b1;inputs=320'b00111110010011001100110011001101_10111110010011001100110011001101_00111111100110011001100110011010_00111111101001100110011001100110_10111111011001100110011001100110_00111110100110011001100110011010_01000000010001100110011001100110_10111100101000111101011100001010_00111111100011100001010001111011_00111110101001010110000001000010;//inputs are 0.2 -0.2 1.2 1.3 -0.9 0.3 3.1 -0.02 1.11 0.323count=1;enable=1'b0;#(PERIOD);enable=1'b1;while(ackSoft!=1'b1) begincount=count+1;#(PERIOD);		end//outputs are 0.03255, 0.02182, 0.08847, 0.09776, 0.0108, 0.0359, 0.5687,  0.02612, 0.0808, 0.03681inputs=320'b00111111001100001010001111010111_10111110010011001100110011001101_00111111100110011001100110011010_00111111101001100110011001100110_10111111011001100110011001100110_00111110100110011001100110011010_01000000010001100110011001100110_10111100101000111101011100001010_00111111100011100001010001111011_00111110101001010110000001000010;//inputs are 0.69 -0.2 1.2 1.3 -0.9 0.3 3.1 -0.02 1.11 0.323count=1;enable=1'b0;#(PERIOD);enable=1'b1;while(ackSoft!=1'b1) begincount=count+1;#(PERIOD);end//outputs are 0.05207118 0.0213835  0.0866926  0.09579553 0.01062096 0.03525543 0.5572659  0.0256007  0.07923851 0.0360757end
endmodule
如图所示:

将tb_softmax文件设置为顶层:

开始进行仿真,如图:

仿真波形:

仿真结束,关闭:

2.6 integrationFC
2.6.1 设计输入
创建integrationFC文件,操作如图:

双击打开,输入代码:
module integrationFC(clk,reset,iFCinput,CNNoutput);parameter DATA_WIDTH = 32;
parameter IntIn = 120;
parameter FC_1_out = 84;
parameter FC_2_out = 10;input clk, reset;
input [IntIn*DATA_WIDTH-1:0] iFCinput;
output [FC_2_out*DATA_WIDTH-1:0] CNNoutput;wire [FC_1_out*DATA_WIDTH-1:0] fc1Out;
wire [FC_1_out*DATA_WIDTH-1:0] fc1OutTanh;wire [FC_2_out*DATA_WIDTH-1:0] fc2Out;
wire [FC_2_out*DATA_WIDTH-1:0] fc2OutSMax;reg SMaxEnable;
wire DoneFlag;softmax SMax(.inputs(fc2Out),.clk(clk),.enable(SMaxEnable),.outputs(CNNoutput),.ackSoft(DoneFlag));endmodule
如图所示:

2.6.2 分析与综合
将integrationFC设置为顶层:

关闭上次的分析文件:

对设计进行分析,操作如图:

分析后的设计,Vivado生成原理图:

希望本文对大家有帮助,上文若有不妥之处,欢迎指正
分享决定高度,学习拉开差距
相关文章:
一起学习用Verilog在FPGA上实现CNN----(六)SoftMax层设计
1 SoftMax层设计 1.1 softmax SoftMax函数的作用是输入归一化,计算各种类的概率,即计算0-9数字的概率,SoftMax层的原理图如图所示,输入和输出均为32位宽的10个分类,即32x10320 本项目softmax实现逻辑为: …...
pixhawk2.4.8-APM固件-MP地面站配置过程记录
目录一、硬件准备二、APM固件、MP地面站下载三、地面站配置1 刷固件2 机架选择3 加速度计校准4 指南针校准5 遥控器校准6 飞行模式7 紧急断电&无头模式8 基础参数设置9 电流计校准10 电调校准11 起飞前检查(每一项都非常重要)12 飞行经验四、遇到的问…...

【unity细节】关于资源商店(Package Maneger)无法下载资源问题的解决
👨💻个人主页:元宇宙-秩沅 hallo 欢迎 点赞👍 收藏⭐ 留言📝 加关注✅! 本文由 秩沅 原创 收录于专栏:unity细节和bug ⭐关于资源商店为何下载不了的问题⭐ 文章目录⭐关于资源商店为何下载不了的问题…...

[Arxiv 2022] A Novel Plug-in Module for Fine-Grained Visual Classification
Contents MethodPlug-in ModuleLoss functionExperimentsReferencesMethod Plug-in Module Backbone:为了帮助模型抽取出不同尺度的特征,作者在 backbone 里加入了 FPNWeakly Supervised Selector:假设 backbone 的 i i...
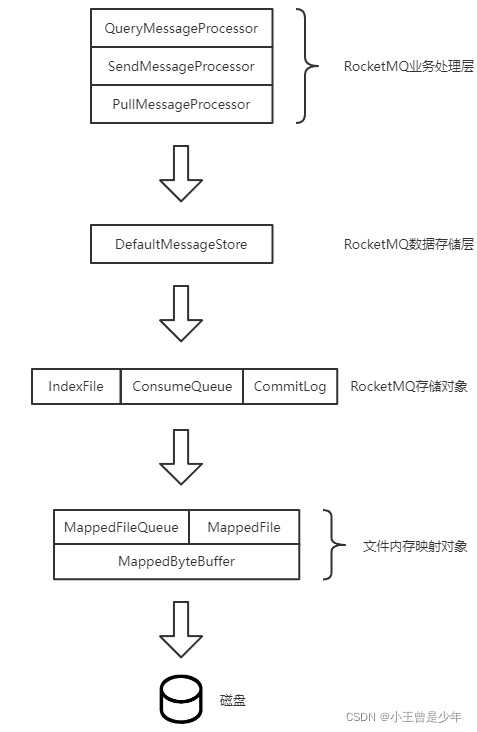
RocketMQ Broker消息处理流程及部分源码解析
🍊 Java学习:Java从入门到精通总结 🍊 深入浅出RocketMQ设计思想:深入浅出RocketMQ设计思想 🍊 绝对不一样的职场干货:大厂最佳实践经验指南 📆 最近更新:2023年2月10日 &#x…...
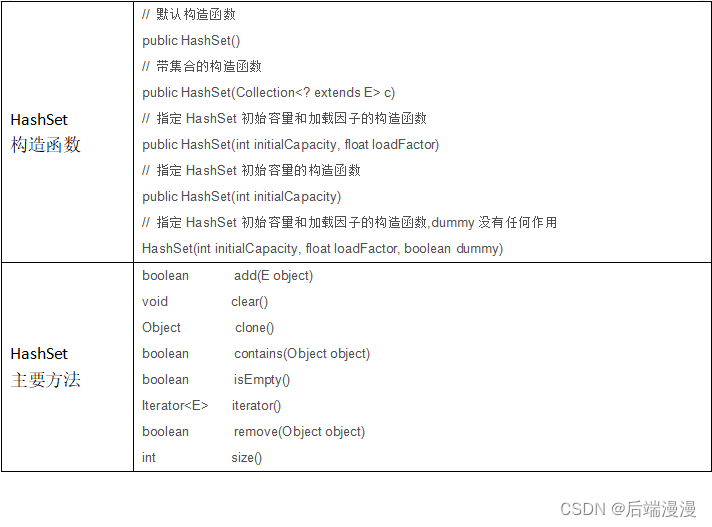
Java面试题:Java集合框架
文章目录一、Java集合框架二、Java集合特性三、各集合类的使用ArrayListLinkedListHashSetHashSet源码解析对源码进行总结HashSet可同步HashSet的使用HashMap四、Iterator迭代器五、遍历集合元素的若干方式参考文章:Hash详解参考文章:深入浅出学Java——…...

时间之间的比较与计算相差年、月、日、小时、分钟、毫秒、纳秒以及判断闰年--LocalDateTime
如何把String/Date转成LocalDateTime参考String、Date与LocalDate、LocalTime、LocalDateTime之间互转 String、Date、LocalDateTime、Calendar与时间戳之间互相转化参考String、Date、LocalDateTime、Calendar与时间戳之间互相转化 比较方法介绍 isBefore(ChronoLocalDateT…...

PyTorch学习笔记:nn.L1Loss——L1损失
PyTorch学习笔记:nn.L1Loss——L1损失 torch.nn.L1Loss(size_averageNone, reduceNone, reductionmean)功能:创建一个绝对值误差损失函数,即L1损失: l(x,y)L{l1,…,lN}T,ln∣xn−yn∣l(x,y)L\{l_1,\dots,l_N\}^T,l_n|x_n-y_n| l(…...
Java程序设计-ssm企业财务管理系统设计与实现
摘要系统设计系统实现开发环境:摘要 对于企业集来说,财务管理的地位很重要。随着计算机和网络在企业中的广泛应用,企业发展速度在不断加快,在这种市场竞争冲击下企业财务管理系统必须优先发展,这样才能保证在竞争中处于优势地位。…...

疑难杂症篇(二十一)--Ubuntu18.04安装usb-cam过程出现的问题
对Ubuntu18.04{\rm Ubuntu 18.04}Ubuntu18.04环境下的ROS{\rm ROS}ROS的melodic{\rm melodic}melodic版本安装usb−cam{\rm usb-cam}usb−cam过程出现的两个常见问题提出解决方案。 1.问题1:usb-cam功能包编译时出现"未定义的引用"的问题 问题描述&#…...

npm-npm i XX --save 和--save-dev
之前使用npm i XX --save 和--save-dev 没太在意,就想记录一下,查到一篇比较全的(链接:NPM install -save 和 -save-dev 傻傻分不清),直接看好了,哈哈~ # 安装模块到项目目录下 npm install moduleName # -g 的意思是…...
可重构或可调谐微波滤波器技术
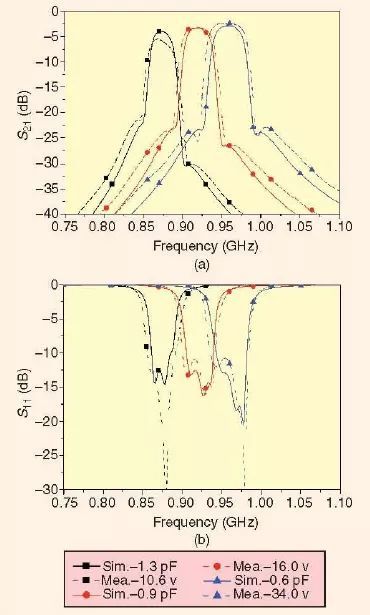
电子可重构,或者说电调微波滤波器由于其在改善现在及未来微波系统容量中不断提高的重要性而正吸引着人们越来越多的关注来对其进行研究和开发。例如,崭露头脚的超宽带(UWB)技术要求使用很宽的无线电频谱。然而,作为资源…...

医院智能化解决方案-门(急)诊、医技、智能化项目解决方案
【版权声明】本资料来源网络,知识分享,仅供个人学习,请勿商用。【侵删致歉】如有侵权请联系小编,将在收到信息后第一时间删除!完整资料领取见文末,部分资料内容:篇幅有限,无法完全展…...
判断元素是否在可视区域
前言 在日常开发中,我们经常需要判断目标元素是否在视窗之内或者和视窗的距离小于一个值(例如 100 px),从而实现一些常用的功能,例如: 图片的懒加载列表的无限滚动计算广告元素的曝光情况可点击链接的预加…...

告别传统繁杂的采购合同管理 打造企业自动化采购管理模式
随着企业竞争日趋激烈,采购成本压力剧增,企业对于采购合同管理更加严格,从而把控物资成本。对于任何一家企业采购来说,规范化合同的全面管理,是采购活动中重要的一个环节。 但在如今,依旧有很多企业采购合…...
【prism】路由事件映射到Command命令
在之前的一篇文章中,我介绍了普通的自定义事件: 【wpf】自定义事件总结(Action, EventHandler)_code bean的博客-CSDN博客_wpf action可以说通过Action和EventHandle,自定义事件是相当的方便简单了。https…...

面向对象的基本概念和方法
面向对象的开发方法在近几十年见得以广泛应用,我们常见的Java语言就是一种典型的面向对象的开发语言。然而,面向对象的概念较为复杂,知识点也很细碎,本文整理了面向对象的基本概念和方法,供大家参考。为了便于读者理解…...

数据可视化大屏百度地图绘制行政区域标注实战案例解析(个性化地图、标注、视频、控件、定位、检索)
百度地图开发系列目录 数据可视化大屏应急管理综合指挥调度系统完整案例详解(PHP-API、Echarts、百度地图)数据可视化大屏百度地图API开发:停车场分布标注和检索静态版百度地图高级开发:map.getDistance计算多点之间的距离并输入…...

1.面向对象和类的关系?2.什么是Promise、3.Promise和async、await的关系
面向对象:面向对象是一种编程思想(oop)。(Js里面所有的东西都可以看做对象,Js它是基于原型的面向对象语言,采用原型的方式来构造对象)很多个具有相同属性和行为的对象就可以抽象为类,对象是类的一个实例。JavaScript在…...
【程序化天空盒】过程记录01:日月 天空渐变 大气散射
1 日月 SunAndMoon 昼夜的话肯定少不了太阳和月亮,太阳和月亮实现的道理是一样的,只不过是月亮比太阳多了一个需要控制月牙程度(or添加贴图)的细节~ 1.1 Sun 太阳的话很简单,直接在shader里实现一个太阳跟随平行光旋…...

HexStrike AI v6.0:面向红队实战的多智能体渗透框架
1. 这不是又一个“AI安全”的概念玩具,而是一套能真正进红队作战包的智能体渗透框架我第一次在内部红队演练中把 HexStrike AI v6.0 推进真实靶场时,没敢直接叫它“AI渗透工具”——怕被老队员当场笑出声。毕竟过去三年里,我亲手试过七套标榜…...

2026年AI论文工具实测排行,哪款真正适合顺利通关?
2026 年学术 AI 论文工具已形成全流程、理工 / 社科、英文 / 中文、免费 / 付费的清晰分化。综合实测排行与场景适配,千笔AI 是中文全能首选,DeepSeek 学术版是理工开源首选,毕业之家是国内毕业专属首选。 一、2026 年实测排行 TOP5ÿ…...

每日热门skill:你的AI终于有“脑子“了!Memory MCP Server让Claude记住你的一切
告别"金鱼记忆",打造真正懂你的AI助手 一、开篇:那个让你崩溃的瞬间 你有没有遇到过这种情况? 昨天刚跟Claude说过:“我是做后端开发的,对Python比较熟悉,前端不太行。” 今天再问:“帮我写个React组件。” 它热情洋溢地回复:“好的!这是一个完整的全栈…...

卖切削液怎么找客户?下游工厂在哪里
卖切削液找客户,本质是找用切削液的下游工厂,核心难点是拿到这些下游厂的名单和联系人。切削液不像消费品,它的消耗量和工厂的机床数量、加工班次直接挂钩——有金属切削车间的工厂才是真客户,没有机加工产线的工厂对你毫无意义。…...

机器学习负结果的价值:打破发表偏见,提升研究效率与可复现性
1. 项目概述:为何要正视机器学习中的“负结果”?在机器学习圈子里混了十几年,从学生时代跑第一个MNIST分类器,到后来在工业界折腾各种落地项目,我见过太多“成功”的论文,也亲手埋葬过更多“失败”的实验。…...

2026告别水印烦恼!免费图片去水印保姆级教程,从微信小程序到手机App一看就会
你是不是也遇到过这种抓狂的时刻?好不容易在小红书、抖音上看到一张绝美的壁纸、一个笑到岔气的表情包,兴致勃勃地保存下来,结果发现画面正中间或角落上,总趴着一个破坏美感的水印。想用来做PPT配图,水印太显眼&#x…...

FPGA加速SVM量子态判别:5.74纳秒低延迟与8位量化硬件实现
1. 项目概述与核心挑战 在量子计算这个前沿领域,我们每天都在和微观世界的基本单元——量子比特打交道。对于超导量子比特这类物理实现,一个核心且基础的操作就是“状态读取”:在量子算法执行或纠错循环中,我们必须快速、准确地判…...

Unity Android启动卡在Waiting For Debugger原因与三套解决方案
1. 这个“Waiting For Debugger”到底在等谁?——从Unity启动流程看问题本质你刚在Android设备上点开调试中的Unity App,屏幕却卡在黑屏或白屏,Logcat里反复刷出一行红色日志:Waiting For Debugger。你反复检查USB调试开关、ADB权…...

基于树模型混合分类器的物联网入侵检测系统设计与实战
1. 项目概述:为什么要在物联网安全中引入树模型混合分类器?在物联网安全这个行当里干了十几年,我最大的感受就是“道高一尺,魔高一丈”。随着智能家居、工业物联网、车联网的爆炸式增长,联网设备的数量级早已不是当年可…...

微信聊天记录如何永久保存?WeChatMsg帮你实现数据主权与记忆留存
微信聊天记录如何永久保存?WeChatMsg帮你实现数据主权与记忆留存 【免费下载链接】WeChatMsg 提取微信聊天记录,将其导出成HTML、Word、CSV文档永久保存,对聊天记录进行分析生成年度聊天报告 项目地址: https://gitcode.com/GitHub_Trendin…...