C++ 并发编程实战 第九章
目录
9.1 线程池
9.1.1 最简易可行的线程池
9.1.2 等待提交给线程池的任务完成运行
9.1.3等待其他任务完成的任务
9.1.4 避免任务队列上的争夺
9.1.5 任务窃取
9.2 中断线程
9.2.1 发起一个线程,以及把他中断
9.2.2 检测线程是否被中断
9.2.3 中断条件变量上的等待
9.2.4 中断条件变量std::condition_variable_any上的等待
9.2.5 中断其他阻塞型等待
9.2.6 处理中断
9.2.7 在应用程序推出时中断后台任务
9.3 小结
参考:https://github.com/xiaoweiChen/CPP-Concurrency-In-Action-2ed-2019/blob/master/content/chapter9/9.1-chinese.md
9.1 线程池
大多数系统中,将每个任务指定给某个线程是不切实际的,不过可以利用并发性,进行并发执行。线程池提供了这样的功能,将提交到线程池中的任务并发执行,提交的任务将会挂在任务队列上。工作线程会从队列中的获取任务,当任务执行完成后,再从任务队列中获取下一个任务。
创建一个线程池时,会遇到几个关键性的设计问题,比如:可使用的线程数量,高效的任务分配方式,以及是否需要等待一个任务完成。
9.1.1 最简易可行的线程池
代码9.1 简单的线程池
class thread_pool
{std::atomic_bool done;thread_safe_queue<std::function<void()> > work_queue;  // 1std::vector<std::thread> threads;  // 2join_threads joiner;  // 3void worker_thread(){while(!done)  // 4{std::function<void()> task;if(work_queue.try_pop(task))  // 5{task();  // 6}else{std::this_thread::yield();  // 7}}}public:thread_pool():done(false),joiner(threads){unsigned const thread_count=std::thread::hardware_concurrency();  // 8try{for(unsigned i=0;i<thread_count;++i){threads.push_back( std::thread(&thread_pool::worker_thread,this));  // 9}}catch(...){done=true;  // 10throw;}}~thread_pool(){done=true;  // 11}template<typename FunctionType>void submit(FunctionType f){work_queue.push(std::function<void()>(f));  // 12}
};这样简单的线程池就完成了,特别是任务没有返回值,或需要执行阻塞操作的任务。很多情况下,这样的线程池是不够用的,其他情况使用这样简单的线程池可能会出现问题,比如:死锁。同样,在简单例子中使用std::async能提供更好的功能。
9.1.2 等待提交给线程池的任务完成运行
第8章中的例子中,线程间的任务划分完成后,代码会显式生成新线程,主线程通常是等待新线程在返回调用之后结束,确保所有任务都完成。使用线程池就需要等待任务提交到线程池中,而非直接提交给单个线程。与基于std::async的方法类似,使用代码9.1中的简单线程池,使用第4章中提到的工具:条件变量和future。虽然会增加代码的复杂度,不过要比直接对任务进行等待好很多。
通过增加线程池的复杂度,可以直接等待任务完成。使用submit()函数返回对任务描述的句柄,可用来等待任务的完成。任务句柄会用条件变量或future进行包装,从而简化线程池的实现。
一种特殊的情况是,执行任务的线程需要返回结果到主线程上进行处理。本这种情况下,需要用future对最终的结果进行转移。代码9.2展示了对简单线程池的修改,通过修改就能等待任务完成,以及在工作线程完成后,返回一个结果到等待线程中去,不过std::packaged_task<>实例是不可拷贝的,仅可移动,所以不能再使用std::function<>来实现任务队列,因为std::function<>需要存储可复制构造的函数对象。包装一个自定义函数,用来处理可移动的类型,就是一个带有函数操作符的类型擦除类。只需要处理没有入参的函数和无返回的函数即可,所以这只是一个简单的虚函数调用。
代码9.2 可等待任务的线程池
class function_wrapper
{struct impl_base {virtual void call()=0;virtual ~impl_base() {}};std::unique_ptr<impl_base> impl;template<typename F>struct impl_type: impl_base{F f;impl_type(F&& f_): f(std::move(f_)) {}void call() { f(); }};
public:template<typename F>function_wrapper(F&& f):impl(new impl_type<F>(std::move(f))){}void operator()() { impl->call(); }function_wrapper() = default;function_wrapper(function_wrapper&& other):impl(std::move(other.impl)){}function_wrapper& operator=(function_wrapper&& other){impl=std::move(other.impl);return *this;}function_wrapper(const function_wrapper&)=delete;function_wrapper(function_wrapper&)=delete;function_wrapper& operator=(const function_wrapper&)=delete;
};class thread_pool
{thread_safe_queue<function_wrapper> work_queue;  // 使用function_wrapper,而非使用std::functionvoid worker_thread(){while(!done){function_wrapper task;if(work_queue.try_pop(task)){task();}else{std::this_thread::yield();}}}
public:template<typename FunctionType>std::future<typename std::result_of<FunctionType()>::type>  // 1submit(FunctionType f){typedef typename std::result_of<FunctionType()>::typeresult_type;  // 2std::packaged_task<result_type()> task(std::move(f));  // 3std::future<result_type> res(task.get_future());  // 4work_queue.push(std::move(task));  // 5return res;  // 6}// 和之前一样
};
9.1.3等待其他任务完成的任务
最简单的方法就是在thread_pool中添加一个新函数,来执行任务队列上的任务,并对线程池进行管理。高级线程池的实现可能会在等待函数中添加逻辑,或等待其他函数来处理这个任务,优先的任务会让其他的任务进行等待。下面代码中的实现,就展示了一个新run_pending_task()函数,对于快速排序的修改将会在代码9.5中展示。
代码9.4 run_pending_task()函数实现
void thread_pool::run_pending_task()
{function_wrapper task;if(work_queue.try_pop(task)){task();}else{std::this_thread::yield();}
}
下面快速排序算法的实现要比代码8.1中版本简单许多,因为所有线程管理逻辑都移到线程池中了。
代码9.5 基于线程池的快速排序实现
template<typename T>
struct sorter  // 1
{thread_pool pool;  // 2std::list<T> do_sort(std::list<T>& chunk_data){if(chunk_data.empty()){return chunk_data;}std::list<T> result;result.splice(result.begin(),chunk_data,chunk_data.begin());T const& partition_val=*result.begin();typename std::list<T>::iterator divide_point=std::partition(chunk_data.begin(),chunk_data.end(),[&](T const& val){return val<partition_val;});std::list<T> new_lower_chunk;new_lower_chunk.splice(new_lower_chunk.end(),chunk_data,chunk_data.begin(),divide_point);std::future<std::list<T> > new_lower=  // 3pool.submit(std::bind(&sorter::do_sort,this,std::move(new_lower_chunk)));std::list<T> new_higher(do_sort(chunk_data));result.splice(result.end(),new_higher);while(!new_lower.wait_for(std::chrono::seconds(0)) ==std::future_status::timeout){pool.run_pending_task();  // 4}result.splice(result.begin(),new_lower.get());return result;}
};template<typename T>
std::list<T> parallel_quick_sort(std::list<T> input)
{if(input.empty()){return input;}sorter<T> s;return s.do_sort(input);
}
9.1.4 避免任务队列上的争夺
为了避免乒乓缓存,每个线程建立独立的任务队列。这样,每个线程就会将新任务放在自己的任务队列上,并且当线程上的任务队列没有任务时,去全局的任务列表中取任务。下面列表中的实现,使用了一个thread_local变量,来保证每个线程都拥有自己的任务列表(如全局列表那样)。
代码9.6 线程池——线程具有本地任务队列
class thread_pool
{thread_safe_queue<function_wrapper> pool_work_queue;typedef std::queue<function_wrapper> local_queue_type;  // 1static thread_local std::unique_ptr<local_queue_type>local_work_queue;  // 2void worker_thread(){local_work_queue.reset(new local_queue_type);  // 3while(!done){run_pending_task();}}public:template<typename FunctionType>std::future<typename std::result_of<FunctionType()>::type>submit(FunctionType f){typedef typename std::result_of<FunctionType()>::type result_type;std::packaged_task<result_type()> task(f);std::future<result_type> res(task.get_future());if(local_work_queue)  // 4{local_work_queue->push(std::move(task));}else{pool_work_queue.push(std::move(task));  // 5}return res;}void run_pending_task(){function_wrapper task;if(local_work_queue && !local_work_queue->empty())  // 6{task=std::move(local_work_queue->front());local_work_queue->pop();task();}else if(pool_work_queue.try_pop(task))  // 7{task();}else{std::this_thread::yield();}}
// rest as before
};
9.1.5 任务窃取
任务分配不均时,造成的结果就是:某个线程本地队列中有很多任务的同时,其他线程无所事事。例如:举一个快速排序的例子,一开始的数据块能在线程池上被处理,因为剩余部分会放在工作线程的本地队列上进行处理,这样的使用方式也违背使用线程池的初衷。
幸好这个问题有解:本地工作队列和全局工作队列上没有任务时,可从别的线程队列中窃取任务。
代码9.7 基于锁的任务窃取队列
class work_stealing_queue
{
private:typedef function_wrapper data_type;std::deque<data_type> the_queue;  // 1mutable std::mutex the_mutex;public:work_stealing_queue(){}work_stealing_queue(const work_stealing_queue& other)=delete;work_stealing_queue& operator=(const work_stealing_queue& other)=delete;void push(data_type data)  // 2{std::lock_guard<std::mutex> lock(the_mutex);the_queue.push_front(std::move(data));}bool empty() const{std::lock_guard<std::mutex> lock(the_mutex);return the_queue.empty();}bool try_pop(data_type& res)  // 3{std::lock_guard<std::mutex> lock(the_mutex);if(the_queue.empty()){return false;}res=std::move(the_queue.front());the_queue.pop_front();return true;}bool try_steal(data_type& res)  // 4{std::lock_guard<std::mutex> lock(the_mutex);if(the_queue.empty()){return false;}res=std::move(the_queue.back());the_queue.pop_back();return true;}
};
这就说明每个线程中的“队列”是一个后进先出的栈,最新推入的任务将会第一个执行。从缓存角度来看,这将对性能有所提升,因为任务相关的数据一直存于缓存中,要比提前将任务相关数据推送到栈上好。同样,这种方式很好的映射到某个算法上,例如:快速排序。之前的实现中,每次调用do_sort()都会推送一个任务到栈上,并且等待这个任务执行完毕。通过对最新推入任务的处理,就可以保证在将当前所需数据块处理完成前,其他任务是否需要这些数据块,从而可以减少活动任务的数量和栈的使用次数。try_steal()从队列末尾获取任务,为了减少与try_pop()之间的竞争。使用在第6、7章中的所讨论的技术来让try_pop()和try_steal()并发执行。
现在拥有了一个很不错的任务队列,并且支持窃取。那如何在线程池中使用这个队列呢?这里简单的展示一下。
代码9.8 使用任务窃取的线程池
class thread_pool
{typedef function_wrapper task_type;std::atomic_bool done;thread_safe_queue<task_type> pool_work_queue;std::vector<std::unique_ptr<work_stealing_queue> > queues;  // 1std::vector<std::thread> threads;join_threads joiner;static thread_local work_stealing_queue* local_work_queue;  // 2static thread_local unsigned my_index;void worker_thread(unsigned my_index_){my_index=my_index_;local_work_queue=queues[my_index].get();  // 3while(!done){run_pending_task();}}bool pop_task_from_local_queue(task_type& task){return local_work_queue && local_work_queue->try_pop(task);}bool pop_task_from_pool_queue(task_type& task){return pool_work_queue.try_pop(task);}bool pop_task_from_other_thread_queue(task_type& task)  // 4{for(unsigned i=0;i<queues.size();++i){unsigned const index=(my_index+i+1)%queues.size();  // 5if(queues[index]->try_steal(task)){return true;}}return false;}public:thread_pool():done(false),joiner(threads){unsigned const thread_count=std::thread::hardware_concurrency();try{for(unsigned i=0;i<thread_count;++i){queues.push_back(std::unique_ptr<work_stealing_queue>(  // 6new work_stealing_queue));threads.push_back(std::thread(&thread_pool::worker_thread,this,i));}}catch(...){done=true;throw;}}~thread_pool(){done=true;}template<typename FunctionType>std::future<typename std::result_of<FunctionType()>::type> submit(FunctionType f){ typedef typename std::result_of<FunctionType()>::type result_type;std::packaged_task<result_type()> task(f);std::future<result_type> res(task.get_future());if(local_work_queue){local_work_queue->push(std::move(task));}else{pool_work_queue.push(std::move(task));}return res;}void run_pending_task(){task_type task;if(pop_task_from_local_queue(task) ||  // 7pop_task_from_pool_queue(task) ||  // 8pop_task_from_other_thread_queue(task))  // 9{task();}else{std::this_thread::yield();}}
};
9.2 中断线程
9.2.1 发起一个线程,以及把他中断
代码9.9 interruptible_thread的基本实现
class interrupt_flag
{
public:void set();bool is_set() const;
};
thread_local interrupt_flag this_thread_interrupt_flag;  // 1class interruptible_thread
{std::thread internal_thread;interrupt_flag* flag;
public:template<typename FunctionType>interruptible_thread(FunctionType f){std::promise<interrupt_flag*> p;  // 2internal_thread=std::thread([f,&p]{  // 3p.set_value(&this_thread_interrupt_flag);f();  // 4});flag=p.get_future().get();  // 5}void interrupt(){if(flag){flag->set();  // 6}}
};
9.2.2 检测线程是否被中断
9.2.3 中断条件变量上的等待
代码9.11 为std::condition_variable在interruptible_wait中使用超时
class interrupt_flag
{std::atomic<bool> flag;std::condition_variable* thread_cond;std::mutex set_clear_mutex;public:interrupt_flag():thread_cond(0){}void set(){flag.store(true,std::memory_order_relaxed);std::lock_guard<std::mutex> lk(set_clear_mutex);if(thread_cond){thread_cond->notify_all();}}bool is_set() const{return flag.load(std::memory_order_relaxed);}void set_condition_variable(std::condition_variable& cv){std::lock_guard<std::mutex> lk(set_clear_mutex);thread_cond=&cv;}void clear_condition_variable(){std::lock_guard<std::mutex> lk(set_clear_mutex);thread_cond=0;}struct clear_cv_on_destruct{~clear_cv_on_destruct(){this_thread_interrupt_flag.clear_condition_variable();}};
};void interruptible_wait(std::condition_variable& cv,std::unique_lock<std::mutex>& lk)
{interruption_point();this_thread_interrupt_flag.set_condition_variable(cv);interrupt_flag::clear_cv_on_destruct guard;interruption_point();cv.wait_for(lk,std::chrono::milliseconds(1));interruption_point();
}
9.2.4 中断条件变量std::condition_variable_any上的等待
代码9.12 为std::condition_variable_any设计的interruptible_wait
class interrupt_flag
{std::atomic<bool> flag;std::condition_variable* thread_cond;std::condition_variable_any* thread_cond_any;std::mutex set_clear_mutex;public:interrupt_flag(): thread_cond(0),thread_cond_any(0){}void set(){flag.store(true,std::memory_order_relaxed);std::lock_guard<std::mutex> lk(set_clear_mutex);if(thread_cond){thread_cond->notify_all();}else if(thread_cond_any){thread_cond_any->notify_all();}}template<typename Lockable>void wait(std::condition_variable_any& cv,Lockable& lk){struct custom_lock{interrupt_flag* self;Lockable& lk;custom_lock(interrupt_flag* self_,std::condition_variable_any& cond,Lockable& lk_):self(self_),lk(lk_){self->set_clear_mutex.lock();  // 1self->thread_cond_any=&cond;  // 2}void unlock()  // 3{lk.unlock();self->set_clear_mutex.unlock();}void lock(){std::lock(self->set_clear_mutex,lk);  // 4}~custom_lock(){self->thread_cond_any=0;  // 5self->set_clear_mutex.unlock();}};custom_lock cl(this,cv,lk);interruption_point();cv.wait(cl);interruption_point();}// rest as before
};template<typename Lockable>
void interruptible_wait(std::condition_variable_any& cv,Lockable& lk)
{this_thread_interrupt_flag.wait(cv,lk);
}
9.2.5 中断其他阻塞型等待
9.2.6 处理中断
9.2.7 在应用程序推出时中断后台任务
试想在桌面上查找一个应用。这就需要与用户互动,应用的状态需要能在显示器上显示,就能看出应用有什么改变。为了避免影响GUI的响应时间,通常会将处理线程放在后台运行。后台进程需要一直执行,直到应用退出。后台线程会作为应用启动的一部分被启动,并且在应用终止的时候停止运行。通常这样的应用只有在机器关闭时才会退出,因为应用需要更新应用最新的状态,就需要全时间运行。在某些情况下,当应用关闭,需要使用有序的方式将后台线程关闭,其中一种方式就是中断。
下面代码中为一个系统实现了简单的线程管理部分。
代码9.13 后台监视文件系统
std::mutex config_mutex;
std::vector<interruptible_thread> background_threads;void background_thread(int disk_id)
{while(true){interruption_point();  // 1fs_change fsc=get_fs_changes(disk_id);  // 2if(fsc.has_changes()){update_index(fsc);  // 3}}
}void start_background_processing()
{background_threads.push_back(interruptible_thread(background_thread,disk_1));background_threads.push_back(interruptible_thread(background_thread,disk_2));
}int main()
{start_background_processing();  // 4process_gui_until_exit();  // 5std::unique_lock<std::mutex> lk(config_mutex);for(unsigned i=0;i<background_threads.size();++i){background_threads[i].interrupt();  // 6}for(unsigned i=0;i<background_threads.size();++i){background_threads[i].join(); // 7}
}
9.3 小结
本章中了解各种线程管理的高级技术:线程池和中断线程。也了解了如何使用本地任务队列,使用任务窃取的方式减小同步开销,提高线程池的吞吐量,等待子任务完成的同时执行队列中其他任务,从而来避免死锁。
还有,使用线程去中断另一个处理线程的各种方式,比如:使用特定的断点和函数执行中断,要不就是使用某种方法对阻塞等待进行中断。
相关文章:

C++ 并发编程实战 第九章
目录 9.1 线程池 9.1.1 最简易可行的线程池 9.1.2 等待提交给线程池的任务完成运行 9.1.3等待其他任务完成的任务 9.1.4 避免任务队列上的争夺 9.1.5 任务窃取 9.2 中断线程 9.2.1 发起一个线程,以及把他中断 9.2.2 检测线程是否被中断 9.2.3 中断条件变…...
【Java】super 关键字用法
目录 this与super区别 1.访问成员变量-示例代码 继承中构造方法的访问特点 2.访问构造方法-示例代码: 继承中成员方法访问特点 3.访问成员方法-示例代码: super 关键字的用法和 this 关键字相似 this : 代表本类对象的引用super : 代表父类存储空间…...

前端笔试题总结,带答案和解析
1. 执行以下程序,输出结果为() var x 10; var y 20; var z x < y ? x:y; console.log(xx;yy;zz);A x11;y21;z11 B x11;y20;z10 C x11;y21;z10 D x11;y20;z11 初始化x的值为10,y的值为20,x < y返回结果为tru…...

Omniverse Machinima
Omniverse Machinima App | NVIDIA Omniverse Machinima 是 NVIDIA 推出的一款实时动画创作工具,可用于在虚拟世界中制作和操纵角色及其环境。该工具使用 Universal Scene Description (USD) 作为其通用场景描述格式,可与多种 3D 建模、动画和渲染应用程…...

【测试人生】游戏业务测试落地精准测试专项的一些思路
精准测试在互联网领域有广泛的应用。以变更为出发点,通过对变更内容进行分析,可以确定单次变更具体涉及到哪些模块和功能点,以及是否存在夹带风险,从而从QA的视角,可以知道哪些功能模块需要做测试,以及哪些…...
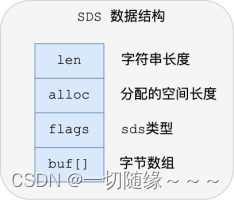
Redis 数据类型底层原理
String 内部编码有三种:int、embstr、raw int:如果一个字符串对象保存的是整数值,并且这个整数值可以用 long类型来表示(不超过 long 的表示范围,如果超过了 long 的表示范围,那么按照存储字符串的编码来存储…...
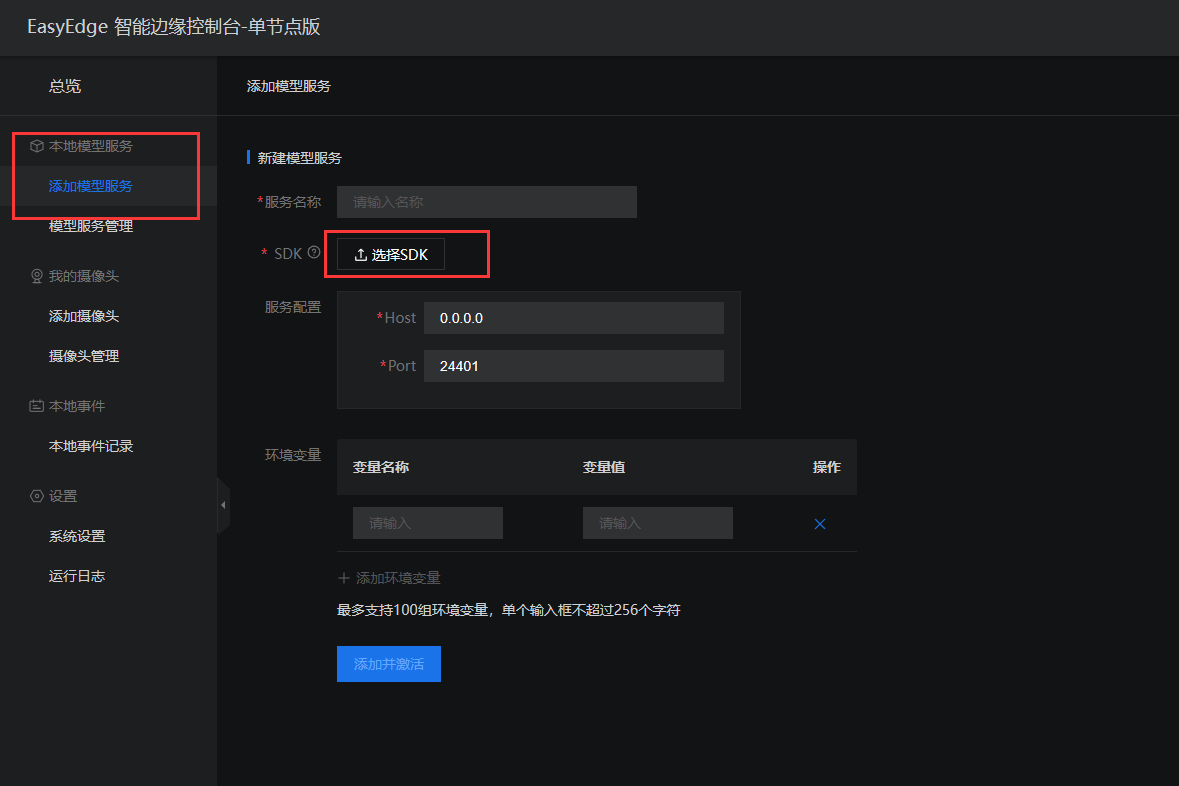
EasyEdge 智能边缘控制台通过sdk发布应用
离线部署SDK生成 模型部署完成后会出现下载SDK的按钮,点击按钮下载SDK并保存好SDK。 进入EasyDL官网的技术文档 安装智能边缘控制台 跟着教程,完成安装:点此链接 树莓派4b是Linux arm64的架构,点击对应的链接进行下载。 下载完成…...

centos软件设置开机启动的方式
以下以redis作为案例: 开机启动方式一 [Unit] Descriptionredis-server Afternetwork.target [Service] Typeforking # 这里需要修改自己的配置文件 ExecStart/usr/local/bin/redis-server /etc/redis/redis.conf PrivateTmptrue [Install] WantedBymulti-user.tar…...
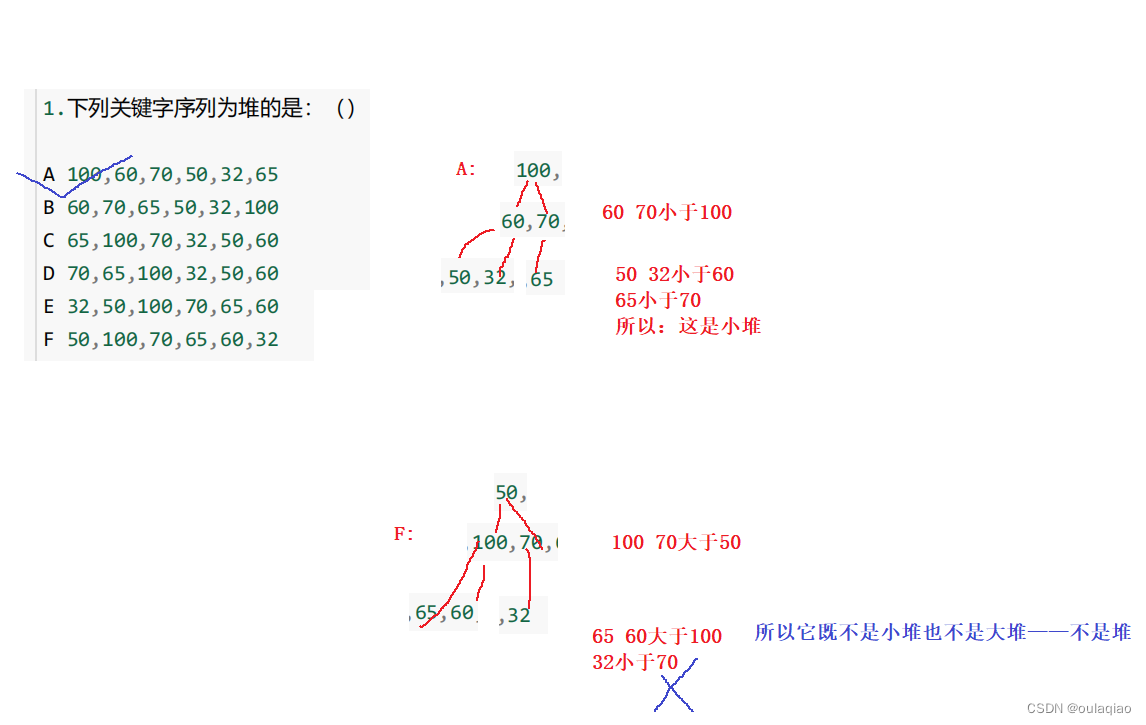
二叉树和堆
二叉树不存在度大于2的结点(每个根最多只有两个子结点)二叉树的子树有左右之分,次序不能颠倒,因此二叉树是有序树 两个特殊的二叉树——(满二叉树,完全二叉树) 满二叉树——每个根结点都有左右…...

洛谷P5732 【深基5.习7】杨辉三角题解
目录 题目【深基5.习7】杨辉三角题目描述输入格式输出格式样例 #1样例输入 #1样例输出 #1传送门 代码解释亲测 题目 【深基5.习7】杨辉三角 题目描述 给出 n ( n ≤ 20 ) n(n\le20) n(n≤20),输出杨辉三角的前 n n n 行。 如果你不知道什么是杨辉三角…...
Docker 精简安装 Nacos 2.2.1 单机版本
准备工作: 1)已安装docker 2)数据库准备,演示使用MySql5.7版本 1、拉取 [rootTseng-HW ~]# docker pull nacos/nacos-server:v2.2.1 v2.2.1: Pulling from nacos/nacos-server 2d473b07cdd5: Already exists 77c5a601c050: Pul…...

IntelliJ IDEA配置Cplex12.6.3详细步骤
Cplex12.6.3版IntelliJ IDEA配置详细步骤 一、Cplex12.6.3版下载地址二、Cplex安装步骤三、IDEA配置CPLEX3.1 添加CPLEX安装目录的cplex.jar包到项目文件中3.2 将CPLEX的x64_win64文件夹添加到IDEA的VM options中 四、检查IDEA中Cplex是否安装成功卸载Cplex 一、Cplex12.6.3版下…...
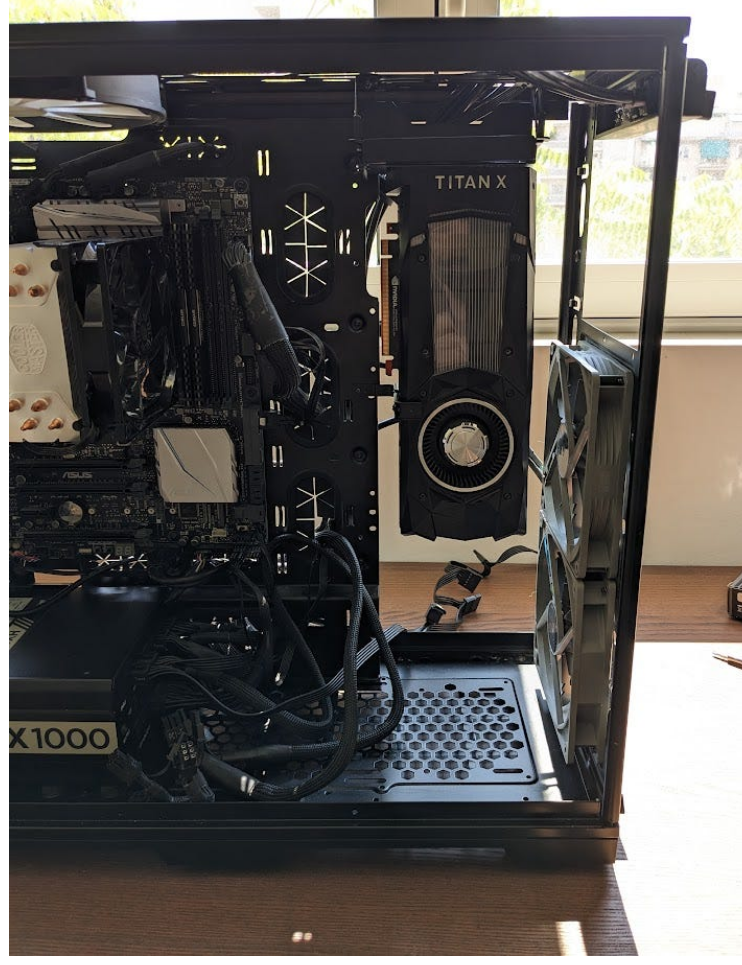
2023 年最佳多 GPU 深度学习系统指南
动动发财的小手,点个赞吧! 本文[1]提供了有关如何构建用于深度学习的多 GPU 系统的指南,并希望为您节省一些研究时间和实验时间。 1. GPU 让我们从有趣(且昂贵)的部分开始! 购买 GPU 时的主要考虑因素是&am…...
Kotlin异常处理runCatching,getOrNull,onFailure,onSuccess(1)
Kotlin异常处理runCatching,getOrNull,onFailure,onSuccess(1) fun main(args: Array<String>) {var s1 runCatching {1 / 1}.getOrNull()println(s1) //s11,打印1println("-")var s2 ru…...

【深入探究人工智能】:历史、应用、技术与未来
深入探究人工智能 前言人工智能的历史人工智能的应用人工智能的技术人工智能的未来当代的人工智能产物结语🍀小结🍀 🎉博客主页:小智_x0___0x_ 🎉欢迎关注:👍点赞🙌收藏✍️留言 &am…...
【设计模式】五、原型模式
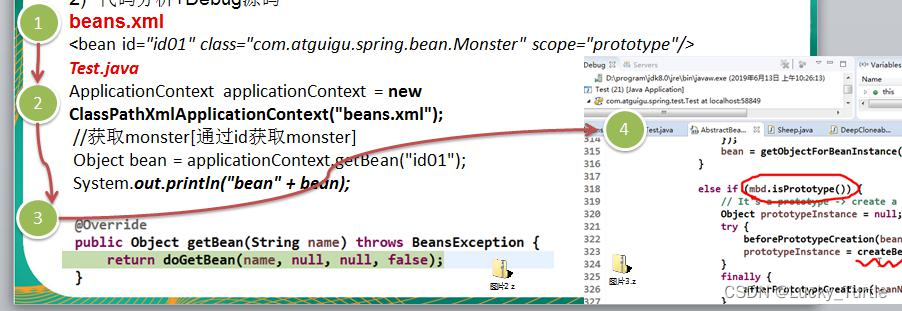
文章目录 概述示例传统的方式的优缺点原型模式原理结构图-uml 类图 原型模式解决克隆羊问题的应用实例Sheep类实现clone()运行原型模式在 Spring 框架中源码分析 深入讨论-浅拷贝和深拷贝浅拷贝的介绍 小结 概述 示例 克隆羊问题 现在有一只羊 tom,姓名为: tom, 年…...

day36-注解
1. 注解 1.1 注释和注解的区别?(掌握) 共同点:都可以对程序进行解释说明。 不同点:注释,是给程序员看的。只在Java中有效。在class文件中不存在注释的。 当编译之后,会进行注释擦除。 …...
【C语言数据结构——————栈和队列4000字详解】
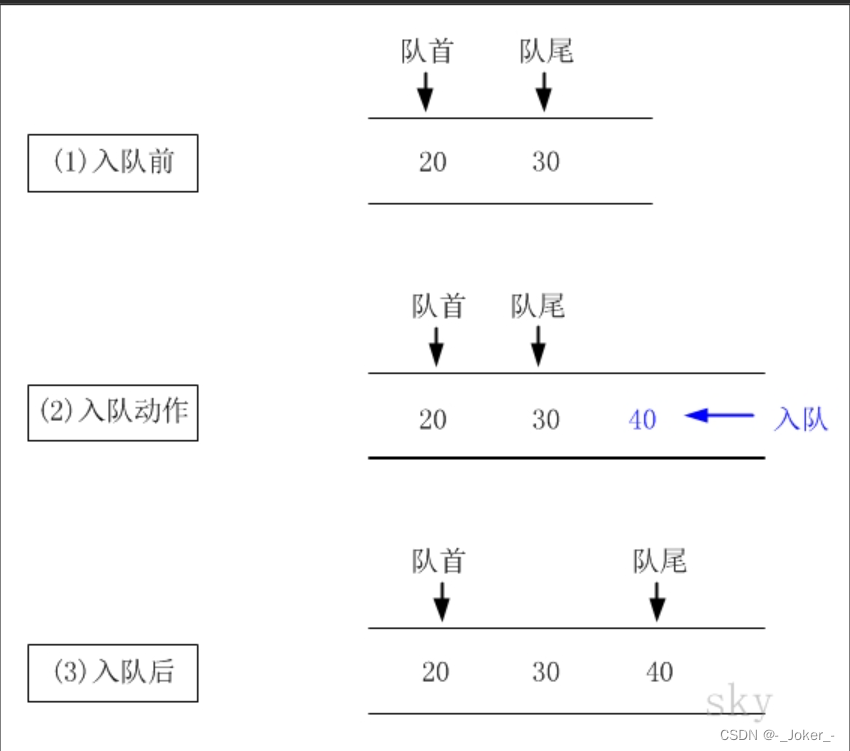
欢迎阅读新一期的c语言数据结构模块————栈和队列 ✒️个人主页:-_Joker_- 🏷️专栏:C语言 📜代码仓库:c_code 🌹🌹欢迎大佬们的阅读和三连关注,顺着评论回访🌹&#…...
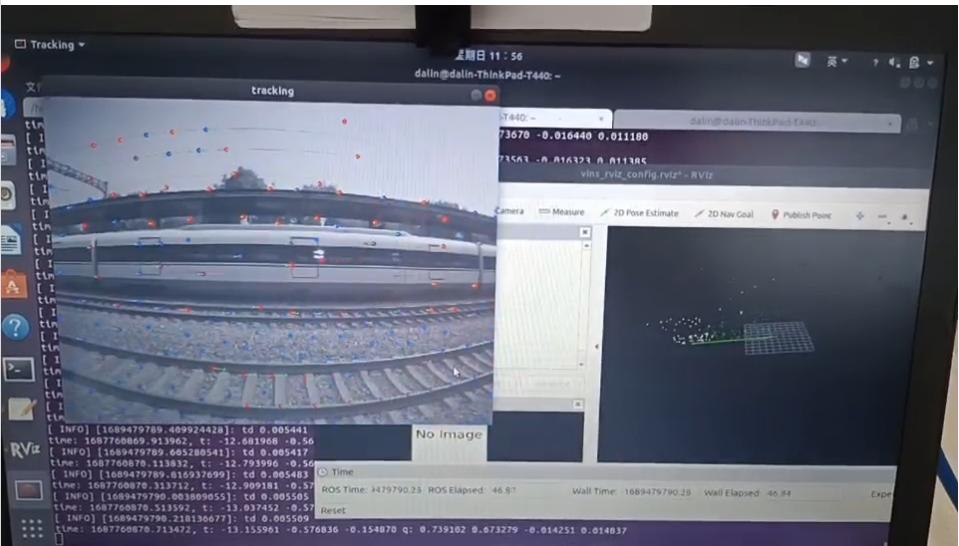
电子地图 | VINS-FUSION | 小觅相机D系列
目录 一、相关介绍 二、VINS-FUSION环境安装及使用 (一)Ubuntu18.04安装配置 1、Ubuntu下载安装 2、设置虚拟内存(可选) (二)VINS-FUSION环境配置 1、ros安装 2、ceres-solver安装 3、vins-fusion…...
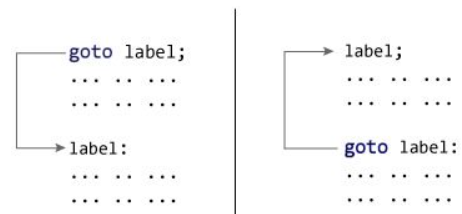
C++goto语句
在本文中,您将了解goto语句,它是如何工作的,以及为什么应该避免它。在C 编程中,goto语句用于通过将控制权转移到程序的其他部分来更改程序执行的正常顺序。 goto语句的语法 goto label; ... .. ... ... .. ... ... .. ... label…...

为什么92%的Sora 2初学者卡在第4步?——帧一致性崩塌诊断工具包+时间轴锚点校准法
更多请点击: https://kaifayun.com 第一章:Sora 2视频生成的核心原理与环境准备 Sora 2并非OpenAI官方发布的模型,而是社区基于Sora技术理念构建的开源复现与增强框架,其核心依托于时空联合建模的扩散变换器(Spacetim…...

Win10家庭版别再卡了!保姆级教程:手动修复gpedit.msc路径,彻底关闭Antimalware Service
Win10家庭版性能优化实战:精准修复组策略路径与系统服务调优每次游戏激战正酣时突然卡顿,或是视频渲染到关键时刻系统响应迟缓,很多Win10家庭版用户都遭遇过这类困扰。任务管理器里那个名为"Antimalware Service Executable"的进程…...

Tftpd32/Tftpd64不止是TFTP!手把手教你玩转它的DHCP和Syslog服务器功能
Tftpd32/Tftpd64:解锁DHCP与Syslog服务的隐藏潜力当大多数人提起Tftpd32/Tftpd64时,第一反应往往是它作为TFTP服务器的功能。这款轻量级工具确实在文件传输领域表现出色,但它的能力远不止于此。今天,我们将深入探索这款软件中两个…...

ARMv8 HFGITR_EL2寄存器解析与虚拟化指令陷阱控制
1. AArch64 HFGITR_EL2寄存器架构解析HFGITR_EL2(Hypervisor Fine-Grained Instruction Trap Register)是ARMv8架构中专门用于指令级陷阱控制的系统寄存器,属于虚拟化扩展的重要组成部分。这个64位寄存器通过位映射机制实现对特定AArch64指令…...

在多轮对话应用中观察Taotoken计费对成本的影响
🚀 告别海外账号与网络限制!稳定直连全球优质大模型,限时半价接入中。 👉 点击领取海量免费额度 在多轮对话应用中观察Taotoken计费对成本的影响 效果展示类,结合一个需要维护长上下文的多轮对话应用案例,…...

别再只比参数了!从插件生态到中文优化,聊聊ChatGPT和文心一言的“隐形”差异
超越参数之争:ChatGPT与文心一言的生态与本土化实战解析 当技术评测文章还在反复比较模型参数量与发布时间时,真正影响日常工作效率的往往是那些未被量化的"软实力"。本文将从插件生态构建与中文场景优化两个维度,带您重新认识这两…...

LeaguePrank:5分钟打造个性化英雄联盟客户端,段位头像随心换!
LeaguePrank:5分钟打造个性化英雄联盟客户端,段位头像随心换! 【免费下载链接】LeaguePrank 项目地址: https://gitcode.com/gh_mirrors/le/LeaguePrank 厌倦了千篇一律的英雄联盟客户端界面?想向好友展示王者段位却还在白…...

基于LSTM自编码器的家用电器功耗异常检测系统构建指南
1. 项目概述:从能耗洞察到智能干预我们每天都在和各种家用电器打交道,从清晨唤醒你的咖啡机,到深夜还在默默工作的路由器。你有没有想过,这些看似微不足道的设备,其背后隐藏的能耗模式,其实大有文章&#x…...

告别KITTI!用TartanAir数据集在Unreal Engine+AirSim里复现那些让VSLAM算法“翻车”的雨天和黑夜
超越KITTI:用TartanAir数据集在虚拟极端环境中锤炼VSLAM算法当视觉SLAM算法在KITTI数据集上取得95%的准确率时,开发者们常常会松一口气——直到这些算法被部署到真实世界的雨夜街道上。突然之间,那些在阳光明媚的德国道路上表现优异的特征点检…...

别再只会用--nogpgcheck了!手把手教你安全修复PostgreSQL yum源的GPG密钥问题
企业级PostgreSQL部署:安全解决GPG密钥验证的完整方案 当你在生产环境中部署PostgreSQL时,遇到GPG签名验证错误直接使用--nogpgcheck绕过检查,就像因为门锁打不开就直接把门拆掉一样危险。本文将带你深入理解GPG验证机制,并提供一…...