使用vite+npm封装组件库并发布到npm仓库
组件库背景:使用elementplus+vue封装了一个通过表单组件。通过JSX对el-form下的el-input和el-button等表单进行统一封装,最后达到,通过数据即可一键生成页面表单的功能。
1.使用vite创建vue项目
npm create vite@latest elementplus-auto-form -- --template vue
2.项目目录
注意此处main.js入口文件只是当前项目入口文件,组件库打包的入口文件还是封装Form表单组件下的index.js

3.封装TFrom.vue
表单+表单校验+JSX生成表单项
TForm.vue:
<template><el-form ref="FormRef":class="formBorder?'form-border':''":model="modelForm":rules="editable ? rules : {}":inline="inline":label-position="labelPosition":label-width="labelWidth"><slot name="header"></slot><el-row :gutter="elRowGutter"><el-col v-for="(item,index) in data":span="item.span" :key="index"><!-- !item.isHidden为控制页面控件显示与否 --><el-form-item v-if="!item.isHidden" :class="isCustom?'custom-form-item':''" :label="item.label ? item.label + ':' : ''":prop="item.prop":label-width="item.labelWidth"><FormItem :formData="modelForm":editable="editable":data="item"></FormItem><FormItem v-if="item.children" :formData="modelForm":editable="editable":clearable="false":data="item.children"></FormItem></el-form-item></el-col><el-col class="button-list" v-if="btnList && btnList.length":span="24"><el-form-item :class="isCustom?'custom-form-item':''"><div v-for="(item,index) in btnList" :key="index"><FormButton :formData="modelForm":editable="editable":data="item"@on-click="onClick(item)"></FormButton></div></el-form-item></el-col><slot name="footer"></slot></el-row></el-form>
</template><script setup>
import { ref } from 'vue'
import formItem from './FormItem.jsx'
import formButton from './FormButton.jsx'// 除data外其他都不是必传项
const prop = defineProps({modelForm:{type: Object,require: true,},rules: {type: Object,default: {}},data: {type: Object,require: true,default: []},inline:{type: Boolean,default: true},labelWidth: {type: String,default: '120'},labelPosition: {type: String,default: 'right'},editable: {type: Boolean,default: true},colLayout: {type: Object,default(){return {xl: 5, //2K屏等lg: 8, //大屏幕,如大桌面显示器md: 12, //中等屏幕,如桌面显示器sm: 24, //小屏幕,如平板xs: 24 //超小屏,如手机}}},elRowGutter: {type: Number,default: 10},size: {type: String,default: 'default'},btnList:{type: Object,default: []},formBorder:{type: Boolean,default: false},formRef:{type: String,default: 'formRef'},customFormItem:{type: Boolean,default: false}})const FormItem = formItem();
const FormButton = formButton();const FormRef = ref()
const isCustom = ref(false);// 表单按钮
function onClick(data) {if (!data.onClick) returndata.onClick()
}// 表单校验
async function validate() {if (!FormRef.value) returnconst result = await FormRef.value.validate()return result;
}// 清除表单验证
async function resetFields() {if(!FormRef.value) return await FormRef.value.resetFields();return await FormRef.value.resetFields()
}// 自定义el-form-item样式
if(prop.customFormItem){isCustom.value = true;
}defineExpose({validate,resetFields,
})</script>
<style scoped>
.button-list{display: flex;justify-content: center;
}.form-border {width: 94%;border: solid 2px rgba(219, 217, 217, 0.6);border-radius: 10px;margin-left: auto;margin-right: auto;padding: 20px;
}.custom-form-item {margin-bottom: 4px;margin-right: 12px;margin-left: 12px;
}
</style>
FormItem.jsx:
import {ElInput,ElSelect,ElOption,ElButton} from 'element-plus'import { defineComponent } from 'vue'// 普通显示
const Span = (form, data) => (<span>{data}</span>)// 输入框
const Input = (form, data) => (<ElInputv-model={form[data.field]}type={data.type}input-style={data.inputStyle}size={data.size}autocomplete={data.autocomplete}show-password={data.type == 'password'}clearableplaceholder={data.placeholder}autosize = {{minRows: 3,maxRows: 4,}}{...data.props}></ElInput>)
// 文本框
const Textarea = (form, data) => (<ElInputv-model={form[data.field]}type={data.type}input-style={data.inputStyle}size={data.size}// 设置rows就不能设置自适应autosizerows={data.rows}clearable={data.clearable}placeholder={data.placeholder}{...data.props}>{data.rows}</ElInput>)const setLabelValue = (_item, { optionsKey } = {}) => {return {label: optionsKey ? _item[optionsKey.label] : _item.label,value: optionsKey ? _item[optionsKey.value] : _item.value,}}// 选择框const Select = (form, data) => (<ElSelectsize={data.size}v-model={form[data.field]}filterablestyle={data.style}clearable={data.clearable}placeholder={data.placeholder}{...data.props}>{data.options.map((item) => {return <ElOption {...setLabelValue(item, data)} />})}</ElSelect>)const Button = (form, data) =>{<ElButtontype={data.type}size={data.size}icon={data.icon}plain={data.plain}click={data.clickBtn}value={data.value}></ElButton>}const setFormItem = (form,data,editable,) => {if (!form) return nullif (!editable) return Span(form, data)switch (data.type) {case 'input':return Input(form, data)case 'textarea':return Textarea(form, data)case 'password':return Input(form, data)// 输入框只能输入数字case 'number':return Input(form, data)case 'select':return Select(form, data)case 'date':case 'daterange':return Date(form, data)case 'time':return Time(form, data)case 'radio':return Radio(form, data)case 'checkbox':return Checkbox(form, data)case 'button':return Button(form, data)default:return null}}export default () =>defineComponent({props: {data: Object,formData: Object,editable: Boolean,},setup(props) {return () =>props.data? setFormItem(props.formData, props.data, props.editable): null},})
按需引入elementplus:
// element-plus按需导入
import AutoImport from 'unplugin-auto-import/vite'
import Components from 'unplugin-vue-components/vite'
import { ElementPlusResolver } from 'unplugin-vue-components/resolvers'
import vueJsx from '@vitejs/plugin-vue-jsx'
import path from 'path'...plugins: [vue(),// 用到JSX语法vueJsx(),AutoImport({resolvers: [ElementPlusResolver()],}),Components({resolvers: [ElementPlusResolver()],}),],resolve: {alias: {'@':  path.resolve(__dirname, 'src')}},
...
通过install插件方式进行使用:
import TForm from "./TForm.vue";export default {install (app) {// 在app上进行扩展,app提供 component directive 函数// 如果要挂载原型 app.config.globalProperties 方式// "TForm"自定义即可app.component("TForm", TForm);}
}
4.打包配置
设置打包文件名,包路径等
注意打包入口为index.js文件(需要使用导出install方法中的组件),而不是main.js文件(main.js中引入index.js只是用于本地测试)
build: {outDir: "elementplus-auto-form", //输出文件名称lib: {entry: path.resolve(__dirname, "./src/package/index.js"), //指定组件编译入口文件name: "elementplus-auto-form",fileName: "elementplus-auto-form",}, //库编译模式配置rollupOptions: {// 确保外部化处理那些你不想打包进库的依赖external: ["vue"],output: {// 在 UMD 构建模式下为这些外部化的依赖提供一个全局变量globals: {vue: "Vue",},},}, },npm run build进行打包
5.在打好的包下,创建package.json文件
在package.json文件中对,包版本等信息进行配置

{"name": "elementplus-auto-form","version": "1.0.0","description": "对elementplus的form表单进行封装,达到根据数据一键生成表单功能","keywords": ["elementplus","el-form","auto-form"],"main": "elementplus-auto-form.js","scripts": {"test": "echo \"Error: no test specified\" && exit 1"},"author": "xxx","license": "ISC","private": false
}
6.上传到npm仓库
- 在npm官网创建自己的账号并登录。
- 在打包好的文件路径下:使用npm login会跳转到npm官网进行登录;
- 登录完成后,将镜像源改为npm官方:npm config set registry=https://registry.npmjs.org
- 然后使用npm publish将包上传到npm仓库

7.从npm下载包并进行测试
将镜像切回到淘宝源:
npm config set registry https://registry.npm.taobao.org
查看当前镜像源:
npm config get registry
配置到淘宝镜像后,首先会到淘宝镜像中下载,没有则去npm官网进行下载
下载后node_modules下的包:

8.代码中使用包elementplus-auto-form
//main.js
import 'elementplus-auto-form/style.css'
import TForm from "elementplus-auto-form"; const app = createApp(App);
app.use(router).use(TForm).mount('#app')
Form.vue页面使用:
<script setup>
import { reactive } from 'vue'
import cronjobConfig from './cronjobConfig'
const formItems = cronjobConfig.value.formItems ? cronjobConfig.value.formItems : {};
const cronjobForm = reactive({iffLength: '1793',keySize: '',dataFileName: '',wfdName: '',version:''
})
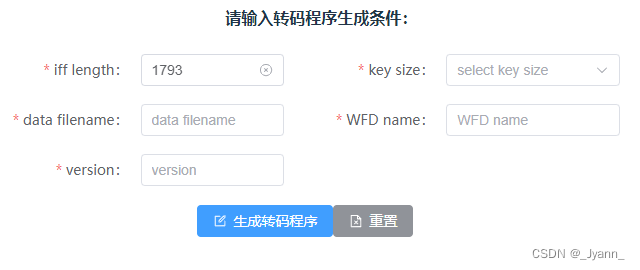
</script><template><t-form ref="cronjobFormRef" :btnList="cronjobConfig.buttons" :modelForm="cronjobForm" :formBorder="true":rules="cronjobConfig.rules" :data="formItems"><template #header><b>请输入转码程序生成条件:</b><br /><br /></template></t-form>
</template>
测试数据:
import { DocumentDelete, Edit, Download } from '@element-plus/icons-vue'
import { shallowRef ,ref } from 'vue'let checkNum = (rule, value, callback) => {// 函数用于检查其参数是否是非数字值,如果参数值为 NaN 或字符串、对象、undefined等非数字值则返回 true, 否则返回 false。if (isNaN(value)) {return callback("iffLength must be a number");}return callback();
}
let checkVersion = (rule, value, callback) => {let regex = /^V(\d{2})[A-L]$/;if (regex.test(value)) {callback();return true;} else {callback(new Error("Version must be similar to 'V23G'"));return false;}
}const cronjobConfig = ref({rules: {iffLength: [{ required: true, message: 'Please input iff length', trigger: 'blur' },{ validator: checkNum, trigger: "blur" }],keySize: [{ required: true, message: 'Please select key size', trigger: 'change', }],dataFileName: [{required: true,message: 'Please input data filename',trigger: 'blur',}],wfdName: [{required: true,message: 'Please input wfd name',trigger: 'blur',}],version: [{ required: true, message: 'Please input version', trigger: 'blur' },{ validator: checkVersion, trigger: "blur" }]},formItems: [{field: 'iffLength',prop: 'iffLength',label: 'iff length',placeholder: '1793',labelWidth: '150px',type: 'input',// size: 'small',span: 12,},{field: 'keySize',prop: 'keySize',type: 'select',label: 'key size',placeholder: 'select key size',// editable: true,// size: 'small',span: 12,options: [{ label: 6, value: 6 }, { label: 9, value: 9 }]},{field: 'dataFileName',prop: 'dataFileName',type: 'input',label: 'data filename',labelWidth: '150px',placeholder: 'data filename',// isHidden: false,span: 12,},{field: 'wfdName',prop: 'wfdName',type: 'input',label: 'WFD name',placeholder: 'WFD name',span: 12,},{field: 'version',prop: 'version',type: 'input',label: 'version',labelWidth: '150px',placeholder: 'version',span: 12,},],// 按钮buttons: [{name: '生成转码程序',title: 'generateCronjob',type: 'primary',size: 'default', //可以是default,small,largeicon: shallowRef(Edit),// 按钮是否为朴素类型// plain: true,onClick: null}, {name: '重置',type: 'info',title: 'resetCronjob',size: 'default',icon: shallowRef(DocumentDelete),// plain: true,onClick: null},{name: '下载转码程序',type: 'success',title: 'downloadCronjob',size: 'default',icon: shallowRef(Download),isHidden: true,// plain: true,onClick: null}],ref: 'cronjobFormRef',labelWidth: '120px',labelPosition: 'right',inline: true,editable: true,// 单元列之间的间隔elRowGutter: 20,// size: 'small',// 是否需要form边框formBorder: true,colLayout: {xl: 5, //2K屏等lg: 8, //大屏幕,如大桌面显示器md: 12, //中等屏幕,如桌面显示器sm: 24, //小屏幕,如平板xs: 24 //超小屏,如手机}
});export default cronjobConfig;
9.测试效果
相关文章:
使用vite+npm封装组件库并发布到npm仓库
组件库背景:使用elementplusvue封装了一个通过表单组件。通过JSX对el-form下的el-input和el-button等表单进行统一封装,最后达到,通过数据即可一键生成页面表单的功能。 1.使用vite创建vue项目 npm create vitelatest elementplus-auto-form…...
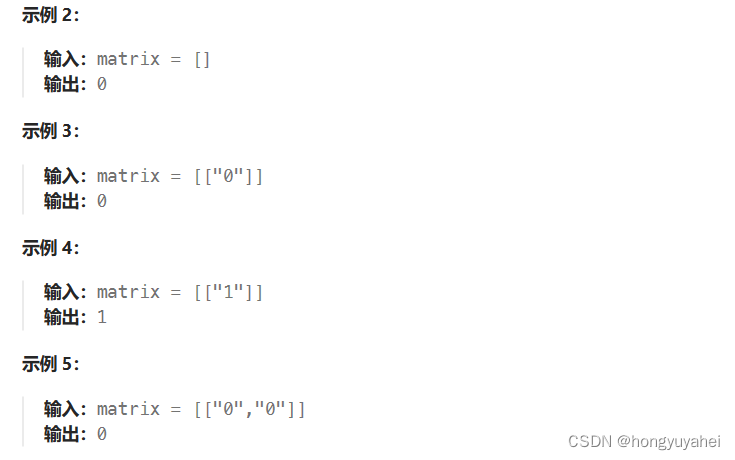
85.最大矩形
单调栈,时间复杂度o(mn),空间复杂度o(mn) class Solution { public:int maximalRectangle(vector<vector<char>>& matrix) {int mmatrix.size();if(m0){return 0;}int nmatrix[0].size();//记录矩阵中每个元素左边连续1的数量vector<…...

Windows服务器 开机自启动服务
1、新建txt,并粘贴下面脚本 start cmd /k "cd /d D:\ahjd&&java -jar clips-admin.jar" start cmd /k "cd /d D:\ahjd\dist&&simple-http-server.exe -i -p 8000"说明,脚本格式为:start cmd /k “cd /d…...

《算法通关之路》chapter17一些通用解题模板
《算法通关之路》学习笔记,记录一下自己的刷题过程,详细的内容请大家购买作者的书籍查阅。 1 二分法 1.1 普通二分法 # 查找nums数组中元素值为target的下标。如果不存在,则返回-1def bs(nums: list[int], target: int) -> int :l, h …...
常用求解器安装
1 建模语言pyomo Pyomo是一个Python建模语言,用于数学优化建模。它可以与不同的求解器(如Gurobi,CPLEX,GLPK,SCIP等)集成使用,以求解各种数学优化问题。可以使用Pyomo建立数学优化模型…...
)
第三章:最新版零基础学习 PYTHON 教程(第一节 - Python 运算符)
在Python编程中,运算符一般用于对值和变量进行操作。这些是用于逻辑和算术运算的标准符号。在本文中,我们将研究不同类型的Python 运算符。 运算符:这些是特殊符号。例如- + 、 * 、 / 等。操作数:它是应用运算符的值。目录 Python 中的运算符类型 Python 中的算术运算符…...
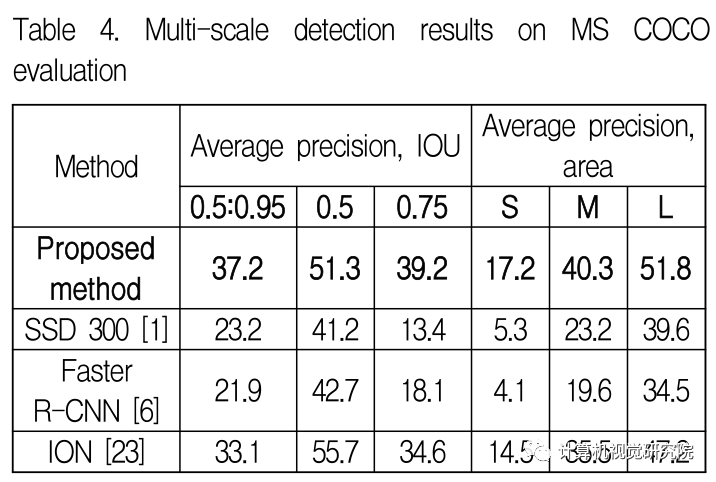
细粒度特征提取和定位用于目标检测:PPCNN
1、简介 近年来,深度卷积神经网络在计算机视觉上取得了优异的性能。深度卷积神经网络以精确地分类目标信息而闻名,并采用了简单的卷积体系结构来降低图层的复杂性。基于深度卷积神经网络概念设计的VGG网络。VGGNet在对大规模图像进行分类方面取得了巨大…...
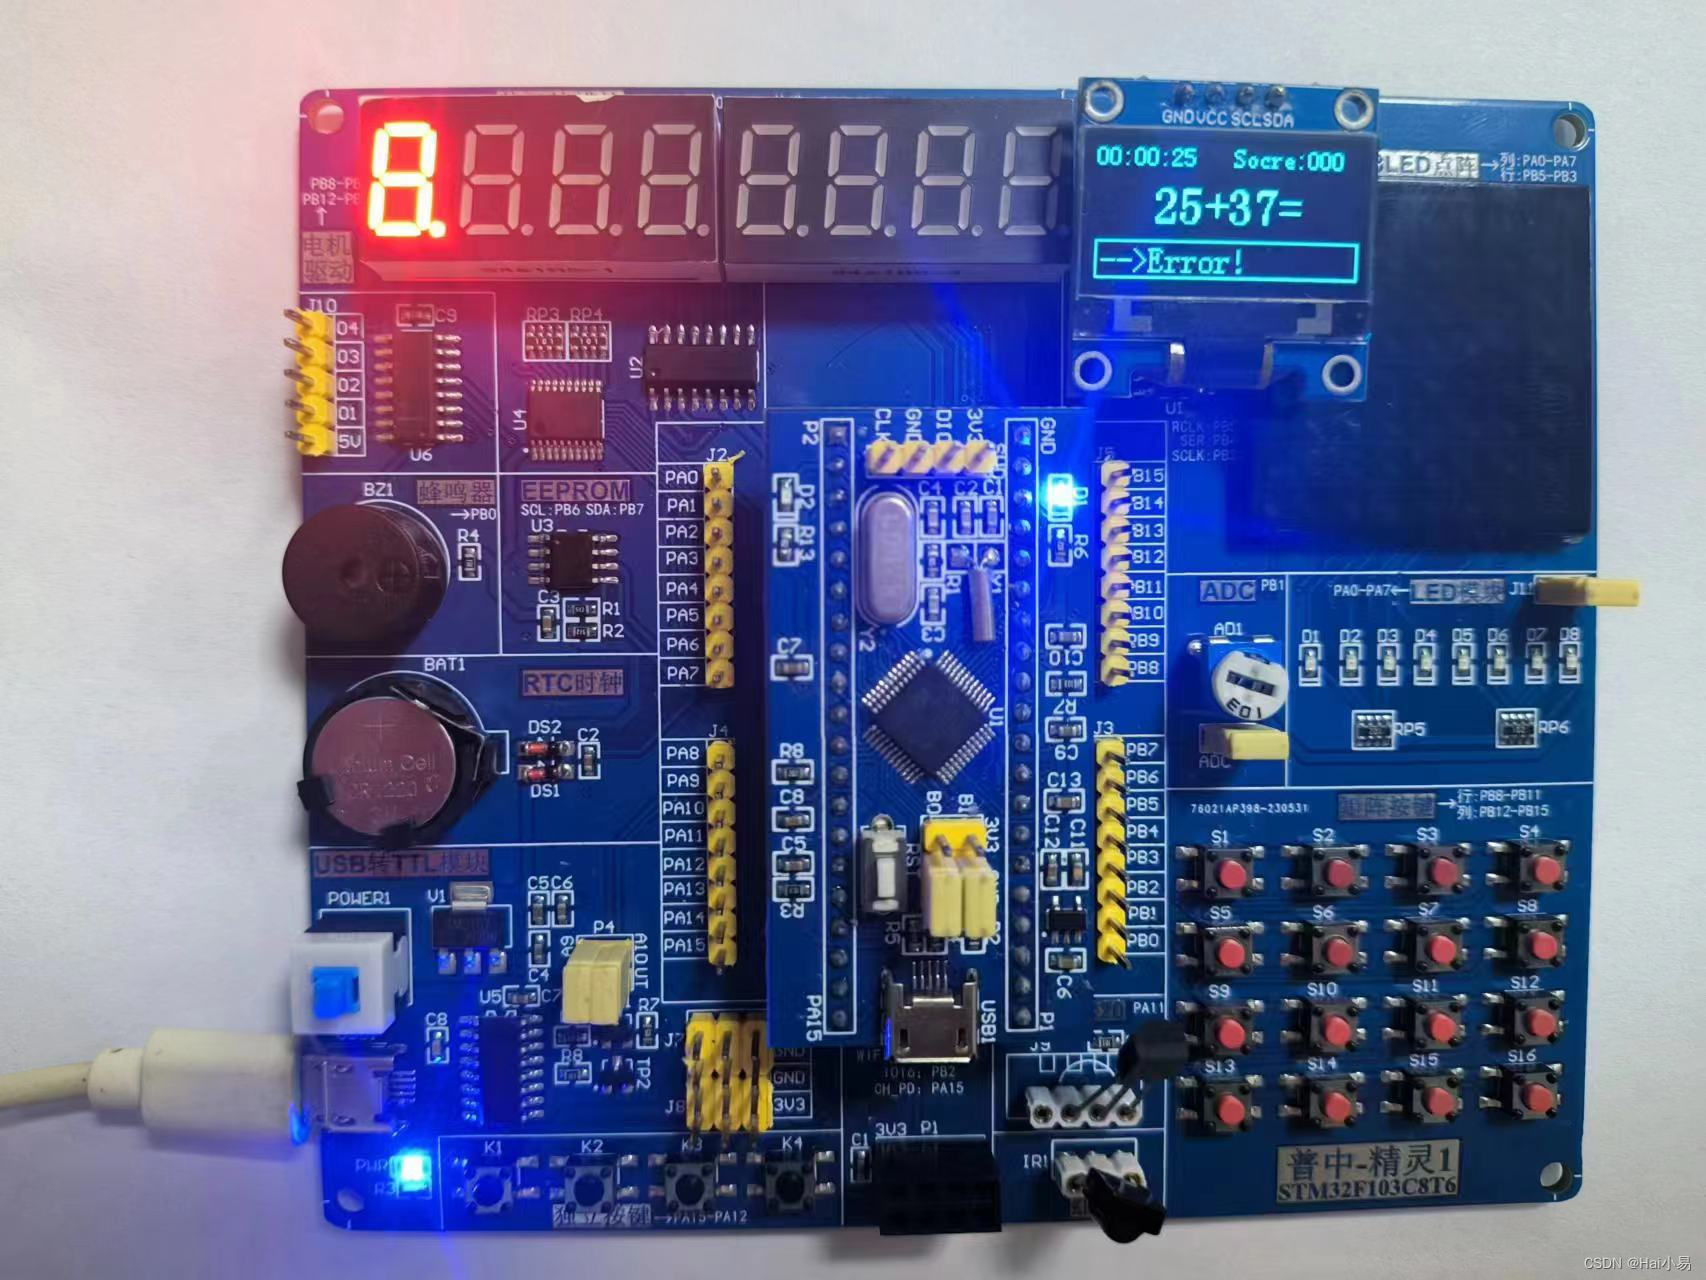
【STM32单片机】数学自动出题器设计
文章目录 一、功能简介二、软件设计三、实验现象联系作者 一、功能简介 本项目使用STM32F103C8T6单片机控制器,使用按键、IIC OLED模块等。 主要功能: 系统运行后,OLED液晶显示出题器开机界面,默认结果范围为100,可按…...
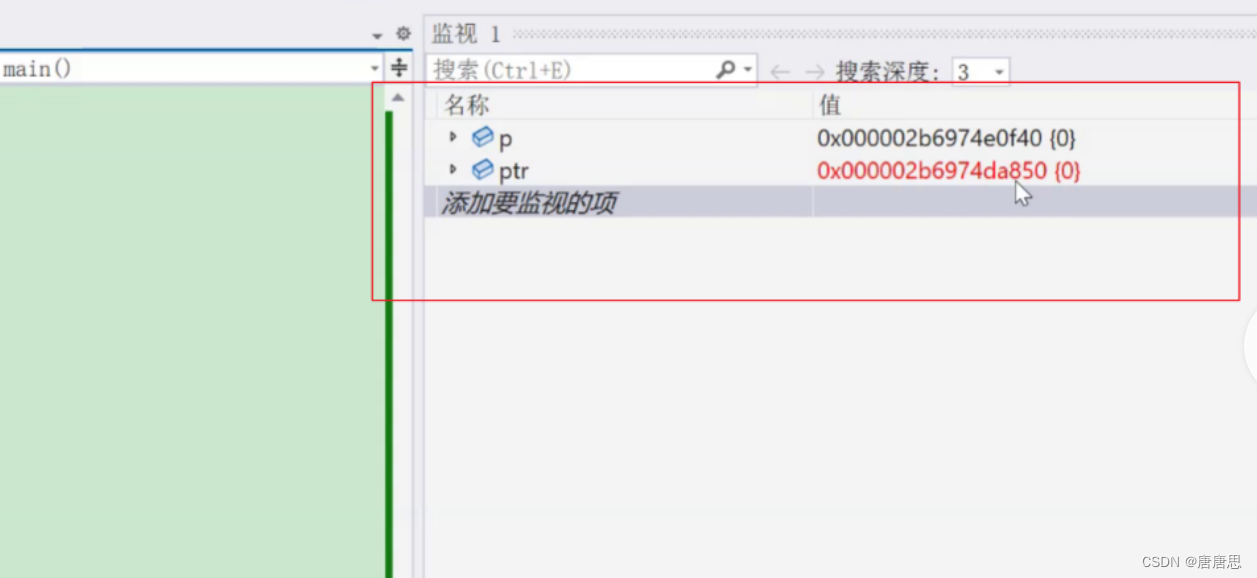
C语言之动态内存管理篇(1)
目录 为什么存在动态内存分配 动态内存函数的介绍 malloc free calloc realloc 常见的动态内存错误 今天收假了,抓紧时间写几篇博客。我又来赶进度了。今天我们来讲解动态内存管理。🆗🆗 为什么存在动态内存分配 假设我们去实现一个…...
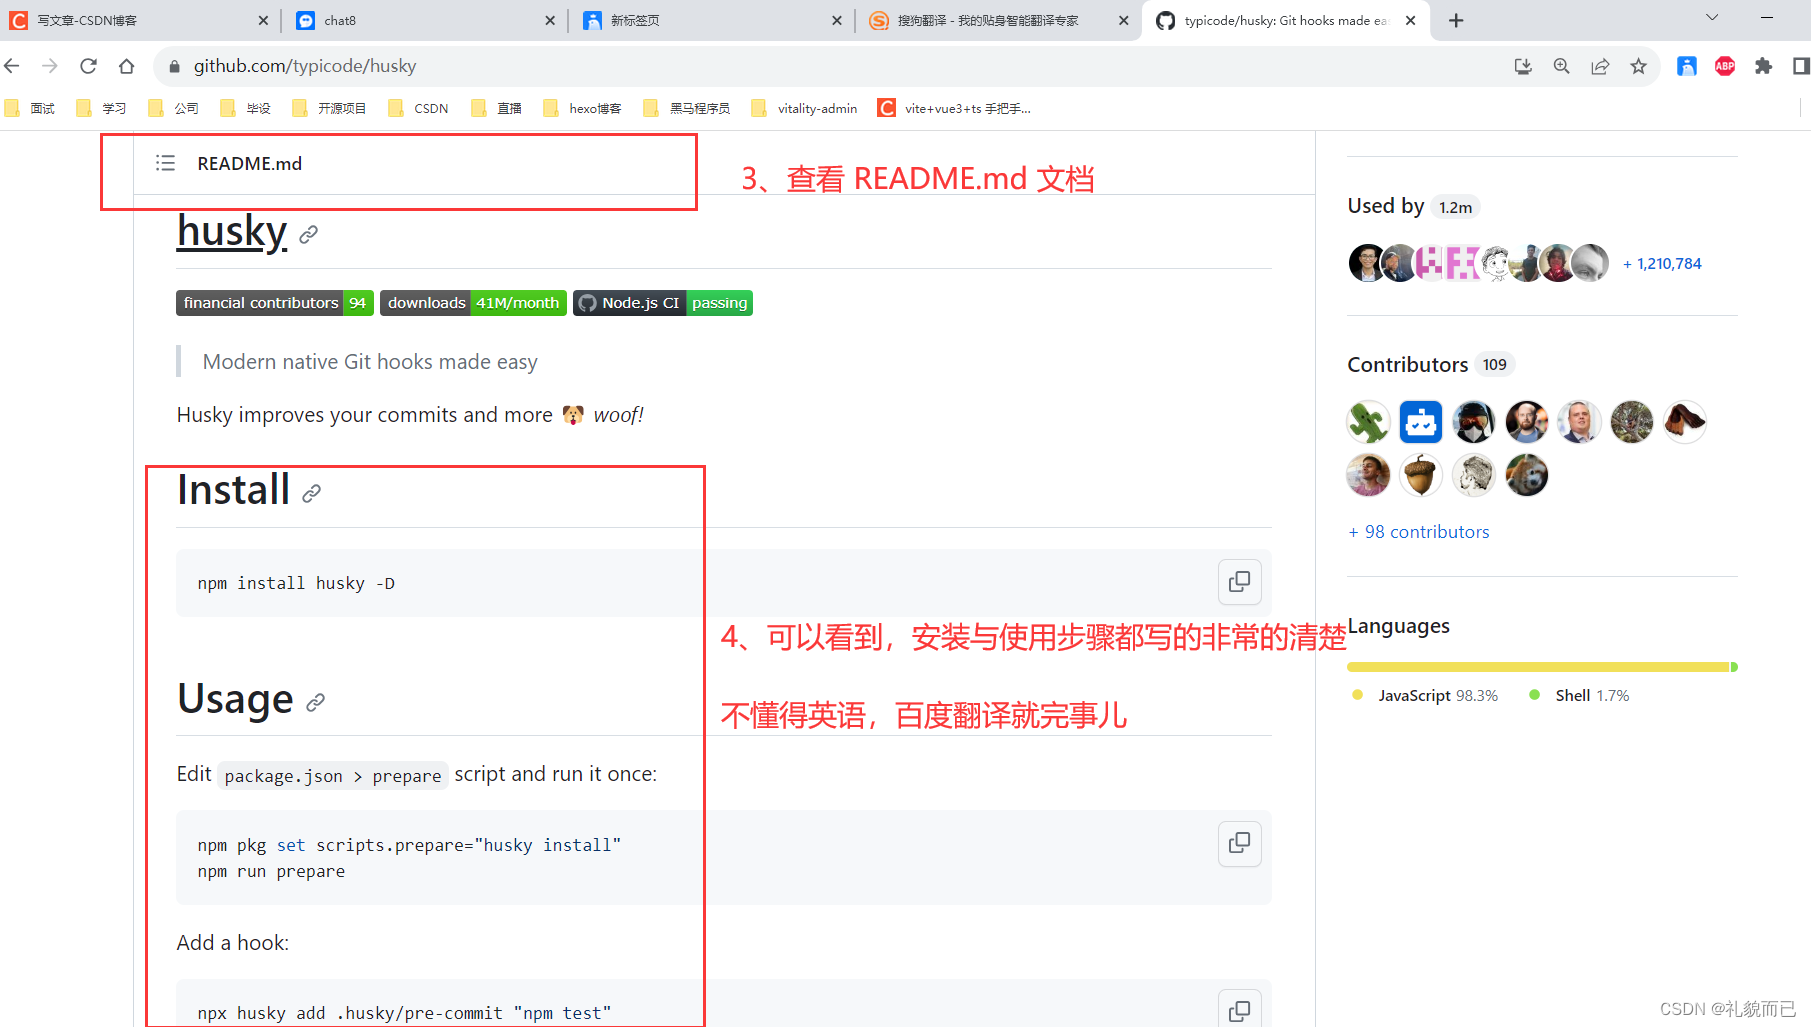
React18入门(第二篇)——React18+Ts项目配置husky、eslint、pretttier、commitLint
前言 我的项目版本如下: React: V18.2.0Node.js: V16.14.0TypeScript:最新版工具: VsCode 本文将采用图文详解的方式,手把手带你快速完成在React项目中配置husky、prettier、commitLint,实现编码规范的统…...
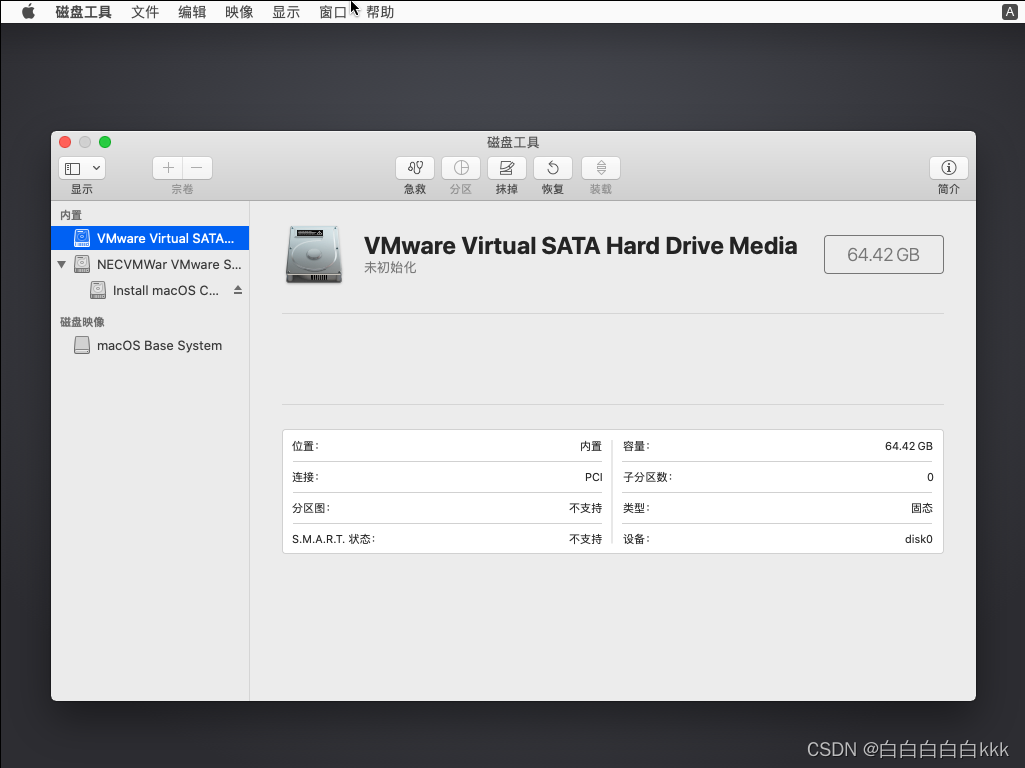
【VINS】苹果手机采集单目相机+IMU数据离线运行VINS-Mono
0.准备工作 开个新坑,之前用Android手机做过离线采集数据的实验,这次用IPhone来测试! 1.虚拟机配置Mac OS 下载一个Mac OS 的ios镜像,打开虚拟机按照跟Ubuntu差不多的方式安装,但是发现没有Mac OS的入口。 因为VMwa…...
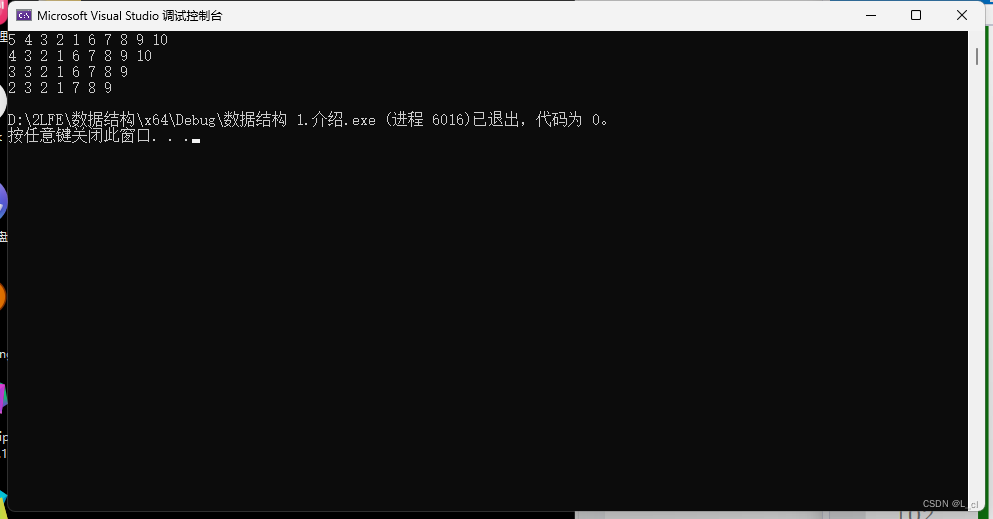
数据结构 2.1 单链表
1.单链表 线性表:1.有限的序列 2.序列中的每一个元素都有唯一的前驱和后继,除了开头和结尾的两个节点。 顺序表:分配一块连续的内存去存放这些元素,eg、数组 链表:内存是不连续的,元素会各自被分配一块内…...
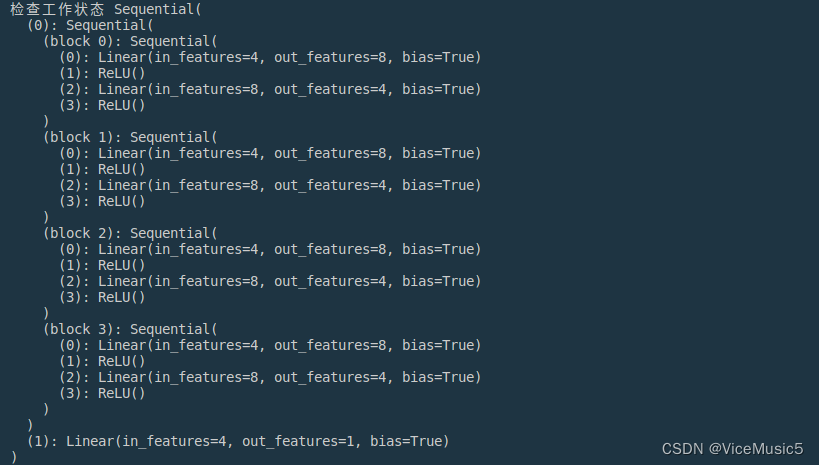
[Machine Learning]pytorch手搓一个神经网络模型
因为之前虽然写过一点点关于pytorch的东西,但是用的还是他太少了。 这次从头开始,尝试着搓出一个神经网络模型 (因为没有什么训练数据,所以最后的训练部分使用可能不太好跑起来的代码作为演示,如果有需要自己连上数据…...
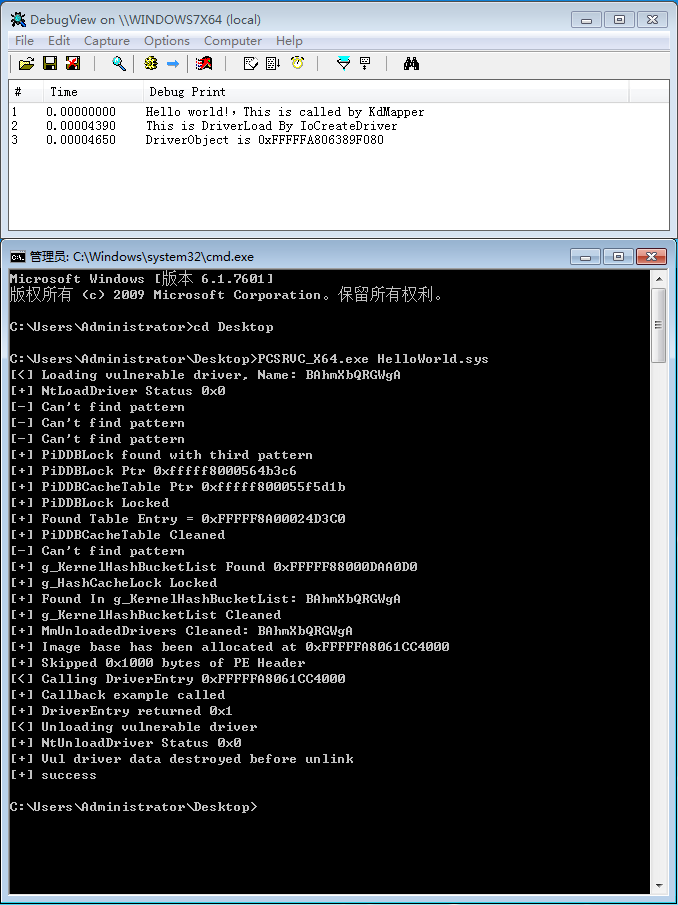
KdMapper扩展实现之Dell(pcdsrvc_x64.pkms)
1.背景 KdMapper是一个利用intel的驱动漏洞可以无痕的加载未经签名的驱动,本文是利用其它漏洞(参考《【转载】利用签名驱动漏洞加载未签名驱动》)做相应的修改以实现类似功能。需要大家对KdMapper的代码有一定了解。 2.驱动信息 驱动名称pcds…...

python和go相互调用的两种方法
前言 Python 和 Go 语言是两种不同的编程语言,它们分别有自己的优势和适用场景。在一些项目中,由于团队内已有的技术栈或者某一部分业务的需求,可能需要 Python 和 Go 相互调用,以此来提升效率和性能。 性能优势 Go 通常比 Python 更高效&…...

c# 分部视图笔记
Html.Partial("**", 1) public ActionResult **(int page) { ViewBag.page page; return PartialView("**"); }...

Vue3最佳实践 第七章 TypeScript 中
Vue组件中TypeScript 在Vue组件中,我们可以使用TypeScript进行各种类型的设置,包括props、Reactive和ref等。下面,让我们详细地探讨一下这些设置。 设置描述设置props在Vue中,props本身就具有类型设定的功能。但如果你希望使用Ty…...
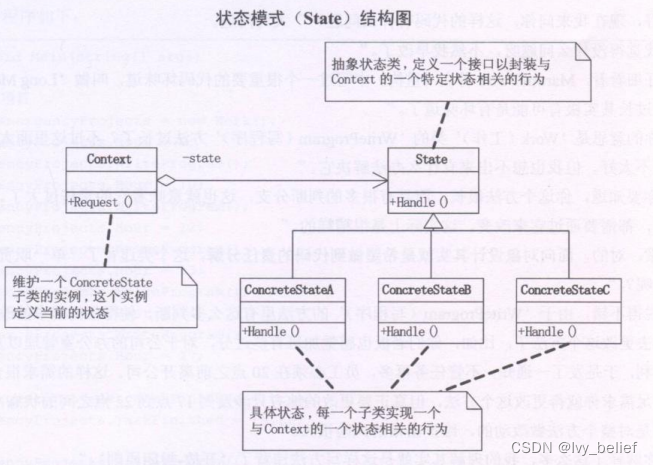
(三)行为模式:8、状态模式(State Pattern)(C++示例)
目录 1、状态模式(State Pattern)含义 2、状态模式的UML图学习 3、状态模式的应用场景 4、状态模式的优缺点 (1)优点 (2)缺点 5、C实现状态模式的实例 1、状态模式(State Pattern&#x…...
)
nginx的配置文件概述及简单demo(二)
默认配置文件 当安装完nginx后,它的目录下通常有默认的配置文件 #user nobody; worker_processes 1;#error_log logs/error.log; #error_log logs/error.log notice; #error_log logs/error.log info;#pid logs/nginx.pid;events {worker_connection…...
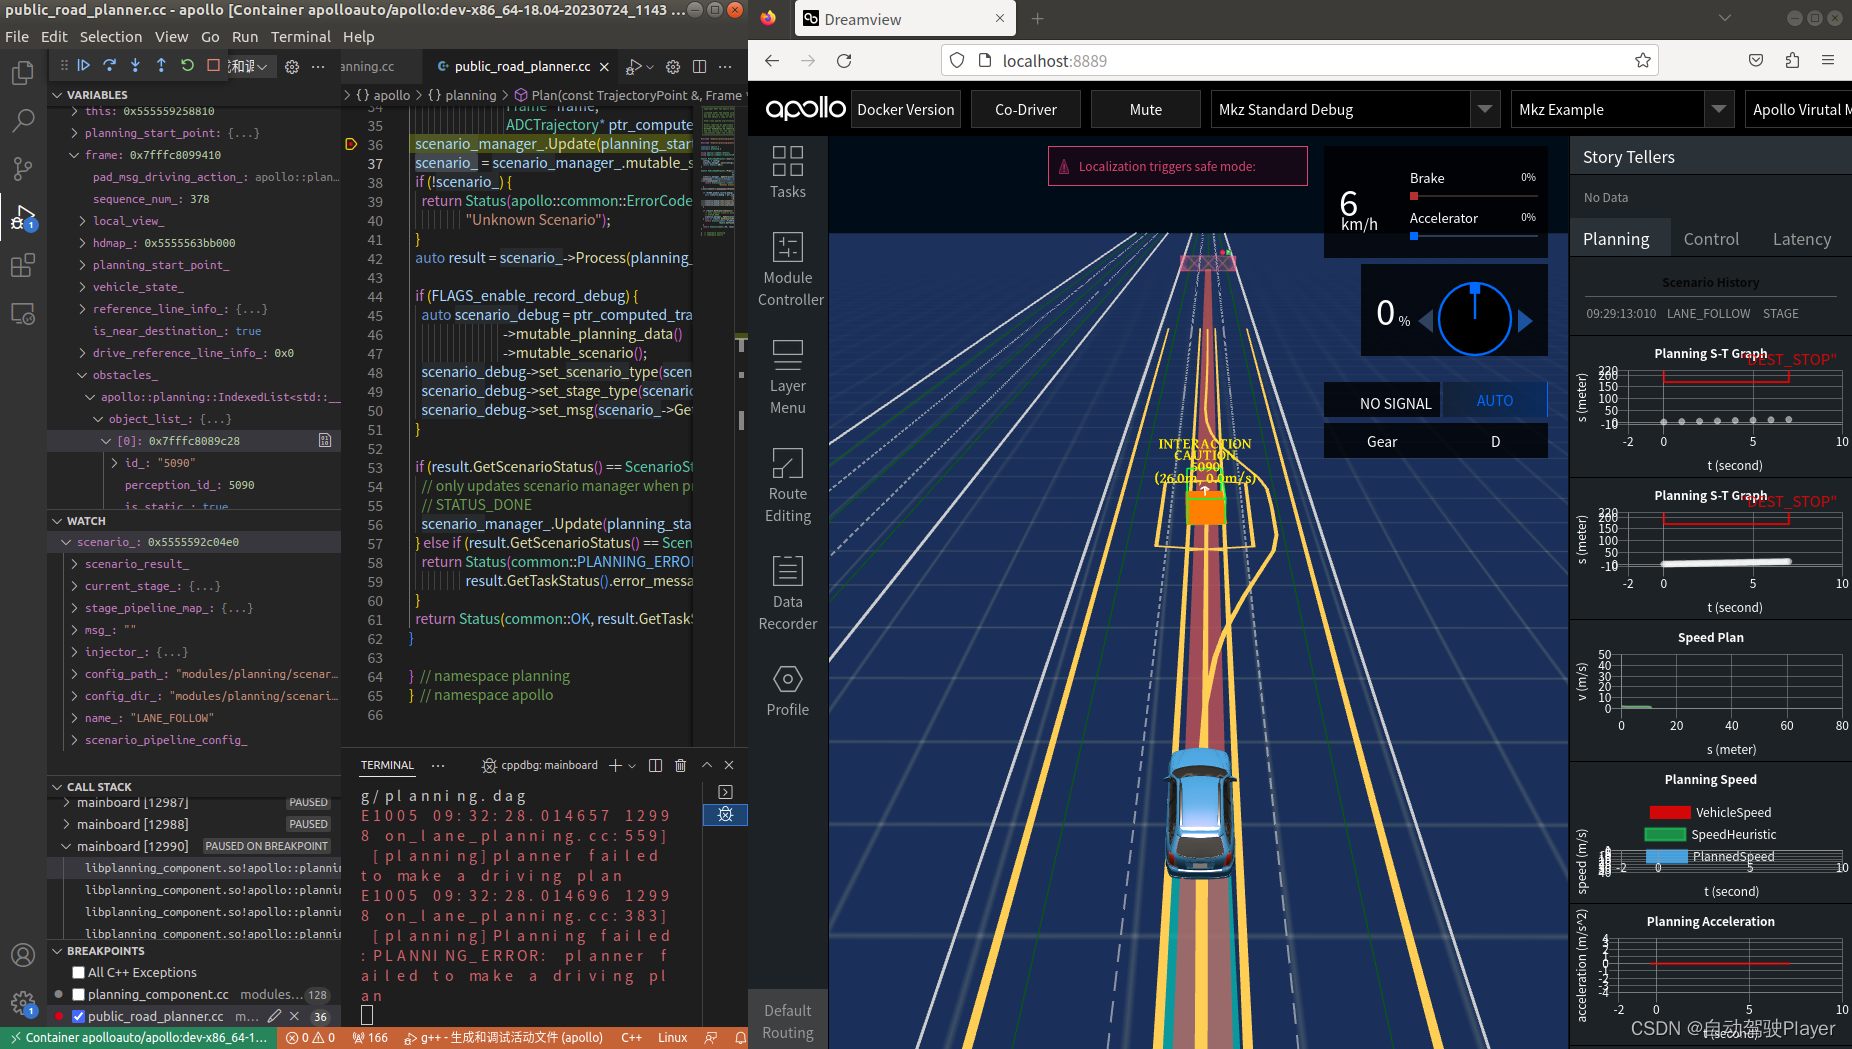
Apollo Planning2.0决策规划算法代码详细解析 (2): vscode gdb单步调试环境搭建
前言: apollo planning2.0 在新版本中在降低学习和二次开发成本上进行了一些重要的优化,重要的优化有接口优化、task插件化、配置参数改造等。 GNU symbolic debugger,简称「GDB 调试器」,是 Linux 平台下最常用的一款程序调试器。GDB 编译器通常以 gdb 命令的形式在终端…...

【SpringBoot】100、SpringBoot中使用自定义注解+AOP实现参数自动解密
在实际项目中,用户注册、登录、修改密码等操作,都涉及到参数传输安全问题。所以我们需要在前端对账户、密码等敏感信息加密传输,在后端接收到数据后能自动解密。 1、引入依赖 <dependency><groupId>org.springframework.boot</groupId><artifactId...

解锁数据库简洁之道:FastAPI与SQLModel实战指南
在构建现代Web应用程序时,与数据库的交互无疑是核心环节。虽然传统的数据库操作方式(如直接编写SQL语句与psycopg2交互)赋予了我们精细的控制权,但在面对日益复杂的业务逻辑和快速迭代的需求时,这种方式的开发效率和可…...

Auto-Coder使用GPT-4o完成:在用TabPFN这个模型构建一个预测未来3天涨跌的分类任务
通过akshare库,获取股票数据,并生成TabPFN这个模型 可以识别、处理的格式,写一个完整的预处理示例,并构建一个预测未来 3 天股价涨跌的分类任务 用TabPFN这个模型构建一个预测未来 3 天股价涨跌的分类任务,进行预测并输…...
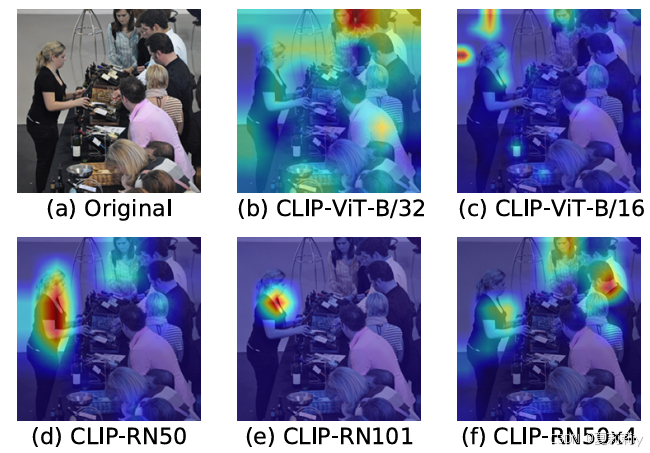
[ICLR 2022]How Much Can CLIP Benefit Vision-and-Language Tasks?
论文网址:pdf 英文是纯手打的!论文原文的summarizing and paraphrasing。可能会出现难以避免的拼写错误和语法错误,若有发现欢迎评论指正!文章偏向于笔记,谨慎食用 目录 1. 心得 2. 论文逐段精读 2.1. Abstract 2…...

全面解析各类VPN技术:GRE、IPsec、L2TP、SSL与MPLS VPN对比
目录 引言 VPN技术概述 GRE VPN 3.1 GRE封装结构 3.2 GRE的应用场景 GRE over IPsec 4.1 GRE over IPsec封装结构 4.2 为什么使用GRE over IPsec? IPsec VPN 5.1 IPsec传输模式(Transport Mode) 5.2 IPsec隧道模式(Tunne…...

2023赣州旅游投资集团
单选题 1.“不登高山,不知天之高也;不临深溪,不知地之厚也。”这句话说明_____。 A、人的意识具有创造性 B、人的认识是独立于实践之外的 C、实践在认识过程中具有决定作用 D、人的一切知识都是从直接经验中获得的 参考答案: C 本题解…...

【7色560页】职场可视化逻辑图高级数据分析PPT模版
7种色调职场工作汇报PPT,橙蓝、黑红、红蓝、蓝橙灰、浅蓝、浅绿、深蓝七种色调模版 【7色560页】职场可视化逻辑图高级数据分析PPT模版:职场可视化逻辑图分析PPT模版https://pan.quark.cn/s/78aeabbd92d1...
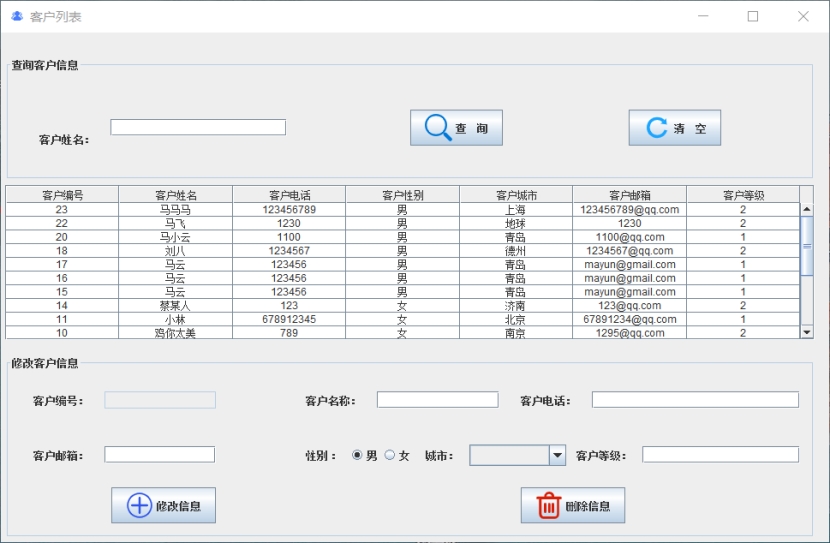
基于Java+MySQL实现(GUI)客户管理系统
客户资料管理系统的设计与实现 第一章 需求分析 1.1 需求总体介绍 本项目为了方便维护客户信息为了方便维护客户信息,对客户进行统一管理,可以把所有客户信息录入系统,进行维护和统计功能。可通过文件的方式保存相关录入数据,对…...
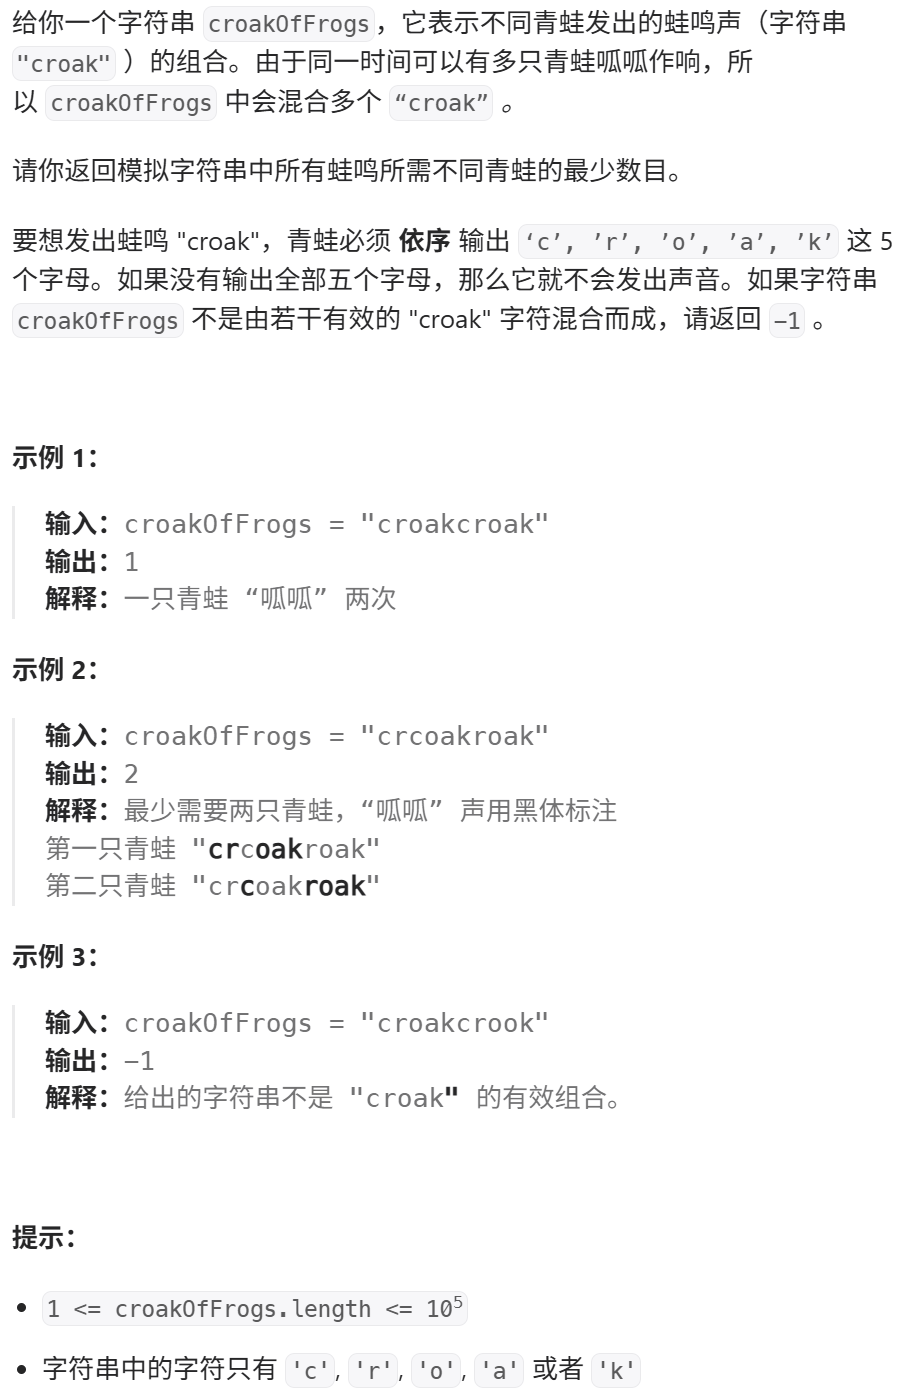
算法:模拟
1.替换所有的问号 1576. 替换所有的问号 - 力扣(LeetCode) 遍历字符串:通过外层循环逐一检查每个字符。遇到 ? 时处理: 内层循环遍历小写字母(a 到 z)。对每个字母检查是否满足: 与…...
的使用)
Go 并发编程基础:通道(Channel)的使用
在 Go 中,Channel 是 Goroutine 之间通信的核心机制。它提供了一个线程安全的通信方式,用于在多个 Goroutine 之间传递数据,从而实现高效的并发编程。 本章将介绍 Channel 的基本概念、用法、缓冲、关闭机制以及 select 的使用。 一、Channel…...