轻量封装WebGPU渲染系统示例<43>- PBR材质与阴影实(源码)
原理简介:
1. 基于rendering pass graph实现。
2. WGSL Shader 基于文件系统和宏机制动态组装。
当前示例源码github地址:
https://github.com/vilyLei/voxwebgpu/blob/feature/rendering/src/voxgpu/sample/PBRShadowTest.ts
当前示例运行效果:
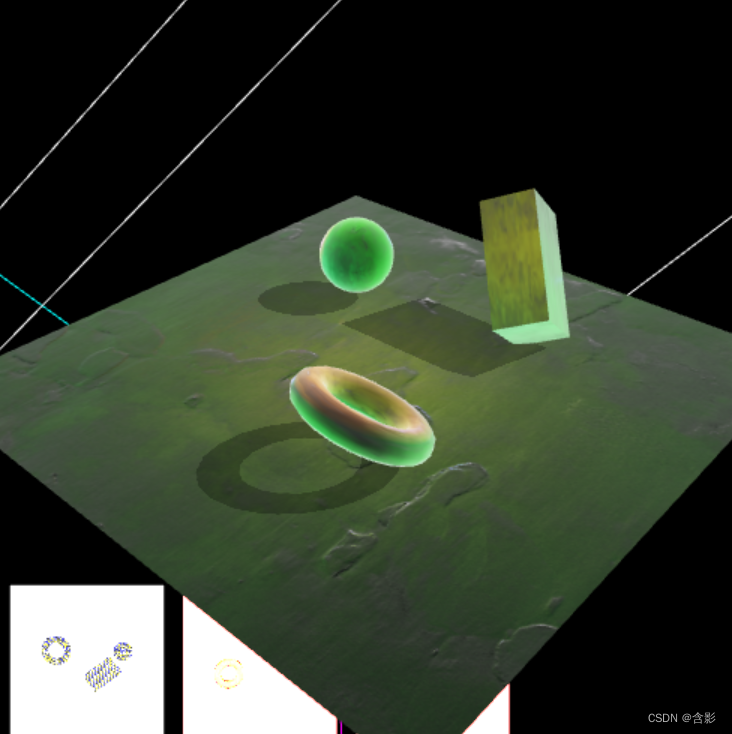
此示例基于此渲染系统实现,当前示例TypeScript源码如下:
class ShadowPassGraph extends WGRPassNodeGraph {private entities: Entity3D[] = [];private mDepthMaterials: WGMaterial[];shadowDepthRTT = { uuid: "rtt-shadow-depth", rttTexture: {}, shdVarName: 'shadowData' };depAttachment: WGRPassColorAttachment = {texture: this.shadowDepthRTT,clearValue: { r: 1, g: 1, b: 1, a: 1.0 },loadOp: "clear",storeOp: "store"};occVRTT = { uuid: "rtt-shadow-occV", rttTexture: {}, shdVarName: 'shadowData' };occHRTT = { uuid: "rtt-shadow-occH", rttTexture: {}, shdVarName: 'shadowData' };occVEntity: FixScreenPlaneEntity;occHEntity: FixScreenPlaneEntity;shadowBias = -0.0005;shadowRadius = 2.0;shadowMapW = 512;shadowMapH = 512;shadowViewW = 1300;shadowViewH = 1300;shadowCamera: Camera;constructor() {super();}private initMaterial(): void {const shadowDepthShdSrc = {shaderSrc: { code: shadowDepthWGSL, uuid: "shadowDepthShdSrc" }};this.mDepthMaterials = [this.createDepthMaterial(shadowDepthShdSrc)];}private createDepthMaterial(shaderSrc: WGRShderSrcType, faceCullMode = "none"): WGMaterial {let pipelineDefParam = {depthWriteEnabled: true,faceCullMode,blendModes: [] as string[]};const material = new WGMaterial({shadinguuid: "shadow-depth_material",shaderSrc,pipelineDefParam});return material;}private buildShadowCam(): void {const g = this;const cam = new Camera({eye: [600.0, 800.0, -600.0],near: 0.1,far: 1900,perspective: false,viewWidth: g.shadowViewW,viewHeight: g.shadowViewH});cam.update();g.shadowCamera = cam;}addEntity(entity: Entity3D): ShadowPassGraph {let pass = this.passes[0];let et = new Entity3D({ transform: entity.transform });et.materials = this.mDepthMaterials;et.geometry = entity.geometry;et.rstate.copyFrom(entity.rstate);this.entities.push(et);pass.addEntity(et);return this;}addEntities(entities: Entity3D[]): ShadowPassGraph {let es = entities;for (let i = 0; i < es.length; ++i) {this.addEntity(es[i]);}return this;}initialize(rc: RendererScene): ShadowPassGraph {let colorAttachments = [this.depAttachment];// create a separate rtt rendering passlet multisampleEnabled = false;let pass = rc.createRTTPass({ colorAttachments, multisampleEnabled });this.passes = [pass];rc.setPassNodeGraph(this);this.buildShadowCam();pass.node.camera = this.shadowCamera;this.initMaterial();this.initocc();return this;}private initocc(): void {let pass = this.passes[0];let extent = [-1, -1, 2, 2];let material = new ShadowOccBlurMaterial();let ppt = material.property;ppt.setShadowRadius(this.shadowRadius);ppt.setViewSize(this.shadowMapW, this.shadowMapH);material.addTextures([this.shadowDepthRTT]);this.occVEntity = new FixScreenPlaneEntity({ extent, materials: [material] });this.occVEntity.visible = false;pass.addEntity(this.occVEntity);material = new ShadowOccBlurMaterial();ppt = material.property;ppt.setShadowRadius(this.shadowRadius);ppt.setViewSize(this.shadowMapW, this.shadowMapH);ppt.toHorizonalBlur();material.addTextures([this.occVRTT]);this.occHEntity = new FixScreenPlaneEntity({ extent, materials: [material] });this.occHEntity.visible = false;pass.addEntity(this.occHEntity);}run(): void {let pass = this.passes[0];let attachment = this.depAttachment;attachment.texture = this.shadowDepthRTT;let es = this.entities;for (let i = 0; i < es.length; ++i) {es[i].visible = true;}pass.render();for (let i = 0; i < es.length; ++i) {es[i].visible = false;}attachment.texture = this.occVRTT;this.occVEntity.visible = true;pass.render();this.occVEntity.visible = false;attachment.texture = this.occHRTT;this.occHEntity.visible = true;pass.render();this.occHEntity.visible = false;}
}
export class PBRShadowTest {private mRscene = new RendererScene();private mGraph = new ShadowPassGraph();initialize(): void {this.mRscene.initialize({canvasWith: 512,canvasHeight: 512,rpassparam: { multisampleEnabled: true }});this.initShadowScene();this.initEvent();}private mEntities: Entity3D[] = [];private initShadowScene(): void {let rc = this.mRscene;let position = [-230.0, 100.0, -200.0];let materials = this.createMaterials(position);let sph = new SphereEntity({radius: 80,transform: {position},materials});this.mEntities.push(sph);rc.addEntity(sph);position = [160.0, 100.0, -210.0];materials = this.createMaterials(position);let box = new BoxEntity({minPos: [-30, -30, -30],maxPos: [130, 230, 80],transform: {position,rotation: [50, 130, 80]},materials});this.mEntities.push(box);rc.addEntity(box);position = [160.0, 100.0, 210.0];materials = this.createMaterials(position);let torus = new TorusEntity({transform: {position,rotation: [50, 30, 80]},materials});this.mEntities.push(torus);rc.addEntity(torus);this.buildShadow();}private buildShadow(): void {this.initShadowPass();this.initShadowReceiveDisp(true);this.buildShadowCamFrame();}private mShadowTransMat: Matrix4;private initShadowPass(): void {let rc = this.mRscene;const graph = this.mGraph;graph.initialize(rc).addEntities(this.mEntities);let cam = graph.shadowCamera;let transMatrix = new Matrix4();transMatrix.setScaleXYZ(0.5, -0.5, 0.5);transMatrix.setTranslationXYZ(0.5, 0.5, 0.5);let shadowMat = new Matrix4();shadowMat.copyFrom(cam.viewProjMatrix);shadowMat.append(transMatrix);this.mShadowTransMat = shadowMat;let extent = [-0.95, -0.95, 0.4, 0.4];let entity = new FixScreenPlaneEntity({ extent, flipY: true, textures: [{ diffuse: graph.shadowDepthRTT }] });rc.addEntity(entity);extent = [-0.5, -0.95, 0.4, 0.4];entity = new FixScreenPlaneEntity({ extent, flipY: true, textures: [{ diffuse: graph.occVRTT }] });rc.addEntity(entity);extent = [-0.05, -0.95, 0.4, 0.4];entity = new FixScreenPlaneEntity({ extent, flipY: true, textures: [{ diffuse: graph.occHRTT }] });rc.addEntity(entity);}private buildShadowCamFrame(): void {const graph = this.mGraph;const cam = graph.shadowCamera;const rsc = this.mRscene;let frameColors = [[1.0, 0.0, 1.0], [0.0, 1.0, 1.0], [1.0, 0.0, 0.0], [0.0, 1.0, 1.0]];let boxFrame = new BoundsFrameEntity({ vertices8: cam.frustum.vertices, frameColors });rsc.addEntity(boxFrame);}private initEvent(): void {const rc = this.mRscene;rc.addEventListener(MouseEvent.MOUSE_DOWN, this.mouseDown);new MouseInteraction().initialize(rc, 0, false).setAutoRunning(true);}private initShadowReceiveDisp(shadowReceived = false): void {let rc = this.mRscene;let position = new Vector3(0, -1, 0);let materials = this.createMaterials(position, shadowReceived);let plane = new PlaneEntity({axisType: 1,materials,extent:[-600,-600,1200,1200],transform: { position }});rc.addEntity(plane);}private hdrEnvtex = new SpecularEnvBrnTexture();private createBaseTextures(shadowReceived = false): WGTextureDataDescriptor[] {const albedoTex = { albedo: { url: `static/assets/pbrtex/rough_plaster_broken_diff_1k.jpg` } };const normalTex = { normal: { url: `static/assets/pbrtex/rough_plaster_broken_nor_1k.jpg` } };const armTex = { arm: { url: `static/assets/pbrtex/rough_plaster_broken_arm_1k.jpg` } };let textures = [this.hdrEnvtex,albedoTex,normalTex,armTex] as WGTextureDataDescriptor[];if(shadowReceived) {textures.push( this.mGraph.occHRTT );}return textures;}private createMaterials(position: Vector3DataType, shadowReceived = false, uvParam?: number[]): BasePBRMaterial[] {let textures0 = this.createBaseTextures(shadowReceived);let material0 = this.createMaterial(position, textures0, ["solid"]);this.applyMaterialPPt(material0, shadowReceived);let list = [material0];if (uvParam) {for (let i = 0; i < list.length; ++i) {list[i].property.uvParam.value = uvParam;}}return list;}private applyMaterialPPt(material: BasePBRMaterial, shadowReceived = false): void {let property = material.property;property.ambient.value = [0.0, 0.2, 0.2];property.albedo.value = [0.7, 0.7, 0.3];property.arms.roughness = 0.8;property.armsBase.value = [0, 0, 0];property.param.scatterIntensity = 32;const graph = this.mGraph;let cam = graph.shadowCamera;property.shadowReceived = shadowReceived;if(shadowReceived) {property.shadowMatrix.shadowMatrix = this.mShadowTransMat;let vsmParams = property.vsmParams;vsmParams.radius = graph.shadowRadius;vsmParams.bias = graph.shadowBias;vsmParams.setSize(graph.shadowMapW, graph.shadowMapH);vsmParams.direction = cam.nv;vsmParams.intensity = 0.5;}}private mLightParams: LightShaderDataParam[] = [];private createMaterial(position: Vector3DataType, textures: WGTextureDataDescriptor[], blendModes: string[], depthCompare = 'less', lightParam?: LightShaderDataParam): BasePBRMaterial {if (!lightParam) {lightParam = createLightData(position);this.mLightParams.push(lightParam);}let pipelineDefParam = {depthWriteEnabled: true,faceCullMode: 'back',blendModes,depthCompare};let material = new BasePBRMaterial({ pipelineDefParam });material.setLightParam(lightParam);material.addTextures(textures);return material;}private mouseDown = (evt: MouseEvent): void => {};run(): void {this.mRscene.run();}
}
相关文章:
轻量封装WebGPU渲染系统示例<43>- PBR材质与阴影实(源码)
原理简介: 1. 基于rendering pass graph实现。 2. WGSL Shader 基于文件系统和宏机制动态组装。 当前示例源码github地址: https://github.com/vilyLei/voxwebgpu/blob/feature/rendering/src/voxgpu/sample/PBRShadowTest.ts 当前示例运行效果: 此示例基于此渲染系统实现&a…...
macOS Big Sur/Mac电脑安装vscode显示您没有权限来打开应用程序‘Visual Studio Code‘ 请联系您的电脑或网络管理员问题修复
错误方法 首先我以为我的权限不足。,需要去用户群组里设置。结果根本不是这个的问题。 1.在系统偏好设置->用户与群组检查了一下我的用户是不是管理员 结果发现是管理员 2.根据苹果提示,右键我的文件夹->显示简介->最下面的共享与权限 解锁&…...

jsp 如何批量改随机人名
对比图 <% page language"java" contentType"text/html; charsetUTF-8"pageEncoding"UTF-8"%> <%page import"java.sql.ResultSet"%> <%page import"java.sql.PreparedStatement"%> <%page import&qu…...
android项目实战之编辑器集成
引言 项目需要用到编辑器,采用RichEditor,如下效果 实现 1. 引入库2 implementation jp.wasabeef:richeditor-android:2.0.0 2. XML <LinearLayout xmlns:android"http://schemas.android.com/apk/res/android"android:layout_width&q…...

JAVA程序如何打jar和war问题解决
背景: 近期研究一个代码审计工具 需要jar包 jar太多了 可以将jar 打成war包 首先看下程序目录结构 pom.xml文件内容 <?xml version"1.0" encoding"UTF-8"?> <project xmlns"http://maven.apache.org/POM/4.0.0"xmlns:xsi"ht…...
Microsoft 365 Copilot正式上线,如何稳定访问体验?
如果将微软对人工智能的投资看成一场豪赌,Microsoft Copilot无疑是现阶段最受瞩目的赌注。2023年9月正式发布的Microsoft Copilot是一种基于大型语言模型(LLM)和微软图形(Microsoft Graph)的数据和人工智能(…...

【安卓】安卓xTS之Media模块 学习笔记(3) VTS测试
1. 背景 接下来进行正式的VTS测试。本章节还是以Media模块相关进行介绍。 VTS主要测的是内核和HAL层,media的hal层是以openMax(即将废弃,今日2023.12) 和 Codec2 (后续主流) 接口为主。 这里我们只看Codec2的要求,CDD…...

Go实现http同步文件操作 - 增删改查
http同步文件操作 - 增删改查 http同步文件操作 - 增删改查1. 前置要求1.1. 构建结构体 文件名 文件内容1.1.1. 页面结构体1.1.2. 为Page结构体绑定方法:Save1.1.3. 对Page结构体支持页面内容查看方法,同时提供页面文件是否存在的方法 1.2. 简单验证上面…...
Spring Boot整合 Spring Security
Spring Boot整合 1、RBAC 权限模型 RBAC模型(Role-Based Access Control:基于角色的访问控制) 在RBAC模型里面,有3个基础组成部分,分别是:用户、角色和权限,它们之间的关系如下图所示 SELECT…...

浅谈低代码
低代码开发是近年来迅速崛起的软件开发方法,让编写应用程序变得更快、更简单。有人说它是美味的膳食,让开发过程高效而满足,但也有人质疑它是垃圾食品,缺乏定制性与深度。你认为低代码到底是美以下方向仅供参考。味的膳食还是垃圾…...

Innodb-ruby深入探索Innodb存储结构
达在之前已经分享过Innodb数据存储结构知识,但是都是基于理论原理知识理解,今天利用Innodb文件解析工具ruby进行探索Innodb真实的存储结构。 索引原理过程:【Mysql】 InnoDB引擎深入 - 数据页 | 聚集索引_innodb的聚集索引的数据插入_Surviv…...

Echarts的使用 笔记
1.数据可视化前言 1.1.什么是数据可视化 数据可视化: 就是把数据以更加直观的方式进行呈现. 1.2.数据可视化的好处 清晰有效地传达与沟通信息更容易洞察隐藏在数据中的信息 2.ECharts的基本使用 2.1.ECharts官网 ECharts是百度公司开源的一个使用 JavaScript 实…...

信息系统工程的基本概念
系统是由相互作用和相互依赖的若干部分,按一定规律结合成的、具有特定功能的有机整体。系统有下述特性: (1)集合性。系统是由许多元素有机地组成的整体。每个元素服从整体,追求全局最优。 (2)相…...

SAP UI5 walkthrough step10 Descriptor for Applications
在这一步,我们将会把所有的应用相关的描述性的文件独立放到manifest.json 新建一个manifest.json文件 webapp/manifest.json (New) {"_version": "1.58.0","sap.app": {"id": "ui5.walkthrough","i18n&q…...
打造专属小程序,乔拓云模板平台助力商家抢占先机
打造专属小程序,乔拓云模板平台助力商家抢占先机!该平台涵盖全行业小程序模板,一键复制即可上线。 想要快速创建高效实用的小程序,乔拓云小程序模板开发平台为您提供了解决方案!我们为您提供一系列精心设计的小程序模板…...
)
Vue2学习(组件的使用)
Vue中使用组件的三个步骤: 一、定义组件(或者叫创建组件) 使用Vue.extend(options)创建,其中options和new Vue(options)时传入的那个options几乎一样,但也有点区别; 区别如下: 1.el不要写,为什么&#x…...

基于Spring、SpringMVC、MyBatis开发的游乐场管理系统
文章目录 项目介绍主要功能截图:部分代码展示设计总结项目获取方式🍅 作者主页:超级无敌暴龙战士塔塔开 🍅 简介:Java领域优质创作者🏆、 简历模板、学习资料、面试题库【关注我,都给你】 🍅文末获取源码联系🍅 项目介绍 基于Spring、SpringMVC、MyBatis开发的游…...

数据清洗、特征工程和数据可视化、数据挖掘与建模的应用场景
1.5 数据清洗、特征工程和数据可视化、挖掘建模的应用场景 视频为《Python数据科学应用从入门到精通》张甜 杨维忠 清华大学出版社一书的随书赠送视频讲解1.5节内容。本书已正式出版上市,当当、京东、淘宝等平台热销中,搜索书名即可。内容涵盖数据科学应…...
Qt简介、工程文件分离、创建Qt工程、Qt的帮助文档
QT 简介 core:核心模块,非图形的接口类,为其它模块提供支持 gui:图形用户接口,qt5之前 widgets:图形界面相关的类模块 qt5之后的 database:数据库模块 network:网络模块 QT 特性 开…...

机器学习与低代码开发:创新驱动的双剑合璧
引言 随着科技的日新月异,机器学习和低代码开发已经成为引领技术行业变革的两大重要趋势。机器学习通过模拟人类的学习方式,让计算机具备了自我学习和预测的能力,打破了传统计算机程序的局限性。而低代码开发则以简化软件开发过程为目标&…...
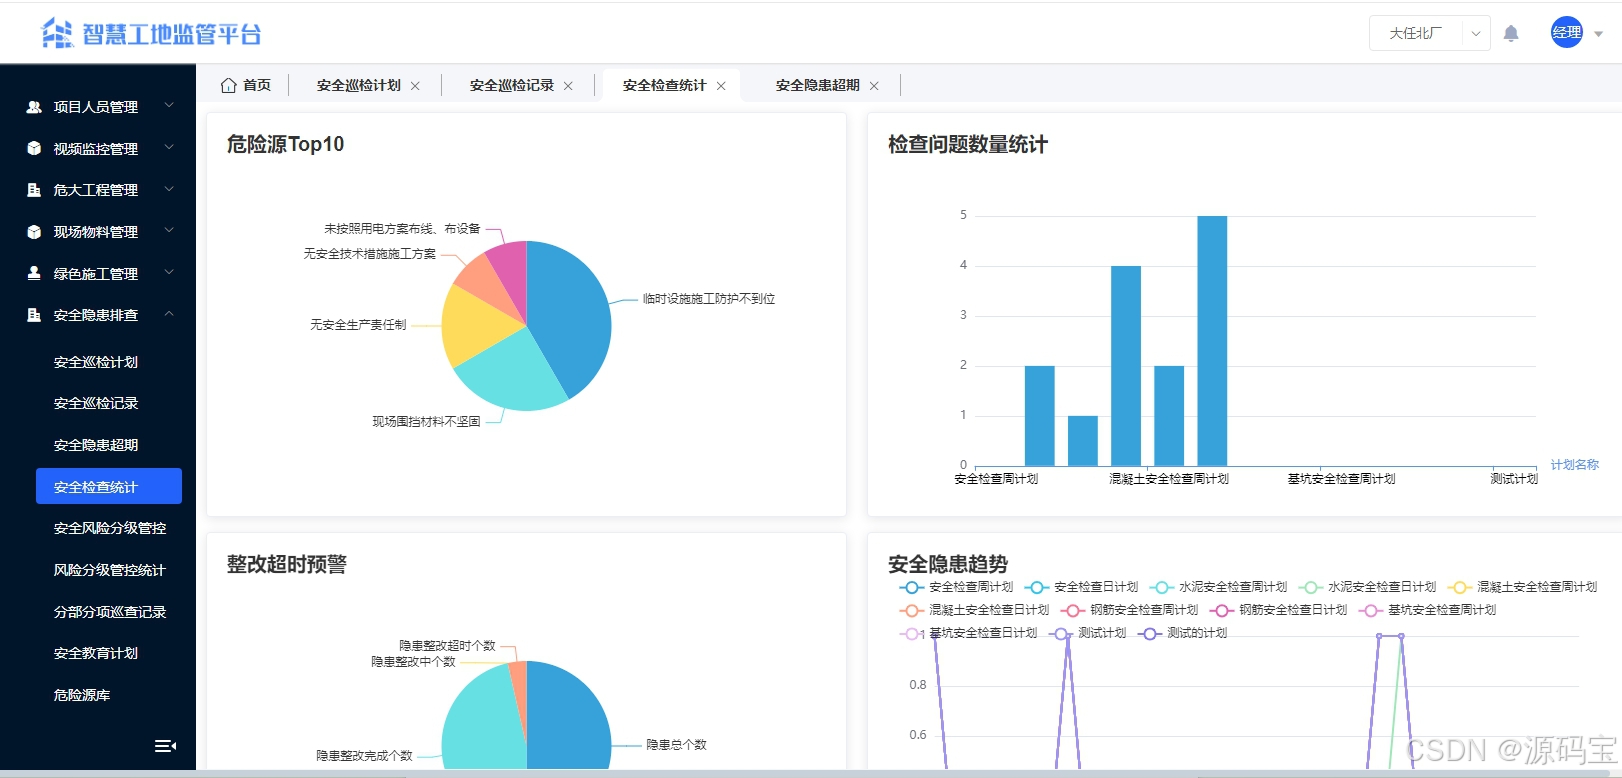
智慧工地云平台源码,基于微服务架构+Java+Spring Cloud +UniApp +MySql
智慧工地管理云平台系统,智慧工地全套源码,java版智慧工地源码,支持PC端、大屏端、移动端。 智慧工地聚焦建筑行业的市场需求,提供“平台网络终端”的整体解决方案,提供劳务管理、视频管理、智能监测、绿色施工、安全管…...

Redis相关知识总结(缓存雪崩,缓存穿透,缓存击穿,Redis实现分布式锁,如何保持数据库和缓存一致)
文章目录 1.什么是Redis?2.为什么要使用redis作为mysql的缓存?3.什么是缓存雪崩、缓存穿透、缓存击穿?3.1缓存雪崩3.1.1 大量缓存同时过期3.1.2 Redis宕机 3.2 缓存击穿3.3 缓存穿透3.4 总结 4. 数据库和缓存如何保持一致性5. Redis实现分布式…...
iPhone密码忘记了办?iPhoneUnlocker,iPhone解锁工具Aiseesoft iPhone Unlocker 高级注册版分享
平时用 iPhone 的时候,难免会碰到解锁的麻烦事。比如密码忘了、人脸识别 / 指纹识别突然不灵,或者买了二手 iPhone 却被原来的 iCloud 账号锁住,这时候就需要靠谱的解锁工具来帮忙了。Aiseesoft iPhone Unlocker 就是专门解决这些问题的软件&…...

【Redis技术进阶之路】「原理分析系列开篇」分析客户端和服务端网络诵信交互实现(服务端执行命令请求的过程 - 初始化服务器)
服务端执行命令请求的过程 【专栏简介】【技术大纲】【专栏目标】【目标人群】1. Redis爱好者与社区成员2. 后端开发和系统架构师3. 计算机专业的本科生及研究生 初始化服务器1. 初始化服务器状态结构初始化RedisServer变量 2. 加载相关系统配置和用户配置参数定制化配置参数案…...

渲染学进阶内容——模型
最近在写模组的时候发现渲染器里面离不开模型的定义,在渲染的第二篇文章中简单的讲解了一下关于模型部分的内容,其实不管是方块还是方块实体,都离不开模型的内容 🧱 一、CubeListBuilder 功能解析 CubeListBuilder 是 Minecraft Java 版模型系统的核心构建器,用于动态创…...

Ascend NPU上适配Step-Audio模型
1 概述 1.1 简述 Step-Audio 是业界首个集语音理解与生成控制一体化的产品级开源实时语音对话系统,支持多语言对话(如 中文,英文,日语),语音情感(如 开心,悲伤)&#x…...

【C语言练习】080. 使用C语言实现简单的数据库操作
080. 使用C语言实现简单的数据库操作 080. 使用C语言实现简单的数据库操作使用原生APIODBC接口第三方库ORM框架文件模拟1. 安装SQLite2. 示例代码:使用SQLite创建数据库、表和插入数据3. 编译和运行4. 示例运行输出:5. 注意事项6. 总结080. 使用C语言实现简单的数据库操作 在…...

rnn判断string中第一次出现a的下标
# coding:utf8 import torch import torch.nn as nn import numpy as np import random import json""" 基于pytorch的网络编写 实现一个RNN网络完成多分类任务 判断字符 a 第一次出现在字符串中的位置 """class TorchModel(nn.Module):def __in…...

Docker 本地安装 mysql 数据库
Docker: Accelerated Container Application Development 下载对应操作系统版本的 docker ;并安装。 基础操作不再赘述。 打开 macOS 终端,开始 docker 安装mysql之旅 第一步 docker search mysql 》〉docker search mysql NAME DE…...
嵌入式学习之系统编程(九)OSI模型、TCP/IP模型、UDP协议网络相关编程(6.3)
目录 一、网络编程--OSI模型 二、网络编程--TCP/IP模型 三、网络接口 四、UDP网络相关编程及主要函数 编辑编辑 UDP的特征 socke函数 bind函数 recvfrom函数(接收函数) sendto函数(发送函数) 五、网络编程之 UDP 用…...