pytorch一致数据增强
分割任务对 image 做(某些)transform 时,要对 label(segmentation mask)也做对应的 transform,如 Resize、RandomRotation 等。如果对 image、label 分别用 transform 处理一遍,则涉及随机操作的可能不一致,如 RandomRotation 将 image 转了 a 度、却将 label 转了 b 度。
MONAI 有个 ArrayDataset 实现了这功能,思路是每次 transform 前都重置一次 random seed 先。对 monai 订制 transform 的方法不熟,torchvision.transforms 的订制接口比较简单,考虑基于 pytorch 实现。要改两个东西:
- 扩展 torchvison.transforms.Compose,使之支持多个输入(image、label);
- 一个 wrapper,扩展 transform,使之支持多输入。
思路也是重置 random seed,参考 [1-4]。
Code
to_multi:将处理单幅图的 transform 扩展成可处理多幅;MultiCompose:扩展 torchvision.transforms.Compose,可输入多幅图。内部调用to_multi扩展传入的 transforms。
import random, os
import numpy as np
import torchdef seed_everything(seed=42):random.seed(seed)os.environ['PYTHONHASHSEED'] = str(seed)np.random.seed(seed)torch.manual_seed(seed)torch.cuda.manual_seed(seed)torch.backends.cudnn.deterministic = Truetorch.backends.cudnn.benchmark = Truedef to_multi(trfm):"""wrap a transform to extend to multiple input with synchronised random seedInput:trfm: transformation function/object (custom or from torchvision.transforms)Output:_multi_transform: function"""# numpy.random.seed range error:#   ValueError: Seed must be between 0 and 2**32 - 1min_seed = 0 # - 0x8000_0000_0000_0000max_seed = min(2**32 - 1, 0xffff_ffff_ffff_ffff)def _multi_transform(*images):"""images: [C, H, W]"""if len(images) == 1:return trfm(images[0])_seed = random.randint(min_seed, max_seed)res = []for img in images:seed_everything(_seed)res.append(trfm(img))return tuple(res)return _multi_transformclass MultiCompose:"""Extension of torchvision.transforms.Compose that accepts multiple input.Usage is the same as torchvision.transforms.Compose. This class will wrap inputtransforms with `to_multi` to support simultaneous multiple transformation.This can be useful when simultaneously transforming images & segmentation masks."""def __init__(self, transforms):"""transforms should be wrapped by `to_multi`"""self.transforms = [to_multi(t) for t in transforms]def __call__(self, *images):for t in self.transforms:images = t(*images)return images
test
测试一致性,用到预处理过的 verse’19 数据集、一些工具函数、一个订制 transform:
- verse’19 数据集及预处理见 iTomxy/data/verse;
digit_sort_key:数据文件排序用;get_palette、color_seg、blend_seg:可视化用;MyDataset:看其中__getitem__的 transform 用法,即同时传入 image 和 label;ResizeZoomPad:一个订制的 transform;
import os, os.path as osp, random
from glob import glob
import numpy as np
from PIL import Image
import torch
import torchvision.transforms as transforms
import torchvision.transforms.functional as Fdef digit_sort_key(s, num_pattern=re.compile('([0-9]+)')):"""natural sort,数据排序用"""return [int(text) for text in num_pattern.split(s) if text.isdigit()]def get_palette(n_classes, pil_format=True):"""创建调色盘,可视化用"""n = n_classespalette = [0] * (n * 3)for j in range(0, n):lab = jpalette[j * 3 + 0] = 0palette[j * 3 + 1] = 0palette[j * 3 + 2] = 0i = 0while lab:palette[j * 3 + 0] |= (((lab >> 0) & 1) << (7 - i))palette[j * 3 + 1] |= (((lab >> 1) & 1) << (7 - i))palette[j * 3 + 2] |= (((lab >> 2) & 1) << (7 - i))i += 1lab >>= 3if pil_format:return paletteres = []for i in range(0, len(palette), 3):res.append(tuple(palette[i: i+3]))return resdef color_seg(label, n_classes=0):"""segmentation mask 上色,可视化用"""if n_classes < 1:n_classes = math.ceil(np.max(label)) + 1label_rgb = Image.fromarray(label.astype(np.int32)).convert("L")label_rgb.putpalette(get_palette(n_classes))return label_rgb.convert("RGB")def blend_seg(image, label, n_classes=0, alpha=0.7, rescale=False, transparent_bg=True, save_file=""):"""融合 image 和其 segmentation mask,可视化用"""if rescale:denom = image.max() - image.min()if 0 != denom:image = (image - image.min()) / denom * 255image = np.clip(image, 0, 255).astype(np.uint8)img_pil = Image.fromarray(image).convert("RGB")lab_pil = color_seg(label, n_classes)blended_image = Image.blend(img_pil, lab_pil, alpha)if transparent_bg:blended_image = Image.fromarray(np.where((0 == label)[:, :, np.newaxis],np.asarray(img_pil),np.asarray(blended_image)))if save_file:blended_image.save(save_file)return blended_imageclass MyDataset(torch.utils.data.Dataset):"""订制 dataset,看 __getitem__ 处 transform 的调法"""def __init__(self, image_list, label_list, transform=None):assert len(image_list) == len(label_list)self.image_list = image_listself.label_list = label_listself.transform = transformdef __len__(self):return len(self.image_list)def __getitem__(self, index):img = np.load(self.image_list[index]) # [h, w]lab = np.load(self.label_list[index])img = torch.from_numpy(img).unsqueeze(0).float() # -> [c=1, h, w]lab = torch.from_numpy(lab).unsqueeze(0).int()if self.transform is not None:img, lab = self.transform(img, lab) # 同时传入 image、labelreturn img, labclass ResizeZoomPad:"""订制 resize"""def __init__(self, size, interpolation="bilinear"):if isinstance(size, int):assert size > 0self.size = [size, size]elif isinstance(size, (tuple, list)):assert len(size) == 2 and size[0] > 0 and size[1] > 0self.size = sizeif isinstance(interpolation, str):assert interpolation.lower() in {"nearest", "bilinear", "bicubic", "box", "hamming", "lanczos"}interpolation = {"nearest": F.InterpolationMode.NEAREST,"bilinear": F.InterpolationMode.BILINEAR,"bicubic": F.InterpolationMode.BICUBIC,"box": F.InterpolationMode.BOX,"hamming": F.InterpolationMode.HAMMING,"lanczos": F.InterpolationMode.LANCZOS}[interpolation.lower()]self.interpolation = interpolationdef __call__(self, image):"""image: [C, H, W]"""scale_h, scale_w = float(self.size[0]) / image.size(1), float(self.size[1]) / image.size(2)scale = min(scale_h, scale_w)tmp_size = [ # clipping to ensure sizemin(int(image.size(1) * scale), self.size[0]),min(int(image.size(2) * scale), self.size[1])]image = F.resize(image, tmp_size, self.interpolation)assert image.size(1) <= self.size[0] and image.size(2) <= self.size[1]pad_h, pad_w = self.size[0] - image.size(1), self.size[1] - image.size(2)if pad_h > 0 or pad_w > 0:pad_left, pad_right = pad_w // 2, (pad_w + 1) // 2pad_top, pad_bottom = pad_h // 2, (pad_h + 1) // 2image = F.pad(image, (pad_left, pad_top, pad_right, pad_bottom))return image# 读数据文件
data_path = os.path.expanduser("~/data/verse/processed-verse19-npy-horizontal")
train_images, train_labels, val_images, val_labels = [], [], [], []
for d in os.listdir(osp.join(data_path, "training")):if d.endswith("_ct"):img_p = osp.join(data_path, "training", d)lab_p = osp.join(data_path, "training", d[:-3]+"_seg-vert_msk")assert osp.isdir(lab_p)train_labels.extend(glob(os.path.join(lab_p, "*.npy")))train_images.extend(glob(os.path.join(img_p, "*.npy")))
for d in os.listdir(osp.join(data_path, "validation")):if d.endswith("_ct"):img_p = osp.join(data_path, "validation", d)lab_p = osp.join(data_path, "validation", d[:-3]+"_seg-vert_msk")assert osp.isdir(lab_p)val_labels.extend(glob(os.path.join(lab_p, "*.npy")))val_images.extend(glob(os.path.join(img_p, "*.npy")))# 数据文件名排序
train_images = sorted(train_images, key=lambda f: digit_sort_key(os.path.basename(f)))
train_labels = sorted(train_labels, key=lambda f: digit_sort_key(os.path.basename(f)))
val_images = sorted(val_images, key=lambda f: digit_sort_key(os.path.basename(f)))
val_labels = sorted(val_labels, key=lambda f: digit_sort_key(os.path.basename(f)))# transform
# 用 MultiCompose,其内部调用 to_multi 将 transforms wrap 成支持多输入的
train_trans = MultiCompose([ResizeZoomPad((224, 256)),transforms.RandomRotation(30),
])# 测试:读数据,可试化 image 和 label
check_ds = MyDataset(train_images, train_labels, train_trans)
check_loader = torch.utils.data.DataLoader(check_ds, batch_size=10, shuffle=True)
for images, labels in check_loader:print(images.size(), labels.size())for i in range(images.size(0)):# print(i, end='\r')img = images[i][0].numpy()lab = labels[i][0].numpy()print(np.unique(lab))seg_img = blend_seg(img, lab)img = (255 * (img - img.min()) / (img.max() - img.min())).astype(np.uint8)img = np.asarray(Image.fromarray(img).convert("RGB"))lab = np.asarray(color_seg(lab))comb = np.concatenate([img, lab, seg_img], axis=1)Image.fromarray(comb).save(f"test-dataset-{i}.png")break
效果:

可见,image 和 label 转了同一个随机角度。
Limits
有些 augmentations 是只对 image 做而不对 label 做的,如 ColorJitter,这里没有考虑怎么处理。
References
- How to Set Random Seeds in PyTorch and Tensorflow
- ihoromi4/seed_everything.py
- Reproducibility
- What is the max seed you can set up?
相关文章:
pytorch一致数据增强
分割任务对 image 做(某些)transform 时,要对 label(segmentation mask)也做对应的 transform,如 Resize、RandomRotation 等。如果对 image、label 分别用 transform 处理一遍,则涉及随机操作的…...

MapReduce
1. MapReduce是什么?请简要说明它的工作原理。 MapReduce是一种编程模型,主要用于处理大规模数据集的并行运算,特别是非结构化数据。这个模型的核心思想是将大数据处理任务分解为两个主要步骤:Map和Reduce。用户只需实现map()和r…...

Spring Boot 快速入门
Spring Boot 快速入门 什么是Spring Boot Spring Boot是一个用于简化Spring应用开发的框架,它基于Spring框架,提供了自动配置、快速开发等特性,使得开发者可以更加便捷地构建独立的、生产级别的Spring应用。 开始使用Spring Boot 步骤一&a…...

什么是神经网络的非线性
大家好啊,我是董董灿。 最近在写《计算机视觉入门与调优》(右键,在新窗口中打开链接)的小册,其中一部分说到激活函数的时候,谈到了神经网络的非线性问题。 今天就一起来看看,为什么神经网络需…...
——浅谈用户体验测试的主要功能)
前端知识(十四)——浅谈用户体验测试的主要功能
用户体验(User Experience,简称UX)在现代软件和产品开发中变得愈发重要。为了确保产品能够满足用户期望,提高用户满意度,用户体验测试成为不可或缺的环节。本文将详细探讨用户体验测试的主要功能,以及它在产品开发过程中的重要性 …...

解决前端跨域问题,后端解决方法
Spring CloudVue前后端分离项目报错:Network Error;net::ERR_FAILED(请求跨越)-CSDN博客记录自用...

【网络奇缘系列】计算机网络|数据通信方式|数据传输方式
🌈个人主页: Aileen_0v0🔥系列专栏: 一见倾心,再见倾城 --- 计算机网络~💫个人格言:"没有罗马,那就自己创造罗马~" 这篇文章是关于计算机网络中数据通信的基础知识点, 从模型,术语再到数据通信方式&#…...

数组 注意事项
1.一维数组的初始化 int a[5]{1,2,3,4,5}; 合法 int a[5]{1,2,3}; 合法 int a[]{1,2,3,4,5}; 合法,后面决定前面的大小 int a[5]{1,2,3,4,5,6}; 不合法! 2.一维数组的定义 int a[5] 合法 int a[11] 合法 int a[1/24] 合法 int x5,a[x…...

day11 滑动窗口中的最大值
class MyQueue { //单调队列(从大到小)public:deque<int> que; // 使用deque来实现单调队列// 每次弹出的时候,比较当前要弹出的数值是否等于队列出口元素的数值,如果相等则弹出。// 同时pop之前判断队列当前是否为空。void…...
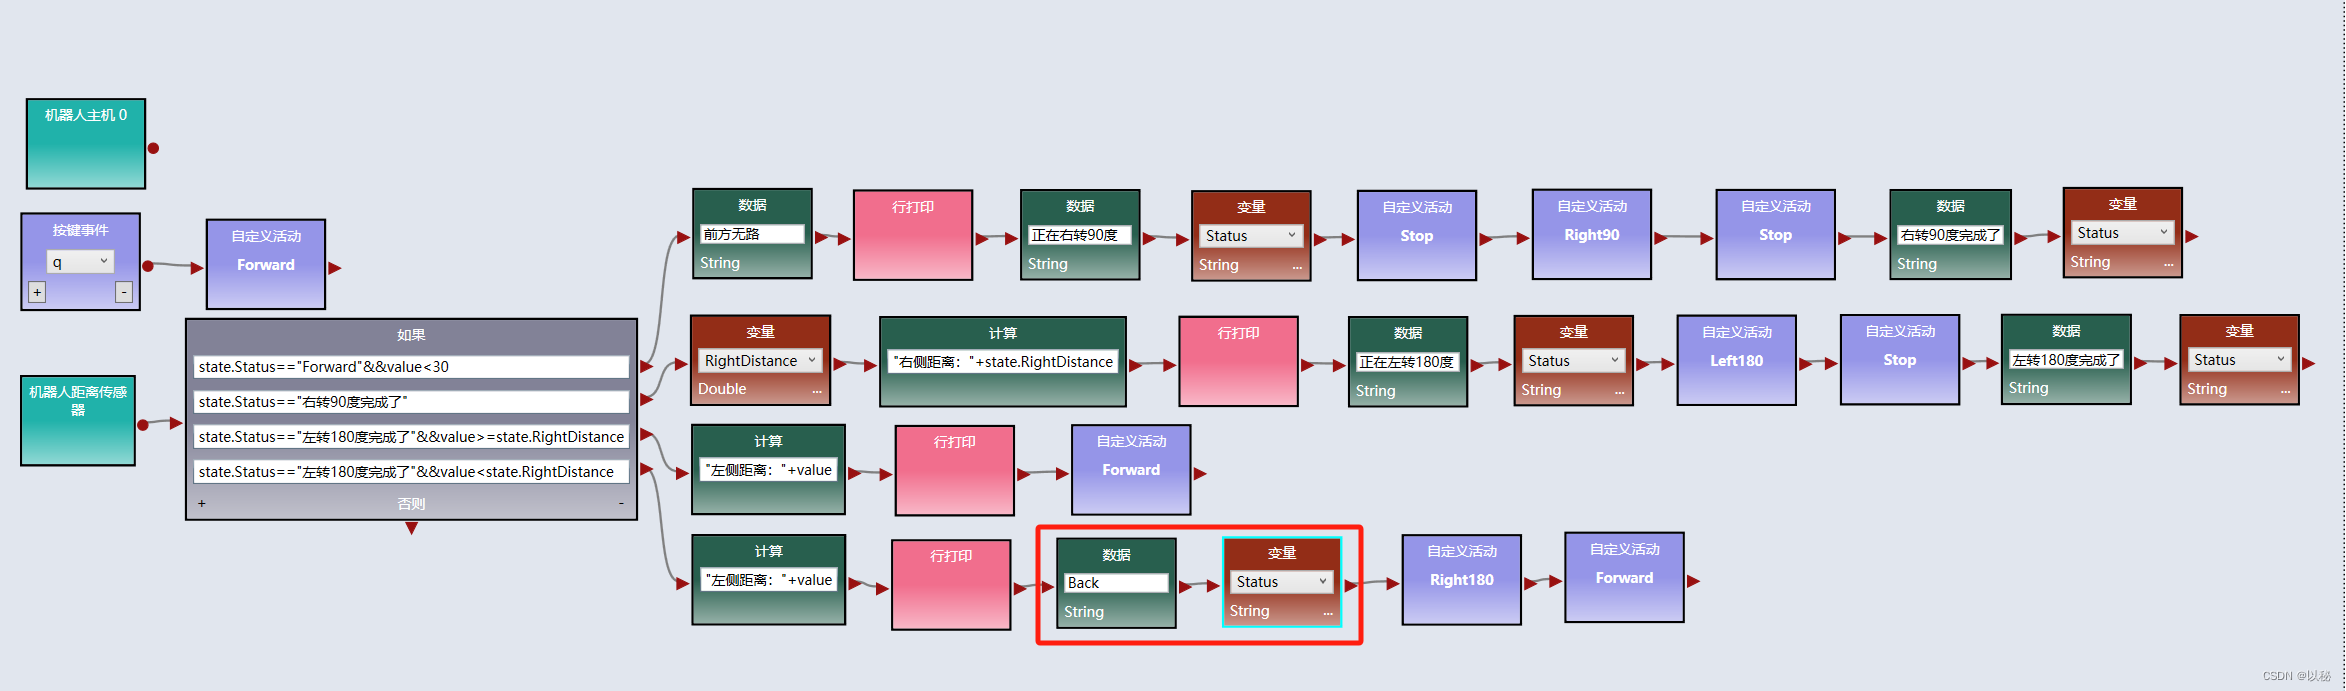
viple模拟器使用(五):Web 2D模拟器中实现两距离局部最优迷宫算法
关于两距离局部最优迷宫算法的原理本文不再赘述,详情请参考:viple模拟器使用(四),归纳总结为: 前方有路,则直行; 前方无路,则右转90度,标记右转完成ÿ…...
)
每日一道算法题 3(2023-12-11)
题目描述: VLAN是一种对局域网设备进行逻辑划分的技术,为了标识不同的VLAN,引入VLAN ID(1-4094之间的整数)的概念。 定义一个VLAN ID的资源池(下称VLAN资源池),资源池中连续的VLAN用开始VLAN-结束VLAN表示,不连续的用单…...
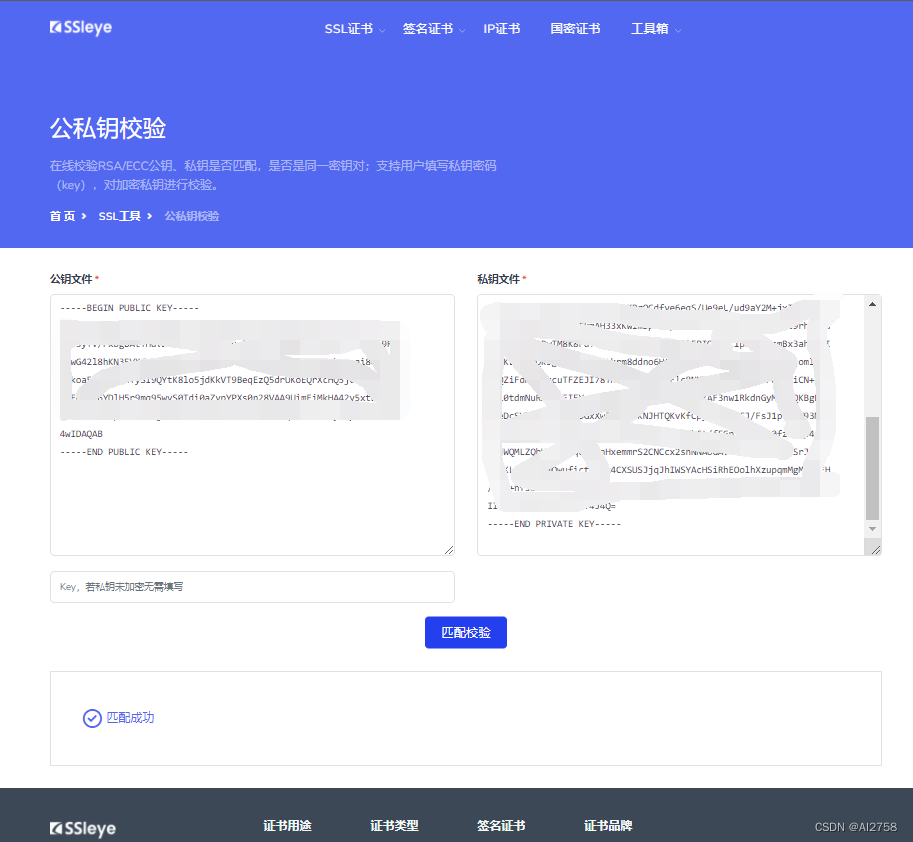
【Android】查看keystore的公钥和私钥
前言: 查看前准备好.keystore文件,安装并配置openssl、keytool。文件路径中不要有中文。 一、查看keystore的公钥: 1.从keystore中获取MD5证书 keytool -list -v -keystore gamekeyold.keystore 2.导出公钥文件 keytool -export -alias …...

ChatGPT的常识
什么是ChatGPT? ChatGPT是一个基于GPT模型的聊天机器人,GPT即“Generative Pre-training Transformer”,是一种预训练的语言模型。ChatGPT使用GPT-2和GPT-3两种模型来生成自然语言响应,从而与人类进行真实的对话。 ChatGPT的设计…...

Spring Boot中的事务是如何实现的?懂吗?
SpringBoot中的事务管理,用得好,能确保数据的一致性和完整性;用得不好,可能会给性能带来不小的影响哦。 基本使用 在SpringBoot中,事务的使用非常简洁。首先,得感谢Spring框架提供的Transactional注解&am…...

应用安全:JAVA反序列化漏洞之殇
应用安全:JAVA反序列化漏洞之殇 概述 序列化是让Java对象脱离Java运行环境的一种手段,可以有效的实现多平台之间的通信、对象持久化存储。Java 序列化是指把 Java 对象转换为字节序列的过程便于保存在内存、文件、数据库中,ObjectOutputStream类的 wri…...
)
基于以太坊的智能合约开发Solidity(函数继承篇)
参考教程:【实战篇】1、函数重载_哔哩哔哩_bilibili 1、函数重载: pragma solidity ^0.5.17;contract overLoadTest {//不带参数function test() public{}//带一个参数function test(address account) public{}//参数类型不同,虽然uint160可…...

【论文极速读】LVM,视觉大模型的GPT时刻?
【论文极速读】LVM,视觉大模型的GPT时刻? FesianXu 20231210 at Baidu Search Team 前言 这一周,LVM在arxiv上刚挂出不久,就被众多自媒体宣传为『视觉大模型的GPT时刻』,笔者抱着强烈的好奇心,在繁忙工作之…...

TS基础语法
前言: 因为在写前端的时候,发现很多UI组件的语法都已经开始使用TS语法,不学习TS根本看不到懂,所以简单的学一下TS语法。为了看UI组件的简单代码,不至于一脸懵。 一、安装node 对于windows来讲,node版本高…...

【基于NLP的微博情感分析:从数据爬取到情感洞察】
基于NLP的微博情感分析:从数据爬取到情感洞察 背景数据集技术选型功能实现创新点 今天我将分享一个基于NLP的微博情感分析项目,通过Python技术、NLP模型和Flask框架,对微博数据进行清洗、分词、可视化,并利用NLP和贝叶斯进行情感分…...

Ubuntu 18.04使用Qemu和GDB搭建运行内核的环境
安装busybox 参考博客: 使用GDBQEMU调试Linux内核环境搭建 一文教你如何使用GDBQemu调试Linux内核 ubuntu22.04搭建qemu环境测试内核 交叉编译busybox 编译busybox出现Library m is needed, can’t exclude it (yet)的解释 S3C2440 制作最新busybox文件系统 https:…...

[特殊字符] 智能合约中的数据是如何在区块链中保持一致的?
🧠 智能合约中的数据是如何在区块链中保持一致的? 为什么所有区块链节点都能得出相同结果?合约调用这么复杂,状态真能保持一致吗?本篇带你从底层视角理解“状态一致性”的真相。 一、智能合约的数据存储在哪里…...

OpenLayers 可视化之热力图
注:当前使用的是 ol 5.3.0 版本,天地图使用的key请到天地图官网申请,并替换为自己的key 热力图(Heatmap)又叫热点图,是一种通过特殊高亮显示事物密度分布、变化趋势的数据可视化技术。采用颜色的深浅来显示…...
Cesium相机控制)
三维GIS开发cesium智慧地铁教程(5)Cesium相机控制
一、环境搭建 <script src"../cesium1.99/Build/Cesium/Cesium.js"></script> <link rel"stylesheet" href"../cesium1.99/Build/Cesium/Widgets/widgets.css"> 关键配置点: 路径验证:确保相对路径.…...

LeetCode - 394. 字符串解码
题目 394. 字符串解码 - 力扣(LeetCode) 思路 使用两个栈:一个存储重复次数,一个存储字符串 遍历输入字符串: 数字处理:遇到数字时,累积计算重复次数左括号处理:保存当前状态&a…...

华为云Flexus+DeepSeek征文|DeepSeek-V3/R1 商用服务开通全流程与本地部署搭建
华为云FlexusDeepSeek征文|DeepSeek-V3/R1 商用服务开通全流程与本地部署搭建 前言 如今大模型其性能出色,华为云 ModelArts Studio_MaaS大模型即服务平台华为云内置了大模型,能助力我们轻松驾驭 DeepSeek-V3/R1,本文中将分享如何…...
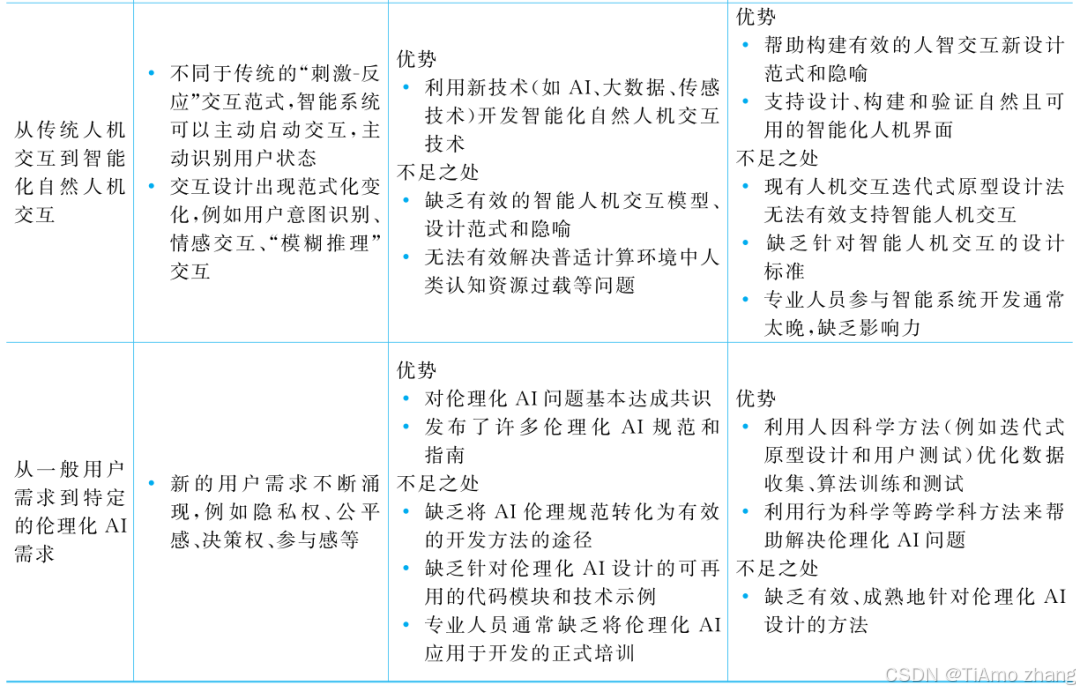
人机融合智能 | “人智交互”跨学科新领域
本文系统地提出基于“以人为中心AI(HCAI)”理念的人-人工智能交互(人智交互)这一跨学科新领域及框架,定义人智交互领域的理念、基本理论和关键问题、方法、开发流程和参与团队等,阐述提出人智交互新领域的意义。然后,提出人智交互研究的三种新范式取向以及它们的意义。最后,总结…...

PostgreSQL——环境搭建
一、Linux # 安装 PostgreSQL 15 仓库 sudo dnf install -y https://download.postgresql.org/pub/repos/yum/reporpms/EL-$(rpm -E %{rhel})-x86_64/pgdg-redhat-repo-latest.noarch.rpm# 安装之前先确认是否已经存在PostgreSQL rpm -qa | grep postgres# 如果存在࿰…...

ArcGIS Pro+ArcGIS给你的地图加上北回归线!
今天来看ArcGIS Pro和ArcGIS中如何给制作的中国地图或者其他大范围地图加上北回归线。 我们将在ArcGIS Pro和ArcGIS中一同介绍。 1 ArcGIS Pro中设置北回归线 1、在ArcGIS Pro中初步设置好经纬格网等,设置经线、纬线都以10间隔显示。 2、需要插入背会归线…...

MeshGPT 笔记
[2311.15475] MeshGPT: Generating Triangle Meshes with Decoder-Only Transformers https://library.scholarcy.com/try 真正意义上的AI生成三维模型MESHGPT来袭!_哔哩哔哩_bilibili GitHub - lucidrains/meshgpt-pytorch: Implementation of MeshGPT, SOTA Me…...
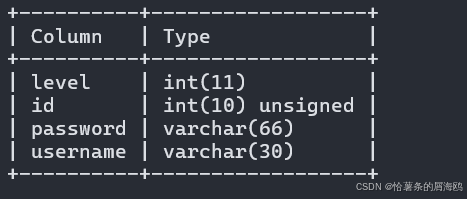
SQL注入篇-sqlmap的配置和使用
在之前的皮卡丘靶场第五期SQL注入的内容中我们谈到了sqlmap,但是由于很多朋友看不了解命令行格式,所以是纯手动获取数据库信息的 接下来我们就用sqlmap来进行皮卡丘靶场的sql注入学习,链接:https://wwhc.lanzoue.com/ifJY32ybh6vc…...