Spring-注解注入
一、回顾XML注解 bean 配置
-
创建 bean
public class Student { } -
配置 xml bean
<?xml version="1.0" encoding="UTF-8"?> <beans xmlns="http://www.springframework.org/schema/beans"xmlns:xsi="http://www.w3.org/2001/XMLSchema-instance"xsi:schemaLocation="http://www.springframework.org/schema/beans http://www.springframework.org/schema/beans/spring-beans.xsd"><bean id="student" class="cn.sycoder.xmlbean.Student"></bean> </beans> -
获取 bean
@Test
public void testXmlBean(){ApplicationContext context = new ClassPathXmlApplicationContext("xmlbeans.xml");final Student student = (Student)context.getBean("student");System.out.println(student);
}
1.存在问题
- 需要写xml 配置,比较麻烦,而已获取也很麻烦
-
注入属性也比较麻烦:构造器,setter
2.解决办法
- 通过注解配置bean 以及注解操作 di 注入
- 注解配置的优点:更简洁,更短,更方便
二、IOC 注解开发
- 版本了解
- 2.0版本时开始支持注解开发(2.0之前就是昨天学习的纯 xml 操作)
- 2.5版本才完善
- 3.0版本支持纯注解开发
1.注解&xml配置Bean
1.1配置用户mapper
- 配置 mapper
public interface UserMapper {void save();
}- 配置 mapper 实现类(还没有交给 spring 管理)
public class UserMapperImpl implements UserMapper {public void save() {System.out.println("保存用户成功");}
}
1.2将mapper交给spring管理
使用 @Component 注解,配置 mapper 实现类
@Component
public class UserMapperImpl implements UserMapper {public void save() {System.out.println("保存用户成功");}
}
配置 xml 包扫描路径
<?xml version="1.0" encoding="UTF-8"?>
<beans xmlns="http://www.springframework.org/schema/beans"xmlns:xsi="http://www.w3.org/2001/XMLSchema-instance"xmlns:context="http://www.springframework.org/schema/context"xsi:schemaLocation="http://www.springframework.org/schema/beans http://www.springframework.org/schema/beans/spring-beans.xsd http://www.springframework.org/schema/context https://www.springframework.org/schema/context/spring-context.xsd"><context:component-scan base-package="cn.wjcoder.xmlAnnotationBean.mapper"/>
</beans>
1.3通过容器获取bean
获取 applicationContext
@Test
public void testComponent(){ApplicationContext context = new ClassPathXmlApplicationContext("xmlAndAnnotation.xml");final UserMapper bean = context.getBean(UserMapper.class);bean.save();
}
1.4Component详解
- 默认不传参,bean 的名称是首字母小写其余不变
正规命名的时候:UserMapperImpl --- userMapperImpl
不正规命名时候:UUserMapperImpl--- UUserMapperImpl- 给bean 指定名称
@Component("u") 参数就是你bean的名称- 使用位置:具体类的上方,不要使用到接口上
- 作用:将bean 交给spring管理
- 延伸的注解,注意,和Component一模一样的,只不过是用于给程序员区分业务组件的
Controller(控制层)
@Controllerpublic class UserController { //写接口}Service(业务层)
@Service
public class UserServiceImpl implements IUserService {public void save() {}
}
Repository(持久层)
@Repository
public class UserMapperImpl implements UserMapper {public void save() {System.out.println("保存用户成功");}
}
2.纯注解配置Bean
2.1配置学生Mapper
mapper 接口
public interface StudentMapper {void save();}
mapper 接口实现类
@Repositorypublic class StudentMapperImpl implements StudentMapper {public void save() {System.out.println("保存学生成功");}}2.2添加配置类
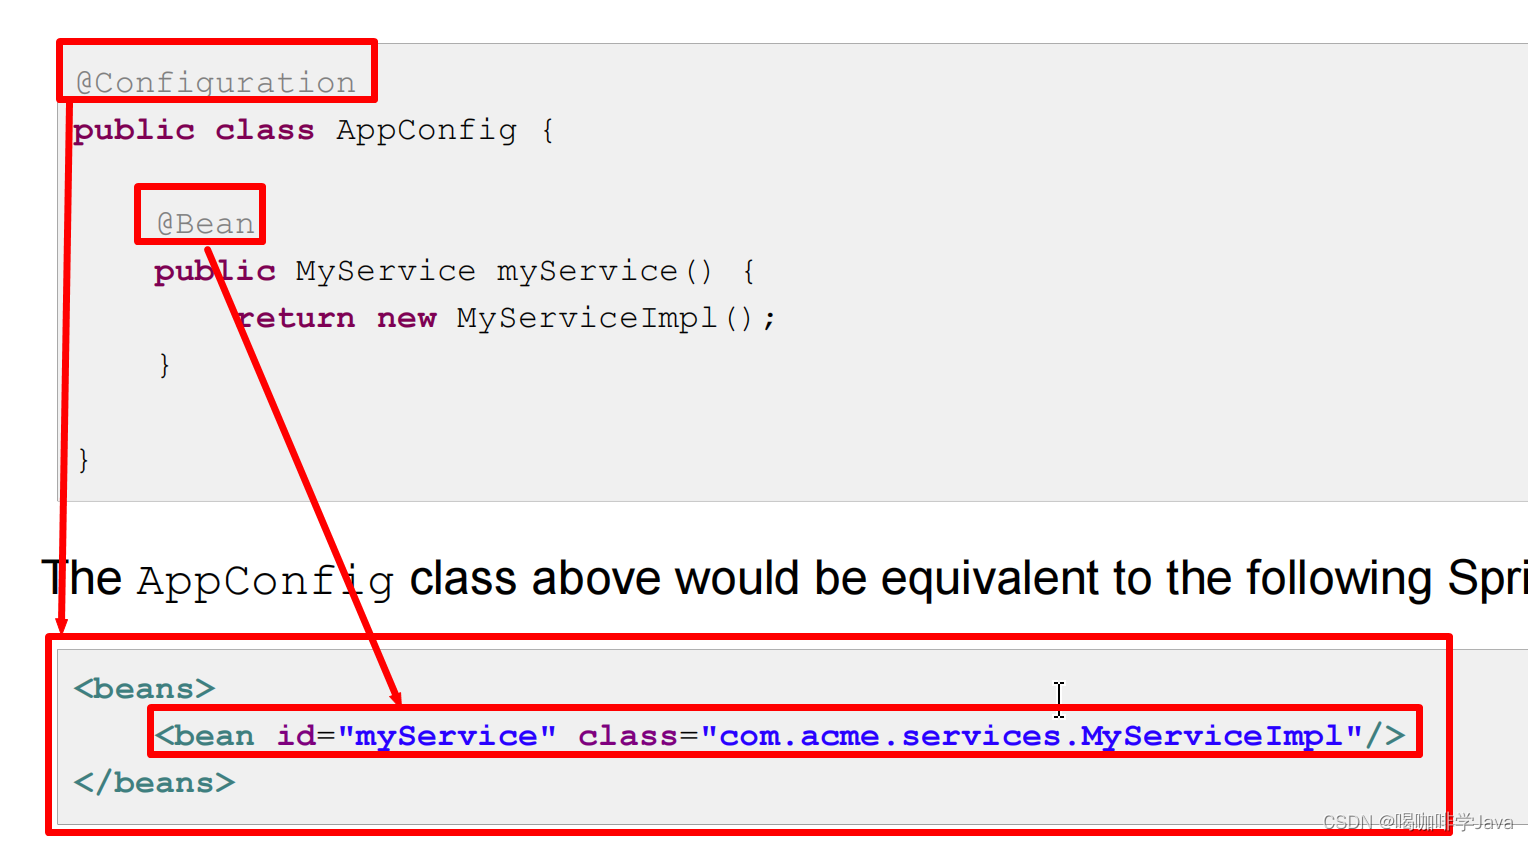
- @Configuration详解
- 使用 @Configuration
@Configurationpublic class SpringConfig {}将 SpringConfig 类变成spring 的配置类,替换 xml 配置文件
作用:标识该类是spring的配置类
配置名称,默认首字母小写
使用在类上
- @ComponentScan详解
配置包扫描 @ComponentScan
@Configuration@ComponentScan("cn.sycoder.annotationBean.mapper")public class SpringConfig {}作用:配置包扫描路径,当前包及其子包都会扫描
value:指定包的路径,用于扫描并且注册bean
2.3获取bean
获取 applicationContext
ApplicationContext context = new AnnotationConfigApplicationContext(SpringConfig.class);获取 bean
@Testpublic void testAnnotation(){ApplicationContext context = new AnnotationConfigApplicationContext(SpringConfig.class);System.out.println(context);final StudentMapper bean = context.getBean(StudentMapper.class);System.out.println(bean);}3.注解开发与xml 的梳理
3.1使用@Component 替代 xml 的过程梳理

3.2使用 @Configuration @ComponentScan 与 xml 配置过程的梳理

4.bean scops
配置类
@Configuration
@ComponentScan({"cn.wjcoder.xmlAnnotationBean"})
public class ScopesConfig {
}
配置 bean
@Component
public class ScopeBean {
}
获取 bean 执行发现bean 单例的
@Testpublic void testScope(){ApplicationContext context = new AnnotationConfigApplicationContext(ScopesConfig.class);final ScopeBean bean = context.getBean(ScopeBean.class);final ScopeBean bean1 = context.getBean(ScopeBean.class);System.out.println(bean);System.out.println(bean1);}4.1通过注解修改 scope(@Scope)
@Component
@Scope("prototype")
public class ScopeBean {
}
4.2@Scope 详解
- 位置:定义到类上方
- 作用:修改对象创建的作用域
- 属性:默认是singleton(单例的),可以修改成 prototype(原型)
5.bean 生命周期常用注解
@Component
public class LifeBean {public LifeBean(){System.out.println("构造器执行了");}@PostConstructpublic void init(){System.out.println("初始化bean");}@PreDestroypublic void destroy(){System.out.println("销毁bean");}
}
5.1@PostConstruct详解
位置:方法上
作用:设置该方法为初始化方法
5.2@PreDestroy
位置:方法上
作用:设置该方法为销毁方法
5.3注解与 xml 的梳理

三、DI 注解开发
1.目前面临问题
-
建立 mapper
public interface EmployeeMapper {void save(); } -
建立 mapper 实现类
@Repository public class EmployeeMapperImpl implements EmployeeMapper {public void save(){System.out.println("保存员工信息");} } -
建立 service
public interface IEmployeeService {void save(); } -
建立 service 实现类
@Service public class EmployeeServiceImpl implements IEmployeeService { private EmployeeMapper employeeMapper; public void setEmployeeMapper(EmployeeMapper employeeMapper){this.employeeMapper = employeeMapper;}public void save() {employeeMapper.save();} } -
设置配置类
@Configuration @ComponentScan("cn.sycoder.di.di01") public class DiConfig { } -
出现空指针异常

2.使用类型注入
-
@Autowired按照类型注入
-
通过构造器注入
@Autowired public EmployeeServiceImpl(EmployeeMapper employeeMapper) {this.employeeMapper = employeeMapper; } -
通过setter 方法注入
@Autowired public void setEmployeeMapper(EmployeeMapper employeeMapper) {this.employeeMapper = employeeMapper; } -
直接在属性上使用(是以后用得最多的)
@Service public class EmployeeServiceImpl implements IEmployeeService { @Autowiredprivate EmployeeMapper employeeMapper; public void save() {employeeMapper.save();} }
-
注意:不提供setter 方法以及构造器是使用反射创建对象的
@Testpublic void autowired() throws Exception {final Class<?> aClass = Class.forName("cn.wjcoder.di.di01.service.EmployeeServiceImpl");final Object o = aClass.newInstance();final Field[] fields = aClass.getDeclaredFields();AnnotationConfigApplicationContext context = new AnnotationConfigApplicationContext(DiConfig.class);final EmployeeMapper bean = context.getBean(EmployeeMapper.class);for (Field field : fields) {field.setAccessible(true);field.set(o,bean);}final EmployeeServiceImpl service = (EmployeeServiceImpl) o;service.save();}-
根据类型注入必须只有一个实现类,否则会报错,添加名称也不行
-
属性required=false,如果找不到不会报错
3.使用名称注入
-
@Autowired & @Qualifier
-
@Autowired & @Qualifier必须同时使用,缺一不可
-
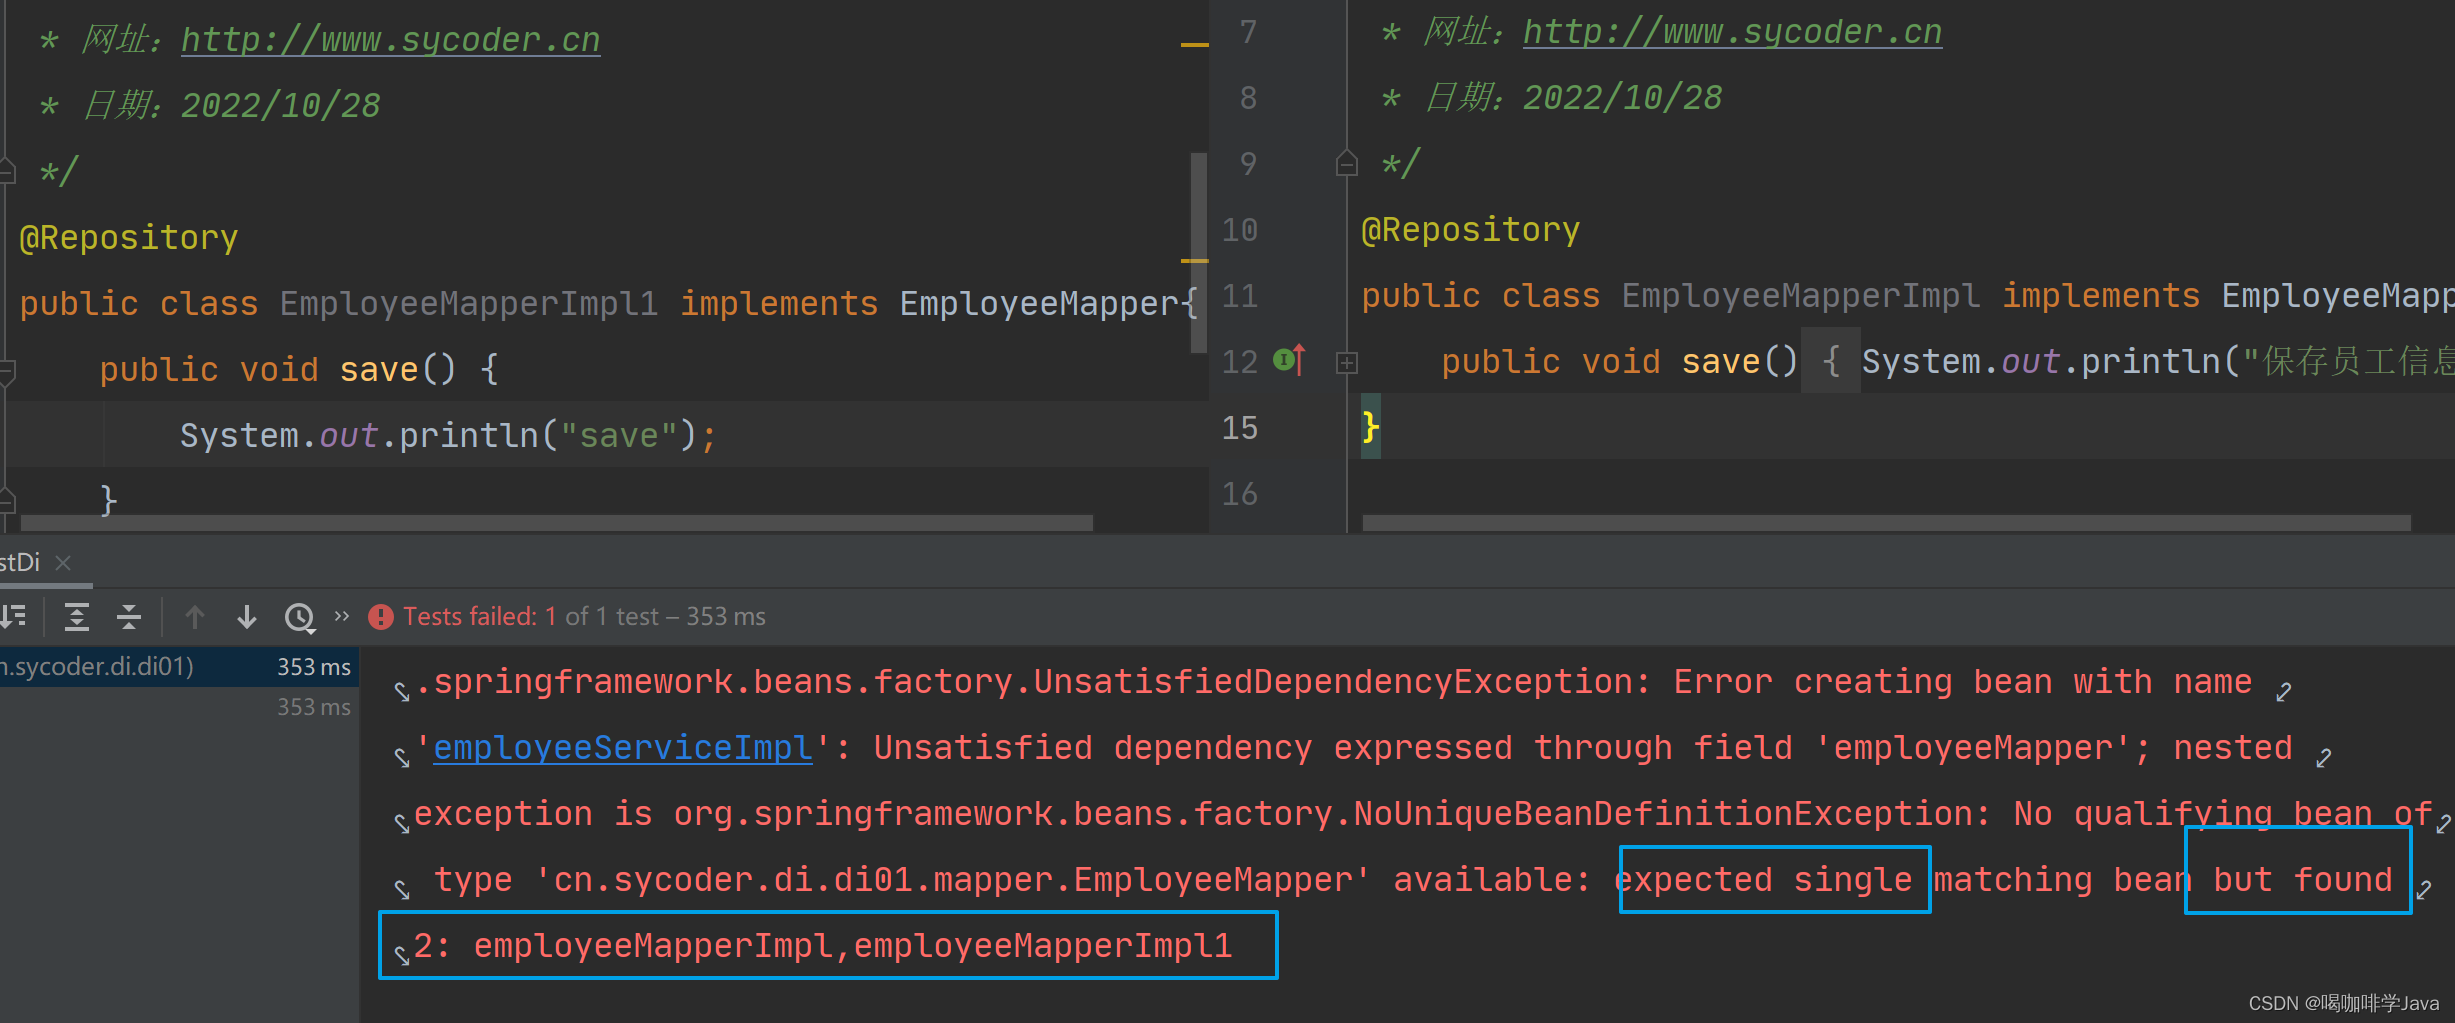
解决刚才出现两个实现类没法注入的问题
-
配置mapper 并且指定实现类的名称
public interface EmployeeMapper {void save();
}
@Repository("empMapper1")
public class EmployeeMapperImpl implements EmployeeMapper{@Overridepublic void save() {System.out.println("保存员工信息");}
}@Repository("empMapper2")
public class EmployeeMapperImpl1 implements EmployeeMapper {private EmployeeMapper employeeMapper;public void save() {employeeMapper.save();}
}- 按照名称注入
@Service
public class EmployeeServiceImpl implements IEmployeeService {@Autowired(required = false)@Qualifier("empMapper1")private EmployeeMapper employeeMapper;public void save() {employeeMapper.save();}}
4.简单数据类型注入
-
@Value
-
修改配置类
@Configuration @ComponentScan("cn.wjcoder.di.di01") @PropertySource("db.properties") public class DiConfig { } -
修改获取方式使用 ${} 的方式
@Component public class DbProperties { @Value("${username}")private String username;@Value("${password}")private String password; public void test(){System.out.println(username + ":" + password);} }
5.1@PropertySource
-
@PropertySource 加载配置文件
-
位置:配置类上
-
作用导入配置文件
-
对于多个配置文件
@Configuration
@ComponentScan("cn.wjcoder.di.di01")
@PropertySource({"db.properties","xx.properties"})
public class DiConfig {
}
6.注解配置第三方bean
6.1配置 druid
-
添加依赖
<dependency><groupId>com.alibaba</groupId><artifactId>druid</artifactId><version>1.2.8</version> </dependency> -
先添加配置类 SpringConfig
@Configuration public class SpringConfig { public DataSource dataSource(){final DruidDataSource source = new DruidDataSource();source.setUsername("root");source.setPassword("123456");source.setDriverClassName("com.mysql.cj.jdbc.Driver");source.setUrl("jdbc:mysql://localhost:3306/mybatis");return source;} } -
传统做法存在硬编码,DataSource 并且没有交给 spring 管理,每次都需要重新新建 DataSource ,并不存在单例一说
@Testpublic void testDruid(){AnnotationConfigApplicationContext context = new AnnotationConfigApplicationContext(SpringConfig.class);final SpringConfig bean = context.getBean(SpringConfig.class);System.out.println(bean.dataSource());}
6.2@Bean 配置 druid
-
使用@Bean 交给 spring 管理
@Configuration public class SpringConfig { @Beanpublic DataSource dataSource(){final DruidDataSource source = new DruidDataSource();source.setUsername("root");source.setPassword("123456");source.setDriverClassName("com.mysql.cj.jdbc.Driver");source.setUrl("jdbc:mysql://localhost:3306/mybatis");return source;} } -
修改配置的硬编码改成软编码
@Configuration @PropertySource("druidDb.properties") public class SpringConfig {@Value("${jdbc.username}")private String username;@Value("${jdbc.password}")private String password;@Value("${jdbc.url}")private String url;@Value("${jdbc.driverClassName}")private String driver; @Beanpublic DataSource dataSource(){final DruidDataSource source = new DruidDataSource();source.setUsername(username);source.setPassword(password);source.setDriverClassName(driver);source.setUrl(url);return source;} }jdbc.username=root jdbc.password=123456 jdbc.driverClassName=com.mysql.cj.jdbc.Driver jdbc.url=jdbc:mysql://localhost:3306/mybatis -
@Bean 与 xml 对应
7.使用@Import 实现配置导入
-
目前存在:任何类都配置到配置类里面,不方便管理,也不方便维护
7.1配置 Component 解决
-
@Component
@Component public class DruidConfig {@Value("{jdbc.username}")private String username;@Value("{jdbc.password}")private String password;@Value("{jdbc.url}")private String url;@Value("{jdbc.driverClassName}")private String driver; @Beanpublic DataSource dataSource(){final DruidDataSource source = new DruidDataSource();source.setUsername(username);source.setPassword(password);source.setDriverClassName(driver);source.setUrl(url);return source;} }
7.2使用@import
-
修改druidConfig
@Configuration public class DruidConfig {@Value("{jdbc.username}")private String username;@Value("{jdbc.password}")private String password;@Value("{jdbc.url}")private String url;@Value("{jdbc.driverClassName}")private String driver; @Beanpublic DataSource dataSource(){final DruidDataSource source = new DruidDataSource();source.setUsername(username);source.setPassword(password);source.setDriverClassName(driver);source.setUrl(url);return source;} } -
修改spring配置类
@Configuration @PropertySource("druidDb.properties") @Import({DruidConfig.class}) public class SpringConfig { } -
如果需要传参,只需要将参数交给spring管理就行了
@Configuration
public class RepositoryConfig {@Beanpublic AccountRepository accountRepository(DataSource dataSource) {return new JdbcAccountRepository(dataSource);}
}
8.注解开发总结
| 注解配置 | xml 配置 | 功能说明 |
|---|---|---|
| @Component @Controller @Service @Repository | bean 标签(id,class) | 定义bean |
| @ComponentScan | <context:component-scan base-package="cn.sycoder.ioc.xmlAnnotationBean"/> | 扫描包加载bean |
| @Autowired @Qualifier @Value | setter 注入 构造器注入 自动装配 | 依赖注入 |
| @Bean | bean 标签, 静态工厂模式, 实例工厂模式, FactoryBean | 配置第三方bean |
| @Scope | bean 标签中的 scope 属性 | 设置作用域 |
| @PostConstructor @PreDestroy | bean 标签中的 init-method / destroy-method | 生命周期相关 |
| @Import | 导入其它的配置类 | |
| @PropertySource({"db.properties","xx.properties"}) | <context:property-placeholder system-properties-mode="NEVER" location="*.properties"/> | 导入配置文件 |
相关文章:
Spring-注解注入
一、回顾XML注解 bean 配置 创建 bean public class Student { } 配置 xml bean <?xml version"1.0" encoding"UTF-8"?> <beans xmlns"http://www.springframework.org/schema/beans"xmlns:xsi"http://www.w3.org/2001/XMLSche…...
)
华为校招机试 - 攻城战(Java JS Python)
目录 题目描述 输入描述 输出描述 用例 题目解析 JavaScript算法源码 Java算法源码...

Docker入门
Docker一、何为DockerDocker是一个开源的应用容器引擎,基于GO语言并遵循从Apache2.0协议开源。Docker可以让开发者打包他们的应用以及依赖包到一个轻量级、可移植的容器中,然后在发布到任何流行的Linux机器上,也可以实现虚拟化。容器是完全使…...

时间序列分析 | CNN-LSTM卷积长短期记忆神经网络时间序列预测(Matlab完整程序)
时间序列分析 | CNN-LSTM卷积长短期记忆神经网络时间序列预测(Matlab完整程序) 目录 时间序列分析 | CNN-LSTM卷积长短期记忆神经网络时间序列预测(Matlab完整程序)预测结果模型输出基本介绍完整程序参考资料预测结果 模型输出 layers = 具有以下层的 151 Layer 数组:...
【蒸滴C】C语言结构体入门?看这一篇就够了
目录 一、结构体的定义 二、结构的声明 例子 三、 结构成员的类型 结构体变量的定义和初始化 1.声明类型的同时定义变量p1 2.直接定义结构体变量p2 3.初始化:定义变量的同时赋初值。 4.结构体变量的定义放在结构体的声明之后 5.结构体嵌套初始化 6.结构体…...
第十三届蓝桥杯
这里写目录标题一、刷题统计(ceil函数返回的是等值于某最小整数的浮点值,不强制转换回int就wa,没错就连和int整数相加都wa二、修剪灌木(主要应看清楚会调转方向三、统计子矩阵(前缀和滑动窗口⭐)四、[积木画…...

消息队列mq
应用场景: 1、解耦 2、削峰填谷 3、异步处理 4、消息通讯 工作模式: 一个消息只能被消费一次(订阅模式除外),消费者接受到消息会回调业务逻辑,消费逻辑写在回调函数里面。 1、简单模式:一个生产…...
[学习笔记]黑马程序员Spark全套视频教程,4天spark3.2快速入门到精通,基于Python语言的spark教程
文章目录视频资料:一、Spark基础入门(环境搭建、入门概念)第二章:Spark环境搭建-Local2.1 课程服务器环境2.2 Local模式基本原理2.3 安装包下载2.4 Spark Local模式部署第三章:Spark环境搭建-StandAlone3.1 StandAlone…...

git push和 git pull的使用
git push与git pull是一对推送/拉取分支的git命令。git push 使用本地的对应分支来更新对应的远程分支。$ git push <远程主机名> <本地分支名>:<远程分支名>*注意: 命令中的本地分支是指将要被推送到远端的分支,而远程分支是指推送的目标分支&am…...
首发,pm3包,一个用于多组(3组)倾向评分匹配的R包
目前,本人写的第二个R包pm3包已经正式在CRAN上线,用于3组倾向评分匹配,只能3组不能多也不能少。 可以使用以下代码安装 install.packages("pm3")什么是倾向性评分匹配?倾向评分匹配(Propensity Score Match…...
基于Canal的数据同步
基于Canal的数据同步 一、 系统结构 该数据同步系统由Spring Boot和Canal共同组成。 Spring Boot 是一个流行的 Java Web 框架,而 Canal 则是阿里巴巴开源的 MySQL 数据库的数据变更监听框架。结合 Spring Boot 和 Canal,可以实现 MySQL 数据库的实时数…...
vuetify设置页面默认主题色
前言 最近工作中接到一个任务: 项目中分light和dark两种主题色a、b页面默认为dark其他页面默认为light 项目前端环境: vue2jsyarnvuexvuetifyelement ui 解决思路 routerjs中配置路径时进行默认主题设置 在左侧aside点击菜单时,进行主题切…...

【Python入门第二十三天】Python 继承
Python 继承 继承允许我们定义继承另一个类的所有方法和属性的类。 父类是继承的类,也称为基类。 子类是从另一个类继承的类,也称为派生类。 创建父类 任何类都可以是父类,因此语法与创建任何其他类相同: 实例 创建一个名为…...

C#中,读取一个或多个文件内容的方法
读取一个或多个文件内容的方法 在C#中,可以使用File.ReadAllLines方法一次读取多个文件中的所有行内容。例如,以下代码读取了两个文件中的所有行内容,然后将它们合并在一起: string[] file1Lines File.ReadAllLines("file1…...

1 基于神经辐射场(neural Radiance Fileds, Nerf)的三维重建- 简介
Nerf简介 Nerf(neural Radiance Fileds) 为2020年ICCV上提出的一个基于隐式表达的三维重建方法,使用2D的 Posed Imageds 来生成(表达)复杂的三维场景。现在越来越多的研究人员开始关注这个潜力巨大的领域,也…...

水果FLStudio21.0.0中文版全能数字音乐工作站DAW
FL Studio 21.0.0官方中文版重磅发布纯正简体中文支持,更快捷的音频剪辑及素材管理器,多样主题随心换!Mac版新增对苹果M2/1家族芯片原生支持。编曲、剪辑、录音、混音,20余年的技术积淀和实力研发,FL Studio 已经从电音…...

【GlobalMapper精品教程】055:GM坐标转换器的巧妙使用
GM软件提供了一个简单实用的坐标转换工具,可以实现地理坐标和投影坐标之间的高斯正反算及多种转换计算。 文章目录 一、坐标转换器认识二、坐标转换案例1. 地理坐标←→地理坐标2. 地理坐标←→投影坐标三、在输出坐标上创建新的点四、其他转换工具的使用一、坐标转换器认识 …...
函数是如何实现的)
C语言之中rand()函数是如何实现的
rand()函数是一个C标准库中的随机数生成函数,用于生成一个范围在0到RAND_MAX之间的伪随机数。RAND_MAX是一个常量,它是随机数的最大值,通常被定义为32767。 rand()函数的实现原理可以概括为以下几个步骤: 初始化随机数生成器 在…...
winform控件PropertyGrid的应用(使运行中的程序能像vistual studio那样设置控件属性)
上周在看别人写的上位机demo代码时,发现创建的项目模板是"Windows 窗体控件库"(如下图) 生成的项目结构像自定义控件库,没有程序入口方法Main,但却很神奇能调试,最后发现原来Vistual Studio启动了一个外挂程序UserContr…...

SBUS的协议详解
SBUS 1.串口配置: 100k波特率, 8位数据位(在stm32中要选择9位), 偶校验(EVEN), 2位停止位, 无控流,25个字节, 2.协议格式: [startbyte] [data1][data2]……...

Axure RP本地化全攻略:从界面优化到效率提升的开源工具本地化指南
Axure RP本地化全攻略:从界面优化到效率提升的开源工具本地化指南 【免费下载链接】axure-cn Chinese language file for Axure RP. Axure RP 简体中文语言包,不定期更新。支持 Axure 9、Axure 10。 项目地址: https://gitcode.com/gh_mirrors/ax/axur…...

Fast Lab突破:3D激光雷达+强化学习如何重塑无人机自主避障新范式?
1. 当无人机遇上3D激光雷达:一场感知革命 想象一下,你操控的无人机正在茂密的树林中穿行,突然前方出现几根几乎透明的钓鱼线——这种场景会让任何飞手瞬间冒冷汗。传统基于视觉或超声波传感器的无人机就像戴着高度近视眼镜的短跑运动员&#…...

Z-Image-Turbo-rinaiqiao-huiyewunv 模型微调实战:使用自定义数据集训练专属风格
Z-Image-Turbo-rinaiqiao-huiyewunv 模型微调实战:使用自定义数据集训练专属风格 想不想让AI画出专属于你的独特风格?比如,你是一位插画师,希望AI能学会你笔下那种温暖治愈的线条;或者你经营一个品牌,需要…...

[技术解析]BetterJoy:Switch手柄电脑适配的原理与实战指南
[技术解析]BetterJoy:Switch手柄电脑适配的原理与实战指南 【免费下载链接】BetterJoy Allows the Nintendo Switch Pro Controller, Joycons and SNES controller to be used with CEMU, Citra, Dolphin, Yuzu and as generic XInput 项目地址: https://gitcode.…...

OpenCV图像拼接避坑指南:为什么你的特征点总是匹配失败?
OpenCV图像拼接避坑指南:为什么你的特征点总是匹配失败? 当你第一次尝试用OpenCV实现图像拼接时,可能会遇到一个令人沮丧的问题:明明按照教程一步步操作,特征点匹配的结果却惨不忍睹。要么匹配点对寥寥无几,…...

Stable Yogi Leather-Dress-Collection开源模型应用:ACG创作者无需订阅即可拥有的本地皮衣工具
Stable Yogi Leather-Dress-Collection开源模型应用:ACG创作者无需订阅即可拥有的本地皮衣工具 1. 项目概述 Stable Yogi Leather-Dress-Collection是一款专为动漫创作者设计的2.5D皮衣穿搭生成工具。基于Stable Diffusion v1.5和Anything V5动漫底座模型开发&…...

告别盲目构筑烦恼:Path of Building带来的流放之路角色优化变革
告别盲目构筑烦恼:Path of Building带来的流放之路角色优化变革 【免费下载链接】PathOfBuilding Offline build planner for Path of Exile. 项目地址: https://gitcode.com/gh_mirrors/pat/PathOfBuilding 在《流放之路》的世界里,每一个角色构…...

OpenClaw本地搜索引擎:GLM-4.7-Flash优化个人文件检索
OpenClaw本地搜索引擎:GLM-4.7-Flash优化个人文件检索 1. 为什么需要智能化的本地文件搜索 作为一个长期被文件管理困扰的技术写作者,我的MacBook里堆积着超过2万份文档——技术笔记、项目草稿、参考资料、会议记录杂乱地分布在各个角落。传统的文件名…...

Windows下OpenClaw全流程指南:接入Qwen3.5-4B-Claude完成办公自动化
Windows下OpenClaw全流程指南:接入Qwen3.5-4B-Claude完成办公自动化 1. 为什么选择OpenClaw做办公自动化 去年我接手了一个新项目,每周需要处理几十份会议录音转写的文字稿。手动整理不仅耗时,还经常漏掉关键行动项。当我第一次听说OpenCla…...

Java程序员,如何从零开始学习AI?
文章为Java程序员提供了零学习大模型并实现涨薪的六阶段路线:掌握AI基础概念、用Java调用大模型API、基于Spring AI实现轻量级AI业务场景、在真实项目中落地、学习智能体进阶技能、将AI知识融入简历。强调应聘AI应用开发工程师而非大模型工程师,适合文本…...