Yocto - Project Quick Build
欢迎光临!
这篇简短的文档将向您介绍使用 Yocto 项目构建典型镜像的过程。本文还介绍了如何为特定硬件配置构建。您将使用 Yocto Project 构建一个名为 Poky 的参考嵌入式操作系统。
Welcome!
This short document steps you through the process for a typical image build using the Yocto Project. The document also introduces how to configure a build for specific hardware. You will use Yocto Project to build a reference embedded OS called Poky.
注意
-
本文中的示例假定您使用的是运行最新 Ubuntu Linux 发行版的原生 Linux 系统。如果你想使用 Yocto Project 来构建镜像(构建主机)的机器不是本地 Linux 系统,你仍然可以通过使用 CROss PlatformS (CROPS) 和设置 Poky 容器来执行这些步骤。更多信息,请参阅《Yocto 项目开发任务手册》中的 "设置使用 CROss PlatformS (CROPS)" 章节。
-
您可以使用第 2 版 Windows Subsystem For Linux (WSL 2) 来设置使用 Windows 10 或更高版本、Windows Server 2019 或更高版本的构建主机。更多信息,请参阅《Yocto 项目开发任务手册》中的 "设置使用 Windows Linux 子系统(WSL 2)"部分。
Note
* The examples in this paper assume you are using a native Linux system running a recent Ubuntu Linux distribution. If the machine you want to use Yocto Project on to build an image (Build Host) is not a native Linux system, you can still perform these steps by using CROss PlatformS (CROPS) and setting up a Poky container. See the Setting Up to Use CROss PlatformS (CROPS) section in the Yocto Project Development Tasks Manual for more information.
* You may use version 2 of Windows Subsystem For Linux (WSL 2) to set up a build host using Windows 10 or later, Windows Server 2019 or later. See the Setting Up to Use Windows Subsystem For Linux (WSL 2) section in the Yocto Project Development Tasks Manual for more information.
如果您想了解有关 Yocto 项目的更多概念或背景信息,请参阅《Yocto 项目概述和概念手册》。
If you want more conceptual or background information on the Yocto Project, see the Yocto Project Overview and Concepts Manual.
Compatible Linux Distribution (兼容的 Linux 发行版)
确保你的构建主机满足以下要求:
-
至少 90 Gbytes 的可用磁盘空间,当然更多空间有助于运行多个构建,并通过重复使用构建工件来提高性能。
-
至少 8 Gbytes 内存,但强烈建议使用具有尽可能多内存和 CPU 内核的现代构建主机,以最大限度地提高构建性能。
-
运行受支持的 Linux 发行版(即 Fedora、openSUSE、CentOS、Debian 或 Ubuntu 的最新版本)。有关支持 Yocto 项目的 Linux 发行版列表,请参阅《Yocto 项目参考手册》中的 "支持的 Linux 发行版 "部分。有关准备构建主机的详细信息,请参阅《Yocto 项目开发任务手册》中的 "准备构建主机 "部分。
-
Git 1.8.3.1 或更高版本
tar 1.28 或更高版本
Python 3.8.0 或更高版本。
gcc 8.0 或更高版本
GNU make 4.0 或更高版本
Make sure your Build Host meets the following requirements:
* At least 90 Gbytes of free disk space, though much more will help to run multiple builds and increase performance by reusing build artifacts.
* At least 8 Gbytes of RAM, though a modern modern build host with as much RAM and as many CPU cores as possible is strongly recommended to maximize build performance.
* Runs a supported Linux distribution (i.e. recent releases of Fedora, openSUSE, CentOS, Debian, or Ubuntu). For a list of Linux distributions that support the Yocto Project, see the Supported Linux Distributions section in the Yocto Project Reference Manual. For detailed information on preparing your build host, see the Preparing the Build Host section in the Yocto Project Development Tasks Manual.
* Git 1.8.3.1 or greater
* tar 1.28 or greater
* Python 3.8.0 or greater.
* gcc 8.0 or greater.
* GNU make 4.0 or greater
如果你的构建主机不符合上述三个版本要求中的任何一个,你可以采取措施准备系统,以便仍然可以使用 Yocto 项目。有关信息,请参阅《Yocto 项目参考手册》中的 "所需的 Git、tar、Python、make 和 gcc 版本 "部分。
If your build host does not meet any of these three listed version requirements, you can take steps to prepare the system so that you can still use the Yocto Project. See the Required Git, tar, Python, make and gcc Versions section in the Yocto Project Reference Manual for information.
Build Host Packages (构建主机软件包)
您必须在构建主机上安装必要的主机软件包。以下命令将安装基于 Ubuntu 发行版的主机软件包:
You must install essential host packages on your build host. The following command installs the host packages based on an Ubuntu distribution:
$ sudo apt install gawk wget git diffstat unzip texinfo gcc build-essential chrpath socat cpio python3 python3-pip python3-pexpect xz-utils debianutils iputils-ping python3-git python3-jinja2 libegl1-mesa libsdl1.2-dev python3-subunit mesa-common-dev zstd liblz4-tool file locales libacl1
$ sudo locale-gen en_US.UTF-8
注意
有关所有受支持 Linux 发行版的主机软件包要求,请参阅《Yocto 项目参考手册》中的 "构建主机所需软件包 "部分。
Note
For host package requirements on all supported Linux distributions, see the Required Packages for the Build Host section in the Yocto Project Reference Manual.
Use Git to Clone Poky
完成机器设置操作后,您需要在构建主机上获取 Poky 仓库的副本。使用以下命令克隆 Poky 仓库。
Once you complete the setup instructions for your machine, you need to get a copy of the Poky repository on your build host. Use the following commands to clone the Poky repository.
$ git clone git://git.yoctoproject.org/poky
Cloning into 'poky'...
remote: Counting
objects: 432160, done. remote: Compressing objects: 100%
(102056/102056), done. remote: Total 432160 (delta 323116), reused
432037 (delta 323000) Receiving objects: 100% (432160/432160), 153.81 MiB | 8.54 MiB/s, done.
Resolving deltas: 100% (323116/323116), done.
Checking connectivity... done.
进入 Releases wiki 页面,选择与最新稳定版或长期支持版相对应的版本代号(如 nanbield)。 (Releases - Yocto Project)
然后移动到 poky 目录,查看现有分支:
Go to Releases wiki page, and choose a release codename (such as nanbield), corresponding to either the latest stable release or a Long Term Support release.
Then move to the poky directory and take a look at existing branches:
$ cd poky
$ git branch -a
.
.
.
remotes/origin/HEAD -> origin/master
remotes/origin/dunfell
remotes/origin/dunfell-next
.
.
.
remotes/origin/gatesgarth
remotes/origin/gatesgarth-next
.
.
.
remotes/origin/master
remotes/origin/master-next
.
.
.
在本例中,请查看基于 Nanbield 版本的 nanbield 分支:
For this example, check out the nanbield branch based on the Nanbield release:
$ git checkout -t origin/nanbield -b my-nanbield
Branch 'my-nanbield' set up to track remote branch 'nanbield' from 'origin'.
Switched to a new branch 'my-nanbield'
前面的 Git 签出命令创建了一个名为 my-nanbield 的本地分支。该分支中的文件与 nanbield 发布分支中的版本库文件完全一致。
注意,你可以定期在同一目录下输入以下命令,以保持本地文件与发布分支同步:
The previous Git checkout command creates a local branch named my-nanbield. The files available to you in that branch exactly match the repository’s files in the nanbield release branch.
Note that you can regularly type the following command in the same directory to keep your local files in sync with the release branch:
$ git pull
有关访问 Yocto Project 相关软件源的更多选项和信息,请参阅《Yocto Project 开发任务手册》中的 "查找 Yocto Project 源文件 "部分。
For more options and information about accessing Yocto Project related repositories, see the Locating Yocto Project Source Files section in the Yocto Project Development Tasks Manual.
Building Your Image (构建你的镜像)
使用以下步骤构建映像。构建过程将从源代码创建整个 Linux 发行版,包括工具链。
注意事项
-
如果您在防火墙后工作,且您的构建主机未设置代理,则在获取源代码时可能会遇到构建过程问题(如获取失败或 Git 失败)。
-
如果不知道代理设置,请查阅本地网络基础设施资源并获取相关信息。检查网络浏览器设置也是一个很好的起点。最后,你可以在 Yocto 项目 Wiki 的 "在网络代理后面工作 "页面找到更多信息。
Use the following steps to build your image. The build process creates an entire Linux distribution, including the toolchain, from source.
Note
* If you are working behind a firewall and your build host is not set up for proxies, you could encounter problems with the build process when fetching source code (e.g. fetcher failures or Git failures).
* If you do not know your proxy settings, consult your local network infrastructure resources and get that information. A good starting point could also be to check your web browser settings. Finally, you can find more information on the “Working Behind a Network Proxy” page of the Yocto Project Wiki.
1,初始化构建环境: 在 poky 目录中运行 oe-init-build-env 环境设置脚本,在构建主机上定义 Yocto Project 的构建环境。
1, Initialize the Build Environment: From within the poky directory, run the oe-init-build-env environment setup script to define Yocto Project’s build environment on your build host.
$ cd poky
$ source oe-init-build-env
You had no conf/local.conf file. This configuration file has therefore been
created for you with some default values. You may wish to edit it to, for
example, select a different MACHINE (target hardware). See conf/local.conf
for more information as common configuration options are commented.
You had no conf/bblayers.conf file. This configuration file has therefore
been created for you with some default values. To add additional metadata
layers into your configuration please add entries to conf/bblayers.conf.
The Yocto Project has extensive documentation about OE including a reference
manual which can be found at:
https://docs.yoctoproject.org
For more information about OpenEmbedded see their website:
https://www.openembedded.org/
### Shell environment set up for builds. ###
You can now run 'bitbake <target>'
Common targets are:
core-image-minimal
core-image-full-cmdline
core-image-sato
core-image-weston
meta-toolchain
meta-ide-support
You can also run generated QEMU images with a command like 'runqemu qemux86-64'
Other commonly useful commands are:
- 'devtool' and 'recipetool' handle common recipe tasks
- 'bitbake-layers' handles common layer tasks
- 'oe-pkgdata-util' handles common target package tasks
其他方面,脚本还会创建构建目录,本例中的构建目录位于源代码目录中。脚本运行后,当前工作目录将被设置为 "构建目录"。之后,当编译完成时,编译目录将包含编译过程中创建的所有文件。
Among other things, the script creates the Build Directory, which is build in this case and is located in the Source Directory. After the script runs, your current working directory is set to the Build Directory. Later, when the build completes, the Build Directory contains all the files created during the build.
2,检查本地配置文件:设置联编环境时,联编目录的 conf 子目录中会出现一个名为 local.conf 的本地配置文件。在本例中,默认设置是为适合仿真的 qemux86 目标机构建。使用的软件包管理器设置为 RPM 软件包管理器。
2, Examine Your Local Configuration File: When you set up the build environment, a local configuration file named local.conf becomes available in a conf subdirectory of the Build Directory. For this example, the defaults are set to build for a qemux86 target, which is suitable for emulation. The package manager used is set to the RPM package manager.
提示
使用共享状态缓存镜像并启用哈希等价,可以大大加快构建速度并防止取件失败。这样,您就可以使用预构建的工件,而无需构建它们。只有当你的网络和你使用的服务器下载这些工件的速度比你构建它们的速度更快时,这才有意义。
要使用此类镜像,请在构建目录下的 conf/local.conf 文件中取消注释以下几行:
Tip
You can significantly speed up your build and guard against fetcher failures by using Shared State Cache mirrors and enabling Hash Equivalence. This way, you can use pre-built artifacts rather than building them. This is relevant only when your network and the server that you use can download these artifacts faster than you would be able to build them.
To use such mirrors, uncomment the below lines in your conf/local.conf file in the Build Directory:
BB_HASHSERVE_UPSTREAM = "hashserv.yocto.io:8687"
SSTATE_MIRRORS ?= "file://.* http://cdn.jsdelivr.net/yocto/sstate/all/PATH;downloadfilename=PATH"
BB_HASHSERVE = "auto"
BB_SIGNATURE_HANDLER = "OEEquivHash"
3,开始构建: 继续执行以下命令,为目标(本例中为 core-image-sato)构建操作系统镜像:
3, Start the Build: Continue with the following command to build an OS image for the target, which is core-image-sato in this example:
有关使用 bitbake 命令的信息,请参阅《Yocto 项目概述和概念手册》中的 BitBake 章节,或《BitBake 用户手册》中的 BitBake 命令。
$ bitbake core-image-sato
For information on using the bitbake command, see the BitBake section in the Yocto Project Overview and Concepts Manual, or see The BitBake Command in the BitBake User Manual.
4,使用 QEMU 模拟镜像:构建好特定镜像后,就可以启动 QEMU,它是 Yocto 项目随附的快速 EMUlator:
4, Simulate Your Image Using QEMU: Once this particular image is built, you can start QEMU, which is a Quick EMUlator that ships with the Yocto Project:
$ runqemu qemux86-64
如果想了解运行 QEMU 的更多信息,请参阅《Yocto 项目开发任务手册》中的 "使用快速 EMUlator (QEMU)" 章节。
If you want to learn more about running QEMU, see the Using the Quick EMUlator (QEMU) chapter in the Yocto Project Development Tasks Manual.
5,退出 QEMU:单击关机图标或在唤起 QEMU 的 QEMU 记录窗口中键入 Ctrl-C 即可退出 QEMU。
5, Exit QEMU: Exit QEMU by either clicking on the shutdown icon or by typing Ctrl-C in the QEMU transcript window from which you evoked QEMU.
Customizing Your Build for Specific Hardware ( 为指定硬件定制构建)
到目前为止,你所做的只是快速构建了一个仅适用于仿真的映像。本节将向你展示如何通过在 Yocto Project 开发环境中添加硬件层来定制特定硬件的构建。
一般来说,层是包含相关指令集和配置的资源库,这些指令集和配置会告诉 Yocto Project 要做什么。将相关元数据隔离到功能特定的层中有利于模块化开发,并使层元数据的重用更加容易。
So far, all you have done is quickly built an image suitable for emulation only. This section shows you how to customize your build for specific hardware by adding a hardware layer into the Yocto Project development environment.
In general, layers are repositories that contain related sets of instructions and configurations that tell the Yocto Project what to do. Isolating related metadata into functionally specific layers facilitates modular development and makes it easier to reuse the layer metadata.
注释
按照惯例,层名称以字符串 "meta-"开头。
Note
By convention, layer names start with the string “meta-“.
请按照以下步骤添加硬件层:
-
查找层: 有许多硬件层可用。Yocto Project 源代码库中有许多硬件层。本例添加了meta-altera硬件层。
-
克隆层: 使用 Git 在你的机器上复制一个硬件层。你可以将该副本放在之前创建的 Poky 仓库副本的顶层:
Follow these steps to add a hardware layer:
1. Find a Layer: Many hardware layers are available. The Yocto Project Source Repositories has many hardware layers. This example adds the meta-altera hardware layer.
2. Clone the Layer: Use Git to make a local copy of the layer on your machine. You can put the copy in the top level of the copy of the Poky repository created earlier:
$ cd poky
$ git clone https://github.com/kraj/meta-altera.git
Cloning into 'meta-altera'...
remote: Counting objects: 25170, done.
remote: Compressing objects: 100% (350/350), done.
remote: Total 25170 (delta 645), reused 719 (delta 538), pack-reused 24219
Receiving objects: 100% (25170/25170), 41.02 MiB | 1.64 MiB/s, done.
Resolving deltas: 100% (13385/13385), done.
Checking connectivity... done.
硬件层现在可以在构建主机上的 Poky 参考资源库中作为 meta-altera 与其他层一起使用,其中包含支持英特尔旗下 Altera 硬件所需的所有元数据。
注意事项
建议每个 Yocto 项目版本的层都有一个分支。请确保签出支持你正在使用的 Yocto 项目版本的层分支。
The hardware layer is now available next to other layers inside the Poky reference repository on your build host as meta-altera and contains all the metadata needed to support hardware from Altera, which is owned by Intel.
Note
It is recommended for layers to have a branch per Yocto Project release. Please make sure to checkout the layer branch supporting the Yocto Project release you’re using.
-
改配置,为特定机器构建: local.conf 文件中的 MACHINE 变量指定了用于编译的机器。在本例中,将 MACHINE 变量设置为 cyclone5。使用这些配置:https://github.com/kraj/meta-altera/blob/master/conf/machine/cyclone5.conf。
注意
有关配置编译的更多信息,请参阅前面的 "检查本地配置文件 "步骤。
3. Change the Configuration to Build for a Specific Machine: The MACHINE variable in the local.conf file specifies the machine for the build. For this example, set the MACHINE variable to cyclone5. These configurations are used: https://github.com/kraj/meta-altera/blob/master/conf/machine/cyclone5.conf.
Note
See the “Examine Your Local Configuration File” step earlier for more information on configuring the build.
-
将层添加到层配置文件中:在构建过程中使用层之前,必须将其添加到 bblayers.conf 文件中,该文件位于构建目录 conf 目录中。
使用 bitbake-layers add-layer 命令将层添加到配置文件中:
4. Add Your Layer to the Layer Configuration File: Before you can use a layer during a build, you must add it to your bblayers.conf file, which is found in the Build Directory conf directory.
Use the bitbake-layers add-layer command to add the layer to the configuration file:
$ cd poky/build
$ bitbake-layers add-layer ../meta-altera
NOTE: Starting bitbake server...
Parsing recipes: 100% |##################################################################| Time: 0:00:32
Parsing of 918 .bb files complete (0 cached, 918 parsed). 1401 targets,
123 skipped, 0 masked, 0 errors.
有关添加图层的更多信息,请参阅 "使用 bitbake-layers 脚本添加层 "部分。
You can find more information on adding layers in the Adding a Layer Using the bitbake-layers Script section.
完成这些步骤后,您的 Yocto Project 开发环境中就添加了 meta-altera 层,并将其配置为在 cyclone5 机器上构建。
注意
前面的步骤仅供演示。如果您尝试为 cyclone5 机器构建镜像,请阅读 Altera README。
Completing these steps has added the meta-altera layer to your Yocto Project development environment and configured it to build for the cyclone5 machine.
Note
The previous steps are for demonstration purposes only. If you were to attempt to build an image for the cyclone5 machine, you should read the Altera README.
Creating Your Own General Layer (创建你的通用层)
也许你有需要隔离的应用程序或特定行为集。您可以使用 bitbake-layers create-layer 命令创建自己的通用层。该工具通过设置一个包含 layer.conf 配置文件的子目录、一个包含 example.bb 配方的 recipes-example 子目录、一个许可文件和一个 README 来自动创建层。
以下命令将运行该工具,在 poky 目录中创建名为 meta-mylayer 的图层:
Maybe you have an application or specific set of behaviors you need to isolate. You can create your own general layer using the bitbake-layers create-layer command. The tool automates layer creation by setting up a subdirectory with a layer.conf configuration file, a recipes-example subdirectory that contains an example.bb recipe, a licensing file, and a README.
The following commands run the tool to create a layer named meta-mylayer in the poky directory:
$ cd poky
$ bitbake-layers create-layer meta-mylayer
NOTE: Starting bitbake server...
Add your new layer with 'bitbake-layers add-layer meta-mylayer'
有关层以及如何创建层的更多信息,请参阅《Yocto 项目开发任务手册》中的 "使用 bitbake-layers 脚本创建常规层 "一节。
For more information on layers and how to create them, see the Creating a General Layer Using the bitbake-layers Script section in the Yocto Project Development Tasks Manual.
Where To Go Next (下一步)
既然你已经体验过使用 Yocto 项目,你可能会问自己 "现在怎么办?Yocto 项目有许多信息来源,包括网站、维基页面和用户手册:
Now that you have experienced using the Yocto Project, you might be asking yourself “What now?”. The Yocto Project has many sources of information including the website, wiki pages, and user manuals:
-
网站: Yocto 项目网站提供背景信息、最新版本、重大新闻、完整的开发文档,以及丰富的 Yocto 项目开发社区。
The Yocto Project
-
视频研讨会: Yocto 项目和 BitBake 简介,第 1 部分和 Yocto 项目和 BitBake 简介,第 2 部分视频提供了一个视频研讨会,向您介绍使用 Yocto 项目开发定制嵌入式 Linux 发行版的最重要方面。
https://youtu.be/yuE7my3KOpo
https://youtu.be/iZ05TTyzGHk
-
Yocto 项目概述与概念手册: Yocto 项目概述与概念手册》是了解 Yocto 项目的绝佳入门读物。本手册向你介绍 Yocto 项目及其开发环境。手册还提供了有关 Yocto 项目各个方面的概念信息。
Yocto Project Overview and Concepts Manual — The Yocto Project ® 4.3.999 documentation
-
Yocto 项目维基: Yocto 项目维基提供了更多信息,包括 Yocto 项目的下一步计划、发布信息、项目规划和 QA 信息。
Yocto Project
-
Yocto 项目邮件列表: 相关邮件列表为讨论、补丁提交和公告提供了一个论坛。有多个按主题分组的邮件列表。有关 Yocto 项目邮件列表的完整列表,请参阅《Yocto 项目参考手册》中的邮件列表部分。
-
链接和其他文档的综合列表: Yocto 项目参考手册》中的 "链接和相关文档 "部分提供了所有相关链接和其他用户文档的完整列表。
15 Contributions and Additional Information — The Yocto Project ® 4.3.999 documentation
* Website: The Yocto Project Website provides background information, the latest builds, breaking news, full development documentation, and access to a rich Yocto Project Development Community into which you can tap.
* Video Seminar: The Introduction to the Yocto Project and BitBake, Part 1 and Introduction to the Yocto Project and BitBake, Part 2 videos offer a video seminar introducing you to the most important aspects of developing a custom embedded Linux distribution with the Yocto Project.
* Yocto Project Overview and Concepts Manual: The Yocto Project Overview and Concepts Manual is a great place to start to learn about the Yocto Project. This manual introduces you to the Yocto Project and its development environment. The manual also provides conceptual information for various aspects of the Yocto Project.
* Yocto Project Wiki: The Yocto Project Wiki provides additional information on where to go next when ramping up with the Yocto Project, release information, project planning, and QA information.
* Yocto Project Mailing Lists: Related mailing lists provide a forum for discussion, patch submission and announcements. There are several mailing lists grouped by topic. See the Mailing lists section in the Yocto Project Reference Manual for a complete list of Yocto Project mailing lists.
* Comprehensive List of Links and Other Documentation: The Links and Related Documentation section in the Yocto Project Reference Manual provides a comprehensive list of all related links and other user documentation.
Original from:
Yocto Project Quick Build — The Yocto Project ® 4.3.999 documentation
相关文章:

Yocto - Project Quick Build
欢迎光临! 这篇简短的文档将向您介绍使用 Yocto 项目构建典型镜像的过程。本文还介绍了如何为特定硬件配置构建。您将使用 Yocto Project 构建一个名为 Poky 的参考嵌入式操作系统。 Welcome! This short document steps you through the process for a typical i…...
)
深入探讨C++中的可变参数列表(Variadic Templates)
文章目录 导言可变参数列表的基本用法使用std::initializer_list应用场景 导言 在C编程中,处理可变数量参数的能力是一种非常有用的功能。通过可变参数列表,你可以编写更加通用和灵活的函数,从而提高代码的可读性和重用性。本文将详细介绍C中…...

MS2548 国产自动方向控制、半双工 RS-485 收发器 替代MAX13487
MS2548 国产自动方向控制、半双工 RS-485 收发器 替代MAX13487 北京冠宇铭通科技有限公司 肖小姐 产品简述 MS2548 是一个 5V 供电、半双工 RS-485 收发器。 芯片具有自动换向控制功能,可用于隔离485 端口,驱动器输入与使能信号一起配合控制芯片的状态&…...
数据库大师之路:Oracle在线学习平台全指南!
介绍数据库是由甲骨文公司开发的一款关系数据库管理系统(RDBMS),在数据库领域具有领先地位,并且以其系统可移植性而闻名。以下是对Oracle数据库的详细介绍: 市场地位:Oracle数据库是目前世界上流行的关系数…...
如何在Windows系统部署Jellyfin Server并实现公网访问内网影音文件
文章目录 1. 前言2. Jellyfin服务网站搭建2.1. Jellyfin下载和安装2.2. Jellyfin网页测试 3.本地网页发布3.1 cpolar的安装和注册3.2 Cpolar云端设置3.3 Cpolar本地设置 4.公网访问测试5. 结语 1. 前言 随着移动智能设备的普及,各种各样的使用需求也被开发出来&…...
CORBA协议开发)
华为北向网管NCE开发教程(3)CORBA协议开发
华为北向网管NCE开发教程(1)闭坑选接口协议 华为北向网管NCE开发教程(2)REST接口开发 华为北向网管NCE开发教程(3)CORBA协议开发 如果你真的还有选择的余地,能用REST,尽量用REST&…...
)
【算法训练营】最长公共子序列,倒水问题,奶牛吃草(Python实现)
最长公共子序列 时间限制:1 sec 空间限制:256 MB 问题描述 给定两个 1 到 n 的排列 A,B (即长度为 n 的序列,其中 [1,n] 之间的所有数都出现了恰好一次)。 求它们的最长公共子序列长度。 输入格式 第一行一个整数 n &a…...

Armadillo:矩阵类、向量类、Cube类和泛型类
文章目录 矩阵类、向量类、Cube类和泛型类Mat<type>matcx_matCol<type>veccx_vecRow<type>rowveccx_rowvecCube<type>cubecx_cubefield<object_type>SpMat<type>sp_matsp_cx_mat运算符: − * % / ! < > <…...

【守护健康】小脑萎缩患者必备营养指南
当生活给予我们挑战,我们选择用科学和关爱予以回应。面对小脑萎缩这一难题,正确的营养补充不仅是一剂强心针,更是患者康复之路上的坚实伙伴。今天,让我们一起了解那些能够助力小脑萎缩患者的神奇维生素! 1. 维生素B群…...
lvs集群中NAT模式
群集的含义 由多台主机构成,但对外表现为一个整体,只提供一个访问入口,相当于一台大型的计算机。 横向发展:放更多的服务器,有调度分配的问题。 垂直发展:升级单机的硬件设备,提高单个服务器自身功能。 …...
FPGA——三速自适应以太网设计(2)GMII与RGMII接口
FPGA——以太网设计(2)GMII与RGMII 基础知识(1)GMII(2)RGMII(3)IDDR GMII设计转RGMII接口跨时钟传输模块 基础知识 (1)GMII GMII:发送端时钟由MAC端提供 下…...
【校园导航小程序】2.0版本 静态/云开发项目 升级日志
演示视频 【校园导航小程序】2.0版本 静态/云开发项目 演示 首页 重做了首页,界面更加高效和美观 校园指南页 新增了 “校园指南” 功能,可以搜索和浏览校园生活指南 地图页 ①弃用路线规划插件,改用SDK开发包。可以无阻通过审核并发布…...
)
深入揭秘Lucene:全面解析其原理与应用场景(二)
本系列文章简介: 本系列文章将深入揭秘Lucene,全面解析其原理与应用场景。我们将从Lucene的基本概念和核心组件开始,逐步介绍Lucene的索引原理、搜索算法以及性能优化策略。通过阅读本文,读者将会对Lucene的工作原理有更深入的了解…...

Java中synchronized关键字、ReentrantLock、volatile关键字是如何实现线程同步的。
在Java中,synchronized关键字、ReentrantLock和volatile关键字这三个是编程中常用于实现线程同步的机制,下面结合代码详细说明一下这三个关键字的用法。 1. synchronized关键字: synchronized关键字是Java语言提供的内置锁机制,…...

路由拦截器
路由拦截可以分为几种不同的类型,每种类型都有其特定的作用和适用场景。以下是常见的几种路由拦截类型及其用途: 身份验证拦截器: 作用: 检查用户是否已经登录或具有有效的身份认证,并根据认证状态决定是否允许用户访问…...
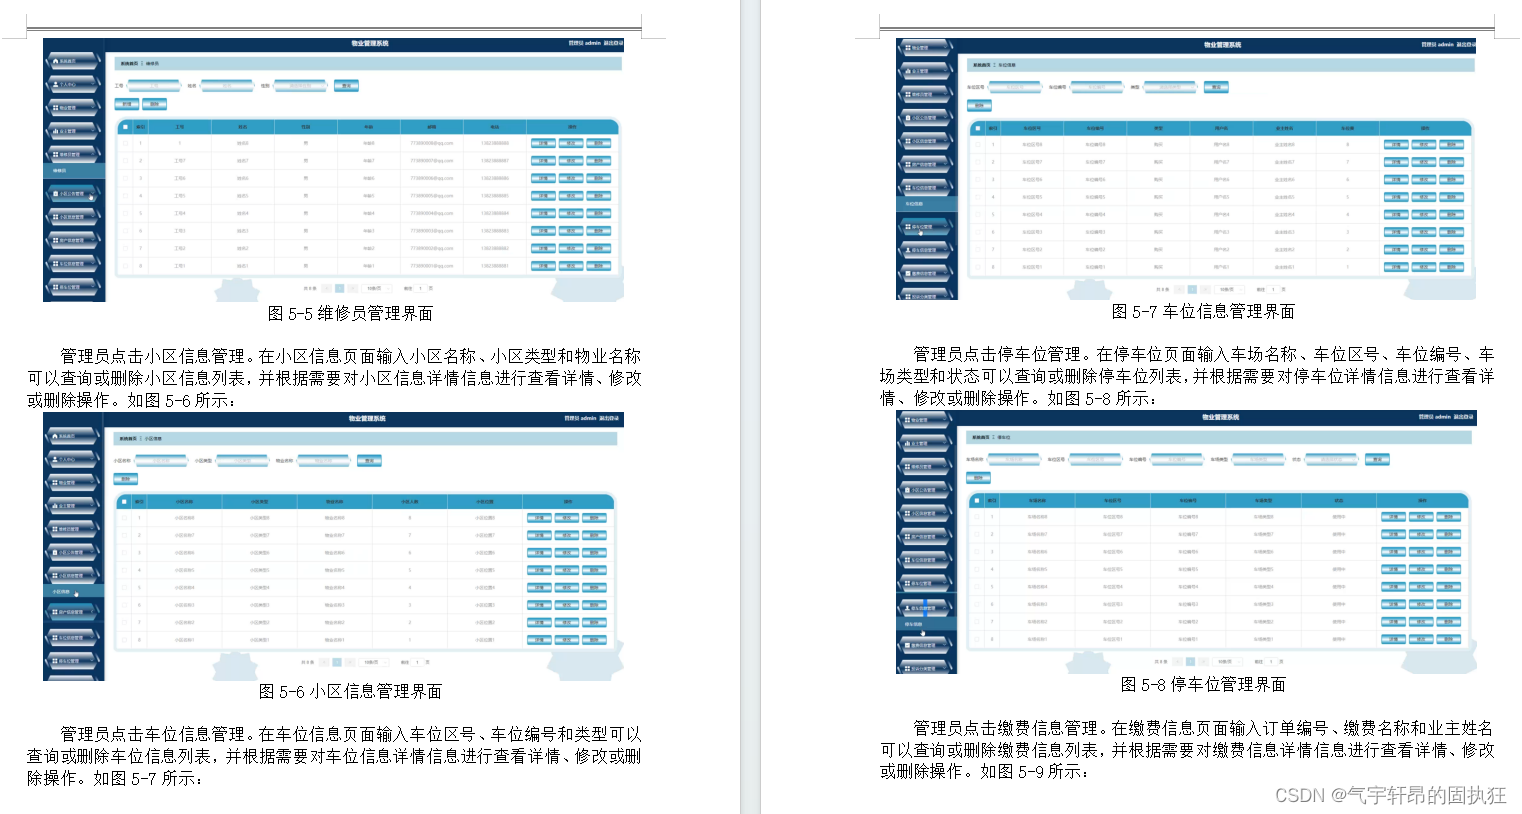
Springboot+vue的物业管理系统(有报告)。Javaee项目,springboot vue前后端分离项目。
演示视频: Springbootvue的物业管理系统(有报告)。Javaee项目,springboot vue前后端分离项目。 项目介绍: 本文设计了一个基于Springbootvue的物业管理系统,采用M(model)Vÿ…...
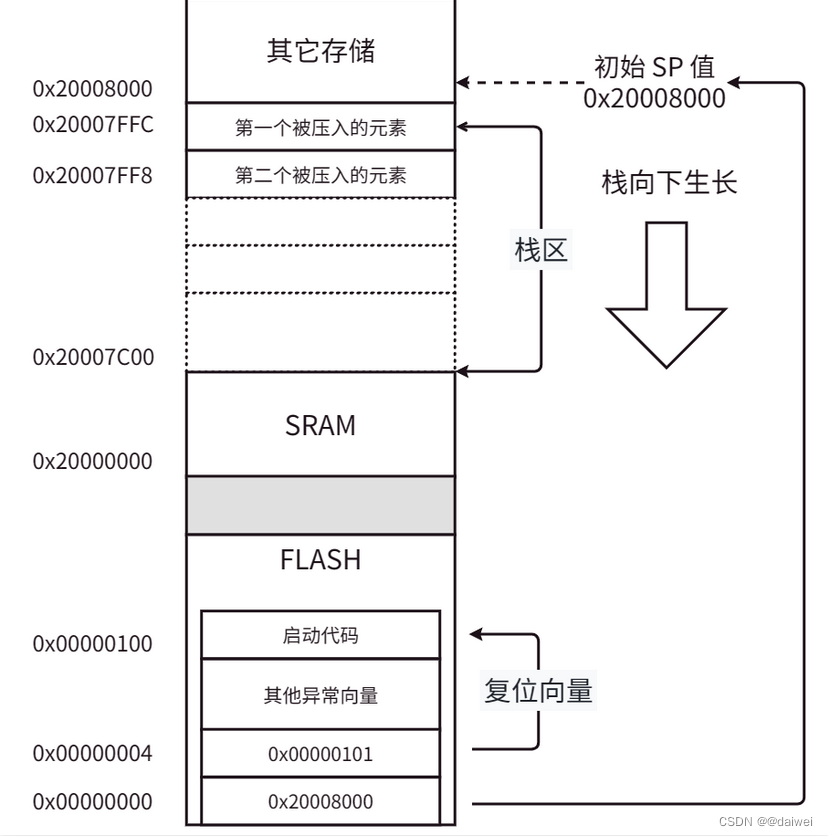
STM32的启动流程分析 和 一些底层控制的原理
阅读引言: 阅读本文之后, 你将对单片机, 甚至是嵌入式系统, 或者是传统的PC机系统的启动流程有一个大致的了解, 本文更加偏向于单片机的启动流程分析。 目录 一、基础知识 1.STM32系列的微控制器(mcu&…...

C#面:几种注释类型
三种常见的注释类型:单行注释、多行注释和 XML 注释。 单行注释: 以双斜线 // 开头,用于在一行中注释单个语句或代码块。单行注释会被编译器忽略,不会对程序的执行产生任何影响。 例如: // 这是一个单行注释 int a…...
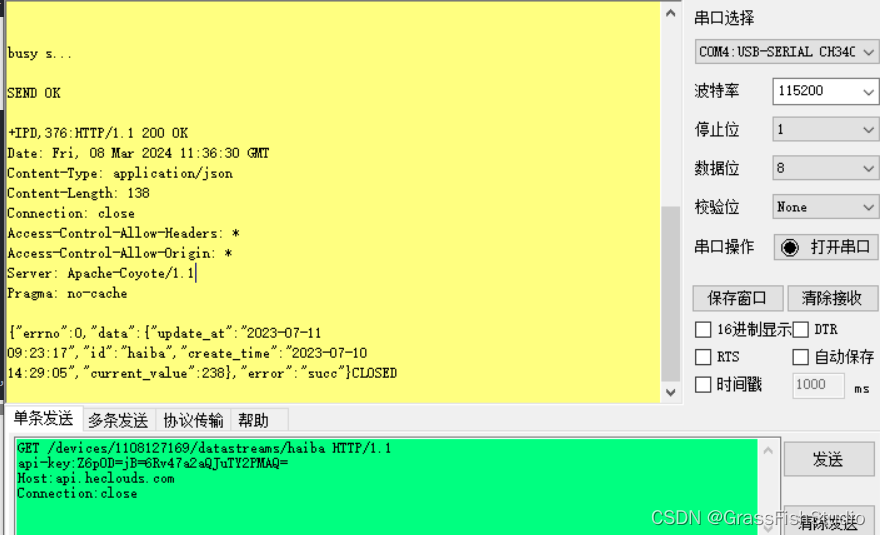
#onenet网络请求http(GET,POST)
参考博文: POST: https://blog.csdn.net/qq_43350239/article/details/104361153 POST请求(用串口助手测试): POST /devices/1105985351/datapoints HTTP/1.1 api-key:AdbrV5kCRsKsRCfjboYOCVcF9FY Host:api.heclouds.com Con…...

零基础学习JS--基础篇--索引集合类
数组是由名称和索引引用的值构成的有序列表。 JavaScript 中没有明确的数组数据类型。但是,你可以使用预定义的 Array 对象及其方法来处理应用程序中的数组。Array 对象具有以各种方式操作数组的方法,例如连接、反转和排序。它有一个用于确定数组长度的…...

ES6从入门到精通:前言
ES6简介 ES6(ECMAScript 2015)是JavaScript语言的重大更新,引入了许多新特性,包括语法糖、新数据类型、模块化支持等,显著提升了开发效率和代码可维护性。 核心知识点概览 变量声明 let 和 const 取代 var…...
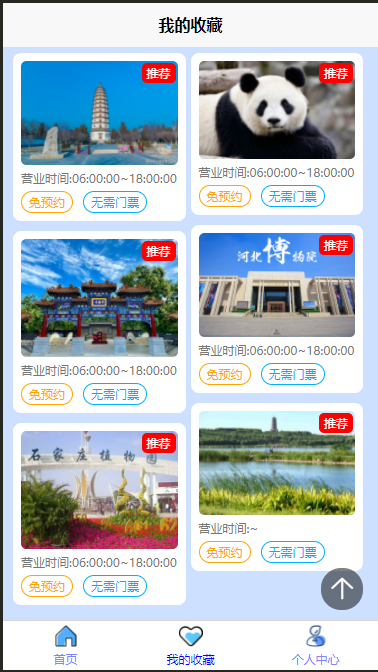
2025 后端自学UNIAPP【项目实战:旅游项目】6、我的收藏页面
代码框架视图 1、先添加一个获取收藏景点的列表请求 【在文件my_api.js文件中添加】 // 引入公共的请求封装 import http from ./my_http.js// 登录接口(适配服务端返回 Token) export const login async (code, avatar) > {const res await http…...

Axios请求超时重发机制
Axios 超时重新请求实现方案 在 Axios 中实现超时重新请求可以通过以下几种方式: 1. 使用拦截器实现自动重试 import axios from axios;// 创建axios实例 const instance axios.create();// 设置超时时间 instance.defaults.timeout 5000;// 最大重试次数 cons…...

稳定币的深度剖析与展望
一、引言 在当今数字化浪潮席卷全球的时代,加密货币作为一种新兴的金融现象,正以前所未有的速度改变着我们对传统货币和金融体系的认知。然而,加密货币市场的高度波动性却成为了其广泛应用和普及的一大障碍。在这样的背景下,稳定…...

《C++ 模板》
目录 函数模板 类模板 非类型模板参数 模板特化 函数模板特化 类模板的特化 模板,就像一个模具,里面可以将不同类型的材料做成一个形状,其分为函数模板和类模板。 函数模板 函数模板可以简化函数重载的代码。格式:templa…...
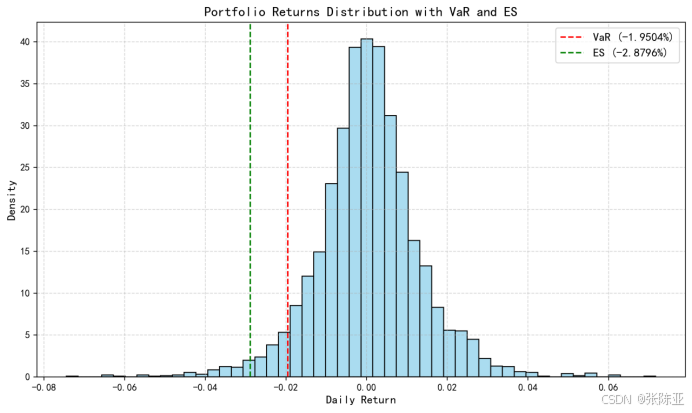
Python基于历史模拟方法实现投资组合风险管理的VaR与ES模型项目实战
说明:这是一个机器学习实战项目(附带数据代码文档),如需数据代码文档可以直接到文章最后关注获取。 1.项目背景 在金融市场日益复杂和波动加剧的背景下,风险管理成为金融机构和个人投资者关注的核心议题之一。VaR&…...
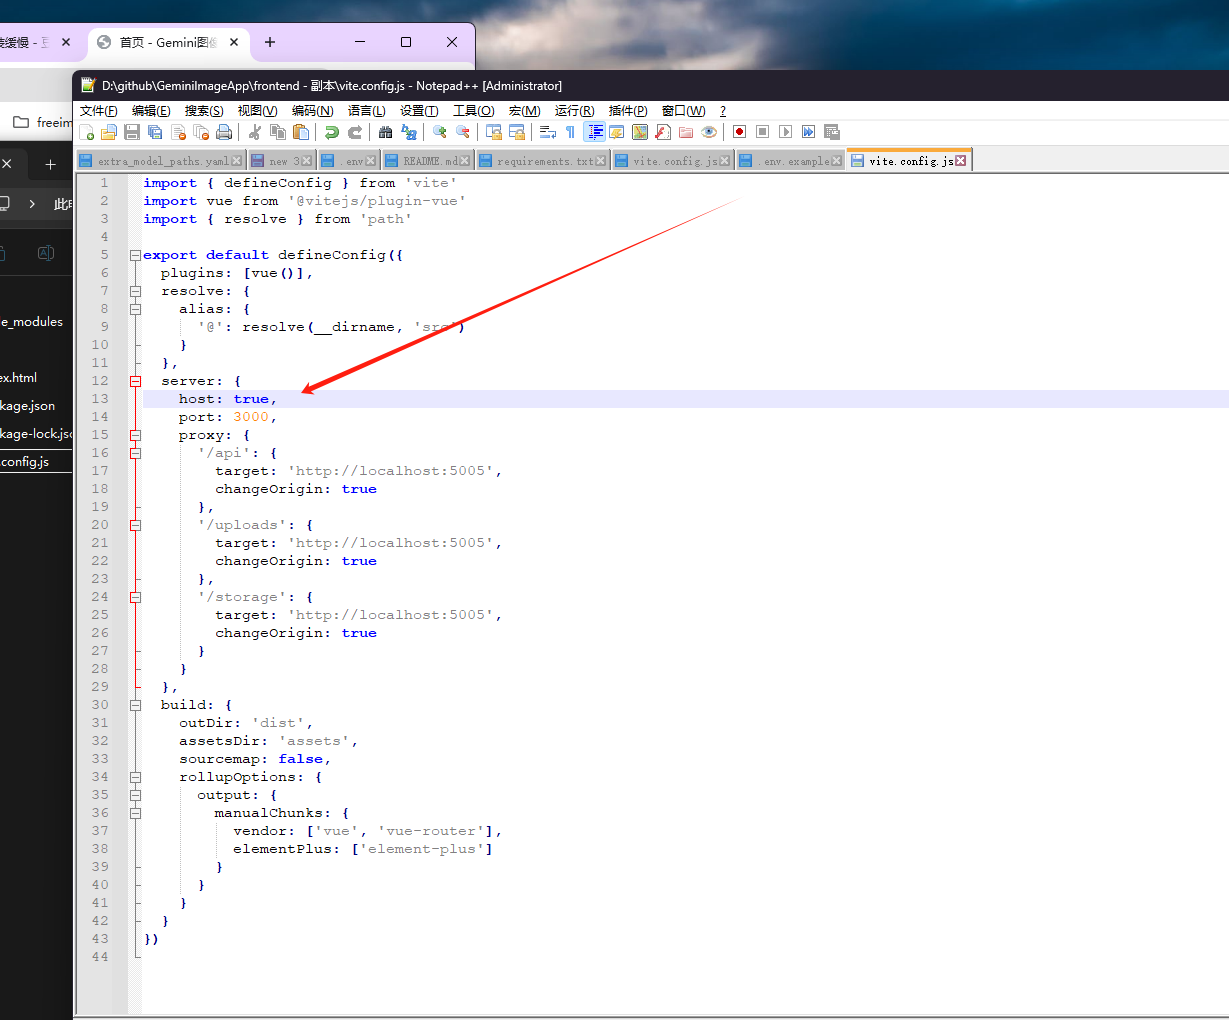
推荐 github 项目:GeminiImageApp(图片生成方向,可以做一定的素材)
推荐 github 项目:GeminiImageApp(图片生成方向,可以做一定的素材) 这个项目能干嘛? 使用 gemini 2.0 的 api 和 google 其他的 api 来做衍生处理 简化和优化了文生图和图生图的行为(我的最主要) 并且有一些目标检测和切割(我用不到) 视频和 imagefx 因为没 a…...
Netty从入门到进阶(二)
二、Netty入门 1. 概述 1.1 Netty是什么 Netty is an asynchronous event-driven network application framework for rapid development of maintainable high performance protocol servers & clients. Netty是一个异步的、基于事件驱动的网络应用框架,用于…...

C语言中提供的第三方库之哈希表实现
一. 简介 前面一篇文章简单学习了C语言中第三方库(uthash库)提供对哈希表的操作,文章如下: C语言中提供的第三方库uthash常用接口-CSDN博客 本文简单学习一下第三方库 uthash库对哈希表的操作。 二. uthash库哈希表操作示例 u…...

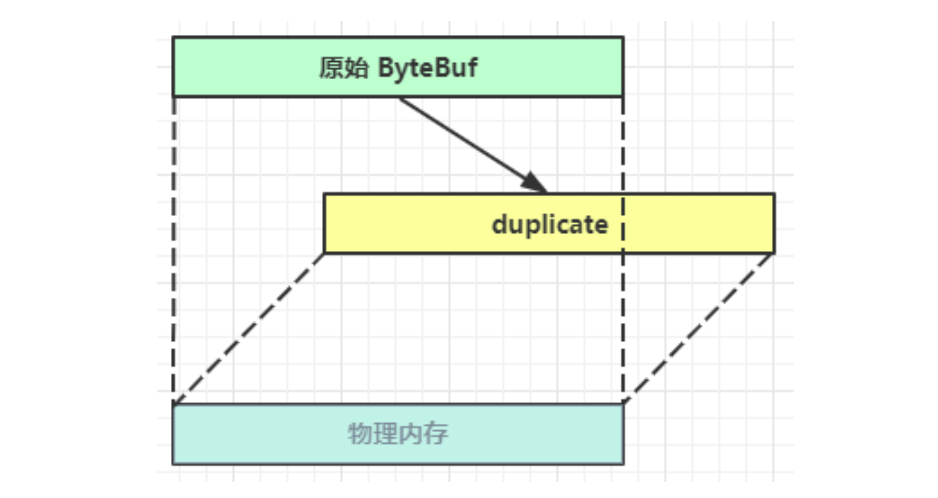
Qt 事件处理中 return 的深入解析
Qt 事件处理中 return 的深入解析 在 Qt 事件处理中,return 语句的使用是另一个关键概念,它与 event->accept()/event->ignore() 密切相关但作用不同。让我们详细分析一下它们之间的关系和工作原理。 核心区别:不同层级的事件处理 方…...