Pytorch的named_children, named_modules和named_children
在 PyTorch 中,named_children、named_modules 和 named_parameters 是用于获取神经网络模型组件和参数的三种不同的方法。下面是它们各自的作用和区别:
named_parameters:递归地列出所有参数名称和tensornamed_modules:递归地列出所有子层,其中第一个返回值就是模型本身named_children:列出模型的第一层级的子层,不往下进行深入递归
1. named_children:
named_children返回一个生成器,它包含模型中所有直接子模块的名称和模块对。- 它只返回一层级的子模块,不递归到更深层次的子模块。
- 这个方法通常用于迭代模型的直接子模块,并对其进行操作或检查。
示例:
from torchvision.models import resnet18model = resnet18()
# Print each layer name and its module
# Note that named_children method only returns the first level submodules
for name, layer in model.named_children():print(name.ljust(10), '-->', type(layer))
输出:
conv1      --> <class 'torch.nn.modules.conv.Conv2d'>
bn1        --> <class 'torch.nn.modules.batchnorm.BatchNorm2d'>
relu       --> <class 'torch.nn.modules.activation.ReLU'>
maxpool    --> <class 'torch.nn.modules.pooling.MaxPool2d'>
layer1     --> <class 'torch.nn.modules.container.Sequential'>
layer2     --> <class 'torch.nn.modules.container.Sequential'>
layer3     --> <class 'torch.nn.modules.container.Sequential'>
layer4     --> <class 'torch.nn.modules.container.Sequential'>
avgpool    --> <class 'torch.nn.modules.pooling.AdaptiveAvgPool2d'>
fc         --> <class 'torch.nn.modules.linear.Linear'>
2. named_modules:
named_modules返回一个生成器,它包含模型中所有模块的名称和模块对,包括子模块的子模块。- 它递归地遍历整个模型,返回所有模块的名称和引用。
- 这个方法适用于当你需要对模型中的所有模块进行操作或检查时,无论它们位于哪一层级。
示例:
from torchvision.models import resnet18model = resnet18()
# The first layer is the model itself
for name, layer in model.named_modules():print(name.ljust(15), '-->', type(layer))
输出:
                --> <class 'torchvision.models.resnet.ResNet'>
conv1           --> <class 'torch.nn.modules.conv.Conv2d'>
bn1             --> <class 'torch.nn.modules.batchnorm.BatchNorm2d'>
relu            --> <class 'torch.nn.modules.activation.ReLU'>
maxpool         --> <class 'torch.nn.modules.pooling.MaxPool2d'>
layer1          --> <class 'torch.nn.modules.container.Sequential'>
layer1.0        --> <class 'torchvision.models.resnet.BasicBlock'>
layer1.0.conv1  --> <class 'torch.nn.modules.conv.Conv2d'>
layer1.0.bn1    --> <class 'torch.nn.modules.batchnorm.BatchNorm2d'>
layer1.0.relu   --> <class 'torch.nn.modules.activation.ReLU'>
layer1.0.conv2  --> <class 'torch.nn.modules.conv.Conv2d'>
layer1.0.bn2    --> <class 'torch.nn.modules.batchnorm.BatchNorm2d'>
layer1.1        --> <class 'torchvision.models.resnet.BasicBlock'>
layer1.1.conv1  --> <class 'torch.nn.modules.conv.Conv2d'>
layer1.1.bn1    --> <class 'torch.nn.modules.batchnorm.BatchNorm2d'>
layer1.1.relu   --> <class 'torch.nn.modules.activation.ReLU'>
layer1.1.conv2  --> <class 'torch.nn.modules.conv.Conv2d'>
layer1.1.bn2    --> <class 'torch.nn.modules.batchnorm.BatchNorm2d'>
layer2          --> <class 'torch.nn.modules.container.Sequential'>
layer2.0        --> <class 'torchvision.models.resnet.BasicBlock'>
layer2.0.conv1  --> <class 'torch.nn.modules.conv.Conv2d'>
layer2.0.bn1    --> <class 'torch.nn.modules.batchnorm.BatchNorm2d'>
layer2.0.relu   --> <class 'torch.nn.modules.activation.ReLU'>
layer2.0.conv2  --> <class 'torch.nn.modules.conv.Conv2d'>
layer2.0.bn2    --> <class 'torch.nn.modules.batchnorm.BatchNorm2d'>
layer2.0.downsample --> <class 'torch.nn.modules.container.Sequential'>
layer2.0.downsample.0 --> <class 'torch.nn.modules.conv.Conv2d'>
layer2.0.downsample.1 --> <class 'torch.nn.modules.batchnorm.BatchNorm2d'>
layer2.1        --> <class 'torchvision.models.resnet.BasicBlock'>
layer2.1.conv1  --> <class 'torch.nn.modules.conv.Conv2d'>
layer2.1.bn1    --> <class 'torch.nn.modules.batchnorm.BatchNorm2d'>
layer2.1.relu   --> <class 'torch.nn.modules.activation.ReLU'>
layer2.1.conv2  --> <class 'torch.nn.modules.conv.Conv2d'>
layer2.1.bn2    --> <class 'torch.nn.modules.batchnorm.BatchNorm2d'>
layer3          --> <class 'torch.nn.modules.container.Sequential'>
layer3.0        --> <class 'torchvision.models.resnet.BasicBlock'>
layer3.0.conv1  --> <class 'torch.nn.modules.conv.Conv2d'>
layer3.0.bn1    --> <class 'torch.nn.modules.batchnorm.BatchNorm2d'>
layer3.0.relu   --> <class 'torch.nn.modules.activation.ReLU'>
layer3.0.conv2  --> <class 'torch.nn.modules.conv.Conv2d'>
layer3.0.bn2    --> <class 'torch.nn.modules.batchnorm.BatchNorm2d'>
layer3.0.downsample --> <class 'torch.nn.modules.container.Sequential'>
layer3.0.downsample.0 --> <class 'torch.nn.modules.conv.Conv2d'>
layer3.0.downsample.1 --> <class 'torch.nn.modules.batchnorm.BatchNorm2d'>
layer3.1        --> <class 'torchvision.models.resnet.BasicBlock'>
layer3.1.conv1  --> <class 'torch.nn.modules.conv.Conv2d'>
layer3.1.bn1    --> <class 'torch.nn.modules.batchnorm.BatchNorm2d'>
layer3.1.relu   --> <class 'torch.nn.modules.activation.ReLU'>
layer3.1.conv2  --> <class 'torch.nn.modules.conv.Conv2d'>
layer3.1.bn2    --> <class 'torch.nn.modules.batchnorm.BatchNorm2d'>
layer4          --> <class 'torch.nn.modules.container.Sequential'>
layer4.0        --> <class 'torchvision.models.resnet.BasicBlock'>
layer4.0.conv1  --> <class 'torch.nn.modules.conv.Conv2d'>
layer4.0.bn1    --> <class 'torch.nn.modules.batchnorm.BatchNorm2d'>
layer4.0.relu   --> <class 'torch.nn.modules.activation.ReLU'>
layer4.0.conv2  --> <class 'torch.nn.modules.conv.Conv2d'>
layer4.0.bn2    --> <class 'torch.nn.modules.batchnorm.BatchNorm2d'>
layer4.0.downsample --> <class 'torch.nn.modules.container.Sequential'>
layer4.0.downsample.0 --> <class 'torch.nn.modules.conv.Conv2d'>
layer4.0.downsample.1 --> <class 'torch.nn.modules.batchnorm.BatchNorm2d'>
layer4.1        --> <class 'torchvision.models.resnet.BasicBlock'>
layer4.1.conv1  --> <class 'torch.nn.modules.conv.Conv2d'>
layer4.1.bn1    --> <class 'torch.nn.modules.batchnorm.BatchNorm2d'>
layer4.1.relu   --> <class 'torch.nn.modules.activation.ReLU'>
layer4.1.conv2  --> <class 'torch.nn.modules.conv.Conv2d'>
layer4.1.bn2    --> <class 'torch.nn.modules.batchnorm.BatchNorm2d'>
avgpool         --> <class 'torch.nn.modules.pooling.AdaptiveAvgPool2d'>
fc              --> <class 'torch.nn.modules.linear.Linear'>
3. named_parameters:
named_parameters返回一个生成器,它包含模型中所有参数的名称和参数值对。- 它递归地遍历模型,返回所有可训练参数的名称和参数张量。
- 这个方法用于获取和检查模型中的参数,例如在打印模型参数、保存模型或加载模型时使用。
示例:
from torchvision.models import resnet18model = resnet18()
for name, param in model.named_parame
conv1.weight              --> torch.Size([64, 3, 7, 7])
bn1.weight                --> torch.Size([64])
bn1.bias                  --> torch.Size([64])
layer1.0.conv1.weight     --> torch.Size([64, 64, 3, 3])
layer1.0.bn1.weight       --> torch.Size([64])
layer1.0.bn1.bias         --> torch.Size([64])
layer1.0.conv2.weight     --> torch.Size([64, 64, 3, 3])
layer1.0.bn2.weight       --> torch.Size([64])
layer1.0.bn2.bias         --> torch.Size([64])
layer1.1.conv1.weight     --> torch.Size([64, 64, 3, 3])
layer1.1.bn1.weight       --> torch.Size([64])
layer1.1.bn1.bias         --> torch.Size([64])
layer1.1.conv2.weight     --> torch.Size([64, 64, 3, 3])
layer1.1.bn2.weight       --> torch.Size([64])
layer1.1.bn2.bias         --> torch.Size([64])
layer2.0.conv1.weight     --> torch.Size([128, 64, 3, 3])
layer2.0.bn1.weight       --> torch.Size([128])
layer2.0.bn1.bias         --> torch.Size([128])
layer2.0.conv2.weight     --> torch.Size([128, 128, 3, 3])
layer2.0.bn2.weight       --> torch.Size([128])
layer2.0.bn2.bias         --> torch.Size([128])
layer2.0.downsample.0.weight --> torch.Size([128, 64, 1, 1])
layer2.0.downsample.1.weight --> torch.Size([128])
layer2.0.downsample.1.bias --> torch.Size([128])
layer2.1.conv1.weight     --> torch.Size([128, 128, 3, 3])
layer2.1.bn1.weight       --> torch.Size([128])
layer2.1.bn1.bias         --> torch.Size([128])
layer2.1.conv2.weight     --> torch.Size([128, 128, 3, 3])
layer2.1.bn2.weight       --> torch.Size([128])
layer2.1.bn2.bias         --> torch.Size([128])
layer3.0.conv1.weight     --> torch.Size([256, 128, 3, 3])
layer3.0.bn1.weight       --> torch.Size([256])
layer3.0.bn1.bias         --> torch.Size([256])
layer3.0.conv2.weight     --> torch.Size([256, 256, 3, 3])
layer3.0.bn2.weight       --> torch.Size([256])
layer3.0.bn2.bias         --> torch.Size([256])
layer3.0.downsample.0.weight --> torch.Size([256, 128, 1, 1])
layer3.0.downsample.1.weight --> torch.Size([256])
layer3.0.downsample.1.bias --> torch.Size([256])
layer3.1.conv1.weight     --> torch.Size([256, 256, 3, 3])
layer3.1.bn1.weight       --> torch.Size([256])
layer3.1.bn1.bias         --> torch.Size([256])
layer3.1.conv2.weight     --> torch.Size([256, 256, 3, 3])
layer3.1.bn2.weight       --> torch.Size([256])
layer3.1.bn2.bias         --> torch.Size([256])
layer4.0.conv1.weight     --> torch.Size([512, 256, 3, 3])
layer4.0.bn1.weight       --> torch.Size([512])
layer4.0.bn1.bias         --> torch.Size([512])
layer4.0.conv2.weight     --> torch.Size([512, 512, 3, 3])
layer4.0.bn2.weight       --> torch.Size([512])
layer4.0.bn2.bias         --> torch.Size([512])
layer4.0.downsample.0.weight --> torch.Size([512, 256, 1, 1])
layer4.0.downsample.1.weight --> torch.Size([512])
layer4.0.downsample.1.bias --> torch.Size([512])
layer4.1.conv1.weight     --> torch.Size([512, 512, 3, 3])
layer4.1.bn1.weight       --> torch.Size([512])
layer4.1.bn1.bias         --> torch.Size([512])
layer4.1.conv2.weight     --> torch.Size([512, 512, 3, 3])
layer4.1.bn2.weight       --> torch.Size([512])
layer4.1.bn2.bias         --> torch.Size([512])
fc.weight                 --> torch.Size([1000, 512])
fc.bias                   --> torch.Size([1000])
总结来说,named_children 用于获取模型的直接子模块,named_modules 用于获取模型的所有模块(包括嵌套的子模块),而 named_parameters 用于获取模型中的所有参数。这些方法在模型调试、分析和优化时非常有用。
相关文章:

Pytorch的named_children, named_modules和named_children
在 PyTorch 中,named_children、named_modules 和 named_parameters 是用于获取神经网络模型组件和参数的三种不同的方法。下面是它们各自的作用和区别: named_parameters:递归地列出所有参数名称和tensornamed_modules:递归地列…...
3.28总结
1.java学习记录 1.方法的重载 重载换而言之其实就是函数名不变,但是其中的参数需要改变,可以三个方面改变(参数类型,参数顺序,参数个数这三个方面入手,这样可以运用的) 但是:注意…...

C# 命名空间的两种定义哦写法与区别
这两种写法在C#中都是有效的,但是它们代表了不同的语法风格和C#版本特性。 第一种写法: namespace Nebula.PDF; public class PdfDocument {}这是C# 9.0及更高版本中引入的顶级语句(top-level statements)特性。它允许你直接在文…...

Rustdesk客户端编译后固定密码不稳定时好时坏
环境: rustdesk1.19 问题描述: Rustdesk客户端编译后固定密码不稳定时好时坏 解决方案: 出现固定密码不稳定的问题可能有多种原因,下面是一些可能的解决方法: 密码强度:确保所设置的固定密码足够强大…...
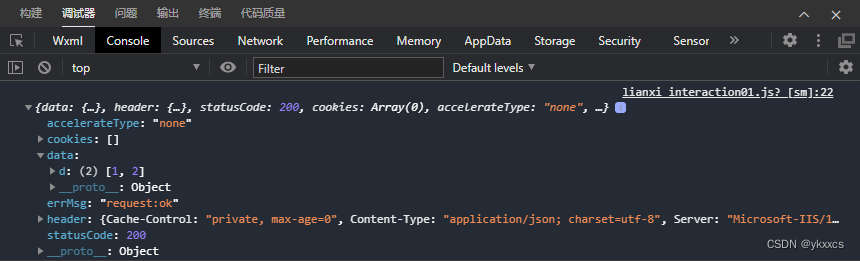
小程序利用WebService跟asp.net交互过程发现的问题并处理
最近在研究一个项目,用到asp.net跟小程序交互,简单的说就是小程序端利用wx.request发起请求。获取asp.net 响应回来的数据。但经常会报错。点击下图的测试按钮 出现如下错误: 百思不得其解,试了若干方法,都不行。 因为…...
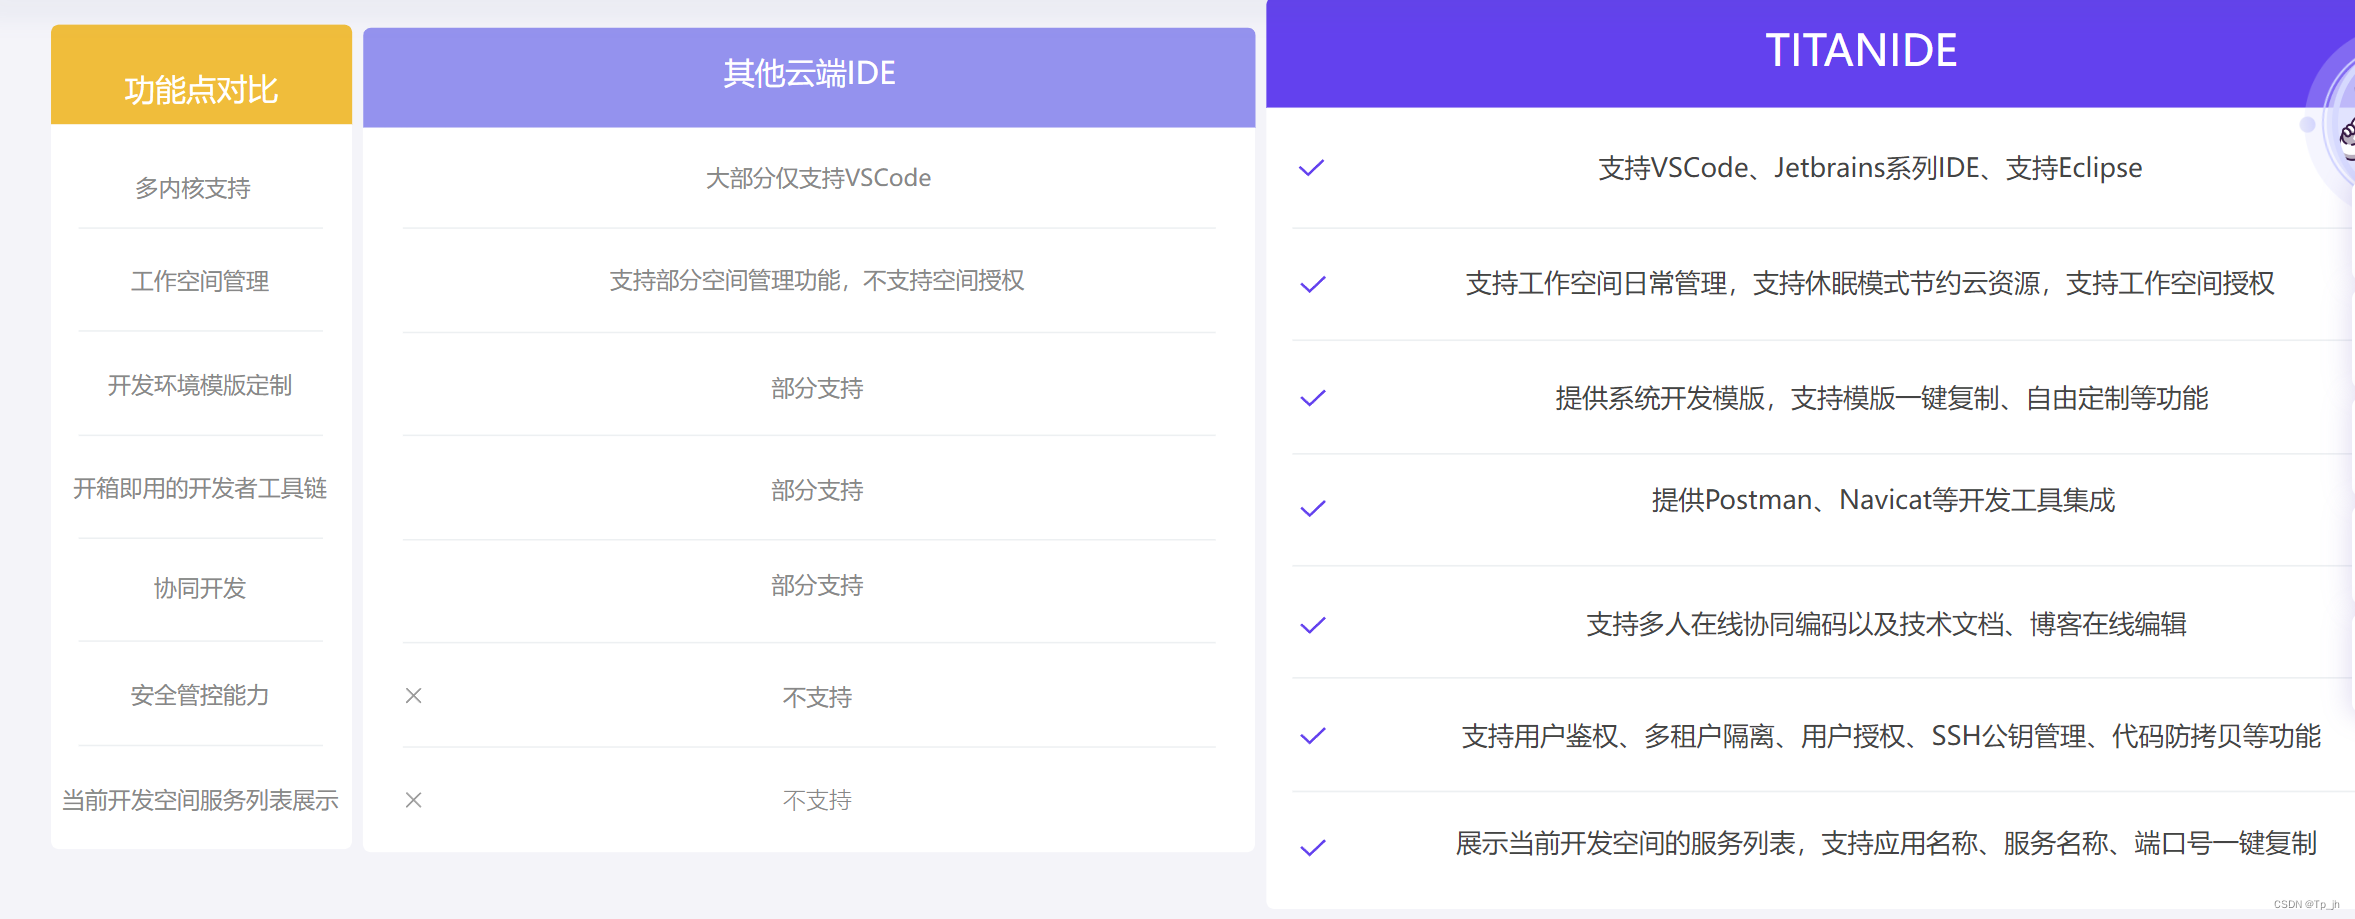
TitanIDE与传统 IDE 比较
与传统IDE的比较 TitanIDE 和传统 IDE 属于不同时代的产物,在手工作坊时代,一切都是那么的自然,开发者习惯 Windows 或 MacOS 原生 IDE。不过,随着时代的变迁,软件行业已经步入云原生时代,TitanIDE 是顺应…...
反序列化动态调用 [NPUCTF2020]ReadlezPHP1
在源代码上看到提示 访问一下看看 代码审计一下 <?php #error_reporting(0); class HelloPhp {public $a;public $b;public function __construct(){$this->a "Y-m-d h:i:s";$this->b "date";}public function __destruct(){$a $this->a;…...
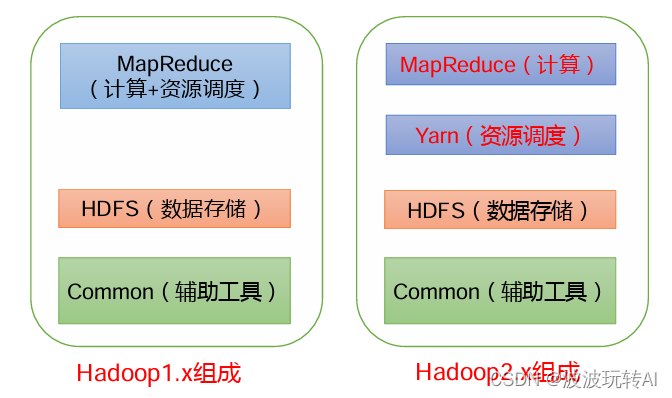
Hadoop面试重点
文章目录 1. Hadoop 常用端口号2.Hadoop特点3.Hadoop1.x、2.x、3.x区别 1. Hadoop 常用端口号 hadoop2.xhadoop3.x访问HDFS 端口500709870访问 MR 执行情况端口80888088历史服务器1988819888客户端访问集群端口90008020 2.Hadoop特点 高可靠:Hadoop底层维护多个数…...

【ONE·基础算法 || 分治·快排并归】
总言 主要内容:编程题举例,理解分治的思想(主要是对快排、并归的应用)。 文章目录 总言1、基本介绍2、颜色分类(medium)2.1、题解 3、快速排序(medium)3.1、题解ÿ…...
注册新用户)
Python 从0开始 一步步基于Django创建项目(11)注册新用户
1、修改C:\D\Python\Python310\study\snap_gram\users路径下的urls.py 添加‘注册新用户’URL。 #注册新用户 path(register/,views.register,nameregister), 2、修改C:\D\Python\Python310\study\snap_gram\users路径下的views.py 编写URL对应的视图函数register。 def r…...

银行监管报送系统介绍(十二):非居民金融账户涉税信息报送
国家税务总局、财政部、中国人民银行、中国银行业监督管理委员会、中国证券监督管理委员会、国家金融监督管理总局2017年5月9日发布、2017年7月1日起施行的《非居民金融账户涉税信息尽职调查管理办法》。 一、《管理办法》出台的背景是什么? 受二十国集团&…...
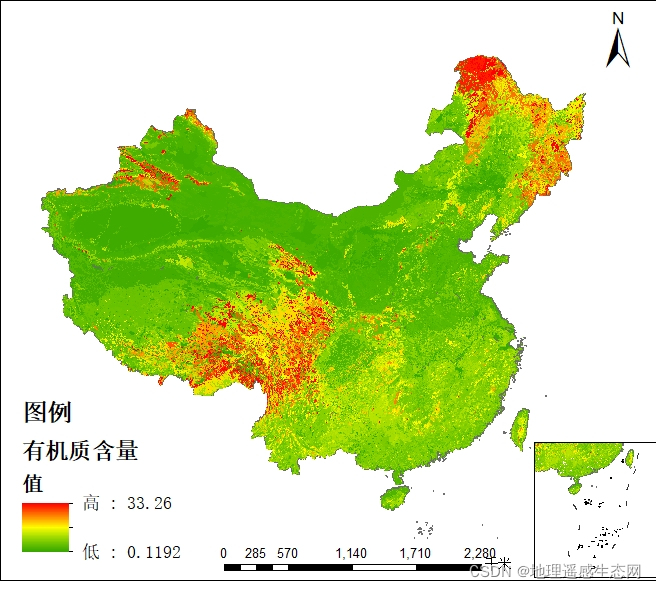
土壤有机质空间分布数据
土壤有机质(soil organic matter)是土壤中含碳有机化合物的总称,包括土壤固有的和外部加入的所有动植物残体及其分解产物和合成产物。主要来源于动植物及微生物残体,可分为腐殖质和非腐殖物质。一般占土壤固相总重的10%以下&#…...
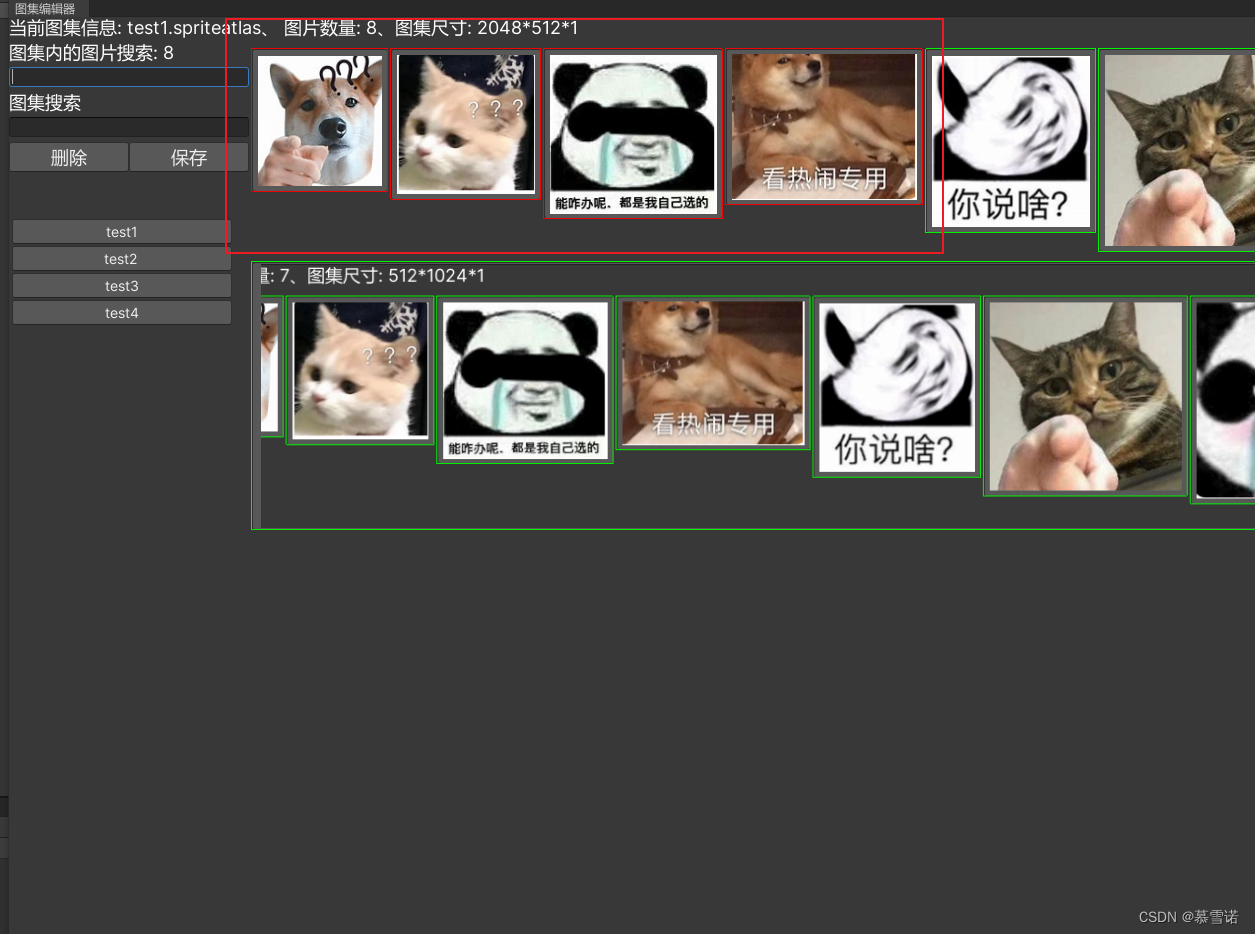
Unity图集编辑器
图集编辑器 欢迎使用图集编辑器新的改变编辑器图片 欢迎使用图集编辑器 Unity图集操作很是费劲 无法批量删除和添加图集中的图片 新的改变 自己写了一个图集编辑器 客: 支持批量删除 左键点击图片代表选中 右键点击图标定位到资产支持批量添加 选中图片拖拽到编…...
)
【JS笔记】JavaScript语法 《基础+重点》 知识内容,快速上手(六)
面向对象OOP 首先,我们要明确,面向对象不是语法,是一个思想,是一种 编程模式面向: 面(脸),向(朝着)面向过程: 脸朝着过程 》 关注着过程的编程模…...
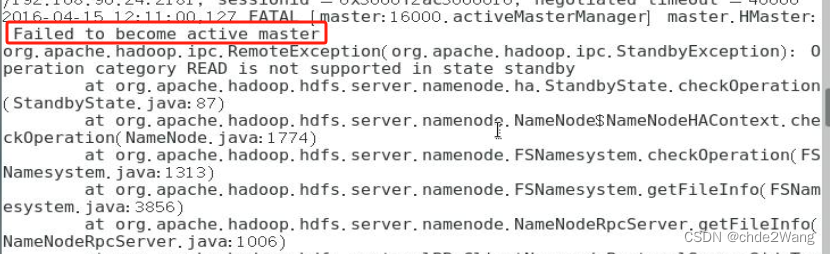
hbase启动错误-local host is“master:XXXX“ destination is:master
博主的安装前提: zookeeper安装完成,且启动成功 hdfs高可用安装,yarn高可用安装,且启动成功 报错原因:端口配置不对 解决方案: 输入:hdfs getconf -confKey fs.default.name 然后把相应的…...
基于SpringBoot的“招生管理系统”的设计与实现(源码+数据库+文档+PPT)
基于SpringBoot的“招生管理系统”的设计与实现(源码数据库文档PPT) 开发语言:Java 数据库:MySQL 技术:SpringBoot 工具:IDEA/Ecilpse、Navicat、Maven 系统展示 系统功能结构图 系统首页界面图 学生注册界面图 …...

Chinese-LLaMA-Alpaca-2模型量化部署测试
简介 Chinese-LLaMA-Alpaca-2基于Meta发布的可商用大模型Llama-2开发, 是中文LLaMA&Alpaca大模型的第二期项目. 量化 模型的下载还是应用脚本 bash hfd.sh hfl/chinese-alpaca-2-13b --tool aria2c -x 8应用llama.cpp进行量化, 主要参考该教程. 其中比较折腾的是与BLAS…...

flutter 打包成web应用后怎么通过url跳转页面
在 Flutter 中,如果你想要在打包成 Web 应用后通过 URL 跳转页面,你可以利用 Flutter 提供的路由导航系统和 URL 策略。以下是具体步骤: 1. 配置路由 在 Flutter 应用中定义路由,一种简单的方式是使用 MaterialApp 构造器的 rou…...
【设计模式】中介者模式的应用
文章目录 1.概述2.中介者模式的适用场景2.1.用户界面事件2.2.分布式架构多模块通信 3.总结 1.概述 中介者模式(Mediator Pattern)是一种行为型设计模式,它用于解决对象间复杂、过度耦合的问题。当多个对象(一般是两个以上的对象&…...

【微服务篇】分布式事务方案以及原理详解
分布式事务是指事务参与者、资源服务器、事务管理器分布在不同的分布式系统的多个节点之上的事务。在微服务架构、大型分布式系统和云计算等环境中,由于系统间调用和资源访问的复杂性,分布式事务变得尤为重要。 应用场景 跨系统交易:当交易…...
)
基于BS模式的小型房屋租赁系统(10016)
有需要的同学,源代码和配套文档领取,加文章最下方的名片哦 一、项目演示 项目演示视频 二、资料介绍 完整源代码(前后端源代码SQL脚本)配套文档(LWPPT开题报告/任务书)远程调试控屏包运行一键启动项目&…...

搞懂这6个核心问题,程序员转智能体开发少走3年弯路
文章目录前言问题一:我只会写CRUD,真的能转智能体开发吗?问题二:转智能体开发,到底需要学哪些技术?2.1 基础层:Python 提示词工程2.2 核心层:RAG 工具调用 记忆管理2.3 进阶层&am…...

Anthropic Claude Haiku 4.5 安全突破:勒索行为从96%降至0%
上一篇: Google I/O 2026前瞻:Gemini 4.0、Android XR与AI原生生态的全面突破 下一篇: Anthropic ARR突破440亿美元:Q1营收同比增长80倍深度分析 核心结论: Anthropic通过"困难建议数据集"和宪法训练方法,成功将Claude模型的勒索行…...

智能语音转文字终极指南:如何用AsrTools轻松完成音频转字幕
智能语音转文字终极指南:如何用AsrTools轻松完成音频转字幕 【免费下载链接】AsrTools ✨ AsrTools: Smart Voice-to-Text Tool | Efficient Batch Processing | User-Friendly Interface | No GPU Required | Supports SRT/TXT Output | Turn your audio into accu…...

多Agent协作是趋势,但谁来管这些Agent
如果你最近参加过AI相关的技术沙龙或者行业峰会,大概率会听到一个词:多Agent协作。简单说就是,不是一个AI帮你干完所有事,而是多个AI各司其职、互相配合。比如一个Agent负责理解需求,一个Agent负责写代码,一…...
)
别再只会用555了!用继电器搭建LED闪烁电路的3个隐藏知识点(附电路图)
继电器驱动LED闪烁电路:超越555的三大物理奥秘与实战设计 在电子爱好者的世界里,LED闪烁电路就像"Hello World"之于程序员,是入门必修的第一课。大多数教程会引导初学者使用555定时器这种"标准化方案",却很少…...

Box64终极指南:5分钟学会在ARM设备上运行x86_64程序
Box64终极指南:5分钟学会在ARM设备上运行x86_64程序 【免费下载链接】box64 Box64 - Linux Userspace x86_64 Emulator with a twist, targeted at ARM64, RV64 and LoongArch Linux devices 项目地址: https://gitcode.com/gh_mirrors/bo/box64 你是否曾经梦…...

告别英文恐惧症!PowerToys-CN让Windows效率工具真正为你所用
告别英文恐惧症!PowerToys-CN让Windows效率工具真正为你所用 【免费下载链接】PowerToys-CN PowerToys Simplified Chinese Translation 微软增强工具箱 自制汉化 项目地址: https://gitcode.com/gh_mirrors/po/PowerToys-CN 你是否曾经面对微软官方的PowerT…...

在Windows上优雅观看B站:BiliBili-UWP第三方客户端完全指南
在Windows上优雅观看B站:BiliBili-UWP第三方客户端完全指南 【免费下载链接】BiliBili-UWP BiliBili的UWP客户端,当然,是第三方的了 项目地址: https://gitcode.com/gh_mirrors/bi/BiliBili-UWP 还在用浏览器看B站视频吗?卡…...

iPaaS平台排名:五大主流产品的市场表现与核心能力
在数字化转型加速推进的当下,iPaaS(集成平台即服务)已成为企业构建敏捷IT架构、打通数据孤岛的关键基础设施。市场上涌现出多款各具特色的集成平台,它们在产品定位、技术架构与行业深耕上形成了差异化优势。本文基于公开资料&…...