一、next-auth 身份验证凭据-使用电子邮件和密码注册登录
一、next-auth 身份验证凭据-使用电子邮件和密码注册登录
文章目录
- 一、next-auth 身份验证凭据-使用电子邮件和密码注册登录
- 一、前言
- 二、前置准备
- 1、环境配置
- 2、相关库安装
- (1)vercel 配置
- (2)Yarn 包管理配置
- 3、next项目初始化与创建
- 三、具体实现
- 1、github 仓库创建与链接
- 2、Vercel项目链接Vercel账户并部署
- (1)项目上传vercel
- (2)项目创建并链接postgre 数据库
- (3)本地化项目链接数据库准备
- 3、登录页面与注册页面的前端
- (1)登录页面
- (1)注册页面
- (1)register 页面
- 四、数据库交互
- 1、数据库创建
- 2、vercel项目链接数据库并插入
- (1)vercel postgre准备
- (2) 项目注册并写sql插入数据库
- (3) 项目查询sql数据库并登录
- 五、状态增加
- 1、查询到登录之后登录自动跳转状态增加
- 2、登出与登录状态转换
- 3、重定向
- 4、root保护
- 5、root保护登录页面转为自定义登录页面
一、前言
近些时间需要在next 里面加入登录注册的功能遂整理了一下学习视频:
Next auth 身份验证凭据 - 使用电子邮件和密码注册和登录(NextJS app 路由)
二、前置准备
1、环境配置
-
Vscode
-
node环境配置
-
vercel 账户注册
-
github账户注册
2、相关库安装
(1)vercel 配置
- npm i -g vercel //安装vercel CLI
(2)Yarn 包管理配置
- npm i -g yarn //安装yarn
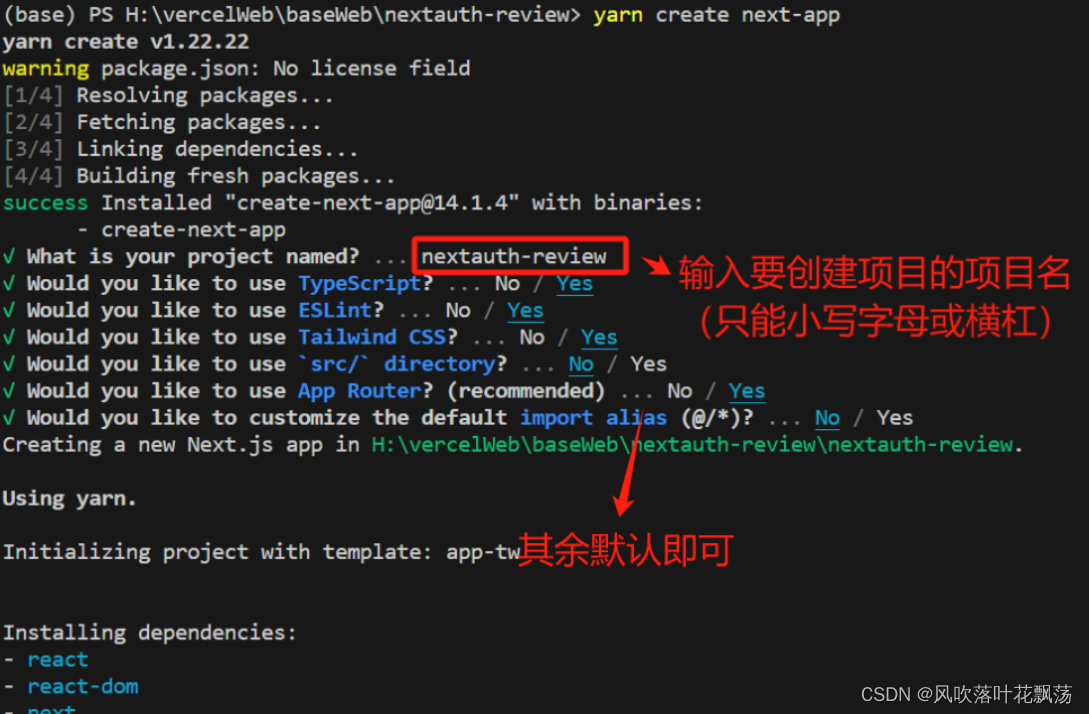
3、next项目初始化与创建
- yarn create next-app
-
cd nextauth-review (这里面放你写的项目名)
-
yarn dev //运行程序,在http://localhost:3000可以查看next项目的项目名
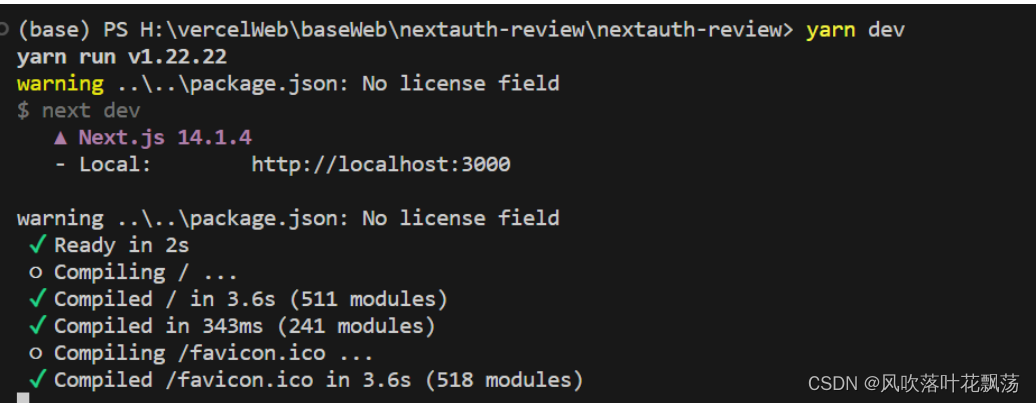
到这里我们就基本完成了前置的准备工作,下面继续。
三、具体实现
1、github 仓库创建与链接
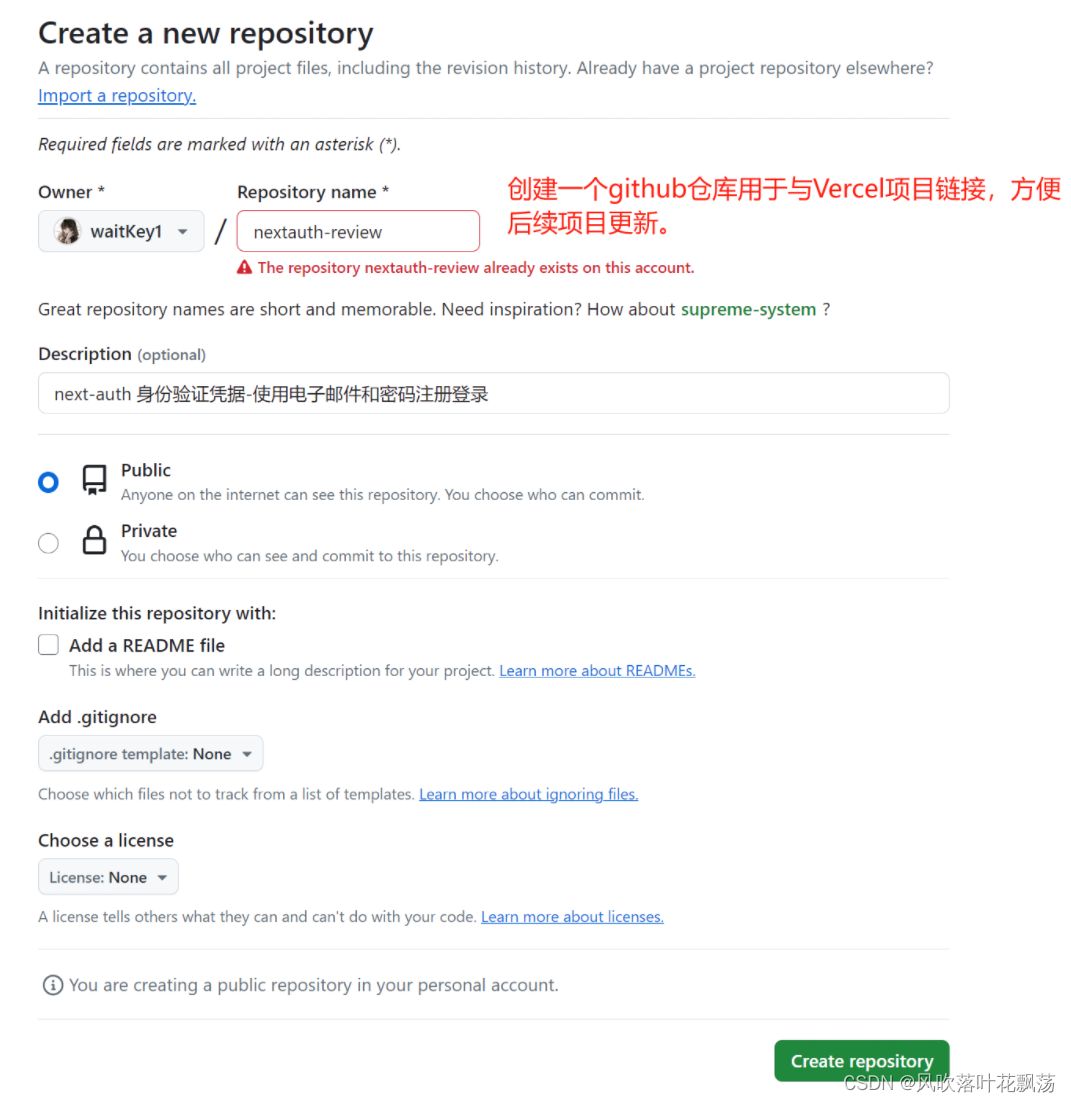
将新建的项目上传github

2、Vercel项目链接Vercel账户并部署
(1)项目上传vercel
-
vercel login //vercel 登录
-
Vercel //链接与上传
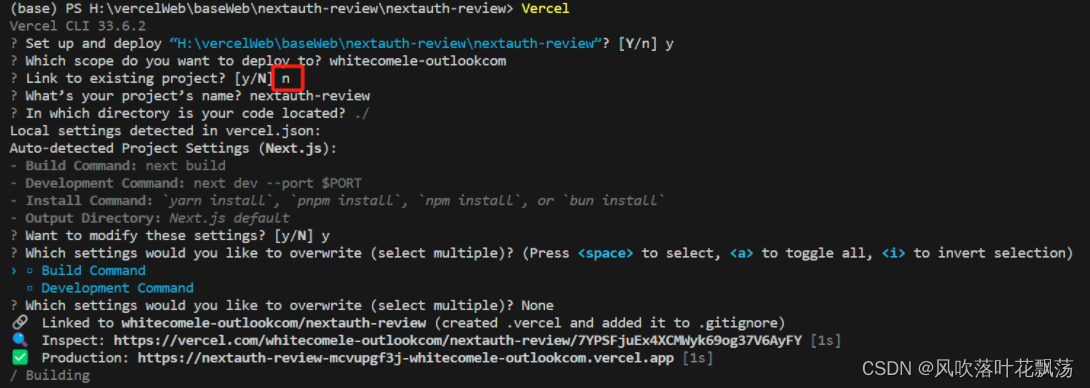
第三行输入n。最开始的时候不连接vercel项目。
注:后续如果项目更新了,要推送到vercel部署,可以通过输入vercel ,然后在第三行输入y,并输入第一步创建的项目名。
(2)项目创建并链接postgre 数据库
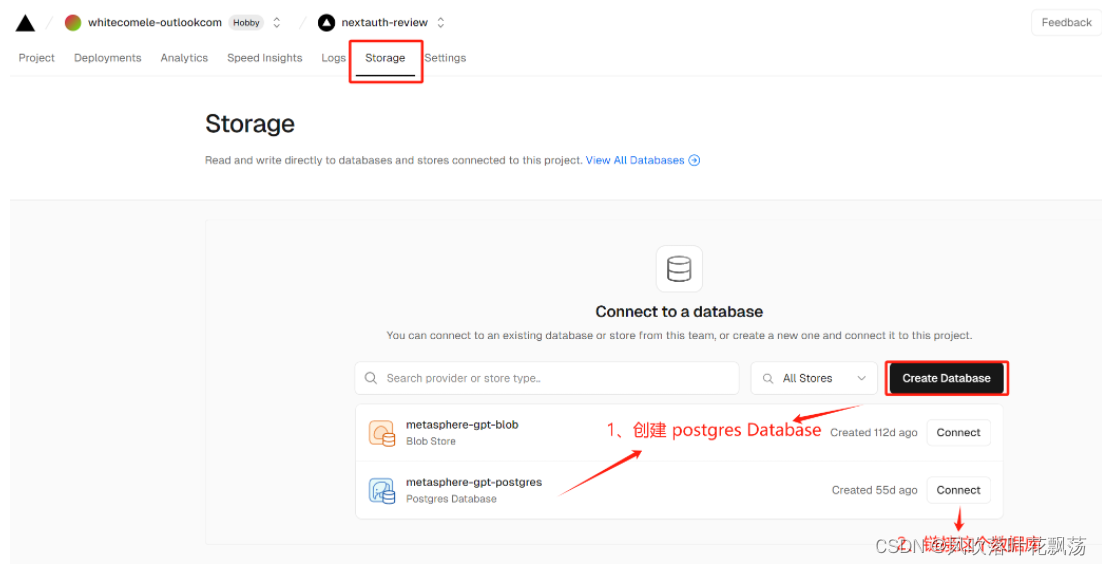
(3)本地化项目链接数据库准备
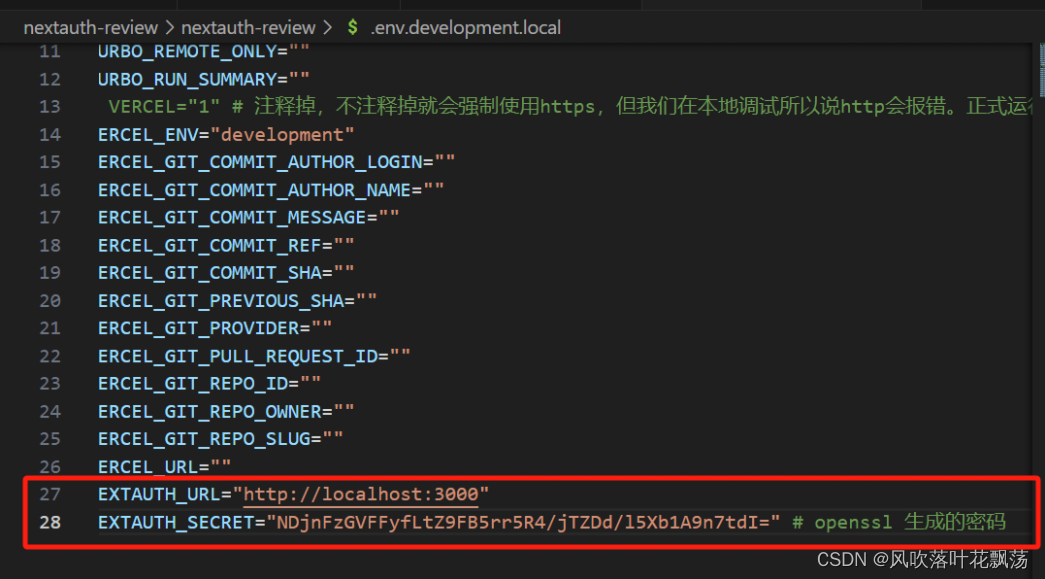
- vercel env pull .env.development.local

注释掉VERCEL,不注释掉就会强制使用https,但我们在本地调试所以说http会报错。正式运行再取消注释。
- openssl rand -base64 32 ,生成32位密码,并修改.env.development.local如下:
-
yarn add @types/bcrypt 安装加密工具bcrypt
-
yarn add @vercel/postgres 安装vercel postgres
-
yarn add next-auth 安装next-auth
到这里该项目的数据库就配置好了,下面我们开始页面开发。
3、登录页面与注册页面的前端
(1)登录页面
新建login文件夹,并在其中新建page.tsx下面是具体的内容
export default function LoginPage(){return (<form className="flex flex-col gap-2 mx-auto max-w-md mt-10"><input name='email' className ="border border-black text-black" type="email" /><input name='password' className ="border border-black text-black" type="password" /><button type="submit">Login</button></form>)
}
(1)注册页面
新建register文件夹,并在其中新建page.tsx下面是具体的内容
export default function LoginPage(){return (<form className="flex flex-col gap-2 mx-auto max-w-md mt-10"><input name='email' className ="border border-black text-black" type="email" /><input name='password' className ="border border-black text-black" type="password" /><button type="submit">Register</button></form>)
}
到这里前端就差不多了,大家可以在http://localhost:3000/login 和http://localhost:3000/register看到你写的页面
nextAuth的官方文档:https://next-auth.js.org/providers/credentials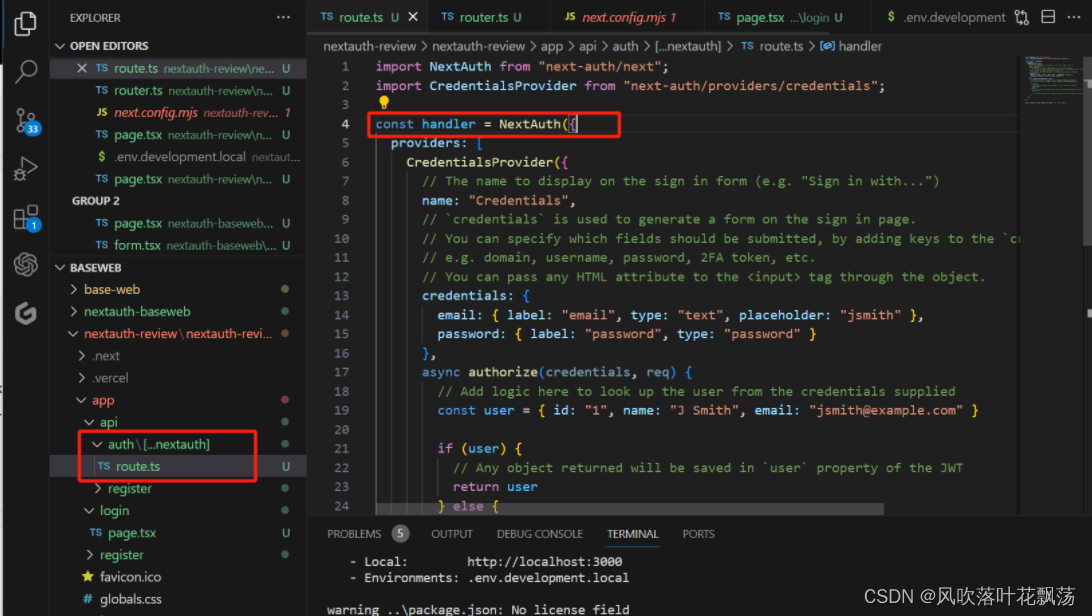
基本就是用来nextAuth 官方文档中的credentials 字段,结尾加上export {handler as GET, handler as POST}; 就差不多了。
类似如下:
api/auth/[…nextauth]/route.ts
import NextAuth from "next-auth/next";
import CredentialsProvider from "next-auth/providers/credentials";
const handler =NextAuth({providers: [CredentialsProvider({credentials: {email: {  },password: { }},async authorize(credentials, req) {// Add logic here to look up the user from the credentials suppliedconst user = { id: "1", name: "J Smith", email: "jsmith@example.com" }if (user) {// Any object returned will be saved in `user` property of the JWTreturn user} else {// If you return null then an error will be displayed advising the user to check their details.return null// You can also Reject this callback with an Error thus the user will be sent to the error page with the error message as a query parameter}}})]
})export {handler as GET, handler as POST};
api/auth/register/route.ts
import { NextResponse } from "next/server";export  async function POST(request : Request){try{const {email,password} = await request.json();console.log({email,password});}catch(e){console.log({e});}return NextResponse.json({message:"success"});
}
(1)register 页面
register\page.tsx
import { log } from "console";
import { FormEvent } from "react"export default function LoginPage(){const handleSubmit= async (e:FormEvent<HTMLFormElement>)=>{e.preventDefault();const formData = new FormData(e.currentTarget);const response = await fetch(`/api/auth/register`,{method:"POST",body:JSON.stringify({email:formData.get('email'),password:formData.get('password'),}),})console.log({response});}return (<form onSubmit ={ handleSubmit}className="flex flex-col gap-2 mx-auto max-w-md mt-10"><input name='email' className ="border border-black text-black" type="email" /><input name='password' className ="border border-black text-black" type="password" /><button type="submit">register</button></form>)
}
运行报错:
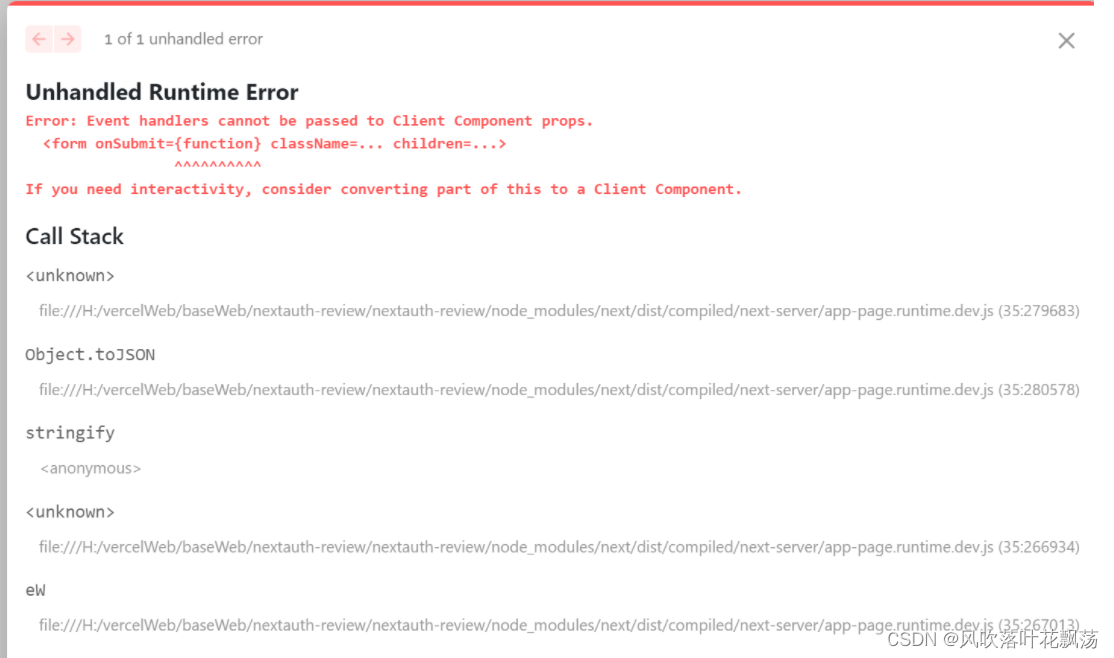
注:错误原因:需要把组件写到客户端部分,不能直接写进去Page.tsx
修改如下:
register/form.tsx
'use client'
import { FormEvent } from "react"export default function Form(){const handleSubmit = async (e:FormEvent<HTMLFormElement>) =>{e.preventDefault();const formData = new FormData(e.currentTarget);console.log(formData.get('email'),formData.get('password'));const response = await fetch(`/api/auth/register`,{method:'POST',body:JSON.stringify({email:formData.get('email'),password:formData.get('password')}),});console.log({response});};return(<form onSubmit={handleSubmit} className="flex flex-col gap-2 mx-auto max-w-md mt-10"><input name='email' className ="border border-black text-black" type="email" /><input name='password' className ="border border-black text-black" type="password" /><button type="submit">Resgiter</button></form>)
}
register/page.tsx
import Form from './form'export default async function RegisterPage(){return <Form />;}
到现在运行yarn dev 并到 http://localhost:3001/register 页面输入账户和密码,点击登录调用接口:fetch(/api/auth/register)然后打印{ email: ‘123@123’, password: ‘123’ }
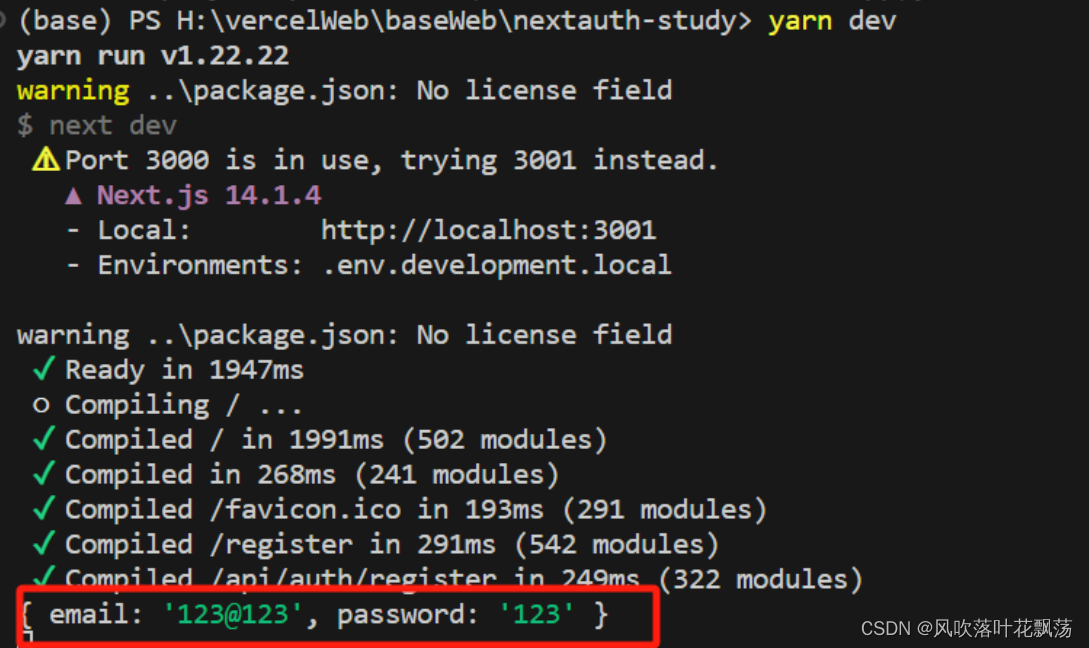
到这里就完成简单的前后端编写,下面进入数据库交互部分。
四、数据库交互
1、数据库创建
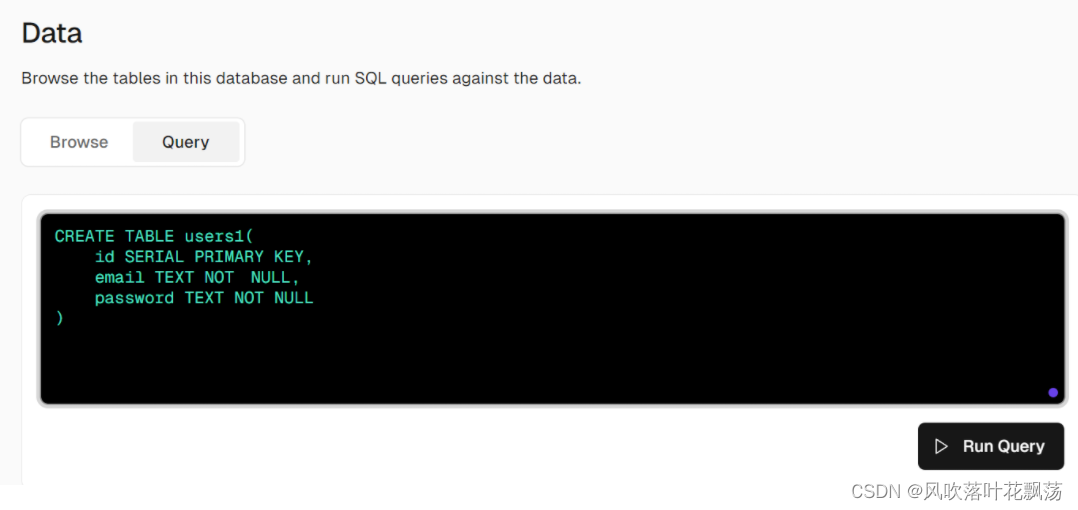
依据需求创建表单users1 如上,一共有两个属性email 和password
2、vercel项目链接数据库并插入
确保Browse页面确实能查到这个新建的数据库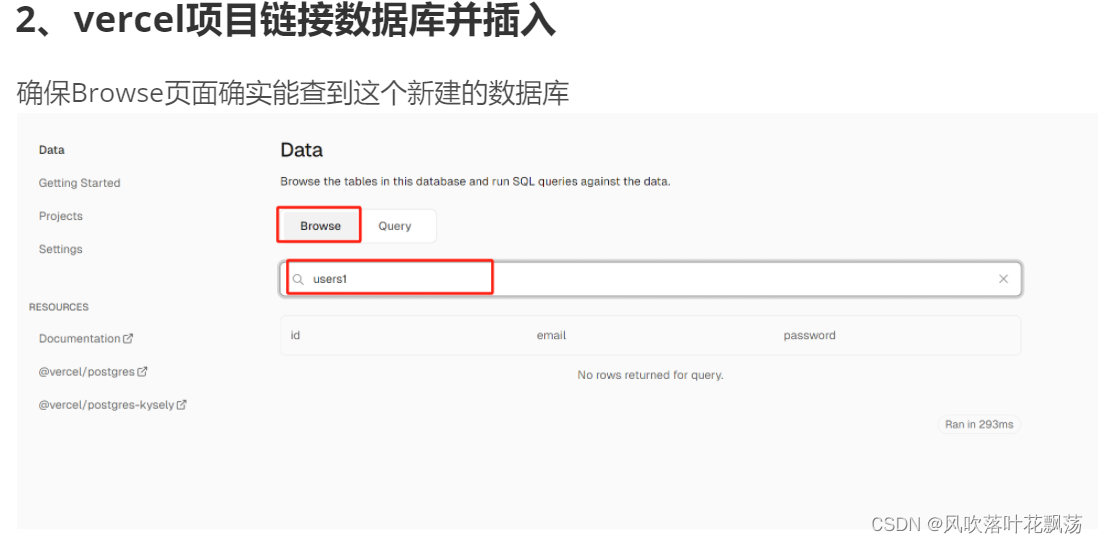
(1)vercel postgre准备
yarn add @vercel/postgres
(2) 项目注册并写sql插入数据库
将API/auth/register/route.ts 的内容修改如下即可实现针对数据库的插入
import { NextResponse } from "next/server";
import {hash} from 'bcrypt'
import {sql} from '@vercel/postgres'
export  async function POST(request : Request){try{const {email,password} = await request.json();console.log({email,password});const hashedPassword = await hash(password,10); //将密码hash加密到10位const response = await sql`INSERT INTO users1 (email,password) VALUES (${email},${password})`;//${参数} 参数化查询}catch(e){console.log({e});}return NextResponse.json({message:"success"});
}
前端页面register\form.tsx 如下,page.tsx 不变
'use client'
import { signIn } from "next-auth/react";
import { FormEvent } from "react"export default function LoginForm() {const handleSubmit = async (e:FormEvent<HTMLFormElement>) =>{e.preventDefault();const formData = new FormData(e.currentTarget);signIn('credentials',{  //nextauth 登录模块email:formData.get('email'),password:formData.get('password'),redirect:false});};return(<form onSubmit={handleSubmit} className="flex flex-col gap-2 mx-auto max-w-md mt-10"><input name='email' className ="border border-black text-black" type="email" /><input name='password' className ="border border-black text-black" type="password" /><button type="submit">Login</button></form>)
}
测试的时候可以发现可以显示登录信息了
问题:发现邮箱有时候同邮箱有多个,所以需要当相同的时候就不添加而是修改
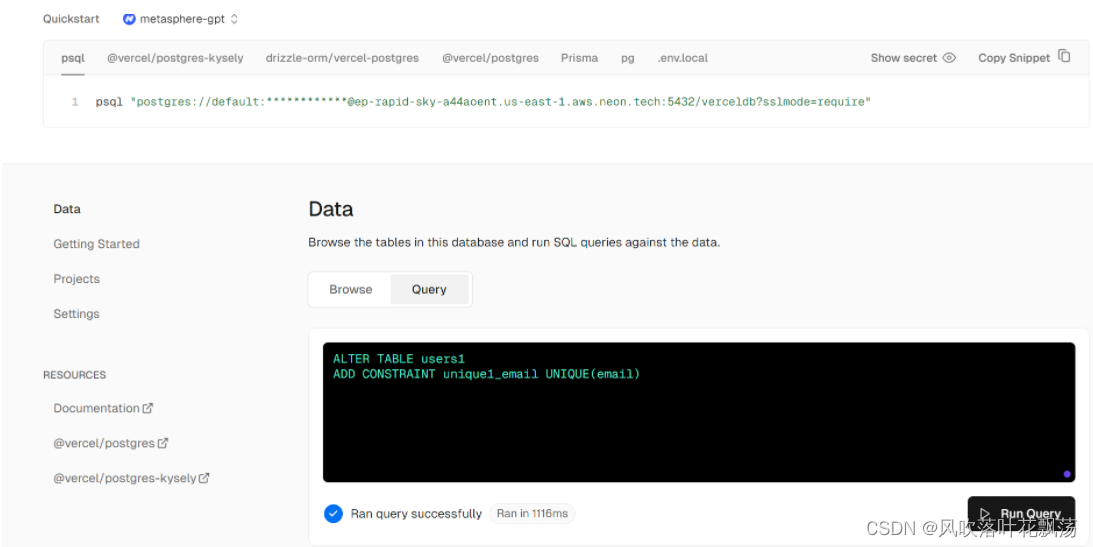
在数据库中限制让email唯一
(3) 项目查询sql数据库并登录
将API/auth/[…nextauth]/route.ts 的内容修改如下即可实现针对数据库的插入
import { sql } from "@vercel/postgres";
import { compare } from "bcrypt";
import NextAuth from "next-auth/next";
import CredentialsProvider from "next-auth/providers/credentials";
const handler =NextAuth({session:{strategy:'jwt'},providers: [CredentialsProvider({credentials: {email: {  },password: { }},async authorize(credentials, req) {const response = await sql`SELECT * FROM users1 WHERE email=${credentials?.email}`;const user = response.rows[0];const passwordCorrect = await compare(credentials?.password ||'',user.password);const passworduser=user.passwordconst passwordcre=credentials?.passwordconsole.log({passwordCorrect},{passwordcre},{passworduser});if (passwordCorrect){return {id:user.id,email:user.email}}//console.log({credentials}); //打印credentials信息return null}})]
})export {handler as GET, handler as POST};
前端页面login\form.tsx 如下,page.tsx 不变
'use client'
import { signIn } from "next-auth/react";
import { FormEvent } from "react"export default function LoginForm() {const handleSubmit = async (e:FormEvent<HTMLFormElement>) =>{e.preventDefault();const formData = new FormData(e.currentTarget);const response= await signIn('credentials',{  //nextauth 登录模块email:formData.get('email'),password:formData.get('password'),redirect:false});console.log({response});};return(<form onSubmit={handleSubmit} className="flex flex-col gap-2 mx-auto max-w-md mt-10"><input name='email' className ="border border-black text-black" type="email" /><input name='password' className ="border border-black text-black" type="password" /><button type="submit">Login</button></form>)
}
这时候就可以写入数据库了
五、状态增加
1、查询到登录之后登录自动跳转状态增加
解析:
如果查询到登录模块,没有返回error。则自动导航到‘/’目录同时刷新。
核心修改:
export default function LoginForm() {const router=useRouter();const handleSubmit = async (e:FormEvent<HTMLFormElement>) =>{e.preventDefault();const formData = new FormData(e.currentTarget);const response= await signIn('credentials',{ //nextauth 登录模块email:formData.get('email'),password:formData.get('password'),redirect:false});console.log({response});if(!response?.error){ //没有返回errorrouter.push('/'); //跳转到‘/’router.refresh(); //刷新缓存}};
login/form.tsx全部内容如下
'use client'
import { signIn } from "next-auth/react";
import { useRouter } from "next/navigation";
import { FormEvent } from "react"export default function LoginForm() {const router=useRouter();const handleSubmit = async (e:FormEvent<HTMLFormElement>) =>{e.preventDefault();const formData = new FormData(e.currentTarget);const response= await signIn('credentials',{  //nextauth 登录模块email:formData.get('email'),password:formData.get('password'),redirect:false});console.log({response});if(!response?.error){router.push('/');router.refresh();}};return(<form onSubmit={handleSubmit} className="flex flex-col gap-2 mx-auto max-w-md mt-10"><input name='email' className ="border border-black text-black" type="email" /><input name='password' className ="border border-black text-black" type="password" /><button type="submit">Login</button></form>)
}
2、登出与登录状态转换
登录之后,登出
登出之后,登录,并自动跳转到首页
功能解析
在全部页面都需要有这个跳转。
1、在app首页的layout.tsx页面进行编写。
2、自动跳转用next
该功能核心修改是增加:
<nav>{!!session &&<Logout />}{!session &&<Link href='/login'>Login</Link>}</nav>
文件全部代码如下:
layout.tsx
mport type { Metadata } from "next";
import { Inter } from "next/font/google";
import "./globals.css";
import { getServerSession } from "next-auth";
import Link from "next/link";
import Logout from "./logout";const inter = Inter({ subsets: ["latin"] });export const metadata: Metadata = {title: "Create Next App",description: "Generated by create next app",
};export default async function RootLayout({children,
}: Readonly<{children: React.ReactNode;
}>) {const session = await getServerSession();return (<html lang="en"><body className={inter.className}><nav>{!!session &&<Logout />}{!session &&<Link href='/login'>Login</Link>}</nav>{children}</body></html>);
}
由于这个里面也涉及到后端,所以需要重新编写一个的客户端API进行处理,在同目录编写
logout.tsx
'use client'import { signOut } from "next-auth/react"
export default function Logout(){return (<span onClick={() => {signOut();}}>Logout</span>)
}
到这里,登出与登录按钮增加完毕
3、重定向
当你登录后不想再返回登录页面可以参考以下的操作。
其他的网址也可以这么操作。
import { getServerSession } from "next-auth";
import Form from "./form";
import { redirect } from "next/navigation";export default async function LoginPage(){const session =await getServerSession();if(session){redirect("/")}return <Form />
}
4、root保护
一些页面需要你登录之后才能访问,在这里面我们借助中间件实现这个操作
在项目主目前增加中间件
middleware.ts
export {default } from 'next-auth/middleware'export const conifg ={matcher:['/dashboard']} //加入你要登录保护的地址
这样子,这个功能就实现完毕了。
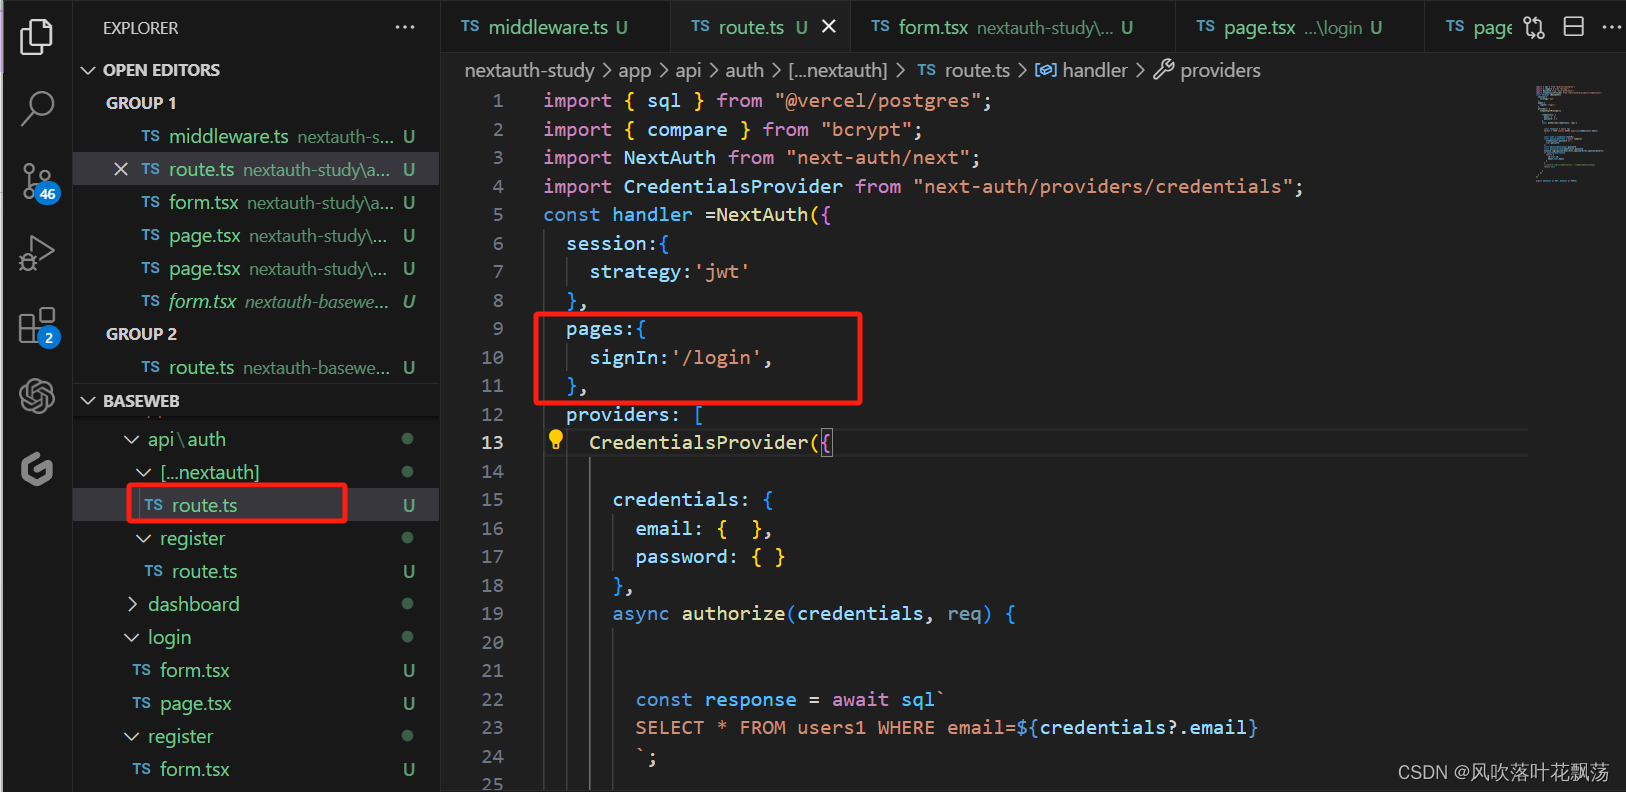
5、root保护登录页面转为自定义登录页面
在nextauth 的route页面增加signin路径
pages:{
signIn:‘/login’,
},
相关文章:
一、next-auth 身份验证凭据-使用电子邮件和密码注册登录
一、next-auth 身份验证凭据-使用电子邮件和密码注册登录 文章目录 一、next-auth 身份验证凭据-使用电子邮件和密码注册登录一、前言二、前置准备1、环境配置2、相关库安装(1)vercel 配置(2)Yarn 包管理配置 3、next项目初始化与…...

2.SpringBoot利用Thymeleaf实现页面的展示
什么是Thymeleaf? Thymeleaf是一个现代服务器端Java模板引擎,适用于Web和独立环境,能够处理HTML,XML,JavaScript,CSS甚至纯文本。 Thymeleaf的主要目标是提供一种优雅且高度可维护的模板创建方式。为实现这…...

devtool: ‘source-map‘ 和 devtool: ‘#source-map‘的区别
devtool: ‘source-map’ 和 devtool: ‘#source-map’ 之间的区别主要在于前面的#字符。 从Webpack 4开始,就废弃了在devtool选项前加#的用法。 devtool: ‘source-map’ 选项意味着Webpack在构建过程中会生成独立的完整的source map文件。对于测试环境很有用&…...

Flutter Boost 3
社区的 issue 没有收敛的趋势。 设计过于复杂,概念太多。这让一个新手看 FlutterBoost 的代码很吃力。 这些问题促使我们重新梳理设计,为了彻底解决这些顽固的问题,我们做一次大升级,我们把这次升级命名为 FlutterBoost 3.0&am…...

ElementUI响应式Layout布局xs,sm,md,lg,xl
响应式布局 参照了 Bootstrap 的 响应式设计,预设了五个响应尺寸:xs、sm、md、lg 和 xl。 <el-row :gutter"10"><el-col :xs"8" :sm"6" :md"4" :lg"3" :xl"1"><div class…...

机器学习——典型的卷积神经网络
机器学习——典型的卷积神经网络 卷积神经网络(Convolutional Neural Networks,CNNs)是一类在图像处理领域应用广泛的深度学习模型。它通过卷积操作和池化操作来提取图像的特征,并通过全连接层来进行分类或回归任务。在本文中&am…...

速通数据结构与算法第四站 双链表
系列文章目录 速通数据结构与算法系列 1 速通数据结构与算法第一站 复杂度 http://t.csdnimg.cn/sxEGF 2 速通数据结构与算法第二站 顺序表 http://t.csdnimg.cn/WVyDb 3 速通数据结构与算法第三站 单链表 http://t.csdnimg.cn/cDpcC 感谢佬们…...
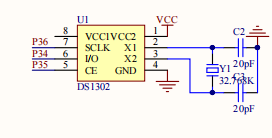
51单片机学习笔记12 SPI接口 使用1302时钟
51单片机学习笔记12 SPI接口 使用1302时钟 一、DS1302简介1. 功能特性2. 涓流充电3. 接口介绍时钟数据和控制线:电源线:备用电池连接: 二、寄存器介绍1. 控制寄存器2. 时间寄存器3. 日历/时钟寄存器 三、BCD码介绍四、DS1302时序1. 读时序2. …...

php编辑器 ide 主流编辑器的优缺点。phpstorm vscode atom 三者对比
编辑器PhpStormvscodeAtom是否收费收费,有30天试用期免费免费内存占用Java平台,一个进程1G多内存占用好几个进程,合起来1G上下/基本功能都具备,有的功能需要装插件都具备,有的功能需要装插件都具备,有的功能…...

【动手学深度学习】深入浅出深度学习之RMSProp算法的设计与实现
目录 🌞一、实验目的 🌞二、实验准备 🌞三、实验内容 🌼1. 认识RMSProp算法 🌼2. 在optimizer_compare_naive.py中加入RMSProp 🌼3. 在optimizer_compare_mnist.py中加入RMSProp 🌼4. 问…...

大转盘抽奖小程序源码
源码介绍 大转盘抽奖小程序源码,测试依旧可用,无BUG,跑马灯旋转效果,非常酷炫。 小程序核心代码参考 //index.js //获取应用实例 var app getApp() Page({data: {circleList: [],//圆点数组awardList: [],//奖品数组colorCirc…...
)
数据结构(无图版)
数据结构与算法(无图版,C语言实现) 1、绪论 1.1、数据结构的研究内容 一般应用步骤:分析问题,提取操作对象,分析操作对象之间的关系,建立数学模型。 1.2、基本概念和术语 数据:…...

软件测试中的顶级测试覆盖率技术
根据 CISQ 报告,劣质软件每年给美国公司造成约2.08 万亿美元的损失。虽然软件工具是企业和行业领域的必需品,但它们也容易出现严重错误和性能问题。人类手动测试不再足以检测和消除软件错误。 因此,产品或软件开发公司必须转向自动化测试&am…...

vscode使用技巧
常用快捷键 代码格式 Windows系统。格式化代码的快捷键是“ShiftAltF” Mac系统。格式化代码的快捷键是“ShiftOptionF” Ubuntu系统。格式化代码的快捷键是“CtrlShiftI”配置缩进 点击左上角的“文件”菜单,然后选择“首选项”>“设置”,或者使用…...
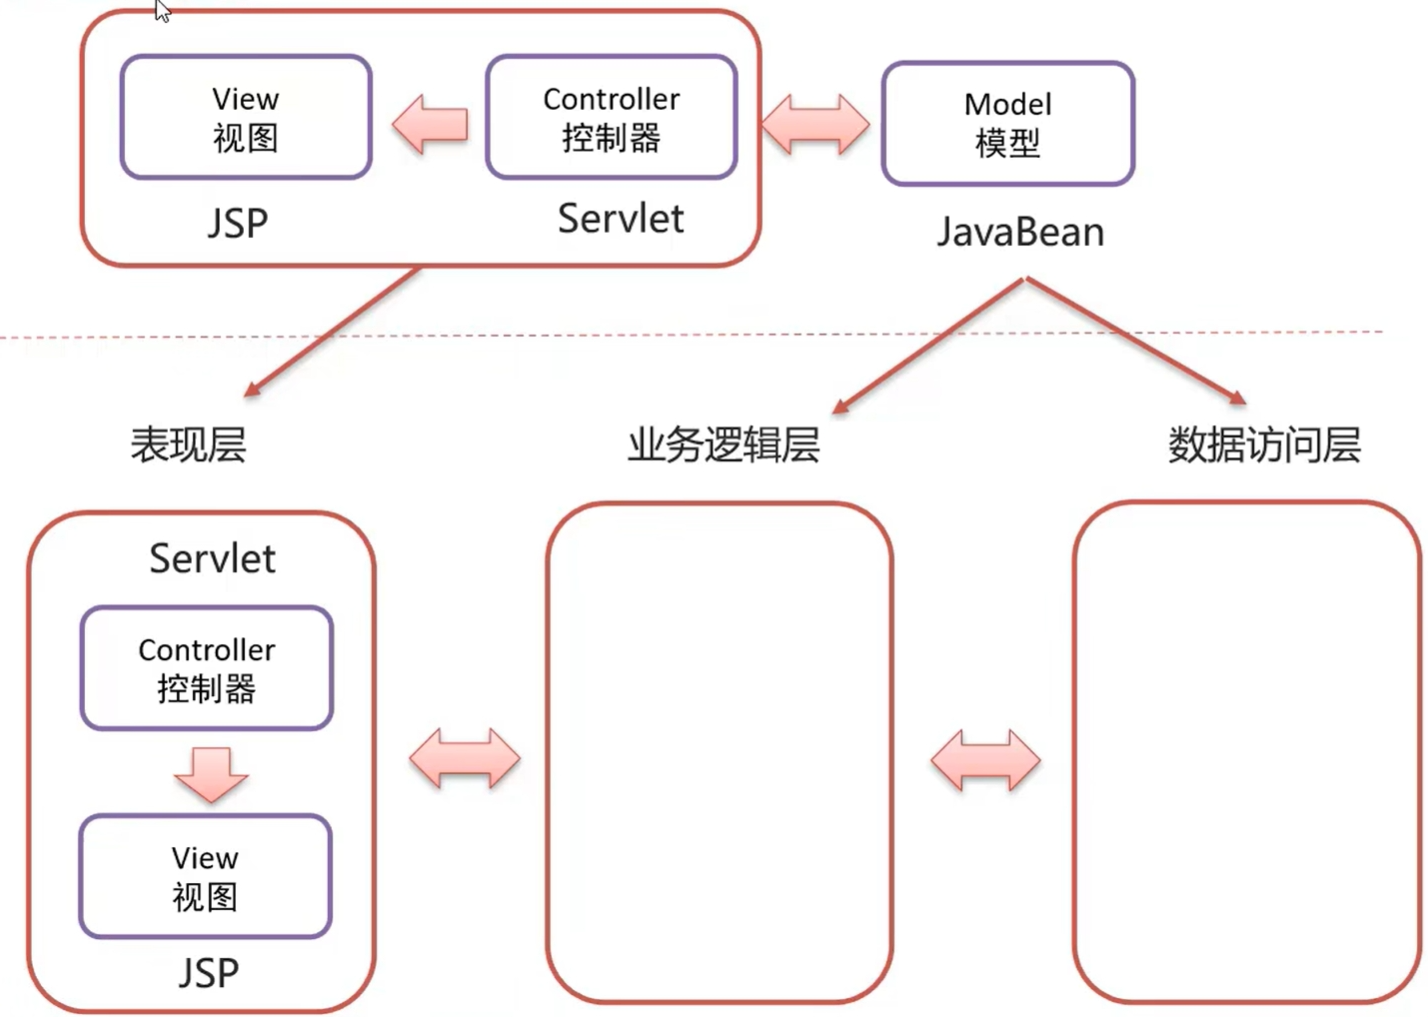
JSP
概念:Java Server Pages,Java服务端页面 一种动态的网页技术,其中既可以定义HTML、JS、CSS等静态内容,还可以定义Java代码的动态内容 JSP HTML Java 快速入门 注:Tomcat中已经有了JSP的jar包,因此我们…...
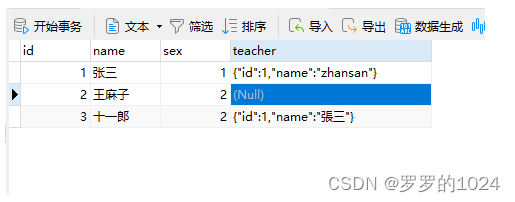
Mybatis--TypeHandler使用手册
TypeHandler使用手册 场景:想保存user时 teacher自动转String ,不想每次保存都要手动去转String;从DB查询出来时,也要自动帮我们转换成Java对象 Teacher Data public class User {private Integer id;private String name;priva…...
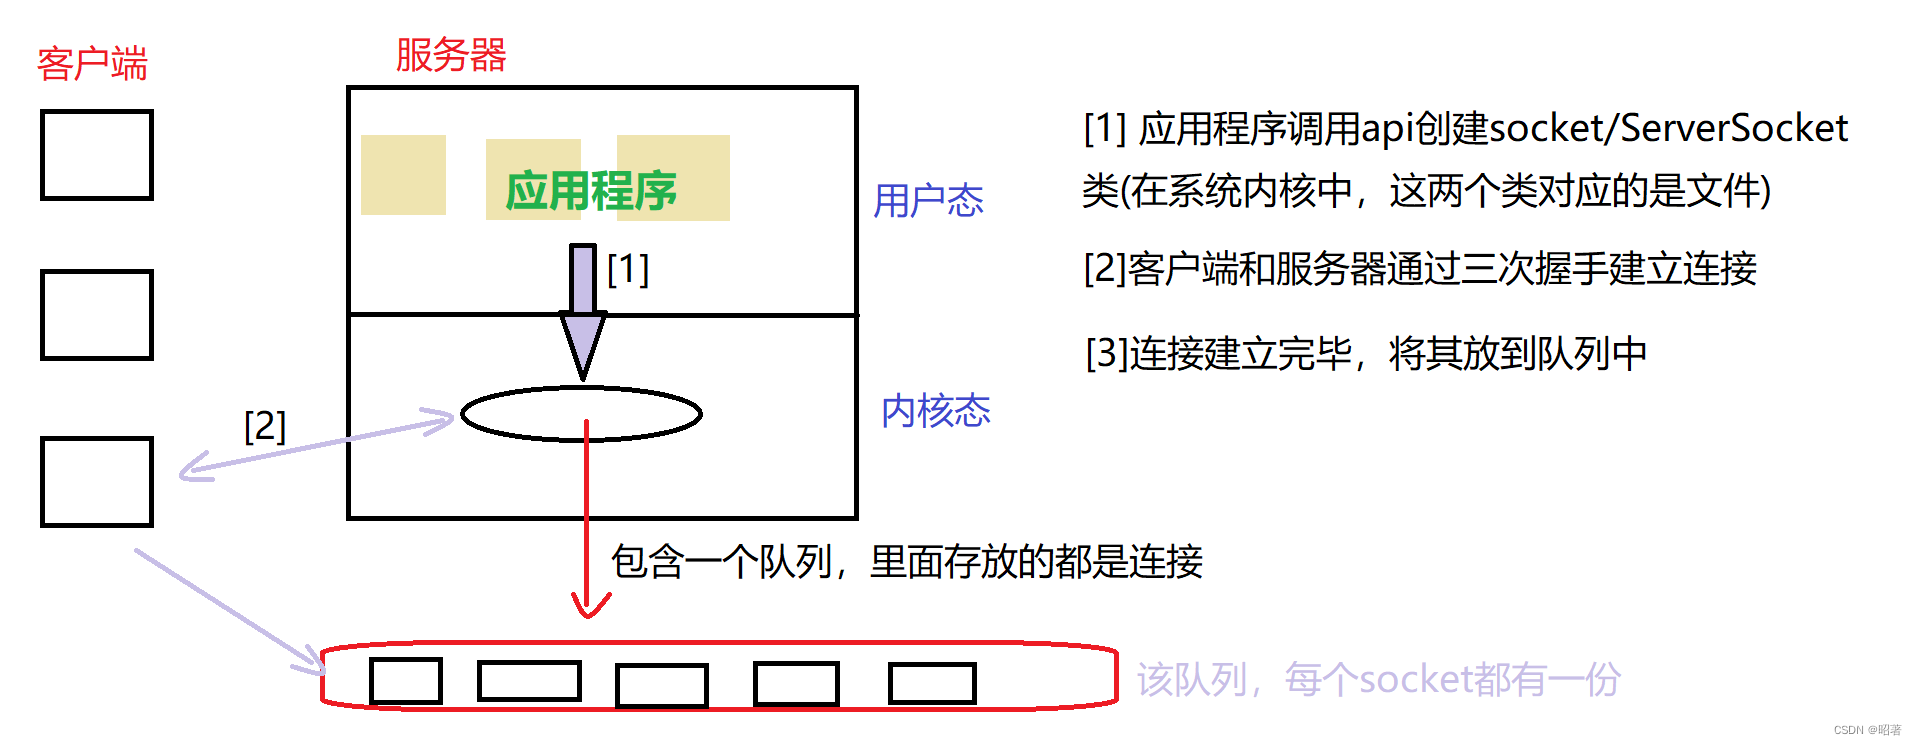
网络编程(TCP、UDP)
文章目录 一、概念1.1 什么是网络编程1.2 网络编程中的基本知识 二、Socket套接字2.1 概念及分类2.2 TCP VS UDP2.3 通信模型2.4 接口方法UDP数据报套接字编程TCP流套接字编程 三、代码示例3.1 注意点3.2 回显服务器基于UDP基于TCP 一、概念 首先介绍了什么是网络编程ÿ…...

Python快速入门系列-7(Python Web开发与框架介绍)
第七章:Python Web开发与框架介绍 7.1 Flask与Django简介7.1.1 Flask框架Flask的特点Flask的安装一个简单的Flask应用示例7.1.2 Django框架Django的特点Django的安装一个简单的Django应用示例7.2 前后端交互与数据传输7.2.1 前后端交互7.2.2 数据传输格式7.2.3 示例:使用Flas…...

最长对称子串
对给定的字符串,本题要求你输出最长对称子串的长度。例如,给定Is PAT&TAP symmetric?,最长对称子串为s PAT&TAP s,于是你应该输出11。 输入格式: 输入在一行中给出长度不超过1000的非空字符串。 输出格式&…...
【大模型】大模型 CPU 推理之 llama.cpp
【大模型】大模型 CPU 推理之 llama.cpp llama.cpp安装llama.cppMemory/Disk RequirementsQuantization测试推理下载模型测试 参考 llama.cpp 描述 The main goal of llama.cpp is to enable LLM inference with minimal setup and state-of-the-art performance on a wide var…...

conda相比python好处
Conda 作为 Python 的环境和包管理工具,相比原生 Python 生态(如 pip 虚拟环境)有许多独特优势,尤其在多项目管理、依赖处理和跨平台兼容性等方面表现更优。以下是 Conda 的核心好处: 一、一站式环境管理:…...

内存分配函数malloc kmalloc vmalloc
内存分配函数malloc kmalloc vmalloc malloc实现步骤: 1)请求大小调整:首先,malloc 需要调整用户请求的大小,以适应内部数据结构(例如,可能需要存储额外的元数据)。通常,这包括对齐调整,确保分配的内存地址满足特定硬件要求(如对齐到8字节或16字节边界)。 2)空闲…...

CTF show Web 红包题第六弹
提示 1.不是SQL注入 2.需要找关键源码 思路 进入页面发现是一个登录框,很难让人不联想到SQL注入,但提示都说了不是SQL注入,所以就不往这方面想了 先查看一下网页源码,发现一段JavaScript代码,有一个关键类ctfs…...

Golang 面试经典题:map 的 key 可以是什么类型?哪些不可以?
Golang 面试经典题:map 的 key 可以是什么类型?哪些不可以? 在 Golang 的面试中,map 类型的使用是一个常见的考点,其中对 key 类型的合法性 是一道常被提及的基础却很容易被忽视的问题。本文将带你深入理解 Golang 中…...

【OSG学习笔记】Day 16: 骨骼动画与蒙皮(osgAnimation)
骨骼动画基础 骨骼动画是 3D 计算机图形中常用的技术,它通过以下两个主要组件实现角色动画。 骨骼系统 (Skeleton):由层级结构的骨头组成,类似于人体骨骼蒙皮 (Mesh Skinning):将模型网格顶点绑定到骨骼上,使骨骼移动…...
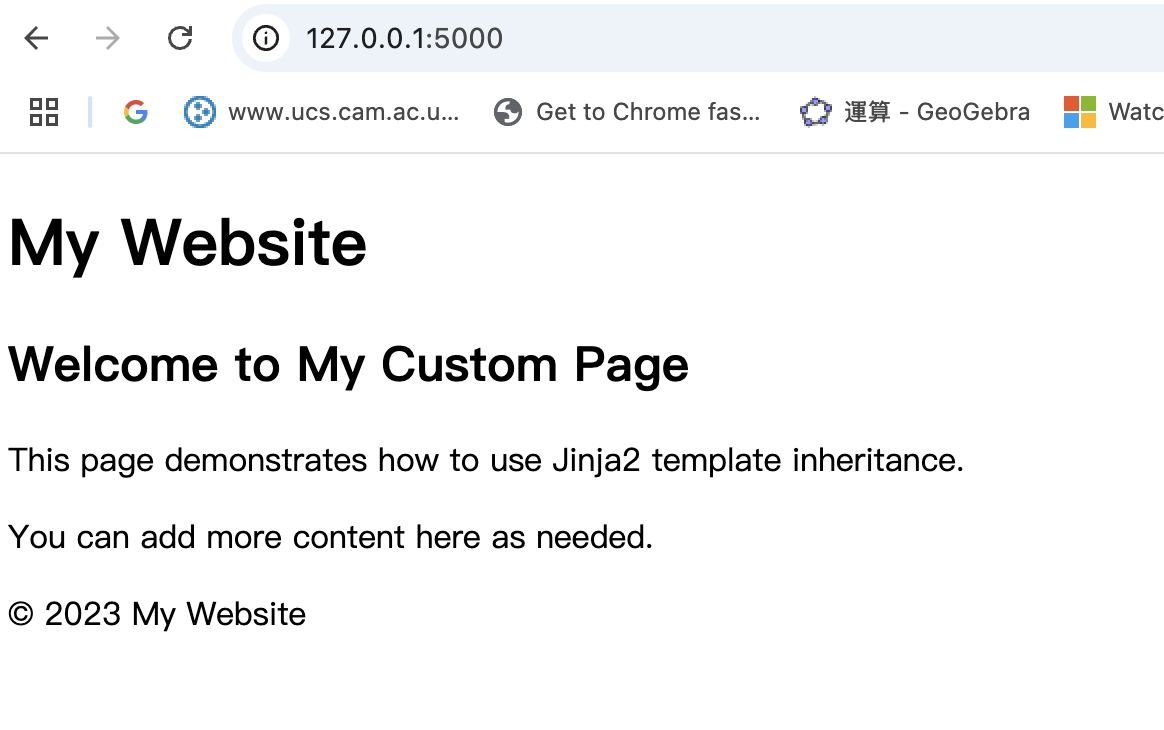
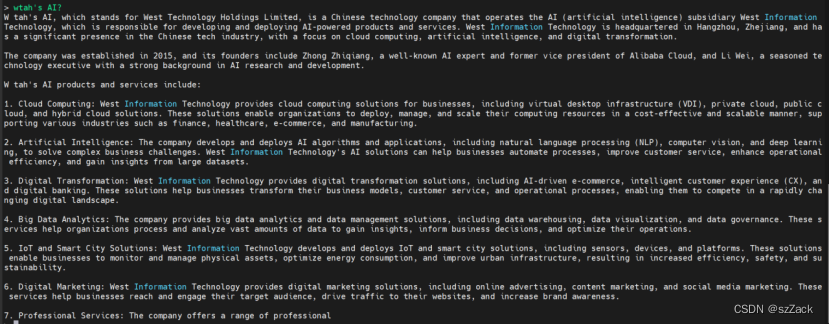
什么是Ansible Jinja2
理解 Ansible Jinja2 模板 Ansible 是一款功能强大的开源自动化工具,可让您无缝地管理和配置系统。Ansible 的一大亮点是它使用 Jinja2 模板,允许您根据变量数据动态生成文件、配置设置和脚本。本文将向您介绍 Ansible 中的 Jinja2 模板,并通…...

Unity | AmplifyShaderEditor插件基础(第七集:平面波动shader)
目录 一、👋🏻前言 二、😈sinx波动的基本原理 三、😈波动起来 1.sinx节点介绍 2.vertexPosition 3.集成Vector3 a.节点Append b.连起来 4.波动起来 a.波动的原理 b.时间节点 c.sinx的处理 四、🌊波动优化…...

ABAP设计模式之---“简单设计原则(Simple Design)”
“Simple Design”(简单设计)是软件开发中的一个重要理念,倡导以最简单的方式实现软件功能,以确保代码清晰易懂、易维护,并在项目需求变化时能够快速适应。 其核心目标是避免复杂和过度设计,遵循“让事情保…...

Linux系统部署KES
1、安装准备 1.版本说明V008R006C009B0014 V008:是version产品的大版本。 R006:是release产品特性版本。 C009:是通用版 B0014:是build开发过程中的构建版本2.硬件要求 #安全版和企业版 内存:1GB 以上 硬盘…...

「Java基本语法」变量的使用
变量定义 变量是程序中存储数据的容器,用于保存可变的数据值。在Java中,变量必须先声明后使用,声明时需指定变量的数据类型和变量名。 语法 数据类型 变量名 [ 初始值]; 示例:声明与初始化 public class VariableDemo {publi…...