基于Vue3和element-plus实现一个完整的登录功能
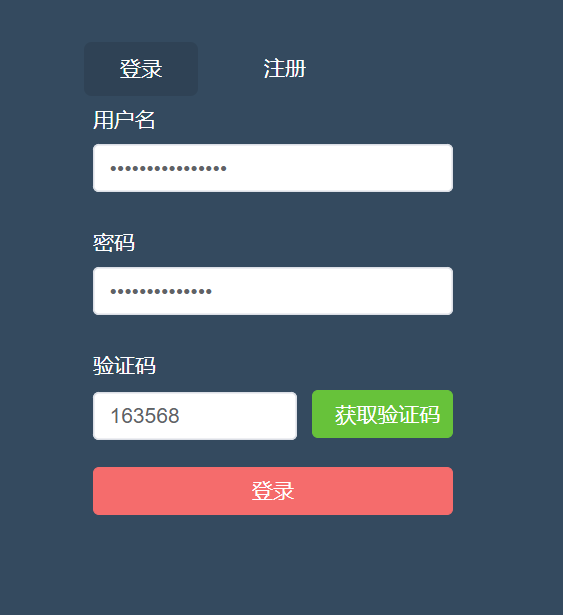
先看一下最终要实现的效果:
登录页面:
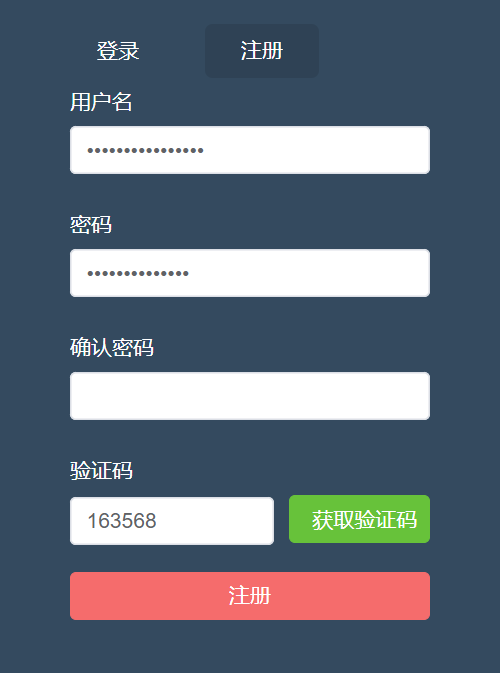
注册页面:
(1)引入element-plus组件库
引入组件库的方式有好多种,在这里我就在main.js全局引入了.
npm i element-plus -Smain.js中代码:
import { createApp } from "vue";
//element-plus
import ElementPlus from "element-plus";
import "element-plus/dist/index.css";
import App from "./App.vue";
import router from "./router";
import axios from "axios";
import store from "./store";
//创建实例
const app = createApp(App);
//全局应用配置
app.config.globalProperties.$axios = axios;app.use(ElementPlus).use(store).use(router).mount("#app");
引入之后自己可以用几个按钮测试一下是否引入成功.
(2)登录及注册页面
html部分
views/account/Login.vue
<template><div id="login"><div><div class="form-wrap"><ul class="menu-tab"><li:class="{ current: current_menu === item.type }"v-for="item in data.tab_menu":key="item.type"@click="toggleMenu(item.type)">{{ item.label }}</li></ul><el-form:model="data.form"ref="account_form":rules="data.form_rules"label-width="80px"><el-form-item prop="username"><label class="form-label">用户名</label><el-input type="password" v-model="data.form.username" /></el-form-item><el-form-item prop="password"><label class="form-label">密码</label><el-input type="password" v-model="data.form.password" /></el-form-item><el-form-item v-show="current_menu === 'register'" prop="passwords "><label class="form-label">确认密码</label><el-input type="password" v-model="data.form.passwords" /></el-form-item><el-form-item prop="code"><label class="form-label">验证码</label><el-row :gutter="10"><el-col :span="14"><el-input v-model="data.form.code"></el-input></el-col><el-col :span="10"><el-buttontype="success"class="el-button-block"@click="handleGetCode">获取验证码</el-button></el-col></el-row></el-form-item><el-form-item><el-buttontype="danger"class="el-button-block":disabled="data.submit_button_disabled":loading="data.submit_button_loading"@click="submitForm">{{ current_menu === "login" ? "登录" : "注册" }}</el-button></el-form-item></el-form></div></div></div>
</template>
js部分
<script>
import { reactive, ref, getCurrentInstance, onBeforeUnmount } from "vue";
import {validate_email,validate_password,validate_code,
} from "@/utils/validate";
import { GetCode } from "@/api/common";
import { Register, Login } from "@/api/account";
import sha1 from "js-sha1"; //密码加密
// ErrorHttp
export default {setup() {const instance = getCurrentInstance();const { proxy } = getCurrentInstance();console.log("instance", instance);// console.log("proxy", proxy);// 用户名校验const validate_name_rules = (rule, value, callback) => {let regEmail = validate_email(value);if (value === "") {callback(new Error("请输入邮箱"));} else if (!regEmail) {callback(new Error("邮箱格式不正确"));} else {callback();}};//获取验证码const handleGetCode = () => {const username = data.form.username;const password = data.form.password;const passwords = data.form.passwords;//校验用户名if (!validate_email(username)) {proxy.$message({message: "用户名不能为空 或 格式不正确",type: "error",});return false;}//校验密码if (!validate_password(password)) {proxy.$message({message: "密码不能为空 或 格式不正确",type: "error",});return false;}//判断为注册时,校验两次密码if (data.current_menu === "redister" ** (password !== passwords)) {proxy.$message({message: "两次密码不一致",type: "error",});return false;}//获取验证码接口const requestData = {username: data.form.username,module: "register",};data.code_button_loading = true;data.code_button_text = "发送中";GetCode(requestData).then((res) => {// console.log("123", res.data);验证码// const data=res.resCodeconst data = res;if (data.resCode === 1024) {proxy.$message.error(data.message);return false;}// 成功 Elementui 提示proxy.$message({message: data.message,type: "success",});//执行倒计时countdown();}).catch((err) => {console.log(err);data.code_button_loading = false;data.code_button_text = "发送验证码";});// ErrorHttp(requestData)//   .then((res) => {//     console.log(res.data);//     // const data=res.resCode//     const data = res.data;//     if (data.resCode === 1024) {//       proxy.$message.error(data.message);//       return false;//     }//     // 成功 Elementui 提示//     proxy.$message({//       message: data.message,//       type: "success",//     });//     //执行倒计时//     countdown();//   })//   .catch((err) => {//     console.log(err);//     data.code_button_loading = false;//     data.code_button_text = "发送验证码";//   });};/** 倒计时 */const countdown = (time) => {if (time && typeof time !== "number") {return false;}let second = time || 60; // 默认时间data.code_button_loading = false; // 取消加载data.code_button_disabled = true; // 禁用按钮data.code_button_text = `倒计进${second}秒`; // 按钮文本// 判断是否存在定时器,存在则先清除if (data.code_button_timer) {clearInterval(data.code_button_timer);}// 开启定时器data.code_button_timer = setInterval(() => {second--;data.code_button_text = `倒计进${second}秒`; // 按钮文本if (second <= 0) {data.code_button_text = `重新获取`; // 按钮文本data.code_button_disabled = false; // 启用按钮clearInterval(data.code_button_timer); // 清除倒计时}}, 1000);};// 组件销毁之前 - 生命周期onBeforeUnmount(() => {clearInterval(data.code_button_timer); // 清除倒计时});// 校验确认密码const validate_password_rules = (rule, value, callback) => {let regPassword = validate_password(value);if (value === "") {callback(new Error("请输入密码"));} else if (!regPassword) {callback(new Error("请输入>=6并且<=20位的密码,包含数字、字母"));} else {callback();}};// 校验确认密码const validate_passwords_rules = (rule, value, callback) => {// 如果是登录,不需要校验确认密码,默认通过if (data.current_menu === "login") {callback();}let regPassword = validate_password(value);// 获取“密码”const passwordValue = data.form.password;if (value === "") {callback(new Error("请输入密码"));} else if (!regPassword) {callback(new Error("请输入>=6并且<=20位的密码,包含数字、字母"));} else if (passwordValue && passwordValue !== value) {callback(new Error("两次密码不一致"));} else {callback();}};const validate_code_rules = (rule, value, callback) => {let regCode = validate_code(value);// 激活提交按钮data.submit_button_disabled = false;if (value === "") {callback(new Error("请输入验证码"));} else if (!regCode) {callback(new Error("请输入6位的验证码"));} else {callback();}};// 提交表单const submitForm = () => {// let res = proxy.$refs.account_form;proxy.$refs.account_form.validate((valid) => {if (valid) {console.log("提交表单", current_menu.value);current_menu.value === "login" ? login() : register();// register();} else {alert("error submit!");return false;}});// console.log(" 提交表单", res);};/** 登录 */const login = () => {const requestData = {username: data.form.username,password: sha1(data.form.password),code: data.form.code,};data.submit_button_loading = true;Login(requestData).then((response) => {console.log("login", response);data.submit_button_loading = false;proxy.$message({message: response.message,type: "success",});reset();}).catch((error) => {console.log("登录失败", error);data.submit_button_loading = false;});};//注册const register = () => {const requestData = {username: data.form.username,password: sha1(data.form.password),code: data.form.code,};data.submit_button_loading = true;Register(requestData).then((res) => {proxy.$message({message: res.message,type: "success",});}).catch((error) => {console.log("注册错误", error);data.submit_button_loading = false;});};/** 重置 */const reset = () => {// 重置表单proxy.$refs.form.resetFields();// 切回登录模式data.current_menu = "login";// 清除定时器data.code_button_timer && clearInterval(data.code_button_timer);// 获取验证码重置文本data.code_button_text = "获取验证码";// 获取验证码激活data.code_button_disabled = false;// 禁用提交按钮data.submit_button_disabled = true;// 取消提交按钮加载data.submit_button_loading = false;};const data = reactive({form_rules: {username: [{ validator: validate_name_rules, trigger: "change" }],password: [{ validator: validate_password_rules, trigger: "change" }],passwords: [{ validator: validate_passwords_rules, trigger: "change" }],code: [{ validator: validate_code_rules, trigger: "change" }],},form: {username: "", // 用户名password: "", // 密码passwords: "", // 确认密码code: "", // 验证码},tab_menu: [{ type: "login", label: "登录" },{ type: "register", label: "注册" },],/*** 获取验证码按钮交互*/code_button_disabled: false,code_button_loading: false,code_button_text: "获取验证码",code_button_timer: null,// 提交按钮submit_button_disabled: true,});const toggleMenu = (type) => {current_menu.value = type;};let current_menu = ref(data.tab_menu[0].type);// const dataItem = toRefs(data);return {// ...dataItem,data,current_menu,toggleMenu,handleGetCode,submitForm,register,reset,login,};},
};
</script>
css部分(使用了scss)
<style lang="scss" scoped>
#login {height: 100vh;background-color: #344a5f;
}
.form-wrap {width: 320px;padding-top: 100px;margin: auto;
}
.menu-tab {text-align: center;li {display: inline-block;padding: 10px 24px;margin: 0 10px;color: #fff;font-size: 14px;border-radius: 5px;cursor: pointer;&.current {background-color: rgba(0, 0, 0, 0.1);}}
}
.form-label {display: block;color: #fff;font-size: 14px;
}
</style>
(3)封装一些公共方法及样式
新建styles文件夹,然后新建几个样式文件:
normalize.scss
/*! normalize.css v8.0.1 | MIT License | github.com/necolas/normalize.css *//* Document========================================================================== *//*** 1. Correct the line height in all browsers.* 2. Prevent adjustments of font size after orientation changes in iOS.*//* div的默认样式不存在padding和margin为0的情况*/html, body, span, applet, object, iframe,h1, h2, h3, h4, h5, h6, p, blockquote, pre,a, abbr, acronym, address, big, cite, code,del, dfn, em, img, ins, kbd, q, s, samp,small, strike, strong, sub, sup, tt, var,b, u, i, center,dl, dt, dd, ol, ul,fieldset, form, legend,table, caption, tbody, tfoot, thead, tr, th, td,article, aside, canvas, details, embed, figure, figcaption, footer, header, hgroup, menu, nav, output, ruby, section, summary,time, mark, audio, video {margin: 0;padding: 0;font-size: 100%;font: inherit;vertical-align: baseline;}/* HTML5 display-role reset for older browsers */article, aside, details, figcaption, figure, footer, header, hgroup, menu, nav, section {display: block;}html {line-height: 1.15; /* 1 */-webkit-text-size-adjust: 100%; /* 2 */}/* Sections========================================================================== *//*** Remove the margin in all browsers.*/body {margin: 0;font-family: 'Microsoft YaHei';font-size: 14px;}/*** Render the `main` element consistently in IE.*/main {display: block;}/*** Correct the font size and margin on `h1` elements within `section` and* `article` contexts in Chrome, Firefox, and Safari.*//* Grouping content========================================================================== *//*** 1. Add the correct box sizing in Firefox.* 2. Show the overflow in Edge and IE.*/hr {box-sizing: content-box; /* 1 */height: 0; /* 1 */overflow: visible; /* 2 */}/*** 1. Correct the inheritance and scaling of font size in all browsers.* 2. Correct the odd `em` font sizing in all browsers.*/pre {font-family: monospace, monospace; /* 1 */font-size: 1em; /* 2 */}/* Text-level semantics========================================================================== *//*** Remove the gray background on active links in IE 10.*/a {background-color: transparent;text-decoration: none;}/*** 1. Remove the bottom border in Chrome 57-* 2. Add the correct text decoration in Chrome, Edge, IE, Opera, and Safari.*/abbr[title] {border-bottom: none; /* 1 */text-decoration: underline; /* 2 */text-decoration: underline dotted; /* 2 */}/*** Add the correct font weight in Chrome, Edge, and Safari.*/b,strong {font-weight: bolder;}/*** 1. Correct the inheritance and scaling of font size in all browsers.* 2. Correct the odd `em` font sizing in all browsers.*/code,kbd,samp {font-family: monospace, monospace; /* 1 */font-size: 1em; /* 2 */}/*** Add the correct font size in all browsers.*/small {font-size: 80%;}/*** Prevent `sub` and `sup` elements from affecting the line height in* all browsers.*/sub,sup {font-size: 75%;line-height: 0;position: relative;vertical-align: baseline;}sub {bottom: -0.25em;}sup {top: -0.5em;}/* Embedded content========================================================================== *//*** Remove the border on images inside links in IE 10.*/img {display: block;border-style: none;}/* Forms========================================================================== *//*** 1. Change the font styles in all browsers.* 2. Remove the margin in Firefox and Safari.*/button,input,optgroup,select,textarea {font-family: inherit; /* 1 */font-size: 100%; /* 1 */margin: 0; /* 2 */}/*** Show the overflow in IE.* 1. Show the overflow in Edge.*/button,input { /* 1 */overflow: visible;}/*** Remove the inheritance of text transform in Edge, Firefox, and IE.* 1. Remove the inheritance of text transform in Firefox.*/button,select { /* 1 */text-transform: none;}/*** Correct the inability to style clickable types in iOS and Safari.*/button,[type="button"],[type="reset"],[type="submit"] {-webkit-appearance: button;}/*** Remove the inner border and padding in Firefox.*/button::-moz-focus-inner,[type="button"]::-moz-focus-inner,[type="reset"]::-moz-focus-inner,[type="submit"]::-moz-focus-inner {border-style: none;padding: 0;}/*** Restore the focus styles unset by the previous rule.*/button:-moz-focusring,[type="button"]:-moz-focusring,[type="reset"]:-moz-focusring,[type="submit"]:-moz-focusring {outline: 1px dotted ButtonText;}/*** Correct the padding in Firefox.*/fieldset {padding: 0.35em 0.75em 0.625em;}/*** 1. Correct the text wrapping in Edge and IE.* 2. Correct the color inheritance from `fieldset` elements in IE.* 3. Remove the padding so developers are not caught out when they zero out* `fieldset` elements in all browsers.*/legend {box-sizing: border-box; /* 1 */color: inherit; /* 2 */display: table; /* 1 */max-width: 100%; /* 1 */padding: 0; /* 3 */white-space: normal; /* 1 */}/*** Add the correct vertical alignment in Chrome, Firefox, and Opera.*/progress {vertical-align: baseline;}/*** Remove the default vertical scrollbar in IE 10+.*/textarea {overflow: auto;}/*** 1. Add the correct box sizing in IE 10.* 2. Remove the padding in IE 10.*/[type="checkbox"],[type="radio"] {box-sizing: border-box; /* 1 */padding: 0; /* 2 */}/*** Correct the cursor style of increment and decrement buttons in Chrome.*/[type="number"]::-webkit-inner-spin-button,[type="number"]::-webkit-outer-spin-button {height: auto;}/*** 1. Correct the odd appearance in Chrome and Safari.* 2. Correct the outline style in Safari.*/[type="search"] {-webkit-appearance: textfield; /* 1 */outline-offset: -2px; /* 2 */}/*** Remove the inner padding in Chrome and Safari on macOS.*/[type="search"]::-webkit-search-decoration {-webkit-appearance: none;}/*** 1. Correct the inability to style clickable types in iOS and Safari.* 2. Change font properties to `inherit` in Safari.*/::-webkit-file-upload-button {-webkit-appearance: button; /* 1 */font: inherit; /* 2 */}/* Interactive========================================================================== *//** Add the correct display in Edge, IE 10+, and Firefox.*/details {display: block;}/** Add the correct display in all browsers.*/summary {display: list-item;}/* Misc========================================================================== *//*** Add the correct display in IE 10+.*/template {display: none;}/*** Add the correct display in IE 10.*/[hidden] {display: none;}ul, li { list-style: none; }elementui.scss(当时测试时用的)
.el-button-block{display: block;width: 100%;
}
新建main.scss(引入上方两个样式文件)
@import "./normalize.scss";
@import './elementui.scss'
vue.config.js配置一下样式文件
css: {// 是否使用css分离插件 ExtractTextPluginextract: true,// 开启 CSS source maps?sourceMap: false,// css预设器配置项loaderOptions: {scss: {additionalData: `@import "./src/styles/main.scss";`,},},// requireModuleExtension: true,},登录中封装的校验方法
新建utils文件夹,
a.validate.js
// 校验邮箱
export function validate_email(value) {let regEmail = /^([a-zA-Z]|[0-9])(\w|\-)+@[a-zA-Z0-9]+\.([a-zA-Z]{2,4})$/;return regEmail.test(value);
}// 校验密码
export function validate_password(value) {let regPassword = /^(?!\D+$)(?![^a-zA-Z]+$)\S{6,20}$/;return regPassword.test(value);
}// 校验验证码
export function validate_code(value) {let regCode = /^[a-z0-9]{6}$/;return regCode.test(value);
}
封装请求方法
npm i axios -S记得先在main.js中引入axios
import axios from "axios";utils中新建request.js
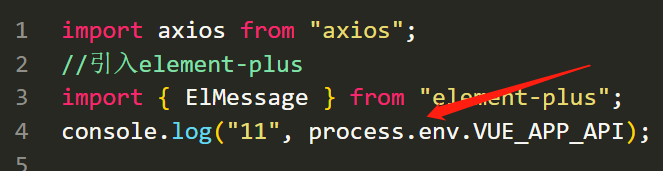
import axios from "axios";
//引入element-plus
import { ElMessage } from "element-plus";
console.log("11", process.env.VUE_APP_API); //undefined??//创建实例
const service = axios.create({baseURL: "/devApi", //请求地址timeout: 5000, //超时
});//添加请求拦截器
service.interceptors.request.use(function (config) {//在发送请求之前做些什么return config;},function (error) {console.log(error.request);const errorData = JSON.parse(error.request.response);if (errorData.message) {//判断是否具有message属性ElMessage({message: errorData.message,type: "error",});}//对请求错误做些什么return Promise.reject(errorData);}
);//添加响  应拦截器
service.interceptors.response.use(function (response) {//对响应数据做些什么console.log("响应数据", response);const data = response.data;if (data.resCode === 0) {return Promise.resolve(data);} else {ElMessage({message: data.message,type: "error",});return Promise.reject(data);}},function (error) {//对响应错误做些什么const errorData = JSON.parse(error.request.response);if (errorData.message) {//判断是否具有message属性ElMessage({message: errorData.message,type: "error",});}return Promise.reject(errorData);}
);//暴露service
export default service;
(4)配置环境变量
和项目根路径同级,新建几个文件:
.env.development
VUE_APP_API = '/devApi'可以自定义,但是必须是VUE_APP_XXX的格式
.env.production
VUE_APP_API = '/production'.env.test
VUE_APP_API = '/test'配置完后记得在axios文件中打印一下,看下能输出自己配置的环境变量吗.
(5)配置代理(跨域)
基本大同小异,代理地址改成自己的就可以了.
devServer: {open: false, //编译完成是否自动打开网页host: "0.0.0.0", //指定使用地址,默认是localhost,0.0.0.0代表可以被外界访问port: 8080,proxy: {"/devApi": {target: "http://v3.web-jshtml.cn/api", //(必选)API服务器的地址changeOrigin: true, //(必选) 是否允许跨域ws: false, //(可选) 是否启用websocketssecure: false, //(可选) 是否启用https接口pathRewrite: {"^/devApi": "", //匹配开头为/devApi的字符串,并替换成空字符串},},},},登录基本上是完成了,还有优化的点,比如说登录放在vuex中,
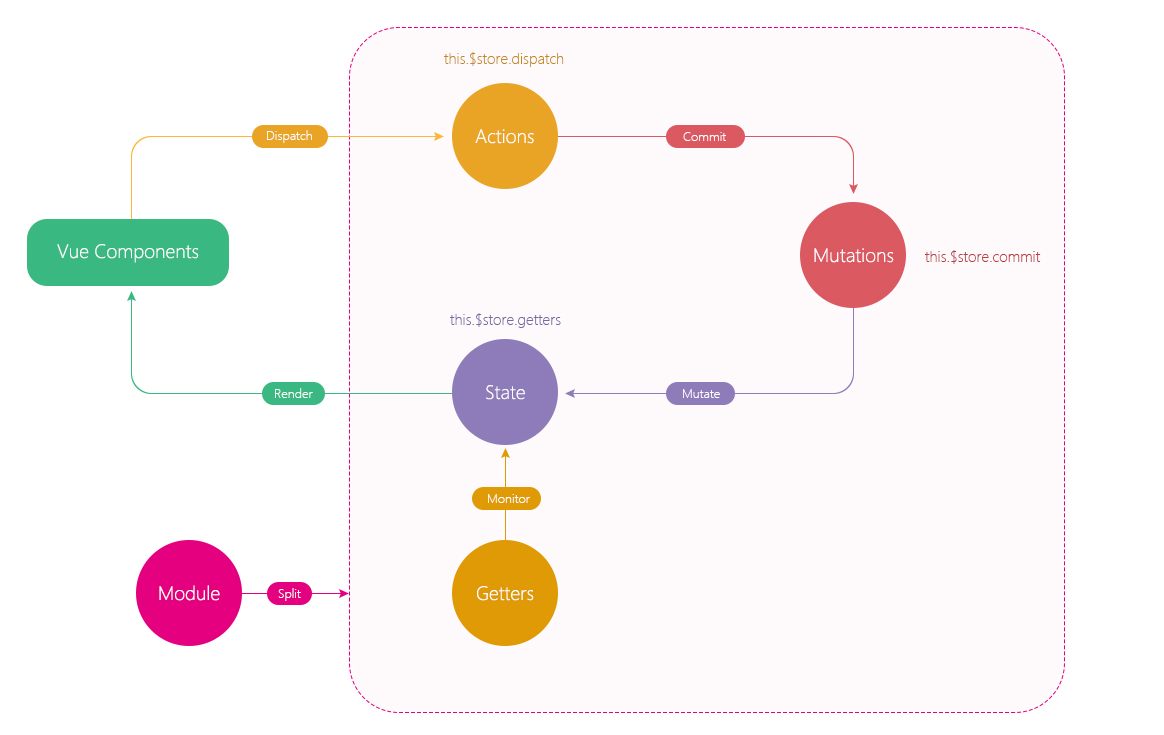
继续改造一下,把登录放在vuex中实现:
先看一下vuex的执行逻辑图:
store新建modules文件夹,新建app.js:
import { Login } from "@/api/account";const state = {count: 100,
};
const getters = {};
const mutations = {};
const actions = {loginAction(context, requestData) {return new Promise((resolve, reject) => {Login(requestData).then((response) => {resolve(response);}).catch((error) => {reject(error);});});},
};export default {namespaced: true,state,getters,mutations,actions,
};
登录页面改造:
import { useStore } from "vuex"; // storeconst store = useStore();注释掉之前的代码:
/** 登录 */// const login = () => {// const requestData = {// username: data.form.username,// password: sha1(data.form.password),// code: data.form.code,// };// data.submit_button_loading = true;// Login(requestData)// .then((response) => {// console.log("login", response);// data.submit_button_loading = false;// proxy.$message({// message: response.message,// type: "success",// });// reset();// })// .catch((error) => {// console.log("登录失败", error);// data.submit_button_loading = false;// });// };const login = () => {const requestData = {username: data.form.username,password: sha1(data.form.password),code: data.form.code,};data.submit_button_loading = true;store.dispatch("app/loginAction", requestData).then((response) => {proxy.$message({message: response.message,type: "success",});reset();}).catch((error) => {console.log("失败", error);});};好了,等有继续优化的地方我再继续完善.
(4)路由守卫
先来看一下总体的思路图:
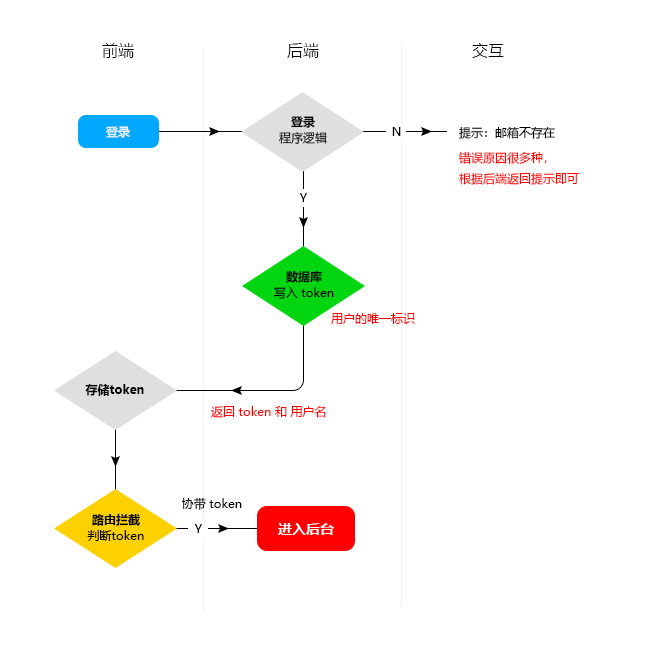
在router文件下新建permit.js:
import router from "./index";
//cookie
import { getToken } from "@/utils/cookies";//全局路由守卫
router.beforeEach((to, from) => {// console.log("from", from);//token不存在if (!getToken()) {console.log("to", to);if (to.name !== "Login") {return {name: "Login",};}}
});//全局后置守卫
router.afterEach((to, from) => {console.log(to);console.log(from);
});
引入到main.js中:
//路由守卫
import "./router/permit";
utils文件中新建cookies.js文件
先安装js-cookie:
npm i js-cookie -Scookies.js:
import Cookies from "js-cookie";//变量
const tokenKey = "tokenAdmin";
const usernameKey = "username";//获取token
export function getToken() {return Cookies.get(tokenKey);
}//写入token
export function setToken(value) {return Cookies.set(tokenKey, value);
}//删除token
export function removeToken() {return Cookies.remove(tokenKey);
}//写入 username
export function setUsername(value) {return Cookies.set(usernameKey, value);
}//获取 username
export function getUsername() {return Cookies.get(usernameKey);
}//删除 username
export function removeUsername() {return Cookies.remove(usernameKey);
}
vuex中改造一下:
store/app.js
import { Login, Logout } from "@a/account";
import {setToken,setUsername,getToken,getUsername,removeToken,removeUsername,
} from "@u/cookies";const state = {token: "" || getToken(),username: "" || getUsername(),collapse: JSON.parse(sessionStorage.getItem("collapse")) || false,
};
const getters = {};
const mutations = {SET_COLLAPSE(state) {state.collapse = !state.collapse;sessionStorage.setItem("collapse", JSON.stringify(state.collapse));},//设置tokenSET_TOKEN(state, value) {state.token = value;value && setToken(value); //当value存在时写入token},//设置用户名SET_USERNAME(state, value) {state.username = value;value && setUsername(value); //当value存在时写入token},
};
const actions = {//登录loginAction(context, requestData) {return new Promise((resolve, reject) => {Login(requestData).then((response) => {let data = response.data;context.commit(" SET_TOKEN", data.token);context.commit("  SET_USERNAME", data.username);resolve(response);}).catch((error) => {reject(error);});});},//退出logoutAction({ commit }) {return new Promise((resolve, reject) => {Logout().then((response) => {removeToken();removeUsername();commit(" SET_TOKEN", "");commit("  SET_USERNAME", "");resolve(response);}).catch((error) => {reject(error);});});},
};export default {namespaced: true,state,getters,mutations,actions,
};
主页有退出的话可以这么来触发:
<span class="logout" @click="handleLogout"><svg-icon iconName="logout" className="icon-logout"></svg-icon></span> //退出const handleLogout = () => {proxy.$confirm("确定退出管理后台", "提示", {confirmButtonText: "确定",cancelButtonText: "取消",type: "warning",}).then(() => {store.dispatch("app/logoutAction").then((res) => {proxy.$message({type: "success",message: res.message,});replace({name: "Login",});});}).catch(() => {// catch error});};记得引入和返回,不能忘记:
import { useStore } from "vuex";
import { ref, getCurrentInstance } from "vue";
import { useRouter } from "vue-router";
//获取实例上下文const { proxy } = getCurrentInstance();//引入routerconst { replace } = useRouter();const store = useStore(); return {handleLogout,};再来改造一下之前封装的axios方法:
import axios from "axios";
//引入element-plus
import { ElMessage } from "element-plus";
// console.log("11", process.env.VUE_APP_API); //undefined??
//cookies
+import { getToken, getUsername, removeToken, removeUsername } from "./cookies";
//引入路由
+import router from "@/router";//创建实例
const service = axios.create({baseURL: "/devApi", //请求地址timeout: 5000, //超时
});//添加请求拦截器
service.interceptors.request.use(function (config) {//在发送请求之前做些什么+ if (getToken()) {config.headers["Token"] = getToken(); //携带token Token可以和后端约定}+ if (getUsername()) {config.headers["Username"] = getUsername();//Username可以和后端约定}console.log("config", config);return config;},function (error) {console.log(error.request);const errorData = JSON.parse(error.request.response);if (errorData.message) {//判断是否具有message属性ElMessage({message: errorData.message,type: "error",});}//对请求错误做些什么return Promise.reject(errorData);}
);//添加响  应拦截器
service.interceptors.response.use(function (response) {//对响应数据做些什么console.log("响应数据", response);const data = response.data;+ if (data.resCode === 0) {return Promise.resolve(data);} else {ElMessage({message: data.message,type: "error",});return Promise.reject(data);}},function (error) {//对响应错误做些什么const errorData = JSON.parse(error.request.response);if (errorData.message) {//判断是否具有message属性ElMessage({message: errorData.message,type: "error",});}//token失效自动退出+ if (errorData.resCode === 1010) {router.replace({name: "Login",});removeToken();removeUsername();}return Promise.reject(errorData);}
);//暴露service
export default service;
再来优化一下目录别名这块:
vue.config.js
configureWebpack: (config) => {config.resolve = {// 配置解析别名extensions: [".js", ".json", ".vue"], // 自动添加文件名后缀alias: {"@": path.resolve(__dirname, "./src"),"@u": path.resolve(__dirname, "./src/utils"),"@a": path.resolve(__dirname, "./src/api"),"@c": path.resolve(__dirname, "./src/components"),},};},改完记得重启项目,所以之前的代码就这样写了:
import { Login, Logout } from "@a/account";
import {setToken,setUsername,getToken,getUsername,removeToken,removeUsername,
} from "@u/cookies";
相关文章:
基于Vue3和element-plus实现一个完整的登录功能
先看一下最终要实现的效果:登录页面:注册页面:(1)引入element-plus组件库引入组件库的方式有好多种,在这里我就在main.js全局引入了.npm i element-plus -Smain.js中代码:import { createApp } from "vue"; //element-plus import ElementPlus from "element-pl…...

【java】Java 中泛型的实现原理
文章目录前序1. 泛型1.1 泛型方法1.2 泛型类1.3 泛型接口2. 泛型的基本原理3. 小结前序 泛型是 Java 开发中常用的技术,了解泛型的几种形式和实现泛型的基本原理,有助于写出更优质的代码。本文总结了 Java 泛型的三种形式以及泛型实现原理。 1. 泛型 …...
)
【C++提高编程】C++全栈体系(二十七)
C提高编程 第五章 STL- 常用算法 三、常用排序算法 算法简介: sort //对容器内元素进行排序random_shuffle //洗牌 指定范围内的元素随机调整次序merge // 容器元素合并,并存储到另一容器中reverse // 反转指定范围的元素 1. sort 功能描述&#…...

软考高级信息系统项目管理师系列之三十九:项目集管理
软考高级信息系统项目管理师系列之三十九:项目集管理 一、项目集管理内容二、项目集管理基础概述1.项目集定义2.项目集活动3.项目集管理三、项目集的管理过程四、项目集治理1.项目集治理概述2.项目集指导委员会的职责3.项目集治理功能五、项目集生命周期1.项目集生命周期三个阶…...
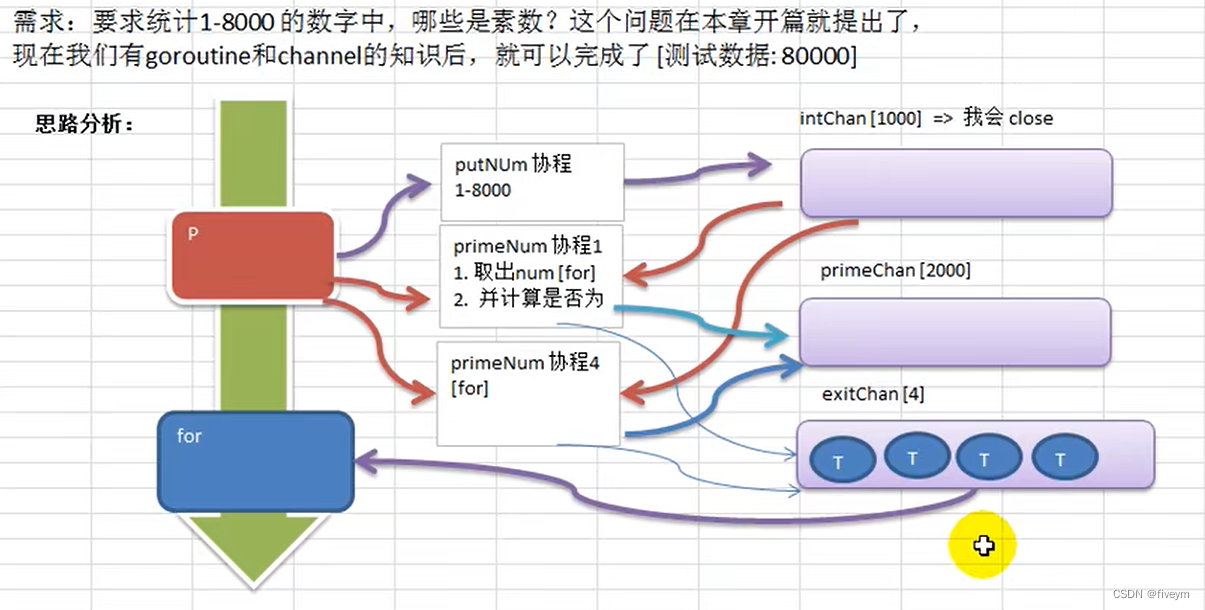
44-Golang中的channel
Golang中的channel为什么要使用channelchannel的介绍channel的基本使用定义/声明channel管道的遍历和关闭channel的关闭channel的遍历goroutine和channel结合应用实例1应用实例2案例注意事项为什么要使用channel 前面使用全局变量加锁同步来解决goroutine的通讯,但…...

80/20法则
80/20法则(The 80/20 Rule)又称为帕累托法则(Pareto Principle)、二八定律、帕累托定律、最省力法则、不平衡原则、犹太法则、马特莱法则等一、什么是80/20法则80/20法则(The 80/20 Rule),又称为帕累托法则…...
)
计算机网络高频面试题(四)
一、什么是计算机网络 是一个将分散的、具有独立功能的计算机系统,通过通信设备与线路连接起来,由功能完善的软件实现资源共享和信息传递的系统 按分布范围,计算机网络里有局域网LAN和广域网WAN, 其中局域网的代表以太网,以及这…...
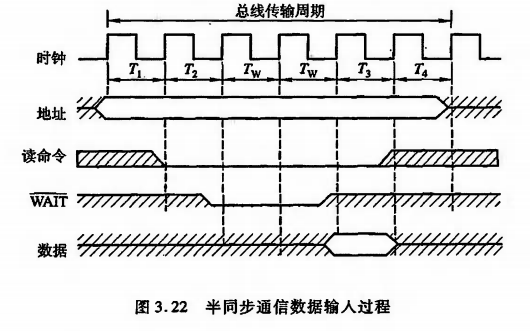
[计算机组成原理(唐朔飞 第2版)]第三章 系统总线(学习复习笔记)
3.1 总线的基本概念 计算机系统的五大部件之间的互连方式有两种 各部件之间使用单独的连线,称为分散连接将各部件连到一组公共信息传输线上,称为总线连接 总线是连接多个部件的信息传输线,是各部件共享的传输介质。 当多个部件与总线相连时&…...
| 机考必刷)
华为OD机试题 - 计算堆栈中的剩余数字(JavaScript)| 机考必刷
更多题库,搜索引擎搜 梦想橡皮擦华为OD 👑👑👑 更多华为OD题库,搜 梦想橡皮擦 华为OD 👑👑👑 更多华为机考题库,搜 梦想橡皮擦华为OD 👑👑👑 华为OD机试题 最近更新的博客使用说明本篇题解:计算堆栈中的剩余数字题目输入输出描述示例一输入输出说明示例二…...

VB实现点爆炸效果
需在窗体放置以下 4 个控件,所有控件不用设置任何属性,均采用默认设置: ’ Picture1,Command1,Check1,Timer1 Option Explicit Dim I Dim ctD() As tyD, ctDs As Long, ctR As Single Private Type tyD x…...
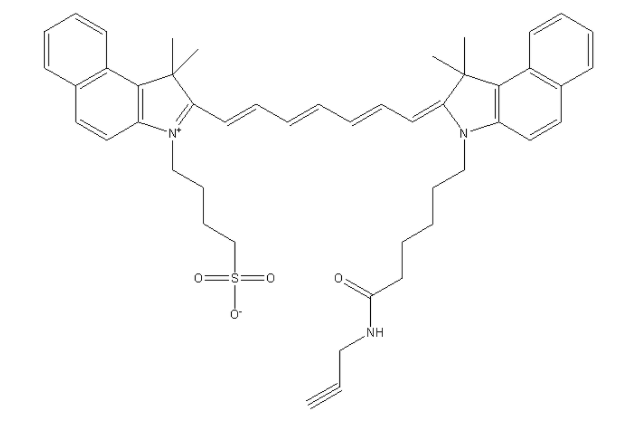
ICG-alkyne,吲哚菁绿-炔基结构式,实验室科研试剂,CAS号:1622335-41-4
ICG-alkyne,吲哚菁绿-炔基 中文名称:吲哚菁绿-炔基 CAS号:1622335-41-4 英文名称:ICG-alkyne 英文别名:ICG-alk 性状:绿色粉末 化学式:C48H53N3O4S 分子量:768.03 溶剂:溶于…...

【并发编程】volatile的原理我好像又懂了
文章目录优秀引用1、概述2、可见性保证2.1、什么是可见性2.2、例子举证2.3、结果解析3、有序性保证3.1、什么是有序性3.2、什么是重排序3.3、例子举证4、无法保证原子性4.1、什么是原子性4.2、例子举证5、内存屏障5.1、什么是内存屏障5.2、不同内存屏障的作用6、volatile和sync…...

【已更新实例】Java网络爬虫-HttpClient工具类
关于用Java进行爬虫的资料网上实在少之又少,但作为以一名对Java刚刚初窥门径建立好兴趣的学生怎么能静得下心用新学的Python去写,毕竟Java是世界上最好的语言嘛 (狗头)关于Java爬虫最受欢迎的一个框架Jsoup常常搭配HttpClient来使用,因为Jsou…...

7.2 向量的坐标
🙌作者简介:数学与计算机科学学院出身、在职高校高等数学专任教师,分享学习经验、生活、 努力成为像代码一样有逻辑的人! 🌙个人主页:阿芒的主页 ⭐ 高等数学专栏介绍:本专栏系统地梳理高等数学…...

公式编写1000问21-22
21.问: 求助——(周,日,60分钟,30分钟)MACD同时向上的公式怎么表达 答(知无不言): z:“macd.dea#week”; r:“macd.dea#day”; f:“macd.dea#min60”; f1:“macd.dea#min30”; rz:“macd.dea##week”; rr:“macd.dea##day”; rf:“…...

1041 考试座位号
每个 PAT 考生在参加考试时都会被分配两个座位号,一个是试机座位,一个是考试座位。正常情况下,考生在入场时先得到试机座位号码,入座进入试机状态后,系统会显示该考生的考试座位号码,考试时考生需要换到考试…...

2023年3月北京/广州/杭州/深圳数据治理工程师认证DAMA-CDGA/CDGP
DAMA认证为数据管理专业人士提供职业目标晋升规划,彰显了职业发展里程碑及发展阶梯定义,帮助数据管理从业人士获得企业数字化转型战略下的必备职业能力,促进开展工作实践应用及实际问题解决,形成企业所需的新数字经济下的核心职业…...
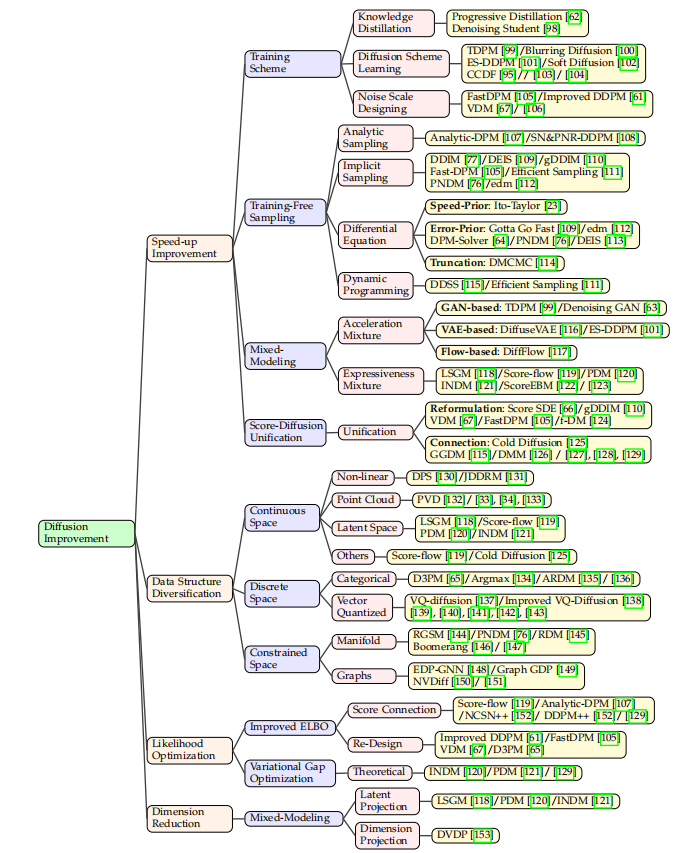
【AICG】2、扩散模型 | 到底什么是扩散模型?
文章目录一、什么是扩散模型二、扩散模型相关定义2.1 符号和定义2.2 问题规范化三、可以提升的点参考论文:A Survey on Generative Diffusion Model github:https://github.com/chq1155/A-Survey-on-Generative-Diffusion-Model 一、什么是扩散模型 已…...

高等数学——多元函数微分学
文章目录多元函数微分学多元函数的极限多元函数的连续性偏导数定义高阶偏导数全微分定义全微分存在的必要条件全微分存在的充分条件多元函数的微分法复合函数微分法隐函数微分法多元函数的极值与最值无约束极值条件极值及拉格朗日乘数法最大值最小值二重积分概念性质计算利用直…...
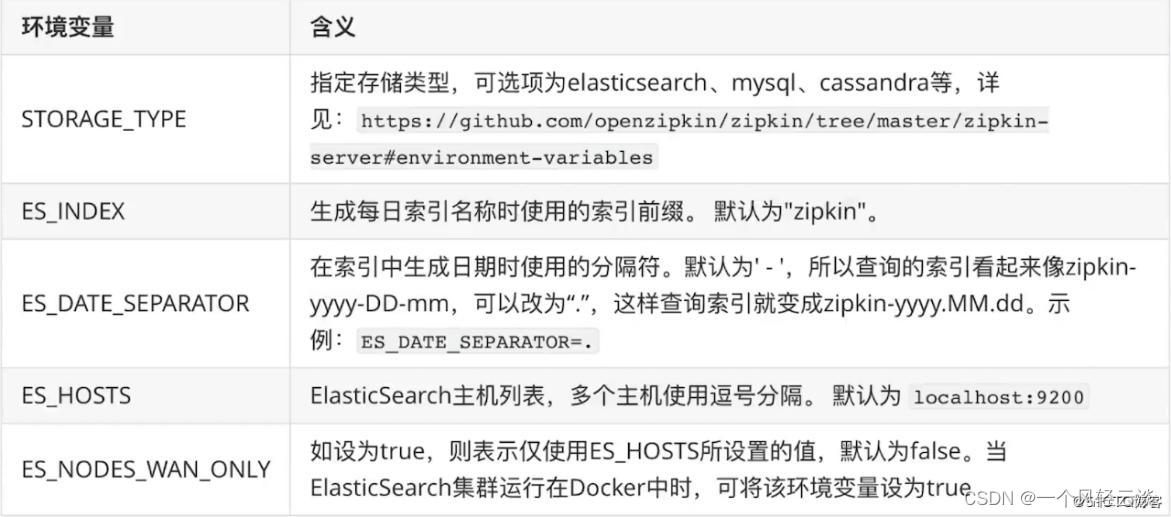
一文打通Sleuth+Zipkin 服务链路追踪
1、为什么用 微服务架构是一个分布式架构,它按业务划分服务单元,一个分布式系统往往有很多个服务单元。由于服务单元数量众多,业务的复杂性,如果出现了错误和异常,很难去定位。主要体现在,一个请求可能需要…...

KubeSphere 容器平台高可用:环境搭建与可视化操作指南
Linux_k8s篇 欢迎来到Linux的世界,看笔记好好学多敲多打,每个人都是大神! 题目:KubeSphere 容器平台高可用:环境搭建与可视化操作指南 版本号: 1.0,0 作者: 老王要学习 日期: 2025.06.05 适用环境: Ubuntu22 文档说…...

调用支付宝接口响应40004 SYSTEM_ERROR问题排查
在对接支付宝API的时候,遇到了一些问题,记录一下排查过程。 Body:{"datadigital_fincloud_generalsaas_face_certify_initialize_response":{"msg":"Business Failed","code":"40004","sub_msg…...

Golang 面试经典题:map 的 key 可以是什么类型?哪些不可以?
Golang 面试经典题:map 的 key 可以是什么类型?哪些不可以? 在 Golang 的面试中,map 类型的使用是一个常见的考点,其中对 key 类型的合法性 是一道常被提及的基础却很容易被忽视的问题。本文将带你深入理解 Golang 中…...
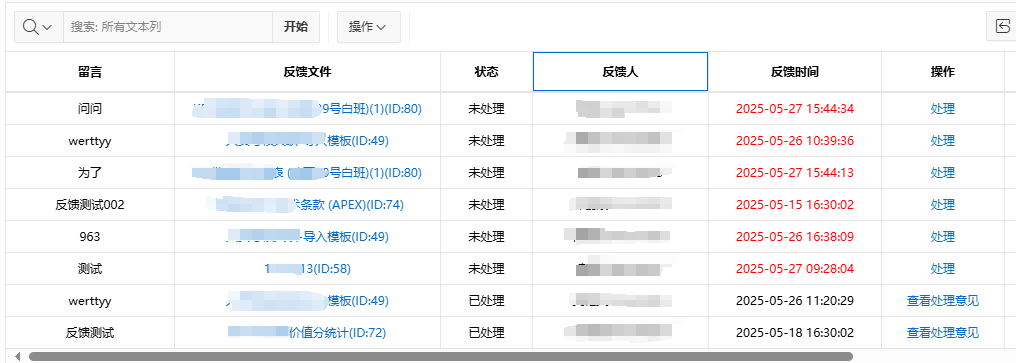
【Oracle APEX开发小技巧12】
有如下需求: 有一个问题反馈页面,要实现在apex页面展示能直观看到反馈时间超过7天未处理的数据,方便管理员及时处理反馈。 我的方法:直接将逻辑写在SQL中,这样可以直接在页面展示 完整代码: SELECTSF.FE…...

Oracle查询表空间大小
1 查询数据库中所有的表空间以及表空间所占空间的大小 SELECTtablespace_name,sum( bytes ) / 1024 / 1024 FROMdba_data_files GROUP BYtablespace_name; 2 Oracle查询表空间大小及每个表所占空间的大小 SELECTtablespace_name,file_id,file_name,round( bytes / ( 1024 …...

全球首个30米分辨率湿地数据集(2000—2022)
数据简介 今天我们分享的数据是全球30米分辨率湿地数据集,包含8种湿地亚类,该数据以0.5X0.5的瓦片存储,我们整理了所有属于中国的瓦片名称与其对应省份,方便大家研究使用。 该数据集作为全球首个30米分辨率、覆盖2000–2022年时间…...

关于 WASM:1. WASM 基础原理
一、WASM 简介 1.1 WebAssembly 是什么? WebAssembly(WASM) 是一种能在现代浏览器中高效运行的二进制指令格式,它不是传统的编程语言,而是一种 低级字节码格式,可由高级语言(如 C、C、Rust&am…...

Java多线程实现之Thread类深度解析
Java多线程实现之Thread类深度解析 一、多线程基础概念1.1 什么是线程1.2 多线程的优势1.3 Java多线程模型 二、Thread类的基本结构与构造函数2.1 Thread类的继承关系2.2 构造函数 三、创建和启动线程3.1 继承Thread类创建线程3.2 实现Runnable接口创建线程 四、Thread类的核心…...
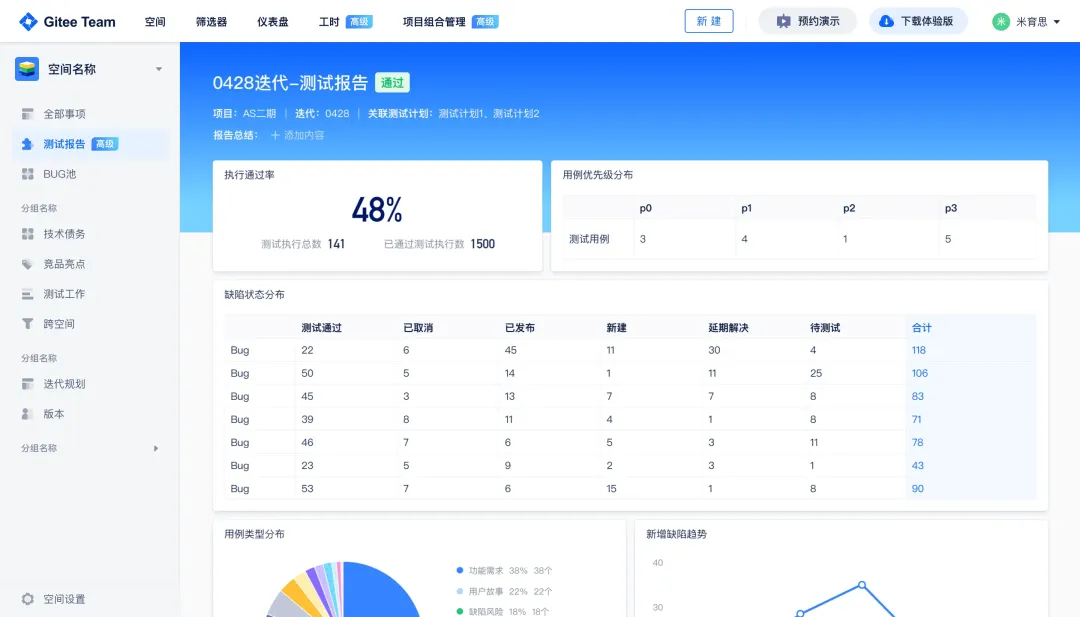
关键领域软件测试的突围之路:如何破解安全与效率的平衡难题
在数字化浪潮席卷全球的今天,软件系统已成为国家关键领域的核心战斗力。不同于普通商业软件,这些承载着国家安全使命的软件系统面临着前所未有的质量挑战——如何在确保绝对安全的前提下,实现高效测试与快速迭代?这一命题正考验着…...

C#中的CLR属性、依赖属性与附加属性
CLR属性的主要特征 封装性: 隐藏字段的实现细节 提供对字段的受控访问 访问控制: 可单独设置get/set访问器的可见性 可创建只读或只写属性 计算属性: 可以在getter中执行计算逻辑 不需要直接对应一个字段 验证逻辑: 可以…...