Flutter开发环境搭建和调试
[你的Flutter文件夹路径]\flutter\bin
这样我们的Flutter SDK的环境变量就配置完毕了。接下来在命令提示符窗口中输入命令:
flutter doctor
它可以帮助我们检查Flutter环境变量是否设置成功,Android SDK是否下载以及配置好环境变量等等。如果有相关的错误提示,根据提示进行修复和安装、设置即可。每次运行这个命令,都会帮你检查是否缺失了必要的依赖。通过运行flutter doctor命令来验证你是否已经正确地设置了,并且可以自动更新和下载相关的依赖。如果全部配置正确的话,会出现如下类似的检测信息:

主要检测信息为:Flutter、Android toolchain、Connected device。
3.安装Visual Studio Code所需插件
在Visual Studio Code的Extensions里搜索安装Dart和Flutter扩展插件:

安装完成插件后,重启Visual Studio Code编辑器即可。
4.创建Flutter项目
接下来进行Flutter项目的新建,我们可以通过命令面板或者快捷键Ctrl+Shif+P打开命令面板,找到Flutter:New Project:

点击New Project,接下来进入项目名称输入:

回车,然后选择好项目的存储位置即可,这样就完成了Flutter项目的新建。
整个的创建流程日志如下:
[undefined] flutter create .
Waiting for another flutter command to release the startup lock…
Creating project …
.gitignore (created)
.idea\libraries\Dart_SDK.xml (created)
.idea\libraries\Flutter_for_Android.xml (created)
.idea\libraries\KotlinJavaRuntime.xml (created)
.idea\modules.xml (created)
.idea\runConfigurations\main_dart.xml (created)
.idea\workspace.xml (created)
.metadata (created)
android\app\build.gradle (created)
android\app\src\main\java\com\example\fluttersamples\MainActivity.java (created)
android\build.gradle (created)
android\flutter_samples_android.iml (created)
android\app\src\main\AndroidManifest.xml (created)
android\app\src\main\res\drawable\launch_background.xml (created)
android\app\src\main\res\mipmap-hdpi\ic_launcher.png (created)
android\app\src\main\res\mipmap-mdpi\ic_launcher.png (created)
android\app\src\main\res\mipmap-xhdpi\ic_launcher.png (created)
android\app\src\main\res\mipmap-xxhdpi\ic_launcher.png (created)
android\app\src\main\res\mipmap-xxxhdpi\ic_launcher.png (created)
android\app\src\main\res\values\styles.xml (created)
android\gradle\wrapper\gradle-wrapper.properties (created)
android\gradle.properties (created)
android\settings.gradle (created)
ios\Runner\AppDelegate.h (created)
ios\Runner\AppDelegate.m (created)
ios\Runner\main.m (created)
ios\Runner.xcodeproj\project.pbxproj (created)
ios\Runner.xcodeproj\xcshareddata\xcschemes\Runner.xcscheme (created)
ios\Flutter\AppFrameworkInfo.plist (created)
ios\Flutter\Debug.xcconfig (created)
ios\Flutter\Release.xcconfig (created)
ios\Runner\Assets.xcassets\AppIcon.appiconset\Contents.json (created)
ios\Runner\Assets.xcassets\AppIcon.appiconset\Icon-App-1024x1024@1x.png (created)
ios\Runner\Assets.xcassets\AppIcon.appiconset\Icon-App-20x20@1x.png (created)
ios\Runner\Assets.xcassets\AppIcon.appiconset\Icon-App-20x20@2x.png (created)
ios\Runner\Assets.xcassets\AppIcon.appiconset\Icon-App-20x20@3x.png (created)
ios\Runner\Assets.xcassets\AppIcon.appiconset\Icon-App-29x29@1x.png (created)
ios\Runner\Assets.xcassets\AppIcon.appiconset\Icon-App-29x29@2x.png (created)
ios\Runner\Assets.xcassets\AppIcon.appiconset\Icon-App-29x29@3x.png (created)
ios\Runner\Assets.xcassets\AppIcon.appiconset\Icon-App-40x40@1x.png (created)
ios\Runner\Assets.xcassets\AppIcon.appiconset\Icon-App-40x40@2x.png (created)
ios\Runner\Assets.xcassets\AppIcon.appiconset\Icon-App-40x40@3x.png (created)
ios\Runner\Assets.xcassets\AppIcon.appiconset\Icon-App-60x60@2x.png (created)
ios\Runner\Assets.xcassets\AppIcon.appiconset\Icon-App-60x60@3x.png (created)
ios\Runner\Assets.xcassets\AppIcon.appiconset\Icon-App-76x76@1x.png (created)
ios\Runner\Assets.xcassets\AppIcon.appiconset\Icon-App-76x76@2x.png (created)
ios\Runner\Assets.xcassets\AppIcon.appiconset\Icon-App-83.5x83.5@2x.png (created)
ios\Runner\Assets.xcassets\LaunchImage.imageset\Contents.json (created)
ios\Runner\Assets.xcassets\LaunchImage.imageset\LaunchImage.png (created)
ios\Runner\Assets.xcassets\LaunchImage.imageset\LaunchImage@2x.png (created)
ios\Runner\Assets.xcassets\LaunchImage.imageset\LaunchImage@3x.png (created)
ios\Runner\Assets.xcassets\LaunchImage.imageset\README.md (created)
ios\Runner\Base.lproj\LaunchScreen.storyboard (created)
ios\Runner\Base.lproj\Main.storyboard (created)
ios\Runner\Info.plist (created)
ios\Runner.xcodeproj\project.xcworkspace\contents.xcworkspacedata (created)
ios\Runner.xcworkspace\contents.xcworkspacedata (created)
lib\main.dart (created)
flutter_samples.iml (created)
pubspec.yaml (created)
README.md (created)
test\widget_test.dart (created)
Running “flutter packages get” in flutter_samples… 11.8s
Wrote 64 files.
All done!
[√] Flutter is fully installed. (Channel stable, v1.0.0, on Microsoft Windows [Version 10.0.17134.590], locale zh-CN)
[√] Android toolchain - develop for Android devices is fully installed. (Android SDK 28.0.3)
[√] Android Studio is fully installed. (version 3.3)
[√] IntelliJ IDEA Community Edition is fully installed. (version 2018.3)
[!] Connected device is not available.
Run “flutter doctor” for information about installing additional components.
In order to run your application, type:
$ cd .
$ flutter run
Your application code is in .\lib\main.dart.
exit code 0
Flutter项目结构如下:

其中,Android相关的修改和配置在android目录下,结构和Android应用项目结构一样;IOS相关修改和配置在ios目录下,结构和IOS应用项目结构一样。最重要的flutter代码文件是在lib目录下,类文件以.dart结尾,语法结构为Dart语法结构。大致如下:
import ‘package:flutter/material.dart’;
void main() => runApp(MyApp());
class MyApp extends StatelessWidget {
// This widget is the root of your application.
@override
Widget build(BuildContext context) {
return MaterialApp(
title: ‘Flutter Demo’,
theme: ThemeData(
// This is the theme of your application.
//
// Try running your application with “flutter run”. You’ll see the
// application has a blue toolbar. Then, without quitting the app, try
// changing the primarySwatch below to Colors.green and then invoke
// “hot reload” (press “r” in the console where you ran “flutter run”,
// or simply save your changes to “hot reload” in a Flutter IDE).
// Notice that the counter didn’t reset back to zero; the application
// is not restarted.
primarySwatch: Colors.blue,
),
home: MyHomePage(title: ‘Flutter Demo Home Page’),
);
}
}
class MyHomePage extends StatefulWidget {
MyHomePage({Key key, this.title}) : super(key: key);
// This widget is the home page of your application. It is stateful, meaning
// that it has a State object (defined below) that contains fields that affect
// how it looks.
// This class is the configuration for the state. It holds the values (in this
// case the title) provided by the parent (in this case the App widget) and
// used by the build method of the State. Fields in a Widget subclass are
// always marked “final”.
final String title;
@override
_MyHomePageState createState() => _MyHomePageState();
}
class _MyHomePageState extends State {
int _counter = 0;
void _incrementCounter() {
setState(() {
// This call to setState tells the Flutter framework that something has
// changed in this State, which causes it to rerun the build method below
// so that the display can reflect the updated values. If we changed
// _counter without calling setState(), then the build method would not be
// called again, and so nothing would appear to happen.
_counter++;
});
}
@override
Widget build(BuildContext context) {
// This method is rerun every time setState is called, for instance as done
// by the _incrementCounter method above.
//
// The Flutter framework has been optimized to make rerunning build methods
// fast, so that you can just rebuild anything that needs updating rather
// than having to individually change instances of widgets.
return Scaffold(
appBar: AppBar(
// Here we take the value from the MyHomePage object that was created by
// the App.build method, and use it to set our appbar title.
title: Text(widget.title),
),
body: Center(
// Center is a layout widget. It takes a single child and positions it
// in the middle of the parent.
child: Column(
// Column is also layout widget. It takes a list of children and
// arranges them vertically. By default, it sizes itself to fit its
// children horizontally, and tries to be as tall as its parent.
//
// Invoke “debug painting” (press “p” in the console, choose the
// “Toggle Debug Paint” action from the Flutter Inspector in Android
// Studio, or the “Toggle Debug Paint” command in Visual Studio Code)
// to see the wireframe for each widget.
//
// Column has various properties to control how it sizes itself and
// how it positions its children. Here we use mainAxisAlignment to
// center the children vertically; the main axis here is the vertical
// axis because Columns are vertical (the cross axis would be
// horizontal).
mainAxisAlignment: MainAxisAlignment.center,
children: [
Text(
‘You have pushed the button this many times:’,
),
Text(
‘$_counter’,
style: Theme.of(context).textTheme.display1,
),
],
),
),
floatingActionButton: FloatingActionButton(
onPressed: _incrementCounter,
tooltip: ‘Increment’,
child: Icon(Icons.add),
), // This trailing comma makes auto-formatting nicer for build methods.
);
}
}
模拟器的安装与调试
项目新建完毕了,接下来就是编译运行Flutter项目到真机或者模拟器了。先说模拟器,模拟器在我们下载的Android SDK的目录里,可以通过两种方法创建模拟器,推荐在Android Studio里新建一个模拟器,点击进入AVD Manager,如果没有模拟器的话,就创建一个即可,可以选择最新的SDK:

创建完毕后,我们就可以在电脑的模拟器目录看到我们创建的模拟器里:

对应的模拟器AVD Manager相关也在Android SDK目录下:

接下来我们就可以关闭相关窗口了,建立一个bat文件,写入启动模拟器的命令,这样每次启动模拟器直接运行这个bat文件即可:
D:\Sdk\emulator\emulator.exe -avd Pixel_XL_API_28
模拟器所在的SDK目录根据你的实际情况位置修改即可。

接下来,双击这个bat文件运行模拟器:

接着在项目所在目录运行flutter run命令即可编译运行flutter项目到模拟器上:

运行效果如下图:

运行成功后,后续运行调试只要不退出应用界面,就可以进行热重载,输入r进行热重载当前页面,输入R进行整个应用的热重启,输入h弹出帮助信息,输入d解除关联,输入q退出应用调试。如果遇到有多个模拟器或者模拟器和真机同时存在的话,可以通过-d参数加设备ID指定要运行的设备,例如:
flutter run -d emulator-5556
可以通过flutter devices或adb devices命令查看目前已连接的设备信息。
还有一种命令方式创建模拟器,输入如下命令可以查看当前可用的模拟器:
最后
小编这些年深知大多数初中级Android工程师,想要提升自己,往往是自己摸索成长,自己不成体系的自学效果低效漫长且无助。
因此我收集整理了一份《2024年Android移动开发全套学习资料》,初衷也很简单,就是希望能够帮助到想自学提升又不知道该从何学起的朋友。
 一个人可以走的很快,但一群人才能走的更远!不论你是正从事IT行业的老鸟或是对IT行业感兴趣的新人
都欢迎加入我们的的圈子(技术交流、学习资源、职场吐槽、大厂内推、面试辅导),让我们一起学习成长!
资料⬅专栏获取
己,往往是自己摸索成长,自己不成体系的自学效果低效漫长且无助**。
因此我收集整理了一份《2024年Android移动开发全套学习资料》,初衷也很简单,就是希望能够帮助到想自学提升又不知道该从何学起的朋友。
[外链图片转存中…(img-1lEfuGdr-1719089137890)]一个人可以走的很快,但一群人才能走的更远!不论你是正从事IT行业的老鸟或是对IT行业感兴趣的新人
都欢迎加入我们的的圈子(技术交流、学习资源、职场吐槽、大厂内推、面试辅导),让我们一起学习成长!
资料⬅专栏获取
相关文章:
Flutter开发环境搭建和调试
[你的Flutter文件夹路径]\flutter\bin 这样我们的Flutter SDK的环境变量就配置完毕了。接下来在命令提示符窗口中输入命令: flutter doctor 它可以帮助我们检查Flutter环境变量是否设置成功,Android SDK是否下载以及配置好环境变量等等。如果有相关的…...

【IC验证】UVM实验lab03
1. TLM端口的创建、例化与使用 创建: uvm_get_blocking_port #(fmt_trans) mon_bp_port; 例化: function new(string name "mcdf_refmod", uvm_component parent);super.new(name, parent);fmt_trans new("fmt_trans", this);…...
方法总结)
document.write()方法总结
document.write()方法总结 大家好,我是免费搭建查券返利机器人省钱赚佣金就用微赚淘客系统3.0的小编,也是冬天不穿秋裤,天冷也要风度的程序猿!document.write()方法是JavaScript中用于向HTML文档写入内容的方法之一。它允许我们在…...

C#循环语句总结
前言 正所谓磨刀不误砍柴工,C#上位机软件开发能力的提升离不开对C#语法的精通,本文接着讲解C#语法知识中的循环语句,在C#程序开发中我们经常会用到各种循环语句,常见的有for循环、while循环,本文就是对C#中用到的各种…...
Spring-bean
Spring 网站:spring.io 两个方面: 简化开发: IoCAOP 框架整合: MyBatis SpringFrameWork系统架构(上层依赖下层) 解决问题(代码耦合度高——模块与模块之间的依赖程度) 目标&am…...
Linux常用命令(14)—查看文件内容(有相关截图)
写在前面: 最近在学习Linux命令,记录一下学习Linux常用命令的过程,方便以后复习。仅供参考,若有不当的地方,恳请指正。如果对你有帮助,欢迎点赞,关注,收藏,评论…...

【html】用html+css实现银行的账户信息表格
我们先来看一看某银行的账户信息表格 我们自己也可以实现类似的效果 效果图: 大家可以看到,其实效果差不多 接下来看看我们实现的代码 源码: <!DOCTYPE html> <html lang"zh"><head><meta charset"UTF-8"&…...
两种单例模式(保证线程安全)
开始前,球球各位读者给个三连吧,有错误感谢指出,谢谢 单例模式也叫单个实例,也就是这个类只有且只能有一个实例对象,这样一个类就叫做“单例”;单例模式有很多种,这里只介绍“饿汉模式”和“懒…...

开发 Golang 项目的 Docker 化案例
开发 Golang 项目的 Docker 化案例 在这个案例中,我们将展示如何使用 Docker 容器化一个简单的 Golang Web 应用。我们将创建一个基于 Go 的 Hello World 应用,并使用 Docker 和 Docker Compose 管理容器化环境。 1. 创建 Golang Web 应用 首先&#…...

PHP面试宝典之Laravel篇
Laravel简介 Laravel是一种优雅的PHP Web应用程序框架,它具有简洁、优雅的语法,并提供了强大的工具用于构建大型、健壮的应用程序。Laravel采用了现代PHP开发的最佳实践,因此深受开发者欢迎。 Laravel面试常见问题 1. 什么是Laravel中间件…...
自动驾驶仿真:Carsim转向传动比设置
文章目录 一、转向传动比概念二、设置转向传动比1、C factor概念2、Steer Kinematics概念3、传动比计算公式 三、转向传动比验证 一、转向传动比概念 转向传动比(Steering Ratio)表示方向盘转动角度与车轮转动角度之间的关系。公式如下: 转向…...
 交叉熵损失函数详解和要点提醒)
PyTorch nn.CrossEntropyLoss() 交叉熵损失函数详解和要点提醒
文章目录 前置知识nn.CrossEntropyLoss() 交叉熵损失参数数学公式带权重的公式(weight)标签平滑(label_smoothing) 要点 附录参考链接 前置知识 深度学习:关于损失函数的一些前置知识(PyTorch Loss&#x…...

DW学习笔记|数学建模task2
本章主要涉及到的知识点有: 微分方程的解法如何用 Python 解微分方程偏微分方程及其求解方法微分方程的基本案例差分方程的求解数值计算方法元胞自动机 2.1 微分方程的理论基础 微分方程是什么?如果你参加过高考,可能在高三备考中遇到过这…...
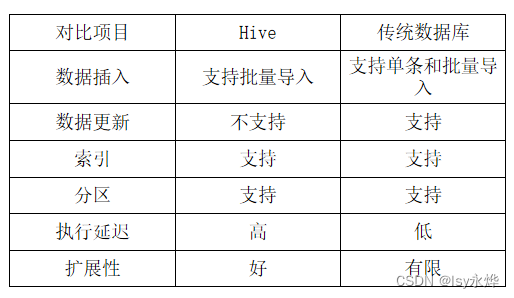
【大数据 复习】第9章 数据仓库分析工具Hive
一、概念 1.概述 (1)Hive是一个构建于Hadoop顶层的数据仓库工具。 (2)某种程度上可以看作是用户编程接口,本身不存储和处理数据。 (3)依赖分布式文件系统HDFS存储数据。 (4…...
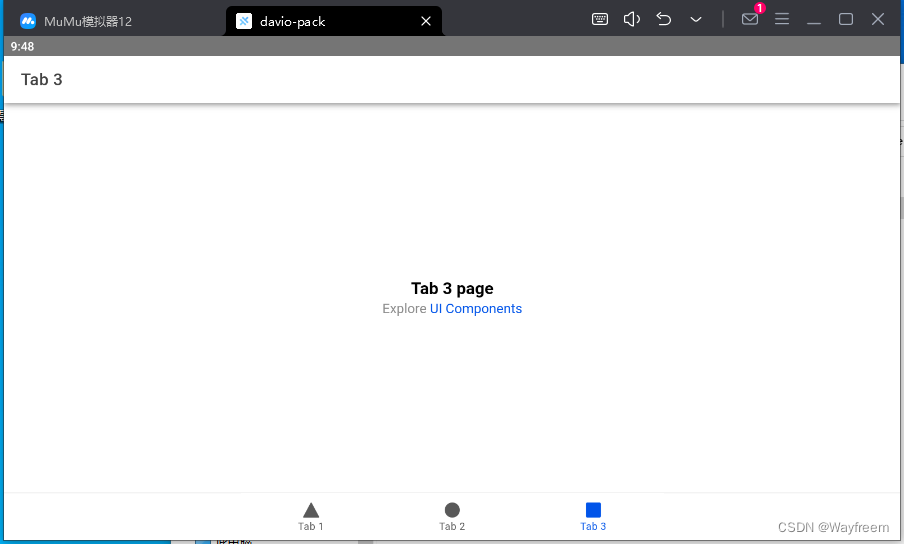
ionic7 从安装 到 项目启动最后打包成 apk
报错处理 在打包的时候遇到过几个问题,这里记录下来两个 Visual Studio Code运行ionic build出错显示ionic : 无法加载文件 ionic 项目通过 android studio 打开报错 capacitor.settings.gradle 文件不存在 说明 由于之前使用的是 ionic 3,当时打包的…...
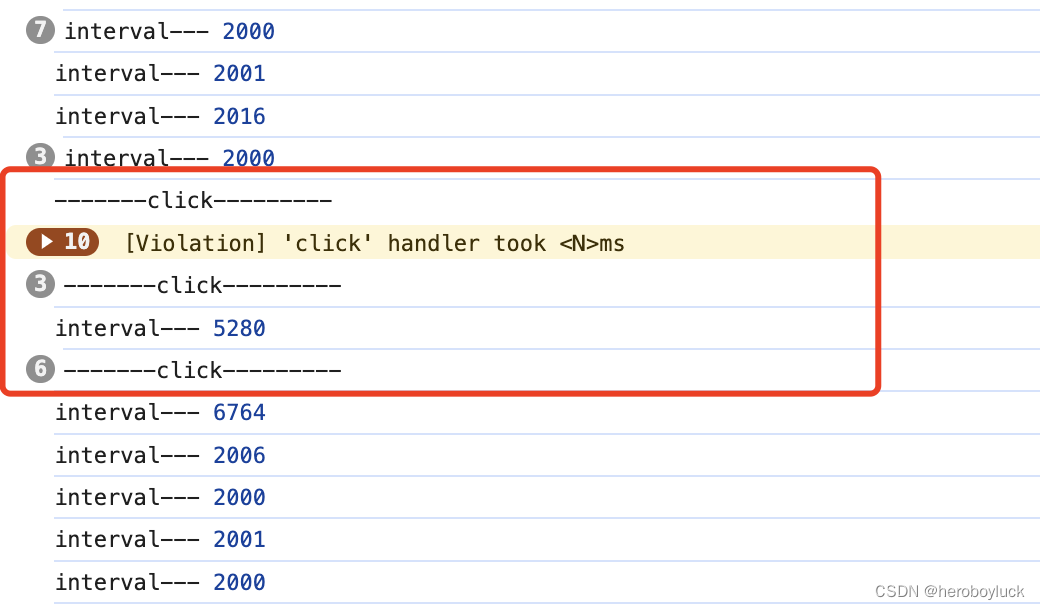
setInterval 定时任务执行时间不准验证
一般在处理定时任务的时候都使用setInterval间隔定时调用任务。 setInterval(() > {console.log("interval"); }, 2 * 1000);我们定义的是两秒执行一次,但是浏览器实际执行的间隔时间只多不少。这是由于浏览器执行 JS 是单线程模式,使用se…...

Stable Diffusion Model网站
Civitai Models | Discover Free Stable Diffusion Modelshttps://www.tjsky.net/tutorial/488https://zhuanlan.zhihu.com/p/610298913超详细的 Stable Diffusion ComfyUI 基础教程(一):安装与常用插件 - 优设网 - 学设计上优设 (uisdc.com)…...
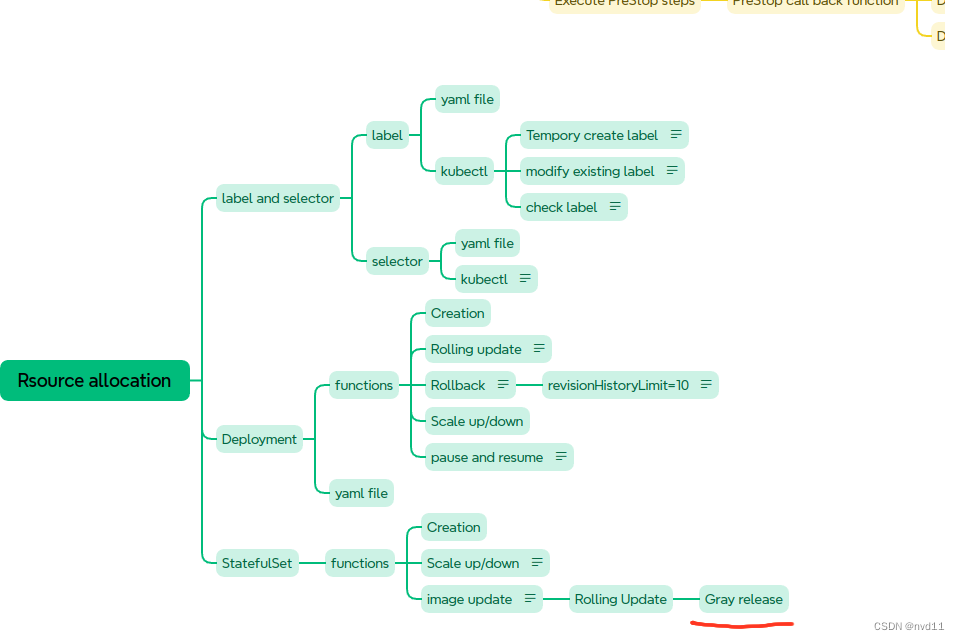
K8S - 实现statefulset 有状态service的灰度发布
什么是灰度发布 Canary Release 参考 理解 什么是 滚动更新,蓝绿部署,灰度发布 以及它们的区别 配置partition in updateStrategy/rollingUpdate 这次我为修改了 statefulset 的1个yaml file statefulsets/stateful-nginx-without-pvc.yaml: --- apiVe…...

Qt 技术博客:深入理解 Qt 中的 delete 和 deleteLater 与信号槽机制
在 Qt 开发中,内存管理和对象生命周期的处理是至关重要的一环。特别是在涉及信号和槽机制时,如何正确删除对象会直接影响应用程序的稳定性。本文将详细讨论在使用 Qt 的信号和槽机制时,delete 和 deleteLater 的工作原理,并给出最…...
自学鸿蒙HarmonyOS的ArkTS语言<一>基本语法
一、一个ArkTs的目录结构 二、一个页面的结构 A、装饰器 Entry 装饰器 : 标记组件为入口组件,一个页面由多个自定义组件组成,但是只能有一个组件被标记 Component : 自定义组件, 仅能装饰struct关键字声明的数据结构 State:组件中的状态变量…...
怎么调?一个案例讲清楚)
Simulink建模避坑指南:ADRC跟踪微分器TD参数(r, h)怎么调?一个案例讲清楚
Simulink建模实战:ADRC跟踪微分器TD参数调优全解析 在控制算法领域,自抗扰控制(ADRC)因其出色的抗干扰能力而备受关注,而跟踪微分器(TD)作为ADRC的核心组件之一,其参数调节直接影响着整个控制系统的性能表现。许多工程师在Simulin…...
)
开源TOP20项目(2026.04.01-2026.04.06)
排名项目名Star描述1luongnv89/claude-howto20.2kClaude Code 的可视化、示例驱动指南——从基本概念到高级代理,提供可立即产生价值的复制粘贴模板。从打字claude到编排代理、钩子、技能和 MCP 服务器——通过可视化教程、复制粘贴模板和引导式学习路径2NousResear…...

用Quartus II 13.1在FPGA上复刻一个复古数字钟:从25MHz到1Hz的分频实战
用Quartus II 13.1在FPGA上打造复古数字钟:从25MHz到1Hz的硬核分频艺术 在电子爱好者的世界里,没有什么比亲手实现一个复古数字钟更让人兴奋的了。想象一下,当你的FPGA开发板上的数码管开始跳动,精准地显示每一秒的流逝࿰…...

谷歌Opal AI构建器:无代码开发的新革命
1. 谷歌Opal AI构建器:无代码时代的开发利器 最近在开发者圈子里,谷歌的Opal AI构建器成了热门话题。作为一个长期关注AI工具的技术从业者,我第一时间体验了这个号称"无代码开发新革命"的平台。说实话,刚开始我也有点怀…...

别再混淆了!用大白话和实际案例,讲清楚BMS硬件版和软件版的那些事儿
别再混淆了!用大白话和实际案例,讲清楚BMS硬件版和软件版的那些事儿 想象一下,你正在健身房举铁。当杠铃突然滑落时,你的脊髓会瞬间触发肌肉收缩——这就像硬件版BMS的本能反应;而教练在一旁记录你的训练数据、调整下周…...
告别语言障碍!Translumo:你的专属游戏外语翻译官
告别语言障碍!Translumo:你的专属游戏外语翻译官 【免费下载链接】Translumo Advanced real-time screen translator for games, hardcoded subtitles in videos, static text and etc. 项目地址: https://gitcode.com/gh_mirrors/tr/Translumo 还…...

终极Windows快捷键冲突检测指南:Hotkey Detective深度解析
终极Windows快捷键冲突检测指南:Hotkey Detective深度解析 【免费下载链接】hotkey-detective A small program for investigating stolen key combinations under Windows 7 and later. 项目地址: https://gitcode.com/gh_mirrors/ho/hotkey-detective 你是…...

CSS如何快速预览CSS颜色值效果_结合浏览器开发者工具取色板
Chrome中直接改颜色值预览效果的关键是在Styles面板点击颜色值旁的小色块调出取色板,支持HEX/RGB/HSL实时切换及滑块调节;切勿双击编辑,需悬停后点色块;CSS变量需点变量名旁色块修改;Firefox需确保about:config中devto…...

城通网盘解析器:3步解决下载慢、广告多的终极方案
城通网盘解析器:3步解决下载慢、广告多的终极方案 【免费下载链接】ctfileGet 获取城通网盘一次性直连地址 项目地址: https://gitcode.com/gh_mirrors/ct/ctfileGet 还在为城通网盘下载速度慢如蜗牛而烦恼吗?还在被层层广告弹窗折磨得耐心全无吗…...

CompressO:终极免费开源视频压缩工具,一键释放95%存储空间
CompressO:终极免费开源视频压缩工具,一键释放95%存储空间 【免费下载链接】compressO Convert any video/image into a tiny size. 100% free & open-source. Available for Mac, Windows & Linux. 项目地址: https://gitcode.com/gh_mirrors…...