Yolov8详解与实战
文章目录
- 摘要
- 模型详解
- C2F模块
- Loss
- head部分
- 模型实战
- 训练COCO数据集
- 下载数据集
- COCO转yolo格式数据集(适用V4,V5,V6,V7,V8)
- 配置yolov8环境
- 训练
- 测试
- 训练自定义数据集
- Labelme数据集
摘要
YOLOv8 是 ultralytics 公司在 2023 年 1月 10 号开源的 YOLOv5 的下一个重大更新版本,目前支持图像分类、物体检测和实例分割任务,鉴于Yolov5的良好表现,Yolov8在还没有开源时就收到了用户的广泛关注。yolov8的整体架构如下:
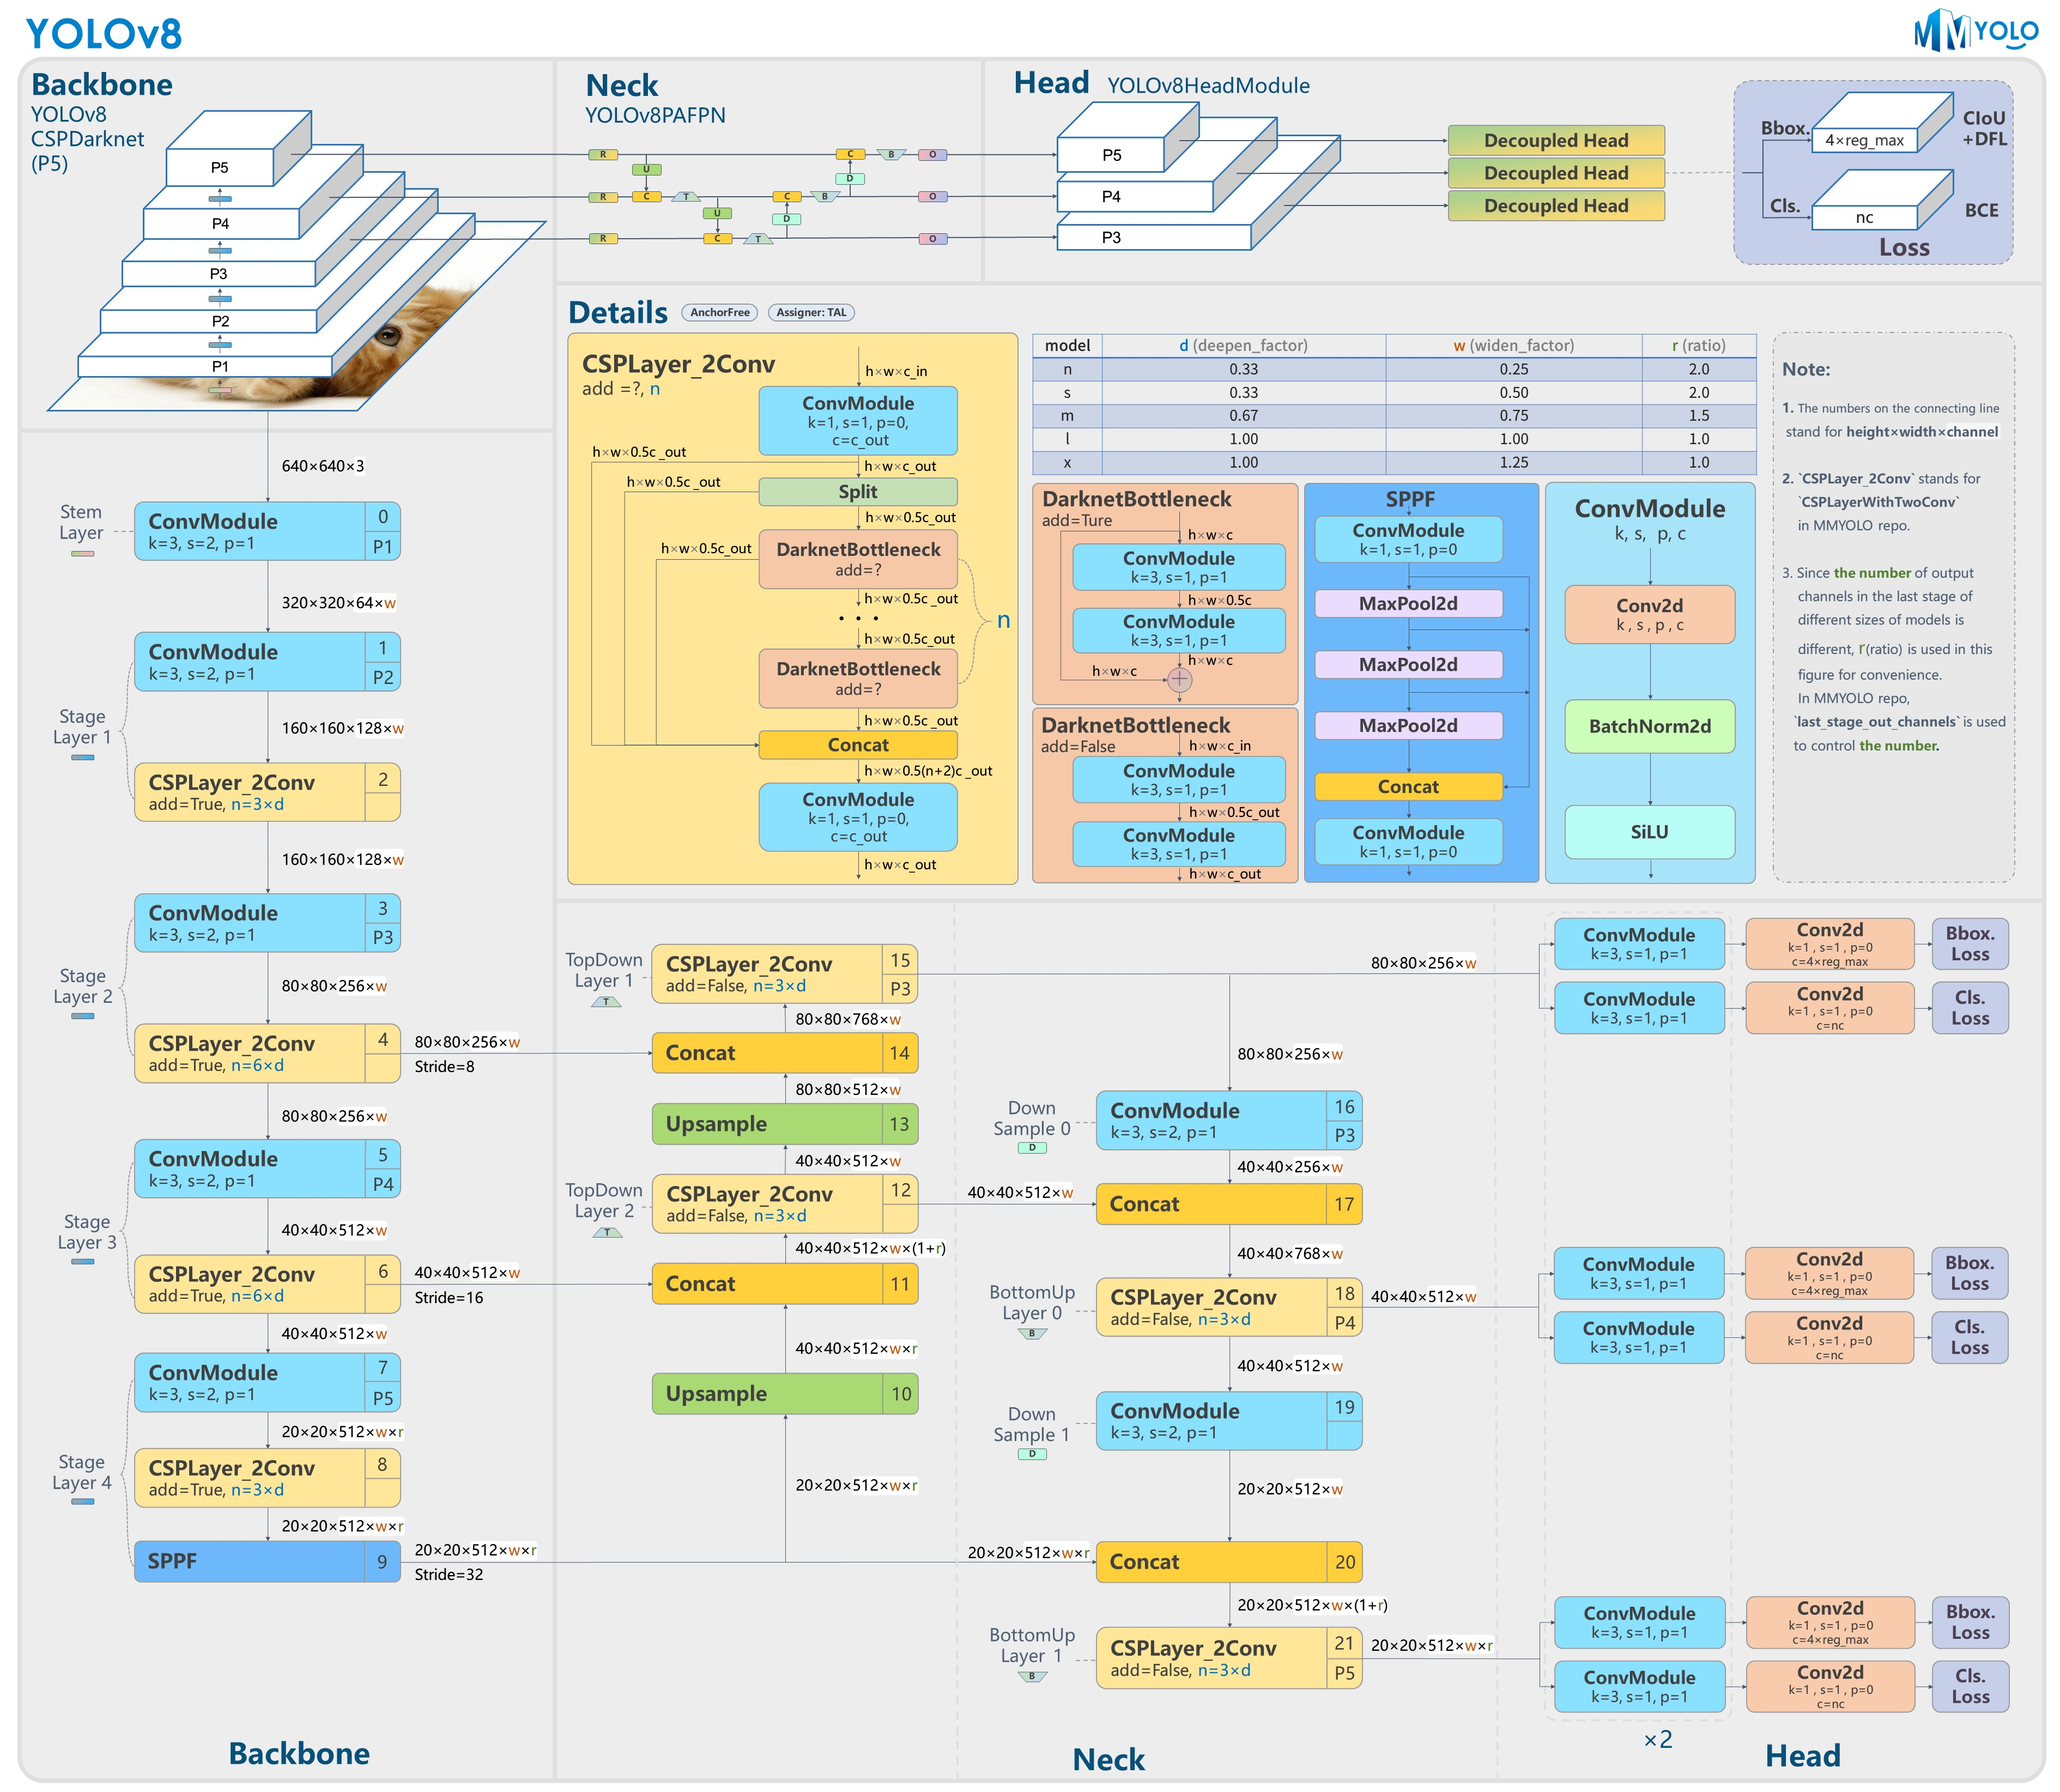
Yolov8的改进之处有以下几个地方:
- Backbone:使用的依旧是CSP的思想,将YOLOv5中的C3模块被替换成了C2f模块,实现了进一步的轻量化,同时YOLOv8依旧使用了YOLOv5等架构中使用的SPPF模块;
- PAN-FPN:YOLOv8依旧使用了PAN的思想,不同的是YOLOv8将YOLOv5中PAN-FPN上采样阶段中的卷积结构删除了,同时也将C3模块替换为了C2f模块;
- Decoupled-Head:这一点源自YOLOX;分类和回归两个任务的head不再共享参数,YoloV8也借鉴了这样的head设计。
- Anchor-Free:YOLOv8抛弃了以往的Anchor-Base,使用了Anchor-Free的思想;
- 损失函数:YOLOv8使用VFL Loss作为分类损失,使用DFL Loss+CIOU Loss作为分类损失;
- 样本匹配:YOLOv8抛弃了以往的IOU匹配或者单边比例的分配方式,而是使用了Task-Aligned Assigner匹配方式。
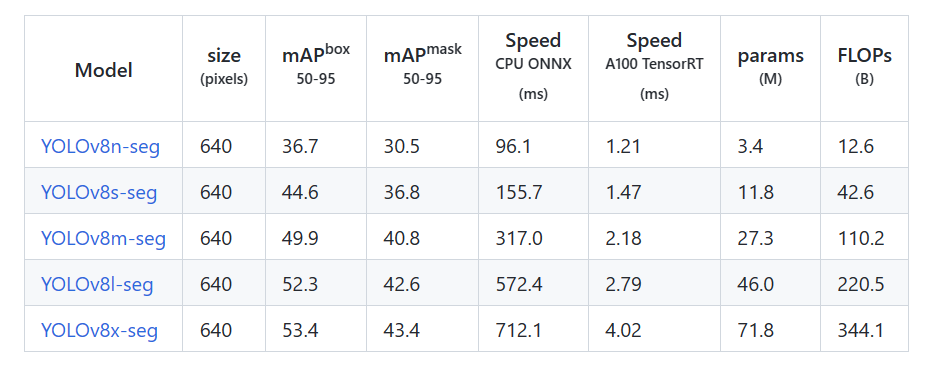
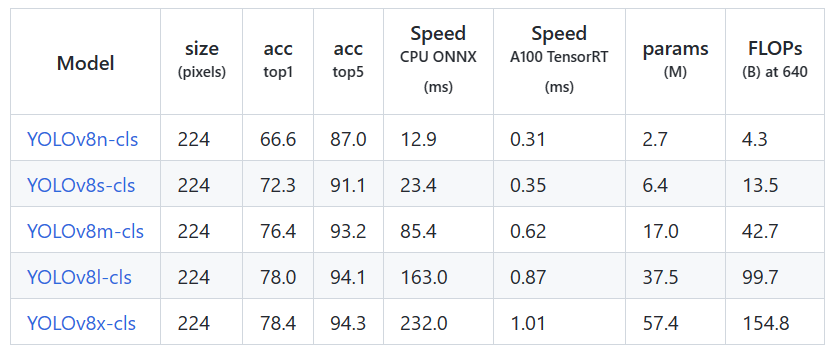
yolov8是个模型簇,从小到大包括:yolov8n、yolov8s、yolov8m、yolov8l、yolov8x等。模型参数、运行速度、参数量等详见下表:

对比yolov5,如下表:
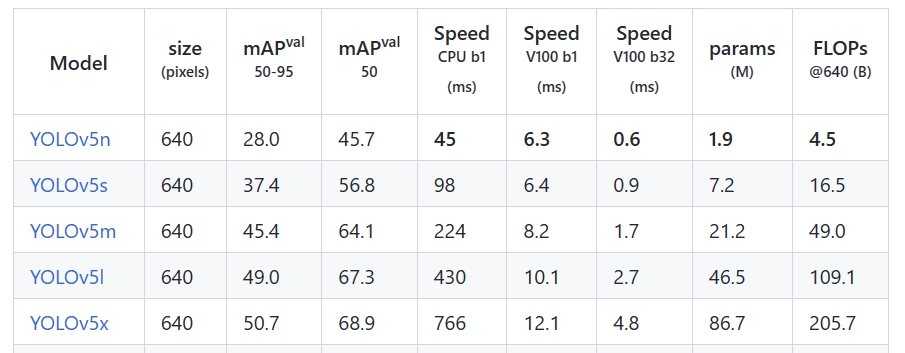
mAP和参数量都上升了不少,具体的感受还是要亲自实践一番。
这篇文章首先对YoloV8做详细的讲解,然后实现对COCO数据集的训练和测试,最后,实现自定义数据集的训练和测试。
希望能帮助到朋友们!
分割的结果
分类的结果
模型详解
C2F模块
yolov8将yolov5中的C3模块换成了C2F模型,我们先了解一下C3模块,如图:
C3模块,其主要是借助CSPNet提取分流的思想,同时结合残差结构的思想,设计了所谓的C3 Block,这里的CSP主分支梯度模块为BottleNeck模块,堆叠的个数由参数n来进行控制,不同的模型,n的个数也不相同。C3的pytorch代码如下:
class C3(nn.Module):# CSP Bottleneck with 3 convolutionsdef __init__(self, c1, c2, n=1, shortcut=True, g=1, e=0.5): # ch_in, ch_out, number, shortcut, groups, expansionsuper().__init__()c_ = int(c2 * e) # hidden channelsself.cv1 = Conv(c1, c_, 1, 1)self.cv2 = Conv(c1, c_, 1, 1)self.cv3 = Conv(2 * c_, c2, 1) # optional act=FReLU(c2)self.m = nn.Sequential(*(Bottleneck(c_, c_, shortcut, g, k=((1, 1), (3, 3)), e=1.0) for _ in range(n)))def forward(self, x):return self.cv3(torch.cat((self.m(self.cv1(x)), self.cv2(x)), 1))
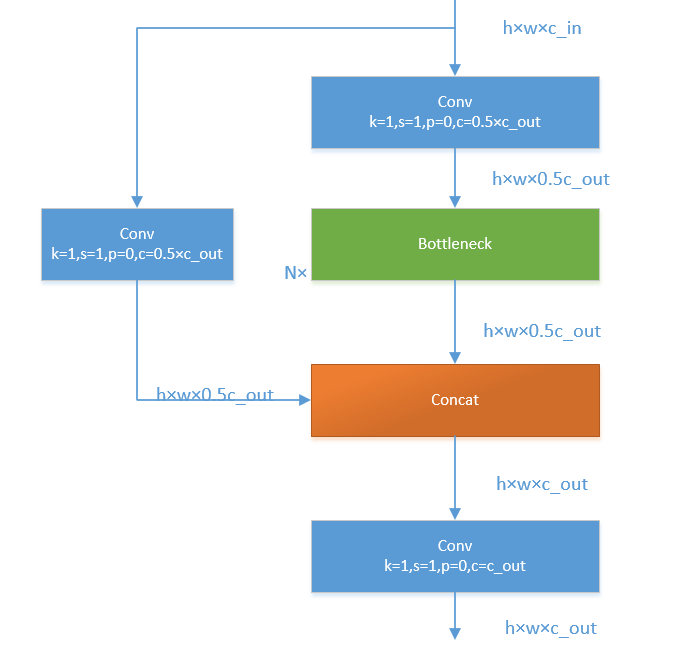
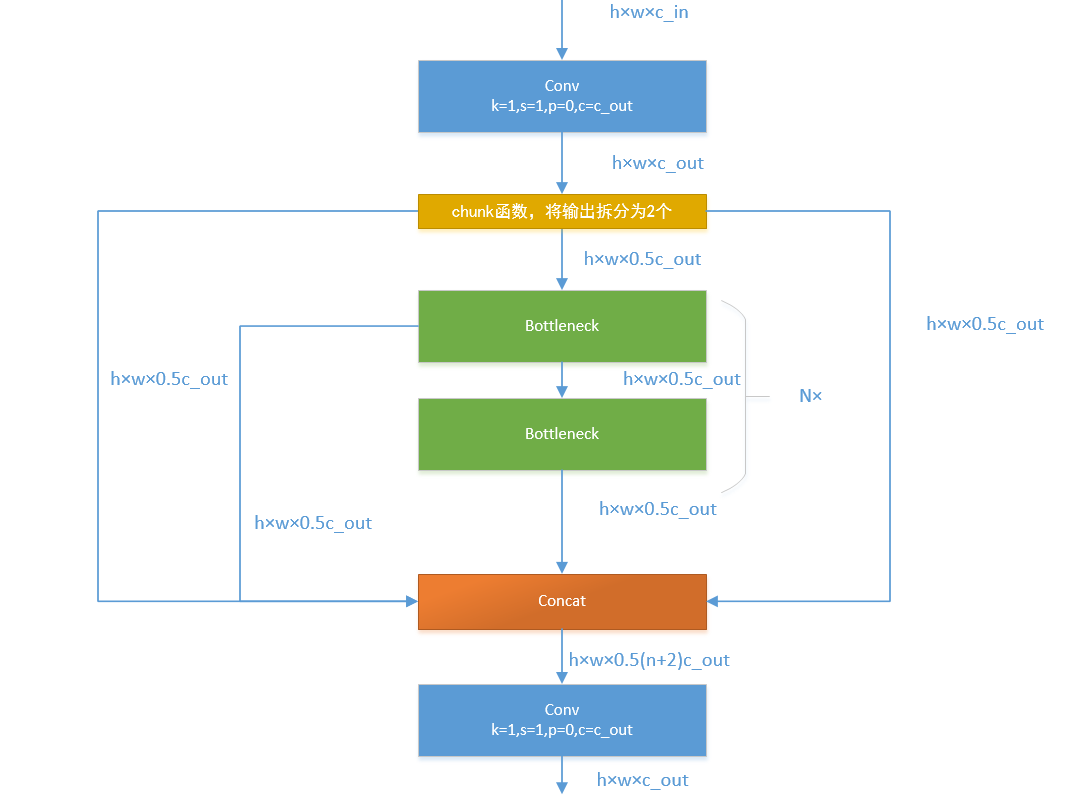
接下来,我们一起学习C2F模块,先经过一个Conv,然后使用chunk函数将out平均拆分成两个向量,然后保存到list中,将后半部分输入到Bottleneck Block里面,Bottleneck Block里面有n个Bottleneck,将每个Bottleneck的输出都追加list中,有n个,所以拼接之后的out等于0.5✖(n+2)。然后经过一个Conv输出,所以输出为h×w×c_out。如下图:
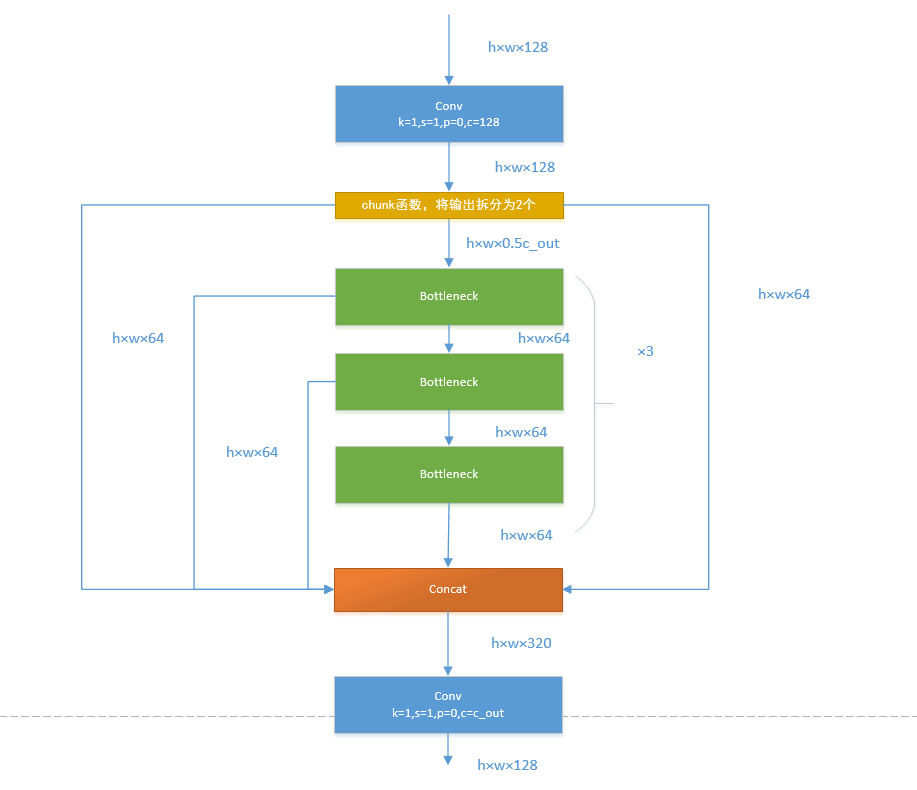
如果还是比较难懂,我将具体的数据代入图中,得出下图:
Loss
对于YOLOv8,其分类损失为VFL Loss,其回归损失为CIOU Loss+DFL的形式,这里Reg_max默认为16。
VFL主要改进是提出了非对称的加权操作,FL和QFL都是对称的。而非对称加权的思想来源于论文PISA,该论文指出首先正负样本有不平衡问题,即使在正样本中也存在不等权问题,因为mAP的计算是主正样本。

q是label,正样本时候q为bbox和gt的IoU,负样本时候q=0,当为正样本时候其实没有采用FL,而是普通的BCE,只不过多了一个自适应IoU加权,用于突出主样本。而为负样本时候就是标准的FL了。可以明显发现VFL比QFL更加简单,主要特点是正负样本非对称加权、突出正样本为主样本。
针对这里的DFL(Distribution Focal Loss),其主要是将框的位置建模成一个 general distribution,让网络快速的聚焦于和目标位置距离近的位置的分布。
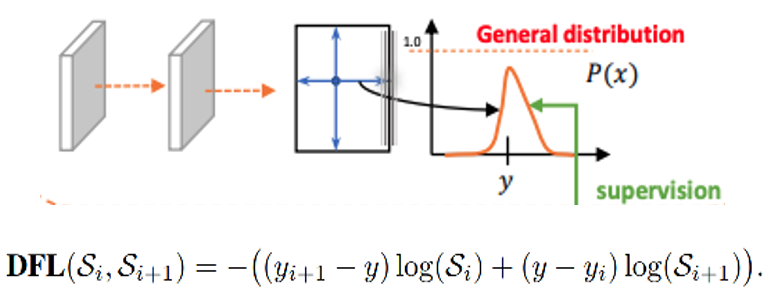
DFL 能够让网络更快地聚焦于目标 y 附近的值,增大它们的概率;
DFL的含义是以交叉熵的形式去优化与标签y最接近的一左一右2个位置的概率,从而让网络更快的聚焦到目标位置的邻近区域的分布;也就是说学出来的分布理论上是在真实浮点坐标的附近,并且以线性插值的模式得到距离左右整数坐标的权重。
head部分
相对于YOLOv5,YOLOv8将Head里面C3模块替换为了C2f,将上采样之前的1×1卷积去除了,将Backbone不同阶段输出的特征直接送入了上采样操作。通过下图对比可以看出差别:


YOLOv8则是使用了Decoupled-Head,同时由于使用了DFL 的思想,因此回归头的通道数也变成了4*reg_max的形式:

模型实战
训练COCO数据集
本次使用2017版本的COCO数据集作为例子,演示如何使用YoloV8训练和预测。
下载数据集
Images:
- 2017 Train images [118K/18GB] :http://images.cocodataset.org/zips/train2017.zip
- 2017 Val images [5K/1GB]:http://images.cocodataset.org/zips/val2017.zip
- 2017 Test images [41K/6GB]:http://images.cocodataset.org/zips/unlabeled2017.zip
Annotations:
- 2017 annotations_trainval2017 [241MB]:http://images.cocodataset.org/annotations/annotations_trainval2017.zip
COCO转yolo格式数据集(适用V4,V5,V6,V7,V8)
最初的研究论文中,COCO中有91个对象类别。然而,在2014年的第一次发布中,仅发布了80个标记和分割图像的对象类别。2014年发布之后,2017年发布了后续版本。详细的类别如下:
| ID | OBJECT (PAPER) | OBJECT (2014 REL.) | OBJECT (2017 REL.) | SUPER CATEGORY |
|---|---|---|---|---|
| 1 | person | person | person | person |
| 2 | bicycle | bicycle | bicycle | vehicle |
| 3 | car | car | car | vehicle |
| 4 | motorcycle | motorcycle | motorcycle | vehicle |
| 5 | airplane | airplane | airplane | vehicle |
| 6 | bus | bus | bus | vehicle |
| 7 | train | train | train | vehicle |
| 8 | truck | truck | truck | vehicle |
| 9 | boat | boat | boat | vehicle |
| 10 | trafficlight | traffic light | traffic light | outdoor |
| 11 | fire hydrant | fire hydrant | fire hydrant | outdoor |
| 12 | street | sign | - | - |
| 13 | stop sign | stop sign | stop sign | outdoor |
| 14 | parking meter | parking meter | parking meter | outdoor |
| 15 | bench | bench | bench | outdoor |
| 16 | bird | bird | bird | animal |
| 17 | cat | cat | cat | animal |
| 18 | dog | dog | dog | animal |
| 19 | horse | horse | horse | animal |
| 20 | sheep | sheep | sheep | animal |
| 21 | cow | cow | cow | animal |
| 22 | elephant | elephant | elephant | animal |
| 23 | bear | bear | bear | animal |
| 24 | zebra | zebra | zebra | animal |
| 25 | giraffe | giraffe | giraffe | animal |
| 26 | hat | - | - | accessory |
| 27 | backpack | backpack | backpack | accessory |
| 28 | umbrella | umbrella | umbrella | accessory |
| 29 | shoe | - | - | accessory |
| 30 | eye glasses | - | - | accessory |
| 31 | handbag | handbag | handbag | accessory |
| 32 | tie | tie | tie | accessory |
| 33 | suitcase | suitcase | suitcase | accessory |
| 34 | frisbee | frisbee | frisbee | sports |
| 35 | skis | skis | skis | sports |
| 36 | snowboard | snowboard | snowboard | sports |
| 37 | sports ball | sports ball | sports ball | sports |
| 38 | kite | kite | kite | sports |
| 39 | baseball bat | baseball bat | baseball bat | sports |
| 40 | baseball glove | baseball glove | baseball glove | sports |
| 41 | skateboard | skateboard | skateboard | sports |
| 42 | surfboard | surfboard | surfboard | sports |
| 43 | tennis racket | tennis racket | tennis racket | sports |
| 44 | bottle | bottle | bottle | kitchen |
| 45 | plate | - | - | kitchen |
| 46 | wine glass | wine glass | wine glass | kitchen |
| 47 | cup | cup | cup | kitchen |
| 48 | fork | fork | fork | kitchen |
| 49 | knife | knife | knife | kitchen |
| 50 | spoon | spoon | spoon | kitchen |
| 51 | bowl | bowl | bowl | kitchen |
| 52 | banana | banana | banana | food |
| 53 | apple | apple | apple | food |
| 54 | sandwich | sandwich | sandwich | food |
| 55 | orange | orange | orange | food |
| 56 | broccoli | broccoli | broccoli | food |
| 57 | carrot | carrot | carrot | food |
| 58 | hot dog | hot dog | hot dog | food |
| 59 | pizza | pizza | pizza | food |
| 60 | donut | donut | donut | food |
| 61 | cake | cake | cake | food |
| 62 | chair | chair | chair | furniture |
| 63 | couch | couch | couch | furniture |
| 64 | potted plant | potted plant | potted plant | furniture |
| 65 | bed | bed | bed | furniture |
| 66 | mirror | - | - | furniture |
| 67 | dining table | dining table | dining table | furniture |
| 68 | window | - | - | furniture |
| 69 | desk | - | - | furniture |
| 70 | toilet | toilet | toilet | furniture |
| 71 | door | - | - | furniture |
| 72 | tv | tv | tv | electronic |
| 73 | laptop | laptop | laptop | electronic |
| 74 | mouse | mouse | mouse | electronic |
| 75 | remote | remote | remote | electronic |
| 76 | keyboard | keyboard | keyboard | electronic |
| 77 | cell phone | cell phone | cell phone | electronic |
| 78 | microwave | microwave | microwave | appliance |
| 79 | oven | oven | oven | appliance |
| 80 | toaster | toaster | toaster | appliance |
| 81 | sink | sink | sink | appliance |
| 82 | refrigerator | refrigerator | refrigerator | appliance |
| 83 | blender | - | - | appliance |
| 84 | book | book | book | indoor |
| 85 | clock | clock | clock | indoor |
| 86 | vase | vase | vase | indoor |
| 87 | scissors | scissors | scissors | indoor |
| 88 | teddy bear | teddy bear | teddy bear | indoor |
| 89 | hair drier | hair drier | hair drier | indoor |
| 90 | toothbrush | toothbrush | toothbrush | indoor |
| 91 | hair brush | - | - | indoor |
可以看到,2014年和2017年发布的对象列表是相同的,它们是论文中最初91个对象类别中的80个对象。所以在转换的时候,要重新对类别做映射,映射函数如下:
def coco91_to_coco80_class(): # converts 80-index (val2014) to 91-index (paper)# https://tech.amikelive.com/node-718/what-object-categories-labels-are-in-coco-dataset/# a = np.loadtxt('data/coco.names', dtype='str', delimiter='\n')# b = np.loadtxt('data/coco_paper.names', dtype='str', delimiter='\n')# x1 = [list(a[i] == b).index(True) + 1 for i in range(80)] # darknet to coco# x2 = [list(b[i] == a).index(True) if any(b[i] == a) else None for i in range(91)] # coco to darknetx = [0, 1, 2, 3, 4, 5, 6, 7, 8, 9, 10, None, 11, 12, 13, 14, 15, 16, 17, 18, 19, 20, 21, 22, 23, None, 24, 25, None,None, 26, 27, 28, 29, 30, 31, 32, 33, 34, 35, 36, 37, 38, 39, None, 40, 41, 42, 43, 44, 45, 46, 47, 48, 49, 50,51, 52, 53, 54, 55, 56, 57, 58, 59, None, 60, None, None, 61, None, 62, 63, 64, 65, 66, 67, 68, 69, 70, 71, 72,None, 73, 74, 75, 76, 77, 78, 79, None]return x接下来,开始格式转换,工程的目录如下:

- coco:存放解压后的数据集。
-out:保存输出结果。
-coco2yolo.py:转换脚本。
转换代码如下:
import json
import glob
import os
import shutil
from pathlib import Path
import numpy as np
from tqdm import tqdmdef make_folders(path='../out/'):# Create foldersif os.path.exists(path):shutil.rmtree(path)  # delete output folderos.makedirs(path)  # make new output folderos.makedirs(path + os.sep + 'labels')  # make new labels folderos.makedirs(path + os.sep + 'images')  # make new labels folderreturn pathdef convert_coco_json(json_dir='./coco/annotations_trainval2017/annotations/'):jsons = glob.glob(json_dir + '*.json')coco80 = coco91_to_coco80_class()# Import jsonfor json_file in sorted(jsons):fn = 'out/labels/%s/' % Path(json_file).stem.replace('instances_', '')  # folder namefn_images = 'out/images/%s/' % Path(json_file).stem.replace('instances_', '')  # folder nameos.makedirs(fn,exist_ok=True)os.makedirs(fn_images,exist_ok=True)with open(json_file) as f:data = json.load(f)print(fn)# Create image dictimages = {'%g' % x['id']: x for x in data['images']}# Write labels filefor x in tqdm(data['annotations'], desc='Annotations %s' % json_file):if x['iscrowd']:continueimg = images['%g' % x['image_id']]h, w, f = img['height'], img['width'], img['file_name']file_path='coco/'+fn.split('/')[-2]+"/"+f# The Labelbox bounding box format is [top left x, top left y, width, height]box = np.array(x['bbox'], dtype=np.float64)box[:2] += box[2:] / 2  # xy top-left corner to centerbox[[0, 2]] /= w  # normalize xbox[[1, 3]] /= h  # normalize yif (box[2] > 0.) and (box[3] > 0.):  # if w > 0 and h > 0with open(fn + Path(f).stem + '.txt', 'a') as file:file.write('%g %.6f %.6f %.6f %.6f\n' % (coco80[x['category_id'] - 1], *box))file_path_t=fn_images+fprint(file_path,file_path_t)shutil.copy(file_path,file_path_t)def coco91_to_coco80_class():  # converts 80-index (val2014) to 91-index (paper)# https://tech.amikelive.com/node-718/what-object-categories-labels-are-in-coco-dataset/# a = np.loadtxt('data/coco.names', dtype='str', delimiter='\n')# b = np.loadtxt('data/coco_paper.names', dtype='str', delimiter='\n')# x1 = [list(a[i] == b).index(True) + 1 for i in range(80)]  # darknet to coco# x2 = [list(b[i] == a).index(True) if any(b[i] == a) else None for i in range(91)]  # coco to darknetx = [0, 1, 2, 3, 4, 5, 6, 7, 8, 9, 10, None, 11, 12, 13, 14, 15, 16, 17, 18, 19, 20, 21, 22, 23, None, 24, 25, None,None, 26, 27, 28, 29, 30, 31, 32, 33, 34, 35, 36, 37, 38, 39, None, 40, 41, 42, 43, 44, 45, 46, 47, 48, 49, 50,51, 52, 53, 54, 55, 56, 57, 58, 59, None, 60, None, None, 61, None, 62, 63, 64, 65, 66, 67, 68, 69, 70, 71, 72,None, 73, 74, 75, 76, 77, 78, 79, None]return xconvert_coco_json()
开始运行:

转换完成后,验证转换的结果:
import cv2
import osdef draw_box_in_single_image(image_path, txt_path):# 读取图像image = cv2.imread(image_path)# 读取txt文件信息def read_list(txt_path):pos = []with open(txt_path, 'r') as file_to_read:while True:lines = file_to_read.readline()  # 整行读取数据if not lines:break# 将整行数据分割处理,如果分割符是空格,括号里就不用传入参数,如果是逗号, 则传入‘,'字符。p_tmp = [float(i) for i in lines.split(' ')]pos.append(p_tmp)  # 添加新读取的数据# Efield.append(E_tmp)passreturn pos# txt转换为boxdef convert(size, box):xmin = (box[1]-box[3]/2.)*size[1]xmax = (box[1]+box[3]/2.)*size[1]ymin = (box[2]-box[4]/2.)*size[0]ymax = (box[2]+box[4]/2.)*size[0]box = (int(xmin), int(ymin), int(xmax), int(ymax))return boxpos = read_list(txt_path)print(pos)tl = int((image.shape[0]+image.shape[1])/2)lf = max(tl-1,1)for i in range(len(pos)):label = str(int(pos[i][0]))print('label is '+label)box = convert(image.shape, pos[i])image = cv2.rectangle(image,(box[0], box[1]),(box[2],box[3]),(0,0,255),2)cv2.putText(image,label,(box[0],box[1]-2), 0, 1, [0,0,255], thickness=2, lineType=cv2.LINE_AA)passif pos:cv2.imwrite('./Data/see_images/{}.png'.format(image_path.split('\\')[-1][:-4]), image)else:print('None')img_folder = "./out/images/val2017"
img_list = os.listdir(img_folder)
img_list.sort()label_folder = "./out/labels/val2017"
label_list = os.listdir(label_folder)
label_list.sort()
if not os.path.exists('./Data/see_images'):os.makedirs('./Data/see_images')
for i in range(len(img_list)):image_path = img_folder + "\\" + img_list[i]txt_path = label_folder + "\\" + label_list[i]draw_box_in_single_image(image_path, txt_path)
结果展示:

配置yolov8环境
可以直接安装requirements.txt里面所有的库文件,执行安装命令:
pip install -r requirements.txt
如果不想安装这么多库文件,在运行的时候,查看缺少哪个库,就安装哪个库,比如我的环境:
pip install thop
我的本地只缺少了这个库文件。
训练
下载代码:https://github.com/ultralytics/ultralytics,通过下载的方式可以下载到源码,这样方便修改。
也可以使用命令:
pip install ultralytics
如果仅仅是为了使用yolov8,可以使用这种方式安装。
yolov8还支持使用命令的方式,例如:
yolo predict model=yolov8n.pt source="https://ultralytics.com/images/bus.jpg"
接下来,创建训练脚本,可以使用yaml文件创建,例如:
from ultralytics import YOLO# Load a model
model = YOLO("yolov8n.yaml")  # build a new model from scratch
模型文件在ultralytics/models/v8下面,如图:
也可以使用预训练模型创建。例如:
model = YOLO("yolov8n.pt") # load a pretrained model (recommended for training)
然后开启训练。
# Use the model
model.train(data="coco128.yaml", epochs=3)  # train the model
数据集的配置文件在:ultralytics/datasets/下面,如图:
是不是很简单!!!!
接下来,我们配置自己的环境。
第一步 找到ultralytics/datasets/coco.yaml文件。
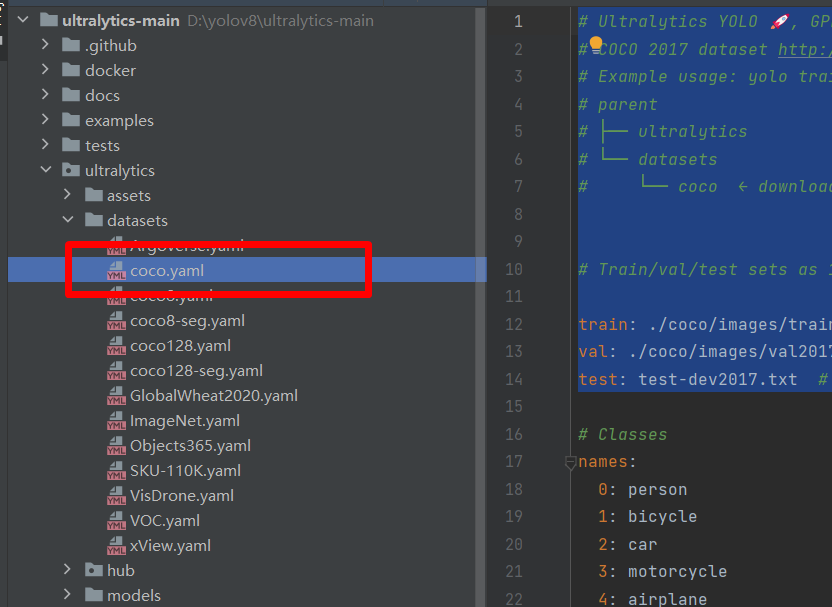
然后将其复制到根目录
将里面的路径修改为:
# Ultralytics YOLO 🚀, GPL-3.0 license
# COCO 2017 dataset http://cocodataset.org by Microsoft
# Example usage: yolo train data=coco.yaml
# parent
# ├── ultralytics
# └── datasets
#     └── coco  ← downloads here (20.1 GB)# Train/val/test sets as 1) dir: path/to/imgs, 2) file: path/to/imgs.txt, or 3) list: [path/to/imgs1, path/to/imgs2, ..]train: ./coco/images/train2017  # train images (relative to 'path') 118287 images
val: ./coco/images/val2017  # val images (relative to 'path') 5000 images
test: test-dev2017.txt  # 20288 of 40670 images, submit to https://competitions.codalab.org/competitions/20794
关于数据集的路径,大家可以自行尝试,我经过多次尝试发现,YoloV8会自行添加datasets这个文件,所以设置./coco/images/train2017,则实际路径是datasets/coco/images/train2017。
第二步 新建train.py脚本。
from ultralytics import YOLO# 加载模型
model = YOLO("ultralytics/models/v8/yolov8n.yaml") # 从头开始构建新模型# Use the model
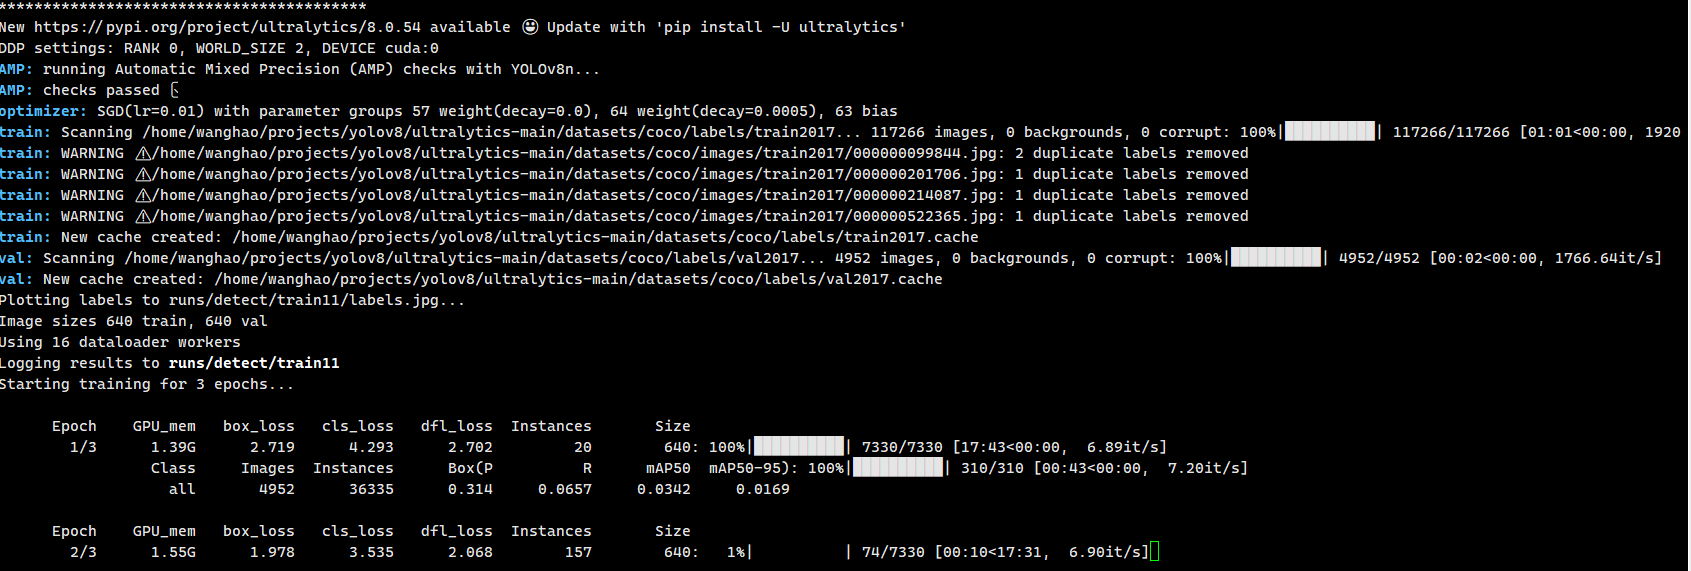
results = model.train(data="coco.yaml", epochs=3,device='3') # 训练模型
然后,点击train.py可以运行了。
如果设置多卡,可以在device中设置,例如我使用四张卡,可以设置为:
results = model.train(data="coco.yaml", epochs=3,device='0,1,2,3') # 训练模型
第三步 修改参数,在ultralytics/yolo/cfg/default.yaml文件中查看。例如:
# Train settings -------------------------------------------------------------------------------------------------------
model:  # path to model file, i.e. yolov8n.pt, yolov8n.yaml
data:  # path to data file, i.e. coco128.yaml
epochs: 100  # number of epochs to train for
patience: 50  # epochs to wait for no observable improvement for early stopping of training
batch: 16  # number of images per batch (-1 for AutoBatch)
imgsz: 640  # size of input images as integer or w,h
save: True  # save train checkpoints and predict results
save_period: -1 # Save checkpoint every x epochs (disabled if < 1)
cache: False  # True/ram, disk or False. Use cache for data loading
device:  # device to run on, i.e. cuda device=0 or device=0,1,2,3 or device=cpu
workers: 8  # number of worker threads for data loading (per RANK if DDP)
project:  # project name
name:  # experiment name, results saved to 'project/name' directory
exist_ok: False  # whether to overwrite existing experiment
pretrained: False  # whether to use a pretrained model
optimizer: SGD  # optimizer to use, choices=['SGD', 'Adam', 'AdamW', 'RMSProp']
verbose: True  # whether to print verbose output
seed: 0  # random seed for reproducibility
deterministic: True  # whether to enable deterministic mode
single_cls: False  # train multi-class data as single-class
image_weights: False  # use weighted image selection for training
rect: False  # support rectangular training if mode='train', support rectangular evaluation if mode='val'
cos_lr: False  # use cosine learning rate scheduler
close_mosaic: 10  # disable mosaic augmentation for final 10 epochs
resume: False  # resume training from last checkpoint
上面是训练过程中常用的参数,我们调用yolo函数可以自行修改。
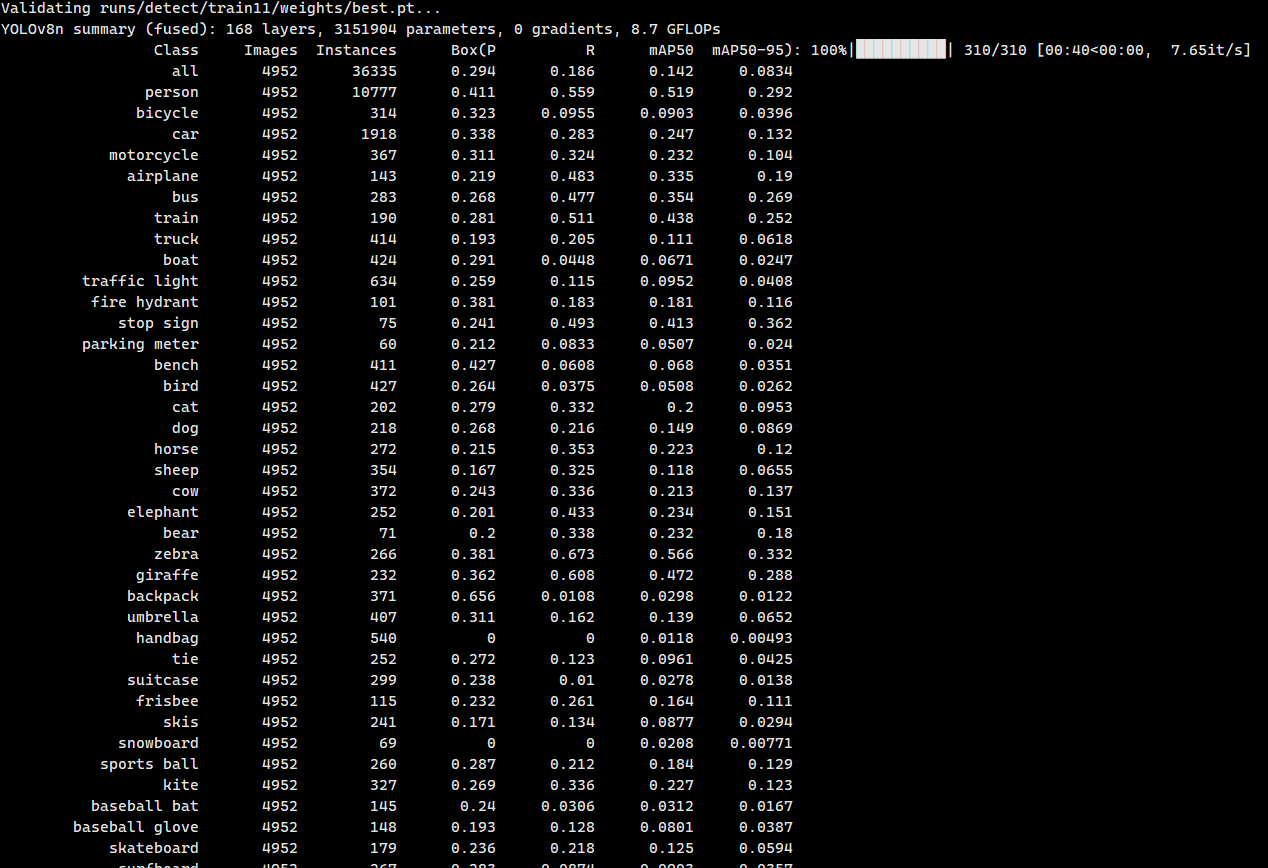
等待测试完成后,就可以看到结果,如下图:
测试
新建测试脚本test.py.
from ultralytics import YOLO# Load a model
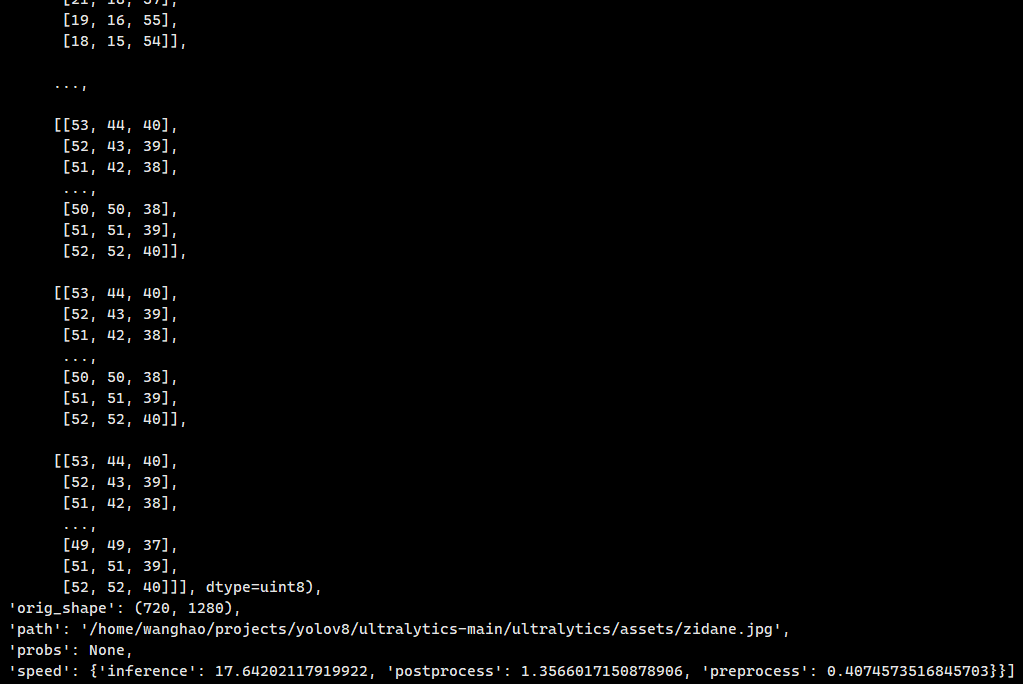
model = YOLO("runs/detect/train11/weights/best.pt") # load a pretrained model (recommended for training)results = model.predict(source="ultralytics/assets",device='3') # predict on an image
print(results)
这个results保存了所有的结果。如下图:
predict的参数也可以在ultralytics/yolo/cfg/default.yaml文件中查看。例如:
# Prediction settings --------------------------------------------------------------------------------------------------
source:  # source directory for images or videos
show: False  # show results if possible
save_txt: False  # save results as .txt file
save_conf: False  # save results with confidence scores
save_crop: False  # save cropped images with results
hide_labels: False  # hide labels
hide_conf: False  # hide confidence scores
vid_stride: 1  # video frame-rate stride
line_thickness: 3  # bounding box thickness (pixels)
visualize: False  # visualize model features
augment: False  # apply image augmentation to prediction sources
agnostic_nms: False  # class-agnostic NMS
classes:  # filter results by class, i.e. class=0, or class=[0,2,3]
retina_masks: False  # use high-resolution segmentation masks
boxes: True  # Show boxes in segmentation predictions
训练自定义数据集
Labelme数据集
相关文章:
Yolov8详解与实战
文章目录摘要模型详解C2F模块Losshead部分模型实战训练COCO数据集下载数据集COCO转yolo格式数据集(适用V4,V5,V6,V7,V8)配置yolov8环境训练测试训练自定义数据集Labelme数据集摘要 YOLOv8 是 ultralytics …...
多线程案例——阻塞队列
目录 一、阻塞队列 1. 生产者消费者模型 (1)解耦合 (2)“削峰填谷” 2. 标准库中的阻塞队列 3. 自己实现一个阻塞队列(代码) 4. 自己实现生产者消费者模型(代码) 一、阻塞队列…...

学习优秀博文(【国产MCU移植】手把手教你使用RT-Thread制作GD32系列BSP)有感 | 文末赠书5本
学习优秀博文(【guo产MCU移植】手把手教你使用RT-Thread制作GD32系列BSP)有感 一篇优秀的博文是什么样的?它有什么规律可循吗?优秀的guo产32位单片机处理器是否真的能成功替换掉stm32的垄断地位? 本文博主以亲身经历聊…...
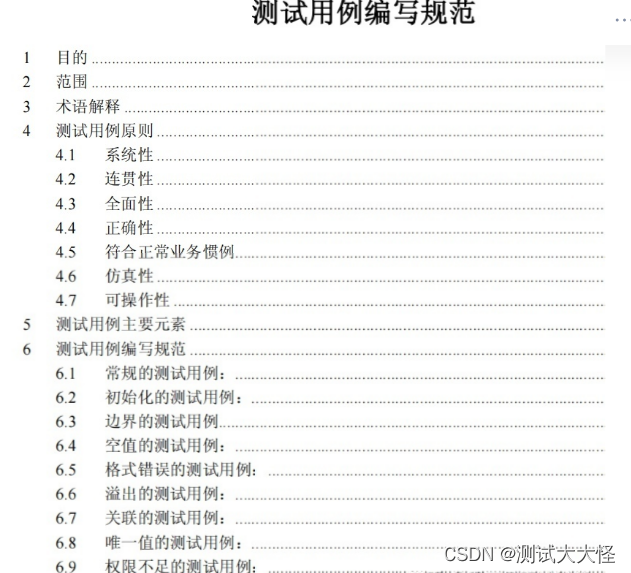
写用例写的焦头烂额?看看摸鱼5年的老点工是怎么写的...
给你个需求,你要怎么转变成最终的用例? 直接把需求文档翻译一下就完事了。 老点工拿到需求后的标准操作: 第一步:解析需求 先解析需求-找出所有需求中的动词,再列出所有测试点。测试点过程不断发散,对于…...

基于深度学习的鸟类检测识别系统(含UI界面,Python代码)
摘要:鸟类识别是深度学习和机器视觉领域的一个热门应用,本文详细介绍基于YOLOv5的鸟类检测识别系统,在介绍算法原理的同时,给出Python的实现代码以及PyQt的UI界面。在界面中可以选择各种鸟类图片、视频以及开启摄像头进行检测识别…...

零基础搭建Tomcat集群(超详细)
💗推荐阅读文章💗 🌸JavaSE系列🌸👉1️⃣《JavaSE系列教程》🌺MySQL系列🌺👉2️⃣《MySQL系列教程》🍀JavaWeb系列🍀👉3️⃣《JavaWeb系列教程》…...
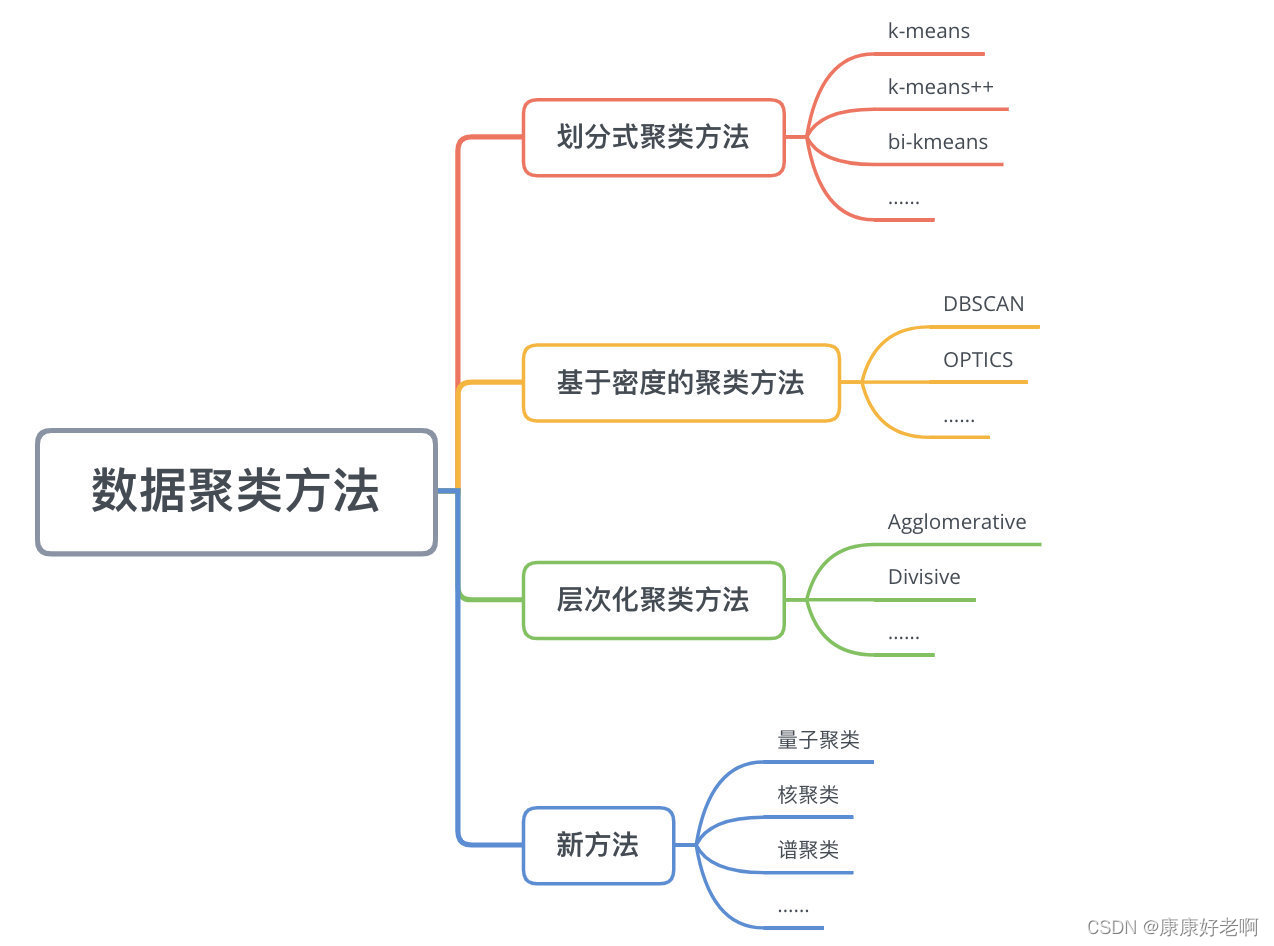
机器学习自学笔记——聚类
聚类的基本概念 聚类,顾名思义,就是将一个数据集中各个样本点聚集成不同的“类”。每个类中的样本点都有某些相似的特征。比如图书馆中,会把成百上千的书分成不同的类别:科普书、漫画书、科幻书等等,方便人们查找。每…...
注意下C语言整形提升
C语言整形提升 C语言整形提升是指在表达式中使用多种类型的数据时,编译器会自动将较小的类型转换为较大的类型,以便进行运算。在C语言中,整型提升规则如下: 如果表达式中存在short类型,则将其自动转换为int类型。 如…...

Go panic的学习
一、前言 我们的应用程序常常会出现异常,包括由运行时检测到的异常或者应用开发者自己抛出的异常。 异常在一些其他语言中,如c、java,被叫做Exception,主要由抛出异常和捕获异常两部分组成。异常在go语言中,叫做pani…...

讲解Linux中samba理论讲解及Linux共享访问
♥️作者:小刘在C站 ♥️个人主页:小刘主页 ♥️每天分享云计算网络运维课堂笔记,努力不一定有收获,但一定会有收获加油!一起努力,共赴美好人生! ♥️夕阳下,是最美的绽放࿰…...
【C++笔试强训】第三十二天
🎇C笔试强训 博客主页:一起去看日落吗分享博主的C刷题日常,大家一起学习博主的能力有限,出现错误希望大家不吝赐教分享给大家一句我很喜欢的话:夜色难免微凉,前方必有曙光 🌞。 💦&a…...

OpenAI GPT-4震撼发布:多模态大模型
OpenAI GPT-4震撼发布:多模态大模型发布要点GPT4的新功能GPT-4:我能玩梗图GPT4:理解图片GPT4:识别与解析图片内容怎样面对GPT4申请 GPT-4 API前言: 🏠个人主页:以山河作礼。 📝📝:本文章是帮助大家更加了…...

手把手教你 在linux上安装kafka
目录 1. 准备服务器 2. 选一台服务器配置kafka安装包 2.1 下载安装包 2.2 解压安装包 2.3 修改配置文件 3. 分发安装包到其他机器 4. 修改每台机器的broker.id 5. 配置环境变量 6. 启停kafka服务 6.1 启动kafak服务 6.2 停止kafka服务 1. 准备服务器 1.买几台云服务…...

Spring Cloud(微服务)学习篇(五)
Spring Cloud(微服务)学习篇(五) 1 nacos配置文件的读取 1.1 访问localhost:8848/index.html并输入账户密码后进入nacos界面并点击配置列表 1.2 点击右侧的号 1.3 点击加号后,进入新建配置界面,并做好如下配置 1.4 往下翻动,点击发布按钮 1.5 发布成功后的界面 1.6 在pom.xml…...

道阻且长,未来可期,从GPT-4窥得通用人工智能时代的冰山一角!
大家这两天是不是又被满屏的ChatGPT相关的文章信息给轰炸得不轻,说实话,我真的对ChatGPT的热度如此经久不衰这个问题非常感兴趣。从去年刚面世时,小范围内造成的行业震荡,到今年二月份铺天盖地得铺舆论造势,引发全民热…...

百度将?百度已!
仿佛一夜之间,创业公司OpenAI旗下的ChatGPT就火遍全球。这是一场十分罕见的科技盛宴。下到普通用户,上到各科技大厂都在讨论ChatGPT的前景,国外的微软、谷歌,国内的百度、腾讯、阿里等等都在布局相关业务。比尔盖茨更是称ChatGPT与…...
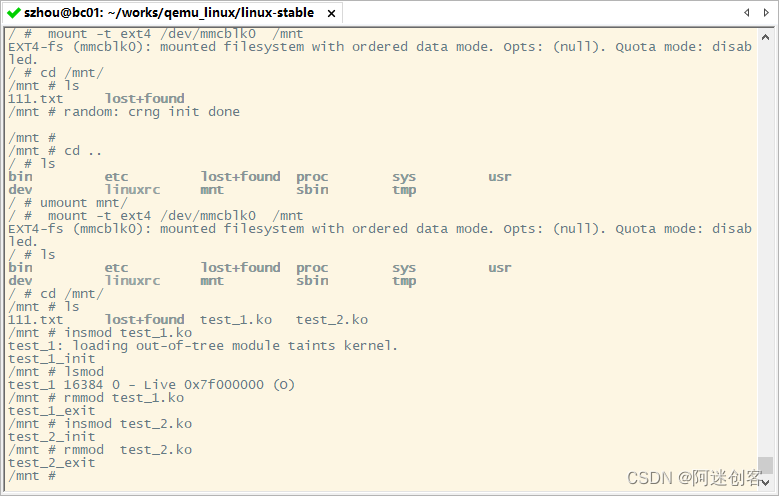
内核实验(三):编写简单Linux内核模块,使用Qemu加载ko做测试
文章目录一、篇头二、QEMU:挂载虚拟分区2.1 创建 sd.ext4.img 虚拟分区2.2 启动 Qemu2.3 手动挂载 sd.ext4.img三、实现一个简单的KO3.1 目录文件3.2 Makefile3.3 编译3.3.1 编译打印3.3.2 生成文件3.4 检查:objdump3.4.1 objdump -dS test\_1.ko3.4.2 o…...
女子举重问题
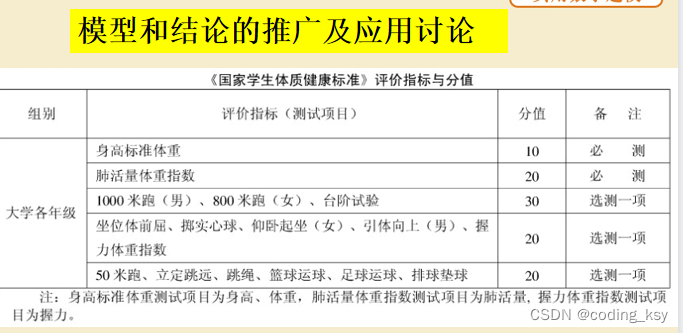
一、问题的描述 问题及要求 1、搜集各个级别世界女子举重比赛的实际数据。分别建立女子举重比赛总成绩的线性模型、幂函数模型、幂函数改进模型,并最终建立总冠军评选模型。 应用以上模型对最近举行的一届奥运会女子举重比赛总成绩进行排名,并对模型及…...

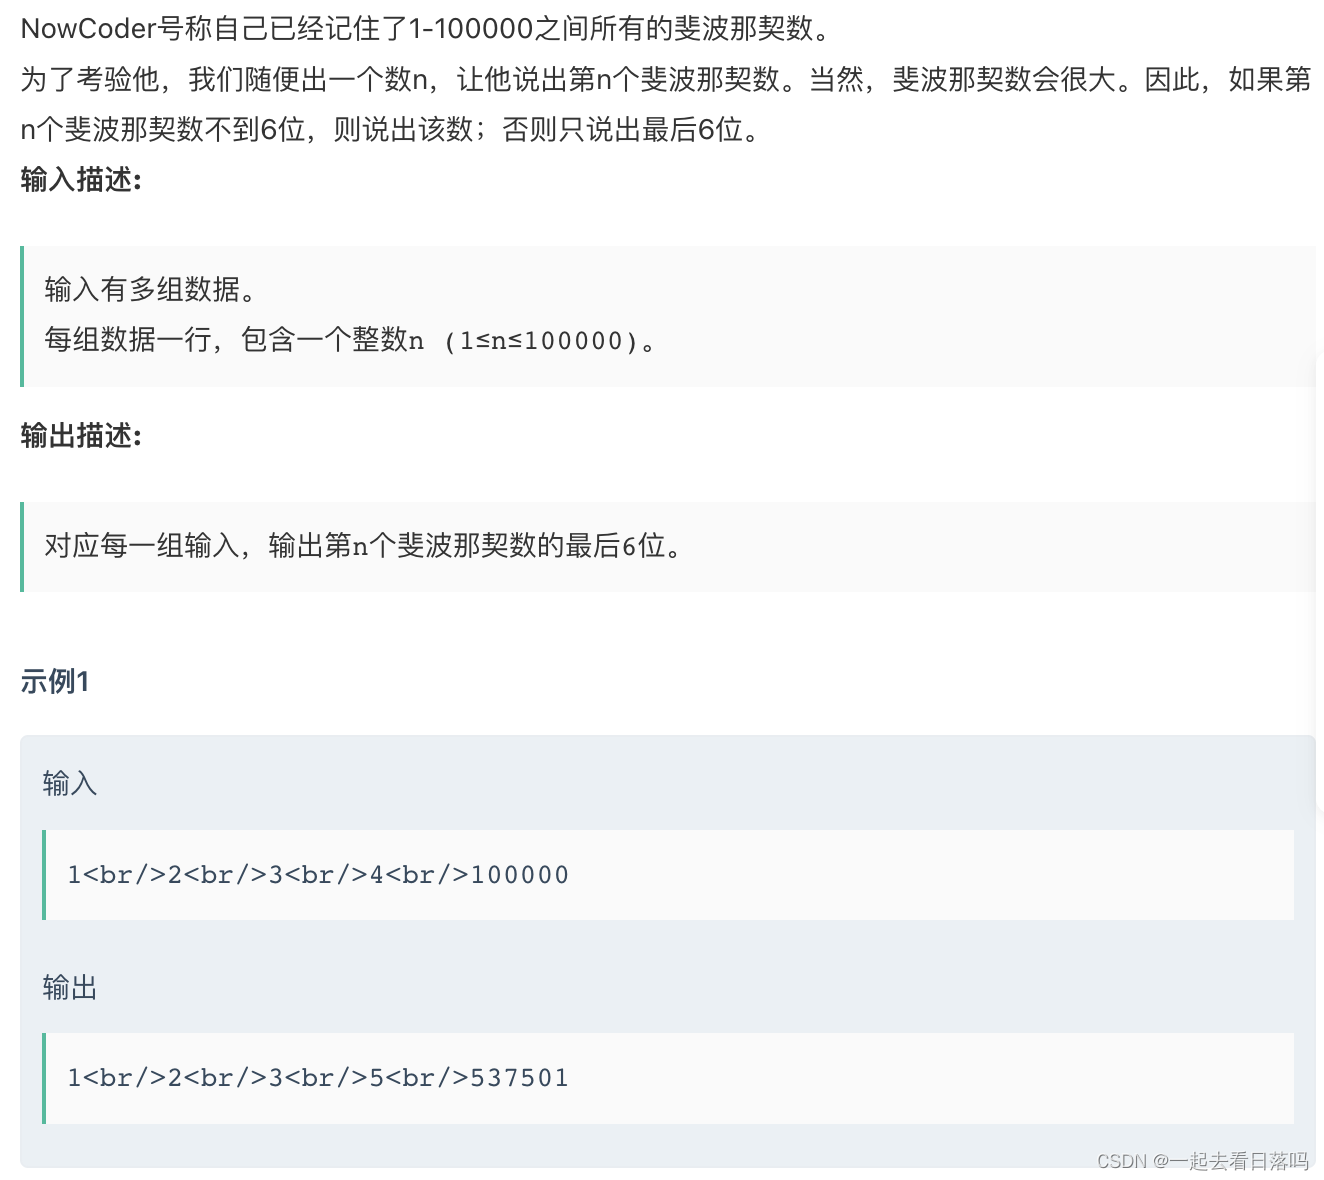
试题 历届真题 循环小数【第十一届】【决赛】【Python】
试题 历届真题 循环小数【第十一届】【决赛】【Python】 题目来源:第十一届蓝桥杯决赛 http://lx.lanqiao.cn/problem.page?gpidT2891 资源限制 内存限制:256.0MB C/C时间限制:1.0s Java时间限制:3.0s Python时间限制ÿ…...

关于类型转换
隐式转换先看个例子int a {500}; unsigned b {1000}; std::cout<<a-b;这里的输出结果并不为-500。因为最后输出结果的类型自动转换成了unsigned,unsigned是正整数型类型转换顺序表(由高到低)long doubledoublefloatunsigned long long long longunsigned long…...

MCU内存管理实战:用__attribute__控制变量在Flash/RAM中的存放位置
MCU内存管理实战:用__attribute__控制变量在Flash/RAM中的存放位置 引言:嵌入式开发中的内存困局 在Cortex-M系列MCU开发中,我们常常面临这样的矛盾:一方面,片上Flash和RAM资源极其有限(尤其是成本敏感型产…...
)
Ubuntu 20.04上解决CARLA报错‘Engine crash handling finished’的保姆级指南(附NVIDIA驱动降级避坑)
Ubuntu 20.04深度调优:彻底解决CARLA引擎崩溃与NVIDIA驱动兼容性问题 当你在Ubuntu 20.04上第一次启动CARLA仿真平台,满心期待地输入./CarlaUE4.sh命令后,终端却突然抛出一连串令人窒息的红色错误信息——"Engine crash handling finish…...

res-downloader高效配置指南:全平台资源捕获从入门到精通
res-downloader高效配置指南:全平台资源捕获从入门到精通 【免费下载链接】res-downloader 资源下载器、网络资源嗅探,支持微信视频号下载、网页抖音无水印下载、网页快手无水印视频下载、酷狗音乐下载等网络资源拦截下载! 项目地址: https://gitcode.…...

轻量级涨点神器:Ghost卷积模块在YOLOv8中的实战应用与性能优化
1. Ghost卷积模块:轻量化的秘密武器 第一次听说Ghost卷积时,我正为一个嵌入式设备上的目标检测项目发愁。当时需要在树莓派上部署YOLOv3,但模型跑起来像老牛拉车,帧率直接掉到个位数。直到试用了Ghost模块,推理速度直接…...

告别编译烦恼:在Ubuntu 22.04上快速验证OpenCV 3.4.15安装的几种方法
告别编译烦恼:在Ubuntu 22.04上快速验证OpenCV 3.4.15安装的几种方法 刚完成OpenCV编译安装的开发者常会遇到这样的困惑:终端显示"100% Built target"后,如何确认这个耗费数小时编译的计算机视觉库真的能正常工作?本文将…...

nix-installer多平台部署实战:Linux、macOS、WSL全攻略
nix-installer多平台部署实战:Linux、macOS、WSL全攻略 【免费下载链接】nix-installer Install Nix and flakes with the fast and reliable Determinate Nix Installer, with over a million installs. 项目地址: https://gitcode.com/gh_mirrors/ni/nix-instal…...

终极指南:如何自定义 rust-analyzer 扩展功能与插件开发
终极指南:如何自定义 rust-analyzer 扩展功能与插件开发 【免费下载链接】rust-analyzer A Rust compiler front-end for IDEs 项目地址: https://gitcode.com/gh_mirrors/ru/rust-analyzer rust-analyzer 是一款强大的 Rust 编译器前端工具,专为…...

OpenLiteSpeed实战踩坑记录:为什么我最终回归了LNMP环境?
OpenLiteSpeed实战反思:为什么复杂WordPress环境更适合LNMP? 最近在技术社区里,OpenLiteSpeed被频繁提及,尤其是它宣称的高性能PHP处理能力吸引了不少WordPress站长的注意。作为一个长期使用LNMP环境的开发者,我也被这…...
相当于派出一群带雷达的无人机直接扫描整片山区找最优解)
直接上干货,咱们用粒子群算法给PID控制器做个暴力调参。传统PID参数调整像盲人摸象,PSO(粒子群优化)相当于派出一群带雷达的无人机直接扫描整片山区找最优解
基于粒子群算法的PID控制优化算法案例 matlab源代码 代码有详细注释,完美运行先看目标——让这个二阶系统达到最顺滑的响应: % 被控对象传递函数 sys tf(1, [1 3 2]); t 0:0.01:10; % 时间序列 粒子群的核心配置得够骚: %% PSO参…...

NOJ编程竞赛中的五大常见错误类型及高效调试技巧
1. NOJ编程竞赛错误类型全景解析 第一次参加NOJ在线编程竞赛时,看到满屏的WA、CE、RE、TE错误提示,我整个人都是懵的。直到后来在实战中踩过无数坑,才发现这些错误其实都有规律可循。最常见的五大错误类型就像编程路上的五个拦路虎࿰…...