spring(二)
一、为对象类型属性赋值
方式一:(引用外部bean)
1.创建班级类Clazz
package com.spring.beanpublic class Clazz {private Integer clazzId;private String clazzName;public Integer getClazzId() {return clazzId;}public void setClazzId(Integer clazzId) {this.clazzId = clazzId;}public String getClazzName() {return clazzName;}public void setClazzName(String clazzName) {this.clazzName = clazzName;}@Overridepublic String toString() {return "Clazz{" +"clazzId=" + clazzId +", clazzName='" + clazzName + '\'' +'}';}public Clazz() {}public Clazz(Integer clazzId, String clazzName) {this.clazzId = clazzId;this.clazzName = clazzName;}
}
2.修改Student类
//在Student类中添加以下代码:
private Clazz clazz;public Clazz getClazz() {return clazz;
}public void setClazz(Clazz clazz) {this.clazz = clazz;
}
3.引用外部bean:
//配置Clazz类型的bean
<bean id="clazzOne" class="com.spring.bean.Clazz"><property name="clazzId" value="001"></property><property name="clazzName" value="一般班"></property>
</bean>//为Student中的clazz属性赋值
<bean id="studentFour" class="com.spring.bean.Student"><property name="id" value="004"></property><property name="name" value="李寒衣"></property><property name="age" value="26"></property><property name="sex" value="女"></property><!-- ref属性:引用IOC容器中某个bean的id,将所对应的bean为属性赋值 --><property name="clazz" ref="clazzOne"></property>
</bean>
方式二:(内部bean)
<bean id="studentFour" class="com.spring.bean.Student"><property name="id" value="1004"></property><property name="name" value="赵六"></property><property name="age" value="26"></property><property name="sex" value="女"></property><property name="clazz"><!-- 在一个bean中再声明一个bean就是内部bean --><!-- 内部bean只能用于给属性赋值,不能在外部通过IOC容器获取,因此可以省略id属性 --><bean id="clazzInner" class="com.spring.bean.Clazz"><property name="clazzId" value="002"></property><property name="clazzName" value="无心班"></property></bean></property>
</bean>
方式三:(级联属性赋值)
<bean id="studentFour" class="com.spring.bean.Student"><property name="id" value="1004"></property><property name="name" value="赵六"></property><property name="age" value="26"></property><property name="sex" value="女"></property><property name="clazz" ref="clazzOne"></property><property name="clazz.clazzId" value="003"></property><property name="clazz.clazzName" value="天下第一班"></property>
</bean>
二、为数组类型属性赋值
1.在Student类中添加以下代码:
private String[] hobbies;public String[] getHobbies() {return hobbies;
}public void setHobbies(String[] hobbies) {this.hobbies = hobbies;
}
2.配置bean:
<bean id="studentFour" class="com.spring.bean.Student"><property name="id" value="1004"></property><property name="name" value="赵六"></property><property name="age" value="26"></property><property name="sex" value="女"></property><!-- ref属性:引用IOC容器中某个bean的id,将所对应的bean为属性赋值 --><property name="clazz" ref="clazzOne"></property><property name="hobbies"><array><value>抽烟</value><value>喝酒</value><value>烫头</value></array></property>
</bean>
三、为集合类型属性赋值
1.在clazz中添加以下代码:
private List<Student> students;public List<Student> getStudents() {return students;
}public void setStudents(List<Student> students) {this.students = students;
}
2.配置bean
<bean id="clazzTwo" class="com.spring.bean.Clazz"><property name="clazzId" value="004"></property><property name="clazzName" value="Javaee"></property><property name="students"><list><ref bean="studentOne"></ref><ref bean="studentTwo"></ref><ref bean="studentThree"></ref></list></property>
</bean>
<!--若为Set集合类型属性赋值,只需要将其中的list标签改为set标签即可-->
四、为Map集合类型属性赋值
1.创建教师类Teacher:
package com.spring.bean;
public class Teacher {private Integer teacherId;private String teacherName;public Integer getTeacherId() {return teacherId;}public void setTeacherId(Integer teacherId) {this.teacherId = teacherId;}public String getTeacherName() {return teacherName;}public void setTeacherName(String teacherName) {this.teacherName = teacherName;}public Teacher(Integer teacherId, String teacherName) {this.teacherId = teacherId;this.teacherName = teacherName;}public Teacher() {}@Overridepublic String toString() {return "Teacher{" +"teacherId=" + teacherId +", teacherName='" + teacherName + '\'' +'}';}
}
2.在Student类中添加以下代码:
private Map<String, Teacher> teacherMap;public Map<String, Teacher> getTeacherMap() {return teacherMap;
}public void setTeacherMap(Map<String, Teacher> teacherMap) {this.teacherMap = teacherMap;
}
3.配置bean:
<bean id="teacherOne" class="com.spring.bean.Teacher"><property name="teacherId" value="10010"></property><property name="teacherName" value="沈眉庄"></property>
</bean><bean id="teacherTwo" class="com.atguigu.spring6.bean.Teacher"><property name="teacherId" value="10086"></property><property name="teacherName" value="陆沉"></property>
</bean><bean id="studentFour" class="com.spring.bean.Student"><property name="id" value="004"></property><property name="name" value="李寒衣"></property><property name="age" value="26"></property><property name="sex" value="女"></property><!-- ref属性:引用IOC容器中某个bean的id,将所对应的bean为属性赋值 --><property name="clazz" ref="clazzOne"></property><property name="hobbies"><array><value>抽烟</value><value>喝酒</value><value>烫头</value></array></property><property name="teacherMap"><map><entry><key><value>10010</value></key><ref bean="teacherOne"></ref></entry><entry><key><value>10086</value></key><ref bean="teacherTwo"></ref></entry></map></property>
</bean>
4.引用集合类型的bean
<!--list集合类型的bean-->
<util:list id="students"><ref bean="studentOne"></ref><ref bean="studentTwo"></ref><ref bean="studentThree"></ref>
</util:list>
<!--map集合类型的bean-->
<util:map id="teacherMap"><entry><key><value>10010</value></key><ref bean="teacherOne"></ref></entry><entry><key><value>10086</value></key><ref bean="teacherTwo"></ref></entry>
</util:map>
<bean id="clazzTwo" class="com.spring.bean.Clazz"><property name="clazzId" value="004"></property><property name="clazzName" value="Javaee"></property><property name="students" ref="students"></property>
</bean>
<bean id="studentFour" class="com.pring.bean.Student"><property name="id" value="004"></property><property name="name" value="李寒衣"></property><property name="age" value="26"></property><property name="sex" value="女"></property><!-- ref属性:引用IOC容器中某个bean的id,将所对应的bean为属性赋值 --><property name="clazz" ref="clazzOne"></property><property name="hobbies"><array><value>抽烟</value><value>喝酒</value><value>烫头</value></array></property><property name="teacherMap" ref="teacherMap"></property>
</bean>
使用util:list、util:map标签必须引入相应的命名空间
<?xml version="1.0" encoding="UTF-8"?>
<beans xmlns="http://www.springframework.org/schema/beans"xmlns:xsi="http://www.w3.org/2001/XMLSchema-instance"xmlns:util="http://www.springframework.org/schema/util"xsi:schemaLocation="http://www.springframework.org/schema/utilhttp://www.springframework.org/schema/util/spring-util.xsdhttp://www.springframework.org/schema/beanshttp://www.springframework.org/schema/beans/spring-beans.xsd">
五、p命名空间
引入p命名空间
<?xml version="1.0" encoding="UTF-8"?>
<beans xmlns="http://www.springframework.org/schema/beans"xmlns:xsi="http://www.w3.org/2001/XMLSchema-instance"xmlns:util="http://www.springframework.org/schema/util"xmlns:p="http://www.springframework.org/schema/p"xsi:schemaLocation="http://www.springframework.org/schema/utilhttp://www.springframework.org/schema/util/spring-util.xsdhttp://www.springframework.org/schema/beanshttp://www.springframework.org/schema/beans/spring-beans.xsd">
引入p命名空间后,可以通过以下方式为bean的各个属性赋值
<bean id="studentSix" class="com.spring.bean.Student"p:id="006" p:name="小明" p:clazz-ref="clazzOne" p:teacherMap-ref="teacherMap"></bean>六、引入外部属性文件
1.加入依赖
<!-- MySQL驱动 -->
<dependency><groupId>mysql</groupId><artifactId>mysql-connector-java</artifactId><version>8.0.30</version>
</dependency><!-- 数据源 -->
<dependency><groupId>com.alibaba</groupId><artifactId>druid</artifactId><version>1.2.15</version>
</dependency>
2.创建外部属性文件
<!--properties-->
jdbc.user=root
jdbc.password=root
jdbc.url=jdbc:mysql://localhost:3306/ssm?serverTimezone=UTC
jdbc.driver=com.mysql.cj.jdbc.Driver
3.引入属性文件
<!--xml-->
<!-- 引入外部属性文件 -->
<context:property-placeholder location="classpath:jdbc.properties"/>
4.配置bean
<bean id="druidDataSource" class="com.alibaba.druid.pool.DruidDataSource"><property name="url" value="${jdbc.url}"/><property name="driverClassName" value="${jdbc.driver}"/><property name="username" value="${jdbc.user}"/><property name="password" value="${jdbc.password}"/>
</bean>
5.测试
@Test
public void testDataSource() throws SQLException {ApplicationContext ac = new ClassPathXmlApplicationContext("spring-datasource.xml");DataSource dataSource = ac.getBean(DataSource.class);Connection connection = dataSource.getConnection();System.out.println(connection);
}
七、bean的作用域
| 取值 | 含义 | 创建对象的时机 |
| singleton(默认) | 在IOC容器中,这个bean的对象始终为单实例 | IOC容器初始化时 |
| prototype | 这个bean在IOC容器中有多个实例 | 获取bean |
如果是在WebApplicationContext环境下还会有另外几个作用域(但不常用):
| 取值 | 含义 |
| request | 在一个请求范围内有效 |
| session | 在一个会话范围内有效 |
1、创建类User
package com.spring.bean;
public class User {private Integer id;private String username;private String password;private Integer age;public User() {}public User(Integer id, String username, String password, Integer age) {this.id = id;this.username = username;this.password = password;this.age = age;}public Integer getId() {return id;}public void setId(Integer id) {this.id = id;}public String getUsername() {return username;}public void setUsername(String username) {this.username = username;}public String getPassword() {return password;}public void setPassword(String password) {this.password = password;}public Integer getAge() {return age;}public void setAge(Integer age) {this.age = age;}@Overridepublic String toString() {return "User{" +"id=" + id +", username='" + username + '\'' +", password='" + password + '\'' +", age=" + age +'}';}
}
2.配置bean
<!-- scope属性:取值singleton(默认值),bean在IOC容器中只有一个实例,IOC容器初始化时创建对象 -->
<!-- scope属性:取值prototype,bean在IOC容器中可以有多个实例,getBean()时创建对象 -->
<bean class="com.spring.bean.User" scope="prototype"></bean>
3.测试
@Test
public void testBeanScope(){ApplicationContext ac = new ClassPathXmlApplicationContext("spring-scope.xml");User user1 = ac.getBean(User.class);User user2 = ac.getBean(User.class);System.out.println(user1==user2);
}
八、bean生命周期
1.具体生命周期过程
- bean对象创建
- 给bean对象设置属性
- bean的后置处理器(初始化之前)
- bean对象初始化(需要在配置bean时指定初始化方法)
- bean的后置处理器(bean的后置处理器会在生命周期的初始化前后添加额外的操作,需要实现BeanPostProcessor接口,且配置到IOC容器中,需要注意的是,bean后置处理器不是单独针对某一个bean生效,而是针对IOC容器中所有bean都会执行)
- bean对象就绪可以使用
- bean对象销毁
- IOC容器关闭
九、FactoryBean
FactoryBean是Spring提供的一种整合第三方框架的常用机制。和普通bean不同,配置一个FactoryBean类型的bean,在获取bean的时候得到的并不是class属性中配置的这个类的对象,而是getObject()方法的返回值。通过这种机制,Spring可以帮我们把复杂组件创建的详细过程和繁琐细节都屏蔽起来,只把最简洁的使用界面展示给我们。
将来我们整合Mybatis时,Spring就是通过FactoryBean机制来帮我们创建SqlSessionFactory对象的。
1.创建类UserFactoryBean
package com.spring.bean;
public class UserFactoryBean implements FactoryBean<User> {@Overridepublic User getObject() throws Exception {return new User();}@Overridepublic Class<?> getObjectType() {return User.class;}
}
2.配置bean
<bean id="user" class="com.spring.bean.UserFactoryBean"></bean>3.测试
@Test
public void testUserFactoryBean(){//获取IOC容器ApplicationContext ac = new ClassPathXmlApplicationContext("spring-factorybean.xml");User user = (User) ac.getBean("user");System.out.println(user);
}
相关文章:
)
spring(二)
一、为对象类型属性赋值 方式一:(引用外部bean) 1.创建班级类Clazz package com.spring.beanpublic class Clazz {private Integer clazzId;private String clazzName;public Integer getClazzId() {return clazzId;}public void setClazzId(Integer clazzId) {th…...

MAC 数据恢复软件: STELLAR Data Recovery For MAC V. 12.1 更多增强功能
天津鸿萌科贸发展有限公司是 Stellar 系列软件的授权代理商。 STELLAR Data Recovery For MAC 该数据恢复软件可从任何存储驱动器、清空的回收站以及崩溃或无法启动的 Mac 设备中恢复丢失或删除的文件。 轻松恢复已删除的文档、照片、音频文件和视频。自定义扫描以帮助恢复特…...

初识godot游戏引擎并安装
简介 Godot是一款自由开源、由社区驱动的2D和3D游戏引擎。游戏开发虽复杂,却蕴含一定的通用规律,正是为了简化这些通用化的工作,游戏引擎应运而生。Godot引擎作为一款功能丰富的跨平台游戏引擎,通过统一的界面支持创建2D和3D游戏。…...

Windows配置Qt+VLC
文章目录 前言下载库文件提取文件编写qmakeqtvlc测试代码 总结 前言 在Windows平台上配置Qt和VLC是开发多媒体应用程序的一个重要步骤。Qt作为一个强大的跨平台应用开发框架,为开发人员提供了丰富的GUI工具和库,而VLC则是一个开源的多媒体播放器&#x…...

本地部署 mistralai/Mistral-Nemo-Instruct-2407
本地部署 mistralai/Mistral-Nemo-Instruct-2407 1. 创建虚拟环境2. 安装 fschat3. 安装 transformers4. 安装 flash-attn5. 安装 pytorch6. 启动 controller7. 启动 mistralai/Mistral-Nemo-Instruct-24078. 启动 api9. 访问 mistralai/Mistral-Nemo-Instruct-2407 1. 创建虚拟…...
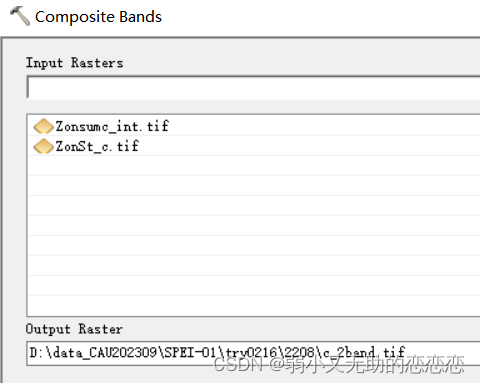
2月科研——arcgis计算植被差异
ArcGIS中,设置高于或低于某个值的像元为 -9999,然后将这些地方设为空——目的:去除异常值和黑色背景值 Con(("T_std ano7.tif" > 2) | ("T_std ano7.tif" < - 2), - 9999,"T_std ano7.tif") SetNull(&…...

深入理解Android中的缓存与文件存储目录
🌟 引言 在Android应用开发中,合理管理应用的数据存储至关重要。应用可能需要保存各种类型的数据,从简单的配置信息到多媒体文件,甚至是缓存数据以提高性能和用户体验。Android提供了多个内置目录来满足这些需求,但它…...

Linux_生产消费者模型
目录 1、生产消费者模型示意图 2、生产者消费者之间的关系 3、定义交易场所 4、实现生产消费者模型 5、伪唤醒 6、多生产多消费者的实际运用 7、POSIX信号量 7.1 初始化信号量 7.2 销毁信号量 7.3 等待信号量 7.4 发布信号量 8、生产消费的环形队列模型 8.1…...

【Vue】`v-if` 指令详解:条件渲染的高效实现
文章目录 一、v-if 指令概述二、v-if 的基本用法1. 基本用法2. 使用 v-else3. 使用 v-else-if 三、v-if 指令的高级用法1. 与 v-for 一起使用2. v-if 的性能优化 四、v-if 的常见应用场景1. 表单验证2. 弹窗控制 五、v-if 指令的注意事项 Vue.js 是一个用于构建用户界面的渐进式…...

junit mockito Base基类
编写单元测试时我们都习惯性减少重复代码 以下基于spring mvc框架,需要手动pom导包 BaseTest类用于启动上下文进行debug调试 MockBaseTset类用于不启动上下文进行打桩mock pom.xml <dependency><groupId>org.mockito</groupId><artifactId…...
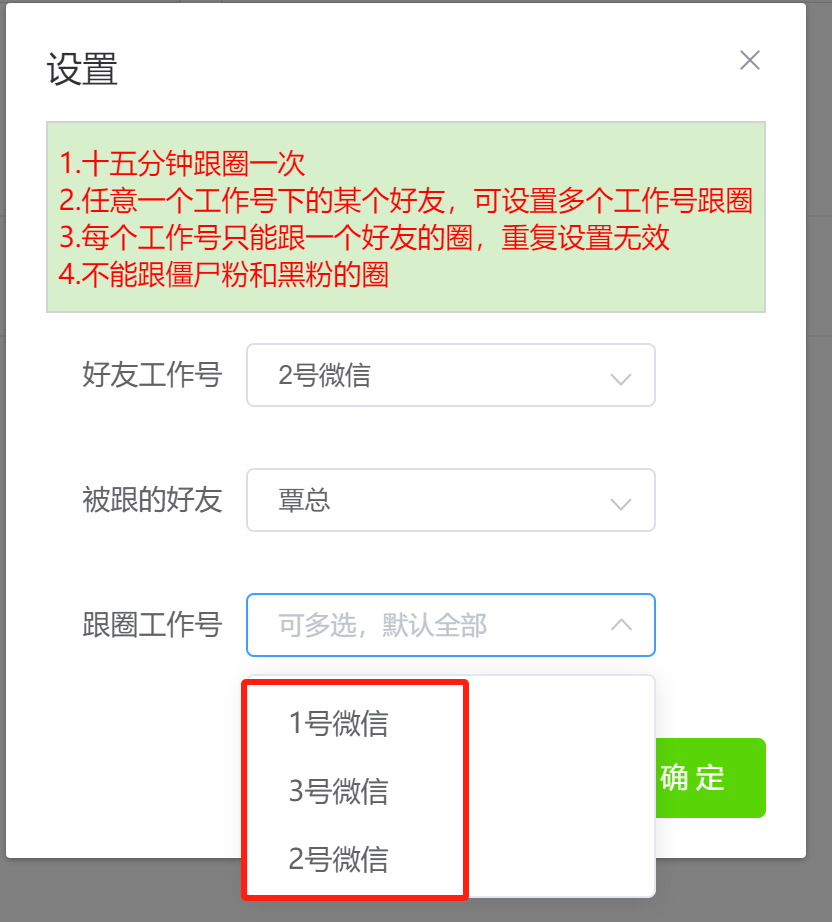
朋友圈运营分享干货2
朋友圈发什么内容? 1、产品相关 产品服务:产品的内容要有“用户视角”从用户的使用痛点入手,写到用户心坎里,才能引发购买 买家秀:买家秀是很好的朋友圈索材,可以让用户有一个正面感知清楚了解工品的情况…...

linux中创建一个名为“thread1“,堆栈大小为1024,优先级为2的线程
在Linux中,直接创建一个具有特定堆栈大小和优先级的线程通常不是通过标准的POSIX线程(pthread)库直接支持的。POSIX线程库(pthread)提供了创建和管理线程的基本机制,但不直接支持设置线程的堆栈大小或优先级…...

架构以及架构中的组件
架构以及架构中的组件 Transform Transform 以下的代码包含: 标准化的示例残差化的示例 # huggingface # transformers# https://www.bilibili.com/video/BV1At4y1W75x?spm_id_from333.999.0.0import copy import math from collections import namedtupleimport …...

Docker启动PostgreSql并设置时间与主机同步
在 Docker 中启动 PostgreSql 时,需要配置容器的时间与主机同步。可以通过在 Dockerfile 或者 Docker Compose 文件中设置容器的时区,或者使用宿主机的时间来同步容器的时间。这样可以确保容器中的 PostgreSql 与主机的时间保持一致,避免在使…...
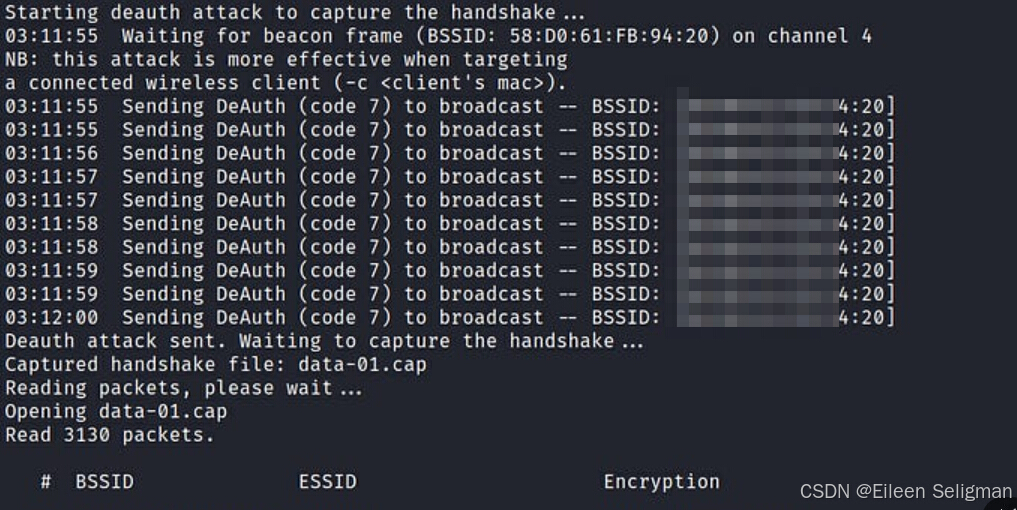
提升无线网络安全:用Python脚本发现并修复WiFi安全问题
文章目录 概要环境准备技术细节3.1 实现原理3.2 创建python文件3.3 插入内容3.4 运行python脚本 加固建议4.1 选择强密码4.2 定期更换密码4.3 启用网络加密4.4 关闭WPS4.5 隐藏SSID4.6 限制连接设备 小结 概要 在本文中,我们将介绍并展示如何使用Python脚本来测试本…...
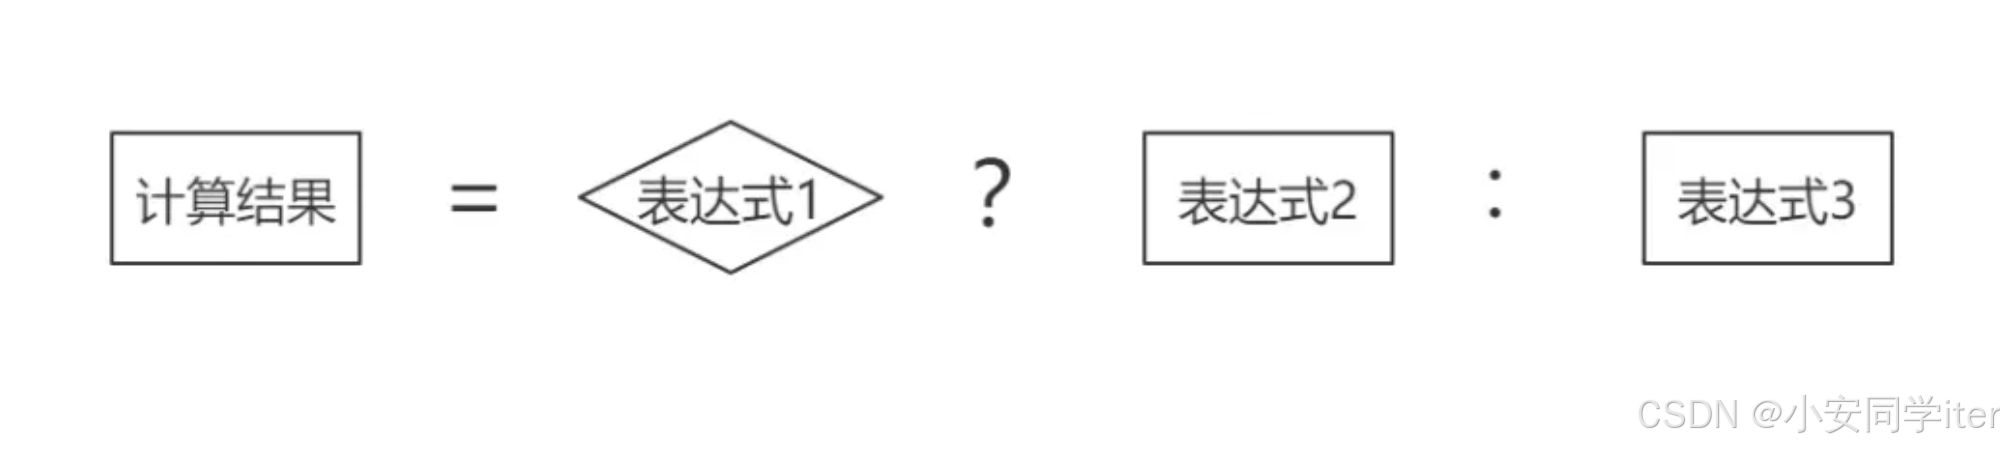
#三元运算符(python/java/c)
引入:什么是三元运算符呢?无疑其操作元有三个,一个是条件表达式,剩余两个为值,条件表达式为真时运算取第一个值,为假时取第二个值。 一 Python true_expression if condition else false_expressi…...

探索Python自然语言处理的新篇章:jionlp库介绍
探索Python自然语言处理的新篇章:jionlp库介绍 1. 背景:为什么选择jionlp? 在Python的生态中,自然语言处理(NLP)是一个活跃且不断发展的领域。jionlp是一个专注于中文自然语言处理的库,它提供了…...
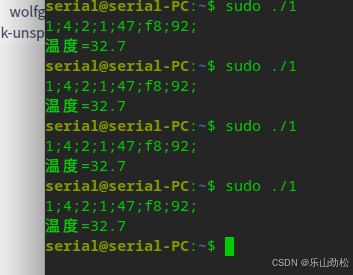
Deepin系统,中盛科技温湿度模块读温度纯c程序(备份)
#include <stdio.h> #include <fcntl.h> #include <unistd.h> #include <termios.h>int main() {int fd;struct termios options;// 打开串口设备fd open("/dev/ttyMP0", O_RDWR | O_NOCTTY|O_NDELAY); //O_NDELAY:打开设备不阻塞//O_NOCTT…...

文件包含漏洞: 函数,实例[pikachu_file_inclusion_local]
文件包含 文件包含是一种较为常见技术,允许程序员在不同的脚本或程序中重用代码或调用文件 主要作用和用途: 代码重用:通过将通用函数或代码段放入单独的文件中,可以在多个脚本中包含这些文件,避免重复编写相同代码。…...

学习计划2024下半年
基础: 学习《算法第4版》,学习leetcode上的面试经典150题,使用C完成;再看一般《深入理解计算机系统》语言: 学习go语言,并且用它写一个小软件(还没想好什么),写一个pingtool程序编程思想: 阅读经…...
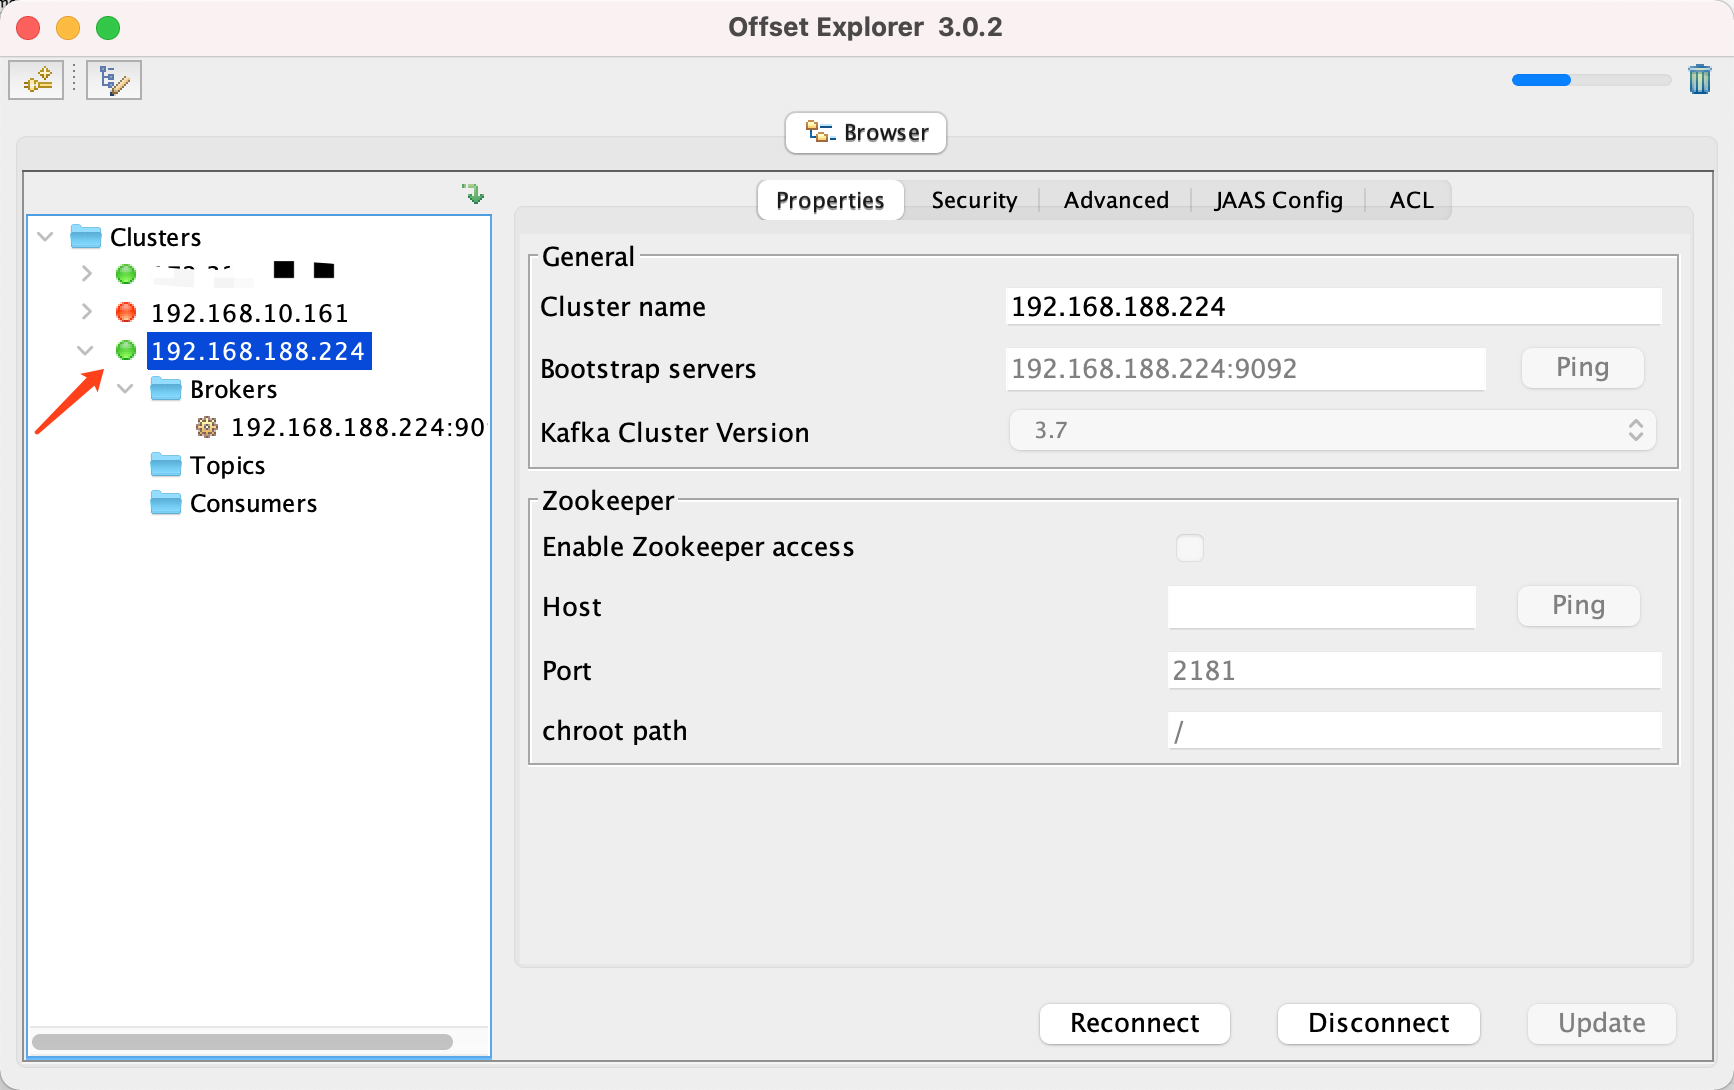
Docker 运行 Kafka 带 SASL 认证教程
Docker 运行 Kafka 带 SASL 认证教程 Docker 运行 Kafka 带 SASL 认证教程一、说明二、环境准备三、编写 Docker Compose 和 jaas文件docker-compose.yml代码说明:server_jaas.conf 四、启动服务五、验证服务六、连接kafka服务七、总结 Docker 运行 Kafka 带 SASL 认…...

Frozen-Flask :将 Flask 应用“冻结”为静态文件
Frozen-Flask 是一个用于将 Flask 应用“冻结”为静态文件的 Python 扩展。它的核心用途是:将一个 Flask Web 应用生成成纯静态 HTML 文件,从而可以部署到静态网站托管服务上,如 GitHub Pages、Netlify 或任何支持静态文件的网站服务器。 &am…...

使用van-uploader 的UI组件,结合vue2如何实现图片上传组件的封装
以下是基于 vant-ui(适配 Vue2 版本 )实现截图中照片上传预览、删除功能,并封装成可复用组件的完整代码,包含样式和逻辑实现,可直接在 Vue2 项目中使用: 1. 封装的图片上传组件 ImageUploader.vue <te…...
前端开发面试题总结-JavaScript篇(一)
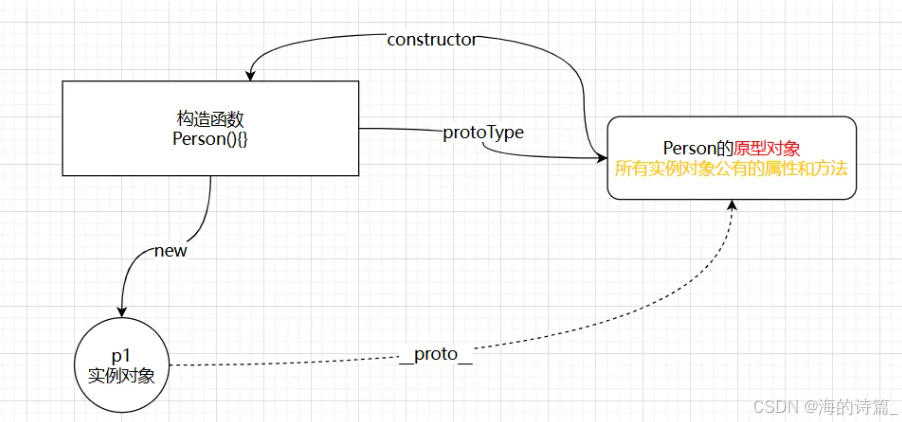
文章目录 JavaScript高频问答一、作用域与闭包1.什么是闭包(Closure)?闭包有什么应用场景和潜在问题?2.解释 JavaScript 的作用域链(Scope Chain) 二、原型与继承3.原型链是什么?如何实现继承&a…...

实现弹窗随键盘上移居中
实现弹窗随键盘上移的核心思路 在Android中,可以通过监听键盘的显示和隐藏事件,动态调整弹窗的位置。关键点在于获取键盘高度,并计算剩余屏幕空间以重新定位弹窗。 // 在Activity或Fragment中设置键盘监听 val rootView findViewById<V…...

网络编程(UDP编程)
思维导图 UDP基础编程(单播) 1.流程图 服务器:短信的接收方 创建套接字 (socket)-----------------------------------------》有手机指定网络信息-----------------------------------------------》有号码绑定套接字 (bind)--------------…...
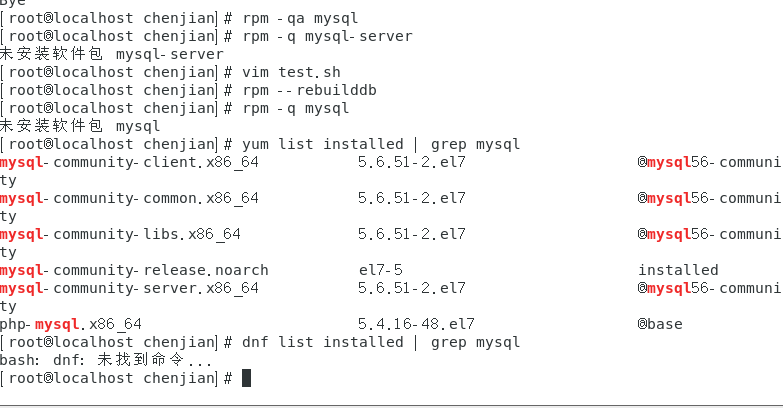
mysql已经安装,但是通过rpm -q 没有找mysql相关的已安装包
文章目录 现象:mysql已经安装,但是通过rpm -q 没有找mysql相关的已安装包遇到 rpm 命令找不到已经安装的 MySQL 包时,可能是因为以下几个原因:1.MySQL 不是通过 RPM 包安装的2.RPM 数据库损坏3.使用了不同的包名或路径4.使用其他包…...

【Oracle】分区表
个人主页:Guiat 归属专栏:Oracle 文章目录 1. 分区表基础概述1.1 分区表的概念与优势1.2 分区类型概览1.3 分区表的工作原理 2. 范围分区 (RANGE Partitioning)2.1 基础范围分区2.1.1 按日期范围分区2.1.2 按数值范围分区 2.2 间隔分区 (INTERVAL Partit…...
中关于正整数输入的校验规则)
Element Plus 表单(el-form)中关于正整数输入的校验规则
目录 1 单个正整数输入1.1 模板1.2 校验规则 2 两个正整数输入(联动)2.1 模板2.2 校验规则2.3 CSS 1 单个正整数输入 1.1 模板 <el-formref"formRef":model"formData":rules"formRules"label-width"150px"…...
android RelativeLayout布局
<?xml version"1.0" encoding"utf-8"?> <RelativeLayout xmlns:android"http://schemas.android.com/apk/res/android"android:layout_width"match_parent"android:layout_height"match_parent"android:gravity&…...