深度学习-卷积神经网络-基于VGG16模型, 实现猫狗二分类(文末附带数据集下载链接, 长期有效)
简介:
1.基于VGG16模型进行特征提取, 结合mlp实现猫狗二分类
2.训练数据--"dog_cat_class\training_set"
3.模型训练流程
1.对图像数据进行导入和预处理
2.搭建模型, 导入VGG16模型, 去除mlp层, 将经过VGG16训练后的数据作为输入, 输入到自建的mlp层中进行训练,
要求:
hidden layers=1, units=10, activation=relu
out layer:units=1, activation=sigmoid
3.对模型进行评估和预测
4.随机下载百度的12张猫/狗的图片, 对模型进行实战测试
4.代码实现(推荐直接看第二个, 比较规范)
4.1, 小垃圾写的(我写的)
# ============================================================
# 1.数据集导入, 单张图片导入, 可以通过load_image导入
from keras.preprocessing.image import load_img, img_to_array
img_path=r"C:\Users\鹰\Desktop\ML_Set\dog_cat_class\training_set\dogs\dog.1.jpg"
img_data=load_img(img_path, target_size=(224,224))
img_data=img_to_array(img_data)
# print(img_data.shape)
# type(img_data)# 2.模型搭建和模型训练
# 对图像增加一个维度, 然后通过图像预处理, 成为合格的图像输入格式,
from keras.applications.vgg16 import preprocess_input
import numpy as np
x_train=np.expand_dims(img_data, axis=0)  # 这里最好换一个名字, 如果接受变量还是img_data的话, 当再一次执行这个代码单元, 会增加数组的维度
x_train=preprocess_input(x_train)
# print(x_train.shape)
#  将合格的图片数据输入到VGG16模型中
from keras.applications.vgg16 import VGG16
extract_model=VGG16(include_top=False, weights='imagenet')
img_features=extract_model.predict(x_train)
print(img_features.shape)# 实现对图片的批量读入
import numpy as npfrom keras.applications.vgg16 import VGG16
vgg=VGG16(include_top=False, weights='imagenet')from keras.preprocessing.image import load_img, img_to_array
from keras.applications.vgg16 import preprocess_input
def model_prepro(model, img_path):img_data=load_img(img_path, target_size=(224,224))img_array=img_to_array(img_data)x_train=np.expand_dims(img_array, axis=0)x_train=preprocess_input(x_train)x_vgg=model.predict(x_train)x_vgg=x_vgg.reshape(1, 25088)return x_vggimport os
# file_path=r"C:\Users\鹰\Desktop\ML_Set\dog_cat_class\training_set\"+sub_file
file_path1=r"C:\Users\鹰\Desktop\ML_Set\dog_cat_class\training_set\cat"
img_name_list = os.listdir(file_path1)img_list=[]
for i in img_name_list:if os.path.splitext(i)[1]=='.jpg':  img_list.append(i)
img_path_list=[os.path.join(file_path1, i) for i in img_list]
img_feature_array1=np.zeros([len(img_path_list), 25088])
for i in range(len(img_path_list)):img_feature=model_prepro(vgg, img_path_list[i])img_feature_array1[i]=img_feature# 显示正在处理的图片print("preprecessing is"+img_list[i])#####################################################
file_path2=r"C:\Users\鹰\Desktop\ML_Set\dog_cat_class\training_set\dog"
img_name_list = os.listdir(file_path2)img_list=[]
for i in img_name_list:if os.path.splitext(i)[1]=='.jpg':  img_list.append(i)
img_path_list=[os.path.join(file_path2, i) for i in img_list]
img_feature_array2=np.zeros([len(img_path_list), 25088])
for i in range(len(img_path_list)):img_feature=model_prepro(vgg, img_path_list[i])img_feature_array2[i]=img_feature# 显示正在处理的图片print("preprecessing is"+img_list[i])print(img_feature_array1.shape, img_feature_array2.shape)
y1=np.zeros(600)
y2=np.ones(602)
x_all=np.concatenate((img_feature_array1, img_feature_array2), axis=0)
y_all=np.concatenate((y1, y2), axis=0)
y_all=y_all.reshape(-1,1)
print(x_all.shape, y_all.shape)
# 分割数据集
from sklearn.model_selection import train_test_split
x_train, x_test,y_train, y_test = train_test_split(x_all, y_all, test_size=0.3, random_state=10)
print(x_train.shape, x_test.shape, y_train.shape, y_test.shape)# MLP模型搭建和训练
from keras.models import Sequential
vgg_model=Sequential()
from keras.layers import Dense
vgg_model.add(Dense(units=10, input_dim=25088, activation='relu'))
vgg_model.add(Dense(units=1, activation='sigmoid'))
vgg_model.compile(optimizer='adam', metrics=['accuracy'], loss='binary_crossentropy')
vgg_model.fit(x_train, y_train, epochs=50)
vgg_model.summary()# ==========================================================================
# 训练集预测
y_train_predict=vgg_model.predict(x_train)
y_train_predict=np.argmax(y_train_predict, axis=1)
print(y_train_predict.shape)
# 计算train准确率
from sklearn.metrics import accuracy_score
accuracy_score=accuracy_score(y_train, y_train_predict)
print("accuracy is ", accuracy_score)# 测试集预测
y_test_predict=vgg_model.predict(x_test)
y_test_predict=np.argmax(y_test_predict, axis=1)
print(y_test_predict.shape)
# 计算test准确率
from sklearn.metrics import accuracy_score
accuracy_score=accuracy_score(y_test, y_test_predict)
print("accuracy is ", accuracy_score)# ====================================================================
#  在网上下载图片, 进行随机测试
from keras.preprocessing.image import load_img, img_to_array
pic_animal=r"C:\Users\鹰\Desktop\Dog+Cat\11.jpg"
pic_animal=load_img(pic_animal, target_size=(224,224))
pic_animal=img_to_array(pic_animal)
x_train=np.expand_dims(pic_animal, axis=0)
x_train=preprocess_input(x_train)
# 特征提取
features=vgg.predict(x_train)
x=features.reshape(1, -1)
print(x.shape)
print(features.shape)
y_predict=vgg_model.predict(x)
import numpy as np
y_predict=np.argmax(y_predict, axis=1)
print("result is :", y_predict)
# 结果为0--猫, 结果为1--狗
结果是...

4.2: 千问大模型修改后的
import numpy as np
from keras.preprocessing.image import load_img, img_to_array
from keras.applications.vgg16 import preprocess_input, VGG16
from sklearn.model_selection import train_test_split
from keras.models import Sequential
from keras.layers import Dense
from sklearn.metrics import accuracy_score
import os# 1. 数据集导入, 单张图片导入, 可以通过load_image导入
img_path = r"C:\Users\鹰\Desktop\ML_Set\dog_cat_class\training_set\dogs\dog.1.jpg"
img_data = load_img(img_path, target_size=(224, 224))
img_data = img_to_array(img_data)
print("Single image shape:", img_data.shape)# 2. 模型搭建和模型训练
def model_prepro(model, img_path):img_data = load_img(img_path, target_size=(224, 224))img_array = img_to_array(img_data)x_train = np.expand_dims(img_array, axis=0)x_train = preprocess_input(x_train)x_vgg = model.predict(x_train)x_vgg = x_vgg.reshape(1, -1)return x_vgg# 加载 VGG16 模型
vgg = VGG16(include_top=False, weights='imagenet')# 处理 cat 文件夹
file_path1 = r"C:\Users\鹰\Desktop\ML_Set\dog_cat_class\training_set\cat"
img_name_list = os.listdir(file_path1)
img_list = [i for i in img_name_list if os.path.splitext(i)[1].lower() == '.jpg']
img_path_list = [os.path.join(file_path1, i) for i in img_list]
img_feature_array1 = np.zeros([len(img_path_list), 25088])
for i in range(len(img_path_list)):img_feature = model_prepro(vgg, img_path_list[i])img_feature_array1[i] = img_featureprint(f"Processing: {img_list[i]} (Cat)")# 处理 dog 文件夹
file_path2 = r"C:\Users\鹰\Desktop\ML_Set\dog_cat_class\training_set\dog"
img_name_list = os.listdir(file_path2)
img_list = [i for i in img_name_list if os.path.splitext(i)[1].lower() == '.jpg']
img_path_list = [os.path.join(file_path2, i) for i in img_list]
img_feature_array2 = np.zeros([len(img_path_list), 25088])
for i in range(len(img_path_list)):img_feature = model_prepro(vgg, img_path_list[i])img_feature_array2[i] = img_featureprint(f"Processing: {img_list[i]} (Dog)")print("Feature array shapes:", img_feature_array1.shape, img_feature_array2.shape)# 创建标签
y1 = np.zeros(len(img_feature_array1))
y2 = np.ones(len(img_feature_array2))# 合并特征和标签
x_all = np.concatenate((img_feature_array1, img_feature_array2), axis=0)
y_all = np.concatenate((y1, y2), axis=0)
y_all = y_all.reshape(-1, 1)
print("Combined data shapes:", x_all.shape, y_all.shape)# 分割数据集
x_train, x_test, y_train, y_test = train_test_split(x_all, y_all, test_size=0.3, random_state=10)
print("Data split shapes:", x_train.shape, x_test.shape, y_train.shape, y_test.shape)# MLP模型搭建和训练
vgg_model = Sequential()
vgg_model.add(Dense(units=128, input_dim=25088, activation='relu'))
vgg_model.add(Dense(units=64, activation='relu'))
vgg_model.add(Dense(units=1, activation='sigmoid'))
vgg_model.compile(optimizer='adam', metrics=['accuracy'], loss='binary_crossentropy')
vgg_model.fit(x_train, y_train, epochs=100, batch_size=32, validation_data=(x_test, y_test))
vgg_model.summary()# 训练集预测
y_train_predict = vgg_model.predict(x_train)
y_train_predict = (y_train_predict > 0.5).astype(int)  # 使用阈值 0.5 进行二分类
print("Train prediction shape:", y_train_predict.shape)# 计算train准确率
train_accuracy = accuracy_score(y_train, y_train_predict)
print("Train accuracy is:", train_accuracy)# 测试集预测
y_test_predict = vgg_model.predict(x_test)
y_test_predict = (y_test_predict > 0.5).astype(int)  # 使用阈值 0.5 进行二分类
print("Test prediction shape:", y_test_predict.shape)# 计算test准确率
test_accuracy = accuracy_score(y_test, y_test_predict)
print("Test accuracy is:", test_accuracy)# 在网上下载图片, 进行随机测试
pic_animal = r"C:\Users\鹰\Desktop\Dog+Cat\11.jpg"
pic_animal = load_img(pic_animal, target_size=(224, 224))
pic_animal = img_to_array(pic_animal)
x_train = np.expand_dims(pic_animal, axis=0)
x_train = preprocess_input(x_train)# 特征提取
features = vgg.predict(x_train)
x = features.reshape(1, -1)
print("Feature shape:", x.shape)
print("Feature shape before reshape:", features.shape)# 预测
y_predict = vgg_model.predict(x)
y_predict = (y_predict > 0.5).astype(int)  # 使用阈值 0.5 进行二分类
print("Prediction result is:", "猫" if y_predict[0][0] == 0 else "狗")
结果是...

这对我的心灵的伤害是百分百的暴击, 我的是反面教材........
想要看正版规范代码, 就看第二个, 当然,
如果觉得50%的成功率还行的话, 那我的勉强也能看
兄弟们不嫌弃的话, 也可以看看, 吸取一下经验教训, 看个乐子
5.扩展
扩展1:
keras.models 模块中的主要组成部分:
1.Sequential 模型是一种线性堆叠的层结构,适用于大多数简单的神经网络
2.Functional API 是一种更灵活的模型构建方式,允许创建复杂的非线性拓扑结构
扩展2:
keras.applications 导入 VGG16 时,你可以得到以下主要部分:
VGG16 Model: 这是整个 VGG16 网络模型,可以直接用来进行预测或者作为迁移学习的基础。
Preprocess Input: 一个函数,用于对输入图像数据进行预处理,以便与 VGG16 模型兼容。实现:from keras.applications.vgg16 import preprocess_input。
Decode Predictions: 一个函数,用于将 VGG16 模型的输出转换为人类可读的标签。实现:from keras.applications.vgg16 import decode_predictions。
Weights: 预训练的权重文件。这些权重是在 ImageNet 数据集上训练得到的,可以帮助你在自己的任务上快速获得较好的性能。
6.数据集链接:
官网:
Cat and Dog | KaggleCats and Dogs dataset to train a DL model![]() https://www.kaggle.com/datasets/tongpython/cat-and-dog?resource=download
https://www.kaggle.com/datasets/tongpython/cat-and-dog?resource=download
百度网盘分享:
链接:https://pan.baidu.com/s/1T1mymwIqOOF3MKfWxRtnpQ
提取码:6axn
相关文章:
深度学习-卷积神经网络-基于VGG16模型, 实现猫狗二分类(文末附带数据集下载链接, 长期有效)
简介: 1.基于VGG16模型进行特征提取, 结合mlp实现猫狗二分类 2.训练数据--"dog_cat_class\training_set" 3.模型训练流程 1.对图像数据进行导入和预处理 2.搭建模型, 导入VGG16模型, 去除mlp层, 将经过VGG16训练后的数据作为输入, 输入到自建的mlp层中进行训练, 要…...

计算Java集合占用的空间【详解】
以ArrayList为例,假设集合元素类型是Person类型,假设集合容量为10,目前有两个person对象{name:“Jack”,age12} {name:“Tom”,age14} public class Person{private String name;private int age; }估算Person对象占用的大小: 对…...

仕考网:关于中级经济师考试的介绍
中级经济师考试是一种职称考试,每年举办一次,报名时间在7-8月,考试时间在10-11月 报名入口:中guo人事考试网 报名条件: 1.高中毕业并取得初级经济专业技术资格,从事相关专业工作满10年; 2.具备大学专科…...

SYN590RL 300MHz至450MHz ASK接收机芯片IC
一般描述 SYN590RL是赛诺克全新开发设计的一款宽电压范围,低功耗,高性能,无需外置AGC电容,灵敏度达到典型-110dBm,300MHz”450MHz 频率范围应用的单芯片ASK或OOK射频接收器。 SYN59ORL是一款典型的即插即用型单片高集成度无线接收器&…...

15分钟学 Go 第 20 天:Go的错误处理
第20天:Go的错误处理 目标 学习如何处理错误,以确保Go程序的健壮性和可维护性。 1. 错误处理的重要性 在开发中,错误处理至关重要。程序在运行时可能会出现各种问题,例如文件未找到、网络连接失败等。正确的错误处理能帮助我们…...

C++——string的模拟实现(上)
目录 引言 成员变量 1.基本框架 成员函数 1.构造函数和析构函数 2.拷贝构造函数 3.容量操作函数 3.1 有效长度和容量大小 3.2 容量操作 3.3 访问操作 (1)operator[]函数 (2)iterator迭代器 3.4 修改操作 (1)push_back()和append() (2)operator函数 引言 在 C—…...

JavaCV 之均值滤波:图像降噪与模糊的权衡之道
🧑 博主简介:CSDN博客专家,历代文学网(PC端可以访问:https://literature.sinhy.com/#/literature?__c1000,移动端可微信小程序搜索“历代文学”)总架构师,15年工作经验,…...

桥接模式,外界与主机通,与虚拟机不通
一 二 在此选择Windows与外界连接的网卡,通过有线连就选有线网卡,通过无线连就选无线网卡。 三 如果需要设置固定IP,则选择"Manual"进行设置。我这边根据实际需要,走无线的时候用DHCP,走有线的时候设固定IP…...

用HTML构建酷炫的文件上传下载界面
1. 基础HTML结构 首先,我们构建一个基本的HTML结构,包括一个表单用于文件上传,以及一个列表用于展示已上传文件: HTML <!DOCTYPE html> <html> <head><title>酷炫文件上传下载</title><link …...

Gateway 统一网关
一、初识 Gateway 1. 为什么需要网关 我们所有的服务可以让任何请求访问,但有些业务不是对外公开的,这就需要用网关来统一替我们筛选请求,它就像是房间的一道门,想进入房间就必须经过门。而请求想要访问微服务,就必须…...

7 种常见的前端攻击
大家都知道,保证网站的安全是十分重要的,一旦网站被攻陷,就有可能造成用户的经济损失,隐私泄露,网站功能被破坏,或者是传播恶意病毒等重大危害。所以下面我们就来讲讲7 种常见的前端攻击。 1. 跨站脚本 (X…...

element plus实现点击上传于链接上传并且回显到upload组件中
摘要: 今天遇到一个问题:vue3使用elemnt plus的上传图片时,数据是从别人的系统导出来的商品,图片是http的形式的,并且商品很多的,一个一个下载下来再上传很麻烦的,所以本系统插件商品时图片使用…...
ELK日志分析系统部署
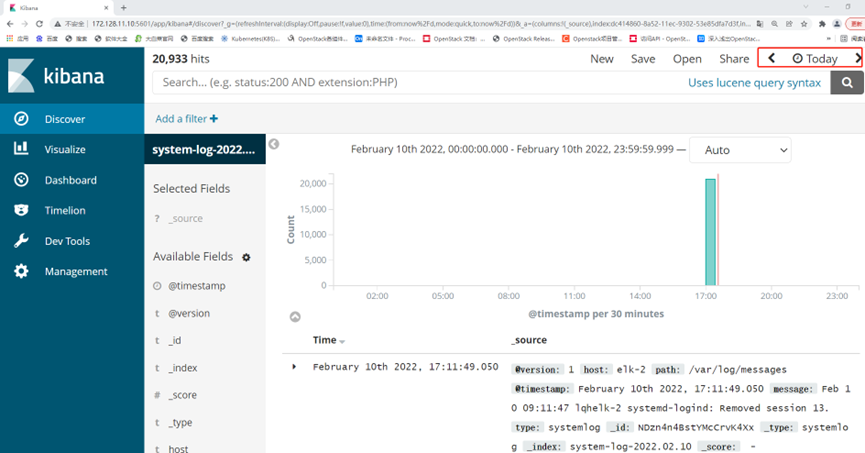
ELK日志分析系统 ELK指的是ElasticsearchLogstashKibana这种架构的缩写。 ELK是一种日志分析平台,在很早之前我们经常使用Shell三剑客(一般泛指grep、sed、awk)来进行日志分析,这种方式虽然也可以应对多种场景,但是当…...

驾校小程序:一站式学车解决方案的设计与实践
一、引言 随着移动互联网技术的飞速发展,人们的生活方式和消费习惯正在发生深刻变化。驾校作为传统的服务行业,也面临着数字化转型的迫切需求。驾校小程序作为一种轻量级的应用,能够为用户提供便捷、丰富的学车服务,成…...

【自然语言处理】BERT模型
BERT:Bidirectional Encoder Representations from Transformers BERT 是 Google 于 2018 年提出的 自然语言处理(NLP)模型,它基于 Transformer 架构的 Encoder 部分。BERT 的出现极大提升了 NLP 任务的性能,如问答系…...
接口)
Android 添加如下飞行模式(飞行模式开和关、飞行模式开关菜单显示隐藏)接口
请添加如下飞行模式(飞行模式开关、飞行模式开关显示隐藏)接口: 飞行模式飞行模式开关com.action.airplankey: enable value:boolean true open the airplan false close the airplan关闭Intent intent = new Intent(); intent.setAction("com.action.airplan");…...

【Vue3】基于 Vue3 + ECharts 实现北京市区域地图可视化
文章目录 基于 Vue3 ECharts 实现北京市区域地图可视化1、引言2、项目初始化2.1、环境搭建2.2 、安装依赖2.3、项目结构 3、地图数据准备3.1、地图 JSON 文件获取(具体的json数据) 4、 组件开发4.1、Map 组件的设计思路4.2、基础结构实现4.3、核心数据结…...

【IC】什么是min period check
在 Synopsys Primetime 工具中可以检查.lib 文件中时钟输入的最小周期。想象这样一个场景,有一个设计 A,它有一个名为 clk 的时钟,并且该设计的 clk 周期被设定为一个值,比如 2 纳秒,即 500MHz。假设我们在进行静态时序…...

MyBatis入门之一对多关联关系(示例)
【图书介绍】《SpringSpring MVCMyBatis从零开始学(视频教学版)(第3版)》-CSDN博客 《SpringSpring MVCMyBatis从零开始学(视频教学版)(第3版)》(杨章伟,刘祥淼)【摘要 书评 试读】- 京东图书 …...

【Git 】Windows 系统下 Git 文件名大小写不敏感
背景 在 Windows 系统上,Git 对文件名大小写的不敏感性问题确实存在。由于 Windows 文件系统(如 NTFS )在默认情况下不区分文件名大小写所导致的。 原因分析 文件系统差异 Windows文件系统(如 NTFS)默认不区分文件名…...

利用ngx_stream_return_module构建简易 TCP/UDP 响应网关
一、模块概述 ngx_stream_return_module 提供了一个极简的指令: return <value>;在收到客户端连接后,立即将 <value> 写回并关闭连接。<value> 支持内嵌文本和内置变量(如 $time_iso8601、$remote_addr 等)&a…...

51c自动驾驶~合集58
我自己的原文哦~ https://blog.51cto.com/whaosoft/13967107 #CCA-Attention 全局池化局部保留,CCA-Attention为LLM长文本建模带来突破性进展 琶洲实验室、华南理工大学联合推出关键上下文感知注意力机制(CCA-Attention),…...

.Net框架,除了EF还有很多很多......
文章目录 1. 引言2. Dapper2.1 概述与设计原理2.2 核心功能与代码示例基本查询多映射查询存储过程调用 2.3 性能优化原理2.4 适用场景 3. NHibernate3.1 概述与架构设计3.2 映射配置示例Fluent映射XML映射 3.3 查询示例HQL查询Criteria APILINQ提供程序 3.4 高级特性3.5 适用场…...
ESP32读取DHT11温湿度数据
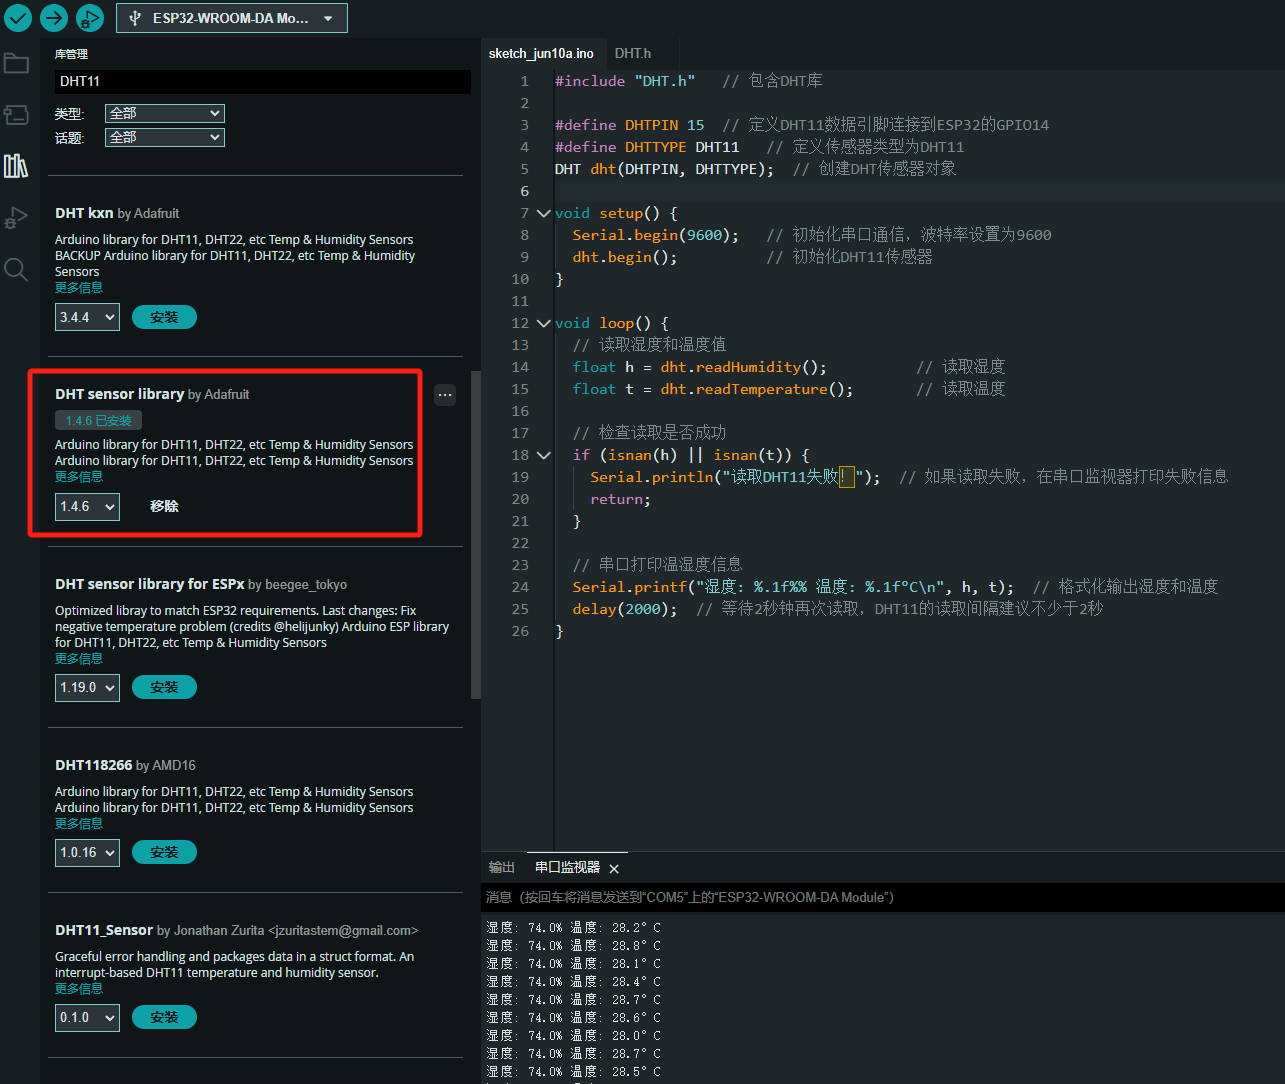
芯片:ESP32 环境:Arduino 一、安装DHT11传感器库 红框的库,别安装错了 二、代码 注意,DATA口要连接在D15上 #include "DHT.h" // 包含DHT库#define DHTPIN 15 // 定义DHT11数据引脚连接到ESP32的GPIO15 #define D…...

抖音增长新引擎:品融电商,一站式全案代运营领跑者
抖音增长新引擎:品融电商,一站式全案代运营领跑者 在抖音这个日活超7亿的流量汪洋中,品牌如何破浪前行?自建团队成本高、效果难控;碎片化运营又难成合力——这正是许多企业面临的增长困局。品融电商以「抖音全案代运营…...
基于IDIG-GAN的小样本电机轴承故障诊断
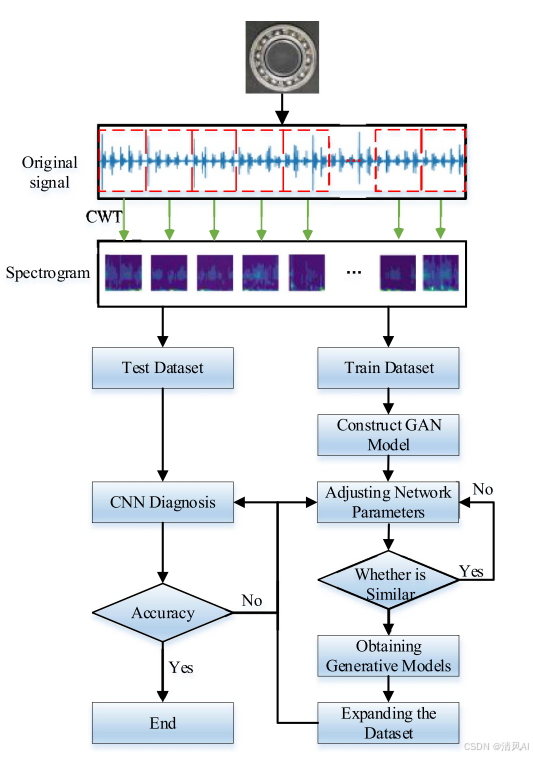
目录 🔍 核心问题 一、IDIG-GAN模型原理 1. 整体架构 2. 核心创新点 (1) 梯度归一化(Gradient Normalization) (2) 判别器梯度间隙正则化(Discriminator Gradient Gap Regularization) (3) 自注意力机制(Self-Attention) 3. 完整损失函数 二…...

解读《网络安全法》最新修订,把握网络安全新趋势
《网络安全法》自2017年施行以来,在维护网络空间安全方面发挥了重要作用。但随着网络环境的日益复杂,网络攻击、数据泄露等事件频发,现行法律已难以完全适应新的风险挑战。 2025年3月28日,国家网信办会同相关部门起草了《网络安全…...
springboot 日志类切面,接口成功记录日志,失败不记录
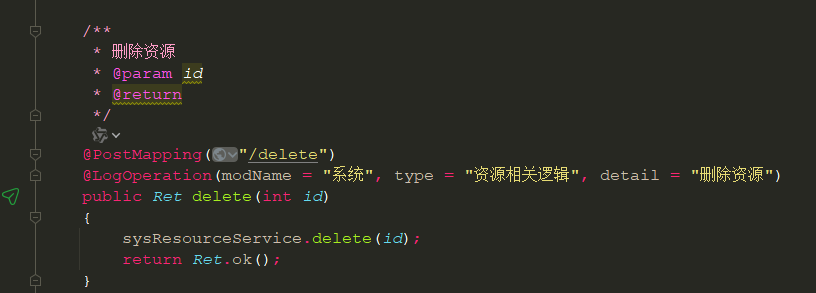
springboot 日志类切面,接口成功记录日志,失败不记录 自定义一个注解方法 import java.lang.annotation.ElementType; import java.lang.annotation.Retention; import java.lang.annotation.RetentionPolicy; import java.lang.annotation.Target;/***…...

小木的算法日记-多叉树的递归/层序遍历
🌲 从二叉树到森林:一文彻底搞懂多叉树遍历的艺术 🚀 引言 你好,未来的算法大神! 在数据结构的世界里,“树”无疑是最核心、最迷人的概念之一。我们中的大多数人都是从 二叉树 开始入门的,它…...
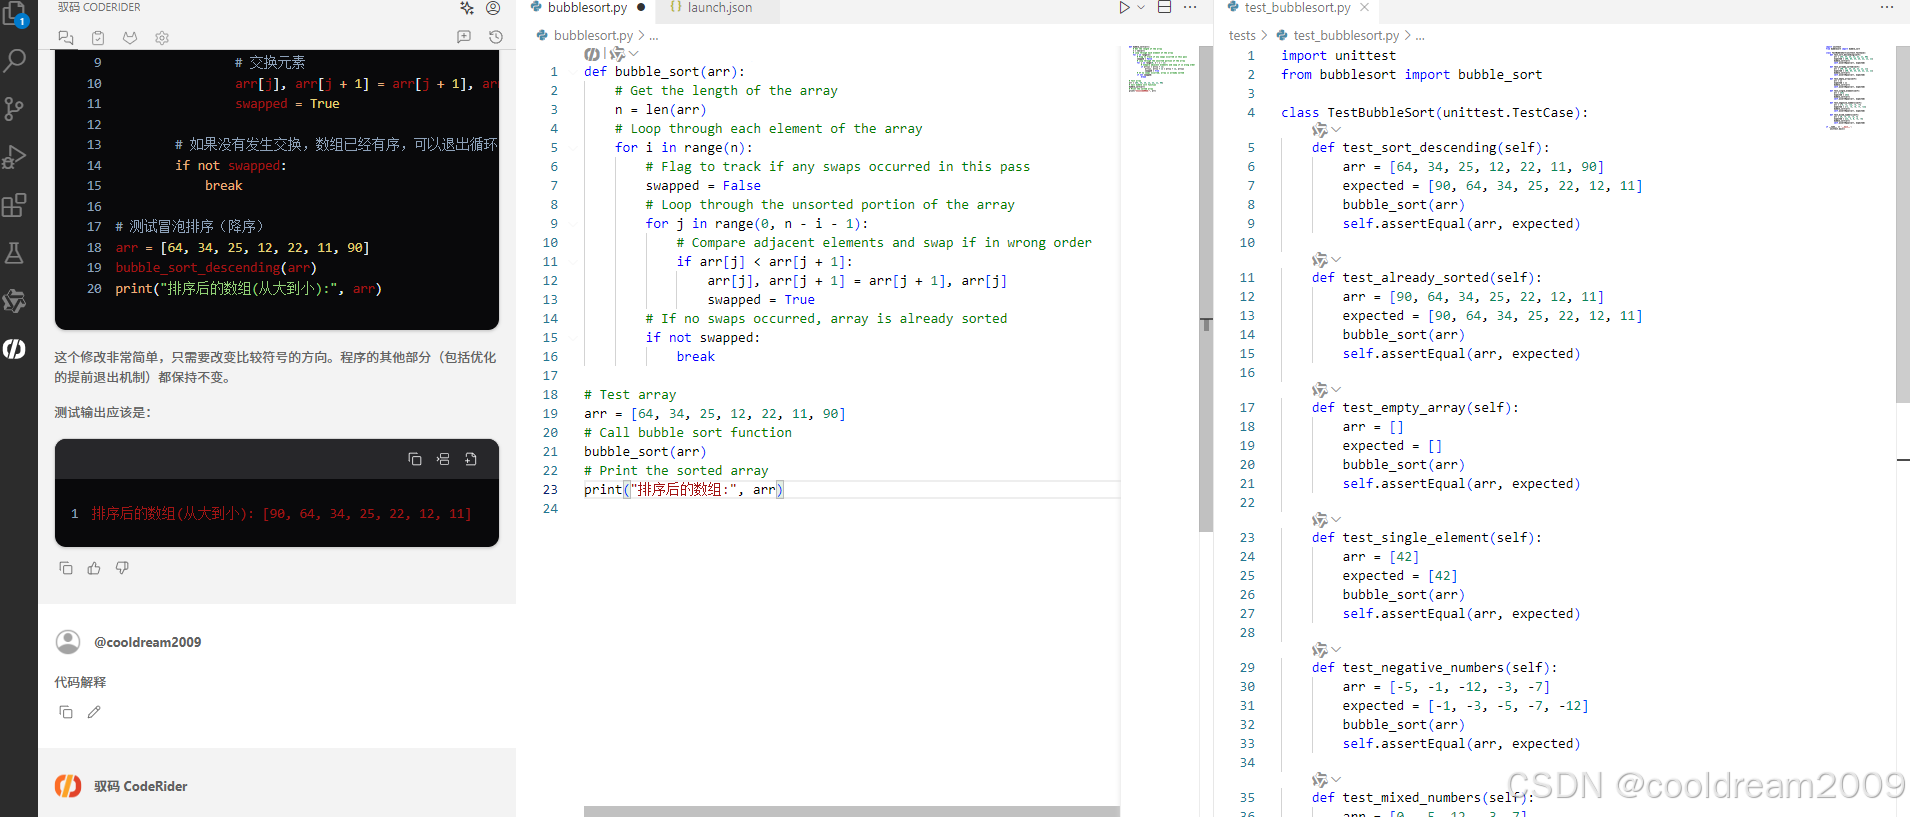
在 Visual Studio Code 中使用驭码 CodeRider 提升开发效率:以冒泡排序为例
目录 前言1 插件安装与配置1.1 安装驭码 CodeRider1.2 初始配置建议 2 示例代码:冒泡排序3 驭码 CodeRider 功能详解3.1 功能概览3.2 代码解释功能3.3 自动注释生成3.4 逻辑修改功能3.5 单元测试自动生成3.6 代码优化建议 4 驭码的实际应用建议5 常见问题与解决建议…...
