Netty小白入门教程
一、概述
1.1 概念
Netty是一个异步的基于事件驱动(即多路复用技术)的网络应用框架,用于快速开发可维护、高性能的网络服务器和客户端。
1.2 地位
Netty在Java网络应用框架中的地位就好比,Spring框架在JavaEE开发中的地位。
以下的框架都使用了Netty,因为他们有网络通信需求。
- Cassandra:非关系型数据库
- Spark:大数据分布式计算框架
- Hadoop:大数据分布式存储框架
- RocketMQ:阿里开源的消息队列
- ElasticSearch:搜索引擎
- gRPC:RPC框架
- Dubbo:RPC框架
- Spring 5.x:flux api完全抛弃了tomcat,使用netty作为服务器端
- Zookeeper:分布式协调框架
1.3 优势
- Netty同样是基于java nio开发。如果自己使用nio开发,工作量大,bug 多,这是因为Netty已经做好了基础部分
- 构建协议
- 解决 TCP 传输问题,如粘包、半包
- Linux多路复用的底层是epoll,会存在空轮询导致 CPU 100%(对应nio中Linux下不阻塞),Netty兼容并解决该问题
- 对 API 进行增强,使之更易用,如 ThreadLocal => FastThreadLocal ,ByteBuffer => ByteBuf
- Netty vs 其它网络应用框架
- Mina 由 apache 维护,将来 3.x 版本可能会有较大重构,破坏 API 向下兼容性,Netty 的开发迭代更迅速,API 更简洁、文档更优秀
- 久经考验,Netty 版本
- 2.x 2004
- 3.x 2008
- 4.x 2013
- 5.x 已废弃(使用了AIO,但是Linux的是伪AIO,只有Win真正实现了AIO。实际没有明显的性能提升,却导致维护成本高)
二、入门
2.1 需求
首先需要引入依赖
<dependency><groupId>io.netty</groupId><artifactId>netty-all</artifactId><version>4.1.39.Final</version>
</dependency>
使用Netty开发一个简单的服务器端和客户端
- 客户端向服务器端发送 hello, world
- 服务器仅接收,不返回
2.2 实现
服务端
public class HelloServer {public static void main(String[] args) {new ServerBootstrap()//启动器,负责组装netty组件,协调工作//一个selector和一个thread就叫EventLoop。EventLoopGroup里面,既有Boss处理连接,也有Worker处理读写.group(new NioEventLoopGroup())//选择服务器netty的ServerSocketChannel具体实现,有4种自行看源码.channel(NioServerSocketChannel.class).childHandler(//child即Worker,负责读写。决定了Worker能执行哪些操作(Handler)new ChannelInitializer<NioSocketChannel>() {//代表和客户端进行数据读写的通道,主要负责在initChannel里面添加其他的handler@Overrideprotected void initChannel(NioSocketChannel channel) throws Exception {//添加具体的handlerchannel.pipeline().addLast(new StringDecoder());//将netty的ByteBuf转换为字符串channel.pipeline().addLast(new ChannelInboundHandlerAdapter() {//自定义handler@Overridepublic void channelRead(ChannelHandlerContext ctx, Object msg) throws Exception {//此时这个msg就是上一步StringDecoder解码后的结果System.out.println(msg);}});}})//监听端口.bind(8080);}
}
客户端
public class HelloClient {public static void main(String[] args) throws Exception {//创建启动器new Bootstrap()//添加EventLoop.group(new NioEventLoopGroup())//选择客户端channel实现.channel(NioSocketChannel.class)//添加处理器,连接建立后该初始化器被调用.handler(new ChannelInitializer<NioSocketChannel>() {@Override//在连接建立后(accept)被调用protected void initChannel(NioSocketChannel channel) throws Exception {channel.pipeline().addLast(new StringEncoder());}})//连接到服务器.connect("localhost", 8080)//阻塞方法,直到连接建立.sync()//代表着连接对象.channel()//向服务器发送数据.writeAndFlush("hello world");}
}
针对上述代码对Netty的流程理解
- channel 是数据的通道,与 jdk nio 中 channel 作用一致
- msg 是流动的数据。输入是 ByteBuf ,输出也是 ByteBuf 。但是中间会经过 pipeline 加工,变成其他的类型对象。
- handler是数据的处理工序
- 工序有多道,合在一起就是 pipeline 。 pipeline 负责发布事件(读、读完成等)传播给各个 handler , handler 对自己感兴趣的事件进行处理
- handler分为Inbound(数据输入时走入站handler)和Outbound(数据输出时走出站handler)两类
- eventLoop(底层就是一个线程)是处理数据的工人
- 工人可以管理多个 channel 的 io 操作。并且工人和 channel 针对io操作是绑定的(这也是从线程安全的角度考虑,如果一个 channel 可以被多个线程管理,就会存在多个线程一起读写的情况,防止出问题可能还要做串行操作)
- 工人既可以执行 io 操作,也可以进行任务的处理。每位工人有任务队列,队列里可以存储该工人绑定的多个 channel 的待处理任务,任务分为普通任务、定时任务
- 工人按照 pipeline 顺序,依次按照 handler 的代码处理数据,可以为每道工序指定不同的工人(只适用非io操作)。
三、组件
3.1 EventLoop
EventLoop,事件循环对象
EventLoop 本质是一个单线程执行器(同时维护了一个 Selector),里面有 run 方法处理 Channel 上源源不断的 io 事件。
它的继承关系比较复杂
-
一条线是继承自
java.util.concurrent.ScheduledExecutorService因此包含了线程池中所有的方法 -
另一条线是继承自
io.netty.util.concurrent.OrderedEventExecutor-
提供了 boolean inEventLoop() 方法判断当前执行的线程是否属于此EventLoop
-
提供了 boolean inEventLoop(Thread thread) 方法判断指定线程是否属于此 EventLoop
-
提供了 parent 方法来看看自己属于哪个 EventLoopGroup
-
一般我们不会直接使用EventLoop,而是使用EventLoopGroup
3.2 EventLoopGroup
EventLoopGroup,事件循环组
EventLoopGroup 是一组 EventLoop,Channel 一般会调用 EventLoopGroup 的 register 方法来绑定其中一个 EventLoop,后续这个 Channel 上的 io 事件都由此 EventLoop 来处理(保证了 io 事件处理时的线程安全)
- 继承自
io.netty.util.concurrent.EventExecutorGroup- 实现了 Iterable 接口提供遍历 EventLoop 的能力
- 另有 next 方法获取集合中下一个 EventLoop, next 底层是轮询
使用示例
@Slf4j
public class TestEventLoop {public static void main(String[] args) {//1. 创建事件循环组。默认线程数跟下源码, 什么都不配置, 默认是cpu线程*2NioEventLoopGroup group = new NioEventLoopGroup(2);//可以执行io事件、普通任务、定时任务//new DefaultEventLoopGroup();//执行普通任务、定时任务//2. 获取下一个事件循环对象,这个next底层就是轮询System.out.println(group.next());System.out.println(group.next());System.out.println(group.next());//3. 执行普通任务, 在netty中的意义就是执行一些比较耗时的任务group.next().execute(() -> {log.info("普通任务");});//4. 执行定时任务。用于keepalive时连接的保活group.next().scheduleAtFixedRate(() -> {log.info("定时任务");}, 0L, 2L, TimeUnit.SECONDS);}
}
3.2.1 完善2.1
将2.1的需求,进一步完善,代码如下。
服务端
@Slf4j
public class EventLoopServer {public static void main(String[] args) {/*** 细分2: 如果处理io的操作比较耗时, 这时候是不应该让nioEventLoop阻塞在那里,否则会影响后续其他channel的读写* 所以创建一个独立的EventLoopGroup用来执行那些耗时操作*/DefaultEventLoopGroup defaultEventLoopGroup = new DefaultEventLoopGroup(2, new ThreadFactory() {private final AtomicInteger atomicInteger = new AtomicInteger(0);@Overridepublic Thread newThread(Runnable r) {return new Thread(r, "calc-" + atomicInteger.incrementAndGet());}});new ServerBootstrap()//.group(new NioEventLoopGroup())//细分1: netty建议将group划分的更细, 划分为parent和child。parent负责accept, child负责read and write.group(new NioEventLoopGroup(1, new ThreadFactory() {private final AtomicInteger atomicInteger = new AtomicInteger(0);@Overridepublic Thread newThread(Runnable r) {return new Thread(r, "boss-" + atomicInteger.incrementAndGet());}}), new NioEventLoopGroup(2, new ThreadFactory() {private final AtomicInteger atomicInteger = new AtomicInteger(0);@Overridepublic Thread newThread(Runnable r) {return new Thread(r, "worker-" + atomicInteger.incrementAndGet());}})).channel(NioServerSocketChannel.class).childHandler(new ChannelInitializer<NioSocketChannel>() {@Overrideprotected void initChannel(NioSocketChannel ch) throws Exception {ch.pipeline().addLast("handler1", new ChannelInboundHandlerAdapter() {@Override//没有编解码,那就是ByteBufpublic void channelRead(ChannelHandlerContext ctx, Object msg) throws Exception {ByteBuf buf = (ByteBuf) msg;log.info(buf.toString(Charset.defaultCharset()) + "_" + ctx.channel().remoteAddress());ctx.fireChannelRead(msg);//将消息传递给下一个handler//上行做法,通过直接调用父级该方法,一样可以实现往下传递//super.channelRead(ctx, msg);}}).addLast(defaultEventLoopGroup, "handler2", new ChannelInboundHandlerAdapter() {@Overridepublic void channelRead(ChannelHandlerContext ctx, Object msg) throws Exception {ByteBuf buf = (ByteBuf) msg;TimeUnit.SECONDS.sleep(2L);log.info(buf.toString(Charset.defaultCharset()) + "_" + ctx.channel().remoteAddress());}});}}).bind(8080);}
}
客户端
public class EventLoopClient {public static void main(String[] args) throws Exception {ChannelFuture future = new Bootstrap()//创建启动器//添加EventLoop.group(new NioEventLoopGroup())//选择客户端channel实现.channel(NioSocketChannel.class)//添加处理器,连接建立后该初始化器被调用.handler(new ChannelInitializer<NioSocketChannel>() {@Override//在连接建立后(accept)被调用protected void initChannel(NioSocketChannel channel) throws Exception {channel.pipeline().addLast(new StringEncoder());}})//连接到服务器.connect("localhost", 8080);Channel channel = future//阻塞方法,直到连接建立.sync().channel();//代表着连接对象while (true) {System.in.read();channel.writeAndFlush("hello world");//channel.write("hello world");}}
}
建立三个Client,每个Client发送一次消息。运行结果如图

由上图可知,channel第一次创建时,就与线程绑定了,不管是处理读写的worker,还是处理耗时的calc,都是绑定的。

h1与h2对应服务端的handler1与handler2
至于head与tail,后面的会提到
3.2.2 切换线程原理
查看源码io.netty.channel.AbstractChannelHandlerContext中的invokeChannelRead
static void invokeChannelRead(final AbstractChannelHandlerContext next, Object msg) {final Object m = next.pipeline.touch(ObjectUtil.checkNotNull(msg, "msg"), next);// 返回下一个handler的eventLoop,这里是使用了多态的写法EventExecutor executor = next.executor();//判断当前handler的线程,是否和下一个handler的eventLoop是同一个线程//如果是,直接调用;否则, 将要处理的消息提交给下一个eventLoopif (executor.inEventLoop()) {next.invokeChannelRead(m);} else {executor.execute(new Runnable() {@Overridepublic void run() {next.invokeChannelRead(m);}});}
}
3.3 Channel
channel 的主要作用
- close() 可以用来异步关闭 channel
- closeFuture() 用来执行 channel 关闭后的善后操作
- sync 方法作用是同步等待 channel 关闭
- 而 addListener 方法是异步等待 channel 关闭
- pipeline() 方法添加处理器
- write() 方法将数据写到缓冲区,但并不是立即写出
- 可以直接将3.2.1的代码,修改成write方法,尝试即可
- writeAndFlush() 方法立即将数据写出
3.3.1 ChannelFuture
保证获取到的channel是成功连接后的,两种方式
- sync 阻塞,本线程阻塞,直到channel成功建立连接
- addListener(回调对象) 添加回调,其他线程执行,channel监听到连接成功后执行回调对象
服务端代码保持不变,客户端代码修改
@Slf4j
public class EventLoopClient {public static void main(String[] args) throws Exception {//带有Future、Promise的都是和异步方法配套使用,目的是提高效率且正确处理结果ChannelFuture future = new Bootstrap()//创建启动器//添加EventLoop.group(new NioEventLoopGroup())//选择客户端channel实现.channel(NioSocketChannel.class)//添加处理器,连接建立后该初始化器被调用.handler(new ChannelInitializer<NioSocketChannel>() {@Override//在连接建立后(accept)被调用protected void initChannel(NioSocketChannel channel) throws Exception {channel.pipeline().addLast(new StringEncoder());}})//连接到服务器/*** 异步非阻塞* 异步:我(当前线程)只负责发起连接,至于连接后的结果,让别人(NioEventLoopGroup中线程)取* 非阻塞:不等待直接下一步*/.connect("localhost", 8080);//方法一:使用sync阻塞方法,直到连接建立//future.sync();//直接获取channel,其实获取到的是个尚未连接的channel//Channel channel = future.channel();//代表着连接对象//for (int i = 0; i < 2; i++) {//    if (channel.isActive()) {//        log.info("已连接");//        channel.writeAndFlush("hello world");//    } else {//        log.info("未连接");//    }//    TimeUnit.SECONDS.sleep(1);//}//方法二:使用addListener(回调对象)方法异步处理结果future.addListener(new ChannelFutureListener() {@Override//在nio线程连接建立好之后,会调用operationCompletepublic void operationComplete(ChannelFuture future) throws Exception {Channel channel = future.channel();for (int i = 0; i < 2; i++) {if (channel.isActive()) {log.info("已连接");channel.writeAndFlush("hello world");} else {log.info("未连接");}TimeUnit.SECONDS.sleep(1);}}});}
}
3.3.2 CloseFuture
Channel通过 closeFuture() 来进行善后操作
- sync 方法作用是同步等待 channel 关闭
- 而 addListener 方法是异步等待 channel 关闭
@Slf4j
public class CloseFutureClient {public static void main(String[] args) throws Exception {NioEventLoopGroup group = new NioEventLoopGroup();ChannelFuture future = new Bootstrap().group(group).channel(NioSocketChannel.class).handler(new ChannelInitializer<NioSocketChannel>() {@Overrideprotected void initChannel(NioSocketChannel ch) throws Exception {ch.pipeline().addLast(new LoggingHandler(LogLevel.DEBUG)).addLast(new StringEncoder());}}).connect("localhost", 8080);Channel channel = future.sync().channel();new Thread(() -> {Scanner scanner = new Scanner(System.in);while (true) {String line = scanner.nextLine();if ("q".equals(line)) {//close是个异步方法, 通过添加LoggingHandler可以监视关闭的线程channel.close();log.info("调用close方法");break;}channel.writeAndFlush(line);}}, "input").start();//方式一:sync//ChannelFuture closeFuture = channel.closeFuture();//closeFuture.sync();//log.info("成功关闭");//group.shutdownGracefully();//方式二:监听channel.closeFuture().addListener(new ChannelFutureListener() {@Overridepublic void operationComplete(ChannelFuture future) throws Exception {log.info("成功关闭后的回调");group.shutdownGracefully();}});}
}


Netty可以通过LoggingHandler打印日志,直观的查看Channel连接、收发、断开的过程
3.3.3 为何异步
疑问:为什么不在一个线程中去执行建立连接、去执行关闭 channel,那样不是也可以吗?非要用这么复杂的异步方式:比如一个线程发起建立连接,另一个线程去真正建立连接;一个线程去关闭连接,另一个线程真正去关闭连接。
这个问题也很简单,就比如多路复用的做法。我只有4个线程来发起长连接,如果一线程一长连接那种,撑死只能建立4个长连接。但是使用多路复用技术,就能处理更多的长连接了。这也就是Netty异步的核心思想了。
3.4 Future&&Promise
3.4.1 比较
在异步处理时,经常用到这 Future Promise 两个接口

首先要说明 netty 中的 Future 与 jdk 中的 Future 同名,但是是两个接口,netty 的 Future 继承自 jdk 的 Future,而 Promise 又对 netty Future 进行了扩展
- jdk Future 只能同步等待任务结束(或成功、或失败)才能得到结果。比如get方法,就是只能同步等待获取结果。
- netty Future 可以同步等待任务结束得到结果,也可以异步方式得到结果(比如CloseFuture的addListener),但都是要等任务结束
- netty Promise 不仅有 netty Future 的功能,而且脱离了任务独立存在,只作为两个线程间传递结果的容器
| 功能/名称 | jdk Future | netty Future | Promise |
|---|---|---|---|
| cancel | 取消任务 | - | - |
| isCanceled | 任务是否取消 | - | - |
| isDone | 任务是否完成,不能区分成功失败 | - | - |
| get | 获取任务结果,阻塞等待 | - | - |
| getNow | - | 获取任务结果,非阻塞,还未产生结果时返回 null | - |
| await | - | 等待任务结束,如果任务失败,不会抛异常,而是通过 isSuccess 判断 | - |
| sync | - | 等待任务结束,如果任务失败,抛出异常 | - |
| isSuccess | - | 判断任务是否成功 | - |
| cause | - | 获取失败信息,非阻塞,如果没有失败,返回null | - |
| addLinstener | - | 添加回调,异步接收结果 | - |
| setSuccess | - | - | 设置成功结果 |
| setFailure | - | - | 设置失败结果 |
3.4.2 示例
jdk Future
@Slf4j
public class TestJDKFuture {public static void main(String[] args) throws Exception {ExecutorService executorService = Executors.newFixedThreadPool(2);Future<Integer> future = executorService.submit(new Callable<Integer>() {@Overridepublic Integer call() throws Exception {log.info("calc..");TimeUnit.SECONDS.sleep(2);return ThreadLocalRandom.current().nextInt(1, 10);}});log.info("waiting..");Integer integer = future.get();log.info("received..{}", integer);}
}
netty Future
@Slf4j
public class TestNettyFuture {public static void main(String[] args) throws Exception {NioEventLoopGroup group = new NioEventLoopGroup(1);EventLoop eventLoop = group.next();Future<Integer> future = eventLoop.submit(new Callable<Integer>() {@Overridepublic Integer call() throws Exception {log.info("calc..");TimeUnit.SECONDS.sleep(2);return ThreadLocalRandom.current().nextInt(1, 10);}});//方式一:同步方式//log.info("waiting..");//Integer integer = future.get();//log.info("received..{}", integer);//方式二:异步方式future.addListener(new GenericFutureListener<Future<Integer>>() {@Overridepublic void operationComplete(Future<Integer> future) throws Exception {log.info("waiting..");Integer integer = future.getNow();log.info("received..{}", integer);}});}
}
netty Promise
@Slf4j
public class TestNettyPromise {public static void main(String[] args) throws Exception {EventLoop eventLoop = new NioEventLoopGroup(1).next();//与future不同的是,可以主动创建promise对象。而不用像future一样通过提交任务获取对象。//结果容器Promise<Integer> promise = new DefaultPromise<>(eventLoop);new Thread(() -> {log.info("calc..");try {TimeUnit.SECONDS.sleep(2L);//int i = 2 / 0;//线程执行完毕后,向promise填充结果promise.setSuccess(ThreadLocalRandom.current().nextInt(1, 10));} catch (InterruptedException e) {e.printStackTrace();promise.setFailure(e);}}).start();//接收结果log.info("waiting..");Integer integer = promise.get();log.info("received..{}", integer);}
}
3.5 Handler&&Pipeline
3.5.1 Handler在Pipeline中执行顺序
ChannelHandler 用来处理 Channel 上的各种事件,分为入站、出站两种。所有 ChannelHandler 被连成一串,就是 Pipeline
- 入站处理器通常是 ChannelInboundHandlerAdapter 的子类,主要用来读取客户端数据、写回结果
- 出站处理器通常是 ChannelOutboundHandlerAdapter 的子类,主要对写回结果进行加工
打个比喻,每个 Channel 是一个产品的加工车间,Pipeline 是车间中的流水线,ChannelHandler 就是流水线上的各道工序,而后面要讲的 ByteBuf 是原材料,经过很多工序的加工:先经过一道道入站工序,再经过一道道出站工序最终变成产品
@Slf4j
public class TestPipeline {public static void main(String[] args) {new ServerBootstrap().group(new NioEventLoopGroup()).channel(NioServerSocketChannel.class).childHandler(new ChannelInitializer<NioSocketChannel>() {@Overrideprotected void initChannel(NioSocketChannel ch) throws Exception {//通过channel拿到pipelineChannelPipeline pipeline = ch.pipeline();//添加处理器。netty会自动添加两个handler分别为head和tail//addLast并不是加到最后,而是加到tail之前//channel的执行流程:head->In_1->In_2->In_3->Out_4->Out_5->Out_6->tailpipeline.addLast("In_1", new ChannelInboundHandlerAdapter() {@Overridepublic void channelRead(ChannelHandlerContext ctx, Object msg) throws Exception {log.info("In_1");super.channelRead(ctx, msg);//唤醒下一个入站处理器}});pipeline.addLast("In_2", new ChannelInboundHandlerAdapter() {@Overridepublic void channelRead(ChannelHandlerContext ctx, Object msg) throws Exception {log.info("In_2");super.channelRead(ctx, msg);//唤醒下一个入站处理器}});pipeline.addLast("In_3", new ChannelInboundHandlerAdapter() {@Overridepublic void channelRead(ChannelHandlerContext ctx, Object msg) throws Exception {log.info("In_3");super.channelRead(ctx, msg);//唤醒下一个入站处理器。此处已经结尾了,所以无所谓。//ctx.writeAndFlush("hello world");//表示从当前处理器往前找 写出 处理器ctx.channel().writeAndFlush("hello world");//表示从channel的tail往前找 写出 处理器}});pipeline.addLast("Out_4", new ChannelOutboundHandlerAdapter() {@Overridepublic void write(ChannelHandlerContext ctx, Object msg, ChannelPromise promise) throws Exception {log.info("Out_4");super.write(ctx, msg, promise);}});pipeline.addLast("Out_5", new ChannelOutboundHandlerAdapter() {@Overridepublic void write(ChannelHandlerContext ctx, Object msg, ChannelPromise promise) throws Exception {log.info("Out_5");super.write(ctx, msg, promise);}});pipeline.addLast("Out_6", new ChannelOutboundHandlerAdapter() {@Overridepublic void write(ChannelHandlerContext ctx, Object msg, ChannelPromise promise) throws Exception {log.info("Out_6");super.write(ctx, msg, promise);}});}}).bind(8080);}
}@Slf4j
class TestPipelineClient {public static void main(String[] args) throws Exception {Channel channel = new Bootstrap().group(new NioEventLoopGroup()).channel(NioSocketChannel.class).handler(new ChannelInitializer<NioSocketChannel>() {@Overrideprotected void initChannel(NioSocketChannel ch) throws Exception {ch.pipeline().addLast(new StringEncoder()).addLast(new StringDecoder()).addLast(new ChannelInboundHandlerAdapter() {@Overridepublic void channelRead(ChannelHandlerContext ctx, Object msg) throws Exception {log.info("received==>{}", msg);}}).addLast(new ChannelOutboundHandlerAdapter() {@Overridepublic void write(ChannelHandlerContext ctx, Object msg, ChannelPromise promise) throws Exception {log.info("writed==>{}", msg);super.write(ctx, msg, promise);}});}}).connect("localhost", 8080).sync().channel();while (true) {System.in.read();channel.writeAndFlush("hello world");}}
}

可以看到,ChannelInboundHandlerAdapter 是按照 addLast 的顺序执行的,而 ChannelOutboundHandlerAdapter 是按照 addLast 的逆序执行的。
ChannelPipeline 的实现是一个 ChannelHandlerContext(包装了 ChannelHandler) 组成的双向链表

3.5.2 更方便地测试Handler执行顺序
@Slf4j
public class TestEmbeddedChannel {public static void main(String[] args) {ChannelInboundHandlerAdapter h1 = new ChannelInboundHandlerAdapter() {@Overridepublic void channelRead(ChannelHandlerContext ctx, Object msg) throws Exception {log.info("h1");super.channelRead(ctx, msg);}};ChannelInboundHandlerAdapter h2 = new ChannelInboundHandlerAdapter() {@Overridepublic void channelRead(ChannelHandlerContext ctx, Object msg) throws Exception {log.info("h2");super.channelRead(ctx, msg);}};ChannelOutboundHandlerAdapter h3 = new ChannelOutboundHandlerAdapter() {@Overridepublic void write(ChannelHandlerContext ctx, Object msg, ChannelPromise promise) throws Exception {log.info("h3");super.write(ctx, msg, promise);}};ChannelOutboundHandlerAdapter h4 = new ChannelOutboundHandlerAdapter() {@Overridepublic void write(ChannelHandlerContext ctx, Object msg, ChannelPromise promise) throws Exception {log.info("h4");super.write(ctx, msg, promise);}};EmbeddedChannel embeddedChannel = new EmbeddedChannel(h1, h2, h3, h4);//测试入站log.info("测试入站");embeddedChannel.writeInbound("inbound");Object o = embeddedChannel.readInbound();log.info("测试出站");embeddedChannel.writeOutbound("outbound");Object o1 = embeddedChannel.readOutbound();}
}

3.6 ByteBuf
3.6.1 优势
io.netty.buffer.ByteBuf是对java.nio.ByteBuffer的增强。
- 支持动态扩容。最大容量不超过Integer最大值。
- 池化思想。对直接内存影响最大,保证享受了直接内存的高读写的同时,又能有效避免重复开辟内存造成的性能损失。
- 读写指针分离。内部使用两套指针,标识读和写。与ByteBuffer相比,就能减少不必要的来回切换。
- 零拷贝。比如slice/duplicate/compositeByteBuf
- 方便开发者高效编写。比如链式调用。
3.6.2 组成
ByteBuf 由四部分组成
- 废弃字节
- 可读字节
- 可写字节
- 可扩容字节

该组成结构,使得ByteBuf在使用上,比ByteBuffer(如下图所示)方便许多,因为节省了人为频繁切换指针位置的操作。

3.6.3 使用
池化 VS 非池化
池化的最大意义在于可以重用 ByteBuf,优点有
- 没有池化,则每次都得创建新的 ByteBuf 实例,这个操作对直接内存代价昂贵,就算是堆内存,也会增加 GC 压力
- 有了池化,则可以重用池中 ByteBuf 实例,并且采用了与 jemalloc 类似的内存分配算法提升分配效率
- 高并发时,池化功能更节约内存,减少内存溢出的可能
池化功能是否开启,可以通过下面的系统环境变量来设置
-Dio.netty.allocator.type={unpooled|pooled}
- 4.1 以后,非 Android 平台默认启用池化实现,Android 平台启用非池化实现
- 4.1 之前,池化功能还不成熟,默认是非池化实现

直接内存 VS 堆内存
可以使用下面的代码来创建池化基于堆内存的 ByteBuf
ByteBuf buffer = ByteBufAllocator.DEFAULT.heapBuffer(10);
也可以使用下面的代码来创建池化基于直接内存的 ByteBuf
ByteBuf buffer = ByteBufAllocator.DEFAULT.directBuffer(10);
直接内存 与 堆内存 的比较
- 直接内存创建和销毁的代价昂贵,但读写性能高(少一次内存复制),适合配合池化功能一起用
- 直接内存对 GC 压力小,因为这部分内存不受 JVM 垃圾回收的管理,但也要注意及时主动释放
调试工具类
首先创建一个调试工具类
import io.netty.buffer.ByteBuf;import static io.netty.buffer.ByteBufUtil.appendPrettyHexDump;
import static io.netty.util.internal.StringUtil.NEWLINE;public class DebugByteBuf {public static void log(ByteBuf buffer) {log(buffer, false);}public static void log(ByteBuf buffer, boolean pretty) {int length = buffer.readableBytes();int rows = length / 16 + (length % 15 == 0 ? 0 : 1) + 4;StringBuilder buf = new StringBuilder(rows * 80 * 2).append("read index:").append(buffer.readerIndex()).append(" write index:").append(buffer.writerIndex()).append(" capacity:").append(buffer.capacity()).append(NEWLINE);if (pretty) {appendPrettyHexDump(buf, buffer);}System.out.println(buf.toString());}
}
创建
ByteBuf能自动扩容,初始值256,最大值为Integer最大范围
public class TestByteBuf {public static void main(String[] args) {//创建ByteBuf, 默认创建大小256个字节的,最大为Integer最大值ByteBuf buffer = ByteBufAllocator.DEFAULT.buffer();System.out.println(buffer.getClass());DebugByteBuf.log(buffer);//初始256StringBuilder sb = new StringBuilder();for (int i = 0; i < 300; i++) {sb.append("a");}buffer.writeBytes(sb.toString().getBytes(StandardCharsets.UTF_8));DebugByteBuf.log(buffer);//由于超过了容量256,自动扩容到512}
}

写入
大小端存储
Big Endian(大端存储)和Little Endian(小端存储)是两种不同的字节存储方式,用于表示一个多字节数据类型在内存中的存储顺序。
不要将字节与位的关系混淆。
计算机中用来表示内存储器容量大小的基本单位是字节(Byte),此处是讲多字节数据类型的存储顺序。
Big Endian(大端存储)是指内存的低地址,存储高位字节。
Little Endian(小端存储)是指内存的低地址,存储低位字节。

操作系统都采用小端存储模式
通讯协议则采用大端存储模式
测试大小端存储时顺序
public class DebugEndian {public static void debug(long num) {// 将 long 变量转换为大端顺序的字节数组byte[] bigEndian = ByteBuffer.allocate(Long.BYTES).order(ByteOrder.BIG_ENDIAN).putLong(num).array();// 将 long 变量转换为小端顺序的字节数组byte[] littleEndian = ByteBuffer.allocate(Long.BYTES).order(ByteOrder.LITTLE_ENDIAN).putLong(num).array();// 打印大端和小端字节数组System.out.println("Big-endian dec: " + Arrays.toString(bigEndian));System.out.println("Little-endian dec: " + Arrays.toString(littleEndian));String[] bigEndianHex = new String[bigEndian.length];for (int i = 0; i < bigEndian.length; i++) {bigEndianHex[i] = Integer.toHexString(bigEndian[i]);}String[] littleEndianHex = new String[littleEndian.length];for (int i = 0; i < bigEndian.length; i++) {littleEndianHex[i] = Integer.toHexString(littleEndian[i]);}System.out.println("Big-endian hex: " + Arrays.toString(bigEndianHex));System.out.println("Little-endian hex: " + Arrays.toString(littleEndianHex));}public static void main(String[] args) {// 声明一个值为 0x112345678 的 long 变量//long num = 0x112345678L;long num = 0x250L;debug(num);}
}

方法列表
方法列表,省略一些不重要的方法
| 方法 | 含义 | 备注 |
|---|---|---|
| writeBoolean(boolean value) | 写入 boolean 值,占1字节 | 非零为真 |
| writeByte(int value) | 写入 byte 值,占1字节 | |
| writeShort(int value) | 写入 short 值,占2字节 | |
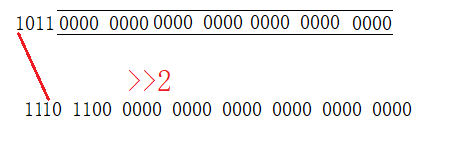
| writeInt(int value) | 写入 int 值,占4字节 | Big Endian(大端写入),如 250,写入后16进制表示 00 00 00 fa |
| writeIntLE(int value) | 写入 int 值,占4字节 | Little Endian(小端写入),如 250,写入后16进制表示 fa 00 00 00 |
| writeLong(long value) | 写入 long 值,占8字节 | |
| writeChar(int value) | 写入 char 值,占2字节 | |
| writeFloat(float value) | 写入 float 值,占4字节 | |
| writeDouble(double value) | 写入 double 值,占8字节 | |
| writeBytes(ByteBuf src) | 写入 netty 的 ByteBuf | |
| writeBytes(byte[] src) | 写入 byte[] | |
| writeBytes(ByteBuffer src) | 写入 nio 的 ByteBuffer | |
| int writeCharSequence(CharSequence sequence, Charset charset) | 写入字符串 |
注意
- 这些方法的未指明返回值的,其返回值都是 ByteBuf,意味着可以链式调用
- 网络传输,默认习惯是 Big Endian (大端存储)
- CharSequence 是个接口,像 String/StringBuilder 都实现该接口
扩容
public class TestByteBufWrite {public static void main(String[] args) {ByteBuf buffer = ByteBufAllocator.DEFAULT.buffer(3);buffer.writeBytes(new byte[]{1,2});DebugByteBuf.log(buffer,true);buffer.writeInt(250);DebugByteBuf.log(buffer,true);buffer.writeIntLE(250);DebugByteBuf.log(buffer,true);}
}

由上图,可验证大小端存储相关知识。
不过由上图,也发现进行了自动扩容, ByteBuf 的扩容规则是
- 若容量小于16,则扩容后16
- 若容量大于16小于64,则扩容后64
- 若容量大于64,则每次扩容为当前容量的2倍
- 扩容不能超过 max capacity 会报错
读取
方法列表
| 方法名 | 含义 | 备注 |
|---|---|---|
| int readByte() | 读取一个字节 | 会向后移动读指针 |
| ByteBuf markReaderIndex() | 将当前位置定义为读标记。默认是0 | |
| ByteBuf resetReaderIndex() | 重置到读标记 | |
| getXXX | 读取 | 不会改变读指针 |
3.6.4 内存释放
释放原理
由于 Netty 中有多种内存的 ByteBuf 实现,因此要灵活处理
- UnpooledHeapByteBuf 使用的是 JVM 内存,只需等 GC 回收内存即可
- UnpooledDirectByteBuf 使用的就是直接内存了,需要特殊的方法来回收内存,手动释放
- PooledByteBuf 和它的子类使用了池化机制,需要更复杂的规则来回收内存,手动释放还给内存池
不过,Netty 为了方便开发者手动释放内存,采用了引用计数法来控制回收内存,每个 ByteBuf 都实现了 io.netty.util.ReferenceCounted 接口
- 每个 ByteBuf 对象初始后,计数为 1
- 调用 release 方法计数减 1,如果计数为 0,ByteBuf 内存被回收
- 调用 retain 方法计数加 1,表示调用者没用完之前,其它 handler 即使调用了 release 也不会造成回收
- 当计数为 0 时,底层内存会被回收,这时即使 ByteBuf 对象还在,其各个方法均无法正常使用
计数为0后的释放逻辑,在io.netty.buffer.AbstractReferenceCountedByteBuf#deallocate方法中
谁来负责 release 呢?
不是我们想象的(一般情况下)
ByteBuf buf = ...
try {...
} finally {buf.release();
}
请思考,因为 pipeline 的存在,一般需要将 ByteBuf 传递给下一个 ChannelHandler,如果在 finally 中 release 了,就失去了传递性(当然,如果在这个 ChannelHandler 内这个 ByteBuf 已完成了它的使命,那么便无须再传递)
基本规则是,谁是最后使用者,谁负责 release。
在pipeline中,head与tail两个处理器可以自动做收尾工作
- 入站msg,tail 对 ByteBuf 进行释放
- 出站msg,head 对 ByteBuf 进行释放
开发者不能完全依赖head与tail
如果用户在某个handler中,并没有将ByteBuf往后面的处理器传,这时候,收尾的head与tail就失去了作用,因为你根本没把资源传递给我,我咋释放啊
tail源码
tail只处理入站,写出都是通过outHandler执行的,所以跟tail也没啥关系。因此代码中也只实现入站处理器。
final class TailContext extends AbstractChannelHandlerContext implements ChannelInboundHandler {}
查看io.netty.channel.DefaultChannelPipeline.TailContext#channelRead方法,往下跟,找到如下代码
protected void onUnhandledInboundMessage(Object msg) {try {logger.debug("Discarded inbound message {} that reached at the tail of the pipeline. " +"Please check your pipeline configuration.", msg);} finally {ReferenceCountUtil.release(msg);}
}
//ReferenceCountUtil
public static boolean release(Object msg) {if (msg instanceof ReferenceCounted) {return ((ReferenceCounted) msg).release();}return false;
}
head源码
head既处理入站,也处理出站,因此两个处理器都实现
final class HeadContext extends AbstractChannelHandlerContextimplements ChannelOutboundHandler, ChannelInboundHandler{}
查看io.netty.channel.DefaultChannelPipeline.HeadContext#write方法,往下跟,找到如下代码
public final void write(Object msg, ChannelPromise promise) {assertEventLoop();ChannelOutboundBuffer outboundBuffer = this.outboundBuffer;if (outboundBuffer == null) {// If the outboundBuffer is null we know the channel was closed and so// need to fail the future right away. If it is not null the handling of the rest// will be done in flush0()// See https://github.com/netty/netty/issues/2362safeSetFailure(promise, newClosedChannelException(initialCloseCause));// release message now to prevent resource-leakReferenceCountUtil.release(msg);return;}int size;try {msg = filterOutboundMessage(msg);size = pipeline.estimatorHandle().size(msg);if (size < 0) {size = 0;}} catch (Throwable t) {safeSetFailure(promise, t);ReferenceCountUtil.release(msg);return;}outboundBuffer.addMessage(msg, size, promise);
}
3.6.5 深拷贝
会将底层内存数据进行深拷贝,因此无论读写,都与原始 ByteBuf 无关
public class TestCopy {public static void main(String[] args) {ByteBuf buf1 = ByteBufAllocator.DEFAULT.buffer(5);buf1.writeBytes(new byte[]{1, 2, 3, 4, 5});ByteBuf buf2 = buf1.copy();//验证深拷贝buf2.setByte(0, 10);log(buf1, true);log(buf2, true);}
}

3.6.6 零拷贝
零拷贝不进行内存复制,使用原有内存,其相关应用分为两大类
- 分
- slice
- duplicate
- 合
- composite
切片slice
【零拷贝】的体现之一,对原始 ByteBuf 进行切片成多个 ByteBuf,切片后的 ByteBuf 并没有发生内存复制,还是使用原始 ByteBuf 的内存,切片后的 ByteBuf 维护独立的 read 和 write 指针
注意:
切片后的ByteBuf底层是SlicedByteBuf,再写内容,对原始数据有影响,因此,SlicedByteBuf禁止写入。
同样地,原内容发生变化,SlicedByteBuf也受到影响
所以,实际编写代码时,需要添加引用和手动释放

验证并没有发生数据复制
public class TestSlice {public static void main(String[] args) {ByteBuf buf = ByteBufAllocator.DEFAULT.buffer(10);buf.writeBytes(new byte[]{1, 2, 3, 4, 5, 6, 7, 8, 9, 10});log(buf, true);//在切片过程中,并未发生数据复制ByteBuf buf1 = buf.slice(0, 3);buf1.retain();//引用一次ByteBuf buf2 = buf.slice(3, 3);buf2.retain();ByteBuf buf3 = buf.slice(6, 4);buf3.retain();log(buf1, true);log(buf2, true);log(buf3, true);//使用如下代码,验证并没有进行数据复制//注意toString中的hashCode并非表示地址值,只是哈希值而已buf1.setByte(0, 10);log(buf1, true);log(buf, true);System.out.println("引用次数"+buf.refCnt());//4}
}

浅拷贝duplicate
【零拷贝】的体现之一,就好比截取了原始 ByteBuf 所有内容,并且没有 max capacity 的限制,也是与原始 ByteBuf 使用同一块底层内存,只是读写指针是独立的

实际编写代码时,需要添加引用和手动释放
组合compositeBuffer
【零拷贝】的体现之一,可以将多个 ByteBuf 合并为一个逻辑上的 ByteBuf,避免拷贝
public class TestComposite {public static void main(String[] args) {ByteBuf buf1 = ByteBufAllocator.DEFAULT.buffer(5);buf1.writeBytes(new byte[]{1, 2, 3, 4, 5});ByteBuf buf2 = ByteBufAllocator.DEFAULT.buffer(5);buf2.writeBytes(new byte[]{6, 7, 8, 9, 10});发生数据复制的合并//ByteBuf buf = ByteBufAllocator.DEFAULT.buffer(10);//buf.writeBytes(buf1).writeBytes(buf2);//log(buf, true);//不发生数据复制的合并CompositeByteBuf buf = ByteBufAllocator.DEFAULT.compositeBuffer(10);buf.addComponents(true, buf1, buf2);buf1.retain();//添加引用,防止buf1和buf2被释放buf2.retain();//添加引用,防止buf1和buf2被释放log(buf, true);//验证未发生数据合并buf1.setByte(0, 10);log(buf, true);System.out.println(buf1.refCnt());System.out.println(buf2.refCnt());}
}

实际编写代码时,需要添加引用和手动释放
Unpooled 是一个工具类,类如其名,提供了非池化的 ByteBuf 创建、组合、复制等操作
这里仅介绍其跟【零拷贝】相关的 wrappedBuffer 方法(底层即CompositeByteBuf),可以用来包装 ByteBuf
ByteBuf buf1 = ByteBufAllocator.DEFAULT.buffer(5);
buf1.writeBytes(new byte[]{1, 2, 3, 4, 5});
ByteBuf buf2 = ByteBufAllocator.DEFAULT.buffer(5);
buf2.writeBytes(new byte[]{6, 7, 8, 9, 10});// 当包装 ByteBuf 个数超过一个时, 底层使用了 CompositeByteBuf
ByteBuf buf3 = Unpooled.wrappedBuffer(buf1, buf2);
System.out.println(ByteBufUtil.prettyHexDump(buf3));
输出
         +-------------------------------------------------+|  0  1  2  3  4  5  6  7  8  9  a  b  c  d  e  f |
+--------+-------------------------------------------------+----------------+
|00000000| 01 02 03 04 05 06 07 08 09 0a                   |..........      |
+--------+-------------------------------------------------+----------------+
也可以用来包装普通字节数组,底层也不会有拷贝操作
ByteBuf buf4 = Unpooled.wrappedBuffer(new byte[]{1, 2, 3}, new byte[]{4, 5, 6});
System.out.println(buf4.getClass());
System.out.println(ByteBufUtil.prettyHexDump(buf4));
输出
class io.netty.buffer.CompositeByteBuf+-------------------------------------------------+|  0  1  2  3  4  5  6  7  8  9  a  b  c  d  e  f |
+--------+-------------------------------------------------+----------------+
|00000000| 01 02 03 04 05 06                               |......          |
+--------+-------------------------------------------------+----------------+
T.buffer(5);
buf1.writeBytes(new byte[]{1, 2, 3, 4, 5});
ByteBuf buf2 = ByteBufAllocator.DEFAULT.buffer(5);
buf2.writeBytes(new byte[]{6, 7, 8, 9, 10});
// 当包装 ByteBuf 个数超过一个时, 底层使用了 CompositeByteBuf
ByteBuf buf3 = Unpooled.wrappedBuffer(buf1, buf2);
System.out.println(ByteBufUtil.prettyHexDump(buf3));
输出 +-------------------------------------------------+| 0 1 2 3 4 5 6 7 8 9 a b c d e f |
±-------±------------------------------------------------±---------------+
|00000000| 01 02 03 04 05 06 07 08 09 0a |… |
±-------±------------------------------------------------±---------------+
也可以用来包装普通字节数组,底层也不会有拷贝操作```java
ByteBuf buf4 = Unpooled.wrappedBuffer(new byte[]{1, 2, 3}, new byte[]{4, 5, 6});
System.out.println(buf4.getClass());
System.out.println(ByteBufUtil.prettyHexDump(buf4));
输出
class io.netty.buffer.CompositeByteBuf+-------------------------------------------------+|  0  1  2  3  4  5  6  7  8  9  a  b  c  d  e  f |
+--------+-------------------------------------------------+----------------+
|00000000| 01 02 03 04 05 06                               |......          |
+--------+-------------------------------------------------+----------------+
相关文章:
Netty小白入门教程
一、概述 1.1 概念 Netty是一个异步的基于事件驱动(即多路复用技术)的网络应用框架,用于快速开发可维护、高性能的网络服务器和客户端。 1.2 地位 Netty在Java网络应用框架中的地位就好比,Spring框架在JavaEE开发中的地位。 以下的框架都使用了Nett…...
【逻辑位移和算数位移】
<< 运算符 && >> 运算符 正数位移 当 x>>n 中 x 为正数时,会将x的所有位右移x位,同时左边高位补0 显而易见,运算结束后,值为1 。 可知右移n位,结果就是 x / 2^n:7 / 2 ^2 1;…...

Blender3.5 边的操作
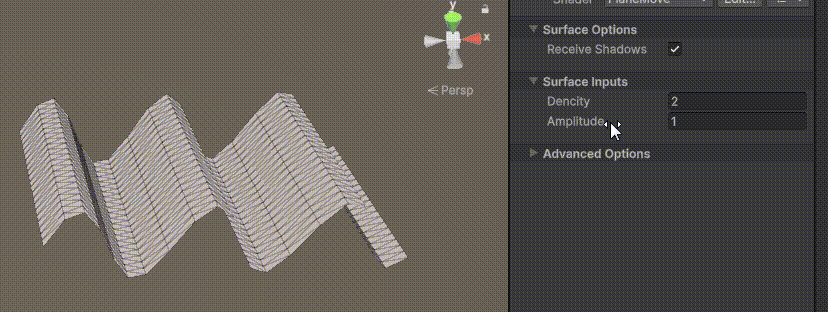
目录 1. 边操作1.1 边的细分 Subdivide1.2 边的滑移 Edge Slide1.3 边的删除1.4 边的溶解 Dissolve1.5 边线倒角 Bevel1.6 循环边 Loop Edges1.7 并排边 Ring Edges1.8 桥接循环边 1. 边操作 1.1 边的细分 Subdivide 在边选择模式,选中一条边,右键&…...

Java与Python、Node.js在人工智能和区块链应用程序开发中的比较
背景 Java、Python和Node.js都是常用的编程语言,它们在不同领域都有广泛的应用。在人工智能和区块链应用程序开发中,这三种语言都具有各自的优势和劣势。 Java的优势 Java在企业级应用中应用广泛,这得益于其跨平台性、安全性和稳定性等特点。在人工智能和区块链应用程序开…...

【计算机是怎么跑起来的】基础:计算机三大原则
【计算机是怎么跑起来的】基础:计算机三大原则 计算机的三个根本性基础1.计算机是执行输入,运算,输出的机器输入,运算,输出 2. 软件是指令和数据的集合指令数据 3. 计算机的处理方式有时与人们的思维习惯不同对计算机来…...
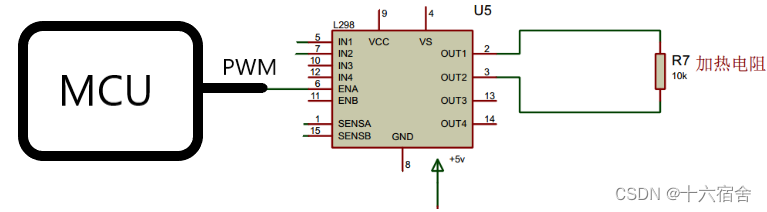
NXP公司LPC21XX+PID实现稳定温度控制
本例使用的是LPC21XX系列芯片提供的PWM功能实现稳定的温度控制。首先我们获得当前环境温度之后,再用设定的温度与当前温度相减,通过PID算法计算出当前输出脉宽,并将其输出到L298N模块中,使加热丝发热,形成闭环…...

【CE实战-生化危机4重置版】实现角色瞬移、飞翔
▒ 目录 ▒ 🛫 导读需求开发环境1️⃣ CE扫描内存,定位坐标地址(加密后的地址)2️⃣ 硬件写入断点,定位真实坐标地址内存写入断点,定位到访问地址分析代码...
强烈建议互联网人转战实体和农业,去了就是降维打击!实体太缺人才了,老板也不缺钱!...
大环境不好,互联网人该何去何从? 一位网友提出了一个新思路:强烈建议互联网同学转战实体、农业这些行业。实体真的太缺人才了,目前大部分实体都留下70后、80后在继续奋斗。其实实体老板很多都不缺钱,经过多年积累&…...

如何将 github pages 迁移到 vercel 上托管
如何将 github pages 迁移到 vercel 上托管 前言 早期网站使用 github pages,后来迁移到 coding,最近又放到腾讯云网站静态托管,无论是 coding 的 cos 存储桶,还是静态网站托管 他们都是收费的,那有没有免费的托管商呢,既不影响网站的访问速度还免费,于是,找了一下,还真有,ve…...

2023五一数学建模竞赛(五一赛)选题建议
提示:DS C君认为的难度:C<A<B,开放度:B<A<C 。 A题:无人机定点投放问题 这道题是传统的物理类题目,基本每次建模竞赛都会有。由于这道题目并未给明数据,所以数据获取和搜集资料是…...
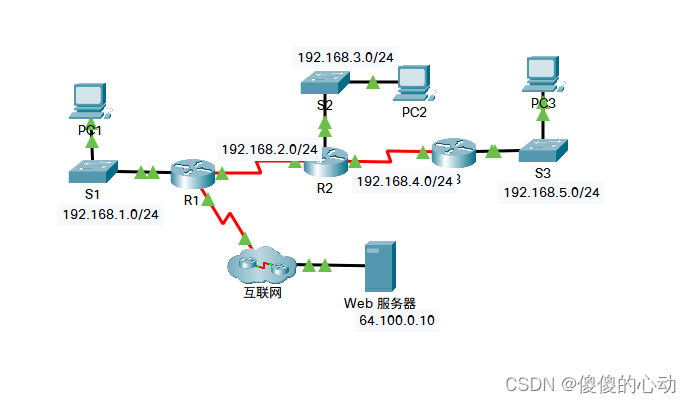
Packet Tracer - 配置 RIPv2
Packet Tracer - 配置 RIPv2 目标 第 1 部分:配置 RIPv2 第 2 部分:验证配置 拓扑图 背景信息 尽管在现代网络中极少使用 RIP,但是作为了解基本网络路由的基础则十分有用。 在本活动中,您将使用适当的网络语句和被动接口配置…...
Android类似微信聊天页面教程(Kotlin)四——数据本地化
前提条件 安装并配置好Android Studio Android Studio Electric Eel | 2022.1.1 Patch 2 Build #AI-221.6008.13.2211.9619390, built on February 17, 2023 Runtime version: 11.0.150-b2043.56-9505619 amd64 VM: OpenJDK 64-Bit Server VM by JetBrains s.r.o. Windows 11 …...
C/C++基础知识
专栏:C/C 个人主页: C/C基础知识 前言C关键字(C98)命名空间命名空间的定义正常的命名空间的定义如何使用命名空间 命名空间可以嵌套同一个工程中允许存在多个相同名称的命名空间,编译器最后会合成同一个命名空间中(一个工程中的.h文件和test.…...

Java 入门 - 语法基础
hello world public class Hello {public static void main(String[] args) {System.out.println("hello world");} } 复制代码 public: 是关键字;表示公开的class: 是关键字;用来定义类Hello: 是类名;大小写敏感;命名…...

Java线程池及拒绝策略详解
前文提到线程的使用以及线程间通信方式,通常情况下我们通过new Thread或者new Runnable创建线程,这种情况下,需要开发者手动管理线程的创建和回收,线程对象没有复用,大量的线程对象创建与销毁会引起频繁GC,…...
GitLABJenkins
GitLAB & Jenkins 目录 实践:基于Jenkins提交流水线(测试成功)-2023.4.25 目的:掌握通过触发器将GitLab和Jenkins集成,实现提交流水线。 1、触发Jenkins构建 安装Generic Webhook Trigger插件 重启后,进入一个Pipeline项目设…...
)
互联网摸鱼日报(2023-04-26)
互联网摸鱼日报(2023-04-26) InfoQ 热门话题 神州数码:抢抓云原生发展机遇,共建共治共享 OpenNJet 应用引擎开源生态 《产业数字人才研究与发展报告(2023)》 如何写出CPU友好的代码,百倍提升…...
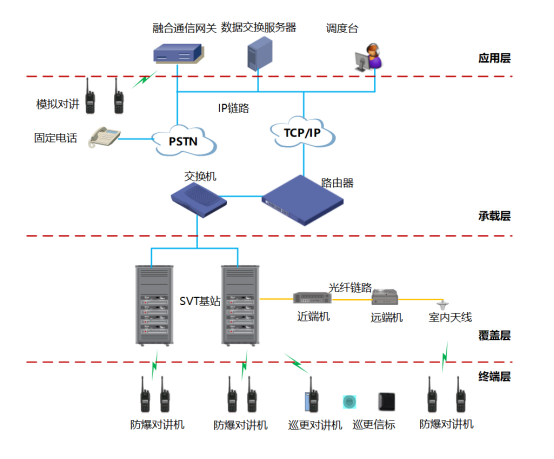
石化企业数字化防爆融合通信解决方案
项目背景 石化工业是我国国民经济和社会发展的基础性、战略性产业,其发展和壮大受到了党和国家的高度重视。随着石化企业厂区规模的不断扩大以及技术的快速发展,现有石化企业专网通信系统建设相对滞后,缺乏结合人员管理、安全生产、安全通信…...
)
NTT学习笔记(快速数论变换)
一些概念 欧拉函数 ϕ ( n ) \phi(n) ϕ(n) 欧拉函数简介 阶 若 g g g和 n n n互质,则令 g x % n 1 g^x\%n1 gx%n1的最小正整数 x x x称为 g g g模 n n n的阶。 原根 对于互质的两个正整数 g g g和 n n n,如果 g g g模 n n n的阶为 ϕ ( n ) \phi…...
Android类似微信首页的页面开发教程(Kotlin)二
前提条件 安装并配置好Android Studio Android Studio Electric Eel | 2022.1.1 Patch 2 Build #AI-221.6008.13.2211.9619390, built on February 17, 2023 Runtime version: 11.0.150-b2043.56-9505619 amd64 VM: OpenJDK 64-Bit Server VM by JetBrains s.r.o. Windows 11 …...

XCTF-web-easyupload
试了试php,php7,pht,phtml等,都没有用 尝试.user.ini 抓包修改将.user.ini修改为jpg图片 在上传一个123.jpg 用蚁剑连接,得到flag...
UE5 学习系列(三)创建和移动物体
这篇博客是该系列的第三篇,是在之前两篇博客的基础上展开,主要介绍如何在操作界面中创建和拖动物体,这篇博客跟随的视频链接如下: B 站视频:s03-创建和移动物体 如果你不打算开之前的博客并且对UE5 比较熟的话按照以…...
ETLCloud可能遇到的问题有哪些?常见坑位解析
数据集成平台ETLCloud,主要用于支持数据的抽取(Extract)、转换(Transform)和加载(Load)过程。提供了一个简洁直观的界面,以便用户可以在不同的数据源之间轻松地进行数据迁移和转换。…...

【Web 进阶篇】优雅的接口设计:统一响应、全局异常处理与参数校验
系列回顾: 在上一篇中,我们成功地为应用集成了数据库,并使用 Spring Data JPA 实现了基本的 CRUD API。我们的应用现在能“记忆”数据了!但是,如果你仔细审视那些 API,会发现它们还很“粗糙”:有…...

【git】把本地更改提交远程新分支feature_g
创建并切换新分支 git checkout -b feature_g 添加并提交更改 git add . git commit -m “实现图片上传功能” 推送到远程 git push -u origin feature_g...
MySQL 8.0 OCP 英文题库解析(十三)
Oracle 为庆祝 MySQL 30 周年,截止到 2025.07.31 之前。所有人均可以免费考取原价245美元的MySQL OCP 认证。 从今天开始,将英文题库免费公布出来,并进行解析,帮助大家在一个月之内轻松通过OCP认证。 本期公布试题111~120 试题1…...

【OSG学习笔记】Day 16: 骨骼动画与蒙皮(osgAnimation)
骨骼动画基础 骨骼动画是 3D 计算机图形中常用的技术,它通过以下两个主要组件实现角色动画。 骨骼系统 (Skeleton):由层级结构的骨头组成,类似于人体骨骼蒙皮 (Mesh Skinning):将模型网格顶点绑定到骨骼上,使骨骼移动…...
Unity | AmplifyShaderEditor插件基础(第七集:平面波动shader)
目录 一、👋🏻前言 二、😈sinx波动的基本原理 三、😈波动起来 1.sinx节点介绍 2.vertexPosition 3.集成Vector3 a.节点Append b.连起来 4.波动起来 a.波动的原理 b.时间节点 c.sinx的处理 四、🌊波动优化…...

力扣-35.搜索插入位置
题目描述 给定一个排序数组和一个目标值,在数组中找到目标值,并返回其索引。如果目标值不存在于数组中,返回它将会被按顺序插入的位置。 请必须使用时间复杂度为 O(log n) 的算法。 class Solution {public int searchInsert(int[] nums, …...

比较数据迁移后MySQL数据库和OceanBase数据仓库中的表
设计一个MySQL数据库和OceanBase数据仓库的表数据比较的详细程序流程,两张表是相同的结构,都有整型主键id字段,需要每次从数据库分批取得2000条数据,用于比较,比较操作的同时可以再取2000条数据,等上一次比较完成之后,开始比较,直到比较完所有的数据。比较操作需要比较…...