YOLOv5+单目测量物体尺寸(python)
YOLOv5+单目测量尺寸(python)
- 1. 相关配置
- 2. 测距原理
- 3. 相机标定
- 3.1:标定方法1(针对图片)
- 3.2:标定方法2(针对视频)
- 4. 相机测距
- 4.1 测距添加
- 4.2 细节修改(可忽略)
- 4.3 主代码
- 5. 实验效果
相关链接
1. YOLOV5 + 单目测距(python)
2. YOLOV7 + 单目测距(python)
本篇博文工程源码下载在文章末尾
1. 相关配置
系统:win 10
YOLO版本:yolov5 6.1
电脑显卡:NVIDIA 2080Ti(CPU也可以跑,GPU只是起到加速推理效果)
2. 测距原理
单目测量尺寸原理和测距原理正好相反,但是需要固定相机距离目标的距离,然后把单目测距公式 D = (F*W)/P 反过来求目标的长宽即可:
W_True = (D*W)/FH_True = (D*H)/F
其中D是目标到摄像机的距离, F是摄像机焦距(焦距需要自己进行标定获取), W是目标的像素点宽度,H是目标的像素点高度
了解基本原理后,下边就进行实操阶段
3. 相机标定
3.1:标定方法1(针对图片)
如果检测图片可以参考张学友标定法,通过拍摄棋盘格获取相机的焦距
3.2:标定方法2(针对视频)
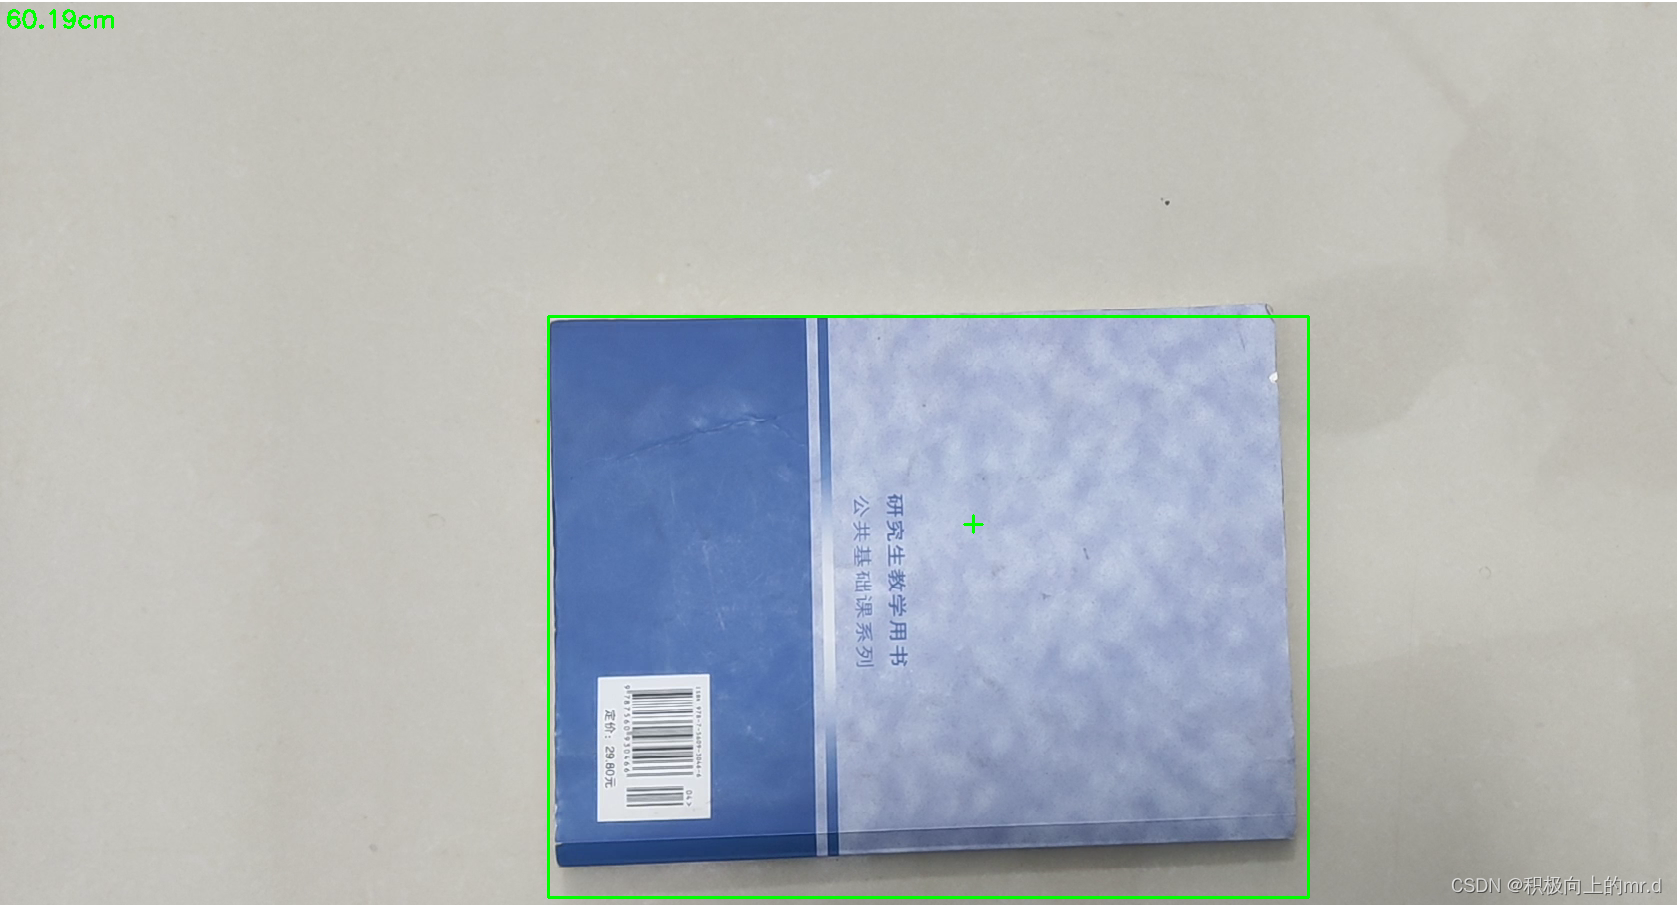
直接使用代码获得焦距,需要提前拍摄一个矩形物体,拍摄时候相机固定,距离被拍摄物体自行设定,并一直保持此距离,背景为纯色,不要出现杂物;最后将拍摄的视频用以下代码检测:
import cv2win_width = 1920
win_height = 1080
mid_width = int(win_width / 2)
mid_height = int(win_height / 2)foc = 1990.0       # 根据教程调试相机焦距
real_wid = 9.05   # A4纸横着的时候的宽度,视频拍摄A4纸要横拍,镜头横,A4纸也横
font = cv2.FONT_HERSHEY_SIMPLEX
w_ok = 1capture = cv2.VideoCapture('5.mp4')
capture.set(3, win_width)
capture.set(4, win_height)while (True):ret, frame = capture.read()# frame = cv2.flip(frame, 1)if ret == False:breakgray = cv2.cvtColor(frame, cv2.COLOR_BGR2GRAY)gray = cv2.GaussianBlur(gray, (5, 5), 0)ret, binary = cv2.threshold(gray, 140, 200, 60)    # 扫描不到纸张轮廓时,要更改阈值,直到方框紧密框住纸张kernel = cv2.getStructuringElement(cv2.MORPH_RECT, (3, 3))binary = cv2.dilate(binary, kernel, iterations=2)contours, hierarchy = cv2.findContours(binary, cv2.RETR_TREE, cv2.CHAIN_APPROX_SIMPLE)# cv2.drawContours(frame, contours, -1, (0, 255, 0), 2)    # 查看所检测到的轮框for c in contours:if cv2.contourArea(c) < 1000:  # 对于矩形区域,只显示大于给定阈值的轮廓,所以一些微小的变化不会显示。对于光照不变和噪声低的摄像头可不设定轮廓最小尺寸的阈值continuex, y, w, h = cv2.boundingRect(c)  # 该函数计算矩形的边界框if x > mid_width or y > mid_height:continueif (x + w) < mid_width or (y + h) < mid_height:continueif h > w:continueif x == 0 or y == 0:continueif x == win_width or y == win_height:continuew_ok = wcv2.rectangle(frame, (x + 1, y + 1), (x + w_ok - 1, y + h - 1), (0, 255, 0), 2)dis_inch = (real_wid * foc) / (w_ok - 2)dis_cm = dis_inch * 2.54# os.system("cls")# print("Distance : ", dis_cm, "cm")frame = cv2.putText(frame, "%.2fcm" % (dis_cm), (5, 25), font, 0.8, (0, 255, 0), 2)frame = cv2.putText(frame, "+", (mid_width, mid_height), font, 1.0, (0, 255, 0), 2)cv2.namedWindow('res', 0)cv2.namedWindow('gray', 0)cv2.resizeWindow('res', win_width, win_height)cv2.resizeWindow('gray', win_width, win_height)cv2.imshow('res', frame)cv2.imshow('gray', binary)c = cv2.waitKey(40)if c == 27:    # 按退出键esc关闭窗口breakcv2.destroyAllWindows()
反复调节 ret, binary = cv2.threshold(gray, 140, 200, 60)这一行里边的三个参数,直到线条紧紧包裹住你所拍摄视频的物体,然后调整相机焦距直到左上角距离和你拍摄视频时相机到物体的距离接近为止
然后将上述步骤得到的相机焦距以及镜头距离目标的距离写进测距代码distance.py文件里
foc = 1998.0        # 镜头焦距
dis = 709         # 镜头距离目标距离(英寸)# 自定义函数,单目测距
def chicun(w,h):w_inch = (dis * w) / focw_cm = w_inch * 2.54w_cm = int(w_cm)w_m = w_cm/100h_inch = (dis * h) / foch_cm = h_inch * 2.54h_cm = int(h_cm)h_m = h_cm / 100return w_m,h_m
4. 相机测距
4.1 测距添加
主要是把测距部分加在了画框附近,首先提取边框的像素点坐标,然后计算边框像素点宽度W和高度H
for *xyxy, conf, cls in reversed(det):if save_txt: # Write to filexywh = (xyxy2xywh(torch.tensor(xyxy).view(1, 4)) / gn).view(-1).tolist() # normalized xywhline = (cls, *xywh, conf) if save_conf else (cls, *xywh) # label formatwith open(txt_path + '.txt', 'a') as f:f.write(('%g ' * len(line)).rstrip() % line + '\n')if save_img or save_crop or view_img: # Add bbox to imagex1 = int(xyxy[0])y1 = int(xyxy[1])x2 = int(xyxy[2])y2 = int(xyxy[3])h = y2-y1w = x2-x1if names[int(cls)] == "person":c = int(cls) # integer class 整数类 1111111111label = None if hide_labels else (names[c] if hide_conf else f'{names[c]} {conf:.2f}') # 111w_m, h_m = chicun(w, h)label += f' {w_m}m'label += f' {h_m}m'txt = '{0}'.format(label)# annotator.box_label(xyxy, txt, color=(255, 0, 255))annotator.box_label(xyxy, txt, color=colors(c, True))if save_crop:save_one_box(xyxy, imc, file=save_dir / 'crops' / names[c] / f'{p.stem}.jpg', BGR=True)
4.2 细节修改(可忽略)
到上述步骤就已经实现了单目测距过程,下边是一些小细节修改,可以不看
为了实时显示画面,对运行的py文件点击编辑配置,在形参那里输入–view-img --save-txt

但实时显示画面太大,我们对显示部分做了修改,这部分也可以不要,具体是把代码
if view_img:cv2.imshow(str(p), im0)cv2.waitKey(1) # 1 millisecond
替换成
if view_img:cv2.namedWindow("Webcam", cv2.WINDOW_NORMAL)cv2.resizeWindow("Webcam", 1280, 720)cv2.moveWindow("Webcam", 0, 100)cv2.imshow("Webcam", im0)cv2.waitKey(1)
4.3 主代码
# YOLOv5 🚀 by Ultralytics, GPL-3.0 license
"""
Run inference on images, videos, directories, streams, etc.Usage - sources:$ python path/to/detect.py --weights yolov5s.pt --source 0              # webcamimg.jpg        # imagevid.mp4        # videopath/          # directorypath/*.jpg     # glob'https://youtu.be/Zgi9g1ksQHc'  # YouTube'rtsp://example.com/media.mp4'  # RTSP, RTMP, HTTP streamUsage - formats:$ python path/to/detect.py --weights yolov5s.pt                 # PyTorchyolov5s.torchscript        # TorchScriptyolov5s.onnx               # ONNX Runtime or OpenCV DNN with --dnnyolov5s.xml                # OpenVINOyolov5s.engine             # TensorRTyolov5s.mlmodel            # CoreML (MacOS-only)yolov5s_saved_model        # TensorFlow SavedModelyolov5s.pb                 # TensorFlow GraphDefyolov5s.tflite             # TensorFlow Liteyolov5s_edgetpu.tflite     # TensorFlow Edge TPU
"""import argparse
import os
import sys
from pathlib import Pathimport cv2
import torch
import torch.backends.cudnn as cudnnFILE = Path(__file__).resolve()
ROOT = FILE.parents[0]  # YOLOv5 root directory
if str(ROOT) not in sys.path:sys.path.append(str(ROOT))  # add ROOT to PATH
ROOT = Path(os.path.relpath(ROOT, Path.cwd()))  # relativefrom models.common import DetectMultiBackend
from utils.datasets import IMG_FORMATS, VID_FORMATS, LoadImages, LoadStreams
from utils.general import (LOGGER, check_file, check_img_size, check_imshow, check_requirements, colorstr,increment_path, non_max_suppression, print_args, scale_coords, strip_optimizer, xyxy2xywh)
from utils.plots import Annotator, colors, save_one_box
from utils.torch_utils import select_device, time_sync
from distance import person_distance, car_distance, chicun@torch.no_grad()
def run(weights=ROOT / 'yolov5s.pt',  # model.pt path(s)source=ROOT / 'data/images',  # file/dir/URL/glob, 0 for webcamdata=ROOT / 'data/coco128.yaml',  # dataset.yaml pathimgsz=(640, 640),  # inference size (height, width)conf_thres=0.25,  # confidence thresholdiou_thres=0.45,  # NMS IOU thresholdmax_det=1000,  # maximum detections per imagedevice='',  # cuda device, i.e. 0 or 0,1,2,3 or cpuview_img=False,  # show resultssave_txt=False,  # save results to *.txtsave_conf=False,  # save confidences in --save-txt labelssave_crop=False,  # save cropped prediction boxesnosave=False,  # do not save images/videosclasses=None,  # filter by class: --class 0, or --class 0 2 3agnostic_nms=False,  # class-agnostic NMSaugment=False,  # augmented inferencevisualize=False,  # visualize featuresupdate=False,  # update all modelsproject=ROOT / 'runs/detect',  # save results to project/namename='exp',  # save results to project/nameexist_ok=False,  # existing project/name ok, do not incrementline_thickness=3,  # bounding box thickness (pixels)hide_labels=False,  # hide labelshide_conf=False,  # hide confidenceshalf=False,  # use FP16 half-precision inferencednn=False,  # use OpenCV DNN for ONNX inference):source = str(source)save_img = not nosave and not source.endswith('.txt')  # save inference imagesis_file = Path(source).suffix[1:] in (IMG_FORMATS + VID_FORMATS)is_url = source.lower().startswith(('rtsp://', 'rtmp://', 'http://', 'https://'))webcam = source.isnumeric() or source.endswith('.txt') or (is_url and not is_file)if is_url and is_file:source = check_file(source)  # download# Directoriessave_dir = increment_path(Path(project) / name, exist_ok=exist_ok)  # increment run(save_dir / 'labels' if save_txt else save_dir).mkdir(parents=True, exist_ok=True)  # make dir# Load modeldevice = select_device(device)model = DetectMultiBackend(weights, device=device, dnn=dnn, data=data)stride, names, pt, jit, onnx, engine = model.stride, model.names, model.pt, model.jit, model.onnx, model.engineimgsz = check_img_size(imgsz, s=stride)  # check image size# Halfhalf &= (pt or jit or onnx or engine) and device.type != 'cpu'  # FP16 supported on limited backends with CUDAif pt or jit:model.model.half() if half else model.model.float()# Dataloaderif webcam:view_img = check_imshow()cudnn.benchmark = True  # set True to speed up constant image size inferencedataset = LoadStreams(source, img_size=imgsz, stride=stride, auto=pt)bs = len(dataset)  # batch_sizeelse:dataset = LoadImages(source, img_size=imgsz, stride=stride, auto=pt)bs = 1  # batch_sizevid_path, vid_writer = [None] * bs, [None] * bs# Run inferencemodel.warmup(imgsz=(1 if pt else bs, 3, *imgsz), half=half)  # warmupdt, seen = [0.0, 0.0, 0.0], 0for path, im, im0s, vid_cap, s in dataset:t1 = time_sync()im = torch.from_numpy(im).to(device)im = im.half() if half else im.float()  # uint8 to fp16/32im /= 255  # 0 - 255 to 0.0 - 1.0if len(im.shape) == 3:im = im[None]  # expand for batch dimt2 = time_sync()dt[0] += t2 - t1# Inferencevisualize = increment_path(save_dir / Path(path).stem, mkdir=True) if visualize else Falsepred = model(im, augment=augment, visualize=visualize)t3 = time_sync()dt[1] += t3 - t2# NMSpred = non_max_suppression(pred, conf_thres, iou_thres, classes, agnostic_nms, max_det=max_det)dt[2] += time_sync() - t3# Second-stage classifier (optional)# pred = utils.general.apply_classifier(pred, classifier_model, im, im0s)# Process predictionsfor i, det in enumerate(pred):  # per imageseen += 1if webcam:  # batch_size >= 1p, im0, frame = path[i], im0s[i].copy(), dataset.counts += f'{i}: 'else:p, im0, frame = path, im0s.copy(), getattr(dataset, 'frame', 0)p = Path(p)  # to Pathsave_path = str(save_dir / p.name)  # im.jpgtxt_path = str(save_dir / 'labels' / p.stem) + ('' if dataset.mode == 'image' else f'_{frame}')  # im.txts += '%gx%g ' % im.shape[2:]  # print stringgn = torch.tensor(im0.shape)[[1, 0, 1, 0]]  # normalization gain whwhimc = im0.copy() if save_crop else im0  # for save_cropannotator = Annotator(im0, line_width=line_thickness, example=str(names))if len(det):# Rescale boxes from img_size to im0 sizedet[:, :4] = scale_coords(im.shape[2:], det[:, :4], im0.shape).round()# Print resultsfor c in det[:, -1].unique():n = (det[:, -1] == c).sum()  # detections per classs += f"{n} {names[int(c)]}{'s' * (n > 1)}, "  # add to string# Write resultsfor *xyxy, conf, cls in reversed(det):if save_txt:  # Write to filexywh = (xyxy2xywh(torch.tensor(xyxy).view(1, 4)) / gn).view(-1).tolist()  # normalized xywhline = (cls, *xywh, conf) if save_conf else (cls, *xywh)  # label formatwith open(txt_path + '.txt', 'a') as f:f.write(('%g ' * len(line)).rstrip() % line + '\n')if save_img or save_crop or view_img:  # Add bbox to imagex1 = int(xyxy[0])y1 = int(xyxy[1])x2 = int(xyxy[2])y2 = int(xyxy[3])h = y2-y1w = x2-x1if names[int(cls)] == "person":c = int(cls)  # integer class  整数类 1111111111label = None if hide_labels else (names[c] if hide_conf else f'{names[c]} {conf:.2f}')  # 111#dis_m = person_distance(h)#label += f'  {dis_m}m'w_m, h_m = chicun(w, h)label += f'  {w_m}m'label += f'  {h_m}m'txt = '{0}'.format(label)# annotator.box_label(xyxy, txt, color=(255, 0, 255))annotator.box_label(xyxy, txt, color=colors(c, True))'''if names[int(cls)] == "car":c = int(cls)  # integer class  整数类 1111111111label = None if hide_labels else (names[c] if hide_conf else f'{names[c]} {conf:.2f}')  # 111dis_m = car_distance(h)label += f'  {dis_m}m'txt = '{0}'.format(label)# annotator.box_label(xyxy, txt, color=(255, 0, 255))annotator.box_label(xyxy, txt, color=colors(c, True))'''if save_crop:save_one_box(xyxy, imc, file=save_dir / 'crops' / names[c] / f'{p.stem}.jpg', BGR=True)# Stream resultsim0 = annotator.result()'''if view_img:cv2.imshow(str(p), im0)cv2.waitKey(1)  # 1 millisecond'''if view_img:cv2.namedWindow("Webcam", cv2.WINDOW_NORMAL)cv2.resizeWindow("Webcam", 1280, 720)cv2.moveWindow("Webcam", 0, 100)cv2.imshow("Webcam", im0)cv2.waitKey(1)# Save results (image with detections)if save_img:if dataset.mode == 'image':cv2.imwrite(save_path, im0)else:  # 'video' or 'stream'if vid_path[i] != save_path:  # new videovid_path[i] = save_pathif isinstance(vid_writer[i], cv2.VideoWriter):vid_writer[i].release()  # release previous video writerif vid_cap:  # videofps = vid_cap.get(cv2.CAP_PROP_FPS)w = int(vid_cap.get(cv2.CAP_PROP_FRAME_WIDTH))h = int(vid_cap.get(cv2.CAP_PROP_FRAME_HEIGHT))else:  # streamfps, w, h = 30, im0.shape[1], im0.shape[0]save_path = str(Path(save_path).with_suffix('.mp4'))  # force *.mp4 suffix on results videosvid_writer[i] = cv2.VideoWriter(save_path, cv2.VideoWriter_fourcc(*'mp4v'), fps, (w, h))vid_writer[i].write(im0)# Print time (inference-only)LOGGER.info(f'{s}Done. ({t3 - t2:.3f}s)')# Print resultst = tuple(x / seen * 1E3 for x in dt)  # speeds per imageLOGGER.info(f'Speed: %.1fms pre-process, %.1fms inference, %.1fms NMS per image at shape {(1, 3, *imgsz)}' % t)if save_txt or save_img:s = f"\n{len(list(save_dir.glob('labels/*.txt')))} labels saved to {save_dir / 'labels'}" if save_txt else ''LOGGER.info(f"Results saved to {colorstr('bold', save_dir)}{s}")if update:strip_optimizer(weights)  # update model (to fix SourceChangeWarning)def parse_opt():parser = argparse.ArgumentParser()parser.add_argument('--weights', nargs='+', type=str, default=ROOT / 'yolov5s.pt', help='model path(s)')parser.add_argument('--source', type=str, default=ROOT / 'data/images/2.mp4', help='file/dir/URL/glob, 0 for webcam')parser.add_argument('--data', type=str, default=ROOT / 'data/coco128.yaml', help='(optional) dataset.yaml path')parser.add_argument('--imgsz', '--img', '--img-size', nargs='+', type=int, default=[640], help='inference size h,w')parser.add_argument('--conf-thres', type=float, default=0.25, help='confidence threshold')parser.add_argument('--iou-thres', type=float, default=0.45, help='NMS IoU threshold')parser.add_argument('--max-det', type=int, default=1000, help='maximum detections per image')parser.add_argument('--device', default='', help='cuda device, i.e. 0 or 0,1,2,3 or cpu')parser.add_argument('--view-img', action='store_true', help='show results')parser.add_argument('--save-txt', action='store_true', help='save results to *.txt')parser.add_argument('--save-conf', action='store_true', help='save confidences in --save-txt labels')parser.add_argument('--save-crop', action='store_true', help='save cropped prediction boxes')parser.add_argument('--nosave', action='store_true', help='do not save images/videos')parser.add_argument('--classes', nargs='+', type=int, help='filter by class: --classes 0, or --classes 0 2 3')parser.add_argument('--agnostic-nms', action='store_true', help='class-agnostic NMS')parser.add_argument('--augment', action='store_true', help='augmented inference')parser.add_argument('--visualize', action='store_true', help='visualize features')parser.add_argument('--update', action='store_true', help='update all models')parser.add_argument('--project', default=ROOT / 'runs/detect', help='save results to project/name')parser.add_argument('--name', default='exp', help='save results to project/name')parser.add_argument('--exist-ok', action='store_true', help='existing project/name ok, do not increment')parser.add_argument('--line-thickness', default=3, type=int, help='bounding box thickness (pixels)')parser.add_argument('--hide-labels', default=False, action='store_true', help='hide labels')parser.add_argument('--hide-conf', default=False, action='store_true', help='hide confidences')parser.add_argument('--half', action='store_true', help='use FP16 half-precision inference')parser.add_argument('--dnn', action='store_true', help='use OpenCV DNN for ONNX inference')opt = parser.parse_args()opt.imgsz *= 2 if len(opt.imgsz) == 1 else 1  # expandprint_args(FILE.stem, opt)return optdef main(opt):check_requirements(exclude=('tensorboard', 'thop'))run(**vars(opt))if __name__ == "__main__":opt = parse_opt()main(opt)
5. 实验效果
实验效果如下

工程源码下载链接:https://github.com/up-up-up-up/yolov5_Monocular_measure
更多测距代码见博客主页
相关文章:
YOLOv5+单目测量物体尺寸(python)
YOLOv5单目测量尺寸(python) 1. 相关配置2. 测距原理3. 相机标定3.1:标定方法1(针对图片)3.2:标定方法2(针对视频) 4. 相机测距4.1 测距添加4.2 细节修改(可忽略…...

C++异常
C异常 提到异常,大家一定不陌生,在学习new关键字的时候就提到了开空间失败会导致抛异常。其实异常在我们生活中的使用是很多的,有些时候程序发生错误以后我们并不希望程序就直接退出,针对不同的情况,我们更希望有不同的…...

Java中的字符串是如何处理的?
Java中的字符串是通过字符串对象来处理的。字符串是一个类,可以创建一个字符串对象,并在该对象上调用一系列方法来操作该字符串。 Java中的字符串是不可变的,这意味着一旦创建了一个字符串对象,就无法修改它的值。任何对字符串对…...

【热门框架】怎样使用Mybatis-Plus制作标准的分页功能
使用 Mybatis-Plus 实现标准的分页功能需要使用 Page 类来进行分页操作。具体步骤如下: 引入 Mybatis-Plus 依赖 在 Maven 项目中,在 pom.xml 文件中引入 Mybatis-Plus 的依赖: <dependency><groupId>com.baomidou</groupId&g…...

Java方法引用:提高代码可读性和可维护性
前言 在Java 8中,可以使用方法引用(Method Reference)来简化Lambda表达式。方法引用是一种更简洁易懂的语法形式,可以通过指定方法的名称代替Lambda表达式。 本文将介绍方法引用的用法和实现原理,并结合代码案例详细…...

如何使用CSS和JS实现一个响应式的滚动时间轴
随着互联网的发展,网站的界面设计越来越重要。吸引用户的关注、提高用户体验已经成为了许多网站的目标。而在实现各种复杂的界面效果中,CSS与JS的组合无疑是开发者的得力工具。本文将介绍如何使用CSS和JS实现一个响应式的滚动时间轴。 1.需求分析 在开…...

Feign组件的使用及开发中使用方式
在微服务的服务集群中服务与服务之间需要调用暴露的服务.那么就需要在服务内部发送http请求, 我们可以使用较为老的HttpClient实现,也可以使用SpringCloud提供的RestTemplate类调用对应的方法来发送对应的请求。 说明: 现在有两个微服务一个是…...

html css 面试题
1. 如何理解HTML语义化 1,可读性,易读性 2,seo搜索引擎更容易读懂 2,哪些是块元素,哪些是内联元素 1:div,h1,table,ul,p 2:span, img…...
LeetCode_双指针_中等_24.两两交换链表中的节点
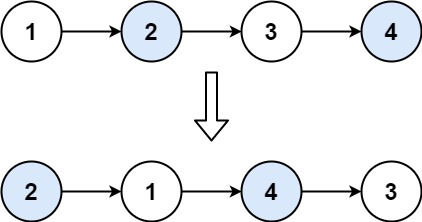
目录 1.题目2.思路3.代码实现(Java) 1.题目 给你一个链表,两两交换其中相邻的节点,并返回交换后链表的头节点。你必须在不修改节点内部的值的情况下完成本题(即,只能进行节点交换)。 示例 1&a…...

【openGauss实战11】性能报告WDR深度解读
📢📢📢📣📣📣 哈喽!大家好,我是【IT邦德】,江湖人称jeames007,10余年DBA及大数据工作经验 一位上进心十足的【大数据领域博主】!😜&am…...

Vue3实现打字机效果
typeit 介绍 typeit是一款轻量级打字机特效插件。该打印机特效可以设置打字速度,是否显示光标,是否换行和延迟时间等属性,它可以打印单行文本和多行文本,并具有可缩放、响应式等特点。官方文档 安装 # npm npm install typeit # …...

maven无法依赖spring-cloud-stater-zipkin如何解决?
当 Maven 无法依赖 spring-cloud-starter-zipkin 时,您可以尝试以下方法解决: 确保拼写正确:请检查项目中的 pom.xml 文件,确保依赖的拼写正确。正确的依赖名称应为:spring-cloud-starter-zipkin。添加 Spring Cloud …...

实战踩坑---MFC---CreateEvent
使用事件CreateEvent注意事项 HANDLECreateEvent( LPSECURITY_ATTRIBUTESlpEventAttributes,// 安全属性 BOOLbManualReset,// 复位方式 BOOLbInitialState,// 初始状态 LPCTSTRlpName // 对象名称 );[1] 参数 lpEventAttributes[输入] 一个指向SECURITY_ATTRIBUTES结构…...
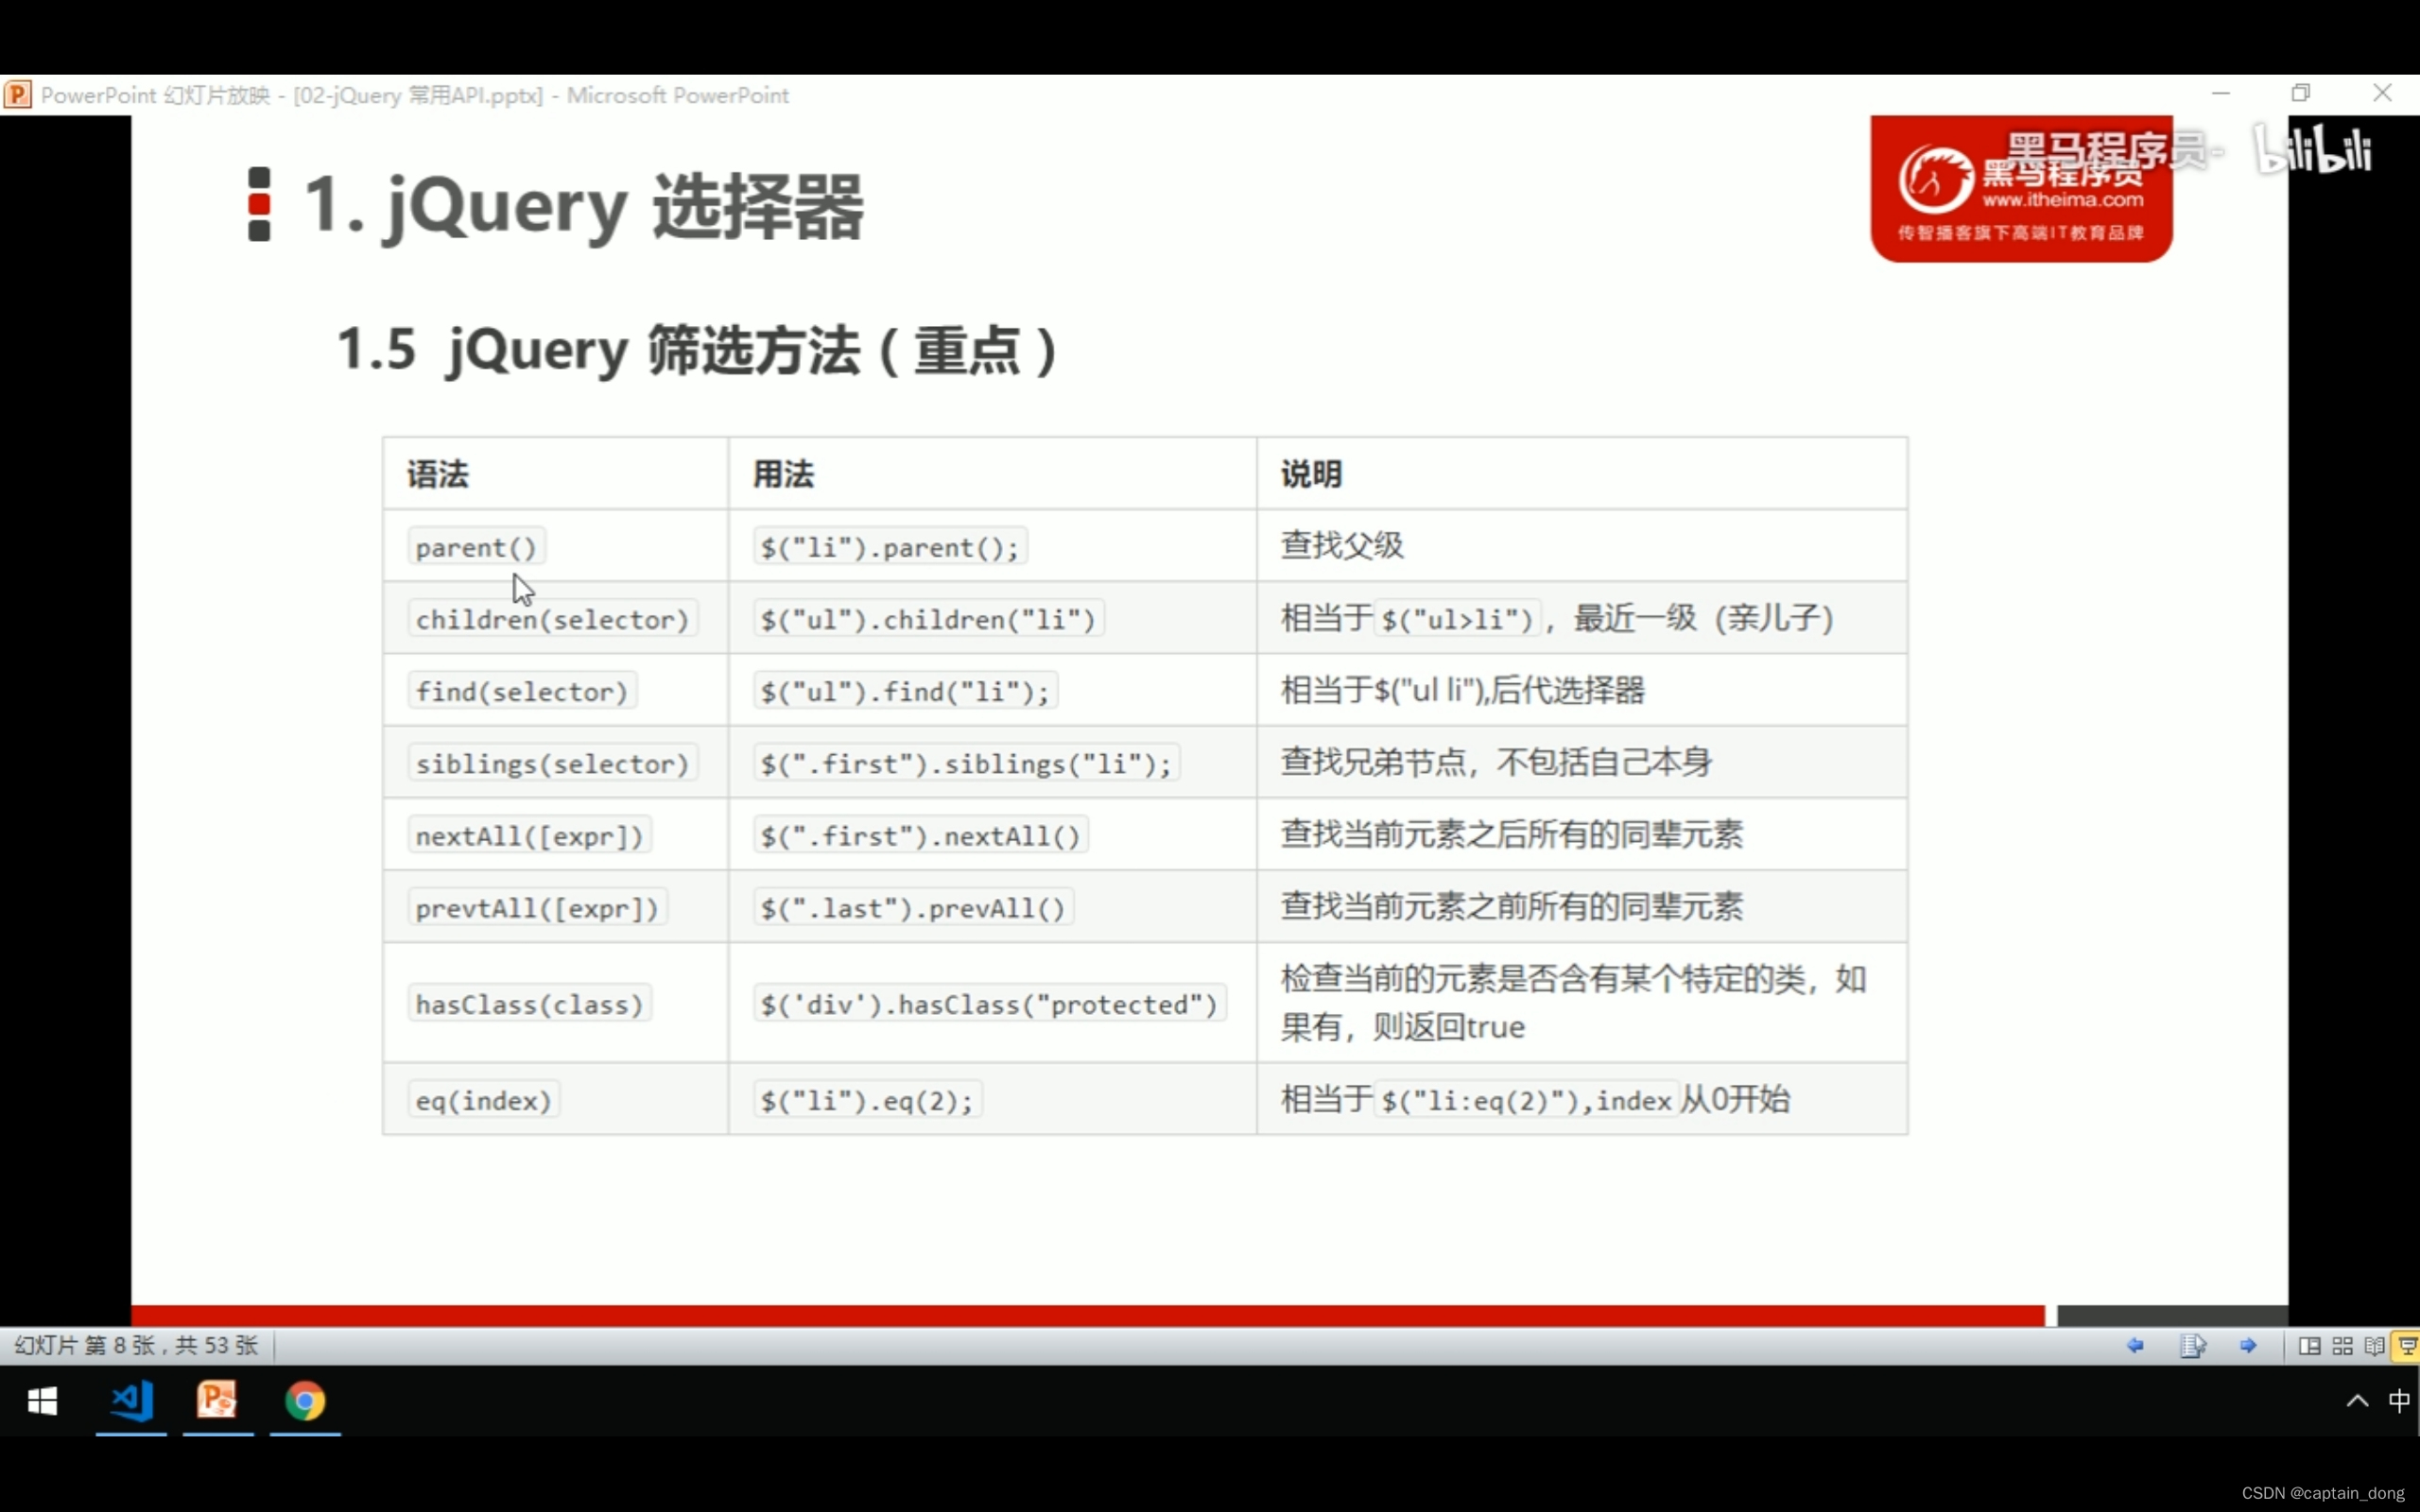
JavaWeb学习------jQuery
JavaWeb学习------jQuery jQuery函数库下载 jQuery函数库下载官网:Download jQuery | jQuery配套资料,免费下载 链接:https://pan.baidu.com/s/1aXBfItEYG4uM53u6PUEMTg 提取码:6c9i 然后下载? 来到官网…...

米哈游测开岗 【一面总结】
目录 1.黑盒测试与白盒测试的区别 2.测试一个下单功能 3.get与post的区别 4.一次get请求产生几个数据包 5.常用的linux命令 6.进程与线程的区别 7.数据库查询如何去重 8.MySql怎么连接两张表,有什么区别 9.说说索引 10.cookie 和 session 的区别 (会话管…...

微服务 Spring Boot 整合Redis 实现优惠卷秒杀 一人一单
文章目录 一、什么是全局唯一ID ⛅全局唯一ID ⚡Redis实现全局唯一ID 二、环境准备 三、实现秒杀下单 四、库存超卖问题 ⏳问题分析 ⌚ 乐观锁解决库存超卖 ✅Jmeter 测试 五、优惠卷秒杀 实现一人一单 ⛵小结 一、什么是全局唯一ID ⛅全局唯一ID 在分布式系统中,经常需要使用…...
构建OVS网络
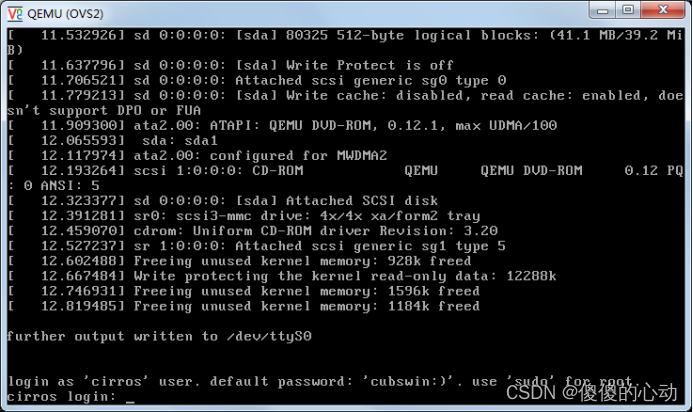
构建OVS网络 1. 配置虚拟机环境 (1)配置虚拟机交换机 1 创建一个名为br-xd的虚拟交换机。 # ovs-vsctl add-br br-xd 2 查询虚拟交换机。 # ovs-vsctl show 5a1cd870-fc31-4820-a7f4-b75c19450582 Bridge br-xd Port br-xd …...

【Python】万能之王 Lambda 函数详解
Python 提供了非常多的库和内置函数。有不同的方法可以执行相同的任务,而在 Python 中,有个万能之王函数:lambda 函数,它可以以不同的方式在任何地方使用。今天云朵君将和大家一起研究下这个万能之王! Lambda 函数简介…...

手把手教你怎么搭建自己的AI数字人直播间?帮你24小时不间断直播卖货
在搭建AI数字人直播间之前,您需要了解数字人技术。 一、什么是AI数字人、数字人直播间? 数字人是一种由人工智能技术构建的虚拟人物,其外貌、行为、语言等特征与真实人物相似,可以与人进行互动。数字人可以通过语音合成、人脸识…...
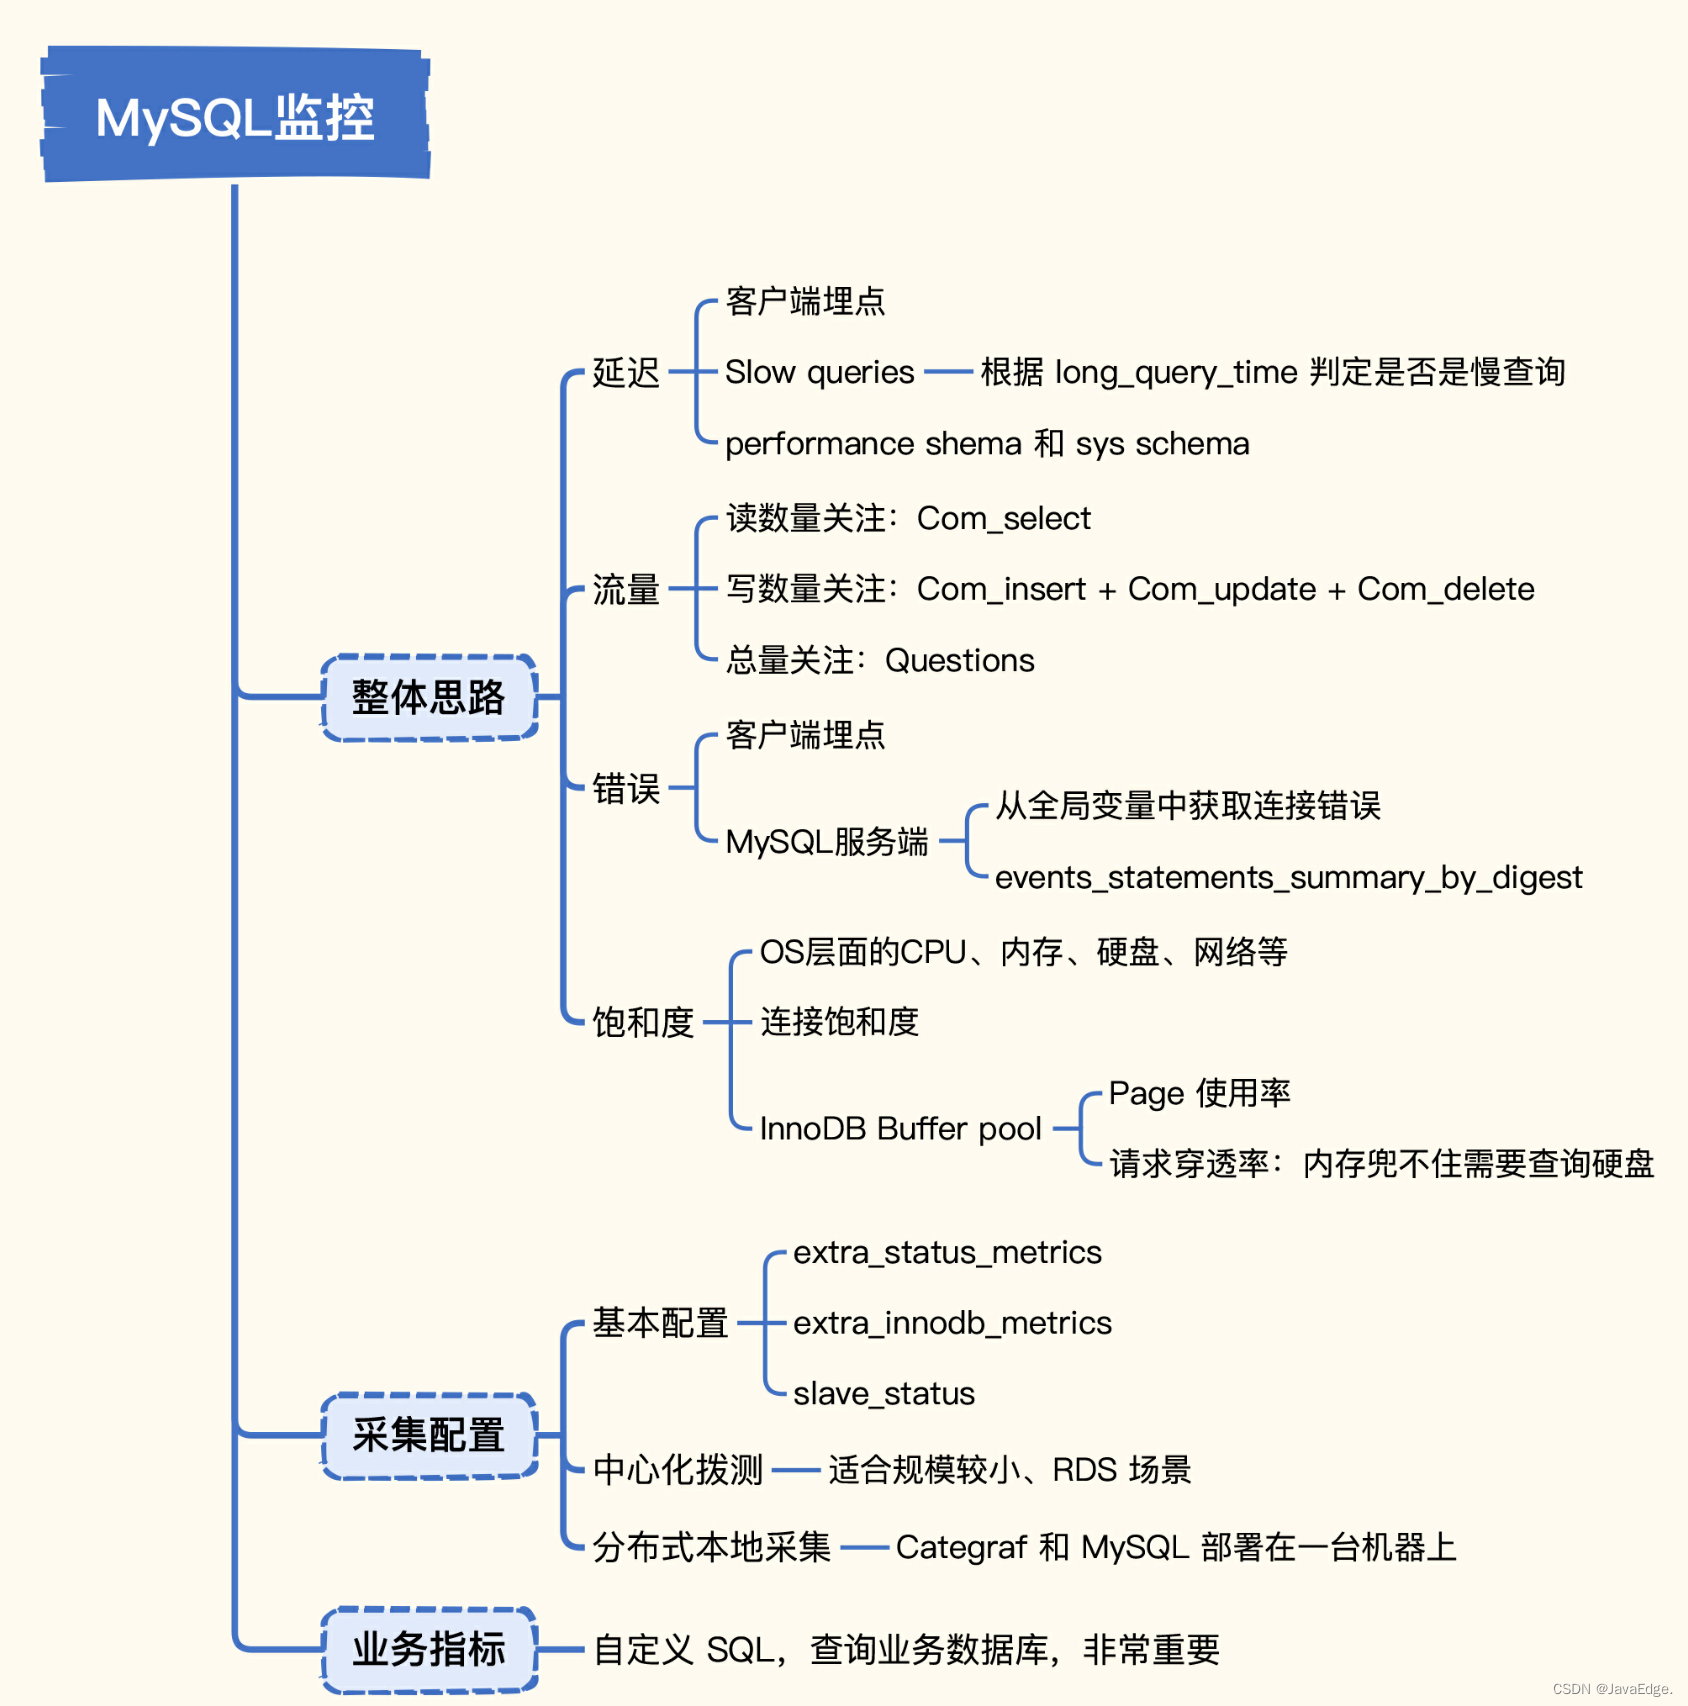
MySQL性能监控全掌握,快来get关键指标及采集方法!
数据库中间件监控实战,MySQL中哪些指标比较关键以及如何采集这些指标了。帮助提早发现问题,提升数据库可用性。 1 整体思路 监控哪类指标? 如何采集数据? 第10讲监控方法论如何落地? 这些就可以在MySQL中应用起来。…...

LinkSwift:告别网盘下载烦恼,八大平台一键获取真实链接
LinkSwift:告别网盘下载烦恼,八大平台一键获取真实链接 【免费下载链接】Online-disk-direct-link-download-assistant 一个基于 JavaScript 的网盘文件下载地址获取工具。基于【网盘直链下载助手】修改 ,支持 百度网盘 / 阿里云盘 / 中国移动…...

如何3分钟制作专业级AI换脸视频?roop-unleashed完整指南
如何3分钟制作专业级AI换脸视频?roop-unleashed完整指南 【免费下载链接】roop-unleashed Evolved Fork of roop with Web Server and lots of additions 项目地址: https://gitcode.com/gh_mirrors/ro/roop-unleashed 想要制作令人惊叹的AI换脸视频却担心技…...

3分钟掌握Cat-Catch:浏览器资源嗅探的终极解决方案
3分钟掌握Cat-Catch:浏览器资源嗅探的终极解决方案 【免费下载链接】cat-catch 猫抓 浏览器资源嗅探扩展 / cat-catch Browser Resource Sniffing Extension 项目地址: https://gitcode.com/GitHub_Trending/ca/cat-catch 你是否曾在网页上遇到喜欢的视频却无…...

AI质量门禁:从概念到CI/CD落地的智能代码审查实践
1. 项目概述:AI驱动的质量门禁,从概念到落地最近在开源社区里,我注意到一个挺有意思的项目,叫mustafacagri/ai-quality-gate。光看这个名字,就能嗅到一股将人工智能(AI)与软件开发流程中的质量保…...
)
别再乱接线了!搞懂数据采集卡的RSE、NRSE和DIFF模式,实测避坑(以USB-3113为例)
数据采集卡输入模式实战指南:RSE、NRSE与DIFF的精准选择与避坑策略 实验室里那台价值不菲的振动传感器突然输出异常波形时,大多数工程师的第一反应是检查传感器本身——但真正的问题往往藏在那些不起眼的接线端子之间。数据采集卡的输入模式选择…...

wxappUnpacker深度解析:从二进制包到可读源码的逆向工程之旅
wxappUnpacker深度解析:从二进制包到可读源码的逆向工程之旅 【免费下载链接】wxappUnpacker forked from https://github.com/qwerty472123/wxappUnpacker 项目地址: https://gitcode.com/gh_mirrors/wxappu/wxappUnpacker 微信小程序逆向工程与源码还原技术…...

ADSP-21565脱机运行避坑指南:手把手教你搞定Flash驱动和CLDP烧写命令
ADSP-21565深度烧写实战:从Flash驱动适配到CLDP命令全解析 当开发板断电后程序"消失"时,那种挫败感每个嵌入式工程师都经历过。ADSP-21565作为音频DSP领域的旗舰芯片,其脱机运行能力直接影响产品可靠性,而Flash烧写质量…...

嵌入式C医疗固件内存泄漏黑洞:用Valgrind定制版+地址 sanitizer 在呼吸机主控板上精准定位0.3KB/小时隐性泄漏
更多请点击: https://intelliparadigm.com 第一章:嵌入式C医疗数据采集优化概览 在高可靠性医疗设备(如便携式心电监护仪、血糖分析终端)中,嵌入式C语言实现的数据采集模块需在资源受限(<512KB Flash、…...

高效AI教材写作:借助AI工具编写教材,低查重效果超惊艳!
一、选择AI教材生成工具的背景与意义 在开始编写教材之前,工具的选择常常让人感到“纠结”!如果选择常规办公软件,就会发现功能实在太有限,框架和格式都得自己动手调整;而专业的AI教材写作工具,则因为操作…...
总报‘serialized_options‘错误?)
TensorFlow/Keras自定义模型踩坑记:为什么你的__init__()总报‘serialized_options‘错误?
TensorFlow/Keras自定义模型避坑指南:破解__init__()中的serialized_options之谜 在深度学习项目中使用TensorFlow/Keras框架时,自定义模型是每个开发者必经的进阶之路。但当你满怀信心地继承tf.keras.Model,准备大展身手时,却可能…...