Docker使用记录
文章目录
- Docker基本使用
- Docker配置
- 查看状态
- 卸载
- 安装
- 使用 apt 存储库安装
- 在 Ubuntu 上安装 Docker 桌面(非必要)
- Docker实例
- 使用现有的镜像
- 查找镜像
- 拖取镜像
- 列出镜像列表
- 更新镜像
- 导出镜像
- 删除镜像
- 导入镜像
- 清理镜像
- 查看容器
- 导出容器
- 导入容器-以镜像的方式
- 创建容器
- 重启容器
- 进入容器
- 停止&关闭容器
- 删除容器
- Dockerfile
- Dockerfile切换国内源
- buildx
Docker基本使用
参考文章:https://www.runoob.com/docker/docker-tutorial.html
参考文章:https://docs.docker.com/desktop/?_gl=11oj7pdo_gaMTY0NDQxMjgwNC4xNjgyMDY2MjM5_ga_XJWPQMJYHQ*MTY4NTQ5NjQyNi4yLjEuMTY4NTQ5NzA1Ny4zNi4wLjA.
参考文章:https://docs.docker.com/engine/
参考文章:https://cloud.tencent.com/developer/article/1885678
参考文章:https://docs.docker.com/get-started/overview/
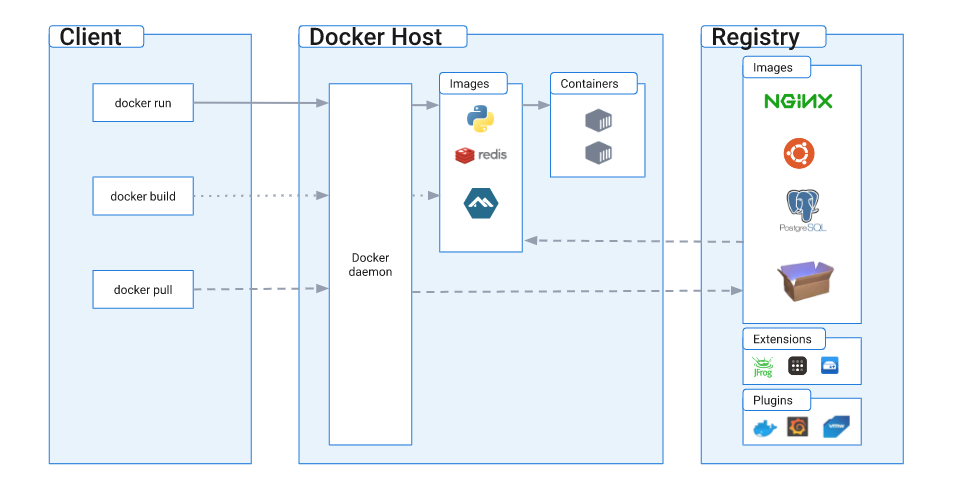
Docker 使用客户端-服务器架构。Docker客户端与 Docker守护进程对话,后者负责构建、运行和分发 Docker 容器的繁重工作。Docker 客户端和守护进程可以 在同一系统上运行,或者您可以将 Docker 客户端连接到远程 Docker 守护进程。Docker 客户端和守护进程使用 REST API 通过 UNIX 套接字或网络接口进行通信。另一个 Docker 客户端是 Docker Compose,它允许您处理由一组容器组成的应用程序。
Docker中的镜像分层
Docker 支持通过扩展现有镜像,创建新的镜像。实际上,Docker Hub 中 99% 的镜像都是通过在 base 镜像中安装和配置需要的软件构建出来的。
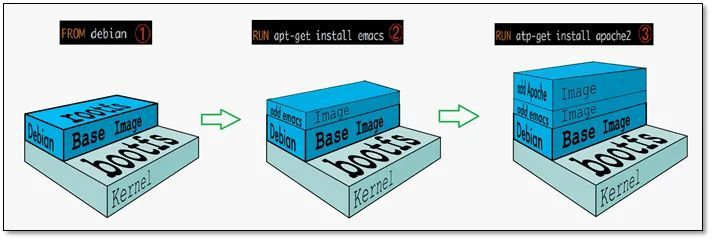
从上图可以看到,新镜像是从 base 镜像一层一层叠加生成的。每安装一个软件,就在现有镜像的基础上增加一层。
Docker 镜像为什么分层
镜像分层最大的一个好处就是共享资源。
比如说有多个镜像都从相同的 base 镜像构建而来,那么 Docker Host 只需在磁盘上保存一份 base 镜像;同时内存中也只需加载一份 base 镜像,就可以为所有容器服务了。而且镜像的每一层都可以被共享。
如果多个容器共享一份基础镜像,当某个容器修改了基础镜像的内容,比如 /etc 下的文件,这时其他容器的 /etc 是不会被修改的,修改只会被限制在单个容器内。这就是容器 Copy-on-Write 特性。
可写的容器层
当容器启动时,一个新的可写层被加载到镜像的顶部。这一层通常被称作“容器层”,“容器层”之下的都叫“镜像层”。
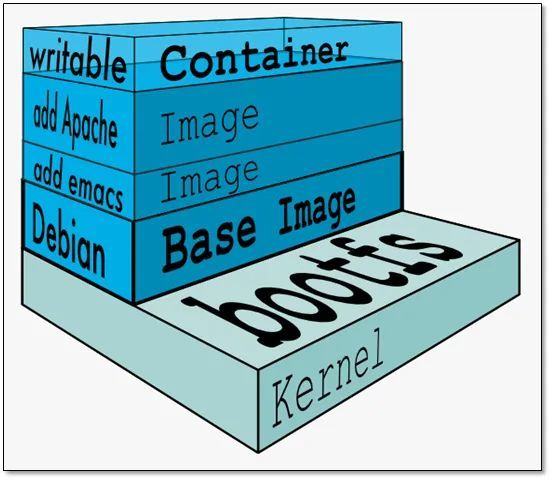
所有对容器的改动 - 无论添加、删除、还是修改文件都只会发生在容器层中。只有容器层是可写的,容器层下面的所有镜像层都是只读的。
容器层的细节说明
镜像层数量可能会很多,所有镜像层会联合在一起组成一个统一的文件系统。如果不同层中有一个相同路径的文件,比如 /a,上层的 /a 会覆盖下层的 /a,也就是说用户只能访问到上层中的文件 /a。在容器层中,用户看到的是一个叠加之后的文件系统。
| 文件操作 | 说明 |
|---|---|
| 添加文件 | 在容器中创建文件时,新文件被添加到容器层中。 |
| 读取文件 | 在容器中读取某个文件时,Docker 会从上往下依次在各镜像层中查找此文件。一旦找到,立即将其复制到容器层,然后打开并读入内存。 |
| 修改文件 | 在容器中修改已存在的文件时,Docker 会从上往下依次在各镜像层中查找此文件。一旦找到,立即将其复制到容器层,然后修改之。 |
| 删除文件 | 在容器中删除文件时,Docker 也是从上往下依次在镜像层中查找此文件。找到后,会在容器层中记录下此删除操作。(只是记录删除操作) |
只有当需要修改时才复制一份数据,这种特性被称作 Copy-on-Write。可见,容器层保存的是镜像变化的部分,不会对镜像本身进行任何修改。
这样就解释了我们前面提出的问题:容器层记录对镜像的修改,所有镜像层都是只读的,不会被容器修改,所以镜像可以被多个容器共享。
Docker配置
系统版本:Ubuntu 20.04.4 LTS (GNU/Linux 5.4.0-146-generic x86_64)
查看状态
首先,可以先检查一下系统是否已经安装过docker,使用下面指令查看docker版本号。
root@qhdata-dev:~# docker -v
Docker version 20.10.17, build 100c701root@qhdata-dev:~# sudo docker run hello-world
Unable to find image 'hello-world:latest' locally
latest: Pulling from library/hello-world
719385e32844: Pull complete
Digest: sha256:fc6cf906cbfa013e80938cdf0bb199fbdbb86d6e3e013783e5a766f50f5dbce0
Status: Downloaded newer image for hello-world:latestHello from Docker!
This message shows that your installation appears to be working correctly.To generate this message, Docker took the following steps:1. The Docker client contacted the Docker daemon.2. The Docker daemon pulled the "hello-world" image from the Docker Hub.(amd64)3. The Docker daemon created a new container from that image which runs theexecutable that produces the output you are currently reading.4. The Docker daemon streamed that output to the Docker client, which sent itto your terminal.To try something more ambitious, you can run an Ubuntu container with:$ docker run -it ubuntu bashShare images, automate workflows, and more with a free Docker ID:https://hub.docker.com/For more examples and ideas, visit:https://docs.docker.com/get-started/
卸载
使用下列语句卸载已安装的docker
sudo apt-get purge docker-ce docker-ce-cli containerd.io docker-buildx-plugin docker-compose-plugin docker-ce-rootless-extras
主机上的图像、容器、卷或自定义配置文件不会自动删除。删除所有镜像、容器和卷:
sudo rm -rf /var/lib/docker
sudo rm -rf /var/lib/containerd
您必须手动删除任何已编辑的配置文件。
安装
- Docker Engine 与Docker Desktop for Linux捆绑在一起 。这是最简单快捷的入门方法。
- 从Docker 的apt存储库设置和安装 Docker 引擎 。
- 手动安装并手动管理升级。
- 使用方便的脚本。仅推荐用于测试和开发环境。
使用 apt 存储库安装
设置存储库
更新apt包索引并安装包以允许apt通过 HTTPS 使用存储库:
sudo apt-get update
sudo apt-get install ca-certificates curl gnupg
添加 Docker 的官方 GPG 密钥:
sudo install -m 0755 -d /etc/apt/keyringscurl -fsSL https://download.docker.com/linux/ubuntu/gpg | sudo gpg --dearmor -o /etc/apt/keyrings/docker.gpgsudo chmod a+r /etc/apt/keyrings/docker.gpg
使用以下命令设置存储库:
echo \"deb [arch="$(dpkg --print-architecture)" signed-by=/etc/apt/keyrings/docker.gpg] https://download.docker.com/linux/ubuntu \"$(. /etc/os-release && echo "$VERSION_CODENAME")" stable" | \sudo tee /etc/apt/sources.list.d/docker.list > /dev/null
安装 Docker 引擎
更新apt包索引:
sudo apt-get update
要安装特定版本的 Docker Engine,首先在存储库中列出可用版本:
apt-cache madison docker-ce | awk '{ print $3 }'
选择所需版本并安装:
VERSION_STRING=5:24.0.0-1~ubuntu.20.04~focalsudo apt-get install docker-ce=$VERSION_STRING docker-ce-cli=$VERSION_STRING containerd.io docker-buildx-plugin docker-compose-plugin
或者直接安装最新版本
sudo apt-get install docker-ce docker-ce-cli containerd.io docker-buildx-plugin docker-compose-plugin
通过运行hello-world映像验证 Docker 引擎安装是否成功
root@qhdata-dev:~# docker -v
Docker version 24.0.2, build cb74dfcsudo docker run hello-world
在 Ubuntu 上安装 Docker 桌面(非必要)
参考文章:https://docs.docker.com/desktop/install/ubuntu/
先决条件
要成功安装 Docker Desktop,您必须:
- 满足系统要求
- 拥有 64 位版本的 Ubuntu Jammy Jellyfish 22.04 (LTS) 或 Ubuntu Impish Indri 21.10。x86_64Docker Desktop 在(或)架构上受支持amd64。
- 对于非 Gnome 桌面环境,gnome-terminal必须安装:
sudo apt install gnome-terminal
安装 Docker 桌面
1.设置Docker 的包存储库。
2.下载最新的DEB 包。
3.使用 apt 安装软件包,如下所示:
sudo apt-get update
sudo apt-get install ./docker-desktop-<version>-<arch>.deb
安装后脚本:
- 设置 Docker Desktop 二进制文件的功能以映射特权端口并设置资源限制。
- 将 Kubernetes 的 DNS 名称添加到/etc/hosts.
- 创建一个从/usr/bin/docker到/usr/local/bin/com.docker.cli的链接
启动 Docker 桌面
Docker实例
参考文章:https://www.quanxiaoha.com/docker/docker-look-image.html
参考文章:https://cloud.tencent.com/developer/article/1885678
参考文章:https://www.w3cschool.cn/docker/docker-image-usage.html
docker_hub地址:https://hub.docker.com/search?q=
docker构建一个基础镜像大概流程:
使用现有的镜像
查找镜像
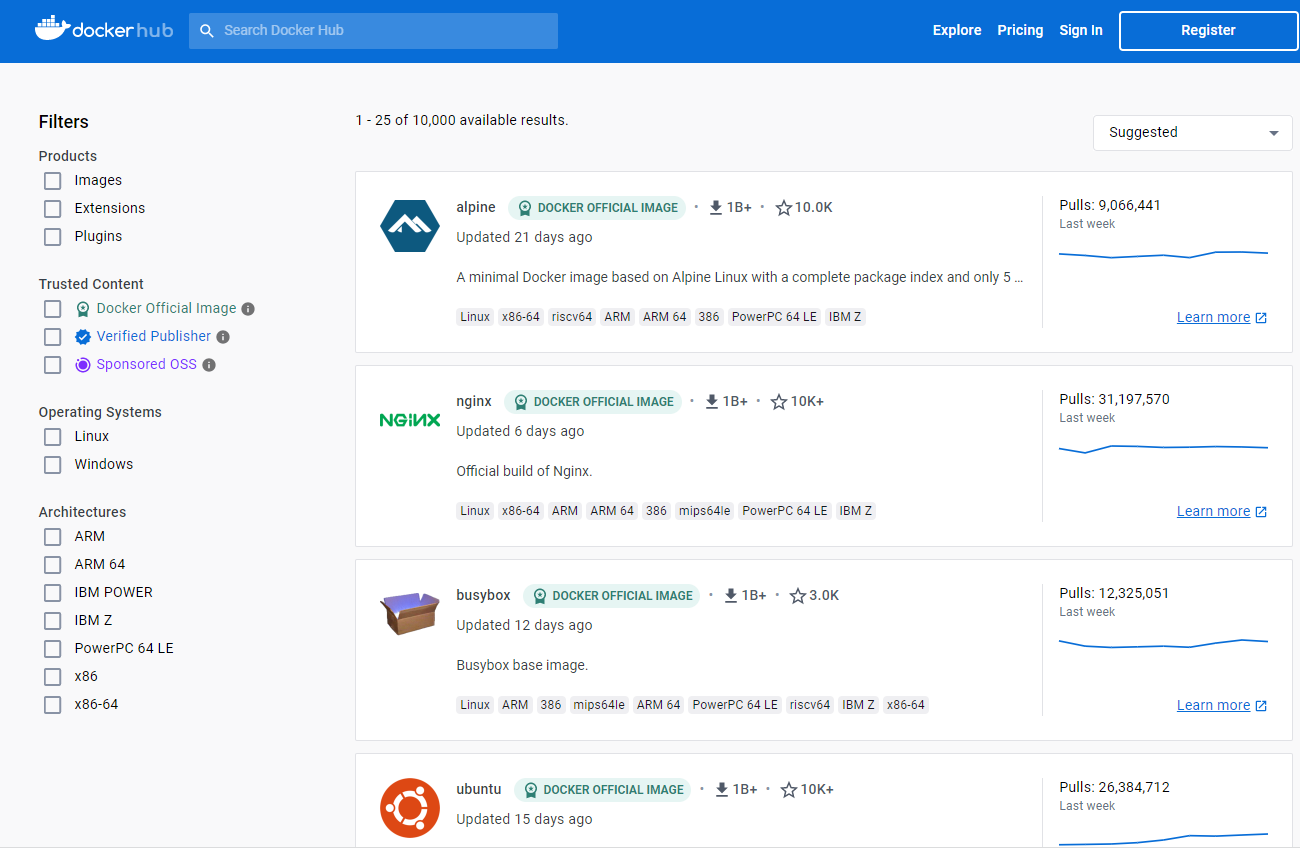
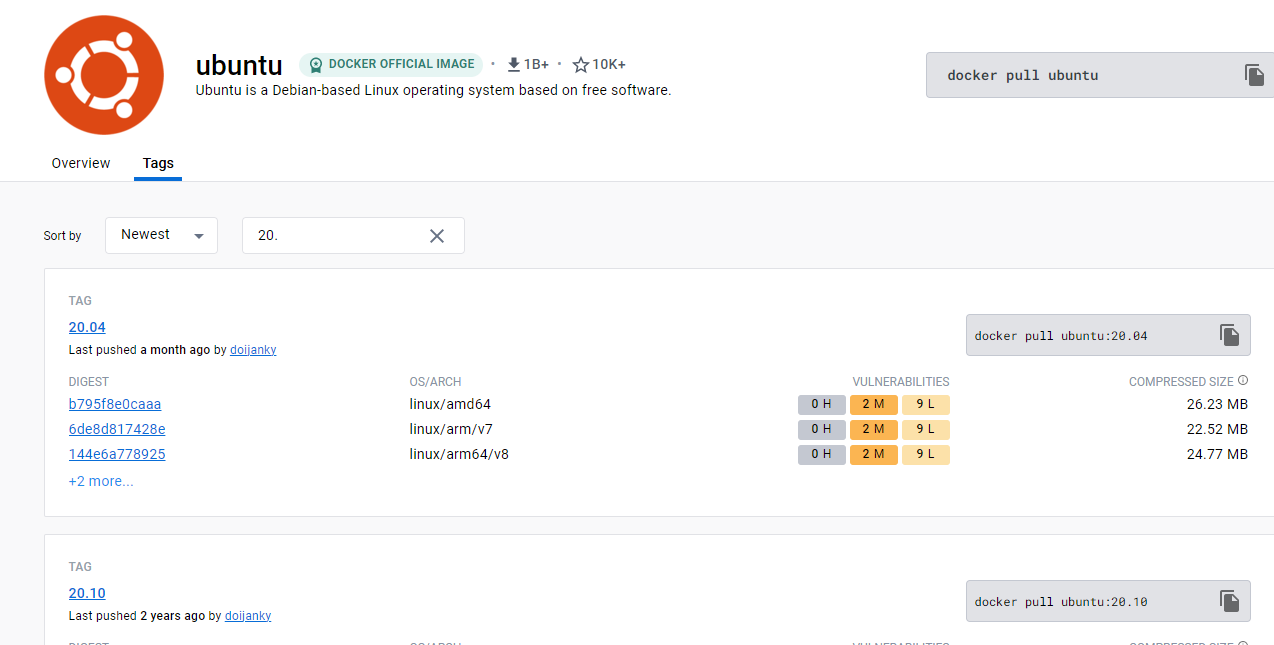
可以登陆Docker Hub来查找我们需要的的镜像。
拖取镜像
使用命令 docker pull 来下载镜像
root@qhdata-dev:/home/qhdata/docker# docker pull ubuntu:20.04
20.04: Pulling from library/ubuntu
ca1778b69356: Pull complete
Digest: sha256:db8bf6f4fb351aa7a26e27ba2686cf35a6a409f65603e59d4c203e58387dc6b3
Status: Downloaded newer image for ubuntu:20.04
docker.io/library/ubuntu:20.04
root@qhdata-dev:/home/qhdata/docker#
列出镜像列表
使用 docker images 来列出本地主机上的镜像。
root@qhdata-dev:/home/qhdata/docker# docker images
REPOSITORY              TAG           IMAGE ID       CREATED         SIZE
hello-world             latest        9c7a54a9a43c   3 weeks ago     13.3kB
ubuntu                  20.04         88bd68917189   6 weeks ago     72.8MB
...
alpine                  latest        e66264b98777   12 months ago   5.53MB
root@qhdata-dev:/home/qhdata/docker#
更新镜像
更新镜像之前,我们需要使用镜像来创建一个容器。
root@qhdata-dev:/home/qhdata/docker# docker run -t -i ubuntu:20.04 /bin/bash
root@7ec56dec1d8e:/#
在运行的容器内使用 apt-get update 命令进行更新。
在完成操作之后,输入 exit命令来退出这个容器。
root@7ec56dec1d8e:/# apt-get update
Get:1 http://security.ubuntu.com/ubuntu focal-security InRelease [114 kB]
.....
Get:18 http://security.ubuntu.com/ubuntu focal-security/main amd64 Packages [2748 kB]
Fetched 26.8 MB in 15s (1767 kB/s)
Reading package lists... Done
root@7ec56dec1d8e:/# exit
exit
root@qhdata-dev:/home/qhdata/docker#
此时ID为7ec56dec1d8e的容器,是按我们的需求更改的容器。我们可以通过命令docker commit来提交容器副本。
root@qhdata-dev:/home/qhdata/docker# docker commit -m="has update" -a="qhdata" 7ec56dec1d8e qhdata/ubuntu:20.04
sha256:dd4c75bc58d43b6ae59f9afc5c528117ac317d936cfd3219fe1ade1e902c3965
各个参数说明:
-m:提交的描述信息-a:指定镜像作者- 7ec56dec1d8e:容器ID
- qhdata/ubuntu:20.04:指定要创建的目标镜像名
我们可以使用docker images命令来查看我们的新镜像 qhdata/ubuntu:20.04:
root@qhdata-dev:/home/qhdata/docker# docker images
REPOSITORY              TAG           IMAGE ID       CREATED         SIZE
qhdata/ubuntu           20.04         dd4c75bc58d4   2 minutes ago   116MB
hello-world             latest        9c7a54a9a43c   3 weeks ago     13.3kB
ubuntu                  20.04         88bd68917189   6 weeks ago     72.8MB
...
alpine                  latest        e66264b98777   12 months ago   5.53MB
root@qhdata-dev:/home/qhdata/docker#
导出镜像
参考文章:https://docs.docker.com/engine/reference/commandline/save/
root@qhdata-dev:/home/qhdata/docker# docker save -o qhdata_ubuntu_20_04.tar qhdata/ubuntu:20.04
root@qhdata-dev:/home/qhdata/docker# ls -r
qhdata_ubuntu_20_04.tar
root@qhdata-dev:/home/qhdata/docker#
参数说明:
--output,-o:写入的文件,而不是 STDOUT
删除镜像
参考文章:https://docs.docker.com/engine/reference/commandline/rmi/
参考文章:https://docs.docker.com/engine/reference/commandline/image_rm/
docker rmi [image]
docker rmi [image id]
docker image rm [image]
参数说明:
--force , -f:强制删除图像--no-prune:不要删除未标记的父级
eg:
root@qhdata-dev:/home/qhdata/docker# docker rmi qhdata/ubuntu:20.04
Untagged: qhdata/ubuntu:20.04
Deleted: sha256:dd4c75bc58d43b6ae59f9afc5c528117ac317d936cfd3219fe1ade1e902c3965
Deleted: sha256:307a3b9484906a84d1b16735fdb6c967692fd0b065985126f54fbeb16eefdf20root@qhdata-dev:/home/qhdata/docker# docker images
REPOSITORY              TAG           IMAGE ID       CREATED         SIZE
hello-world             latest        9c7a54a9a43c   3 weeks ago     13.3kB
ubuntu                  20.04         88bd68917189   6 weeks ago     72.8MB
...
alpine                  latest        e66264b98777   12 months ago   5.53MB
root@qhdata-dev:/home/qhdata/docker#
导入镜像
参考文章:https://docs.docker.com/engine/reference/commandline/load/
参考文章:https://docs.docker.com/engine/reference/commandline/image_load/
从 STDIN 加载图像
docker load < qhdata_ubuntu_20_04.tar
docker image load < qhdata_ubuntu_20_04.tar
从文件加载图像 (–input)
docker load -i qhdata_ubuntu_20_04.tar
docker image load -i qhdata_ubuntu_20_04.tar
参数说明:
--input,-i:从 tar 归档文件中读取,而不是从 STDIN 中读取--quiet,-q抑制负载输出
eg:
root@qhdata-dev:/home/qhdata/docker# docker load -i qhdata_ubuntu_20_04.tar
f6ed57753c5f: Loading layer [==================================================>]  43.33MB/43.33MB
Loaded image: qhdata/ubuntu:20.04root@qhdata-dev:/home/qhdata/docker# docker images
REPOSITORY              TAG           IMAGE ID       CREATED         SIZE
qhdata/ubuntu           20.04         dd4c75bc58d4   2 hours ago     116MB
hello-world             latest        9c7a54a9a43c   3 weeks ago     13.3kB
ubuntu                  20.04         88bd68917189   6 weeks ago     72.8MB
...
alpine                  latest        e66264b98777   12 months ago   5.53MB
root@qhdata-dev:/home/qhdata/docker#
清理镜像
参考文章:https://docs.docker.com/engine/reference/commandline/image_prune/
root@qhdata-dev:/home/qhdata/docker# docker image prune
WARNING! This will remove all dangling images.
Are you sure you want to continue? [y/N] y
Total reclaimed space: 0B
root@qhdata-dev:/home/qhdata/docker#
参数说明:
--all,-a:删除所有未使用的图像,而不仅仅是悬挂的图像--filter:提供过滤值(例如until=<timestamp>)--force,-f:不提示确认
过滤(--filter)
过滤标志(–filter)格式为“key=value”。如果有多个过滤器,则传递多个标志(例如,–filter “foo=bar” --filter “bif=baz”)
目前支持的过滤器有:
- until (
<timestamp>) - 仅删除在给定时间戳之前创建的图像 - label (
label=<key>,label=<key>=<value>,label!=<key>, orlabel!=<key>=<value>) - 仅删除带有(或不带,如果label!=...使用)指定标签的图像。
查看容器
docker ps: 查看正在运行中的容器;
docker ps -a: 查看所有容器,包括运行中的、已经停止运行的容器。
docker container ls -a: 查看所有容器,包括运行中的、已经停止运行的容器。
root@qhdata-dev:/home/qhdata/docker# docker ps
CONTAINER ID   IMAGE             COMMAND                  CREATED         STATUS       PORTS                                       NAMES
7b651a8dfc5c   registry:latest   "/entrypoint.sh /etc…"   11 months ago   Up 7 hours   0.0.0.0:5001->5000/tcp, :::5001->5000/tcp   registryroot@qhdata-dev:/home/qhdata/docker# docker ps -a
CONTAINER ID   IMAGE                          COMMAND                  CREATED         STATUS                      PORTS                                                                            NAMES
7ec56dec1d8e   ubuntu:20.04                   "/bin/bash"              3 minutes ago   Exited (0) 2 minutes ago                                                                                     unruffled_ganguly
dea79bf486d4   hello-world                    "/hello"                 8 hours ago     Exited (0) 8 hours ago                                                                                       laughing_joliot
a67c7b72196a   owasp/modsecurity-crs:nginx    "/docker-entrypoint.…"   9 months ago    Exited (255) 5 months ago   0.0.0.0:8080->80/tcp, :::8080->80/tcp, 0.0.0.0:8443->443/tcp, :::8443->443/tcp   wafdemo-waf-1
d2945582db44   bkimminich/juice-shop:latest   "/nodejs/bin/node /j…"   9 months ago    Exited (255) 5 months ago   0.0.0.0:1003->3000/tcp, :::1003->3000/tcp                                        wafdemo-webapp-1
c7f605ab3ec9   nginx:latest                   "/docker-entrypoint.…"   9 months ago    Exited (255) 5 months ago   0.0.0.0:8081->80/tcp, :::8081->80/tcp                                            nginx-webapp-1
7b651a8dfc5c   registry:latest                "/entrypoint.sh /etc…"   11 months ago   Up 7 hours                  0.0.0.0:5001->5000/tcp, :::5001->5000/tcp                                        registry
root@qhdata-dev:/home/qhdata/docker#
返回字段说明:
CONTAINER ID: 容器 ID;IMAGE: 创建容器时使用的镜像;COMMAND: 容器最后运行的命令;CREATED: 容器创建时间;STATUS: 容器状态;PORTS: 端口信息;NAMES: 容器名:和容器 ID 一样,可以标识容器的唯一性,同一台宿主机上不允许有同名容器存在,否则会冲突;
导出容器
参考文章:https://docs.docker.com/engine/reference/commandline/export/
docker export 7ec56dec1d8e > qhdata_ubuntu_20_04.tar
docker export --output="qhdata_ubuntu_20_04.tar" 7ec56dec1d8e
参数说明:
--output , -o:写入的文件,而不是 STDOUT
eg:
root@qhdata-dev:/home/qhdata/docker# docker export --output="qhdata_ubuntu_20_04.tar" 7ec56dec1d8e
root@qhdata-dev:/home/qhdata/docker# ls -r
qhdata_ubuntu_20_04.tar
root@qhdata-dev:/home/qhdata/docker#
导入容器-以镜像的方式
参考文章:https://docs.docker.com/engine/reference/commandline/import/
// 从远程位置导入
docker import https://example.com/exampleimage.tgz  // 这将创建一个新的未标记图像。
// 从本地文件导入
cat exampleimage.tgz | docker import - exampleimagelocal:new  // 通过管道导入到 docker 和STDIN.
cat exampleimage.tgz | docker import --message "New image imported from tarball" - exampleimagelocal:new  // 使用提交消息导入。
docker import /path/to/exampleimage.tgz  // 从本地存档导入到 docker。
// 从本地目录导入
sudo tar -c . | docker import - exampleimagedir
// 使用新配置从本地目录导入
sudo tar -c . | docker import --change "ENV DEBUG=true" - exampleimagedir
参数说明:
--change,-c:将 Dockerfile 指令应用于创建的图像--message,-m:为导入的图像设置提交信息--platform:如果服务器支持多平台,则设置平台
eg:
root@qhdata-dev:/home/qhdata/docker# cat qhdata_ubuntu_20_04.tar | docker import - qhdata/ubuntu:20.04
sha256:db81f58964d10ecf857bbb61777ebe3aa1318eaa71ef3ba58fb15ac87d13aed7root@qhdata-dev:/home/qhdata/docker# docker images
REPOSITORY              TAG           IMAGE ID       CREATED          SIZE
qhdata/ubuntu           20.04         db81f58964d1   14 seconds ago   116MB
hello-world             latest        9c7a54a9a43c   3 weeks ago      13.3kB
...
alpine                  latest        e66264b98777   12 months ago    5.53MB
root@qhdata-dev:/home/qhdata/docker#
创建容器
参考文章:https://docs.docker.com/engine/reference/commandline/run/
root@qhdata-dev:/home/qhdata/docker# docker  run -v ./dm7:/dm7 -w /dm7 -i -t qhdata/ubuntu:20.04 /bin/bash
root@1867b8bbbbc8:/dm7# root@8b5dd52725e5:/dm7# ls -r
include  drivers  bin
root@8b5dd52725e5:/dm7# root@1867b8bbbbc8:/dm7# cd /
root@1867b8bbbbc8:/# ls -r
var  usr  tmp  sys  srv  sbin  run  root  proc  opt  mnt  media  libx32  lib64  lib32  lib  home  etc  dm7  dev  boot  bin
root@1867b8bbbbc8:/# exit
参数说明(部分):
--volume,-v:绑定挂载卷,从 Docker 引擎版本 23 开始,您可以在主机上使用相对路径。--workdir,-w:容器内的工作目录--tty,-t:分配伪 TTY--interactive,-i:即使未附加,也要保持 STDIN 打开--env,-e:设置环境变量--platform: 如果服务器支持多平台,则设置平台/bin/bash:在容器中创建交互式shell。/bin/echo:echo后面接需要使用的命令。
重启容器
参考文章:https://docs.docker.com/engine/reference/commandline/restart/
参考文章:https://docs.docker.com/engine/reference/commandline/container_restart/
root@qhdata-dev:/home/qhdata/docker# docker restart 8b5dd52725e5
8b5dd52725e5
root@qhdata-dev:/home/qhdata/docker# docker ps
CONTAINER ID   IMAGE                 COMMAND                  CREATED         STATUS          PORTS                                       NAMES
8b5dd52725e5   qhdata/ubuntu:20.04   "/bin/bash"              24 hours ago    Up 10 seconds                                               gracious_sanderson
7b651a8dfc5c   registry:latest       "/entrypoint.sh /etc…"   11 months ago   Up 2 days       0.0.0.0:5001->5000/tcp, :::5001->5000/tcp   registry
root@qhdata-dev:/home/qhdata/docker#
参数说明:
--signal,-s: 发送到容器的信号--time,-t: 杀死容器前等待的秒数
进入容器
参考文章:https://docs.docker.com/engine/reference/commandline/exec/
docker exec -it [container ID or NAMES]
docker exec -it mycontainer sh  // 在容器上执行交互式shell
docker exec -it mycontainer pwd  // 在创建容器时运行命令
参数说明:
--detach,-d: 分离模式:在后台运行命令--detach-keys: 覆盖用于分离容器的键序列--env,-e: 设置环境变量--env-file: 读入环境变量文件--interactive,-i: 即使未附加,也要保持 STDIN 打开--privileged: 赋予命令扩展权限--tty,-t: 分配伪 TTY--user,-u: 用户名或 UID(格式<name|uid>[:<group|gid>]:)--workdir,-w: 容器内的工作目录
eg:
root@qhdata-dev:/home/qhdata/docker# docker exec -it 8b5dd52725e5 sh
# ls -r
include  drivers  bin
# cd /
# ls -r
var  usr  tmp  sys  srv  sbin  run  root  proc	opt  mnt  media  libx32  lib64	lib32  lib  home  etc  dm7  dev  boot  bin
# exit
root@qhdata-dev:/home/qhdata/docker#
如果进入一个未启动的容器,会报错误。
root@qhdata-dev:/home/qhdata/docker# docker exec -it 1867b8bbbbc8 sh
Error response from daemon: Container 1867b8bbbbc83c348ea1f898d6cfc6dd7208d36d3b3d926a1abcc8f94eb8fa7b is not running
停止&关闭容器
参考文章:https://docs.docker.com/engine/reference/commandline/stop/
参考文章:https://docs.docker.com/engine/reference/commandline/container_stop/
参考文章:https://docs.docker.com/engine/reference/commandline/kill/
参考文章:https://docs.docker.com/engine/reference/commandline/container_kill/
// 优雅模式
docker container stop [container ID or NAMES]
# 简写模式(可省略关键字 container )
docker stop [container ID or NAMES]
// 强制模式
docker container kill [container ID or NAMES]
# 简写模式(可省略关键字 container )
docker kill [container ID or NAMES]
参数说明:
--signal,-s: 发送到容器的信号--time,-t: 杀死容器前等待的秒数
eg:
root@qhdata-dev:/home/qhdata/docker# docker ps
CONTAINER ID   IMAGE                 COMMAND                  CREATED         STATUS      PORTS                                       NAMES
8b5dd52725e5   qhdata/ubuntu:20.04   "/bin/bash"              3 days ago      Up 2 days                                               gracious_sanderson
7b651a8dfc5c   registry:latest       "/entrypoint.sh /etc…"   11 months ago   Up 5 days   0.0.0.0:5001->5000/tcp, :::5001->5000/tcp   registry
root@qhdata-dev:/home/qhdata/docker# docker container stop 8b5dd52725e5
8b5dd52725e5
root@qhdata-dev:/home/qhdata/docker# docker ps
CONTAINER ID   IMAGE             COMMAND                  CREATED         STATUS      PORTS                                       NAMES
7b651a8dfc5c   registry:latest   "/entrypoint.sh /etc…"   11 months ago   Up 5 days   0.0.0.0:5001->5000/tcp, :::5001->5000/tcp   registry
root@qhdata-dev:/home/qhdata/docker#
删除容器
参考文章:https://docs.docker.com/engine/reference/commandline/rm/
参考文章:https://docs.docker.com/engine/reference/commandline/container_rm/
docker container rm [container ID or NAMES]
# 简写模式(可省略关键字 container )
docker rm [container ID or NAMES]
参数说明:
--force,-f: 强制删除正在运行的容器(使用 SIGKILL)--link,-l: 删除指定链接--volumes,-v: 删除与容器关联的匿名卷
eg:
root@qhdata-dev:/home/qhdata/docker# docker rm 8b5dd52725e5
8b5dd52725e5
root@qhdata-dev:/home/qhdata/docker# docker ps -a
CONTAINER ID   IMAGE                          COMMAND                  CREATED         STATUS                      PORTS                                                                            NAMES
1867b8bbbbc8   qhdata/ubuntu:20.04            "/bin/bash"              3 days ago      Exited (0) 3 days ago                                                                                        intelligent_feynman
7ec56dec1d8e   ubuntu:20.04                   "/bin/bash"              4 days ago      Exited (0) 4 days ago                                                                                        unruffled_ganguly
dea79bf486d4   hello-world                    "/hello"                 5 days ago      Exited (0) 5 days ago                                                                                        laughing_joliot
...
7b651a8dfc5c   registry:latest                "/entrypoint.sh /etc…"   11 months ago   Up 5 days                   0.0.0.0:5001->5000/tcp, :::5001->5000/tcp                                        registry
root@qhdata-dev:/home/qhdata/docker#
Dockerfile
参考文章:https://docs.docker.com/engine/reference/builder/
参考文章:https://www.quanxiaoha.com/docker/dockerfile-build-image.html
Dockerfile的构建
FROM --platform=linux/arm64 python:3.8.10ADD . .RUN apt-get update -y && \
apt-get install python-dev -y && \
apt-get install gcc* -yENV DM_HOME=/dm7 LD_LIBRARY_PATH=/dm7/bin:$LD_LIBRARY_PATH PATH=$PATH:$HOME/bin:/dm7/binRUN cd ./dm7/drivers/python/dmPython/ && python setup.py install  # 安装dmPythonRUN cd ./dm7/drivers/python/sqlalchemy1.4.6/ && python setup.py install  # sqlalchemy1.4.6RUN pip install --upgrade scipy==1.7.3 -i https://pypi.tuna.tsinghua.edu.cn/simple && \
pip install --upgrade numpy==1.22.4 -i https://pypi.tuna.tsinghua.edu.cn/simple && \
pip install --upgrade pandas==1.2.4 -i https://pypi.tuna.tsinghua.edu.cn/simple && \
pip install --upgrade xlrd==1.2.0 -i https://pypi.tuna.tsinghua.edu.cn/simple && \
pip install --upgrade xlwt==0.7.2 -i https://pypi.tuna.tsinghua.edu.cn/simple && \
pip install --upgrade python_dateutil==2.8.2 -i https://pypi.tuna.tsinghua.edu.cn/simple && \
pip install --upgrade pymysql==0.9.3 -i https://pypi.tuna.tsinghua.edu.cn/simple && \
pip install --upgrade SQLAlchemy==1.4.18 -i https://pypi.tuna.tsinghua.edu.cn/simple && \
pip install --upgrade openpyxl==3.0.0 -i https://pypi.tuna.tsinghua.edu.cn/simple
执行生成
root@qhdata-dev:/home/qhdata/docker# docker build -t dm_base/qhdata .
但是执行失败,报下面的错误。
ERROR: failed to solve: process "/bin/sh -c apt-get update -y" did not complete successfully: exit code: 1
估计是新版问题。我切换回5:20.10.23~3-0~ubuntu-focal就不再提示上述错误。
Sending build context to Docker daemon  3.164GB
Step 1/8 : FROM --platform=linux/arm64 python:3.8.10---> a369814a9797
Step 2/8 : ADD . .---> 8ce022ad8be9
Step 3/8 : RUN apt-get update -y---> Running in 76f670c26669
Get:1 http://security.debian.org/debian-security buster/updates InRelease [34.8 kB]
Get:2 http://deb.debian.org/debian buster InRelease [122 kB]
Get:3 http://deb.debian.org/debian buster-updates InRelease [56.6 kB]
Get:4 http://security.debian.org/debian-security buster/updates/main amd64 Packages [508 kB]
Get:5 http://deb.debian.org/debian buster/main amd64 Packages [7909 kB]
Get:6 http://deb.debian.org/debian buster-updates/main amd64 Packages [8788 B]
Fetched 8640 kB in 15s (588 kB/s)
Reading package lists...
Removing intermediate container 76f670c26669---> 7b2a2534e290
Step 4/8 : RUN apt-get install gcc -y---> Running in 0befdb33c623
Reading package lists...
Building dependency tree...
Reading state information...
...
Removing intermediate container da5f1a91fce3---> 0d450fba1928
Successfully built 0d450fba1928
Successfully tagged dm_base/qhdata:latest
root@qhdata-dev:/home/qhdata/docker# docker images
REPOSITORY              TAG           IMAGE ID       CREATED          SIZE
dm_base/qhdata          latest        0d450fba1928   21 seconds ago   4.42GB
<none>                  <none>        926744ce4933   9 minutes ago    4.08GB
...
python                  3.8.10        a369814a9797   23 months ago    883MB
root@qhdata-dev:/home/qhdata/docker#  docker save -o dm_base.tar dm_base/qhdata:latest
但是如果是这样的话,在跨平台(linux/amd64 -> linux/arm64)还是会出现问题。提示如下
WARNING: The requested image's platform (linux/amd64) does not match the detected host platform (linux/arm64/v8) and no specific platform was requested
exec /bin/bash: exec format error
Dockerfile切换国内源
参考文章:https://blog.csdn.net/xiaowu_wu/article/details/124355694
参考文章:https://mirrors.tuna.tsinghua.edu.cn/help/debian/
参考文章:https://blog.csdn.net/karmacode/article/details/104902656
参考文章:https://blog.csdn.net/weixin_45067618/article/details/122234387
参考文章:https://stackoverflow.com/questions/70789307/how-to-fix-the-following-signatures-couldnt-be-verified-because-the-public-key
参考文章:https://blog.csdn.net/seaofbits/article/details/123647256
在切换前,需要进入你目标镜像中查看系统版本(cat /etc/os-release)。
root@qhdata-dev:/home/qhdata/docker# docker run -t -i python:3.9 /bin/bash
WARNING: The requested image's platform (linux/arm64/v8) does not match the detected host platform (linux/amd64) and no specific platform was requested
root@016143a4d2f4:/# cat /etc/os-release
PRETTY_NAME="Debian GNU/Linux 11 (bullseye)"
NAME="Debian GNU/Linux"
VERSION_ID="11"
VERSION="11 (bullseye)"
VERSION_CODENAME=bullseye
ID=debian
HOME_URL="https://www.debian.org/"
SUPPORT_URL="https://www.debian.org/support"
BUG_REPORT_URL="https://bugs.debian.org/"
root@016143a4d2f4:/#
得到目标镜像实用的PRETTY_NAME。然后到清华大学开源软件镜像站查找对应实用版本镜像。
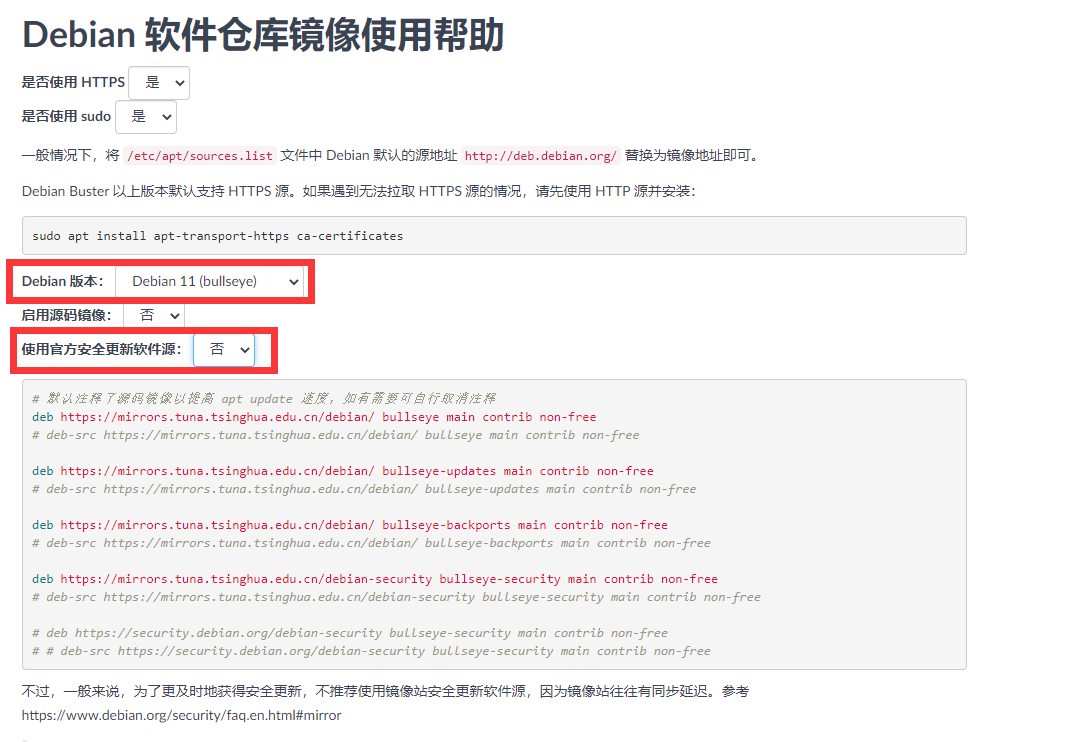
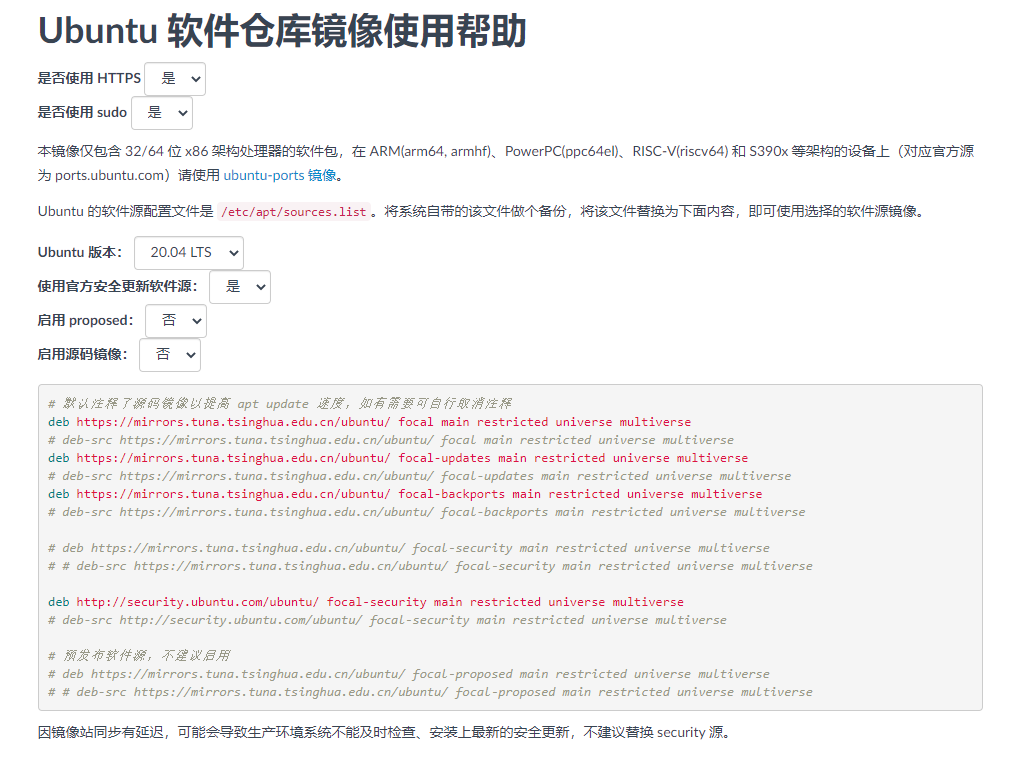
将里面的内容复制到dockerfile里面。
RUN mv /etc/apt/sources.list /etc/apt/sources_backup.list && \
echo "deb https://mirrors.tuna.tsinghua.edu.cn/ubuntu-ports/ focal main restricted universe multiverse                      " >> /etc/apt/sources.list && \
echo "deb https://mirrors.tuna.tsinghua.edu.cn/ubuntu-ports/ focal-updates main restricted universe multiverse              " >> /etc/apt/sources.list && \
echo "deb https://mirrors.tuna.tsinghua.edu.cn/ubuntu-ports/ focal-backports main restricted universe multiverse            " >> /etc/apt/sources.list && \
echo "deb https://mirrors.tuna.tsinghua.edu.cn/ubuntu-ports/ focal-security main restricted universe multiverse             " >> /etc/apt/sources.list && \
echo "deb https://mirrors.tuna.tsinghua.edu.cn/debian/ bullseye main contrib non-free                                 " >> /etc/apt/sources.list && \
echo "deb https://mirrors.tuna.tsinghua.edu.cn/debian/ bullseye-updates main contrib non-free                         " >> /etc/apt/sources.list && \
echo "deb https://mirrors.tuna.tsinghua.edu.cn/debian/ bullseye-backports main contrib non-free                       " >> /etc/apt/sources.list && \
echo "deb https://security.debian.org/debian-security bullseye-security main contrib non-free                         " >> /etc/apt/sources.list RUN apt-key adv --keyserver keyserver.ubuntu.com --recv-keys 3B4FE6ACC0B21F32 && \
apt-key adv --keyserver keyserver.ubuntu.com --recv-keys 871920D1991BC93C
这时候运行的结果就如图瞎:

错误1:E: Failed to fetch https://mirrors.tuna.tsinghua.edu.cn/ubuntu/dists/focal-updates/main/binary-arm64/Packages 404 Not Found [IP: 101.6.15.130 443]
这是由于框架是用arm的,但是网上给的教程都是amd的。所以只需要将镜像网址中的ubuntu改成ubuntu-ports即可。
错误2:The following signatures couldn't be verified because the public key is not available: NO_PUBKEY 3B4FE6ACC0B21F32 NO_PUBKEY 871920D1991BC93C
这是镜像的key不存在,只要在dockerfile中将该key添加即可
apt-key adv --keyserver keyserver.ubuntu.com --recv-keys 3B4FE6ACC0B21F32
错误3:Some packages could not be installed. This may mean that you have requested an impossible situation or if you are using the unstable distribution that some required packages have not yet been created or been moved out of Incoming.
这个错误无解,就是镜像缺少对应的包。
buildx
参考文章:https://docs.docker.com/build/building/multi-platform/
参考文章:https://docs.docker.com/build/building/multi-stage/
参考文章:https://docs.docker.com/engine/reference/commandline/buildx_build/
参考文章:https://blog.bwcxtech.com/posts/43dd6afb/
参考文章:https://waynerv.com/posts/building-multi-architecture-images-with-docker-buildx/
Docker 默认会使用不支持多 CPU 架构的构建器,我们需要手动切换。
查看现有的构建器
root@qhdata-dev:/home/qhdata/docker# docker buildx ls
NAME/NODE DRIVER/ENDPOINT STATUS  BUILDKIT PLATFORMS
default * docker                           default default         running 20.10.23 linux/amd64, linux/386
root@qhdata-dev:/home/qhdata/docker#
先创建一个新的构建器:
docker buildx create --use --name mybuilder
docker buildx use mybuilder
启动构建器:
docker buildx inspect mybuilder --bootstrap
如果发现还是像我一样不支持arm架构,则使用下面方法来安装支持。
Buildx 和 Dockerfiles 支持的三种不同策略构建多平台镜像:
- 在内核中使用 QEMU 仿真支持
- 使用相同的构建器实例在多个本机节点上构建
- 使用 Dockerfile 中的阶段交叉编译到不同的体系结构
如果您的节点已经支持 QEMU(例如,如果您正在使用 Docker Desktop),QEMU 是最简单的入门方法。它不需要更改您的 Dockerfile,并且 BuildKit 会自动检测可用的二级架构。当 BuildKit 需要为不同的体系结构运行二进制文件时,它会通过在处理程序中注册的二进制文件自动加载它binfmt_misc 。
binfmt_misc对于在主机操作系统上注册的 QEMU 二进制文件要在容器内透明地工作,它们必须静态编译并使用fix_binary标志注册。这需要内核 >= 4.8 和 binfmt-support >= 2.1.7。您可以通过检查是否 F在/proc/sys/fs/binfmt_misc/qemu-*. 虽然 Docker Desktop 预配置了binfmt_misc对其他平台的支持,但对于其他安装,它可能需要使用 tonistiigi/binfmt 图像进行安装。
docker run --privileged --rm tonistiigi/binfmt --install all
这时候重新走启动构建器这一步后,检查构建器情况。
root@qhdata-dev:/home/qhdata# docker buildx ls
NAME/NODE    DRIVER/ENDPOINT             STATUS  BUILDKIT PLATFORMS
mybuilder *  docker-container                             mybuilder0 unix:///var/run/docker.sock running v0.11.6  linux/amd64, linux/amd64/v2, linux/amd64/v3, linux/amd64/v4, linux/386, linux/arm64, linux/riscv64, linux/ppc64le, linux/s390x, linux/mips64le, linux/mips64
default      docker                                       default    default                     running 20.10.23 linux/amd64, linux/386, linux/arm64, linux/riscv64, linux/ppc64le, linux/s390x, linux/arm/v7, linux/arm/v6root@qhdata-dev:~# docker buildx inspect --bootstrap
Name:          mybuilder
Driver:        docker-container
Last Activity: 2023-06-09 06:14:55 +0000 UTCNodes:
Name:      mybuilder0
Endpoint:  unix:///var/run/docker.sock
Status:    running
Buildkit:  v0.11.6
Platforms: linux/amd64, linux/amd64/v2, linux/amd64/v3, linux/amd64/v4, linux/386, linux/arm64, linux/riscv64, linux/ppc64le, linux/s390x, linux/mips64le, linux/mips64
root@qhdata-dev:~#
这时候发现都可以支持arm架构了。
然后使用下面语句进行构建即可。
docker buildx build --platform linux/amd64,linux/arm64 --output type=tar,dest=./dm_base_python38.rar -t dm_base/python38 .
部分参数说明:
--load::简写为–output=type=docker,会自动将单平台构建结果加载到docker images--output,-o:输出目的地(格式type=local,dest=path:)--platform:为构建设置目标平台--add-host:添加自定义主机到 IP 映射(格式host:ip:)--file,-f:Dockerfile 的名称(默认值PATH/Dockerfile:)
platform详细说明:
设置构建的目标平台。如果Dockerfile 中所有的FROM命令没有自己--platform标志则会使用这个参数所代表的platform作为最终platform。
相关文章:

Docker使用记录
文章目录 Docker基本使用Docker配置查看状态卸载安装使用 apt 存储库安装在 Ubuntu 上安装 Docker 桌面(非必要) Docker实例使用现有的镜像查找镜像拖取镜像列出镜像列表更新镜像导出镜像删除镜像导入镜像清理镜像查看容器导出容器导入容器-以镜像的方式创建容器重启容器进入容…...
OpenCV(图像处理)-基于Python-形态学处理-开运算、闭运算、顶帽、黑帽运算
1. 形态学2. 常用接口2.1 cvtColor()2.2 图像二值化threshod()自适应阈值二值化adaptiveThreshod() 2.3 腐蚀与膨胀erode()getStructuringElement()dilate() 2.4开、闭、梯度、顶帽、黑帽运算morphologyEx() 1. 形态学 OpenCV形态学是一种基于OpenCV库的数字图像处理技术&…...

chatgpt赋能python:Python支持跨平台软件开发
Python支持跨平台软件开发 作为一种高级编程语言,Python 以其丰富的库和跨平台支持而备受开发人员欢迎。Python 通过将应用程序的可移植性最大化,使得开发人员可以轻松地在不同的操作系统平台上构建和部署软件。 跨平台支持 Python 支持各种不同的操作…...
哈工大计算机网络课程网络层协议详解之:CIDR与路由聚集
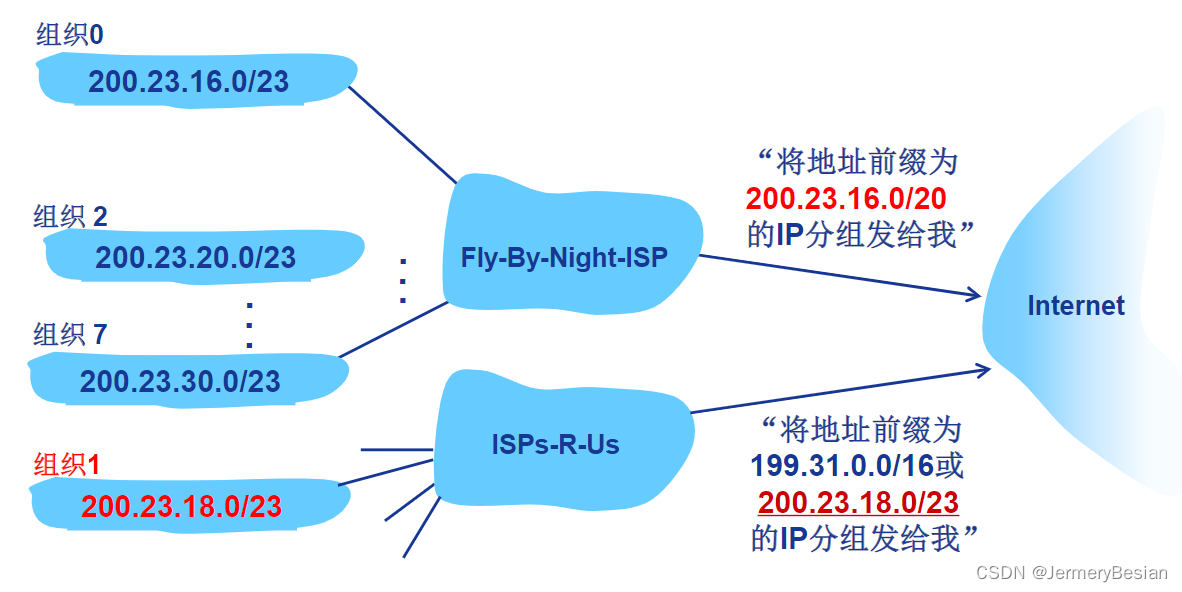
哈工大计算机网络课程网络层协议详解之:CIDR与路由聚集 文章目录 哈工大计算机网络课程网络层协议详解之:CIDR与路由聚集CIDR与路由聚集CIDR路由聚集 CIDR与路由聚集 CIDR CIDR:无类域间路由(CIDR:Classless InterDo…...
——日期 时间)
C++ 教程(19)——日期 时间
C 日期 & 时间 C 标准库没有提供所谓的日期类型。C 继承了 C 语言用于日期和时间操作的结构和函数。为了使用日期和时间相关的函数和结构,需要在 C 程序中引用 <ctime> 头文件。 有四个与时间相关的类型:clock_t、time_t、size_t 和 tm。类型…...
React 应用 Effect Hook 函数式中操作生命周期
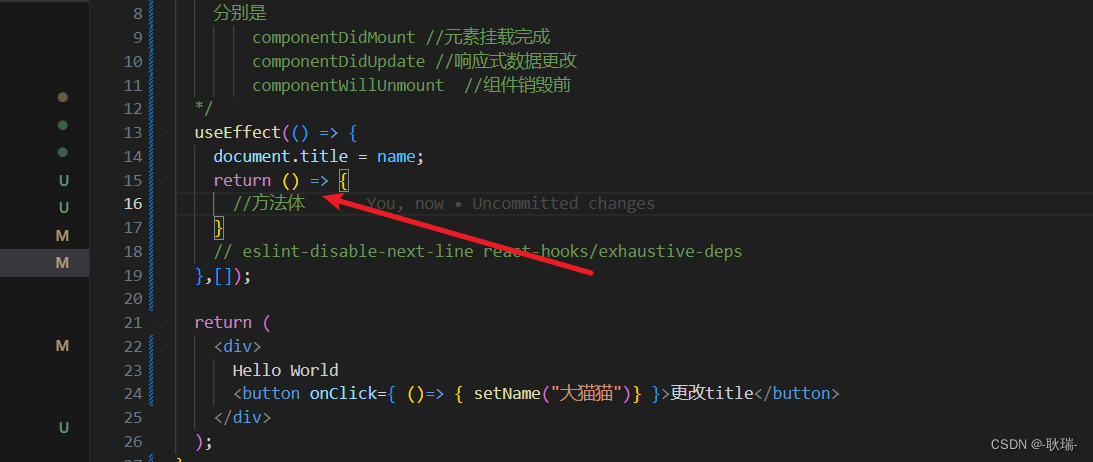
React Hook入门小案例 在函数式组件中使用state响应式数据给大家演示了最简单的 Hook操作 那么 我们继续 首先 Hook官方介绍 他没有破坏性是完全可选的 百分比兼容 也就说 我们一起的 类 class的方式也完全可以用 只要 react 16,8以上就可以使用 Hook本身不会影响你的react的理…...

C代码程序实现扫雷游戏纯代码版本
//test.c文件 #define _CRT_SECURE_NO_WARNINGS 1#include "game.h"void menu() {printf("***********************\n");printf("***** 1. play *****\n");printf("***** 0. exit *****\n");printf("*******************…...

ai代写---怎么在ubutnu服务器中安装mqtt
在Ubuntu服务器中安装MQTT Broker可以使用Mosquitto,它是一个开源的MQTT Broker实现,支持Linux、Windows和MacOS等多个平台。 以下是在Ubuntu服务器中安装Mosquitto的步骤: 更新apt-get包列表 打开终端,执行以下命令更新apt-get…...
【设计模式与范式:行为型】63 | 职责链模式(下):框架中常用的过滤器、拦截器是如何实现的?
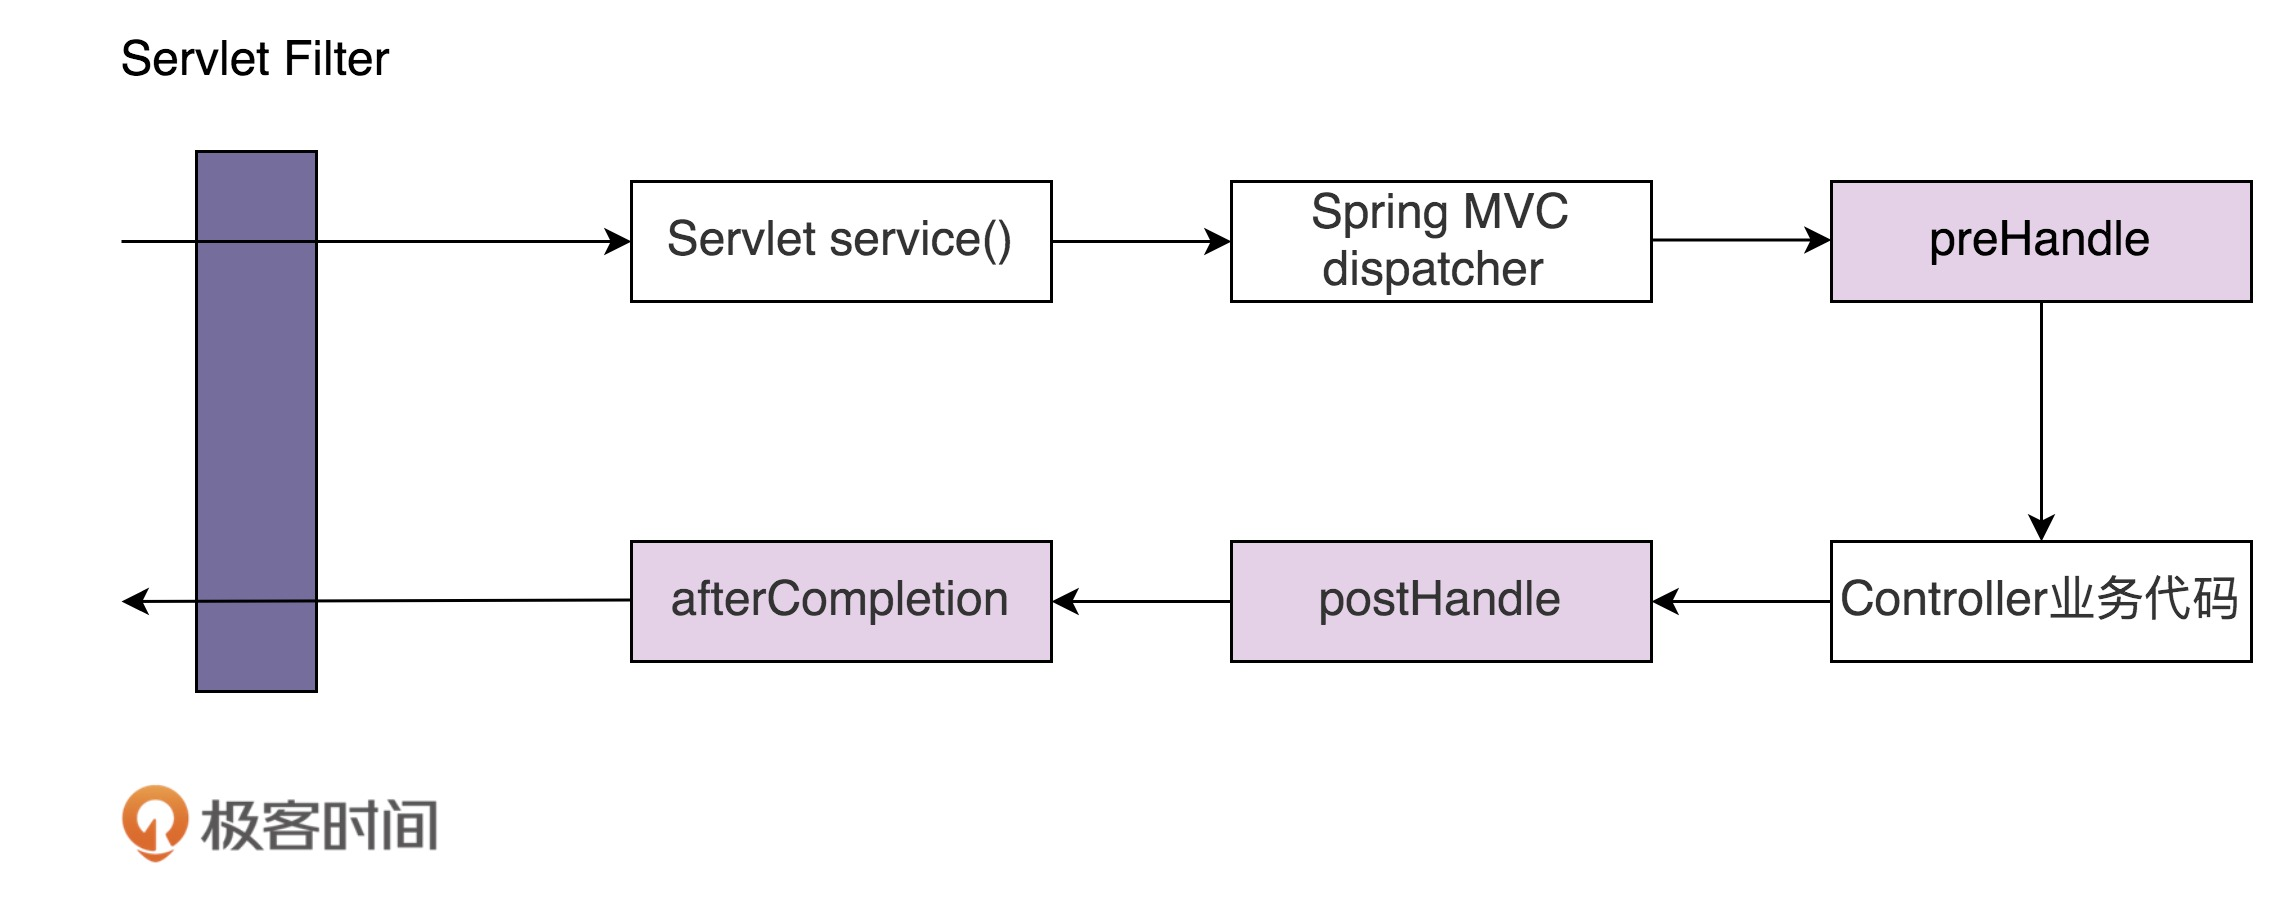
上一节课,我们学习职责链模式的原理与实现,并且通过一个敏感词过滤框架的例子,展示了职责链模式的设计意图。本质上来说,它跟大部分设计模式一样,都是为了解耦代码,应对代码的复杂性,让代码满足…...
Kendo UI for jQuery---03.组件___网格---02.开始
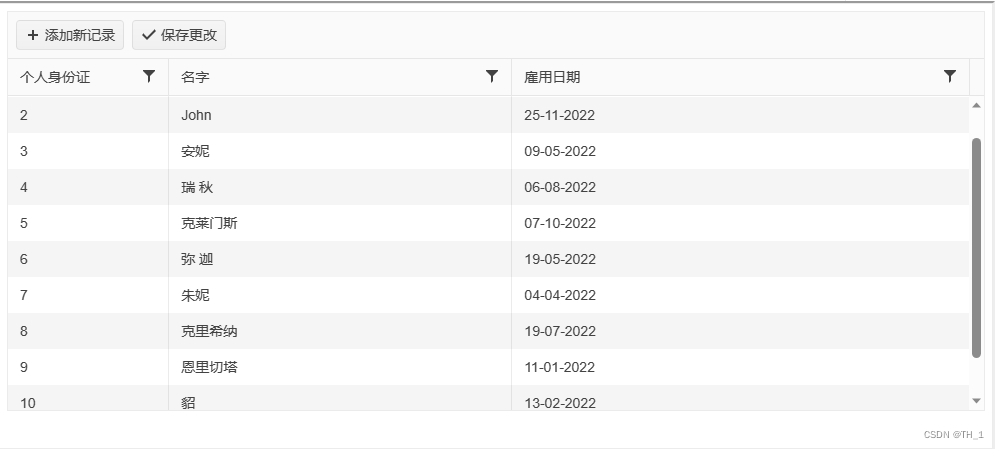
网格入门 本指南演示了如何启动和运行 Kendo UI for jQuery Grid。 完成本指南后,您将能够实现以下最终结果: 1. 创建一个空的 div 元素 首先,在页面上创建一个空元素,该元素将用作 Grid 组件的主容器。 <div id"my-…...
初识Telegraf、InfluxDB和Grafana铁三角形成的监控可视化解决方案
文章目录 前言原始的监控靠人盯进化的监控靠批处理脚本高端的监控靠完整的可视化解决方案Telegraf、InfluxDB和Grafana铁三角TelegrafInfluxDBGrafana Grafana仪表板展示服务器资源总览负载和内存使用网络带宽磁盘IOIO延迟其他指标进程信息 总结 前言 数据监控目前用于各行各业…...

【哈佛积极心理学笔记】第20课 幸福与幽默
第20课 幸福与幽默 The vanguard of the positive psychology revolution: Our brain is basically a single processor, capable of consciouly choosing to devote resources either to the pain and suffering on one side, or viewing the world that lens of something l…...

设计模式-责任链模式
责任链模式 请求发送者和接收者连接成一条链,一个对象处理完,交给下一位,沿着链传递请求,这就是责任链模式。 角色 抽象处理者(Handler) 定义了处理请求的方法具体处理者(ContreteHandler&am…...
不变的是需求,变化的是解决方法和工具:探讨iPaaS与ESB的差异
在企业数字化转型过程中,企业需要面临日益复杂的业务和数据集成挑战。为了应对这些挑战,需要借助适当的解决方法和工具来实现系统间的通信和数据传输。在这方面,iPaaS(Integration Platform as a Service)和ESB&#x…...
网络解析----faster rcnn
Faster R-CNN(Region-based Convolutional Neural Network)是一种基于区域的卷积神经网络用于目标检测任务的模型。它是一种两阶段的目标检测方法,主要包含以下几个步骤: Region Proposal Network(RPN): F…...
modbus TCP协议讲解及实操
具体讲解 前言正文modbus tcp主机请求数据基本讲解Modbus Poll工具简单使用讲解 modbus tcp从机响应数据Modbus Slave工具简单使用讲解 前言 关于modbus tcp从0到1的讲解,案例结合讲解,详细了解整个modbus的可以参考这个:详解Modbus通信协议…...

既有内销又有外贸,多样性外贸业务管理解决方案
随着外贸数字化贸易全球化的深入发展,出口、进口、内销业务越来越受到关注。外贸业务是企业在海外市场进行商品贸易,而内销业务是企业在国内市场进行商品贸易。在管理这种业务时,想要实现降本增效,企业需要有一套成熟的管理解决方…...

spring eurake中使用IP注册
在开发spring cloud的时候遇到一个很奇葩的问题,就是服务向spring eureka中注册实例的时候使用的是机器名,然后出现localhost、xxx.xx等这样的内容,如下图: eureka.instance.perferIpAddresstrue 我不知道这朋友用的什么spring c…...

c# 从零到精通 form界面之listView控件
c# c# 从零到精通 form界面之listView控件 添加值 设置值 using System; using System.Collections.Generic; using System.ComponentModel; using System.Data; using System.Drawing; using System.Text; using System.Windows.Forms; namespace Test06 { public partial cla…...

Qt6.5.1+WebRTC学习笔记(十二)环境搭建流媒体服务器(ubuntu22.04+SRS)
前言 若只是实现一对一通信,仅使用webrtc就足够了。但有时间需要进行多个人的直播会议,当人比较多时,建议使用一个流媒体服务器,笔者使用的是SRS。 这个开源项目资料比较全,笔者仅在此记录下搭建过程 一、准备 1.操…...

[特殊字符] 智能合约中的数据是如何在区块链中保持一致的?
🧠 智能合约中的数据是如何在区块链中保持一致的? 为什么所有区块链节点都能得出相同结果?合约调用这么复杂,状态真能保持一致吗?本篇带你从底层视角理解“状态一致性”的真相。 一、智能合约的数据存储在哪里…...
。】2022-5-15)
【根据当天日期输出明天的日期(需对闰年做判定)。】2022-5-15
缘由根据当天日期输出明天的日期(需对闰年做判定)。日期类型结构体如下: struct data{ int year; int month; int day;};-编程语言-CSDN问答 struct mdata{ int year; int month; int day; }mdata; int 天数(int year, int month) {switch (month){case 1: case 3:…...

设计模式和设计原则回顾
设计模式和设计原则回顾 23种设计模式是设计原则的完美体现,设计原则设计原则是设计模式的理论基石, 设计模式 在经典的设计模式分类中(如《设计模式:可复用面向对象软件的基础》一书中),总共有23种设计模式,分为三大类: 一、创建型模式(5种) 1. 单例模式(Sing…...
YSYX学习记录(八)
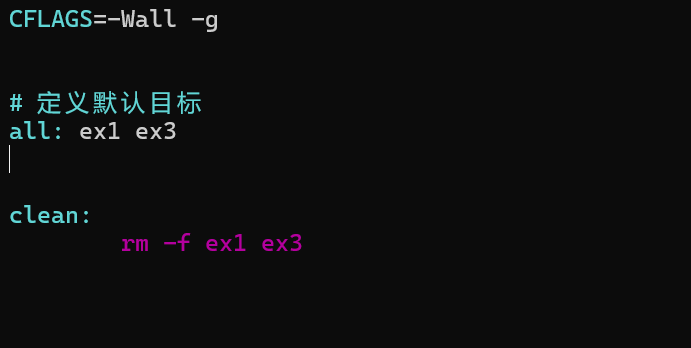
C语言,练习0: 先创建一个文件夹,我用的是物理机: 安装build-essential 练习1: 我注释掉了 #include <stdio.h> 出现下面错误 在你的文本编辑器中打开ex1文件,随机修改或删除一部分,之后…...

基于Uniapp开发HarmonyOS 5.0旅游应用技术实践
一、技术选型背景 1.跨平台优势 Uniapp采用Vue.js框架,支持"一次开发,多端部署",可同步生成HarmonyOS、iOS、Android等多平台应用。 2.鸿蒙特性融合 HarmonyOS 5.0的分布式能力与原子化服务,为旅游应用带来…...
mysql已经安装,但是通过rpm -q 没有找mysql相关的已安装包
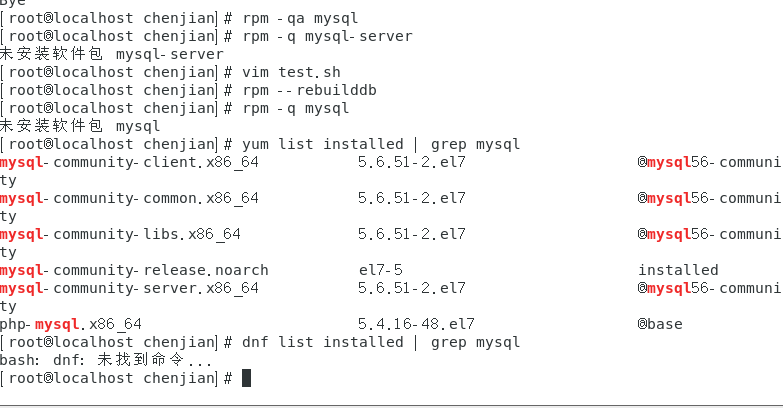
文章目录 现象:mysql已经安装,但是通过rpm -q 没有找mysql相关的已安装包遇到 rpm 命令找不到已经安装的 MySQL 包时,可能是因为以下几个原因:1.MySQL 不是通过 RPM 包安装的2.RPM 数据库损坏3.使用了不同的包名或路径4.使用其他包…...
图表类系列各种样式PPT模版分享
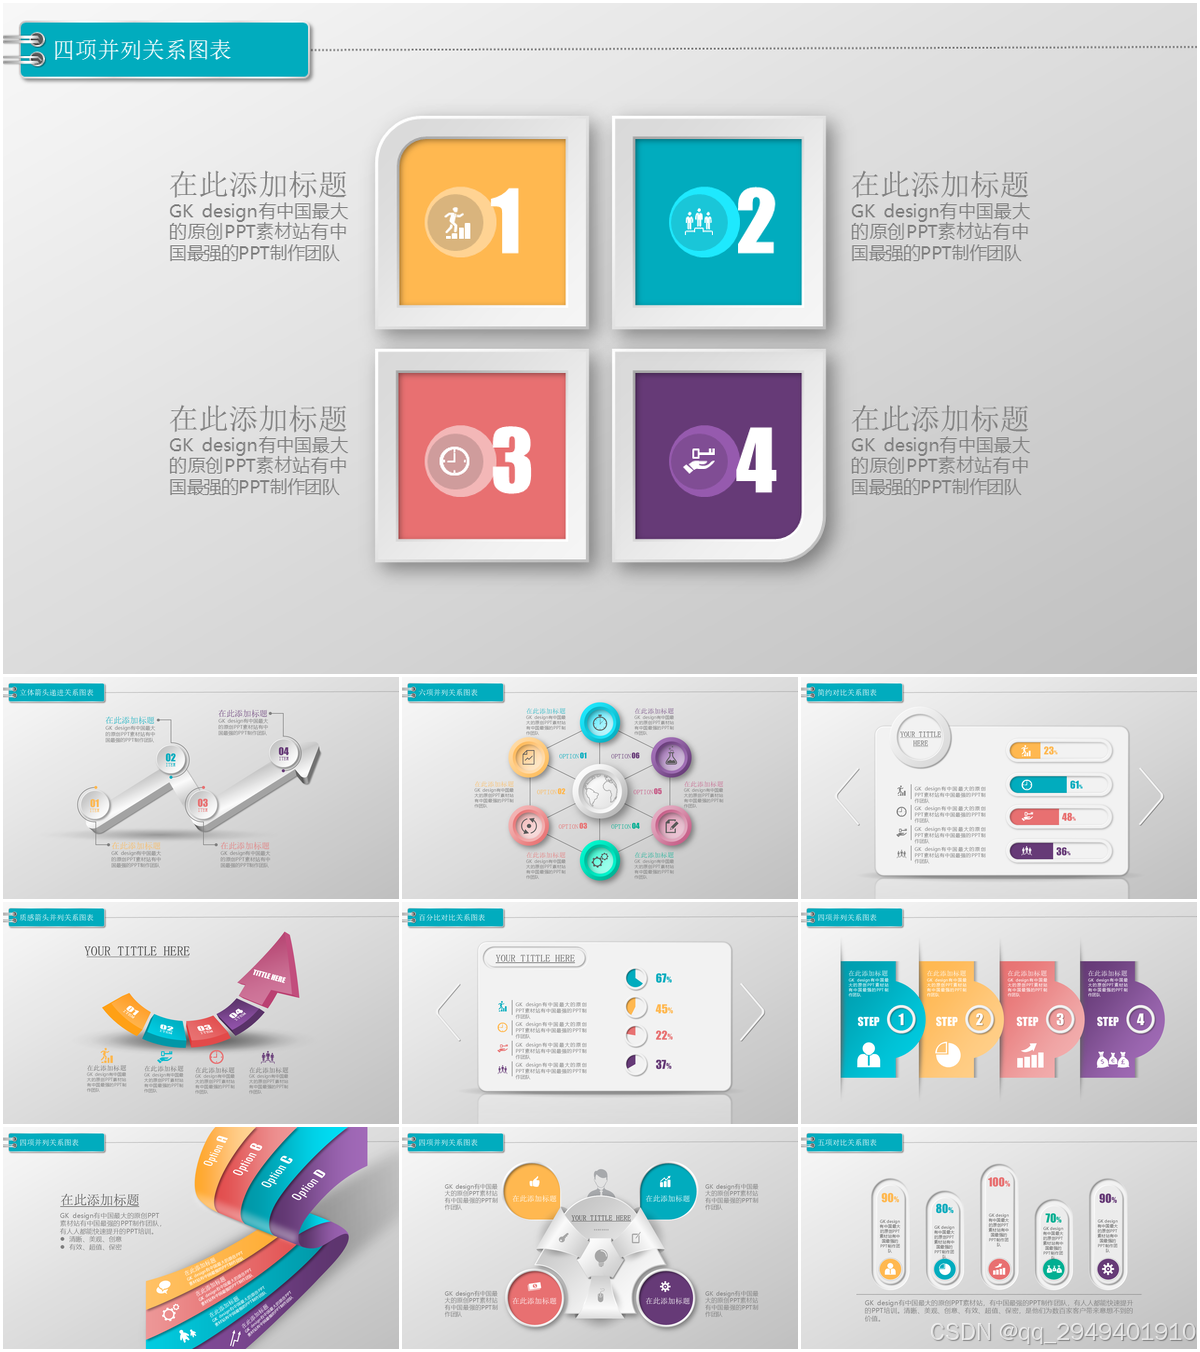
图标图表系列PPT模版,柱状图PPT模版,线状图PPT模版,折线图PPT模版,饼状图PPT模版,雷达图PPT模版,树状图PPT模版 图表类系列各种样式PPT模版分享:图表系列PPT模板https://pan.quark.cn/s/20d40aa…...
的使用)
Go 并发编程基础:通道(Channel)的使用
在 Go 中,Channel 是 Goroutine 之间通信的核心机制。它提供了一个线程安全的通信方式,用于在多个 Goroutine 之间传递数据,从而实现高效的并发编程。 本章将介绍 Channel 的基本概念、用法、缓冲、关闭机制以及 select 的使用。 一、Channel…...
打手机检测算法AI智能分析网关V4守护公共/工业/医疗等多场景安全应用
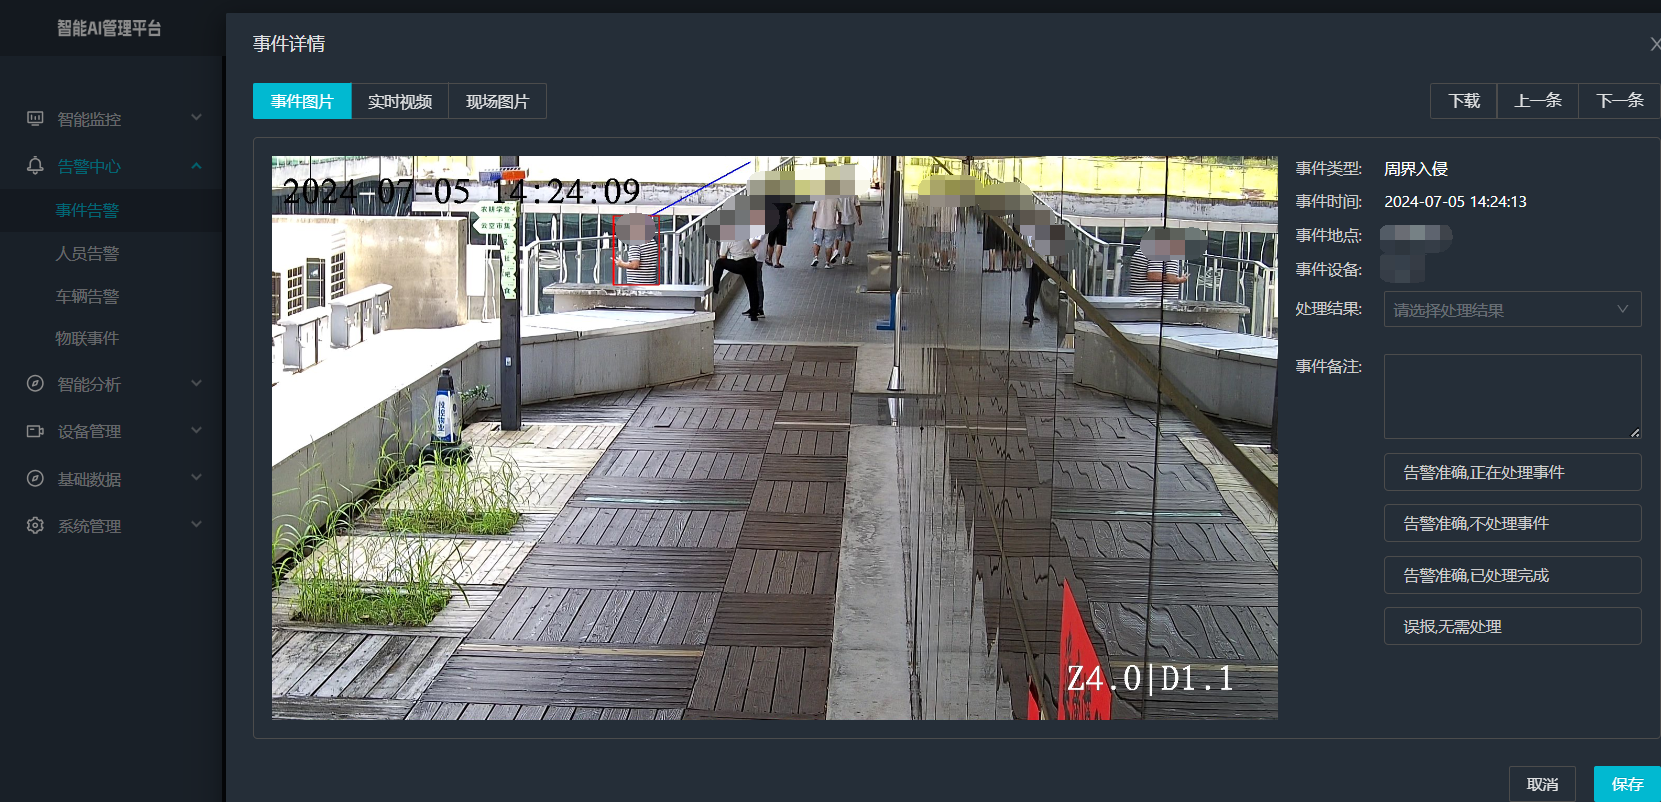
一、方案背景 在现代生产与生活场景中,如工厂高危作业区、医院手术室、公共场景等,人员违规打手机的行为潜藏着巨大风险。传统依靠人工巡查的监管方式,存在效率低、覆盖面不足、判断主观性强等问题,难以满足对人员打手机行为精…...
【堆垛策略】设计方法
堆垛策略的设计是积木堆叠系统的核心,直接影响堆叠的稳定性、效率和容错能力。以下是分层次的堆垛策略设计方法,涵盖基础规则、优化算法和容错机制: 1. 基础堆垛规则 (1) 物理稳定性优先 重心原则: 大尺寸/重量积木在下…...
