Pytest测试框架3
目录:
- pytest结合数据驱动-yaml
- pytest结合数据驱动-excel
- pytest结合数据驱动-csv
- pytest结合数据驱动-json
- pytest测试用例生命周期管理(一)
- pytest测试用例生命周期管理(二)
- pytest测试用例生命周期管理(三)
- pytest测试用例生命周期管理-自动注册
- pytest测试用例生命周期管理-自动生效
- pytestfixture实现参数化
1.pytest结合数据驱动-yaml
数据驱动
-
什么是数据驱动?
- 数据驱动就是数据的改变从而驱动自动化测试的执行,最终引起测试结果的改变。简单来说,就是参数化的应用。数据量小的测试用例可以使用代码的参数化来实现数据驱动,数据量大的情况下建议大家使用一种结构化的文件(例如 yaml,json 等)来对数据进行存储,然后在测试用例中读取这些数据。
-
应用:
- App、Web、接口自动化测试
- 测试步骤的数据驱动
- 测试数据的数据驱动
- 配置的数据驱动
yaml 文件介绍
- 对象:键值对的集合,用冒号 “:” 表示
- 数组:一组按次序排列的值,前加 “-”
- 纯量:单个的、不可再分的值
- 字符串
- 布尔值
- 整数
- 浮点数
- Null
- 时间
- 日期
# 编程语言
languages:- PHP- Java- Python
book:Python入门: # 书籍名称price: 55.5author: Lilyavailable: Truerepertory: 20date: 2018-02-17Java入门:price: 60author: Lilyavailable: Falserepertory: Nulldate: 2018-05-11
yaml 文件使用
- 查看 yaml 文件
- pycharm
- txt 记事本
- 读取 yaml 文件
- 安装:
pip install pyyaml - 方法:
yaml.safe_load(f) - 方法:
yaml.safe_dump(f)
- 安装:
import yamlfile_path = './my.yaml'
with open(file_path, 'r', encoding='utf-8') as f:data = yaml.safe_load(f)
代码实例:
工程目录结构
- data 目录:存放 yaml 数据文件
- func 目录:存放被测函数文件
- testcase 目录:存放测试用例文件
# 工程目录结构
.
├── data
│   └── data.yaml
├── func
│   ├── __init__.py
│   └── operation.py
└── testcase├── __init__.py└── test_add.py
测试准备
- 被测对象:
operation.py - 测试用例:
test_add.py - 测试数据:
data.yaml
# operation.py 文件内容
def my_add(x, y):result = x + yreturn result
# test_add.py 文件内容
class TestWithYAML:@pytest.mark.parametrize('x,y,expected', [[1, 1, 2]])def test_add(self, x, y, expected):assert my_add(int(x), int(y)) == int(expected)
# data.yaml 文件内容
-- 1- 1- 2
-- 3- 6- 9
-- 100- 200- 300
import pytest
import yamlfrom func.operation import my_add# 方法一
# class TestWithYAML:
# @pytest.mark.parametrize('x,y,expected', [[1, 1, 2], [3, 6, 9], [100, 200, 300]])
# def test_add(self, x, y, expected):
# assert my_add(int(x), int(y)) == int(expected)# 方法二
def get_data():with open("../data/data.yaml", encoding='utf-8') as f:data = yaml.safe_load(f)return dataclass TestWithYAML:@pytest.mark.parametrize('x,y,expected', get_data())def test_add(self, x, y, expected):assert my_add(int(x), int(y)) == int(expected)
2.pytest结合数据驱动-excel
读取 Excel 文件
-
第三方库
xlrdxlwingspandas
-
openpyxl
- 官方文档: https://openpyxl.readthedocs.io/en/stable/
openpyxl 库的安装
- 安装:
pip install openpyxl - 导入:
import openpyxl
openpyxl 库的操作
-
读取工作簿
-
读取工作表
-
读取单元格
import openpyxl# 获取工作簿
book = openpyxl.load_workbook('./data/test.xlsx')# 读取工作表
sheet = book.active
print(sheet)# 读取单个单元格
cell_a1 = sheet['A1']
print(cell_a1.value)cell_a3 = sheet.cell(column=1, row=3)  # A3
print(cell_a3.value)# 读取多个连续单元格
cells = sheet["A1":"C3"]
for i in cells:for j in i:print(j.value,end=' ')print()
代码实例:
import openpyxl
import pytest
import yamlfrom func.operation import my_add# 方法一
# class TestWithYAML:
#     @pytest.mark.parametrize('x,y,expected', [[1, 1, 2], [3, 6, 9], [100, 200, 300]])
#     def test_add(self, x, y, expected):
#         assert my_add(int(x), int(y)) == int(expected)# 方法二
# def get_data():
#     with open("../data/data.yaml", encoding='utf-8') as f:
#         data = yaml.safe_load(f)
#     return data
#
#
# class TestWithYAML:
#     @pytest.mark.parametrize('x,y,expected', get_data())
#     def test_add(self, x, y, expected):
#         assert my_add(int(x), int(y)) == int(expected)# 方法三
def get_excel():book = openpyxl.load_workbook("../data/test.xlsx")sheet = book.activecells = sheet["A1":"C3"]values = []for row in cells:data = []for cell in row:data.append(cell.value)values.append(data)return valuesclass TestWithYAML:@pytest.mark.parametrize('x,y,expected', get_excel())def test_add(self, x, y, expected):assert my_add(int(x), int(y)) == int(expected)
3.pytest结合数据驱动-csv
csv 文件介绍
- csv:逗号分隔值
- 是 Comma-Separated Values 的缩写
- 以纯文本形式存储数字和文本
- 文件由任意数目的记录组成
- 每行记录由多个字段组成
Linux从入门到高级,linux,¥5000
web自动化测试进阶,python,¥3000
app自动化测试进阶,python,¥6000
Docker容器化技术,linux,¥5000
测试平台开发与实战,python,¥8000
csv 文件使用
-
读取数据
- 内置函数:
open() - 内置模块:
csv
- 内置函数:
-
方法:
csv.reader(iterable)- 参数:iterable ,文件或列表对象
- 返回:迭代器,每次迭代会返回一行数据。
import csvdef get_csv():with open('./data/params.csv', 'r', encoding='utf-8') as file:raw = csv.reader(file)for line in raw:print(line)if __name__ == '__main__':get_csv()代码实例:
测试准备
-
被测对象:
operation.py -
测试用例:
test_add.py -
测试数据:
params.csv
# operation.py 文件内容
def my_add(x, y):result = x + yreturn result# test_add.py 文件内容
class TestWithCSV:@pytest.mark.parametrize('x,y,expected', [[1, 1, 2]])def test_add(self, x, y, expected):assert my_add(int(x), int(y)) == int(expected)# params.csv 文件内容
1,1,2
3,6,9
100,200,300
import csvimport openpyxl
import pytest
import yamlfrom func.operation import my_add# 方法一
# class TestWithYAML:
# @pytest.mark.parametrize('x,y,expected', [[1, 1, 2], [3, 6, 9], [100, 200, 300]])
# def test_add(self, x, y, expected):
# assert my_add(int(x), int(y)) == int(expected)# 方法二
# def get_data():
# with open("../data/data.yaml", encoding='utf-8') as f:
# data = yaml.safe_load(f)
# return data
#
#
# class TestWithYAML:
# @pytest.mark.parametrize('x,y,expected', get_data())
# def test_add(self, x, y, expected):
# assert my_add(int(x), int(y)) == int(expected)# 方法三
# def get_excel():
# book = openpyxl.load_workbook("../data/test.xlsx")
# sheet = book.active
# cells = sheet["A1":"C3"]
# values = []
# for row in cells:
# data = []
# for cell in row:
# data.append(cell.value)
# values.append(data)
# return values
#
#
# class TestWithYAML:
# @pytest.mark.parametrize('x,y,expected', get_excel())
# def test_add(self, x, y, expected):
# assert my_add(int(x), int(y)) == int(expected)# 方法四
def get_csv():with open('../data/test.csv', encoding='utf-8') as f:raw = csv.reader(f)data = []for line in raw:data.append(line)return dataclass TestWithYAML:@pytest.mark.parametrize('x,y,expected', get_csv())def test_add(self, x, y, expected):assert my_add(int(x), int(y)) == int(expected)
4.pytest结合数据驱动-json
json 文件介绍
-
json 是 JS 对象
-
全称是 JavaScript Object Notation
-
是一种轻量级的数据交换格式
-
json 结构
- 对象
{"key": value} - 数组
[value1, value2 ...]
- 对象
{"name:": "tom","detail": {"course": "python","city": "北京"},"remark": [1000, 666, 888]
}
json 文件使用
- 查看 json 文件
- pycharm
- txt 记事本
- 读取 json 文件
- 内置函数 open()
- 内置库 json
- 方法:
json.loads() - 方法:
json.dumps()
params.json
{"case1": [1, 1, 2],"case2": [3, 6, 9],"case3": [100, 200, 300]
}
import jsondef get_json():with open('./data/params.json', 'r') as f:data = json.loads(f.read())print(data)print(type(data))s = json.dumps(data, ensure_ascii=False)print(s)print(type(s))if __name__ == '__main__':get_json()代码示例:
测试准备
-
被测对象:
operation.py -
测试用例:
test_add.py -
测试数据:
params.json
# operation.py 文件内容
def my_add(x, y):result = x + yreturn result# test_add.py 文件内容
class TestWithJSON:@pytest.mark.parametrize('x,y,expected', [[1, 1, 2]])def test_add(self, x, y, expected):assert my_add(int(x), int(y)) == int(expected)# params.json 文件内容
{"case1": [1, 1, 2],"case2": [3, 6, 9],"case3": [100, 200, 300]
}
import csv
import jsonimport openpyxl
import pytest
import yamlfrom func.operation import my_add# 方法一
# class TestWithYAML:
# @pytest.mark.parametrize('x,y,expected', [[1, 1, 2], [3, 6, 9], [100, 200, 300]])
# def test_add(self, x, y, expected):
# assert my_add(int(x), int(y)) == int(expected)# 方法二
# def get_data():
# with open("../data/data.yaml", encoding='utf-8') as f:
# data = yaml.safe_load(f)
# return data
#
#
# class TestWithYAML:
# @pytest.mark.parametrize('x,y,expected', get_data())
# def test_add(self, x, y, expected):
# assert my_add(int(x), int(y)) == int(expected)# 方法三
# def get_excel():
# book = openpyxl.load_workbook("../data/test.xlsx")
# sheet = book.active
# cells = sheet["A1":"C3"]
# values = []
# for row in cells:
# data = []
# for cell in row:
# data.append(cell.value)
# values.append(data)
# return values
#
#
# class TestWithYAML:
# @pytest.mark.parametrize('x,y,expected', get_excel())
# def test_add(self, x, y, expected):
# assert my_add(int(x), int(y)) == int(expected)# 方法四
# def get_csv():
# with open('../data/test.csv', encoding='utf-8') as f:
# raw = csv.reader(f)
# data = []
# for line in raw:
# data.append(line)
# return data
#
#
# class TestWithYAML:
# @pytest.mark.parametrize('x,y,expected', get_csv())
# def test_add(self, x, y, expected):
# assert my_add(int(x), int(y)) == int(expected)# 方法五
def get_json():with open('../data/params.json', 'r') as f:data = json.loads(f.read())print(data)print(type(data))print(list(data.values()))return list(data.values())class TestWithYAML:@pytest.mark.parametrize('x,y,expected', get_json())def test_add(self, x, y, expected):assert my_add(int(x), int(y)) == int(expected)
5.pytest测试用例生命周期管理(一)
Fixture 特点及优势
- 1、命令灵活:对于 setup,teardown,可以不起这两个名字
- 2、数据共享:在 conftest.py 配置⾥写⽅法可以实现数据共享,不需要 import 导⼊。可以跨⽂件共享
- 3、scope 的层次及神奇的 yield 组合相当于各种 setup 和 teardown
- 4、实现参数化
Fixture 在自动化中的应用- 基本用法
- 场景:
测试⽤例执⾏时,有的⽤例需要登陆才能执⾏,有些⽤例不需要登陆。
setup 和 teardown ⽆法满⾜。fixture 可以。默认 scope(范围)function
- 步骤:
- 1.导⼊ pytest
- 2.在登陆的函数上⾯加@pytest.fixture()
- 3.在要使⽤的测试⽅法中传⼊(登陆函数名称),就先登陆
- 4.不传⼊的就不登陆直接执⾏测试⽅法。
import pytest@pytest.fixture()
def login():print('完成登录操作')def test_search():print('搜索')# def test_cart():
#     login()
#     print('购物车')def test_cart(login):print('购物车')def test_order(login):print('下单功能')
6.pytest测试用例生命周期管理(二)
Fixture 在自动化中的应用 - 作用域
| 取值 | 范围 | 说明 |
|---|---|---|
| function | 函数级 | 每一个函数或方法都会调用 |
| class | 类级别 | 每个测试类只运行一次 |
| module | 模块级 | 每一个.py 文件调用一次 |
| package | 包级 | 每一个 python 包只调用一次(暂不支持) |
| session | 会话级 | 每次会话只需要运行一次,会话内所有方法及类,模块都共享这个方法 |
import pytest@pytest.fixture(scope="function")
def login():print('完成登录操作')def test_search():print('搜索')# def test_cart():
#     login()
#     print('购物车')def test_cart(login):print('购物车')def test_order(login):print('下单功能')class TestDemo:def test_case1(self, login):print("case1")def test_case2(self, login):print("case2")
7.pytest测试用例生命周期管理(三)
Fixture 在自动化中的应用 - yield 关键字
- 场景:
你已经可以将测试⽅法【前要执⾏的或依赖的】解决了,测试⽅法后销毁清除数据的要如何进⾏呢?
- 解决:
通过在 fixture 函数中加⼊ yield 关键字,yield 是调⽤第⼀次返回结果,第⼆次执⾏它下⾯的语句返回。
- 步骤:
在@pytest.fixture(scope=module)。在登陆的⽅法中加 yield,之后加销毁清除的步骤
import pytest
'''
@pytest.fixture
def fixture_name():setup 操作yield 返回值teardown 操作
'''@pytest.fixture(scope="function")
def login():#setup操作print('完成登录操作')tocken = "abcdafafasdfds"username = 'tom'yield tocken,username #相当于return#teardown操作print('完成登出操作')def test_search():print('搜索')# def test_cart():
#     login()
#     print('购物车')def test_cart(login):print('购物车')def test_order(login):print('下单功能')class TestDemo:def test_case1(self, login):print("case1")def test_case2(self, login):print("case2")
8.pytest测试用例生命周期管理-自动注册
Fixture 在自动化中的应用 - 数据共享
- 场景:
与其他测试⼯程师合作⼀起开发时,公共的模块要放在⼤家都访问到的地⽅。
- 解决:
使⽤ conftest.py 这个⽂件进⾏数据共享,并且他可以放在不同位置起着不同的范围共享作⽤。
-
前提:
- conftest ⽂件名是不能换的
- 放在项⽬下是全局的数据共享的地⽅
-
执⾏:
- 系统执⾏到参数 login 时先从本模块中查找是否有这个名字的变量什么的,
- 之后在 conftest.py 中找是否有。
-
步骤:
将登陆模块带@pytest.fixture 写在 conftest.py 里面
代码示例:
conftest.py
# conftest.py名字是固定的,不能改变
import pytest@pytest.fixture(scope="function")
def login():# setup操作print('完成登录操作')tocken = "abcdafafasdfds"username = 'tom'yield tocken, username  # 相当于return# teardown操作print('完成登出操作')
test_test1.py
import pytest
'''
@pytest.fixture
def fixture_name():setup 操作yield 返回值teardown 操作
'''def test_search():print('搜索')# def test_cart():
#     login()
#     print('购物车')def test_cart(login):print('购物车')def test_order(login):print('下单功能')class TestDemo:def test_case1(self, login):print("case1")def test_case2(self, login):print("case2")
项目结构:

9.pytest测试用例生命周期管理-自动生效
Fixture 在自动化中的应用 - 自动应用
场景:
不想原测试⽅法有任何改动,或全部都⾃动实现⾃动应⽤,
没特例,也都不需要返回值时可以选择⾃动应⽤
解决:
使⽤ fixture 中参数 autouse=True 实现
步骤:
在⽅法上⾯加 @pytest.fixture(autouse=True)
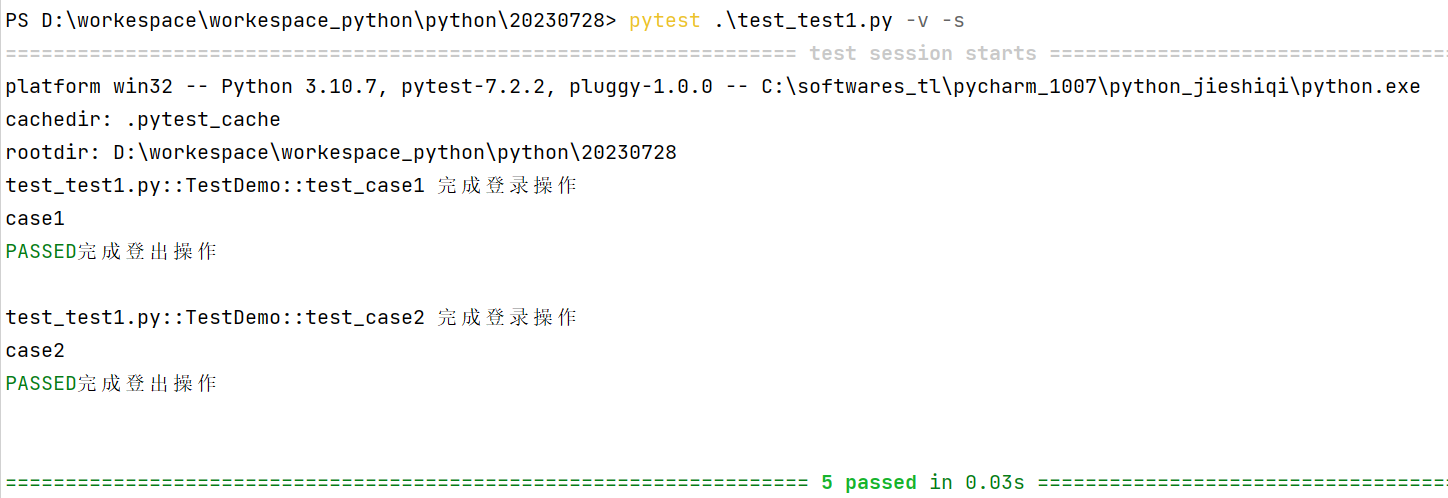
test_test1.py
import pytest'''
@pytest.fixture
def fixture_name():setup 操作yield 返回值teardown 操作
'''def test_search():print('搜索')# def test_cart():
#     login()
#     print('购物车')# def test_cart(login):
#     print('购物车')
def test_cart():print('购物车')# def test_order(login):
#     print('下单功能')def test_order():print('下单功能')class TestDemo:# def test_case1(self, login):#     print("case1")def test_case1(self):print("case1")# def test_case2(self, login):#     print("case2")def test_case2(self):print("case2")
conftest.py
# conftest.py名字是固定的,不能改变
import pytest@pytest.fixture(scope="function", autouse=True)
def login():# setup操作print('完成登录操作')tocken = "abcdafafasdfds"username = 'tom'yield tocken, username  # 相当于return# teardown操作print('完成登出操作')
运行结果:

10.pytestfixture实现参数化
Fixture 在自动化中的应用 -参数化
场景:
测试离不开数据,为了数据灵活,⼀般数据都是通过参数传的
解决:
fixture 通过固定参数 request 传递
步骤:
在 fixture 中增加@pytest.fixture(params=[1, 2, 3, ‘linda’])
在⽅法参数写 request,方法体里面使用 request.param 接收参数
# @pytest.fixture(params=['tom', 'jenny'])
# def login(request):
#     print(f"用户名:{request.param}")
#     return request.param
#
#
# def test_demo1(login):
#     print(f'demo1 case:数据为{login}')@pytest.fixture(params=[['tom', 'harry'], ['jenny', 'jack']])
def login(request):print(f"用户名:{request.param}")return request.paramdef test_demo1(login):print(f'demo1 case:数据为{login}')
Fixture 的用法总结
- 模拟 setup,teardown(一个用例可以引用多个 fixture)
- yield 的用法
- 作用域( session,module, 类级别,方法级别 )
- 自动执行 (autouse 参数)
- conftest.py 用法,一般会把 fixture 写在 conftest.py 文件中(这个文件名字是固定的,不能改)
- 实现参数化
相关文章:
Pytest测试框架3
目录: pytest结合数据驱动-yamlpytest结合数据驱动-excelpytest结合数据驱动-csvpytest结合数据驱动-jsonpytest测试用例生命周期管理(一)pytest测试用例生命周期管理(二)pytest测试用例生命周期管理(三&a…...
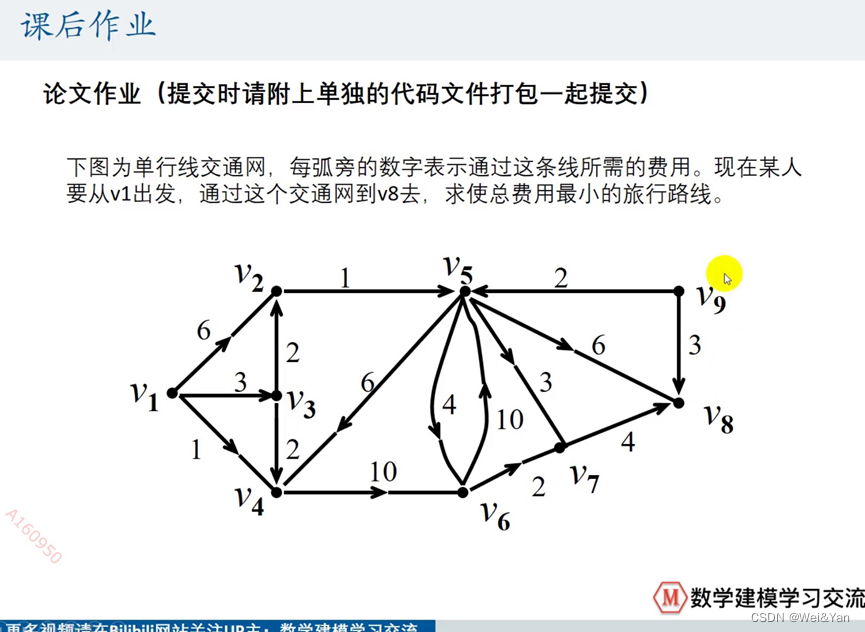
【数学建模】-- Matlab中图的最短路径
前言: 图的基本概念: 若想简单绘制图可以利用此网站: 左上角Undirected/Directed是无向图/有向图 左边 0-index ,1-index为0下标,1下标。 Node Count为节点个数 Graph Data:最初尾节点的名称ÿ…...

中国月入过万的人多不多
Q:中国月入过万的人多不多 单从这个问题来看,这是个费米问题啊: 估算中国月入过万的有多少人? 要解决费米问题,其实也很好办,就是逻辑拆解,这篇文章也分为3个部分,先从公开数据中估…...
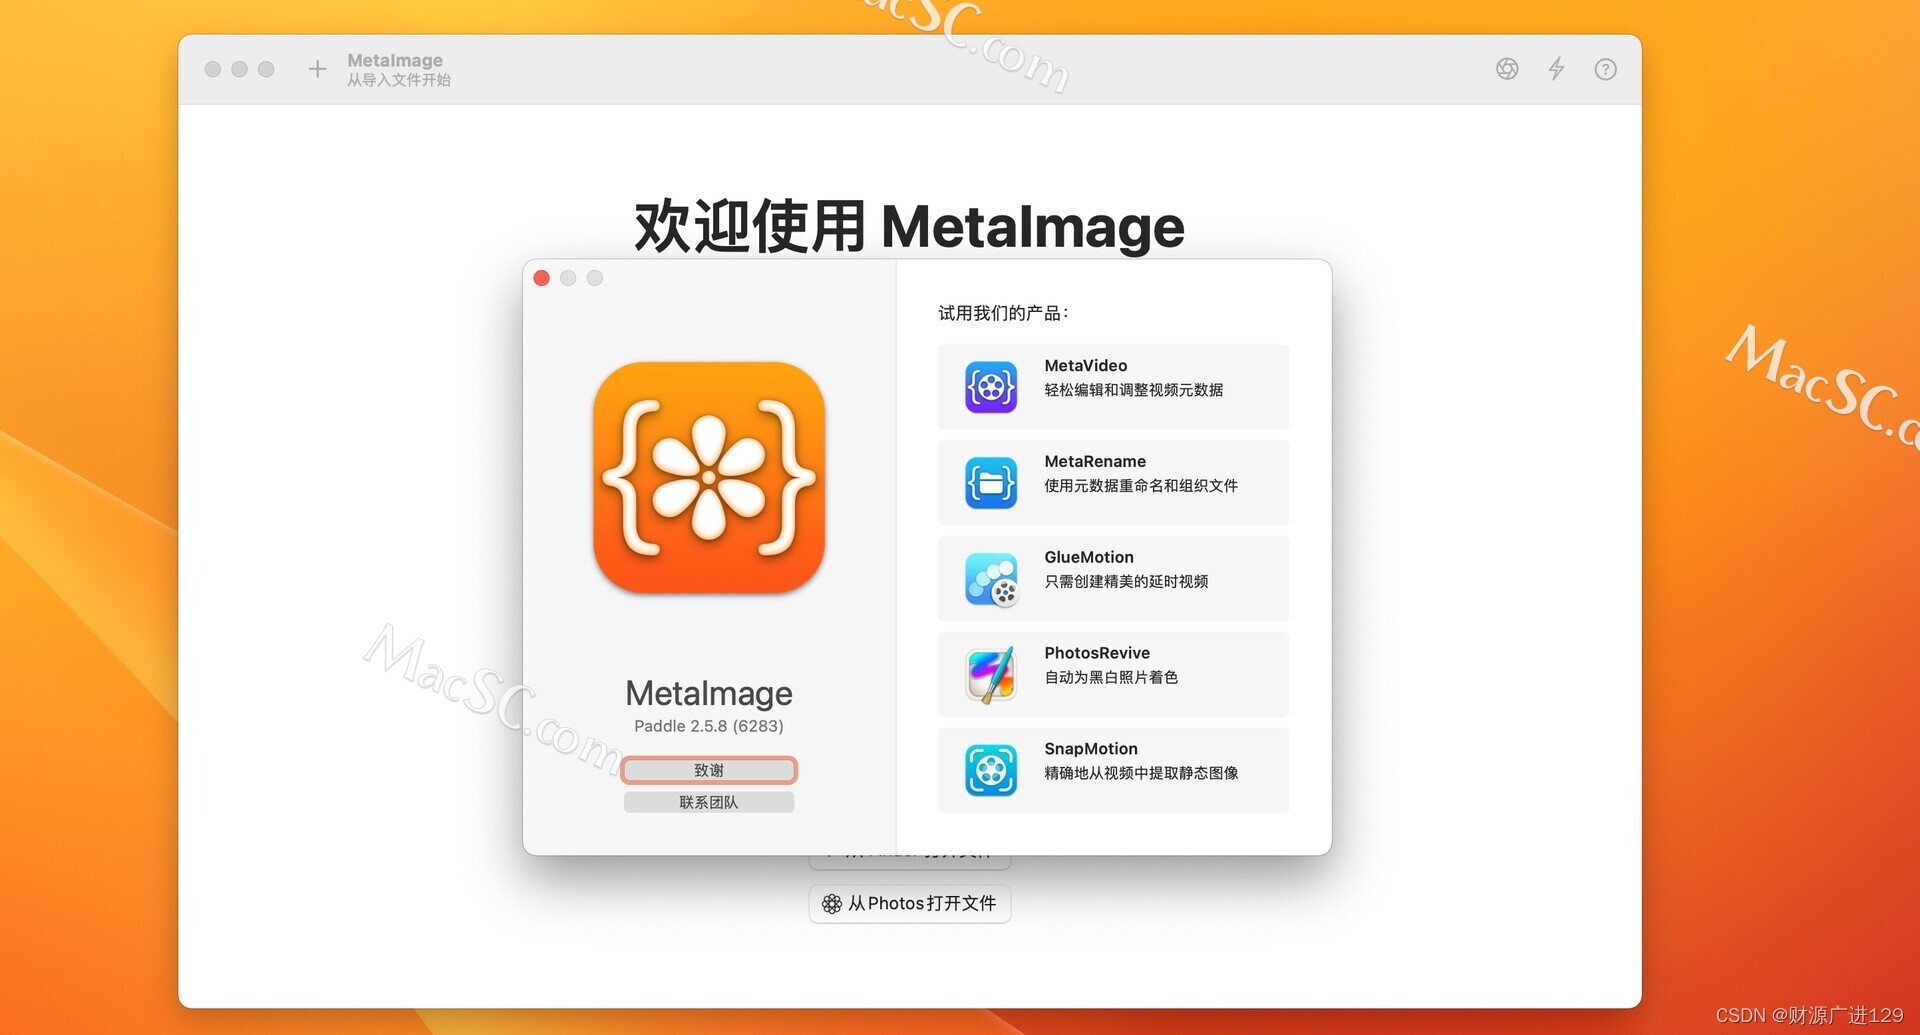
苹果电脑图像元数据编辑器:MetaImage for Mac
MetaImage for Mac是一款功能强大的照片元数据编辑器,它可以帮助用户编辑并管理照片的元数据信息,包括基本信息和扩展信息。用户可以根据需要进行批量处理,方便快捷地管理大量照片。 MetaImage for Mac还提供了多种导入和导出格式࿰…...
 详解)
BeanUtils.copyProperties() 详解
BeanUtils.copyProperties会进行类型转换; BeanUtils.copyProperties方法简单来说就是将两个字段相同的对象进行属性值的复制。如果 两个对象之间存在名称不相同的属性,则 BeanUtils 不对这些属性进行处理,需要程序手动处理。 这两个类在不同…...

基于CentOS 7构建LVS-DR集群
DIPVIPRIPClient192.169.41.139 LVS 192.168.41.134192.169.41.10RS1192.168.41.135RS2192.168.41.138 要求: node4为客户端,node2为LVS,node3和node4为RS。 1.配置DNS解析(我这里使用本地解析) 192.168.41.134 www.y…...

openEuler-OECA考试报名火热开启,尊享半价优惠 作者:HopeInfra 发布时间:2023-08-10
近日,润和软件人才评定报名系统已成功上线运行,现openEuler-OECA人才评定考试报名优惠活动火热开启,欢迎大家报名咨询! 关于openEuler人才评定 随着openEuler及其发行版本在各个行业使用量逐年增多,相关人才的评定诉求…...
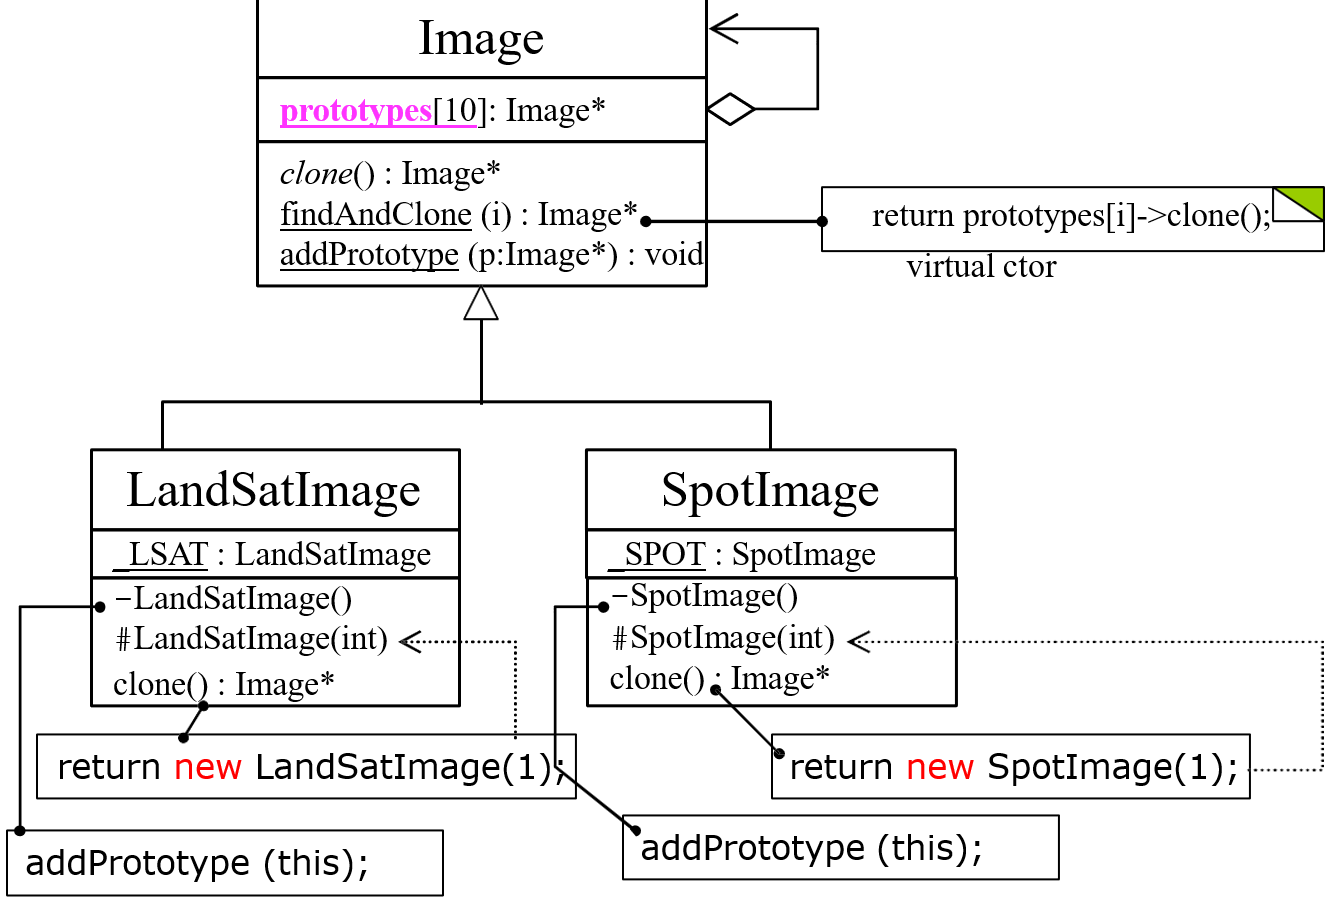
侯捷 C++面向对象编程笔记——10 继承与虚函数
10 继承与虚函数 10.1 Inheritance 继承 语法::public base_class_name public 只是一种继承的方式,还有protect,private 子类会拥有自己的以及父类的数据 10.1.1 继承下的构造和析构 与复合下的构造和析构相似 构造是由内而外 Container …...
、计算日期之间的天数等))
mysql日期函数(查询最近n(天/月/年)、计算日期之间的天数等)
mysql日期函数 目录 mysql查询最近一个月数据返回当前日期和时间将字符串转变为日期日期 d 减去 n 天后的日期计时间差,返回 datetime_expr2 − datetime_expr1 的时间差算查询当天数据 ADDDATE(d,n)计算起始日期 d 加上 n 天的日期 SELECT ADDDATE("2017-06…...

通过anvt X6和vue3实现图编辑
通过anvt X6 X6地址:https://x6.antv.antgroup.com/tutorial/about; 由于节点比较复杂,使用vue实现的节点; x6提供了一个独立的包 antv/x6-vue-shape 来使用 Vue 组件渲染节点。 VUE3的案例: <template><div…...

win2012 IIS8.5 安装PHP教程,一些版本不能用
因为一直用win2003IIS6.0PHP的环境,所以搭建PHP自认为非常熟悉了,但是最近在搭建win2012IIS8.5PHP的环境时,我遇到了一些问题,经过4个小时的折腾,终于搞定了,本文记录一些经验,可能不少朋友也会…...

sqlalchemy执行原生sql
# 有的复杂sql 用orm写不出来---》用原生sql查询 # 原生sql查询,查出的结果是对象 # 原生sql查询,查询结果列表套元组 准备工作 from sqlalchemy.orm import sessionmaker, relationship from sqlalchemy import create_engineengine create_engine(&…...
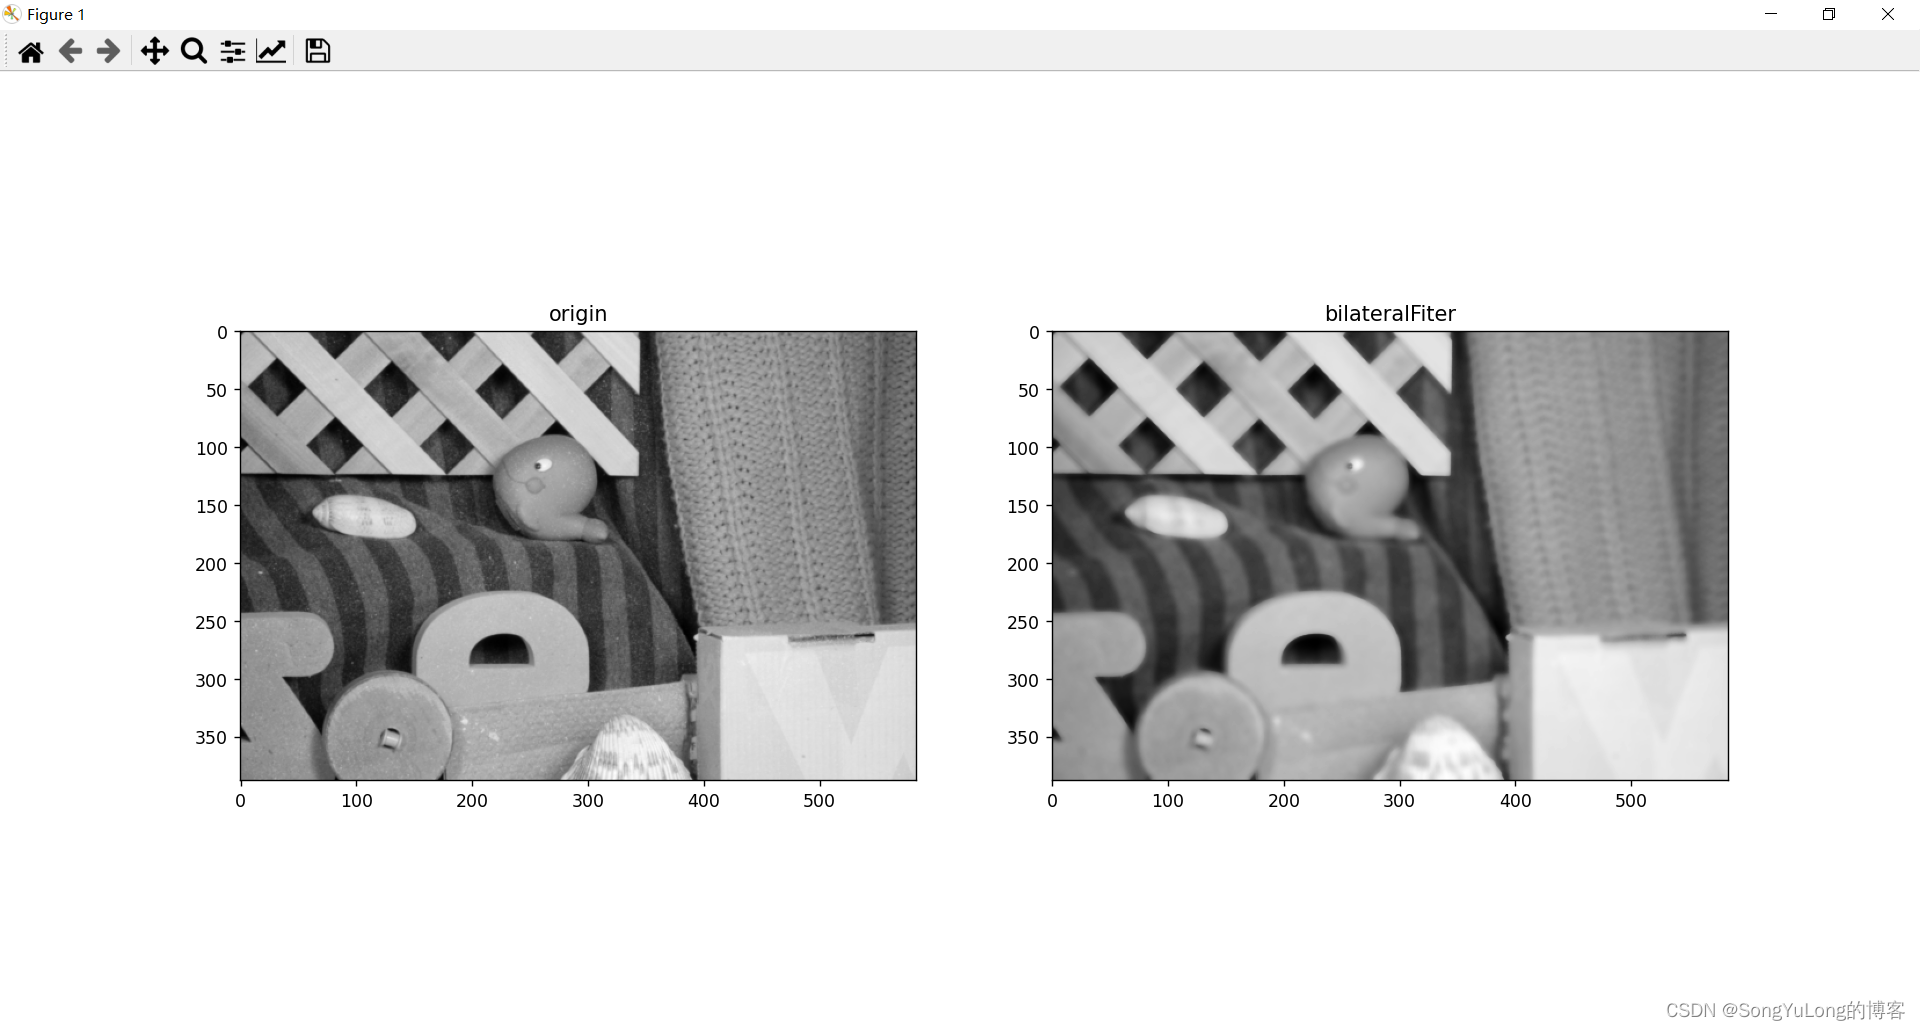
Python-OpenCV中的图像处理-图像平滑
Python-OpenCV中的图像处理-图像平滑 图像平滑平均滤波高斯模糊中值模糊双边滤波 图像平滑 使用低通滤波器可以达到图像模糊的目的。这对与去除噪音很有帮助。其实就是去除图像中的高频成分(比如:噪音,边界)。所以边界也会被模糊…...
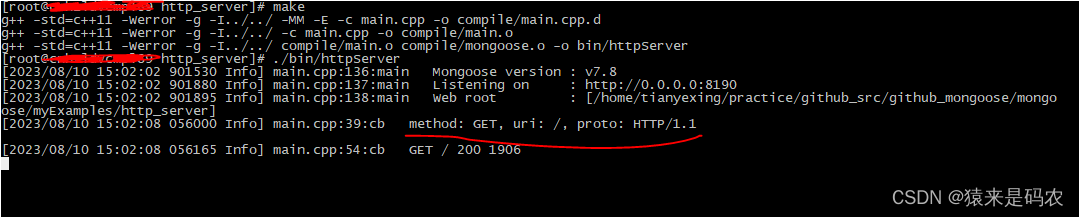
Mongoose http server 例子
今天抽了点时间看了一下 mongoose的源码, github 地址,发现跟以前公司内部使用的不太一样,这里正好利用其 http server 例子来看一下。以前的 http message 结构体是这样的: /* HTTP message */ struct http_message {struct mg_…...

1、初识HTML
1、初识HTML 前端就是写一些基本的页面,HTML即超文本标记语言:Hyper Text Markup Language,超文本包括,文字、图片、音频、视频、动画等,HTML5,提供了一些新的元素和一些有趣的新特性,同时也建…...

线性代数(三) 线性方程组
前言 如何利用行列式,矩阵求解线性方程组。 线性方程组的相关概念 用矩阵方程表示 齐次线性方程组:Ax0;非齐次线性方程组:Axb. 可以理解 齐次线性方程组 是特殊的 非齐次线性方程组 如何判断线性方程组的解 其中R(A)表示矩阵A的…...
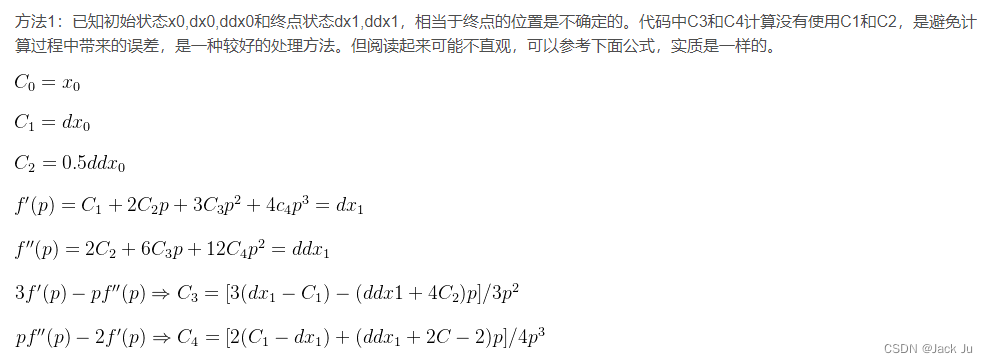
Apoll 多项式规划求解
一、纵向规划 void QuarticPolynomialCurve1d::ComputeCoefficients(const float x0, const float dx0, const float ddx0, const float dx1,const float ddx1, const float p) {if (p < 0.0) {std::cout << "p should be greater than 0 at line 140." &…...
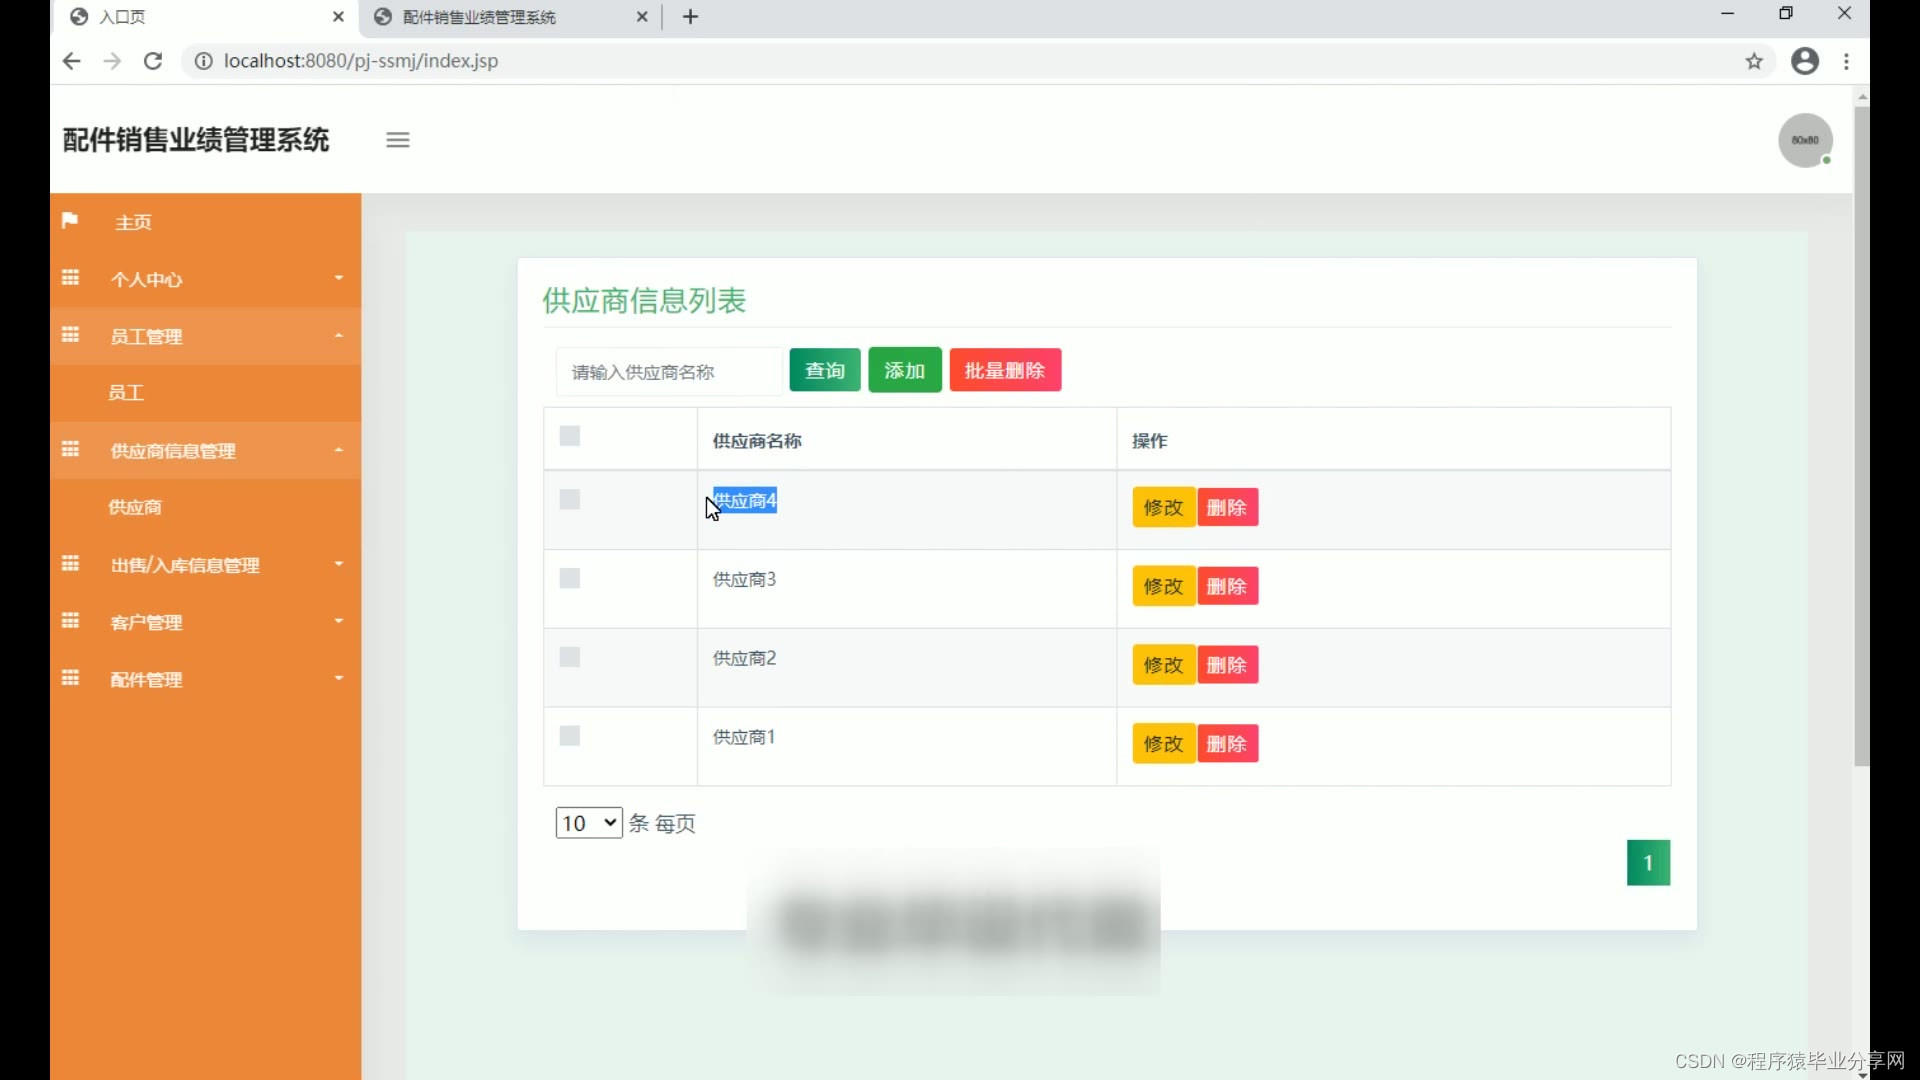
ssm亚盛汽车配件销售业绩管理统源码和论文PPT
ssm亚盛汽车配件销售业绩管理统源码和论文PPT007 开发工具:idea 数据库mysql5.7(mysql5.7最佳) 数据库链接工具:navcat,小海豚等 开发技术:java ssm tomcat8.5 研究的意义 汽车配件销售类企业近年来得到长足发展,在市场份额不断扩大同时…...
发布属于自己的 npm 包
1 创建文件夹,并创建 index.js 在文件中声明函数,使用module.exports 导出 2 npm 初始化工具包,package.json 填写包的信息(包的名字是唯一的) npm init 可在这里写包的名字,或者一路按回车,后…...

Redis主从复制和哨兵架构图,集成Spring Boot项目实战分享
目录 1. Redis 主从复制2. Redis 哨兵架构3. 集成spring boot项目案列 Redis 主从复制和哨兵架构是 Redis 集群的重要组成部分,用于提高 Redis 集群的可用性和性能。以下是 Redis 主从复制和哨兵架构的详细介绍,包括架构图和 Java 代码详解。 1. Redis …...

MySQL 隔离级别:脏读、幻读及不可重复读的原理与示例
一、MySQL 隔离级别 MySQL 提供了四种隔离级别,用于控制事务之间的并发访问以及数据的可见性,不同隔离级别对脏读、幻读、不可重复读这几种并发数据问题有着不同的处理方式,具体如下: 隔离级别脏读不可重复读幻读性能特点及锁机制读未提交(READ UNCOMMITTED)允许出现允许…...

Redis相关知识总结(缓存雪崩,缓存穿透,缓存击穿,Redis实现分布式锁,如何保持数据库和缓存一致)
文章目录 1.什么是Redis?2.为什么要使用redis作为mysql的缓存?3.什么是缓存雪崩、缓存穿透、缓存击穿?3.1缓存雪崩3.1.1 大量缓存同时过期3.1.2 Redis宕机 3.2 缓存击穿3.3 缓存穿透3.4 总结 4. 数据库和缓存如何保持一致性5. Redis实现分布式…...

转转集团旗下首家二手多品类循环仓店“超级转转”开业
6月9日,国内领先的循环经济企业转转集团旗下首家二手多品类循环仓店“超级转转”正式开业。 转转集团创始人兼CEO黄炜、转转循环时尚发起人朱珠、转转集团COO兼红布林CEO胡伟琨、王府井集团副总裁祝捷等出席了开业剪彩仪式。 据「TMT星球」了解,“超级…...

基础测试工具使用经验
背景 vtune,perf, nsight system等基础测试工具,都是用过的,但是没有记录,都逐渐忘了。所以写这篇博客总结记录一下,只要以后发现新的用法,就记得来编辑补充一下 perf 比较基础的用法: 先改这…...

Spring AI 入门:Java 开发者的生成式 AI 实践之路
一、Spring AI 简介 在人工智能技术快速迭代的今天,Spring AI 作为 Spring 生态系统的新生力量,正在成为 Java 开发者拥抱生成式 AI 的最佳选择。该框架通过模块化设计实现了与主流 AI 服务(如 OpenAI、Anthropic)的无缝对接&…...
MySQL 8.0 OCP 英文题库解析(十三)
Oracle 为庆祝 MySQL 30 周年,截止到 2025.07.31 之前。所有人均可以免费考取原价245美元的MySQL OCP 认证。 从今天开始,将英文题库免费公布出来,并进行解析,帮助大家在一个月之内轻松通过OCP认证。 本期公布试题111~120 试题1…...
RNN避坑指南:从数学推导到LSTM/GRU工业级部署实战流程
本文较长,建议点赞收藏,以免遗失。更多AI大模型应用开发学习视频及资料,尽在聚客AI学院。 本文全面剖析RNN核心原理,深入讲解梯度消失/爆炸问题,并通过LSTM/GRU结构实现解决方案,提供时间序列预测和文本生成…...
springboot整合VUE之在线教育管理系统简介
可以学习到的技能 学会常用技术栈的使用 独立开发项目 学会前端的开发流程 学会后端的开发流程 学会数据库的设计 学会前后端接口调用方式 学会多模块之间的关联 学会数据的处理 适用人群 在校学生,小白用户,想学习知识的 有点基础,想要通过项…...

HTML前端开发:JavaScript 获取元素方法详解
作为前端开发者,高效获取 DOM 元素是必备技能。以下是 JS 中核心的获取元素方法,分为两大系列: 一、getElementBy... 系列 传统方法,直接通过 DOM 接口访问,返回动态集合(元素变化会实时更新)。…...

绕过 Xcode?使用 Appuploader和主流工具实现 iOS 上架自动化
iOS 应用的发布流程一直是开发链路中最“苹果味”的环节:强依赖 Xcode、必须使用 macOS、各种证书和描述文件配置……对很多跨平台开发者来说,这一套流程并不友好。 特别是当你的项目主要在 Windows 或 Linux 下开发(例如 Flutter、React Na…...