Spring源码深度解析三 (MVC)
书接上回
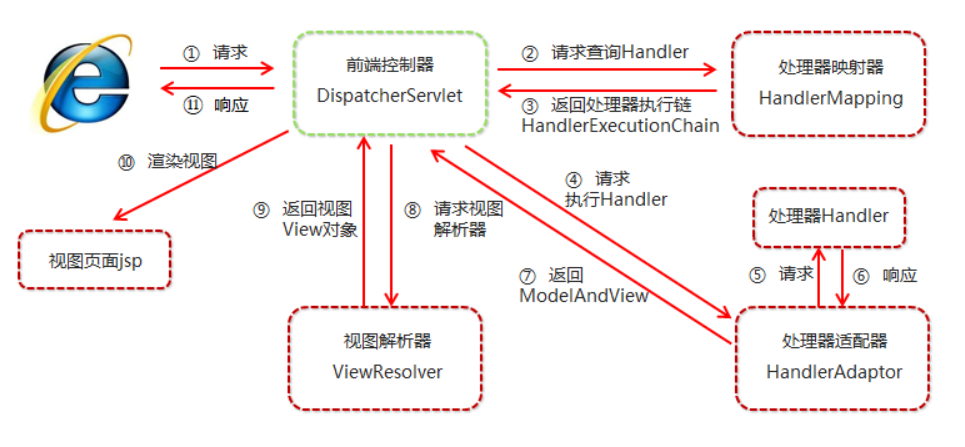
10.MVC 流程&源码剖析
* 问题1:Spring和SpringMVC整合使用时,会创建一个容器还是两个容器(父子容器?)
* 问题2:DispatcherServlet初始化过程中做了什么?
* 问题3:请求的执行流程是怎么样的?
SpringMVC是基于Servlet和Spring容器设计的Web框架
追根溯源之 Servlet
Servlet 接口及其实现类结构:
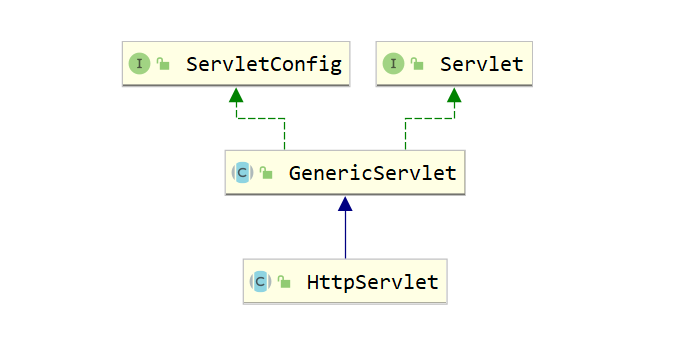
public interface Servlet {public void init(ServletConfig config) throws ServletException;public ServletConfig getServletConfig();public void service(ServletRequest req, ServletResponse res) throws ServletException, IOException;public String getServletInfo();public void destroy();
}
ServletConfig 是一个和 Servlet 配置相关的接口:
在配置 Spring MVC 的 DispatcherServlet 时,会通过 ServletConfig 将配置文件的位置告知 DispatcherServlet。
例:
<servlet><servlet-name>dispatcher</servlet-name><servlet-class>org.springframework.web.servlet.DispatcherServlet</servlet-class><init-param><param-name>contextConfigLocation</param-name><param-value>classpath:springmvc.xml</param-value></init-param>
</servlet>
如上,标签内的配置信息最终会被放入 ServletConfig 实现类对象中。DispatcherServlet 通过 ServletConfig 接口中的方法,就能获取到 contextConfigLocation 对应的值。
DispatcherServlet 类图
红色框是 Servlet 中的接口和类,蓝色框中则是 Spring 中的接口和类
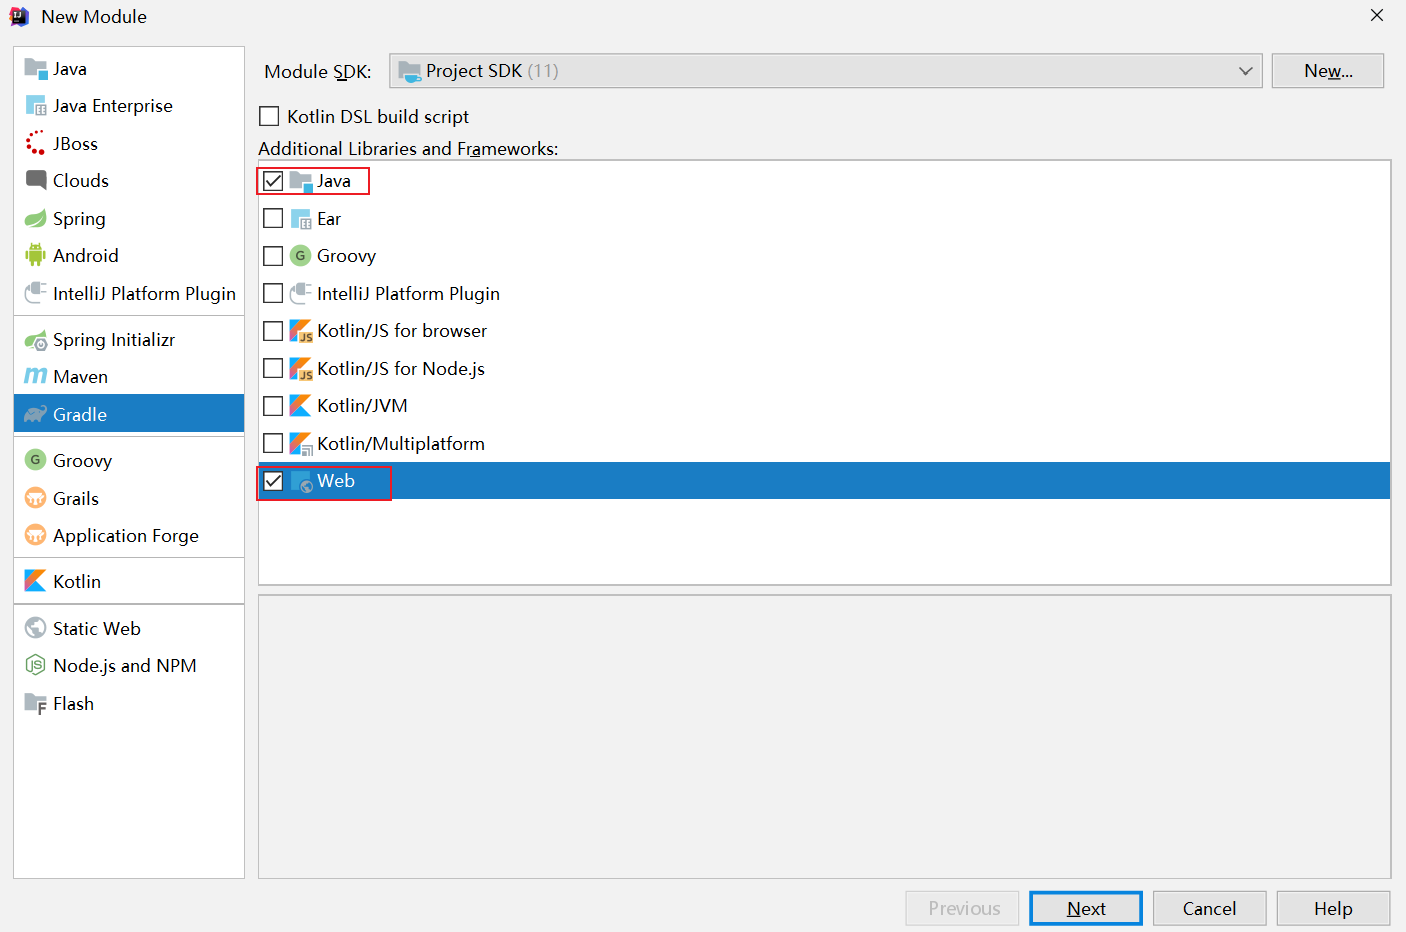
SpringMVC源码环境构建
基于Gradle新建Module(构建web工程,勾选Java & Web)
填写包信息
工程缺少web.xml

生成web.xml

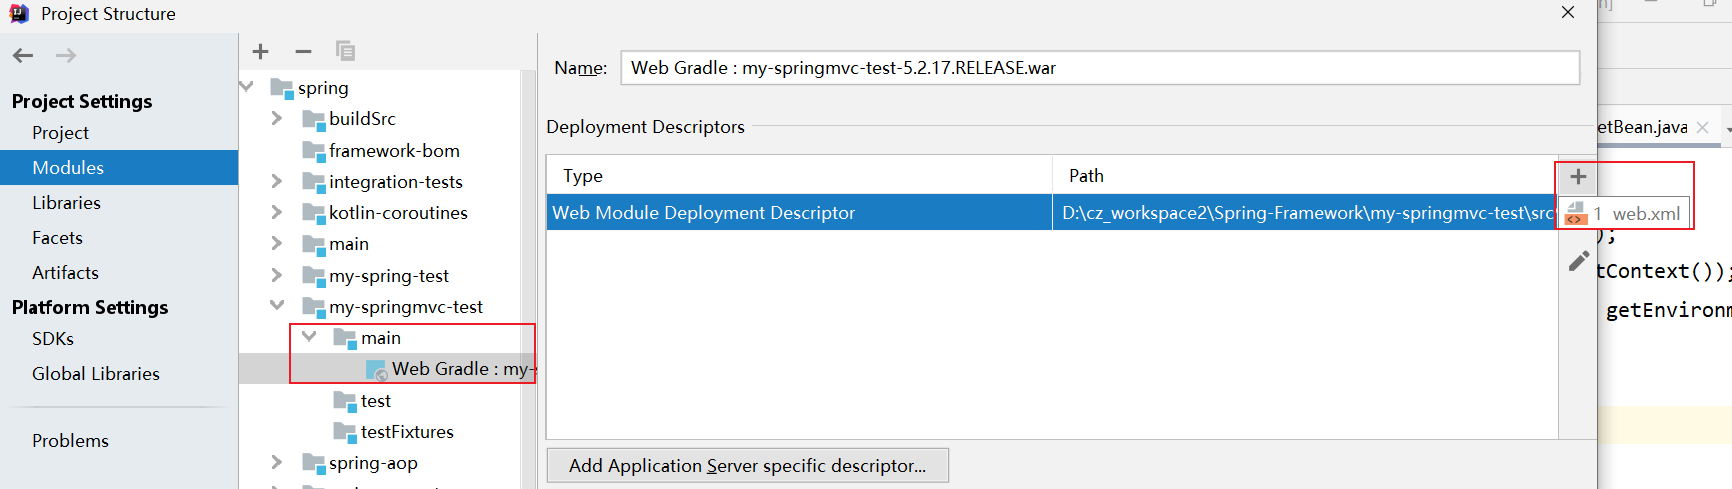
生成web.xml到webapp目录下
build.gradle
plugins {id 'java'id 'war'}group 'com.demo'
version '5.2.17.RELEASE'sourceCompatibility = 1.8repositories {mavenCentral()
}// tomcat: 以下配置会在第一次启动时下载插件二进制文件
//在项目根目录中执行gradle tomcatRun// 配置阿里源
allprojects {repositories {maven{ url 'http://maven.aliyun.com/nexus/content/groups/public/'}}
}dependencies {compile(project(':spring-context'))compile(project(':spring-aop'))compile(project(':spring-webmvc'))compile(project(':spring-web'))compile(project(':spring-test'))compile 'org.aspectj:aspectjweaver:1.9.2'testCompile group: 'junit', name: 'junit', version: '4.12'
}// UTF-8
tasks.withType(JavaCompile) {options.encoding = "UTF-8"
}
创建TestService
package com.demo.service;import org.springframework.stereotype.Service;@Service
public class TestService {public void testService(){System.out.println("testService");}}
创建TestController
@Controller
@RequestMapping("/test")
public class TestController {@Autowiredprivate TestService testService;@RequestMapping("/handle01")public String handle01(Integer id, String name, Model model){// 1.调用service方法testService.testService();System.out.println(id);System.out.println(name);// 2.model中存值model.addAttribute("name","子慕");return "success";}}
success.jsp
<%--Created by IntelliJ IDEA.User: EricDate: 2021/10/28Time: 10:38To change this template use File | Settings | File Templates.
--%>
<%@ page contentType="text/html;charset=UTF-8" language="java" %>
<html><head><title>$Title$</title></head><body>SpringMVC 源码环境构建成功..授课老师: ${userName}</body>
</html>
applicationContext.xml
<beans xmlns="http://www.springframework.org/schema/beans"xmlns:mvc="http://www.springframework.org/schema/mvc"xmlns:context="http://www.springframework.org/schema/context"xmlns:xsi="http://www.w3.org/2001/XMLSchema-instance"xsi:schemaLocation="http://www.springframework.org/schema/beanshttp://www.springframework.org/schema/beans/spring-beans.xsdhttp://www.springframework.org/schema/mvchttp://www.springframework.org/schema/mvc/spring-mvc.xsdhttp://www.springframework.org/schema/contexthttp://www.springframework.org/schema/context/spring-context.xsd"><!-- 开启注解扫描 --><context:component-scan base-package="com.demo.service"/></beans>
spring-mvc.xml
<beans xmlns="http://www.springframework.org/schema/beans"xmlns:mvc="http://www.springframework.org/schema/mvc"xmlns:context="http://www.springframework.org/schema/context"xmlns:xsi="http://www.w3.org/2001/XMLSchema-instance"xsi:schemaLocation="http://www.springframework.org/schema/beanshttp://www.springframework.org/schema/beans/spring-beans.xsdhttp://www.springframework.org/schema/mvchttp://www.springframework.org/schema/mvc/spring-mvc.xsdhttp://www.springframework.org/schema/contexthttp://www.springframework.org/schema/context/spring-context.xsd"><!-- 开启注解扫描 --><context:component-scan base-package="com.demo.controller"/><!-- 视图解析器对象 --><bean id="internalResourceViewResolver" class="org.springframework.web.servlet.view.InternalResourceViewResolver"><property name = "prefix" value="/WEB-INF/pages/"></property<property name="suffix" value=".jsp"/></bean><!-- 开启SpringMVC框架注解的支持 --><mvc:annotation-driven/><!--静态资源(js、image等)的访问--><mvc:default-servlet-handler/></beans>
webapp/WEB-INF/web.xml
<?xml version="1.0" encoding="UTF-8"?>
<web-app xmlns="http://xmlns.jcp.org/xml/ns/javaee"xmlns:xsi="http://www.w3.org/2001/XMLSchema-instance"xsi:schemaLocation="http://xmlns.jcp.org/xml/ns/javaee http://xmlns.jcp.org/xml/ns/javaee/web-app_4_0.xsd"version="4.0"><!--spring监听器--><context-param><param-name>contextConfigLocation</param-name><param-value>classpath:applicationContext.xml</param-value></context-param><listener><listener-class>org.springframework.web.context.ContextLoaderListener</listener-class></listener><!--springmvc前端控制器--><servlet><servlet-name>dispatcherServlet</servlet-name><servlet-class>org.springframework.web.servlet.DispatcherServlet</servlet-class><init-param><param-name>contextConfigLocation</param-name><param-value>classpath:spring-mvc.xml</param-value></init-param><!--该servelt随容器启动实例化--><load-on-startup>2</load-on-startup></servlet><servlet-mapping><servlet-name>dispatcherServlet</servlet-name><url-pattern>/test/hello</url-pattern></servlet-mapping></web-app>
部署到Tomcat,发布项目

源码剖析-根容器初始化【父容器】
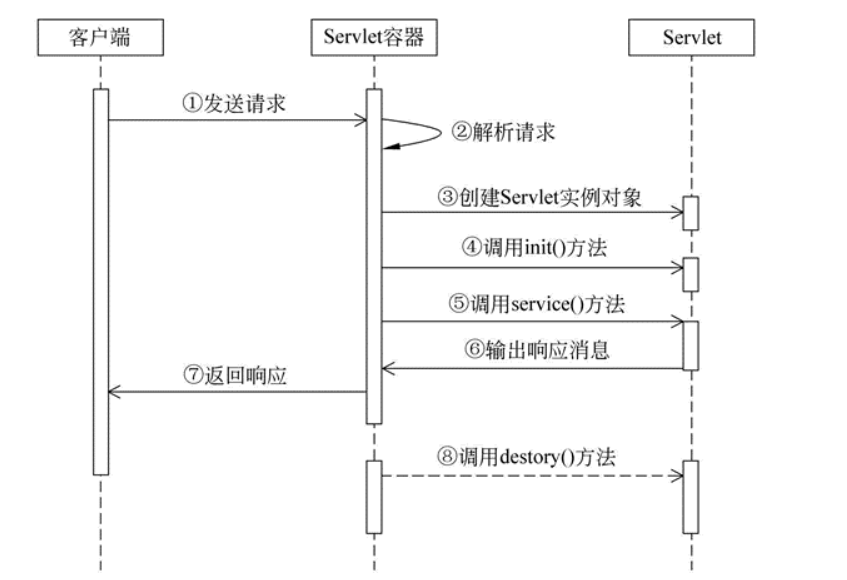
Web应用部署初始化过程 (Web Application Deployement)
参考Oracle官方文档,可知Web应用部署的相关步骤如下:
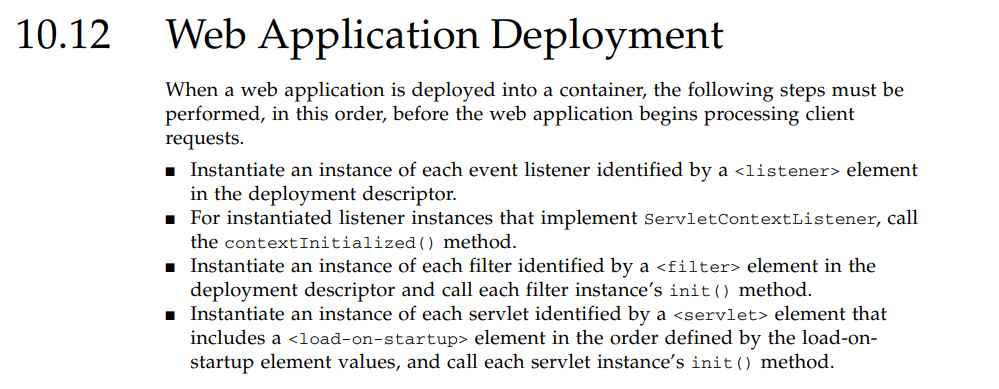
通过上述官方文档的描述,可绘制如下Web应用部署初始化流程执行图。
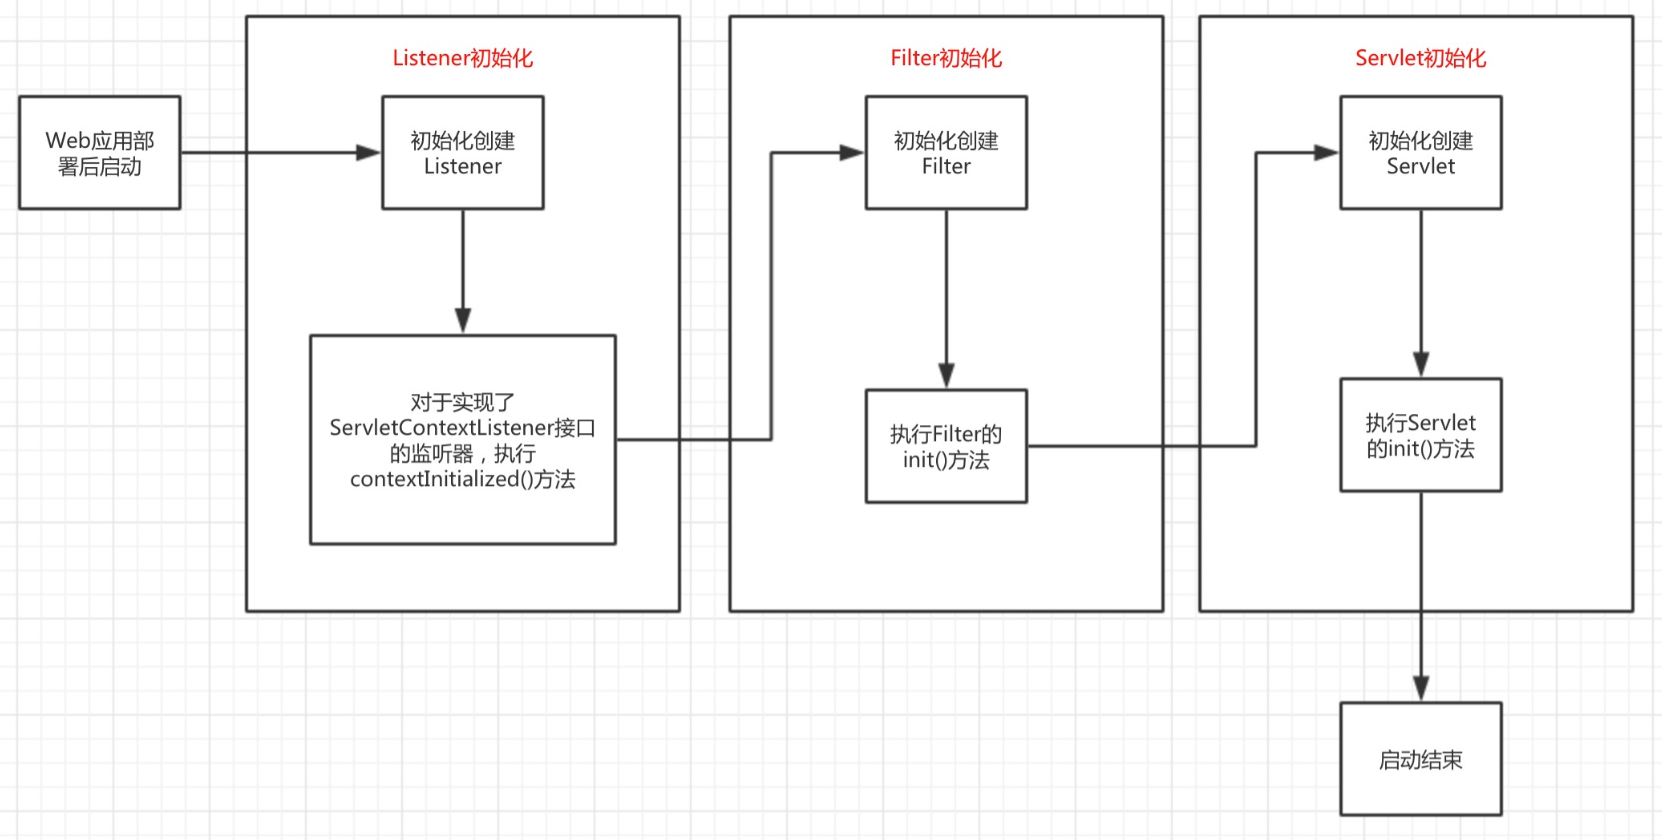
可以发现,在tomcat下web应用的初始化流程是,先初始化listener接着初始化filter最后初始化servlet,当我们清楚认识到Web应用部署到容器后的初始化过程后,就可以进一步深入探讨SpringMVC的启动过程。
web.xml配置进行Spring MVC启动过程的分析,web.xml配置内容如下:
<?xml version="1.0" encoding="UTF-8"?>
<web-app xmlns="http://xmlns.jcp.org/xml/ns/javaee"xmlns:xsi="http://www.w3.org/2001/XMLSchema-instance"xsi:schemaLocation="http://xmlns.jcp.org/xml/ns/javaee http://xmlns.jcp.org/xml/ns/javaee/web-app_4_0.xsd"version="4.0"><!--spring监听器--><context-param><param-name>contextConfigLocation</param-name><param-value>classpath:applicationContext.xml</param-value></context-param><listener><listener-class>org.springframework.web.context.ContextLoaderListener</listener-class></listener><!--springmvc前端控制器--><servlet><servlet-name>dispatcherServlet</servlet-name><servlet-class>org.springframework.web.servlet.DispatcherServlet</servlet-class><init-param><param-name>contextConfigLocation</param-name><param-value>classpath:spring-mvc.xml</param-value></init-param><!--该servelt随容器启动实例化--><load-on-startup>2</load-on-startup></servlet><servlet-mapping><servlet-name>dispatcherServlet</servlet-name><url-pattern>/test/hello</url-pattern></servlet-mapping></web-app>
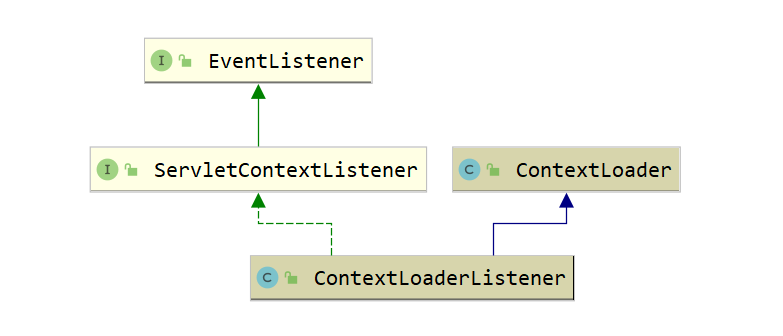
ContextLoaderListener的初始化过程
首先定义了<context-param>标签,用于配置一个全局变量,<context-param>标签的内容读取后会被放进application中,做为Web应用的全局变量使用,接下来创建listener时会使用到这个全局变量,因此,Web应用在容器中部署后,进行初始化时会先读取这个全局变量,之后再进行上述讲解的初始化启动过程。
接着定义了一个ContextLoaderListener类的listener。查看ContextLoaderListener的类声明源码如下图:
ServletContextListener接口源码:
public interface ServletContextListener extends java.util.EventListener {void contextInitialized(javax.servlet.ServletContextEvent servletContextEvent);void contextDestroyed(javax.servlet.ServletContextEvent servletContextEvent);
}
该接口只有两个方法contextInitialized和contextDestroyed,这里采用的是观察者模式,也称为为订阅-发布模式,实现了该接口的listener会向发布者进行订阅,当Web应用初始化或销毁时会分别调用上述两个方法。
继续看ContextLoaderListener,该listener实现了ServletContextListener接口,因此在Web应用初始化时会调用该方法,该方法的具体实现如下:
/*** Initialize the root web application context.*/@Overridepublic void contextInitialized(ServletContextEvent event) {initWebApplicationContext(event.getServletContext());}
ContextLoaderListener的contextInitialized()方法直接调用了initWebApplicationContext()方法,这个方法是继承自ContextLoader类,通过函数名可以知道,该方法是用于初始化Web应用上下文,即IoC容器,这里使用的是代理模式,继续查看ContextLoader类的initWebApplicationContext()方法的源码如下:
1. ⭐Web应用上下文环境创建简析
public WebApplicationContext initWebApplicationContext(ServletContext servletContext) {if (servletContext.getAttribute(WebApplicationContext.ROOT_WEB_APPLICATION_CONTEXT_ATTRIBUTE) != null) {throw new IllegalStateException("Cannot initialize context because there is already a root application context present - " +"check whether you have multiple ContextLoader* definitions in your web.xml!");}servletContext.log("Initializing Spring root WebApplicationContext");Log logger = LogFactory.getLog(ContextLoader.class);if (logger.isInfoEnabled()) {logger.info("Root WebApplicationContext: initialization started");}long startTime = System.currentTimeMillis();try {// 将上下文存储在本地实例变量中,以确保它在ServletContext关闭时可用。// Store context in local instance variable, to guarantee that it is available on ServletContext shutdown.if (this.context == null) {// 1.创建web应用上线文环境this.context = createWebApplicationContext(servletContext);}if (this.context instanceof ConfigurableWebApplicationContext) {ConfigurableWebApplicationContext cwac = (ConfigurableWebApplicationContext) this.context;// 如果当前上下文环境未激活,那么其只能提供例如设置父上下文、设置上下文id等功能if (!cwac.isActive()) {// The context has not yet been refreshed -> provide services such as// setting the parent context, setting the application context id, etcif (cwac.getParent() == null) {// The context instance was injected without an explicit parent ->// determine parent for root web application context, if any.ApplicationContext parent = loadParentContext(servletContext);cwac.setParent(parent);}// 2.配置并刷新当前上下文环境configureAndRefreshWebApplicationContext(cwac, servletContext);}}// 将当前上下文环境存储到ROOT_WEB_APPLICATION_CONTEXT_ATTRIBUTE变量中servletContext.setAttribute(WebApplicationContext.ROOT_WEB_APPLICATION_CONTEXT_ATTRIBUTE, this.context);ClassLoader ccl = Thread.currentThread().getContextClassLoader();if (ccl == ContextLoader.class.getClassLoader()) {currentContext = this.context;}else if (ccl != null) {currentContextPerThread.put(ccl, this.context);}if (logger.isInfoEnabled()) {long elapsedTime = System.currentTimeMillis() - startTime;logger.info("Root WebApplicationContext initialized in " + elapsedTime + " ms");}return this.context;}catch (RuntimeException | Error ex) {logger.error("Context initialization failed", ex);servletContext.setAttribute(WebApplicationContext.ROOT_WEB_APPLICATION_CONTEXT_ATTRIBUTE, ex);throw ex;}
}
2. 创建web应用上线文环境
/*** 为当前类加载器实例化根WebApplicationContext,可以是默认上线文加载类或者自定义上线文加载类*/
protected WebApplicationContext createWebApplicationContext(ServletContext sc) {// 1.确定实例化WebApplicationContext所需的类Class<?> contextClass = determineContextClass(sc);if (!ConfigurableWebApplicationContext.class.isAssignableFrom(contextClass)) {throw new ApplicationContextException("Custom context class [" + contextClass.getName() +"] is not of type [" + ConfigurableWebApplicationContext.class.getName() + "]");}// 2.实例化得到的WebApplicationContext类return (ConfigurableWebApplicationContext) BeanUtils.instantiateClass(contextClass);
}
逻辑很简单,得到一个类,将其实例化。
那么要得到或者明确哪个类呢? 继续看代码:
/*** 返回WebApplicationContext(web应用上线文环境)实现类* 如果没有自定义默认返回XmlWebApplicationContext类** 两种方式:* 1。非自定义:通过ContextLoader类的静态代码块加载ContextLoader.properties配置文件并解析,该配置文件中的默认类即XmlWebApplicationContext* 2。自定义: 通过在web.xml文件中,配置context-param节点,并配置param-name为contextClass的自己点,如* <context-param>* <param-name>contextClass</param-name>* <param-value>org.springframework.web.context.support.MyWebApplicationContext</param-value>* </context-param>** Return the WebApplicationContext implementation class to use, either the* default XmlWebApplicationContext or a custom context class if specified.* @param servletContext current servlet context* @return the WebApplicationContext implementation class to use* @see #CONTEXT_CLASS_PARAM* @see org.springframework.web.context.support.XmlWebApplicationContext*/
protected Class<?> determineContextClass(ServletContext servletContext) {String contextClassName = servletContext.getInitParameter(CONTEXT_CLASS_PARAM);// 1.自定义if (contextClassName != null) {try {return ClassUtils.forName(contextClassName, ClassUtils.getDefaultClassLoader());}catch (ClassNotFoundException ex) {throw new ApplicationContextException("Failed to load custom context class [" + contextClassName + "]", ex);}}// 2.默认else {// 根据静态代码块的加载这里 contextClassName = XmlWebApplicationContextcontextClassName = defaultStrategies.getProperty(WebApplicationContext.class.getName());try {return ClassUtils.forName(contextClassName, ContextLoader.class.getClassLoader());}catch (ClassNotFoundException ex) {throw new ApplicationContextException("Failed to load default context class [" + contextClassName + "]", ex);}}
}
自定义方式注释里已经写的很清晰了,我们来看默认方式,这里涉及到了一个静态变量defaultStrategies,并在下面的静态代码块中对其进行了初始化操作:
private static final String DEFAULT_STRATEGIES_PATH = "ContextLoader.properties";private static final Properties defaultStrategies;/*** 静态代码加载默认策略,即默认的web应用上下文* DEFAULT_STRATEGIES_PATH --> ContextLoader.properties** org.springframework.web.context.WebApplicationContext=org.springframework.web.context.support.XmlWebApplicationContext*/
static {// Load default strategy implementations from properties file.// This is currently strictly internal and not meant to be customized by application developers.try {ClassPathResource resource = new ClassPathResource(DEFAULT_STRATEGIES_PATH, ContextLoader.class);defaultStrategies = PropertiesLoaderUtils.loadProperties(resource);}catch (IOException ex) {throw new IllegalStateException("Could not load 'ContextLoader.properties': " + ex.getMessage());}
}
这段代码对ContextLoader.properties进行了解析,那么ContextLoader.properties中存储的内容是什么呢?
# Default WebApplicationContext implementation class for ContextLoader.
# Used as fallback when no explicit context implementation has been specified as context-param.
# Not meant to be customized by application developers.org.springframework.web.context.WebApplicationContext=org.springframework.web.context.support.XmlWebApplicationContext
很简单,通过上面的操作,我们就可以确定contextClassName是XmlWebApplicationContext,跟我们之前分析的ApplicationContext差不多,只是在其基础上又提供了对web的支持。接下来通过BeanUtils.instantiateClass(contextClass)将其实例化即可。
initWebApplicationContext()方法如上注解讲述,主要目的就是创建root WebApplicationContext对象即根IoC容器,其中比较重要的就是,整个Web应用如果存在根IoC容器则有且只能有一个,根IoC容器作为全局变量存储在ServletContext即application对象中。将根IoC容器放入到application对象之前进行了IoC容器的配置和刷新操作,调用了configureAndRefreshWebApplicationContext()方法,该方法源码如下:
configureAndRefreshWebApplicationContext();
/*** 配置并刷新当前web应用上下文*/
protected void configureAndRefreshWebApplicationContext(ConfigurableWebApplicationContext wac, ServletContext sc) {/*** 1.配置应用程序上下文id* 如果当前应用程序上下文id仍然设置为其原始默认值,则尝试为其设置自定义上下文id,如果有的话。* 在web.xml中配置* <context-param>* <param-name>contextId</param-name>* <param-value>jack-2019-01-02</param-value>* </context-param>*/if (ObjectUtils.identityToString(wac).equals(wac.getId())) {String idParam = sc.getInitParameter(CONTEXT_ID_PARAM);if (idParam != null) {wac.setId(idParam);}// 无自定义id则为其生成默认idelse {wac.setId(ConfigurableWebApplicationContext.APPLICATION_CONTEXT_ID_PREFIX +ObjectUtils.getDisplayString(sc.getContextPath()));}}wac.setServletContext(sc);/*** 2.设置配置文件路径,如* <context-param>* <param-name>contextConfigLocation</param-name>* <param-value>classpath:spring-context.xml</param-value>* </context-param>*/String configLocationParam = sc.getInitParameter(CONFIG_LOCATION_PARAM);if (configLocationParam != null) {wac.setConfigLocation(configLocationParam);}// The wac environment's #initPropertySources will be called in any case when the context// is refreshed; do it eagerly here to ensure servlet property sources are in place for// use in any post-processing or initialization that occurs below prior to #refresh// 3.创建ConfigurableEnvironment并配置初始化参数ConfigurableEnvironment env = wac.getEnvironment();if (env instanceof ConfigurableWebEnvironment) {((ConfigurableWebEnvironment) env).initPropertySources(sc, null);}// 4.自定义配置上下文环境customizeContext(sc, wac);// 5.刷新上下文环境wac.refresh();
}
比较重要的就是获取到了web.xml中的<context-param>标签配置的全局变量contextConfigLocation,并最后一行调用了refresh()方法,ConfigurableWebApplicationContext是一个接口,通过对常用实现类ClassPathXmlApplicationContext逐层查找后可以找到一个抽象类AbstractApplicationContext实现了refresh()方法
📌refresh();
public void refresh() throws BeansException, IllegalStateException {synchronized (this.startupShutdownMonitor) {// 1、准备刷新上下文环境prepareRefresh();// 2、读取xml并初始化BeanFactoryConfigurableListableBeanFactory beanFactory = obtainFreshBeanFactory();// 3、填充BeanFactory功能prepareBeanFactory(beanFactory);try {// 4、子类覆盖方法额外处理(空方法)postProcessBeanFactory(beanFactory);// 5、调用BeanFactoryPostProcessorinvokeBeanFactoryPostProcessors(beanFactory);// 6、注册BeanPostProcessorsregisterBeanPostProcessors(beanFactory);// 7、初始化Message资源initMessageSource();// 8、初始事件广播器initApplicationEventMulticaster();// 9、留给子类初始化其他Bean(空的模板方法)onRefresh();// 10、注册事件监听器registerListeners();// 11、初始化其他的单例Bean(非延迟加载的)finishBeanFactoryInitialization(beanFactory);// 12、完成刷新过程,通知生命周期处理器lifecycleProcessor刷新过程,同时发出ContextRefreshEvent通知finishRefresh();}catch (BeansException ex) {// 13、销毁已经创建的BeandestroyBeans();// 14、重置容器激活标签cancelRefresh(ex);throw ex;}finally {resetCommonCaches();}}
}
该方法主要用于创建并初始化contextConfigLocation类配置的xml文件中的Bean,因此,如果我们在配置Bean时出错,在Web应用启动时就会抛出异常,而不是等到运行时才抛出异常。
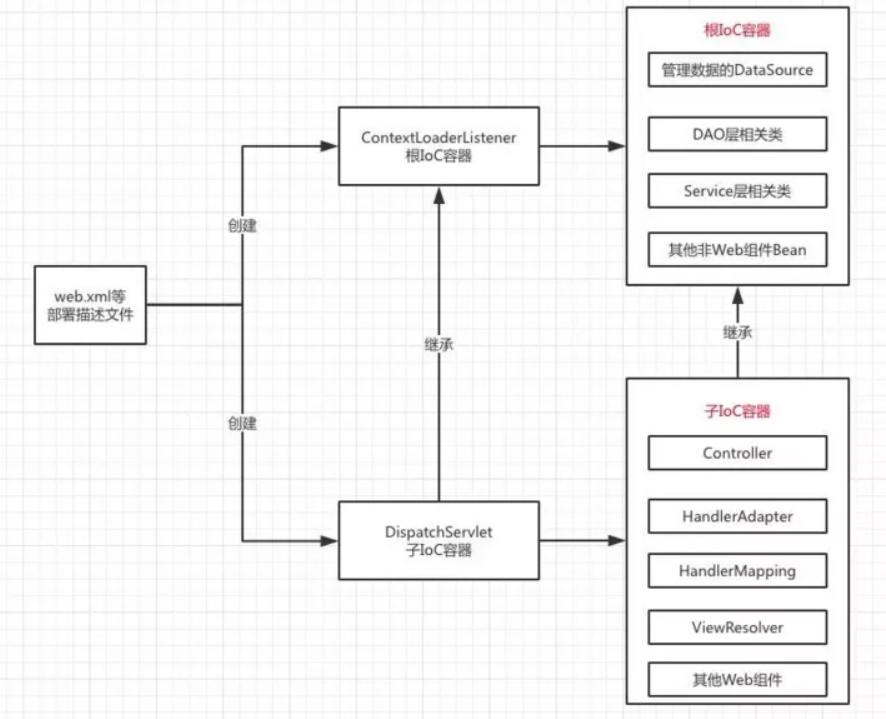
整个ContextLoaderListener类的启动过程到此就结束了,可以发现,创建ContextLoaderListener是比较核心的一个步骤,主要工作就是为了创建根IoC容器并使用特定的key将其放入到application对象中,供整个Web应用使用,由于在ContextLoaderListener类中构造的根IoC容器配置的Bean是全局共享的,因此,在<context-param>标识的contextConfigLocation的xml配置文件一般包括:数据库DataSource、DAO层、Service层、事务等相关Bean。
源码剖析-DispatcherServlet初始化【子容器&9大组件】
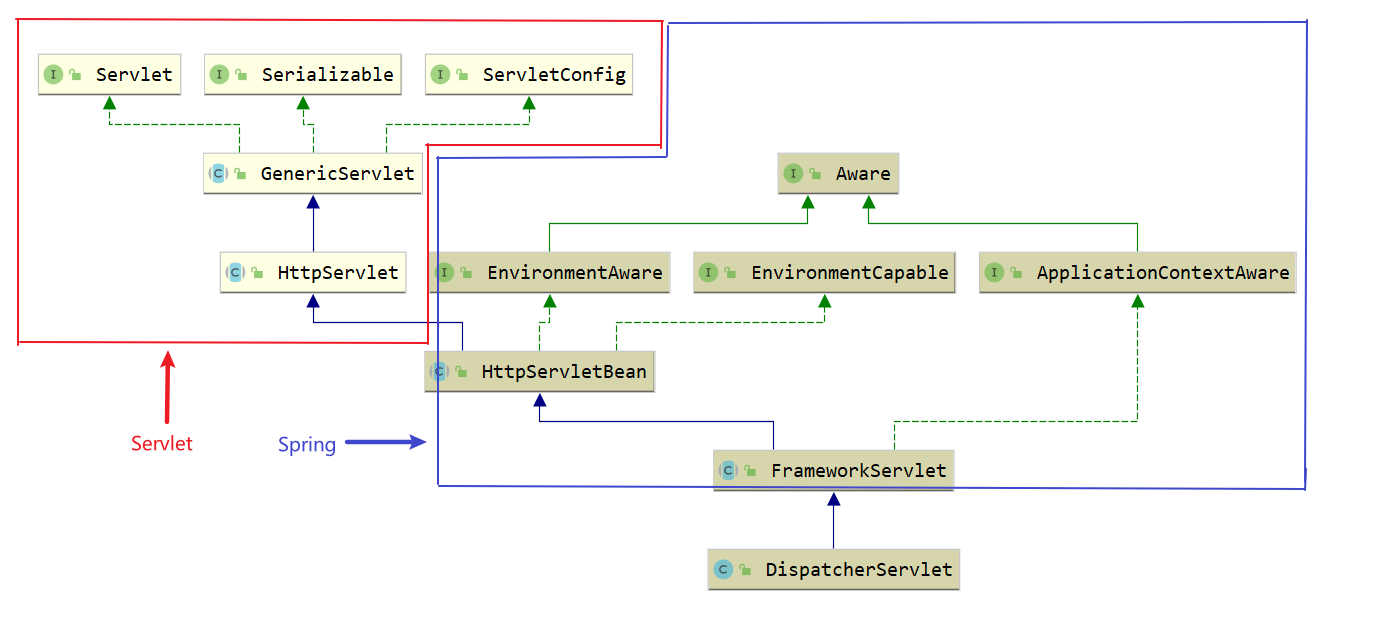
1.DispatcherServlet类图
Web应用启动的最后一个步骤就是创建和初始化相关Servlet,我们配置了DispatcherServlet类前端控制器,前端控制器作为中央控制器是整个Web应用的核心,用于获取分发用户请求并返回响应。
其类图如下所示:
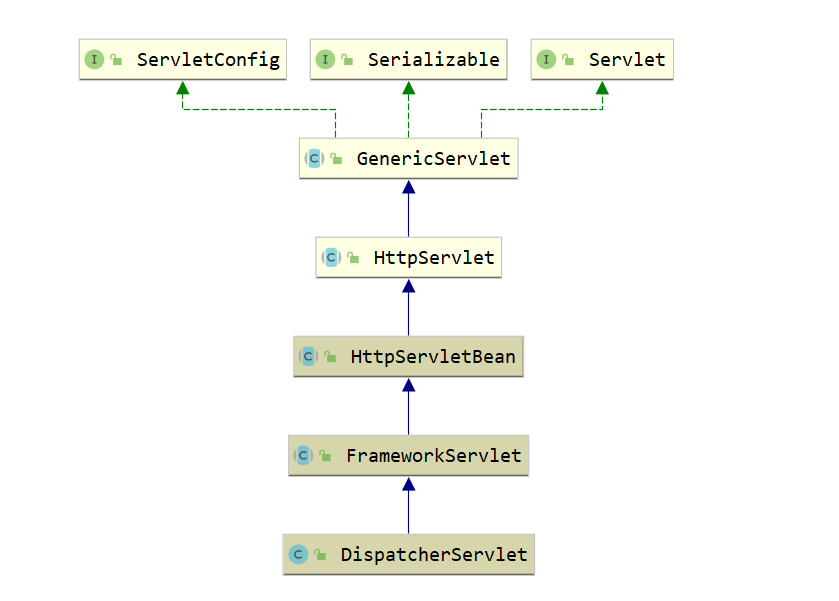
通过类图可以看出DispatcherServlet类的间接父类实现了Servlet接口,因此其本质上依旧是一个Servlet
📌⭐2.HttpServletBean初始化
DispatcherServelt类的本质是Servlet,所以在Web应用部署到容器后进行Servlet初始化时会调用相关的init(ServletConfig)方法,因此,DispatchServlet类的初始化过程也由该方法开始:
(注意:DispatcherServelt 没有init方法,会走到父类HttpServletBean的init方法)
/*** DispatcherServlet 初始化入口* Map config parameters onto bean properties of this servlet, and* invoke subclass initialization.* @throws ServletException if bean properties are invalid (or required* properties are missing), or if subclass initialization fails.*/
@Override
public final void init() throws ServletException {// Set bean properties from init parameters./*** 1.加载初始化参数,如:* <servlet>* <servlet-name>example</servlet-name>* <servlet-class>org.springframework.web.servlet.DispatcherServlet</servlet-class>* <init-param>* <param-name>name</param-name>* <param-value>jack</param-value>* </init-param>* <load-on-startup>1</load-on-startup>* </servlet>* 这里会解析init-param列表。*/PropertyValues pvs = new ServletConfigPropertyValues(getServletConfig(), this.requiredProperties);if (!pvs.isEmpty()) {try {BeanWrapper bw = PropertyAccessorFactory.forBeanPropertyAccess(this);ResourceLoader resourceLoader = new ServletContextResourceLoader(getServletContext());bw.registerCustomEditor(Resource.class, new ResourceEditor(resourceLoader, getEnvironment()));initBeanWrapper(bw);bw.setPropertyValues(pvs, true);}catch (BeansException ex) {if (logger.isErrorEnabled()) {logger.error("Failed to set bean properties on servlet '" + getServletName() + "'", ex);}throw ex;}}// Let subclasses do whatever initialization they like.// 2.留给子类覆盖的模板方法initServletBean();
}
该方法最主要的作用就是初始化init-param,如果我们没有配置任何init-param,那么该方法不会执行任何操作。从这里我们没有拿到有用的信息,但是在该方法结尾有initServletBean(),这是一个模板方法,可以由子类来实现,那么接下来我们就去看其子类FrameworkServlet中的initServletBean
📌3.FrameworkServlet初始化
继续查看 initServletBean()。父类 FrameworkServlet 覆盖了 HttpServletBean 中的 initServletBean 函数,如下:
protected void initServletBean() throws ServletException {
}
protected final void initServletBean() throws ServletException {getServletContext().log("Initializing Spring " + getClass().getSimpleName() + " '" + getServletName() + "'");if (logger.isInfoEnabled()) {logger.info("Initializing Servlet '" + getServletName() + "'");}long startTime = System.currentTimeMillis();try {// 为当前servlet初始化web应用上下文this.webApplicationContext = initWebApplicationContext();// 空的模板方法initFrameworkServlet();}catch (ServletException | RuntimeException ex) {logger.error("Context initialization failed", ex);throw ex;}if (logger.isDebugEnabled()) {String value = this.enableLoggingRequestDetails ?"shown which may lead to unsafe logging of potentially sensitive data" :"masked to prevent unsafe logging of potentially sensitive data";logger.debug("enableLoggingRequestDetails='" + this.enableLoggingRequestDetails +"': request parameters and headers will be " + value);}if (logger.isInfoEnabled()) {logger.info("Completed initialization in " + (System.currentTimeMillis() - startTime) + " ms");}
}
protected WebApplicationContext initWebApplicationContext() {// 获取rootContext,该Context就是通过ContextLoaderListener创建的XmlWebApplicationContextWebApplicationContext rootContext = WebApplicationContextUtils.getWebApplicationContext(getServletContext());WebApplicationContext wac = null;// 如果当前webApplicationContext不为null,则为其设置父容器if (this.webApplicationContext != null) {// A context instance was injected at construction time -> use itwac = this.webApplicationContext;if (wac instanceof ConfigurableWebApplicationContext) {ConfigurableWebApplicationContext cwac = (ConfigurableWebApplicationContext) wac;if (!cwac.isActive()) {// The context has not yet been refreshed -> provide services such as// setting the parent context, setting the application context id, etcif (cwac.getParent() == null) {// The context instance was injected without an explicit parent -> set// the root application context (if any; may be null) as the parentcwac.setParent(rootContext);}configureAndRefreshWebApplicationContext(cwac);}}}// 未能通过构造函数注入,则尝试去ServletContext容器中查找有无WebApplicationContextif (wac == null) {// No context instance was injected at construction time -> see if one// has been registered in the servlet context. If one exists, it is assumed// that the parent context (if any) has already been set and that the// user has performed any initialization such as setting the context idwac = findWebApplicationContext();}// 以上均无WebApplicationContext,则创建一个新的WebApplicationContextif (wac == null) {// No context instance is defined for this servlet -> create a local onewac = createWebApplicationContext(rootContext);}// 刷新上下文容器,空的模板方法,留给子类实现if (!this.refreshEventReceived) {// Either the context is not a ConfigurableApplicationContext with refresh// support or the context injected at construction time had already been// refreshed -> trigger initial onRefresh manually here.onRefresh(wac);}if (this.publishContext) {// Publish the context as a servlet context attribute.String attrName = getServletContextAttributeName();getServletContext().setAttribute(attrName, wac);}return wac;
}
通过函数名不难发现,该方法的主要作用同样是创建一个WebApplicationContext对象,即Ioc容器,不过前面讲过每个Web应用最多只能存在一个根IoC容器,这里创建的则是特定Servlet拥有的子IoC容器
为什么需要多个IOC容器呢?
答:父子容器类似于类的继承关系,子类可以访问父类中的成员变量,而父类不可访问子类的成员变量,同样的,子容器可以访问父容器中定义的Bean,但父容器无法访问子容器定义的Bean。
根IoC容器做为全局共享的IoC容器放入Web应用需要共享的Bean,而子IoC容器根据需求的不同,放入不同的Bean,这样能够做到隔离,保证系统的安全性。
DispatcherServlet类的子IoC容器创建过程,如果当前Servlet存在一个IoC容器则为其设置根IoC容器作为其父类,并配置刷新该容器,用于构造其定义的Bean,这里的方法与前文讲述的根IoC容器类似,同样会读取用户在web.xml中配置的中的值,用于查找相关的xml配置文件用于构造定义的Bean,这里不再赘述了。如果当前Servlet不存在一个子IoC容器就去查找一个,如果仍然没有查找到则调用 createWebApplicationContext()方法去创建一个,查看该方法的源码如下图所示:
protected WebApplicationContext createWebApplicationContext(@Nullable WebApplicationContext parent) {return createWebApplicationContext((ApplicationContext) parent);
}protected WebApplicationContext createWebApplicationContext(@Nullable ApplicationContext parent) {Class<?> contextClass = getContextClass();if (!ConfigurableWebApplicationContext.class.isAssignableFrom(contextClass)) {throw new ApplicationContextException("Fatal initialization error in servlet with name '" + getServletName() +"': custom WebApplicationContext class [" + contextClass.getName() +"] is not of type ConfigurableWebApplicationContext");}ConfigurableWebApplicationContext wac = (ConfigurableWebApplicationContext) BeanUtils.instantiateClass(contextClass);wac.setEnvironment(getEnvironment());wac.setParent(parent);String configLocation = getContextConfigLocation();if (configLocation != null) {wac.setConfigLocation(configLocation);}configureAndRefreshWebApplicationContext(wac);return wac;
}
该方法用于创建一个子IoC容器并将根IoC容器做为其父容器,接着进行配置和刷新操作用于构造相关的Bean。至此,根IoC容器以及相关Servlet的子IoC容器已经配置完成,子容器中管理的Bean一般只被该Servlet使用,因此,其中管理的Bean一般是“局部”的,如SpringMVC中需要的各种重要组件,包括Controller、Interceptor、Converter、ExceptionResolver等。相关关系如下图所示:
4.DispatcherServlet初始化
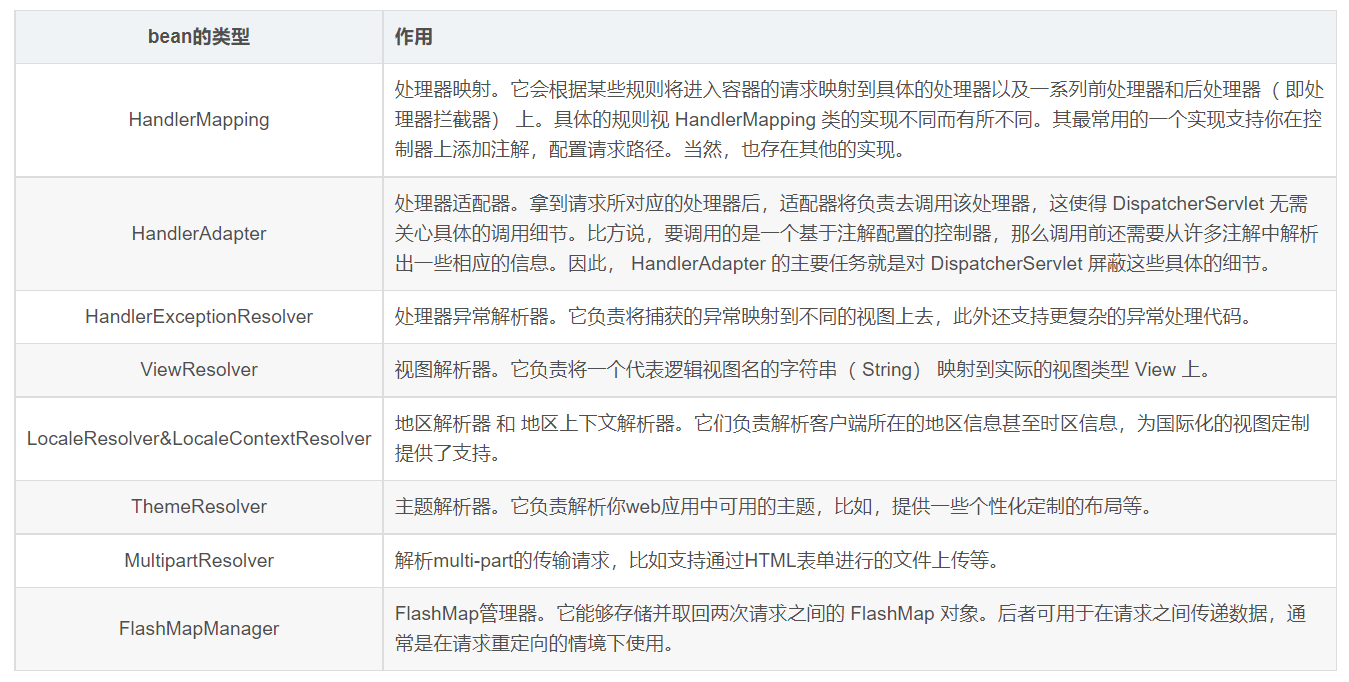
了解DispatcherServlet之前,先回顾一下DispatcherServlet的内置组件及其作用。
📌DispatcherServlet#onRefresh();
当IoC子容器构造完成后调用了onRefresh()方法,该方法的调用与initServletBean()方法的调用相同,由父类调用但具体实现由子类覆盖,调用onRefresh()方法时将前文创建的IoC子容器作为参数传入,查看DispatcherServletBean类的onRefresh()方法源码如下:
@Overrideprotected void onRefresh(ApplicationContext context) {initStrategies(context);}protected void initStrategies(ApplicationContext context) {// 1.初始化 MultipartResolverinitMultipartResolver(context);// 2.初始化 LocaleResolverinitLocaleResolver(context);// 3.初始化 ThemeResolverinitThemeResolver(context);// 4.初始化 HandlerMappingsinitHandlerMappings(context);// 5.初始化 HandlerAdaptersinitHandlerAdapters(context);// 6.初始化 HandlerExceptionResolverinitHandlerExceptionResolvers(context);// 7.初始化 RequestToViewNameTranslatorinitRequestToViewNameTranslator(context);// 8.初始化 ViewResolversinitViewResolvers(context);// 9.初始化 FlashMapManagerinitFlashMapManager(context);}
onRefresh()方法直接调用了initStrategies()方法,源码如上,通过函数名可以判断,该方法用于初始化创建multipartResovle来支持图片等文件的上传、本地化解析器、主题解析器、HandlerMapping处理器映射器、HandlerAdapter处理器适配器、异常解析器、视图解析器、flashMap管理器等,这些组件都是SpringMVC开发中的重要组件,相关组件的初始化创建过程均在此完成。
重点:initHandlerMappings
Handler : 绑定了注解@RequestMapping和@Controller的类
HandlerMethod:就是Handler下某个绑定@RequestMapping注解的方法(GetMapping、PostMapping…等都绑定的有注解@RequestMapping,spring mvc在做注解解析处理生成代理对象等的时候,会做值的合并等处理,所以最终都是用RequestMapping的注解来计算,所以@Controller和@RestController的处理等同)
private void initHandlerMappings(ApplicationContext context) {// 初始化记录 HandlerMapping 对象的属性变量为nullthis.handlerMappings = null;// 根据属性detectAllHandlerMappings决定是检测所有的 HandlerMapping 对象,还是// 使用指定名称的 HandlerMapping 对象if (this.detectAllHandlerMappings) {// Find all HandlerMappings in the ApplicationContext, including ancestor contexts.// 从容器及其祖先容器查找所有类型为 HandlerMapping 的 HandlerMapping 对象,记录到   handlerMappings 并排序Map<String, HandlerMapping> matchingBeans =BeanFactoryUtils.beansOfTypeIncludingAncestors(context, HandlerMapping.class, true, false);if (!matchingBeans.isEmpty()) {this.handlerMappings = new ArrayList<>(matchingBeans.values());// We keep HandlerMappings in sorted order.// We keep HandlerMappings in sorted order.// 排序,关于这里的排序,可以参考   WebMvcConfigurationSupport 类中对各种 HandlerMapping bean// 进行定义时所使用的 order 属性,顺序属性很关键,因为它涉及到 HandlerMapping 使用时的优先级AnnotationAwareOrderComparator.sort(this.handlerMappings);}}else {try {// 获取名称为  handlerMapping 的 HandlerMapping bean 并记录到 handlerMappingsHandlerMapping hm = context.getBean(HANDLER_MAPPING_BEAN_NAME, HandlerMapping.class);this.handlerMappings = Collections.singletonList(hm);}catch (NoSuchBeanDefinitionException ex) {// Ignore, we'll add a default HandlerMapping later.}}// Ensure we have at least one HandlerMapping, by registering// a default HandlerMapping if no other mappings are found.if (this.handlerMappings == null) {// 如果上面步骤从容器获取 HandlerMapping 失败,则使用缺省策略创建 HandlerMapping 对象记录到// handlerMappingsthis.handlerMappings = getDefaultStrategies(context, HandlerMapping.class);if (logger.isTraceEnabled()) {logger.trace("No HandlerMappings declared for servlet '" + getServletName() +"': using default strategies from DispatcherServlet.properties");}}
}

RequestMappingHandlerMapping
这个就是我们常见的基于注解的映射方式,例如:
@Controller
@RequestMapping("/testA")
public class MappingTest1 {@ResponseBody@RequestMapping("/index")public String index(){return "RequestMappingHandlerMapping test!";}
}
springboot在初始化RequestMappingHandlerMapping时,会扫描容器中的bean,判断它上面是否存在@Controller或@RequestMapping两种注解,通过上面的方法,判断该bean是否是一个handler,如果是,则会将其注册到RequestMappingHandlerMapping,用来处理和它匹配的请求
SimpleUrlHandlerMapping
这种方式直接通过简单的url匹配的方式将其映射到一个处理器。首先像容器注册一个自定义的SimpleUrlHandlerMapping
@Configuration
public class MyConfig extends SimpleUrlHandlerMapping{@Beanpublic SimpleUrlHandlerMapping simpleUrlHandlerMapping(){SimpleUrlHandlerMapping simpleUrlHandlerMapping = new SimpleUrlHandlerMapping();Properties properties = new Properties();properties.setProperty("simpleUrl","mappingTest2");simpleUrlHandlerMapping.setMappings(properties);//设置该handlermapping的优先级为1,否则会被默认的覆盖,导致访问无效simpleUrlHandlerMapping.setOrder(1);return simpleUrlHandlerMapping;}
}
定义一个名称为mappingTest2的bean,并实现org.springframework.web.servlet.mvc.Controller接口
@Component("mappingTest2")
public class MappingTest2 implements Controller {@Overridepublic ModelAndView handleRequest(HttpServletRequest request, HttpServletResponse response) throws Exception {response.getWriter().write("SimpleUrlHandlerMapping test!");return null;}
}
在这个例子中,我们访问localhost/simpleUrl就会直接进入容器中名称为mappingTest2的bean的handleRequest方法。
BeanNameUrlHandlerMapping
这个最简单:直接以bean的名称作为访问路径,但有个硬性条件就是bean的名称必须以/开始。
@Component("/mappingTest3")
public class MappingTest3 implements Controller {@Overridepublic ModelAndView handleRequest(HttpServletRequest request, HttpServletResponse response) throws Exception {response.getWriter().write("BeanNameUrlHandlerMapping test!");return null;}
}
HandlerMapping的实现原理
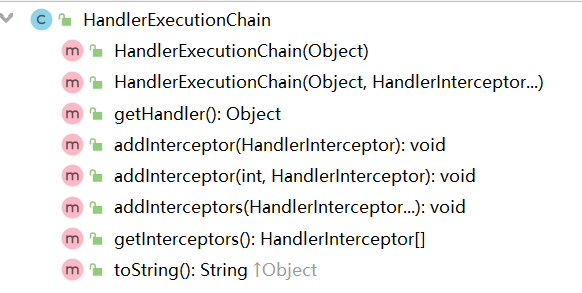
HandlerExecutionChain
HandlerMapping在SpringMVC扮演着相当重要的角色,它可以为HTTP请求找到 对应的Controller控制器

HandlerMapping是一个接口,其中包含一个getHandler方法,能够通过该方法获得与HTTP请求对应的handlerExecutionChain,而这个handlerExecutionChain对象中持有handler和interceptorList,以及和设置拦截器相关的方法。可以判断是同通过这些配置的拦截器对handler对象提供的功能进行了一波增强。
RequestMappingHandlerMapping#afterPropertiesSet
AbstractHandlerMethodMapping中当bean被注入到容器后会执行一系列的初始化过程
public void afterPropertiesSet() {// 创建 BuilderConfigurationthis.config = new RequestMappingInfo.BuilderConfiguration();this.config.setUrlPathHelper(getUrlPathHelper());this.config.setPathMatcher(getPathMatcher());this.config.setSuffixPatternMatch(useSuffixPatternMatch());this.config.setTrailingSlashMatch(useTrailingSlashMatch());this.config.setRegisteredSuffixPatternMatch(useRegisteredSuffixPatternMatch());this.config.setContentNegotiationManager(getContentNegotiationManager());super.afterPropertiesSet();
}
进行HandlerMethod的注册操作,简单来说就是从springMVC的容器中获取所有的beanName,注册url和实现方法HandlerMethod的对应关系。
/*** Scan beans in the ApplicationContext, detect and register handler methods.* @see #isHandler(Class)* @see #getMappingForMethod(Method, Class)* @see #handlerMethodsInitialized(Map)* handlerMethod的注册操作*/protected void initHandlerMethods() {if (logger.isDebugEnabled()) {logger.debug("Looking for request mappings in application context: " + getApplicationContext());}//从springMVC容器中获取所有的beanNameString[] beanNames = (this.detectHandlerMethodsInAncestorContexts ?BeanFactoryUtils.beanNamesForTypeIncludingAncestors(getApplicationContext(), Object.class) :getApplicationContext().getBeanNamesForType(Object.class));//注册从容器中获取的beanNamefor (String beanName : beanNames) {if (!beanName.startsWith(SCOPED_TARGET_NAME_PREFIX)) {Class<?> beanType = null;try {beanType = getApplicationContext().getType(beanName);}catch (Throwable ex) {// An unresolvable bean type, probably from a lazy bean - let's ignore it.if (logger.isDebugEnabled()) {logger.debug("Could not resolve target class for bean with name '" + beanName + "'", ex);}}if (beanType != null && isHandler(beanType)) {detectHandlerMethods(beanName);}}}handlerMethodsInitialized(getHandlerMethods());}
根据beanName进行一系列的注册,最终实现是在registerHandlerMethod
/*** Look for handler methods in a handler.* @param handler the bean name of a handler or a handler instance*/protected void detectHandlerMethods(final Object handler) {// 获取bean实例Class<?> handlerType = (handler instanceof String ?getApplicationContext().getType((String) handler) : handler.getClass());final Class<?> userType = ClassUtils.getUserClass(handlerType);Map<Method, T> methods = MethodIntrospector.selectMethods(userType,创建RequestMappingInfonew MethodIntrospector.MetadataLookup<T>() {@Overridepublic T inspect(Method method) {try {return getMappingForMethod(method, userType);}catch (Throwable ex) {throw new IllegalStateException("Invalid mapping on handler class [" +userType.getName() + "]: " + method, ex);}}});if (logger.isDebugEnabled()) {logger.debug(methods.size() + " request handler methods found on " + userType + ": " + methods);}for (Map.Entry<Method, T> entry : methods.entrySet()) {Method invocableMethod = AopUtils.selectInvocableMethod(entry.getKey(), userType);T mapping = entry.getValue();registerHandlerMethod(handler, invocableMethod, mapping);}}
registerHandlerMethod的注册操作是将beanName,Method及创建的RequestMappingInfo之间的 关系。
/*** Register a handler method and its unique mapping. Invoked at startup for* each detected handler method.* @param handler the bean name of the handler or the handler instance* @param method the method to register* @param mapping the mapping conditions associated with the handler method* @throws IllegalStateException if another method was already registered* under the same mapping*/// 注册beanName和method及RequestMappingInfo之间的关系,RequestMappingInfo会保存url信息protected void registerHandlerMethod(Object handler, Method method, T mapping) {this.mappingRegistry.register(mapping, handler, method);}
getMappingForMethod方法是在子类RequestMappingHandlerMapping中实现的,具体实现就是创建一个RequestMappingInfo
/*** Uses method and type-level @{@link RequestMapping} annotations to create* the RequestMappingInfo.* @return the created RequestMappingInfo, or {@code null} if the method* does not have a {@code @RequestMapping} annotation.* @see #getCustomMethodCondition(Method)* @see #getCustomTypeCondition(Class)*/@Overrideprotected RequestMappingInfo getMappingForMethod(Method method, Class<?> handlerType) {RequestMappingInfo info = createRequestMappingInfo(method);if (info != null) {RequestMappingInfo typeInfo = createRequestMappingInfo(handlerType);if (typeInfo != null) {info = typeInfo.combine(info);}}return info;}/*** Delegates to {@link #createRequestMappingInfo(RequestMapping, RequestCondition)},* supplying the appropriate custom {@link RequestCondition} depending on whether* the supplied {@code annotatedElement} is a class or method.* @see #getCustomTypeCondition(Class)* @see #getCustomMethodCondition(Method)*/private RequestMappingInfo createRequestMappingInfo(AnnotatedElement element) {RequestMapping requestMapping = AnnotatedElementUtils.findMergedAnnotation(element, RequestMapping.class);RequestCondition<?> condition = (element instanceof Class ?getCustomTypeCondition((Class<?>) element) : getCustomMethodCondition((Method) element));return (requestMapping != null ? createRequestMappingInfo(requestMapping, condition) : null);}
这样就简单实现了将url和HandlerMethod的对应关系注册到mappingRegistry中。 MappingRegistry中的注册实现如下,并且MappingRegistry定义了几个map结构,用来存储注册信息
AbstractHandlerMethodMapping
class MappingRegistry {private final Map<T, MappingRegistration<T>> registry = new HashMap<T, MappingRegistration<T>>();private final Map<T, HandlerMethod> mappingLookup = new LinkedHashMap<T, HandlerMethod>();private final MultiValueMap<String, T> urlLookup = new LinkedMultiValueMap<String, T>();private final Map<String, List<HandlerMethod>> nameLookup =new ConcurrentHashMap<String, List<HandlerMethod>>();private final Map<HandlerMethod, CorsConfiguration> corsLookup =new ConcurrentHashMap<HandlerMethod, CorsConfiguration>();private final ReentrantReadWriteLock readWriteLock = new ReentrantReadWriteLock();
完成beanName,HandlerMethod及RequestMappingInfo之间的对应关系注册。
public void register(T mapping, Object handler, Method method) {this.readWriteLock.writeLock().lock();try {HandlerMethod handlerMethod = createHandlerMethod(handler, method);assertUniqueMethodMapping(handlerMethod, mapping);if (logger.isInfoEnabled()) {logger.info("Mapped \\"" + mapping + "\\" onto " + handlerMethod);}this.mappingLookup.put(mapping, handlerMethod);List<String> directUrls = getDirectUrls(mapping);for (String url : directUrls) {this.urlLookup.add(url, mapping);}String name = null;if (getNamingStrategy() != null) {name = getNamingStrategy().getName(handlerMethod, mapping);addMappingName(name, handlerMethod);}CorsConfiguration corsConfig = initCorsConfiguration(handler, method, mapping);if (corsConfig != null) {this.corsLookup.put(handlerMethod, corsConfig);}this.registry.put(mapping, new MappingRegistration<T>(mapping, handlerMethod, directUrls, name));}finally {this.readWriteLock.writeLock().unlock();}
}
DispatcherServlet准备HandlerMapping的流程如下 :
从容器获取HandlerMapping对象;
当detectAllHandlerMappings为true时,从容器(以及祖先容器)获取所有类型为HandlerMapping的bean组件,记录到handlerMappings并排序; 当detectAllHandlerMappings为false时,从容器(以及祖先容器)获取名称为handlerMapping的bean组件,记录到handlerMappings,这种情况下handlerMappings中最多有一个元素; 如果上面步骤结束时handlerMappings为空则创建缺省HandlerMapping对象记录到handlerMappings;
- HttpServletBean 主要做一些初始化的工作,将web.xml中配置的参数设置到Servlet中。比如servlet标签的子标签init-param标签中配置的参数。
- FrameworkServlet 将Servlet与Spring容器上下文关联。其实也就是初始化FrameworkServlet的属性webApplicationContext,这个属性代表SpringMVC上下文,它有个父类上下文,既web.xml中配置的ContextLoaderListener监听器初始化的容器上下文。
- DispatcherServlet 初始化各个功能的实现类。比如异常处理、视图处理、请求映射处理等。
总结:SpringMVC启动过程:
tomcat web容器启动时会去读取web.xml这样的部署描述文件,相关组件启动顺序为: 解析<context-param> => 解析<listener> => 解析<filter> => 解析<servlet>,具体初始化过程如下:
- 1、解析
<context-param>里的键值对。 - 2、创建一个
application内置对象即ServletContext,servlet上下文,用于全局共享。 - 3、将
<context-param>的键值对放入ServletContext即application中,Web应用内全局共享。 - 4、读取
<listener>标签创建监听器,一般会使用ContextLoaderListener类,如果使用了ContextLoaderListener类,Spring就会创建一个WebApplicationContext类的对象,WebApplicationContext类就是IoC容器,ContextLoaderListener类创建的IoC容器是根IoC容器为全局性的,并将其放置在appication中,作为应用内全局共享,键名为WebApplicationContext.ROOT_WEB_APPLICATION_CONTEXT_ATTRIBUTE,可以通过以下两种方法获取 WebApplicationContext applicationContext = (WebApplicationContext) application.getAttribute(WebApplicationContext.ROOT_WEB_APPLICATION_CONTEXT_ATTRIBUTE); WebApplicationContext applicationContext1 = WebApplicationContextUtils.getWebApplicationContext(application);
这个全局的根IoC容器只能获取到在该容器中创建的Bean不能访问到其他容器创建的Bean,也就是读取web.xml配置的contextConfigLocation参数的xml文件来创建对应的Bean。
- 5、
listener创建完成后如果有<filter>则会去创建filter。 - 6、初始化创建
<servlet>,一般使用DispatchServlet类。 - 7、
DispatchServlet的父类FrameworkServlet会重写其父类的initServletBean方法,并调用initWebApplicationContext()以及onRefresh()方法。 - 8、
initWebApplicationContext()方法会创建一个当前servlet的一个IoC子容器,如果存在上述的全局WebApplicationContext则将其设置为父容器,如果不存在上述全局的则父容器为null。 - 9、读取
<servlet>标签的<init-param>配置的xml文件并加载相关Bean。 - 10、
onRefresh()方法创建Web应用相关组件。
源码剖析-【mvc:annotation-driven标签解析】
1.mvc:annotation-driven标签概述
mvc:annotation-driven标签默认会开启SpringMVC的注解驱动模式,默认注册一个RequestMappingHandlerMapping、一个RequestMappingHandlerAdapter、一个ExceptionHandlerExceptionResolver。以支持对使用了 @RequestMapping 、 @ExceptionHandler 及其他注解的控制器方法的请求处理。
2.mvc:annotation-driven标签解析【RequestMappingHandlerMapping生成】
关于定位自定义标签解析的过程,IOC中已经说明过,这里直接打开AnnotationDrivenBeanDefinitionParser类并定位到其parse方法
/*** 解析 mvc:annotation-driven 标签*/
@Override
@Nullable
public BeanDefinition parse(Element element, ParserContext parserContext) {Object source = parserContext.extractSource(element);XmlReaderContext readerContext = parserContext.getReaderContext();CompositeComponentDefinition compDefinition = new CompositeComponentDefinition(element.getTagName(), source);parserContext.pushContainingComponent(compDefinition);/*** 获取协商内容视图配置*/RuntimeBeanReference contentNegotiationManager = getContentNegotiationManager(element, source, parserContext);/*** 创建RequestMappingHandlerMapping的RootBeanDefinition* 从这里也可以看出,开启mvc:annotation-driven标签后,* 将会默认注册RequestMappingHandlerMapping作为默认的HandlerMapping*/RootBeanDefinition handlerMappingDef = new RootBeanDefinition(RequestMappingHandlerMapping.class);handlerMappingDef.setSource(source);handlerMappingDef.setRole(BeanDefinition.ROLE_INFRASTRUCTURE);handlerMappingDef.getPropertyValues().add("order", 0);handlerMappingDef.getPropertyValues().add("contentNegotiationManager", contentNegotiationManager);// 是否开启矩阵变量if (element.hasAttribute("enable-matrix-variables")) {Boolean enableMatrixVariables = Boolean.valueOf(element.getAttribute("enable-matrix-variables"));handlerMappingDef.getPropertyValues().add("removeSemicolonContent", !enableMatrixVariables);}// 解析path-matching路径匹配标签configurePathMatchingProperties(handlerMappingDef, element, parserContext);readerContext.getRegistry().registerBeanDefinition(HANDLER_MAPPING_BEAN_NAME , handlerMappingDef);// 解析cors跨域标签RuntimeBeanReference corsRef = MvcNamespaceUtils.registerCorsConfigurations(null, parserContext, source);handlerMappingDef.getPropertyValues().add("corsConfigurations", corsRef);// 解析conversion-service数据转换、格式化标签RuntimeBeanReference conversionService = getConversionService(element, source, parserContext);// 解析validator标签RuntimeBeanReference validator = getValidator(element, source, parserContext);// 解析message-codes-resolver标签RuntimeBeanReference messageCodesResolver = getMessageCodesResolver(element);/*** 创建ConfigurableWebBindingInitializer的RootBeanDefinition对象* 并将上一步解析的conversionService、validator、messageCodesResolver* 作为属性注入到该对象中*/RootBeanDefinition bindingDef = new RootBeanDefinition(ConfigurableWebBindingInitializer.class);bindingDef.setSource(source);bindingDef.setRole(BeanDefinition.ROLE_INFRASTRUCTURE);bindingDef.getPropertyValues().add("conversionService", conversionService);bindingDef.getPropertyValues().add("validator", validator);bindingDef.getPropertyValues().add("messageCodesResolver", messageCodesResolver);// 解析message-converters标签ManagedList<?> messageConverters = getMessageConverters(element, source, parserContext);// 解析argument-resolvers标签ManagedList<?> argumentResolvers = getArgumentResolvers(element, parserContext);// 解析return-value-handlers标签ManagedList<?> returnValueHandlers = getReturnValueHandlers(element, parserContext);// 解析async-support标签String asyncTimeout = getAsyncTimeout(element);// 解析async-support的task-executor子标签RuntimeBeanReference asyncExecutor = getAsyncExecutor(element);// 解析async-support的callable-interceptors子标签ManagedList<?> callableInterceptors = getCallableInterceptors(element, source, parserContext);// 解析async-support的deferred-result-interceptors子标签ManagedList<?> deferredResultInterceptors = getDeferredResultInterceptors(element, source, parserContext);/*** 创建RequestMappingHandlerAdapter的RootBeanDefinition* 从这里也可以看出,开启mvc:annotation-driven标签后,* 将会默认注册RequestMappingHandlerAdapter作为默认的HandlerAdapter* 并将上面解析的内容绑定到该HandlerAdapter中*/RootBeanDefinition handlerAdapterDef = new RootBeanDefinition(RequestMappingHandlerAdapter.class);handlerAdapterDef.setSource(source);handlerAdapterDef.setRole(BeanDefinition.ROLE_INFRASTRUCTURE);handlerAdapterDef.getPropertyValues().add("contentNegotiationManager", contentNegotiationManager);handlerAdapterDef.getPropertyValues().add("webBindingInitializer", bindingDef);handlerAdapterDef.getPropertyValues().add("messageConverters", messageConverters);addRequestBodyAdvice(handlerAdapterDef);addResponseBodyAdvice(handlerAdapterDef);if (element.hasAttribute("ignore-default-model-on-redirect")) {Boolean ignoreDefaultModel = Boolean.valueOf(element.getAttribute("ignore-default-model-on-redirect"));handlerAdapterDef.getPropertyValues().add("ignoreDefaultModelOnRedirect", ignoreDefaultModel);}if (argumentResolvers != null) {handlerAdapterDef.getPropertyValues().add("customArgumentResolvers", argumentResolvers);}if (returnValueHandlers != null) {handlerAdapterDef.getPropertyValues().add("customReturnValueHandlers", returnValueHandlers);}if (asyncTimeout != null) {handlerAdapterDef.getPropertyValues().add("asyncRequestTimeout", asyncTimeout);}if (asyncExecutor != null) {handlerAdapterDef.getPropertyValues().add("taskExecutor", asyncExecutor);}handlerAdapterDef.getPropertyValues().add("callableInterceptors", callableInterceptors);handlerAdapterDef.getPropertyValues().add("deferredResultInterceptors", deferredResultInterceptors);readerContext.getRegistry().registerBeanDefinition(HANDLER_ADAPTER_BEAN_NAME , handlerAdapterDef);/*** 创建CompositeUriComponentsContributorFactoryBean的RootBeanDefinition* CompositeUriComponentsContributorFactoryBean是一个工厂bean,* 可以用来获取RequestMappingHandlerAdapter中的HandlerMethodArgumentResolver配置*/RootBeanDefinition uriContributorDef = new RootBeanDefinition(CompositeUriComponentsContributorFactoryBean.class);uriContributorDef.setSource(source);uriContributorDef.getPropertyValues().addPropertyValue("handlerAdapter", handlerAdapterDef);uriContributorDef.getPropertyValues().addPropertyValue("conversionService", conversionService);String uriContributorName = MvcUriComponentsBuilder.MVC_URI_COMPONENTS_CONTRIBUTOR_BEAN_NAME;readerContext.getRegistry().registerBeanDefinition(uriContributorName, uriContributorDef);/*** 创建ConversionServiceExposingInterceptor的RootBeanDefinition* 主要用来解析spring:eval标签*/RootBeanDefinition csInterceptorDef = new RootBeanDefinition(ConversionServiceExposingInterceptor.class);csInterceptorDef.setSource(source);csInterceptorDef.getConstructorArgumentValues().addIndexedArgumentValue(0, conversionService);RootBeanDefinition mappedInterceptorDef = new RootBeanDefinition(MappedInterceptor.class);mappedInterceptorDef.setSource(source);mappedInterceptorDef.setRole(BeanDefinition.ROLE_INFRASTRUCTURE);mappedInterceptorDef.getConstructorArgumentValues().addIndexedArgumentValue(0, (Object) null);mappedInterceptorDef.getConstructorArgumentValues().addIndexedArgumentValue(1, csInterceptorDef);String mappedInterceptorName = readerContext.registerWithGeneratedName(mappedInterceptorDef);/*** 创建ExceptionHandlerExceptionResolver的RootBeanDefinition*/RootBeanDefinition methodExceptionResolver = new RootBeanDefinition(ExceptionHandlerExceptionResolver.class);methodExceptionResolver.setSource(source);methodExceptionResolver.setRole(BeanDefinition.ROLE_INFRASTRUCTURE);methodExceptionResolver.getPropertyValues().add("contentNegotiationManager", contentNegotiationManager);methodExceptionResolver.getPropertyValues().add("messageConverters", messageConverters);methodExceptionResolver.getPropertyValues().add("order", 0);addResponseBodyAdvice(methodExceptionResolver);if (argumentResolvers != null) {methodExceptionResolver.getPropertyValues().add("customArgumentResolvers", argumentResolvers);}if (returnValueHandlers != null) {methodExceptionResolver.getPropertyValues().add("customReturnValueHandlers", returnValueHandlers);}String methodExResolverName = readerContext.registerWithGeneratedName(methodExceptionResolver);/*** 创建ResponseStatusExceptionResolver的RootBeanDefinition**/RootBeanDefinition statusExceptionResolver = new RootBeanDefinition(ResponseStatusExceptionResolver.class);statusExceptionResolver.setSource(source);statusExceptionResolver.setRole(BeanDefinition.ROLE_INFRASTRUCTURE);statusExceptionResolver.getPropertyValues().add("order", 1);String statusExResolverName = readerContext.registerWithGeneratedName(statusExceptionResolver);/*** 创建DefaultHandlerExceptionResolver的RootBeanDefinition* 该类是HandlerExceptionResolver的默认实现,可以解析http异常并将相应的http状态码返回* 例如:404*/RootBeanDefinition defaultExceptionResolver = new RootBeanDefinition(DefaultHandlerExceptionResolver.class);defaultExceptionResolver.setSource(source);defaultExceptionResolver.setRole(BeanDefinition.ROLE_INFRASTRUCTURE);defaultExceptionResolver.getPropertyValues().add("order", 2);String defaultExResolverName = readerContext.registerWithGeneratedName(defaultExceptionResolver);/*** 将上面创建的RootBeanDefinition以组件形式纳入SpringIOC容器*/parserContext.registerComponent(new BeanComponentDefinition(handlerMappingDef, HANDLER_MAPPING_BEAN_NAME));parserContext.registerComponent(new BeanComponentDefinition(handlerAdapterDef, HANDLER_ADAPTER_BEAN_NAME));parserContext.registerComponent(new BeanComponentDefinition(uriContributorDef, uriContributorName));parserContext.registerComponent(new BeanComponentDefinition(mappedInterceptorDef, mappedInterceptorName));parserContext.registerComponent(new BeanComponentDefinition(methodExceptionResolver, methodExResolverName));parserContext.registerComponent(new BeanComponentDefinition(statusExceptionResolver, statusExResolverName));parserContext.registerComponent(new BeanComponentDefinition(defaultExceptionResolver, defaultExResolverName));// Ensure BeanNameUrlHandlerMapping (SPR-8289) and default HandlerAdapters are not "turned off"// 注册默认组件MvcNamespaceUtils.registerDefaultComponents(parserContext, source);parserContext.popAndRegisterContainingComponent();return null;
}
那么接下来我们需要总结一下,如果mvc:annotation-driven没有配置任何子标签的话,Spring会如何处理呢?
RootBeanDefinition handlerMappingDef = new RootBeanDefinition(RequestMappingHandlerMapping.class);
RootBeanDefinition bindingDef = new RootBeanDefinition(ConfigurableWebBindingInitializer.class);
RootBeanDefinition handlerAdapterDef = new RootBeanDefinition(RequestMappingHandlerAdapter.class);
RootBeanDefinition uriContributorDef = new RootBeanDefinition(CompositeUriComponentsContributorFactoryBean.class);
RootBeanDefinition csInterceptorDef = new RootBeanDefinition(ConversionServiceExposingInterceptor.class);
RootBeanDefinition mappedInterceptorDef = new RootBeanDefinition(MappedInterceptor.class);
RootBeanDefinition methodExceptionResolver = new RootBeanDefinition(ExceptionHandlerExceptionResolver.class);
RootBeanDefinition statusExceptionResolver = new RootBeanDefinition(ResponseStatusExceptionResolver.class);
RootBeanDefinition defaultExceptionResolver = new RootBeanDefinition(DefaultHandlerExceptionResolver.class);
可以看到即使不做任何子标签的配置,SpringMVC默认也会创建上述9个内部bean的实例。
源码剖析-【DispatcherServlet请求入口分析】
1.DispatcherServlet请求入口
通过前面的分析,我们知道DispatcherServlet其本质还是Servlet,那么当客户端的请求到达时,根据Servlet生命周期,其应该会调用其或者其父类中的service方法。
在其父类FrameworkServlet中我们找到了service方法
@Override
protected void service(HttpServletRequest request, HttpServletResponse response)throws ServletException, IOException {/***  获取HttpMethod类型,*  HttpMethod为枚举类,支持的Http请求类型有GET, HEAD, POST, PUT, PATCH, DELETE, OPTIONS, TRACE*/HttpMethod httpMethod = HttpMethod.resolve(request.getMethod());if (httpMethod == HttpMethod.PATCH || httpMethod == null) {processRequest(request, response);}else {super.service(request, response);}
}
但是在这里似乎没有看到我们最想要的东西,那么我们来看一下其doGet和doPost方法。
protected final void doGet(HttpServletRequest request, HttpServletResponse response) throws ServletException, IOException {processRequest(request, response);
}protected final void doPost(HttpServletRequest request, HttpServletResponse response) throws ServletException, IOException {processRequest(request, response);
}
从这里我们可以分析到,doGet、doPost等Http请求委托给了processRequest方法进行处理。
protected final void processRequest(HttpServletRequest request, HttpServletResponse response)throws ServletException, IOException {// 记录开始时间long startTime = System.currentTimeMillis();Throwable failureCause = null;// 提取LocaleContext和RequestAttributes属性,以便在请求结束后能从当前线程中恢复LocaleContext previousLocaleContext = LocaleContextHolder.getLocaleContext();LocaleContext localeContext = buildLocaleContext(request);RequestAttributes previousAttributes = RequestContextHolder.getRequestAttributes();ServletRequestAttributes requestAttributes = buildRequestAttributes(request, response, previousAttributes);WebAsyncManager asyncManager = WebAsyncUtils.getAsyncManager(request);asyncManager.registerCallableInterceptor(FrameworkServlet.class.getName(), new RequestBindingInterceptor());// 初始化ContextHolder,将当前线程的LocaleContext和RequestAttributes绑定到ContextHolderinitContextHolders(request, localeContext, requestAttributes);// 调用doService方法做下一步处理try {doService(request, response);}catch (ServletException | IOException ex) {failureCause = ex;throw ex;}catch (Throwable ex) {failureCause = ex;throw new NestedServletException("Request processing failed", ex);}// 请求结束,从当前线程中恢复previousLocaleContext和previousAttributesfinally {resetContextHolders(request, previousLocaleContext, previousAttributes);if (requestAttributes != null) {requestAttributes.requestCompleted();}logResult(request, response, failureCause, asyncManager);// 发布事件通知publishRequestHandledEvent(request, response, startTime, failureCause);}
}
该方法只是做了一些变量提取绑定、恢复、事件发布等工作,具体工作委托给了doService方法。
protected void doService(HttpServletRequest request, HttpServletResponse response) throws Exception {logRequest(request);/*** 如果当前请求是一个 include request(不好翻译),如:<jsp:incluede page="xxx.jsp"/>* 则为此请求属性建立快照,以便include request结束后能够将其恢复*/// Keep a snapshot of the request attributes in case of an include,// to be able to restore the original attributes after the include.Map<String, Object> attributesSnapshot = null;if (WebUtils.isIncludeRequest(request)) {attributesSnapshot = new HashMap<>();Enumeration<?> attrNames = request.getAttributeNames();while (attrNames.hasMoreElements()) {String attrName = (String) attrNames.nextElement();if (this.cleanupAfterInclude || attrName.startsWith(DEFAULT_STRATEGIES_PREFIX)) {attributesSnapshot.put(attrName, request.getAttribute(attrName));}}}// Make framework objects available to handlers and view objects.// 将下列对象保存到request中,以便使用request.setAttribute(WEB_APPLICATION_CONTEXT_ATTRIBUTE, getWebApplicationContext());request.setAttribute(LOCALE_RESOLVER_ATTRIBUTE, this.localeResolver);request.setAttribute(THEME_RESOLVER_ATTRIBUTE, this.themeResolver);request.setAttribute(THEME_SOURCE_ATTRIBUTE, getThemeSource());if (this.flashMapManager != null) {FlashMap inputFlashMap = this.flashMapManager.retrieveAndUpdate(request, response);if (inputFlashMap != null) {request.setAttribute(INPUT_FLASH_MAP_ATTRIBUTE, Collections.unmodifiableMap(inputFlashMap));}request.setAttribute(OUTPUT_FLASH_MAP_ATTRIBUTE, new FlashMap());request.setAttribute(FLASH_MAP_MANAGER_ATTRIBUTE, this.flashMapManager);}try {// 真正开始处理http请求doDispatch(request, response);}finally {if (!WebAsyncUtils.getAsyncManager(request).isConcurrentHandlingStarted()) {// Restore the original attribute snapshot, in case of an include.// 恢复之前保存的数据快照if (attributesSnapshot != null) {restoreAttributesAfterInclude(request, attributesSnapshot);}}}
}
该方法中依然没有看到对核心流程的处理,请求处理进一步委托给了doDispatch方法。
protected void doDispatch(HttpServletRequest request, HttpServletResponse response) throws Exception {HttpServletRequest processedRequest = request;HandlerExecutionChain mappedHandler = null;boolean multipartRequestParsed = false;WebAsyncManager asyncManager = WebAsyncUtils.getAsyncManager(request);try {ModelAndView mv = null;Exception dispatchException = null;try {// 1.尝试将当前请求转换为MultipartHttpServletRequestprocessedRequest = checkMultipart(request);multipartRequestParsed = (processedRequest != request);// Determine handler for the current request.// 2.查找当前请求对应的handler,包括Handler(控制器)本身和Handler拦截器mappedHandler = getHandler(processedRequest);// 未能找到对应的handler,抛出NoHandlerFoundException异常并返回404if (mappedHandler == null) {noHandlerFound(processedRequest, response);return;}// Determine handler adapter for the current request.// 3.查找当前请求对应的HandlerAdapterHandlerAdapter ha = getHandlerAdapter(mappedHandler.getHandler());// Process last-modified header, if supported by the handler.// 4.处理last-modified请求头,如果当前请求支持的话String method = request.getMethod();boolean isGet = "GET".equals(method);if (isGet || "HEAD".equals(method)) {long lastModified = ha.getLastModified(request, mappedHandler.getHandler());if (new ServletWebRequest(request, response).checkNotModified(lastModified) && isGet) {return;}}// 5.应用前置拦截器// 如果有拦截器返回false,则表明该拦截器已经处理了返回结果,直接返回;if (!mappedHandler.applyPreHandle(processedRequest, response)) {return;}// Actually invoke the handler.// 6.调用HandlerAdapter的handler方法,真正开始处理Controllermv = ha.handle(processedRequest, response, mappedHandler.getHandler());// 7.如果当前请求是并发处理,直接返回if (asyncManager.isConcurrentHandlingStarted()) {return;}// 8.为返回值设定默认视图名,如果当前返回值中不包含视图名的话applyDefaultViewName(processedRequest, mv);// 9.应用已注册拦截器的后置方法。mappedHandler.applyPostHandle(processedRequest, response, mv);}catch (Exception ex) {dispatchException = ex;}catch (Throwable err) {// As of 4.3, we're processing Errors thrown from handler methods as well,// making them available for @ExceptionHandler methods and other scenarios.dispatchException = new NestedServletException("Handler dispatch failed", err);}// 10.处理分发调用结果,如视图模型解析、返回等工作processDispatchResult(processedRequest, response, mappedHandler, mv, dispatchException);}catch (Exception ex) {triggerAfterCompletion(processedRequest, response, mappedHandler, ex);}catch (Throwable err) {triggerAfterCompletion(processedRequest, response, mappedHandler,new NestedServletException("Handler processing failed", err));}finally {if (asyncManager.isConcurrentHandlingStarted()) {// Instead of postHandle and afterCompletionif (mappedHandler != null) {mappedHandler.applyAfterConcurrentHandlingStarted(processedRequest, response);}}else {// Clean up any resources used by a multipart request.if (multipartRequestParsed) {cleanupMultipart(processedRequest);}}}
}
历经service–>doGet–>processRequest–>doService–>doDispatch,终于到了核心方法。doDispatch方法看似简单,但是其背后有复杂的业务逻辑支撑
源码剖析-【获取handler及HandlerAdapter】
1.getHandler方法以及HandlerExecutionChain简析
/*** 返回当前请求的HandlerExecutionChain** Return the HandlerExecutionChain for this request.* <p>Tries all handler mappings in order.* @param request current HTTP request* @return the HandlerExecutionChain, or {@code null} if no handler could be found*/
@Nullable
protected HandlerExecutionChain getHandler(HttpServletRequest request) throws Exception {if (this.handlerMappings != null) {for (HandlerMapping mapping : this.handlerMappings) {HandlerExecutionChain handler = mapping.getHandler(request);if (handler != null) {return handler;}}}return null;
}
该方法并没有返回一个具体的Handler,而是返回了HandlerExecutionChain对象。HandlerExecutionChain是Handler执行链,包括Handler本身和HandlerInterceptor拦截器。其在HandlerExecutionChain中的定义如下:
// Controller本身实例
private final Object handler;
// 拦截器数组
@Nullable
private HandlerInterceptor[] interceptors;
// 拦截器集合
@Nullable
private List<HandlerInterceptor> interceptorList;
其中handler即Controller本身实例,HandlerInterceptor是一个拦截器,其可以在SpringMVC的请求过过程中在不同的时机回调不同的接口。HandlerInterceptor接口的定义如下:
public interface HandlerInterceptor {/*** 拦截处理程序的执行。在HandlerMapping确定适当的处理程序对象之后调用,但在HandlerAdapter调用处理程序之前调用。** DispatcherServlet在执行链中处理一个处理程序,该处理程序由任意数量的拦截器组成,处理程序本身位于执行链的末端。* 使用此方法,每个拦截器可以决定中止执行链,通常是发送HTTP错误或编写自定义响应。** 异步请求处理需要特殊考虑。 默认返回true** 如果执行链应该继续下一个拦截器或处理程序本身,则返回@return {@code true}。* 否则,DispatcherServlet假设这个拦截器已经处理了响应本身。**/default boolean preHandle(HttpServletRequest request, HttpServletResponse response, Object handler)throws Exception {return true;}/*** 拦截处理程序的执行。在HandlerAdapter实际调用处理程序之后调用,但在DispatcherServlet呈现视图之前调用。* 可以通过给定的ModelAndView向视图公开其他模型对象。*/default void postHandle(HttpServletRequest request, HttpServletResponse response, Object handler,@Nullable ModelAndView modelAndView) throws Exception {}/*** 请求处理完成后的回调,即呈现视图后的回调。将在处理程序执行的任何结果上调用,因此允许吗*/default void afterCompletion(HttpServletRequest request, HttpServletResponse response, Object handler,@Nullable Exception ex) throws Exception {}}
2.getHandler方法详解
通过上面的分析,已经了解了HandlerExecutionChain的组成。接下来看具体的获取HandlerExecutionChain的过程。Spring会循环所有注册的HandlerMapping并返回第一个匹配的HandlerExecutionChain的。
下面以AbstractHandlerMapping为例来分析一下其具体的获取过程:
public final HandlerExecutionChain getHandler(HttpServletRequest request) throws Exception {// 1.获取当前请求对应的handlerObject handler = getHandlerInternal(request);// 未能获取到对应的handler,则使用默认的defaultHandlerif (handler == null) {handler = getDefaultHandler();}// 两者同时未找到,则返回nullif (handler == null) {return null;}// Bean name or resolved handler?// 2.如果获取到的handler是String类型,则以handler为beanName,从IOC容器中获取其实例if (handler instanceof String) {String handlerName = (String) handler;handler = obtainApplicationContext().getBean(handlerName);}// 3.根据handler和request获取对应的HandlerExecutionChain实例// 会将handler封装到HandlerExecutionChain对象中,// 并将系统和自定义的拦截器加入到HandlerExecutionChain中HandlerExecutionChain executionChain = getHandlerExecutionChain(handler, request);if (logger.isTraceEnabled()) {logger.trace("Mapped to " + handler);}else if (logger.isDebugEnabled() && !request.getDispatcherType().equals(DispatcherType.ASYNC)) {logger.debug("Mapped to " + executionChain.getHandler());}if (CorsUtils.isCorsRequest(request)) {CorsConfiguration globalConfig = this.globalCorsConfigSource.getCorsConfiguration(request);CorsConfiguration handlerConfig = getCorsConfiguration(handler, request);CorsConfiguration config = (globalConfig != null ? globalConfig.combine(handlerConfig) : handlerConfig);executionChain = getCorsHandlerExecutionChain(request, executionChain, config);}return executionChain;
}
来看其比较核心的方法:
2.1 getHandlerInternal
protected HandlerMethod getHandlerInternal(HttpServletRequest request) throws Exception {// 解析请求路径String lookupPath = getUrlPathHelper().getLookupPathForRequest(request);// 加只读锁this.mappingRegistry.acquireReadLock();try {// 根据请求路径和当前请求对象,获取最佳匹配的HandlerMethodHandlerMethod handlerMethod = lookupHandlerMethod(lookupPath, request);// 获取当前Controller的实例,并将获取到的实例封装至HandlerMethod对象中return (handlerMethod != null ? handlerMethod.createWithResolvedBean() : null);}finally {// 释放只读锁this.mappingRegistry.releaseReadLock();}
}
如果该方法未能获取到HandlerMethod,则使用默认的Handler。注意:defaultHandler默认为空,需要自己去配置。
2.2 getHandlerExecutionChain
protected HandlerExecutionChain getHandlerExecutionChain(Object handler, HttpServletRequest request) {HandlerExecutionChain chain = (handler instanceof HandlerExecutionChain ?(HandlerExecutionChain) handler : new HandlerExecutionChain(handler));String lookupPath = this.urlPathHelper.getLookupPathForRequest(request);for (HandlerInterceptor interceptor : this.adaptedInterceptors) {if (interceptor instanceof MappedInterceptor) {MappedInterceptor mappedInterceptor = (MappedInterceptor) interceptor;if (mappedInterceptor.matches(lookupPath, this.pathMatcher)) {chain.addInterceptor(mappedInterceptor.getInterceptor());}}else {chain.addInterceptor(interceptor);}}return chain;
}
将上一步获取到的handler转化为HandlerExecutionChain对象,并循环所有注册的HandlerInterceptor并将其加入到HandlerExecutionChain链中。
3.getHandlerAdapter 获取HandlerAdapter
protected HandlerAdapter getHandlerAdapter(Object handler) throws ServletException {if (this.handlerAdapters != null) {for (HandlerAdapter adapter : this.handlerAdapters) {if (adapter.supports(handler)) {return adapter;}}}throw new ServletException("No adapter for handler [" + handler +"]: The DispatcherServlet configuration needs to include a HandlerAdapter that supports this handler");
}
4.applyPreHandle 应用前置拦截器
/*** 调用注册的HandlerInterceptor拦截器中的preHandle方法** 1.preHandle:HandlerMapping确定适当的处理程序对象之后,在HandlerAdapter调用处理程序之前调用* 2.preHandle默认返回true,如果返回true,则DispatcherServlet假设这个拦截器已经处理了响应本身。** Apply preHandle methods of registered interceptors.* @return {@code true} if the execution chain should proceed with the* next interceptor or the handler itself. Else, DispatcherServlet assumes* that this interceptor has already dealt with the response itself.*/
boolean applyPreHandle(HttpServletRequest request, HttpServletResponse response) throws Exception {HandlerInterceptor[] interceptors = getInterceptors();if (!ObjectUtils.isEmpty(interceptors)) {for (int i = 0; i < interceptors.length; i++) {HandlerInterceptor interceptor = interceptors[i];if (!interceptor.preHandle(request, response, this.handler)) {triggerAfterCompletion(request, response, null);return false;}this.interceptorIndex = i;}}return true;
}
这里要注意一下applyPreHandle的返回值,如果为true的话则表示DispatcherServlet已经完成了本次请求处理。
程序再往下执行就要真正开始开始处理Controller了
源码剖析-【HandlerAdapter handle 方法解析】
1.handleInternal方法简析
前面分析了SpringMVC获取handler及HandlerAdapter的过程,接下来就要真正开始处理Controller了。
以AbstractHandlerMethodAdapter为例来来分析一下其具体的处理过程。
在此过程中会包含SpringMVC流程处理的的关键部分。例如参数获取及解析、异步处理、调用Controller中的方法、返回视图等等
public final ModelAndView handle(HttpServletRequest request, HttpServletResponse response, Object handler) throws Exception {return handleInternal(request, response, (HandlerMethod) handler);
}
protected ModelAndView handleInternal(HttpServletRequest request,HttpServletResponse response,HandlerMethod handlerMethod) throws Exception {ModelAndView mav;// 1.检测当前请求,验证请求方法合法性和session合法性checkRequest(request);// Execute invokeHandlerMethod in synchronized block if required.// 2.根据synchronizeOnSession值判断,当前请求是否需串行化访问。if (this.synchronizeOnSession) {HttpSession session = request.getSession(false);if (session != null) {// 获取最佳互斥锁,即同步当前回话对象;如未能获取到互斥锁,将返回HttpSession对象本身Object mutex = WebUtils.getSessionMutex(session);synchronized (mutex) {mav = invokeHandlerMethod(request, response, handlerMethod);}}else {// No HttpSession available -> no mutex necessary// 即无最佳互斥锁,也未能获取到HttpSession,则当前回话无需串行化访问mav = invokeHandlerMethod(request, response, handlerMethod);}}else {// No synchronization on session demanded at all...mav = invokeHandlerMethod(request, response, handlerMethod);}// 3.相应信息不包含Cache-Controlif (!response.containsHeader(HEADER_CACHE_CONTROL)) {if (getSessionAttributesHandler(handlerMethod).hasSessionAttributes()) {applyCacheSeconds(response, this.cacheSecondsForSessionAttributeHandlers);}else {prepareResponse(response);}}return mav;
}
这里会涉及到一部分异步操作的代码。具体的处理方法委托给了invokeHandlerMethod方法。
@Nullable
protected ModelAndView invokeHandlerMethod(HttpServletRequest request,HttpServletResponse response, HandlerMethod handlerMethod) throws Exception {ServletWebRequest webRequest = new ServletWebRequest(request, response);try {//WebDataBinderFactory --> 工厂类,为目标对象创建一个WebDataBinder实例// 1.WebDataBinder继承了DataBinder类,为web请求提供了参数绑定服务WebDataBinderFactory binderFactory = getDataBinderFactory(handlerMethod);// 获取ModelFactory:// 2.ModelFactory可以协助控制器在调用方法之前初始化模型,并在调用之后更新模型ModelFactory modelFactory = getModelFactory(handlerMethod, binderFactory);// 创建ServletInvocableHandlerMethod对象// 3.ServletInvocableHandlerMethod继承并扩展了InvocableHandlerMethodServletInvocableHandlerMethod invocableMethod = createInvocableHandlerMethod(handlerMethod);// 4.尝试绑定参数、返回值解析器if (this.argumentResolvers != null) {invocableMethod.setHandlerMethodArgumentResolvers(this.argumentResolvers);}if (this.returnValueHandlers != null) {invocableMethod.setHandlerMethodReturnValueHandlers(this.returnValueHandlers);}invocableMethod.setDataBinderFactory(binderFactory);invocableMethod.setParameterNameDiscoverer(this.parameterNameDiscoverer);// 5.创建ModelAndViewContainer,并初始化Model对象ModelAndViewContainer mavContainer = new ModelAndViewContainer();mavContainer.addAllAttributes(RequestContextUtils.getInputFlashMap(request));modelFactory.initModel(webRequest, mavContainer, invocableMethod);mavContainer.setIgnoreDefaultModelOnRedirect(this.ignoreDefaultModelOnRedirect);// 6.异步请求相关AsyncWebRequest asyncWebRequest = WebAsyncUtils.createAsyncWebRequest(request, response);asyncWebRequest.setTimeout(this.asyncRequestTimeout);WebAsyncManager asyncManager = WebAsyncUtils.getAsyncManager(request);asyncManager.setTaskExecutor(this.taskExecutor);asyncManager.setAsyncWebRequest(asyncWebRequest);asyncManager.registerCallableInterceptors(this.callableInterceptors);asyncManager.registerDeferredResultInterceptors(this.deferredResultInterceptors);if (asyncManager.hasConcurrentResult()) {Object result = asyncManager.getConcurrentResult();mavContainer = (ModelAndViewContainer) asyncManager.getConcurrentResultContext()[0];asyncManager.clearConcurrentResult();if (logger.isDebugEnabled()) {logger.debug("Resume with async result ["+ (result instanceof CharSequence ? "\\"" + result + "\\"" :  result) + "]");}invocableMethod = invocableMethod.wrapConcurrentResult(result);}// 7.调用Controller中的具体方法并处理返回值invocableMethod.invokeAndHandle(webRequest, mavContainer);if (asyncManager.isConcurrentHandlingStarted()) {return null;}// 8.返回ModelAndView对象return getModelAndView(mavContainer, modelFactory, webRequest);}finally {// 完成请求后续处理,并将当前请求置为未激活webRequest.requestCompleted();}
}
invokeHandlerMethod方法还是很复杂的,下面我们对该方法进行详细的分析
2.getModelFactory方法
private ModelFactory getModelFactory(HandlerMethod handlerMethod, WebDataBinderFactory binderFactory) {// 1.处理@SessionAttributes注解SessionAttributesHandler sessionAttrHandler = getSessionAttributesHandler(handlerMethod);Class<?> handlerType = handlerMethod.getBeanType();// 2.处理@ModelAttribute注解Set<Method> methods = this.modelAttributeCache.get(handlerType);if (methods == null) {methods = MethodIntrospector.selectMethods(handlerType, MODEL_ATTRIBUTE_METHODS);this.modelAttributeCache.put(handlerType, methods);}List<InvocableHandlerMethod> attrMethods = new ArrayList<>();// Global methods first// 3.优先处理全局@ModelAttribute注解的方法,例如被@ControllerAdvice标注的类中存在被@ModelAttribute注解的方法,则优先处理this.modelAttributeAdviceCache.forEach((clazz, methodSet) -> {if (clazz.isApplicableToBeanType(handlerType)) {Object bean = clazz.resolveBean();for (Method method : methodSet) {attrMethods.add(createModelAttributeMethod(binderFactory, bean, method));}}});// 4.循环所有标注了@ModelAttribute注解的方法,并创建InvocableHandlerMethod对象// InvocableHandlerMethod:负责具体的HandlerMethod的调用、参数解析等工作for (Method method : methods) {Object bean = handlerMethod.getBean();attrMethods.add(createModelAttributeMethod(binderFactory, bean, method));}// 5.返回ModelFactory对象// ModelFactory:协助在控制器方法调用之前初始化模型,并在调用之后更新它。return new ModelFactory(attrMethods, binderFactory, sessionAttrHandler);
}
该方法主要作用是处理@ModelAttribute和@SessionAttributes两个注解
3.ModelFactory的initModel初始化
上一步创建了ModelFactory对象实例,接下来看其initModel具体都做了什么工作:
public void initModel(NativeWebRequest request, ModelAndViewContainer container, HandlerMethod handlerMethod)throws Exception {// 1.解析并合并@SessionAttributes注解Map<String, ?> sessionAttributes = this.sessionAttributesHandler.retrieveAttributes(request);container.mergeAttributes(sessionAttributes);// 2.调用被@ModelAttribute注解的方法invokeModelAttributeMethods(request, container);// 3.查找标注了@ModelAttribute、@SessionAttributes的方法参数,确保其解析过程中不会发生异常for (String name : findSessionAttributeArguments(handlerMethod)) {if (!container.containsAttribute(name)) {Object value = this.sessionAttributesHandler.retrieveAttribute(request, name);if (value == null) {throw new HttpSessionRequiredException("Expected session attribute '" + name + "'", name);}container.addAttribute(name, value);}}
}
注意这里会有一个Expected session attribute xxx的异常,如果类上标注了@SessionAttributes注解,且在方法中标注了@ModelAttribute注解,如果@ModelAttribute为空,则会抛出此异常
4.invokeAndHandle简析
继续分析,接下来应该调用Controller中的具体方法了,但是在调用之前,还要有参数解析、InitBinder方法初始化、InitBinder方法调用等工作,接下来逐步分析。
public void invokeAndHandle(ServletWebRequest webRequest,ModelAndViewContainer mavContainer,Object... providedArgs) throws Exception {// 1.调用Controller中的具体方法Object returnValue = invokeForRequest(webRequest, mavContainer, providedArgs);// 2.设置返回状态码setResponseStatus(webRequest);// 3.当前请求无返回值或者返回值中包含错误,则将请求完成标识设置为true并返回if (returnValue == null) {if (isRequestNotModified(webRequest) || getResponseStatus() != null || mavContainer.isRequestHandled()) {mavContainer.setRequestHandled(true);return;}}else if (StringUtils.hasText(getResponseStatusReason())) {mavContainer.setRequestHandled(true);return;}// 4.当前请求有返回值且无错误信息,则将请求完成标识设置为false,并继续处理当前请求mavContainer.setRequestHandled(false);Assert.state(this.returnValueHandlers != null, "No return value handlers");try {// 选取合适的HandlerMethodReturnValueHandler,并处理返回值this.returnValueHandlers.handleReturnValue(returnValue, getReturnValueType(returnValue), mavContainer, webRequest);}catch (Exception ex) {if (logger.isTraceEnabled()) {logger.trace(formatErrorForReturnValue(returnValue), ex);}throw ex;}
}
最重要的就是第一步invokeForRequest方法:
public Object invokeForRequest(NativeWebRequest request,@Nullable ModelAndViewContainer mavContainer,Object... providedArgs) throws Exception {// 获取并解析请求参数/*** 注意这里不一定都是解析@RequestMapping方法的参数,* 也有可能会解析@InitBinder方法的参数** 所以下面的doInvoke方法也并不一定调用具体的@RequestMapping方法,* 也有可能调用@InitBinder方法进行参数的解析绑定*/Object[] args = getMethodArgumentValues(request, mavContainer, providedArgs);if (logger.isTraceEnabled()) {logger.trace("Arguments: " + Arrays.toString(args));}// 调用方法return doInvoke(args);
}
该方法看起来很简单,只有两个函数调用,但是其背后的逻辑还是相当复杂的。
接下来的处理分为两步,一是参数处理,二是方法调用。
5.getMethodArgumentValues参数获取及解析
private Object[] getMethodArgumentValues(NativeWebRequest request,@Nullable ModelAndViewContainer mavContainer,Object... providedArgs) throws Exception {// 1.获取方法参数列表,并创建与参数个数相同的Object数组,用来保存解析的参数值MethodParameter[] parameters = getMethodParameters();Object[] args = new Object[parameters.length];// 2.解析参数for (int i = 0; i < parameters.length; i++) {MethodParameter parameter = parameters[i];parameter.initParameterNameDiscovery(this.parameterNameDiscoverer);// 这里当解析@InitBinder参数时会指定providedArgs参数,无需纠结...args[i] = resolveProvidedArgument(parameter, providedArgs);if (args[i] != null) {continue;}// 参数解析器是否支持对该参数的解析if (this.argumentResolvers.supportsParameter(parameter)) {try {// 调用参数解析器的解析方法/*** SpringMVC的参数解析器顶级接口为HandlerMethodArgumentResolver* 该接口只提供了两个方法:supportsParameter和resolveArgument** 我们也可以自定义参数解析器,只需实现这两个方法即可*/args[i] = this.argumentResolvers.resolveArgument(parameter, mavContainer, request, this.dataBinderFactory);continue;}catch (Exception ex) {// Leave stack trace for later, e.g. AbstractHandlerExceptionResolverif (logger.isDebugEnabled()) {String message = ex.getMessage();if (message != null && !message.contains(parameter.getExecutable().toGenericString())) {logger.debug(formatArgumentError(parameter, message));}}throw ex;}}// 如未能正常解析参数且未抛出异常,则说明当前参数没有合适的参数解析器,抛出 'No suitable resolver' 异常if (args[i] == null) {throw new IllegalStateException(formatArgumentError(parameter, "No suitable resolver"));}}return args;
}
从代码中可以看到,具体的参数解析工作委托给了HandlerMethodArgumentResolver,HandlerMethodArgumentResolver是一个接口,其中只有两个方法:
public interface HandlerMethodArgumentResolver {/*** 此解析器是否支持给定的方法参数。*/boolean supportsParameter(MethodParameter parameter);/*** 将方法参数解析为给定请求的参数值。*/@NullableObject resolveArgument(MethodParameter parameter, @Nullable ModelAndViewContainer mavContainer,NativeWebRequest webRequest, @Nullable WebDataBinderFactory binderFactory) throws Exception;}
那么看到这里,大家一定也能想到,既然这个类是一个接口,那么必然有多个实现,接下来就应该查找具体的参数解析器、并调用解析器的resolveArgument方法对参数进行解析:
public Object resolveArgument(MethodParameter parameter,@Nullable ModelAndViewContainer mavContainer,NativeWebRequest webRequest,@Nullable WebDataBinderFactory binderFactory) throws Exception {// 获取参数解析器HandlerMethodArgumentResolver resolver = getArgumentResolver(parameter);if (resolver == null) {throw new IllegalArgumentException("Unknown parameter type [" + parameter.getParameterType().getName() + "]");}// 解析参数,不同的参数解析器实例,有不同的解析方式return resolver.resolveArgument(parameter, mavContainer, webRequest, binderFactory);
}
上述代码就是干这些事情的,接下来以AbstractNamedValueMethodArgumentResolver为例,看一下参数的具体解析过程:
public final Object resolveArgument(MethodParameter parameter, @Nullable ModelAndViewContainer mavContainer,NativeWebRequest webRequest, @Nullable WebDataBinderFactory binderFactory) throws Exception {// 1.NamedValueInfo对象包含了name,required,defaultValue三个信息NamedValueInfo namedValueInfo = getNamedValueInfo(parameter);// 获取MethodParameter对象,该对象封装了方法参数的规范MethodParameter nestedParameter = parameter.nestedIfOptional();// 2.解析参数名,包括占位符和表达式等Object resolvedName = resolveStringValue(namedValueInfo.name);if (resolvedName == null) {throw new IllegalArgumentException("Specified name must not resolve to null: [" + namedValueInfo.name + "]");}// 3.将给定的参数类型和值名称解析为参数值。Object arg = resolveName(resolvedName.toString(), nestedParameter, webRequest);// 如果未能正常解析/*** 如* 方法参数 : @RequestParam(name = "name") String name* 请求路径参数后缀 : sayHello?1212** 未指定参数名称,则无法正常解析,接下来要判断NamedValueInfo属性值,并作出后续处理*/if (arg == null) {// 如果默认值不为空,则if (namedValueInfo.defaultValue != null) {arg = resolveStringValue(namedValueInfo.defaultValue);}// 指定了required属性且该参数不是为非不必须,则调动handleMissingValue方法处理缺失值,该方法一般会抛出异常else if (namedValueInfo.required && !nestedParameter.isOptional()) {handleMissingValue(namedValueInfo.name, nestedParameter, webRequest);}// 最后处理将该参数值处理为null即可arg = handleNullValue(namedValueInfo.name, arg, nestedParameter.getNestedParameterType());}else if ("".equals(arg) && namedValueInfo.defaultValue != null) {arg = resolveStringValue(namedValueInfo.defaultValue);}if (binderFactory != null) {// 4.创建WebDataBinder实例WebDataBinder binder = binderFactory.createBinder(webRequest, null, namedValueInfo.name);try {// 5.尝试转换参数arg = binder.convertIfNecessary(arg, parameter.getParameterType(), parameter);}catch (ConversionNotSupportedException ex) {throw new MethodArgumentConversionNotSupportedException(arg, ex.getRequiredType(),namedValueInfo.name, parameter, ex.getCause());}catch (TypeMismatchException ex) {throw new MethodArgumentTypeMismatchException(arg, ex.getRequiredType(),namedValueInfo.name, parameter, ex.getCause());}}handleResolvedValue(arg, namedValueInfo.name, parameter, mavContainer, webRequest);return arg;
}
前面对于参数的各种情况的处理,都比较简单,大家可以多写一些实例,多测试即可;接下来要看convertIfNecessary函数的调用过程。
public <T> T convertIfNecessary(@Nullable Object value, @Nullable Class<T> requiredType,@Nullable MethodParameter methodParam) throws TypeMismatchException {return getTypeConverter().convertIfNecessary(value, requiredType, methodParam);
}public <T> T convertIfNecessary(@Nullable Object value, @Nullable Class<T> requiredType, @Nullable MethodParameter methodParam)throws TypeMismatchException {return doConvert(value, requiredType, methodParam, null);
}private <T> T doConvert(@Nullable Object value,@Nullable Class<T> requiredType,@Nullable MethodParameter methodParam, @Nullable Field field) throws TypeMismatchException {Assert.state(this.typeConverterDelegate != null, "No TypeConverterDelegate");try {if (field != null) {return this.typeConverterDelegate.convertIfNecessary(value, requiredType, field);}else {return this.typeConverterDelegate.convertIfNecessary(value, requiredType, methodParam);}}catch (ConverterNotFoundException | IllegalStateException ex) {throw new ConversionNotSupportedException(value, requiredType, ex);}catch (ConversionException | IllegalArgumentException ex) {throw new TypeMismatchException(value, requiredType, ex);}
}public <T> T convertIfNecessary(@Nullable String propertyName, @Nullable Object oldValue, @Nullable Object newValue,@Nullable Class<T> requiredType, @Nullable TypeDescriptor typeDescriptor) throws IllegalArgumentException {// Custom editor for this type?// 1、判断有无自定义属性编辑器PropertyEditor editor = this.propertyEditorRegistry.findCustomEditor(requiredType, propertyName);ConversionFailedException conversionAttemptEx = null;// No custom editor but custom ConversionService specified?// 2、判断有无自定义ConversionServiceConversionService conversionService = this.propertyEditorRegistry.getConversionService();if (editor == null && conversionService != null && newValue != null && typeDescriptor != null) {TypeDescriptor sourceTypeDesc = TypeDescriptor.forObject(newValue);if (conversionService.canConvert(sourceTypeDesc, typeDescriptor)) {try {return (T) conversionService.convert(newValue, sourceTypeDesc, typeDescriptor);}catch (ConversionFailedException ex) {// fallback to default conversion logic belowconversionAttemptEx = ex;}}}Object convertedValue = newValue;// Value not of required type?// ClassUtils.isAssignableValue(requiredType, convertedValue)-->判断requiredType和convertedValue的class,是否相同,// 相同返回->true;否则返回->false// 3、 如果有自定义属性编辑器或者通过解析出来的值类型与真实的值类型的class不同// 例如<property name="age" value="3"/>,我们需要将value转换成int时if (editor != null || (requiredType != null && !ClassUtils.isAssignableValue(requiredType, convertedValue))) {if (typeDescriptor != null && requiredType != null && Collection.class.isAssignableFrom(requiredType) && convertedValue instanceof String) {TypeDescriptor elementTypeDesc = typeDescriptor.getElementTypeDescriptor();if (elementTypeDesc != null) {Class<?> elementType = elementTypeDesc.getType();if (Class.class == elementType || Enum.class.isAssignableFrom(elementType)) {convertedValue = StringUtils.commaDelimitedListToStringArray((String) convertedValue);}}}if (editor == null) {editor = findDefaultEditor(requiredType);}convertedValue = doConvertValue(oldValue, convertedValue, requiredType, editor);}boolean standardConversion = false;// 4、执行转换if (requiredType != null) {// Try to apply some standard type conversion rules if appropriate.if (convertedValue != null) {// Object类型if (Object.class == requiredType) {return (T) convertedValue;}// 数组类型else if (requiredType.isArray()) {// Array required -> apply appropriate conversion of elements.if (convertedValue instanceof String && Enum.class.isAssignableFrom(requiredType.getComponentType())) {convertedValue = StringUtils.commaDelimitedListToStringArray((String) convertedValue);}return (T) convertToTypedArray(convertedValue, propertyName, requiredType.getComponentType());}// 集合类型else if (convertedValue instanceof Collection) {// Convert elements to target type, if determined.convertedValue = convertToTypedCollection((Collection<?>) convertedValue, propertyName, requiredType, typeDescriptor);standardConversion = true;}// map类型else if (convertedValue instanceof Map) {// Convert keys and values to respective target type, if determined.convertedValue = convertToTypedMap((Map<?, ?>) convertedValue, propertyName, requiredType, typeDescriptor);standardConversion = true;}// 注意:这里是新开启的if,不接上面的else if// 如果经过转换过的值是数组类型,且其长度只有1,那么只取其第0个作为最终转换值if (convertedValue.getClass().isArray() && Array.getLength(convertedValue) == 1) {convertedValue = Array.get(convertedValue, 0);standardConversion = true;}// 如果类型是String,并且是java的基本数据类型或者包装类型// 包括 boolean, byte, char, short, int, long, float, double// 和 Boolean, Byte, Character, Short, Integer, Long, Float, Double// 那么直接调用toString()方法返回即可,注意convertedValue是Object类型,不是基本或包装类型,所以是可以调用toString()方法的if (String.class == requiredType && ClassUtils.isPrimitiveOrWrapper(convertedValue.getClass())) {// We can stringify any primitive value...return (T) convertedValue.toString();}// 如果转换值是String类的实例,但是我们又不能转换为解析出来的requiredType的实例// 例如枚举类型值的注入else if (convertedValue instanceof String && !requiredType.isInstance(convertedValue)) {if (conversionAttemptEx == null && !requiredType.isInterface() && !requiredType.isEnum()) {try {Constructor<T> strCtor = requiredType.getConstructor(String.class);return BeanUtils.instantiateClass(strCtor, convertedValue);}// 删除logger信息catch (NoSuchMethodException ex) {// proceed with field lookupif (logger.isTraceEnabled()) {logger.trace("No String constructor found on type [" + requiredType.getName() + "]", ex);}}catch (Exception ex) {if (logger.isDebugEnabled()) {logger.debug("Construction via String failed for type [" + requiredType.getName() + "]", ex);}}}String trimmedValue = ((String) convertedValue).trim();if (requiredType.isEnum() && "".equals(trimmedValue)) {// It's an empty enum identifier: reset the enum value to null.return null;}convertedValue = attemptToConvertStringToEnum(requiredType, trimmedValue, convertedValue);standardConversion = true;}// 数值类型else if (convertedValue instanceof Number && Number.class.isAssignableFrom(requiredType)) {convertedValue = NumberUtils.convertNumberToTargetClass((Number) convertedValue, (Class<Number>) requiredType);standardConversion = true;}}else {// convertedValue == nullif (requiredType == Optional.class) {convertedValue = Optional.empty();}}// 5、 判定requiredType是否可从convertedValue转换而来,并尝试使用conversionService转换,及处理转换异常if (!ClassUtils.isAssignableValue(requiredType, convertedValue)) {if (conversionAttemptEx != null) {// Original exception from former ConversionService call above...throw conversionAttemptEx;}else if (conversionService != null && typeDescriptor != null) {// ConversionService not tried before, probably custom editor found// but editor couldn't produce the required type...TypeDescriptor sourceTypeDesc = TypeDescriptor.forObject(newValue);if (conversionService.canConvert(sourceTypeDesc, typeDescriptor)) {return (T) conversionService.convert(newValue, sourceTypeDesc, typeDescriptor);}}// 到此为止,可以确定类型不匹配,无法转换,抛出IllegalArgumentException/IllegalStateExceptionStringBuilder msg = new StringBuilder();msg.append("Cannot convert value of type '").append(ClassUtils.getDescriptiveType(newValue));msg.append("' to required type '").append(ClassUtils.getQualifiedName(requiredType)).append("'");if (propertyName != null) {msg.append(" for property '").append(propertyName).append("'");}if (editor != null) {msg.append(": PropertyEditor [").append(editor.getClass().getName()).append("] returned inappropriate value of type '").append(ClassUtils.getDescriptiveType(convertedValue)).append("'");throw new IllegalArgumentException(msg.toString());}else {msg.append(": no matching editors or conversion strategy found");throw new IllegalStateException(msg.toString());}}}if (conversionAttemptEx != null) {if (editor == null && !standardConversion && requiredType != null && Object.class != requiredType) {throw conversionAttemptEx;}}// 6、返回转换值return (T) convertedValue;
}
6.doInvoke方法调用
protected Object doInvoke(Object... args) throws Exception {ReflectionUtils.makeAccessible(getBridgedMethod());try {return getBridgedMethod().invoke(getBean(), args);}catch (IllegalArgumentException ex) {assertTargetBean(getBridgedMethod(), getBean(), args);String text = (ex.getMessage() != null ? ex.getMessage() : "Illegal argument");throw new IllegalStateException(formatInvokeError(text, args), ex);}catch (InvocationTargetException ex) {// Unwrap for HandlerExceptionResolvers ...Throwable targetException = ex.getTargetException();if (targetException instanceof RuntimeException) {throw (RuntimeException) targetException;}else if (targetException instanceof Error) {throw (Error) targetException;}else if (targetException instanceof Exception) {throw (Exception) targetException;}else {throw new IllegalStateException(formatInvokeError("Invocation failure", args), targetException);}}
}
继续上面的分析,接下来就应该设置状态码了:
7.setResponseStatus设置相应状态码以及handleReturnValue处理返回值
private void setResponseStatus(ServletWebRequest webRequest) throws IOException {// 获取HttpStatusHttpStatus status = getResponseStatus();// 未发现HttpStatus直接返回if (status == null) {return;}HttpServletResponse response = webRequest.getResponse();if (response != null) {String reason = getResponseStatusReason();if (StringUtils.hasText(reason)) {/*** 注意 注意 注意:这里是 sendError , 不是 setError* 使用指定的状态码并清空缓冲,发送一个错误响应至客户端。如果响应已经被提交,这个方法会抛出IllegalStateException。* 服务器默认会创建一个HTML格式的服务错误页面作为响应结果,其中包含参数msg指定的文本信息,* 这个HTML页面的内容类型为“text/html”,保留cookies和其他未修改的响应头信息。** 如果一个对应于传入的错误码的错误页面已经在web.xml中声明,那么这个声明的错误页面将会优先于建议的msg参数服务于客户端。*/response.sendError(status.value(), reason);}else {/*** 设置响应的状态码。* 这个方法被用于当响应结果正常时(例如,状态码为SC_OK或SC_MOVED_TEMPORARTLY)设置响应状态码。* 如果发生错误,而且来访者希望调用在web应用中定义的错误页面作为显示,那么应该使用sendError方法代替之。* 使用setStatus方法之后,容器会清空缓冲并设置Location响应头,保留cookies和其他响应头信息。*/response.setStatus(status.value());}}// To be picked up by RedirectViewwebRequest.getRequest().setAttribute(View.RESPONSE_STATUS_ATTRIBUTE, status);
}
如果@RequestMapping设置了@ResponseStatus注解,这里则要根据注解设置放回状态码。如果getResponseStatusReason方法返回了错误信息,则直接通过sendError方法返回给前端。否则将状态码信息设置到response里即可。
在后续处理根据@RequestMapping方法返回值、相应信息等判断,是否将当前请求设置为已经完成。例如当前请求无需返回视图、或者当前请求的放回状态码包含了错误信息,则无需继续后续处理。
假设当前是有视图或者返回值,接下来应该选取合适的HandlerMethodReturnValueHandler并处理返回值,先来看一下HandlerMethodReturnValueHandler的定义:
public interface HandlerMethodReturnValueHandler {/*** 判断当前策略(Handler)是否支持MethodParameter(方法返回类型)*/boolean supportsReturnType(MethodParameter returnType);/*** 处理返回值,为模型添加属性、视图等想关内容*/void handleReturnValue(@Nullable Object returnValue,MethodParameter returnType,ModelAndViewContainer mavContainer,NativeWebRequest webRequest) throws Exception;
}
对于其实现者,只需实现这两个方法即可。这里以ModelAndViewMethodReturnValueHandler为例看其具体的处理过程:
public void handleReturnValue(@Nullable Object returnValue,MethodParameter returnType,ModelAndViewContainer mavContainer,NativeWebRequest webRequest) throws Exception {// 选取合适的HandlerMethodReturnValueHandler,如果没有找到则抛出异常HandlerMethodReturnValueHandler handler = selectHandler(returnValue, returnType);if (handler == null) {throw new IllegalArgumentException("Unknown return value type: " + returnType.getParameterType().getName());}// 处理返回值handler.handleReturnValue(returnValue, returnType, mavContainer, webRequest);
}public void handleReturnValue(@Nullable Object returnValue, MethodParameter returnType,ModelAndViewContainer mavContainer, NativeWebRequest webRequest) throws Exception {// 当前请求返回值为null,无需处理,并且要将当前请求标记已处理if (returnValue == null) {mavContainer.setRequestHandled(true);return;}// 处理引用视图ModelAndView mav = (ModelAndView) returnValue;if (mav.isReference()) {String viewName = mav.getViewName();mavContainer.setViewName(viewName);if (viewName != null && isRedirectViewName(viewName)) {mavContainer.setRedirectModelScenario(true);}}// 处理普通视图(即我们已经制定了具体的View视图,而无需通过视图解析器再次解析)else {View view = mav.getView();mavContainer.setView(view);if (view instanceof SmartView && ((SmartView) view).isRedirectView()) {mavContainer.setRedirectModelScenario(true);}}// 处理属性mavContainer.setStatus(mav.getStatus());mavContainer.addAllAttributes(mav.getModel());
}
这里又涉及到两个概念,即引用视图以及普通视图(姑且命名为普通视图)。引用视图如没有指定具体的View类型,而只是通过ModelAndView对象的setViewName设置了返回视图的名称,则该视图还需要再次被解析;普通视图正好相反。
到这里invokeAndHandle方法的调用就完成了,接下来是getModelAndViewd对返回的模型做了进一步的处理。
8.getModelAndView方法后续处理
private ModelAndView getModelAndView(ModelAndViewContainer mavContainer,ModelFactory modelFactory, NativeWebRequest webRequest) throws Exception {// 1.更新模型modelFactory.updateModel(webRequest, mavContainer);if (mavContainer.isRequestHandled()) {return null;}// 2.获取ModelMap并创建ModelAndViewModelMap model = mavContainer.getModel();ModelAndView mav = new ModelAndView(mavContainer.getViewName(), model, mavContainer.getStatus());// 3.处理引用类型视图和转发类型视图if (!mavContainer.isViewReference()) {mav.setView((View) mavContainer.getView());}if (model instanceof RedirectAttributes) {Map<String, ?> flashAttributes = ((RedirectAttributes) model).getFlashAttributes();HttpServletRequest request = webRequest.getNativeRequest(HttpServletRequest.class);if (request != null) {RequestContextUtils.getOutputFlashMap(request).putAll(flashAttributes);}}return mav;
}
源码剖析-【视图解析渲染】
1. applyDefaultViewName设置默认视图名
private void applyDefaultViewName(HttpServletRequest request, @Nullable ModelAndView mv) throws Exception {// ModelAndView不为空,但是没有View对象则尝试为其生成一个默认的视图名if (mv != null && !mv.hasView()) {String defaultViewName = getDefaultViewName(request);if (defaultViewName != null) {mv.setViewName(defaultViewName);}}
}protected String getDefaultViewName(HttpServletRequest request) throws Exception {return (this.viewNameTranslator != null ? this.viewNameTranslator.getViewName(request) : null);
}public String getViewName(HttpServletRequest request) {String lookupPath = this.urlPathHelper.getLookupPathForRequest(request);return (this.prefix + transformPath(lookupPath) + this.suffix);
}protected String transformPath(String lookupPath) {String path = lookupPath;if (this.stripLeadingSlash && path.startsWith(SLASH)) {path = path.substring(1);}if (this.stripTrailingSlash && path.endsWith(SLASH)) {path = path.substring(0, path.length() - 1);}if (this.stripExtension) {path = StringUtils.stripFilenameExtension(path);}if (!SLASH.equals(this.separator)) {path = StringUtils.replace(path, SLASH, this.separator);}return path;
}
具体工作委托给了RequestToViewNameTranslator接口的实现类,该方法比较简单。
2. applyPostHandle 应用已注册拦截器的后置方法
/*** 应用已注册拦截器的后置方法。** Apply postHandle methods of registered interceptors.*/
void applyPostHandle(HttpServletRequest request, HttpServletResponse response, @Nullable ModelAndView mv) throws Exception {HandlerInterceptor[] interceptors = getInterceptors();if (!ObjectUtils.isEmpty(interceptors)) {for (int i = interceptors.length - 1; i >= 0; i--) {HandlerInterceptor interceptor = interceptors[i];interceptor.postHandle(request, response, this.handler, mv);}}
}
以上这两步都比较简单,接下来看返回视图结果的处理。
3.processDispatchResult简析
private void processDispatchResult(HttpServletRequest request,HttpServletResponse response,@Nullable HandlerExecutionChain mappedHandler,@Nullable ModelAndView mv,@Nullable Exception exception) throws Exception {boolean errorView = false;// 处理异常信息if (exception != null) {if (exception instanceof ModelAndViewDefiningException) {logger.debug("ModelAndViewDefiningException encountered", exception);mv = ((ModelAndViewDefiningException) exception).getModelAndView();}else {Object handler = (mappedHandler != null ? mappedHandler.getHandler() : null);mv = processHandlerException(request, response, handler, exception);errorView = (mv != null);}}// Did the handler return a view to render?// 尝试解析视图和模型;// wasCleared:判断当前模型和视图是否已经被标识为清空,且当前视图和模型是否同时为空if (mv != null && !mv.wasCleared()) {// 解析并呈现视图和模型render(mv, request, response);if (errorView) {WebUtils.clearErrorRequestAttributes(request);}}else {if (logger.isTraceEnabled()) {logger.trace("No view rendering, null ModelAndView returned.");}}if (WebAsyncUtils.getAsyncManager(request).isConcurrentHandlingStarted()) {// Concurrent handling started during a forwardreturn;}// 处理注册的后置完成拦截器if (mappedHandler != null) {mappedHandler.triggerAfterCompletion(request, response, null);}
}
processDispatchResult处理程序选择和处理程序调用的结果,该结果要么是一个ModelAndView,要么是一个要解析为ModelAndView的异常。该方法的核心是render方法,用来解析并呈现视图和模型。这也是一次完整请求最后要处理的部分。
4. render方法分析
protected void render(ModelAndView mv, HttpServletRequest request, HttpServletResponse response) throws Exception {// Determine locale for request and apply it to the response.// 确定请求的区域设置并将其应用于响应。Locale locale = (this.localeResolver != null ? this.localeResolver.resolveLocale(request) : request.getLocale());response.setLocale(locale);View view;// 获取视图名String viewName = mv.getViewName();// 未能获取视图名,则解析视图名if (viewName != null) {// We need to resolve the view name.view = resolveViewName(viewName, mv.getModelInternal(), locale, request);if (view == null) {throw new ServletException("Could not resolve view with name '" + mv.getViewName() +"' in servlet with name '" + getServletName() + "'");}}// 获取到视图名,再次判断当前ModelAndView对象中是否包含真正的View对象,// 因为接下来需要调用View对象的render方法else {// No need to lookup: the ModelAndView object contains the actual View object.view = mv.getView();if (view == null) {throw new ServletException("ModelAndView [" + mv + "] neither contains a view name nor a " +"View object in servlet with name '" + getServletName() + "'");}}// Delegate to the View object for rendering.if (logger.isTraceEnabled()) {logger.trace("Rendering view [" + view + "] ");}try {// 设置返回状态码if (mv.getStatus() != null) {response.setStatus(mv.getStatus().value());}// 调用View对象的render方法完成视图解析view.render(mv.getModelInternal(), request, response);}catch (Exception ex) {if (logger.isDebugEnabled()) {logger.debug("Error rendering view [" + view + "]", ex);}throw ex;}
}
其核心处理委托给了View对象的render方法:
public void render(@Nullable Map<String, ?> model, HttpServletRequest request,HttpServletResponse response) throws Exception {if (logger.isDebugEnabled()) {logger.debug("View " + formatViewName() +", model " + (model != null ? model : Collections.emptyMap()) +(this.staticAttributes.isEmpty() ? "" : ", static attributes " + this.staticAttributes));}// 合并模型Map<String, Object> mergedModel = createMergedOutputModel(model, request, response);// 如果当前请求为下载的话,预先处理请求头prepareResponse(request, response);// 为客户端返回视图renderMergedOutputModel(mergedModel, getRequestToExpose(request), response);
}
这里我们以InternalResourceView为例看看一下具体的返回过程:
protected void renderMergedOutputModel(Map<String, Object> model, HttpServletRequest request, HttpServletResponse response) throws Exception {// Expose the model object as request attributes.// 曝光模型exposeModelAsRequestAttributes(model, request);// Expose helpers as request attributes, if any.// 空的模板方法 //todoexposeHelpers(request);// Determine the path for the request dispatcher.// 获取转发路径String dispatcherPath = prepareForRendering(request, response);// Obtain a RequestDispatcher for the target resource (typically a JSP).// 获取可应用于 forward/include 的RequestDispatcherRequestDispatcher rd = getRequestDispatcher(request, dispatcherPath);if (rd == null) {throw new ServletException("Could not get RequestDispatcher for [" + getUrl() +"]: Check that the corresponding file exists within your web application archive!");}// 处理include// If already included or response already committed, perform include, else forward.if (useInclude(request, response)) {response.setContentType(getContentType());if (logger.isDebugEnabled()) {logger.debug("Including [" + getUrl() + "]");}rd.include(request, response);}// 处理转发else {// Note: The forwarded resource is supposed to determine the content type itself.if (logger.isDebugEnabled()) {logger.debug("Forwarding to [" + getUrl() + "]");}rd.forward(request, response);}
}
对于返回的普通的视图,如JSP等,最后还是调用的RequestDispatcher.forward方法进行转发而已。
面试题:BeanFactory和ApplicationContext的区别?
BeanFactory:
BeanFactory是Spring容器的基础接口,提供了基础的容器访问能力。
BeanFactory提供懒加载方式,只有通过getBean方法调用获取Bean才会进行实例化。
常用的是加载XMLBeanFactory:
public class HelloWorldApp{public static void main(String[] args) {XmlBeanFactory factory = new XmlBeanFactory (new ClassPathResource("beans.xml"));HelloWorld obj = (HelloWorld) factory.getBean("helloWorld");obj.getMessage();}
}
ApplicationContext:
ApplicationContext继承自BeanFactory接口,ApplicationContext包含了BeanFactory中所有的功能。
具有自己独特的特性:
- Bean实例化/串联
- 自动BeanPostProcessor注册
- 自动BeanFactoryPostProcessor注册
- 方便的MessageSource访问(i18n)
- ApplicationEvent发布
ApplicationContext采用的是预加载,每个Bean都在ApplicationContext启动后实例化。
public class HelloWorldApp{public static void main(String[] args) {ApplicationContext context=new ClassPathXmlApplicationContext("beans.xml");HelloWorld obj = (HelloWorld) context.getBean("helloWorld");obj.getMessage();}
}
面试题:BeanFactory和FactoryBean的区别?
BeanFactory
BeanFactory,以Factory结尾,表示它是一个工厂类(接口), 它负责生产和管理bean的一个工厂(IOC容器),在Spring中,所有的Bean都是由BeanFactory(也就是IOC容器)来进行管理的
FactoryBean
FactoryBean,以Bean结尾,表示它是一个Bean,一般情况下,Spring通过反射机制利用的class属性指定实现类实例化Bean,在某些情况下,实例化Bean过程比较复杂,如果按照传统的方式,则需要在中提供大量的配置信息。配置方式的灵活性是受限的,这时采用编码的方式可能会得到一个简单的方案。
Spring为此提供了一个org.springframework.bean.factory.FactoryBean的工厂类接口,用户可以通过实现该接口定制实例化Bean的逻辑。FactoryBean接口对于Spring框架来说占用重要的地位,Spring自身就提供了70多个FactoryBean的实现
// 可以让我们⾃定义Bean的创建过程(完成复杂Bean的定义)
public interface FactoryBean<T> {@Nullable// 返回FactoryBean创建的Bean实例,如果isSingleton返回true,则该实例会放到Spring容器的单例对象缓存池中MapT getObject() throws Exception;@Nullable// 返回FactoryBean创建的Bean类型Class<?> getObjectType();// 返回作⽤域是否单例default boolean isSingleton() {return true;}
}
总结:
- BeanFactory:负责生产和管理Bean的一个工厂接口,提供一个Spring Ioc容器规范,
- FactoryBean: 一种Bean创建的一种方式,对Bean的一种扩展。对于复杂的Bean对象初始化创建使用其可封装对象的创建细节。
相关文章:
Spring源码深度解析三 (MVC)
书接上回 10.MVC 流程&源码剖析 * 问题1:Spring和SpringMVC整合使用时,会创建一个容器还是两个容器(父子容器?) * 问题2:DispatcherServlet初始化过程中做了什么? * 问题3:请求…...

API接口漏洞利用及防御
API是不同软件系统之间进行数据交互和通信的一种方式。API接口漏洞指的是在API的设计、开发或实现过程中存在的安全漏洞,可能导致恶意攻击者利用这些漏洞来获取未授权的访问、篡改数据、拒绝服务等恶意行为。 1.API接口漏洞简介 API(Application Progr…...
解决Spring mvc + JDK17@Resource无法使用的情况
问题描述 我在使用jdk17进行Spring mvc开发时发现 Resource用不了了。 原因 因为JDK版本升级的改动,在Jdk9~17环境下,搭建Springboot项目,会出现原有Resource(javax.annotation.Resource)不存在的问题,导…...

页面禁用鼠标右键,禁用F12打开开发者工具!!!
文章目录 问题分析方法一方法二方法二问题 今天在浏览博主文章时发现无法复制页面上的内容,也无法F12打开开发者工具,更用不了鼠标右键,于是上网找了原因并亲测可用 分析 方法一 将 <body> 改成 <body oncontextmenu=self.event.returnValue=false>方法二 …...
Android中使用JT808协议进行车载终端通信的实现和优化
JT808是一种在中国广泛应用的车载终端通信协议,用于车辆与监控中心之间的数据通信。下面是关于Android平台上使用JT808协议进行通信的一般步骤和注意事项: 协议了解:首先,您需要详细了解JT808协议的规范和定义。该协议包含了通信消…...

导出pdf
该方法导出的pdf大小是A4纸的尺寸,如果大于1页需要根据元素高度进行截断的话,页面元素需要加 class ergodic-dom,方法里面会获取ergodic-dom元素,对元素高度和A4高度做比较,如果大于A4高度,会塞一个空白元素…...
【考研数学】线形代数第三章——向量 | 基本概念、向量组的相关性与线性表示
文章目录 引言一、向量的概念与运算1.1 基本概念1.2 向量运算的性质 二、向量组的相关性与线性表示2.1 理论背景2.2 相关性与线性表示基本概念2.3 向量组相关性与线性表示的性质 引言 向量是线性代数的重点和难点。向量是矩阵,同时矩阵又是由向量构成的,…...

温故知新之:接口和抽象类有什么区别?
本文以下内容基于 JDK 8 版本。 1、接口介绍 接口是 Java 语言中的一个抽象类型,用于定义对象的公共行为。它的创建关键字是 interface,在接口的实现中可以定义方法和常量,其普通方法是不能有具体的代码实现的,而在 JDK 8 之后&…...

回归预测 | MATLAB实现SSA-RF麻雀搜索优化算法优化随机森林算法多输入单输出回归预测(多指标,多图)
回归预测 | MATLAB实现SSA-RF麻雀搜索优化算法优化随机森林算法多输入单输出回归预测(多指标,多图) 目录 回归预测 | MATLAB实现SSA-RF麻雀搜索优化算法优化随机森林算法多输入单输出回归预测(多指标,多图)…...

文旅景区vr体验馆游乐场vr项目是什么
我们知道现在很多的景区或者游玩的地方,以及学校、科技馆、科普馆、商场或公园或街镇,都会建一些关于游玩以及科普学习的项目。从而增加学习氛围或者带动人流量等等。这样的形式,还是有很好的效果呈现。 普乐蛙VR体验馆案例 下面是普乐蛙做的…...
Vue Element upload组件和Iview upload 组件上传文件
今天要分享的是使用这俩个UI组件库的upload组件分别实现调用组件本身的上传方法实现和后台交互。接下来就是开车的时间,请坐稳扶好~ 一、element upload组件传送门 1、html文件 <el-upload ref"uploadRef" :action"uploadUrl" :data"…...

无涯教程-PHP - File 函数
文件系统功能用于访问和操纵文件系统,PHP为您提供了操纵文件的所有功能。 运行时配置 这些功能的行为受php.ini中的设置影响。 NameDefaultChangeableChangelogallow_url_fopen"1"PHP_INI_ALLPHP_INI_ALL in PHP < 4.3.4. PHP_INI_SYSTEM in PHP &l…...

elasticsearch 常用查询 7.4 版本
Elasticsearch 常用查询 match:全文查询exists:查询存在的字段must_not:查询不存在的字段ids:跟据id查询prefix:前缀查询range: 查询范围term:精准查询terms:多术语查询 本文基于es 7.4版本文档…...

ChatGpt 从入门到精通
相关资源下载地址: 基于ChatGPT的国际中文语法教学辅助应用的探讨.pdf 生成式人工智能技术对教育领域的影响-关于ChatGPT的专访.pdf 电子-从ChatGPT热议看大模型潜力.pdf 从图灵测试到ChatGPT——人机对话的里程碑及启示.pdf 正文 ChatGPT 是一种强大的自然语言处理模型&…...
vscode远程调试
安装ssh 在vscode扩展插件搜索remote-ssh安装 如果连接失败,出现 Resolver error: Error: XHR failedscode 报错,可以看这篇帖子vscode ssh: Resolver error: Error: XHR failedscode错误_阿伟跑呀的博客-CSDN博客 添加好后点击左上角的加号࿰…...

Vue3 数据响应式原理
核心: 通过Proxy(代理): 拦截对data任意属性的任意(13种)操作, 包括属性值的读写, 属性的添加, 属性的删除等… 通过 Reflect(反射): 动态对被代理对象的相应属性进行特定的操作 const userData {name: "John",age: 12 };let proxyUser new Proxy(use…...

2023.08.20 学习周报
文章目录 摘要文献阅读1.题目2.现有问题3.解决方案4.本文贡献5.方法5.1 利用长短期记忆网络学习时空演化特征5.2 构建用于气象辅助信息编码的堆叠自编码器5.3 使用多任务学习发现全市通用模式5.4 模型 6. 实验6.1 数据集6.2 实验设置6.3 实验结果 7.结论8.展望 大气污染物传输总…...
)
软件测试技术之单元测试—工程师 Style 的测试方法(2)
怎么写单元测试? JUnit 简介 基本上每种语言和框架都有不错的单元测试框架和工具,例如 Java 的 JUnit、Scala 的 ScalaTest、Python的 unittest、JavaScript 的 Jest 等。上面的例子都是基于 JUnit 的,我们下面就简单介绍下 JUnit。 JUnit…...

项目中超图 for openlayer和超图for cesium同时引入的问题
一个项目中同时用到了超图的openlayer和cesium版本,首先我是外部引入的超图的开发包,你要是通过npm导入的那就没关系了。 <script type"text/javascript" src"/static/openlayer/supermap/ol/iclient-ol.min.js"></script&…...

3D与沉浸式技术,如何助力企业数字化转型?
说起3D,估计许多读者朋友会在第一时间想起《阿凡达》系列和《侏罗纪公园》系列电影大作。每一帧细节纤毫毕现的逼真画面,让观众几乎分不清虚拟与现实,完全沉浸在导演打造的视觉盛宴中。 事实上,除了大家所熟知的3D影视动画之外&am…...

AI-调查研究-01-正念冥想有用吗?对健康的影响及科学指南
点一下关注吧!!!非常感谢!!持续更新!!! 🚀 AI篇持续更新中!(长期更新) 目前2025年06月05日更新到: AI炼丹日志-28 - Aud…...
)
postgresql|数据库|只读用户的创建和删除(备忘)
CREATE USER read_only WITH PASSWORD 密码 -- 连接到xxx数据库 \c xxx -- 授予对xxx数据库的只读权限 GRANT CONNECT ON DATABASE xxx TO read_only; GRANT USAGE ON SCHEMA public TO read_only; GRANT SELECT ON ALL TABLES IN SCHEMA public TO read_only; GRANT EXECUTE O…...
高等数学(下)题型笔记(八)空间解析几何与向量代数
目录 0 前言 1 向量的点乘 1.1 基本公式 1.2 例题 2 向量的叉乘 2.1 基础知识 2.2 例题 3 空间平面方程 3.1 基础知识 3.2 例题 4 空间直线方程 4.1 基础知识 4.2 例题 5 旋转曲面及其方程 5.1 基础知识 5.2 例题 6 空间曲面的法线与切平面 6.1 基础知识 6.2…...

使用van-uploader 的UI组件,结合vue2如何实现图片上传组件的封装
以下是基于 vant-ui(适配 Vue2 版本 )实现截图中照片上传预览、删除功能,并封装成可复用组件的完整代码,包含样式和逻辑实现,可直接在 Vue2 项目中使用: 1. 封装的图片上传组件 ImageUploader.vue <te…...

TRS收益互换:跨境资本流动的金融创新工具与系统化解决方案
一、TRS收益互换的本质与业务逻辑 (一)概念解析 TRS(Total Return Swap)收益互换是一种金融衍生工具,指交易双方约定在未来一定期限内,基于特定资产或指数的表现进行现金流交换的协议。其核心特征包括&am…...

Ascend NPU上适配Step-Audio模型
1 概述 1.1 简述 Step-Audio 是业界首个集语音理解与生成控制一体化的产品级开源实时语音对话系统,支持多语言对话(如 中文,英文,日语),语音情感(如 开心,悲伤)&#x…...
EtherNet/IP转DeviceNet协议网关详解
一,设备主要功能 疆鸿智能JH-DVN-EIP本产品是自主研发的一款EtherNet/IP从站功能的通讯网关。该产品主要功能是连接DeviceNet总线和EtherNet/IP网络,本网关连接到EtherNet/IP总线中做为从站使用,连接到DeviceNet总线中做为从站使用。 在自动…...

OPenCV CUDA模块图像处理-----对图像执行 均值漂移滤波(Mean Shift Filtering)函数meanShiftFiltering()
操作系统:ubuntu22.04 OpenCV版本:OpenCV4.9 IDE:Visual Studio Code 编程语言:C11 算法描述 在 GPU 上对图像执行 均值漂移滤波(Mean Shift Filtering),用于图像分割或平滑处理。 该函数将输入图像中的…...
基于 TAPD 进行项目管理
起因 自己写了个小工具,仓库用的Github。之前在用markdown进行需求管理,现在随着功能的增加,感觉有点难以管理了,所以用TAPD这个工具进行需求、Bug管理。 操作流程 注册 TAPD,需要提供一个企业名新建一个项目&#…...

Mysql8 忘记密码重置,以及问题解决
1.使用免密登录 找到配置MySQL文件,我的文件路径是/etc/mysql/my.cnf,有的人的是/etc/mysql/mysql.cnf 在里最后加入 skip-grant-tables重启MySQL服务 service mysql restartShutting down MySQL… SUCCESS! Starting MySQL… SUCCESS! 重启成功 2.登…...