Three.js之几何体、高光材质、渲染器设置、gui
参考资料
- 阵列立方体和相机适配体验
- Threejs常见几何体简介
- …
- gui.js库(可视化改变三维场景)
知识点
注:基于Three.jsv0.155.0
- 长方体:oxGeometry
- 球体:SphereGeometry
- 圆柱:CylinderGeometry
- 矩形平面:PlaneGeometry
- 圆形平面:CircleGeometry
- 高光网格材质:MeshPhongMaterial(shininess、specular)
- WebGL渲染器设置:antialias 、setPixelRatio、setClearColor
- gui.js库:add、addColor、addFolder、name、step、onChange
- 关键词搜索examples:
Find in Folder
代码实现
阵列立方体
<!DOCTYPE html>
<html lang="en">
<head><meta charset="UTF-8"><title>Three.js</title>
</head><body></body><!-- 具体路径配置,你根据自己文件目录设置,我的是课件中源码形式 --><script type="importmap">{"imports": {"three": "./js/three.module.js","three/addons/": "../three.js/examples/jsm/"}}</script><script type="module">import * as THREE from 'three';import { OrbitControls } from 'three/addons/controls/OrbitControls.js';const width = 800const height = 500// 场景const scene = new THREE.Scene();// 几何体const geometry = new THREE.BoxGeometry(100, 100, 100);// 材质 // MeshBasicMaterial:不受光// MeshLambertMaterial:受光const material = new THREE.MeshLambertMaterial({color: 0x00ffff, //设置材质颜色transparent: true,//开启透明opacity: 0.8,//设置透明度});for (let i = 0; i < 10; i++) {for (let j = 0; j < 10; j++) {const mesh = new THREE.Mesh(geometry, material); //网格模型对象Mesh// 在XOZ平面上分布mesh.position.set(i * 200, 0, j * 200);scene.add(mesh); //网格模型添加到场景中  }}// 坐标系const axes = new THREE.AxesHelper(200);scene.add(axes);// 点光源const pointLight = new THREE.PointLight( 0xffffff, 1.0, 0, 0);pointLight.position.set(2000, 2000, 2000 );scene.add( pointLight );// 环境光const ambientLight = new THREE.AmbientLight( 0xffffff, 0.2);scene.add( ambientLight );// 相机const camera = new THREE.PerspectiveCamera(60, width / height, 1, 8000);// camera.position.set(292, 223, 185);//在原来相机位置基础上拉远,可以观察到更大的范围camera.position.set(2000, 2000, 2000);camera.lookAt(1000, 0, 1000);// 渲染器const renderer = new THREE.WebGLRenderer();renderer.setSize(width, height);renderer.render(scene, camera);document.body.appendChild(renderer.domElement);// 控制器const controls = new OrbitControls(camera, renderer.domElement);controls.target.set(1000, 0, 1000);controls.update();controls.addEventListener('change', () => {renderer.render(scene, camera);});</script>
</html>
常见几何体
<!DOCTYPE html>
<html lang="en">
<head><meta charset="UTF-8"><title>Three.js</title>
</head><body></body><!-- 具体路径配置,你根据自己文件目录设置,我的是课件中源码形式 --><script type="importmap">{"imports": {"three": "./js/three.module.js","three/addons/": "../three.js/examples/jsm/"}}</script><script type="module">import * as THREE from 'three';import { OrbitControls } from 'three/addons/controls/OrbitControls.js';const width = 800const height = 500// 场景const scene = new THREE.Scene();// 几何体:// 正方体// const geometry = new THREE.BoxGeometry(100, 100, 100);// 球体// const geometry = new THREE.SphereGeometry(100);// 圆锥体// const geometry = new THREE.CylinderGeometry(50, 100, 100);// 正方形平面// const geometry = new THREE.PlaneGeometry(100, 100);// 圆形平面const geometry = new THREE.CircleGeometry(100);// 材质const material = new THREE.MeshLambertMaterial({color: 0x00ff00,transparent: true,opacity: 0.8,side: THREE.DoubleSide, //两面可见});// 网格模型:物体const mesh = new THREE.Mesh(geometry, material);mesh.position.set(0, 0, 0);scene.add(mesh);// 坐标系const axes = new THREE.AxesHelper(200);scene.add(axes);// 点光源const pointLight = new THREE.PointLight( 0xffffff, 1.0, 0, 0);pointLight.position.set(2000, 2000, 2000 );scene.add( pointLight );// 环境光const ambientLight = new THREE.AmbientLight( 0xffffff, 0.2);scene.add( ambientLight );// 相机const camera = new THREE.PerspectiveCamera(75, width/height, 0.1, 1000);camera.position.set(200, 200, 200);camera.lookAt(scene.position);// 渲染器const renderer = new THREE.WebGLRenderer();renderer.setSize(width, height);renderer.render(scene, camera);document.body.appendChild(renderer.domElement);// 控制器const controls = new OrbitControls(camera, renderer.domElement);controls.addEventListener('change', () => {renderer.render(scene, camera);});</script>
</html>
高光网格材质
<!DOCTYPE html>
<html lang="en">
<head><meta charset="UTF-8"><title>Three.js</title>
</head><body></body><!-- 具体路径配置,你根据自己文件目录设置,我的是课件中源码形式 --><script type="importmap">{"imports": {"three": "./js/three.module.js","three/addons/": "../three.js/examples/jsm/"}}</script><script type="module">import * as THREE from 'three';import { OrbitControls } from 'three/addons/controls/OrbitControls.js';const width = 800const height = 500// 场景const scene = new THREE.Scene();// 几何体:// 球体// const geometry = new THREE.BoxGeometry(100, 100, 100);const geometry = new THREE.SphereGeometry(100);// 材质const material = new THREE.MeshPhongMaterial({color: 0x00ff00,shininess: 80, //高光部分的亮度,默认30specular: 0x444444, //高光部分的颜色});// 网格模型:物体const mesh = new THREE.Mesh(geometry, material);mesh.position.set(0, 0, 0);scene.add(mesh);// 坐标系const axes = new THREE.AxesHelper(200);scene.add(axes);// 点光源const pointLight = new THREE.PointLight( 0xffffff, 1.0, 0, 0);pointLight.position.set(2000, 2000, 2000 );scene.add( pointLight );// 环境光const ambientLight = new THREE.AmbientLight( 0xffffff, 0.2);scene.add( ambientLight );// 相机const camera = new THREE.PerspectiveCamera(75, width/height, 0.1, 1000);camera.position.set(200, 200, 200);camera.lookAt(scene.position);// 渲染器const renderer = new THREE.WebGLRenderer();renderer.setSize(width, height);renderer.render(scene, camera);document.body.appendChild(renderer.domElement);// 控制器const controls = new OrbitControls(camera, renderer.domElement);controls.addEventListener('change', () => {renderer.render(scene, camera);});</script>
</html>
WebGL渲染器设置
<!DOCTYPE html>
<html lang="en">
<head><meta charset="UTF-8"><title>Three.js</title>
</head><body></body><!-- 具体路径配置,你根据自己文件目录设置,我的是课件中源码形式 --><script type="importmap">{"imports": {"three": "./js/three.module.js","three/addons/": "../three.js/examples/jsm/"}}</script><script type="module">import * as THREE from 'three';import { OrbitControls } from 'three/addons/controls/OrbitControls.js';const width = 800const height = 500// 场景const scene = new THREE.Scene();// 几何体:// 球体const geometry = new THREE.BoxGeometry(100, 100, 100);// 材质const material = new THREE.MeshLambertMaterial({color: 0x00ff00, //设置材质颜色transparent: true,//开启透明opacity: 0.8,//设置透明度});// 网格模型:物体const mesh = new THREE.Mesh(geometry, material);mesh.position.set(0, 0, 0);scene.add(mesh);// 坐标系const axes = new THREE.AxesHelper(200);scene.add(axes);// 点光源const pointLight = new THREE.PointLight( 0xffffff, 1.0, 0, 0);pointLight.position.set(2000, 2000, 2000 );scene.add( pointLight );// 环境光const ambientLight = new THREE.AmbientLight( 0xffffff, 0.2);scene.add( ambientLight );// 相机const camera = new THREE.PerspectiveCamera(75, width/height, 0.1, 1000);camera.position.set(200, 200, 200);camera.lookAt(scene.position);// 渲染器const renderer = new THREE.WebGLRenderer({antialias: true});// 设置设备比,固定写法renderer.setPixelRatio(window.devicePixelRatio);// 设置背景色renderer.setClearColor(0x444444, 1);// 设置渲染器的尺寸renderer.setSize(width, height);renderer.render(scene, camera);document.body.appendChild(renderer.domElement);// 控制器const controls = new OrbitControls(camera, renderer.domElement);controls.addEventListener('change', () => {renderer.render(scene, camera);});</script>
</html>
gui.js库
<!DOCTYPE html>
<html lang="en">
<head><meta charset="UTF-8"><title>Three.js</title>
</head><body></body><!-- 具体路径配置,你根据自己文件目录设置,我的是课件中源码形式 --><script type="importmap">{"imports": {"three": "./js/three.module.js","three/addons/": "../three.js/examples/jsm/"}}</script><script type="module">import * as THREE from 'three';import { OrbitControls } from 'three/addons/controls/OrbitControls.js';import { GUI } from 'three/addons/libs/lil-gui.module.min.js';const width = 800const height = 500const gui = new GUI();gui.domElement.style.right = '0px';gui.domElement.style.width = '300px';// 场景const scene = new THREE.Scene();// 几何体:// 球体const geometry = new THREE.BoxGeometry(100, 100, 100);// 材质const material = new THREE.MeshLambertMaterial({color: 0x00ff00, //设置材质颜色transparent: true,//开启透明opacity: 0.8,//设置透明度});console.log('🚀 ~ file: 1.19gui.js库(可视化改变三维场景).html:42 ~ material:', material)// 网格模型:物体const mesh = new THREE.Mesh(geometry, material);mesh.position.set(0, 0, 0);scene.add(mesh);// 坐标系const axes = new THREE.AxesHelper(200);scene.add(axes);// 点光源const pointLight = new THREE.PointLight( 0xffffff, 1.0, 0, 0);pointLight.position.set(2000, 2000, 2000 );scene.add( pointLight );// 环境光const ambientLight = new THREE.AmbientLight( 0xffffff, 0.2);scene.add( ambientLight );// 相机const camera = new THREE.PerspectiveCamera(75, width/height, 0.1, 1000);camera.position.set(200, 200, 200);camera.lookAt(scene.position);// 渲染器const renderer = new THREE.WebGLRenderer({antialias: true});// 设置设备比,固定写法renderer.setPixelRatio(window.devicePixelRatio);// 设置背景色renderer.setClearColor(0x444444, 1);// 设置渲染器的尺寸renderer.setSize(width, height);renderer.render(scene, camera);document.body.appendChild(renderer.domElement);// 控制器const controls = new OrbitControls(camera, renderer.domElement);controls.addEventListener('change', () => {renderer.render(scene, camera);});var guiObj = {color: '0xffffff',obj: {左: -100,中: 0,右: 200},bool: false,}// 动画渲染// 跟踪时间function render() {requestAnimationFrame(render);guiObj.bool && (mesh.rotation.y += 0.01);renderer.render(scene, camera);}render();const ambientFoloer = gui.addFolder('环境光');ambientFoloer.close();// gui动态改变光的强度ambientFoloer.add(ambientLight, 'intensity', 0, 2).name('环境光强度');const materialFoloer = gui.addFolder('材料');materialFoloer.close();// gui动态改变材料颜色materialFoloer.addColor(guiObj, 'color').name('材料颜色').onChange(function (value) {  mesh.material.color.set(value)});const meshFoloer = gui.addFolder('物体');meshFoloer.close();// gui动态改变材料颜色meshFoloer.add(mesh.position, 'y', [-100, 0 ,200]).name('物体y轴');// gui动态改变材料颜色meshFoloer.add(mesh.position, 'x',  {左: -100,中: 0,右: 200}).name('物体x轴');meshFoloer.add(mesh.position, 'x', 0, 100).step(2);meshFoloer.add(mesh.position, 'y', 0, 100);meshFoloer.add(mesh.position, 'z', 0, 100);meshFoloer.add(guiObj, 'bool').name('是否旋转');</script>
</html>
相关文章:

Three.js之几何体、高光材质、渲染器设置、gui
参考资料 阵列立方体和相机适配体验Threejs常见几何体简介…gui.js库(可视化改变三维场景) 知识点 注:基于Three.jsv0.155.0 长方体:oxGeometry球体:SphereGeometry圆柱:CylinderGeometry矩形平面:PlaneGeometry圆…...
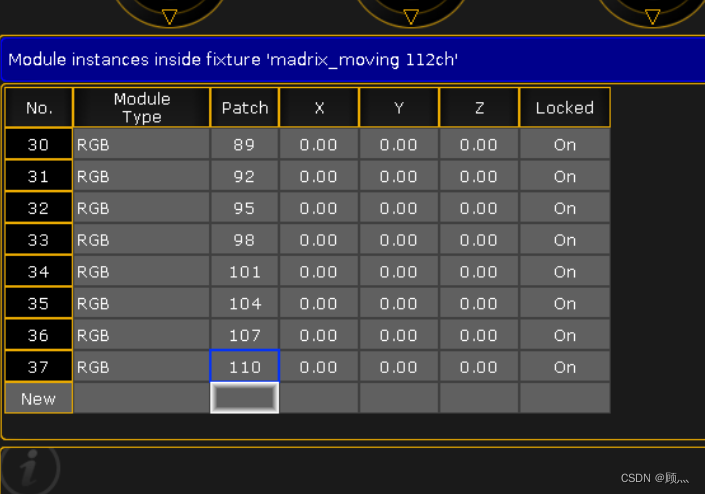
UE4如何连接dmx---摇头矩阵灯具的创建
UE4如何连接dmx---摇头矩阵灯具的创建 开始创建库! 然后我们开始创建多少个灯珠(注意了:这是矩阵灯,是看灯珠的) 那么这里我们创建6X6灯珠 下面设置灯珠的属性,灯珠有什么属性呢,只有颜色属性&…...
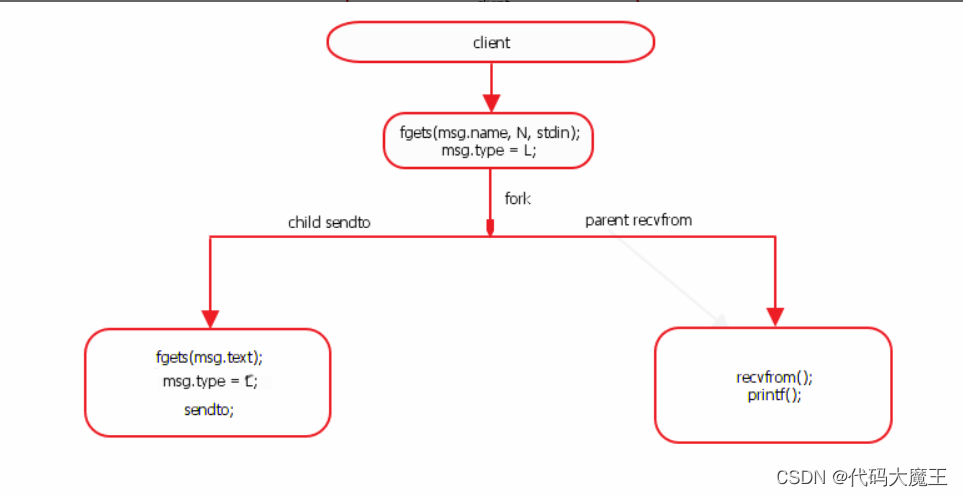
网络聊天室
一、项目要求 利用UDP协议,实现一套聊天室软件。服务器端记录客户端的地址,客户端发送消息后,服务器群发给各个客户端软件。 问题思考 客户端会不会知道其它客户端地址? UDP客户端不会直接互连,所以不会获知其它客…...
ChatGPT只是玩具:生成式人工智能在不同行业的应用
源自:IT经理网 生成式人工智能的十一个行业用例 打开生成式 AI的正确姿势 声明:公众号转载的文章及图片出于非商业性的教育和科研目的供大家参考和探讨,并不意味着支持其观点或证实其内容的真实性。版权归原作者所有,如转载稿涉及版权等问题&…...

RestFul的风格是什么
RestFul的风格是什么? 当我们谈论RESTful风格时,它指的是一种设计和构建网络应用程序的原则和约定。以下是RESTful风格的一些主要特点: 资源:将应用程序的功能封装为资源,每个资源都有一个唯一的标识符(U…...

【自制C/C++小项目JuLongEditor】使用Windows控制台API来制作一个简单的文本编辑器
2023年8月22日,周二下午 昨天花了一个下午和晚上来制作的, 实现了一些基本的功能, 但由于代码只有130行,所以存在很多不足之处 GitHub:GitHub - JuLongZhiLu/JuLongEditor: C/C小项目,使用Windows控制台…...
中国芯,寻找新赛道迫在眉睫
北京华兴万邦管理咨询有限公司 商瑞 陈皓 近期国内半导体行业的热点可以用两个“有点多”来描述,一个是中国芯群体中上市公司股价闪崩的有点多,另一个是行业和企业的活动有点多。前者说明了许多国内芯片设计企业(fabless商业模式)…...

C++ 好用的格式化库--fmt
背景 fmt 库是一个开源的 C 格式化库,它提供了一种简洁、安全和高效的方式来进行字符串格式化。该库的设计目标是提供与 Python 的字符串格式化语法类似的功能,同时保持 C 的类型安全性和性能。 下载与安装 官网下载 fmt 官网地址:https:…...
)
微信小程序教学系列(3)
微信小程序教学系列 第三章:小程序高级开发技巧 1. 小程序API的使用 小程序API简介 小程序API是小程序提供的一系列接口,用于实现各种功能和操作。通过调用小程序API,可以实现页面跳转、数据存储、网络请求等功能。 使用小程序API的步骤…...

ORB-SLAM系列算法演进
ORB-SLAM算法是特征点法的代表,当前最新发展的ORB-SLAM3已经将相机模型抽象化,适用范围非常广,虽然ORB-SLAM在算法上的创新并不是很丰富,但是它在工程上的创新确实让人耳目一新,也能更好的为AR、机器人的算法实现落地。…...
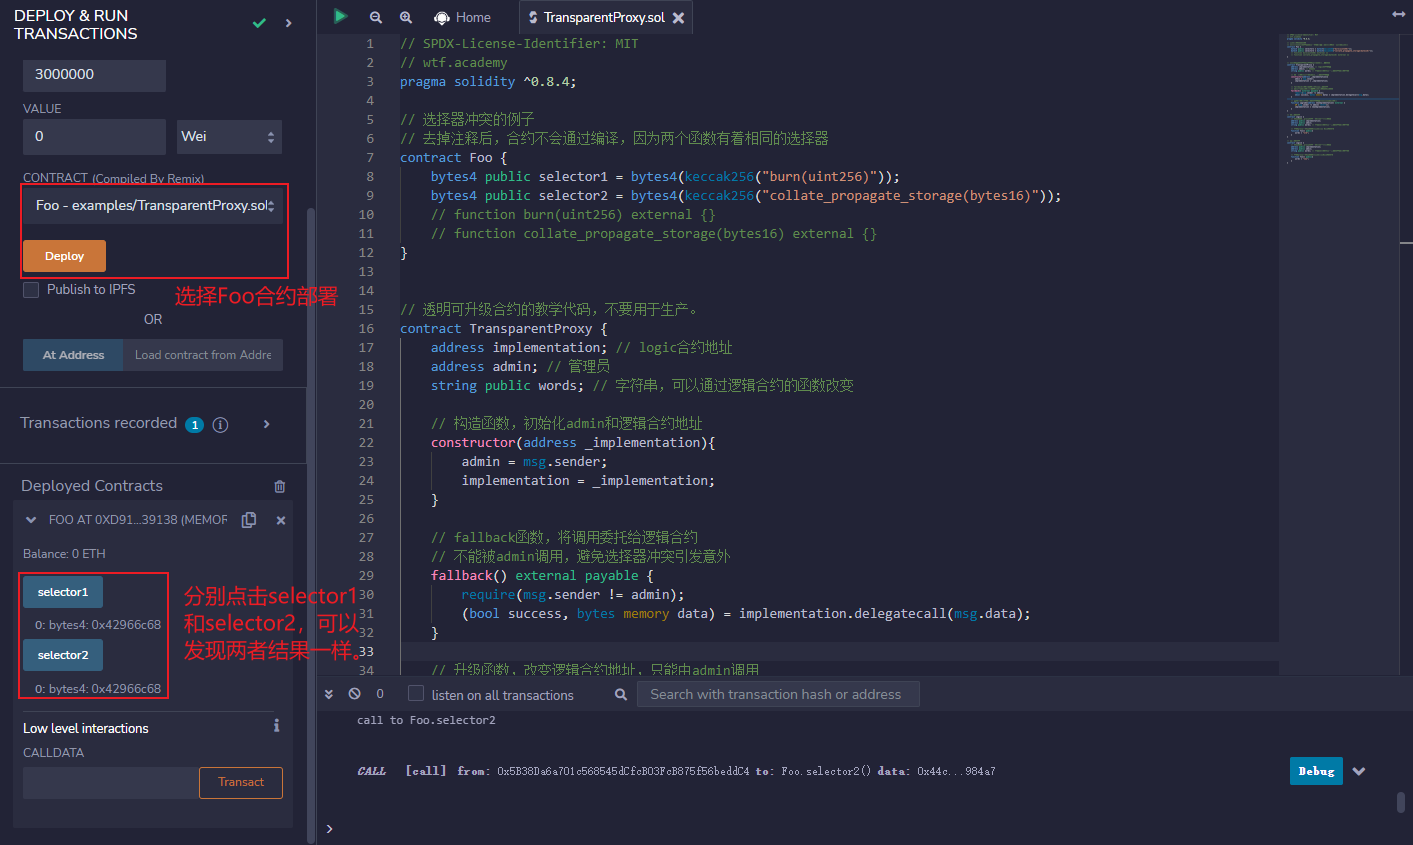
solidity0.8.0的应用案例11:透明代理合约
选择器冲突 智能合约中,函数选择器(selector)是函数签名的哈希的前4个字节。例如mint(address account)的选择器为bytes4(keccak256("mint(address)")),也就是0x6a627842. 由于函数选择器仅有4个字节,范围很小,因此两个不同的函数可能会有相同的选择器,例如…...
最新消息:谷歌将在Chromebook上运用UWB技术,无线通信更上一层
超宽带(UWB)技术是一种创新的短距离无线通信技术,具有高速数据传输和精确定位物体位置的优势。尽管该技术已经存在一段时间,但最近开始广泛应用于各种设备中。据最新报道,Pixel Watch 2可能会搭载UWB模块,这…...
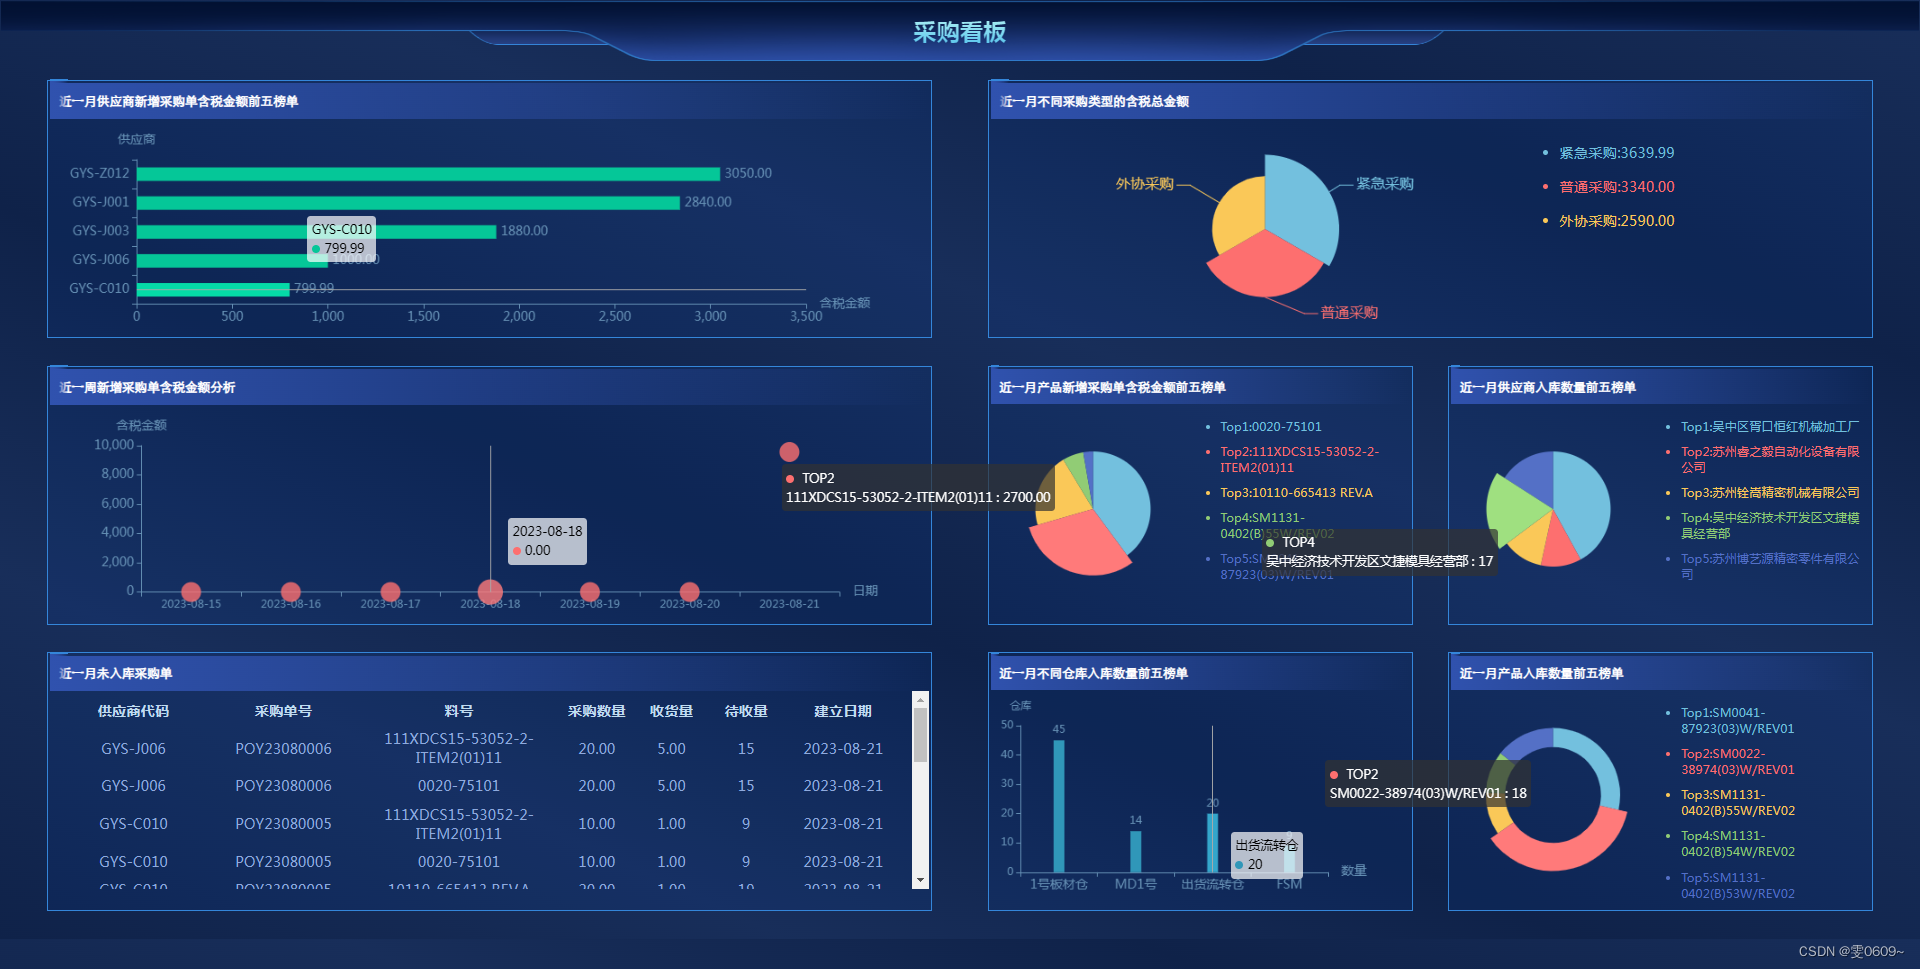
php+echarts实现数据可视化实例3
效果 全部代码 <?php include(includes/session.inc); include(includes/SQL_CommonFunctions.inc); ?> <!DOCTYPE html> <html lang"en"> <head><meta charset"UTF-8"><meta http-equiv"X-UA-Compatible" …...

ubuntu下安装Sphinx,编译pdf
安装WSL2: 以管理员身份打开PowerShellwsl --install 来安装其他 Linux 发行版wsl --list --verbose 查看安装在 Windows 计算机上的 Linux 发行版列表 安装sphinx: sudo apt-get updatesudo apt-get install python3-sphinxsudo apt-get install lat…...
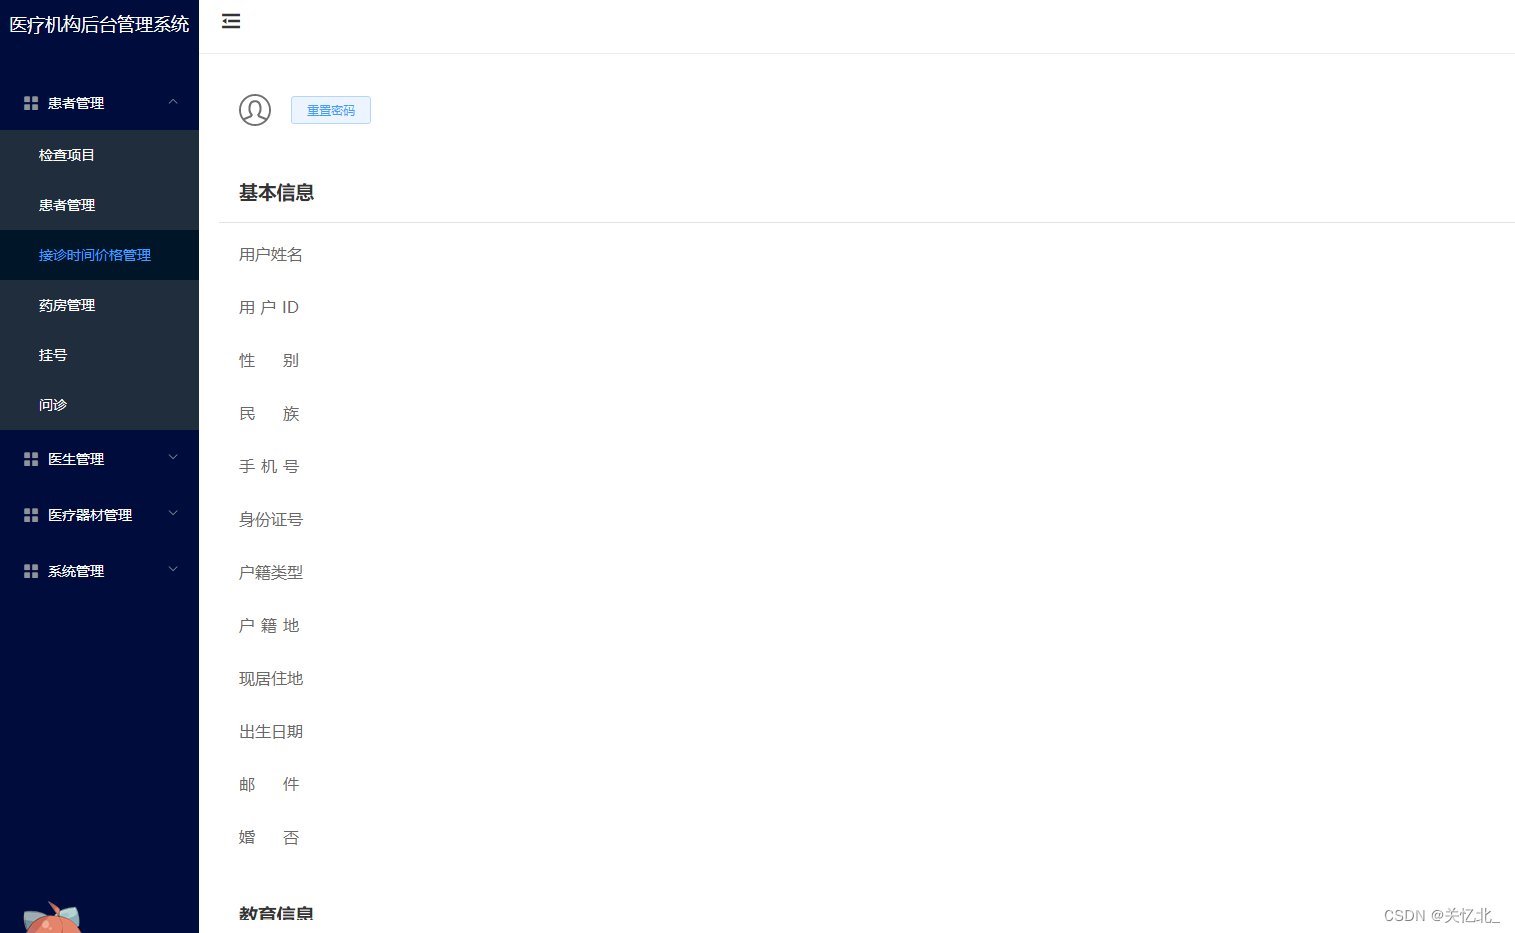
vue2.x项目从0到1(七)之用户权限
此章节偏理论知识 对于小一点的项目 比如说角色都是平级的 那我们直接像之前 vue2.x项目从0到1(二)之后台管理侧边栏(动态渲染路由以及高亮)_vue动态渲染侧边栏_关忆北_的博客-CSDN博客这样渲染就行了 但是一旦项目大了 …...
上传镜像到阿里云的ACR
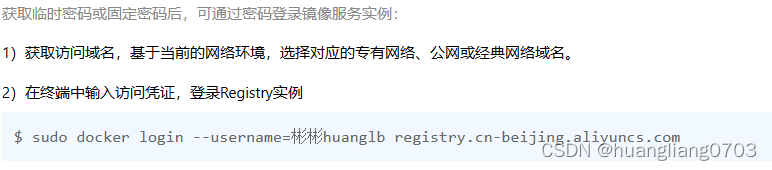
1、开通阿里云ACR 2、在ACR 中创建命名空间 3、本地安装docker 4、登录到 开通ACR,需要配置访问凭证 [rootmaster ~]# docker login --username***lb registry.cn-beijing.aliyuncs.com Password: 5、给镜像打标签 [rootmaster ~]# docker images REPOSITORY …...
)
ahooks.js:一款强大的React Hooks库及其API使用教程(五)
一、ahooks.js简介二、ahooks.js安装三、继续ahooks.js API的介绍与使用教程61. useEventTarget62. useExternal63. useFavicon64. useMutationObserver65. useLongPress66. useScroll67. useResponsive68. useFocusWithin69. useControllableValue70. useEventEmitter 一、aho…...

MySQL TCL 事务控制
文章目录 1.事务四大特性2.事务并发问题3.事务隔离级别4.隔离级别查看与设置5.动提交事务5.1 查看自动提交事务5.2 关闭或开启自动提交事务 6.事务执行的基本流程7.设置事务的保存点参考文献 说到事务控制,先说一下数据库的事务是什么以及 MySQL 中我们必知的知识点…...
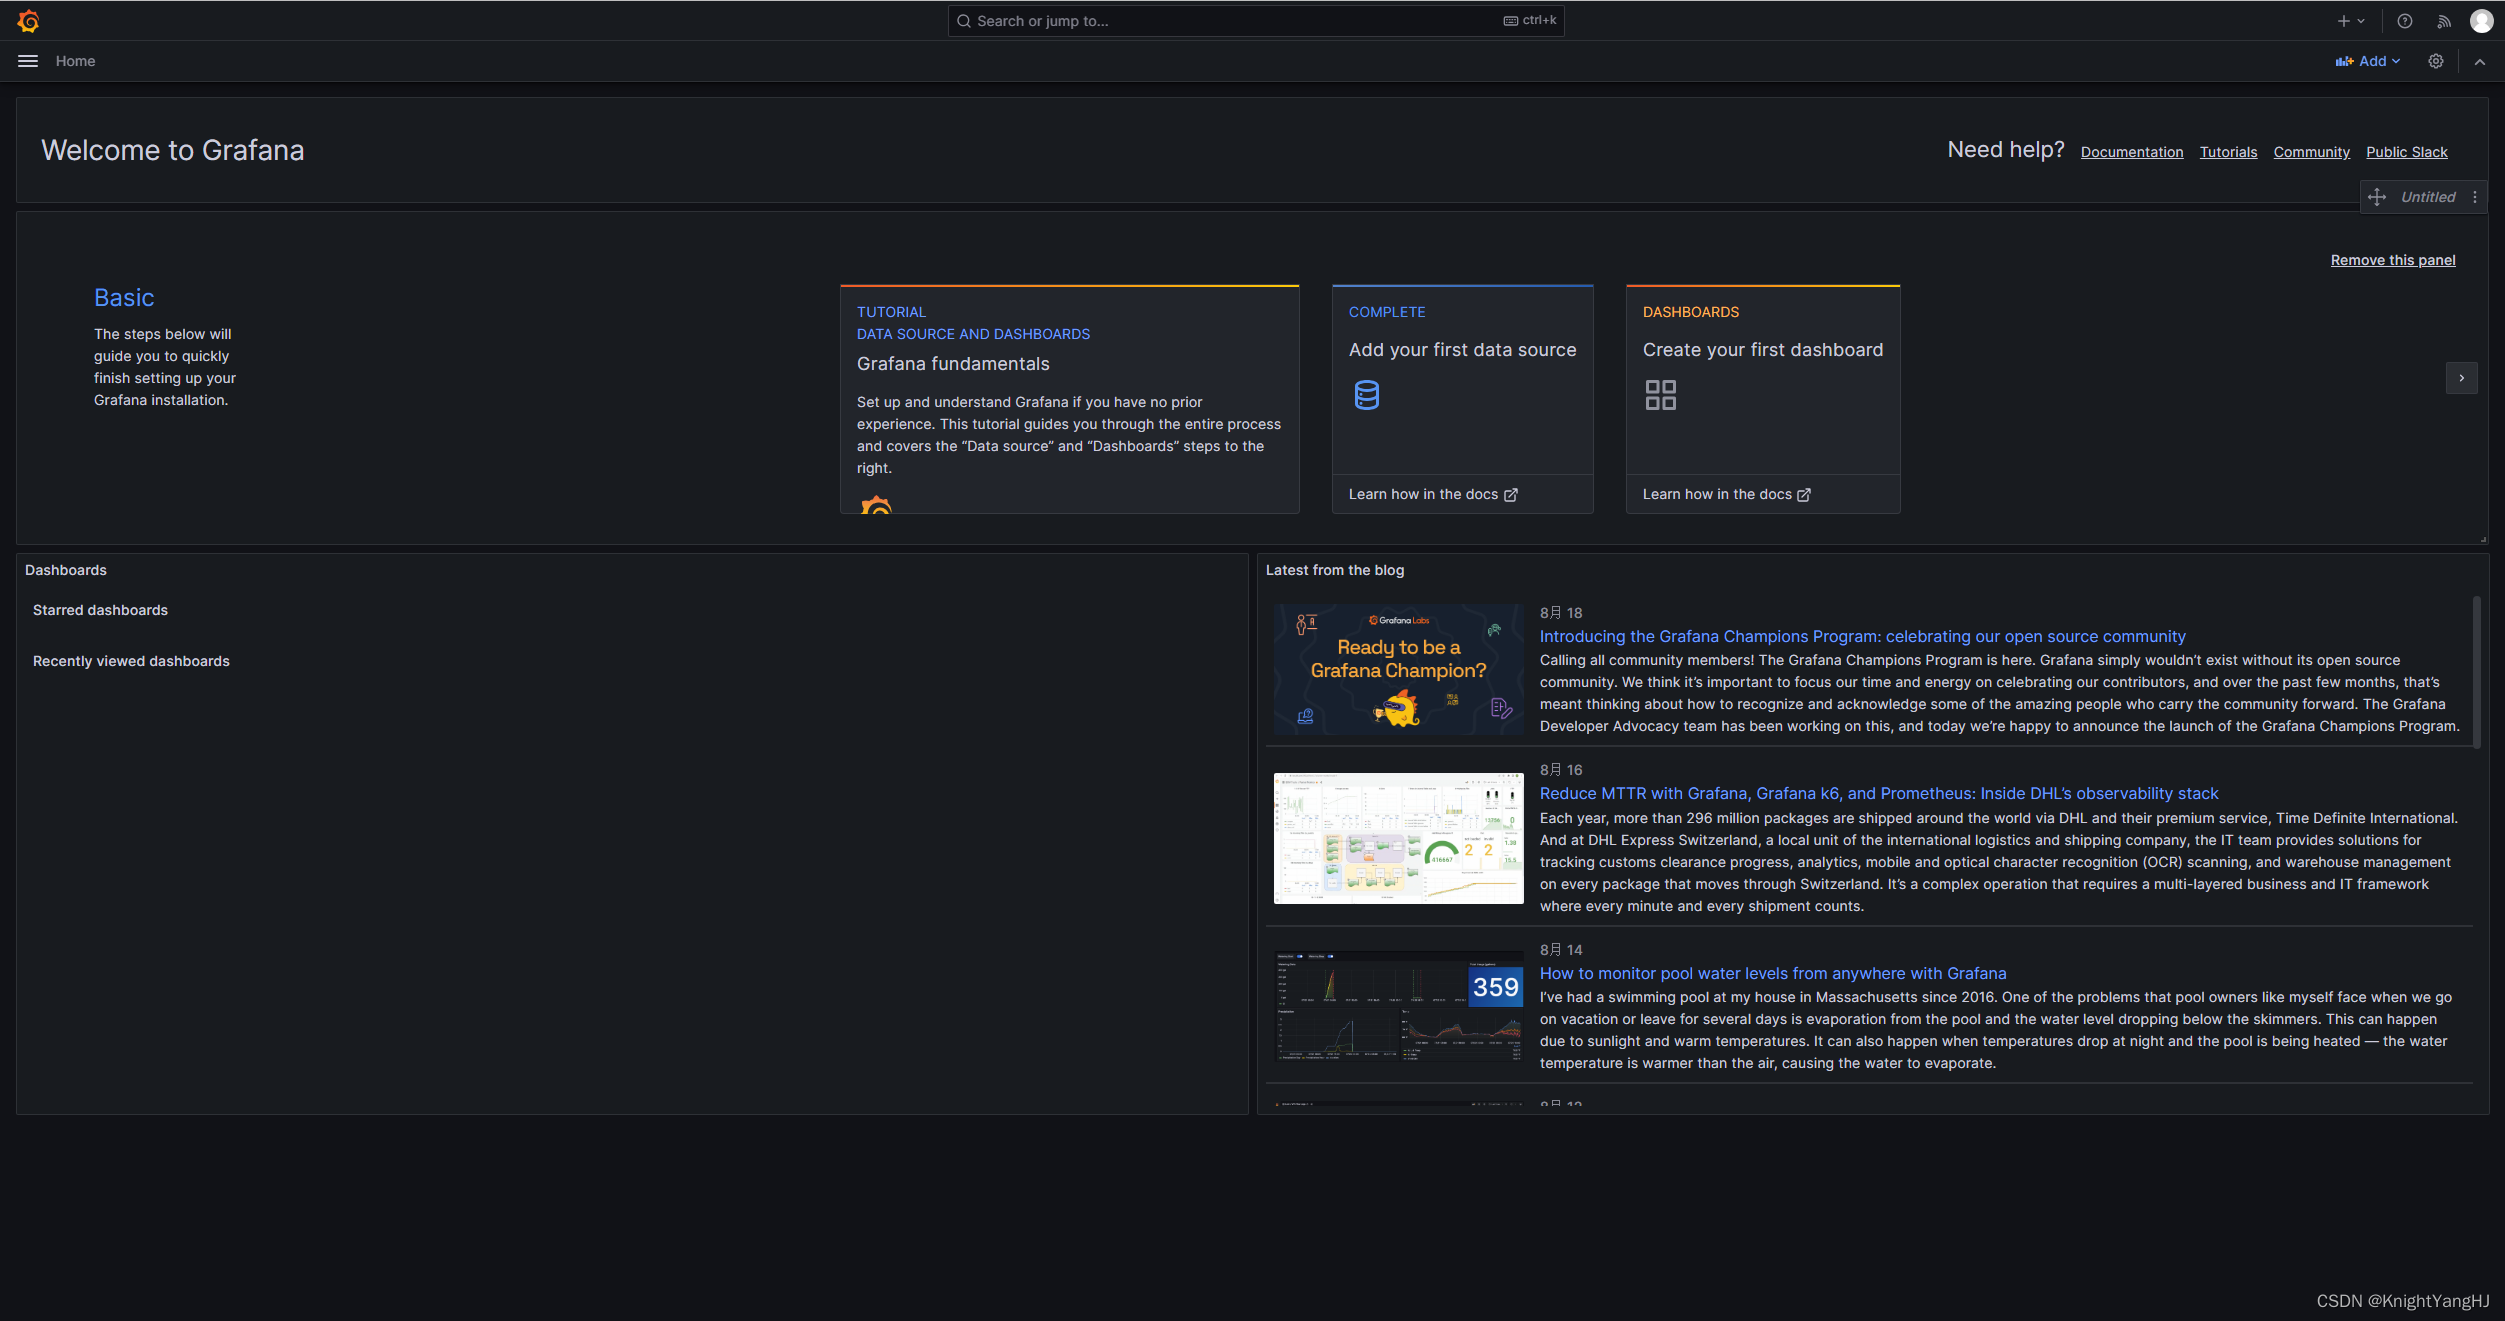
【Ubuntu】从Graylog到Grafana Loki:构建更强大的网络设备管理和监控系统
在将Graylog部署到生产环境时,我们遇到了一些问题,其中最主要的是无法安装MongoDB并且无法随时重启机器去修改BIOS设置来修复问题 【WARNING: MongoDB 5.0 requires a CPU with AVX support, and your current system does not appear to have that! 】。…...
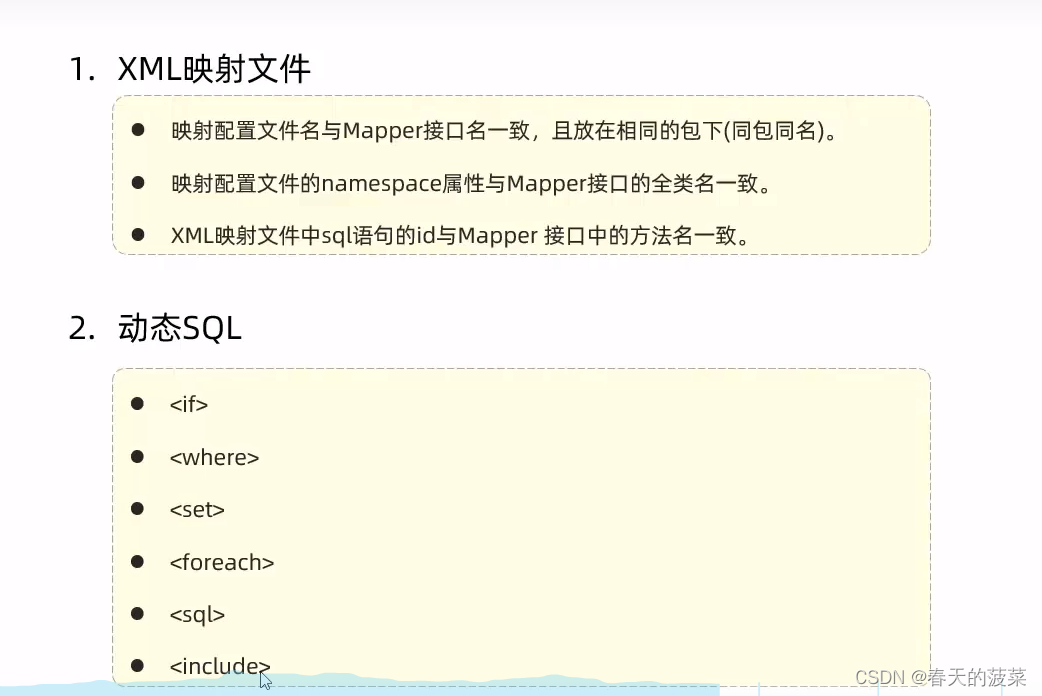
[JavaWeb]【八】web后端开发-Mybatis
目录 一 介绍 二 Mybatis的入门 2.1 快速入门 2.1.1 准备SpringBoot工程 2.1.2 创建数据库mybatis以及对应库表user 2.1.3 创建User实体类 2.1.4 配置application.properties数据库连接信息 2.1.5 编写sql语句(注解方式) 2.1.6 测试运行 2.1.7 配…...

用Python手搓一个简易飞行仿真器:从状态机到轨迹计算的保姆级教程
用Python手搓一个简易飞行仿真器:从状态机到轨迹计算的保姆级教程 飞行仿真技术听起来像是航空航天工程师的专属领域,但你知道吗?用Python和一些基础库,我们完全可以构建一个简化版的飞行仿真系统。本文将带你从零开始࿰…...
抛开Transformer,我们还能如何理解Attention机制?
对于许多软件测试从业者而言,“Attention机制”这个词常常与Transformer、BERT、GPT这些大模型名词紧密捆绑,仿佛是深度学习“黑盒”中一个难以触及的复杂组件。然而,当我们暂时抛开Transformer这棵参天大树,回归到Attention机制本…...
流水线搭建)
Wan2.2-I2V-A14B持续集成/持续部署(CI/CD)流水线搭建
Wan2.2-I2V-A14B持续集成/持续部署(CI/CD)流水线搭建 1. 引言 在AI模型服务开发中,频繁的迭代更新是常态。每次代码修改后手动执行测试、构建和部署不仅效率低下,还容易出错。本文将带你从零开始,为Wan2.2-I2V-A14B模…...

AssetRipper终极指南:轻松提取Unity游戏资源的完整教程
AssetRipper终极指南:轻松提取Unity游戏资源的完整教程 【免费下载链接】AssetRipper GUI Application to work with engine assets, asset bundles, and serialized files 项目地址: https://gitcode.com/GitHub_Trending/as/AssetRipper 还在为无法获取Uni…...

基于Qwen3.5-2B的操作系统概念学习助手
基于Qwen3.5-2B的操作系统概念学习助手 1. 为什么需要操作系统学习助手 计算机专业的学生在学习操作系统时,常常面临抽象概念难以理解、理论实践脱节的问题。传统教材中的进程、线程、死锁等概念,如果仅靠文字描述,往往让初学者感到晦涩难懂…...

IndexTTS2 V23应用案例:打造智能客服语音,让机器说话更有人情味
IndexTTS2 V23应用案例:打造智能客服语音,让机器说话更有人情味 1. 为什么智能客服需要情感语音? 在当今的客户服务场景中,冰冷的机械语音正在被市场淘汰。研究表明,带有适当情感的语音交互能显著提升用户体验&#…...

OFA-VE开源多模态分析系统:GPU算力优化部署实操手册
OFA-VE开源多模态分析系统:GPU算力优化部署实操手册 1. 系统概述与核心价值 OFA-VE是一个基于阿里巴巴达摩院OFA大模型构建的多模态推理平台,专门用于分析图像内容与文本描述之间的逻辑关系。这个系统不仅能看懂图片内容,还能理解文字描述&…...

28 openclaw负载均衡实现:应对高并发场景的解决方案
背景/痛点在OpenClaw项目中,随着业务规模的扩大,单节点处理能力逐渐成为瓶颈。特别是在高并发场景下,如秒杀活动、实时数据推送等,如何合理分配负载、避免单点故障、提升整体吞吐量,成为架构设计的核心挑战。传统的负载…...

Intv_AI_MK11 解决 403 Forbidden 错误:模型服务访问权限配置详解
Intv_AI_MK11 解决 403 Forbidden 错误:模型服务访问权限配置详解 1. 问题背景与解决思路 当你兴致勃勃地准备调用 Intv_AI_MK11 模型服务时,突然收到一个冷冰冰的 "403 Forbidden" 错误,这种体验就像拿着门票却被拦在演唱会门外…...

SSM+JSP动漫网站源码+论文
代码可以查看文章末尾⬇️联系方式获取,记得注明来意哦~🌹 分享万套开题报告任务书答辩PPT模板 作者完整代码目录供你选择: 《SpringBoot网站项目》1800套 《SSM网站项目》1500套 《小程序项目》1600套 《APP项目》1500套 《Python网站项目》…...