K8S最新版本集群部署(v1.28) + 容器引擎Docker部署(下)
温故知新
- 📚第三章 Kubernetes各组件部署
- 📗安装kubectl(可直接跳转到安装kubeadm章节,直接全部安装了)
- 📕下载kubectl安装包
- 📕执行kubectl安装
- 📕验证kubectl
- 📗安装kubeadm
- 📕添加yum存储库配置文件kubernetes.repo
- 📕安装kubeadm & kubelet & kubectl (前面安装kubectl 可以放到这里一块安装)
- 📕查看版本信息
- 📕启动kubelet
- 📘kubelet启动、查看状态、日志命令
- 📗其他机器Kubernetes组件安装
- 📕关闭防火墙、swap、selinux
- 📕创建sudo安装用户kubernetes
- 📕添加kubernetes对应的yum存储库配置文件
- 📕安装kubeadm & kubelet & kubectl
- 📕安装命令验证
- 📚第四章 kubernetes集群部署
- 📗安装docker(r1、r2、r3都要安装)
- 📕yum 方式安装
- 📗安装cri-dockerd(r1、r2、r3都要安装)
- 📕下载rpm安装包
- 📕通过rpm安装
- 📕启动cri-dockerd
- 📗初始化K8S集群
- 📕配置/etc/hosts(r1、r2、r3三台机器)
- 📕配置初始化系统参数
- 📘module参数
- 📘sysctl 参数
- 📕Master节点初始化(对应r1机器)
- 📘kubeadm init
- 📘admin.conf
- 📕安装网络插件(r1、r2、r3机器)
- 📕Node节点假如到Master(对应r2、r3机器)
- 📚总结
- ⁉️问题记录
- ❓问题一:yum安装软件提示“网络不可达”
- ❗解决方式一:重启虚拟机网络`sudo systemctl restart network`
- ❕其他:替换镜像地址为阿里云的命令
- ❓问题二:容器运行时名词解释
- ❓问题三:获取阿里云镜像加速器地址步骤
- ❓问题四:kubeadm init执行失败
- ❓错误详情一:`detected that the sandbox image "registry.k8s.io/pause:3.6" of the container runtime is inconsistent with that used by kubeadm. It is recommended that using "registry.aliyuncs.com/google_containers/pause:3.9" as the CRI sandbox image`
- ❓错误详情二:`[kubelet-check] Initial timeout of 40s passed.`
- ❗最终解决:修改`vi /usr/lib/systemd/system/cri-docker.service`
- ❓问题五:kubeadm join执行失败
- ❓错误详情一:`[WARNING Hostname]: hostname "renxiaozhao03"could not be reached`
- ❗解决方式添加`--node-name`参数,指定主机名
- ❓错误详情二:超时报错`error execution phase kubelet-start: error uploading crisocket: nodes "k8s-node01" not found`
- ❗解决方式使用`kubeadm reset`重置之后再添加`join`
- 🦒弯路历程
🔼上一集:K8S最新版本集群部署(v1.28) + 容器引擎Docker部署(上)
*️⃣主目录:温故知新专栏
🔽下一集:Kubernetes可视化管理工具Kuboard部署使用及k8s常用命令梳理记录
📚第三章 Kubernetes各组件部署
📗安装kubectl(可直接跳转到安装kubeadm章节,直接全部安装了)
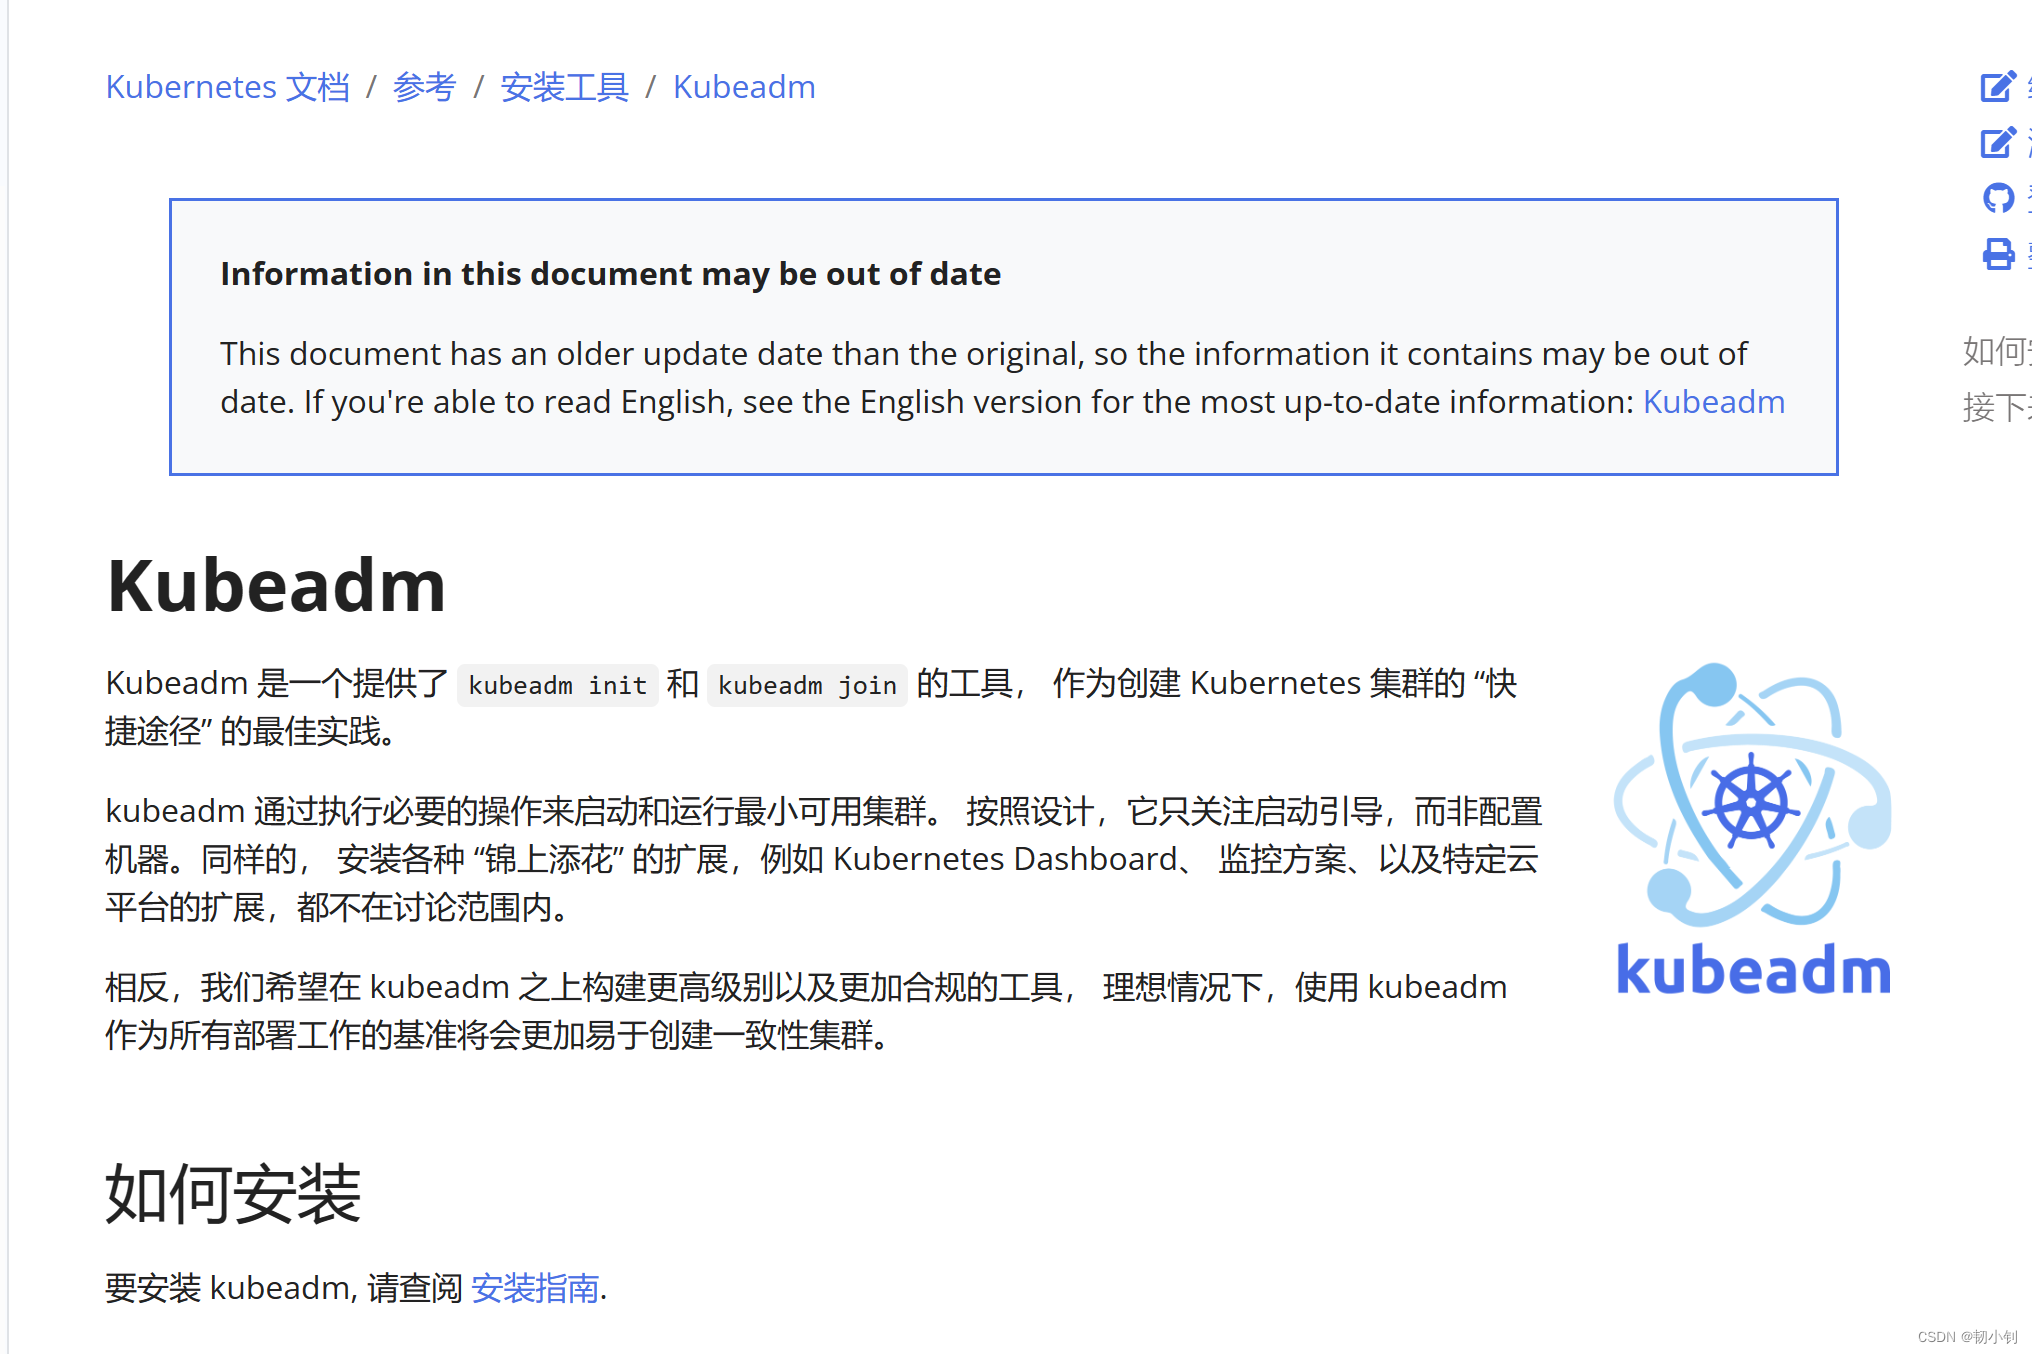
kubectl 是使用 Kubernetes API 与 Kubernetes 集群的控制面进行通信的命令行工具。详见官网安装步骤
📕下载kubectl安装包
kubectl v1.28.1下载

📕执行kubectl安装
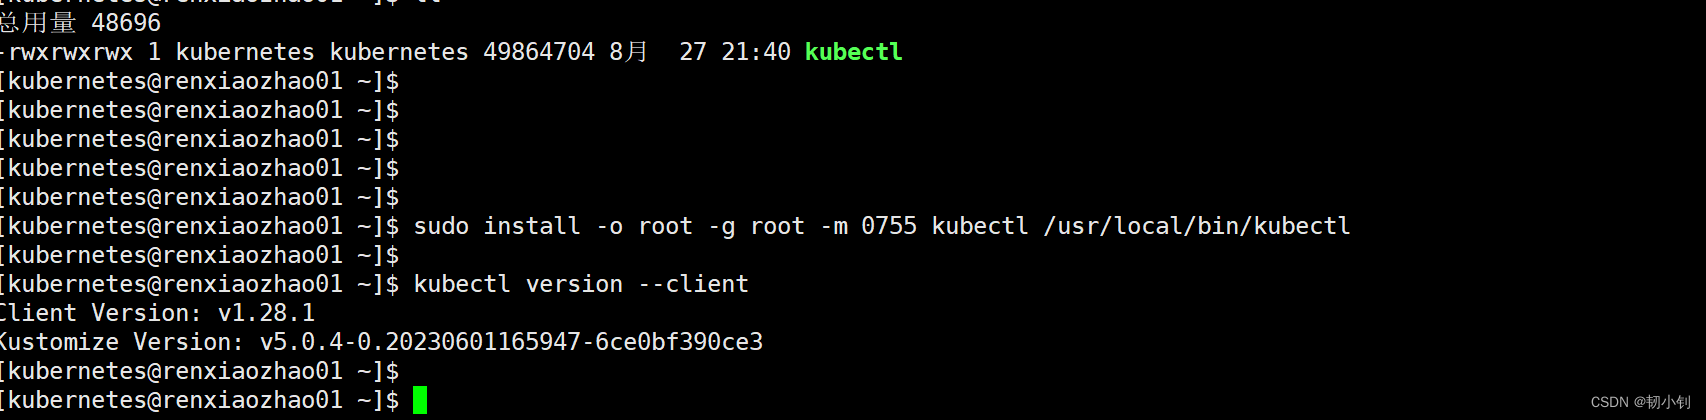
[kubernetes@renxiaozhao01 ~]$ sudo install -o root -g root -m 0755 kubectl /usr/local/bin/kubectl
[kubernetes@renxiaozhao01 ~]$
[kubernetes@renxiaozhao01 ~]$ kubectl version --client
Client Version: v1.28.1
Kustomize Version: v5.0.4-0.20230601165947-6ce0bf390ce3
[kubernetes@renxiaozhao01 ~]$
[kubernetes@renxiaozhao01 ~]$ 就这么简单,之前傻傻的通过curl下载,估计哪里卡住了,一个半小时都没下载好,网络环境好的话当然还是直接curl -LO https://dl.k8s.io/release/v1.28.1/bin/linux/amd64/kubectl方便
📕验证kubectl
执行kubectl version --client或者kubectl version --client --output=yaml
[kubernetes@renxiaozhao01 ~]$ kubectl version --client --output=yaml
clientVersion:buildDate: "2023-08-24T11:23:10Z"compiler: gcgitCommit: 8dc49c4b984b897d423aab4971090e1879eb4f23gitTreeState: cleangitVersion: v1.28.1goVersion: go1.20.7major: "1"minor: "28"platform: linux/amd64
kustomizeVersion: v5.0.4-0.20230601165947-6ce0bf390ce3[kubernetes@renxiaozhao01 ~]$
[kubernetes@renxiaozhao01 ~]$ kubectl version --client
Client Version: v1.28.1
Kustomize Version: v5.0.4-0.20230601165947-6ce0bf390ce3
[kubernetes@renxiaozhao01 ~]$
[kubernetes@renxiaozhao01 ~]$
📗安装kubeadm
官网详情
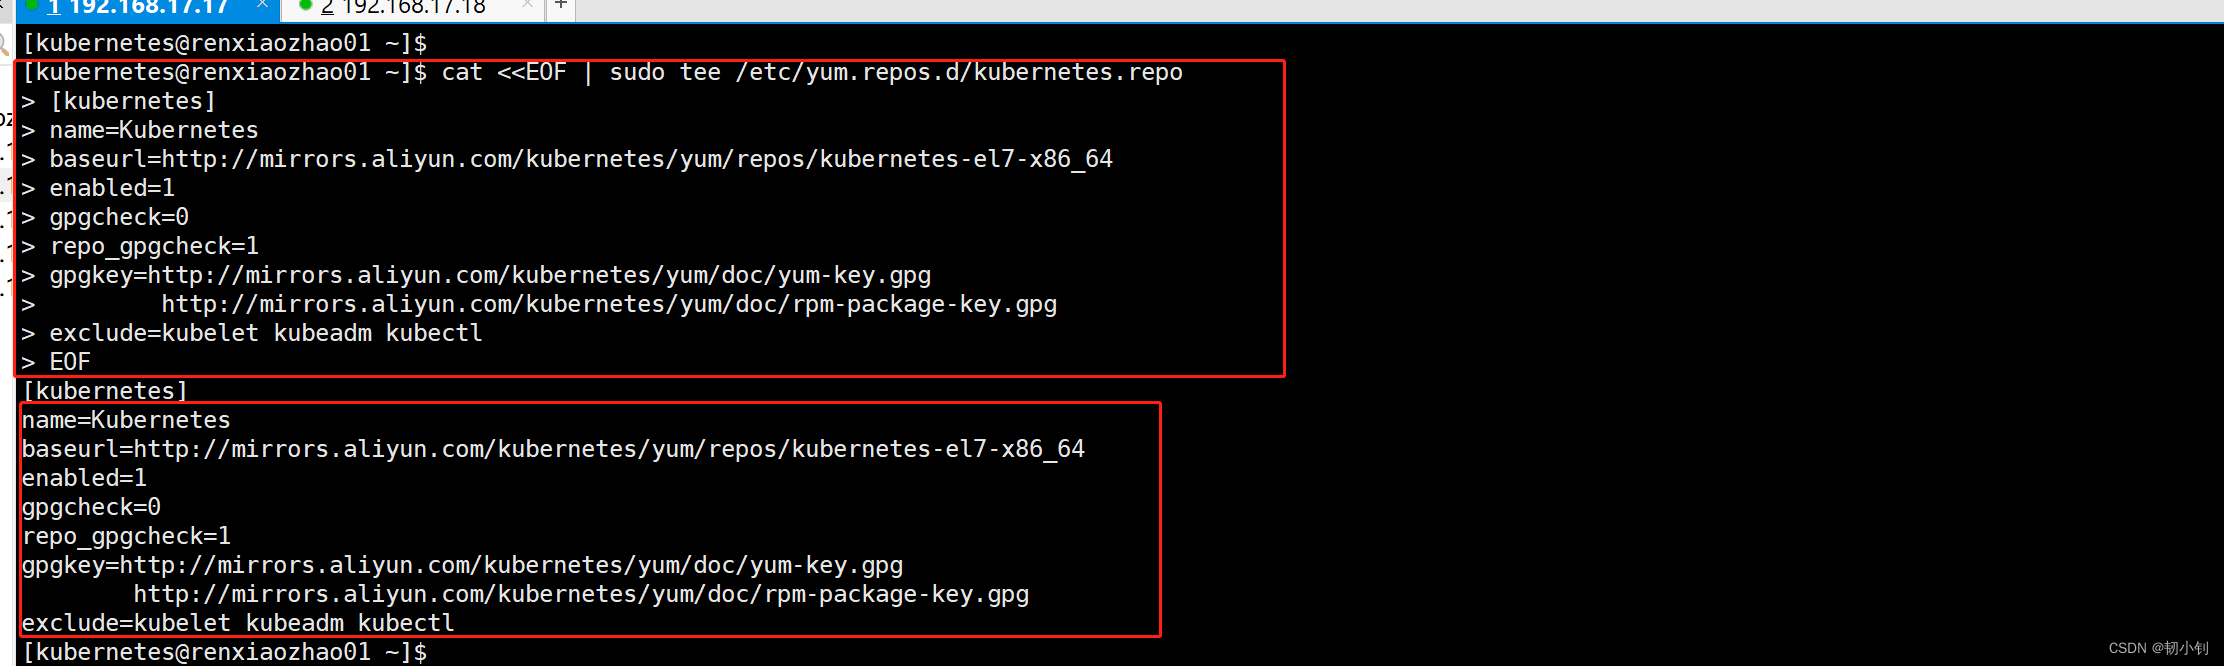
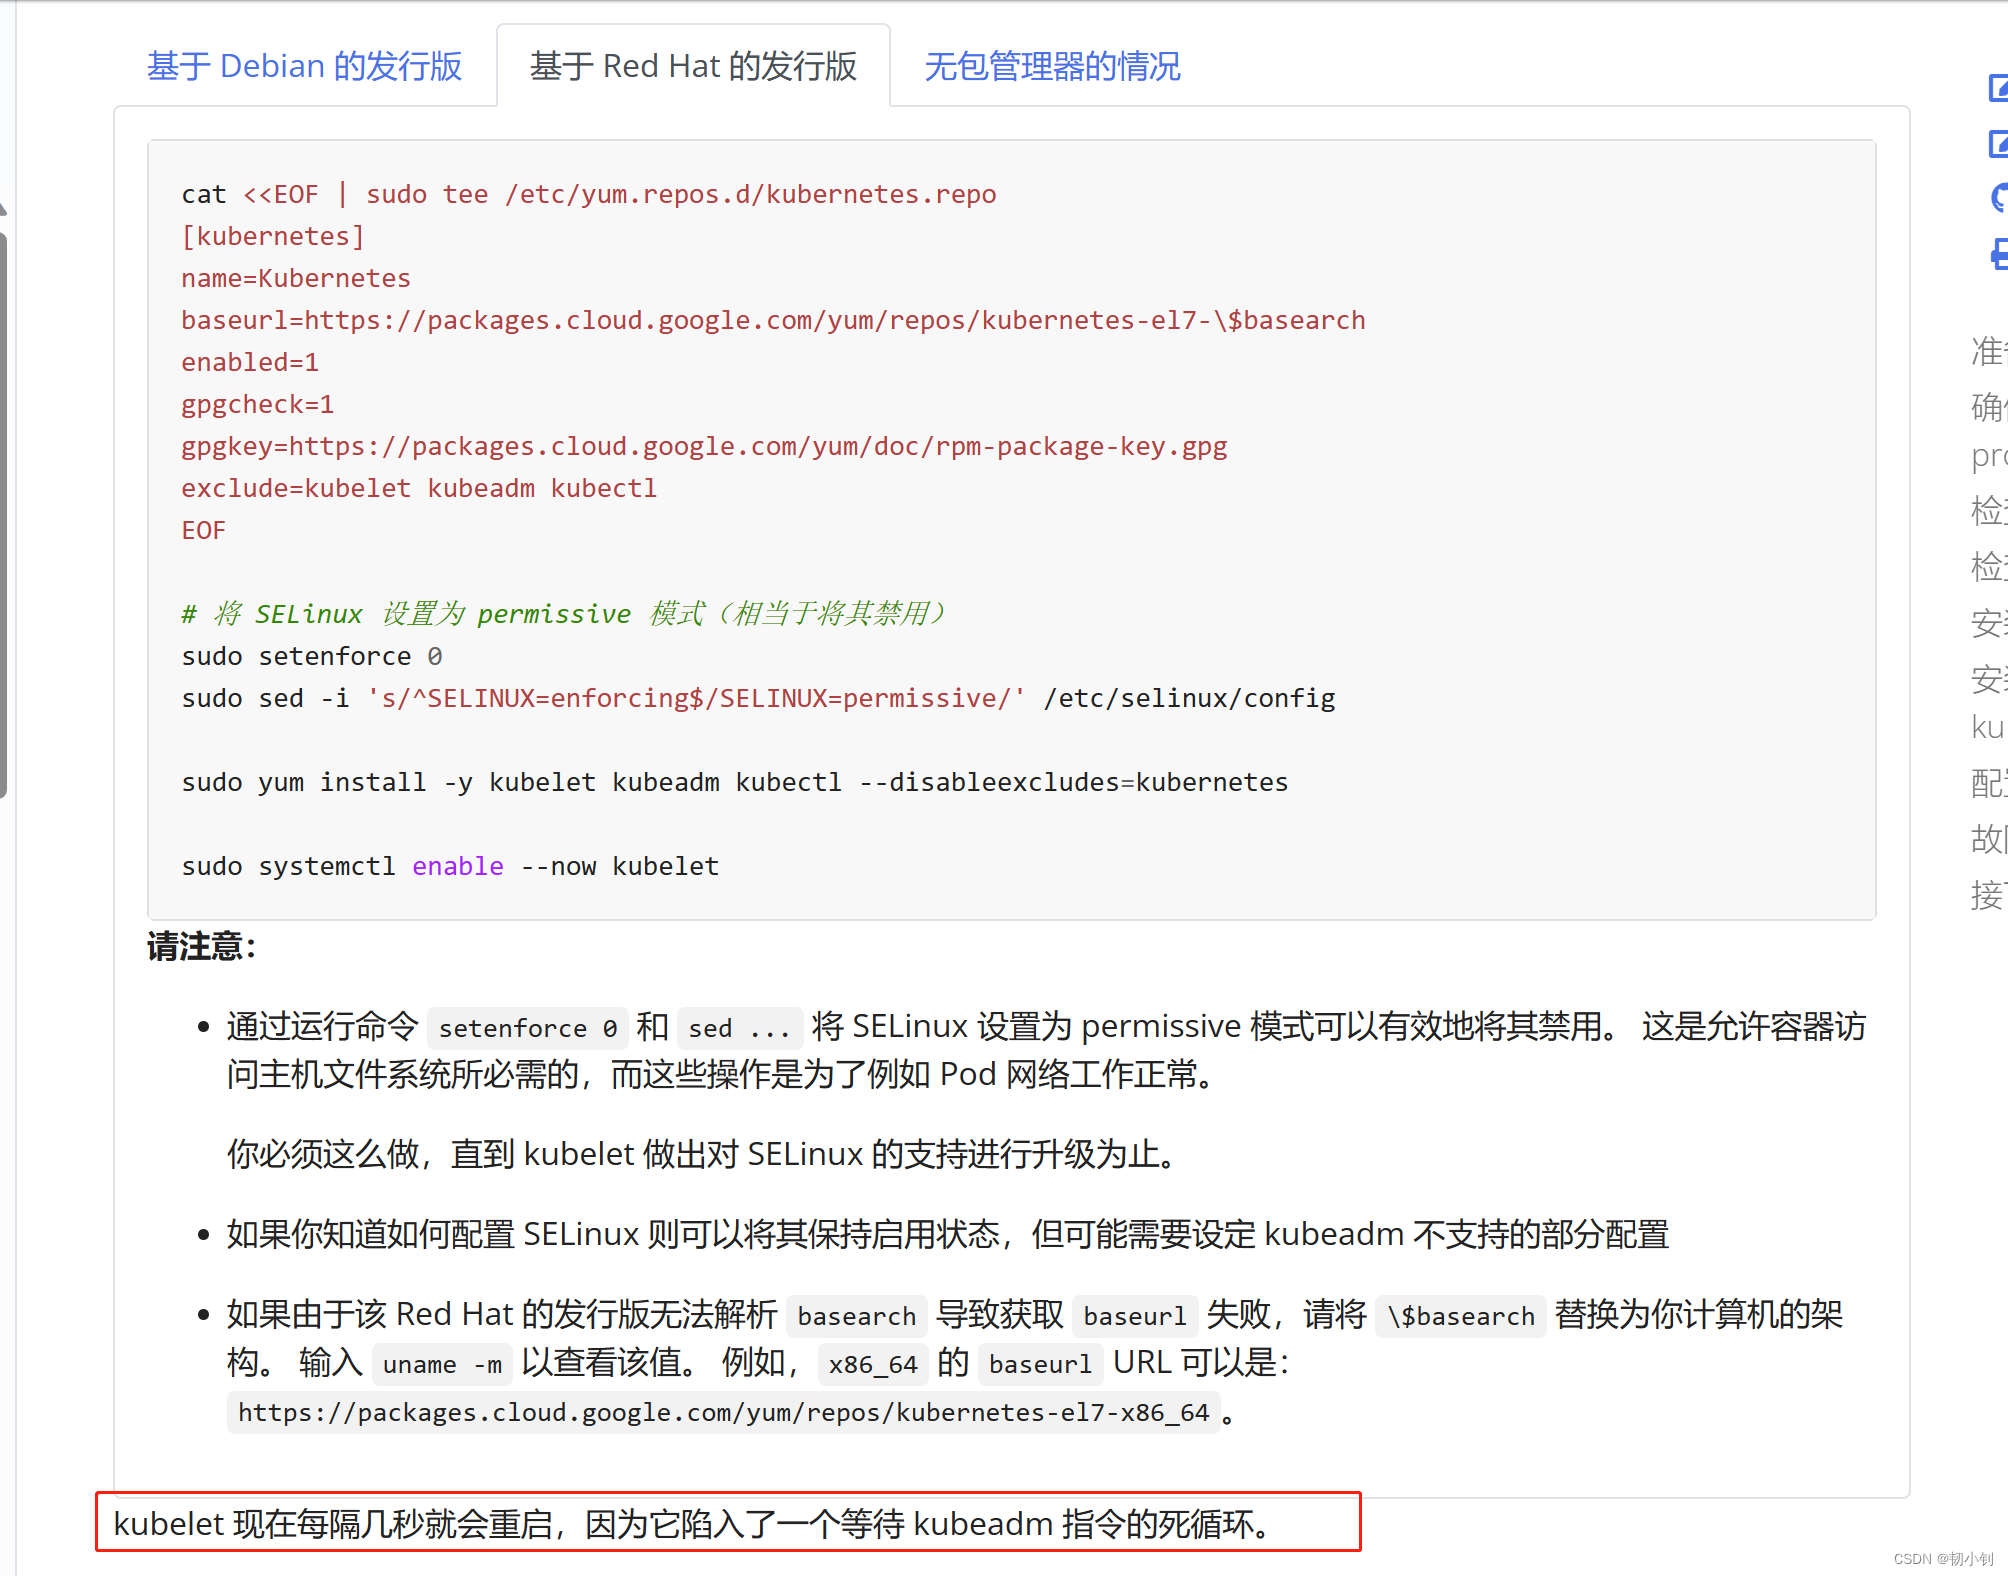
📕添加yum存储库配置文件kubernetes.repo
cat <<EOF | sudo tee /etc/yum.repos.d/kubernetes.repo
[kubernetes]
name=Kubernetes
baseurl=http://mirrors.aliyun.com/kubernetes/yum/repos/kubernetes-el7-x86_64
enabled=1
gpgcheck=0
repo_gpgcheck=1
gpgkey=http://mirrors.aliyun.com/kubernetes/yum/doc/yum-key.gpghttp://mirrors.aliyun.com/kubernetes/yum/doc/rpm-package-key.gpg
exclude=kubelet kubeadm kubectl
EOF
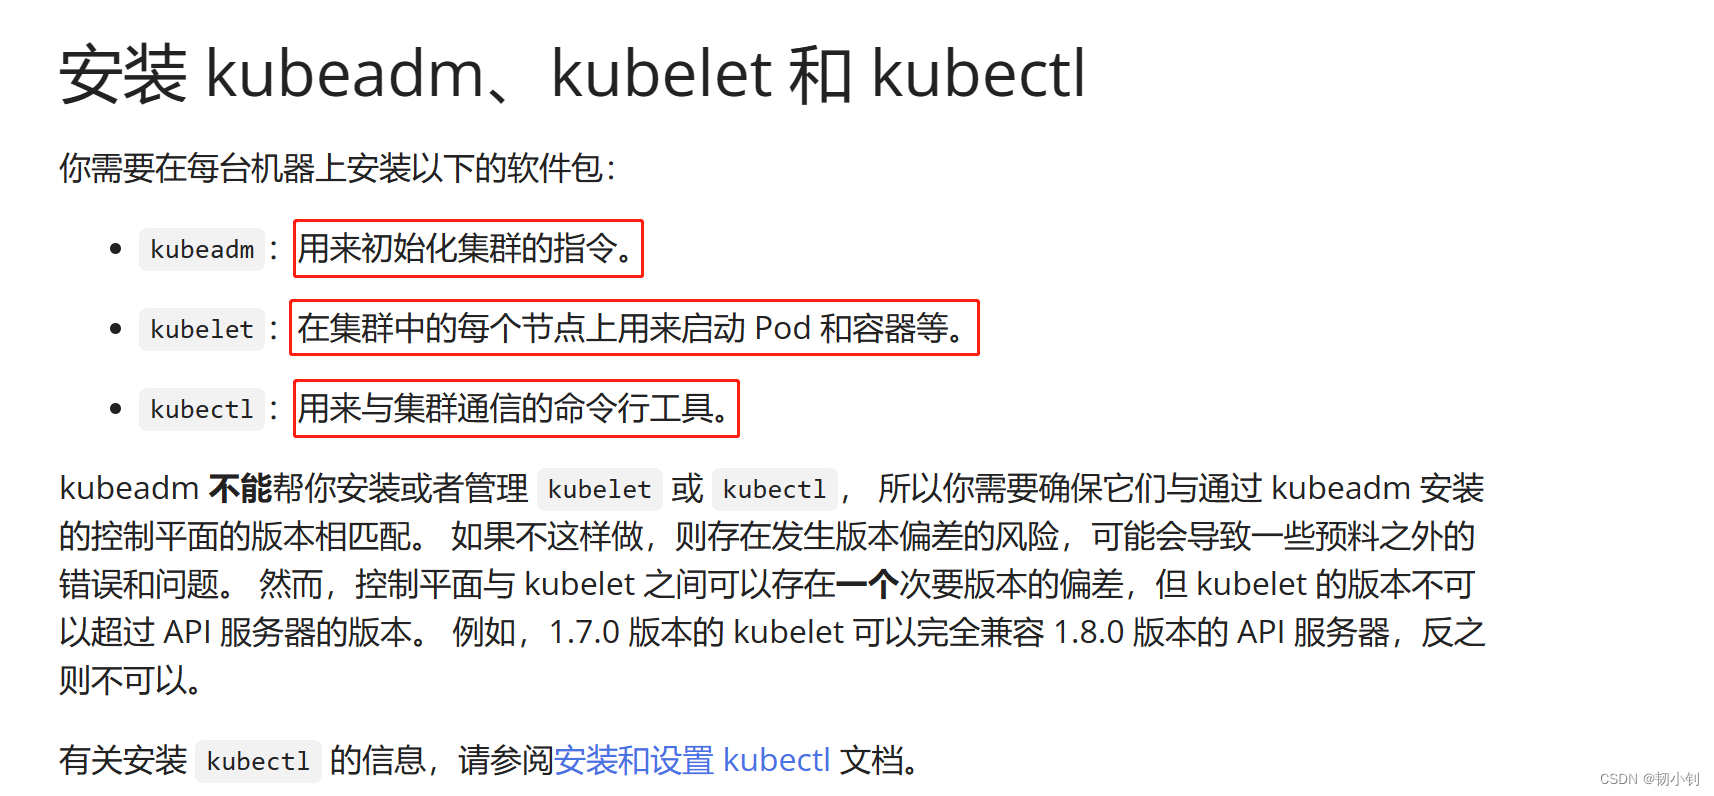
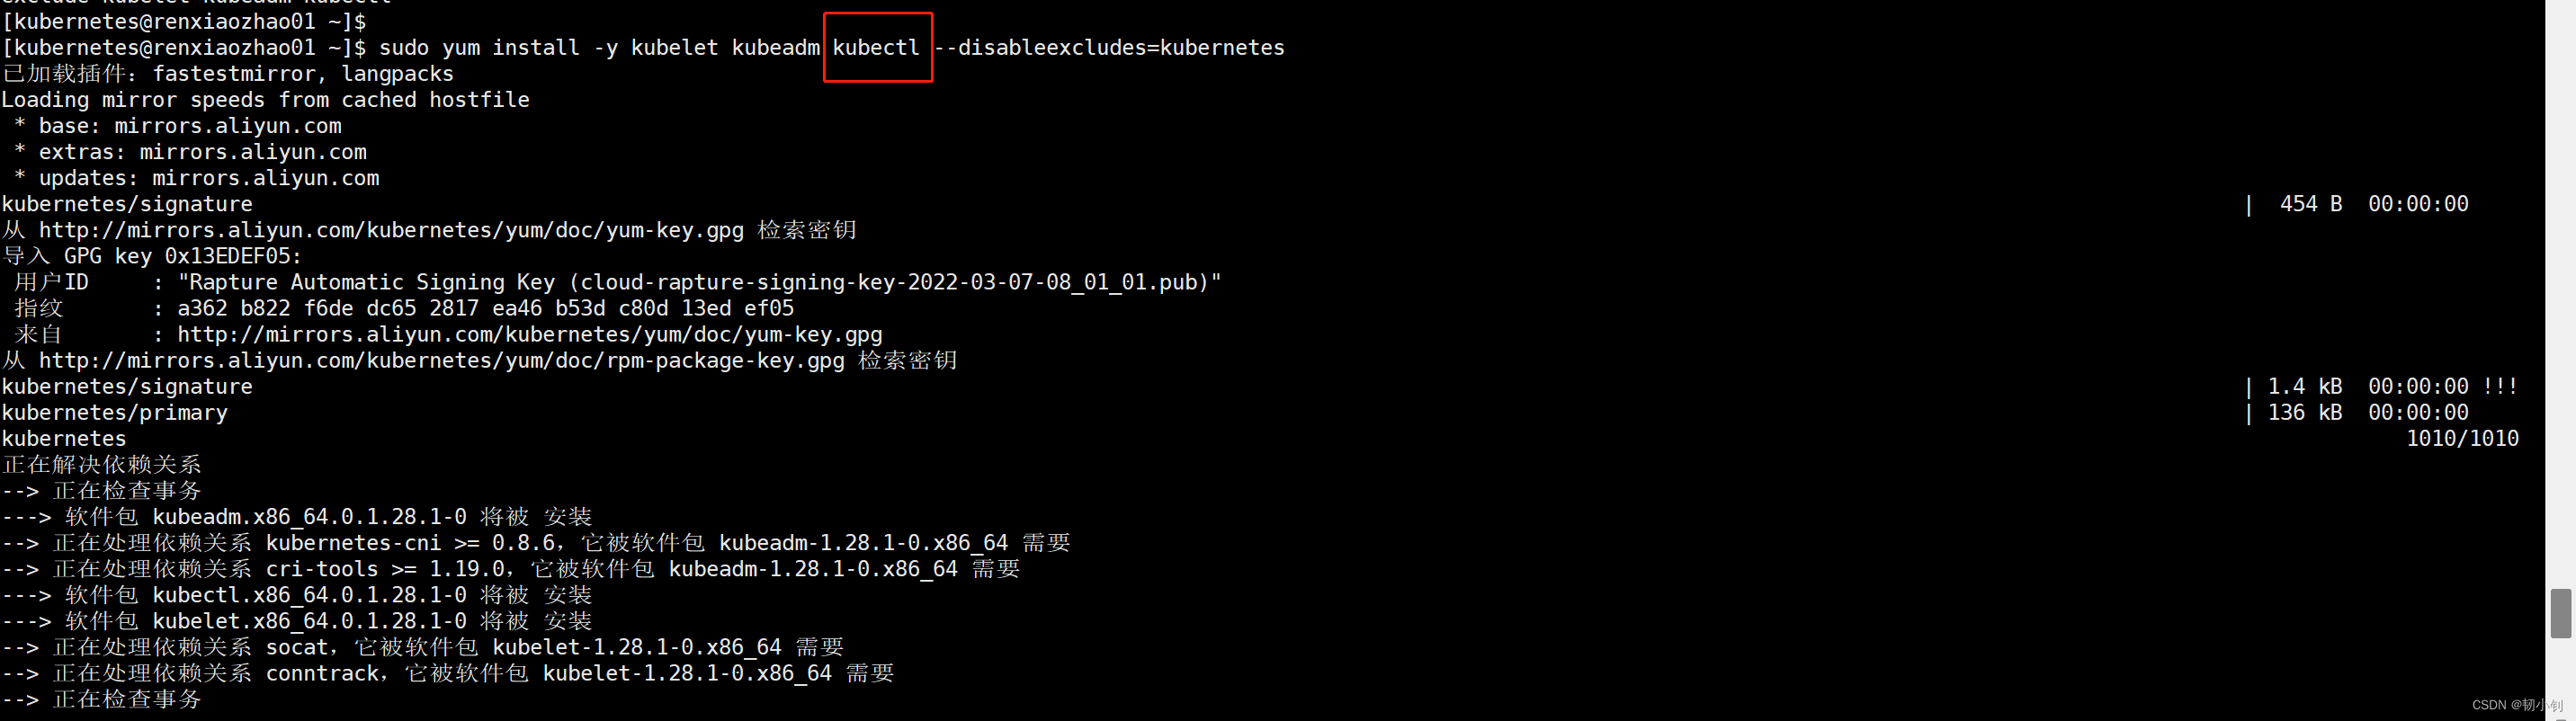
📕安装kubeadm & kubelet & kubectl (前面安装kubectl 可以放到这里一块安装)
安装命令:sudo yum install -y kubelet kubeadm kubectl --disableexcludes=kubernetes
这里不会重复安装,对于之前已经安装过的kubectl,yum安装时会自动跳过

📕查看版本信息
[kubernetes@renxiaozhao01 ~]$ kubelet --version
Kubernetes v1.28.1
[kubernetes@renxiaozhao01 ~]$ kubeadm  version
kubeadm version: &version.Info{Major:"1", Minor:"28", GitVersion:"v1.28.1", GitCommit:"8dc49c4b984b897d423aab4971090e1879eb4f23", GitTreeState:"clean", BuildDate:"2023-08-24T11:21:51Z", GoVersion:"go1.20.7", Compiler:"gc", Platform:"linux/amd64"}
[kubernetes@renxiaozhao01 ~]$
[kubernetes@renxiaozhao01 ~]$ 
📕启动kubelet
执行sudo systemctl enable --now kubelet命令:
kubelet运行在每个节点上,并负责管理和监控节点上的容器。它与Kubernetes Master节点通信,接收来自Master节点的指令,并根据指令来创建、销毁和管理容器。enable将kubelet服务设置为开机启动。而通过添加--now选项,kubelet服务将立即启动
📘kubelet启动、查看状态、日志命令
-
查看状态:
systemctl status kubelet
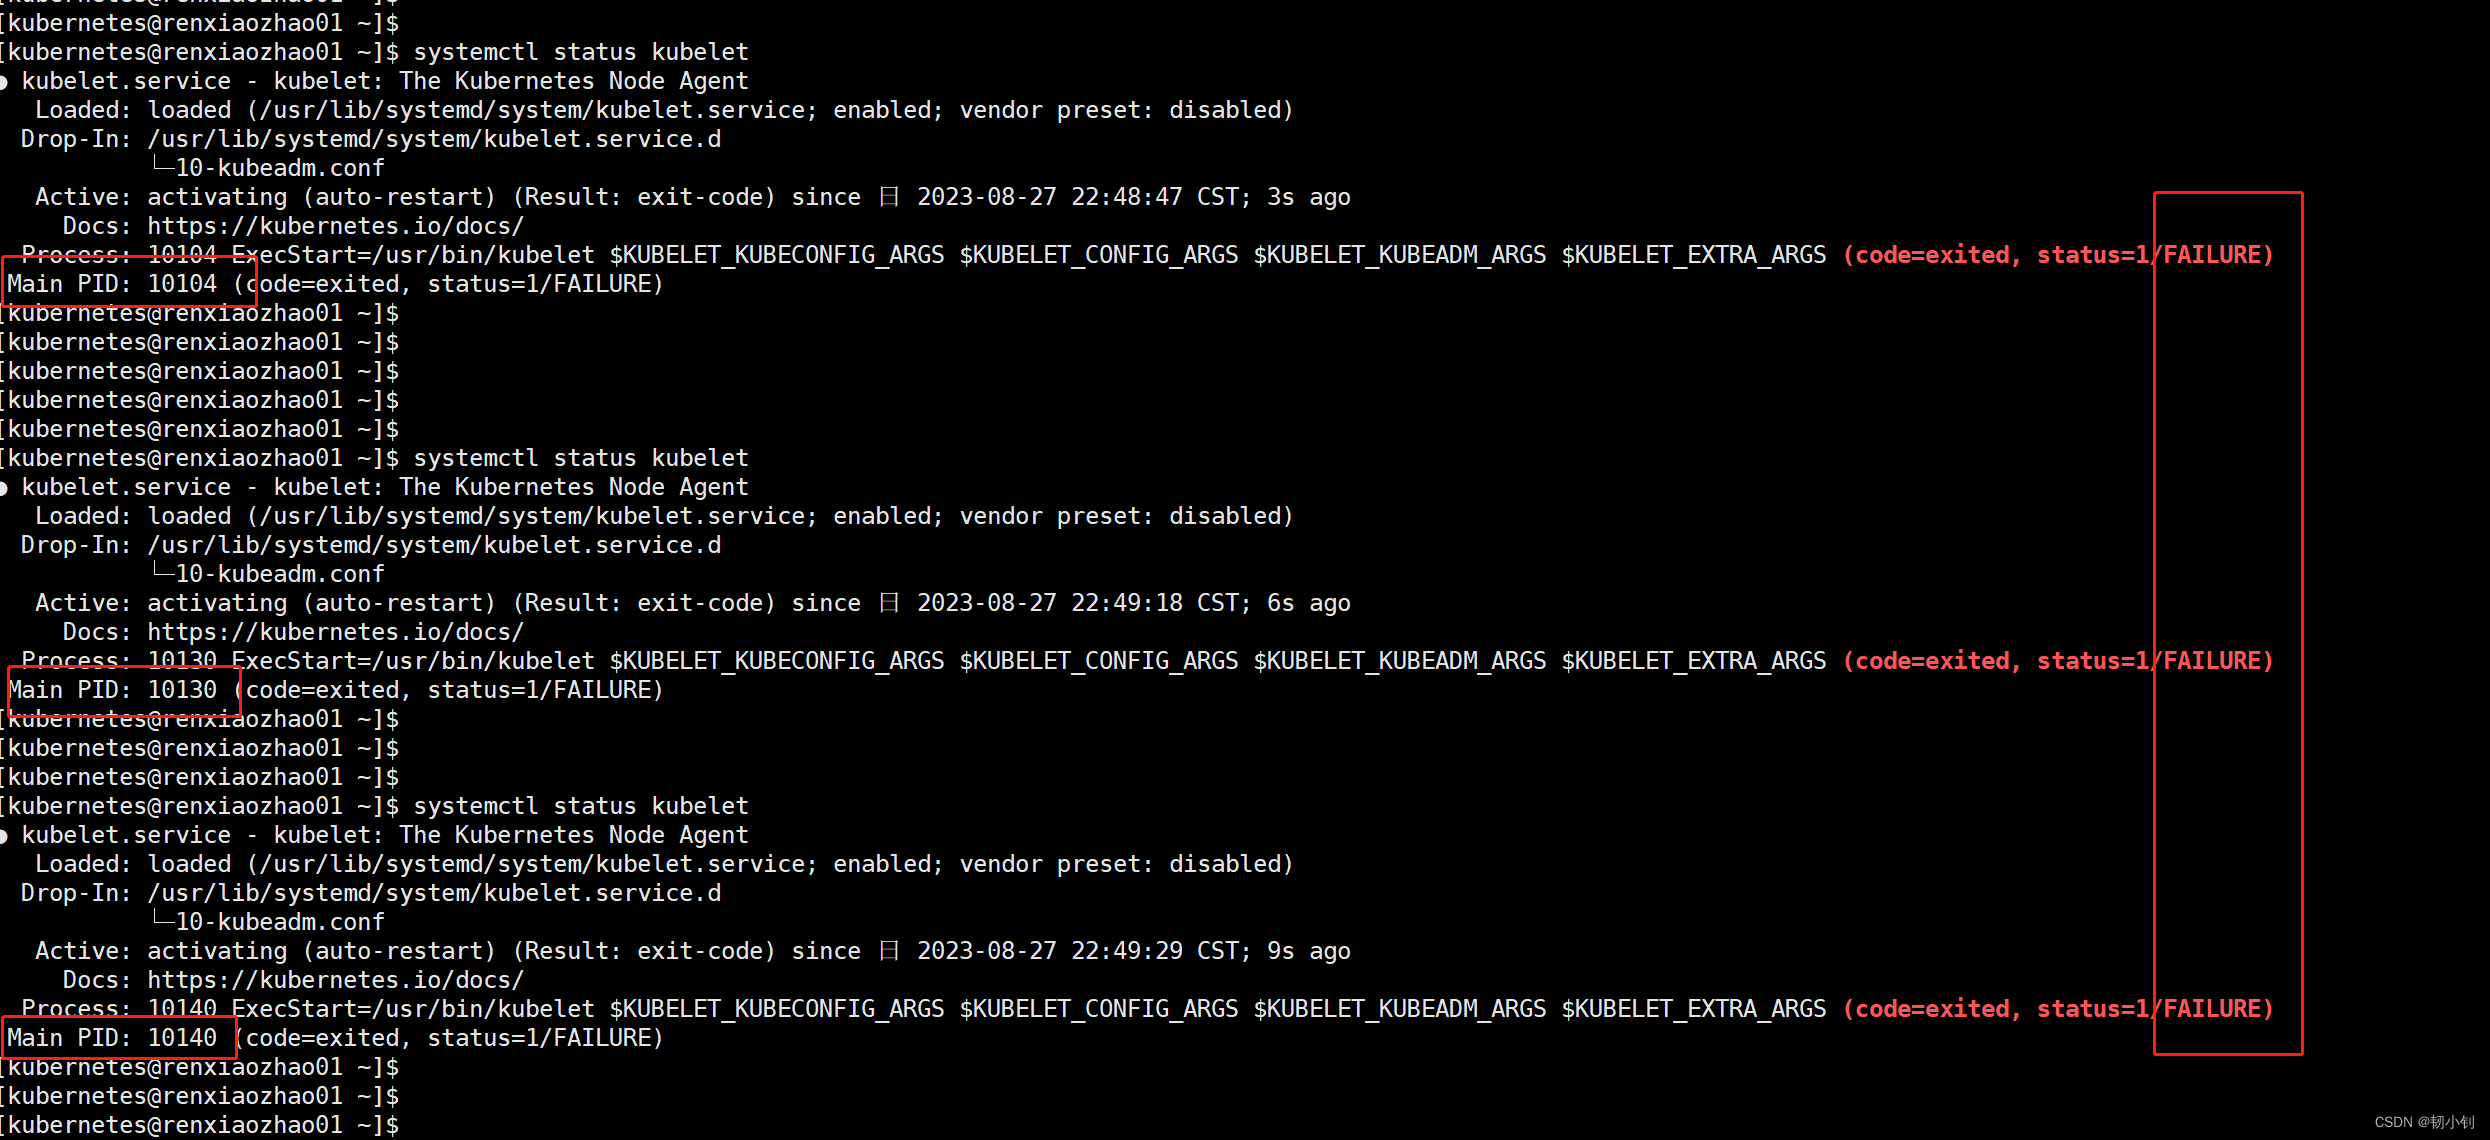
kubelet 现在每隔几秒就会重启,因为它陷入了一个等待 kubeadm 指令的死循环。
在使用kubeadm初始化Kubernetes集群时,需要在Master节点上运行一些kubeadm命令来完成初始化过程。其中一个命令是kubeadm init,它将生成一个用于加入其他节点的令牌。kubelet服务在启动时会检查是否存在这个令牌,如果没有找到,它会陷入一个等待kubeadm指令的死循环。 -
手动启动:
systemctl start kubelet -
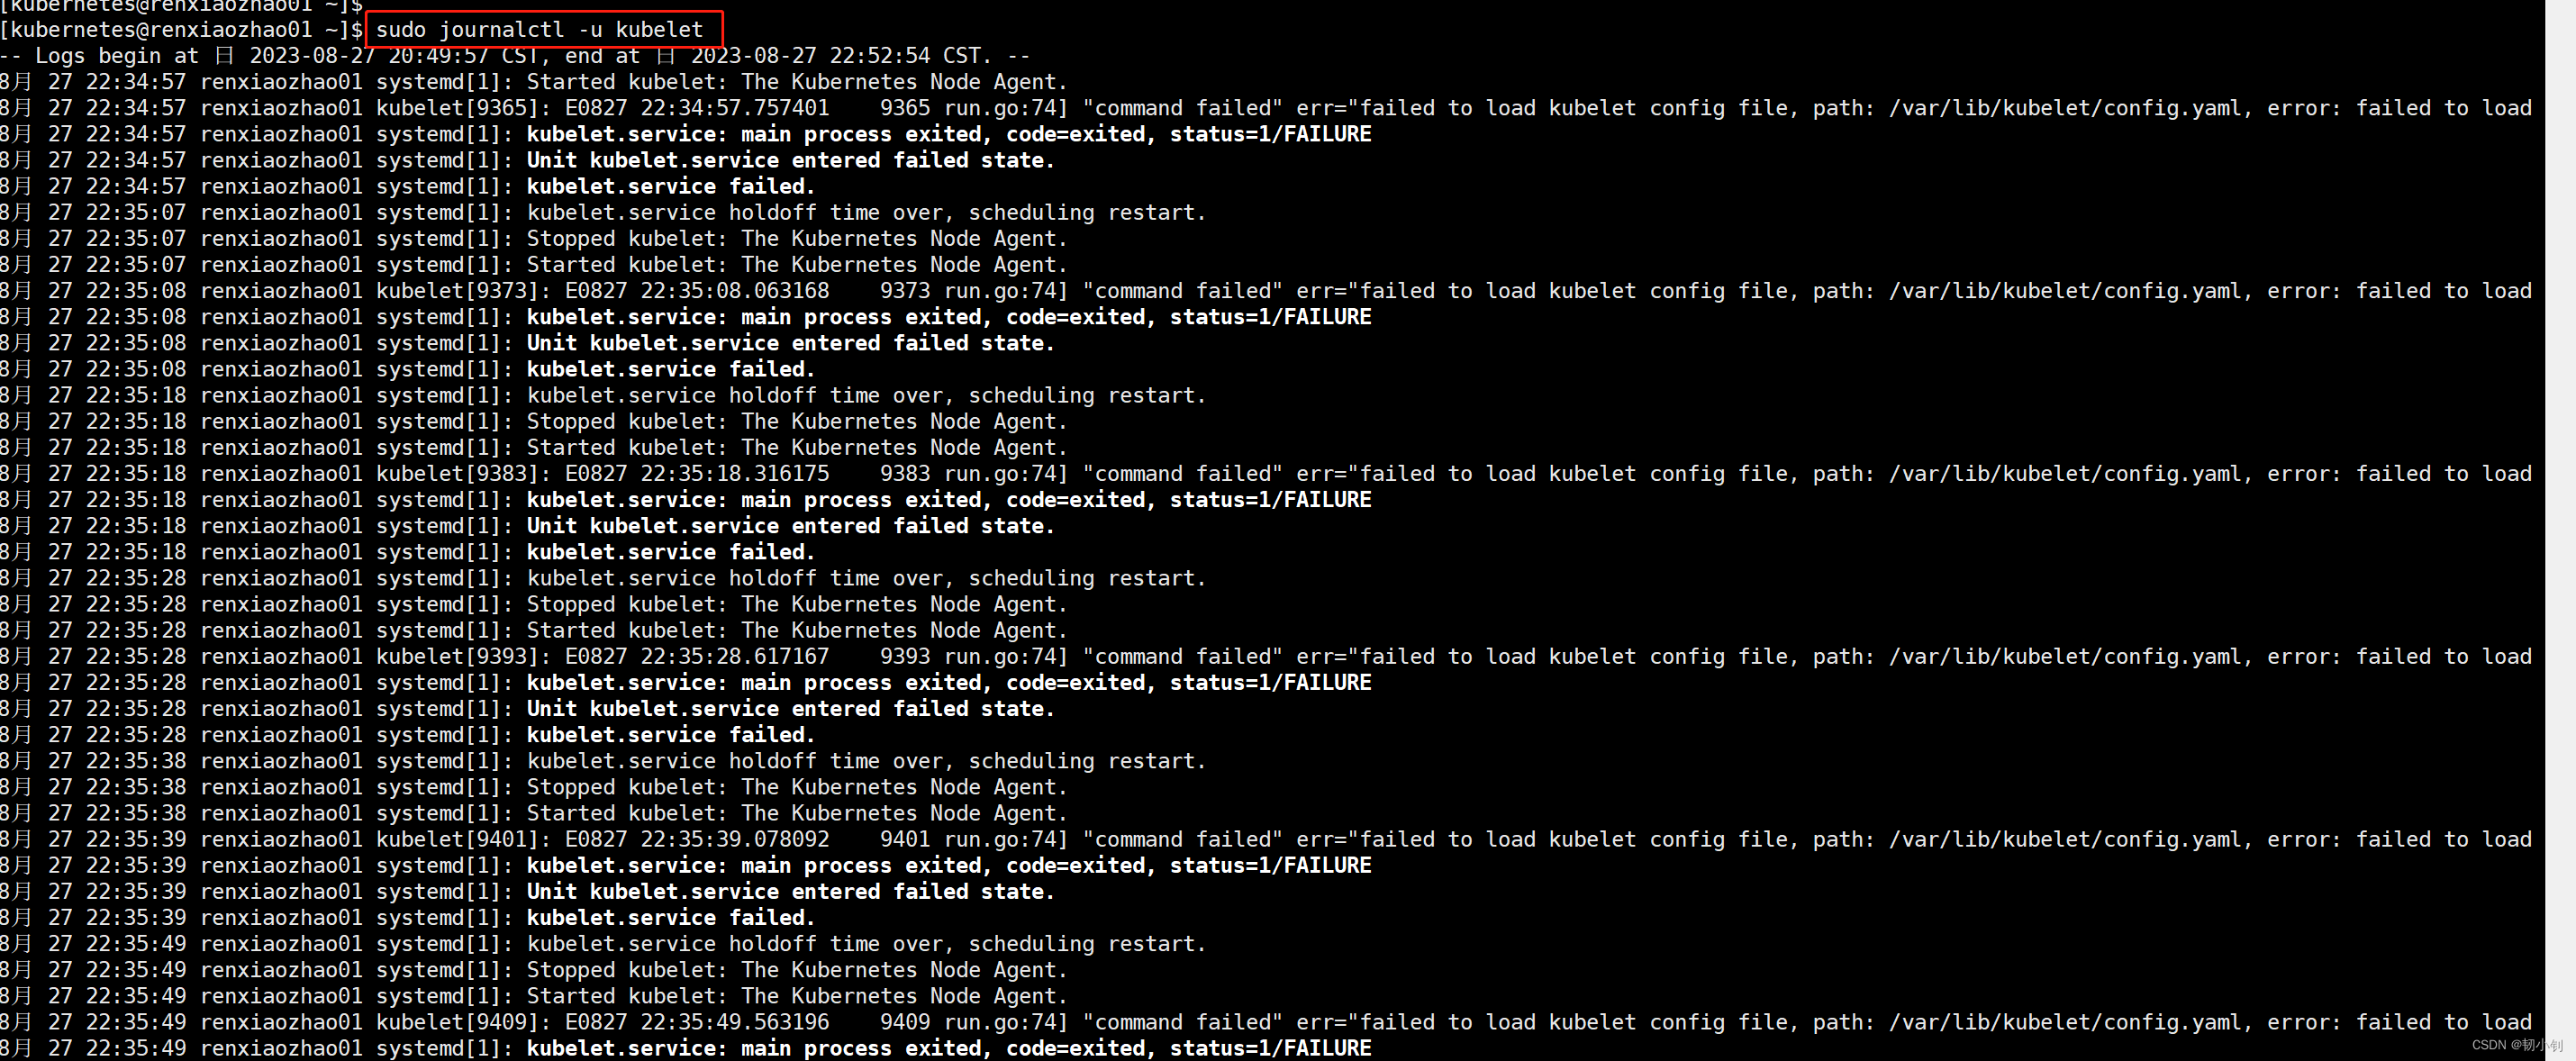
查看日志:
sudo journalctl -u kubelet
📗其他机器Kubernetes组件安装
到这里已经在r1机器安装完了Kubernetes核心组件,参照上集,主要就是关闭防火墙那些操作,和本集安装kubeadm操作(覆盖了kubeadm、kubelet、kubectl三个核心组件),此处做个精简版概括,继续在r2、r3机器安装(机器信息在上集第二章有介绍)。

📕关闭防火墙、swap、selinux
- 📘关闭防火墙
systemctl stop firewalld.service systemctl status firewalld.service systemctl disable firewalld.service - 📘关闭swap
修改vi /etc/fstab,注释掉/dev/mapper/centos-swap swap...这一行

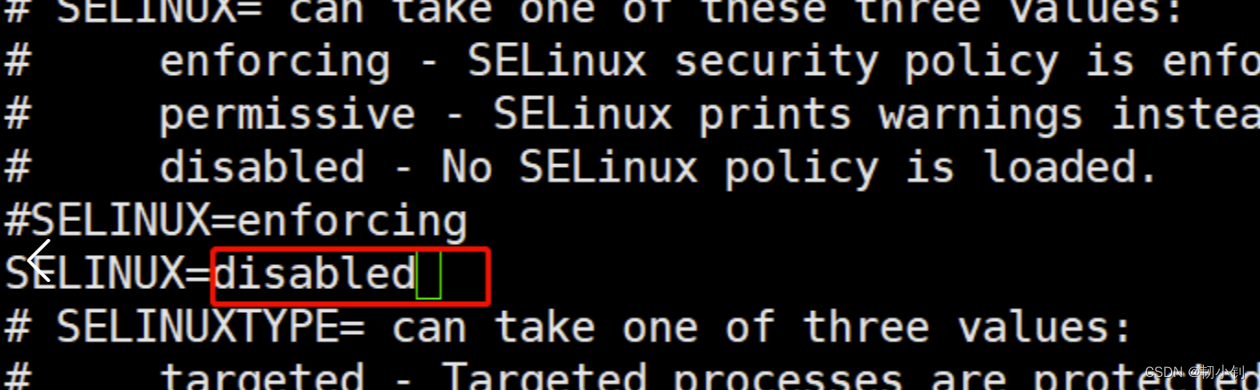
- 📘关闭selinux
修改vi /etc/sysconfig/selinux,SELINUX=enforcing改为SELINUX=disabled
- 📘重启虚拟机生效
执行reboot或者shutdown -r now
📕创建sudo安装用户kubernetes
useradd kubernetes -d /home/kubernetes
passwd kubernetes
echo 'kubernetes  ALL=(ALL)  NOPASSWD: ALL' >> /etc/sudoers
📕添加kubernetes对应的yum存储库配置文件
cat <<EOF | sudo tee /etc/yum.repos.d/kubernetes.repo
[kubernetes]
name=Kubernetes
baseurl=http://mirrors.aliyun.com/kubernetes/yum/repos/kubernetes-el7-x86_64
enabled=1
gpgcheck=0
repo_gpgcheck=1
gpgkey=http://mirrors.aliyun.com/kubernetes/yum/doc/yum-key.gpghttp://mirrors.aliyun.com/kubernetes/yum/doc/rpm-package-key.gpg
exclude=kubelet kubeadm kubectl
EOF
📕安装kubeadm & kubelet & kubectl
sudo yum install -y kubelet kubeadm kubectl --disableexcludes=kubernetes
📕安装命令验证
kubelet --version
kubeadm  version
kubectl version --client


📚第四章 kubernetes集群部署
官网创建集群说明
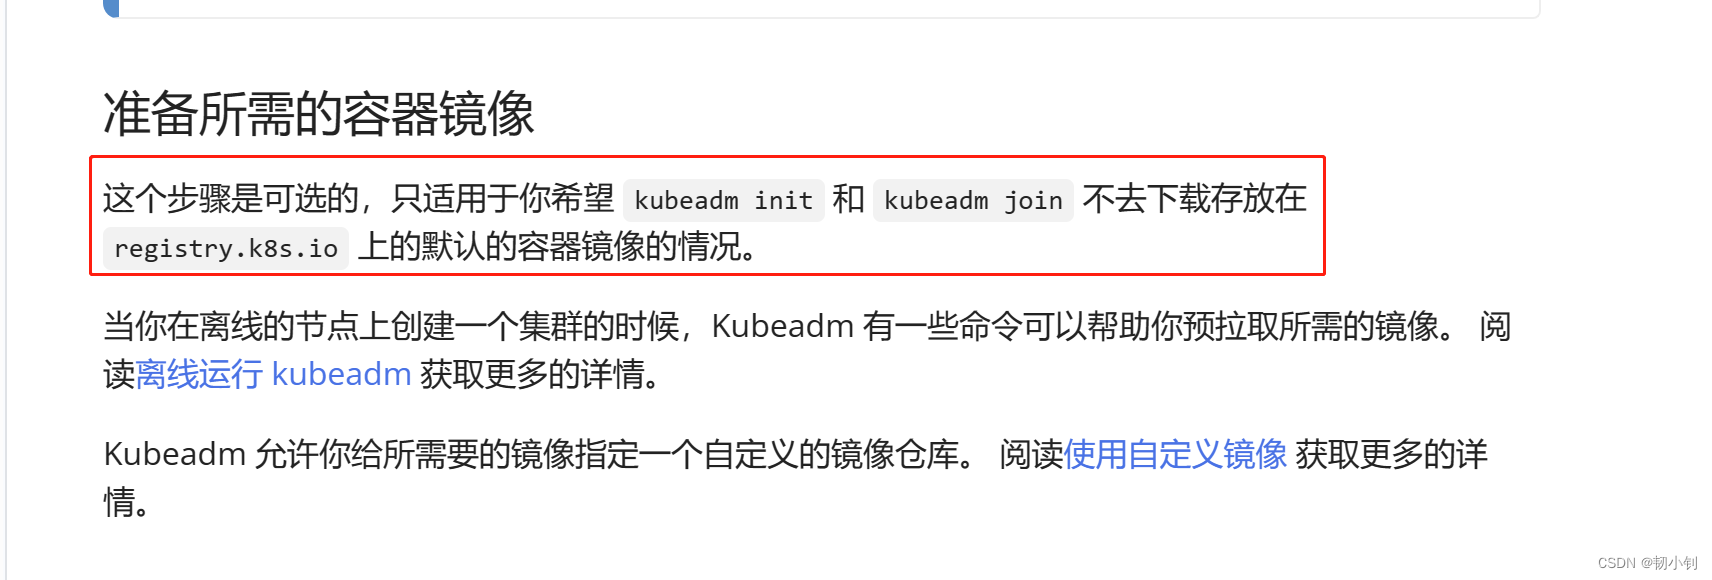
kubeadm init和kubeadm join命令在默认情况下会自动下载所需的Docker镜像。这些镜像包括Kubernetes组件(如kube-apiserver、kube-controller-manager、kube-scheduler等)以及其他一些常用的容器镜像(如CoreDNS等)。- 使用
kubeadm init和kubeadm join命令来初始化和加入集群,并且不需要自定义镜像源,kubeadm init和kubeadm join命令会自动处理Docker的安装和配置。
尝试了一下直接执行kubeadm init,反正都是错,所以还是在r1、r2、r3上面手动安装docker相关组件吧


📗安装docker(r1、r2、r3都要安装)
Kubernetes是一个容器编排平台,用于管理和编排容器化应用程序。它可以与多种容器运行时集成,包括Docker、containerd、CRI-O等。- 安装
Kubernetes时,默认情况下会使用Docker作为容器运行时(这是因为Docker是目前最广泛使用的容器运行时之一,具有广泛的社区支持和成熟的生态系统。因此,大多数Kubernetes安装指南和教程都会建议先安装Docker)。
总结起来,Kubernetes和Docker是相互独立、不是必须绑定在一起的。但是正常在安装Kubernetes时,默认都是先安装Docker容器
📕yum 方式安装
yum 这种方式的安装适用于大多数情况,它会自动获取最新的稳定版本
- 下面的
yum-config-manager是yum-utils中的一个工具sudo yum install -y yum-utils - 设置docker社区版存储库
sudo yum-config-manager --add-repo http://mirrors.aliyun.com/docker-ce/linux/centos/docker-ce.repo - 安装
dockersudo yum install -y docker-ce docker-ce-cli containerd.io docker-buildx-plugin docker-compose-plugin - 启动
dockersudo systemctl start docker - 设置
docker开启启动(虚拟机会经常重启,为了减少麻烦最好设置开机启动)sudo systemctl enable docker - 查看
docker状态sudo systemctl status docker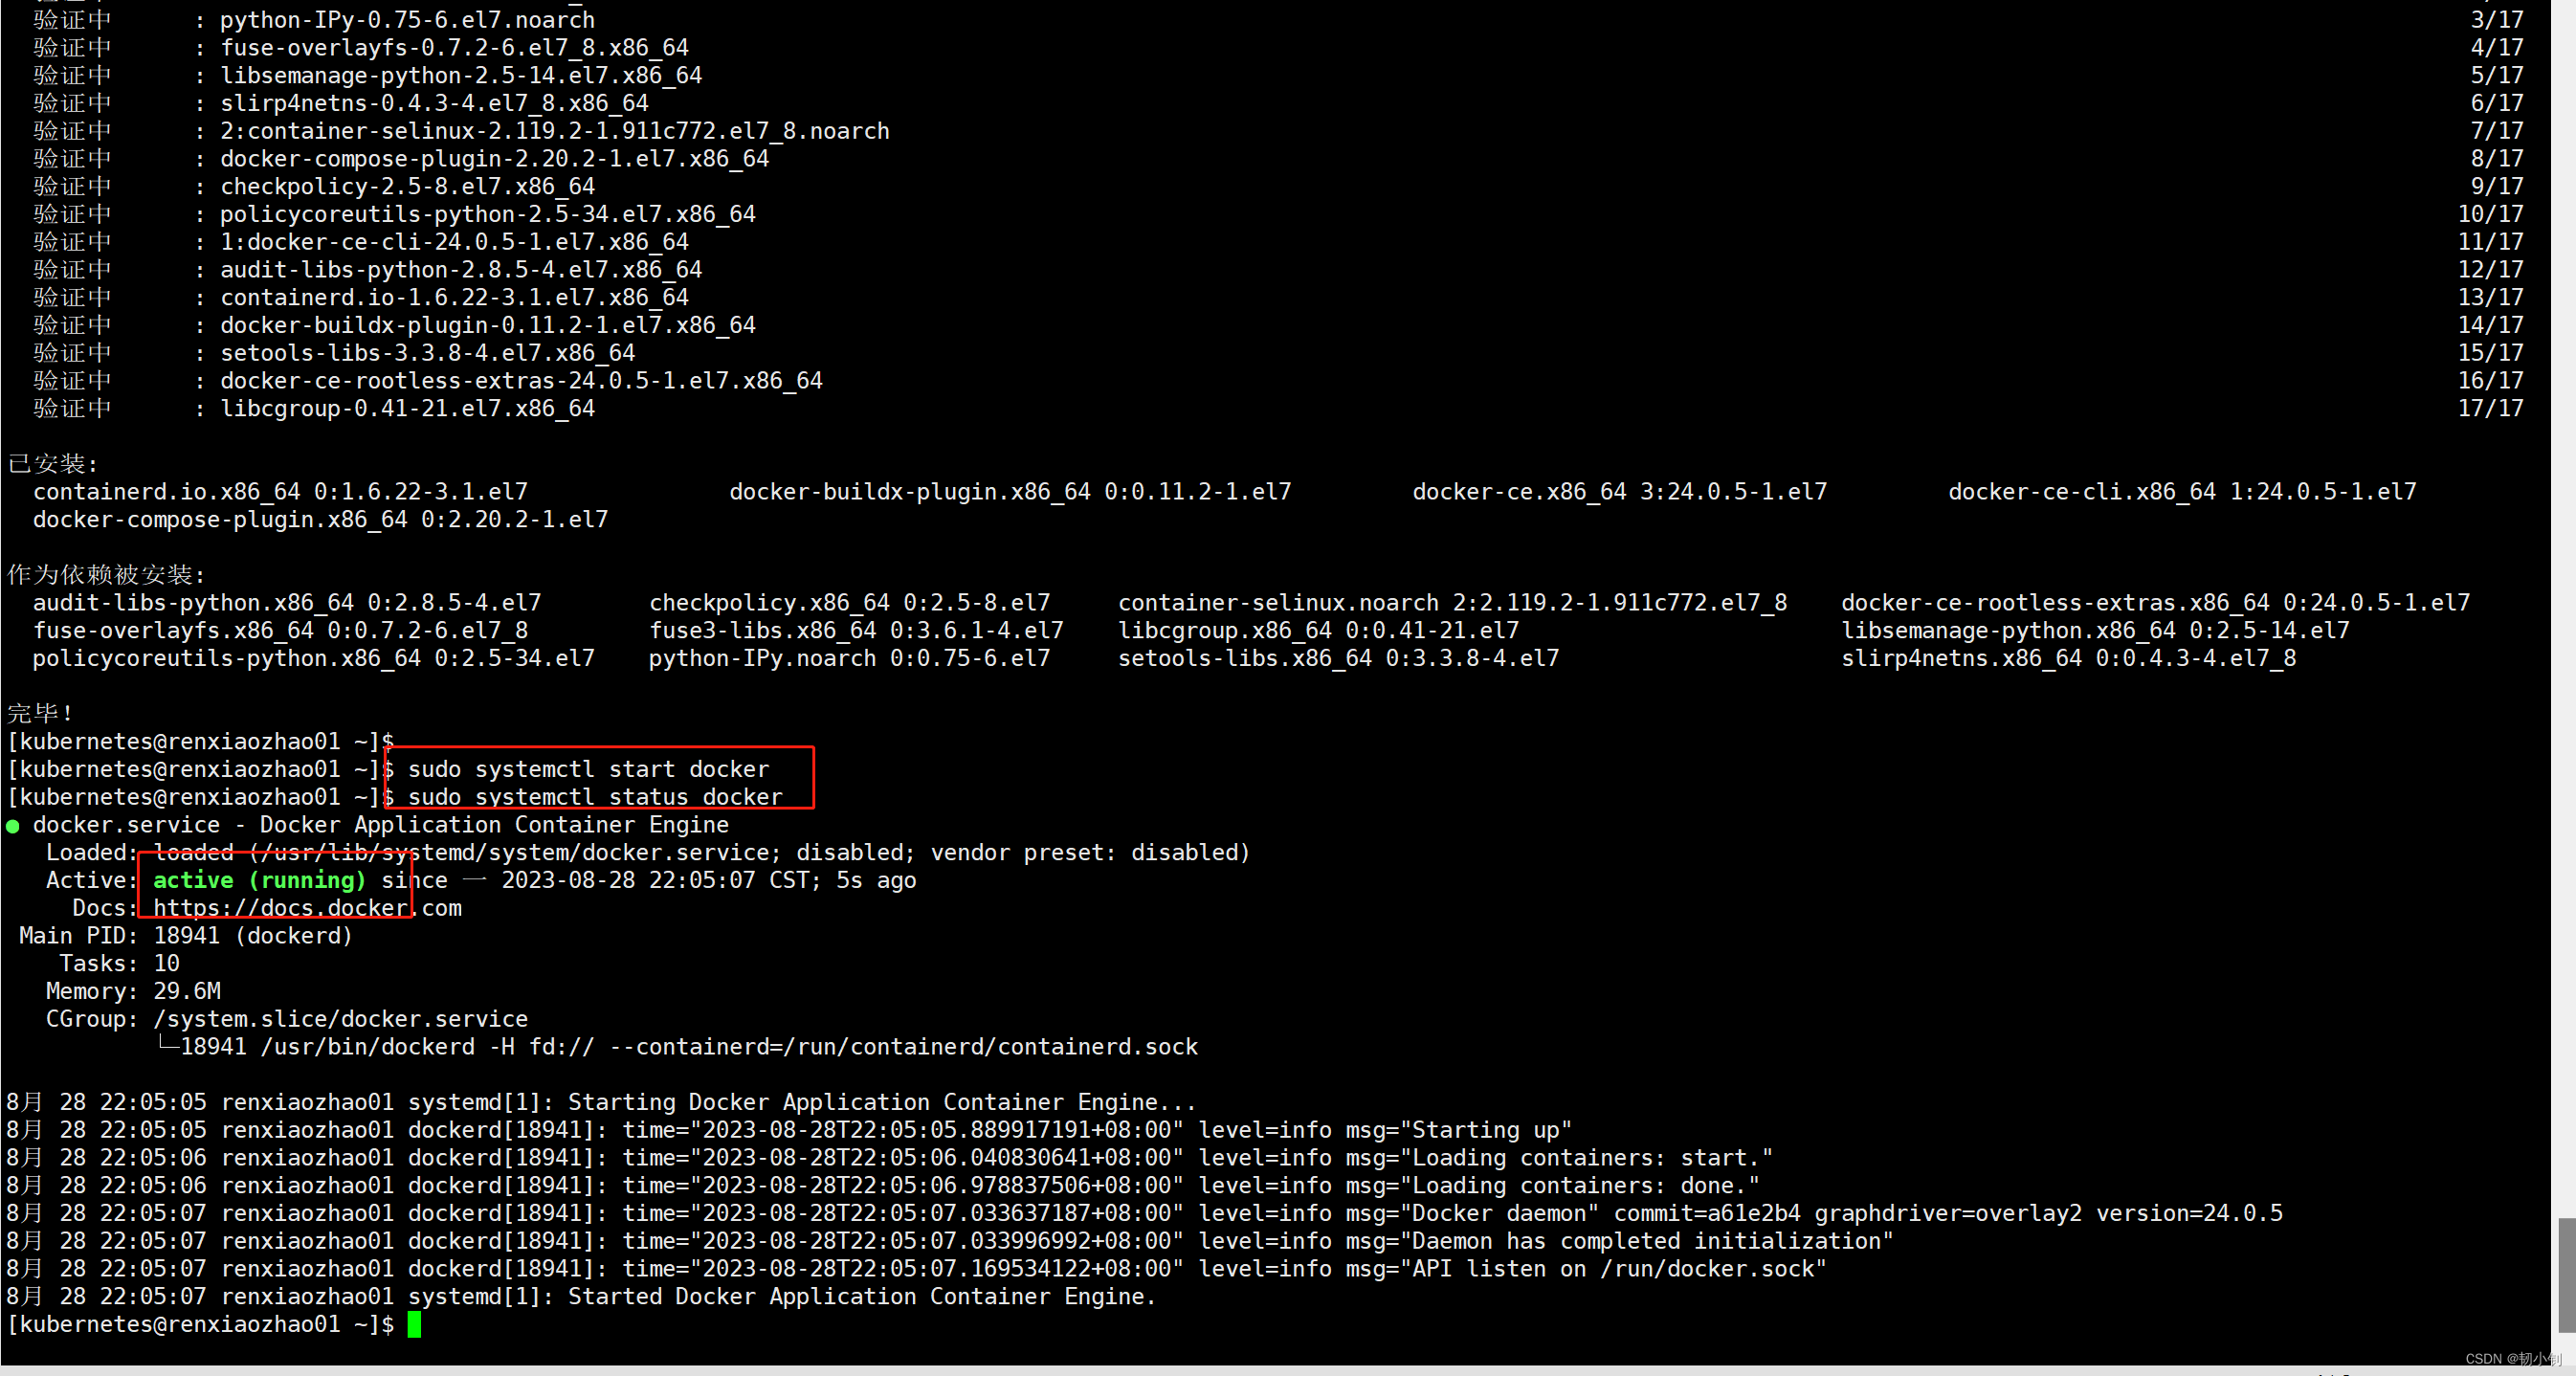
- 查看
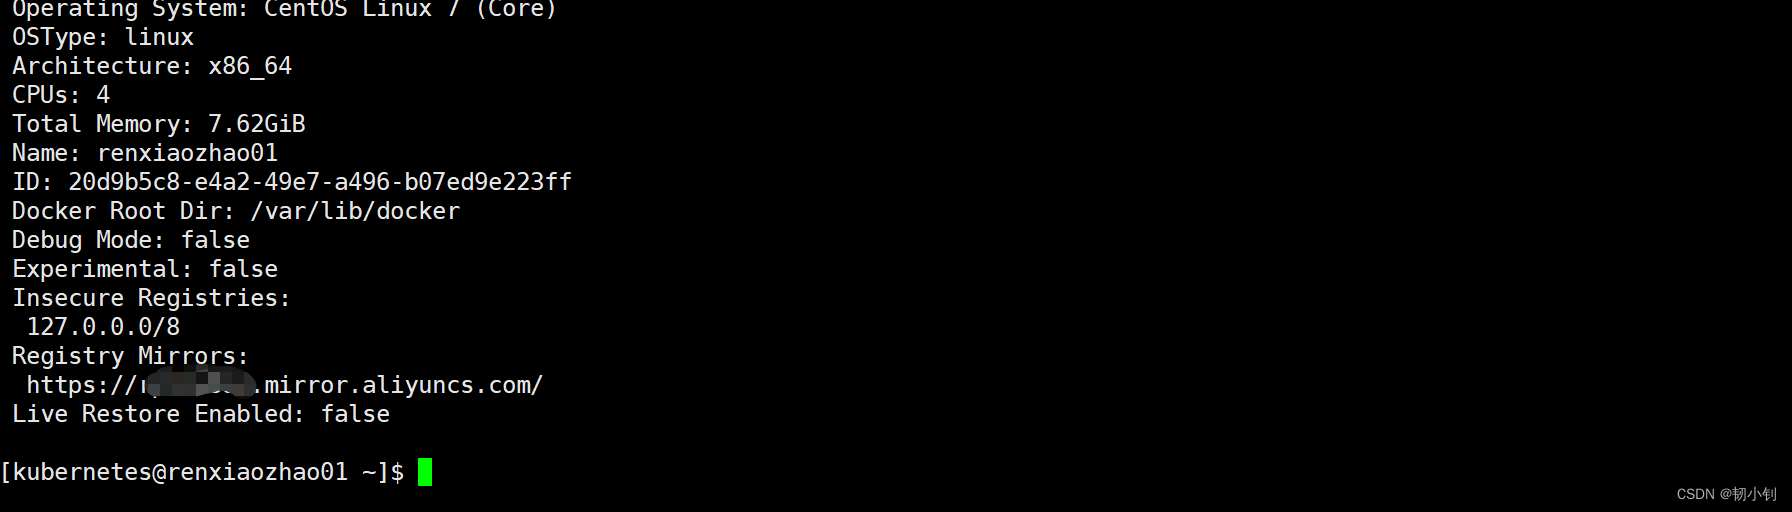
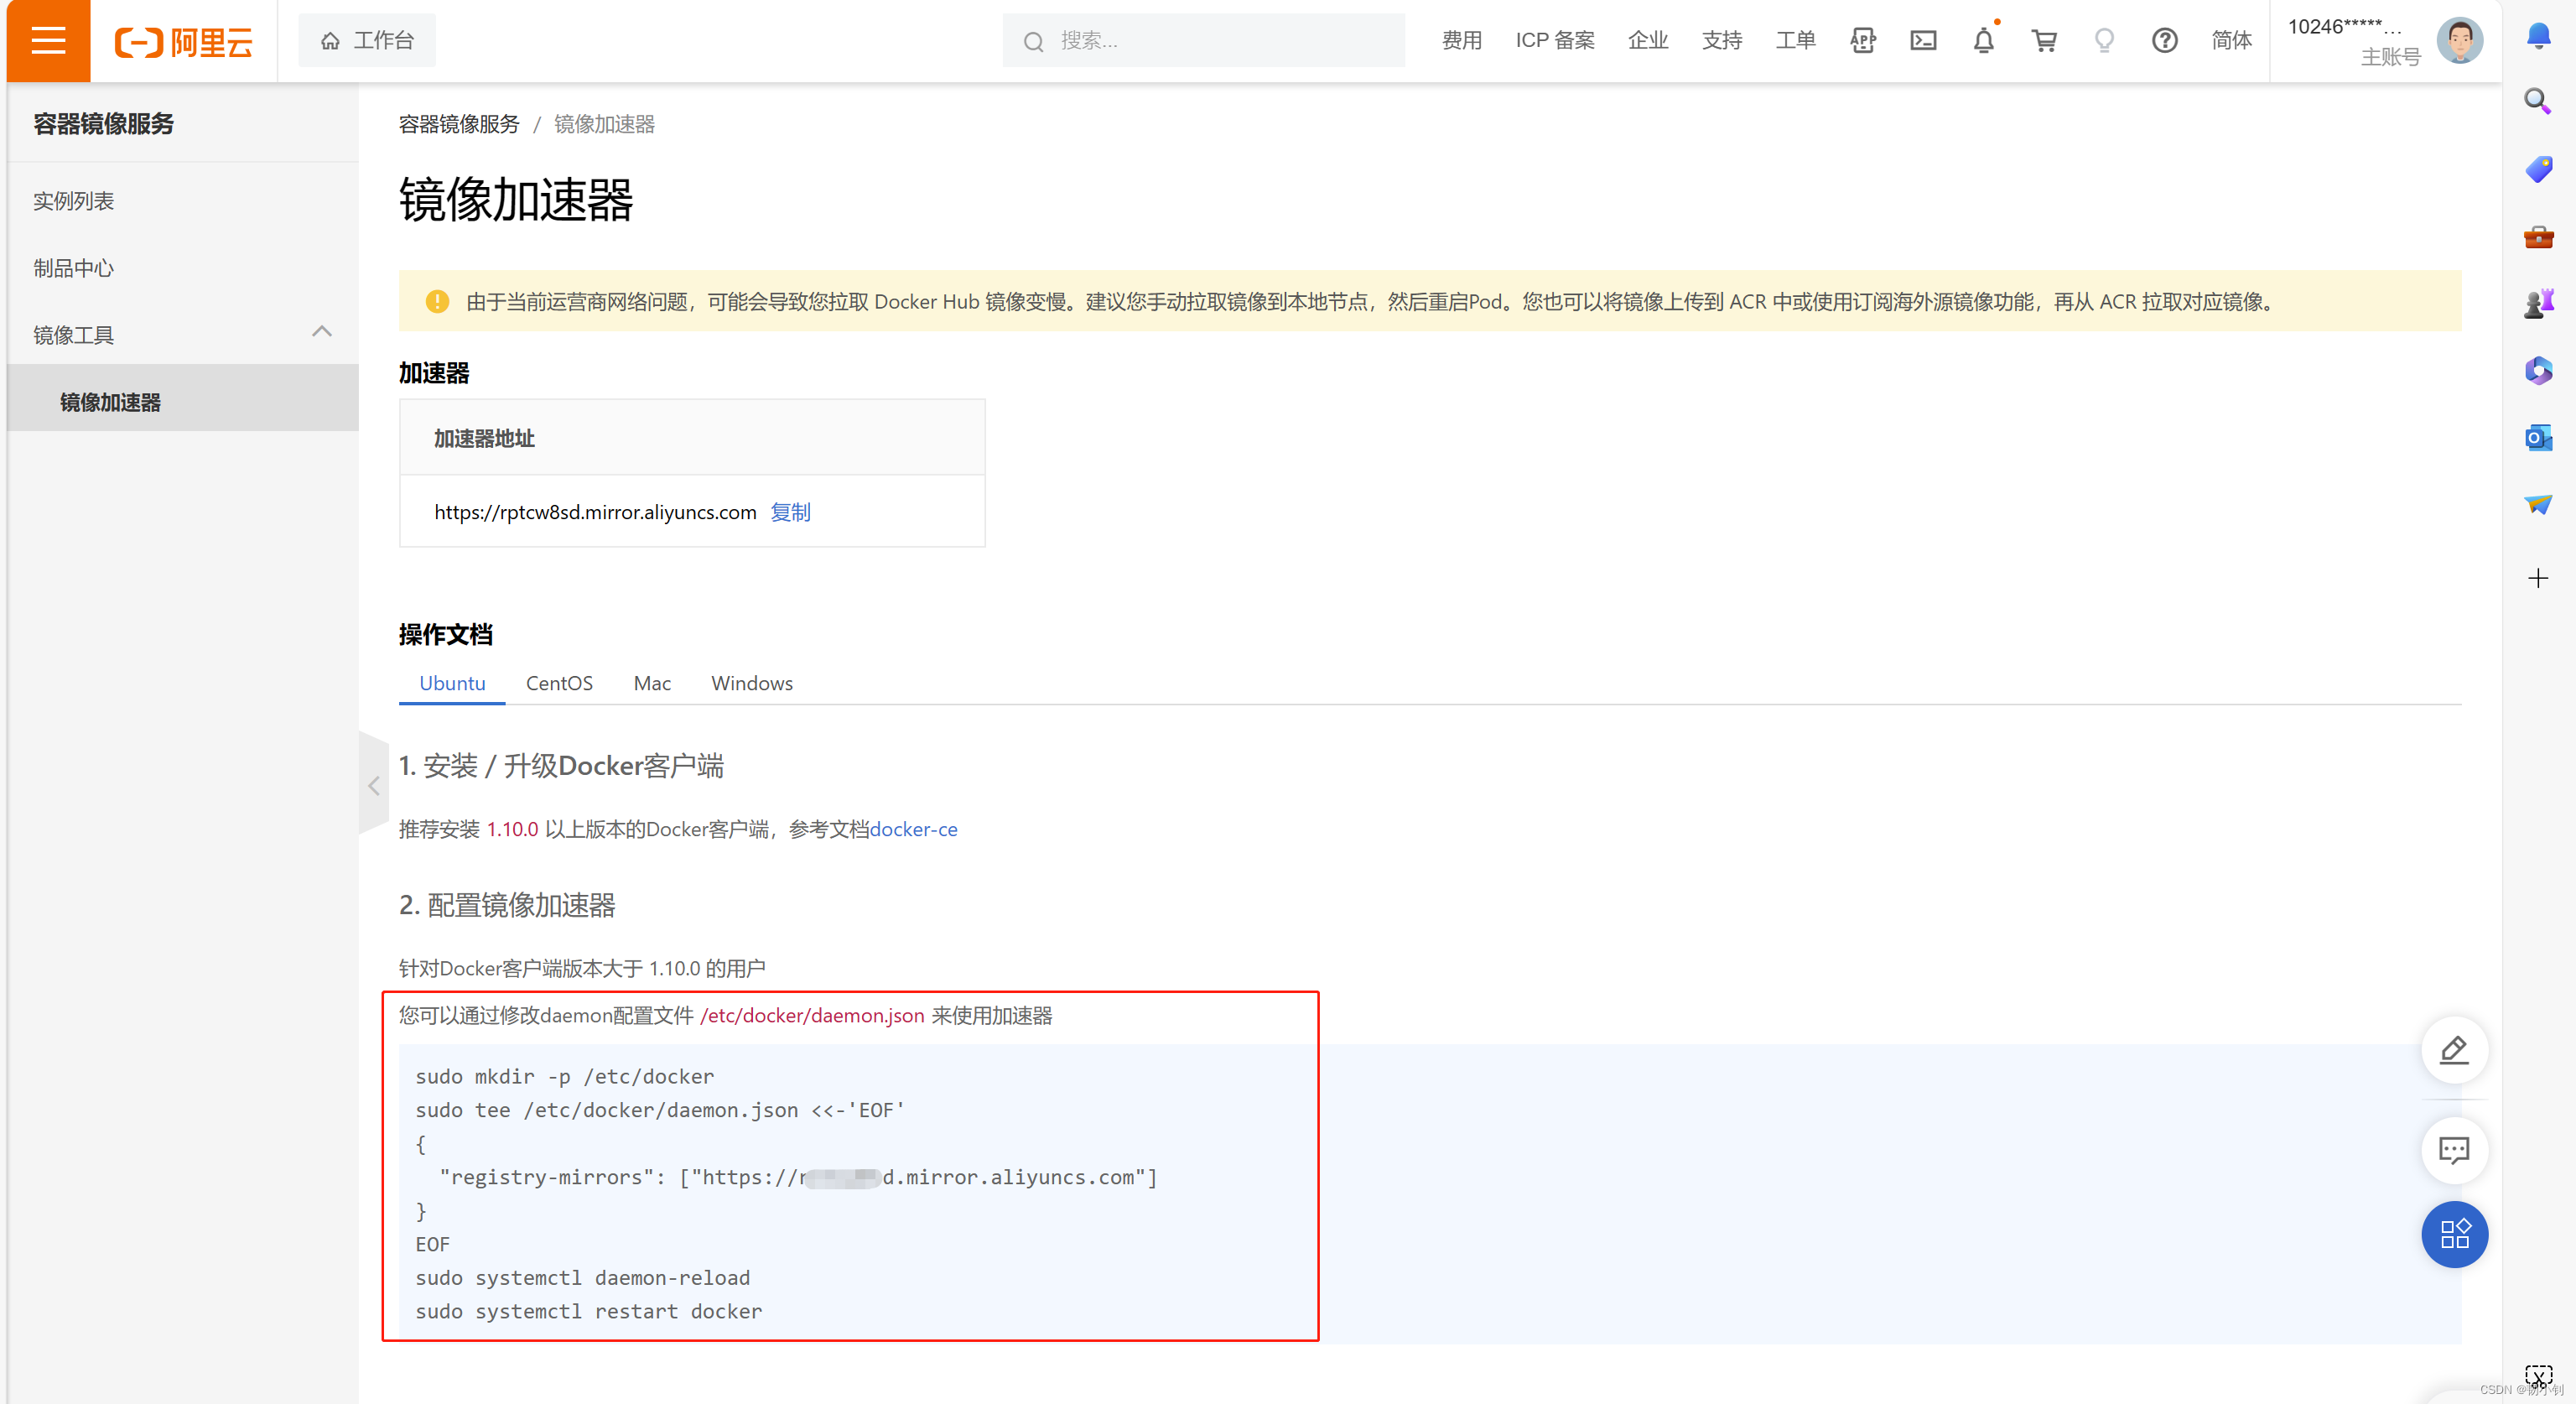
docker版本:docker version[kubernetes@renxiaozhao01 ~]$ docker version Client: Docker Engine - CommunityVersion: 24.0.5API version: 1.43Go version: go1.20.6Git commit: ced0996Built: Fri Jul 21 20:39:02 2023OS/Arch: linux/amd64Context: default permission denied while trying to connect to the Docker daemon socket at unix:///var/run/docker.sock: Get "http://%2Fvar%2Frun%2Fdocker.sock/v1.24/version": dial unix /var/run/docker.sock: connect: permission denied [kubernetes@renxiaozhao01 ~]$ - 配置镜像加速器,参照文章下面的问题三,支付宝登录一下阿里云镜像地址就获取到了
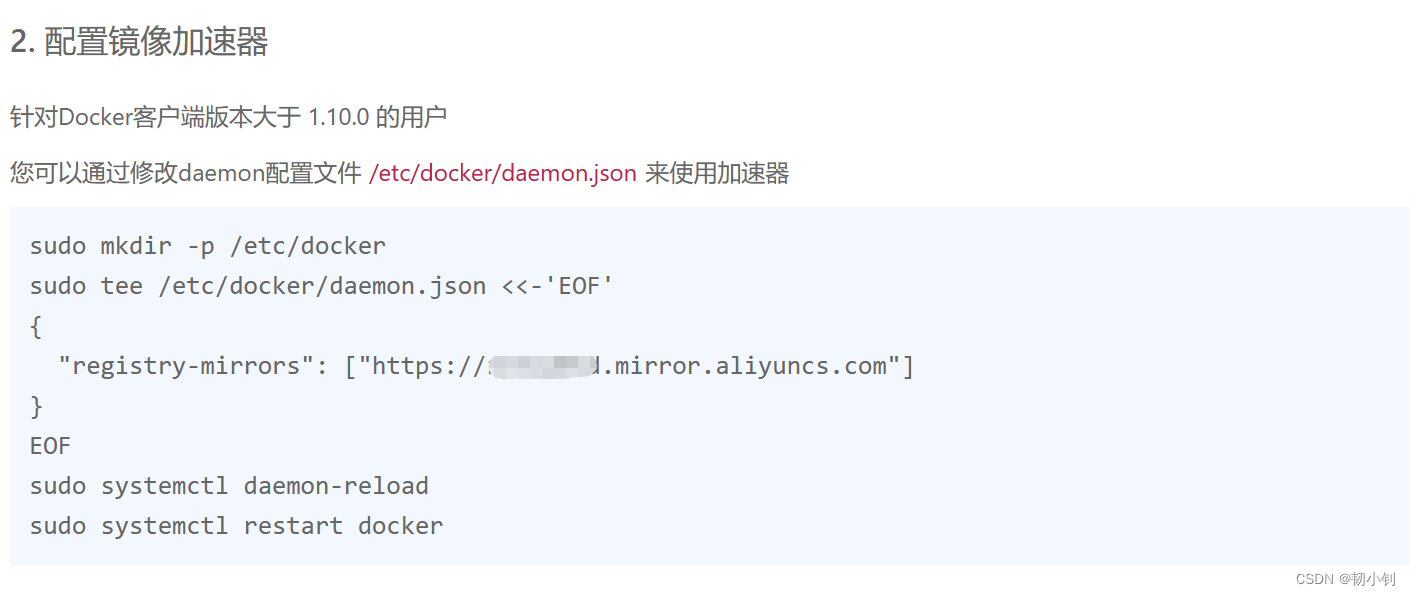
sudo mkdir -p /etc/docker sudo tee /etc/docker/daemon.json <<-'EOF' {"registry-mirrors": ["https://xxxx.mirror.aliyuncs.com"] } EOF sudo systemctl daemon-reload sudo systemctl restart docker - 执行
sudo docker info可以看到刚刚配置的加速器信息
📗安装cri-dockerd(r1、r2、r3都要安装)
官网地址
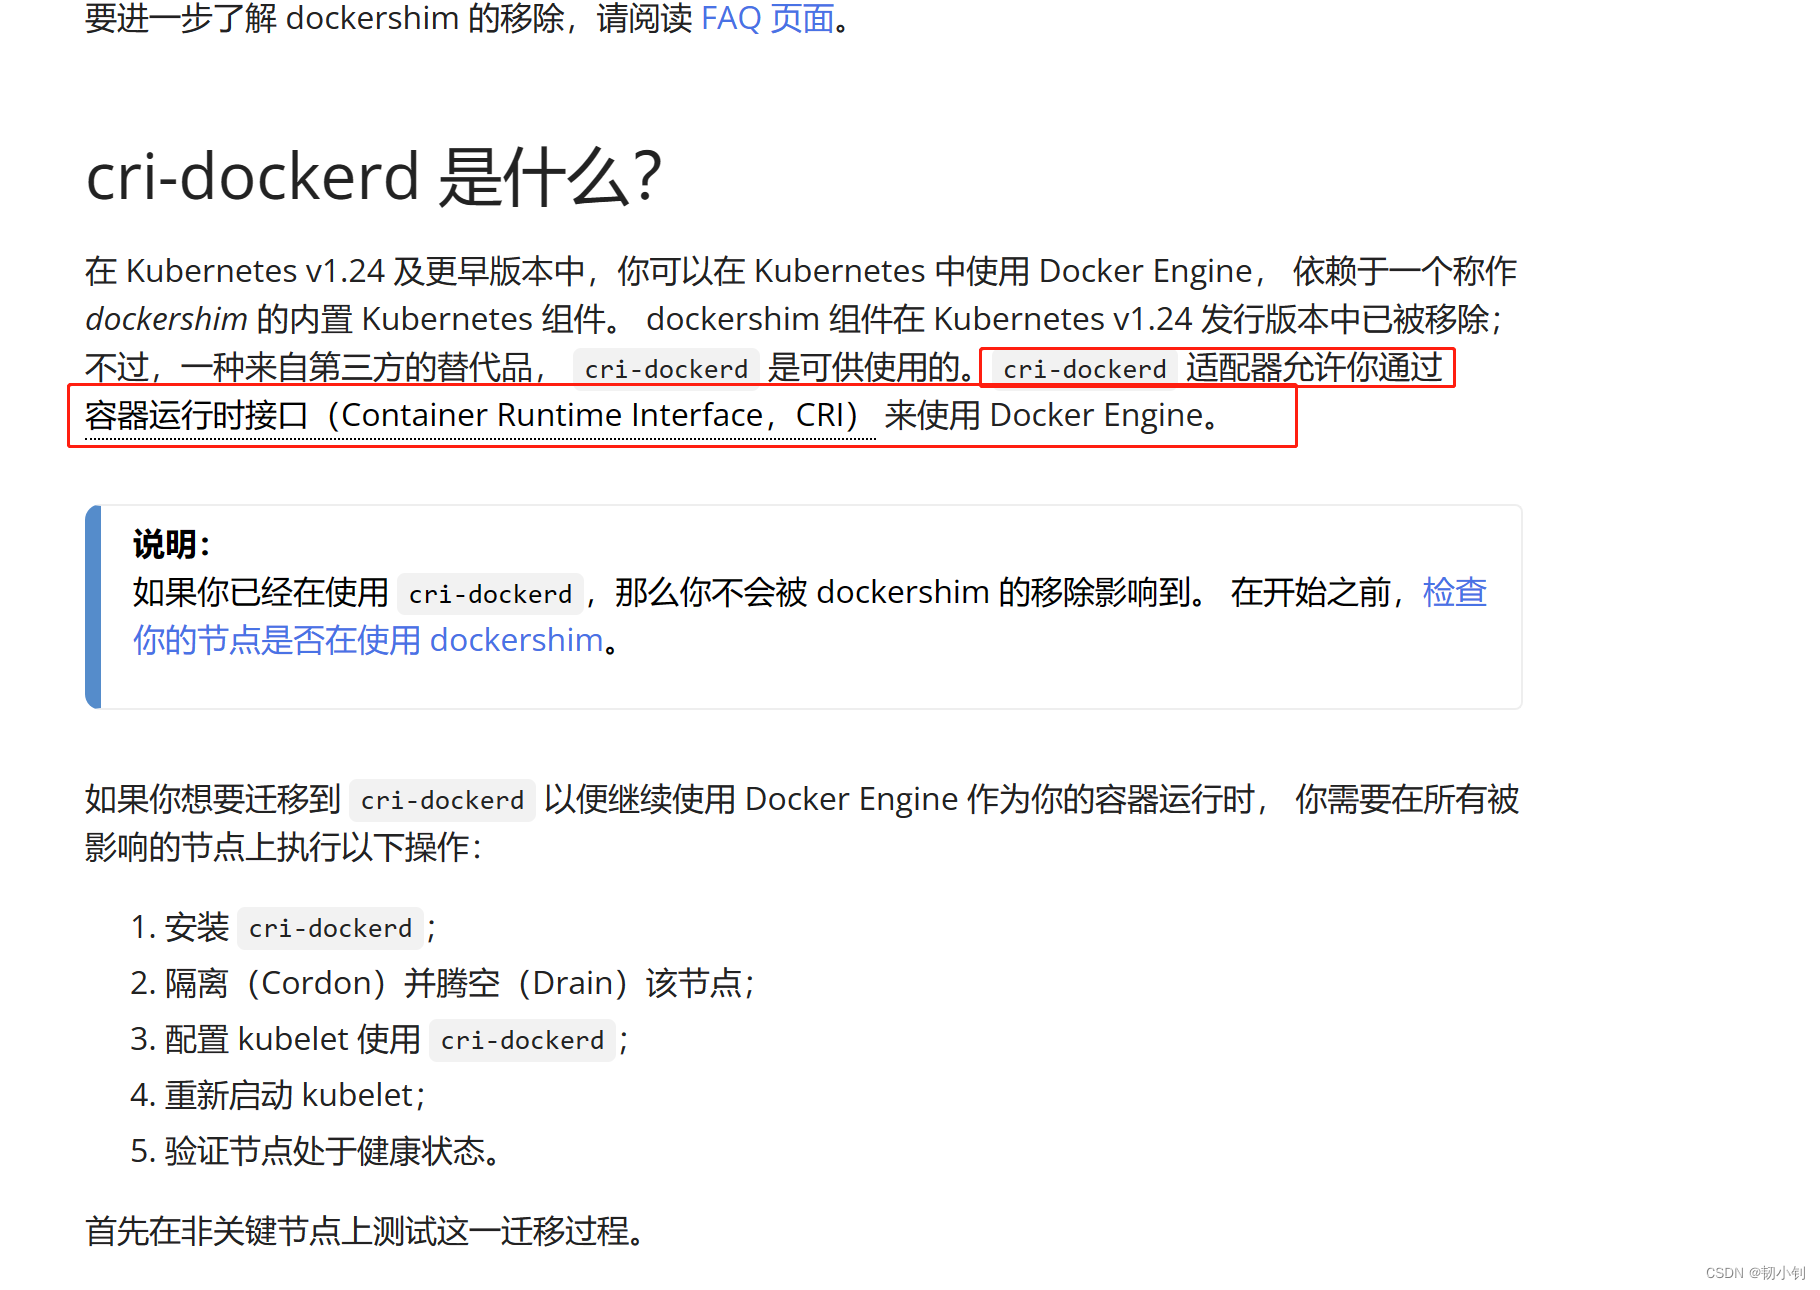
cri-dockerd 是一种基于 Docker 的容器运行时实现,它通过实现 CRI 接口,使 Kubernetes 能够与 Docker 进行交互,创建和管理容器
📕下载rpm安装包
官网说明
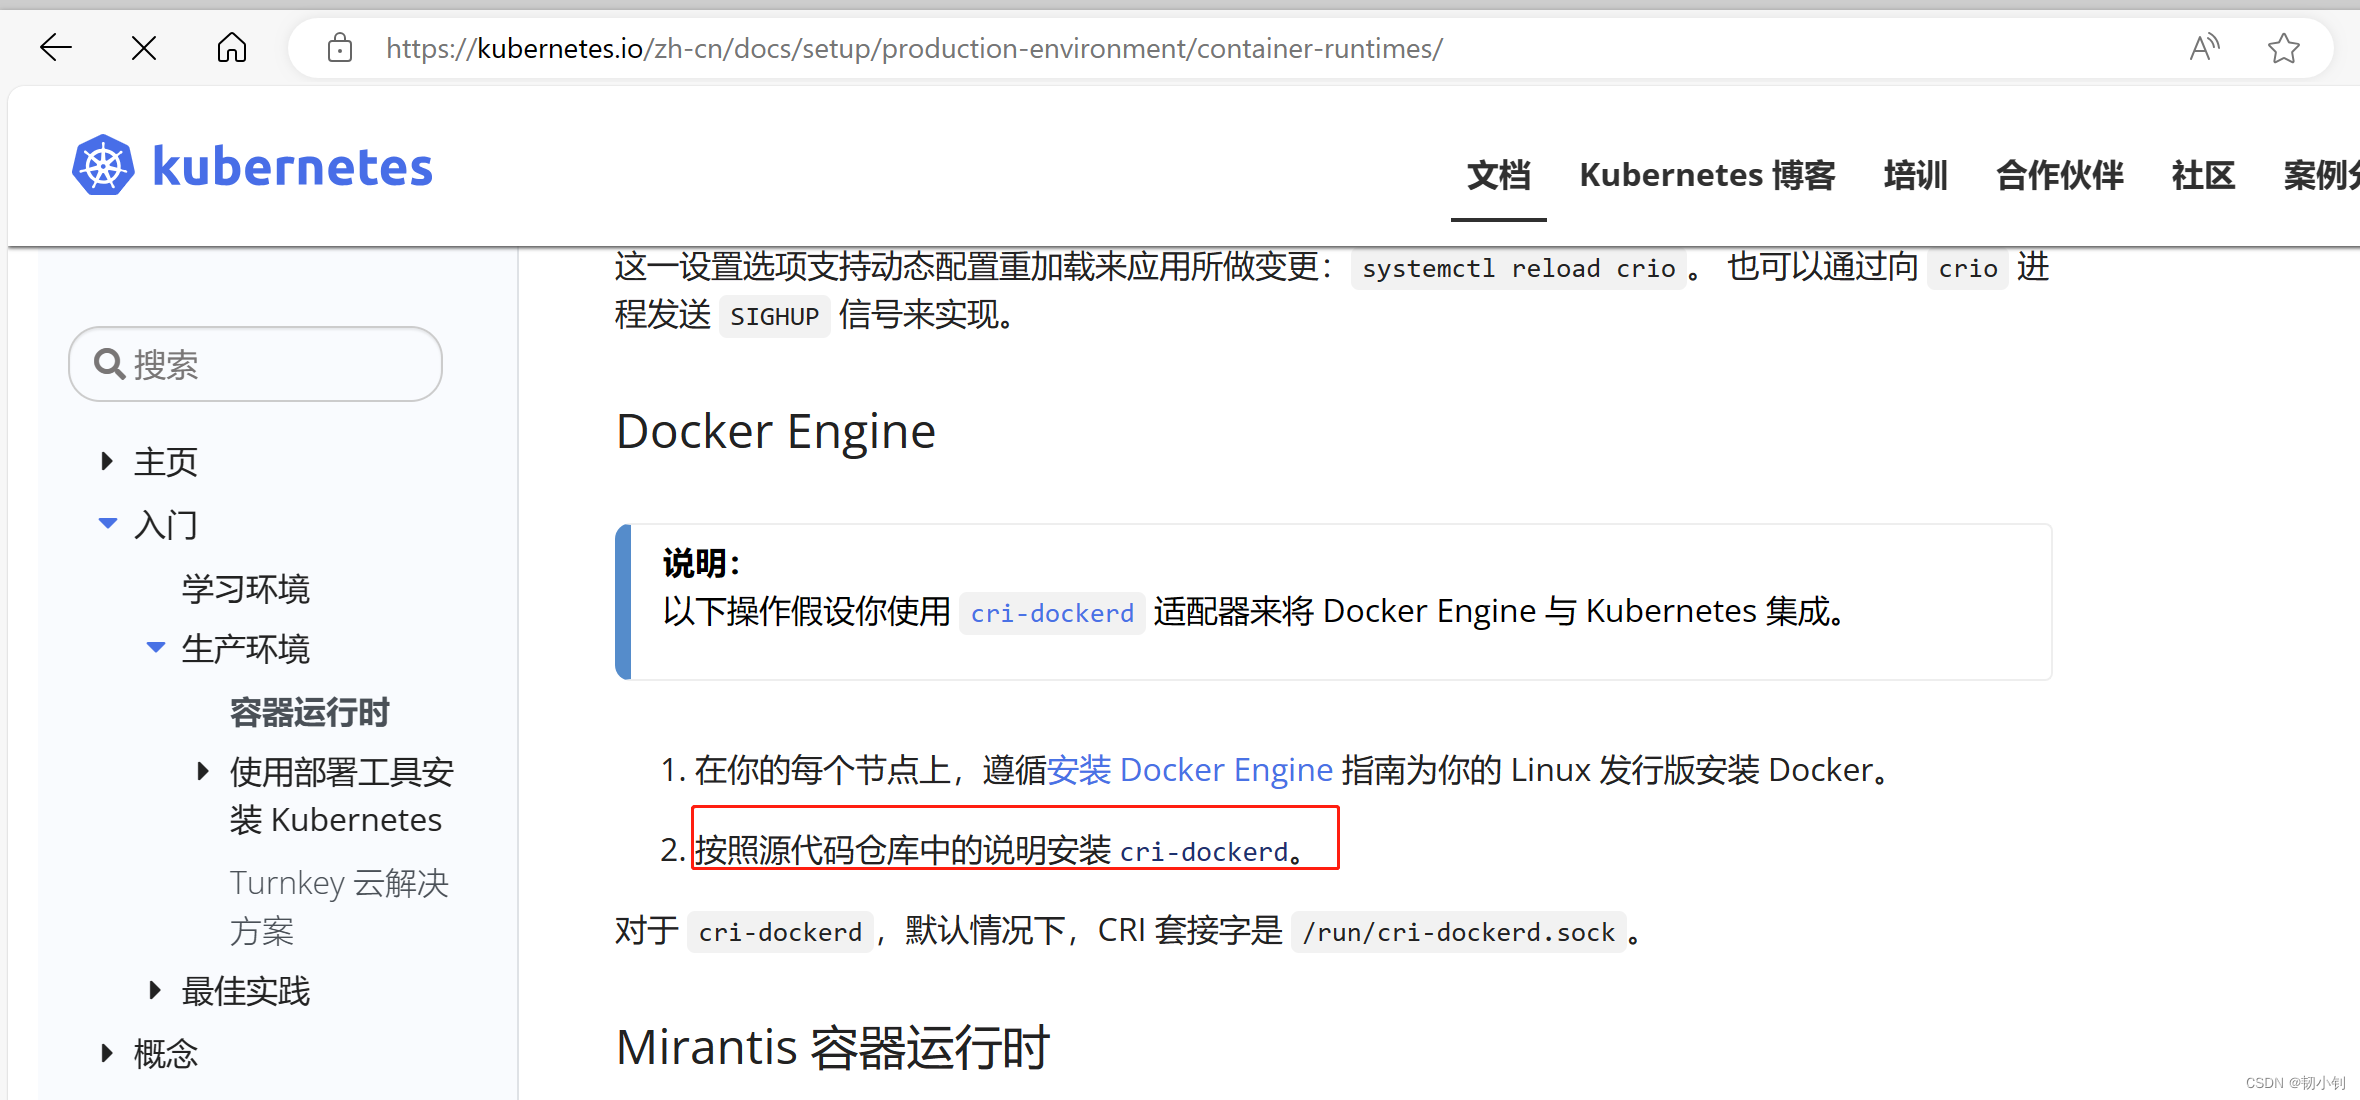
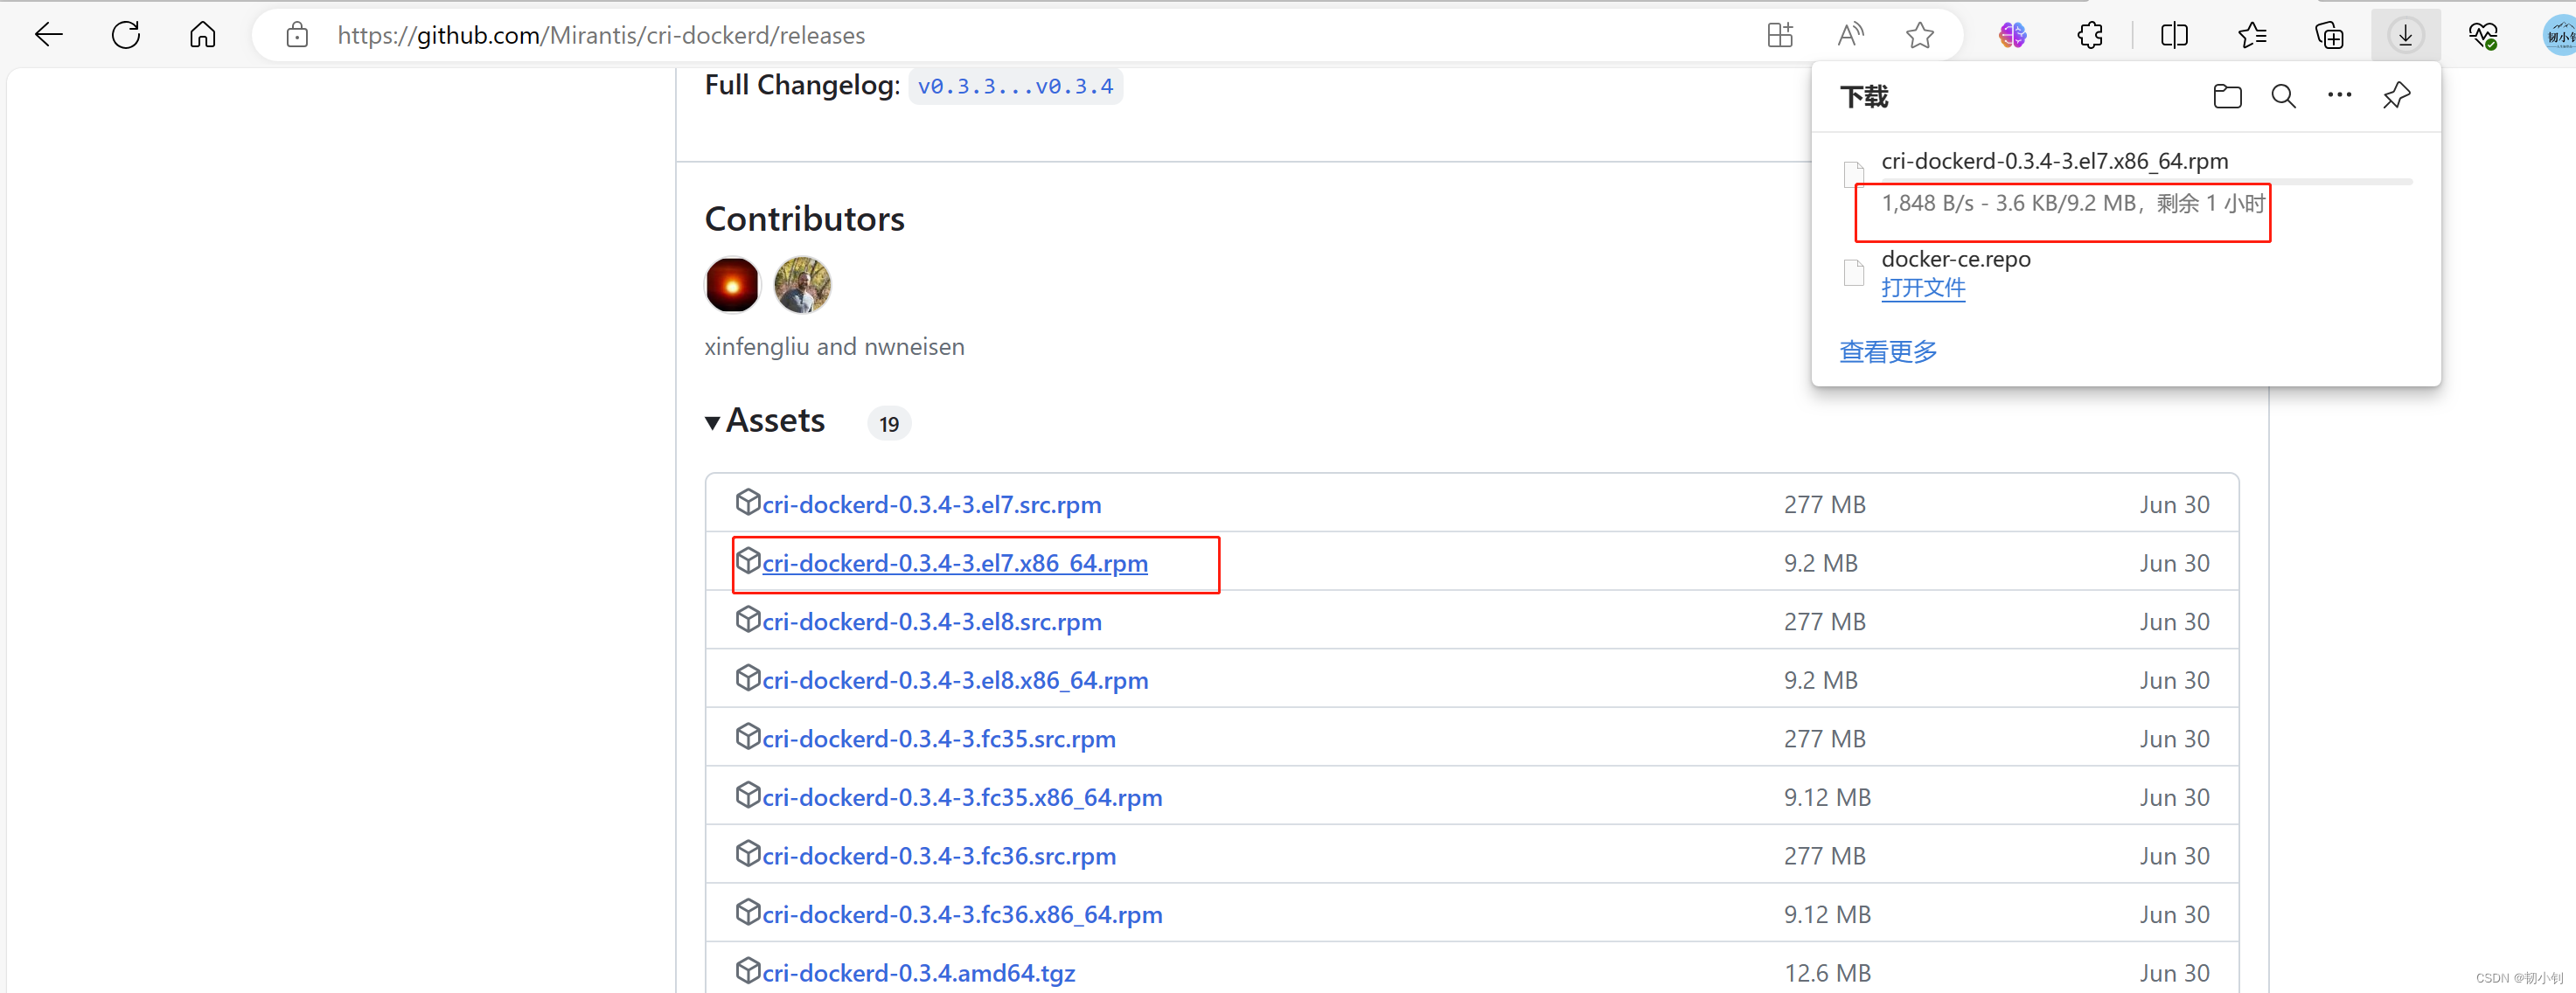
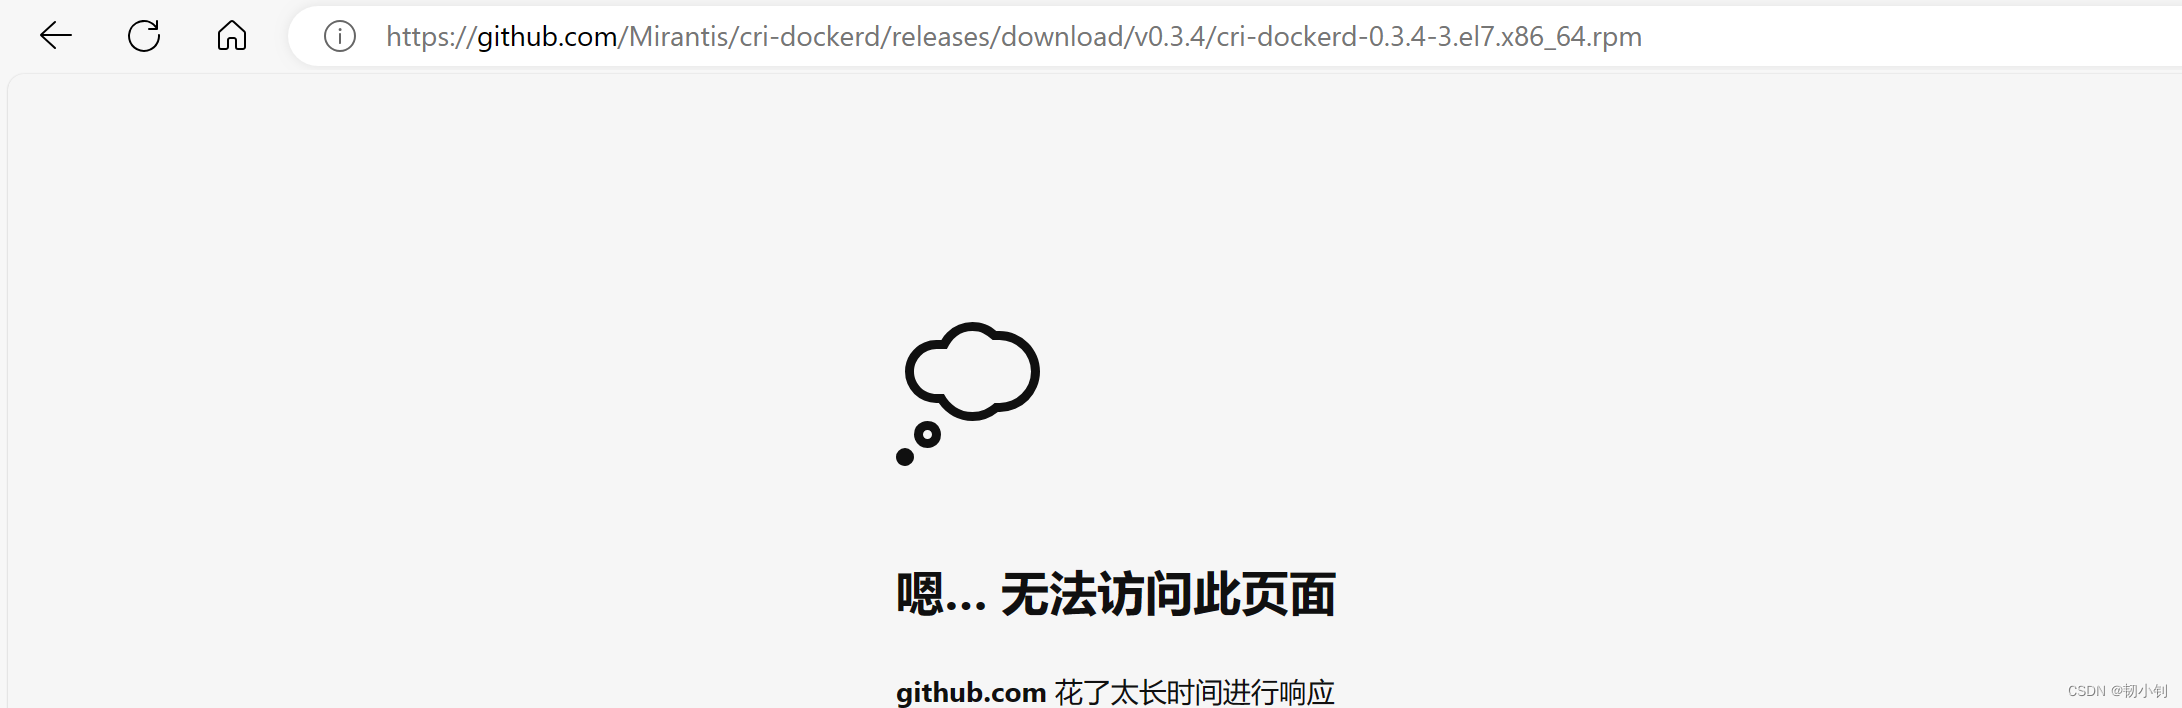
Git地址,直接点击下载丢到服务器(网络好的话可以直接服务器执行sudo wget https://github.com/Mirantis/cri-dockerd/releases/download/v0.3.4/cri-dockerd-0.3.4-3.el7.x86_64.rpm进行下载),下载挺慢…
这次反而在环境上下载快一点
心累…明晚继续
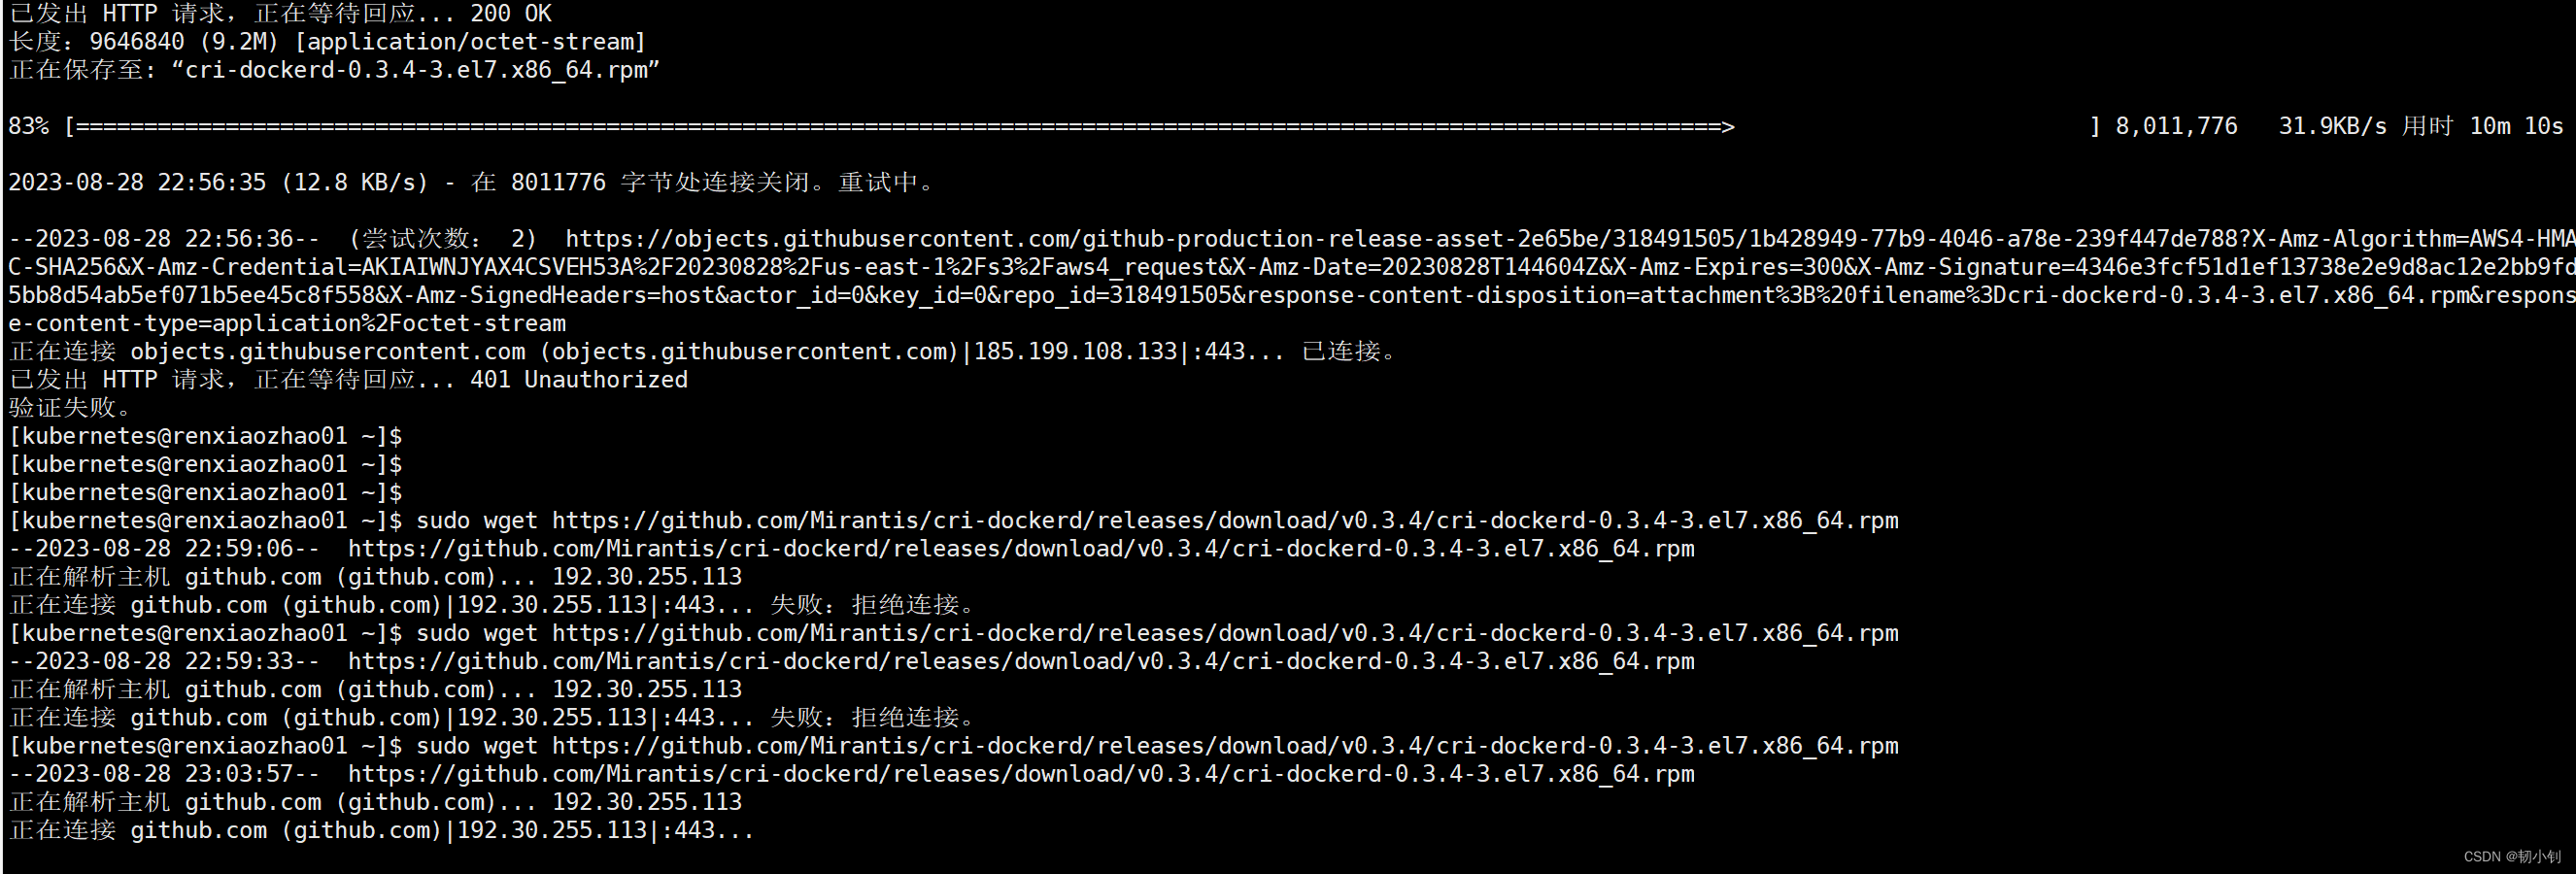
cri-dockerd-0.3.4-3.el7.x86-64.rpm快速下载地址
📕通过rpm安装
没有rpm命令,可以执行yum - y intall rpm 安装该命令
- 通过rpm安装:
sudo rpm -ivh cri-dockerd-0.3.4-3.el7.x86_64.rpm,-i表示安装软件包,-v表示显示详细的安装过程,-h表示显示进度条。

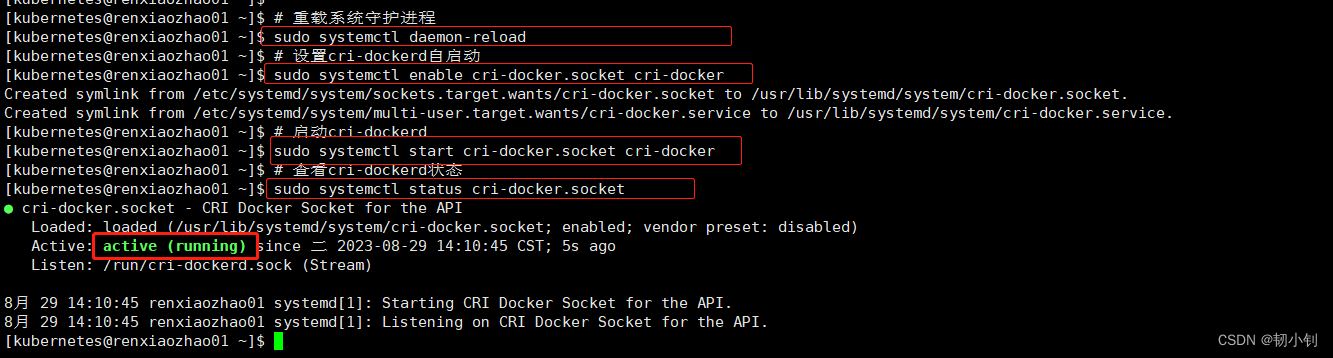
📕启动cri-dockerd
# 重载系统守护进程
sudo systemctl daemon-reload
# 设置cri-dockerd自启动
sudo systemctl enable cri-docker.socket cri-docker
# 启动cri-dockerd
sudo systemctl start cri-docker.socket cri-docker
# 查看cri-dockerd状态
sudo systemctl status cri-docker.socket
📗初始化K8S集群
📕配置/etc/hosts(r1、r2、r3三台机器)
名称添加k8s标识,方便区分,日后部署hadoop集群可以叫hp-master、hp-slave01、hp-slave02
[kubernetes@renxiaozhao01 ~]$ sudo vi /etc/hosts
[kubernetes@renxiaozhao01 ~]$ sudo cat  /etc/hosts
127.0.0.1   localhost localhost.localdomain localhost4 localhost4.localdomain4
::1         localhost localhost.localdomain localhost6 localhost6.localdomain6
192.168.17.17	k8s-master
192.168.17.18	k8s-node01
192.168.17.19   k8s-node02
[kubernetes@renxiaozhao01 ~]$
📕配置初始化系统参数
📘module参数
-
内核模块配置文件
cat <<EOF | sudo tee /etc/modules-load.d/k8s.conf overlay br_netfilter EOF -
加载内核模块:
-
overlay模块是用于支持容器的联合文件系统的 -
br_netfilter模块是用于支持 Kubernetes 网络的桥接和网络过滤功能的。 -
加载命令:
sudo modprobe overlay sudo modprobe br_netfilter -
验证加载是否成功:
lsmod | grep br_netfilter
lsmod | grep overlay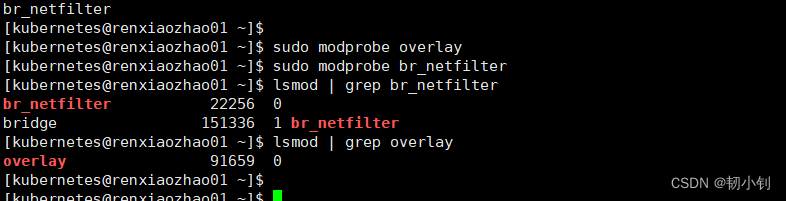
-
📘sysctl 参数
net.bridge.bridge-nf-call-iptables:用于启用桥接网络对 iptables 的调用net.bridge.bridge-nf-call-ip6tables: 用于启用桥接网络对 ip6tables 的调用net.ipv4.ip_forward: 用于启用 IP 转发- 参数:
-
配置文件
cat <<EOF | sudo tee /etc/sysctl.d/k8s.conf net.bridge.bridge-nf-call-iptables = 1 net.bridge.bridge-nf-call-ip6tables = 1 net.ipv4.ip_forward = 1 EOF -
生效配置
sudo sysctl --system -
查看配置:
sysctl net.bridge.bridge-nf-call-iptables net.bridge.bridge-nf-call-ip6tables net.ipv4.ip_forward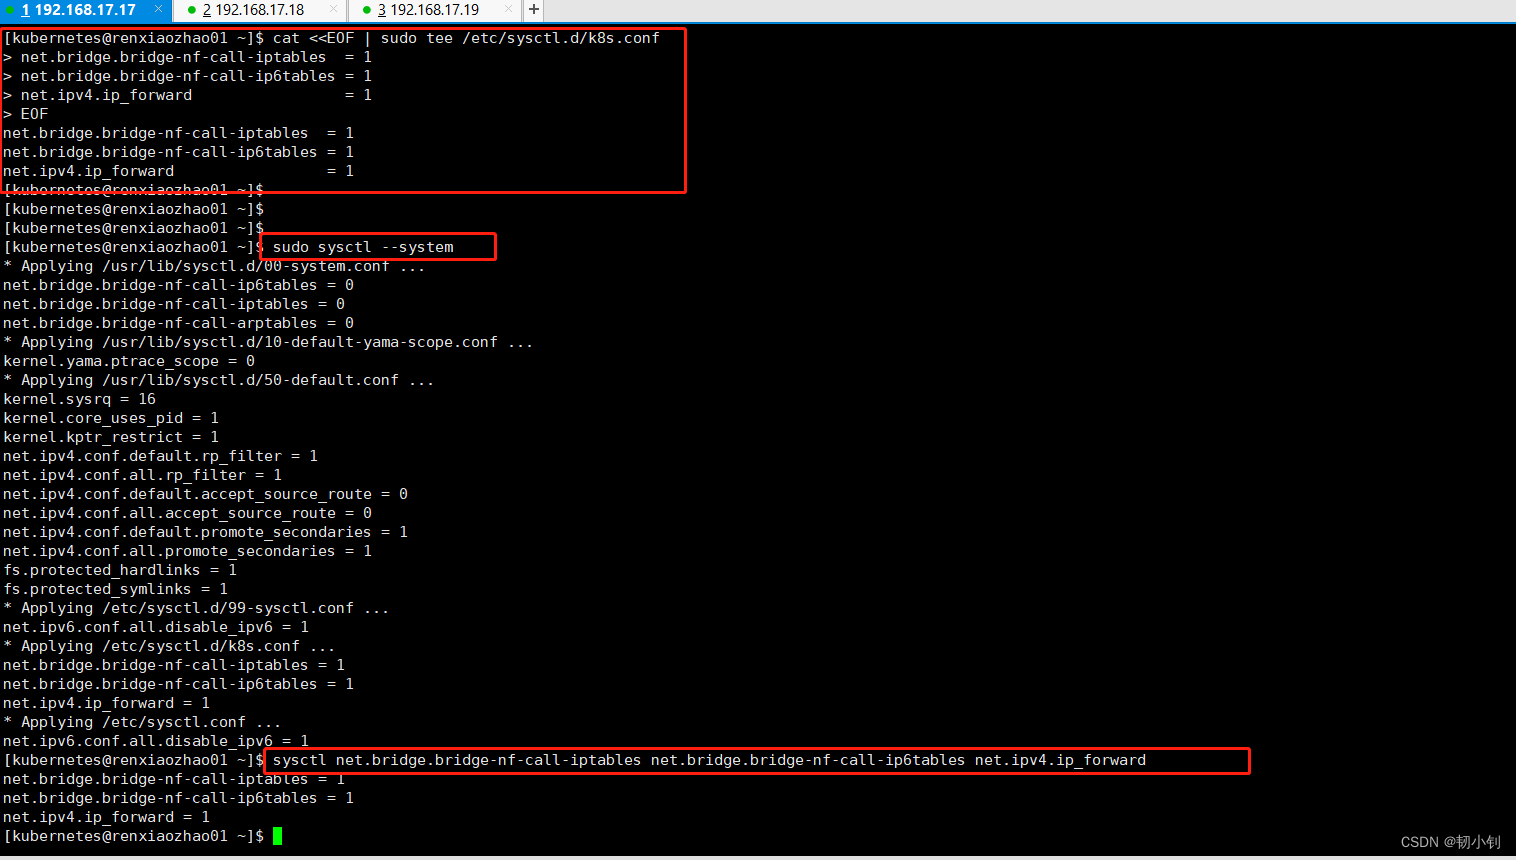
-
📕Master节点初始化(对应r1机器)
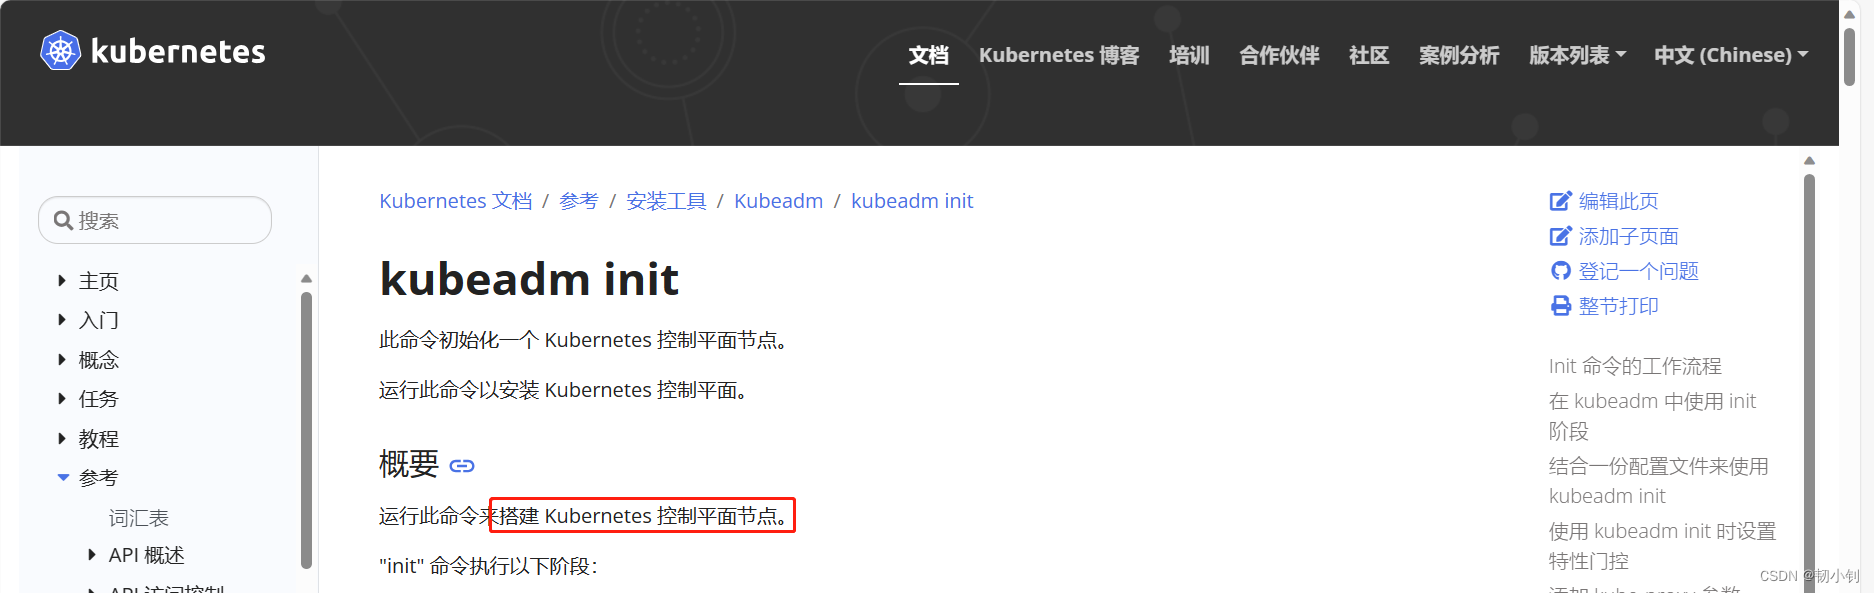
📘kubeadm init
-
官网地址
-
初始化命令
sudo kubeadm init --node-name=k8s-master --image-repository=registry.aliyuncs.com/google_containers --cri-socket=unix:///var/run/cri-dockerd.sock --apiserver-advertise-address=192.168.17.17 --pod-network-cidr=10.244.0.0/16 --service-cidr=10.96.0.0/12
kubeadm init 命令中的参数解释(上面的官网地址中也有解释):
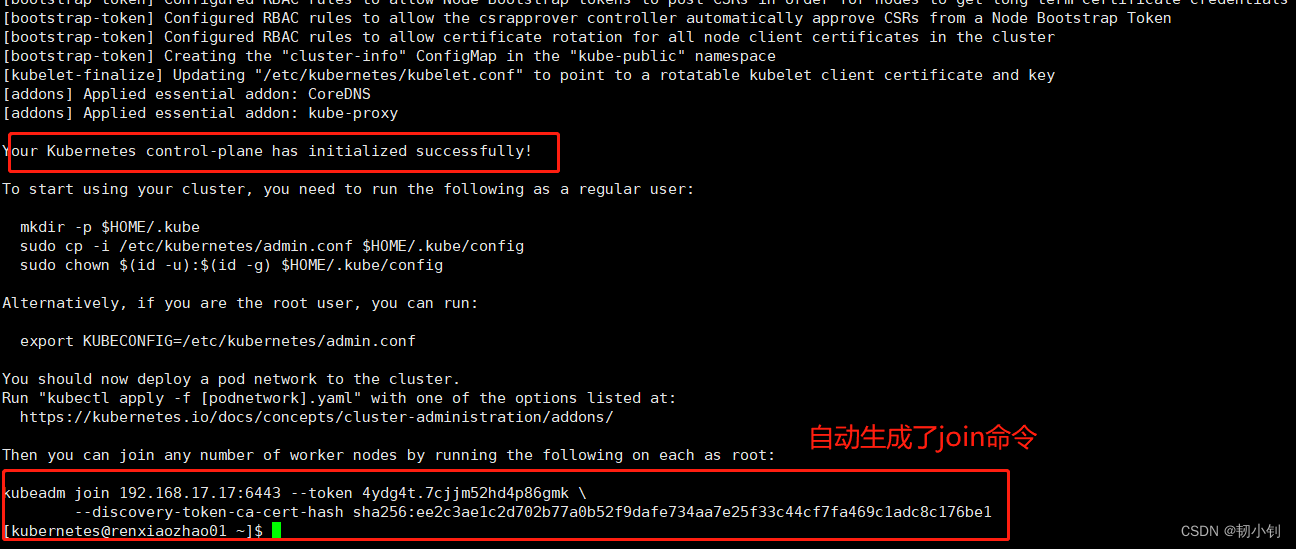
--node-name=k8s-master: 指定k8s集群中Master节点的名称,和上面/etc/hosts配置中192.168.17.17 k8s-master名称一致。--image-repository=registry.aliyuncs.com/google_containers: 指定容器镜像的仓库地址。--cri-socket=unix:///var/run/cri-dockerd.sock: 指定容器运行时的 CRI(Container Runtime Interface)套接字路径(Docker 的配置文件路径通常是 /etc/docker/daemon.json,CRI 套接字路径通常不会在 Docker 的配置文件中直接指定。Kubernetes一般会使用默认的 Docker 套接字路径 /var/run/docker.sock)。--apiserver-advertise-address=192.168.17.17: 指定Kubernetes API Server的地址,即Master节点的IP地址。和上面/etc/hosts配置中192.168.17.17 k8s-master的IP一致--pod-network-cidr=10.244.0.0/16: 指定 Pod 网络的 CIDR(Classless Inter-Domain Routing)地址范围。默认使用这个即可。--service-cidr=10.96.0.0/12: 指定服务网络的 CIDR 地址范围(需要选择一个未被使用的 CIDR 地址范围),一般默认使用这个即可。- 执行成功如下(差点崩溃了,卡了好久,详见问题四)
[kubernetes@renxiaozhao01 ~]$ sudo kubeadm init --node-name=k8s-master --image-repository=registry.aliyuncs.com/google_containers --cri-socket=unix:///var/run/cri-dockerd.sock --apiserver-advertise-address=192.168.17.17 --pod-network-cidr=10.244.0.0/16 --service-cidr=10.96.0.0/12
[init] Using Kubernetes version: v1.28.1
[preflight] Running pre-flight checks
[preflight] Pulling images required for setting up a Kubernetes cluster
[preflight] This might take a minute or two, depending on the speed of your internet connection
[preflight] You can also perform this action in beforehand using 'kubeadm config images pull'
[certs] Using certificateDir folder "/etc/kubernetes/pki"
[certs] Generating "ca" certificate and key
[certs] Generating "apiserver" certificate and key
[certs] apiserver serving cert is signed for DNS names [k8s-master kubernetes kubernetes.default kubernetes.default.svc kubernetes.default.svc.cluster.local] and IPs [10.96.0.1 192.168.17.17]
[certs] Generating "apiserver-kubelet-client" certificate and key
[certs] Generating "front-proxy-ca" certificate and key
[certs] Generating "front-proxy-client" certificate and key
[certs] Generating "etcd/ca" certificate and key
[certs] Generating "etcd/server" certificate and key
[certs] etcd/server serving cert is signed for DNS names [k8s-master localhost] and IPs [192.168.17.17 127.0.0.1 ::1]
[certs] Generating "etcd/peer" certificate and key
[certs] etcd/peer serving cert is signed for DNS names [k8s-master localhost] and IPs [192.168.17.17 127.0.0.1 ::1]
[certs] Generating "etcd/healthcheck-client" certificate and key
[certs] Generating "apiserver-etcd-client" certificate and key
[certs] Generating "sa" key and public key
[kubeconfig] Using kubeconfig folder "/etc/kubernetes"
[kubeconfig] Writing "admin.conf" kubeconfig file
[kubeconfig] Writing "kubelet.conf" kubeconfig file
[kubeconfig] Writing "controller-manager.conf" kubeconfig file
[kubeconfig] Writing "scheduler.conf" kubeconfig file
[etcd] Creating static Pod manifest for local etcd in "/etc/kubernetes/manifests"
[control-plane] Using manifest folder "/etc/kubernetes/manifests"
[control-plane] Creating static Pod manifest for "kube-apiserver"
[control-plane] Creating static Pod manifest for "kube-controller-manager"
[control-plane] Creating static Pod manifest for "kube-scheduler"
[kubelet-start] Writing kubelet environment file with flags to file "/var/lib/kubelet/kubeadm-flags.env"
[kubelet-start] Writing kubelet configuration to file "/var/lib/kubelet/config.yaml"
[kubelet-start] Starting the kubelet
[wait-control-plane] Waiting for the kubelet to boot up the control plane as static Pods from directory "/etc/kubernetes/manifests". This can take up to 4m0s
[apiclient] All control plane components are healthy after 16.526647 seconds
[upload-config] Storing the configuration used in ConfigMap "kubeadm-config" in the "kube-system" Namespace
[kubelet] Creating a ConfigMap "kubelet-config" in namespace kube-system with the configuration for the kubelets in the cluster
[upload-certs] Skipping phase. Please see --upload-certs
[mark-control-plane] Marking the node k8s-master as control-plane by adding the labels: [node-role.kubernetes.io/control-plane node.kubernetes.io/exclude-from-external-load-balancers]
[mark-control-plane] Marking the node k8s-master as control-plane by adding the taints [node-role.kubernetes.io/control-plane:NoSchedule]
[bootstrap-token] Using token: 4ydg4t.7cjjm52hd4p86gmk
[bootstrap-token] Configuring bootstrap tokens, cluster-info ConfigMap, RBAC Roles
[bootstrap-token] Configured RBAC rules to allow Node Bootstrap tokens to get nodes
[bootstrap-token] Configured RBAC rules to allow Node Bootstrap tokens to post CSRs in order for nodes to get long term certificate credentials
[bootstrap-token] Configured RBAC rules to allow the csrapprover controller automatically approve CSRs from a Node Bootstrap Token
[bootstrap-token] Configured RBAC rules to allow certificate rotation for all node client certificates in the cluster
[bootstrap-token] Creating the "cluster-info" ConfigMap in the "kube-public" namespace
[kubelet-finalize] Updating "/etc/kubernetes/kubelet.conf" to point to a rotatable kubelet client certificate and key
[addons] Applied essential addon: CoreDNS
[addons] Applied essential addon: kube-proxyYour Kubernetes control-plane has initialized successfully!To start using your cluster, you need to run the following as a regular user:mkdir -p $HOME/.kubesudo cp -i /etc/kubernetes/admin.conf $HOME/.kube/configsudo chown $(id -u):$(id -g) $HOME/.kube/configAlternatively, if you are the root user, you can run:export KUBECONFIG=/etc/kubernetes/admin.confYou should now deploy a pod network to the cluster.
Run "kubectl apply -f [podnetwork].yaml" with one of the options listed at:https://kubernetes.io/docs/concepts/cluster-administration/addons/Then you can join any number of worker nodes by running the following on each as root:kubeadm join 192.168.17.17:6443 --token 4ydg4t.7cjjm52hd4p86gmk \--discovery-token-ca-cert-hash sha256:ee2c3ae1c2d702b77a0b52f9dafe734aa7e25f33c44cf7fa469c1adc8c176be1
📘admin.conf
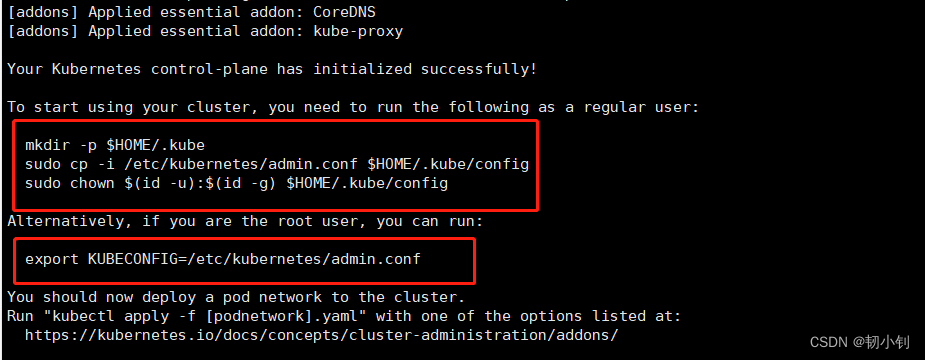
- 参照上面初始化信息还需要执行以下命令(kubernetes用户,如果用root执行的命令):
[kubernetes@renxiaozhao01 ~]$ [kubernetes@renxiaozhao01 ~]$ mkdir -p $HOME/.kube [kubernetes@renxiaozhao01 ~]$ sudo cp -i /etc/kubernetes/admin.conf $HOME/.kube/config [kubernetes@renxiaozhao01 ~]$ sudo chown $(id -u):$(id -g) $HOME/.kube/config [kubernetes@renxiaozhao01 ~]$ [kubernetes@renxiaozhao01 ~]$ - 如果用root执行的命令:
直接执行export KUBECONFIG=/etc/kubernetes/admin.conf临时生效,建议配置放到环境变量文件(非root用户不需要再配置环境变量)
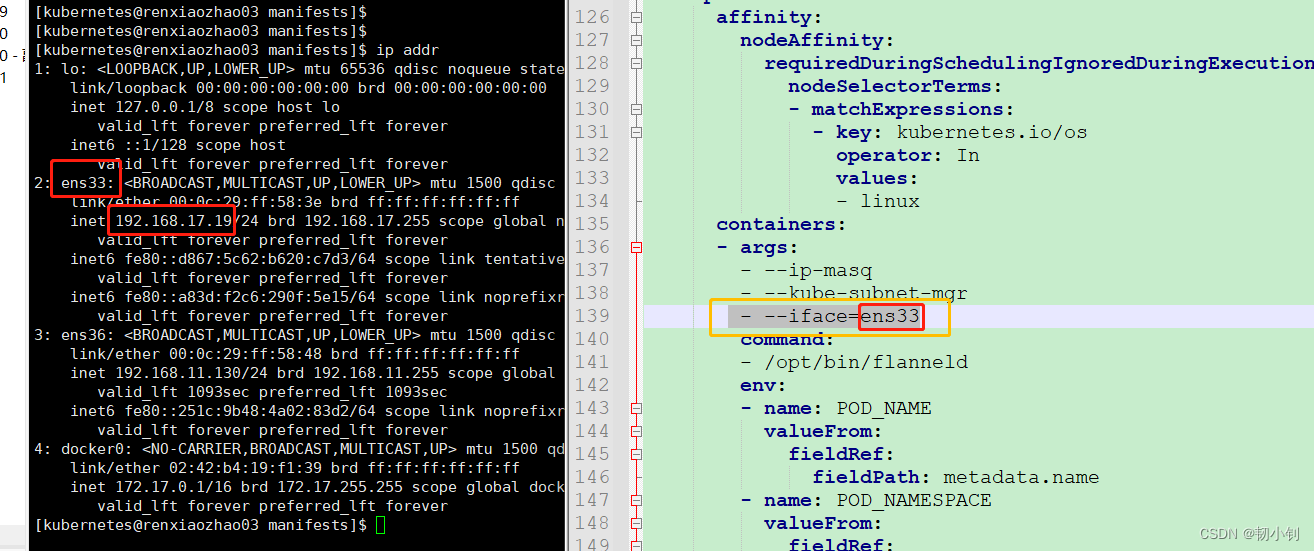
📕安装网络插件(r1、r2、r3机器)
应该是必须安装,一开始没安装,执行下 kubeadm join也可以添加成功(但是状态应该不对),后来 kubeadm join 添加节点名称参数时候一直不成功,然后尝试安装网络插件flannel下载地址,简单记录下吧
- 下载
kube-flannel.yml,指定网络接口名称,搜索kube-subnet-mgr,下面添加- --iface=ens33(对应自己的固定IP网关)
- 直接执行
kubectl apply -f kube-flannel.yml,如果非root用户,添加sudo会报错,很多加sudo执行都会报错localhost:8080 was refused,去掉就好了,有待研究[kubernetes@renxiaozhao03 ~]$ kubectl apply -f kube-flannel.yml namespace/kube-flannel unchanged serviceaccount/flannel unchanged clusterrole.rbac.authorization.k8s.io/flannel unchanged clusterrolebinding.rbac.authorization.k8s.io/flannel unchanged configmap/kube-flannel-cfg unchanged daemonset.apps/kube-flannel-ds unchanged [kubernetes@renxiaozhao03 ~]$ [kubernetes@renxiaozhao03 ~]$ [kubernetes@renxiaozhao03 ~]$ [kubernetes@renxiaozhao03 ~]$ sudo kubectl apply -f kube-flannel.yml The connection to the server localhost:8080 was refused - did you specify the right host or port? [kubernetes@renxiaozhao03 ~]$ [kubernetes@renxiaozhao03 ~]$
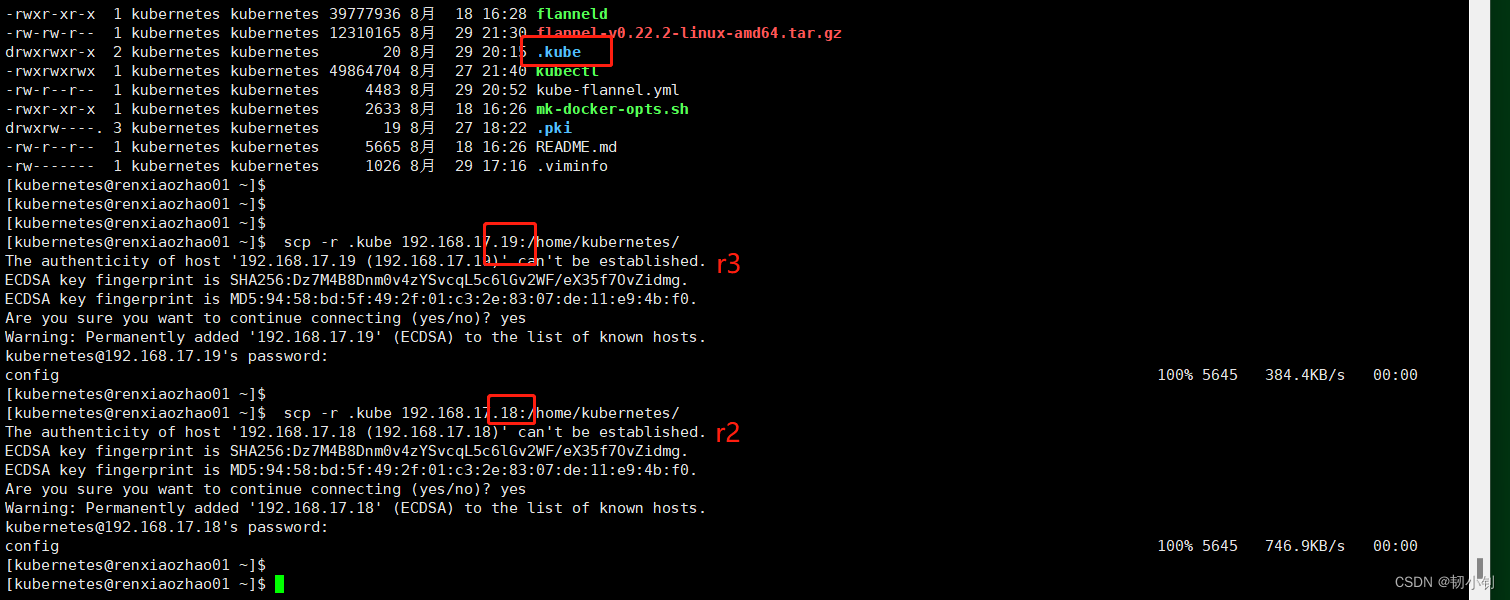
📕Node节点假如到Master(对应r2、r3机器)
-
同步
master上的.kube到node上面:scp -r .kube 192.168.17.18:/home/kubernetes/
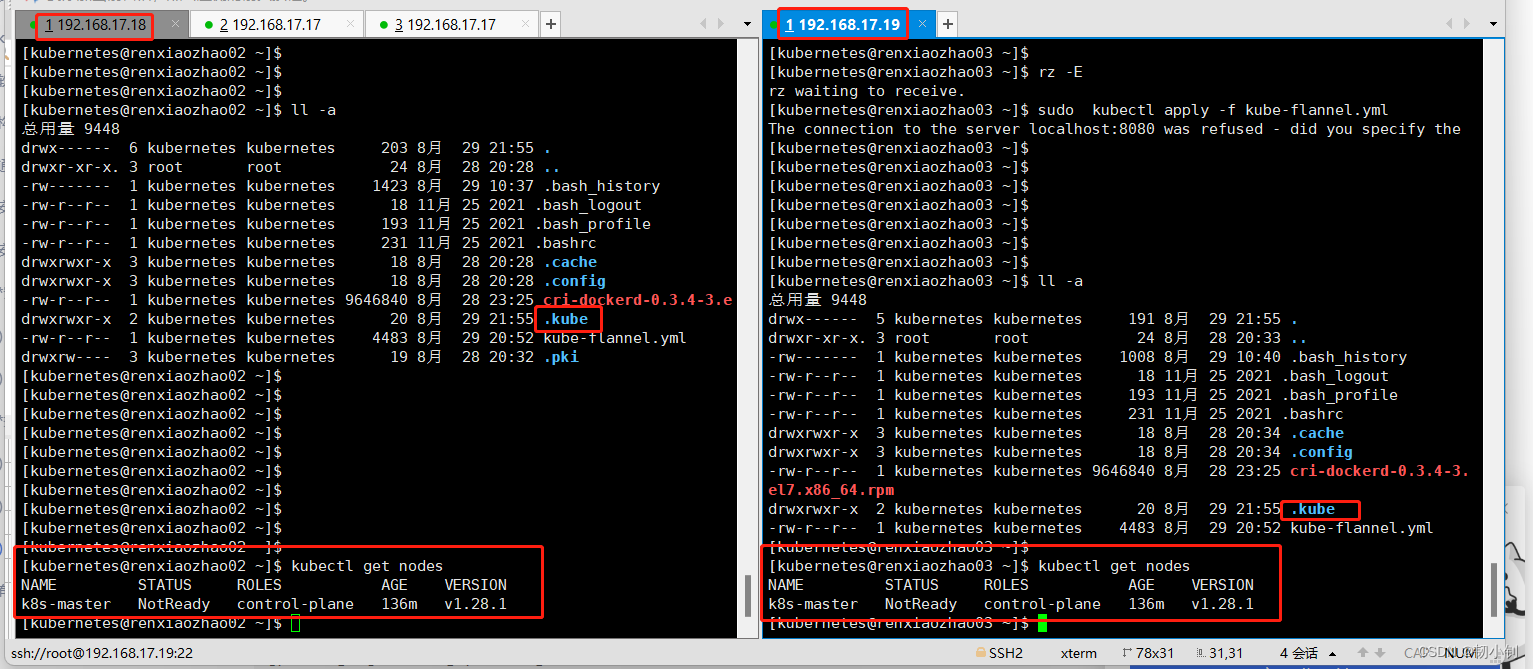
-
同步完验证下
-
执行上文生成的join指令:
sudo kubeadm join 192.168.17.17:6443 --token 4ydg4t.7cjjm52hd4p86gmk --discovery-token-ca-cert-hash sha256:ee2c3ae1c2d702b77a0b52f9dafe734aa7e25f33c44cf7fa469c1adc8c176be1 --cri-socket=unix:///var/run/cri-dockerd.sock
-
添加成功后,查看节点信息
kubectl get nodes有个节点没准备好呀😂,有缘再说吧,累了,不过好像可以确认网络插件属于必装,比如
flannel
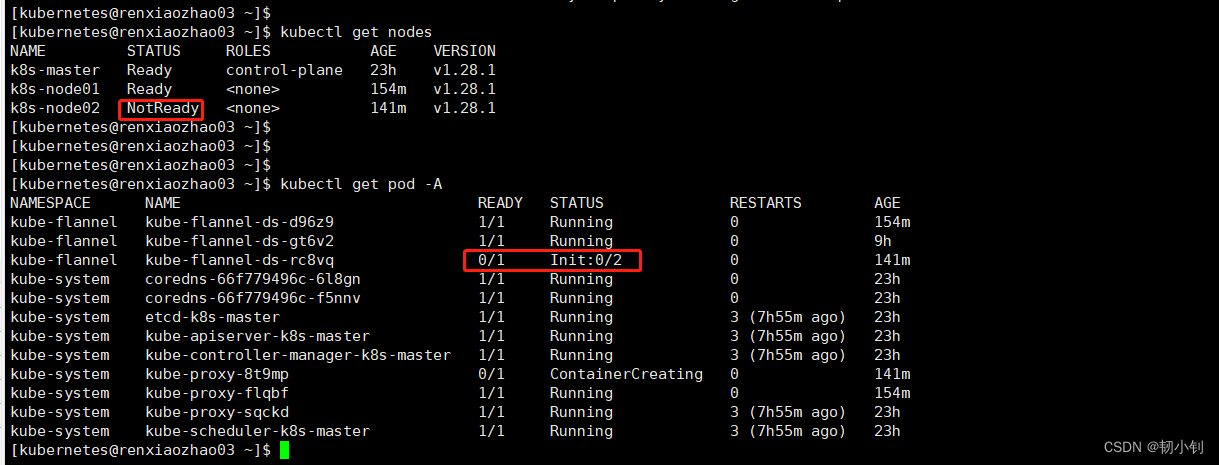
没忍住排查了一下,反正现在好了,就是按照下面的问题四,修改了一下cri-docker.service,然后反复重启了几次😂
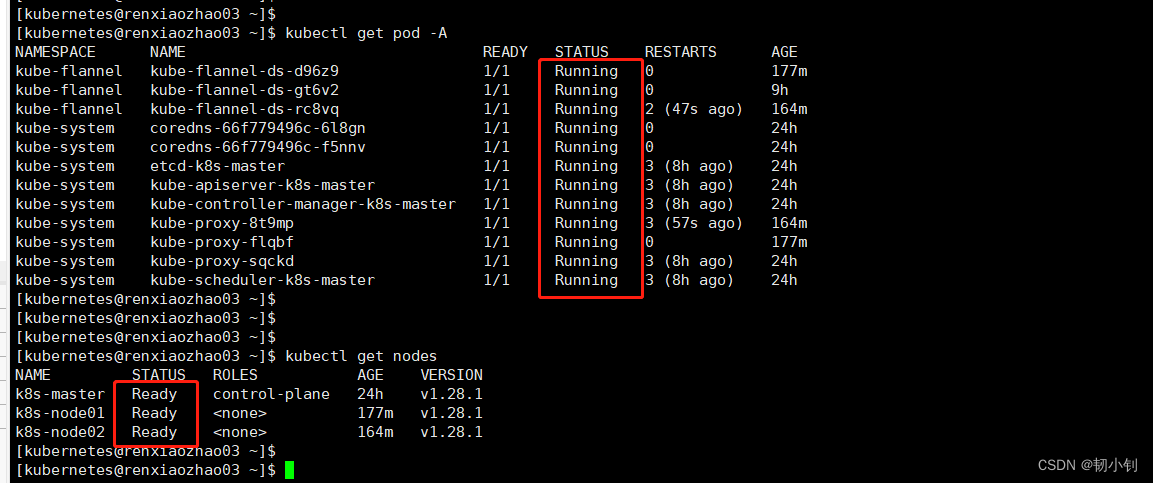
[kubernetes@renxiaozhao03 ~]$ sudo systemctl stop cri-docker
[kubernetes@renxiaozhao03 ~]$ #怎么修改参照问题四
[kubernetes@renxiaozhao03 ~]$ sudo vi /usr/lib/systemd/system/cri-docker.service
[kubernetes@renxiaozhao03 ~]$ sudo systemctl daemon-reload
[kubernetes@renxiaozhao03 ~]$ sudo systemctl start cri-docker
[kubernetes@renxiaozhao03 ~]$ sudo systemctl  restart kubelet docker cri-docker
[kubernetes@renxiaozhao03 ~]$
[kubernetes@renxiaozhao03 ~]$
[kubernetes@renxiaozhao03 ~]$ sudo systemctl  restart kubelet docker cri-docker
[kubernetes@renxiaozhao03 ~]$ kubectl get pod -A|grep kube-flannel-ds-rc8vq
kube-flannel   kube-flannel-ds-rc8vq                1/1     Running   2 (33s ago)   164m
[kubernetes@renxiaozhao03 ~]$
📚总结
略
⁉️问题记录
❓问题一:yum安装软件提示“网络不可达”
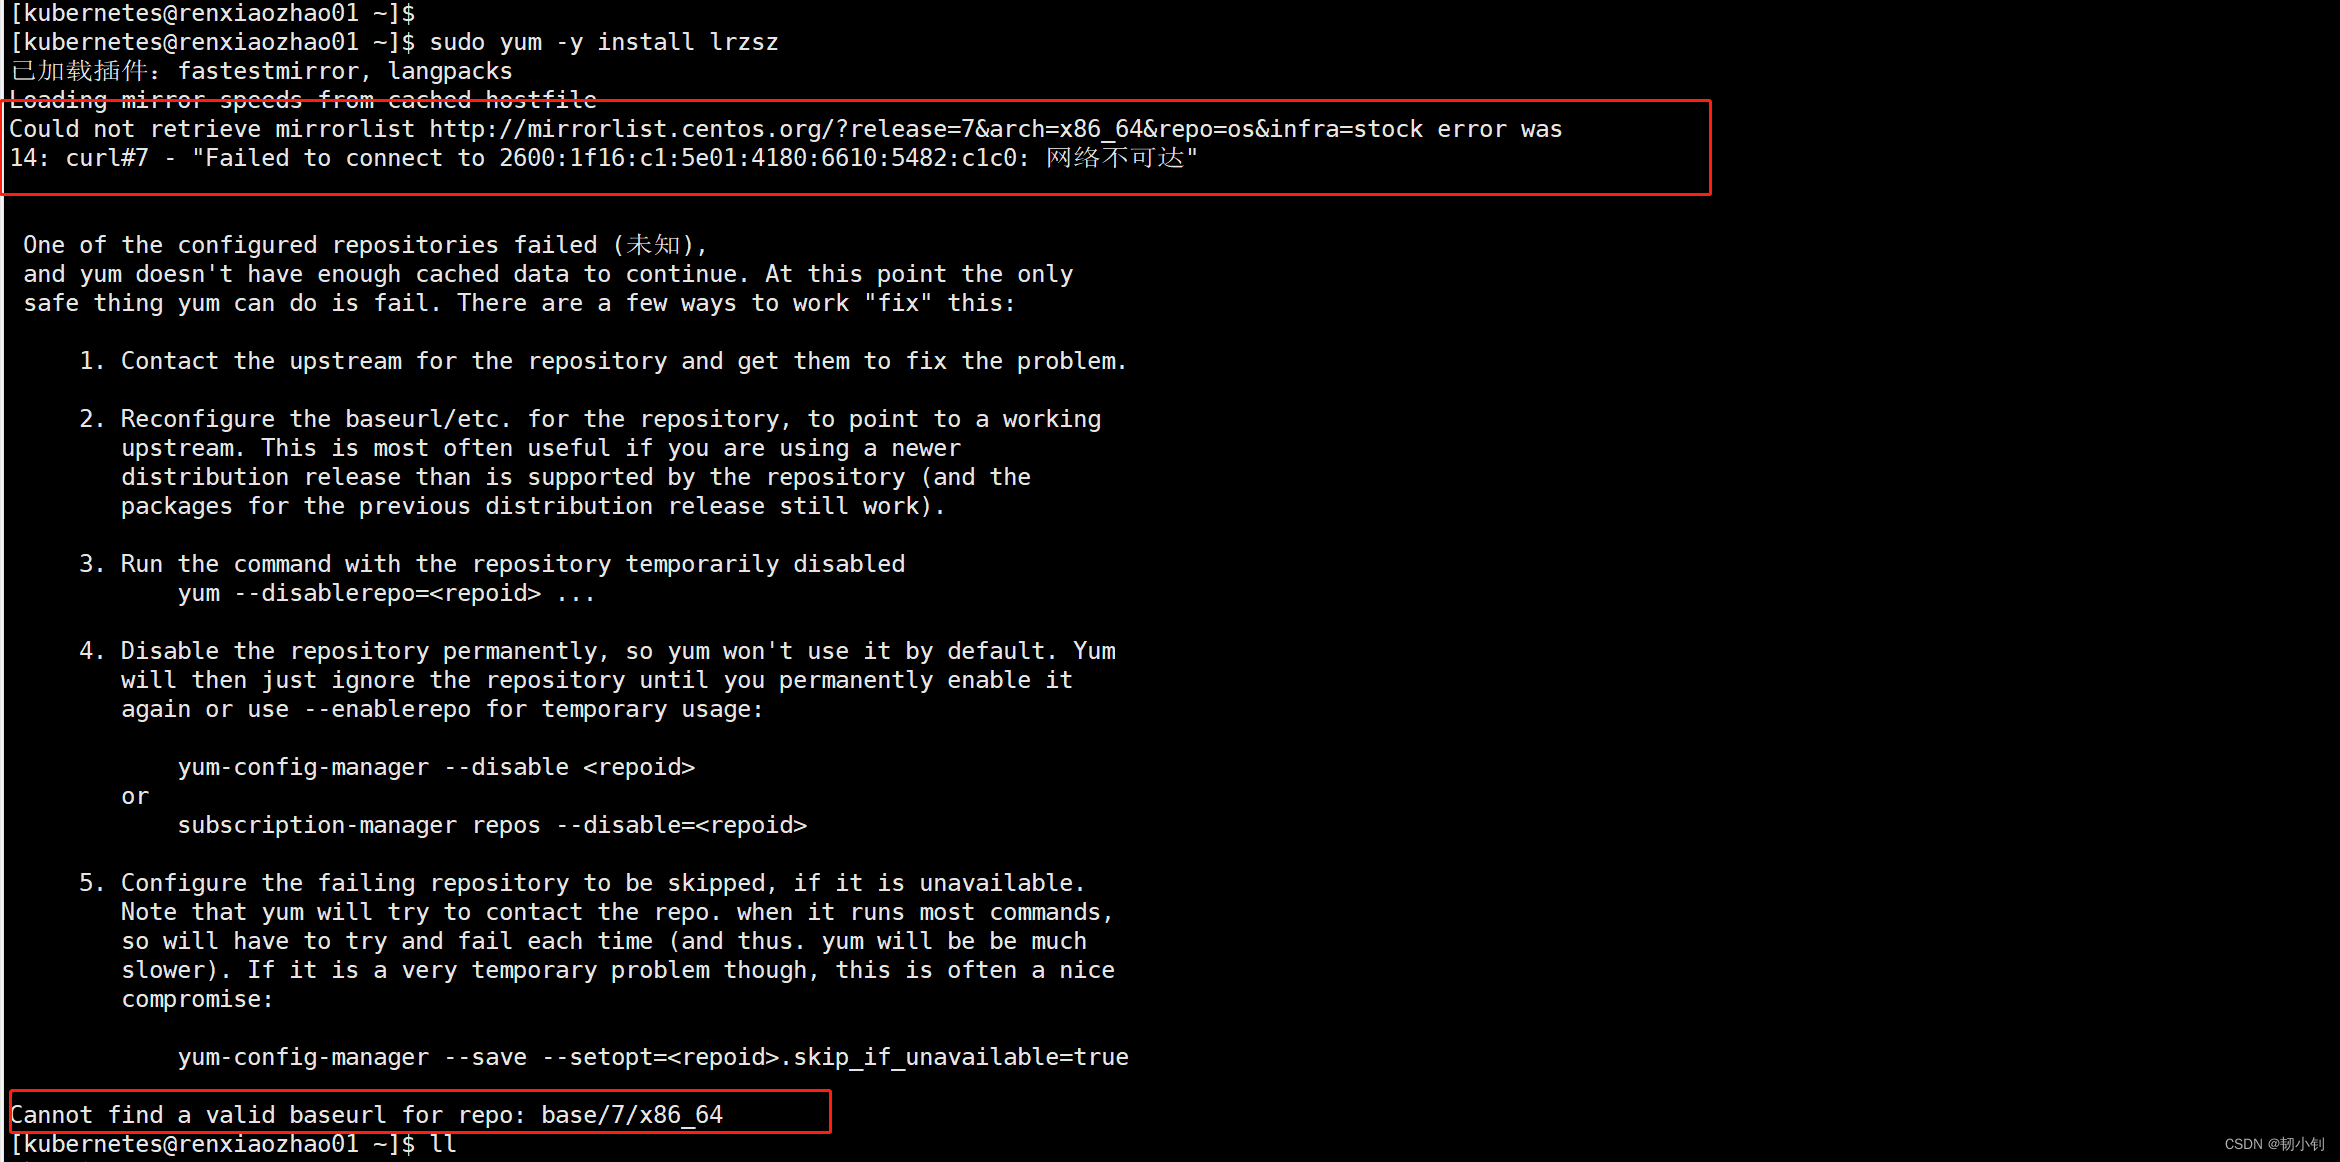
[kubernetes@renxiaozhao01 ~]$ sudo yum -y install lrzsz
已加载插件:fastestmirror, langpacks
Loading mirror speeds from cached hostfile
Could not retrieve mirrorlist http://mirrorlist.centos.org/?release=7&arch=x86_64&repo=os&infra=stock error was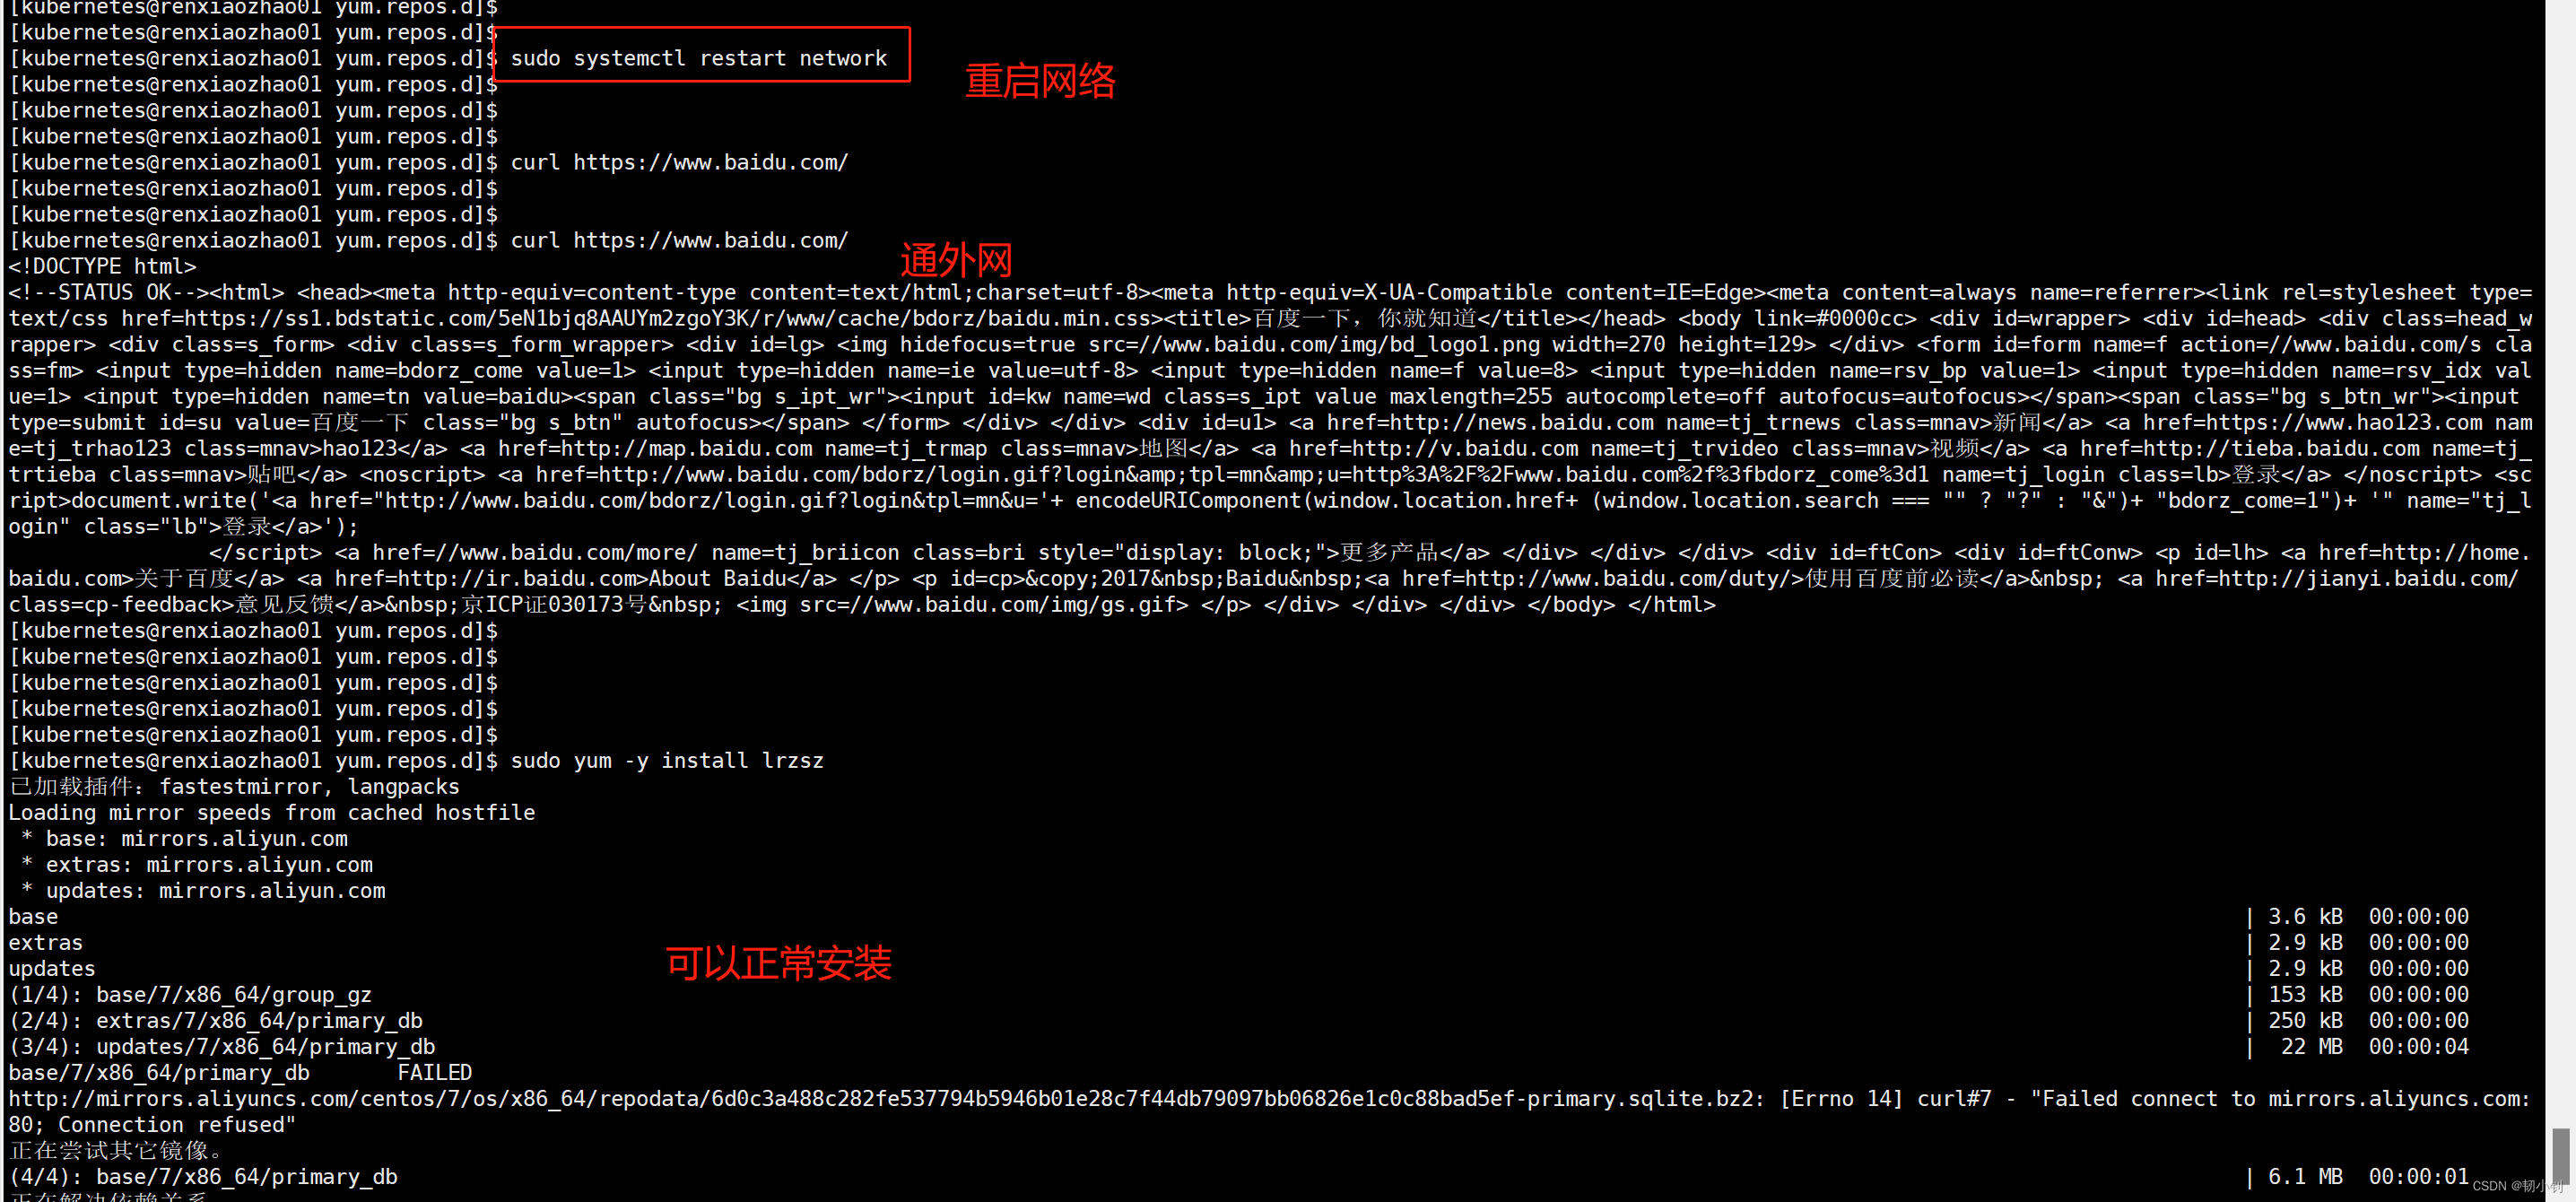
14: curl#7 - "Failed to connect to 2600:1f16:c1:5e01:4180:6610:5482:c1c0: 网络不可达"One of the configured repositories failed (未知),and yum doesn't have enough cached data to continue. At this point the onlysafe thing yum can do is fail. There are a few ways to work "fix" this:1. Contact the upstream for the repository and get them to fix the problem.2. Reconfigure the baseurl/etc. for the repository, to point to a workingupstream. This is most often useful if you are using a newerdistribution release than is supported by the repository (and thepackages for the previous distribution release still work).3. Run the command with the repository temporarily disabledyum --disablerepo=<repoid> ...4. Disable the repository permanently, so yum won't use it by default. Yumwill then just ignore the repository until you permanently enable itagain or use --enablerepo for temporary usage:yum-config-manager --disable <repoid>orsubscription-manager repos --disable=<repoid>5. Configure the failing repository to be skipped, if it is unavailable.Note that yum will try to contact the repo. when it runs most commands,so will have to try and fail each time (and thus. yum will be be muchslower). If it is a very temporary problem though, this is often a nicecompromise:yum-config-manager --save --setopt=<repoid>.skip_if_unavailable=trueCannot find a valid baseurl for repo: base/7/x86_64❗解决方式一:重启虚拟机网络sudo systemctl restart network
从公司回到家,切换了网络,虚拟机已经重启了,ping www.baidu.com也是通的,后面又试了一下,发现不通了,突然想起来中间切换过一次无线网络,重启网络就好了,原因还是本地网络不好,不稳(长城宽带😂)
[kubernetes@renxiaozhao01 yum.repos.d]$ curl https://www.baidu.com/
curl: (7) Failed connect to www.baidu.com:443; 没有到主机的路由
执行重启命令:sudo systemctl restart network
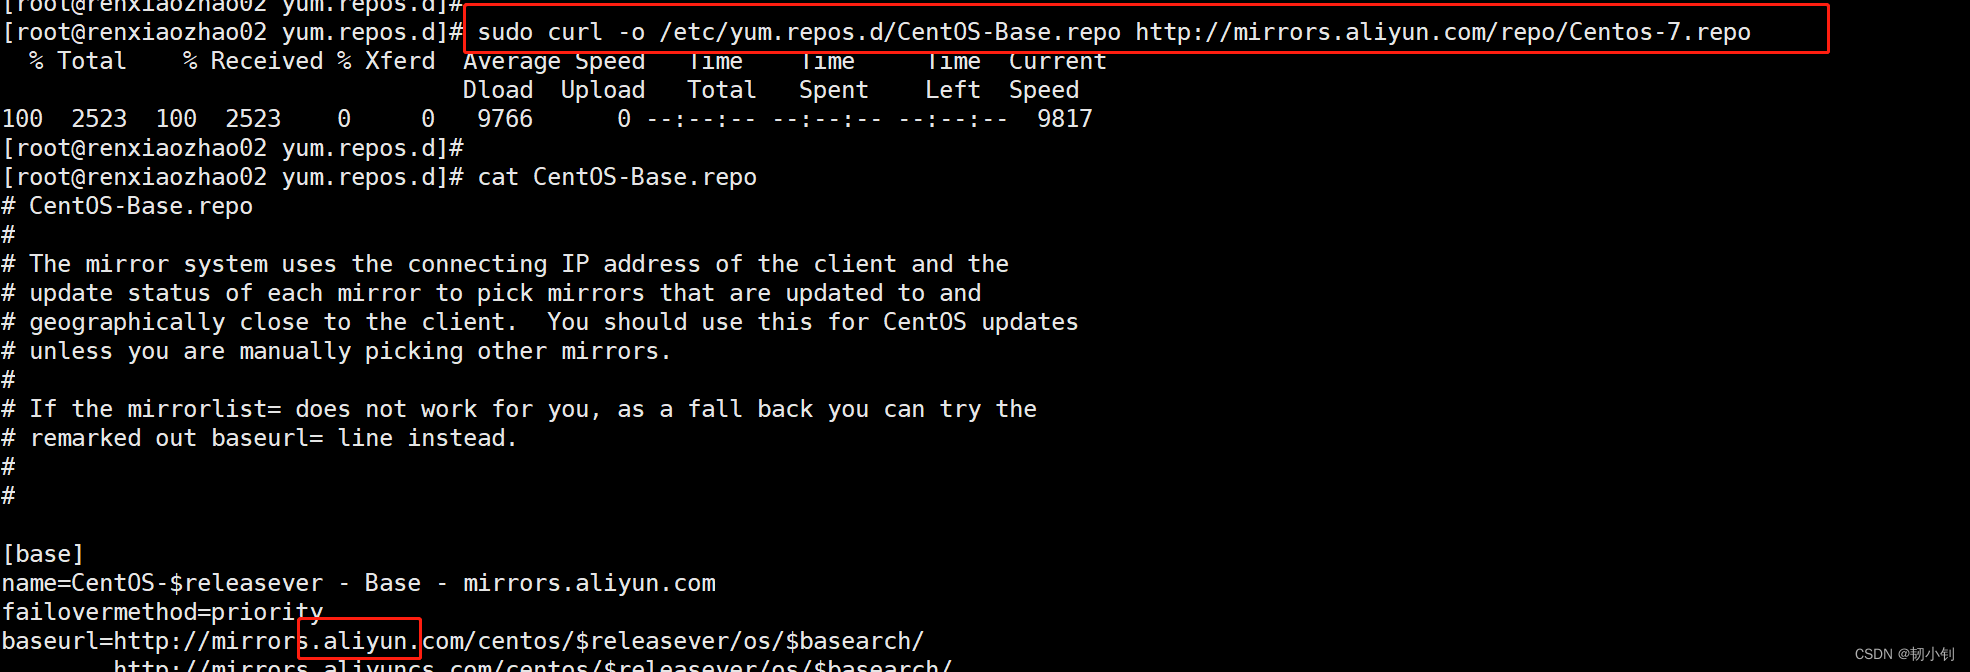
❕其他:替换镜像地址为阿里云的命令
sudo curl -o /etc/yum.repos.d/CentOS-Base.repo http://mirrors.aliyun.com/repo/Centos-7.repo
❓问题二:容器运行时名词解释
容器运行时:用于指代用于创建、打包和运行容器的软件组件
-
容器运行时是
负责管理和执行容器的主要组件- 负责加载和运行容器镜像,创建和管理容器的生命周期,并提供与容器交互的接口
- 负责处理容器的资源隔离、网络和存储配置等方面
-
常见的容器运行时包括
Docker、containerd、CRI-O等
❓问题三:获取阿里云镜像加速器地址步骤
- 获取镜像加速器地址方法
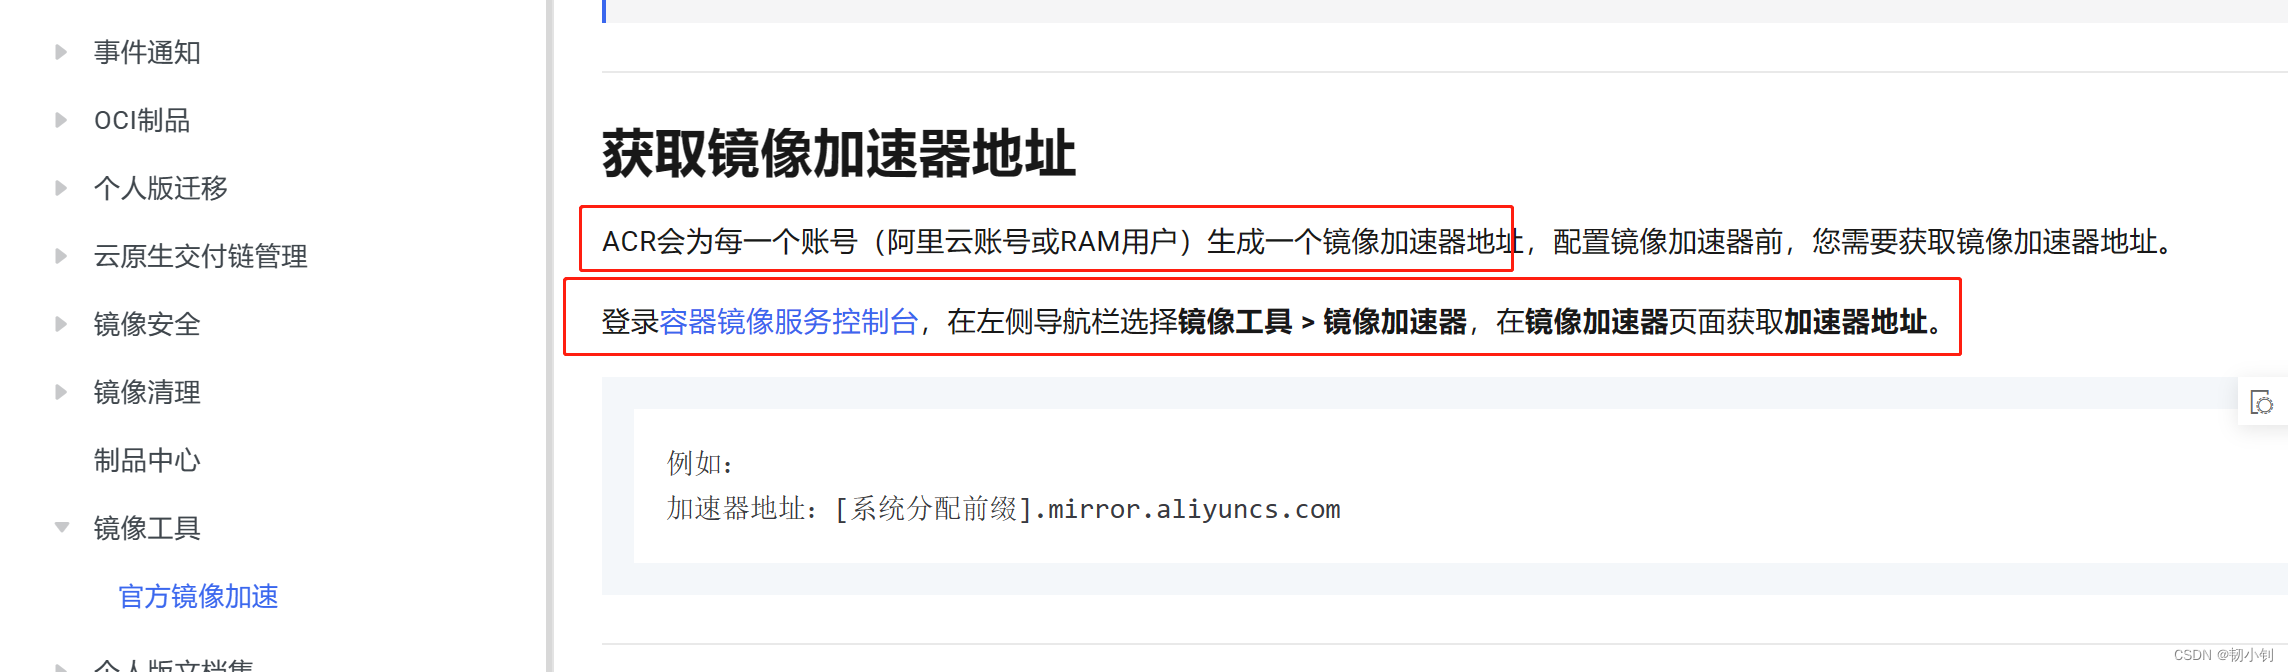
- 直接支付宝扫码登录阿里云容器镜像服务
❓问题四:kubeadm init执行失败
[init] Using Kubernetes version: v1.28.1
[preflight] Running pre-flight checks
[preflight] Pulling images required for setting up a Kubernetes cluster
[preflight] This might take a minute or two, depending on the speed of your internet connection
[preflight] You can also perform this action in beforehand using 'kubeadm config images pull'
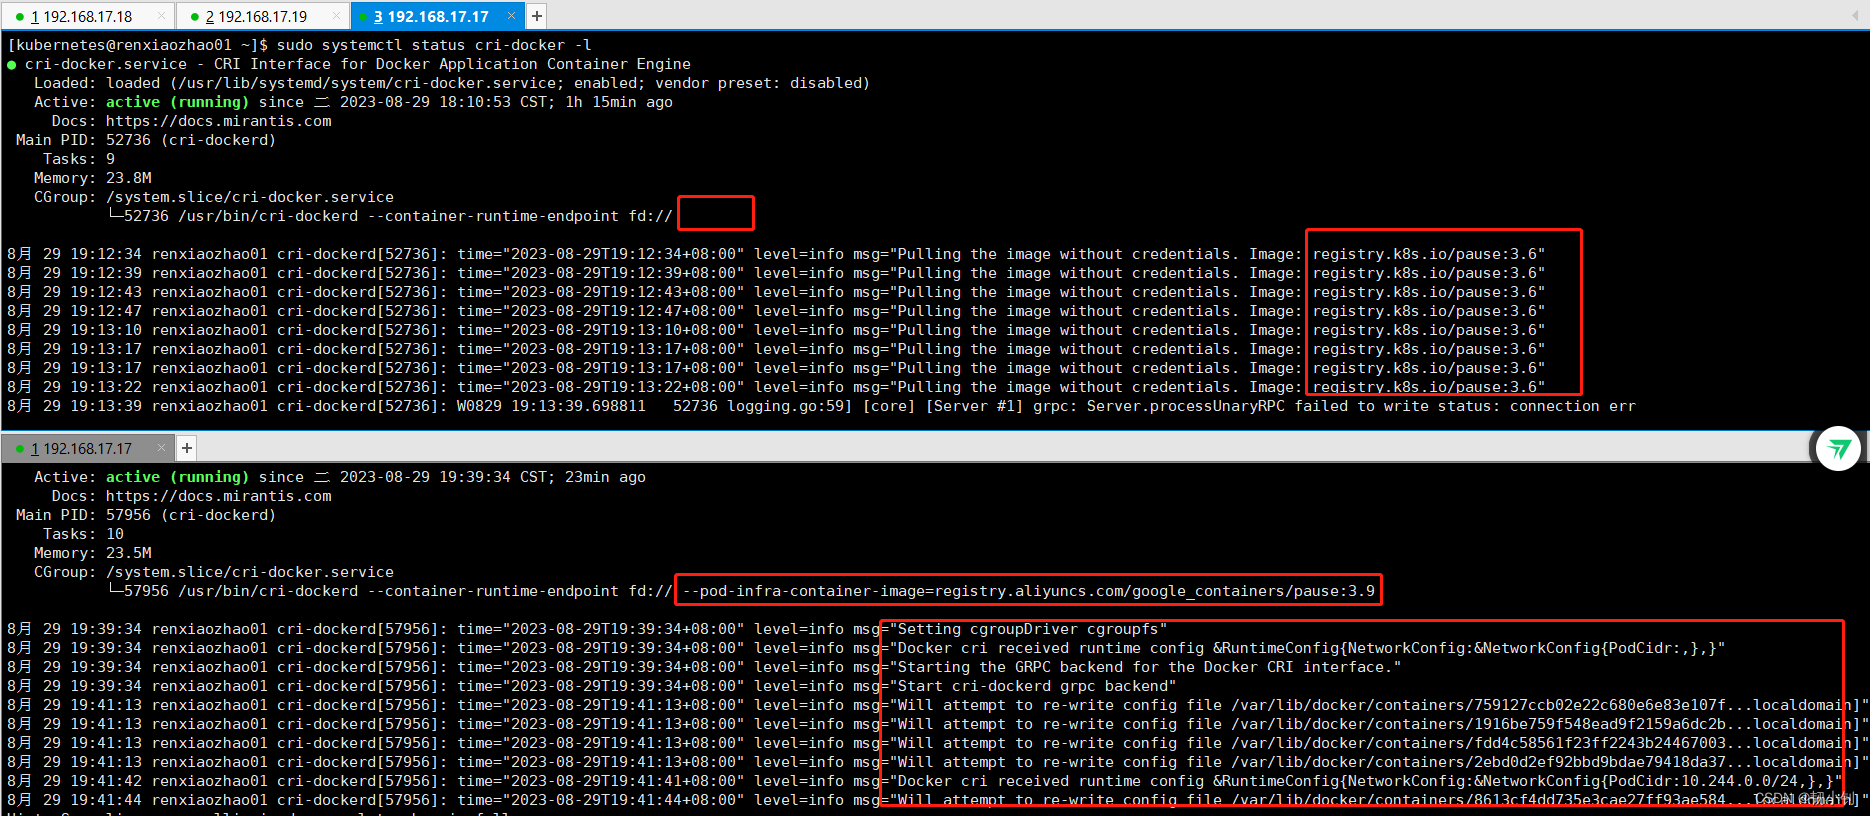
W0829 19:08:22.039382 55875 checks.go:835] detected that the sandbox image "registry.k8s.io/pause:3.6" of the container runtime is inconsistent with that used by kubeadm. It is recommended that using "registry.aliyuncs.com/google_containers/pause:3.9" as the CRI sandbox image.
[certs] Using certificateDir folder "/etc/kubernetes/pki"
[certs] Generating "ca" certificate and key
[certs] Generating "apiserver" certificate and key
[certs] apiserver serving cert is signed for DNS names [k8s-master kubernetes kubernetes.default kubernetes.default.svc kubernetes.default.svc.cluster.local] and IPs [10.96.0.1 192.168.17.17]
[certs] Generating "apiserver-kubelet-client" certificate and key
[certs] Generating "front-proxy-ca" certificate and key
[certs] Generating "front-proxy-client" certificate and key
[certs] Generating "etcd/ca" certificate and key
[certs] Generating "etcd/server" certificate and key
[certs] etcd/server serving cert is signed for DNS names [k8s-master localhost] and IPs [192.168.17.17 127.0.0.1 ::1]
[certs] Generating "etcd/peer" certificate and key
[certs] etcd/peer serving cert is signed for DNS names [k8s-master localhost] and IPs [192.168.17.17 127.0.0.1 ::1]
[certs] Generating "etcd/healthcheck-client" certificate and key
[certs] Generating "apiserver-etcd-client" certificate and key
[certs] Generating "sa" key and public key
[kubeconfig] Using kubeconfig folder "/etc/kubernetes"
[kubeconfig] Writing "admin.conf" kubeconfig file
[kubeconfig] Writing "kubelet.conf" kubeconfig file
[kubeconfig] Writing "controller-manager.conf" kubeconfig file
[kubeconfig] Writing "scheduler.conf" kubeconfig file
[etcd] Creating static Pod manifest for local etcd in "/etc/kubernetes/manifests"
[control-plane] Using manifest folder "/etc/kubernetes/manifests"
[control-plane] Creating static Pod manifest for "kube-apiserver"
[control-plane] Creating static Pod manifest for "kube-controller-manager"
[control-plane] Creating static Pod manifest for "kube-scheduler"
[kubelet-start] Writing kubelet environment file with flags to file "/var/lib/kubelet/kubeadm-flags.env"
[kubelet-start] Writing kubelet configuration to file "/var/lib/kubelet/config.yaml"
[kubelet-start] Starting the kubelet
[wait-control-plane] Waiting for the kubelet to boot up the control plane as static Pods from directory "/etc/kubernetes/manifests". This can take up to 4m0s
[kubelet-check] Initial timeout of 40s passed.Unfortunately, an error has occurred:timed out waiting for the conditionThis error is likely caused by:- The kubelet is not running- The kubelet is unhealthy due to a misconfiguration of the node in some way (required cgroups disabled)If you are on a systemd-powered system, you can try to troubleshoot the error with the following commands:- 'systemctl status kubelet'- 'journalctl -xeu kubelet'Additionally, a control plane component may have crashed or exited when started by the container runtime.
To troubleshoot, list all containers using your preferred container runtimes CLI.
Here is one example how you may list all running Kubernetes containers by using crictl:- 'crictl --runtime-endpoint unix:///var/run/cri-dockerd.sock ps -a | grep kube | grep -v pause'Once you have found the failing container, you can inspect its logs with:- 'crictl --runtime-endpoint unix:///var/run/cri-dockerd.sock logs CONTAINERID'
error execution phase wait-control-plane: couldn't initialize a Kubernetes cluster
To see the stack trace of this error execute with --v=5 or higher
❓错误详情一:detected that the sandbox image "registry.k8s.io/pause:3.6" of the container runtime is inconsistent with that used by kubeadm. It is recommended that using "registry.aliyuncs.com/google_containers/pause:3.9" as the CRI sandbox image
❓错误详情二:[kubelet-check] Initial timeout of 40s passed.
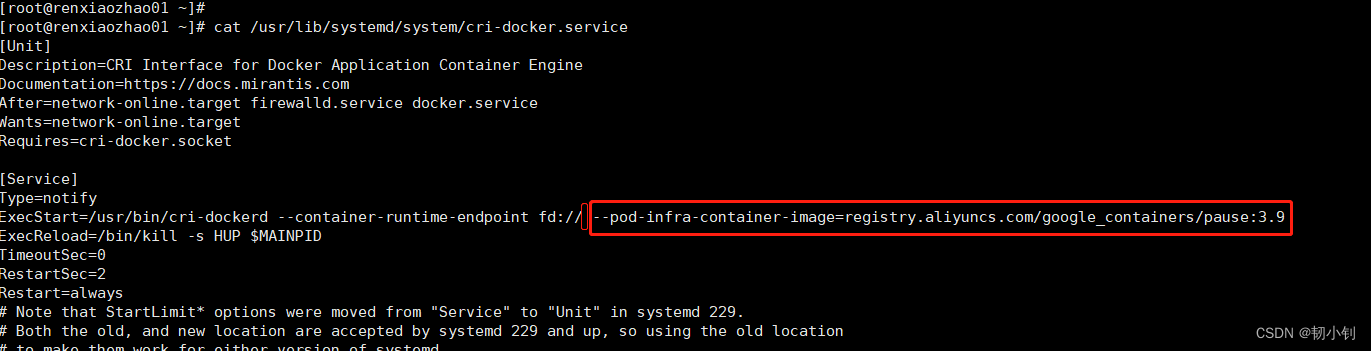
❗最终解决:修改vi /usr/lib/systemd/system/cri-docker.service
错误详情一通过修改cri-docker.service解决,错误详情二由错误详情一导致
解决步骤:
-
停止cri-docker服务:
sudo systemctl stop cri-docker -
编辑
vi /usr/lib/systemd/system/cri-docker.service- 找到ExecStart,在后面添加
--pod-infra-container-image=registry.aliyuncs.com/google_containers/pause:3.9ExecStart=/usr/bin/cri-dockerd --container-runtime-endpoint fd:// --pod-infra-container-image=registry.aliyuncs.com/google_containers/pause:3.9
- 找到ExecStart,在后面添加
-
重新加载服务:
sudo systemctl daemon-reload -
启动cri-docker服务:
sudo systemctl start cri-docker -
查看cri-docker服务状态:
sudo systemctl start cri-docker
[kubernetes@renxiaozhao01 ~]$ sudo  kubectl apply -f kube-flannel.yml
The connection to the server localhost:8080 was refused - did you specify the right host or port?
❓问题五:kubeadm join执行失败
❓错误详情一:[WARNING Hostname]: hostname "renxiaozhao03"could not be reached
虽然是警告信息,但是名称和IP都不是我之前在/etc/hosts中设置的,所以肯定不对对
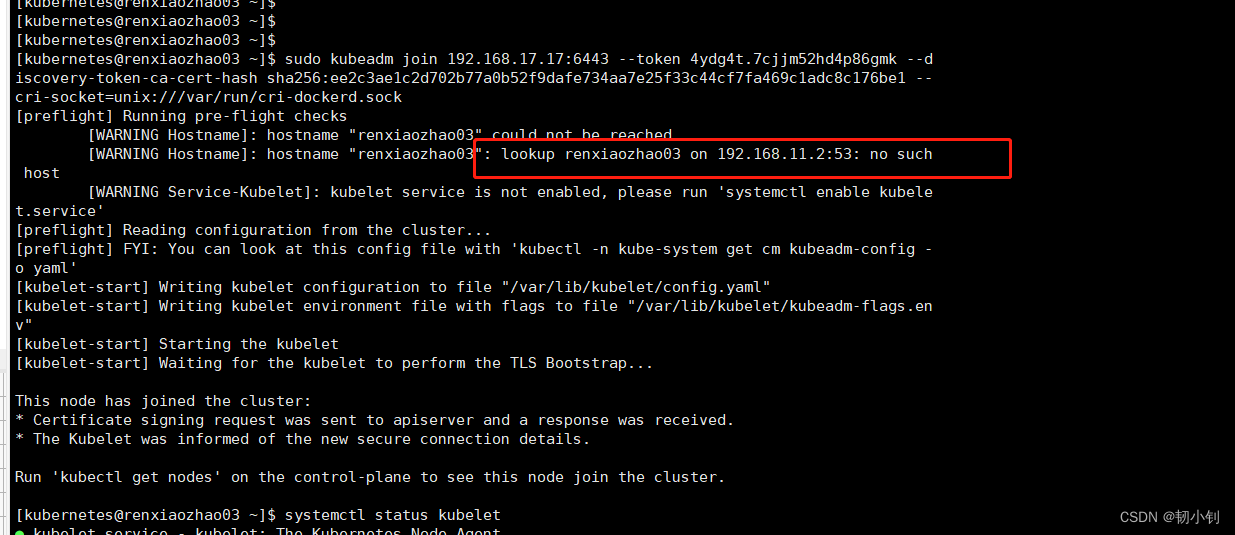
❗解决方式添加--node-name参数,指定主机名
指定--node-name k8s-node02,中间=加不加都可以,不加就用空格
sudo kubeadm join 192.168.17.17:6443 --node-name=k8s-node02 --token 4ydg4t.7cjjm52hd4p86gmk --discovery-token-ca-cert-hash sha256:ee2c3ae1c2d702b77a0b52f9dafe734aa7e25f33c44cf7fa469c1adc8c176be1 --cri-socket=unix:///var/run/cri-dockerd.sock
其中--cri-socket=unix:///var/run/cri-dockerd.sock也是根据错误提示新指定的参数,其中containerd不知道是不是那个组件自带的,博主只装了cri-dockerd,这一块也迷糊,一方面查资料使用docker容器,必须安装cri-dockerd,一方面又说只要containerd,一步步来吧,先跑起来集群再深究
[kubernetes@renxiaozhao02 .kube]$ sudo kubeadm join 192.168.17.17:6443  --node-name=k8s-node02 --token 4ydg4t.7cjjm52hd4p86gmk --discovery-token-ca-cert-hash sha256:ee2c3ae1c2d702b77a0b52f9dafe734aa7e25f33c44cf7fa469c1adc8c176be1
Found multiple CRI endpoints on the host. Please define which one do you wish to use by setting the 'criSocket' field in the kubeadm configuration file: unix:///var/run/containerd/containerd.sock, unix:///var/run/cri-dockerd.sock
To see the stack trace of this error execute with --v=5 or higher
❓错误详情二:超时报错error execution phase kubelet-start: error uploading crisocket: nodes "k8s-node01" not found
[kubernetes@renxiaozhao02 .kube]$ sudo systemctl stop kubelet
[kubernetes@renxiaozhao02 .kube]$ sudo rm -rf /etc/kubernetes/*
[kubernetes@renxiaozhao02 .kube]$ sudo kubeadm join 192.168.17.17:6443 --token urwtz8.3tvnbe2a63b3fnbl --discovery-token-ca-cert-hash sha256:ee2c3ae1c2d702b77a0b52f9dafe734aa7e25f33c44cf7fa469c1adc8c176be1  --node-name k8s-node01  --cri-socket=unix:///var/run/cri-dockerd.sock
[preflight] Running pre-flight checks
[preflight] Reading configuration from the cluster...
[preflight] FYI: You can look at this config file with 'kubectl -n kube-system get cm kubeadm-config -o yaml'
[kubelet-start] Writing kubelet configuration to file "/var/lib/kubelet/config.yaml"
[kubelet-start] Writing kubelet environment file with flags to file "/var/lib/kubelet/kubeadm-flags.env"
[kubelet-start] Starting the kubelet
[kubelet-start] Waiting for the kubelet to perform the TLS Bootstrap...
[kubelet-check] Initial timeout of 40s passed.
error execution phase kubelet-start: error uploading crisocket: nodes "k8s-node01" not found
To see the stack trace of this error execute with --v=5 or higher
[kubernetes@renxiaozhao02 .kube]$ ❗解决方式使用kubeadm reset重置之后再添加join
不要通过上面删除的方式,博主之前添加成功过renxiaozhao02节点(不指定--node-name,默认就是主机名),虽然节点已经删除了,但是貌似有残留,直接在node几点机器执行kubeadm reset,然后再添加,成功
[kubernetes@renxiaozhao03 ~]$ sudo kubeadm reset --cri-socket=unix:///var/run/cri-dockerd.sock
W0830 17:11:12.123313   25230 preflight.go:56] [reset] WARNING: Changes made to this host by 'kubeadm init' or 'kubeadm join' will be reverted.
[reset] Are you sure you want to proceed? [y/N]: y
[preflight] Running pre-flight checks
W0830 17:11:14.355783   25230 removeetcdmember.go:106] [reset] No kubeadm config, using etcd pod spec to get data directory
[reset] Deleted contents of the etcd data directory: /var/lib/etcd
[reset] Stopping the kubelet service
[reset] Unmounting mounted directories in "/var/lib/kubelet"
[reset] Deleting contents of directories: [/etc/kubernetes/manifests /var/lib/kubelet /etc/kubernetes/pki]
[reset] Deleting files: [/etc/kubernetes/admin.conf /etc/kubernetes/kubelet.conf /etc/kubernetes/bootstrap-kubelet.conf /etc/kubernetes/controller-manager.conf /etc/kubernetes/scheduler.conf]The reset process does not clean CNI configuration. To do so, you must remove /etc/cni/net.dThe reset process does not reset or clean up iptables rules or IPVS tables.
If you wish to reset iptables, you must do so manually by using the "iptables" command.If your cluster was setup to utilize IPVS, run ipvsadm --clear (or similar)
to reset your system's IPVS tables.The reset process does not clean your kubeconfig files and you must remove them manually.
Please, check the contents of the $HOME/.kube/config file.
[kubernetes@renxiaozhao03 ~]$ #验证有没有用到ipvs(gpt说的,咋说呢,被它带着走了很远的路)
[kubernetes@renxiaozhao03 ~]$ kubectl get svc -A | grep ipvs
[kubernetes@renxiaozhao03 ~]$
[kubernetes@renxiaozhao03 ~]$
[kubernetes@renxiaozhao03 ~]$  #验证有没有用到 CNI
[kubernetes@renxiaozhao03 ~]$ kubectl get svc -A | grep cni -i

🦒弯路历程
- 重新
join会报错,之前已经生成了相关文件,报文件已存在,直接执行了删除,结果引发新的错
直接sudo systemctl stop kubelet sudo rm -rf /etc/kubernetes/*sudo rm -rf /etc/kubernetes/*,结果引发了新的报错/etc/kubernetes/manifests不存在(后来网上看了下,好像本来就没有这个目录,不是删除引起的),也不知道之前有没有这个文件,貌似只有master节点会用到,最终解决方式是直接把mastre节点上的该目录同步过来,或者直接创建mkdir -p /etc/kubernetes/manifests,应该也可以
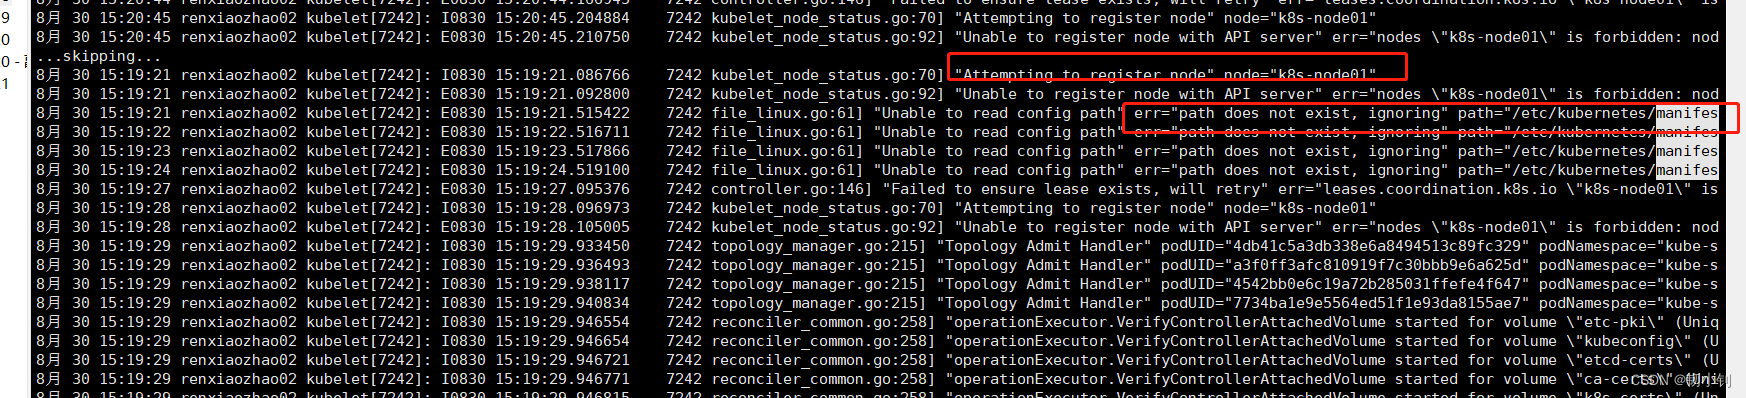
查看kubelet日志:sudo journalctl -u kubelet(也被坑了,一开始没注意,这个命令日志不自动换行),改用sudo journalctl -u kubelet --no-pager --follow Unable to register node with API server" err="nodes \"k8s-node01\" is forbidden: node \"renxiaozhao02\" is not allowed to modify node \"k8s-node01\"" node="k8s-node01"
目录同步过来之后有报错,通过sudo journalctl -u kubelet --no-pager --follow可以准确的查看日志8月 30 15:37:47 renxiaozhao02 kubelet[9469]: I0830 15:37:47.153840 9469 kubelet_node_status.go:70] "Attempting to register node" node="k8s-node01" 8月 30 15:37:47 renxiaozhao02 kubelet[9469]: E0830 15:37:47.160006 9469 kubelet_node_status.go:92] "Unable to register node with API server" err="nodes \"k8s-node01\" is forbidden: node \"renxiaozhao02\" is not allowed to modify node \"k8s-node01\"" node="k8s-node01" 8月 30 15:37:47 renxiaozhao02 kubelet[9469]: I0830 15:37:47.283440 9469 scope.go:117] "RemoveContainer" containerID="b0ab74aedc14936c3f0e95682f257b3a8981ecb3e9e36b590a35d65c3eafbd16" 8月 30 15:37:47 renxiaozhao02 kubelet[9469]: E0830 15:37:47.284025 9469 pod_workers.go:1300] "Error syncing pod, skipping" err="failed to \"StartContainer\" for \"kube-scheduler\" with CrashLoopBackOff: \"back-off 5m0s restarting failed container=kube-scheduler pod=kube-scheduler-k8s-node01_kube-system(7734ba1e9e5564ed51f1e93da8155ae7)\"" pod="kube-system/kube-scheduler-k8s-node01" podUID="7734ba1e9e5564ed51f1e93da8155ae7"
相关文章:
K8S最新版本集群部署(v1.28) + 容器引擎Docker部署(下)
温故知新 📚第三章 Kubernetes各组件部署📗安装kubectl(可直接跳转到安装kubeadm章节,直接全部安装了)📕下载kubectl安装包📕执行kubectl安装📕验证kubectl 📗安装kubead…...

女子垒球运动的发展·垒球1号位
女子垒球运动的发展 1. 女子垒球运动的起源和发展概述 女子垒球运动,诞生于19世纪末的美国,作为棒球运动的衍生品,经过百年的积淀,已在全球范围内广泛传播,形成了丰富的赛事文化。她的起源,可以追溯到19世…...

Debian 30 周年,生日快乐!
导读近日是 Debian 日,也是由伊恩-默多克(Ian Murdock)创立的 Debian GNU/Linux 通用操作系统和社区支持的 Debian 项目 30 周年纪念日。 不管你信不信,从已故的伊恩-默多克于 1993 年 8 月 16 日宣布成立 Debian 项目,…...

字符串匹配的Rabin–Karp算法
leetcode-28 实现strStr() 更熟悉的字符串匹配算法可能是KMP算法, 但在Golang中,使用的是Rabin–Karp算法 一般中文译作 拉宾-卡普算法,由迈克尔拉宾与理查德卡普于1987年提出 “ 要在一段文本中找出单个模式串的一个匹配,此算法具有线性时间的平均复杂度࿰…...
傅里叶变换(FFT)笔记存档
参考博客:https://www.luogu.com.cn/blog/command-block/fft-xue-xi-bi-ji 目录: FFT引入复数相关知识单位根及其相关性质DFT过程(难点)DFT结论(重要)IDFT结论(重要)IDFT结论证明&…...
ELK安装、部署、调试 (二) ES的安装部署
ElasticSearch是一个基于Lucene的搜索服务器。它提供了一个分布式多用户能力的全文搜索引擎,基于RESTful web接口操作ES,也可以利用Java API。Elasticsearch是用Java开发的,并作为Apache许可条款下的开放源码发布,是当前流行的企业…...
Android 13 - Media框架(8)- MediaExtractor
上一篇我们了解了 GenericSource 需要依赖 IMediaExtractor 完成 demux 工作,这一篇我们就来学习 android media 框架中的第二个服务 media.extractor,看看 IMediaExtractor 是如何创建与工作的。 1、MediaExtractorService media.extractor 和 media.p…...
Flutter 混合开发调试
针对Flutter开发的同学来说,大部分的应用还是Native Flutter的混合开发,所以每次改完Flutter代码,运行整个项目无疑是很费时间的。所以Flutter官方也给我们提供了混合调试的方案【在混合开发模式下进行调试】,这里以Android Stud…...

C语言每日一练------(Day3)
本专栏为c语言练习专栏,适合刚刚学完c语言的初学者。本专栏每天会不定时更新,通过每天练习,进一步对c语言的重难点知识进行更深入的学习。 今天练习题的关键字: 尼科彻斯定理 等差数列 💓博主csdn个人主页:…...
14、监测数据采集物联网应用开发步骤(10)
监测数据采集物联网应用开发步骤(9.2) Modbus rtu协议开发 本章节在《监测数据采集物联网应用开发步骤(7)》基础上实现可参考《...开发步骤(7)》调试工具,本章节代码需要调用modbus_tk组件,阅读本章节前建议baidu熟悉modbus rtu协议内容 组件安装modb…...
Linux禅道上修改Apache 和 MySQL 默认端口号
1. 修改Apache默认端口号 80 cd /opt/zbox/etc/apachevim httpd.conf :wq 保存 2. 修改MySQL默认端口号 3306 cd /opt/zbox/etc/mysql vim my.cnf :wq 保存 3. 重启服务 ./zbox restart...

操作教程|通过1Panel开源Linux面板快速安装DataEase
DataEase开源数据可视化分析工具(dataease.io)的在线安装是通过在服务器命令行执行Linux命令来进行的。但是在实际的安装部署过程中,很多数据分析师或者业务人员经常会因为不熟悉Linux操作系统及命令行操作方式,在安装DataEase的过…...
机器学习策略——优化深度学习系统
正交化(Orthogonalization) 老式电视机,有很多旋钮可以用来调整图像的各种性质,对于这些旧式电视,可能有一个旋钮用来调图像垂直方向的高度,另外有一个旋钮用来调图像宽度,也许还有一个旋钮用来…...

ES6中Proxy和Proxy实例
1.Proxy Proxy 这个词的原意是代理,用在这里表示由它来“代理”某些操作,可以译为“代理器” 使用方法 let p new Proxy(target, handler);其中,target 为被代理对象。handler 是一个对象,其声明了代理 target 的一些操作。p 是…...

UDP协议的重要知识点
UDP,即用户数据报协议(User Datagram Protocol),是一个简单的无连接的传输层协议。与TCP相比,UDP提供了更少的错误检查机制,并允许数据包在网络上更快地传输。在这篇博客中,我们将深入探讨UDP的…...
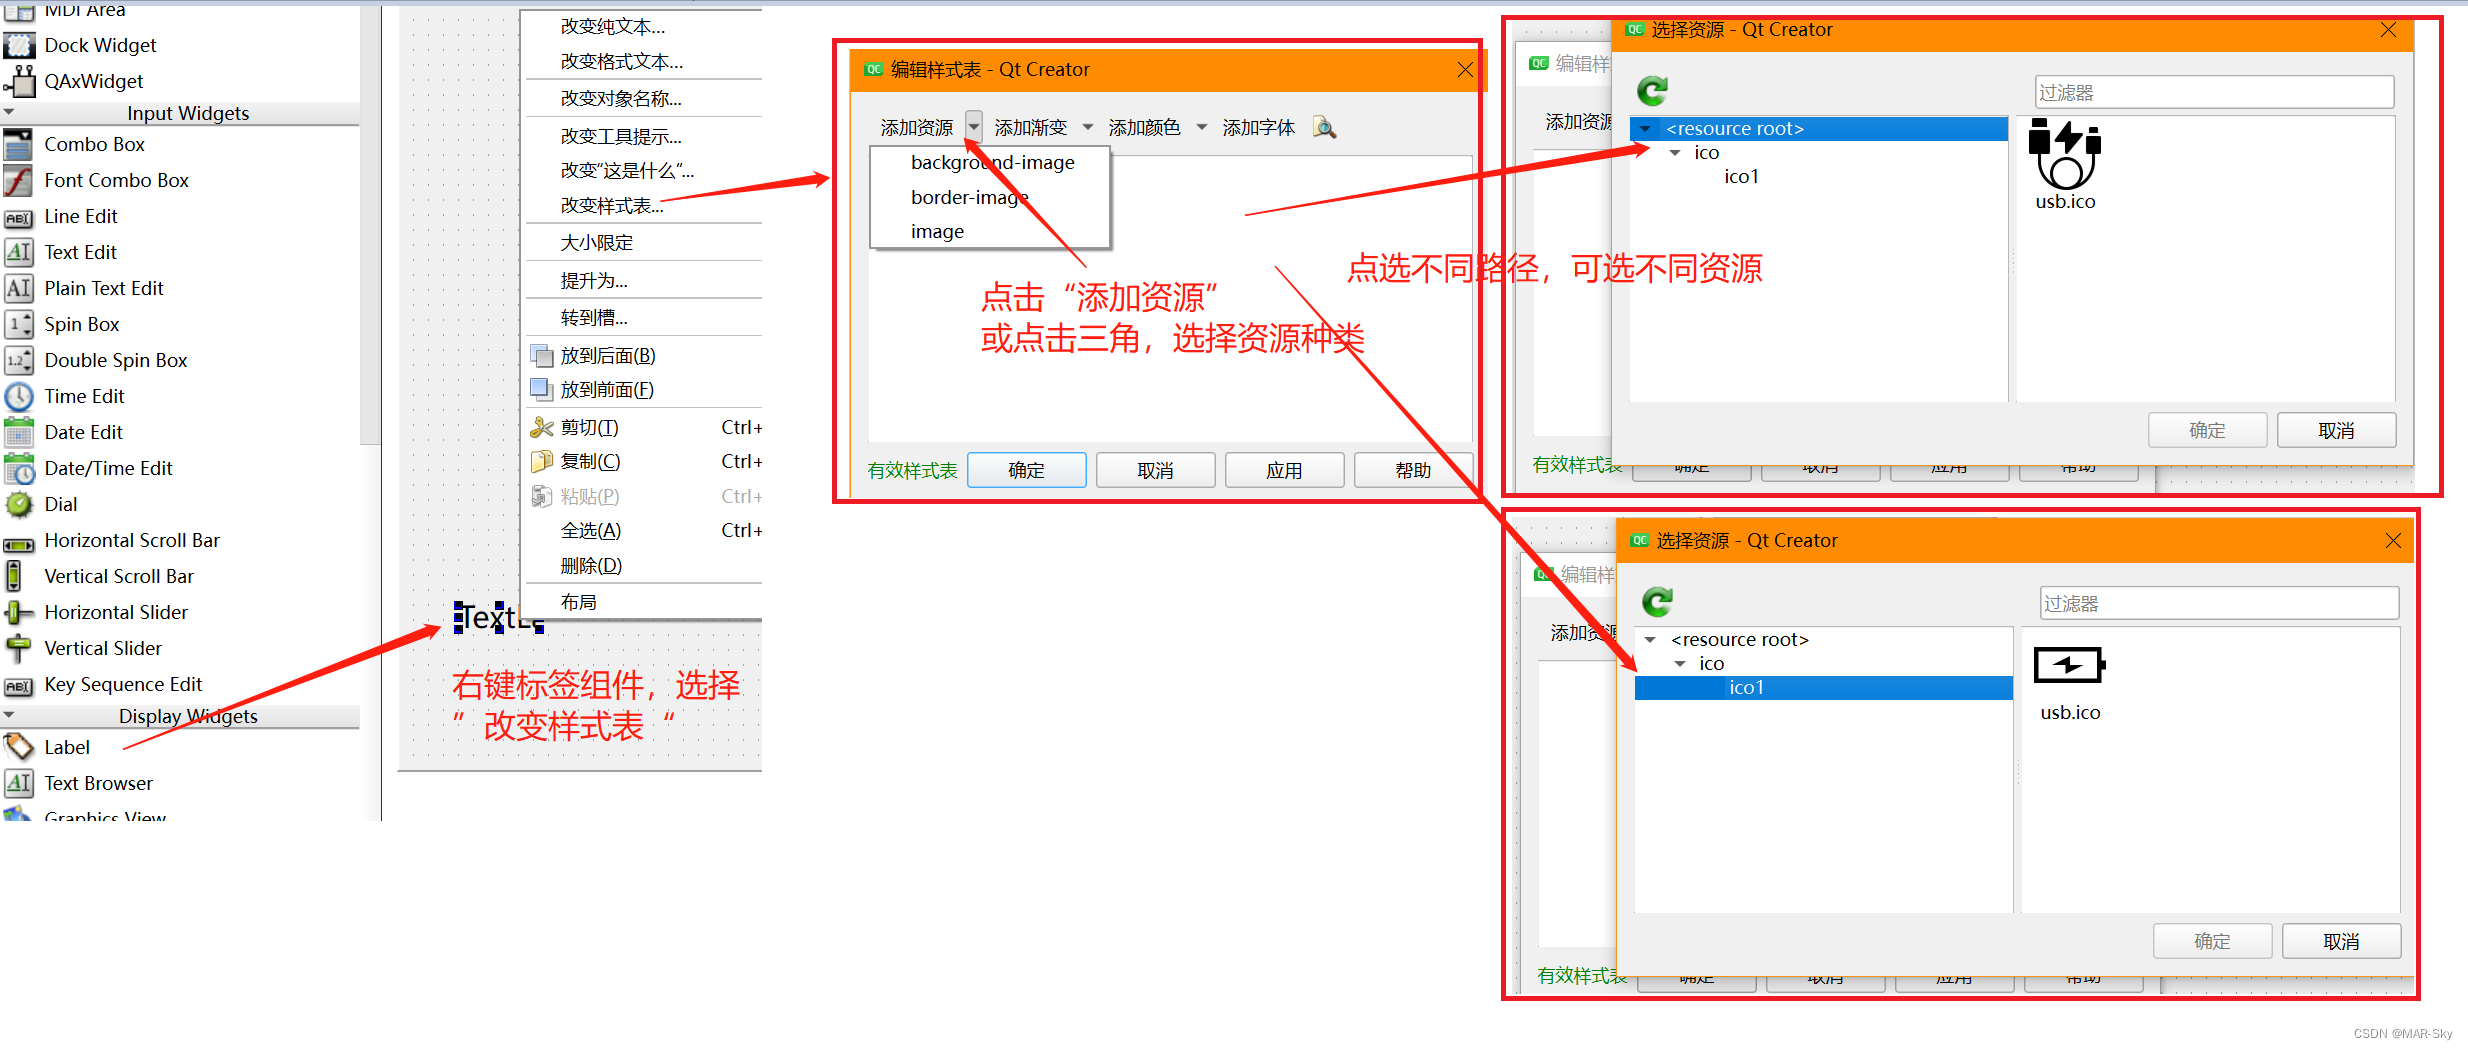
QT6为工程添加资源文件,并在ui界面引用
以添加图片资源为例 右键工程名字(不是最上面的名字),点击添加现有文件 这种方式虽然添加到了工程中,但不能在UI设计界面完成引用。主要原因可能是未把文件放入到项目资源文件中,以下面一种方式可以看出区别。 点击添…...

Python小知识 - 如何使用Python的Flask框架快速开发Web应用
如何使用Python的Flask框架快速开发Web应用 现在越来越多的人把Python作为自己的第一语言来学习,Python的简洁易学的语法以及丰富的第三方库让人们越来越喜欢上了这门语言。本文将介绍如何使用Python的Flask框架快速开发Web应用。 Flask是一个使用Python编写的轻量级…...
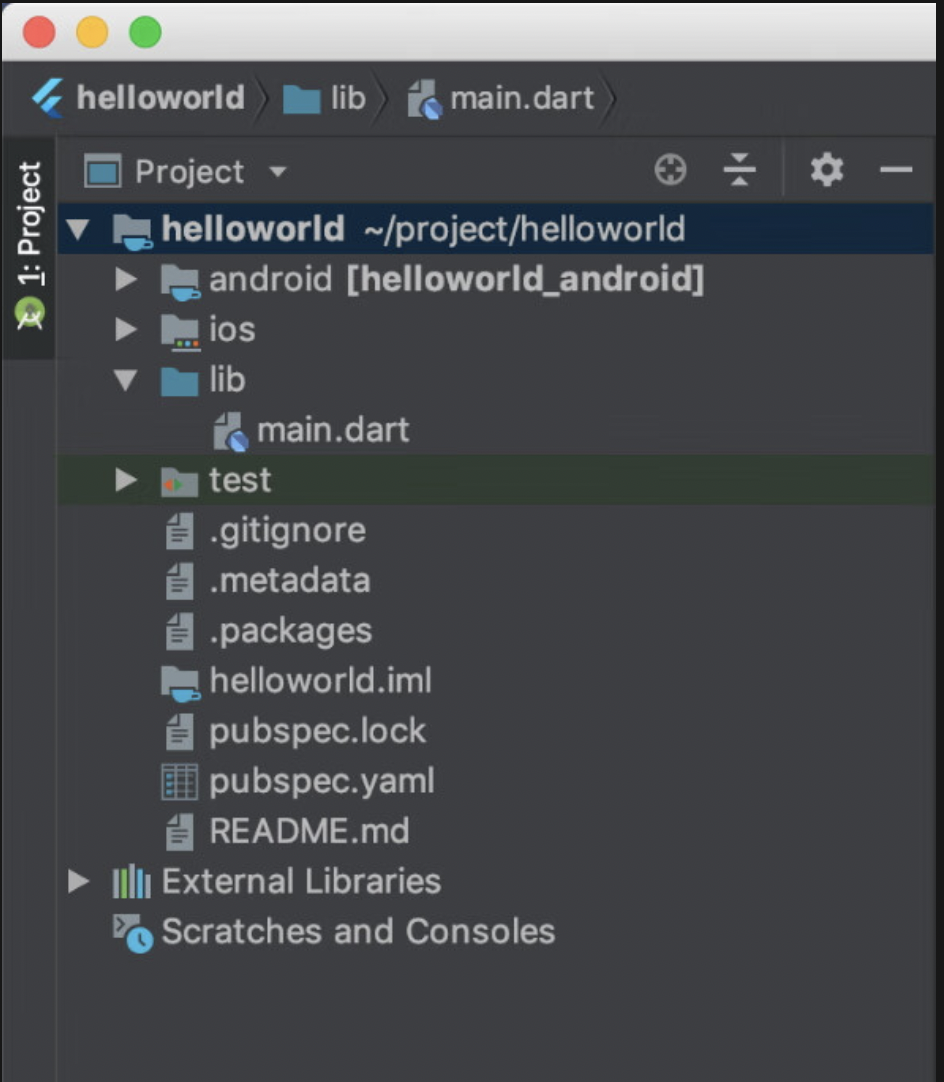
Flutter 项目结构文件
1、Flutter项目的文件结构 先helloworld项目,看看它都包含哪些组成部分。首先,来看一下项目的文件结构,如下图所示。 2、介绍上图的内容。 -litb/main.dart文件:整个应用的入口文件,其中的main函数是整个Flutter应…...
未找到System.Runtime.InteropServices.Marshal.GetTypeFromCLSID(System.Guid) 方法错误
记录此问题实际上是由于.netFrame框架配置太高引起的,一般常见于二次开发中,因为二次开发一般都是引用的com组件,在引用过程中后台代码调用了 Method not found: System.Type System.Runtime.InteropServices.Marshal.GetTypeFromCLSID(Syste…...
人员位置管理,点亮矿山安全之路
矿山作为一个高危行业,安全问题一直备受关注。人员定位置管理是现代矿山安全管理的重要一环,可以帮助企业更好地实现对人员的实时监控和管理。因此,矿山人员位置管理系统对于矿山安全生产和管理非常重要,可以帮助减少安全事故的发…...
大数据学习栈记——Neo4j的安装与使用
本文介绍图数据库Neofj的安装与使用,操作系统:Ubuntu24.04,Neofj版本:2025.04.0。 Apt安装 Neofj可以进行官网安装:Neo4j Deployment Center - Graph Database & Analytics 我这里安装是添加软件源的方法 最新版…...

设计模式和设计原则回顾
设计模式和设计原则回顾 23种设计模式是设计原则的完美体现,设计原则设计原则是设计模式的理论基石, 设计模式 在经典的设计模式分类中(如《设计模式:可复用面向对象软件的基础》一书中),总共有23种设计模式,分为三大类: 一、创建型模式(5种) 1. 单例模式(Sing…...

AI编程--插件对比分析:CodeRider、GitHub Copilot及其他
AI编程插件对比分析:CodeRider、GitHub Copilot及其他 随着人工智能技术的快速发展,AI编程插件已成为提升开发者生产力的重要工具。CodeRider和GitHub Copilot作为市场上的领先者,分别以其独特的特性和生态系统吸引了大量开发者。本文将从功…...

数据库分批入库
今天在工作中,遇到一个问题,就是分批查询的时候,由于批次过大导致出现了一些问题,一下是问题描述和解决方案: 示例: // 假设已有数据列表 dataList 和 PreparedStatement pstmt int batchSize 1000; // …...

Caliper 配置文件解析:config.yaml
Caliper 是一个区块链性能基准测试工具,用于评估不同区块链平台的性能。下面我将详细解释你提供的 fisco-bcos.json 文件结构,并说明它与 config.yaml 文件的关系。 fisco-bcos.json 文件解析 这个文件是针对 FISCO-BCOS 区块链网络的 Caliper 配置文件,主要包含以下几个部…...
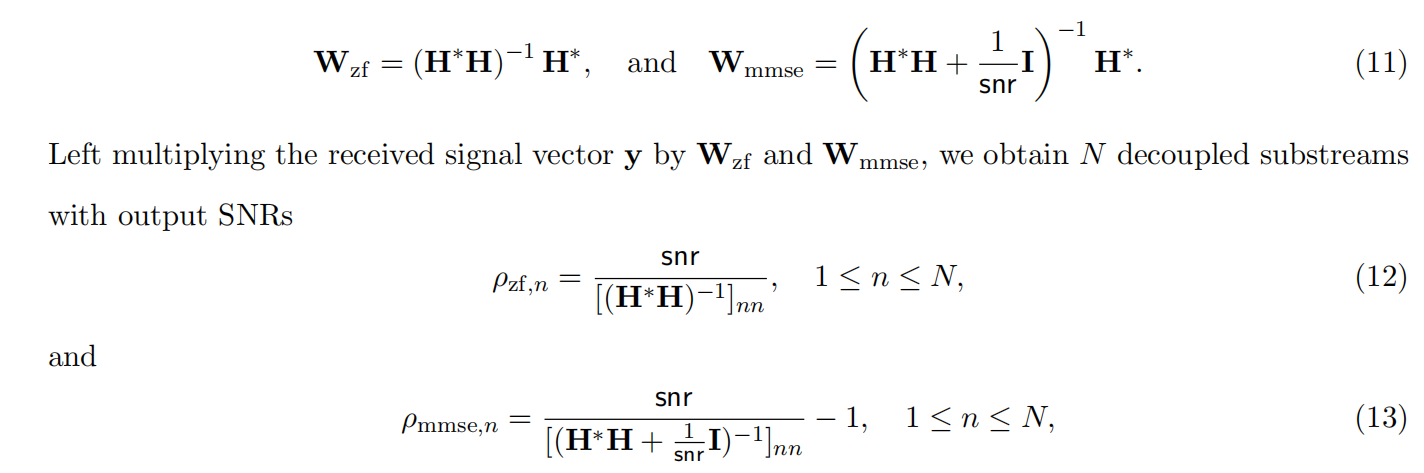
均衡后的SNRSINR
本文主要摘自参考文献中的前两篇,相关文献中经常会出现MIMO检测后的SINR不过一直没有找到相关数学推到过程,其中文献[1]中给出了相关原理在此仅做记录。 1. 系统模型 复信道模型 n t n_t nt 根发送天线, n r n_r nr 根接收天线的 MIMO 系…...
html css js网页制作成品——HTML+CSS榴莲商城网页设计(4页)附源码
目录 一、👨🎓网站题目 二、✍️网站描述 三、📚网站介绍 四、🌐网站效果 五、🪓 代码实现 🧱HTML 六、🥇 如何让学习不再盲目 七、🎁更多干货 一、👨…...

Docker 本地安装 mysql 数据库
Docker: Accelerated Container Application Development 下载对应操作系统版本的 docker ;并安装。 基础操作不再赘述。 打开 macOS 终端,开始 docker 安装mysql之旅 第一步 docker search mysql 》〉docker search mysql NAME DE…...

Python Einops库:深度学习中的张量操作革命
Einops(爱因斯坦操作库)就像给张量操作戴上了一副"语义眼镜"——让你用人类能理解的方式告诉计算机如何操作多维数组。这个基于爱因斯坦求和约定的库,用类似自然语言的表达式替代了晦涩的API调用,彻底改变了深度学习工程…...
【Linux系统】Linux环境变量:系统配置的隐形指挥官
。# Linux系列 文章目录 前言一、环境变量的概念二、常见的环境变量三、环境变量特点及其相关指令3.1 环境变量的全局性3.2、环境变量的生命周期 四、环境变量的组织方式五、C语言对环境变量的操作5.1 设置环境变量:setenv5.2 删除环境变量:unsetenv5.3 遍历所有环境…...