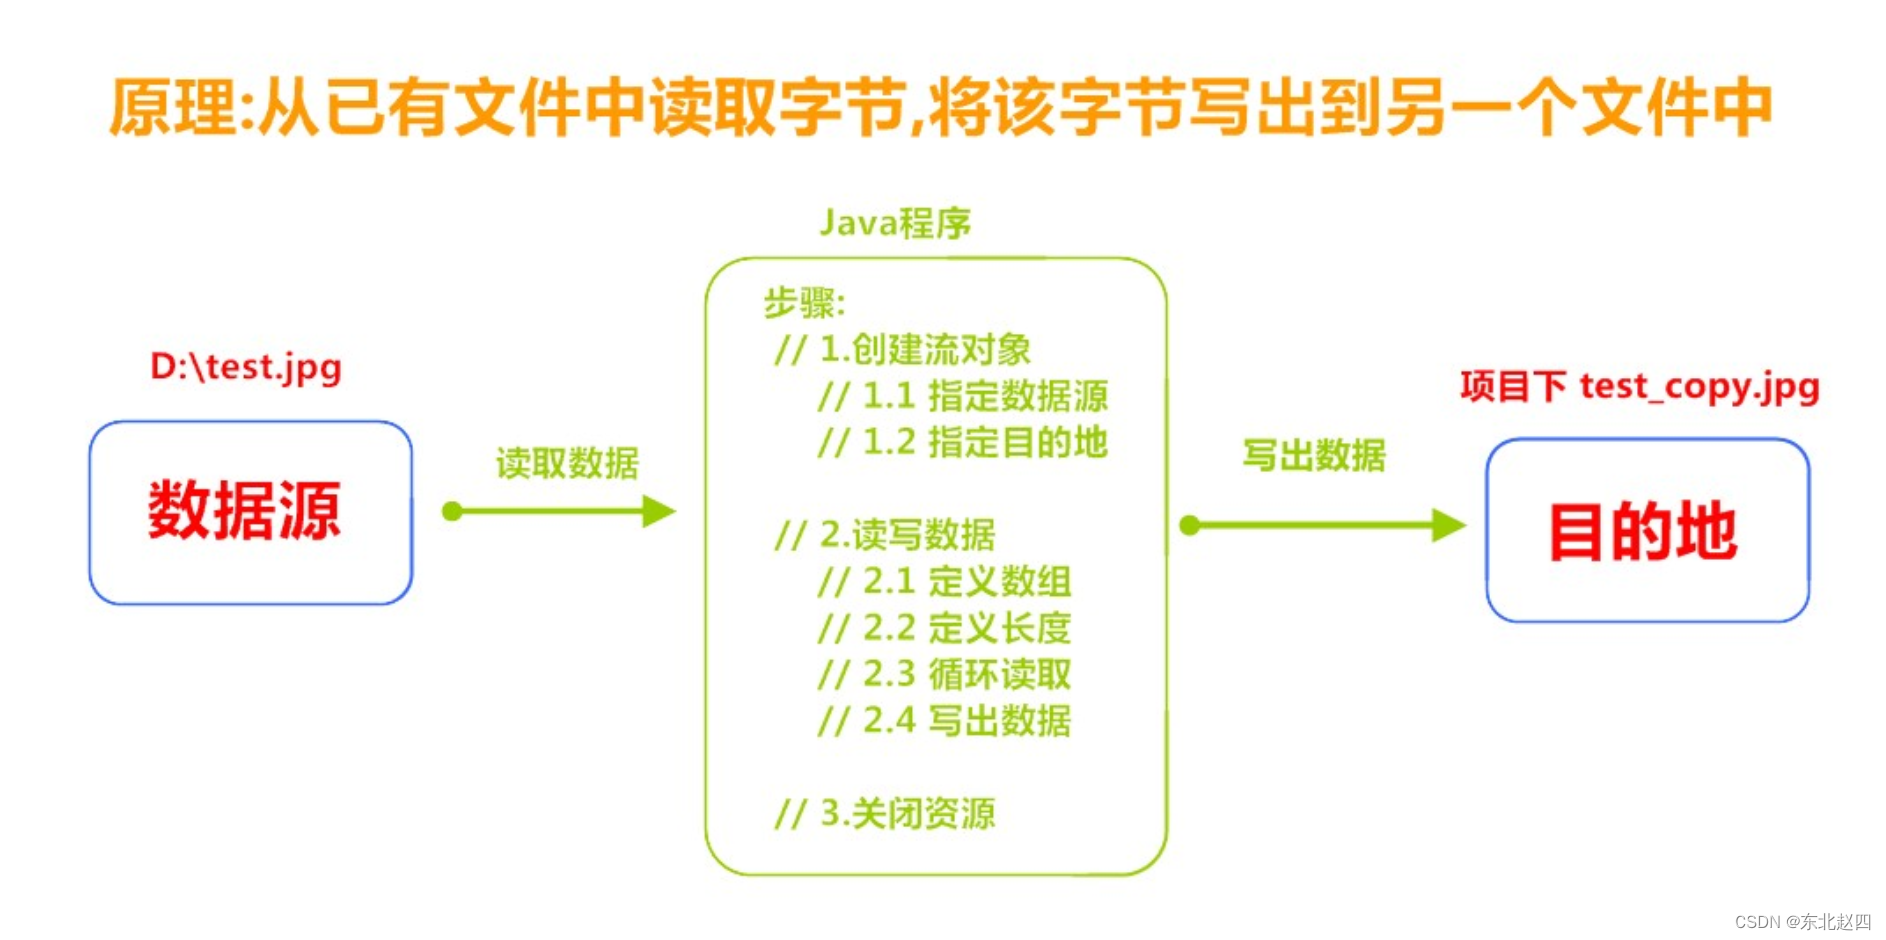
mnist数据集
训练模型
import tensorflow as tfimport keras
from keras.models import Sequential
from keras.layers import Dense,Dropout, Flatten,Conv2D, MaxPooling2D
# from keras.optimizers import SGD
from tensorflow.keras.optimizers import Adam,Nadam, SGDfrom PIL import Image
import numpy as np
import matplotlib.pyplot as pltprint('tf',tf.__version__)
print('keras',keras.__version__)# batch大小,每处理128个样本进行一次梯度更新
batch_size = 64
# 训练素材类别数
num_classes = 10
# 迭代次数
epochs = 5f = np.load("mnist.npz")
x_train, y_train = f['x_train'], f['y_train']
x_test, y_test = f['x_test'], f['y_test']
f.close()
print(x_train.shape,"  ",y_train.shape)
print(x_test.shape,"  ",y_test.shape)# im=plt.imshow(x_train[0],cmap="gray")
# plt.show()## 维度合并784 = 28*28
x_train = x_train.reshape(60000, 784).astype('float32')
x_test = x_test.reshape(10000, 784).astype('float32')## 归一化,像素点的值 转成 0-1 之间的数字
x_train /= 255
x_test /= 255# print(x_train[0])# 标签转换为独热码
y_train = tf.keras.utils.to_categorical(y_train, num_classes)
y_test = tf.keras.utils.to_categorical(y_test, num_classes)
# print(y_train[0]) ## 类似 [0. 0. 0. 0. 0. 1. 0. 0. 0. 0.]print(x_train.shape,"  ",y_train.shape)
print(x_test.shape,"  ",y_test.shape)# 构建模型
model = Sequential()
model.add(Dense(512, activation='relu',input_shape=(784,)))
model.add(Dense(256, activation='relu'))
model.add(Dense(num_classes, activation='softmax'))
model.summary()# [编译模型] 配置模型,损失函数采用交叉熵,优化采用Adadelta,将识别准确率作为模型评估
model.compile(loss=tf.keras.losses.categorical_crossentropy, optimizer=tf.keras.optimizers.Adadelta(), metrics=['accuracy'])
#  validation_data为验证集
model.fit(x_train, y_train, batch_size=batch_size, epochs=epochs, verbose=1, validation_data=(x_test, y_test))# 开始评估模型效果 # verbose=0为不输出日志信息
score = model.evaluate(x_test, y_test, verbose=0)
print('Test loss:', score[0])
print('Test accuracy:', score[1]) # 准确度model.save('mnist_model_weights.h5') # 保存训练模型
训练结果
Epoch 4/5
938/938 [==============================] - 7s 7ms/step - loss: 1.5926 - accuracy: 0.7292 - val_loss: 1.4802 - val_accuracy: 0.7653
Epoch 5/5
938/938 [==============================] - 6s 6ms/step - loss: 1.4047 - accuracy: 0.7686 - val_loss: 1.2988 - val_accuracy: 0.7918
Test loss: 1.2988097667694092
Test accuracy: 0.7918000221252441Process finished with exit code 0
测试模型
import tensorflow as tffrom PIL import Image
import numpy as np
from keras.models import load_model# 构建模型
model = load_model('mnist_model_weights.h5') # 加载训练模型
# model.summary()def read_image(img_name):im = Image.open(img_name).resize((28,28),Image.ANTIALIAS).convert('L') # 将要识别的图缩放到训练图一样的大小,并且灰度化data = np.array(im)return dataimages=[]
images.append(read_image("test.png"))
# print(images)X = np.array(images)
print(X.shape)
X=X.reshape(1, 784).astype('float32')
print(X.shape)
X /=255
# print(X[0:1])
result=model.predict(X[0:1])[0] # 识别出第一张图的结果,多张图的时候,把后面的[0] 去掉,返回的就是多张图结果
num=0 # 用来分析预测的结果
for i in range(len(result)): # result的长度是10# print(result[i]*255)if result[i]*255>result[num]*255: # 值越大,就越可能是结果num=iprint("预测结果",num)
将数据集转换为图片
#coding: utf-8
import os
import tensorflow as tf
import input_data
from PIL import Image'''
函数功能:按照bmp格式提取mnist数据集中的图片
参数介绍:mnist_dir   mnist数据集存储的路径save_dir    提取结果存储的目录
'''mint=tf.keras.datasets.mnistdef extract_mnist(mnist_dir, save_dir):rows = 28cols = 28# 加载mnist数据集# one_hot = True为默认打开"独热编码"mnist = input_data.read_data_sets(mnist_dir, one_hot=False)# 获取训练图片数量shape = mnist.train.images.shapeimages_train_count = shape[0]pixels_count_per_image = shape[1]# 获取训练标签数量=训练图片数量# 关闭"独热编码"后,labels的类型为[7 3 4 ... 5 6 8]labels = mnist.train.labelsprint(labels)exit(0)labels_train_count = labels.shape[0]if (images_train_count == labels_train_count):print("训练集共包含%d张图片,%d个标签" % (images_train_count, labels_train_count))print("每张图片包含%d个像素" % (pixels_count_per_image))print("数据类型为", mnist.train.images.dtype)# mnist图像数值的范围为[0,1], 需将其转换为[0,255]for current_image_id in range(images_train_count):for i in range(pixels_count_per_image):if mnist.train.images[current_image_id][i] != 0:mnist.train.images[current_image_id][i] = 255if ((current_image_id + 1) % 50) == 0:print("已转换%d张,共需转换%d张" %(current_image_id + 1, images_train_count))# 创建train images的保存目录, 按标签保存for i in range(10):dir = "%s/%s" % (save_dir, i)print(dir)if not os.path.exists(dir):os.mkdir(dir)# indices = [0, 0, 0, ..., 0]用来记录每个标签对应的图片数量indices = [0 for x in range(0, 10)]for i in range(images_train_count):new_image = Image.new("L", (cols, rows))# 遍历new_image 进行赋值for r in range(rows):for c in range(cols):new_image.putpixel((r, c), int(mnist.train.images[i][c + r * cols]))# 获取第i张训练图片对应的标签label = labels[i]image_save_path = "%s/%s/%s.bmp" % (save_dir, label,indices[label])indices[label] += 1new_image.save(image_save_path)# 打印保存进度if ((i + 1) % 50) == 0:print("图片保存进度: 已保存%d张,共需保存%d张" % (i + 1, images_train_count))else:print("图片数量与标签数量不一致!")if __name__ == '__main__':mnist_dir = "Mnist_Data"save_dir = "Mnist_Data_TrainImages"extract_mnist(mnist_dir, save_dir)
利用图片制作mnist格式数据集
import os
from PIL import Image
from array import *
from random import shuffle# # 文件组织架构:
# ├──training-images
# │   └──0(类别为0的图像)
# │   ├──1(类别为1的图像)
# │   ├──2(类别为2的图像)
# │   ├──3(类别为3的图像)
# │   └──4(类别为4的图像)
# ├──test-images
# │   └──0(类别为0的图像)
# │   ├──1(类别为1的图像)
# │   ├──2(类别为2的图像)
# │   ├──3(类别为3的图像)
# │   └──4(类别为4的图像)
# └── mnist数据集制作.py(本脚本)# Load from and save to
Names = [['./training-images', 'train'], ['./test-images', 'test']]for name in Names:data_image = array('B')data_label = array('B')print(os.listdir(name[0]))FileList = []for dirname in os.listdir(name[0])[0:]:  # [1:] Excludes .DS_Store from Mac OS# print(dirname)path = os.path.join(name[0], dirname)# print(path)for filename in os.listdir(path):# print(filename)if filename.endswith(".png"):FileList.append(os.path.join(name[0] + '/', dirname + '/', filename))print(FileList)shuffle(FileList)  # Usefull for further segmenting the validation setfor filename in FileList:label = int(filename.split('/')[2])print(filename)Im = Image.open(filename)# print(Im)pixel = Im.load()width, height = Im.sizefor x in range(0, width):for y in range(0, height):data_image.append(pixel[y, x])data_label.append(label)  # labels start (one unsigned byte each)hexval = "{0:#0{1}x}".format(len(FileList), 6)  # number of files in HEX# header for label arrayheader = array('B')header.extend([0, 0, 8, 1, 0, 0])header.append(int('0x' + hexval[2:][:2], 16))header.append(int('0x' + hexval[2:][2:], 16))data_label = header + data_label# additional header for images arrayif max([width, height]) <= 256:header.extend([0, 0, 0, width, 0, 0, 0, height])else:raise ValueError('Image exceeds maximum size: 256x256 pixels');header[3] = 3  # Changing MSB for image data (0x00000803)data_image = header + data_imageoutput_file = open(name[1] + '-images-idx3-ubyte', 'wb')data_image.tofile(output_file)output_file.close()output_file = open(name[1] + '-labels-idx1-ubyte', 'wb')data_label.tofile(output_file)output_file.close()# 运行脚本得到四个文件test-images-idx3-ubyte、test-labels-idx1-ubyte、train-images-idx3-ubyte、train-labels-idx1-ubyte
# 在cmd中利用gzip -c train-labels-idx1-ubyte > train-labels-idx1-ubyte.gz命令对上述四个文件压缩得到最终的mnist格式数据集
相关文章:

mnist数据集
训练模型 import tensorflow as tfimport keras from keras.models import Sequential from keras.layers import Dense,Dropout, Flatten,Conv2D, MaxPooling2D # from keras.optimizers import SGD from tensorflow.keras.optimizers import Adam,Nadam, SGDfrom PIL import…...
Java之IO概述以及
1.1 什么是IO 生活中,你肯定经历过这样的场景。当你编辑一个文本文件,忘记了ctrls ,可能文件就白白编辑了。当你电脑上插入一个U盘,可以把一个视频,拷贝到你的电脑硬盘里。那么数据都是在哪些设备上的呢?键…...

Spring WebFlux—Reactive 核心
一、概述 spring-web 模块包含以下对响应式Web应用的基础支持: 对于服务器请求处理,有两个级别的支持。 HttpHandler: 用于HTTP请求处理的基本约定,具有非阻塞I/O和Reactive Streams背压,以及Reactor Netty、Undertow、Tomcat、…...
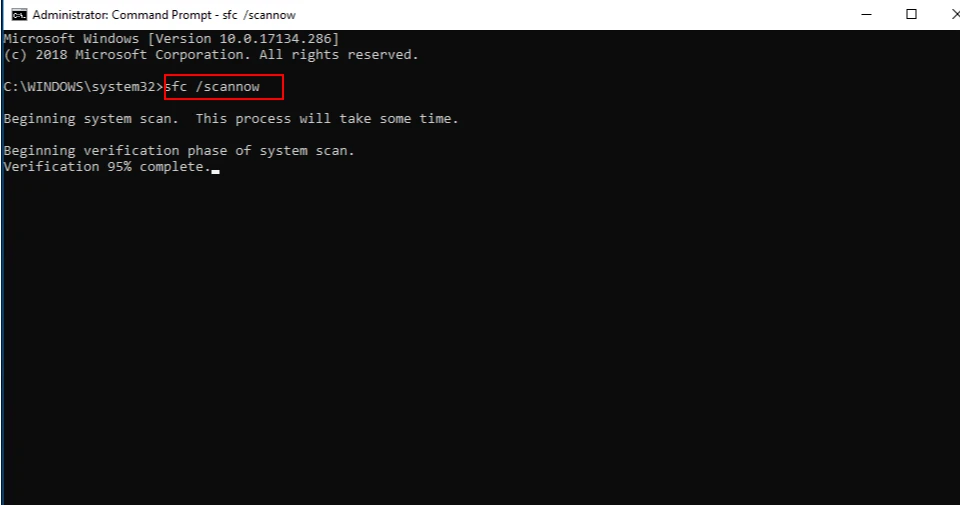
由于找不到d3dx9_43.dll,无法继续执行代码要怎么解决
D3DX9_43.dll是一个动态链接库文件,它是DirectX的一个组件,主要用于支持一些旧版本的游戏和软件。当电脑缺少这个文件时,可能会导致这些游戏和软件无法正常运行。例如,一些老游戏可能需要D3DX9_43.dll来支持图形渲染等功能。此外&…...
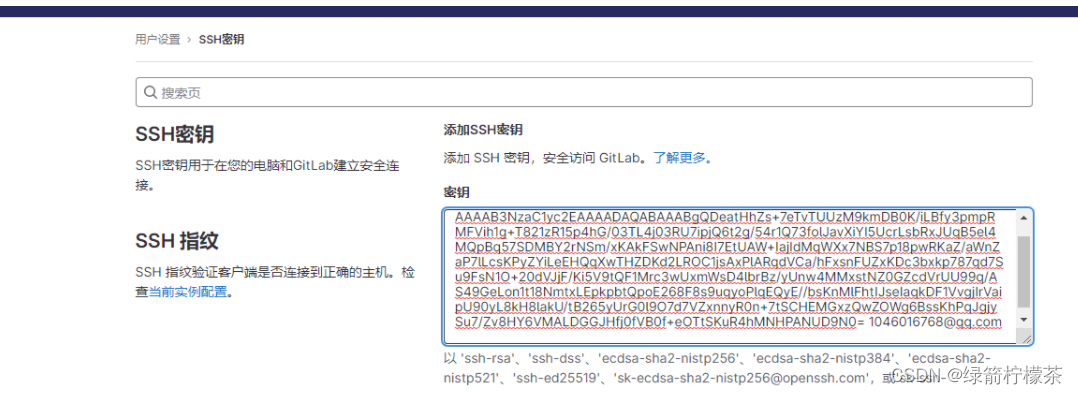
git安装配置教程
目录 git安装配置1. 安装git2. git 配置3.生成ssh key:4. 获取生产的密钥3. gitee或者github添加ssh-key4.git使用5. git 使用-本地仓库与远程仓库建立连接第一步:进入项目文件夹,初始化本地仓库第二步:建立远程仓库。 建立远程连接的小技巧 …...

要如何选择报修工单管理系统?需要注意哪些核心功能?
现如今,越来越多的企业已经离不开报修工单管理系统,但市面上的产品繁多,很难寻找到一款特别符合企业需求的系统。企业采购报修工单管理系统的主要目的在于利用其核心功能,如工单流转等,来解决工作事件的流程问题&#…...

面对大数据量渲染,前端工程师如何保证页面流畅性?
一、问题背景 在web前端开发中,需要渲染大量数据是很常见的需求。拿一般的业务系统来说,一个模块中往往需要显示成百上千条记录,这已经属于比较大的数据量。而一些大型系统,如数据分析平台、监控系统等,需要同时渲染的 数据量可能达到几十万甚至上百万。 面对大数据量渲染的需…...
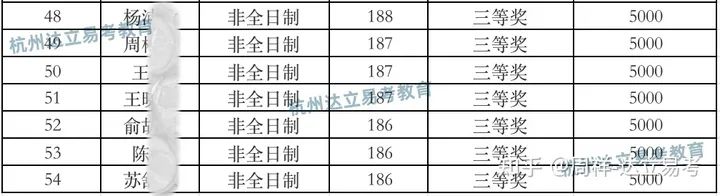
2023年浙工商MBA新生奖学金名单公布,如何看待?
浙工商MBA项目官方最新公布了2023年的非全日制新生奖学金名单,按照政策约定,共分为特等奖学金1名,一等奖学金10名,二等奖学金15名,三等奖学金30名,额度对应3万、1万、0.8万、0.5万不等,主要名单…...
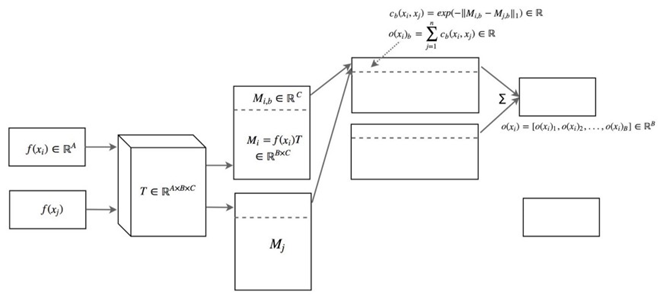
关于时空数据的培训 GAN:实用指南(第 02/3 部分)
一、说明 在本系列关于训练 GAN 实用指南的第 1 部分中,我们讨论了 a) 鉴别器 (D) 和生成器 (G) 训练之间的不平衡如何导致模式崩溃和由于梯度消失而导致静音学习,以及 b) GAN 对超参…...

UNIAPP利用canvas绘制图片和文字,并跟随鼠标移动
最近有个项目,要触摸组件,产生一条图片跟随移动,并显示相应的文字,在网上找了一些资料,终于完成构想,废话少说,直接上代码(测试通过) <template> <view>…...
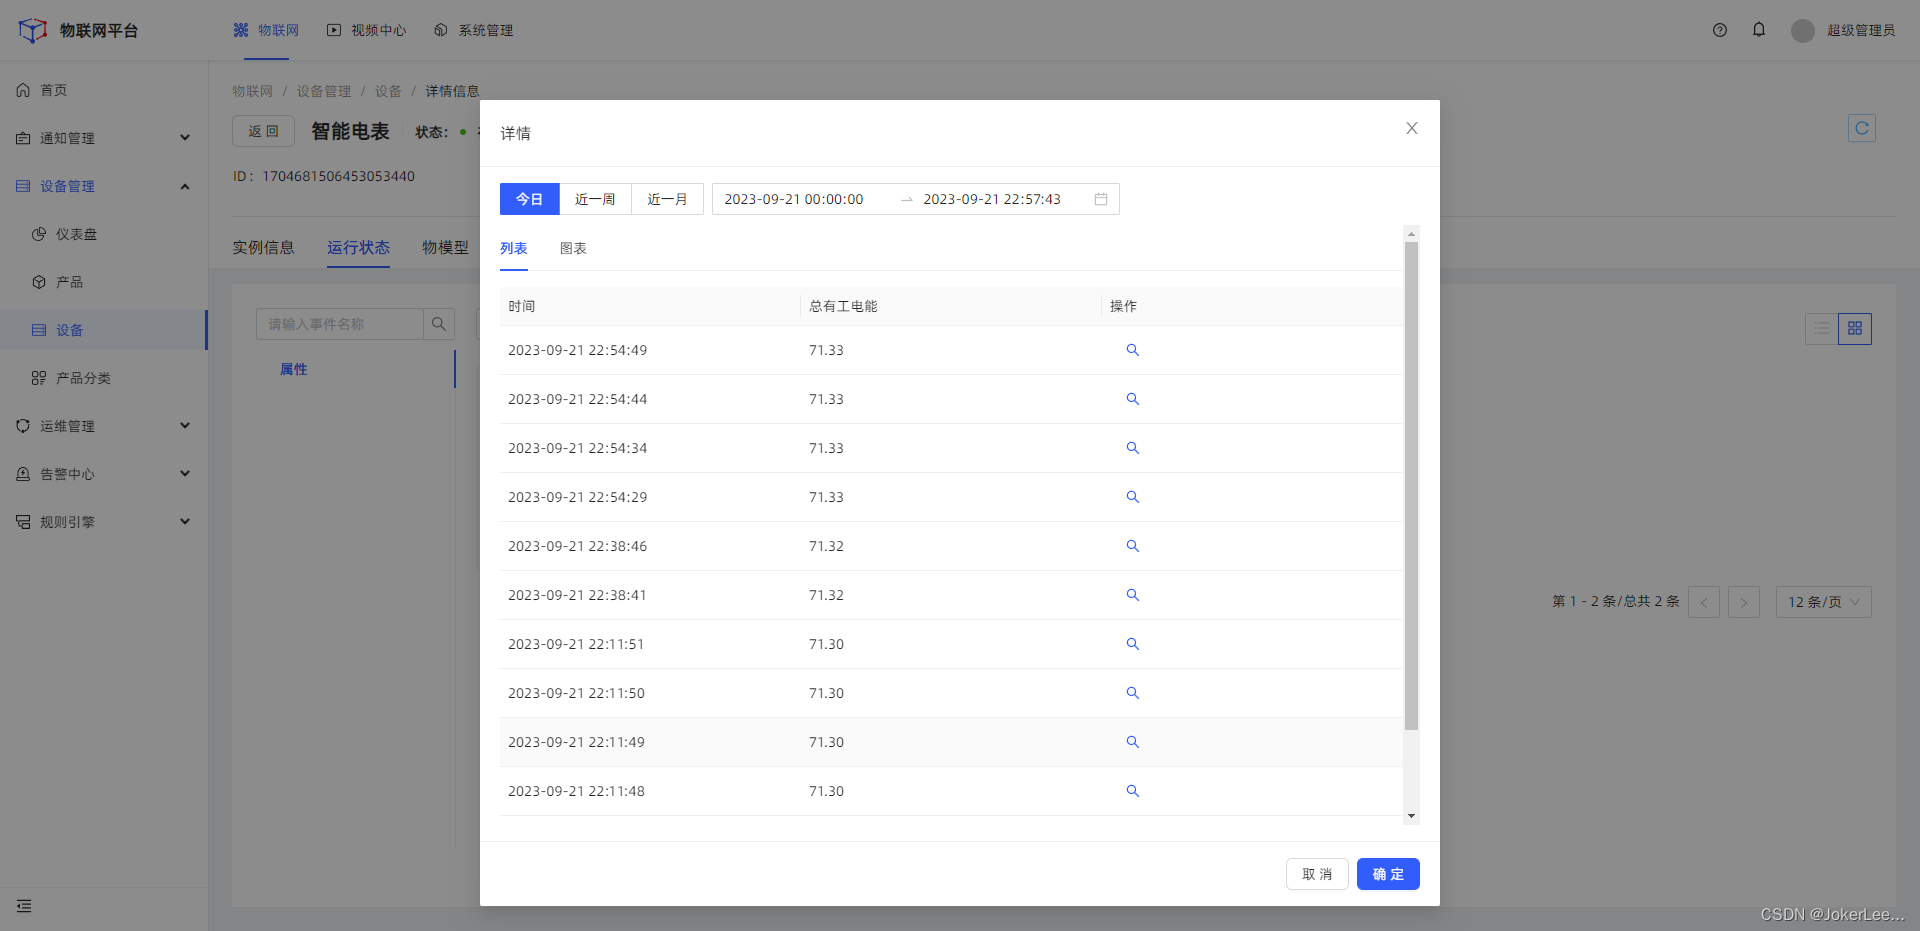
【智能电表数据接入物联网平台实践】
智能电表数据接入物联网平台实践 设备接线准备设备调试代码实现Modbus TCP Client 读取电表数据读取寄存器数据转成32bit Float格式然后使用modbusTCP Client 读取数据 使用mqtt协议接入物联网平台最终代码实现 设备接线准备 设备调试 代码实现 Modbus TCP Client 读取电表数…...

Docker--network命令的用法
原文网址:Docker--network命令的用法_IT利刃出鞘的博客-CSDN博客 简介 说明 本文介绍Docker的network网络命令的用法。 官网网址 docker network | Docker Documentation 命令概述 所有命令 命令名称 说明 docker network connect 将容器连接到网络 dock…...
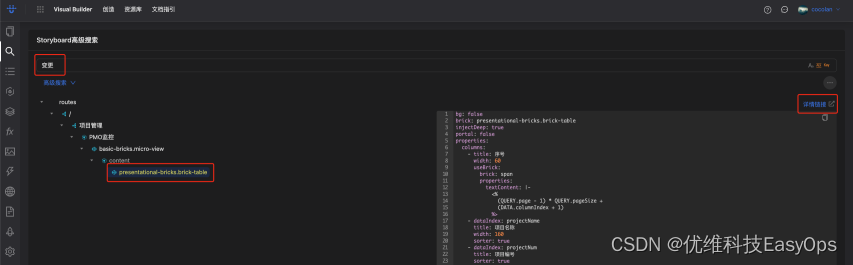
优维低代码实践:图片和搜索
优维低代码技术专栏,是一个全新的、技术为主的专栏,由优维技术委员会成员执笔,基于优维7年低代码技术研发及运维成果,主要介绍低代码相关的技术原理及架构逻辑,目的是给广大运维人提供一个技术交流与学习的平台。 优维…...
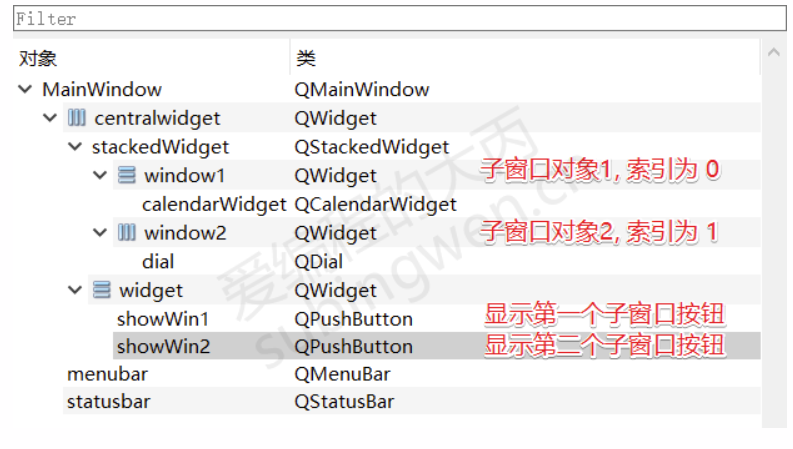
[Qt]控件
文章摘于 爱编程的大丙 文章目录 1. 按钮类型控件1.1 按钮基类 QAbstractButton1.1.1 标题和图标1.1.2 按钮的 Check 属性1.1.3 信号1.1.4 槽函数 1.2 QPushButton1.2.1 常用API1.2.2 按钮的使用 1.3 QToolButton1.3.1 常用API1.3.2 按钮的使用 1.4 QRadioButton1.4.1 常用API…...
GEE:快速实现时间序列线性趋势和变化敏感性计算(斜率、截距)以NDVI时间序列为例
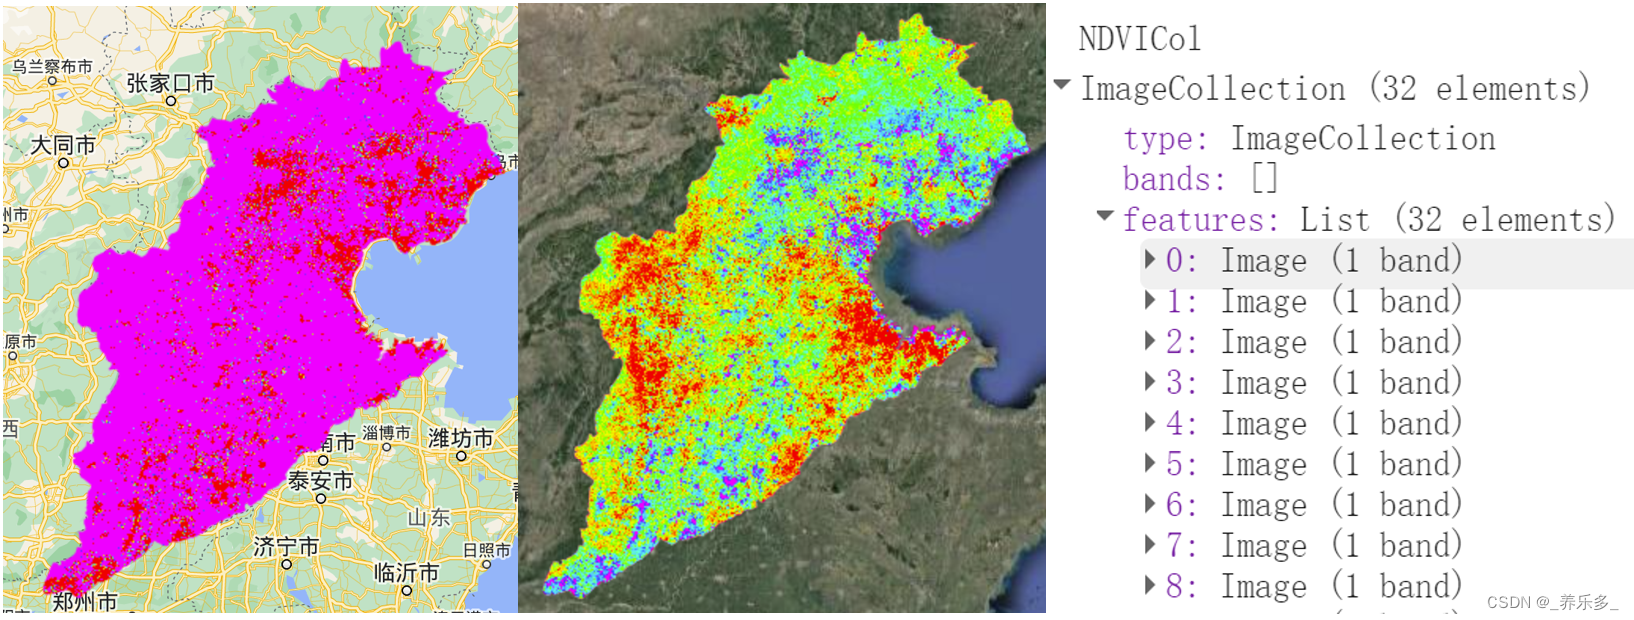
作者:CSDN @ _养乐多_ 本博客将向您介绍如何使用Google Earth Engine(GEE)平台来处理Landsat 5、7和8的卫星图像数据,构建时间序列,以NDVI为例,计算NDVI时间序列的斜率和截距,以及如何导出这些结果供进一步分析使用。 文章目录 一、代码详解1.1 核心代码详解1.2 核心代…...

LC1713. 得到子序列的最少操作次数(java - 动态规划)
LC1713. 得到子序列的最少操作次数 题目描述LIS 动态规划 二分法代码演示 题目描述 难度 - 困难 LC1713.得到子序列的最少操作次数 给你一个数组 target ,包含若干 互不相同 的整数,以及另一个整数数组 arr ,arr 可能 包含重复元素。 每一次…...

vr飞机驾驶舱模拟流程3D仿真演示加大航飞安全法码
众所周知,航空航天飞行是一项耗资大、变量参数很多、非常复杂的系统工程,因此可利用虚拟仿真技术经济、安全及可重复性等特点,进行飞行任务或操作的模拟,以代替某些费时、费力、费钱的真实试验或者真实试验无法开展的场合…...
一、八大排序(sort)
文章目录 一、时间复杂度(一)定义:常数操作 二、空间复杂度(一)定义: 三、排序(一)选择排序1.定义2.代码3.特性 (二)冒泡排序1.定义2.代码3.特性 (…...
【AWS】AI 代码生成器—Amazon CodeWhisperer初体验 | 开启开挂编程之旅
使用 AI 编码配套应用程序更快、更安全地构建应用程序 文章目录 1.1 Amazon CodeWhisperper简介1.2 Amazon CodeWhisperer 定价2.1 打开VS Code2.2 安装AWS ToolKit插件 一、前言 1.1 Amazon CodeWhisperper简介 1️⃣更快地完成更多工作 CodeWhisperer 经过数十亿行代码的训…...

【Mysql主从配置方法---单主从】
Mysql主从 主服务器 创建用户 create user “for_rep”“从服务器IP地址” IDENTIFIED by “123456” 授权 grant replication slave on . to “for_rep”“从服务器IP地址” IDENTIFIED by “123456” 查看用户权限 SHOW GRANTS FOR “for_rep”“从服务器IP地址”; 修改M…...

CANN hcomm通道获取API
HcclChannelAcquire 【免费下载链接】hcomm HCOMM(Huawei Communication)是HCCL的通信基础库,提供通信域以及通信资源的管理能力。 项目地址: https://gitcode.com/cann/hcomm 产品支持情况 Ascend 950PR/Ascend 950DT:支…...

OpenClaw 环境搭建|可视化操作零门槛
📌 OpenClaw 一键安装包|一键部署,告别复杂环境配置 适配系统:Windows10/11 64 位当前版本:v2.7.5(虾壳云版) ⭐ 核心优势 全程可视化操作,无需命令行、无需手动配置 Python/Node…...

从ChatGLM2到LLaMA2:大厂如何用GQA和MQA在推理速度与模型质量间做取舍?
大模型注意力机制实战:GQA与MQA如何重塑推理效率与生成质量的平衡 当ChatGLM2-6B在推理速度上展现出惊人优势时,技术团队发现其生成质量偶尔会出现波动;而LLaMA2虽然保持了稳定的输出品质,却在资源消耗上让不少企业望而却步。这背…...

量子态重构技术QSDC:动态电路与机器学习结合
1. 量子态重构的技术挑战与QSDC框架概述 量子计算领域长期面临一个基础性难题:如何在电路运行过程中获取量子态的"快照"而不破坏其量子特性?传统量子态层析(QST)需要制备大量相同量子态副本进行测量,不仅效率…...

Chrome Regex Search:如何在网页上使用正则表达式快速查找信息
Chrome Regex Search:如何在网页上使用正则表达式快速查找信息 【免费下载链接】chrome-regex-search 项目地址: https://gitcode.com/gh_mirrors/ch/chrome-regex-search 你是否曾经在浏览网页时,需要查找特定格式的信息却无从下手?…...

百考通:AI让每一份调研与设计都高效落地
在数字化时代,市场调研、产品设计、学术研究等场景中,问卷设计作为核心环节,直接影响着数据收集的质量与工作推进的效率。传统问卷设计往往面临流程繁琐、耗时耗力、问题设计不精准等痛点,而百考通(https://www.baikao…...

C# 环境:深入解析与应用
C# 环境:深入解析与应用 引言 C#(读作“C Sharp”)是一种由微软开发的高级编程语言,广泛应用于Windows平台的应用程序开发。自从2002年推出以来,C#已经成为了全球开发者喜爱的编程语言之一。本文将深入解析C#环境,包括其特点、应用场景以及开发环境搭建等。 C#环境概述…...

【MySQL百日打怪升级第8天】SELECT执行流程
【第8天】每天一个MySQL知识点,百日打怪升级 SQL基础:SELECT执行流程 大家好,我是一名拥有10年以上经验的DBA老兵。 做这个系列,源于一个朴素的愿望:把踩过的坑、总结的经验系统化输出,希望能帮到刚入行或…...

软件设计师下午题训练2-3题+2020下上午题错题解析 练习真题训练15
一、训练题2 1、2021上 (1) (2) a:团购点编号 b:客户电话 供货 主键 :(供货商编号,团购点编号) 外键:供货商编号、团购点编号 订单 主键:订单编号…...
方案:四横五纵框架 、元模型+视图 、业务、应用、数据、技术四大架构)
企业信息化架构(业务架构、应用架构、数据架构、技术架构)方案:四横五纵框架 、元模型+视图 、业务、应用、数据、技术四大架构
该方案提出了企业信息化架构的“四横五纵”框架,涵盖业务、应用、数据、技术四大架构及架构管控,通过元模型定义元素关系,以多层级视图实现从战略到实施的可视化与落地,支撑企业架构全生命周期管理。 四横五纵框架清晰划分了企业架…...