计算机视觉框架OpenMMLab开源学习(三):图像分类实战
前言:本篇主要偏向图像分类实战部分,使用MMclassification工具进行代码应用,最后对水果分类进行实战演示,本次环境和代码配置部分省略,具体内容建议参考前一篇文章:计算机视觉框架OpenMMLab开源学习(二):图像分类
计算机视觉框架OpenMMLab开源学习(三):图像分类实战
一、安装OpenMMLab v2.0
Step 1. Install MMCV
mim install "mmcv>=2.0.0rc0"
Step 2. Install MMClassification and MMDetection
mim install "mmcls>=1.0.0rc0" "mmdet>=3.0.0rc0"
代码模版讲解:
model = dict(type='ImageClassifier', # 分类器类型backbone=dict(type='ResNet', # 主干网络类型depth=50, # 主干网网络深度, ResNet 一般有18, 34, 50, 101, 152 可以选择num_stages=4, # 主干网络状态(stages)的数目,这些状态产生的特征图作为后续的 head 的输入。out_indices=(3, ), # 输出的特征图输出索引。越远离输入图像,索引越大frozen_stages=-1, # 网络微调时,冻结网络的stage(训练时不执行反相传播算法),若num_stages=4,backbone包含stem 与 4 个 stages。frozen_stages为-1时,不冻结网络; 为0时,冻结 stem; 为1时,冻结 stem 和 stage1; 为4时,冻结整个backbonestyle='pytorch'), # 主干网络的风格,'pytorch' 意思是步长为2的层为 3x3 卷积, 'caffe' 意思是步长为2的层为 1x1 卷积。neck=dict(type='GlobalAveragePooling'), # 颈网络类型head=dict(type='LinearClsHead', # 线性分类头,num_classes=1000, # 输出类别数,这与数据集的类别数一致in_channels=2048, # 输入通道数,这与 neck 的输出通道一致loss=dict(type='CrossEntropyLoss', loss_weight=1.0), # 损失函数配置信息topk=(1, 5), # 评估指标,Top-k 准确率, 这里为 top1 与 top5 准确率))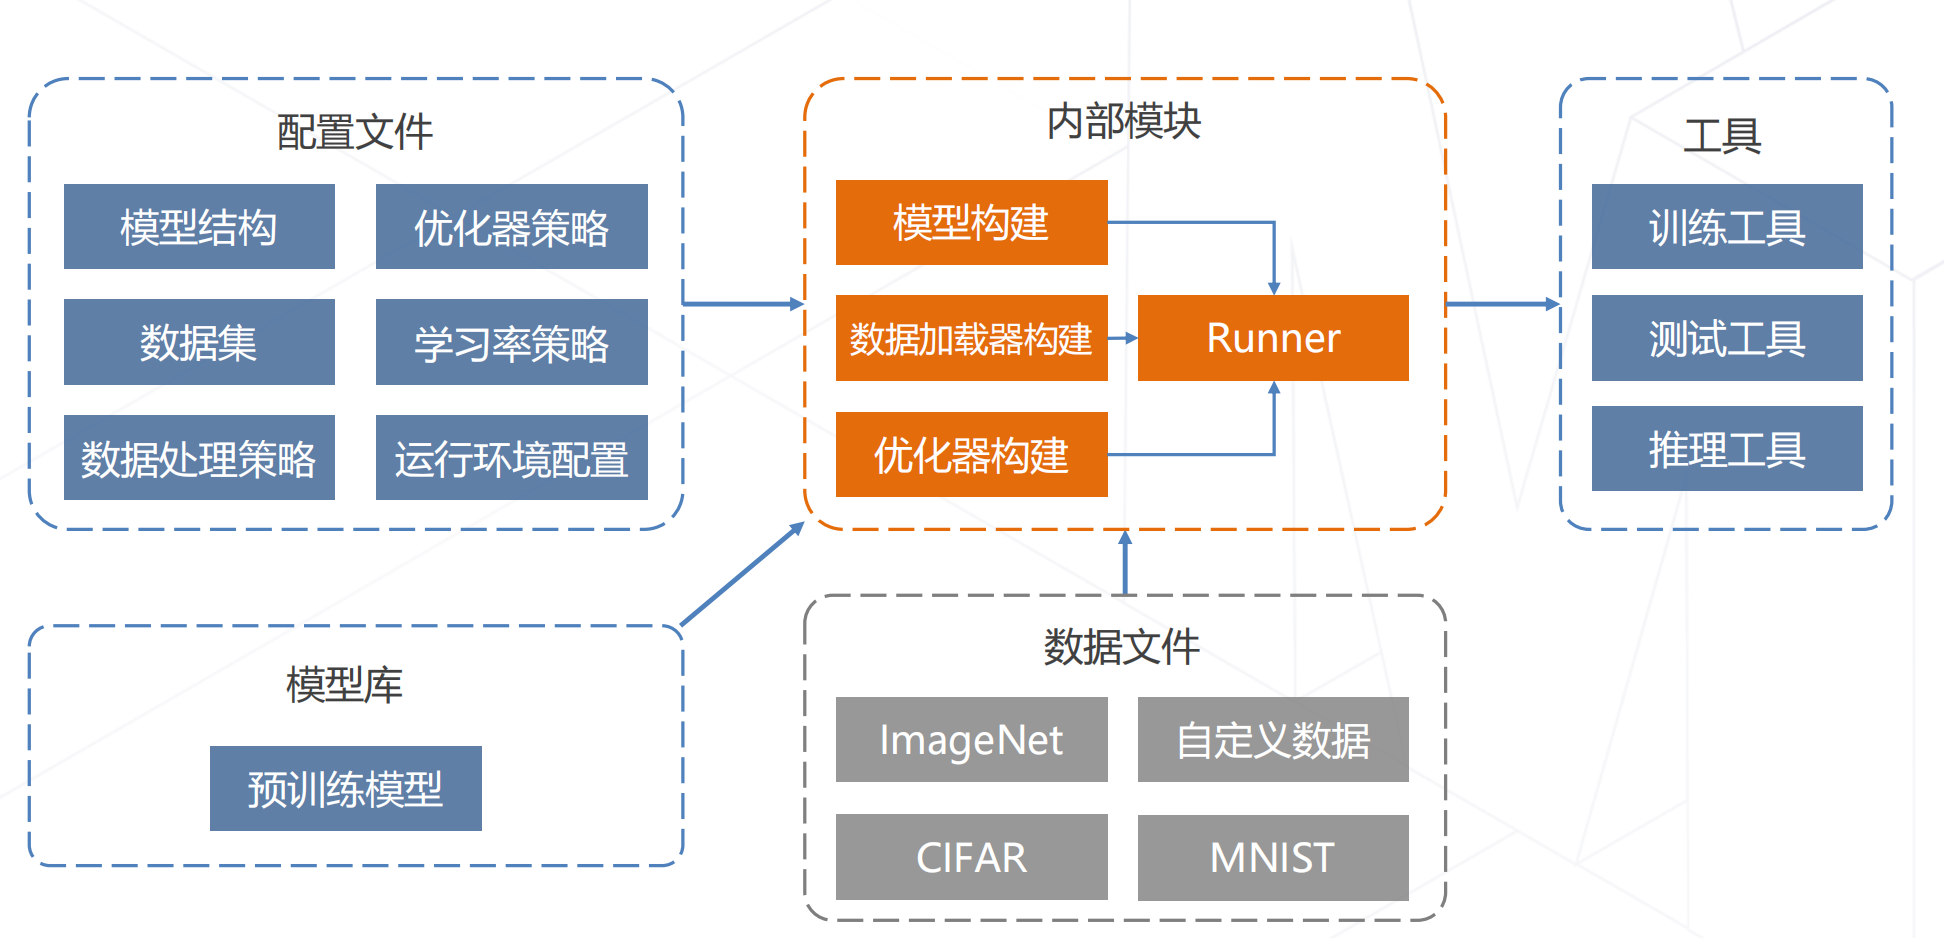 二、Pytorch图像分类任务
本次任务训练数据为FashionMNIST,完整代码如下:
# https://pytorch.org/tutorials/beginner/basics/quickstart_tutorial.htmlimport torch
from torch import nn
from torch.utils.data import DataLoader
from torchvision import datasets
from torchvision.transforms import ToTensor# Training## Construct Dataset and Dataloader
training_data = datasets.FashionMNIST(root="data",train=True,download=True,transform=ToTensor(),
)
test_data = datasets.FashionMNIST(root="data",train=False,download=True,transform=ToTensor(),
)batch_size = 64train_dataloader = DataLoader(training_data, batch_size=batch_size)
test_dataloader = DataLoader(test_data, batch_size=batch_size)## Define model
class NeuralNetwork(nn.Module):def __init__(self):super(NeuralNetwork, self).__init__()self.flatten = nn.Flatten()self.linear_relu_stack = nn.Sequential(nn.Linear(28*28, 512),nn.ReLU(),nn.Linear(512, 512),nn.ReLU(),nn.Linear(512, 10))def forward(self, x):x = self.flatten(x)logits = self.linear_relu_stack(x)return logitsdevice = "cuda" if torch.cuda.is_available() else "cpu"
model = NeuralNetwork().to(device)## Define loss function and Optimizer
loss_fn = nn.CrossEntropyLoss()
optimizer = torch.optim.SGD(model.parameters(), lr=1e-3)## Inner loop for training
def train(dataloader, model, loss_fn, optimizer):size = len(dataloader.dataset)model.train()for batch, (X, y) in enumerate(dataloader):X, y = X.to(device), y.to(device)# Compute prediction errorpred = model(X)loss = loss_fn(pred, y)# Backpropagationoptimizer.zero_grad()loss.backward()optimizer.step()# Output Logsif batch % 100 == 0:loss, current = loss.item(), batch * len(X)print(f"loss: {loss:>7f}  [{current:>5d}/{size:>5d}]")## Inner loop for test
def test(dataloader, model, loss_fn):size = len(dataloader.dataset)num_batches = len(dataloader)model.eval()test_loss, correct = 0, 0with torch.no_grad():for X, y in dataloader:X, y = X.to(device), y.to(device)pred = model(X)test_loss += loss_fn(pred, y).item()correct += (pred.argmax(1) == y).type(torch.float).sum().item()test_loss /= num_batchescorrect /= sizeprint(f"Test Error: \n Accuracy: {(100*correct):>0.1f}%, Avg loss: {test_loss:>8f} \n")## Launch training / test loops#
epochs = 5
for t in range(epochs):print(f"Epoch {t+1}\n-------------------------------")train(train_dataloader, model, loss_fn, optimizer)test(test_dataloader, model, loss_fn)
print("Done!")## Saving Modelstorch.save(model.state_dict(), "model.pth")
print("Saved PyTorch Model State to model.pth")# Deployment## Loading Models
model = NeuralNetwork()
model.load_state_dict(torch.load("model.pth"))# Predict new imagesclasses = ["T-shirt/top","Trouser","Pullover","Dress","Coat","Sandal","Shirt","Sneaker","Bag","Ankle boot",
]model.eval()
x, y = test_data[0][0], test_data[0][1]
with torch.no_grad():pred = model(x)predicted, actual = classes[pred[0].argmax(0)], classes[y]print(f'Predicted: "{predicted}", Actual: "{actual}"')
三、利用MMClassification提供的预训练模型推理:
安装环境:
pip install openmim, mmengine
mim install mmcv-full mmcls
Inference using high-level API
from mmcls.apis import init_model, inference_modelmodel = init_model('mobilenet-v2_8xb32_in1k.py', 'mobilenet_v2_batch256_imagenet_20200708-3b2dc3af.pth', device='cuda:0')
load checkpoint from local path: mobilenet_v2_batch256_imagenet_20200708-3b2dc3af.pth
result = inference_model(model, 'banana.png')
result
{'pred_label': 954, 'pred_score': 0.9999284744262695, 'pred_class': 'banana'}
from mmcls.apis import show_result_pyplotshow_result_pyplot(model, 'banana.png', result)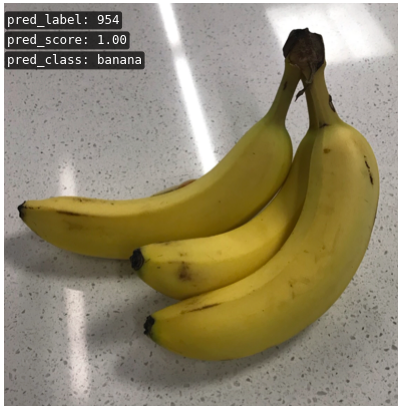
PyTorch codes under the hood
Let write some raw PyTorch codes to do the same thing.
These are actual codes wrapped in high-level APIs.
construct an ImageClassifier
Note: current implementation only allow configs of backbone, neck and classification head instead of Python objects.
from mmcls.models import ImageClassifierclassifier = ImageClassifier(backbone=dict(type='MobileNetV2', widen_factor=1.0),neck=dict(type='GlobalAveragePooling'),head=dict(type='LinearClsHead',num_classes=1000,in_channels=1280)
)
Load trained parameters
import torchckpt = torch.load('mobilenet_v2_batch256_imagenet_20200708-3b2dc3af.pth')
classifier.load_state_dict(ckpt['state_dict'])
Construct data preprocessing pipeline
Important: A models work only if image preprocessing pipelines is correct.
from mmcls.datasets.pipelines import Composetest_pipeline = Compose([dict(type='LoadImageFromFile'),dict(type='Resize', size=(256, -1), backend='pillow'),dict(type='CenterCrop', crop_size=224),dict(type='Normalize',mean=[123.675, 116.28, 103.53],std=[58.395, 57.12, 57.375],to_rgb=True),dict(type='ImageToTensor', keys=['img']),dict(type='Collect', keys=['img'])
])
data = dict(img_info=dict(filename='banana.png'), img_prefix=None)
data = test_pipeline(data)
data
{'img_metas': DataContainer({'filename': 'banana.png', 'ori_filename': 'banana.png', 'ori_shape': (403, 393, 3), 'img_shape': (224, 224, 3), 'img_norm_cfg': {'mean': array([123.675, 116.28 , 103.53 ], dtype=float32), 'std': array([58.395, 57.12 , 57.375], dtype=float32), 'to_rgb': True}}),'img': tensor([[[ 0.3309, 0.2967, 0.3138, ..., 2.0263, 2.0092, 1.9920],[ 0.3481, 0.3309, 0.2282, ..., 2.0263, 2.0092, 1.9920],[ 0.2796, 0.2967, 0.2967, ..., 1.9920, 2.0263, 1.9749],...,[ 0.1939, 0.1768, 0.2282, ..., 0.3994, 0.3309, 0.3823],[ 0.1426, 0.1254, 0.2111, ..., 0.5878, 0.5364, 0.5536],[-0.0116, -0.0801, 0.1597, ..., 0.5707, 0.5536, 0.5364]],[[ 0.3803, 0.3803, 0.3803, ..., 2.1660, 2.1485, 2.1134],[ 0.4153, 0.4153, 0.3102, ..., 2.1835, 2.1310, 2.1134],[ 0.3452, 0.3803, 0.3803, ..., 2.1134, 2.1485, 2.1134],...,[ 0.2752, 0.2577, 0.3102, ..., 0.5028, 0.4328, 0.4328],[ 0.2227, 0.1877, 0.3102, ..., 0.6604, 0.6254, 0.5728],[ 0.0301, -0.0049, 0.2402, ..., 0.6604, 0.6254, 0.5728]],[[ 0.5485, 0.5485, 0.5485, ..., 2.3437, 2.3263, 2.2914],[ 0.5834, 0.5834, 0.4788, ..., 2.3611, 2.3088, 2.2914],[ 0.5136, 0.5485, 0.5485, ..., 2.3088, 2.3437, 2.3088],...,[ 0.4091, 0.3916, 0.4439, ..., 0.5834, 0.5136, 0.5311],[ 0.3568, 0.3045, 0.4265, ..., 0.7576, 0.7228, 0.7054],[ 0.1651, 0.1128, 0.3742, ..., 0.7576, 0.7402, 0.7054]]])}
equivalent in torchvision
from PIL import Image
from torchvision.transforms import Compose, Resize, CenterCrop, Normalize, ToTensortv_transform = Compose([Resize(256), CenterCrop(224), ToTensor(),Normalize([0.485, 0.456, 0.406], [0.229, 0.224, 0.225])])image = Image.open('banana.png').convert('RGB')
tv_data = tv_transform(image)
Forward through the model
## IMPORTANT: set the classifier to eval mode
classifier.eval()imgs = data['img'].unsqueeze(0)
imgs = tv_data.unsqueeze(0)with torch.no_grad():# class probabilitiesprob = classifier.forward_test(imgs)[0]# featuresfeat = classifier.extract_feat(imgs, stage='neck')[0]print(len(prob))
print(prob.argmax().item())
print(feat.shape)
1000
954
torch.Size([1, 1280])
3.使用MMClassificaiton完整进行水果分类实战:
数据集下载:
GitHub - TommyZihao/MMClassification_Tutorials: Jupyter notebook tutorials for MMClassificationJupyter notebook tutorials for MMClassification. Contribute to TommyZihao/MMClassification_Tutorials development by creating an account on GitHub.https://github.com/TommyZihao/MMClassification_Tutorials
代码框架:
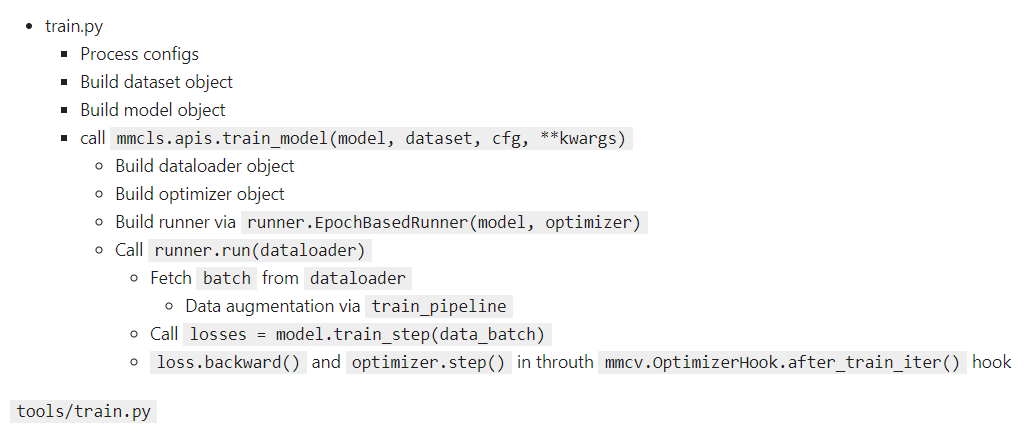
def main():model = build_classifier(cfg.model)model.init_weights()datasets = [build_dataset(cfg.data.train)]train_model(model,datasets,cfg,distributed=distributed,validate=(not args.no_validate),timestamp=timestamp,device=cfg.device,meta=meta)
mmcls/apis/train_model.pydef train_model(model,dataset,cfg):data_loaders = [build_dataloader(ds, **train_loader_cfg) for ds in dataset]optimizer = build_optimizer(model, cfg.optimizer)runner = build_runner(cfg.runner,default_args=dict(model=model,optimizer=optimizer))runner.register_training_hooks(cfg.lr_config,optimizer_config,cfg.checkpoint_config,cfg.log_config,cfg.get('momentum_config', None),custom_hooks_config=cfg.get('custom_hooks', None))runner.run(data_loaders, cfg.workflow)
mmcv/runner/epoch_based_runner.pyclass EpochBasedRunner(BaseRunner):def run_iter(self, data_batch: Any, train_mode: bool, **kwargs) -> None:if train_mode:outputs = self.model.train_step(data_batch, self.optimizer, **kwargs)else:outputs = self.model.val_step(data_batch, self.optimizer, **kwargs)self.outputs = outputsdef train(self, data_loader, **kwargs):self.model.train()self.data_loader = data_loaderfor i, data_batch in enumerate(self.data_loader):self.run_iter(data_batch, train_mode=True, **kwargs)self.call_hook('after_train_iter')
mmcls/models/classifiers/base.pyclass BaseClassifier(BaseModule, metaclass=ABCMeta):def forward(self, img, return_loss=True, **kwargs):"""Calls either forward_train or forward_test depending on whetherreturn_loss=True.Note this setting will change the expected inputs. When`return_loss=True`, img and img_meta are single-nested (i.e. Tensor andList[dict]), and when `resturn_loss=False`, img and img_meta should bedouble nested (i.e.  List[Tensor], List[List[dict]]), with the outerlist indicating test time augmentations."""if return_loss:return self.forward_train(img, **kwargs)else:return self.forward_test(img, **kwargs)def train_step(self, data, optimizer=None, **kwargs):losses = self(**data)loss, log_vars = self._parse_losses(losses)outputs = dict(loss=loss, log_vars=log_vars, num_samples=len(data['img'].data))return outputs
mmcls/models/classifiers/image.pyclass ImageClassifier(BaseClassifier):def __init__(self,backbone,neck=None,head=None,pretrained=None,train_cfg=None,init_cfg=None):super(ImageClassifier, self).__init__(init_cfg)if pretrained is not None:self.init_cfg = dict(type='Pretrained', checkpoint=pretrained)self.backbone = build_backbone(backbone)if neck is not None:self.neck = build_neck(neck)if head is not None:self.head = build_head(head)def extract_feat(self, img):x = self.backbone(img)if self.with_neck:x = self.neck(x)return xdef forward_train(self, img, gt_label, **kwargs):x = self.extract_feat(img)losses = dict()loss = self.head.forward_train(x, gt_label)losses.update(loss)return losses
mmcv/runner/hooks/optimizer.pyclass OptimizerHook(Hook):def after_train_iter(self, runner):runner.optimizer.zero_grad()runner.outputs['loss'].backward()runner.optimizer.step()
总结:本篇主要偏向图像分类实战部分,使用MMclassification工具进行代码应用,熟悉其框架应用,为后续处理不同场景下分类问题提供帮助。
本文参考:GitHub - wangruohui/sjtu-openmmlab-tutorial
相关文章:

计算机视觉框架OpenMMLab开源学习(三):图像分类实战
前言:本篇主要偏向图像分类实战部分,使用MMclassification工具进行代码应用,最后对水果分类进行实战演示,本次环境和代码配置部分省略,具体内容建议参考前一篇文章:计算机视觉框架OpenMMLab开源学习&#x…...

awk命令
一.介绍 awk是专门为文本处理设计的编程语言,是一门数据驱动的编程语言。与sed类似,都是以数据驱动的行处理软件,主要用于数据扫描,过滤和汇总。数据可以来自于标准输入,管道或者文件。 二.语法 awk是一种处理文本文件…...

LocalDateTime获取时间的年、月、日、时、分、秒、纳秒
如何把String/Date转成LocalDateTime参考String、Date与LocalDate、LocalTime、LocalDateTime之间互转 String、Date、LocalDateTime、Calendar与时间戳之间互相转化参考String、Date、LocalDateTime、Calendar与时间戳之间互相转化 方法介绍 getYear() 获取日期的年 getMon…...
MoveIT Rviz和Gazebo联合仿真
文章目录环境安装概述ros_control框架ros_control数据流文件配置附加工具故障问题解决参考接前两篇:ROS MoveIT1(Noetic)安装总结 Solidworks导出为URDF用于MoveIT总结(带prismatic) MoveIT1 Assistant 总结 环境 Ubu…...
-DS18B20数码管显示温度)
ESP32S2(12K)-DS18B20数码管显示温度
一、物料清单: NODEMCU-32-S2 (ESP32-12K)四段数码管(共阴)DS18B20(VCC/DQ/GND)Arduino-IDE 2.0.3二、实现方法及效果图: 2.1 引用库 // #include <OneWire.h> //可以不引入,因为DallasTemperature.h中已经引入了OneWire.h #include <DallasTemperature.h>#…...

linux栈溢出定位
一、编译选项定位堆栈溢出 来源:堆栈溢出检测机制 - SkrSky - 博客园 1、栈溢出可能打印 unhandled level 1 translation fault (11) at 0x7f8d0347, esr 0x92000005 2、栈溢出保护机制 gcc提供了栈保护机制stack-protector(编译选项-fstack-protec…...

CSS基础:选择器和声明样式
CSS概念 CSS(Cascading Style Sheets)层叠样式表,又叫级联样式表,简称样式表 CSS用于HTML文档中元素样式的定义 使用css让网页具有美观一致的页面 语法 CSS 规则由两个主要的部分构成:选择器和声明样式 选择器通常…...

VS中安装gismo库
文章目录前言一、下载安装paraview直接下载压缩包安装就可以了解压后按步骤安装即可二、gismo库的安装gismo库网址第一种方法:第二种方法第三种方法:用Cmake软件直接安装首先下载cmake软件[网址](https://cmake.org/download/)安装gismo库三、gismo库的使…...
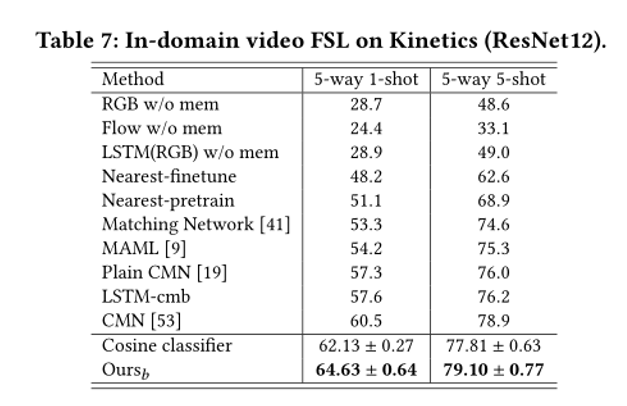
元学习方法解决CDFSL以及两篇SOTA论文讲解
来源:投稿 作者:橡皮 编辑:学姐 带你学习跨域小样本系列1-简介篇 跨域小样本系列2-常用数据集与任务设定详解 跨域小样本系列3:元学习方法解决CDFSL以及两篇SOTA论文讲解(本篇) 跨域小样本系列4…...
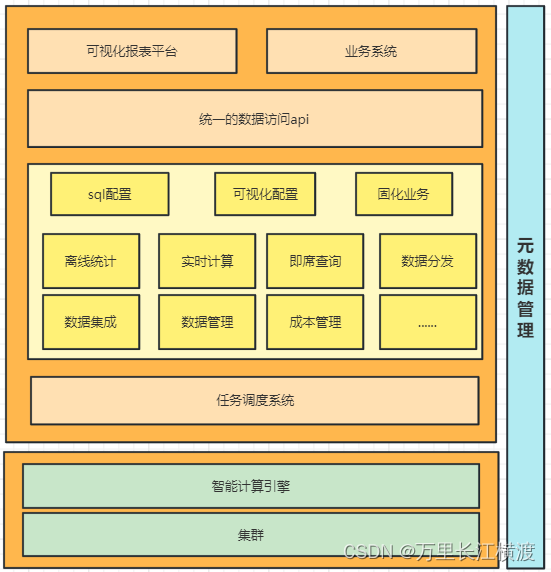
大数据之------------数据中台
一、什么是数据中台 **数据中台是指通过数据技术,对海量数据进行采集、计算、存储、加工,同时统一标准和口径。**数据中台的目标是让数据持续用起来,通过数据中台提供的工具、方法和运行机制,把数据变为一种服务能力,…...

Python 中 字符串是什么?
字符串是 Python 中最常用的数据类型。我们可以使用引号 ( ’ 或 " ) 来创建字符串。 创建字符串很简单,只要为变量分配一个值即可。例如: var1 ‘Hello World!’ var2 “Python Runoob” Python 访问字符串中的值 Python 不支持单字符类型&…...

OJ刷题Day1 · 一维数组的动态和 · 将数字变成 0 的操作次数 · 最富有的客户资产总量 · Fizz Buzz · 链表的中间结点 · 赎金信
一、一维数组的动态和二、将数字变成 0 的操作次数三、最富有的客户资产总量四、Fizz Buzz五、链表的中间结点六、赎金信一、一维数组的动态和 给你一个数组 nums 。数组「动态和」的计算公式为:runningSum[i] sum(nums[0]…nums[i]) 。 请返回 nums 的动态和。 示…...

【数据结构】栈——必做题
逆波兰表达式后缀表达式的出现是为了方便计算机处理,它的运算符是按照一定的顺序出现,所以求值过程中并不需要使用括号来指定运算顺序,也不需要考虑运算符号(比如加减乘除)的优先级。先介绍中简单的人工转化方法&#…...

LearnOpenGL 笔记 - 入门 04 你好,三角形
系列文章目录 LearnOpenGL 笔记 - 入门 01 OpenGLLearnOpenGL 笔记 - 入门 02 创建窗口LearnOpenGL 笔记 - 入门 03 你好,窗口 文章目录系列文章目录前言你好,三角形顶点输入顶点着色器(Vertex Shader)编译着色器片段着色器&…...

keepalived+mysql高可用
一.设置mysql同步信息两节点安装msyql略#配置节点11.配置权限允许远程访问mysql -u root -p grant all on *.* to root% identified by Root1212# with grant option; flush privileges;2.修改my.cnf#作为主节点配置(节点1)#作为主节点配置 server-id 1 …...
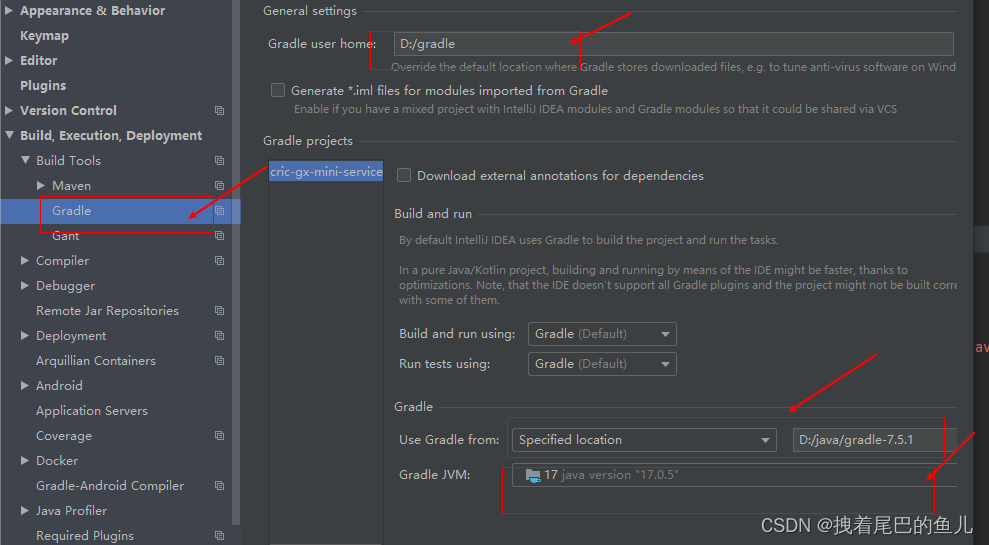
JAVA工具篇--1 Idea中 Gradle的使用
前言: 既然我们已经使用Maven 来完成对项目的构建,为什么还要使用Gradle 进行项目的构建;gradle和maven都可以作为java程序的构建工具,但两者还是有很大的不同之处的:1.可扩展性,gradle比较灵活,…...
弄懂自定义 Hooks 不难,改变开发认知有点不习惯
前言 我之前总结逻辑重用的时候,就一直在思考一个问题。 对于逻辑复用,render props 和 高阶组件都可以实现,同样官方说 Hooks 也可以实现,且还是在不增加额外的组件的情况下。 但是我在项目代码中,没有找到自定义 …...

Java面向对象基础
文章目录面向对象类注意事项内存机制构造器this关键字封装javabean格式成员变量和局部变量区别static静态关键字使用成员方法使用场景内存机制注意事项static应用:工具类static应用:代码块静态代码块实例代码块(用的比较少)static…...

基于python下selenium库实现交互式图片保存操作(批量保存浏览器中的图片)
Selenium是最广泛使用的开源Web UI(用户界面)自动化测试套件之一,可以通过编程与浏览量的交互式操作对网页进行自动化控制。基于这种操作进行数据保存操作,尤其是在图像数据的批量保存上占据优势。本博文基于selenium 与jupyterla…...
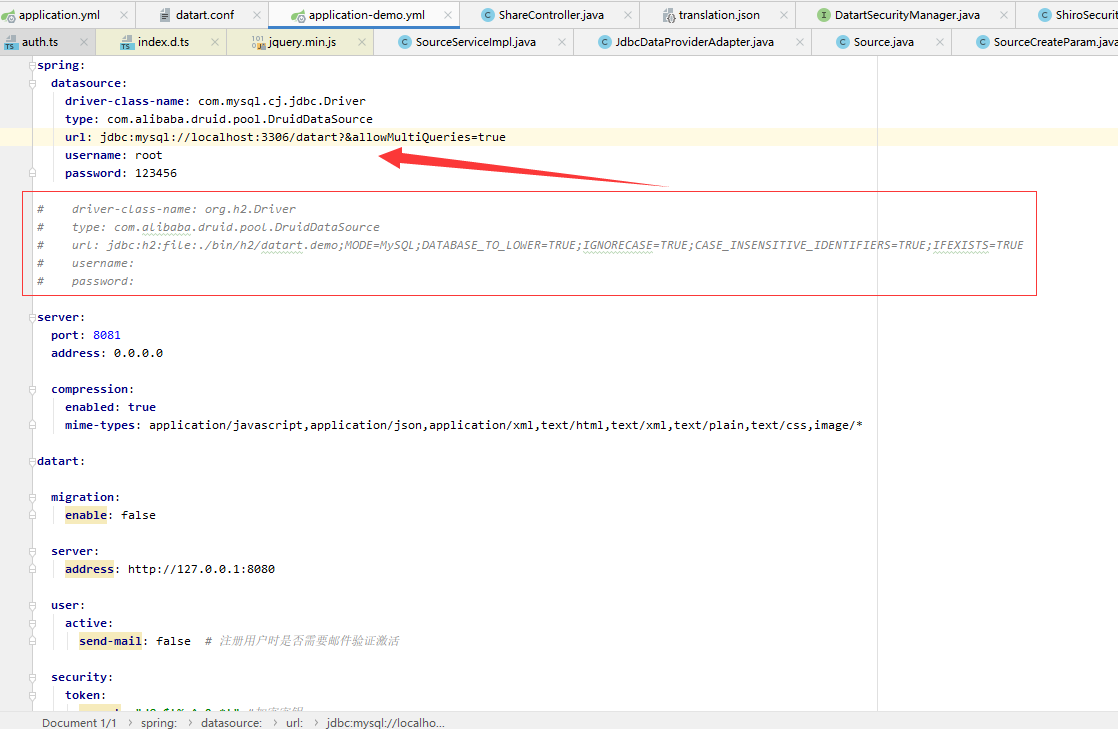
一:Datart的下载、本地运行
前言:本文只是个人在使用datart的一个记录,仅供参考。如果有不一样的地方,欢迎评论或私信进行交流。datart 是新一代数据可视化开放平台,支持各类企业数据可视化场景需求,如创建和使用报表、仪表板和大屏,进…...

智慧医疗能源事业线深度画像分析(上)
引言 医疗行业作为现代社会的关键基础设施,其能源消耗与环境影响正日益受到关注。随着全球"双碳"目标的推进和可持续发展理念的深入,智慧医疗能源事业线应运而生,致力于通过创新技术与管理方案,重构医疗领域的能源使用模式。这一事业线融合了能源管理、可持续发…...
)
WEB3全栈开发——面试专业技能点P2智能合约开发(Solidity)
一、Solidity合约开发 下面是 Solidity 合约开发 的概念、代码示例及讲解,适合用作学习或写简历项目背景说明。 🧠 一、概念简介:Solidity 合约开发 Solidity 是一种专门为 以太坊(Ethereum)平台编写智能合约的高级编…...
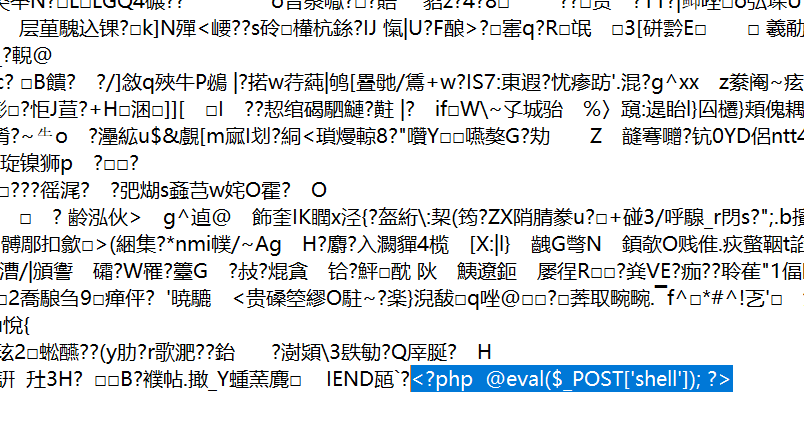
零基础在实践中学习网络安全-皮卡丘靶场(第九期-Unsafe Fileupload模块)(yakit方式)
本期内容并不是很难,相信大家会学的很愉快,当然对于有后端基础的朋友来说,本期内容更加容易了解,当然没有基础的也别担心,本期内容会详细解释有关内容 本期用到的软件:yakit(因为经过之前好多期…...
多光源(Multiple Lights))
C++.OpenGL (14/64)多光源(Multiple Lights)
多光源(Multiple Lights) 多光源渲染技术概览 #mermaid-svg-3L5e5gGn76TNh7Lq {font-family:"trebuchet ms",verdana,arial,sans-serif;font-size:16px;fill:#333;}#mermaid-svg-3L5e5gGn76TNh7Lq .error-icon{fill:#552222;}#mermaid-svg-3L5e5gGn76TNh7Lq .erro…...

安宝特案例丨Vuzix AR智能眼镜集成专业软件,助力卢森堡医院药房转型,赢得辉瑞创新奖
在Vuzix M400 AR智能眼镜的助力下,卢森堡罗伯特舒曼医院(the Robert Schuman Hospitals, HRS)凭借在无菌制剂生产流程中引入增强现实技术(AR)创新项目,荣获了2024年6月7日由卢森堡医院药剂师协会࿰…...

莫兰迪高级灰总结计划简约商务通用PPT模版
莫兰迪高级灰总结计划简约商务通用PPT模版,莫兰迪调色板清新简约工作汇报PPT模版,莫兰迪时尚风极简设计PPT模版,大学生毕业论文答辩PPT模版,莫兰迪配色总结计划简约商务通用PPT模版,莫兰迪商务汇报PPT模版,…...

【JVM】Java虚拟机(二)——垃圾回收
目录 一、如何判断对象可以回收 (一)引用计数法 (二)可达性分析算法 二、垃圾回收算法 (一)标记清除 (二)标记整理 (三)复制 (四ÿ…...
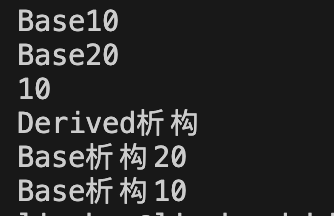
c++第七天 继承与派生2
这一篇文章主要内容是 派生类构造函数与析构函数 在派生类中重写基类成员 以及多继承 第一部分:派生类构造函数与析构函数 当创建一个派生类对象时,基类成员是如何初始化的? 1.当派生类对象创建的时候,基类成员的初始化顺序 …...
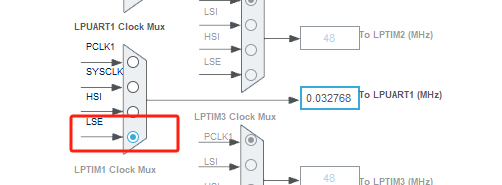
stm32wle5 lpuart DMA数据不接收
配置波特率9600时,需要使用外部低速晶振...

Java中栈的多种实现类详解
Java中栈的多种实现类详解:Stack、LinkedList与ArrayDeque全方位对比 前言一、Stack类——Java最早的栈实现1.1 Stack类简介1.2 常用方法1.3 优缺点分析 二、LinkedList类——灵活的双端链表2.1 LinkedList类简介2.2 常用方法2.3 优缺点分析 三、ArrayDeque类——高…...
