如何在任何STM32上面安装micro_ros
就我知道的:micro-ros只能在特定的昂贵的开发板上面运行,但是偶然发现了这个文章,似乎提供了一个全新的方式来在ros2和单片机之间通讯,如果能够这样肯定也能够提高效率,但即使不行,使用串口库也应该比较简单。
GitHub - lFatality/stm32_micro_ros_setup: Example of how to setup micro-ROS on any STM32 microcontroller
README.md
Setting up micro-ROS on any STM32 microcontroller
This repository gives an example of how to set up micro-ROS on any STM32 microcontroller. For this repository an STM32F429ZI was chosen but you are free to choose another one.
You can also find the instructions in video form here: https://youtu.be/xbWaHARjSmk
Goal
If you follow all steps in the tutorial you should have an STM32 microcontroller with a micro-ROS publisher that transmits messages via UART to your PC running ROS 2. Here you can receive the messages via ros2 topic echo.
Steps
In the following the required steps to achieve the goal are presented in detail. It will show how to do this for a microcontroller that is not listed as a device directly supported by micro-ROS. (看到没有:即使是不受官方支持的,也可以使用MICRO_ROS,那个官方支持的开发板实在太少,而且太贵,所以我才说成本太高,现在看来有办法降低成本了)If you find that you have problems check out the Troubleshooting section below.(如果有问题请看后面的”Trobleshooting“部分
micro-ROS
1.) Create a new CubeMx project for your micro controller
2.) In System Core -> RCC -> High Speed Clock (HSE) select Crystal/Ceramic Resonator

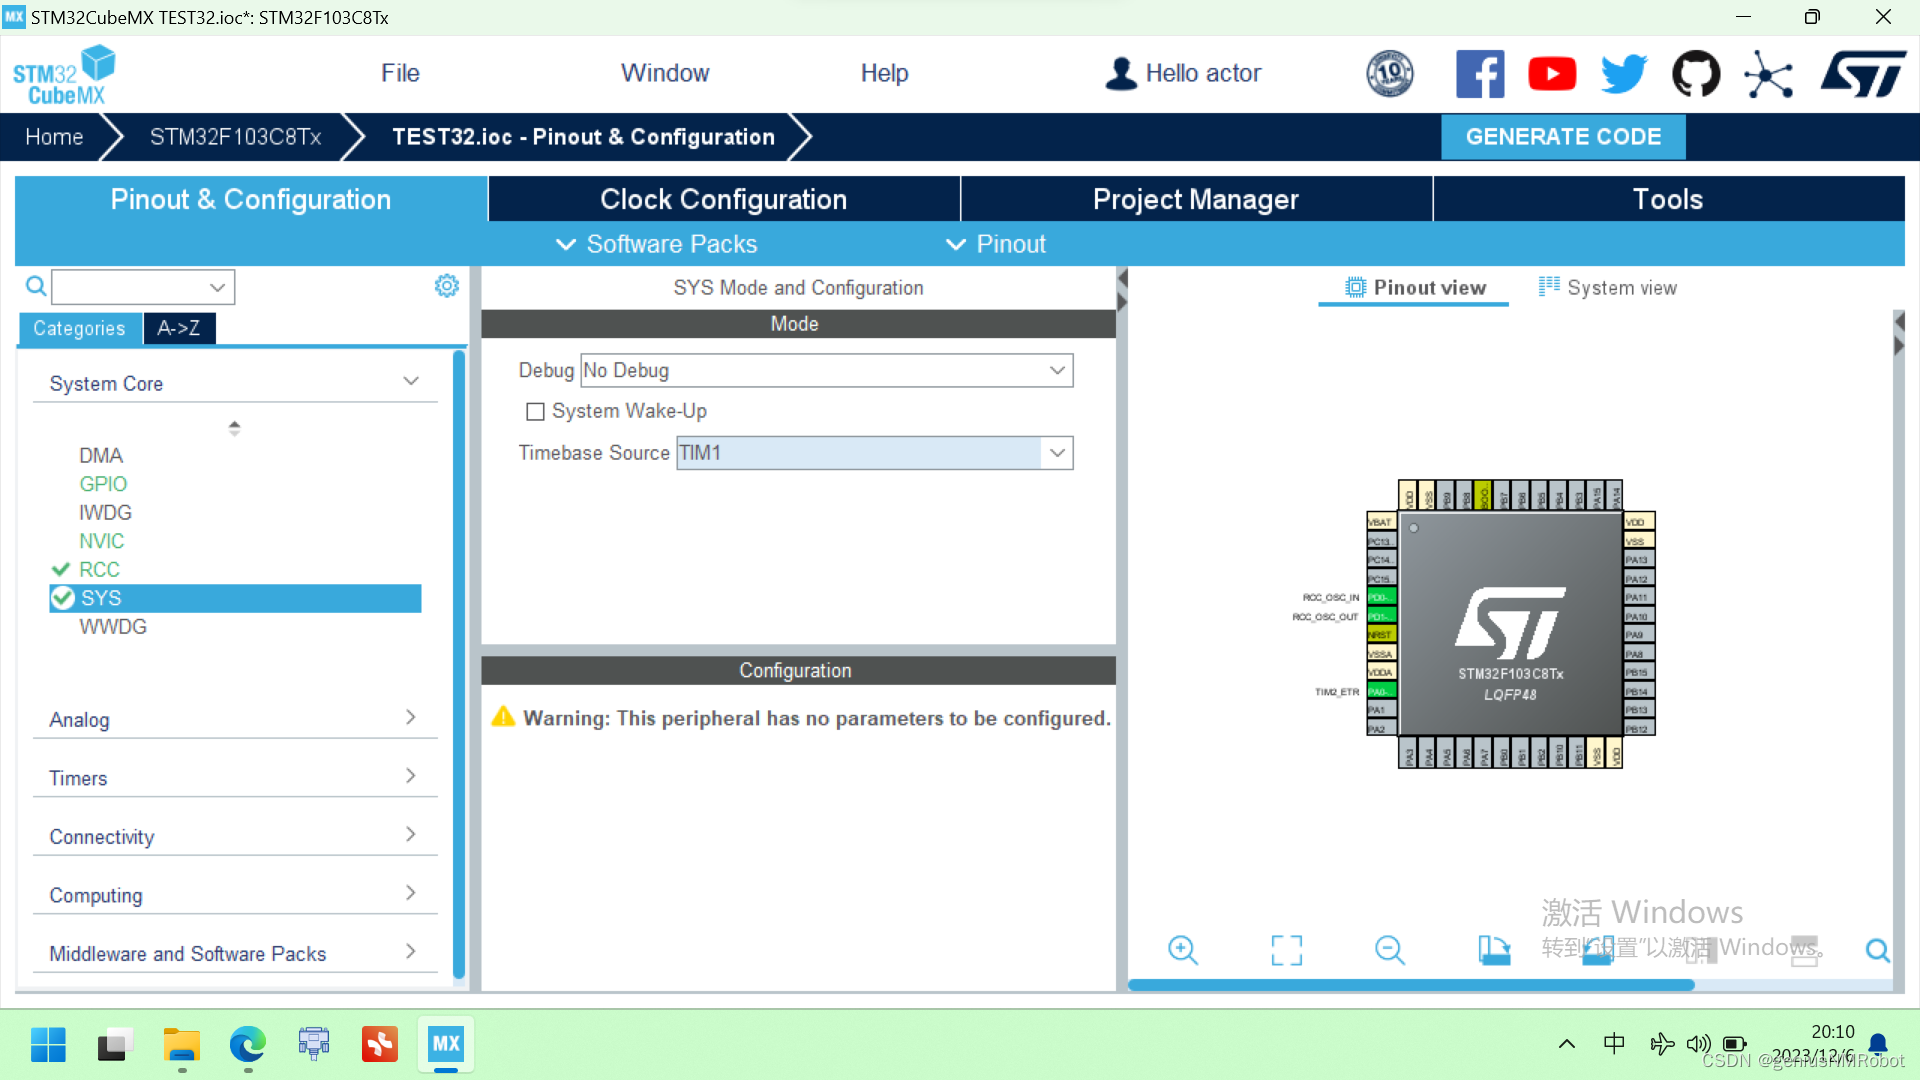
3.) In System Core -> SYS -> Timebase Source select TIM1
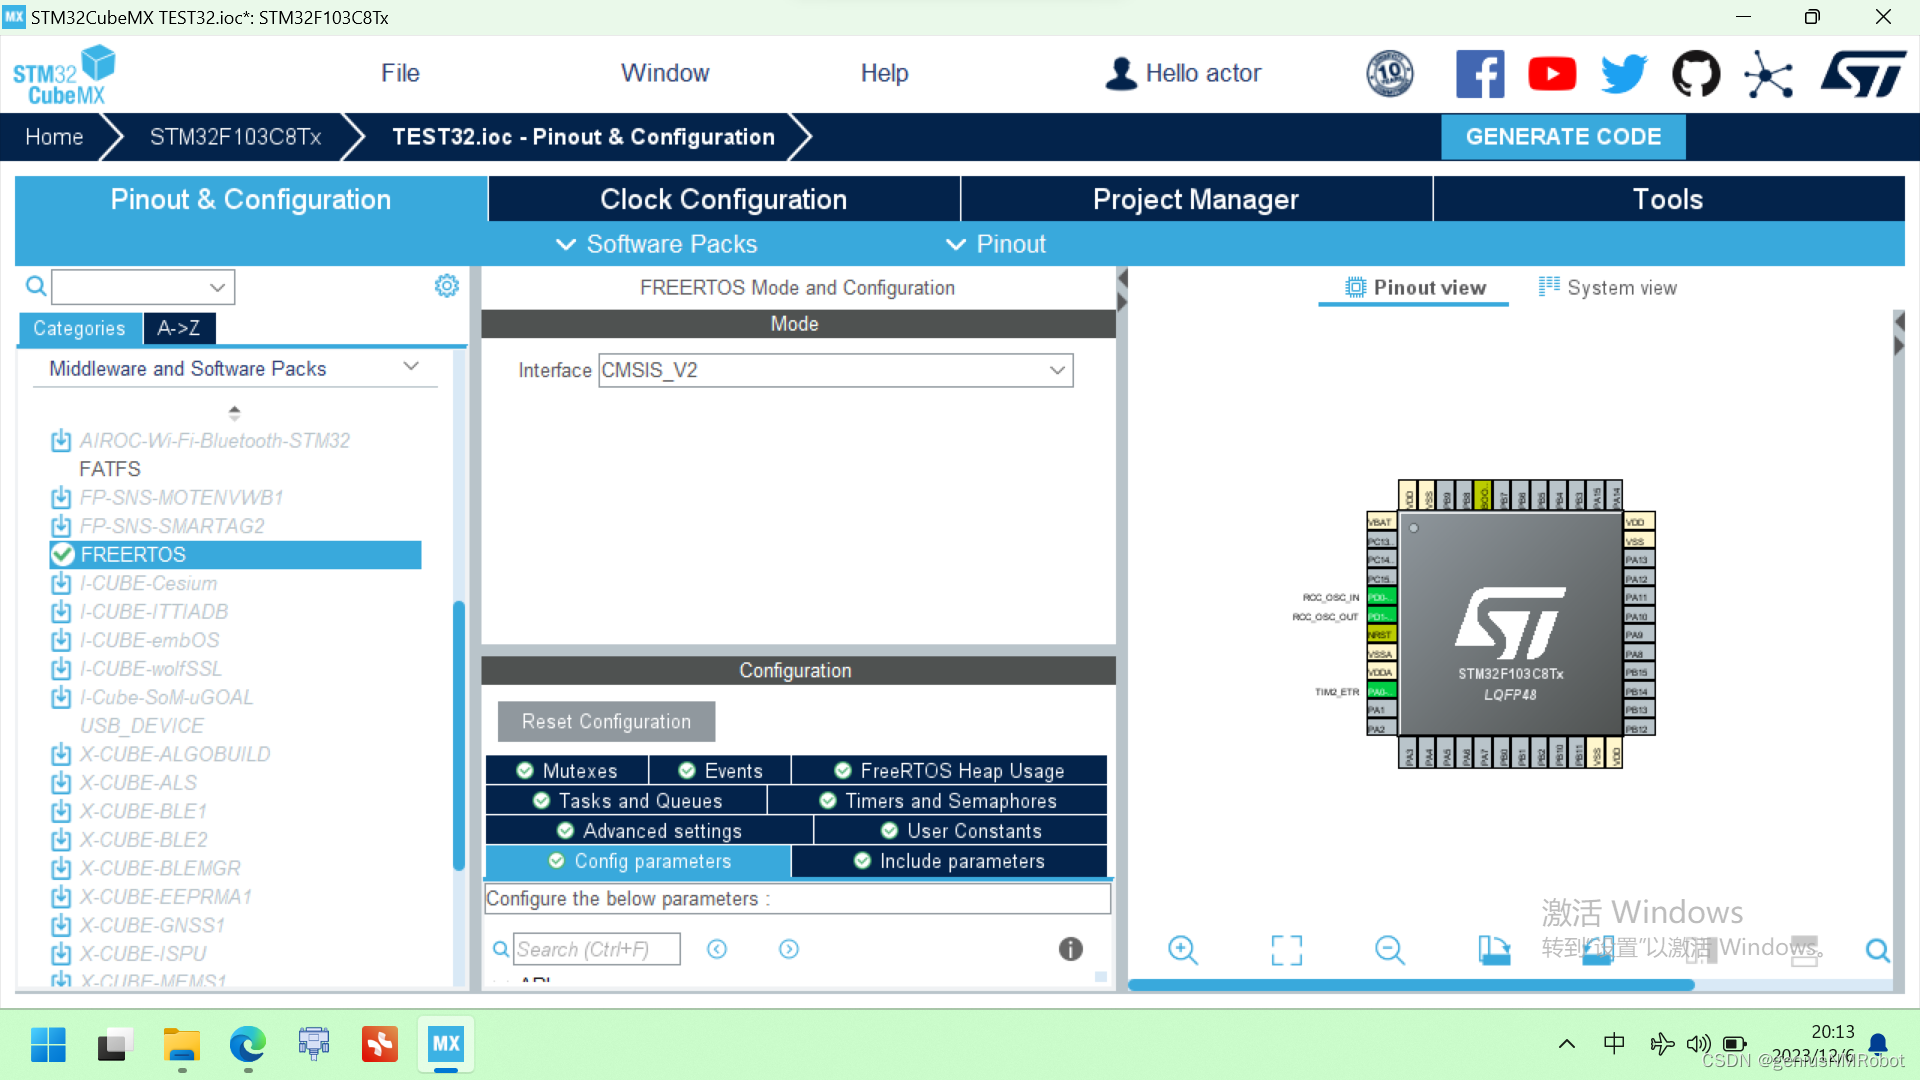
4.) In Middleware -> FREERTOS -> Interface select CMSIS_V2
4.1.) In Middleware -> FREERTOS -> Configuration -> Task and Queues double click the defaultTask and set a stack size of 3000. It has to be greater than 10.000 byte (3000 words * 4 byte = 12.000 byte).F103C8T6有20KB,明明没有超为什么不行?
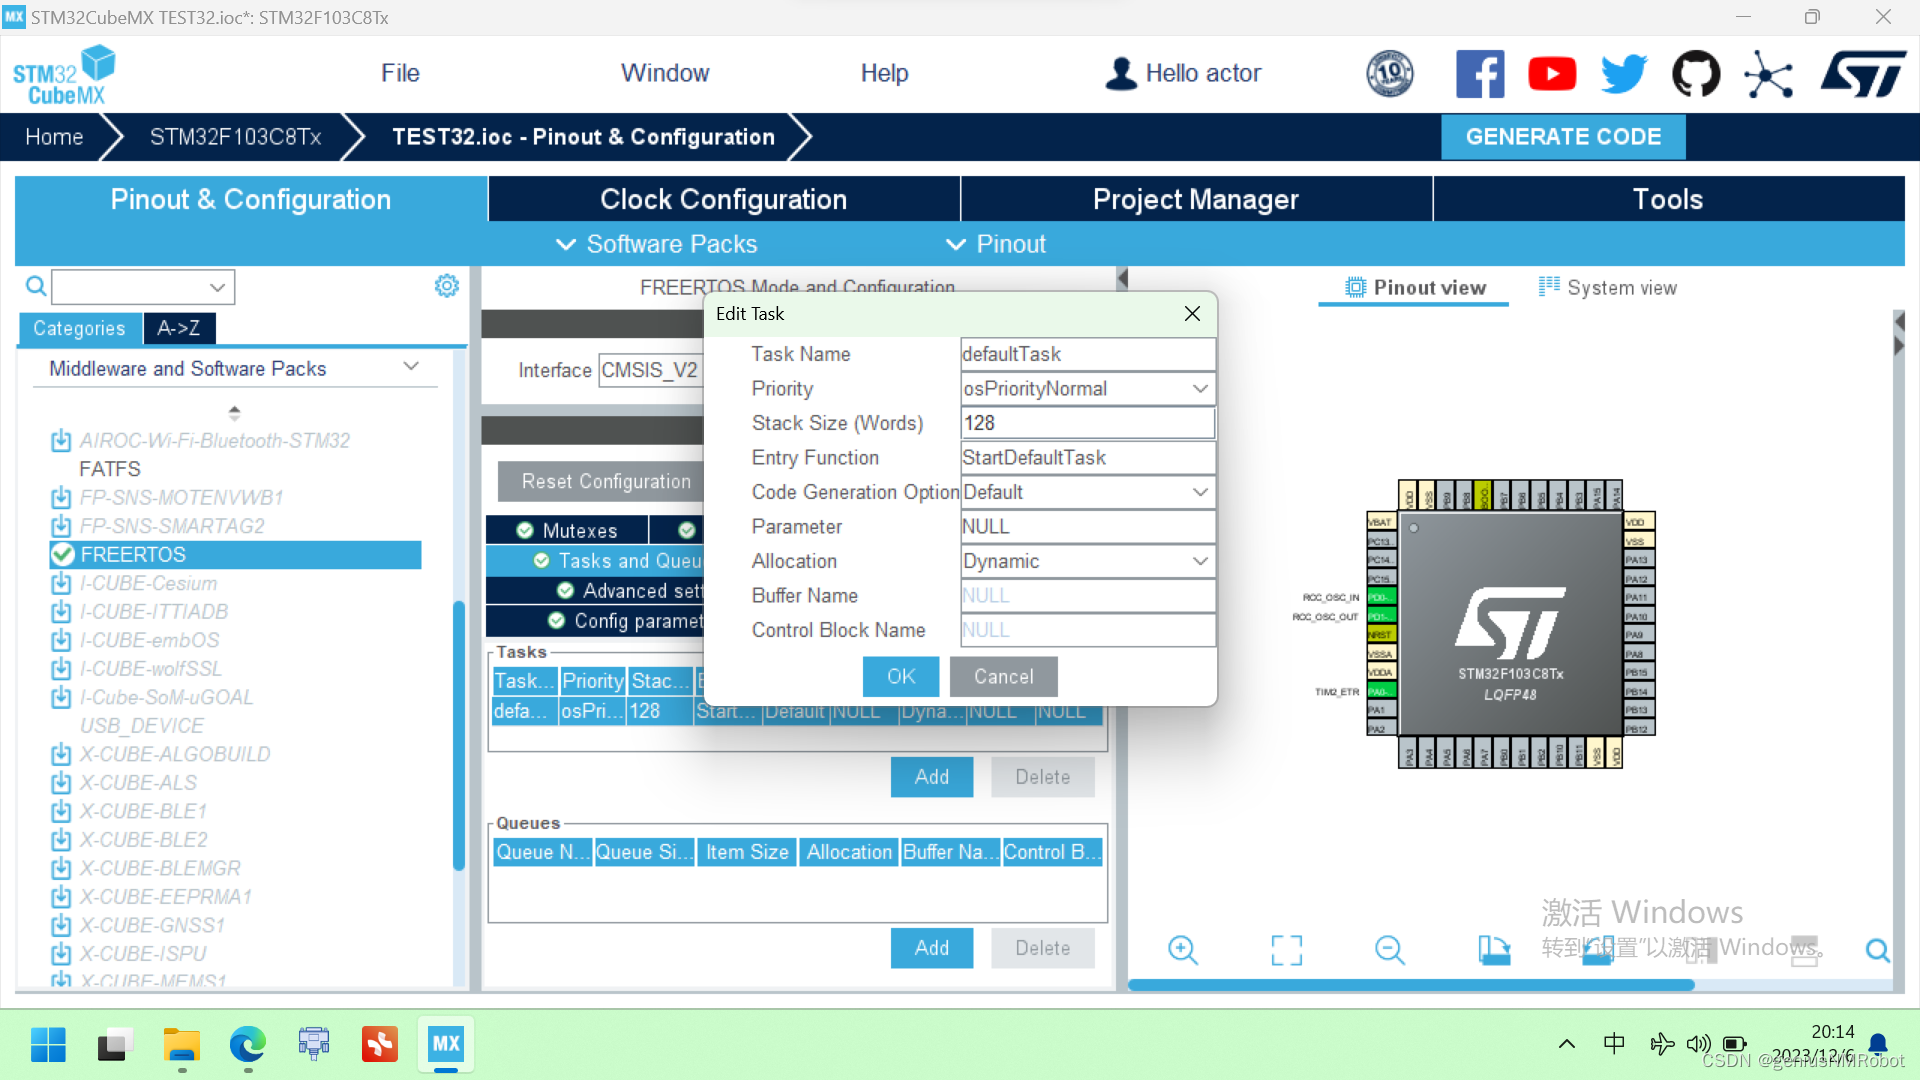

注意了:STM32C8T6在这里好像出了问题:因为这个Stack Size我感觉好像超了
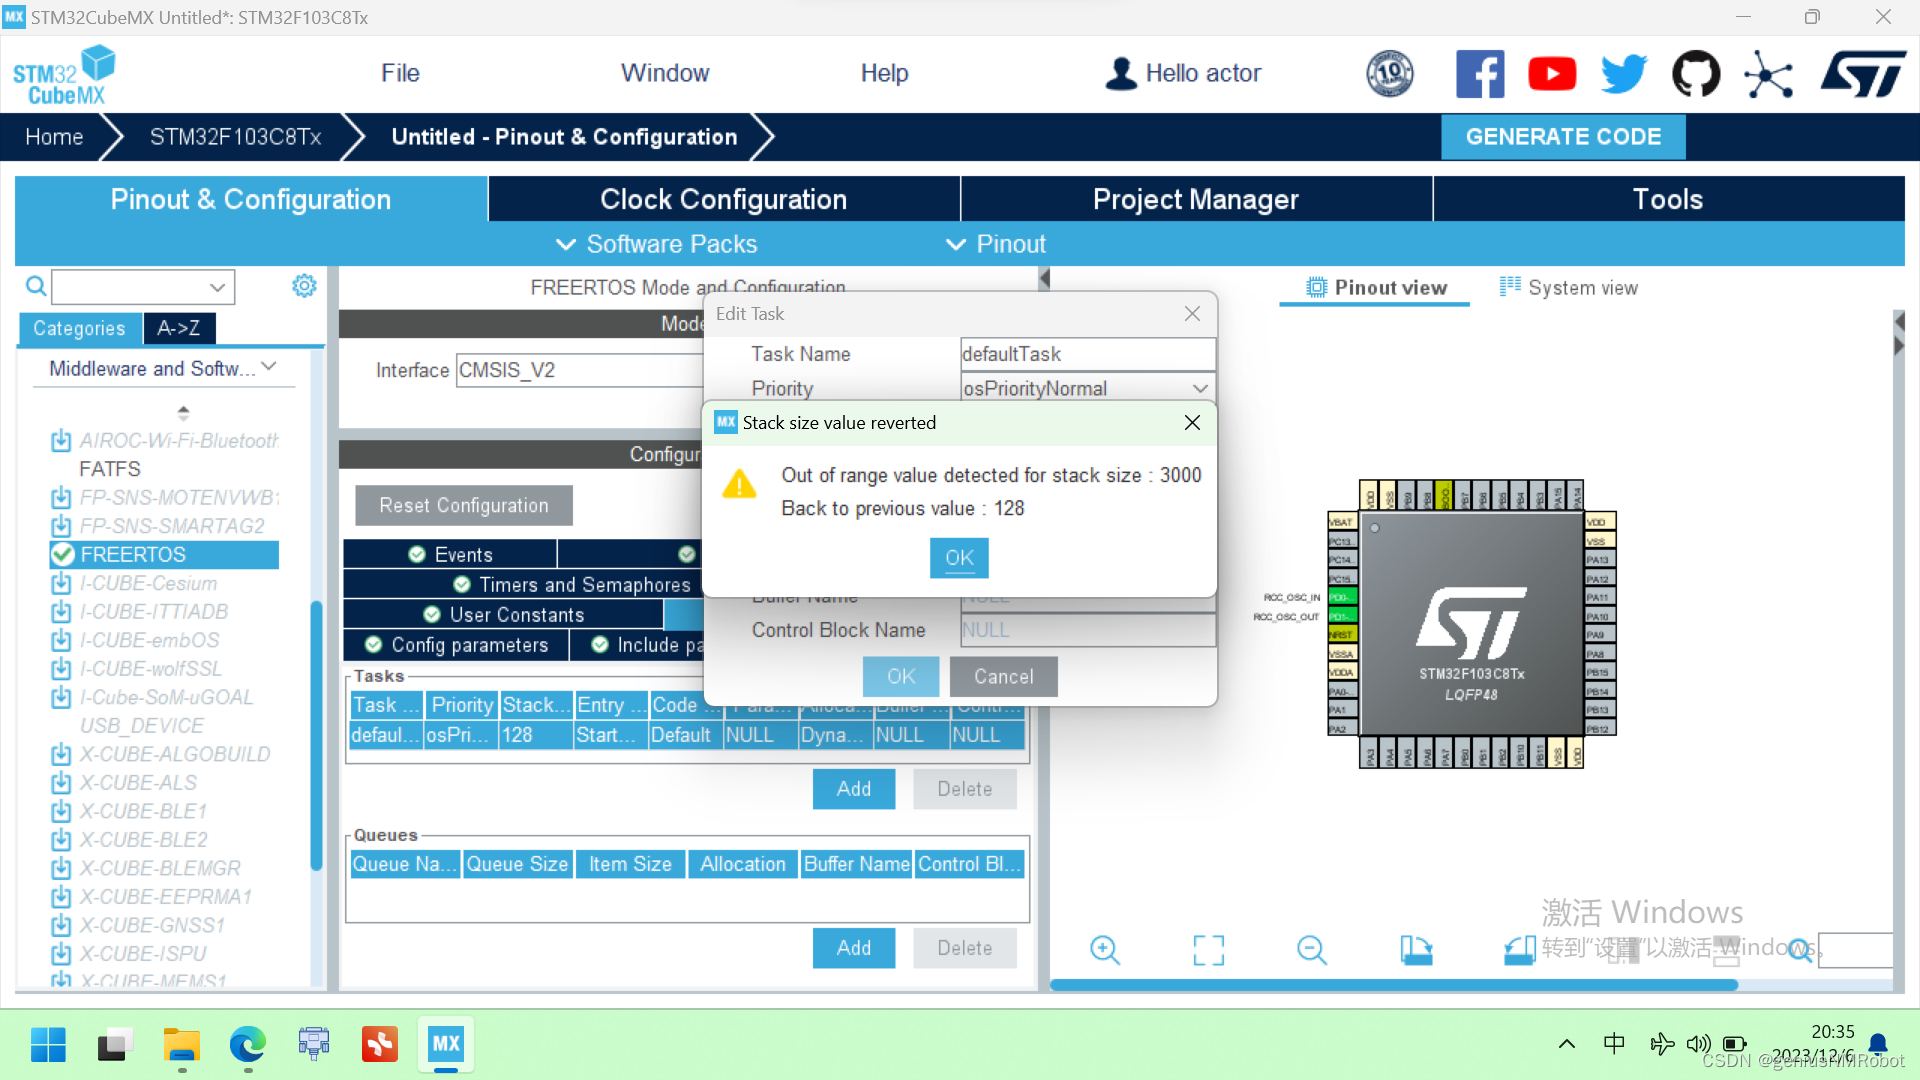
如果遇到这个问题需要首先修改堆栈大小:
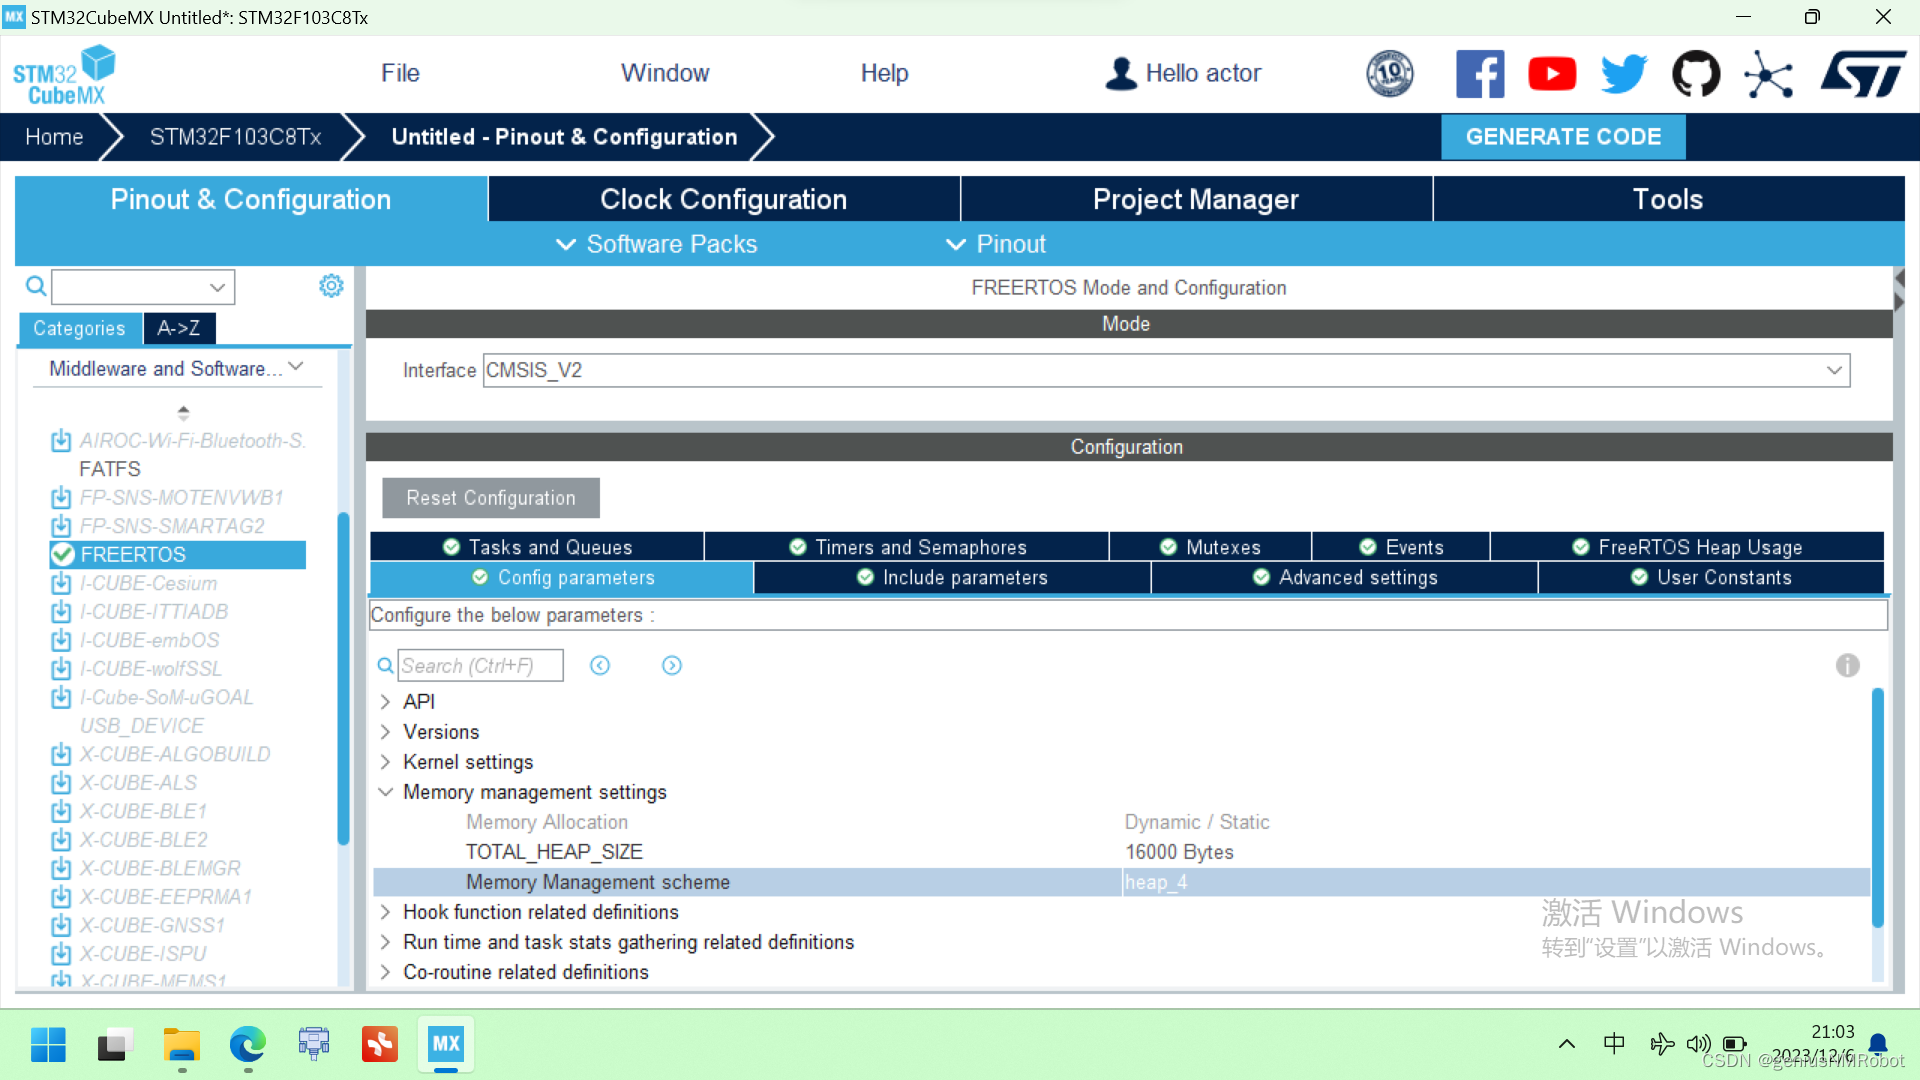
修改步骤:修改Config parmeters-->Memory management settings---->TOTAL_HEAP_SIZE设置为16000;然后就可以解决这个问题
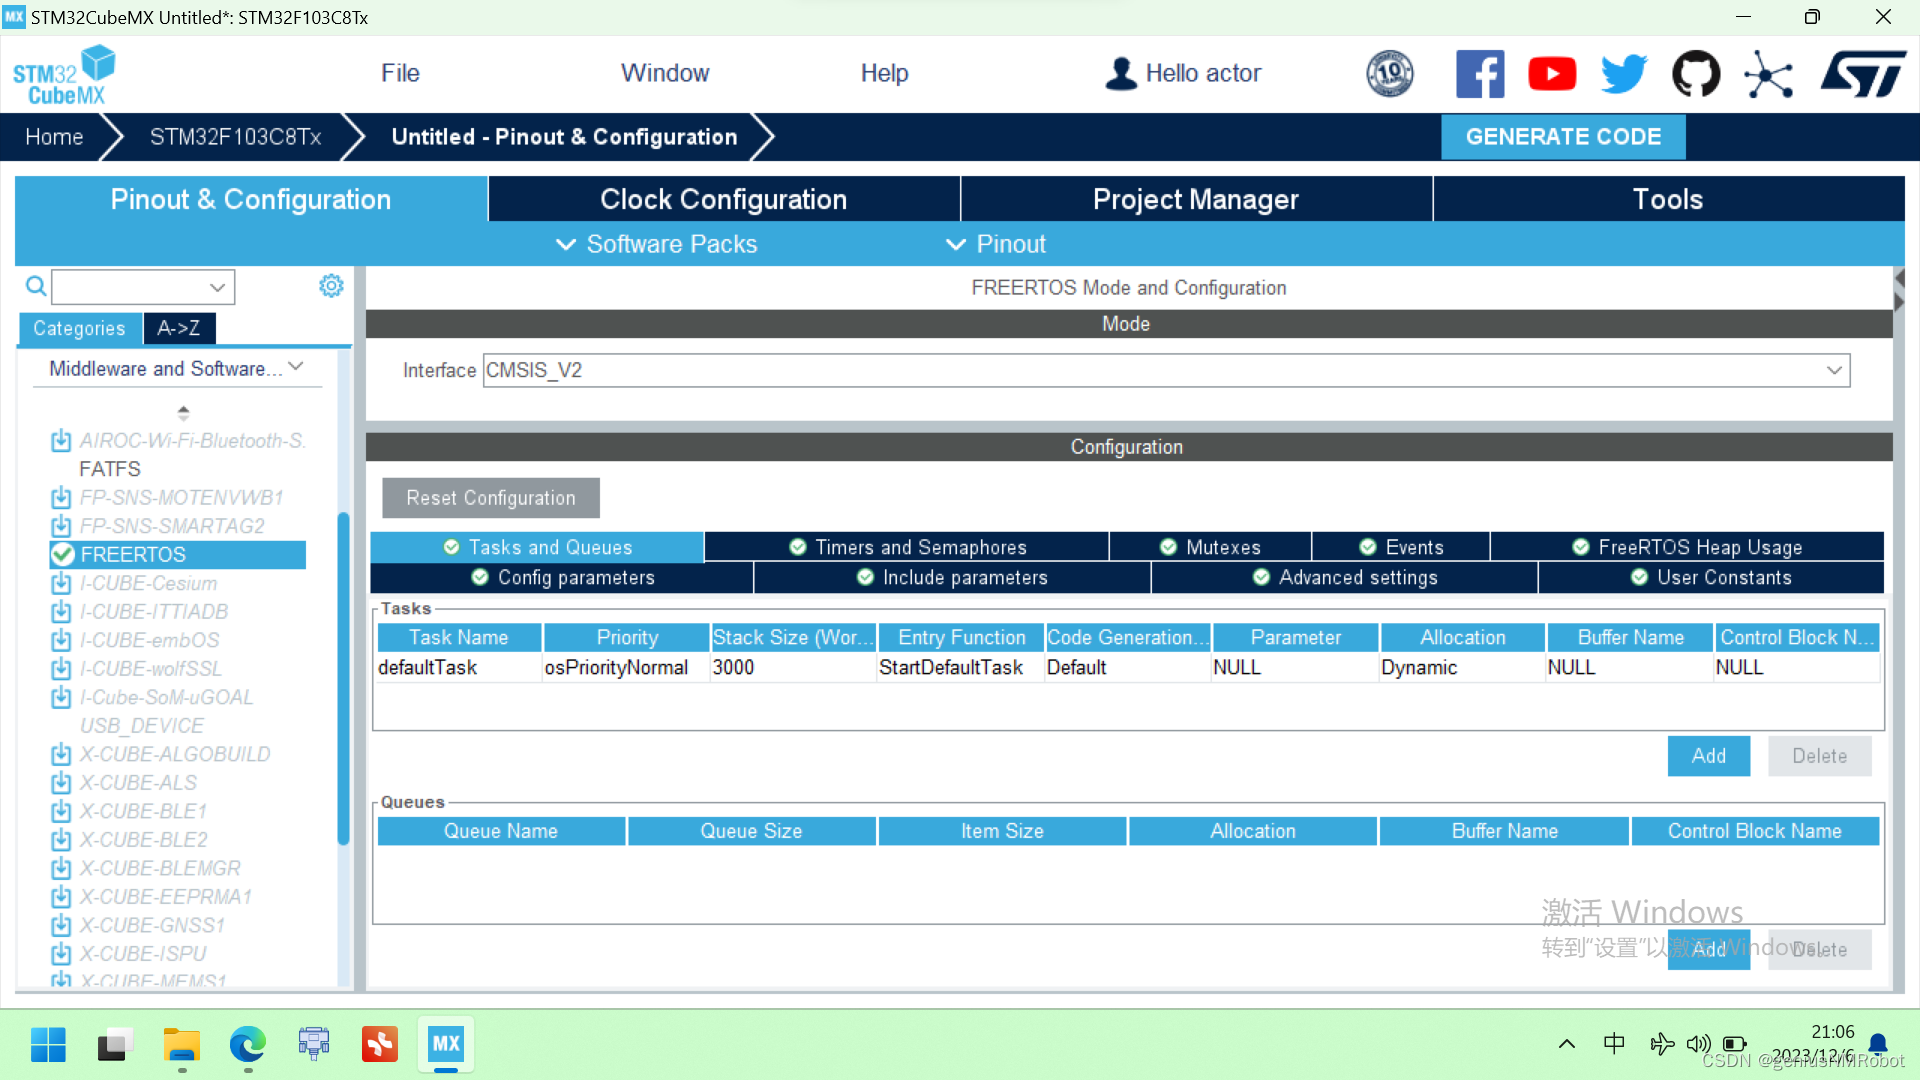
看吧已经改好了
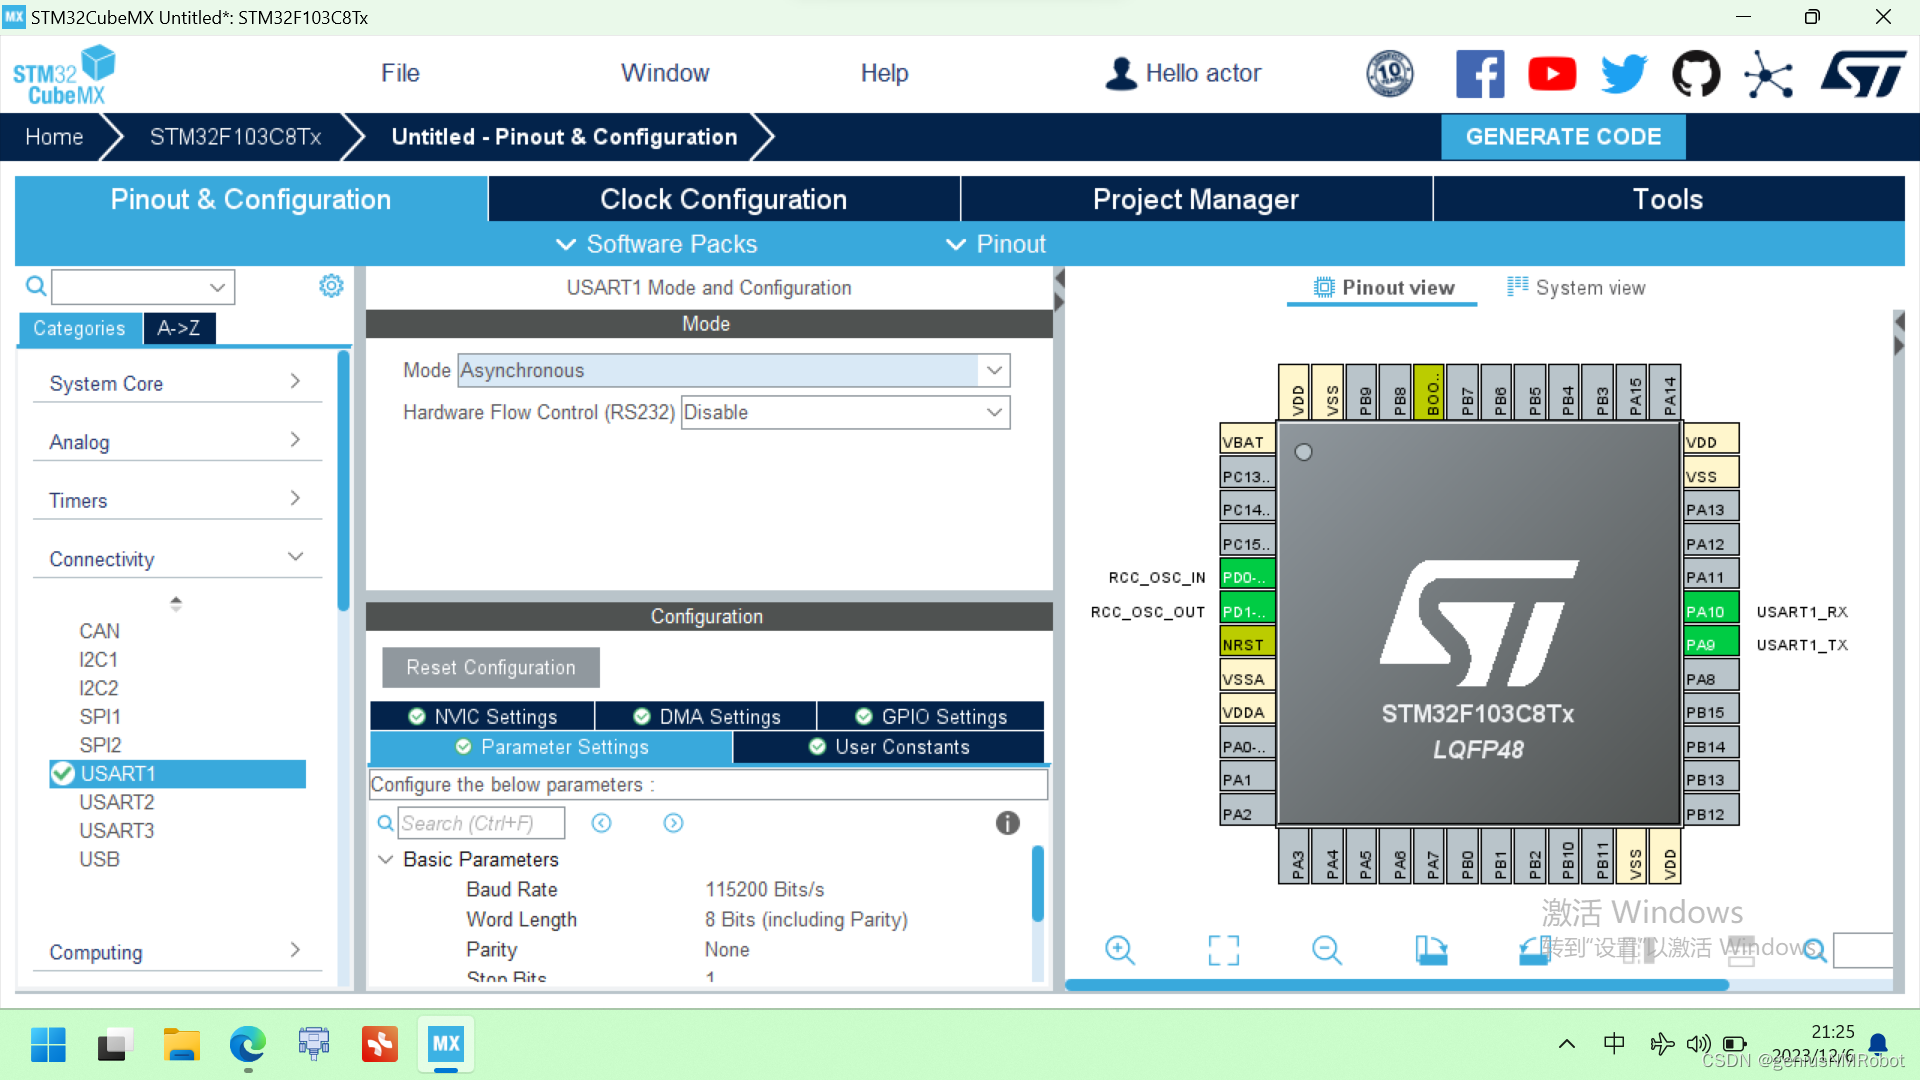
5.) In Connectivity choose the UART / USART that you want to use.
5.1.) In the Uart configuration, go to DMA Settings. Click on the Add button. Click on the Select dropdown and choose both Rx and Tx.
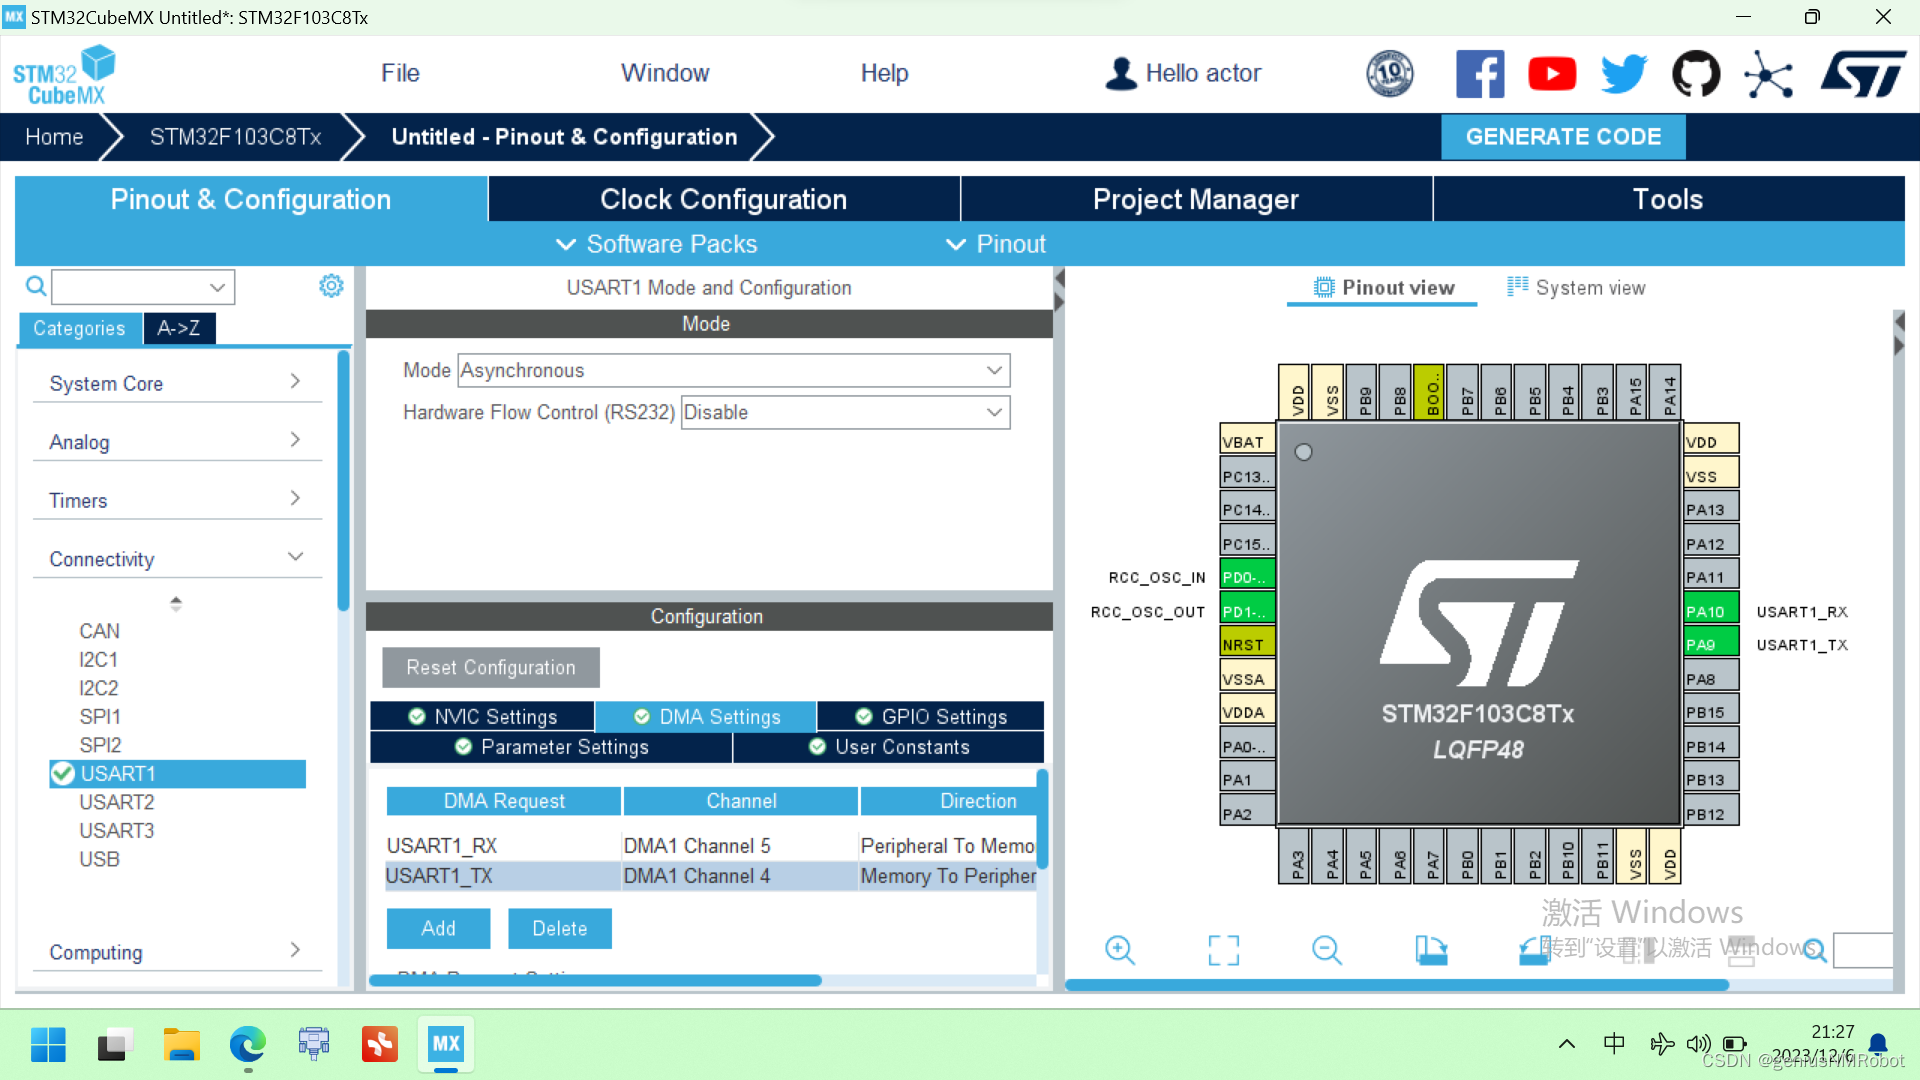
5.2.) Click on the Rx DMA you've just created and for Mode choose Circular.
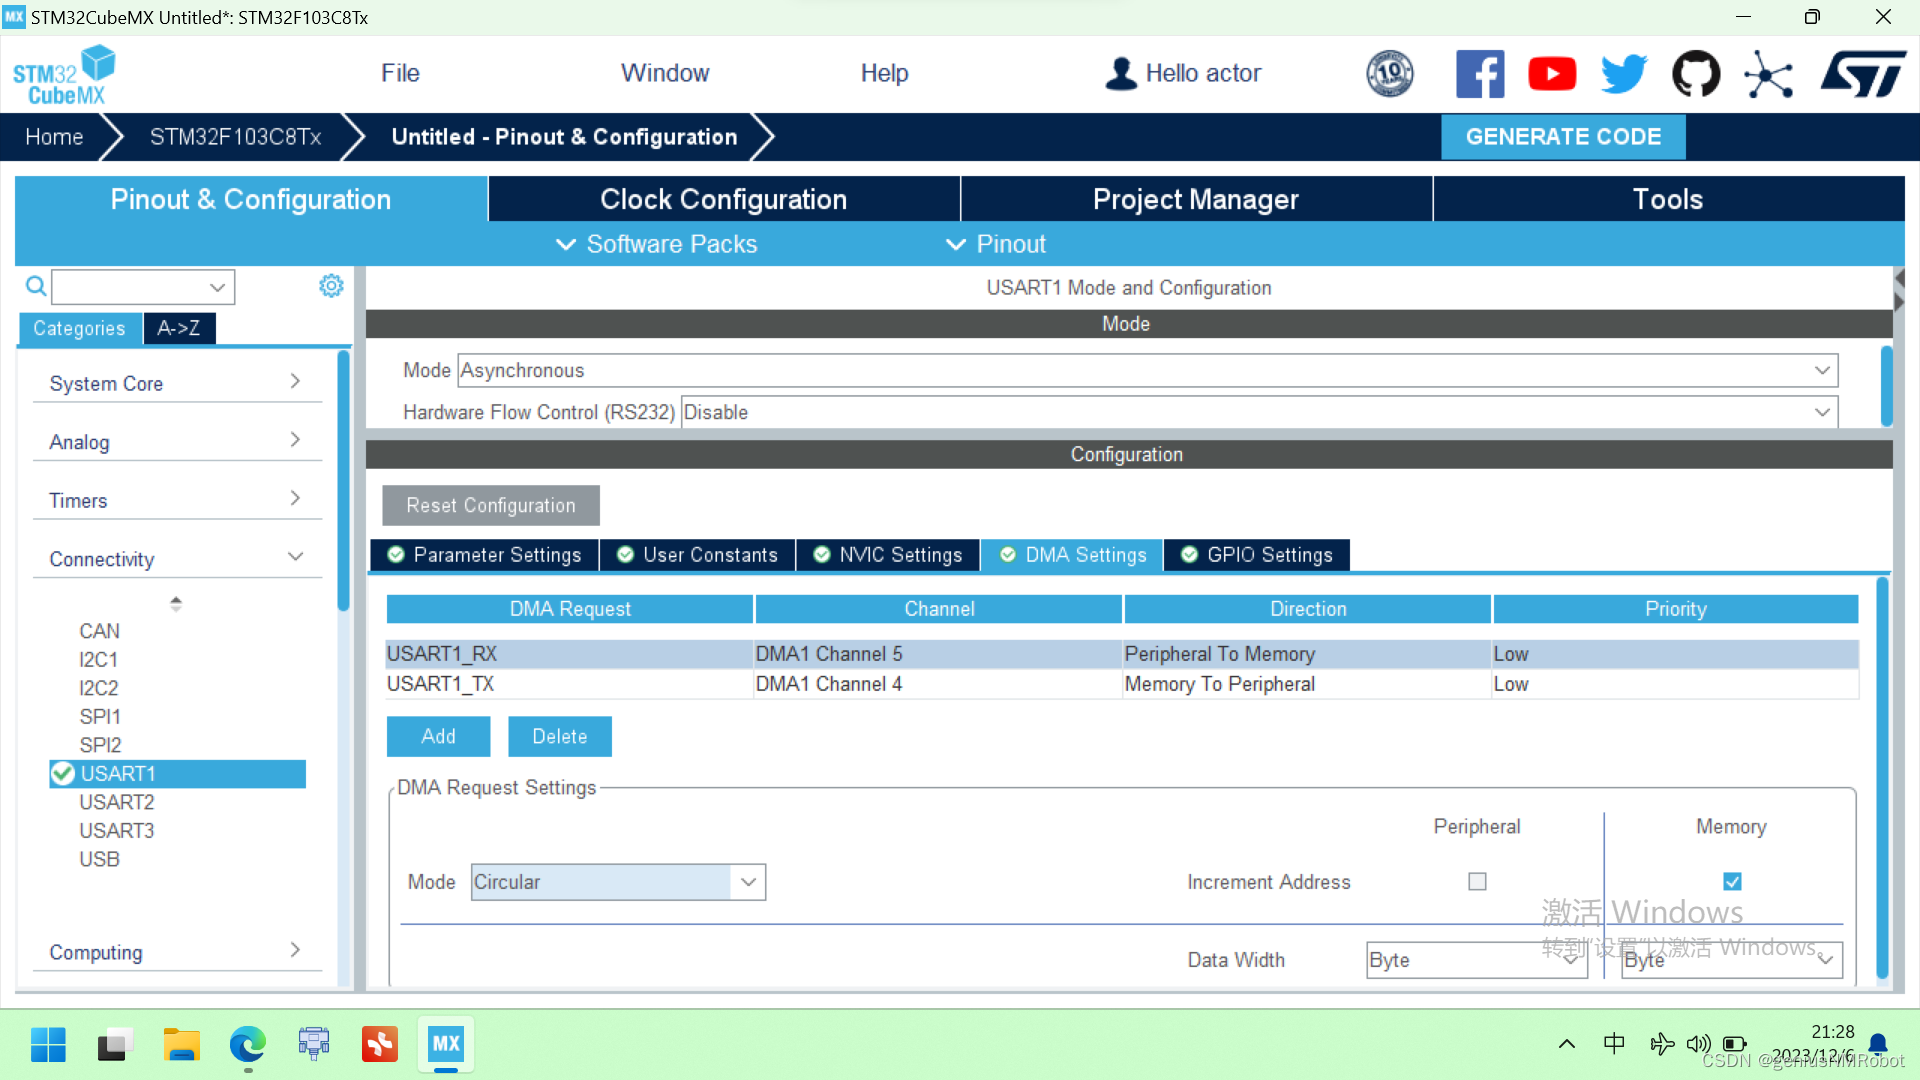
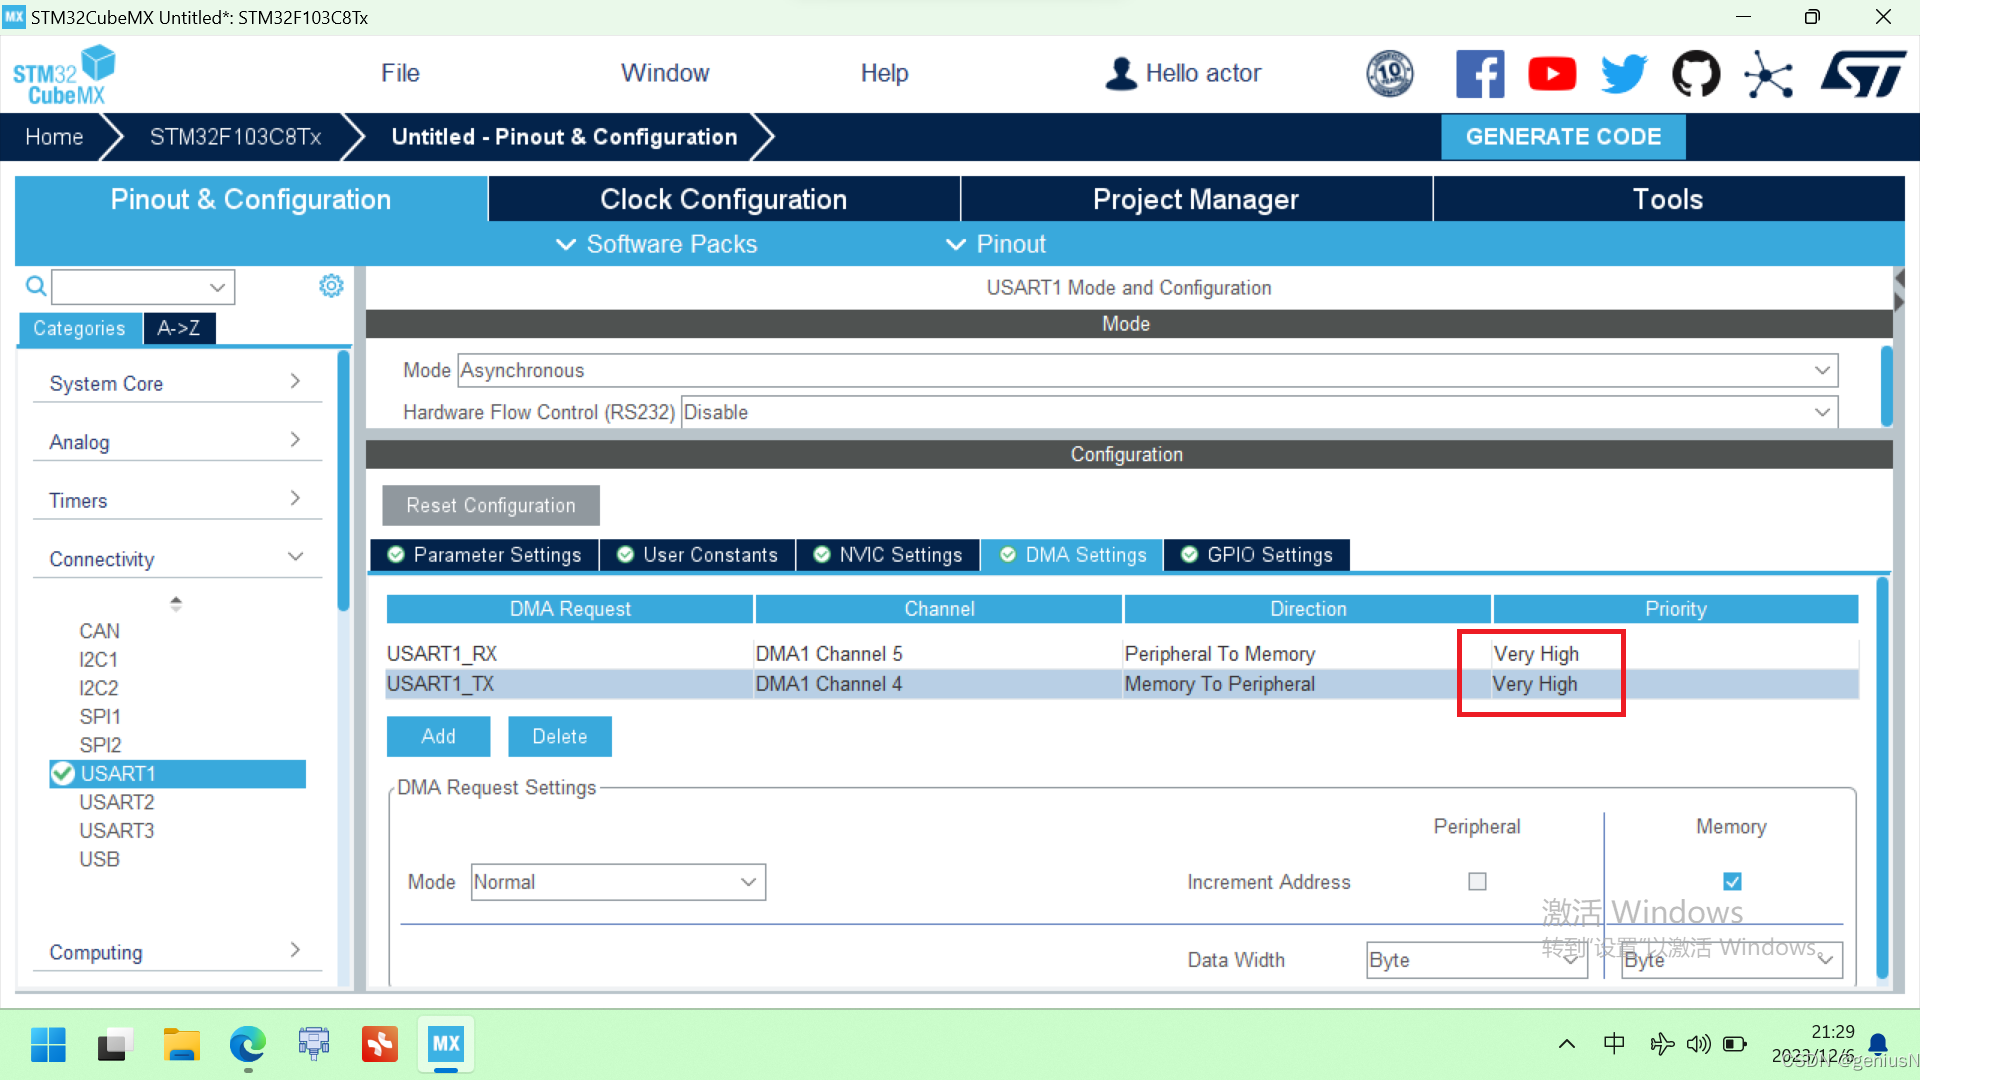
5.3.) For the priority of the DMA choose Very high for both Rx and Tx.
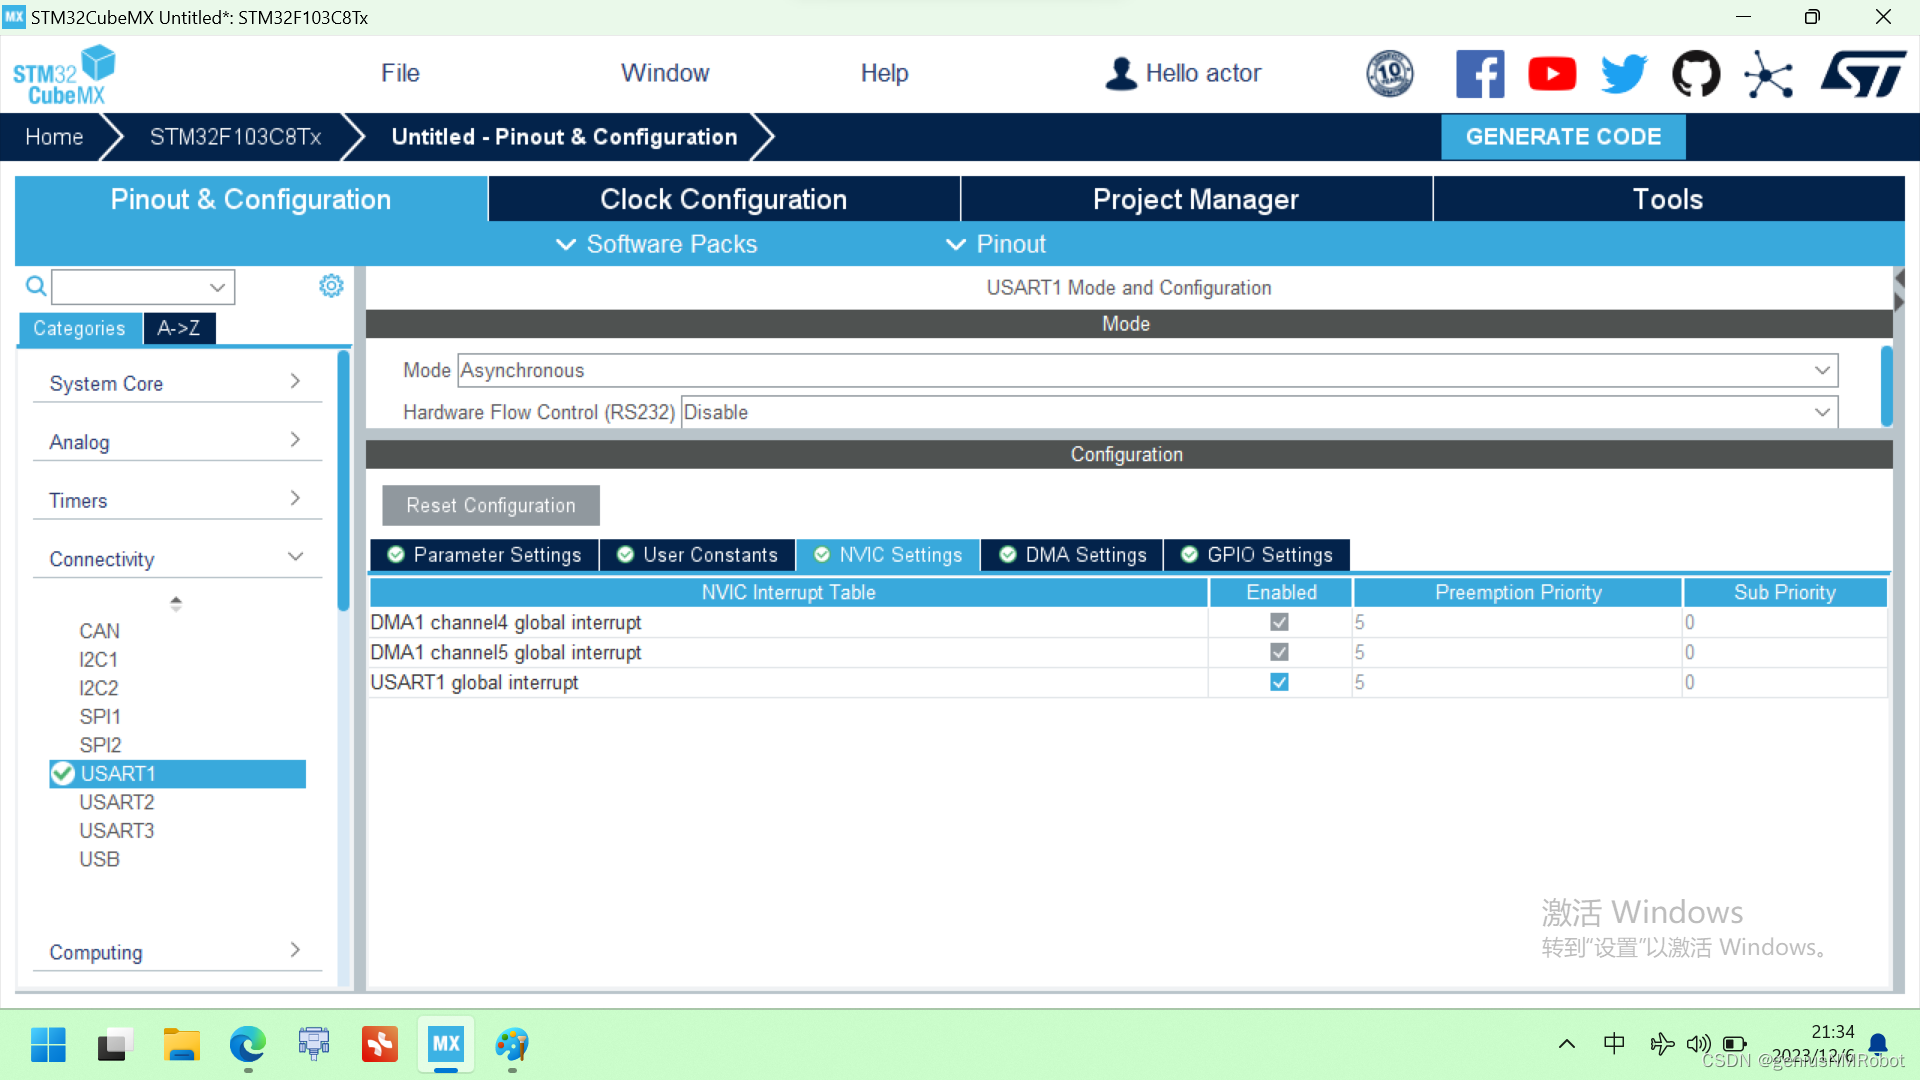
5.4.) Go to NVIC Settings of the UART and activate the UARTx global interrupt.
6.) Set up the Clock Configuration for your micro controller
7.) In Project Manager select a folder where to generate your code
7.1.) In Toolchain / IDE select Makefile(这里有点不一样:平时都选择keil)
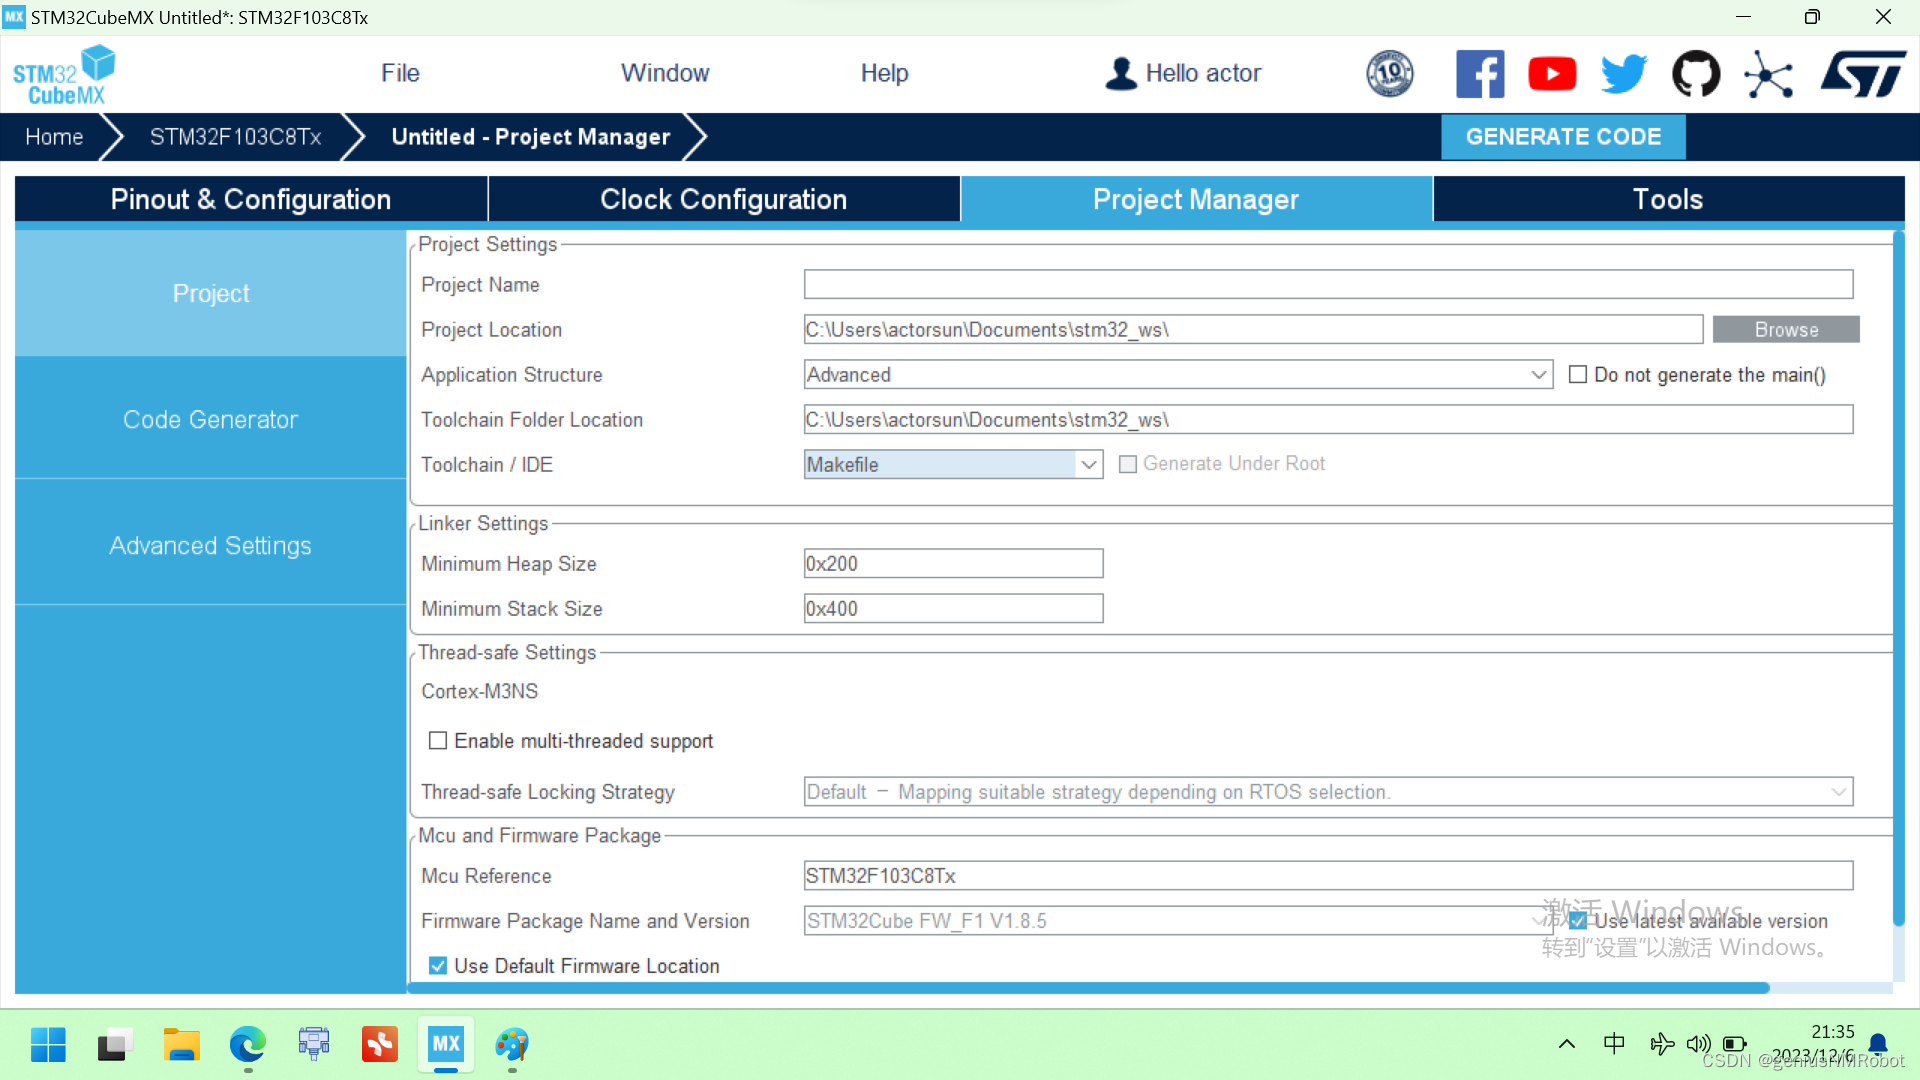
7.2.) Optional: In Project Manager -> Code Generator select Generate peripheral intitialization as a pair of '.c/.h' files per peripheral
8.) Click on Generate Code
9.) In the root folder of the code you've just generated, clone the following repository (into a subfolder, don't change its name).:
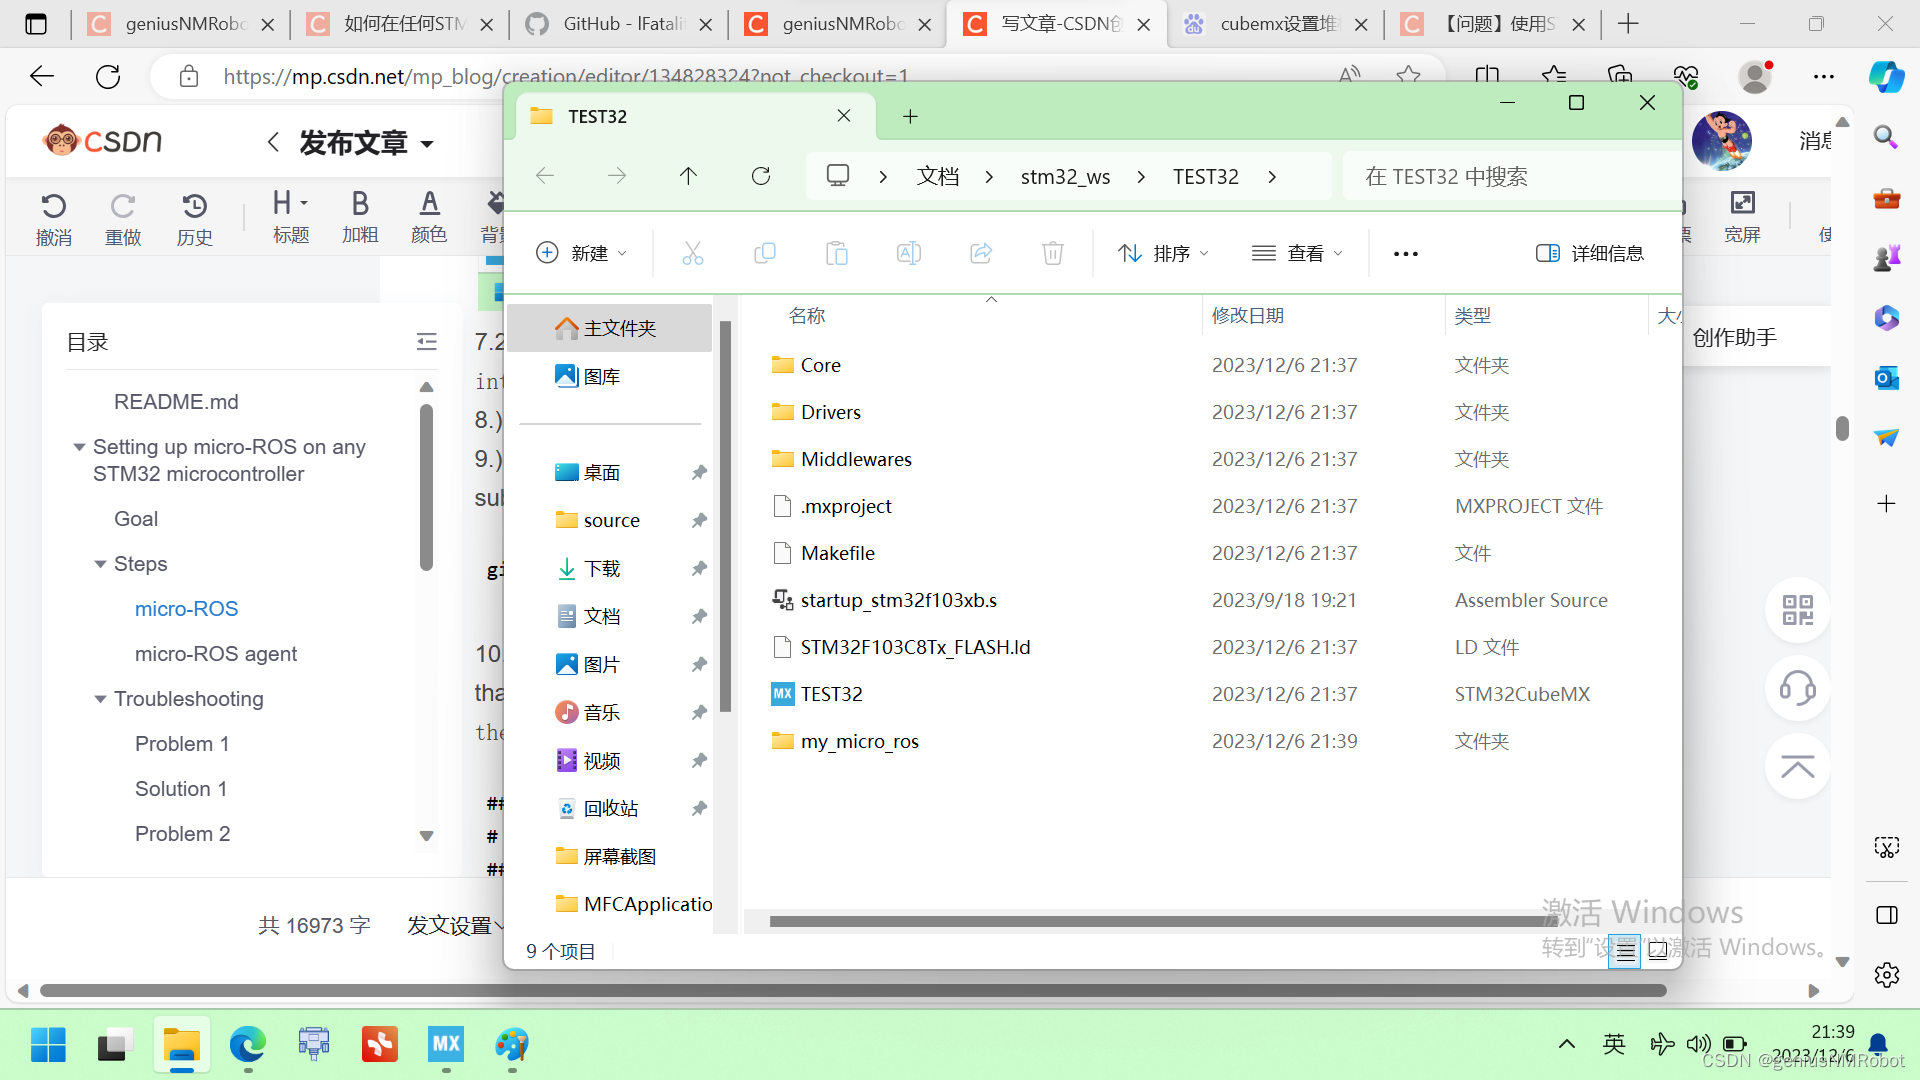
git clone https://github.com/micro-ROS/micro_ros_stm32cubemx_utils.git
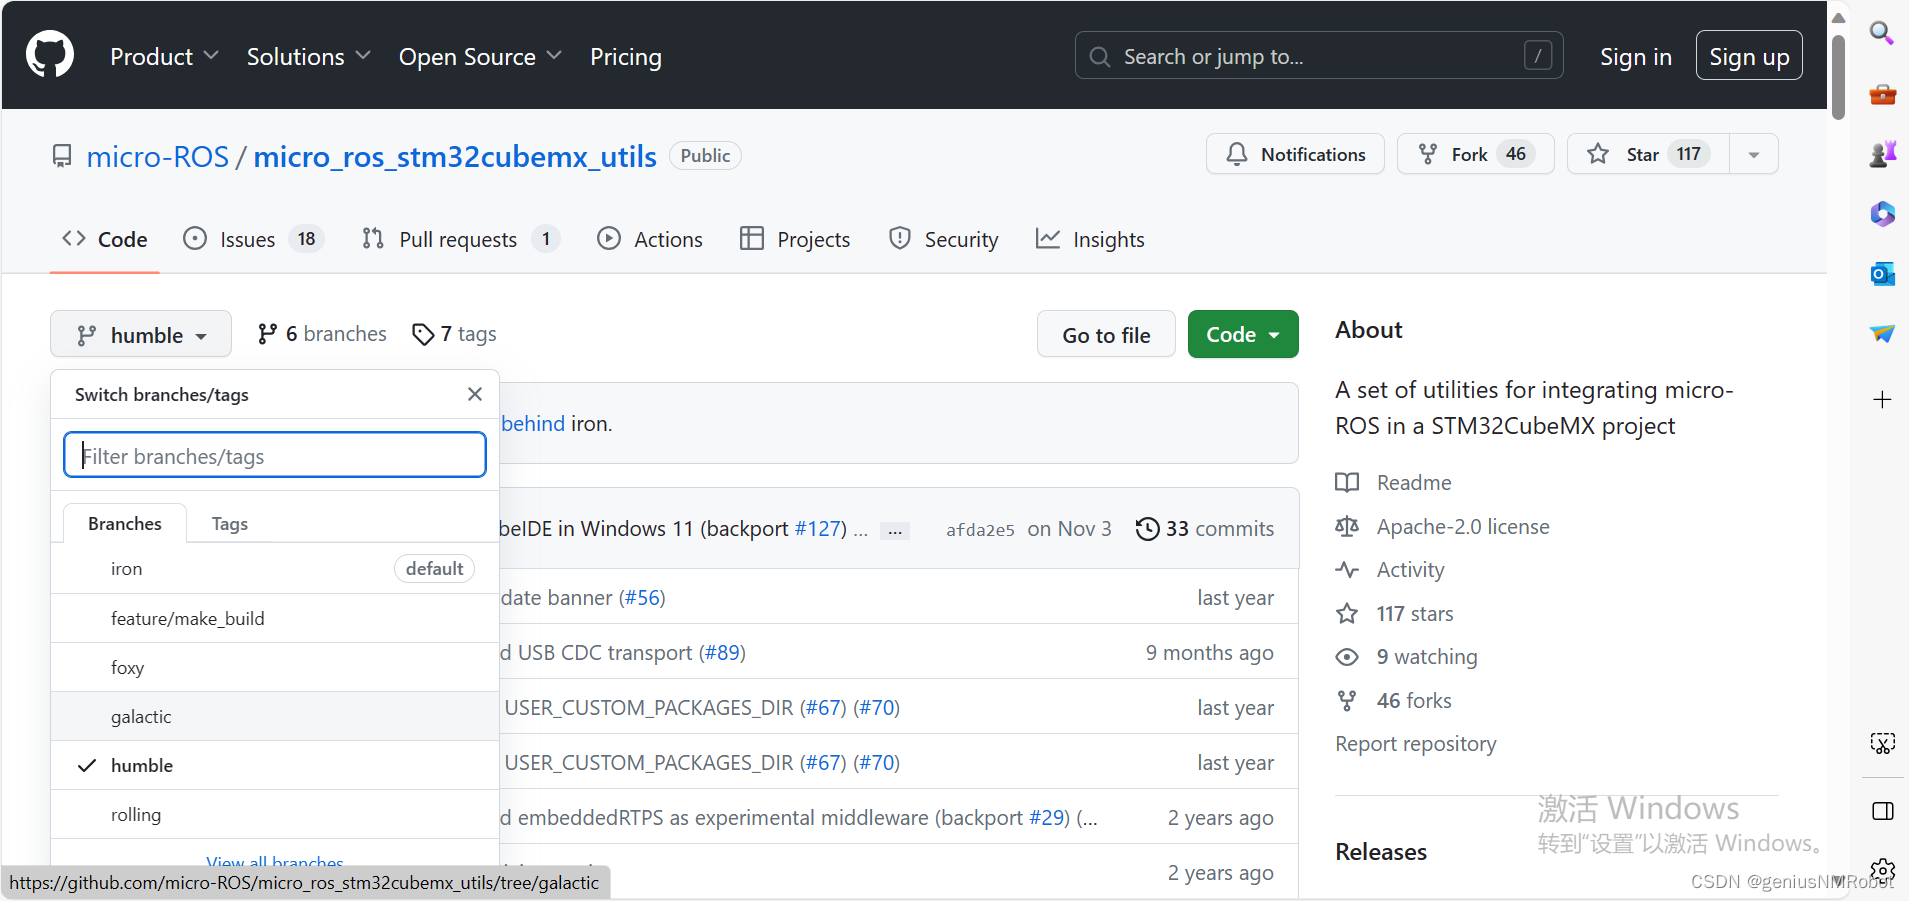
10.) Make sure you have the right branch for your ROS version checked out 11.) In the Makefile that was generated by CubeMx put the following code snippet after the part where it says build the application:
#######################################
# micro-ROS addons
#######################################
LDFLAGS += micro_ros_stm32cubemx_utils/microros_static_library/libmicroros/libmicroros.a
C_INCLUDES += -Imicro_ros_stm32cubemx_utils/microros_static_library/libmicroros/microros_include# Add micro-ROS utils
C_SOURCES += micro_ros_stm32cubemx_utils/extra_sources/custom_memory_manager.c
C_SOURCES += micro_ros_stm32cubemx_utils/extra_sources/microros_allocators.c
C_SOURCES += micro_ros_stm32cubemx_utils/extra_sources/microros_time.c# Set here the custom transport implementation
C_SOURCES += micro_ros_stm32cubemx_utils/extra_sources/microros_transports/dma_transport.cprint_cflags:@echo $(CFLAGS)
11.)Execute the static library generation tool.(执行“静态库产生”工具软件) Compiler flags will retrieved automatically from your Makefile and user will be prompted to check if they are correct.
Pull and run the following docker (这个docker就是静态库生产工具软件)to generate the micro-ros lib(我现在就卡在这个编译静态micro_lib库的地方,我需要知道怎么样编译micro_lib静态库). Make sure you use the right ROS version (注意这个ros的版本不要搞错了makefile里的版本要搞对,下面这个galactic指的是ros2版本,我的是humble就应该吧galactic改为humble)when you pull / run the docker. This should be executed in the root folder of your project.
#这里的microros/micro_ros_static_library_builder:humble是服务器上面的镜像名称,不是本地存放位置
docker pull microros/micro_ros_static_library_builder:humble
#docker pull命令:从镜像仓库获取镜像
#后面3行是一个整体,并且其中的project要修改为存放micro_ros_stm32cubemx_utils文件夹的文件夹其中/project必须是绝对文件位置,不能是以~开头之类的相对位置
docker run -it --rm -v $(pwd):/project --env MICROROS_LIBRARY_FOLDER=micro_ros_stm32cubemx_utils/microros_static_library microros/micro_ros_static_library_builder:humble
我已经安装了ros2和Ubuntu所以我就不用docker了上边这个很可能就是编译静态库的的过程,我替换为以下步骤:
#这个地方的网址可能要改一下,另外这条命令中src/micro_ros_setup表示在本地建立2个文件夹,一个是src,另外在src内再建立一个micro_ros_setup文件夹,最后把远程复制的文件放到这个里面来
git clone -b humble https://github.com/micro-ROS/micro_ros_stm32cubemx_utils.git src/micro_ros_stm32cubemx_utils
rosdep update && rosdep install --from-paths src --ignore-src -y
colcon build
#应该就是使用rosdep补全依赖项,然后就使用colcon工具编译这个代码库成为静态库
上边这个git命令不一定能正确运行,所以可以自己使用浏览器从github下载代码库,然后把文件放到文件夹内。具体说就是下载后的文件夹整个复制到src文件夹内(没有就新建一个src文件夹)
后面这个是对git clone remote_address local_address的一个示范。可看出local_address指定的是存放代码库的文件夹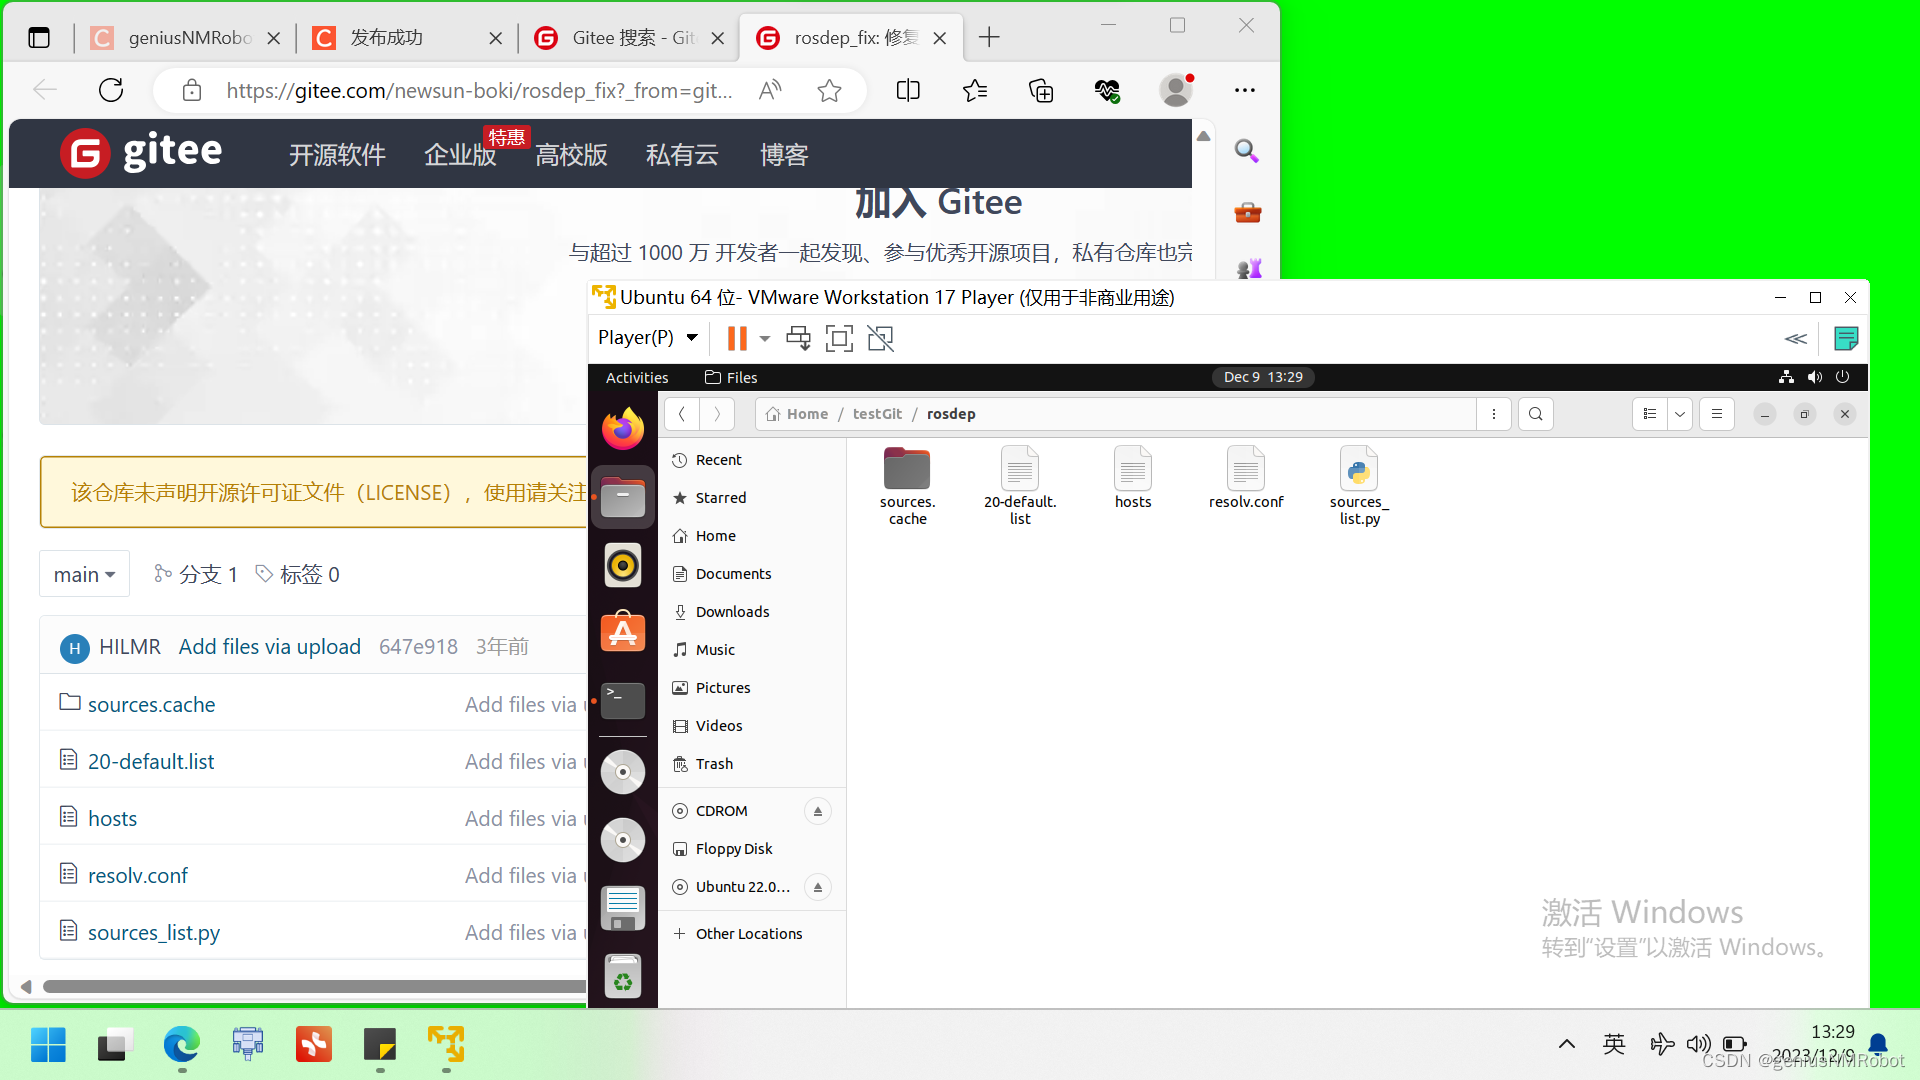
12.) If it asks for the CFLAGS, if you can see some, continue. They might look like this:
Found CFLAGS:
-------------
-mcpu=cortex-m4 -mthumb -mfpu=fpv4-sp-d16 -mfloat-abi=hard -DUSE_HAL_DRIVER -DSTM32F429xx -ICore/Inc -IDrivers/STM32F4xx_HAL_Driver/Inc -IDrivers/STM32F4xx_HAL_Driver/Inc/Legacy -IMiddlewares/Third_Party/FreeRTOS/Source/include -IMiddlewares/Third_Party/FreeRTOS/Source/CMSIS_RTOS -IMiddlewares/Third_Party/FreeRTOS/Source/portable/GCC/ARM_CM4F -IDrivers/CMSIS/Device/ST/STM32F4xx/Include -IDrivers/CMSIS/Include -IDrivers/CMSIS/Include -Imicro_ros_stm32cubemx_utils/microros_static_library/libmicroros/microros_include -Og -Wall -fdata-sections -ffunction-sections -g -gdwarf-2 -MMD -MP -MFprint_cflags
-------------
If instead the CFLAGS are empty there was likely a mistake. If you get an error about a missing separator in the Makefile, check the line in the Makefile. For me there were 2 similar includes. I deleted one of them.
13.) If you get an error like this during building:
'rcutils' exports library 'dl' which couldn't be found
That's ok and can be ignored.
14.) Go into Core/main.cpp and adjust it so that it's similar to the sample_main.cpp you can find in the micro_ros_stm32cubemx_utils repository we found earlier. The most interesting parts are the following:
#include <rcl/rcl.h>
#include <rcl/error_handling.h>
#include <rclc/rclc.h>
#include <rclc/executor.h>
#include <uxr/client/transport.h>
#include <rmw_microxrcedds_c/config.h>
#include <rmw_microros/rmw_microros.h>#include <std_msgs/msg/int32.h>
bool cubemx_transport_open(struct uxrCustomTransport * transport);
bool cubemx_transport_close(struct uxrCustomTransport * transport);
size_t cubemx_transport_write(struct uxrCustomTransport* transport, const uint8_t * buf, size_t len, uint8_t * err);
size_t cubemx_transport_read(struct uxrCustomTransport* transport, uint8_t* buf, size_t len, int timeout, uint8_t* err);void * microros_allocate(size_t size, void * state);
void microros_deallocate(void * pointer, void * state);
void * microros_reallocate(void * pointer, size_t size, void * state);
void * microros_zero_allocate(size_t number_of_elements, size_t size_of_element, void * state);
void StartDefaultTask(void *argument)
{/* USER CODE BEGIN StartDefaultTask *//* Infinite loop */// micro-ROS configurationrmw_uros_set_custom_transport(true,(void *) &huart2,cubemx_transport_open,cubemx_transport_close,cubemx_transport_write,cubemx_transport_read);rcl_allocator_t freeRTOS_allocator = rcutils_get_zero_initialized_allocator();freeRTOS_allocator.allocate = microros_allocate;freeRTOS_allocator.deallocate = microros_deallocate;freeRTOS_allocator.reallocate = microros_reallocate;freeRTOS_allocator.zero_allocate =  microros_zero_allocate;if (!rcutils_set_default_allocator(&freeRTOS_allocator)) {printf("Error on default allocators (line %d)\n", __LINE__);}// micro-ROS apprcl_publisher_t publisher;std_msgs__msg__Int32 msg;rclc_support_t support;rcl_allocator_t allocator;rcl_node_t node;allocator = rcl_get_default_allocator();//create init_optionsrclc_support_init(&support, 0, NULL, &allocator);// create noderclc_node_init_default(&node, "cubemx_node", "", &support);// create publisherrclc_publisher_init_default(&publisher,&node,ROSIDL_GET_MSG_TYPE_SUPPORT(std_msgs, msg, Int32),"cubemx_publisher");msg.data = 0;for(;;){rcl_ret_t ret = rcl_publish(&publisher, &msg, NULL);if (ret != RCL_RET_OK){printf("Error publishing (line %d)\n", __LINE__);}msg.data++;osDelay(10);}/* USER CODE END StartDefaultTask */
}
15.) Open the project in your favorite IDE. In general you should now be able to build and debug your program. To built I used the arm-none-eabi-toolchain. To flash and debug I used openocd. If you can not build check step 15.1.
15.1.) It might be that you can not build yet because of missing syscalls. In that case you might get errors like undefined reference to _kill or undefined reference to _getpid. In that case add a syscalls.c file to your project and also add it to the Makefile so that it will be compiled. You can find an example syscalls.c at the end of this page.
micro-ROS agent
19.) Now you need a micro-ROS agent. It's responsible to create the communication between your embedded controller and the rest of your ROS 2 software. Create a different folder that will be used as a ROS 2 workspace.
20.) Clone the micro_ros_setup repository and build it by executing the following steps from the root of your workspace folder:
source /opt/ros/$ROS_DISTRO/setup.bash
git clone -b $ROS_DISTRO https://github.com/micro-ROS/micro_ros_setup.git src/micro_ros_setup
rosdep update && rosdep install --from-path src --ignore-src -y
colcon build
source install/local_setup.bash
21.) Build the agent packages
ros2 run micro_ros_setup create_agent_ws.sh
ros2 run micro_ros_setup build_agent.sh
source install/local_setup.sh
I got a warning about stderr output when running build_agent.sh (at the end of the build process) but I ignored that. I also had a problem were build_agent.sh complained about being unable to find a package (Package 'micro_ros_agent' specified with --packages-up-to was not found). This was because I didn't follow the steps to build the workspace first correctly (step 20).
22.) Start the micro-ros-agent. For example:
ros2 run micro_ros_agent micro_ros_agent serial -b 115200 --dev /dev/ttyACM0
serial: for UART use, other options available -b: baudrate --dev: the device to use
To get help with the usage:
ros2 run micro_ros_agent micro_ros_agent --help
23.) In the agent you should see something like this:
[1641665035.090947] info     | TermiosAgentLinux.cpp | init                     | running...             | fd: 3
[1641665035.130109] info     | Root.cpp           | create_client            | create                 | client_key: 0x041835D4, session_id: 0x81
[1641665035.130212] info     | SessionManager.hpp | establish_session        | session established    | client_key: 0x041835D4, address: 0
[1641665035.156038] info     | ProxyClient.cpp    | create_participant       | participant created    | client_key: 0x041835D4, participant_id: 0x000(1)
[1641665035.171020] info     | ProxyClient.cpp    | create_topic             | topic created          | client_key: 0x041835D4, topic_id: 0x000(2), participant_id: 0x000(1)
[1641665035.181034] info     | ProxyClient.cpp    | create_publisher         | publisher created      | client_key: 0x041835D4, publisher_id: 0x000(3), participant_id: 0x000(1)
[1641665035.191347] info     | ProxyClient.cpp    | create_datawriter        | datawriter created     | client_key: 0x041835D4, datawriter_id: 0x000(5), publisher_id: 0x000(3)
[1641665052.957930] info     | SessionManager.hpp | establish_session        | session re-established | client_key: 0x041835D4, address: 0
This is some kind of handshake between the agent and the embedded system. You might have to restart your MCU, the agent should be started first it seems.
If you see something like this instead:
[1641665033.757172] info     | TermiosAgentLinux.cpp | init                     | Serial port not found. | device: /dev/ttyACM0, error 2, waiting for connection...
[1641665034.757430] info     | TermiosAgentLinux.cpp | init                     | Serial port not found. | device: /dev/ttyACM0, error 2, waiting for connection...
You have likely selected the wrong device or your MCU is not connected.
23.) You should now be able to see the messages published by the MCU on ROS2:
ros2 topic echo /cubemx_publisher
The data would look like this:
---
data: 2399
---
data: 2400
---
data: 2401
---
data: 2402
---
data: 2403
---
data: 2404
---
Troubleshooting
Problem 1
When stepping through the code the programs hangs at rclc_support_init.
Solution 1
Be sure that the UART you use when calling rmw_uros_set_custom_transport is the one that you set up for ROS (e.g. with the right DMA settings). Also be aware that the call to this function can take some time (~10 seconds). When running the micro-ROS agent it usually is faster though.
Problem 2
The publishing doesn't work. I go into the error case in the infinite loop of the main task:
rcl_ret_t ret = rcl_publish(&publisher, &msg, NULL);
if (ret != RCL_RET_OK)
{printf("Error publishing (line %d)\n", __LINE__); // <-------------------- this is entered
}
In my case I can see some prints on the UART before entering the while loop. There is a lot of random bytes but sometimes I can see XRCE.
Solution 2
You need a running micro-ROS agent. See steps 19.) and following. If you have an agent running but it still doesn't work, look at problem / solution 6.
Problem 3
When trying to flash the board, I get an openocd bug saying something with "free"
Solution 3
Unplug MCU and replug it (power).
Problem 4
When I run the agent and MCU the agent says
fynn@sphalerite:~/main/dev/tests/micro-ros/agent_ws$ ros2 run micro_ros_agent micro_ros_agent serial -b 115200 --dev /dev/ttyACM0
[1643036775.906617] info     | TermiosAgentLinux.cpp | init                     | running...             | fd: 3
[1643036775.906762] info     | Root.cpp           | set_verbose_level        | logger setup           | verbose_level: 4
but nothing else happens and I can't receive my data.
Solution 4 :
Check that your MCU doesn't crash anywhere (e.g. in the syscalls).
Problem 5
I get an error saying that _getpid and _kill are not defined.
Solution 5
You need to define a syscalls.c file and add these function with their functionality. You can find an example of such a file at the end of this page.
Problem 6
When I run the agent and the MCU, the agent says
[1641665035.090947] info     | TermiosAgentLinux.cpp | init                     | running...             | fd: 3
[1641665035.130109] info     | Root.cpp           | create_client            | create                 | client_key: 0x041835D4, session_id: 0x81
[1641665035.130212] info     | SessionManager.hpp | establish_session        | session established    | client_key: 0x041835D4, address: 0
but it's not creating a participant or topic. I can't receive my data.
Solution 6
Check that you don't have another serial program (putty, hterm, gtkterm, ...) connected to your device (at least not to that same UART). Also be sure that your hardware setup is correct, e.g. that you have GND connected between the two nodes when using a UART connection.
Problem 7
If you're using Eclipse: When compiling Eclipse says Error: Program "" not found in PATH
Solution 7
Right click your project -> Properties -> C/C++ Build -> Uncheck "Use default build command" and exchange ${cross_make} with a simple make
Problem 8
If you're using Eclipse:
I get an error that the program "" can not be executed
Solution 8
Right click your project -> Properties -> C/C++ Build: Untick Use default build command. Define Build command as: make
Problem 10
If you're using Eclipse and it says that it can't find the arm-none-eabi-gcc
Solution 10
You need to download and extract the toolchain. You can find it here: Downloads | GNU Arm Embedded Toolchain Downloads – Arm Developer
Then set up your Eclipse to know where it is: Right click your project -> Properties -> MCU -> Arm Toolchains Paths: Toolchain name: xPack GNU Arm Embedded GCC Toolchain folder: path/to/your/arm-none-eabi-toolchain/bin
In the bin folder should be arm-none-eabi-gcc among others.
If it still doesn't work, try just opening the following menu: Right click your project -> Properties -> C/C++ Build -> Settings
Example syscalls.c
/**
*****************************************************************************
**
** File : syscalls.c
**
** Author : Auto-generated by System workbench for STM32
**
** Abstract : System Workbench Minimal System calls file
**
** For more information about which c-functions
** need which of these lowlevel functions
** please consult the Newlib libc-manual
**
** Target : STMicroelectronics STM32
**
** Distribution: The file is distributed “as is,” without any warranty
** of any kind.
**
*****************************************************************************
** @attention
**
** <h2><center>© COPYRIGHT(c) 2019 STMicroelectronics</center></h2>
**
** Redistribution and use in source and binary forms, with or without modification,
** are permitted provided that the following conditions are met:
** 1. Redistributions of source code must retain the above copyright notice,
** this list of conditions and the following disclaimer.
** 2. Redistributions in binary form must reproduce the above copyright notice,
** this list of conditions and the following disclaimer in the documentation
** and/or other materials provided with the distribution.
** 3. Neither the name of STMicroelectronics nor the names of its contributors
** may be used to endorse or promote products derived from this software
** without specific prior written permission.
**
** THIS SOFTWARE IS PROVIDED BY THE COPYRIGHT HOLDERS AND CONTRIBUTORS "AS IS"
** AND ANY EXPRESS OR IMPLIED WARRANTIES, INCLUDING, BUT NOT LIMITED TO, THE
** IMPLIED WARRANTIES OF MERCHANTABILITY AND FITNESS FOR A PARTICULAR PURPOSE ARE
** DISCLAIMED. IN NO EVENT SHALL THE COPYRIGHT HOLDER OR CONTRIBUTORS BE LIABLE
** FOR ANY DIRECT, INDIRECT, INCIDENTAL, SPECIAL, EXEMPLARY, OR CONSEQUENTIAL
** DAMAGES (INCLUDING, BUT NOT LIMITED TO, PROCUREMENT OF SUBSTITUTE GOODS OR
** SERVICES; LOSS OF USE, DATA, OR PROFITS; OR BUSINESS INTERRUPTION) HOWEVER
** CAUSED AND ON ANY THEORY OF LIABILITY, WHETHER IN CONTRACT, STRICT LIABILITY,
** OR TORT (INCLUDING NEGLIGENCE OR OTHERWISE) ARISING IN ANY WAY OUT OF THE USE
** OF THIS SOFTWARE, EVEN IF ADVISED OF THE POSSIBILITY OF SUCH DAMAGE.
**
*****************************************************************************
*/// the code was modified by Fynn Boyer/* Includes */
#include <sys/stat.h>
#include <stdlib.h>
#include <errno.h>
#include <stdio.h>
#include <signal.h>
#include <time.h>
#include <sys/time.h>
#include <sys/times.h>/* Variables */
//#undef errno
extern int errno;
extern int __io_putchar(int ch) __attribute__((weak));
extern int __io_getchar(void) __attribute__((weak));register char * stack_ptr asm("sp");char *__env[1] = { 0 };
char **environ = __env;extern char _estack; // see ld file
extern char _Min_Stack_Size; // see ld file/* Functions */
void initialise_monitor_handles()
{
}int _getpid(void)
{return 1;
}int _kill(int pid, int sig)
{errno = EINVAL;return -1;
}void _exit (int status)
{_kill(status, -1);while (1) {} /* Make sure we hang here */
}__attribute__((weak)) int _read(int file, char *ptr, int len)
{int DataIdx;for (DataIdx = 0; DataIdx < len; DataIdx++){*ptr++ = __io_getchar();}return len;
}__attribute__((weak)) int _write(int file, char *ptr, int len)
{int DataIdx;for (DataIdx = 0; DataIdx < len; DataIdx++){__io_putchar(*ptr++);}return len;
}caddr_t _sbrk(int incr) {extern char __heap_start__ asm("end"); // Defined by the linker.static char *heap_end;char *prev_heap_end;if (heap_end == NULL) heap_end = &__heap_start__;prev_heap_end = heap_end;if (heap_end + incr > &_estack - _Min_Stack_Size) {__asm("BKPT #0\n");errno = ENOMEM;return (caddr_t)-1;}heap_end += incr;return (caddr_t)prev_heap_end;}int _close(int file)
{return -1;
}int _fstat(int file, struct stat *st)
{st->st_mode = S_IFCHR;return 0;
}int _isatty(int file)
{return 1;
}int _lseek(int file, int ptr, int dir)
{return 0;
}int _open(char *path, int flags, ...)
{/* Pretend like we always fail */return -1;
}int _wait(int *status)
{errno = ECHILD;return -1;
}int _unlink(char *name)
{errno = ENOENT;return -1;
}int _times(struct tms *buf)
{return -1;
}int _stat(char *file, struct stat *st)
{st->st_mode = S_IFCHR;return 0;
}int _link(char *old, char *new)
{errno = EMLINK;return -1;
}int _fork(void)
{errno = EAGAIN;return -1;
}int _execve(char *name, char **argv, char **env)
{errno = ENOMEM;return -1;
}相关文章:
如何在任何STM32上面安装micro_ros
就我知道的:micro-ros只能在特定的昂贵的开发板上面运行,但是偶然发现了这个文章,似乎提供了一个全新的方式来在ros2和单片机之间通讯,如果能够这样肯定也能够提高效率,但即使不行,使用串口库也应该比较简单…...
肖sir__ 项目讲解__项目数据
项目时间: 情况一:项目时间开始到上线的时间,这个时间一般比较长(一年,二年,三年) 情况二:项目的版本的时间或则是周期(1个月,2个月,3个月&…...

微服务实战系列之J2Cache
前言 经过近几天陆续发布Cache系列博文,博主已对业界主流的缓存工具进行了基本介绍,当然也提到了一些基本技巧。相信各位盆友看见这么多Cache工具后,在选型上一定存在某些偏爱: A同学说:不管业务千变万化,…...

12.ROS导航模块:gmapping、AMCL、map_server、move_base案例
目录 1 导航概述 2 导航简介 2.1 导航模块简介 1.全局地图 2.自身定位 3.路径规划 4.运动控制 5.环境感知 2.2 导航坐标系odom、map 1.简介 2.特点 3.坐标系变换 2.3 导航条件说明 1.硬件 2.软件 3 导航实现 3.1 创建本篇博客的功能包 3.2 建图--gmapping 3.…...
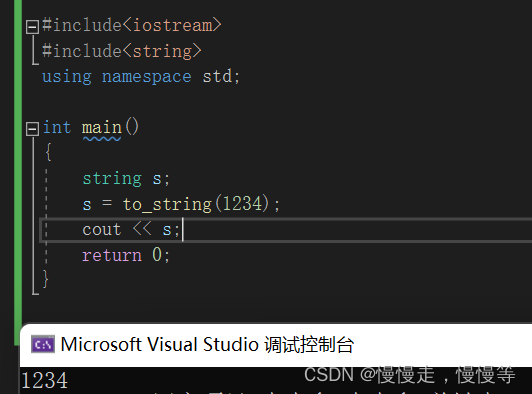
C++中string类的使用
一.string类 1.1为什么学习string类? C 语言中,字符串是以 \0 结尾的一些字符的集合,为了操作方便, C 标准库中提供了一些 str 系列的库函数,但是这些库函数与字符串是分离开的,不太符合OOP 的思想&#x…...

LeeCode每日刷题12.8
搜索插入位置 给定一个排序数组和一个目标值,在数组中找到目标值,并返回其索引。如果目标值不存在于数组中,返回它将会被按顺序插入的位置。 请必须使用时间复杂度为 O(log n) 的算法。 示例 1: 输入: nums [1,3,5,6], target 5 输出: …...

硕士毕业论文格式修改要点_word
目录 0、最开始要做的事情1、更改样式(先善器)2、多级标题(解决自动更新问题必要的基础设置)2、插入图片(1)设置一个图片样式——“无间隔”(2)插入题注(3)修…...

远红外温和护理,一贴缓解痛风不适
在冬天,很多人都会因为痛风等原因引起的关节炎症而感到不适,因为关节疼痛、肢体麻木等问题会对生活质量造成很大的影响。市场上缓解关节酸痛的护理品很多,常见的应该还是关节贴,我现在用的就是何浩明关节痛风贴。 相比于同类产品&…...

优化 SQL 日志记录的方法
为什么 SQL 日志记录是必不可少的 SQL 日志记录在数据库安全和审计中起着至关重要的作用,它涉及跟踪在数据库上执行的所有 SQL 语句,从而实现审计、故障排除和取证分析。SQL 日志记录可以提供有关数据库如何访问和使用的宝贵见解,使其成为确…...

Java设计模式-工厂模式
目录 一、简单工厂模式 (一)需求 (二)使用传统的方法来完成 (三)传统方法的优缺点 (四)基本介绍 (五)使用简单工厂模式 二、工厂方法模式 ࿰…...
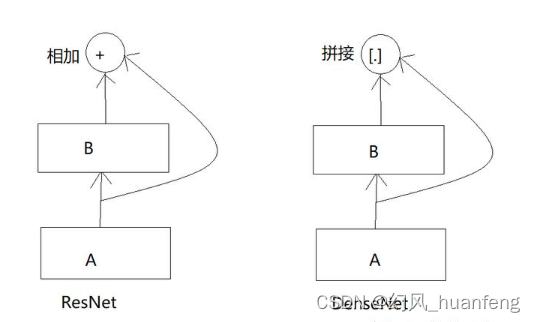
每天五分钟计算机视觉:稠密连接网络(DenseNet)
本文重点 在前面的课程中我们学习了残差网络ResNet,而DenseNet可以看成是ResNet的后续,我们看一下图就可以看出二者的主要区别了。 特点 DenseNet是一种卷积神经网络,它的特点是每一层都直接连接到所有后续层。这意味着,每一层都接收来自前一层的输出,并将其作为输入传递…...
mysql支持的整数类型、各类型整数能够表示的数值范围
MySQL :: MySQL 8.2 Reference Manual :: 11.1.2 Integer Types (Exact Value) - INTEGER, INT, SMALLINT, TINYINT, MEDIUMINT, BIGINT mysql支持的整数有:TINYINT、SMALLINT、MEDIUMINT、INT(INT和INTEGER是同义词)、BIGINT,各…...

我不是DBA之慢SQL诊断方式
最近经常遇到技术开发跑来问我慢SQL优化相关工作,所以干脆出几篇SQL相关优化技术月报,我这里就以公司mysql一致的5.7版本来说明下。 在企业中慢SQL问题进场会遇到,尤其像我们这种ERP行业。 成熟的公司企业都会有晚上的慢SQL监控和预警机制。…...

JavaScript基础知识整理(最全知识点, 精简版,0基础版)
文章目录 一、输入和输出内容 1.1 输出 1.1.1 在浏览器的控制台输出打印 1.1.2 直接在浏览器的页面上输出内容 1.1.3 页面弹出警告对话框 1.2 输入 二、变量 2.1 变量是什么 2.2 变量的声明和赋值 2.3 变量的命名规范和规范 三、变量扩展(数组) 3.1 数组…...

人工智能和网络安全:坏与好
人工智能似乎可以并且已经被用来帮助网络犯罪和网络攻击的各个方面。 人工智能可以用来令人信服地模仿真人的声音。人工智能工具可以帮助诈骗者制作更好、语法正确的网络钓鱼消息(而糟糕的语法往往会暴露出漏洞),并将其翻译成多种语言&…...
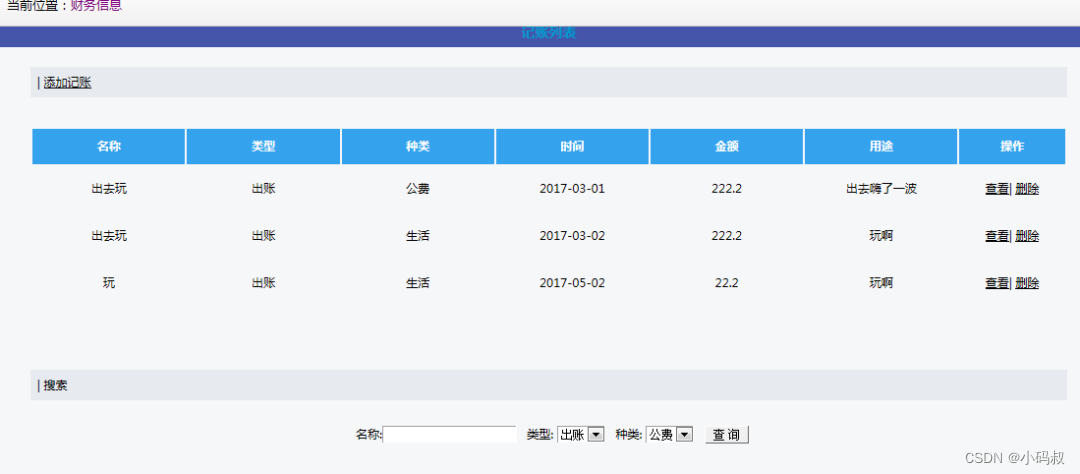
基于SSH的java记账管理系统
基于SSH的java记账管理系统 一、系统介绍二、功能展示四、其他系统实现五、获取源码 一、系统介绍 项目类型:Java EE项目 项目名称:基于SSH的记账管理系统 项目架构:B/S架构 开发语言:Java语言 前端技术:HTML、CS…...

github可访问但无法clone问题
github可访问但无法clone问题 重置 http.proxy 重置 http.proxy git config --global http.proxy http://127.0.0.1:1080 git config --global https.proxy https://127.0.0.1:1080 git config --global --unset http.proxy git config --global --unset https.proxy...
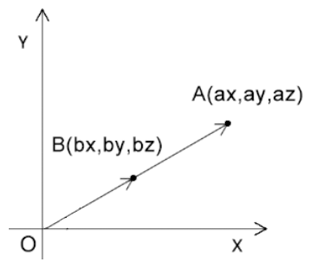
WebGL笔记:图形缩放的原理和实现
缩放 1 )原理 缩放可以理解为对向量长度的改变,或者对向量坐标分量的同步缩放 如下图,比如让向量OA 收缩到点B的位置,也就是从OA变成OB,缩放了一半 2 )公式 已知 点A的位置是(ax,ay,az)点A基于原点內缩了…...
)
前端学习--React(5)
一、useReducer 管理相对复杂的状态数据 定义一个reducer函数,根据action值的不同返回不同的状态 在组件中调用useReducer并传入reducer函数和状态的初始值 事件发生时,通过dispatch函数分派一个对象,即通知reducer具体返回哪个状态对应的操…...

【数据结构】平衡树引入
数据结构-平衡树 前置知识 二叉树二叉树的中序遍历 问题 维护一个数据结构,支持插入元素、删除元素、查询元素的排名、查询排名对应的元素、查询元素的前驱、查询元素的后继等。 BST(二叉搜索树) 作为一个基本无效(很容易卡掉…...

Tao-8k大模型一键部署教程:Python环境配置与快速启动
Tao-8k大模型一键部署教程:Python环境配置与快速启动 最近有不少朋友在问,有没有那种开箱即用、对新手友好的大模型部署方案?特别是现在很多开源模型,虽然能力很强,但部署起来一堆依赖和环境问题,很容易劝…...

如何解决多音频设备切换难题:AudioSwitch的高效管理方案
如何解决多音频设备切换难题:AudioSwitch的高效管理方案 【免费下载链接】AudioSwitch Switch between default audio input or output change volume 项目地址: https://gitcode.com/gh_mirrors/au/AudioSwitch 在现代工作与娱乐场景中,电脑用户…...

openclaw 安装镜像下载问题处理记录
一 ,首先 容器启动 报错如下: tart.sh: line 2: !/bin/bash: No such file or directory Unable to find image creatoraris/openclaw:latest locally 二,问题分析 看到这个错误提示确实会让人有点懵,请别担心。你遇到的这两个问题都很典型,我们来一步步解决。根本原因…...

Qwen-Image-2512镜像免配置价值:省去Git LFS、HuggingFace token等繁琐步骤
Qwen-Image-2512镜像免配置价值:省去Git LFS、HuggingFace token等繁琐步骤 1. 为什么选择预置镜像方案 传统部署AI模型通常需要经历复杂的配置过程:从Git LFS大文件下载到HuggingFace访问令牌管理,再到环境依赖安装和模型权重加载。这些步…...

深度解析HtmlToWord:基于Office Interop的HTML转Word技术实现
深度解析HtmlToWord:基于Office Interop的HTML转Word技术实现 【免费下载链接】HtmlToWord Convert html to word using Microsoft.Office.Interop.Word 项目地址: https://gitcode.com/gh_mirrors/ht/HtmlToWord 在Web应用开发中,将HTML内容转换…...

基于QT的Lingyuxiu MXJ LoRA桌面应用开发
基于QT的Lingyuxiu MXJ LoRA桌面应用开发 将AI绘画能力装进桌面应用,让创意触手可及 1. 为什么需要桌面端LoRA应用? 如果你用过在线AI绘画平台,肯定遇到过这样的困扰:网络不稳定时生成中断,想批量处理图片却只能一张张…...

AIGlasses_for_navigation应用:结合STM32实现嵌入式视觉导航机器人
AIGlasses_for_navigation应用:结合STM32实现嵌入式视觉导航机器人 最近在捣鼓一个挺有意思的项目,想用最便宜的单片机做个能自己看路走的机器人。手头正好有块经典的STM32F103C8T6最小系统板,还有一台能跑AI模型的云服务器。我就琢磨着&…...

毕业论文神器!降AI率工具 千笔 VS 锐智 AI 全行业通用
在AI技术迅速发展的今天,越来越多的学生和研究人员开始借助AI工具辅助论文写作,以提升效率、优化内容。然而,随着各大查重系统对AI生成内容的识别能力不断提升,论文中的“AI痕迹”也变得愈发敏感。一旦AI率过高,不仅会…...

Qwen3-14B-Int4-AWQ集成SpringBoot实战:构建企业级智能问答微服务
Qwen3-14B-Int4-AWQ集成SpringBoot实战:构建企业级智能问答微服务 1. 引言:当大模型遇见微服务 最近在帮一家电商平台升级客服系统时,遇到了一个典型问题:传统规则引擎已经无法应对用户五花八门的提问。比如有用户问"我上周…...

AI绘画神器:李慕婉-仙逆-造相Z-Turbo开箱即用,快速生成李慕婉图片
AI绘画神器:李慕婉-仙逆-造相Z-Turbo开箱即用,快速生成李慕婉图片 1. 镜像简介与特色 1.1 专为李慕婉角色定制的AI绘画工具 李慕婉-仙逆-造相Z-Turbo是一款基于Xinference部署的专用文生图模型服务,专注于生成《仙逆》中李慕婉角色的高质量…...