Mybatis的学习
01-mybatis传统dao开发模式
-
概述
- mybatis有两种使用模式: ①传统dao开发模式, ②dao接口代理开发模式
-
①传统dao开发模式
- dao接口 + dao实现子类 + mapper映射文件
- dao实现子类来决定了
dao接口的方法和mapper映射文件的statement的关系
-
代码实现
public class StudentDaoImpl implements StudentDao {private SqlSessionFactory sqlSessionFactory;public StudentDaoImpl(SqlSessionFactory sqlSessionFactory) {//外界(Spring容器)传递过来的是一个单例对象即可.this.sqlSessionFactory = sqlSessionFactory;}@Overridepublic Student getById(Integer id) throws Exception {//1,获取SqlSessionFactory对象//1.1, 获取mybatis核心配置文件的路径//String resource = "mybatis-config.xml";//1.2, 获取mybatis核心配置文件对应的输入流//InputStream inputStream = Resources.getResourceAsStream(resource);//1.3, 编译获取SqlSessionFactory工厂对象//SqlSessionFactory sqlSessionFactory = new SqlSessionFactoryBuilder().build(inputStream);//2, 获取SqlSession会话对象SqlSession sqlSession = sqlSessionFactory.openSession();//3, 使用SqlSession会话对象执行已配置的statementStudent student = sqlSession.selectOne("getById", id);//4, 操作完毕, 关闭会话sqlSession.close();return student;}@Overridepublic int insert(Student student) throws Exception {//1, 获取SqlSessionFactory工厂对象//SqlSessionFactory sqlSessionFactory = new SqlSessionFactoryBuilder().build(Resources.getResourceAsStream("mybatis-config.xml"));//2, 获取SqlSession会话对象SqlSession sqlSession = sqlSessionFactory.openSession();//3, 执行已配置的statement,并返回影响的行数int insert = sqlSession.insert("insert", student);//4, 手动提交sqlSession.commit();//5, 释放资源sqlSession.close();return insert;}@Overridepublic int delete(Integer id) throws Exception {//1, 获取SqlSessionFactory工厂对象//SqlSessionFactory sqlSessionFactory =new SqlSessionFactoryBuilder().build(Resources.getResourceAsStream("mybatis-config.xml"));//2, 获取SqlSession会话对象SqlSession sqlSession = sqlSessionFactory.openSession();//3, 执行statementint delete = sqlSession.delete("delete", id);//4, 手动提交sqlSession.commit();//5, 释放资源sqlSession.close();return delete;}@Overridepublic int update(Student student) throws Exception {//1, 获取SqlSessionFactory工厂对象//SqlSessionFactory sqlSessionFactory = new SqlSessionFactoryBuilder().build(Resources.getResourceAsStream("mybatis-config.xml"));//2, 获取SqlSession会话对象SqlSession sqlSession = sqlSessionFactory.openSession();//3, 执行statementint update = sqlSession.update("update", student);//4, 手动提交sqlSession.commit();//5, 释放资源sqlSession.close();return update;}
}
public class StudentDaoTest {private SqlSessionFactory sqlSessionFactory;@Before//在单元测试方法之前执行public void init() throws IOException {sqlSessionFactory = new SqlSessionFactoryBuilder().build(Resources.getResourceAsStream("mybatis-config.xml"));}@Testpublic void getById() throws Exception {StudentDao studentDao = new StudentDaoImpl(sqlSessionFactory);Student student = studentDao.getById(8);System.out.println("student = " + student);}@Testpublic void insert() throws Exception {StudentDao studentDao = new StudentDaoImpl(sqlSessionFactory);int insert = studentDao.insert(new Student(null,"鹏鹏","男"));System.out.println("insert = " + insert);}@Testpublic void delete() throws Exception {StudentDao studentDao = new StudentDaoImpl(sqlSessionFactory);int delete = studentDao.delete(6);System.out.println("delete = " + delete);}@Testpublic void update() throws Exception {StudentDao studentDao = new StudentDaoImpl(sqlSessionFactory);int update = studentDao.update(new Student(8,"黄郑","妖怪"));System.out.println("update = " + update);} } -
存在的问题
dao实现子类和mapper映射文件之间存在高耦合.
02-mybatis接口代理开发模式
-
概述
- 由
dao接口和mapper映射文件组成, 此时由一套规则来确定dao接口方法和映射文件statement的关系
- 由
-
一套规则
- ①dao接口和mapper映射文件必须在同一个目录中
- 可以不放在同一个目录, 只要保证能够加载到即可, 建议放在同一个目录
- ②dao接口和mapper映射文件必须名称一样
- 可以不一样, 只要保证能够加载到即可, 建议名称一样
- ③mapper映射文件的namespace必须等于dao接口的全限定类名
- 必须遵守
- ④statement的id必须等于dao接口的方法名称
- 必须遵守
- ⑤statement的parameterType必须等于dao接口方法的形参类型
- 必须遵守
- ⑥statement的resultType必须等于dao接口方法的返回值类型
- 必须遵守
- ①dao接口和mapper映射文件必须在同一个目录中
-
代码实现
public interface StudentDao {Student getById(Integer id) throws Exception;int insert(Student student) throws Exception;int delete(Integer id) throws Exception;int update(Student student) throws Exception; }<?xml version="1.0" encoding="UTF-8" ?> <!DOCTYPE configurationPUBLIC "-//mybatis.org//DTD Config 3.0//EN""https://mybatis.org/dtd/mybatis-3-config.dtd"> <configuration><environments default="development"><environment id="development"><transactionManager type="JDBC"/><dataSource type="POOLED"><property name="driver" value="com.mysql.jdbc.Driver"/><property name="url" value="jdbc:mysql://localhost:3306/mydb?useSSL=false"/><property name="username" value="root"/><property name="password" value="root"/></dataSource></environment></environments><mappers><mapper resource="com/qh/dao/StudentDao.xml"/></mappers> </configuration>public class StudentDaoTest {private SqlSessionFactory sqlSessionFactory;@Beforepublic void init() throws IOException {sqlSessionFactory = new SqlSessionFactoryBuilder().build(Resources.getResourceAsStream("mybatis-config.xml"));}@Testpublic void getById() throws Exception {SqlSession sqlSession = sqlSessionFactory.openSession();//获取dao接口代理对象StudentDao studentDao = sqlSession.getMapper(StudentDao.class);Student student = studentDao.getById(8);System.out.println("student = " + student);sqlSession.close();}@Testpublic void insert() throws Exception {SqlSession sqlSession = sqlSessionFactory.openSession();//获取dao接口代理对象StudentDao studentDao = sqlSession.getMapper(StudentDao.class);int insert = studentDao.insert(new Student(null, "武帆", "男"));System.out.println("insert = " + insert);sqlSession.commit();sqlSession.close();}@Testpublic void delete() {}@Testpublic void update() {} }
03-lombok插件
-
开发步骤
-
①在idea安装lombok插件
- 安装完成重启idea
-
②勾选Annotation Processors
-
③引入lombok依赖
-
④修改java实体类
- 使用lombok相关注解
-
-
①在idea安装lombok插件
- [外链图片转存失败,源站可能有防盗链机制,建议将图片保存下来直接上传(img-aUn7xueA-1676283014283)(null)]
-
②勾选Annotation Processors
- [外链图片转存失败,源站可能有防盗链机制,建议将图片保存下来直接上传(img-gi5b9xxx-1676283012446)(null)]
-
③引入lombok依赖
<dependency><groupId>org.projectlombok</groupId><artifactId>lombok</artifactId><version>1.18.24</version> </dependency> -
④修改java实体类
@NoArgsConstructor//生成无参构造器
@RequiredArgsConstructor//生成有参构造器
@AllArgsConstructor//生成全参构造器
@Data
public class Student {private Integer id;@NonNullprivate String name;@NonNullprivate String gender;
}
04-核心配置文件解释
-
核心配置文件
- [外链图片转存失败,源站可能有防盗链机制,建议将图片保存下来直接上传(img-wet0mkl0-1676283012623)(null)]
- properties,
- settings
- cacheEnabled(缓存开关), lazyLoadingEnabled(懒加载开关), mapUnderscoreToCamelCase(驼峰标识), logImpl(日志实现)
- typeAliases
- plugins
- enviroments
- mappers
<?xml version="1.0" encoding="UTF-8" ?>
<!DOCTYPE configurationPUBLIC "-//mybatis.org//DTD Config 3.0//EN""https://mybatis.org/dtd/mybatis-3-config.dtd"><configuration><!--	Mybatis核心配置文件中标签的顺序:		properties?,settings?,typeAliases?,typeHandlersobjectFactory?,objectWrapperFactory?,reflectorFactoryplugins?,environments?,databaseIdProvider?,mappers--><!--    引入数据源文件properties      --><properties resource="jdbc.properties"/><!--    设置      --><settings><!--    配置log4j日志文件      --><setting name="logImpl" value="LOG4J"/><!--    忽略驼峰大小写      --><setting name="mapUnderscoreToCamelCase" value="true"/></settings><!--	类型别名	--><typeAliases><!--	type:类型全类名alias:当前类型的别名,可不写,默认为类名<typeAlias [alias="User"] type="com.qh.pojo.Users"/>!!!不推荐使用 typeAlias--><typeAlias alias="User" type="com.qh.pojo.Users"/><!--	给包下所有的类分别起别名name:全限定类名!!!推荐使用--><package name="com.qh.pojo"/></typeAliases<!--    environments:配置多个连接数据库的环境default:切换默认数据库环境的id--><environments default="development"><!--    environment:配置单个连接数据库的环境id:配置连接数据库环境的唯一标识--><environment id="development"><!--transactionManager:设置事务管理的方式属性:type:"JDBC|MANAGED"JDBC:表示当前环境中执行sql时使用JDBC中原生的事务管理方式,事务的提交或回滚需要手动处理MANAGED:被管理,例如spring--><transactionManager type="JDBC"/><!--dataSource:配置数据源属性:type:"POOLED|UNPOOLED|JNDI"POOLED:表示使用数据库连接池缓存数据库连接UNPOOLED:表示不使用数据库连接池JNDI:表示使用上下文中的数据源--><dataSource type="POOLED"><!--	设置连接数据库的驱动	--><property name="driver" value="${jdbc.driver}"/><!--	设置连接数据库的链接地址	--><property name="url" value="${jdbc.url}"/><!--	设置连接数据库的用户名	--><property name="username" value="${jdbc.username}"/><!--	设置连接数据库的密码 	--><property name="password" value="${jdbc.password}"/></dataSource></environment></environments><!--    引入映射文件      --><mappers><!--    引入少量映射文件时使用,直接加载xml      --><mapper resource="mappers/UserMapper.xml"/><!--    引入多个映射文件时[接口代理模式使用]      --><mapper class="com.qh.dao.UserDao"/><!--    引入多个映射文件时[接口代理模式使用]!!!推荐使用                                                                               --><package name="com.qh.dao"/></mappers></configuration>
05-mybatis内置的数据源技术
-
概述
-
[外链图片转存失败,源站可能有防盗链机制,建议将图片保存下来直接上传(img-KzUqPBMj-1676283013426)(null)]
-
PooledDataSouce参数值为: POOLED; UnpooledDataSource参数值为: UNPOOLED
-
06-enviroments标签
-
概述
- 用于配置mybatis的运行环境(事务, 数据源), 而且可以配置多个不同的运行环境.
-
事务管理器(transactionManager)
- JDBC : 这个配置直接使用了 JDBC 的提交和回滚功能,它依赖从数据源获得的连接来管理事务作用域。
- MANAGED: 这个配置几乎没做什么。它从不提交或回滚一个连接,而是让容器来管理事务的整个生命周期(比如 JEE 应用服务器的上下文)。
-
数据源(dataSource)
- UNPOOLED– 这个数据源的实现会每次请求时打开和关闭连接。
- POOLED– 这种数据源的实现利用“池”的概念将 JDBC 连接对象组织起来,避免了创建新的连接实例时所必需的初始化和认证时间。
- JNDI – 这个数据源实现是为了能在如 EJB 或应用服务器这类容器中使用,容器可以集中或在外部配置数据源,然后放置一个 JNDI 上下文的数据源引用。
-
代码实现
<!--default: 启用指定运行环境 --> <environments default="development"><environment id="development"><!--transactionManager:JDBC: 有合理的事务管理, 推荐MANAGED: 什么都没做--><transactionManager type="JDBC"/><!--type: 启用数据源你的类型JNDI: 使用jndi技术实现的数据源POOLED: 带链接池的数据源, PooledDataSource, 推荐UNPOOLED: 不带链接池的数据源, UnPooledDataSource--><dataSource type="POOLED"><property name="driver" value="com.mysql.jdbc.Driver"/><property name="url" value="jdbc:mysql://localhost:3306/mydb?useSSL=false"/><property name="username" value="root"/><property name="password" value="root"/></dataSource></environment><environment id="development2"><transactionManager type="JDBC"/><dataSource type="UNPOOLED"><property name="driver" value="com.mysql.jdbc.Driver"/><property name="url" value="jdbc:mysql://localhost:3306/mydb?useSSL=false"/><property name="username" value="root"/><property name="password" value="root"/></dataSource></environment> </environments> -
总结
- mybatis内置的数据源技术功能太过单一, 仅在学习mybatis框架时使用, 后续修改为第三方数据源技术: DruidDataSource, C3P0, DBCP…
07-propertie标签
-
概述
- 用于声明变量, 在mybatis中使用.
-
方式一
<properties><property name="driverClassName" value="com.mysql.jdbc.Driver"/><property name="jdbdUrl" value="jdbc:mysql://localhost:3306/mydb?useSSL=false"/><property name="username" value="root"/><property name="password" value="root"/> </properties><!--default: 启用指定运行环境 --> <environments default="development"><environment id="development"><!--transactionManager:JDBC: 有合理的事务管理, 推荐MANAGED: 什么都没做--><transactionManager type="JDBC"/><!--type: 启用数据源你的类型JNDI: 使用jndi技术实现的数据源POOLED: 带链接池的数据源, PooledDataSource, 推荐UNPOOLED: 不带链接池的数据源, UnPooledDataSource--><dataSource type="POOLED"><property name="driver" value="${driverClassName}"/><property name="url" value="${jdbcUrl}"/><property name="username" value="${username}"/><property name="password" value="${password}"/></dataSource></environment><environment id="development2"><transactionManager type="JDBC"/><dataSource type="UNPOOLED"><property name="driver" value="${driverClassName}"/><property name="url" value="${jdbcUrl}"/><property name="username" value="${username}"/><property name="password" value="${password}"/></dataSource></environment> </environments> -
方式二
<!--加载jdbc.properties文件-->
<properties resource="jdbc.properties"></properties>
<!--default: 启用指定运行环境
-->
<environments default="development"><environment id="development"><!--transactionManager:JDBC: 有合理的事务管理, 推荐MANAGED: 什么都没做--><transactionManager type="JDBC"/><!--type: 启用数据源你的类型JNDI: 使用jndi技术实现的数据源POOLED: 带链接池的数据源, PooledDataSource, 推荐UNPOOLED: 不带链接池的数据源, UnPooledDataSource--><dataSource type="POOLED"><property name="driver" value="${driverClass}"/><property name="url" value="${jdbcUrl}"/><property name="username" value="${user}"/><property name="password" value="${password}"/></dataSource></environment><environment id="development2"><transactionManager type="JDBC"/><dataSource type="UNPOOLED"><property name="driver" value="${driverClass}"/><property name="url" value="${jdbcUrl}"/><property name="username" value="${user}"/><property name="password" value="${password}"/></dataSource></environment>
</environments>
08-settings标签之log4j
-
概述
- mybatis程序运行时在控制台打印输出
sql语句,输入参数,结果数量等等
- mybatis程序运行时在控制台打印输出
-
开发步骤
- ①引入依赖
- log4j
- ②修改mybatis-config.xml
- 配置settings标签中的logImpl参数
- ③编写log4j.xml
- ④代码测试
- ①引入依赖
-
①引入依赖
<dependency><groupId>log4j</groupId><artifactId>log4j</artifactId><version>1.2.17</version> </dependency> -
②修改mybatis-config.xml
<settings><!--指定日志框架--><setting name="logImpl" value="LOG4J"/> </settings> -
③编写log4j.xml
<?xml version="1.0" encoding="UTF-8" ?>
<!DOCTYPE log4j:configuration SYSTEM "log4j.dtd">
<log4j:configuration xmlns:log4j="http://jakarta.apache.org/log4j/"><!--规定打印到console中的日志的格式--><appender name="STDOUT" class="org.apache.log4j.ConsoleAppender"><param name="Encoding" value="UTF-8"/><layout class="org.apache.log4j.PatternLayout"><param name="ConversionPattern" value="%-5p %d{MM-dd HH:mm:ss,SSS} %m  (%F:%L) \n"/></layout></appender><!--局部日志级别--><logger name="java.sql"><level value="debug"/></logger><logger name="org.apache.ibatis"><level value="info"/></logger><!--全局日志级别--><root><level value="debug"/><appender-ref ref="STDOUT"/></root>
</log4j:configuration>
09-typeAliases标签
-
概述
- 设置别名
-
方式一: 挨个设置每个类的别名
<typeAlias type="com.qh.pojo.Student" alias="Student"></typeAlias> -
方式二: 根据包给每个类自动取别名, 默认为类名
<typeAliases><package name="com.qh.pojo"/>
</typeAliases>
10-mappers标签
-
概述
- 用于加载mapper映射文件.
-
方式一: 直接加载mapper映射文件, 传统dao模式可以使用, 接口代理模式也可以使用, 不能使用通配符
*<mappers><mapper resource="com/qh/dao/StudentDao.xml"/> </mappers> -
方式二: 先加载dao接口, 再加载mapper映射文件, 接口代理模式可以使用, 不能使用通配符
*<mappers><mapper class="com.qh.dao.StudentDao"></mapper> </mappers> -
方式三: 先加载所有dao接口, 再加载所有mapper映射文件, 接口代理模式可以使用
<mappers><package name="com.qh.dao"/>
</mappers>
11-核心配置文件之plugins分页插件
-
概述
- 插件pagehelper封装了复杂的分页操作.
-
工作流程
- [外链图片转存失败,源站可能有防盗链机制,建议将图片保存下来直接上传(img-ne0DJdXq-1676283014477)(null)]****
-
开发步骤
- ①引入依赖
- pagehelper
- ②修改service接口及其实现
- ③修改mybatis-config.xml, 配置PageInterceptor分页拦截器
- ①引入依赖
-
①引入依赖
<dependency><groupId>com.github.pagehelper</groupId><artifactId>pagehelper</artifactId><version>5.3.2</version> </dependency> -
②修改service接口及其实现
public class StudentServiceImpl implements StudentService {@Overridepublic List<Student> findAll() throws Exception {SqlSessionFactory sqlSessionFactory = new SqlSessionFactoryBuilder().build(Resources.getResourceAsStream("mybatis-config.xml"));SqlSession sqlSession = sqlSessionFactory.openSession();StudentDao studentDao = sqlSession.getMapper(StudentDao.class);List<Student> studentList = studentDao.findAll();sqlSession.close();return studentList;}@Overridepublic PageInfo<Student> findByPage(Integer currentPage, Integer pageSize) throws Exception {//开始分页查询PageHelper.startPage(currentPage, pageSize);//执行分页查询(查询所有 -> 分页查询)List<Student> studentList = findAll();return new PageInfo<>(studentList);} } -
③修改mybatis-config.xml, 配置PageInterceptor分页拦截器
<plugins><plugin interceptor="com.github.pagehelper.PageInterceptor"><!--合理化--><property name="reasonable" value="true"/><!--方言--><property name="helperDialect" value="mysql"/></plugin> </plugins> -
④代码测试
@Test
public void findByPage() throws Exception {StudentService studentService = new StudentServiceImpl();PageInfo<Student> pageInfo = studentService.findByPage(4, 3);System.out.println("当前页数 = " + pageInfo.getPageNum());System.out.println("每页记录数 = " + pageInfo.getPageSize());System.out.println("当前页实际记录数 = " + pageInfo.getSize());System.out.println("上一页 = " + pageInfo.getPrePage());System.out.println("当前页数据 = " + pageInfo.getList());System.out.println("下一页 = " + pageInfo.getNextPage());System.out.println("总记录数 = " + pageInfo.getTotal());System.out.println("总页数 = " + pageInfo.getPages());System.out.println("是否第一页 = " + pageInfo.isIsFirstPage());System.out.println("是否最后一页 = " + pageInfo.isIsLastPage());System.out.println("页码 = " + Arrays.toString(pageInfo.getNavigatepageNums()));}
12-给SQL语句传参
-
概述
- 在mybatis中,使用两种占位符
#{}和${}给sql语句中的?赋值.
- 在mybatis中,使用两种占位符
-
需求
- 根据姓名模糊查询
-
代码实现
List<Teacher> findLikeName1(String name) throws Exception;List<Teacher> findLikeName2(String name) throws Exception;<select id="findLikeName1" parameterType="String" resultType="Teacher">select * from t_teacher where name like "%"#{name}"%" </select><select id="findLikeName2" parameterType="String" resultType="Teacher">select * from t_teacher where name like "%${name}%" </select> -
#{} VS ${}
- #{}:
- 会转换为?占位符, 传入的数据可以有类型
- 防止SQL注入漏洞
- 不可以传入表名
- ${}
- 不会转换为?占位符, 传入的数据直接可以理解为关键字
- 不能防止SQL注入漏洞
- 可以传入表名
- #{}:
13-输入映射概述
- 概述
- 输入映射,是在映射文件中通过parameterType指定输入参数的类型。类型可以是①简单类型、②复杂类型
- ①简单类型: 只有一个值
- 基本数据类型: 四类八种
- 包装类
- String
- ②复杂类型: 有多个值
- 对象
- 集合(list, set, map)
- 数组
14-输入映射之简单类型
-
需求
- 根据id查询用户
-
代码实现
<select id="getById1" parameterType="Integer" resultType="Teacher">select * from t_teacher where id = #{id} </select><!--#{}中的名称从语法上可以随意写, 但是最好和形参名称一样 --> <select id="getById2" parameterType="Integer" resultType="Teacher">select * from t_teacher where id = #{a} </select><!--parameterType="Integer"可以省略--> <select id="getById3" resultType="Teacher">select * from t_teacher where id = #{a} </select> -
注意事项
- ①占位符
#{名称}中的名称从语法上可以随意写, 但是最好和接口方法的形参名称一样; - ②
pamaterType可以省略.
- ①占位符
15-输入映射之零散简单类型
-
概述
- 零散简单类型: 在dao接口方法上有多个分开的简单类型的形参.
-
需求
- 根据账户和密码查询用户记录
-
代码实现
Teacher getByNameAndPwd1(String name , String password) throws Exception;
Teacher getByNameAndPwd2(String name , String password) throws Exception;Teacher getByNameAndPwd3(@Param("name") String name ,@Param("password") String password) throws Exception;
<!--使用内置名称arg0,arg1--> <select id="getByNameAndPwd1" resultType="Teacher">select * from t_teacher where name = #{arg0} and password = #{arg1} </select><!--使用内置名称param1,param2--> <select id="getByNameAndPwd2" resultType="Teacher">select * from t_teacher where name = #{param1} and password = #{param2} </select><!--使用自定义名称--> <select id="getByNameAndPwd3" resultType="Teacher">select * from t_teacher where name = #{name} and password = #{password} </select>
16-输入映射之实体类型
-
概述
- Mybatis会根据#{}中传入的数据,加工成getXxx()方法,通过反射在实体类对象中调用这个方法,从 而获取到对应的数据。填充到#{}这个位置。
-
需求
- 根据账户和密码查询用户记录
-
工作流程
- [外链图片转存失败,源站可能有防盗链机制,建议将图片保存下来直接上传(img-eUle6N7v-1676283013075)(null)]
-
代码实现
Teacher getByInstance1(Teacher teacher) throws Exception; Teacher getByInstance2(Teacher teacher) throws Exception;<select id="getByInstance1" parameterType="Teacher" resultType="Teacher">select * from t_teacher where name = #{name} and password = #{password} </select><!--省略parameterType="Teacher"--> <select id="getByInstance2" resultType="Teacher">select * from t_teacher where name = #{name} and password = #{password} </select> -
注意事项
- ①
parameterType可以省略; - ②占位符名称应该和
get方法名称保持一致!!! - ③如果有
get方法直接调用, 如果没有get方法直接暴力反射操作成员变量. - ④按照规则, 占位符名称应该和实体类的属性名称一样.
- ①
-
总结
- 输入映射中使用反射动态执行
get方法!!!
- 输入映射中使用反射动态执行
17-输入映射之Map
-
概述
- 如果要输入多个参数值, 如果使用零散简单类型比较麻烦, 又没有对应的实体类, 这个时候就可以使用Map.
-
需求
- 根据账户和密码查询用户记录
-
代码实现
Teacher getByMap1(Map map) throws Exception; Teacher getByMap2(Map map) throws Exception;<select id="getByMap1" parameterType="Map" resultType="Teacher">select * from t_teacher where name = #{name} and password = #{password} </select><select id="getByMap2" resultType="Teacher">select * from t_teacher where name = #{name} and password = #{password} </select> -
注意事项
- ①
parameterType可以省略; - ②#{}占位符名称应该和map的键名称一样.
- ①
18-输出映射概述
- 概述
- 输出映射,是在映射文件中通过resultType指定输出结果的类型。类型可以是简单类型、复杂类型
- ①简单类型: 只有一个值
- 基本数据类型: 四类八种
- 包装类
- String
- ②复杂类型: 有多个值
- 对象
- 集合(list, set, map)
- 数组
19-输出映射之简单类型
-
需求
- 统计总记录数
-
代码实现
Integer getTotalSize() throws Exception;<select id="getTotalSize" resultType="Integer">select count(*) from t_customer </select>
20-输出映射之实体类型
-
需求
- 根据姓名查询记录
-
工作流程
- [外链图片转存失败,源站可能有防盗链机制,建议将图片保存下来直接上传(img-TPFwu9qI-1676283013204)(null)]
- Mybatis会根据
结果集中的字段名称,加工成setXxx()方法,通过反射在实体类对象中调用这个方法,从 而将结果集中的数据赋值到实体类对象中。
-
代码实现
Customer getByName(String name) throws Exception;<select id="getByName" resultType="Customer">select * from t_customer where name = #{name} </select> -
注意事项
- ①结果集字段名称和
setXxx方法名称一致!!! - ②如果没有对应的set方法, 直接暴力反射赋值给成员变量.
- ①结果集字段名称和
select查询无需添加
parameterType,只需要resultType即可增删改需要添加
parameterType,一个参数随便填写占位符名称,resultType=具体数据类型
多个用
@param指定,@param(值)中的值与sql语句中占位符的值应相同, resultType=全限定类名
21-输出映射之Map
-
概述
- 适用于SQL查询返回的各个字段综合起来并不和任何一个现有的实体类对应,没法封装到实体类对象 中。能够封装成实体类类型的,就不使用Map类型。
- 字段名是map的键,字段值是map的值
-
需求
- 根据id查询记录, 并返回Map
-
代码实现
Map getByIdWithMap(Integer id) throws Exception;<select id="getByIdWithMap" resultType="Map">select * from t_user where userId = #{userId} </select>
22-输出映射之List
-
需求
- 查询所有记录
-
代码实现
List<User> findAll() throws Exception;<select id="findAll" resultType="User">select * from t_user </select>
23-settings标签之mapUnderscoreToCamelCase
-
概述
- mapUnderscoreToCamelCase: map underscore to camelcase, 将下划线映射给驼峰.
- 下划线: 在数据库中, 字段名称规范是a_b
- 驼峰: 在实体类中, 属性名称规范是aB
- 按照默认的输出映射规则, 要求字段名称和
set方法名称一致, 所以无法直接输出映射成功!!!
-
解决方案
- ①修改属性名称或字段名称
- ②查询记录操作中给结果集中的字段名称取别名
- ③自动将
下划线输出映射给驼峰标识.
-
②查询记录操作中给结果集中的字段名称取别名
User2 getById1(Integer id) throws Exception;<select id="getById1" resultType="User2">select user_id userId , user_name userName ,user_pwd userPwd from t_user2 where user_id = #{userId} </select> -
③自动将
下划线输出映射给驼峰标识.<settings><!--日志实现--><setting name="logImpl" value="LOG4J"/><!--自动驼峰标识--><setting name="mapUnderscoreToCamelCase" value="true"/> </settings>User2 getById2(Integer id) throws Exception;<select id="getById2" resultType="User2">select * from t_user2 where user_id = #{userId} </select>
24-输出映射之ResultMap
-
概述
- ResultMap: 自定义输出映射规则, 自定义将指定的字段名称映射给指定的属性名称.
-
代码实现
User2 getByName(String name) throws Exception;<select id="getByName" resultMap="User2Map">select * from t_user2 where user_name = #{userName} </select>
25-insert实现主键返回
-
概述
- insert记录,并获取已经添加的记录的id。
-
解决方案
- ①使用
Statement.RETURN_GENERATED_KEYS - ②使用
select last_insert_id()
- ①使用
-
①使用
Statement.RETURN_GENERATED_KEYSint insert1(User user) throws Exception;<insert id="insert1" parameterType="User" useGeneratedKeys="true" keyColumn="userId" keyProperty="userId" >insert into t_user values(null,#{userName},#{userPwd},#{money}) </insert> -
②使用
select last_insert_id()int insert2(User user) throws Exception;<insert id="insert2" >insert into t_user values(null,#{userName},#{userPwd},#{money})<!--keyColumn: 字段名称keyProperty: 属性名称resultType: 类型order: AFTER(主键在添加记录之后生成)--><selectKey keyColumn="userId" keyProperty="userId" resultType="Integer" order="AFTER">select last_insert_id()</selectKey> </insert>
26-动态sql之sql片段
-
概述
- sql片段: 将重复的sql语句独立抽取出来进行单独维护.
-
代码实现
<sql id="query_of_columns">name, password
</sql><select id="getById" resultType="Teacher">select<include refid="query_of_columns"></include>from t_teacher where id = #{id}
</select><select id="getByName" resultType="Teacher">select<include refid="query_of_columns"></include>from t_teacher where name = #{name}
</select>
27-动态sql之if标签
-
概述
- 根据条件动态生成指定的sql语句.
-
需求
- 如果账户和密码都没有就查询所有用户记录;
- 如果只有账户,就根据账户查询用户记录;
- 如果只有密码,就根据密码查询用户记录;
- 如果账户和密码都有,就根据账户和密码查询用户记录。
-
代码实现
<select id="getByIf1" resultType="Teacher">select * from t_teacher where name = #{name} and password = #{password} </select><select id="getByIf2" resultType="Teacher">select * from t_teacher where<if test="name!=null and name!=''">name = #{name}</if><if test="password!=null and password!=''">and password = #{password}</if> </select><select id="getByIf3" resultType="Teacher">select * from t_teacher where 1 = 1<if test="name!=null and name!=''">and name = #{name}</if><if test="password!=null and password!=''">and password = #{password}</if> </select> -
存在的问题
where 1 = 1不够优雅~~~
-
总结
- 没有条件生成多
where关键字; 只有password成立多and关键字
- 没有条件生成多
28-动态sql之where标签
-
概述
- 根据条件动态生成
where关键字, 去掉前面多余的and/or关键字
- 根据条件动态生成
-
代码实现
List<Teacher> getByWhere(@Param("name") String name,@Param("password") String password) throws Exception;<select id="getByWhere" resultType="Teacher">select * from t_teacher<where><if test="name!=null and name!=''">and name = #{name}</if><if test="password!=null and password!=''">and password = #{password}</if></where> </select>
29-动态sql之trim标签
-
概述
- 可以通过prefix、prefixOverrides、suffix、suffixOverrides设置sql语句的前缀和后缀
-
参数说明
- [外链图片转存失败,源站可能有防盗链机制,建议将图片保存下来直接上传(img-KoxWj0xf-1676283012987)(null)]
-
需求
- 使用
trim标签达到where标签的效果,- where标签: 如果条件成立生成where关键字, 去除前面多余的
and|or
- where标签: 如果条件成立生成where关键字, 去除前面多余的
- 使用
-
代码实现
List<User> getByTrim(@Param("userName") String userName,@Param("userPwd") String userPwd ) throws Exception;<select id="getByTrim" resultType="User">select * from t_user<trim prefix="where" prefixOverrides="and|or"><if test="userName!=null and userName!=''">and user_name = #{userName}</if><if test="userPwd!=null and userPwd!=''">and user_pwd = #{userPwd}</if></trim> </select>
30-动态sql之set标签
-
概述
- 根据条件动态生成
set关键字, 去掉后面多余的逗号
- 根据条件动态生成
-
需求
- 根据id修改用户信息
-
代码实现
int update1(Teacher teacher) throws Exception; int update2(Teacher teacher) throws Exception; int update3(Teacher teacher) throws Exception;<update id="update1" parameterType="Teacher">update t_teacher set name = #{name} , password = #{password} where id = #{id} </update><update id="update2" parameterType="Teacher">update t_teacher set<if test="name!=null and name!=''">name = #{name} ,</if><if test="password!=null and password!=''">password = #{password}</if><where>id = #{id}</where> </update><update id="update3" parameterType="Teacher">update t_teacher<set><if test="name!=null and name!=''">name = #{name} ,</if><if test="password!=null and password!=''">password = #{password} ,</if></set><where>id = #{id}</where> </update>
31-动态sql之choose标签
-
概述
- 在多个分支条件中,仅执行一个,而后面的条件匹配都会被忽略
-
代码实现
List<Teacher> getByChoose(@Param("name") String name,@Param("password") String password) throws Exception;<select id="getByChoose" resultType="Teacher">select * from t_teacher<where><choose><when test="name!=null and name!=''">name = #{name}</when><when test="password!=null and password!=''">password = #{password}</when><otherwise>1=1</otherwise></choose></where> </select>
32-动态sql之foreach标签
-
概述
- foreach标签主要用于批量操作.
-
语法
<!--collection: 数组=array, 集合=listopen: sql语句的开头seperator: sql语句的分隔符close: sql语句的结尾item: 元素名称 --> <foreach collection="" open="" separator="" close="" item=""> </foreach> -
①批量查询: 操作一条sql语句
select * from t_teacher where id in (1,2,3); select * from t_teacher where id = 1 or id = 2 or id = 3;List<Teacher> findByIds1(List<Integer> idList) throws Exception; List<Teacher> findByIds2(List<Integer> idList) throws Exception;<!--11.1, 批量查询--> <!--select * from t_teacher where id in (1,2,3)--> <select id="findByIds1" resultType="Teacher">select * from t_teacher<where>id in<!--(1,2,3)--><foreach collection="list" open="(" separator="," close=")" item="id">#{id}</foreach></where> </select> <!--select * from t_teacher where id = 1 or id = 2 or id = 3--> <select id="findByIds2" resultType="Teacher">select * from t_teacher<where><!--id = 1 or id = 2 or id = 3--><foreach collection="list" separator="or" item="id">id = #{id}</foreach></where> </select> -
②批量添加: 操作一条sql语句
insert into t_teacher values(null,'刘备','beibei'), (null,'张飞','feifei');void inserts(List<Teacher> teacherList) throws Exception;<insert id="inserts">insert into t_teacher values<foreach collection="list" separator="," item="teacher">(null,#{teacher.name},#{teacher.password})</foreach> </insert> -
③批量删除: 参考
批量查询, 操作一条sql语句delete from t_teacher where id in(1,2,3) delete from t_teacher where id = 1 or id = 2 or id = 3; -
④批量修改: 操作多条sql语句
update t_teacher set name = 'liubeibei', password = 'babyliu' where id = 1 ;
update t_teacher set name = 'zhangfeifei', password = 'feifeifei' where id = 2 ;
void updates(List<Teacher> teacherList) throws Exception;<update id="updates"><foreach collection="list" separator=";" item="teacher">update t_teacher set name = #{teacher.name}, password = #{teacher.password} where id = #{teacher.id}</foreach></update>- 注意: mybatis默认一次只能执行一条sql语句, 如果要支持执行多条sql语句, 需要设置
allowMultiQueries=true
- 注意: mybatis默认一次只能执行一条sql语句, 如果要支持执行多条sql语句, 需要设置
33-多表关系设计
- 一对一
- 表A中的一条记录可以确定表B中的一条记录; 表B中的一条记录可以确定表A中的一条记录.
- 比如: 公司和注册地址
- 一对一查询
- 一对多
- 表A中的一条记录可以确定表B中的多条记录, 表B中的一条记录可以确定表A中的一条记录
- 比如: 部门和员工
- 一对一查询, 一对多查询
- 多对多
- 表A中的一条记录可以确定表B中的多条记录, 表B中的一条记录可以确定表A中的多条记录
- 比如: 老师和学生
- 一对一查询, 一对多查询
34-关联查询环境搭建
-
数据库代码
CREATE TABLE t_order (order_id int PRIMARY KEY AUTO_INCREMENT,order_name varchar(30),order_state VARCHAR(40),customer_id BIGINT ); CREATE TABLE t_customer (customer_id int PRIMARY KEY AUTO_INCREMENT,customer_name VARCHAR(60),address VARCHAR(60) );insert into t_order values (null, '订单一', '已完成', 1),(null, '订单二', '未完成', 1),(null, '订单三', '已完成', 2);insert into t_customer values (1, '杨世康', '武汉市洪山区'),(2, '黄郑', '武汉市武昌区'),(3, '崔新凯', '武汉市青山区'),(4, '李鑫鹏', '武汉市青山区'),(5, '武一帆', '武汉市青山区'); -
实体类代码
public class Customer {private Integer customerId;private String customerName;private String address;private List<Order> orderList;
}
public class Order {private Integer orderId;private String orderName;private String orderState;private Customer customer;}
35-关联查询之一对一查询
-
需求
- 根据id查询订单信息, 关联查询用户信息.
-
代码实现
Order getOrderAndCustomerById(Integer id) throws Exception;<resultMap id="OrderMap" type="Order"><id column="order_id" property="orderId" javaType="Integer"></id><result column="order_name" property="orderName" javaType="String"></result><result column="order_state" property="orderState" javaType="String"></result><association property="customer" javaType="Customer"><id column="customer_id" property="customerId" javaType="Integer"></id><result column="customer_name" property="customerName" javaType="String"></result><result column="address" property="address" javaType="String"></result></association> </resultMap><select id="getOrderAndCustomerById" resultMap="OrderMap">select *from t_orderleft outer join t_customer on t_order.customer_id = t_customer.customer_idwhere t_order.order_id = #{orderId} </select> -
注意事项
- 使用
resultMap自定义输出映射规则, 将3个用户字段的值输出映射给1个用户对象属性
- 使用
36-关联查询之一对多查询
-
需求
- 根据id查询用户信息, 关联查询订单信息
-
代码实现
Customer getCustomerAndOrderById(Integer id) throws Exception;<resultMap id="CustomerMap" type="Customer"><id column="customer_id" property="customerId" javaType="Integer"></id><result column="customer_name" property="customerName" javaType="String"></result><result column="address" property="address" javaType="String"></result><collection property="orderList" ofType="Order"><id column="order_id" property="orderId" javaType="Integer"></id><result column="order_name" property="orderName" javaType="String"></result><result column="order_state" property="orderState" javaType="String"></result></collection> </resultMap><select id="getCustomerAndOrderById" resultMap="CustomerMap">select *from t_customerleft outer join t_order on t_customer.customer_id = t_order.customer_idwhere t_customer.customer_id = #{customerId} </select>
37-分步查询之一对一
-
概述
- 分步查询: 将一次多表查询拆分成多次单表查询.
-
一对一
#多表查询 select * from t_orderleft outer join t_customer on t_order.customer_id = t_customer.customer_id where order_id = 1;#①查询订单信息(`customer_id=1`) select * from t_order where order_id = 1;#②根据`customer_id=1`查询用户信息 select * from t_customer where customer_id = 1; -
需求
- 根据id查询订单信息, 再分步查询用户信息
-
开发步骤
- ①第一次单表查询
- ②第二次单表查询
-
①第一次单表查询
//01-分步查询之一对一
//1.1,第一次单表查询
Order getById(Integer id) throws Exception;
<!--01-分步查询之一对一--> <resultMap id="OrderMap" type="Order"><id column="order_id" property="orderId" javaType="Integer"></id><result column="order_name" property="orderName" javaType="String"></result><result column="order_state" property="orderState" javaType="String"></result><!--1.2,调用第二次单表查询--><association property="customer"javaType="Customer"select="com.atguigu.mapper.CustomerMapper.getById"column="customer_id"></association> </resultMap><!--1.1,第一次单表查询--> <select id="getById" resultMap="OrderMap">select * from t_order where order_id = #{orderId} </select> -
②第二次单表查询
//01-分步查询之一对一
//1.3,第二次单表查询
Customer getById(Integer id) throws Exception;
<!--01-分步查询之一对一--> <!--1.3,第二次单表查询--> <select id="getById" resultType="Customer">select * from t_customer where customer_id = #{customerId} </select>
38-分步查询之一对多
-
一对多
#多表查询
select *
from t_customerleft join t_order t on t_customer.customer_id = t.customer_id
where t.customer_id = 2;#①第一次单表查询(customer_id = 2)
select *
from t_customer
where customer_id = 2;#②第二次单表查询(customer_id = 2)
select *
from t_order
where customer_id = 2;
39-mybatis延迟加载
- 概述
- 延迟加载: 也叫懒加载, 在用到时才查询.
- 好处
- 能够大幅度节约内存空间 ,提高查询效率
- 应用场景
- 一对一不推荐使用懒加载, 一对多需要使用懒加载.
40-mybatis延迟加载之一对一
-
概述
lazyLoadingEnabled: 延迟加载的全局开关。当开启时,所有关联对象都会延迟加载。 特定关联关系中可通过设置fetchType属性来覆盖该项的开关状态。
-
开发步骤
- ①修改mybatis-config.xml
- lazuLoadingEnabled=true
- ②修改OrderMapper.xml
- fetchType=lazy|eager
- ①修改mybatis-config.xml
-
①修改mybatis-config.xml
<settings><!--懒加载--><setting name="lazyLoadingEnable" value="true"/> </settings> -
②修改OrderMapper.xml
<resultMap id="OrderMap" type="Order"><id column="order_id" property="orderId" javaType="Integer"></id><result column="order_name" property="orderName" javaType="String"></result><result column="order_state" property="orderState" javaType="String"></result><!--1.2,调用第二次单表查询--><association property="customer"javaType="Customer"select="com.atguigu.mapper.CustomerMapper.getById"column="customer_id"fetchType="lazy"></association>
</resultMap><select id="getById" resultMap="OrderMap">select * from t_order where order_id = #{orderId}
</select>
41-mybatis延迟加载之一对多
-
开发步骤
- ①修改mybatis-config.xml
- lazuLoadingEnabled=true
- ②修改CustomerMapper.xml
- fetchType=lazy|eager
- ①修改mybatis-config.xml
-
①修改mybatis-config.xml
-
②修改CustomerMapper.xml
<resultMap id="CustomerMap" type="Customer"><id column="customer_id" property="customerId" javaType="Integer"></id><result column="customer_name" property="customerName" javaType="String"></result><result column="address" property="address" javaType="String"></result><!--2.2, 调用第二次单表查询--><collection property="orderList"ofType="Order"select="com.atguigu.mapper.OrderMapper.findByCustomerId"column="customer_id" fetchType="lazy"></collection>
</resultMap><!--2.1,第一次单表查询-->
<select id="getByName" resultMap="CustomerMap">select * from t_customer where customer_name = #{customerName}
</select>
42-mybatis缓存概述
-
概述
-
[外链图片转存失败,源站可能有防盗链机制,建议将图片保存下来直接上传(img-8qhdsZv4-1676283012864)(null)]
-
直接操作数据库, 比较耗费时间, 为了减少程序运行的时长, 可以将之前查询得到的数据保存到
缓存, 后续直接使用缓存中的数据.
-
-
作用
- 减少和数据库的交互次数,提高执行效率
-
坏处
- 数据的时效性存在问题
-
分类
-
[外链图片转存失败,源站可能有防盗链机制,建议将图片保存下来直接上传(img-U8X0AJzq-1676283014782)(null)]
-
一级缓存: 数据共享范围在当前SqlSession有效, 等价于请求域;
-
二级缓存: 数据共享范围在整个应用, 等价于应用域.
-
-
流程
- ①mybatis程序查询记录, 在二级缓存中查找数据, 如果有直接使用, 如果没有查询一级缓存;
- ②查询一级缓存, 如果有直接使用, 如果没有查询数据库;
- ③查询数据库, 查询出来的结果直接一级缓存, 一级缓存的数据在当前SqlSession有效;
- ④当前SqlSession关闭时, 会将一级缓存中的数据销毁并存储到二级缓存.
43-一级缓存的验证
-
概述
- 一级缓存在当前SqlSession有效, 也就是当前方法有效.
-
开发步骤
- ①修改mybatis-config.xml, 开启缓存
- cacheEnabled=true
- ②代码测试
- ①修改mybatis-config.xml, 开启缓存
-
①修改mybatis-config.xml, 开启缓存
<settings><!--缓存--><setting name="cacheEnabled" value="true"/> </settings> -
②代码测试
@Test
public void getById() throws Exception {SqlSession sqlSession = sqlSessionFactory.openSession();UserMapper userMapper = sqlSession.getMapper(UserMapper.class);//操作数据库, 并将结果保存到一级缓存User user = userMapper.getById(1);System.out.println("user = " + user);//直接使用一级缓存user = userMapper.getById(1);System.out.println("user = " + user);sqlSession.close();
}
44-一级缓存的清空
-
概述
- 为了保证缓存数据的时效性, 需要及时地(
添加,删除,修改)清空一级缓存, 存入新的数据. - 当然, 程序员也可以通过SqlSession.clearCache方法来清空一级缓存.
- 为了保证缓存数据的时效性, 需要及时地(
-
代码实现
@Test
public void getById2() throws Exception {SqlSession sqlSession = sqlSessionFactory.openSession();UserMapper userMapper = sqlSession.getMapper(UserMapper.class);//操作数据库, 并将结果保存到一级缓存User user = userMapper.getById(1);System.out.println("user = " + user);//增删改清空一级缓存//userMapper.insert(new User(null , "阿怡","ayi"));//手动清空一级缓存sqlSession.clearCache();//操作数据库, 并将结果保存到一级缓存user = userMapper.getById(1);System.out.println("user = " + user);//使用一级缓存user = userMapper.getById(1);System.out.println("user = " + user);sqlSession.close();
}
45-二级缓存的验证
-
开发步骤
- ①修改mybatis-config.xml, 开启缓存全局开关
- cacheEnabled=true
- ②修改mapper映射文件, 开启缓存局部开关
- 添加
cache标签 - 在指定的statement上使用
useCache=true|false
- 添加
- ③实体类实现Serializable接口
- ③代码测试
- ①修改mybatis-config.xml, 开启缓存全局开关
-
①修改mybatis-config.xml, 开启缓存全局开关
- 参考
07-一级缓存的验证
- 参考
-
②修改mapper映射文件, 开启缓存局部开关
<?xml version="1.0" encoding="UTF-8" ?> <!DOCTYPE mapperPUBLIC "-//mybatis.org//DTD Mapper 3.0//EN""https://mybatis.org/dtd/mybatis-3-mapper.dtd"> <mapper namespace="com.qh.mapper.UserMapper"><cache></cache><select id="getById" resultType="User" useCache="true">select * from t_user where user_id = #{userId}</select><insert id="insert">insert into t_user values(null,#{userName},#{userPwd})</insert></mapper> -
③实体类实现Serializable接口
public class User implements Serializable {private Integer userId;private String userName;private String userPwd;} -
④代码测试
//09-二级缓存的验证 @Test public void getById3() throws Exception {//①第一个SqlSessionSqlSession sqlSession = sqlSessionFactory.openSession();UserMapper userMapper = sqlSession.getMapper(UserMapper.class);//操作数据库, 并将数据存储到一级缓存User user = userMapper.getById(1);System.out.println("user = " + user);//使用一级缓存user = userMapper.getById(1);System.out.println("user = " + user);//将一级缓存清空并存储到二级缓存sqlSession.close();//②第二个SqlSessionsqlSession = sqlSessionFactory.openSession();userMapper = sqlSession.getMapper(UserMapper.class);//使用二级缓存user = userMapper.getById(1);System.out.println("user = " + user);sqlSession.close();//③第三个SqlSessionsqlSession = sqlSessionFactory.openSession();userMapper = sqlSession.getMapper(UserMapper.class);//使用二级缓存user = userMapper.getById(1);System.out.println("user = " + user);sqlSession.close(); } -
二级缓存命中率
- [外链图片转存失败,源站可能有防盗链机制,建议将图片保存下来直接上传(img-tVsPvCV4-1676283014372)(null)]
46-EHCache二级缓存
-
概述
- Ehcache是一种开源的、基于标准的缓存,可以提高性能、减轻数据库负担,并简化可扩展性。它是 使用最广泛的基于Java的缓存,因为它健壮、经过验证、功能齐全,并且与其他流行的库和框架集 成。
-
开发步骤
- ①引入依赖
- ②编写ehcache.xml配置文件
- ③修改mapper映射文件, 指定使用ehcache
- ④代码测试
-
①引入依赖
<dependency><groupId>org.mybatis.caches</groupId><artifactId>mybatis-ehcache</artifactId><version>1.2.3</version> </dependency> -
②编写ehcache.xml配置文件
<?xml version="1.0" encoding="UTF-8"?> <ehcache xmlns:xsi="http://www.w3.org/2001/XMLSchema-instance"xsi:noNamespaceSchemaLocation="http://ehcache.org/ehcache.xsd"><!-- 磁盘保存路径 --><diskStore path="D:\mybatis-ehcache"/><defaultCachemaxElementsInMemory="1000"maxElementsOnDisk="10000000"eternal="false"overflowToDisk="true"timeToIdleSeconds="120"timeToLiveSeconds="120"diskExpiryThreadIntervalSeconds="120"memoryStoreEvictionPolicy="LRU"></defaultCache> </ehcache> -
③修改mapper映射文件, 指定使用ehcache
<?xml version="1.0" encoding="UTF-8" ?> <!DOCTYPE mapperPUBLIC "-//mybatis.org//DTD Mapper 3.0//EN""https://mybatis.org/dtd/mybatis-3-mapper.dtd"> <mapper namespace="com.qh.mapper.UserMapper"><cache type="org.mybatis.caches.ehcache.EhcacheCache"></cache><select id="getById" resultType="User" useCache="true">select * from t_user where user_id = #{userId}</select></mapper> -
④代码测试
- 参考
44-二级缓存的验证
- 参考
47-EHCache配置参数
- 配置参数
- [外链图片转存失败,源站可能有防盗链机制,建议将图片保存下来直接上传(img-4EvnD2ba-1676283012289)(null)]
48-mybatis逆向工程概述
- 概述
- 正向工程: 实体类 -> 表, dao接口, mapper映射文件
- 逆向工程: 表-> 实体类, dao接口, mapper映射文件
49-mybatis逆向工程操作
-
开发步骤
- ①新建逆向工程项目: mybatis-generator-project
- ②配置pom.xml
- ③配置generatorConfig.xml, 逆向工程核心配置文件
- ④执行逆向操作
- ⑤查看效果
-
①新建逆向工程项目: mybatis-generator-project
-
②配置pom.xml
<dependencies><dependency><groupId>org.mybatis</groupId><artifactId>mybatis</artifactId><version>3.5.11</version></dependency> </dependencies> <!-- 控制Maven在构建过程中相关配置 --> <build><!-- 构建过程中用到的插件 --><plugins><!-- 具体插件,逆向工程的操作是以构建过程中插件形式出现的 --><plugin><groupId>org.mybatis.generator</groupId><artifactId>mybatis-generator-maven-plugin</artifactId><version>1.3.0</version><!-- 插件的依赖 --><dependencies><!-- 逆向工程的核心依赖 --><dependency><groupId>org.mybatis.generator</groupId><artifactId>mybatis-generator-core</artifactId><version>1.3.2</version></dependency><!-- 数据库连接池 --><dependency><groupId>com.mchange</groupId><artifactId>c3p0</artifactId><version>0.9.2</version></dependency><!-- MySQL驱动 --><dependency><groupId>mysql</groupId><artifactId>mysql-connector-java</artifactId><version>8.0.32</version></dependency></dependencies></plugin></plugins> </build> -
③配置generatorConfig.xml, 逆向工程核心配置文件
<?xml version="1.0" encoding="UTF-8"?> <!DOCTYPE generatorConfigurationPUBLIC "-//mybatis.org//DTD MyBatis Generator Configuration 1.0//EN""http://mybatis.org/dtd/mybatis-generator-config_1_0.dtd"> <generatorConfiguration><!--targetRuntime: 执行生成的逆向工程的版本MyBatis3Simple: 生成基本的CRUD(清新简洁版)MyBatis3: 生成带条件的CRUD(奢华尊享版)--><context id="DB2Tables" targetRuntime="MyBatis3"><!-- 数据库的连接信息 --><jdbcConnection driverClass="com.mysql.jdbc.Driver"connectionURL="jdbc:mysql://127.0.0.1:3306/mydb1"userId="root"password="root"></jdbcConnection><!-- javaBean的生成策略--><javaModelGenerator targetPackage="com.atguigu.pojo" targetProject=".\src\main\java"><property name="enableSubPackages" value="true"/><property name="trimStrings" value="true"/></javaModelGenerator><!-- SQL映射文件的生成策略 --><sqlMapGenerator targetPackage="com.atguigu.mapper" targetProject=".\src\main\java"><property name="enableSubPackages" value="true"/></sqlMapGenerator><!-- Mapper接口的生成策略 --><javaClientGenerator type="XMLMAPPER" targetPackage="com.atguigu.mapper"targetProject=".\src\main\java"><property name="enableSubPackages" value="true"/></javaClientGenerator><!-- 逆向分析的表 --><!-- tableName设置为*号,可以对应所有表,此时不写domainObjectName --><!-- domainObjectName属性指定生成出来的实体类的类名 --><table tableName="t_user" domainObjectName="User"/></context> </generatorConfiguration> -
④执行逆向操作
- [外链图片转存失败,源站可能有防盗链机制,建议将图片保存下来直接上传(img-vcs1Tp6w-1676283012724)(null)]
-
双击运行生成
50-QBC查询
-
[外链图片转存中…(img-jDgDHKOb-1676283111659)]
-
[外链图片转存失败,源站可能有防盗链机制,建议将图片保存下来直接上传(img-paEpJpla-1676283014630)(null)]
-
概述
- QBC: Query By Criteria
- QBC查询最大的特点就是将SQL语句中的WHERE子句进行了组件化的封装,让我们可以通过调用Criteria 对象的方法自由的拼装查询条件
-
开发步骤
- ①将
mybatis-generator-project项目生成的资料拷贝到项目 - ②代码测试
- ①将
-
①将
mybatis-generator-project项目生成的资料拷贝到项目 -
②代码测试
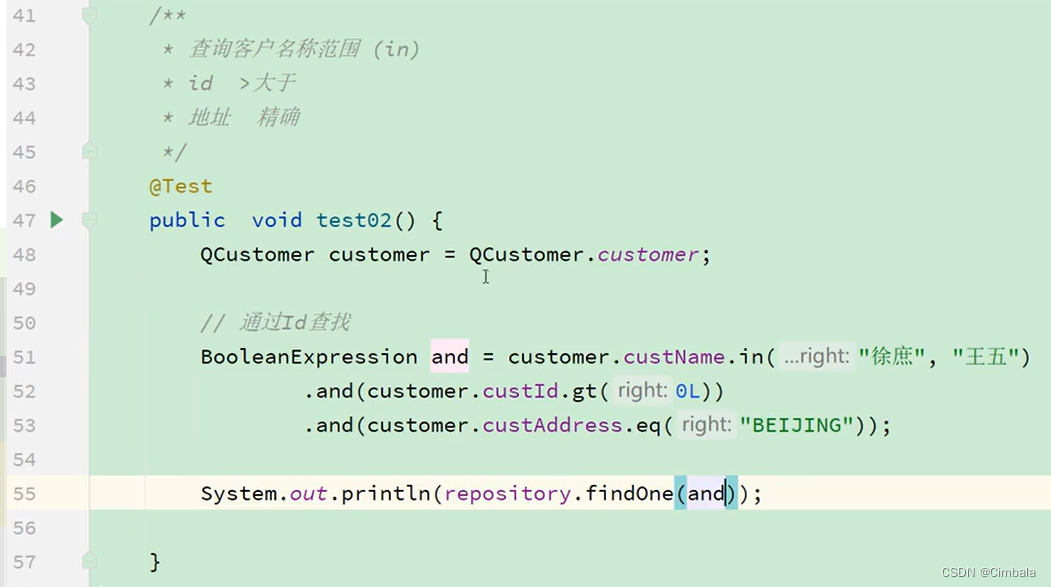
public class UserMapperTest {private SqlSessionFactory sqlSessionFactory;@Beforepublic void init() throws IOException {sqlSessionFactory = new SqlSessionFactoryBuilder().build(Resources.getResourceAsStream("mybatis-config.xml"));}//添加记录, 固定SQL@Testpublic void insert() {SqlSession sqlSession = sqlSessionFactory.openSession();UserMapper userMapper = sqlSession.getMapper(UserMapper.class);User inputUser = new User(null, "刘宇豪", "haohao");userMapper.insert(inputUser);sqlSession.commit();sqlSession.close();}//添加记录, 动态SQL@Testpublic void insertSelective() {SqlSession sqlSession = sqlSessionFactory.openSession();UserMapper userMapper = sqlSession.getMapper(UserMapper.class);User inputUser = new User(null, "刘宇豪", "haohao");userMapper.insertSelective(inputUser);sqlSession.commit();sqlSession.close();}/*** 删除记录, 根据主键. 固定SQL*/@Testpublic void deleteByPrimaryKey() {SqlSession sqlSession = sqlSessionFactory.openSession();UserMapper userMapper = sqlSession.getMapper(UserMapper.class);userMapper.deleteByPrimaryKey(8);sqlSession.commit();sqlSession.close();}/*** 删除记录, 根据criteria删除, where动态SQL*/@Testpublic void deleteByExample() {SqlSession sqlSession = sqlSessionFactory.openSession();UserMapper userMapper = sqlSession.getMapper(UserMapper.class);UserExample example = new UserExample();UserExample.Criteria criteria1 = example.createCriteria();criteria1.andUserIdEqualTo(1);criteria1.andUserNameEqualTo("好好");UserExample.Criteria criteria2 = example.or();criteria2.andUserIdEqualTo(2);userMapper.deleteByExample(example);//sqlSession.commit();sqlSession.close();}/*** 查询记录, 根据主键查询, 固定SQL*/@Testpublic void selectByPrimaryKey() {SqlSession sqlSession = sqlSessionFactory.openSession();UserMapper userMapper = sqlSession.getMapper(UserMapper.class);User user = userMapper.selectByPrimaryKey(1);System.out.println("user = " + user);sqlSession.close();}/*** 查询记录, 根据Criteria查询, where动态SQL*/@Testpublic void selectByExample() {SqlSession sqlSession = sqlSessionFactory.openSession();UserMapper userMapper = sqlSession.getMapper(UserMapper.class);UserExample example = new UserExample();UserExample.Criteria criteria = example.createCriteria();criteria.andUserIdBetween(1, 10);List<User> userList = userMapper.selectByExample(example);System.out.println("userList = " + userList);sqlSession.close();}/*** 统计记录, 根据Criteria查询, where动态SQL*/@Testpublic void countByExample() {}/*** 修改记录, 根据主键, 固定SQL*/@Testpublic void updateByPrimaryKey() {SqlSession sqlSession = sqlSessionFactory.openSession();UserMapper userMapper = sqlSession.getMapper(UserMapper.class);userMapper.updateByPrimaryKey(new User(1, "a", "a"));//sqlSession.commit();sqlSession.close();}/*** 修改记录, 根据主键, set动态SQL*/@Testpublic void updateByPrimaryKeySelective() {SqlSession sqlSession = sqlSessionFactory.openSession();UserMapper userMapper = sqlSession.getMapper(UserMapper.class);userMapper.updateByPrimaryKeySelective(new User(1, null, "a"));//sqlSession.commit();sqlSession.close();}/*** 修改记录, 根据Criteria, set固定SQL, where动态SQL*/@Testpublic void updateByExample() {SqlSession sqlSession = sqlSessionFactory.openSession();UserMapper userMapper = sqlSession.getMapper(UserMapper.class);User inputUser = new User(1, null, "a");UserExample example = new UserExample();UserExample.Criteria criteria = example.createCriteria();criteria.andUserIdEqualTo(1);userMapper.updateByExample(inputUser, example);//sqlSession.commit();sqlSession.close();}/*** 修改记录, 根据Criteria, set动态SQL, where动态SQL*/@Testpublic void updateByExampleSelective() {SqlSession sqlSession = sqlSessionFactory.openSession();UserMapper userMapper = sqlSession.getMapper(UserMapper.class);User inputUser = new User(1, null, "a");UserExample example = new UserExample();UserExample.Criteria criteria = example.createCriteria();criteria.andUserIdEqualTo(1);userMapper.updateByExampleSelective(inputUser, example);//sqlSession.commit();sqlSession.close();}} -
注意事项
- 多个Cretiria对象之间用
or分割, Criteria对象内部条件用and分割.
- 多个Cretiria对象之间用
51-mybatis注解开发概述
- 概述
- 使用注解配置替代xml配置(映射配置文件)
- 常用注解
- @Insert, @Delete, @Update, @Select, @Results, @Many, @One, @Result
52-mybatis注解操作CRUD
-
代码实现
public interface TeacherMapper {@Insert("insert into t_teacher values(null,#{name},#{password})")int insert(Teacher teacher) throws Exception;@Delete("delete from t_teacher where id = #{id}")int delete(Integer id) throws Exception;@Update("update t_teacher set name=#{name}, password=#{password} where id = #{id}")int update(Teacher teacher) throws Exception;@Select("select * from t_teacher where id = #{id}")Teacher getById(Integer id) throws Exception;}
53-mybatis复杂关系映射注解说明(掌握)
-
回顾
<resultMap><id></id><result></result><association></association><collection></collection> </resultMap> -
①@Results
- 等价于
<resultMap>标签 - 有多个
@Result注解
- 等价于
-
②@Result
- @Result(id = true) 等价于
<id>标签 - @Result(id = false) 等价于
<result>标签 - @Result(id = false,one=@One ) 等价于
<association>标签, 一对一查询 - @Result(id = false,many=@Many ) 等价于
<collection>标签, 一对多查询
- @Result(id = true) 等价于
-
③@One
- 一对一查询
-
④@Many
- 一对多查询
54-mybatis注解实现一对一查询
-
需求
- 根据订单信息查询用户信息
-
①第一次单表查询
//01-分步查询之一对一 @Results({@Result(id = true, column = "order_id", property = "orderId", javaType = Integer.class),@Result(column = "order_name", property = "orderName", javaType = String.class),@Result(column = "order_state", property = "orderState", javaType = String.class),@Result(property = "customer",javaType = Customer.class,column = "customer_id",//1.2,调用第二次单表查询one = @One(select = "com.atguigu.mapper.CustomerMapper.getById", fetchType = FetchType.LAZY)) }) //1.1,第一次单表查询 @Select("select * from t_order where order_id = #{orderId}") Order getById(Integer id) throws Exception; -
②第二次单表查询
//01-分步查询之一对一
//1.3,第二次单表查询@Select("select * from t_customer where customer_id = #{customerId}")
Customer getById(Integer id) throws Exception;
55-mybatis注解实现一对多查询
-
需求
- 根据用户信息查询订单信息
-
①第一次单表查询
//02-分步查询之一对多 //2.2,调用第二次单表查询 @Results({@Result(id = true, column = "customer_id", property = "customerId", javaType = Integer.class),@Result(column = "customer_name", property = "customerName", javaType = String.class),@Result(column = "address", property = "address", javaType = String.class),@Result(property = "orderList",many = @Many(select = "com.atguigu.mapper.OrderMapper.findByCustomerId",fetchType = FetchType.LAZY),column = "customer_id"),}) //2.1, 第一次单表查询 @Select("select * from t_customer where customer_name = #{customerName}") Customer getByName(String name) throws Exception; -
②第二次单表查询
//02-分步查询之一对多 //2.3,第二次单表查询 @Select("select * from t_order where customer_id = #{customerId}") List<Order> findByCustomerId(Integer customerId) throws Exception; -
思考: mybatis注解如何实现动态SQL?
- 构建SQL , 使用mybatis内置API ; SQL , values(), …
相关文章:

Mybatis的学习
01-mybatis传统dao开发模式 概述 mybatis有两种使用模式: ①传统dao开发模式, ②dao接口代理开发模式 ①传统dao开发模式 dao接口 dao实现子类 mapper映射文件dao实现子类来决定了dao接口的方法和mapper映射文件的statement的关系 代码实现 public class StudentDaoImpl im…...
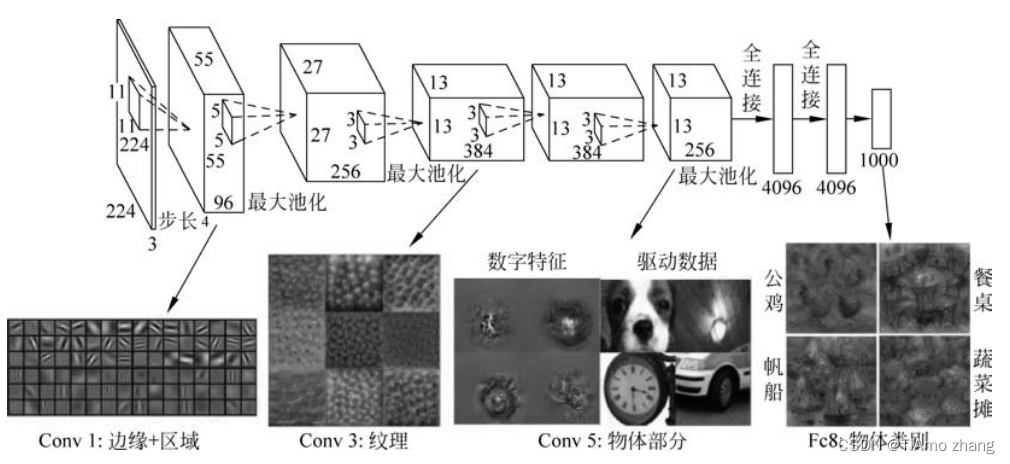
PyTorch深度学习实战 | 计算机视觉
深度学习领域技术的飞速发展,给人们的生活带来了很大改变。例如,智能语音助手能够与人类无障碍地沟通,甚至在视频通话时可以提供实时翻译;将手机摄像头聚焦在某个物体上,该物体的相关信息就会被迅速地反馈给使用者&…...
436. 寻找右区间(2023.03.10))
力扣(LeetCode)436. 寻找右区间(2023.03.10)
给你一个区间数组 intervals ,其中 intervals[i] [starti, endi] ,且每个 starti 都 不同 。 区间 i 的 右侧区间 可以记作区间 j ,并满足 startj > endi ,且 startj 最小化 。 返回一个由每个区间 i 的 右侧区间 在 interv…...
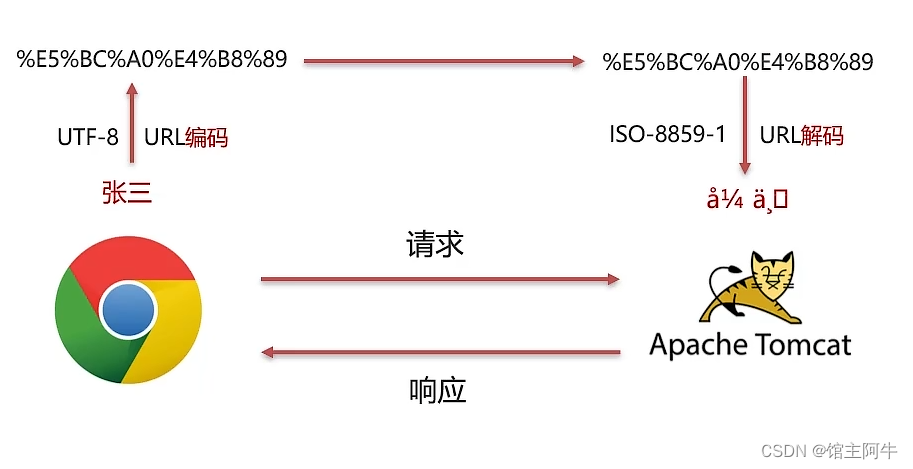
已解决Servlet中Request请求参数中文乱码的问题
📋 个人简介 💖 作者简介:大家好,我是阿牛,全栈领域优质创作者。😜📝 个人主页:馆主阿牛🔥🎉 支持我:点赞👍收藏⭐️留言Ὅ…...

【flask】URL和视图映射
目录 首页 传参 URL数据类型 get传参 首页 url与视图函数的映射是通过app.route()装饰器实现的。 只有一个斜杠代表的是根目录——首页。 传参 URL传参是通过<参数名称>的形式进行传递。URL中有几个参数,在视图函数中也要指定几个参数 from flask im…...

Python实现性能测试(locust)
一、安装locustpip install locust -- 安装(在pycharm里面安装或cmd命令行安装都可)locust -V -- 查看版本,显示了就证明安装成功了或者直接在Pycharm中安装locust:搜索locust并点击安装,其他的第三方包也可以通过这种方式二、loc…...
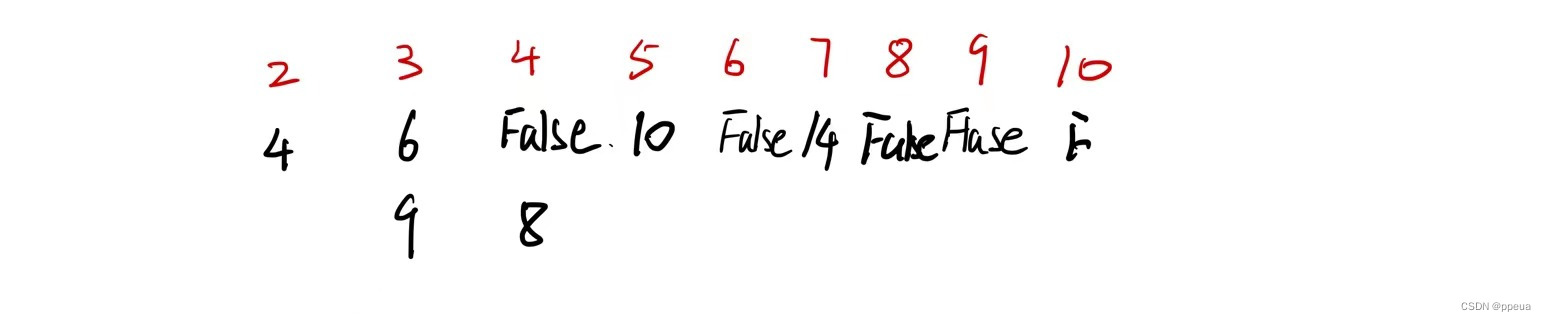
【数论】试除法判断质数,分解质因数,筛质数
Halo,这里是Ppeua。平时主要更新C语言,C,数据结构算法......感兴趣就关注我吧!你定不会失望。 🌈个人主页:主页链接 🌈算法专栏:专栏链接 现已更新完KMP算法、排序模板,之…...
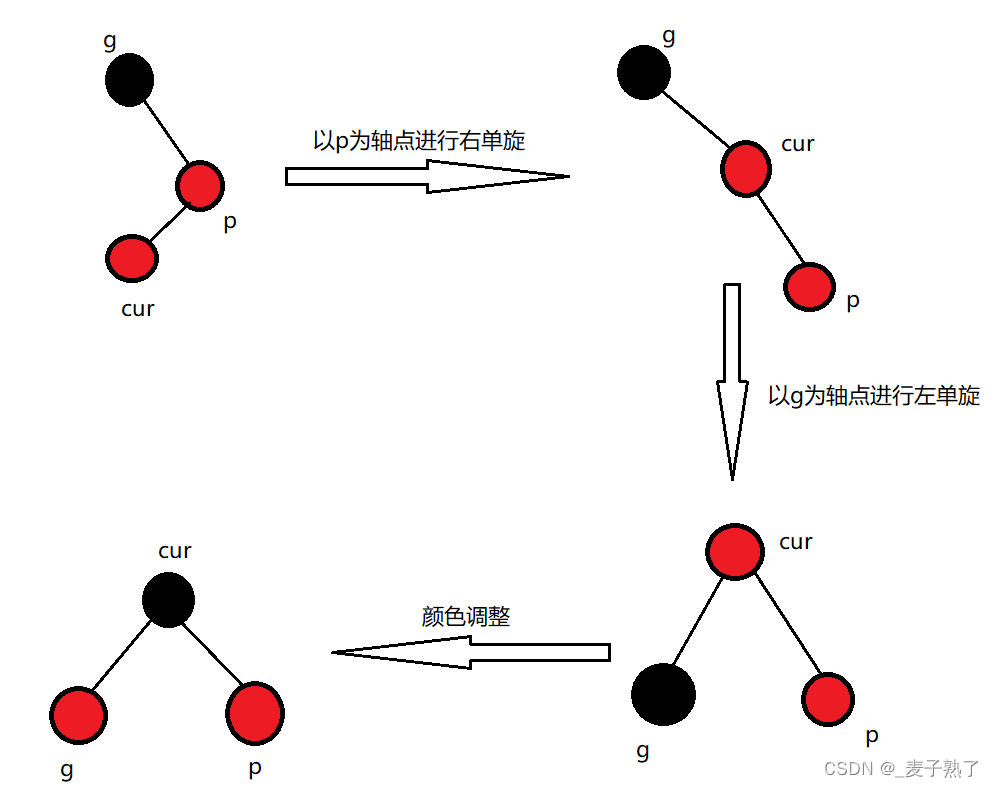
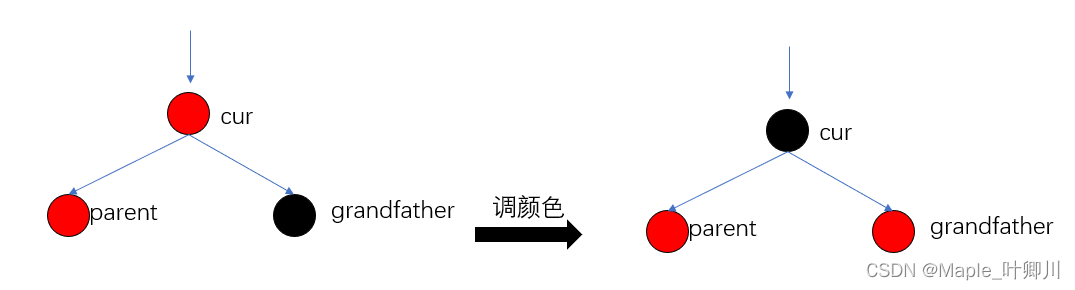
【C++】红黑树
文章目录红黑树的概念红黑树的性质特征红黑树结点的定义红黑树的插入操作情况1情况2情况3特殊情况代码实现红黑树的验证红黑树的删除红黑树和AVL树的比较红黑树的应用红黑树的概念 红黑树,是一种二叉搜索树,但是每一个结点都增加一个存储位表示结点的颜…...
【剧前爆米花--爪哇岛寻宝】进程的调度以及并发和并行,以及PCB中属性的详解。
作者:困了电视剧 专栏:《JavaEE初阶》 文章分布:这是关于进程调度、并发并行以及相关属性详解的文章,我会在之后文章中更新有关线程的相关知识,并将其与进程进行对比,希望对你有所帮助。 目录 什么是进程/…...
网络的瓶颈效应
python从小白到总裁完整教程目录:https://blog.csdn.net/weixin_67859959/article/details/129328397?spm1001.2014.3001.5501 ❤ 网络的瓶颈效应 网络瓶颈,指的是影响网络传输性能及稳定性的一些相关因素,如网络拓扑结构,网线࿰…...
【C++进阶】四、红黑树(三)
目录 一、红黑树的概念 二、红黑树的性质 三、红黑树节点的定义 四、红黑树的插入 五、红黑树的验证 六、红黑树与AVL树的比较 七、完整代码 一、红黑树的概念 红黑树,是一种二叉搜索树,但在每个结点上增加一个存储位表示结点的颜色,可…...

Spring——AOP切入点表达式和AOP通知类型
切入点:要进行增强的方法 切入点表达式:要进行增强的方法的描述式 第一种方法的本质是基于接口实现的动态代理(jdk) 第二种是基于cglib实现的动态代理 AOP切入点表达式 而需要加载多个切入点时,不可能每个切入点都写一个切入点表达式 例子 下面的代理描述的是匹配…...
Hadoop学习:Yarn
1.YARN介绍 一个通用的资源管理系统和调度平台 YARN不分配磁盘,由HDFS分配 相当于一个分布式的操作系统平台,为上层MR等计算程序提供运算所需要的资源(内存、CPU等) 2.YARN三大组件 不要忘记AppMaster,他是程序内部…...
Spring Data JPA
文章目录一、Spring Data基础概念二、JPA与JDBC的相同与不同之处三、Hibernate & JPA快速搭建1.添加依赖2.实体类3.hibernate的配置文件 ——hibernate.cfg.xml四、测试——基于hibernate的持久化(单独使用)五、测试——基于JPA的持久化(…...

java List报错Method threw ‘java.lang.UnsupportedOperationException‘ exception. 解决
问题描述:List使用Arrays.asList()初始化后,再add对象时报错:Method threw java.lang.UnsupportedOperationException exception.错误示例如下: List<ExportListVO.ExportSheet> sheetVOList Arrays.asList(new ExportList…...
数据结构-用栈实现队列
前言: 请你仅使用两个栈实现先入先出队列。队列应当支持一般队列支持的所有操作(push、pop、peek、empty): 实现 MyQueue 类: void push(int x) 将元素 x 推到队列的末尾 int pop() 从队列的开头移除并返回元素 int…...

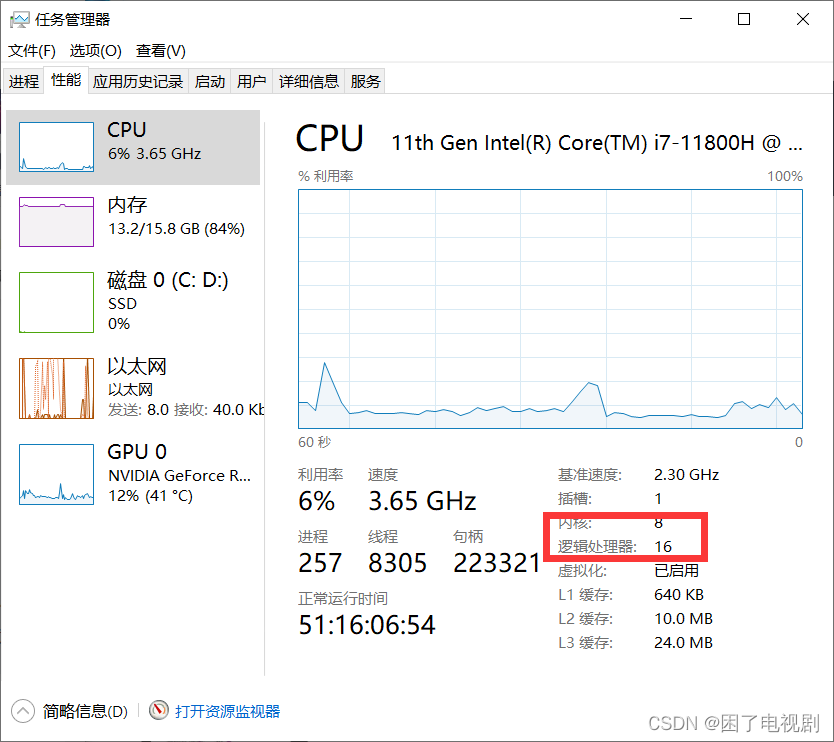
第十四章 从 Windows 客户端控制 IRIS
文章目录第十四章 从 Windows 客户端控制 IRISIRISctlGetDirsSyntaxReturn ValuesIRISctlConfigStatusSyntaxReturn ValuesIRISctlControlSyntaxReturn Values第十四章 从 Windows 客户端控制 IRIS IRIS 为 Windows 客户端程序提供了一种机制来控制 IRIS 配置并启动 IRIS 进程…...
数据结构---双链表
专栏:数据结构 个人主页:HaiFan. 专栏简介:从零开始,数据结构!! 双链表前言双链表各接口的实现为要插入的值开辟一块空间BuyLN初始化LNInit和销毁LNDestory打印链表中的值LNPrint尾插LNPushBack和尾删LNPop…...

Windows 环境安装Scala详情
为了进一步学习Spark,必须先学习Scala 编程语言。首先开始Scala 环境搭建。温馨提示:本文是基于Windows 11 安装Scala 2.13.1 版本第一步:确保本机已经正确安装JDK1.8 环境第二步:Scala 官网下载我们所属scala版本文件。Scala 官网…...
C++ Qt自建网页浏览器
C Qt自建网页浏览器如需安装运行环境或远程调试,见文章底部个人QQ名片,由专业技术人员远程协助!前言这篇博客针对<<C Qt自建网页浏览器>>编写代码,代码整洁,规则,易读。 学习与应用推荐首选。文…...

抖音增长新引擎:品融电商,一站式全案代运营领跑者
抖音增长新引擎:品融电商,一站式全案代运营领跑者 在抖音这个日活超7亿的流量汪洋中,品牌如何破浪前行?自建团队成本高、效果难控;碎片化运营又难成合力——这正是许多企业面临的增长困局。品融电商以「抖音全案代运营…...
2.Vue编写一个app
1.src中重要的组成 1.1main.ts // 引入createApp用于创建应用 import { createApp } from "vue"; // 引用App根组件 import App from ./App.vue;createApp(App).mount(#app)1.2 App.vue 其中要写三种标签 <template> <!--html--> </template>…...
【CSS position 属性】static、relative、fixed、absolute 、sticky详细介绍,多层嵌套定位示例
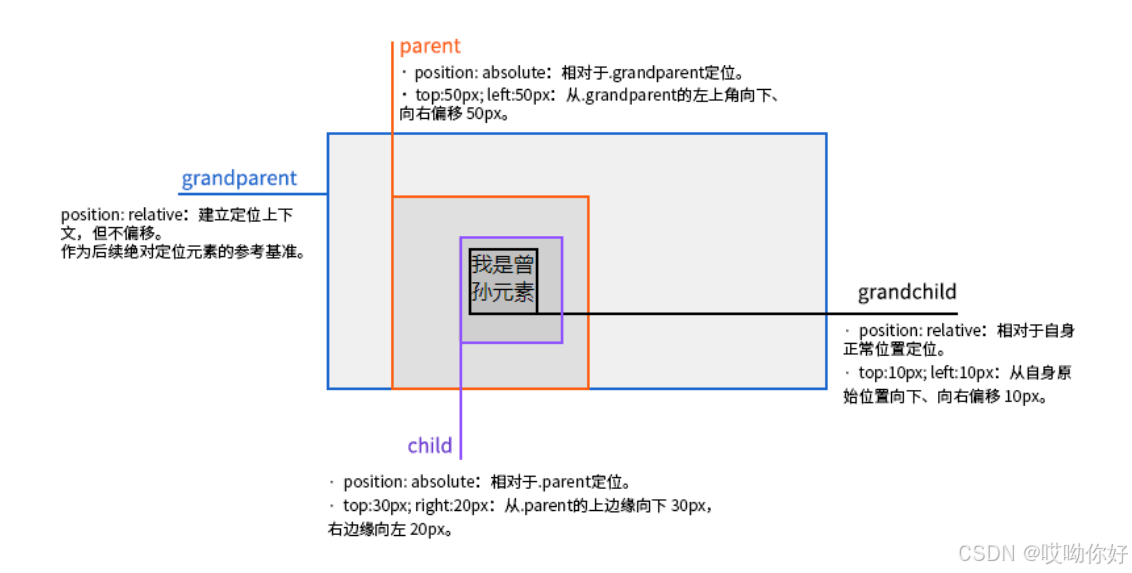
文章目录 ★ position 的五种类型及基本用法 ★ 一、position 属性概述 二、position 的五种类型详解(初学者版) 1. static(默认值) 2. relative(相对定位) 3. absolute(绝对定位) 4. fixed(固定定位) 5. sticky(粘性定位) 三、定位元素的层级关系(z-i…...

基于数字孪生的水厂可视化平台建设:架构与实践
分享大纲: 1、数字孪生水厂可视化平台建设背景 2、数字孪生水厂可视化平台建设架构 3、数字孪生水厂可视化平台建设成效 近几年,数字孪生水厂的建设开展的如火如荼。作为提升水厂管理效率、优化资源的调度手段,基于数字孪生的水厂可视化平台的…...
)
python爬虫:Newspaper3k 的详细使用(好用的新闻网站文章抓取和解析的Python库)
更多内容请见: 爬虫和逆向教程-专栏介绍和目录 文章目录 一、Newspaper3k 概述1.1 Newspaper3k 介绍1.2 主要功能1.3 典型应用场景1.4 安装二、基本用法2.2 提取单篇文章的内容2.2 处理多篇文档三、高级选项3.1 自定义配置3.2 分析文章情感四、实战案例4.1 构建新闻摘要聚合器…...

反射获取方法和属性
Java反射获取方法 在Java中,反射(Reflection)是一种强大的机制,允许程序在运行时访问和操作类的内部属性和方法。通过反射,可以动态地创建对象、调用方法、改变属性值,这在很多Java框架中如Spring和Hiberna…...

今日科技热点速览
🔥 今日科技热点速览 🎮 任天堂Switch 2 正式发售 任天堂新一代游戏主机 Switch 2 今日正式上线发售,主打更强图形性能与沉浸式体验,支持多模态交互,受到全球玩家热捧 。 🤖 人工智能持续突破 DeepSeek-R1&…...

CRMEB 框架中 PHP 上传扩展开发:涵盖本地上传及阿里云 OSS、腾讯云 COS、七牛云
目前已有本地上传、阿里云OSS上传、腾讯云COS上传、七牛云上传扩展 扩展入口文件 文件目录 crmeb\services\upload\Upload.php namespace crmeb\services\upload;use crmeb\basic\BaseManager; use think\facade\Config;/*** Class Upload* package crmeb\services\upload* …...

智能分布式爬虫的数据处理流水线优化:基于深度强化学习的数据质量控制
在数字化浪潮席卷全球的今天,数据已成为企业和研究机构的核心资产。智能分布式爬虫作为高效的数据采集工具,在大规模数据获取中发挥着关键作用。然而,传统的数据处理流水线在面对复杂多变的网络环境和海量异构数据时,常出现数据质…...
)
GitHub 趋势日报 (2025年06月06日)
📊 由 TrendForge 系统生成 | 🌐 https://trendforge.devlive.org/ 🌐 本日报中的项目描述已自动翻译为中文 📈 今日获星趋势图 今日获星趋势图 590 cognee 551 onlook 399 project-based-learning 348 build-your-own-x 320 ne…...