TensorBoard进阶
文章目录
- TensorBoard进阶
- 1.设置TensorBoard
- 2.图像数据在TensorBoard中可视化
- 3.模型结构在TensorBoard中可视化(重点✅)
- 4.高维数据在TensorBoard中低维可视化
- 5.利用TensorBoard跟踪模型的训练过程(重点✅)
- 6.利用TensorBoard给每个类绘制PR曲线
- 参考
TensorBoard进阶
本教程使用TensorBoard可视化模型、数据和训练过程。展示了如何加载数据,通过定义为nn.Module子类的模型将其输入,在训练数据上训练该模型,并在测试数据上测试它。为了了解发生了什么,我们在模型训练时打印出一些统计数据,以了解训练是否正在进行。然而,我们可以做得更好:PyTorch与TensorBoard集成,TensorBoard是一种旨在可视化神经网络训练运行结果的工具。本教程使用Fashion-MNIST数据集说明了它的一些功能,该数据集可以使用torchvision.datasets读入PyTorch。
引导代码:直接运行,知道每个功能模块是干什么的就可以了。
# imports
import matplotlib.pyplot as plt
import numpy as npimport torch
import torchvision
import torchvision.transforms as transformsimport torch.nn as nn
import torch.nn.functional as F
import torch.optim as optim# transforms
# 给下面的datasets做准备,就是对图像进行处理的,将图像数据转换为张量。
transform = transforms.Compose([transforms.ToTensor(),transforms.Normalize((0.5,), (0.5,))])# datasets
# 创建并加载FashionMNIST训练集与测试集,并对图像数据进行了预处理。
trainset = torchvision.datasets.FashionMNIST('./data',download=True,train=True,transform=transform)
testset = torchvision.datasets.FashionMNIST('./data',download=True,train=False,transform=transform)# dataloaders
# 定义了train dataloader与test dataloader,用于加载数据的。
trainloader = torch.utils.data.DataLoader(trainset, batch_size=4,shuffle=True, num_workers=2)testloader = torch.utils.data.DataLoader(testset, batch_size=4,shuffle=False, num_workers=2)# constant for classes
# 类别标签
classes = ('T-shirt/top', 'Trouser', 'Pullover', 'Dress', 'Coat','Sandal', 'Shirt', 'Sneaker', 'Bag', 'Ankle Boot')# helper function to show an image
# (used in the `plot_classes_preds` function below)
# 显示图像的函数
def matplotlib_imshow(img, one_channel=False):if one_channel:img = img.mean(dim=0)img = img / 2 + 0.5     # unnormalizenpimg = img.numpy()if one_channel:plt.imshow(npimg, cmap="Greys")else:plt.imshow(np.transpose(npimg, (1, 2, 0)))
# 定义了一个Net模型
class Net(nn.Module):def __init__(self):super(Net, self).__init__()self.conv1 = nn.Conv2d(1, 6, 5)  # 二维卷积self.pool = nn.MaxPool2d(2, 2)  # 最大池化self.conv2 = nn.Conv2d(6, 16, 5)  # 二维卷积self.fc1 = nn.Linear(16 * 4 * 4, 120)  # 全连接self.fc2 = nn.Linear(120, 84)  # 全连接self.fc3 = nn.Linear(84, 10)   # 全连接def forward(self, x):x = self.pool(F.relu(self.conv1(x)))x = self.pool(F.relu(self.conv2(x)))x = x.view(-1, 16 * 4 * 4)x = F.relu(self.fc1(x))x = F.relu(self.fc2(x))x = self.fc3(x)return xnet = Net()
criterion = nn.CrossEntropyLoss() # 交叉熵损失
optimizer = optim.SGD(net.parameters(), lr=0.001, momentum=0.9) # SGD优化器
1.设置TensorBoard
from torch.utils.tensorboard import SummaryWriter# default `log_dir` is "runs" - we'll be more specific here
# 创建SummaryWriter实例
writer = SummaryWriter('runs/fashion_mnist_experiment_1')
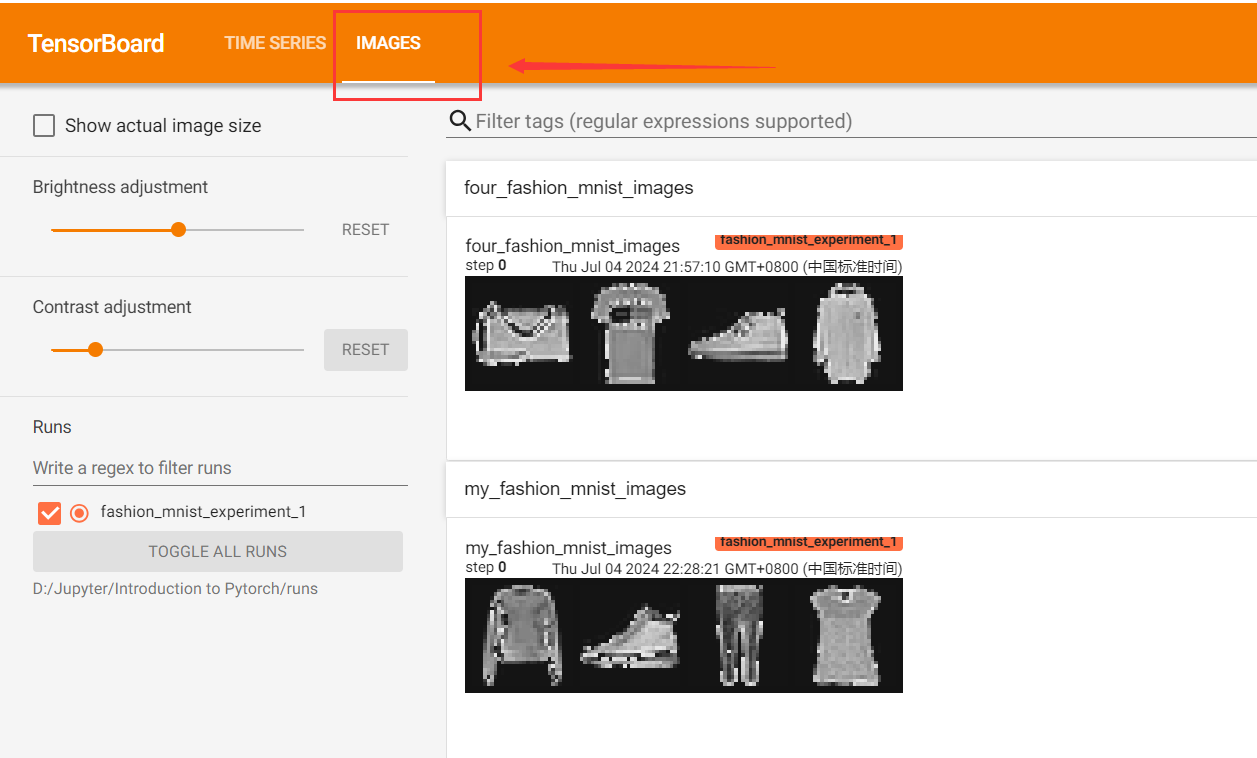
2.图像数据在TensorBoard中可视化
利用add_image(tag, img_tensor, global_step=None, walltime=None, dataformats='CHW')函数将图像数据添加到Writer中。
writer.add_image('tag', image_tensor)
Examples:
# get some random training images
dataiter = iter(trainloader)
images, labels = next(dataiter)# create grid of images
img_grid = torchvision.utils.make_grid(images)# show images
matplotlib_imshow(img_grid, one_channel=True)# write to tensorboard
# 一个标签只对应一组图片,尽管这段运行多次,代码中呈现的是不同的图片组,但是写入tensorboard中的图片组仅是第一次运行所保存的图片组。
writer.add_image('four_fashion_mnist_images', img_grid)
注意:pillow版本应该低于10.0.0,否则会报错module 'pil.image' has no attribute 'antialias'。
现在启动TensorBoard,注意要写全路径,或者在对应的目录下直接tensorboard --logdir runs。Windows下和Linux下不同,Windows下路径需要用引号包括,Linux不用。
tensorboard --logdir "D:\Jupyter\Introduction to Pytorch\runs"

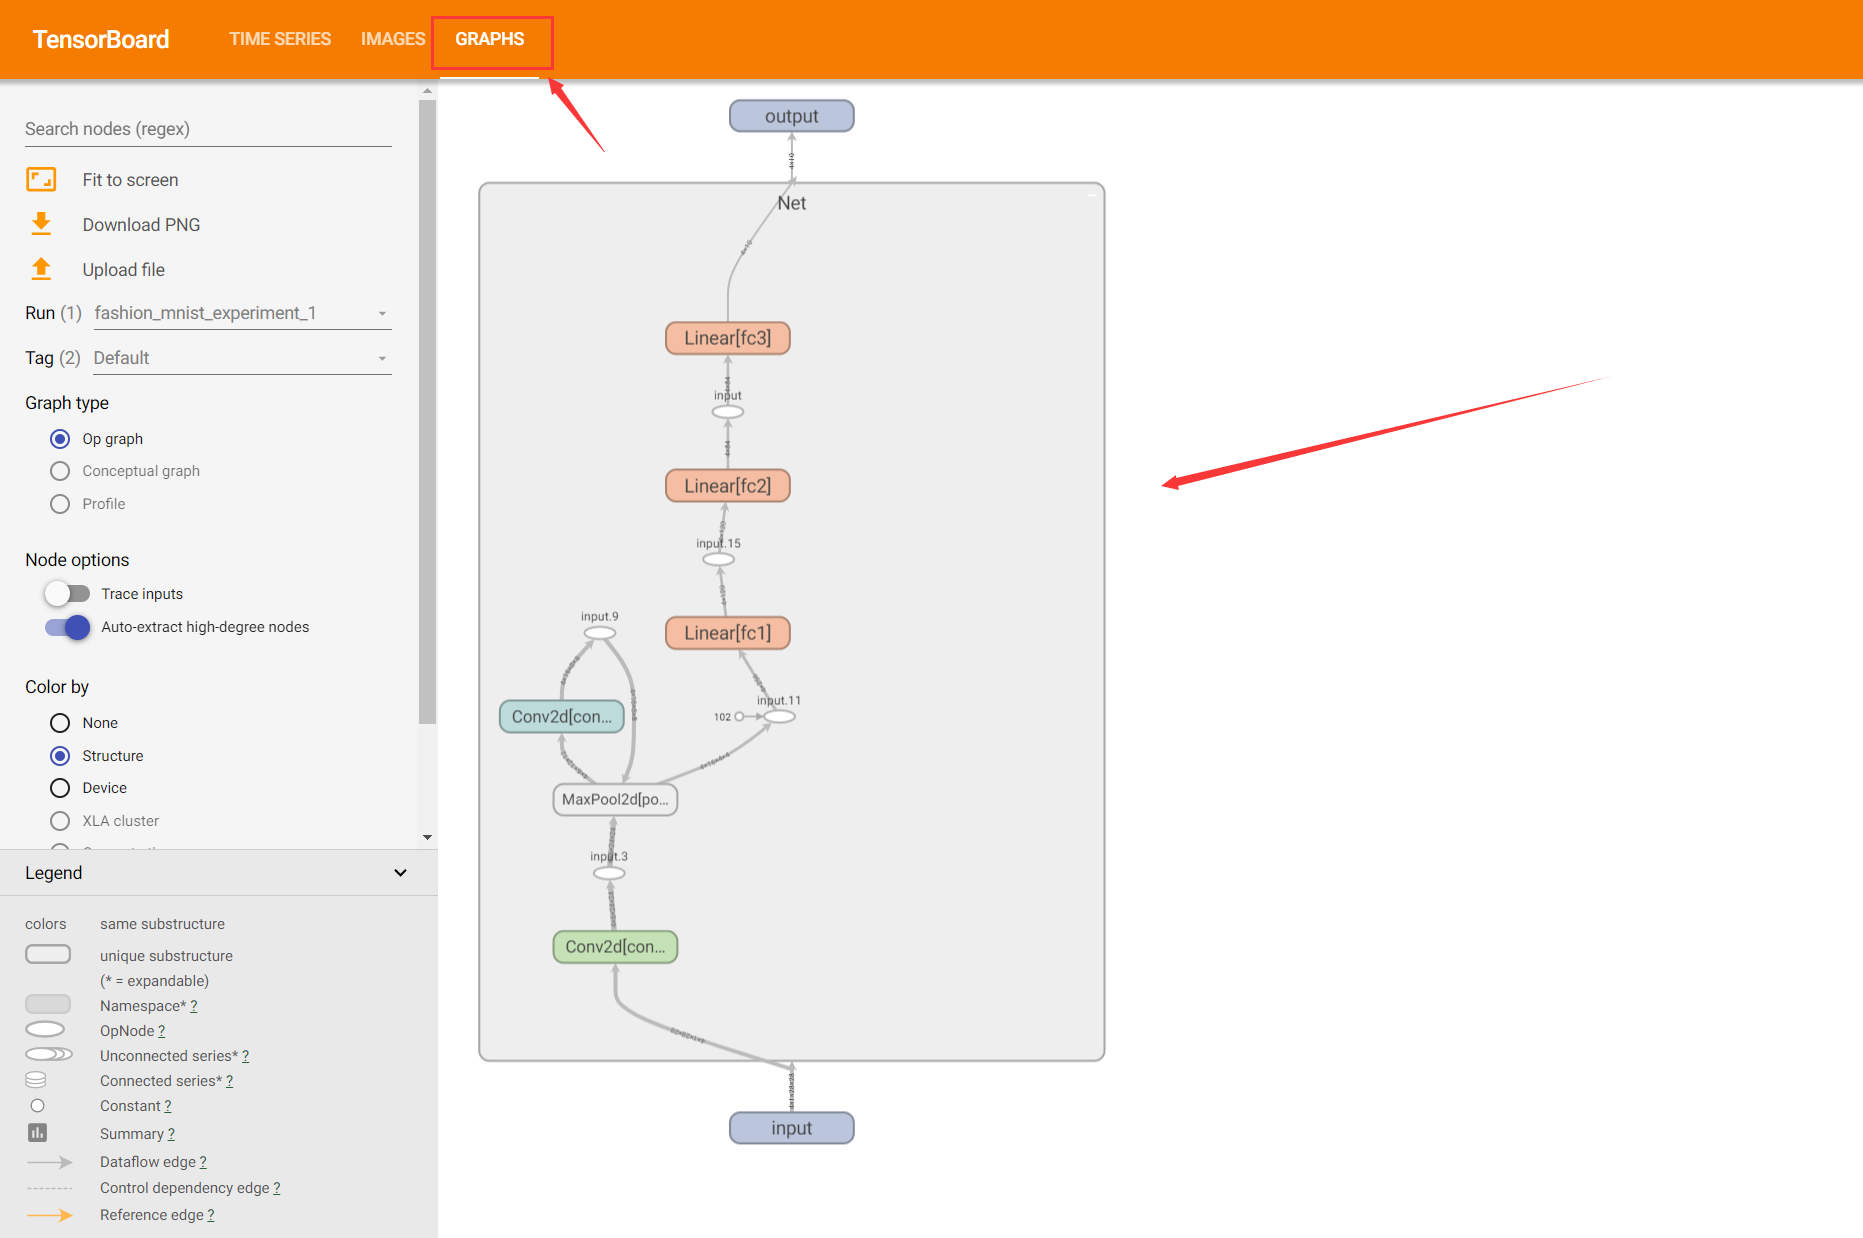
3.模型结构在TensorBoard中可视化(重点✅)
利用add_graph(model, input_to_model=None, verbose=False, use_strict_trace=True)函数将模型结构添加到Writer中。
writer.add_graph(model, input_to_model = torch.rand(1, 3, 224, 224))
Examples:
writer.add_graph(net, images)
writer.close()
刷新TensorBoard UI界面,会在“Graphs”选项卡看到模型结构。模型结构里面还有维度的变化,很方便我们去观察特征的维度变化。👍
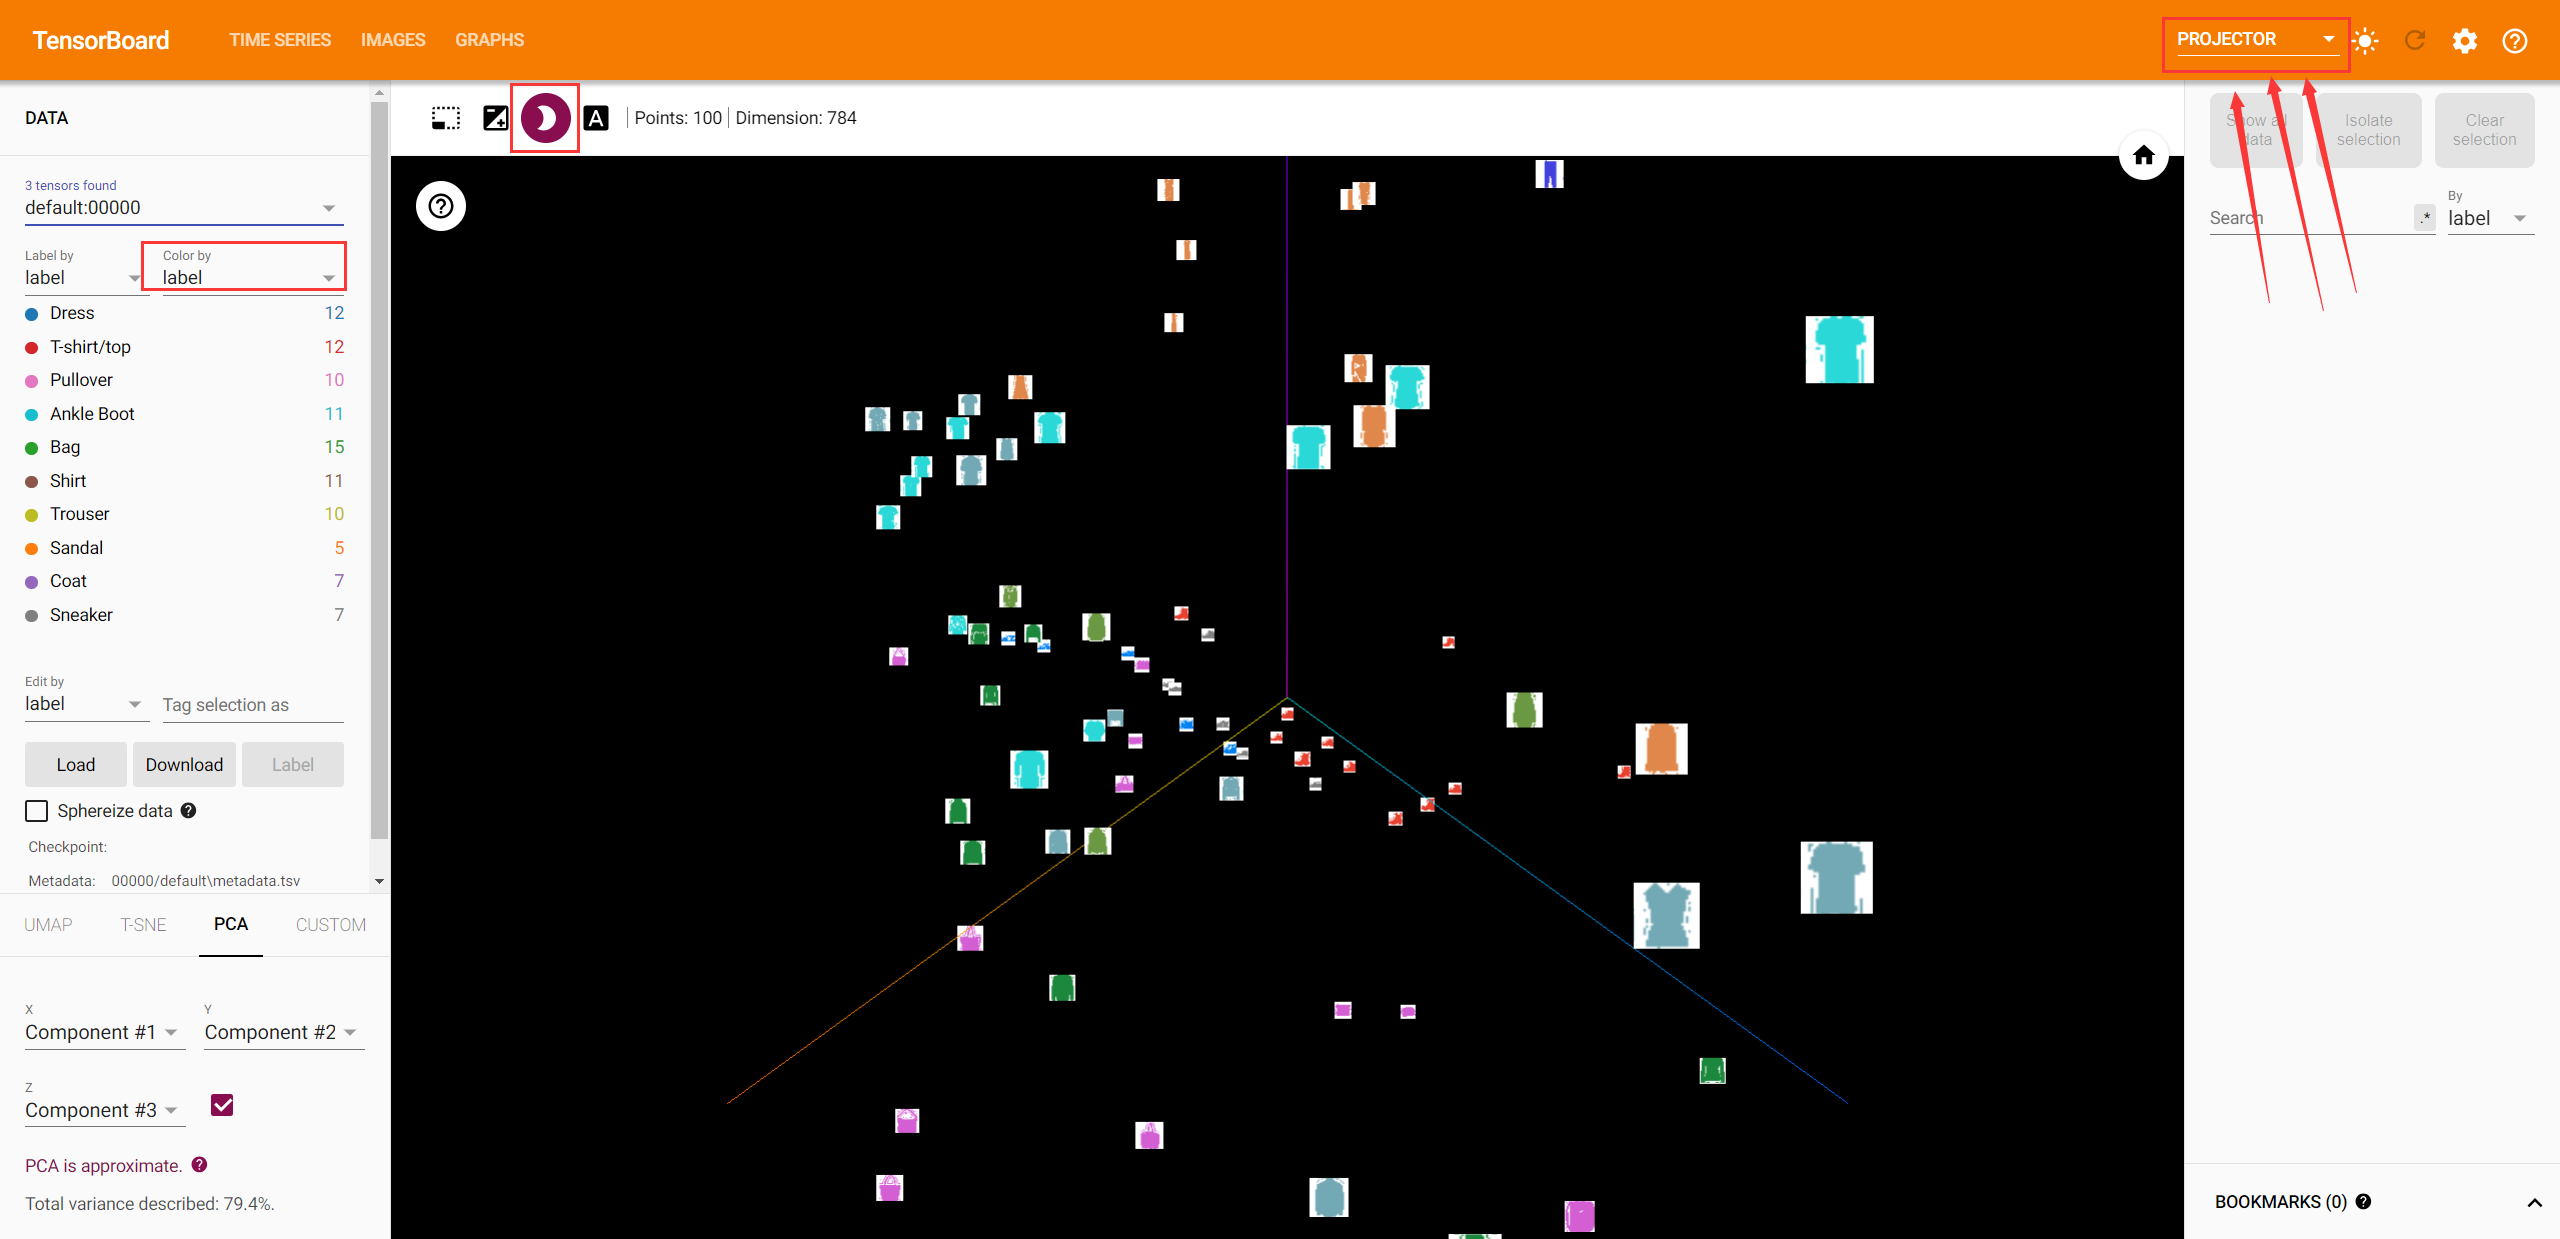
4.高维数据在TensorBoard中低维可视化
利用add_embedding(mat, metadata=None, label_img=None, global_step=None, tag='default', metadata_header=None)函数将嵌入数据可视化。
writer.add_embedding(features,metadata=class_labels,label_img=images.unsqueeze(1))
Examples:
# helper function
def select_n_random(data, labels, n=100):'''Selects n random datapoints and their corresponding labels from a dataset'''assert len(data) == len(labels)perm = torch.randperm(len(data))return data[perm][:n], labels[perm][:n]# select random images and their target indices
images, labels = select_n_random(trainset.data, trainset.targets)# get the class labels for each image
class_labels = [classes[lab] for lab in labels]# log embeddings
features = images.view(-1, 28 * 28)
writer.add_embedding(features,metadata=class_labels,label_img=images.unsqueeze(1))
writer.close()
在TensorBoard UI中找到Project选项卡,然后就会看到被投影到三维空间的图像数据。
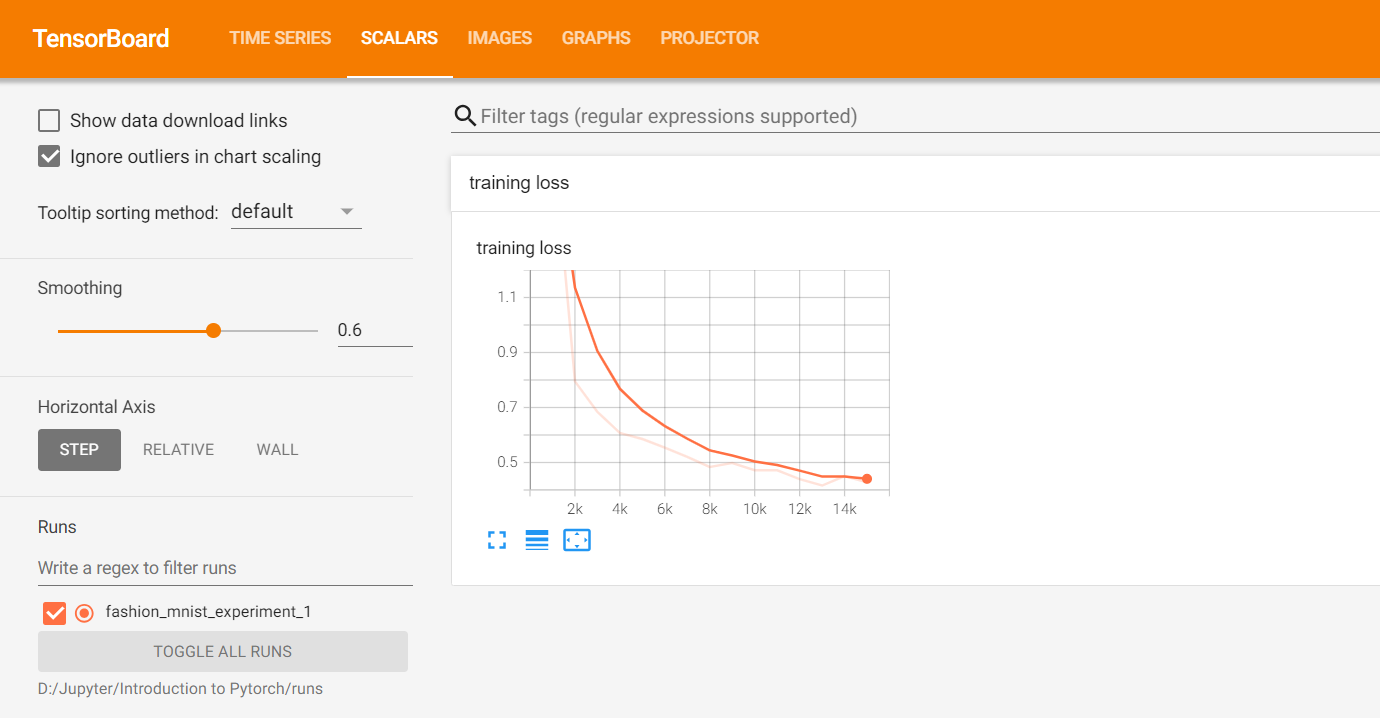
5.利用TensorBoard跟踪模型的训练过程(重点✅)
利用add_scalar(tag, scalar_value, global_step=None, walltime=None, new_style=False, double_precision=False)函数记录要跟踪的指标来观察模型的训练过程。
writer.add_scalar('loss', loss, epoch)
writer.add_scalar('accuracy', accuracy, epoch)
Examples:
# helper functionsdef images_to_probs(net, images):'''Generates predictions and corresponding probabilities from a trainednetwork and a list of images'''output = net(images)# convert output probabilities to predicted class_, preds_tensor = torch.max(output, 1)preds = np.squeeze(preds_tensor.numpy())return preds, [F.softmax(el, dim=0)[i].item() for i, el in zip(preds, output)]def plot_classes_preds(net, images, labels):'''Generates matplotlib Figure using a trained network, along with imagesand labels from a batch, that shows the network's top prediction alongwith its probability, alongside the actual label, coloring thisinformation based on whether the prediction was correct or not.Uses the "images_to_probs" function.'''preds, probs = images_to_probs(net, images)# plot the images in the batch, along with predicted and true labelsfig = plt.figure(figsize=(12, 48))for idx in np.arange(4):ax = fig.add_subplot(1, 4, idx+1, xticks=[], yticks=[])matplotlib_imshow(images[idx], one_channel=True)ax.set_title("{0}, {1:.1f}%\n(label: {2})".format(classes[preds[idx]],probs[idx] * 100.0,classes[labels[idx]]),color=("green" if preds[idx]==labels[idx].item() else "red"))return fig
running_loss = 0.0
for epoch in range(1):  # loop over the dataset multiple timesfor i, data in enumerate(trainloader, 0):# get the inputs; data is a list of [inputs, labels]inputs, labels = data# zero the parameter gradientsoptimizer.zero_grad()# forward + backward + optimizeoutputs = net(inputs)loss = criterion(outputs, labels)loss.backward()optimizer.step()running_loss += loss.item()if i % 1000 == 999:    # every 1000 mini-batches...# ...log the running loss# 记录的是每1000个mini-batch所对应的损失变化writer.add_scalar('training loss',running_loss / 1000,epoch * len(trainloader) + i)# ...log a Matplotlib Figure showing the model's predictions on a random mini-batchwriter.add_figure('predictions vs. actuals',plot_classes_preds(net, inputs, labels),global_step=epoch * len(trainloader) + i)running_loss = 0.0
print('Finished Training')
在TensorBoard UI中的Scalars选项卡查看loss的变化。
6.利用TensorBoard给每个类绘制PR曲线
利用add_pr_curve(tag, labels, predictions, global_step=None, num_thresholds=127, weights=None, walltime=None)函数绘制精度召回曲线。
writer.add_pr_curve(classes[class_index],tensorboard_truth,tensorboard_probs)
Examples:
# 1. gets the probability predictions in a test_size x num_classes Tensor
# 2. gets the preds in a test_size Tensor
# takes ~10 seconds to run
class_probs = []
class_label = []
with torch.no_grad():for data in testloader:images, labels = dataoutput = net(images)class_probs_batch = [F.softmax(el, dim=0) for el in output]class_probs.append(class_probs_batch)class_label.append(labels)test_probs = torch.cat([torch.stack(batch) for batch in class_probs])
test_label = torch.cat(class_label)# helper function
def add_pr_curve_tensorboard(class_index, test_probs, test_label, global_step=0):'''Takes in a "class_index" from 0 to 9 and plots the correspondingprecision-recall curve'''tensorboard_truth = test_label == class_indextensorboard_probs = test_probs[:, class_index]writer.add_pr_curve(classes[class_index],tensorboard_truth,tensorboard_probs,global_step=global_step)writer.close()# plot all the pr curves
for i in range(len(classes)):add_pr_curve_tensorboard(i, test_probs, test_label)
在TensorBoard UI中的PR Curves选项卡查看每个类的精度-召回曲线(Precision-Recall Curve,简称 PR 曲线)。(PR 曲线功能:可以用于比较不同分类器或不同模型的性能。通过比较不同模型的 PR 曲线下的面积(Area Under the Curve, AUC),可以直观地评估哪种模型在特定类别上表现更优;对于多分类问题,每个类别都有对应的 PR 曲线,通过分析每个类别的 PR 曲线,可以发现模型在哪些类别上表现较好,在哪些类别上存在不足,从而针对性地进行改进。)

参考
- Visualizing Models, Data, and Training with TensorBoard
- 准确率、精确率、召回率、P-R曲线
- torch.utils.tensorboard
😃😃😃
相关文章:
TensorBoard进阶
文章目录 TensorBoard进阶1.设置TensorBoard2.图像数据在TensorBoard中可视化3.模型结构在TensorBoard中可视化(重点✅)4.高维数据在TensorBoard中低维可视化5.利用TensorBoard跟踪模型的训练过程(重点✅)6.利用TensorBoard给每个…...

使用AES加密数据传输的iOS客户端实现方案
在现代应用开发中,确保数据传输的安全性是至关重要的。本文将介绍如何在iOS客户端中使用AES加密数据传输,并与服务器端保持加密解密的一致性。本文不会包含服务器端代码,但会解释其实现原理。 加密与解密的基本原理 AES(Advance…...

vue3【实战】语义化首页布局
技术要点,详见注释 <script setup></script><template><div class"page"><header>页头</header><nav>导航</nav><!-- 主体内容 --><main class"row"><aside>左侧边栏<s…...

FANG:利用社交网络图进行虚假新闻检测
1.概述 社交媒体已逐渐演变成为公众获取信息的主要途径。然而,值得警惕的是,并非所有流通的信息都具备真实性。特别是在政治选举、疫情爆发等关键节点,带有恶意企图的虚假信息(即“假新闻”)可能会对社会秩序、公平性和理性思考造成严重的干扰。作为全球抗击COVID-19的一部…...

Vue2 基础八电商后台管理项目——中
代码下载 商品分类页 新商品分类组件 goods/Cate.vue,在router.js中导入子级路由组件 Cate.vue,并设置路由规则。 绘制商品分类基本结构 在Cate.vue组件中添加面包屑导航以及卡片视图中的添加分类按钮: <template><div><…...

Typescript window.localStorage 存储 Obj Value区别
window.localStorage.setItem(UserC, JSON.stringify(userC)) const userC JSON.parse(window.localStorage.getItem(UserC) || {}) 不能获得UserC,所有保存的时候需要存储value,而不是对象。 {"__v_isShallow":false, "__v_isRef&quo…...

Linux要解压 .rar 文件,你应该使用 unrar 命令
命令 sudo tar -zxf ~/WebDemo.rar -C /usr/local 有一些问题。tar 命令通常用于解压 .tar、.tar.gz 或 .tar.bz2 文件,而不是 .rar 文件。要解压 .rar 文件,你应该使用 unrar 命令。下面是正确的步骤: 首先,安装 unrar࿰…...

【qt】如何获取网卡的信息?
网卡不只一种,有有线的,有无线的等等 我们用QNetworkInterface类的静态函数allInterfaces() 来获取所有的网卡 返回的是一个网卡的容器. 然后我们对每个网卡来获取其设备名称和硬件地址 可以通过静态函数humanReadableName() 来获取设备名称 可以通过静态函数**hardwareAddre…...
使用Netty框架实现WebSocket服务端与客户端通信(附ssl)
仓库地址: https://gitee.com/lfw1024/netty-websocket 导入后可直接运行 预览页面 自签证书: #换成自己的本地ip keytool -genkey -alias server -keyalg RSA -validity 3650 -keystore D:\mystore.jks -ext sanip:192.168.3.7,ip:127.0.0.1,dns:lo…...

ssm校园志愿服务信息系统-计算机毕业设计源码97697
摘 要 随着社会的进步和信息技术的发展,越来越多的学校开始重视志愿服务工作,通过组织各种志愿服务活动,让学生更好地了解社会、服务社会。然而,在实际操作中,志愿服务的组织和管理面临着诸多问题,如志愿者…...
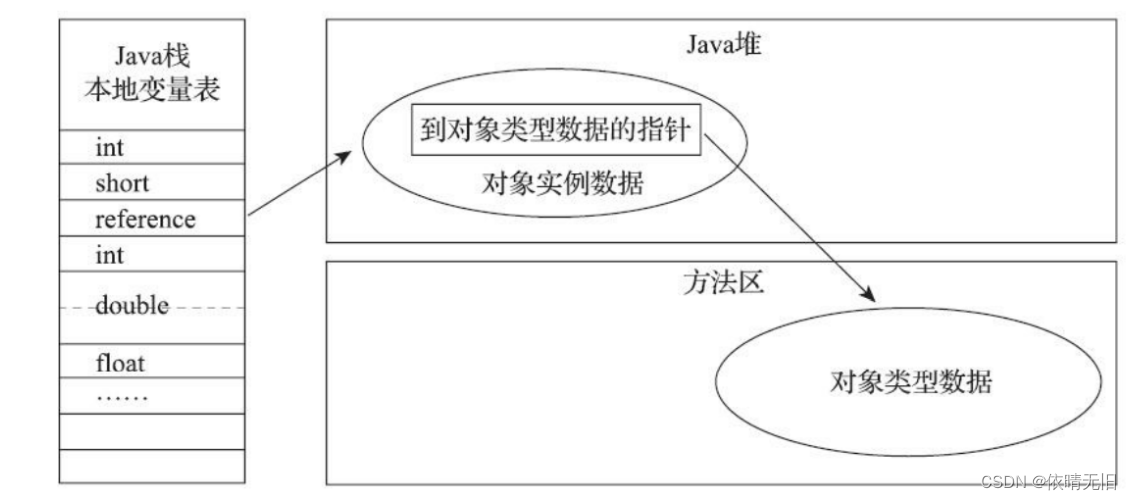
JVM原理(二):JVM之HotSpot虚拟机中对象的创建寻位与定位整体流程
1. 对象的创建 遇到new指令时 当Java虚拟机遇到一个字节码new指令时。 首先会去检查这个指令的参数是否能在常量池中定位到一个类的符号引用,并且检查这个符号引用代表的类是否被加载、解析和初始化过。 如果没有,那么必须执行类的加载过程(加载、检查…...
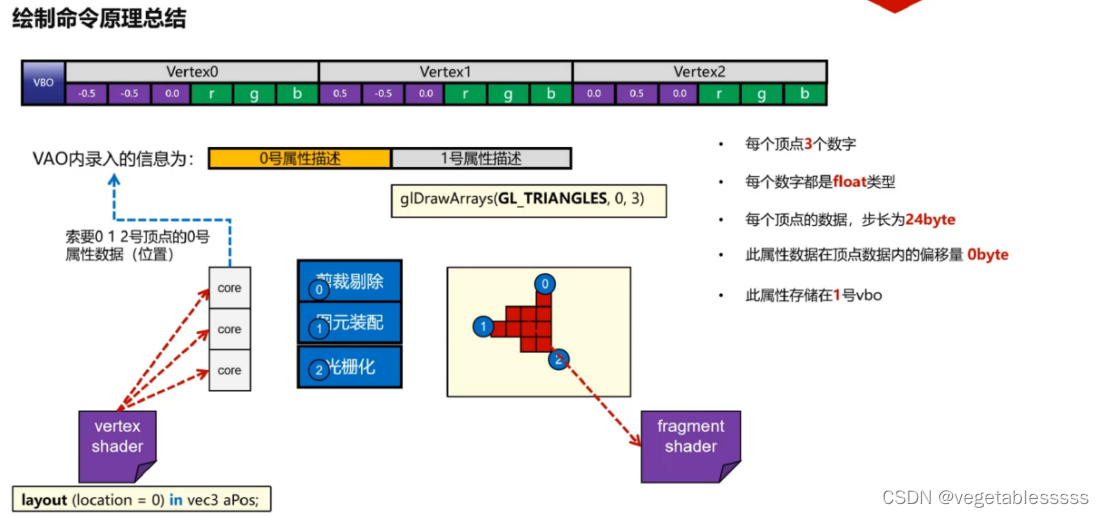
(七)glDrawArry绘制
几何数据:vao和vbo 材质程序:vs和fs(顶点着色器和片元着色器) 接下来只需要告诉GPU,使用几何数据和材质程序来进行绘制。 #include <glad/glad.h>//glad必须在glfw头文件之前包含 #include <GLFW/glfw3.h> #include <iostrea…...

记一次小程序渗透
这次的小程序渗透刚好每一个漏洞都相当经典所以记录一下。 目录 前言 漏洞详情 未授权访问漏洞/ 敏感信息泄露(高危) 水平越权(高危) 会话重用(高危) 硬编码加密密钥泄露(中危࿰…...

C++ 的常见算法 之一
C 的常见算法 之一 不修改序列算法for_eachcountfind 修改序列算法copymove 不修改序列算法 for_each #include <iostream> // std::cout #include <algorithm> // std::for_each #include <vector> // std::vectorusing namespace std;struc…...

微前端的需求有哪些?微前端的原理是怎么样的?为什么这么设计,及微前端的应用场景是什么?对有些客户,前端的重要性高于后端
微前端(Micro Frontends)是将前端应用拆分成多个独立、可部署的部分,每个部分可以由不同的团队独立开发、测试、部署和维护。这种架构类似于微服务在后端的应用,是为了应对复杂前端应用的维护和扩展问题而提出的。 来龙去脉 背景…...

【Spring Boot】统一数据返回
目录 统一数据返回一. 概念二.实现统一数据返回2.1 重写responseAdvice方法2.2 重写beforeBodyWriter方法 三. 特殊类型-String的处理四. 全部代码 统一数据返回 一. 概念 其实统一数据返回是运用了AOP(对某一类事情的集中处理)的思维,简单…...

证券交易系统中服务器监控系统功能设计
1.背景介绍 此服务器监控系统的目的在于提高行情服务器的监管效率,因目前的的行情服务器,包括DM、DT、DS配置数量较多,巡回维护耗时较多,当行情服务器出现异常故障,或者因为网络问题造成数据断线等情况时,监…...

【线性代数的本质】矩阵与线性变换
线性变化要满足两点性质: 直线(连续的点)在变换后还是直线。原点不变。 假设有坐标轴(基底) i ^ \widehat{i} i 和 j ^ \widehat{j} j : i ^ [ 1 0 ] , j ^ [ 0 1 ] \widehat{i}\begin{bmatrix} 1 \…...

CV02_超强数据集:MSCOCO数据集的简单介绍
1.1 简介 MSCOCO数据集,全称为Microsoft Common Objects in Context,是由微软公司在2014年推出并维护的一个大规模的图像数据集,旨在推动计算机视觉领域的研究,尤其是目标识别、目标检测、实例分割、图像描述生成等任务。该数据集…...

Linux--信号(万字详解!超完整!)
目录 0.预备知识 0.1.基本概念 0.2.信号的捕捉 0.3.理解信号的发送与保存 1.信号的产生(阶段一) 1.通过kill命令,向指定进程发送指定的信号 2.通过终端按键产生信号:ctrlc(信号2),ctrl\(…...

线程同步:确保多线程程序的安全与高效!
全文目录: 开篇语前序前言第一部分:线程同步的概念与问题1.1 线程同步的概念1.2 线程同步的问题1.3 线程同步的解决方案 第二部分:synchronized关键字的使用2.1 使用 synchronized修饰方法2.2 使用 synchronized修饰代码块 第三部分ÿ…...
` 方法)
深入浅出:JavaScript 中的 `window.crypto.getRandomValues()` 方法
深入浅出:JavaScript 中的 window.crypto.getRandomValues() 方法 在现代 Web 开发中,随机数的生成看似简单,却隐藏着许多玄机。无论是生成密码、加密密钥,还是创建安全令牌,随机数的质量直接关系到系统的安全性。Jav…...

Frozen-Flask :将 Flask 应用“冻结”为静态文件
Frozen-Flask 是一个用于将 Flask 应用“冻结”为静态文件的 Python 扩展。它的核心用途是:将一个 Flask Web 应用生成成纯静态 HTML 文件,从而可以部署到静态网站托管服务上,如 GitHub Pages、Netlify 或任何支持静态文件的网站服务器。 &am…...

Java 加密常用的各种算法及其选择
在数字化时代,数据安全至关重要,Java 作为广泛应用的编程语言,提供了丰富的加密算法来保障数据的保密性、完整性和真实性。了解这些常用加密算法及其适用场景,有助于开发者在不同的业务需求中做出正确的选择。 一、对称加密算法…...
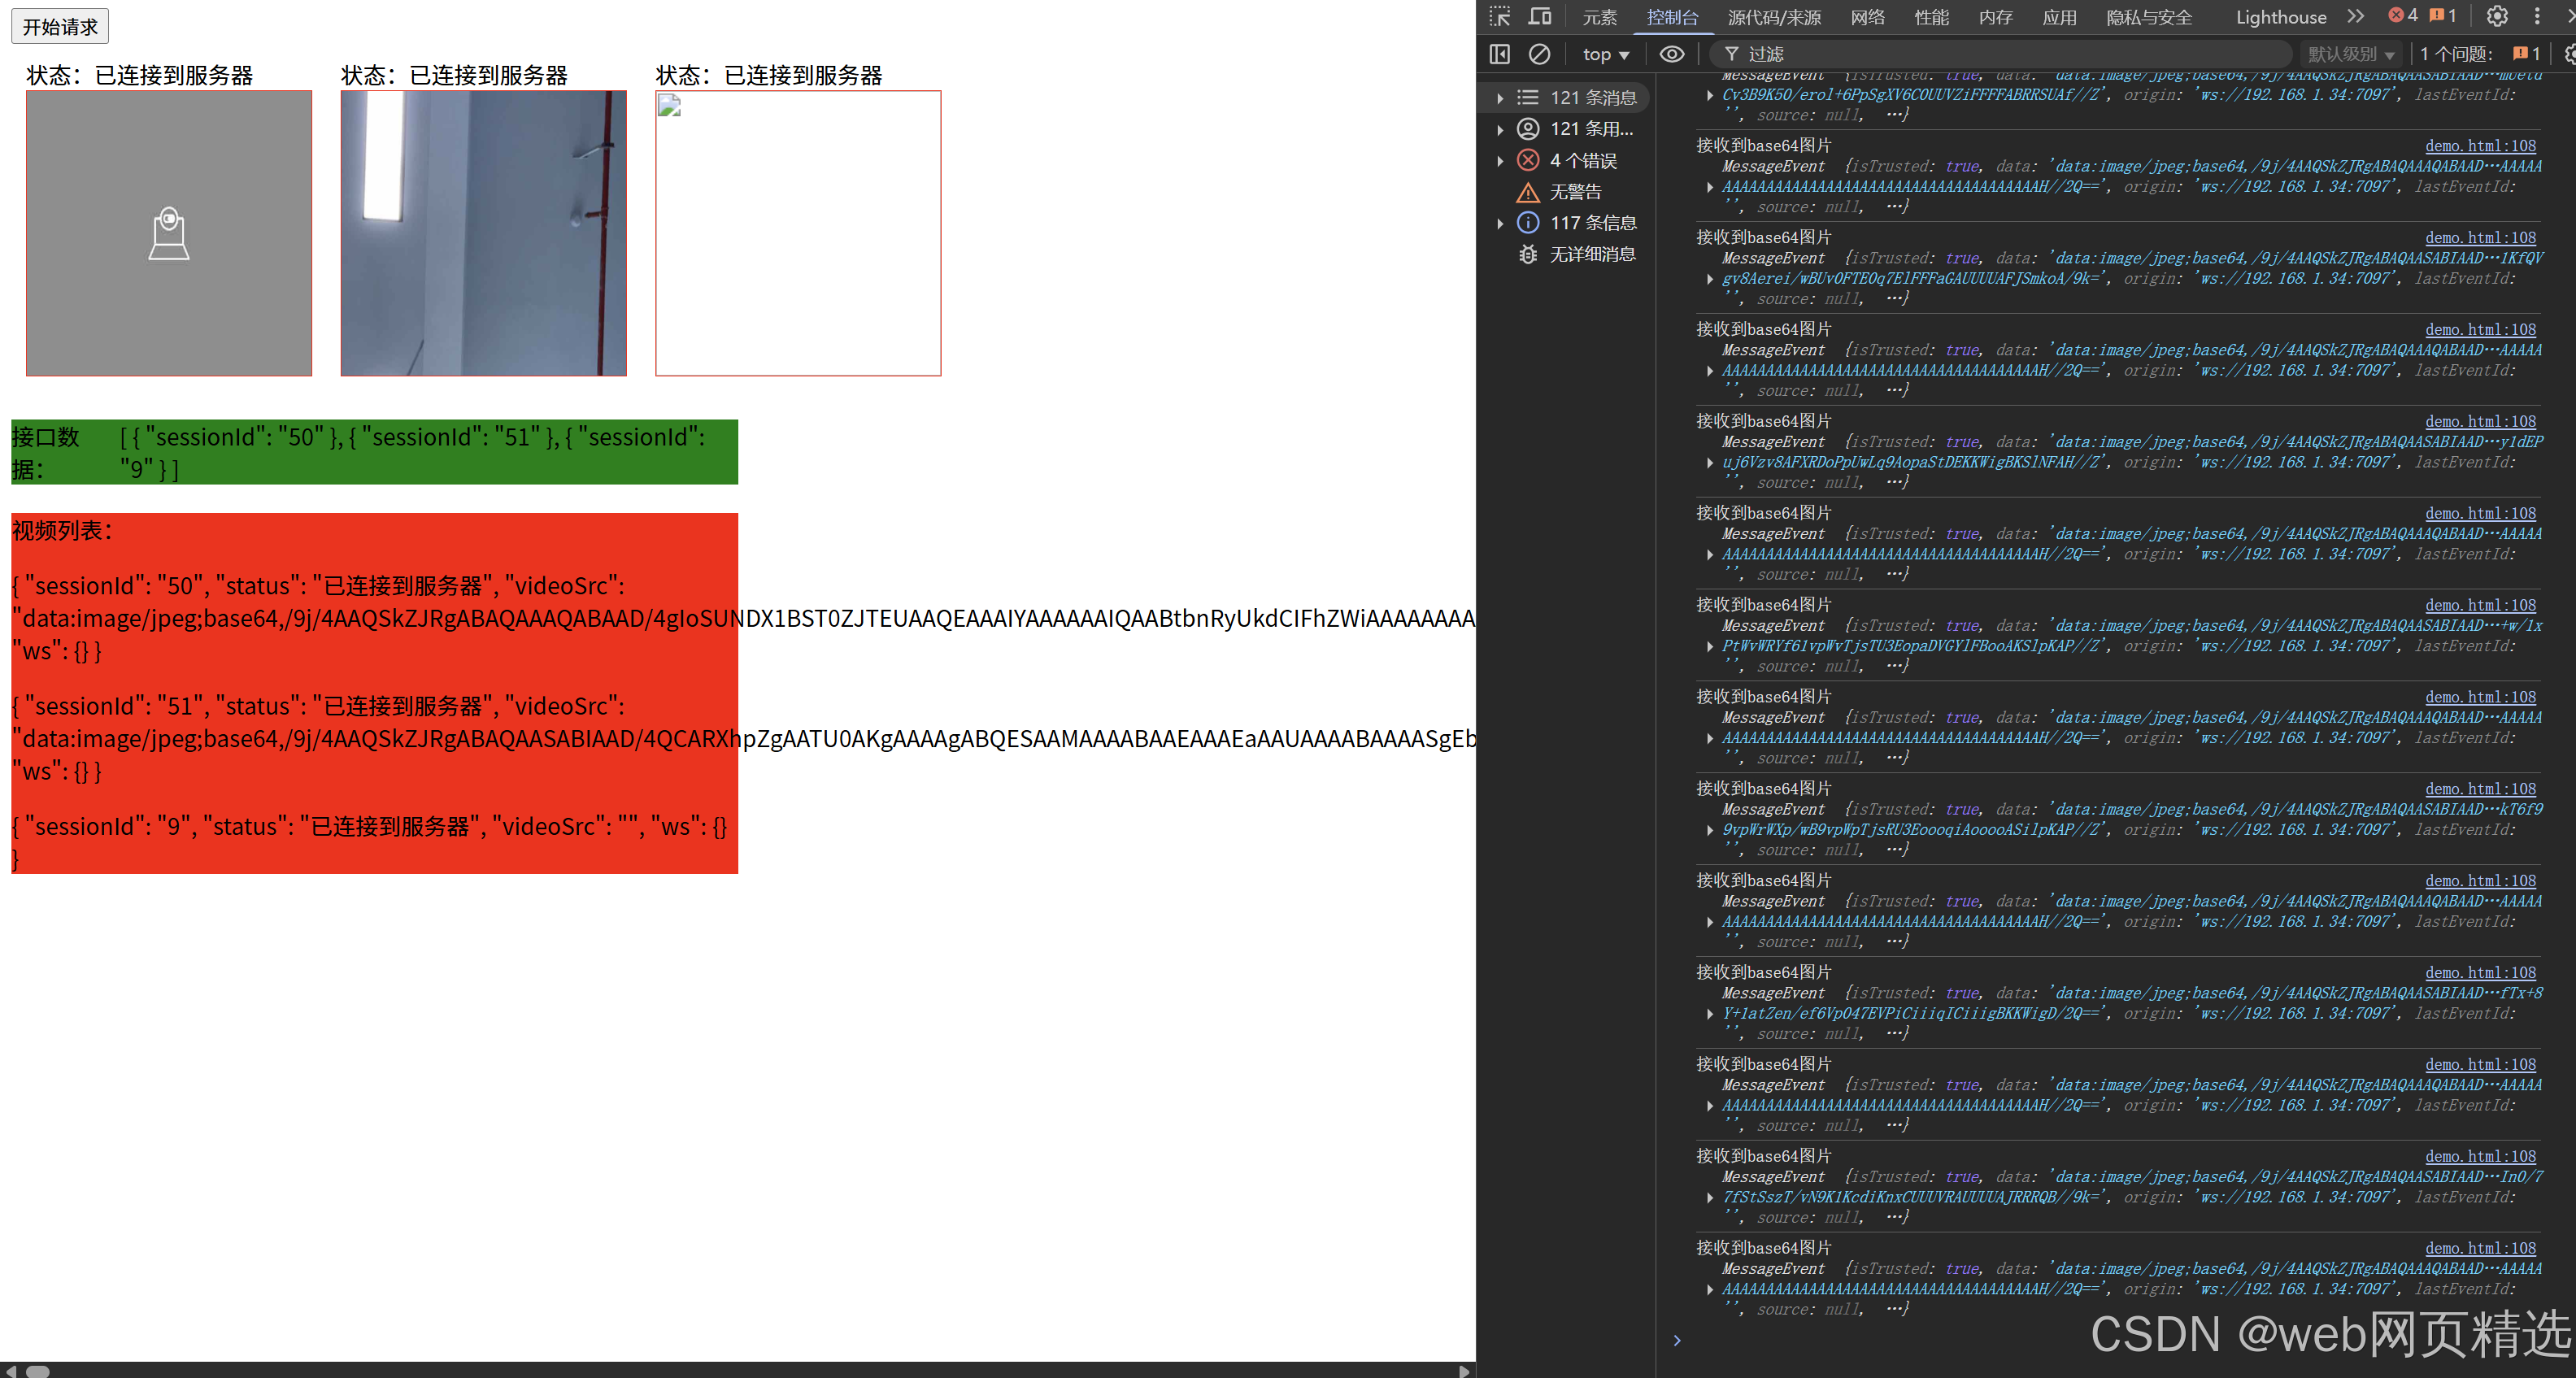
uniapp微信小程序视频实时流+pc端预览方案
方案类型技术实现是否免费优点缺点适用场景延迟范围开发复杂度WebSocket图片帧定时拍照Base64传输✅ 完全免费无需服务器 纯前端实现高延迟高流量 帧率极低个人demo测试 超低频监控500ms-2s⭐⭐RTMP推流TRTC/即构SDK推流❌ 付费方案 (部分有免费额度&#x…...

leetcodeSQL解题:3564. 季节性销售分析
leetcodeSQL解题:3564. 季节性销售分析 题目: 表:sales ---------------------- | Column Name | Type | ---------------------- | sale_id | int | | product_id | int | | sale_date | date | | quantity | int | | price | decimal | -…...

Axios请求超时重发机制
Axios 超时重新请求实现方案 在 Axios 中实现超时重新请求可以通过以下几种方式: 1. 使用拦截器实现自动重试 import axios from axios;// 创建axios实例 const instance axios.create();// 设置超时时间 instance.defaults.timeout 5000;// 最大重试次数 cons…...

优选算法第十二讲:队列 + 宽搜 优先级队列
优选算法第十二讲:队列 宽搜 && 优先级队列 1.N叉树的层序遍历2.二叉树的锯齿型层序遍历3.二叉树最大宽度4.在每个树行中找最大值5.优先级队列 -- 最后一块石头的重量6.数据流中的第K大元素7.前K个高频单词8.数据流的中位数 1.N叉树的层序遍历 2.二叉树的锯…...
Netty从入门到进阶(二)
二、Netty入门 1. 概述 1.1 Netty是什么 Netty is an asynchronous event-driven network application framework for rapid development of maintainable high performance protocol servers & clients. Netty是一个异步的、基于事件驱动的网络应用框架,用于…...

莫兰迪高级灰总结计划简约商务通用PPT模版
莫兰迪高级灰总结计划简约商务通用PPT模版,莫兰迪调色板清新简约工作汇报PPT模版,莫兰迪时尚风极简设计PPT模版,大学生毕业论文答辩PPT模版,莫兰迪配色总结计划简约商务通用PPT模版,莫兰迪商务汇报PPT模版,…...