C++编程:实现一个跨平台安全的定时器Timer模块
文章目录
- 0. 概要
- 1. 设计目标
- 2. `SafeTimer` 类的实现
- 2.1 头文件 `safe_timer.h`
- 源文件 `safe_timer.cpp`
- 3. 工作流程图
- 4. 单元测试
0. 概要
对于C++应用编程,定时器模块是一个至关重要的组件。为了确保系统的可靠性和功能安全,我们需要设计一个高效、稳定的定时器。
本文将实现一个跨平台安全的C++ SafeTimer 定时器模块,并提供完整的gtest单元测试。
完整代码见 gitee_safe_timer
类似设计请参阅文章:C++编程: 线程池封装、任务异步执行以及任务延迟执行
1. 设计目标
目标是创建一个符合功能安全要求的定时器模块,具体包括以下几点:
- 线程安全:确保多线程环境下的安全性。
- 高可靠性:在异常情况下能够安全地停止定时器。
- 高可维护性:代码结构清晰,易于扩展和维护。
2. SafeTimer 类的实现
SafeTimer 类是我们实现的核心,它提供了单次触发(SingleShot)和重复触发(Repeat)两种定时功能,同时还支持暂停(Pause)和恢复(Resume)。以下是 SafeTimer 类的完整实现。
2.1 头文件 safe_timer.h
#ifndef SAFE_TIMER_H
#define SAFE_TIMER_H#include <atomic>
#include <chrono>
#include <condition_variable>
#include <functional>
#include <memory>
#include <mutex>
#include <string>
#include <thread>// 定义SafeTimer类,用于管理定时任务
class SafeTimer {public:// 构造函数,可以指定定时器的名称,默认为"SafeTimer"explicit SafeTimer(const std::string& name = "SafeTimer") noexcept;// 析构函数virtual ~SafeTimer() noexcept;// 禁止复制构造和赋值操作SafeTimer(const SafeTimer&) = delete;SafeTimer& operator=(const SafeTimer&) = delete;// 返回定时器的名称std::string GetName() const noexcept;// 返回定时器是否处于循环模式bool IsLoop() const noexcept;// 设置一个一次性定时任务template <typename Callable, typename... Arguments>bool SingleShot(uint64_t interval_in_millis, Callable&& func, Arguments&&... args);// 设置一个可重复的定时任务template <typename Callable, typename... Arguments>bool Repeat(uint64_t interval_in_millis, Callable&& func, Arguments&&... args);// 设置一个可重复的定时任务,可以选择是否立即执行一次template <typename Callable, typename... Arguments>bool Repeat(uint64_t interval_in_millis, bool call_func_immediately, Callable&& func, Arguments&&... args);// 取消当前的定时任务void Cancel() noexcept;// 暂停当前的定时任务bool Pause() noexcept;// 恢复已暂停的定时任务void Resume() noexcept;// 判断定时器是否处于空闲状态bool IsTimerIdle() const noexcept;private:// 启动定时任务的核心函数bool Start(uint64_t interval_in_millis, std::function<void()> callback, bool loop, bool callback_immediately = false);// 尝试使定时器过期,用于取消或暂停任务void TryExpire() noexcept;// 销毁线程资源void DestroyThread() noexcept;private:// 定时器的名称std::string name_;// 标记定时器是否为循环模式bool is_loop_;// 原子布尔类型,标记定时器是否已经过期std::atomic_bool is_expired_;// 原子布尔类型,标记是否尝试使定时器过期std::atomic_bool try_to_expire_;// 独占所有权的线程智能指针std::unique_ptr<std::thread> thread_;// 互斥锁,用于线程同步std::mutex mutex_;// 条件变量,用于线程间的通信std::condition_variable condition_;// 定时器启动时的时间点std::chrono::time_point<std::chrono::steady_clock> start_time_;// 定时器结束时的时间点std::chrono::time_point<std::chrono::steady_clock> end_time_;// 剩余任务时间(毫秒)uint64_t task_remain_time_ms_;// 回调函数,当定时器过期时调用std::function<void()> callback_;
};// 实现模板成员函数// 单次定时任务的实现
template <typename Callable, typename... Arguments>
bool SafeTimer::SingleShot(uint64_t interval_in_millis, Callable&& func, Arguments&&... args) {// 创建一个绑定的函数对象,用于延迟执行auto action = std::bind(std::forward<Callable>(func), std::forward<Arguments>(args)...);// 调用私有的Start函数,设置一次性任务return Start(interval_in_millis, action, false);
}// 循环定时任务的实现
template <typename Callable, typename... Arguments>
bool SafeTimer::Repeat(uint64_t interval_in_millis, Callable&& func, Arguments&&... args) {// 创建一个绑定的函数对象,用于延迟执行auto action = std::bind(std::forward<Callable>(func), std::forward<Arguments>(args)...);// 调用私有的Start函数,设置循环任务return Start(interval_in_millis, action, true);
}// 循环定时任务的实现,允许指定是否立即执行一次
template <typename Callable, typename... Arguments>
bool SafeTimer::Repeat(uint64_t interval_in_millis, bool call_func_immediately, Callable&& func, Arguments&&... args) {// 创建一个绑定的函数对象,用于延迟执行auto action = std::bind(std::forward<Callable>(func), std::forward<Arguments>(args)...);// 调用私有的Start函数,设置循环任务,可选择立即执行return Start(interval_in_millis, action, true, call_func_immediately);
}#endif  // SAFE_TIMER_H
源文件 safe_timer.cpp
#include "safe_timer.h"
#include <iostream>SafeTimer::SafeTimer(const std::string& name) noexcept: name_(name), is_loop_(false), is_expired_(true), try_to_expire_(false), task_remain_time_ms_(0), callback_(nullptr) {}SafeTimer::~SafeTimer() noexcept {TryExpire();
}std::string SafeTimer::GetName() const noexcept {return name_;
}bool SafeTimer::IsLoop() const noexcept {return is_loop_;
}void SafeTimer::Cancel() noexcept {if (is_expired_ || try_to_expire_ || !thread_) {return;}TryExpire();
}bool SafeTimer::Pause() noexcept {if (is_expired_) {return false;}auto now = std::chrono::steady_clock::now();auto elapsed = std::chrono::duration_cast<std::chrono::milliseconds>(now - start_time_).count();auto remaining = std::chrono::duration_cast<std::chrono::milliseconds>(end_time_ - now).count();if (remaining <= 0) {return false;}Cancel();task_remain_time_ms_ = static_cast<uint64_t>(remaining);return true;
}void SafeTimer::Resume() noexcept {if (task_remain_time_ms_ > 0 && callback_) {Start(task_remain_time_ms_, callback_, false, false);task_remain_time_ms_ = 0;}
}bool SafeTimer::IsTimerIdle() const noexcept {return is_expired_ && !try_to_expire_;
}bool SafeTimer::Start(uint64_t interval_in_millis, std::function<void()> callback, bool loop, bool callback_immediately) {if (!is_expired_ || try_to_expire_) {return false;}is_expired_ = false;is_loop_ = loop;DestroyThread();thread_ = std::make_unique<std::thread>([this, interval_in_millis, callback, callback_immediately]() {if (callback_immediately) {callback();}while (!try_to_expire_) {callback_ = callback;start_time_ = std::chrono::steady_clock::now();end_time_ = start_time_ + std::chrono::milliseconds(interval_in_millis);std::unique_lock<std::mutex> lock(mutex_);condition_.wait_until(lock, end_time_);if (try_to_expire_) {break;}callback();if (!is_loop_) {break;}}is_expired_ = true;try_to_expire_ = false;});return true;
}void SafeTimer::TryExpire() noexcept {try_to_expire_ = true;DestroyThread();try_to_expire_ = false;
}void SafeTimer::DestroyThread() noexcept {if (thread_) {{std::lock_guard<std::mutex> lock(mutex_);condition_.notify_all();}if (thread_->joinable()) {thread_->join();}thread_.reset();}
}
3. 工作流程图
这个流程图分别展示了 SingleShot 和 Repeat 的流程,同时包括了暂停、恢复和取消操作。
4. 单元测试
为了验证 SafeTimer 的功能,我们编写了一组单元测试,覆盖了定时器的各种使用场景,包括单次触发、重复触发、暂停、恢复和取消等功能。
#include <gmock/gmock.h>
#include <gtest/gtest.h>#include <chrono>
#include <thread>#include "safe_timer.h"class CallbackMock {public:MOCK_METHOD(void, CallbackMethod, ());
};class SafeTimerTest : public testing::Test {protected:CallbackMock callback_mock;void SetUp() override {// Do nothing now}void TearDown() override {// Do nothing now}
};TEST_F(SafeTimerTest, SingleShot) {SafeTimer timer("TestSingleShot");EXPECT_CALL(callback_mock, CallbackMethod()).Times(1);int time_ms = 100;  // Delay time in millisecondsbool ret = timer.SingleShot(time_ms, &CallbackMock::CallbackMethod, &callback_mock);EXPECT_TRUE(ret);// Sleep for an additional 100ms to ensure executionstd::this_thread::sleep_for(std::chrono::milliseconds(time_ms + 100));
}TEST_F(SafeTimerTest, RepeatWithParamCallImmediately) {SafeTimer timer("TestRepeatWithParamCallImmediately");int repeat_count = 3;  // Number of times repeat should executeint time_ms = 200;     // Delay time in millisecondsEXPECT_CALL(callback_mock, CallbackMethod()).Times(repeat_count);// Execute once immediatelyauto ret = timer.Repeat(time_ms, true, &CallbackMock::CallbackMethod, &callback_mock);EXPECT_TRUE(ret);// Sleep for an additional 100ms to ensure executionstd::this_thread::sleep_for(std::chrono::milliseconds((repeat_count - 1) * time_ms + 100));// Cancel previous timertimer.Cancel();EXPECT_CALL(callback_mock, CallbackMethod()).Times(repeat_count);// Do not execute immediatelyret = timer.Repeat(time_ms, false, &CallbackMock::CallbackMethod, &callback_mock);EXPECT_TRUE(ret);// Sleep for an additional 100ms to ensure executionstd::this_thread::sleep_for(std::chrono::milliseconds(repeat_count * time_ms + 100));
}TEST_F(SafeTimerTest, RepeatWithoutParamCallImmediately) {SafeTimer timer("TestRepeatWithoutParamCallImmediately");int repeat_count = 3;  // Number of times repeat should executeint time_ms = 500;     // Delay time in millisecondsEXPECT_CALL(callback_mock, CallbackMethod()).Times(repeat_count);auto ret = timer.Repeat(time_ms, &CallbackMock::CallbackMethod, &callback_mock);EXPECT_TRUE(ret);// Sleep for an additional 100ms to ensure executionstd::this_thread::sleep_for(std::chrono::milliseconds(repeat_count * time_ms + 100));
}TEST_F(SafeTimerTest, Cancel) {SafeTimer timer("Cancel");int repeat_count = 3;  // Number of times repeat should executeint time_ms = 500;  // Delay time in millisecondsEXPECT_CALL(callback_mock, CallbackMethod()).Times(repeat_count - 1);// Execute once immediatelyauto ret = timer.Repeat(time_ms, true, &CallbackMock::CallbackMethod, &callback_mock);EXPECT_TRUE(ret);// Sleep for 100ms less to ensure cancel is called in timestd::this_thread::sleep_for(std::chrono::milliseconds((repeat_count - 1) * time_ms - 100));timer.Cancel();
}// Test if cancelling immediately after timer creation causes any issues
// Expected: Cancelling immediately after timer creation should directly return and perform no operation
TEST_F(SafeTimerTest, CancelBeforeSingleShot) {SafeTimer timer("TestCancelBeforeSingleShot");EXPECT_CALL(callback_mock, CallbackMethod()).Times(1);timer.Cancel();int time_ms = 100;  // Delay time in millisecondsauto ret = timer.SingleShot(time_ms, &CallbackMock::CallbackMethod, &callback_mock);EXPECT_TRUE(ret);// Sleep for an additional 100ms to ensure executionstd::this_thread::sleep_for(std::chrono::milliseconds(time_ms + 100));
}// Test if cancelling immediately after creating a SingleShot timer causes any issues
// Expected: Properly cancel without issues
TEST_F(SafeTimerTest, CancelImmediatelyAfterSingleShot) {SafeTimer timer("TestCancelImmediatelyAfterSingleShot");EXPECT_CALL(callback_mock, CallbackMethod()).Times(0);int time_ms = 100;  // Delay time in millisecondstimer.SingleShot(time_ms, &CallbackMock::CallbackMethod, &callback_mock);timer.Cancel();// Sleep for an additional 100ms to ensure callback is not calledstd::this_thread::sleep_for(std::chrono::milliseconds(time_ms + 100));
}TEST_F(SafeTimerTest, CancelAfterSingleShot) {SafeTimer timer("TestCancelAfterSingleShot");EXPECT_CALL(callback_mock, CallbackMethod()).Times(1);int time_ms = 100;  // Delay time in millisecondsauto ret = timer.SingleShot(time_ms, &CallbackMock::CallbackMethod, &callback_mock);EXPECT_TRUE(ret);// Sleep for an additional 100ms to ensure executionstd::this_thread::sleep_for(std::chrono::milliseconds(time_ms + 100));timer.Cancel();
}TEST_F(SafeTimerTest, Pause) {SafeTimer timer("Pause");int repeat_count = 2;  // Number of times repeat should executeint time_ms = 500;  // Delay time in millisecondsEXPECT_CALL(callback_mock, CallbackMethod()).Times(repeat_count - 1);// Execute once immediatelytimer.Repeat(time_ms, true, &CallbackMock::CallbackMethod, &callback_mock);// Sleep for 100ms less to ensure pause is called in timestd::this_thread::sleep_for(std::chrono::milliseconds((repeat_count - 1) * time_ms - 100));auto ret = timer.Pause();EXPECT_TRUE(ret);
}TEST_F(SafeTimerTest, Resume) {SafeTimer timer("Resume");int repeat_count = 3;  // Number of times repeat should executeint time_ms = 100;  // Delay time in millisecondsEXPECT_CALL(callback_mock, CallbackMethod()).Times(repeat_count);// Execute once immediatelytimer.Repeat(time_ms, true, &CallbackMock::CallbackMethod, &callback_mock);int time_advance_pause = 50;  // Time in milliseconds to pause in advance// Sleep for time_advance_pause ms less to ensure pause is called in timestd::this_thread::sleep_for(std::chrono::milliseconds((repeat_count - 1) * time_ms - time_advance_pause));timer.Pause();timer.Resume();// Sleep for an additional 100ms to ensure timer execution is completedstd::this_thread::sleep_for(std::chrono::milliseconds(time_advance_pause + 100));
}int main(int argc, char** argv) {testing::InitGoogleMock(&argc, argv);return RUN_ALL_TESTS();
}
以上代码是使用Google Test和Google Mock进行单元测试,以下是几项要点:
-
单次触发测试:
SingleShot测试了SafeTimer在设定的延时后只触发一次CallbackMethod。
-
重复触发测试:
RepeatWithParamCallImmediately测试了计时器立即执行并重复触发回调的功能。RepeatWithoutParamCallImmediately测试了计时器不立即执行,仅按照设定间隔重复触发回调的功能。
-
取消计时器测试:
Cancel测试了在计时器执行过程中取消操作是否有效。CancelBeforeSingleShot测试了在单次触发计时器创建后立即取消是否有效。CancelImmediatelyAfterSingleShot测试了在单次触发计时器执行前立即取消的效果。CancelAfterSingleShot测试了在单次触发计时器执行后再取消的效果。
-
暂停与恢复计时器测试:
Pause测试了暂停计时器的功能。Resume测试了暂停后恢复计时器的功能。
每个测试都使用EXPECT_CALL设置了预期的回调调用次数,并在适当的延时时间后检查回调是否按预期执行。
执行结果:
$ ./safe_timer_test
[==========] Running 9 tests from 1 test suite.
[----------] Global test environment set-up.
[----------] 9 tests from SafeTimerTest
[ RUN      ] SafeTimerTest.SingleShot
[       OK ] SafeTimerTest.SingleShot (200 ms)
[ RUN      ] SafeTimerTest.RepeatWithParamCallImmediately
[       OK ] SafeTimerTest.RepeatWithParamCallImmediately (1201 ms)
[ RUN      ] SafeTimerTest.RepeatWithoutParamCallImmediately
[       OK ] SafeTimerTest.RepeatWithoutParamCallImmediately (1600 ms)
[ RUN      ] SafeTimerTest.Cancel
[       OK ] SafeTimerTest.Cancel (900 ms)
[ RUN      ] SafeTimerTest.CancelBeforeSingleShot
[       OK ] SafeTimerTest.CancelBeforeSingleShot (200 ms)
[ RUN      ] SafeTimerTest.CancelImmediatelyAfterSingleShot
[       OK ] SafeTimerTest.CancelImmediatelyAfterSingleShot (201 ms)
[ RUN      ] SafeTimerTest.CancelAfterSingleShot
[       OK ] SafeTimerTest.CancelAfterSingleShot (200 ms)
[ RUN      ] SafeTimerTest.Pause
[       OK ] SafeTimerTest.Pause (400 ms)
[ RUN      ] SafeTimerTest.Resume
[       OK ] SafeTimerTest.Resume (300 ms)
[----------] 9 tests from SafeTimerTest (5208 ms total)[----------] Global test environment tear-down
[==========] 9 tests from 1 test suite ran. (5208 ms total)
[  PASSED  ] 9 tests.
相关文章:

C++编程:实现一个跨平台安全的定时器Timer模块
文章目录 0. 概要1. 设计目标2. SafeTimer 类的实现2.1 头文件 safe_timer.h源文件 safe_timer.cpp 3. 工作流程图4. 单元测试 0. 概要 对于C应用编程,定时器模块是一个至关重要的组件。为了确保系统的可靠性和功能安全,我们需要设计一个高效、稳定的定…...

PyTorch的自动微分模块【含梯度基本数学原理详解】
文章目录 1、简介1.1、基本概念1.2、基本原理1.2.1、自动微分1.2.2、梯度1.2.3、梯度求导1.2.4、梯度下降法1.2.5、张量梯度举例 1.3、Autograd的高级功能 2、梯度基本计算2.1、单标量梯度2.2、单向量梯度的计算2.3、多标量梯度计算2.4、多向量梯度计算 3、控制梯度计算4、累计…...

AI 绘画|Midjourney设计Logo提示词
你是否已经看过许多别人分享的 MJ 咒语,却仍无法按照自己的想法画图?通过学习 MJ 的提示词逻辑后,你将能够更好地理解并创作自己的“咒语”。本文将详细拆解使用 MJ 设计 Logo 的逻辑,让你在阅读后即可轻松上手,制作出…...

LeNet实验 四分类 与 四分类变为多个二分类
目录 1. 划分二分类 2. 训练独立的二分类模型 3. 二分类预测结果代码 4. 二分类预测结果 5 改进训练模型 6 优化后 预测结果代码 7 优化后预测结果 8 训练四分类模型 9 预测结果代码 10 四分类结果识别 1. 划分二分类 可以根据不同的类别进行多个划分,以…...
【BUG】已解决:java.lang.reflect.InvocationTargetException
已解决:java.lang.reflect.InvocationTargetException 欢迎来到英杰社区https://bbs.csdn.net/topics/617804998 欢迎来到我的主页,我是博主英杰,211科班出身,就职于医疗科技公司,热衷分享知识,武汉城市开发…...

配置kali 的apt命令在线安装包的源为国内源
目录 一、安装VMware Tools 二、配置apt国内源 一、安装VMware Tools 点击安装 VMware Tools 后,会加载一个虚拟光驱,里面包含 VMware Tools 的安装包 鼠标右键单击 VMware Tools 的安装包,点击复制到 点击 主目录,再点击选择…...

JAVA 异步编程(线程安全)二
1、线程安全 线程安全是指你的代码所在的进程中有多个线程同时运行,而这些线程可能会同时运行这段代码,如果每次运行的代码结果和单线程运行的结果是一样的,且其他变量的值和预期的也是一样的,那么就是线程安全的。 一个类或者程序…...

Golang | Leetcode Golang题解之第260题只出现一次的数字III
题目: 题解: func singleNumber(nums []int) []int {xorSum : 0for _, num : range nums {xorSum ^ num}lsb : xorSum & -xorSumtype1, type2 : 0, 0for _, num : range nums {if num&lsb > 0 {type1 ^ num} else {type2 ^ num}}return []in…...

IDEA自带的Maven 3.9.x无法刷新http nexus私服
问题: 自建的私服,配置了域名,使用http协议,在IDEA中或本地Maven 3.9.x会出现报错,提示http被blocked,原因是Maven 3.8.1开始,Maven默认禁止使用HTTP仓库地址,只允许使用HTTPS仓库地…...

56、本地数据库迁移到阿里云
现有需求,本地数据库迁移到阿里云上。 库名xy102表 test01test02test01 test023条数据。1、登录阿里云界面创建免费试用ECS实列。 阿里云登录页 (aliyun.com)](https://account.aliyun.com/login/login.htm?oauth_callbackhttps%3A%2F%2Fusercenter2.aliyun.com%…...

新时代多目标优化【数学建模】领域的极致探索——数学规划模型
目录 例1 1.问题重述 2.基本模型 变量定义: 目标函数: 约束条件: 3.模型分析与假设 4.模型求解 5.LINGO代码实现 6.结果解释 编辑 7.敏感性分析 8.结果解释 例2 奶制品的销售计划 1.问题重述 编辑 2.基本模型 3.模…...

单例模式详解
文章目录 一、概述1.单例模式2.单例模式的特点3.单例模式的实现方法 二、单例模式的实现1. 饿汉式2. 懒汉式3. 双重校验锁4. 静态内部类5. 枚举 三、总结 一、概述 1.单例模式 单例模式(Singleton Pattern)是一种创建型设计模式,确保一个类…...

WebGIS主流的客户端框架比较|OpenLayers|Leaflet|Cesium
实现 WebGIS 应用的主流前端框架主要包括 OpenLayers、Leaflet、Mapbox GL JS 和 Cesium 等。每个框架都有其独特的功能和优势,适合不同的应用场景。 WebGIS主流前端框架的优缺点 前 端 框架优点缺点OpenLayers较重量级的开源库,二维GIS功能最丰富全面…...

【LabVIEW作业篇 - 2】:分数判断、按钮控制while循环暂停、单击按钮获取book文本
文章目录 分数判断按钮控制while循环暂停按钮控制单个while循环暂停 按钮控制多个while循环暂停单击按钮获取book文本 分数判断 限定整型数值输入控件值得输入范围,范围在0-100之间,判断整型数值输入控件的输入值。 输入范围在0-59之间,显示…...
Kafka架构详解之分区Partition
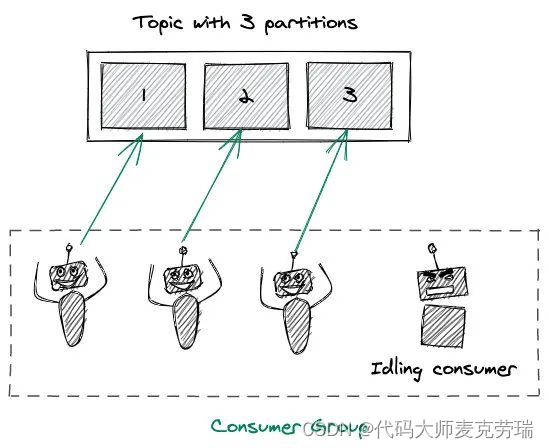
目录 一、简介二、架构三、分区Partition1.分区概念2.Offsets(偏移量)和消息的顺序3.分区如何为Kafka提供扩展能力4.producer写入策略5.consumer消费机制 一、简介 Apache Kafka 是分布式发布 - 订阅消息系统,在 kafka 官网上对 kafka 的定义…...
SSM之Mybatis
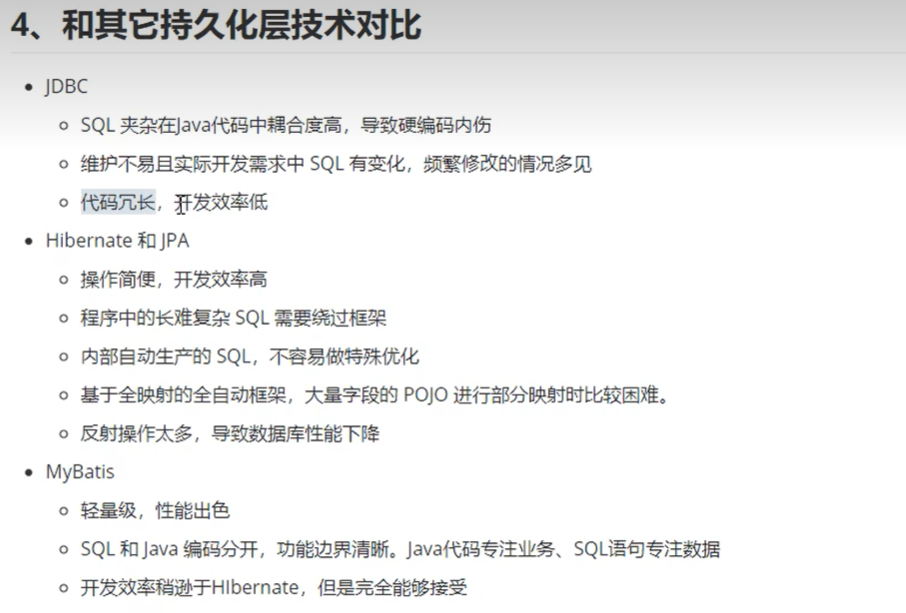
SSM之Mybatis 一、MyBatis简介1、MyBatis特性2、MyBatis的下载3、MyBatis和其他持久化层技术对比 二、MyBatis框架搭建三、MyBatis基础功能1、MyBatis核心配置文件2、MyBatis映射文件3、MyBatis实现增删改查4、MyBatis获取参数值的两种方式5、MyBatis查询功能6、MyBatis自定义映…...

Python list comprehension (列表推导式 - 列表解析式 - 列表生成式)
Python list comprehension {列表推导式 - 列表解析式 - 列表生成式} 1. Python list comprehension (列表推导式 - 列表解析式 - 列表生成式)2. Example3. ExampleReferences Python 中的列表解析式并不是用来解决全新的问题,只是为解决已有问题提供新的语法。 列…...

2024年7月12日理发记录
上周五天气还算好,不太热,晚上下班打车回家后,将目的地设置成日常去的那个理发店。 下车走到门口,熟悉的托尼帅哥正在抽烟,他一眼看到了我,马上掐灭烟头,从怀里拿出口香糖,咀嚼起来&…...

几种常用排序算法
1 基本概念 排序是处理数据的一种最常见的操作,所谓排序就是将数据按某字段规律排列,所谓的字段就是数据节点的其中一个属性。比如一个班级的学生,其字段就有学号、姓名、班级、分数等等,我们既可以针对学号排序,也可…...

Spring3(代理模式 Spring1案例补充 Aop 面试题)
一、代理模式 在代理模式(Proxy Pattern)中,一个类代表另一个类的功能,这种类型的设计模式属于结构型模式。 代理模式通过引入一个代理对象来控制对原对象的访问。代理对象在客户端和目标对象之间充当中介,负责将客户端…...

HagiCode Desktop 混合分发架构解析:如何用 PP 加速大文件下载耘
一、Actor 模型:不是并发技巧,而是领域单元 Actor 模型的本质是: Actor 是独立运行的实体 Actor 之间只通过消息交互 Actor 内部状态不可被外部直接访问 Actor 自行决定如何处理收到的消息 Actor 模型真正解决的是: 如何在不共享状…...

Intv_AI_MK11与Claude协同实战:构建多模型AI应用开发平台
Intv_AI_MK11与Claude协同实战:构建多模型AI应用开发平台 1. 混合AI模型的应用价值 在AI应用开发领域,单一模型往往难以满足复杂业务需求。就像一支足球队需要不同位置的球员配合一样,将Intv_AI_MK11与Claude等模型协同部署,能够…...

SUPER COLORIZER模型训练进阶:使用自定义数据集微调以适配特定画风
SUPER COLORIZER模型训练进阶:使用自定义数据集微调以适配特定画风 你是不是觉得直接用现成的上色模型,出来的效果总是差那么点意思?要么颜色太普通,要么风格不是你想要的。比如你想给线稿上色成那种飘逸的水墨风,或者…...

OpenClaw日程管理:千问3.5-9B解析邮件创建待办
OpenClaw日程管理:千问3.5-9B解析邮件创建待办 1. 为什么需要AI助手管理日程? 每天早上打开邮箱,总能看到十几封未读邮件——会议邀请、项目更新、待办提醒混杂在一起。上周我就因为漏看了一封包含截止日期变更的邮件,差点耽误了…...

OpenClaw日志分析:千问3.5-35B-A3B-FP8任务执行效率优化
OpenClaw日志分析:千问3.5-35B-A3B-FP8任务执行效率优化 1. 为什么需要关注OpenClaw的任务执行效率 上周我在本地部署了OpenClaw,并接入千问3.5-35B-A3B-FP8模型进行自动化任务测试。最初几天运行还算顺利,但随着任务复杂度增加,…...

Bugku CTF: Exploiting LFI Vulnerabilities in Multi-Language Web Apps
1. 理解LFI漏洞的本质 本地文件包含(Local File Inclusion,简称LFI)是Web安全中常见的漏洞类型,它允许攻击者通过精心构造的输入参数读取服务器上的敏感文件。这种漏洞通常出现在动态包含文件的功能中,比如PHP的includ…...

OpenAlternative移动端优化完全指南:打造完美开源软件目录响应式体验
OpenAlternative移动端优化完全指南:打造完美开源软件目录响应式体验 【免费下载链接】openalternative Curated list of open source alternatives to proprietary software. 项目地址: https://gitcode.com/gh_mirrors/op/openalternative 在移动设备使用率…...

RMBG-2.0快速上手指南:上传即处理,3步完成透明物体精细抠图
RMBG-2.0快速上手指南:上传即处理,3步完成透明物体精细抠图 1. 为什么你需要RMBG-2.0——不只是“能用”,而是“好用” 你有没有遇到过这样的情况:一张玻璃杯的照片,边缘泛着光晕,背景和杯身几乎融为一体…...

Phi-4-mini-reasoning企业知识图谱增强:实体关系推理与逻辑补全案例
Phi-4-mini-reasoning企业知识图谱增强:实体关系推理与逻辑补全案例 1. 模型简介与核心能力 Phi-4-mini-reasoning 是一个基于合成数据构建的轻量级开源模型,专注于高质量、密集推理的数据处理能力。作为Phi-4模型家族的一员,它特别强化了数…...
)
双目视觉实战:如何用OpenCV和Python实现简易3D建模(附完整代码)
双目视觉实战:如何用OpenCV和Python实现简易3D建模(附完整代码) 当你第一次看到3D电影中跃然眼前的画面,或是用手机扫描物体生成三维模型时,是否好奇过这背后的技术原理?双目视觉技术正是实现这些酷炫效果的…...