有关pytorch的一些总结
Tensor
含义
张量(Tensor):是一个多维数组,它是标量、向量、矩阵的高维拓展。
创建
非随机创建
1.用数组创建
将数组转化为tensor
np.ones([a,b]) 全为1
#首先导入PyTorch
import torch#数组创建
import numpy as np
a=np.array([2,3.3])#维度为一的矩阵
torch.from_numpy(a)#转化为tensor
#out:tensor([2.0000, 3.3000], dtype=torch.float64)a=np.ones([2,3])#2行3列全为1
torch.from_numpy(a)
'''out
tensor([[1., 1., 1.],[1., 1., 1.]], dtype=torch.float64)
'''
torch.zeros([a,b]) 全为0
torch.eye([a,b]) 对角线上全为1
torch.ones([a,b]) 全为1
torch.zeros(3,3)
'''
tensor([[0., 0., 0.],[0., 0., 0.],[0., 0., 0.]])
'''
torch.eye(3,3)#不适用于3维以上
'''
tensor([[1., 0., 0.],[0., 1., 0.],[0., 0., 1.]])
'''
torch.ones(3,3)
'''
tensor([[1., 1., 1.],[1., 1., 1.],[1., 1., 1.]])
'''
2.给定数字直接创建
#直接用用给定的数字创建tensor
torch.tensor([2.,3.2])#list,小写tensor接受的是现有的数据
#out:tensor([2.0000, 3.2000])
3.创建空的tensor
#创建一个空的tensor,数字随机
torch.empty(1)#未初始化的维度1的数据
#out:tensor([-1.8860e+26])
#Torch.FloatTensor(d1, d2, d3)torch.Tensor(2,3)#创建一个2行3列的数,默认float类
'''out:
tensor([[2.5353e+30, 2.8026e-44, 8.0519e-42],[9.4081e-39, 7.8194e-25, 2.5353e+30]])'''torch.IntTensor(2,3)#创建2行3列的整数
#注意会出现数据非常大或者非常小的情况,要记得覆盖数据
'''out
tensor([[1912602624,         20,       5746],[   6713856,  393347072, 1912602624]], dtype=torch.int32)
'''
4.如何更改默认类型
torch.set_default_tensor_type(torch.DoubleTensor)#设置默认类型为double
随机初始化
1.产生0-1之间
采用rand随即产生0-1之间的数字填充在创建的张量中
a=torch.rand(3,3)#随机2行3列数据,01之间
'''
tensor([[0.5724, 0.5070, 0.7747],[0.0624, 0.9298, 0.5318],[0.8444, 0.1081, 0.1214]])
'''
torch.rand_like(a)#_like代表的就是tensor函数,随机生成一个像a一样的3行3列的数
'''
tensor([[0.1703, 0.8234, 0.6707],[0.2379, 0.7012, 0.6451],[0.6607, 0.2193, 0.7388]])
'''
2.自定义区间
randiant自定义区间
torch.randint(1,10,[3,3])#自定义区间,最大值不包含在区间内
#区间1-10,数据是3*3的矩阵
3.自定义均值和方差
#自定义均值和方差
torch.normal(mean=torch.full([10],0.),std=torch.arange(1,0.,-0.1))
#torch.full([10],0.)生成度为10,均值为0
#std=torch.arange(1,0.,-0.1),方差在慢慢减少
4.重复数
tensor中的数字一样
#生成2行3列全是7
torch.full([2,3],7)
arange/range
#生成0-9数
torch.arange(0,10)
#tensor([0, 1, 2, 3, 4, 5, 6, 7, 8, 9])
#range在torch中不建议使用
torch.range(0,10)
linspace/logspace等分
#边包含[0,10],等分切steps个数字
torch.linspace(0,10,steps=4)
#tensor([ 0.0000,  3.3333,  6.6667, 10.0000])#返回logx
torch.logspace(0,-1,steps=10)
#tensor([1.0000, 0.7743, 0.5995, 0.4642, 0.3594, 0.2783, 0.2154, 0.1668, 0.1292,0.1000])
randperm
torch.randperm(10)#0-9之间随机生成,随即打散
#tensor([2, 6, 4, 9, 1, 3, 7, 0, 8, 5])#掉换行
a=torch.rand(3,3)
b=torch.rand(3,2)
idx=torch.randperm(3)
a,b,idx
'''
(tensor([[0.5896, 0.2464, 0.6245],[0.0282, 0.2187, 0.4708],[0.8680, 0.9148, 0.7411]]),tensor([[0.7101, 0.0145],[0.3003, 0.3720],[0.4903, 0.2437]]))tensor([0, 2, 1])'''
idx=torch.randperm(3)
idx
#tensor([2, 1, 0])
a[idx]#给a做索引,相反
b[idx]#idx保持一致,随机打散的种子
'''
tensor([[0.8680, 0.9148, 0.7411],[0.0282, 0.2187, 0.4708],[0.5896, 0.2464, 0.6245]])
tensor([[0.4903, 0.2437],[0.3003, 0.3720],[0.7101, 0.0145]])'''
索引与切片
#创建一个tensor
a=torch.rand(4,3,28,28)
#可以将其理解为4张图片3个维度(RGB)图片大小为28x28a[0].shape#取第0张图片
#out:torch.Size([3, 28, 28])a[0,0].shape#第0张图片的第0个通道的size
#out:torch.Size([28, 28])a[0,0,2,4]
#含义:第0张图片的第0个通道的第2行4列的那个像素点
#是标量
#out:tensor(0.2814)#取前2张图
a[:2].shape#前2张图片的第1个通道的shape
a[:2,:1,:,:].shape#取前2张图片
a[:2,1:,:,:].shapea[:2,-1:,:,:].shape#-1反方向开始
# 3  2  1
#-1 -2 -3a[:,:,0:28:2,0:28:2].shape
#隔行采样,区间:0-28,间隔:2a[:,:,::3,::3].shape
#取全部,隔行采样
按索引取
a=torch.rand(4,3,28,28)#先选维度,再选范围
#(第一维度,第几张[0-2张])
#torch.index_select(a, 0, torch.tensor([0, 2]))
a.index_select(0,torch.tensor([0,2])).shapea[...].shape#取所有
a[0,...].shape#取第一张图片所有的通道和大小
a[:,1,...].shape#取所有图片第一个通道的大小
a[...,:2].shape#取所有图片所有通道的0-2像素大小位置
掩码,masked_select
判断tensor中的值是否符合制定大小返回bool值
#随机创建一个tensor值
x=torch.randn(3,4)
'''tensor([[ 0.6212,  0.6210, -0.7202,  3.2044],[ 0.5992, -0.4278,  1.6079,  2.0227],[ 1.2778,  0.8451, -0.6770, -0.6830]])''''mask=x.ge(0.5)#>=0.5的元素判断
mask
'''out:
tensor([[ True,  True, False,  True],[ True, False,  True,  True],[ True,  True, False, False]])'''torch.masked_select(x,mask)#选择出>=0.5的数
#out:tensor([0.6212, 0.6210, 3.2044, 0.5992, 1.6079, 2.0227, 1.2778, 0.8451])
除使用上述方法还可以直接得到
x[x>0.5]
#out:tensor([0.6212, 0.6210, 3.2044, 0.5992, 1.6079, 2.0227, 1.2778, 0.8451])
take
返回一个新的张量,其中的元素是输入元素在给定的索引处,将输入张量视为视为一维张量。
#返回一个新的张量,其中的元素是输入元素在给定的索引处,将输入张量视为视为一维张量。
torch.take(src,torch.tensor([0,2,5]))
Broadcasting
自动扩展,先在大维度上扩张,[B,C,H,W]维度大–>小,然后在维度长度为1的地方扩张。
在下图中,在图中③的情况中,A[3,1]先在小维度上1扩张成3横着扩张,B[1,3]在大维度上扩张1变成3竖着扩张所以broadcast相当于是unsqueeze和expand的结合,先在维度上扩张然后在某维度的尺寸上扩张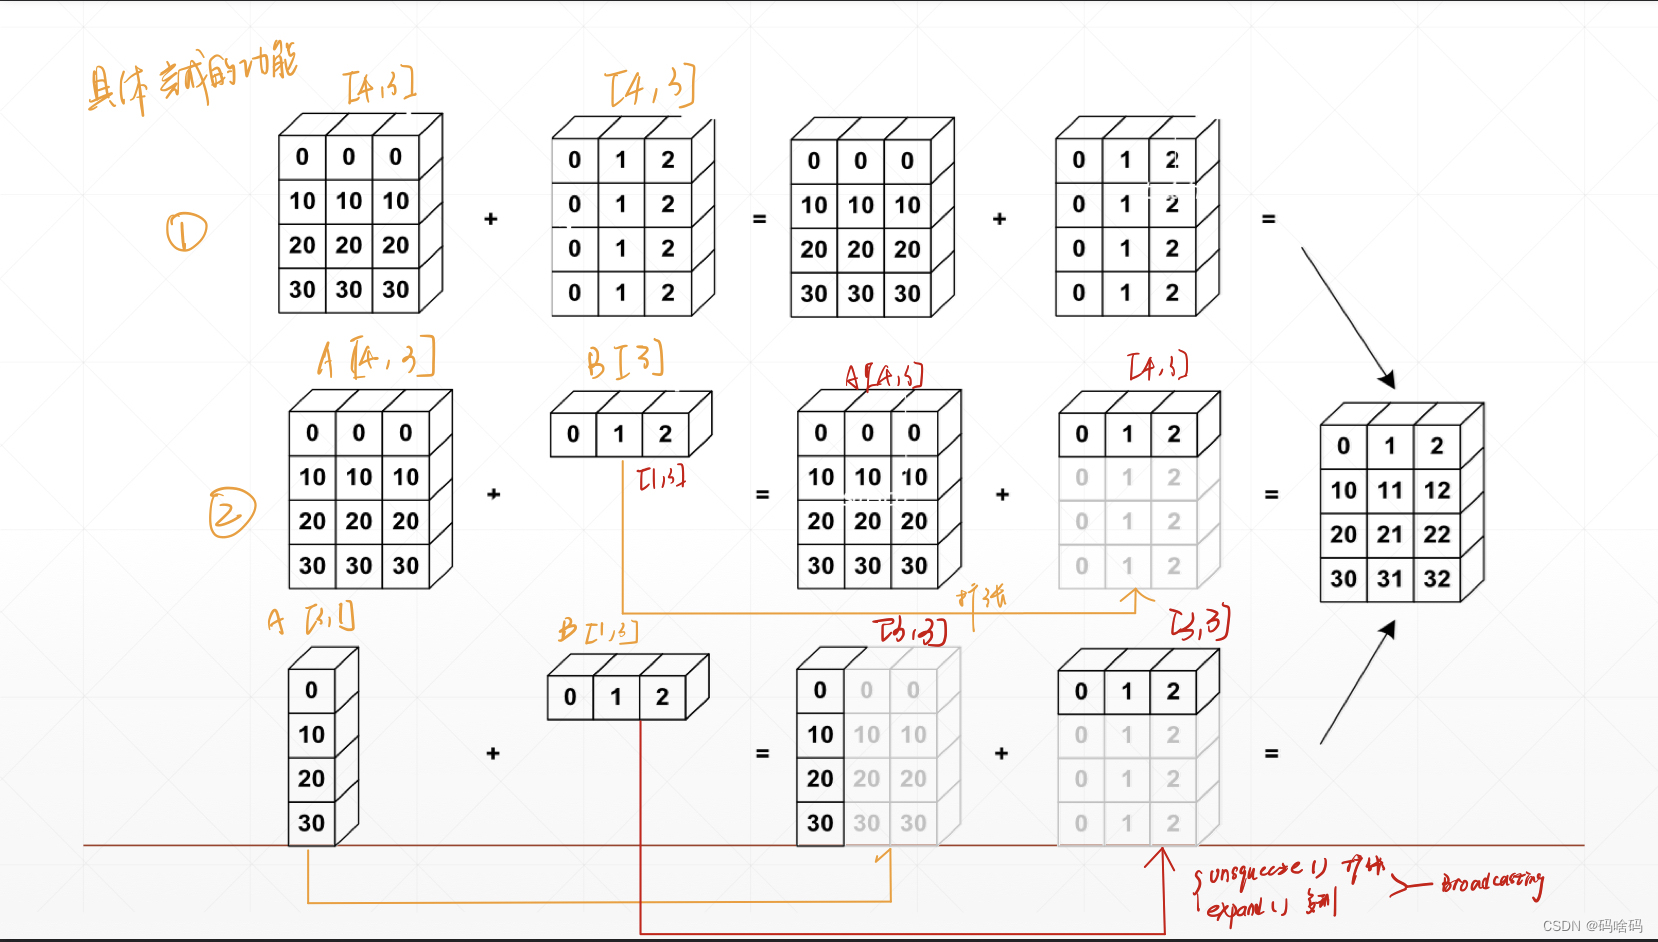
为什么需要broadcasting
1满足实际需求: 因为希望某个向量可以和某个标量直接相加,省去自己写多个unsqueeze和expand接口的麻烦。
2节省内存计算:如果使用repeat不使用expand接口会将标量[1]扩展成[4,32,8]4328=1024这样扩大内存,broadcasting可以节约内存。
什么时候可以用broadicasting
假设[class,student,score],[4,32,8]4个班级32个学生8门课,每门成绩加5分即一个标量[1],即实现A和B两个不同维度向量的相加,用broadcasting
#可以使用Broadcasting的情况
A:[4,32,14,14]
B:[1,32,1,1] => [4,32,14,14]
-----------------------------------------------------
A:[4,32,14,14]
B:[14,14] => [1,1,14,14] => [4,32,14,14]#不可以使用Broadcasting的情况
A:[4,32,14,14]
B:[2,32,14,14]
#Dim 0 has dim,can NOT insert and expand to same
#Dim 0 has distinct dim,NOT size 1
合并与分割
cat
torch.cat([a,b],dim=0).shape#[a,b]第一个参数是合并list,第二个参数dim=0是在哪个维度上合并
对于拼接的维度可以不同,但是非cat的维度上必须保持一致
a=torch.rand(4,32,8)
b=torch.rand(5,32,8)
torch.cat([a,b],dim=0).shape
#合并第1维,
#dim需要一样
#不合并的维度需要一样
#out:torch.Size([9, 32, 8])a1=torch.rand(4,3,32,32)
a2=torch.rand(4,1,32,32)
torch.cat([a1,a2],dim=0).shape
#此时会报错,因为第二维度不一致#改
a1=torch.rand(4,3,32,32)
a2=torch.rand(4,1,32,32)
torch.cat([a1,a2],dim=1).shape
#out:torch.Size([4, 4, 32, 32])
stack
torch.stack() :两个维度必须一致,会创建一个新的维度。
两个向量进行拼接ab都是[32,8] ,表示ab两个班级32个学生的8门成绩用cat就是[64,8],这样丢失了2个班级的信息用stack就是[2,32,8]创建一个新的维度,但是stack就是必须两个tensor完全一样,cat允许在连接的dim上尺寸不一样
a1 = torch.rand(4,3,16,16)
a2 = torch.rand(4,3,16,16)
torch.stack([a1,a2],dim = 2).shape   #torch.Size([4, 3, 2, 16, 16])a = torch.rand(32,8)
b = torch.rand(32,8)
torch.stack([a,b],dim = 0).shape     #torch.Size([2, 32, 8])
a = torch.rand(32,8)
b = torch.rand(30,8)
torch.stack([a,b],dim = 0).shape     #RuntimeError: stack expects each tensor to be equal size, but got [32, 8] at entry 0 and [30, 8] at entry 1
split
torch.split() :按长度拆分
c = torch.rand(2,32,8)
aa,bb = c.split([1,1],dim = 0)
aa.shape     #torch.Size([1, 32, 8])
bb.shape     #torch.Size([1, 32, 8])aa,bb = c.split(1,dim = 0)
aa.shape     #torch.Size([1, 32, 8])
bb.shape     #torch.Size([1, 32, 8])c = torch.rand(6,32,8)
aa,bb,cc = c.split([3,2,1],dim = 0)
aa.shape    #torch.Size([3, 32, 8])
bb.shape    #torch.Size([2, 32, 8])
cc.shape    #torch.Size([1, 32, 8])aa,bb = c.split(3,dim = 0)  #3代表拆分后每个tensor的0维长度为3
aa.shape  #torch.Size([3, 32, 8])
bb.shape  #torch.Size([3, 32, 8])
chunk
torch.chunk() :按数量拆分
c = torch.rand(2,32,8)aa,bb = c.chunk(2,dim = 0) #2代表拆分后的tensor数量
aa.shape     #torch.Size([1, 32, 8])
bb.shape     #torch.Size([1, 32, 8])aa,bb = c.split(2,dim = 0)  #ValueError: not enough values to unpack (expected 2, got 1)
数学运算
四则运算
加 减 乘 除
| add | + |
| sub | - |
| mul | * |
| div | / |
a=torch.rand(3,4)
b=torch.rand(4)
a,b
'''
(tensor([[0.2384, 0.5022, 0.7100, 0.0400],[0.1716, 0.0894, 0.0795, 0.1456],[0.7635, 0.9423, 0.7649, 0.3379]]),tensor([0.8526, 0.8296, 0.1845, 0.7922]))'''
#加
torch.add(a,b)
a+b#减
torch.sub(a,b)
a-b
torch.all(torch.eq(a-b,torch.sub(a,b)))
#True#乘
a*b
torch.mul(a,b)#除
a/b
torch.div(a,b)
矩阵相乘
matmul
a=torch.tensor([[3.,3.],[3.,3.]])
b=torch.ones(2,2)torch.mm(a,b)#数据类型Long
torch.matmul(a,b)
a@b
维度超过2时,mm就不可用了
维度超过2时,用matmul用后两维做相乘
matmul维度要匹配,虽然只用后两个乘
a=torch.rand(4,3,28,64)
b=torch.rand(4,3,64,32)
'''RuntimeError                              Traceback (most recent call last)
Input In [41], in <cell line: 1>()
----> 1 torch.mm(a,b).shapeRuntimeError: self must be a matrix'''torch.matmul(a,b).shape
#torch.Size([4, 3, 28, 32])b=torch.rand(4,64,32)
torch.matmul(a,b).shape#维度要匹配,虽然只用后两个乘
'''
RuntimeError                              Traceback (most recent call last)
Input In [46], in <cell line: 2>()1 b=torch.rand(4,64,32)
----> 2 torch.matmul(a,b).shapeRuntimeError: The size of tensor a (3) must match the size of tensor b (4) at non-singleton dimension 1'''
幂运算
指数:pow()
平方根:sqrt()
平方根的倒数:rsqrt()
#pow()
a=torch.full([2,2],3)a**2
a.pow(2)aa=a**2
#平方根
aa.sqrt()
aa**0.5#1/2的幂#立方根
aa.rsqrt()
#aa**(1/3)
对数
a=torch.exp(torch.ones(2,2))#e的次方torch.log(a)#lna
近似
| torch.floor() | 向下取整 |
| torch.ceil() | 向上取整 |
| torch.trunc() | 拆分后取整数部分 |
| torch.frac() | 拆分后取小数部分 |
| torch.floor() | 向下取整 |
#向上取整
a=torch.tensor(3.14)
a.ceil()#tensor(4.)#向下取整
a.floor()#(tensor(3.),)#四舍五入
a.round()#tensor(3.)#取整数部分
a.trunc()#tensor(3.)#取小数部分
a.frac()#tensor(0.1400)
裁剪
grad=torch.rand(2,3)*15
grad
'''
tensor([[ 6.9523,  0.3185, 14.4829],[ 2.2099, 13.3388,  6.6735]])'''
grad.max()#tensor(14.4829)#取最小
grad.min()#tensor(0.3185)#取中位数
grad.median()#tensor(6.6735)#最小值限定为10,<10,都改为10
grad.clamp(10)
'''
tensor([[10.0000, 10.0000, 14.4829],[10.0000, 13.3388, 10.0000]])
'''
grad.clamp(0,10)#最小值限定0,最大值限定10
'''
tensor([[ 6.9523,  0.3185, 10.0000],[ 2.2099, 10.0000,  6.6735]])
'''
属性统计
范式norm
1范式:元素相加
A=[a,b]
F=∣a+b∣F=|a+b|F=∣a+b∣
a=torch.full([8],1.)
b=a.view(2,4)
c=a.view(2,2,2)
a,b,c
'''
output:
(tensor([1., 1., 1., 1., 1., 1., 1., 1.]),tensor([[1., 1., 1., 1.],[1., 1., 1., 1.]]),tensor([[[1., 1.],[1., 1.]],[[1., 1.],[1., 1.]]]))
'''
a.norm(1),b.norm(1),c.norm(1)#1范式
'''
a=1+1+1+1+1+1+1+1=8
b=(1+1+1+1)+(1+1+1+1)
c=(1+1+1+1)+(1+1+1+1)+(1+1+1+1)+(1+1+1+1)
(tensor(8.), tensor(8.), tensor(8.))
'''
2-范式
A=[a,b]
F=a2+b2F=\sqrt{a^2+b^2}F=a2+b2
a.norm(2),b.norm(2),c.norm(2)
'''
(tensor(2.8284), tensor(2.8284), tensor(2.8284))
'''
也可以对固定维度做范式计算
b[2,4],dim=1就是在数字4对应的维度做范式计算
b.norm(1,dim=1)#第1维的第一范数
'''
tensor([4., 4.])
'''b.norm(2,dim=1)#第1维的第二范数
'''
tensor([2., 2.])
'''c.norm(1,dim=0)#第0维的第一范数
'''
tensor([[2., 2.],[2., 2.]])'''
c.norm(2,dim=0)#第0维的第二范数
'''
tensor([[1.4142, 1.4142],[1.4142, 1.4142]])
'''
最小,最大,平均值,累乘
a=torch.arange(8).view(2,4).float()
'''
tensor([[0., 1., 2., 3.],[4., 5., 6., 7.]])
'''a.min(),a.max(),a.mean(),a.prod()#最小,最大,平均值,累乘
'''
(tensor(0.), tensor(7.), tensor(3.5000), tensor(0.))
'''a.argmax(),a.argmin()#索引
'''
(tensor(7), tensor(0))
'''
#按第一维分布计算得到对应的数以及位置
a.max(dim=1)
'''
torch.return_types.max(
values=tensor([3., 7.]),
indices=tensor([3, 3]))
'''a.max(dim=1,keepdim=True)#keepdim保持维度与原来一致
#实际上是输出与原始数据维度一致
'''
torch.return_types.max(
values=tensor([[3.],[7.]]),
indices=tensor([[3],[3]]))'''a.argmax(dim=1,keepdim=True)#输出对应最大值的位置,输出与原来保持维度一致
'''
tensor([[3],[3]])
'''
高阶操作
where
torch.where(condition,x,y)
(条件,A矩阵,B矩阵),符合条件从A对应位置选数,不符合就从B对应位置选数
条件选择函数
a=torch.full([2,2],0)
b=torch.full([2,2],1)
a,b
'''
(tensor([[0, 0],[0, 0]]),tensor([[1, 1],[1, 1]]))
'''
#条件
cond=torch.rand(2,2)
cond
'''
tensor([[0.6961, 0.8969],[0.2795, 0.9759]])
'''torch.where(cond>0.5,a,b)
#如果cond的值>0.5就选取a对应位置的数,不是就选取b中对应位置的数
'''
tensor([[0, 0],[1, 0]])
'''
gather
torch.gather(input,dim,index,out=None)-Tensor
input,输入数据
dim,查看维度
index,查看索引
out=None
prob=torch.randn(4,10)
'''
tensor([[ 0.6805, -0.4651,  0.6448,  0.6679, -0.5646,  2.3565,  0.9479, -0.0406,-0.4645,  1.3624],[ 0.8647, -0.5109,  0.5100,  0.6534, -0.8373, -1.8661, -0.8300, -0.0230,-0.2076,  0.6472],[ 0.9843,  1.0484,  0.1264, -1.2768,  0.7247,  0.9827,  1.1230,  0.9566,0.4962, -0.9180],[ 1.3375,  0.7297, -0.8324,  0.5294, -1.7625,  0.7328,  0.9702, -0.0741,2.6688,  0.1584]])
'''#得到按第一维排序的top3的数的大小以及位置,输出形式与原来的数一样
idx=prob.topk(dim=1,k=3)
idx
'''
torch.return_types.topk(
values=tensor([[2.3565, 1.3624, 0.9479],[0.8647, 0.6534, 0.6472],[1.1230, 1.0484, 0.9843],[2.6688, 1.3375, 0.9702]]),
indices=tensor([[5, 9, 6],[0, 3, 9],[6, 1, 0],[8, 0, 6]]))
'''label=torch.arange(10)+100
label
'''
tensor([100, 101, 102, 103, 104, 105, 106, 107, 108, 109])
'''
idx=idx[1]#只得到第二部分即对应数的位置
idx
'''
tensor([[5, 9, 6],[0, 3, 9],[6, 1, 0],[8, 0, 6]])'''idx.long()
'''tensor([[5, 9, 6],[0, 3, 9],[6, 1, 0],[8, 0, 6]])
'''
#按idx的下标在label.expand中查找对应的数
torch.gather(label.expand(4,10),dim=1,index=idx.long())
'''
tensor([[105, 109, 106],[100, 103, 109],[106, 101, 100],[108, 100, 106]])
'''
相关文章:
有关pytorch的一些总结
Tensor 含义 张量(Tensor):是一个多维数组,它是标量、向量、矩阵的高维拓展。 创建 非随机创建 1.用数组创建 将数组转化为tensor np.ones([a,b]) 全为1 #首先导入PyTorch import torch#数组创建 import numpy as np anp.arr…...
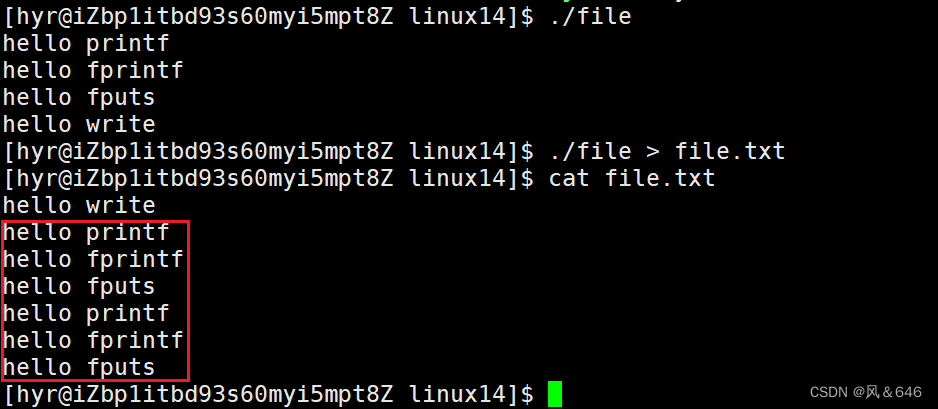
基础IO【Linux】
文章目录:文件相关知识C语言文件IOstdin & stdout & stderr系统文件 IOopenclosewriteread文件描述符文件描述符的分配规则重定向dup2系统调用FILEFILE中的文件描述符FILE中的缓冲区理解文件相关知识 文件 文件内容 文件属性(每一个已经存在的…...
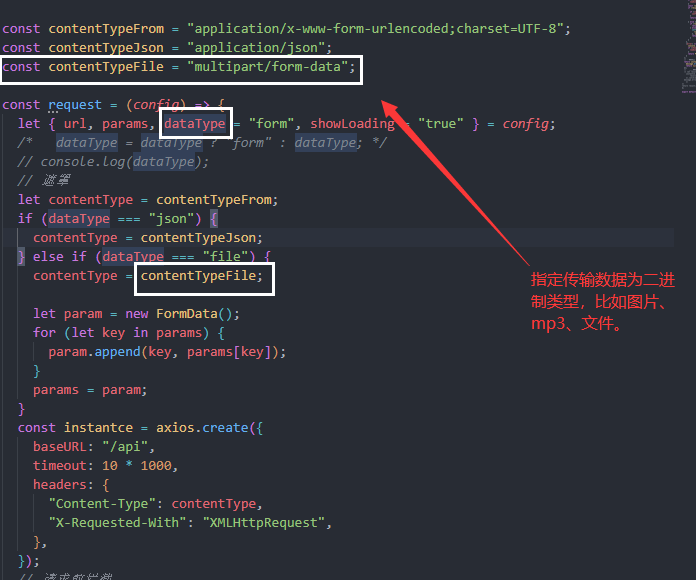
Vue3——自定义封装上传图片样式
自定义封装上传图片样式 一、首先需要新建一个自组建完善基础的结构,我这里起名为ImgUpload.vue <el-upload name"file" :show-file-list"false" accept".png,.PNG,.jpg,.JPG,.jpeg,.JPEG,.gif,.GIF,.bmp,.BMP" :multiple"…...
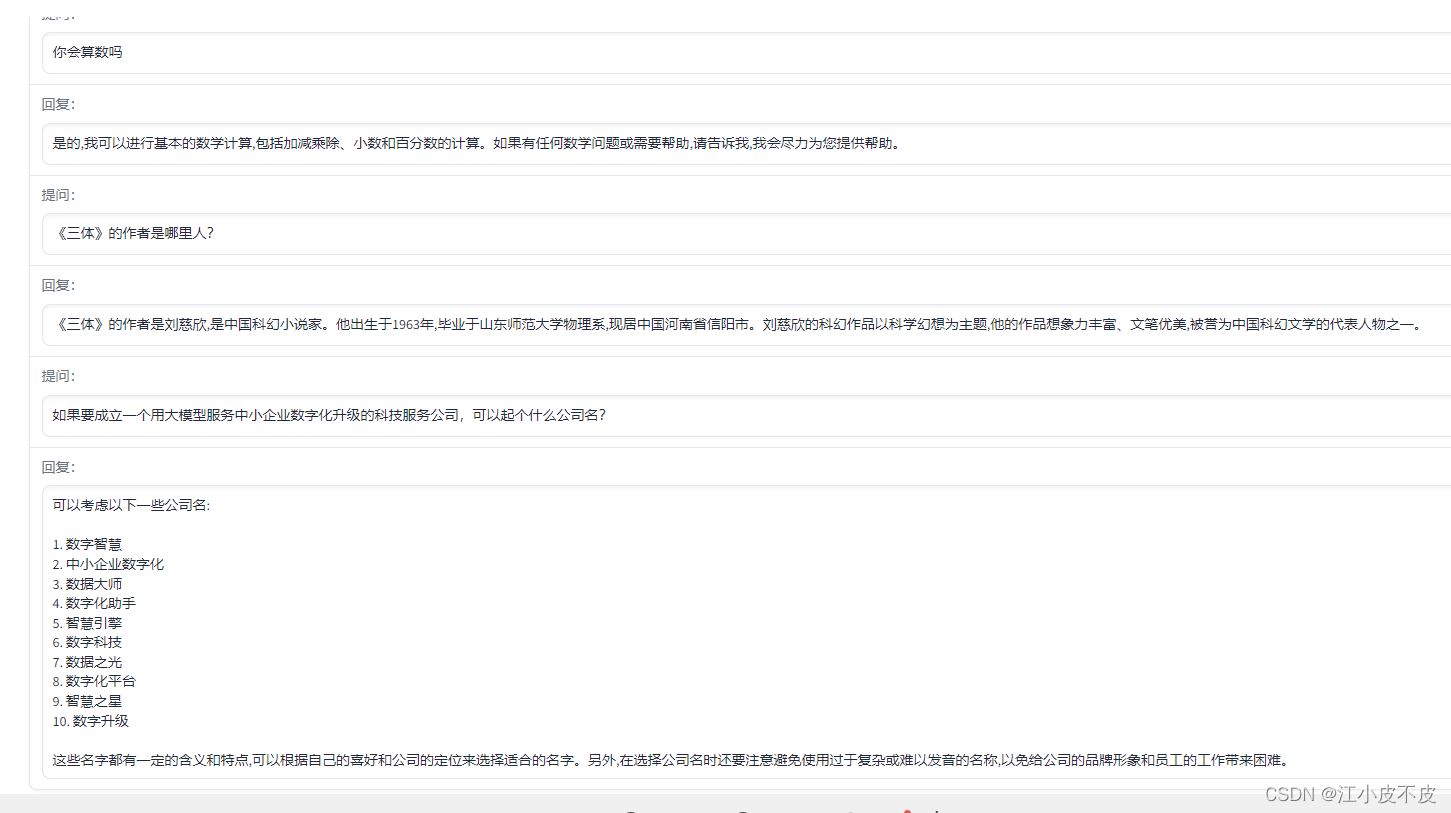
ChatGLM-6B (介绍以及本地部署)
中文ChatGPT平替——ChatGLM-6BChatGLM-6B简介官方实例本地部署1.下载代码2.通过conda创建虚拟环境3.修改代码4.模型量化5.详细代码调用示例ChatGLM-6B 简介 ChatGLM-6B 是一个开源的、支持中英双语问答的对话语言模型,基于 General Language Model (GLM) 架构&…...
react的基础使用
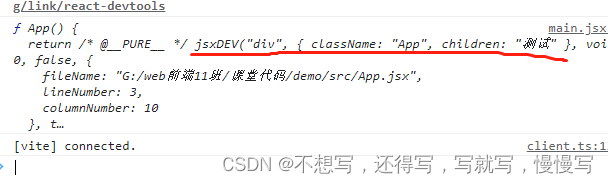
react中为什么使用jsxReact 认为渲染逻辑本质上与其他 UI 逻辑内在耦合,比如,在 UI 中需要绑定处理事件、在某些时刻状态发生变化时需要通知到 UI,以及需要在 UI 中展示准备好的数据。react认为将业务代码和数据以及事件等等 需要和UI高度耦合…...

letcode 4.寻找两个正序数组的中位数(官方题解笔记)
题目描述 给定两个大小分别为 m 和 n 的正序(从小到大)数组 nums1 和 nums2。请你找出并返回这两个正序数组的 中位数 。 算法的时间复杂度应该为 O(log (mn)) 。 1.二分查找 1.1思路 时间复杂度:O(log(mn)) 空间复杂度:O(1) 给定…...
【面试题系列】K8S常见面试题
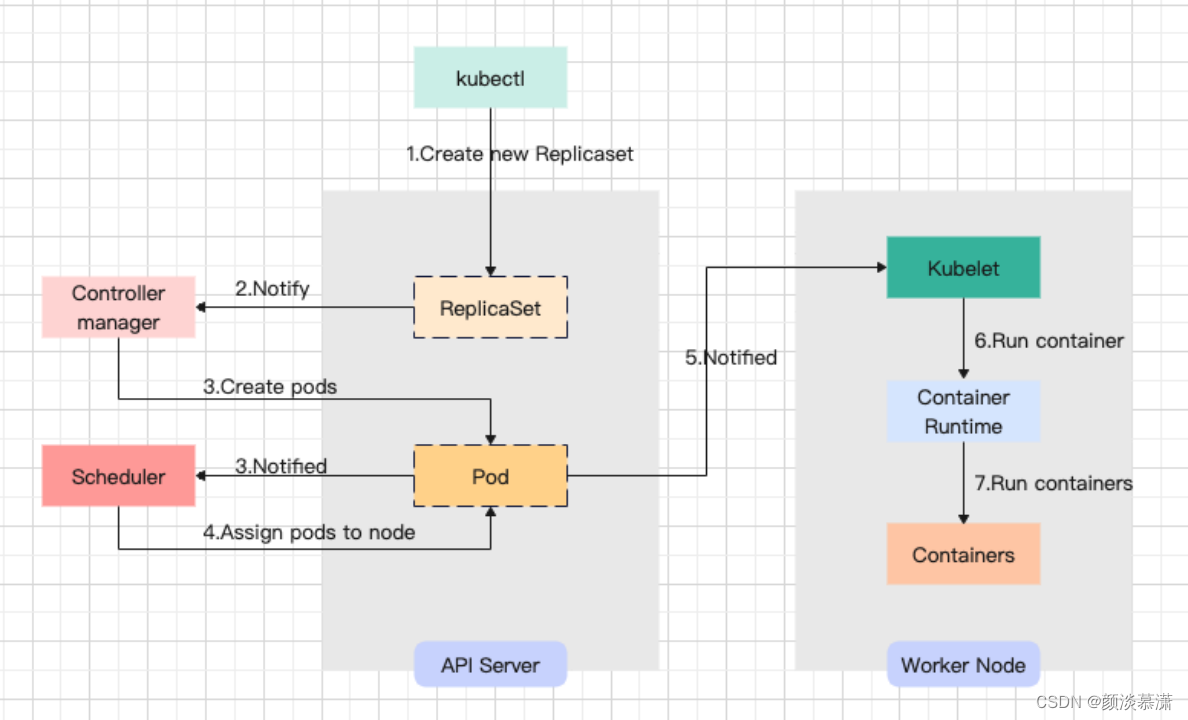
目录 序言 问题 1. 简单说一下k8s集群内外网络如何互通的吧 2.描述一下pod的创建过程 3. 描述一下k8s pod的终止过程 4.Kubernetes 中的自动伸缩有哪些方式? 5.Kubernetes 中的故障检测有哪些方式? 6.Kubernetes 中的资源调度有哪些方式ÿ…...

字符函数和字符串函数(上)-C语言详解
CSDN的各位友友们你们好,今天千泽为大家带来的是C语言中字符函数和字符串函数的详解,掌握了这些内容能够让我们更加灵活的运用字符串,接下来让我们一起走进今天的内容吧!写这篇文章需要在cplusplus.com上大量截图,十分不易!如果对您有帮助的话希望能够得到您的支持和帮助,我会持…...
全连接神经网络
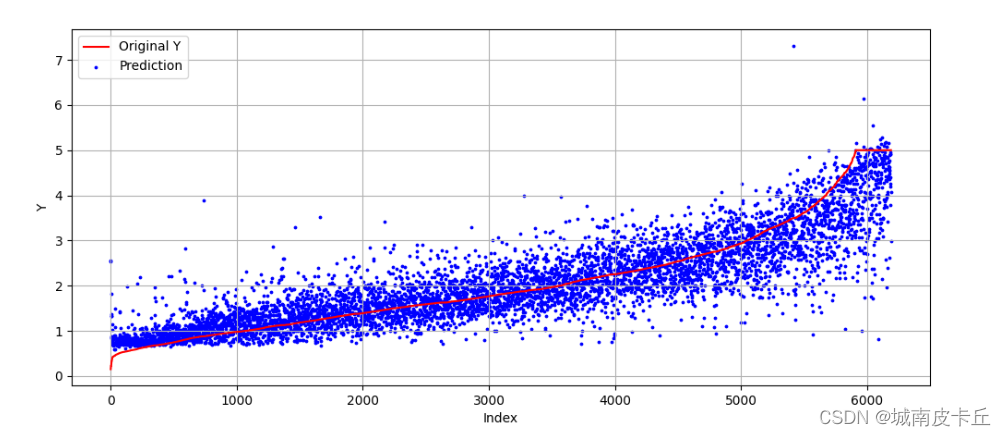
目录 1.全连接神经网络简介 2.MLP分类模型 2.1 数据准备与探索 2.2 搭建网络并可视化 2.3 使用未预处理的数据训练模型 2.4 使用预处理后的数据进行模型训练 3. MLP回归模型 3.1 数据准备 3.2 搭建回归预测网络 1.全连接神经网络简介 全连接神经网络(Multi-Layer Percep…...

深度学习目标检测ui界面-交通标志检测识别
深度学习目标检测ui界面-交通标志检测识别 为了将算法封装起来,博主尝试了实验pyqt5的上位机界面进行封装,其中遇到了一些坑举给大家避开。这里加载的训练模型参考之前写的博客: 自动驾驶目标检测项目实战(一)—基于深度学习框架yolov的交通…...

ubuntu不同版本的源(换源)(镜像源)(lsb_release -c命令,显示当前系统的发行版代号(Codename))
文章目录查看unbuntu版本名(lsb_release -c命令)各个版本源代号(仅供参考,具体代号用上面命令查)各版本软件源Ubuntu20.10阿里源:清华源:Ubuntu20.04阿里源:清华源:Ubunt…...

linux入门---程序翻译的过程
我们在vs编译器中写的代码按下ctrl f5就可以直接运行起来,并且会将运行的结果显示到显示器上,这里看上去只有一个步骤但实际上这里会存在很多的细节,比如说生成结果在这里插入代码片之前我们的代码会经过预处理,编译,汇…...
springboot复习(黑马)
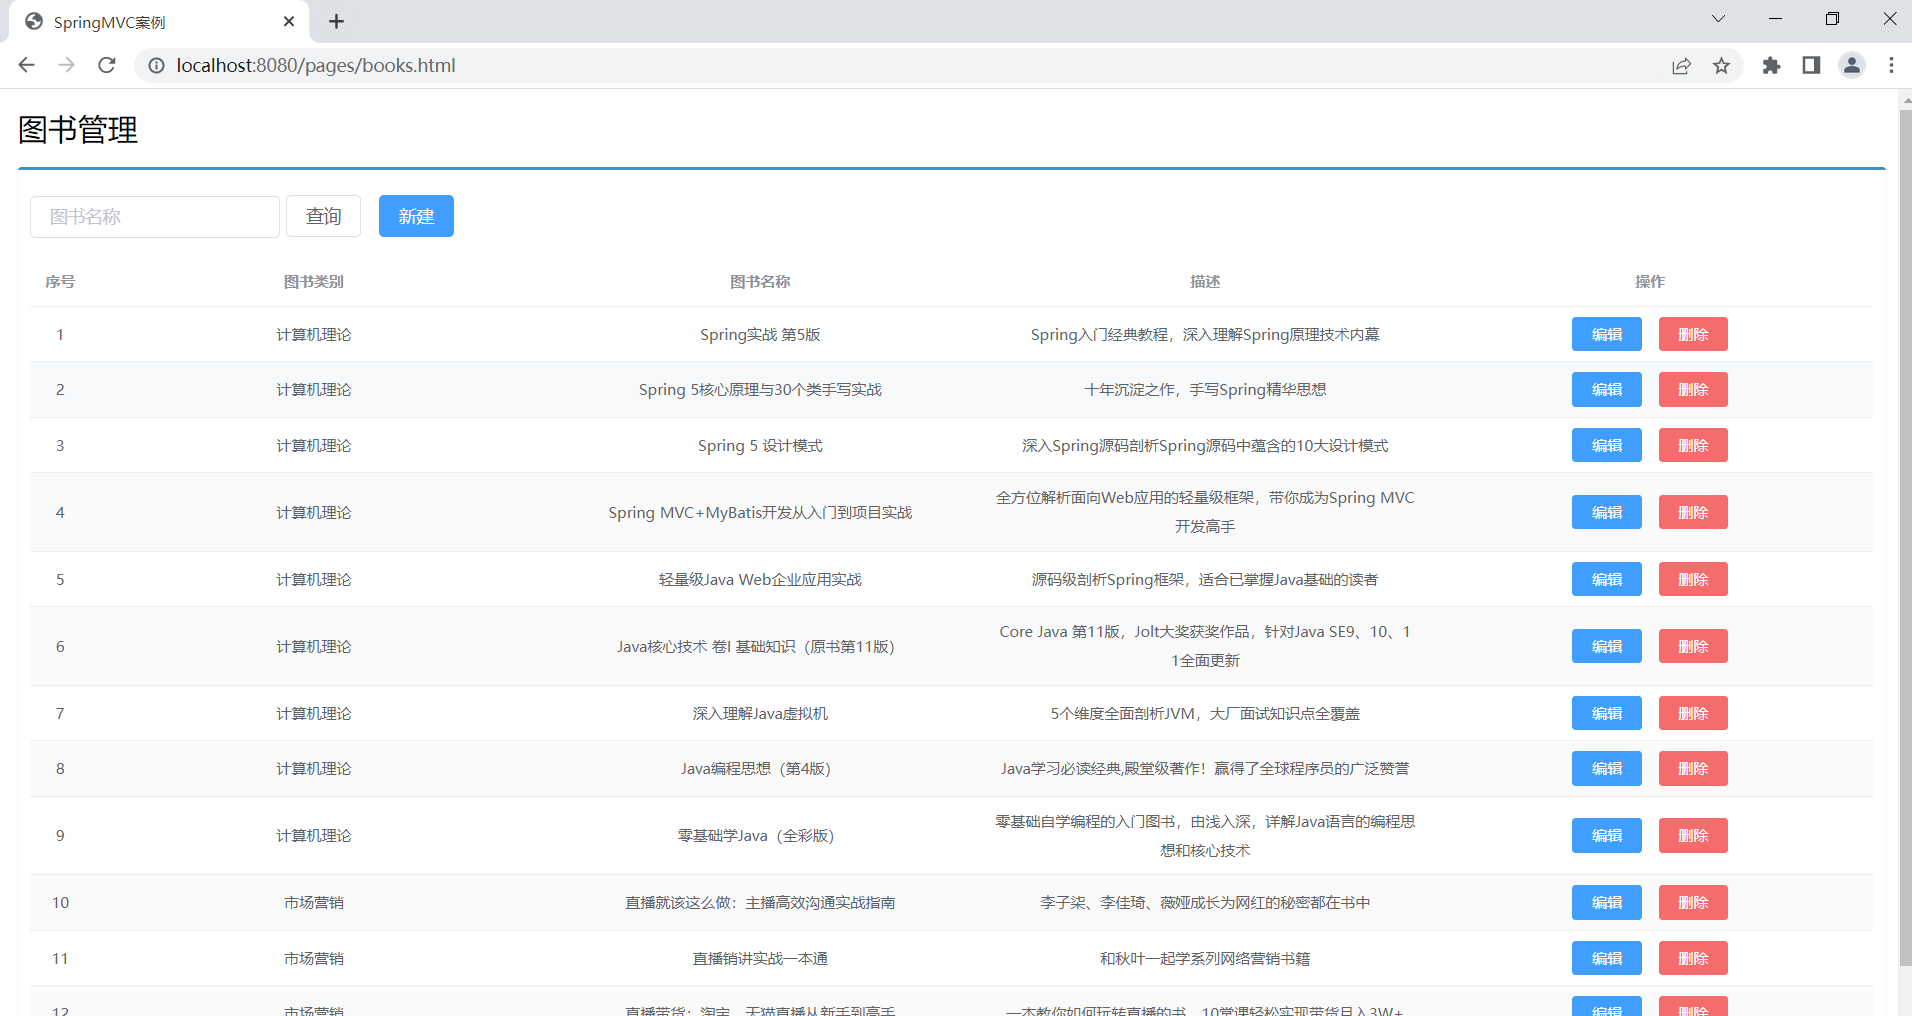
学习目标基于SpringBoot框架的程序开发步骤熟练使用SpringBoot配置信息修改服务器配置基于SpringBoot的完成SSM整合项目开发一、SpringBoot简介1. 入门案例问题导入SpringMVC的HelloWord程序大家还记得吗?SpringBoot是由Pivotal团队提供的全新框架,其设计…...
C++指针详解
旧文更新:两三年的旧文了,一直放在电脑里,现在直接传上CSDN 一、指针的概念 1.1 指针 程序运行时每个变量都会有一块内存空间,变量的值就存放在这块空间中。程序可以通过变量名直接访问这块空间内的数据,这种访问方…...

tauri+vite+vue3开发环境下创建、启动运行和打包发布
目录 1.创建项目 2.安装依赖 3.启动项目 4.打包生成windows安装包 5.安装打包生成的安装包 1.创建项目 运行下面命令创建一个tauri项目 pnpm create tauri-app 我创建该项目时的node版本为16.15.0 兼容性注意 Vite 需要 Node.js 版本 14.18,16。然而&#x…...

安卓进阶系列-系统基础
文章目录计算机结构冯诺依曼结构哈弗结构冯诺依曼结构与哈弗结构对比安卓采用的架构安卓操作系统进程间通讯(IPC)内存共享linux内存共享安卓内存共享管道Unix Domain Socket同步常见同步机制信号量Mutex管程安卓同步机制安卓中的Mutex安卓中的ConditionB…...
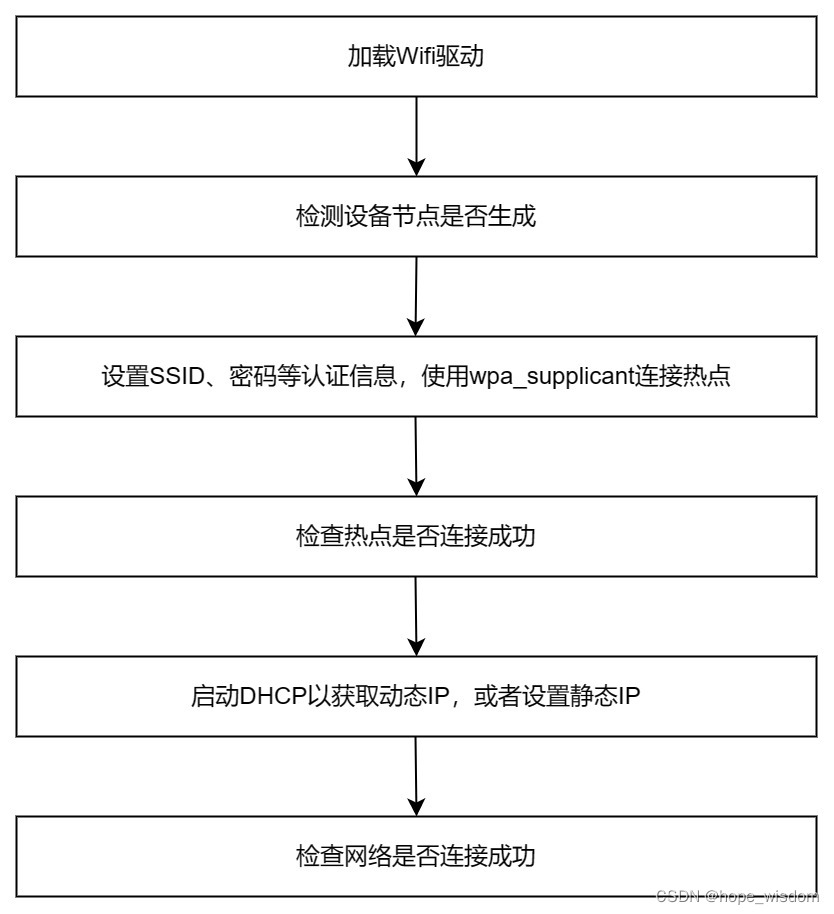
10 Wifi网络的封装
概述 Wifi有多种工作模式,比如:STA模式、AccessPoint模式、Monitor模式、Ad-hoc模式、Mesh模式等。但在IPC设备上,主要使用STA和AccessPoint这两种模式。下面分别进行介绍。 STA模式:任何一种无线网卡都可以运行在此模式,这种模式也是无线网卡的默认模式。在此模式下,无线…...
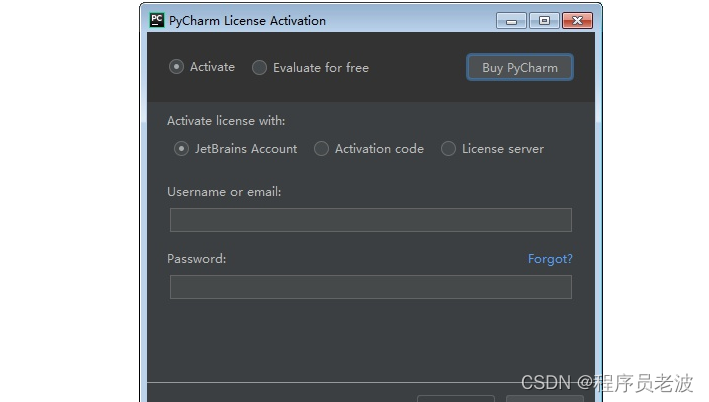
手把手的教你安装PyCharm --Pycharm安装详细教程(一)(非常详细,非常实用)
简介 Jetbrains家族和Pycharm版本划分: pycharm是Jetbrains家族中的一个明星产品,Jetbrains开发了许多好用的编辑器,包括Java编辑器(IntelliJ IDEA)、JavaScript编辑器(WebStorm)、PHP编辑器&…...

开发板与ubantu文件传送
接下来的所以实验都通过下面这种方式发送APP文件到开发板运行 目录 1、在ubantu配置 ①在虚拟机上添加一个桥接模式的虚拟网卡 ②设定网卡 ③在网卡上配置静态地址 2、开发板设置 ①查看网卡 ②配置网卡静态ip 3、 测试 ①ping ②文件传送 传送报错情况 配置环境&#…...
如何成为一名优秀的网络安全工程师?
前言 这是我的建议如何成为网络安全工程师,你应该按照下面顺序学习。 简要说明 第一件事你应该学习如何编程,我建议首先学python,然后是java。 (非必须)接下来学习一些算法和数据结构是很有帮助的,它将…...

3个步骤玩转虚拟手柄模拟:ViGEmBus驱动从入门到精通
3个步骤玩转虚拟手柄模拟:ViGEmBus驱动从入门到精通 【免费下载链接】ViGEmBus Windows kernel-mode driver emulating well-known USB game controllers. 项目地址: https://gitcode.com/gh_mirrors/vi/ViGEmBus Windows虚拟手柄驱动技术为游戏玩家和开发者…...

League Akari:终极英雄联盟自动化工具集——提升90%游戏效率的完整指南
League Akari:终极英雄联盟自动化工具集——提升90%游戏效率的完整指南 【免费下载链接】League-Toolkit 兴趣使然的、简单易用的英雄联盟工具集。支持战绩查询、自动秒选等功能。基于 LCU API。 项目地址: https://gitcode.com/gh_mirrors/le/League-Toolkit …...

LangGraph 工作流实战:Few-Shot提示赋能大模型精准调用自定义计算工具
1. 为什么需要Few-Shot提示赋能工具调用? 大模型在通用任务上表现惊艳,但遇到需要精确调用自定义工具的场景时,常常会出现"知道但不会用"的情况。比如让GPT-4计算"3172531284724",它可能直接输出错误答案而非…...
)
保姆级避坑指南:手把手教你搞定CARLA 0.9.11与Autoware的ROS话题转发(附完整代码)
深度解析CARLA与Autoware联合仿真中的ROS话题转发实战 在自动驾驶仿真开发领域,CARLA与Autoware的联合使用已成为研究热点。许多开发者在尝试将两者结合时,往往会在ROS话题转发环节遇到各种"坑"。本文将聚焦这一关键环节,提供一份详…...

CosyVoice Docker Compose 中 model_id 的高效配置与优化实践
最近在部署 CosyVoice 语音服务时,我发现 docker-compose.yml 文件里的 model_id 配置项,虽然看起来只是简单的一行,但配置得当与否,直接关系到整个服务的部署效率、启动速度和资源开销。如果随便填一个值,或者不理解其…...
TranslucentTB:轻量任务栏视觉增强工具,让Windows桌面颜值提升300%
TranslucentTB:轻量任务栏视觉增强工具,让Windows桌面颜值提升300% 【免费下载链接】TranslucentTB A lightweight utility that makes the Windows taskbar translucent/transparent. 项目地址: https://gitcode.com/gh_mirrors/tr/TranslucentTB …...

SpringBoot+Vue 毕业设计效率提升实战:从脚手架到自动化部署的全链路优化
SpringBootVue 毕业设计效率提升实战:从脚手架到自动化部署的全链路优化 毕业设计是每个计算机相关专业学生必须跨越的一道坎。回想我自己的经历,以及身边同学的故事,一个普遍的现象是:大家往往在技术选型和环境搭建上就耗费了大量…...

Go代码越容易被AI写,Go工程师越值钱
Go代码越容易被AI写,Go工程师越值钱。 这句话听起来矛盾,但它是这个系列的终极结论。 前提是——你的价值不在"写代码"。 这是「AI工程时代三部曲」的收官篇。第一篇我们聊了Agent框架设计为什么比模型选型更重要,第二篇聊了技术债…...

生成式AI欺诈来袭,什么样的IP数据接口才能筑起防线?
某电商平台的风控系统发出预警:一个“新用户”正在批量下单高价商品,收货地址遍布全国,支付方式各不相同。但奇怪的是,这些订单的浏览行为、停留时间、点击轨迹几乎完全一致——这不是真人,而是生成式AI模拟的虚假用户…...

Grep vs RAG vs ACE:AI编程助手如何选择?实测对比三大代码检索技术
Grep vs RAG vs ACE:AI编程助手技术选型实战指南 当团队需要引入AI编程助手时,技术负责人常陷入工具选择的困境。市面上主流的代码检索技术可分为三大流派:基于传统文本匹配的Grep路线、依赖向量数据库的RAG方案,以及新兴的混合检…...