MySQL数据库实现主主同步
前言
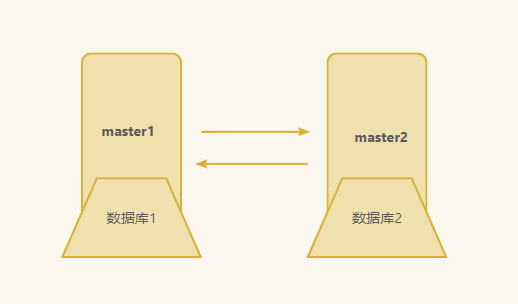
MySQL主主同步实际上是在主从同步的基础上将从数据库也提升成主数据库,让它们可以互相读写数据库,从数据库变成主数据库;主从相互授权连接,读取对方binlog日志并更新到本地数据库的过程,只要对方数据改变,自己就跟着改变。
1. 主主同步的优与劣
事实上每个技术都有它的优劣势,我们要在功能之间选择更适合自己使用的技术服务。
主主同步的优势
- 提高数据可用性:MySQL主主同步可以将多个MySQL服务器之间的数据同步,当其中一个服务器出现故障时,其他服务器可以继续提供服务,从而提高了数据的可用性。
- 增强数据的安全性:MySQL主主同步可以实现数据的备份和复制,当其中一个服务器出现数据丢失或损坏时,其他服务器可以提供备份数据,从而增强了数据的安全性。
- 支持读写分离:MySQL主主同步可以实现读写分离,即将读请求和写请求分发到不同的MySQL服务器上,从而提高了数据库的读写性能。
主主同步的劣势
- 数据同步延迟:MySQL主主同步存在数据同步延迟的问题,即在数据同步过程中,可能会出现数据不一致的情况。当一个MySQL服务器修改了数据后,其他服务器需要一定的时间才能完成数据同步,因此可能会出现数据同步延迟的问题。
- 需要协调多个MySQL服务器:MySQL主主同步需要协调多个MySQL服务器之间的数据同步,因此需要更多的管理和维护工作,包括配置、监控和故障处理等。
- 数据库性能下降:MySQL主主同步可能会降低数据库的性能,特别是在数据同步过程中,可能会占用过多的系统资源,从而影响数据库的性能。
综上所述,MySQL主主同步具有提高数据可用性、增强数据安全性、支持读写分离等优点,但也存在数据同步延迟、需要协调多个MySQL服务器和数据库性能下降等缺点。因此,在选择数据库同步方式时,需要根据实际情况综合考虑。
一. 部署MySQL数据库
还是一样需要先将两台服务器同时都安装上MySQL8.0数据库,这里就快速的演示一下。
1.1 前期准备
为了整个实验步骤比较顺利,需要先将防火墙和selinux提前关闭。
iptables -F
systemctl stop firewalld.service
setenforce 0
这里第二台服务器不在作为从,而是两台都是作为主数据库。
| 系统 | IP | 数据库版本 |
|---|---|---|
| CentOS7.9 | 192.168.116.166(master1) | mysql8.0 |
| CentOS7.9 | 192.168.116.128(master2) | mysql8.0 |
1.2 安装数据库
两台服务器都需要安装好数据库,这个是前提,也是必须安装的。
详细步骤可参考《安装部署MySQL8.0》
#备份源
[root@localhost yum.repos.d]# mv CentOS-Base.repo CentOS-Base.repo.bak#下载网络源
[root@localhost yum.repos.d]# wget -O /etc/yum.repos.d/CentOS-Base.repo https://mirrors.aliyun.com/repo/Centos-7.repo#清空现有的文件和软件包
[root@localhost yum.repos.d]# rpm -qa | grep mysql
[root@localhost yum.repos.d]# rpm -qa | grep mariadb
mariadb-libs-5.5.68-1.el7.x86_64
[root@localhost yum.repos.d]# rpm -e mariadb-libs --nodeps[root@localhost yum.repos.d]# find / -name mysql
/etc/selinux/targeted/active/modules/100/mysql
/usr/lib64/mysql
[root@localhost yum.repos.d]# rm -rf /etc/selinux/targeted/active/modules/100/mysql /usr/lib64/mysql#下载安装MySQL8.0
[root@localhost yum.repos.d]# rpm -ivh https://repo.mysql.com/mysql80-community-release-el7.rpm
[root@localhost yum.repos.d]# yum install mysql-community-server -y
[root@localhost yum.repos.d]# systemctl restart mysqld#找到初始化密码,为下一步登录修改密码做准备
[root@localhost yum.repos.d]# grep -iwa "Password" /var/log/mysqld.log
2023-03-07T06:56:53.564861Z 6 [Note] [MY-010454] [Server] A temporary password is generated for root@localhost: h-Ijft/b/9W*#修改数据库密码
[root@localhost yum.repos.d]# mysql -uroot -p
Enter password:
Welcome to the MySQL monitor.  Commands end with ; or \g.
Your MySQL connection id is 8
Server version: 8.0.32Copyright (c) 2000, 2023, Oracle and/or its affiliates.Oracle is a registered trademark of Oracle Corporation and/or its
affiliates. Other names may be trademarks of their respective
owners.Type 'help;' or '\h' for help. Type '\c' to clear the current input statement.mysql> alter user 'root'@'localhost' identified by 'Admin#123';
Query OK, 0 rows affected (0.00 sec)mysql> exit
安装好之后,就可以开始配置主主同步了。
1.3 思路
将第一台服务器设定为主master1,第二台服务器设定为主master2
主master1与主master2先做一遍主从同步,让它们互为主从关系,第二遍反过来,让主作从,让从作主。
在这个基础上,肯定是需要修改配置文件的,那么我们就先修改master1的。
二. 配置主master1
增加辨识度,提前先将第一台服务器修改主机名
[root@localhost ~]# hostname master1
[root@localhost ~]# bash
[root@master1 ~]#
2.1 修改配置文件
[root@master1 ~]# vim /etc/my.cnf
[root@master1 ~]# sed 4,+5p -n /etc/my.cnf
[mysqld]
server-id=11
log-bin=mysql-bin
auto_increment_increment=2
auto_increment_offset=1
replicate-do-db=demo_db
- server-id=11 #数据库的唯一ID
- log-bin=mysql-bin #存放日志文件位置
- auto_increment_increment=2 #控制主键自增的步长,几台服务器就设置几
- auto_increment_offset=1 #设置自增起始值。这个是第1台,那么为1,下一台则为2。
- replicate-do-db=demo_db #选择要同步的数据库。
修改好配置文件后,记得记得一定要重启服务,因为修改配置文件等于重新给变量赋值;不重启服务,文件的inode值不会同步到内核中,因此重启服务就是让新的inode值让内核知道的一个过程。
[root@master1 ~]# systemctl restart mysqld
2.2 创建用户master1
在数据库中创建一个master1的用户
[root@master1 ~]# mysql -uroot -p'Admin#123'
mysql: [Warning] Using a password on the command line interface can be insecure.
Welcome to the MySQL monitor.  Commands end with ; or \g.
Your MySQL connection id is 8
Server version: 8.0.32 MySQL Community Server - GPLCopyright (c) 2000, 2023, Oracle and/or its affiliates.Oracle is a registered trademark of Oracle Corporation and/or its
affiliates. Other names may be trademarks of their respective
owners.Type 'help;' or '\h' for help. Type '\c' to clear the current input statement.mysql> create user 'master1'@'%' identified with mysql_native_password by '#Master1';
Query OK, 0 rows affected (0.01 sec)mysql>  grant replication slave on *.* to 'master1'@'%';
Query OK, 0 rows affected (0.00 sec)mysql> flush privileges;
Query OK, 0 rows affected (0.00 sec)mysql> show grants for 'master1'@'%';
+-------------------------------------------------+
| Grants for master1@%                            |
+-------------------------------------------------+
| GRANT REPLICATION SLAVE ON *.* TO `master1`@`%` |
+-------------------------------------------------+
1 row in set (0.00 sec)
create user 'master1'@'%' identified with mysql_native_password by '#Master1';
- 这一条语句的意思就是创建一个master1这个用户,用户的名称是可以自己定义的;@'%'表示可以远程登录数据库,identified with mysql_native_password by这个语句则是MySQL8.0的固定写法,表示就是给他设置密码。
grant replication slave on *.* to 'master'@'%';
- 这条语句则是表示给这个用户授权数据库的权限,*.基本上就是给所有权限,第一个表示所有数据库,第二个是表示数据库表。
flush privileges;
- 这条语句表示刷新数据库,让之前设置的内容可以同步到数据库中。
show grants for 'master1'@'%';
- 查看之前设置的权限是否已经写入到数据库中,有显示内容表示已经写入成功了。
接下来继续查看master1的状态
mysql> show master status;
+------------------+----------+--------------+------------------+-------------------+
| File             | Position | Binlog_Do_DB | Binlog_Ignore_DB | Executed_Gtid_Set |
+------------------+----------+--------------+------------------+-------------------+
| mysql-bin.000002 |      157 |              |                  |                   |
+------------------+----------+--------------+------------------+-------------------+
1 row in set (0.00 sec)
- File 就是我们刚刚设置的log-bin的存放文件,用来记录mysql操作的日志文件。
- Position 表示是偏移量
- Binlog_Do_DB 需要进行同步的数据库
- Binlog_Ignore_DB 不进行同步的数据库
每操作一步数据库,这个偏移量的值都会发生变化,因此查看状态后,master1数据库最好就不要继续再操作任何内容了。
那么接下来就开始修改第二台数据库。
三. 配置slave1从数据库
此配置在第二台服务器上进行操作
修改主机名
[root@localhost ~]# hostname master2
[root@localhost ~]# bash
[root@master2 ~]#
3.1 修改配置文件
修改配置文件/etc/my.cnf,这个是第二台服务器,因此id和auto_increment_offset都需要调整为2。
[root@master2 ~]# vim /etc/my.cnf
[root@master2 ~]# sed 4,+5p -n /etc/my.cnf
[mysqld]
server-id=12
log-bin=mysql-bin
auto_increment_increment=2
auto_increment_offset=2
replicate-do-db=demo_db
还是一样,修改好配置文件一定要重启服务
[root@master2 ~]# systemctl restart mysqld
3.2 绑定主master1数据库
mysql> change master to master_host='192.168.116.166',-> master_user='master1',-> master_password='#Master1',-> master_log_file='mysql-bin.000002',-> master_log_pos=157;
Query OK, 0 rows affected, 8 warnings (0.00 sec)mysql> start slave;
Query OK, 0 rows affected, 1 warning (0.01 sec)mysql> show slave status \G
*************************** 1. row ***************************Slave_IO_State: Waiting for source to send eventMaster_Host: 192.168.116.166Master_User: master1Master_Port: 3306Connect_Retry: 60Master_Log_File: mysql-bin.000002Read_Master_Log_Pos: 157Relay_Log_File: master2-relay-bin.000002Relay_Log_Pos: 326Relay_Master_Log_File: mysql-bin.000002Slave_IO_Running: YesSlave_SQL_Running: YesReplicate_Do_DB: demo_dbReplicate_Ignore_DB: Replicate_Do_Table:
......
1 row in set, 1 warning (0.00 sec)
以上的语句内容实际上只有几句是需要执行的,一起来看下。
这一条信息的模板可以直接复制,需要在等号后面将IP,自己定义的用户名,密码,日志文件,偏移量进行修改。
change master to master_host='192.168.116.166',  #填写您自己的IP
master_user='master1', 		#填写您自己在第一台服务器上创建的用户名称
master_password='#Master1',   #填写在第一台服务器上创建的用户密码
master_log_file='mysql-bin.000002',  #填写第一台服务器上master的日志信息
master_log_pos=157;  			#填写在第一台服务器上master的偏移量
使用这条语句查看从数据库的状态;
show slave status \G

看到这两个值为yes表示是已经同步成功了。
四. 配置master2数据库
接下来在现在这台master2服务器继续配置
4.1 创建用户master2
创建一个名为master2的用户
mysql> create user 'master2'@'%' identified with mysql_native_password by '#Master2';
Query OK, 0 rows affected (0.01 sec)mysql>  grant replication slave on *.* to 'master2'@'%';
Query OK, 0 rows affected (0.00 sec)mysql> flush privileges;
Query OK, 0 rows affected (0.00 sec)
查看master2的状态
mysql> show master status;
+------------------+----------+--------------+------------------+-------------------+
| File             | Position | Binlog_Do_DB | Binlog_Ignore_DB | Executed_Gtid_Set |
+------------------+----------+--------------+------------------+-------------------+
| mysql-bin.000004 |      157 |              |                  |                   |
+------------------+----------+--------------+------------------+-------------------+
1 row in set (0.00 sec)
到这里就可以不用继续操作了,也可以直接退出mysql管理系统。
再回到第一台服务器上继续同步第二台的数据库用户
五. 配置slave2数据库
其实slave2也就是master1,还是使用相同的方式进行绑定。
5.1 绑定同步主master2数据库
mysql> change master to master_host='192.168.116.128', master_user='master2',-> master_password='#Master2',master_log_file='mysql-bin.000004',-> master_log_pos=157;
Query OK, 0 rows affected, 8 warnings (0.00 sec)mysql> start slave;
Query OK, 0 rows affected, 1 warning (0.02 sec)mysql> show slave status \G
*************************** 1. row ***************************Slave_IO_State: Connecting to sourceMaster_Host: 192.168.116.128Master_User: master2Master_Port: 3306Connect_Retry: 60Master_Log_File: mysql-bin.000004Read_Master_Log_Pos: 157Relay_Log_File: master1-relay-bin.000001Relay_Log_Pos: 4Relay_Master_Log_File: mysql-bin.000004Slave_IO_Running: ConnectingSlave_SQL_Running: YesReplicate_Do_DB: demo_dbReplicate_Ignore_DB: Replicate_Do_Table: Replicate_Ignore_Table: Replicate_Wild_Do_Table: Replicate_Wild_Ignore_Table: Last_Errno: 0Last_Error: Skip_Counter: 0Exec_Master_Log_Pos: 157Relay_Log_Space: 157Until_Condition: NoneUntil_Log_File: Until_Log_Pos: 0Master_SSL_Allowed: NoMaster_SSL_CA_File: Master_SSL_CA_Path: Master_SSL_Cert: Master_SSL_Cipher: Master_SSL_Key: Seconds_Behind_Master: NULL
Master_SSL_Verify_Server_Cert: NoLast_IO_Errno: 2003Last_IO_Error: error connecting to master 'master2@192.168.116.128:3306' - retry-time: 60 retries: 1 message: Can't connect to MySQL server on '192.168.116.128:3306' (113)Last_SQL_Errno: 0Last_SQL_Error: Replicate_Ignore_Server_Ids:
......
1 row in set, 1 warning (0.00 sec)
可以看到,在查看slave状态时,有个值并不是yes。
Slave_IO_Running: Connecting
Slave_SQL_Running: Yes

这里可以看到错误的原因,当然影响到IO的值是Connecting的原因很多,我们逐一进行排查。
5.2 解决方案
遇到错误不可怕,可以思考一下之前执行的步骤,先返回查看上一步步骤执行是否正确,若正确,在看看是否是selinux,防火墙,网络等问题。
配置失败的原因:
- 网络不通–可以尝试ping下网站域名
- 防火墙,selinux没有关–重新执行关闭的操作
- 用户密码输错–重新再配置一遍,确认清楚再输入
- IP错误–确认是否是本地服务器的IP
- 偏移量和日志文件错误–重启服务后再重新配置一遍
两台服务器都需要做下排查
[root@master1 ~]# hostname -I
192.168.116.166 192.168.122.1
[root@master1 ~]# systemctl status firewalld
● firewalld.service - firewalld - dynamic firewall daemonLoaded: loaded (/usr/lib/systemd/system/firewalld.service; enabled; vendor preset: enabled)Active: inactive (dead) since 五 2023-02-10 10:52:45 CST; 1 months 12 days agoDocs: man:firewalld(1)Main PID: 804 (code=exited, status=0/SUCCESS)2月 10 10:51:06 localhost.localdomain systemd[1]: Starting firewalld - dynamic f....
2月 10 10:51:10 localhost.localdomain systemd[1]: Started firewalld - dynamic fi....
2月 10 10:51:11 localhost.localdomain firewalld[804]: WARNING: AllowZoneDrifting ...
2月 10 10:52:44 localhost.localdomain systemd[1]: Stopping firewalld - dynamic f....
2月 10 10:52:45 localhost.localdomain systemd[1]: Stopped firewalld - dynamic fi....
Hint: Some lines were ellipsized, use -l to show in full.
[root@master1 ~]# ping -c 1 www.baidu.com
PING www.a.shifen.com (14.215.177.38) 56(84) bytes of data.
64 bytes from 14.215.177.38 (14.215.177.38): icmp_seq=1 ttl=53 time=37.8 ms--- www.a.shifen.com ping statistics ---
1 packets transmitted, 1 received, 0% packet loss, time 0ms
rtt min/avg/max/mdev = 37.807/37.807/37.807/0.000 ms
[root@master1 ~]# getenforce
Permissive
[root@master1 ~]# iptables -L
Chain INPUT (policy ACCEPT)
target     prot opt source               destination         Chain FORWARD (policy ACCEPT)
target     prot opt source               destination         Chain OUTPUT (policy ACCEPT)
target     prot opt source               destination
第一台服务器测试正常
接下来测试第二台服务器
[root@master2 ~]# hostname -I
192.168.116.128 192.168.122.1 [root@master2 ~]# systemctl status firewalld
● firewalld.service - firewalld - dynamic firewall daemonLoaded: loaded (/usr/lib/systemd/system/firewalld.service; enabled; vendor preset: enabled)Active: active (running) since 六 2023-03-25 15:28:38 CST; 2s agoDocs: man:firewalld(1)Main PID: 70425 (firewalld)Tasks: 2CGroup: /system.slice/firewalld.service└─70425 /usr/bin/python2 -Es /usr/sbin/firewalld --nofork --nopid3月 25 15:28:39 master2 firewalld[70425]: WARNING: COMMAND_FAILED: '/usr/sbin/ipt...).
3月 25 15:28:39 master2 firewalld[70425]: WARNING: COMMAND_FAILED: '/usr/sbin/ipt...).
3月 25 15:28:39 master2 firewalld[70425]: WARNING: COMMAND_FAILED: '/usr/sbin/ipt...).
3月 25 15:28:39 master2 firewalld[70425]: WARNING: COMMAND_FAILED: '/usr/sbin/ipt...e.
3月 25 15:28:39 master2 firewalld[70425]: WARNING: COMMAND_FAILED: '/usr/sbin/ipt...e.
3月 25 15:28:39 master2 firewalld[70425]: WARNING: COMMAND_FAILED: '/usr/sbin/ipt...).
3月 25 15:28:39 master2 firewalld[70425]: WARNING: COMMAND_FAILED: '/usr/sbin/ipt...).
3月 25 15:28:39 master2 firewalld[70425]: WARNING: COMMAND_FAILED: '/usr/sbin/ipt...).
3月 25 15:28:39 master2 firewalld[70425]: WARNING: COMMAND_FAILED: '/usr/sbin/ipt...).
3月 25 15:28:39 master2 firewalld[70425]: WARNING: COMMAND_FAILED: '/usr/sbin/ipt...).
Hint: Some lines were ellipsized, use -l to show in full.
发现是第二台服务器防火墙没有关闭,大概率是这些的问题影响的,接下来将防火墙给关了。
[root@master2 ~]# systemctl stop firewalld.service
关闭之后,在第一台服务器上继续绑定服务器。
是防火墙的问题就比较好办,先将slave给关闭了,重新设置一下,再开启。
stop slave;
reset slave;
start slave;
mysql> stop slave;
Query OK, 0 rows affected, 1 warning (0.00 sec)mysql> reset slave;
Query OK, 0 rows affected, 1 warning (0.00 sec)mysql> start slave;
Query OK, 0 rows affected, 1 warning (0.04 sec)mysql> show slave status \G
*************************** 1. row ***************************Slave_IO_State: Waiting for source to send eventMaster_Host: 192.168.116.128Master_User: master2Master_Port: 3306Connect_Retry: 60Master_Log_File: mysql-bin.000004Read_Master_Log_Pos: 157Relay_Log_File: master1-relay-bin.000006Relay_Log_Pos: 373Relay_Master_Log_File: mysql-bin.000004Slave_IO_Running: YesSlave_SQL_Running: YesReplicate_Do_DB: demo_dbReplicate_Ignore_DB:
......
1 row in set, 1 warning (0.00 sec)
查看两个值都为yes表示已经同步成功。
六. 测试结果
以上就是主主同步的全部内容了,到这里是时候该验证一下是否已经完全成功。
我们在第一台master1上创建之前选择同步的数据库,接下来给这个数据库创建表,再给表内插入几行信息。
6.1 第一台数据库测试
[root@master1 ~]# mysql -uroot -pAdmin#123
mysql: [Warning] Using a password on the command line interface can be insecure.
Welcome to the MySQL monitor.  Commands end with ; or \g.
Your MySQL connection id is 32
Server version: 8.0.32 MySQL Community Server - GPLCopyright (c) 2000, 2023, Oracle and/or its affiliates.Oracle is a registered trademark of Oracle Corporation and/or its
affiliates. Other names may be trademarks of their respective
owners.Type 'help;' or '\h' for help. Type '\c' to clear the current input statement.mysql> create database demo_db;
Query OK, 1 row affected (0.01 sec)mysql> use demo_db
Database changed
mysql> create table demo_tb(id int not null,name varchar(20) default 'username');
Query OK, 0 rows affected (0.02 sec)mysql> insert into demo_tb values(1,'zhangsan'), (2,'lisi'), (3,'kunkun');
Query OK, 3 rows affected (0.00 sec)
Records: 3  Duplicates: 0  Warnings: 0
6.2 第二台数据库测试
[root@master2 ~]# mysql -uroot -p
Enter password:
Welcome to the MySQL monitor.  Commands end with ; or \g.
Your MySQL connection id is 16
Server version: 8.0.32 MySQL Community Server - GPLCopyright (c) 2000, 2023, Oracle and/or its affiliates.Oracle is a registered trademark of Oracle Corporation and/or its
affiliates. Other names may be trademarks of their respective
owners.Type 'help;' or '\h' for help. Type '\c' to clear the current input statement.mysql> show databases;
+--------------------+
| Database           |
+--------------------+
| demo_db            |
| information_schema |
| mysql              |
| performance_schema |
| sys                |
+--------------------+
5 rows in set (0.00 sec)mysql> select * from demo_db.demo_tb;
+----+----------+
| id | name     |
+----+----------+
|  1 | zhangsan |
|  2 | lisi     |
|  3 | kunkun   |
+----+----------+
3 rows in set (0.01 sec)mysql> use demo_db
Reading table information for completion of table and column names
You can turn off this feature to get a quicker startup with -ADatabase changed
mysql> insert into demo_tb values(4,'liao'),-> (5,'chengpi'),-> (6,'mahua');
Query OK, 3 rows affected (0.01 sec)
Records: 3  Duplicates: 0  Warnings: 0
在第一台数据库上看看第二台插入的内容是否也能成功写入。
mysql> select * from demo_tb;
+----+----------+
| id | name     |
+----+----------+
|  1 | zhangsan |
|  2 | lisi     |
|  3 | kunkun   |
|  4 | liao     |
|  5 | chengpi  |
|  6 | mahua    |
+----+----------+
6 rows in set (0.00 sec)
查看第二台数据库输入的内容,也能同步到第一台上,说明已经成功。
总结
以上就是本文的全部内容了,如果有看过昨天那篇《MySQL数据库实现主从同步》就会发现主主同步,也只是在主从同步上再反过来操作一次主从同步。若觉得以上内容还行的,可以点赞支持一下!

相关文章:
MySQL数据库实现主主同步
前言 MySQL主主同步实际上是在主从同步的基础上将从数据库也提升成主数据库,让它们可以互相读写数据库,从数据库变成主数据库;主从相互授权连接,读取对方binlog日志并更新到本地数据库的过程,只要对方数据改变,自己就…...

JavaScript传参的6种方式
JavaScript传参的方式1. 传递基本类型参数2. 传递对象类型参数3. 使用解构赋值传递参数4. 使用展开运算符传递参数5. 使用可选参数6. 使用剩余参数JavaScript是一门非常灵活的语言,其参数传递方式也同样灵活。在本篇文章中,会详细介绍JavaScript中的参数…...

蓝桥之统计子矩阵
样例说明 满足条件的子矩阵一共有 19 , 包含: 大小为 11 的有 10 个。 大小为 12 的有 3 个。 大小为13 的有 2 个。 大小为 14 的有 1 个。 大小为 21 的有 3 个。 前缀和二维数组 前缀和暴力搜索 import java.util.*; public class Main{private static int ans0;pub…...

Java的基础面试题
一.java基础1.JDK和JRE有什么区别?JDK是java开发工具包,JRE是java运行时环境(包括Java基础类库,java虚拟机)2.和equals的区别是什么?比较的是两者的地址值,equals比较的是两者的内容是否一样3.两…...

J1939故障码诊断说明
1:1939整体协议说明 这里主要说明1939不同的协议,对应不同的网络分层 注意了,这里只进行文档解析说明,具体查看去搜素协议的关键字进行理解 2:DMx和FMI 说明 想知道每个代号的具体含义,可以去 saeJ1939…...

XCPC第十三站,贪心问题
一.区间选点 我们采取这样的策略来选点:step(1)将区间按照右端点的大小从小到大排序;step(2)从前往后依次枚举每个区间,如果当前区间中已经包含点,直接pass,否则选当前区…...
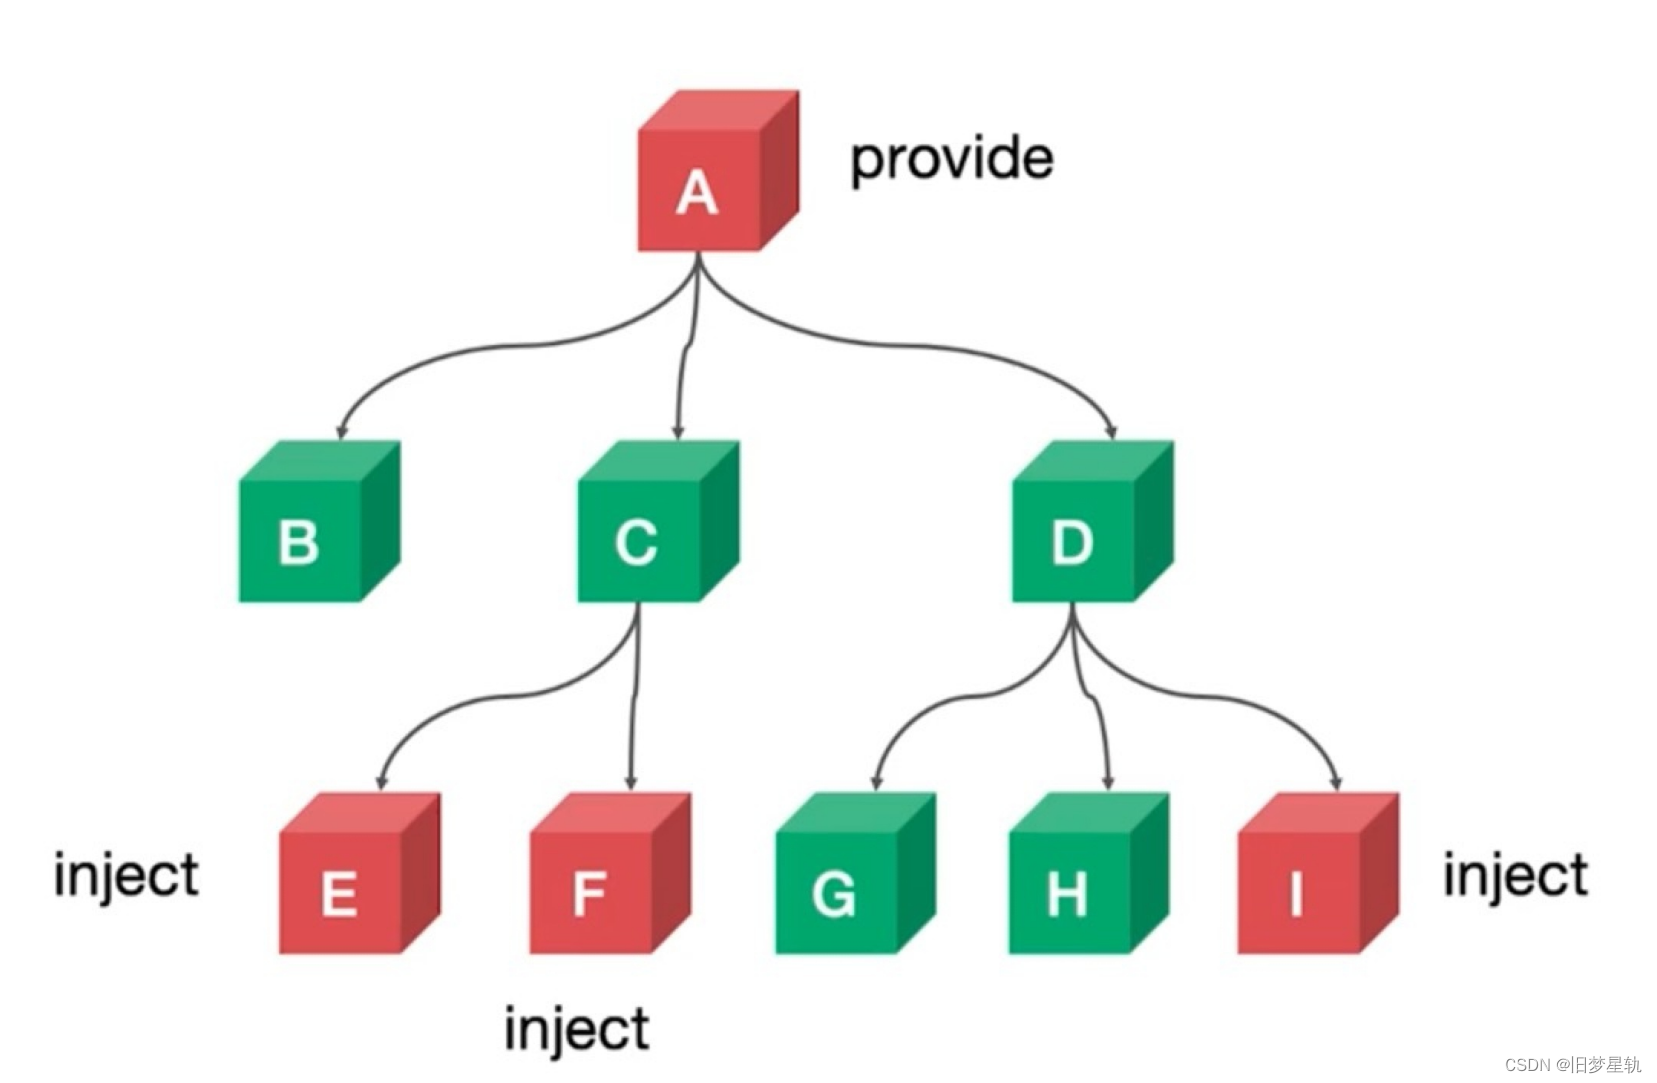
一文让你吃透 Vue3中的组件间通讯 【一篇通】
文章目录前情回顾前言1. 父组件 > 子组件通讯传递2. 子组件 > 父组件通讯传递3. 爷孙组件,后代组件通讯数据总结前情回顾 在本专栏前一章节中,我为大家带来了 Vue3 新特性变化上手指南 的归纳梳理,主要介绍了 Vue3 的 Proxy 响应式原理…...

EVE遭遇大规模DDOS攻击,玩家和官方都傻眼了
如果你恰好是一名《星战前夜》(EVE)的国际服玩家(虽然这个几率很小),又恰好因为疫情一直待在家里,那你就真是倒霉透顶了。因为从1月底开始,EVE的服务器就一直受到大规模的DDOS攻击,而…...

【数据结构】二叉树及相关习题详解
新年新气象! 祝大家兔年 财源滚滚! 万事胜意! 文章目录前言1. 树的一些基础概念1.1 树的一些基本概念1.2 树的一些重要概念2. 二叉树的一些基本概念2.1 二叉树的结构2.2 两种特殊的二叉树3. 二叉树的性质4. 二叉树的存储5. 二叉树的基本操作5.1 构造一棵二叉树5.2 二叉树的遍历…...
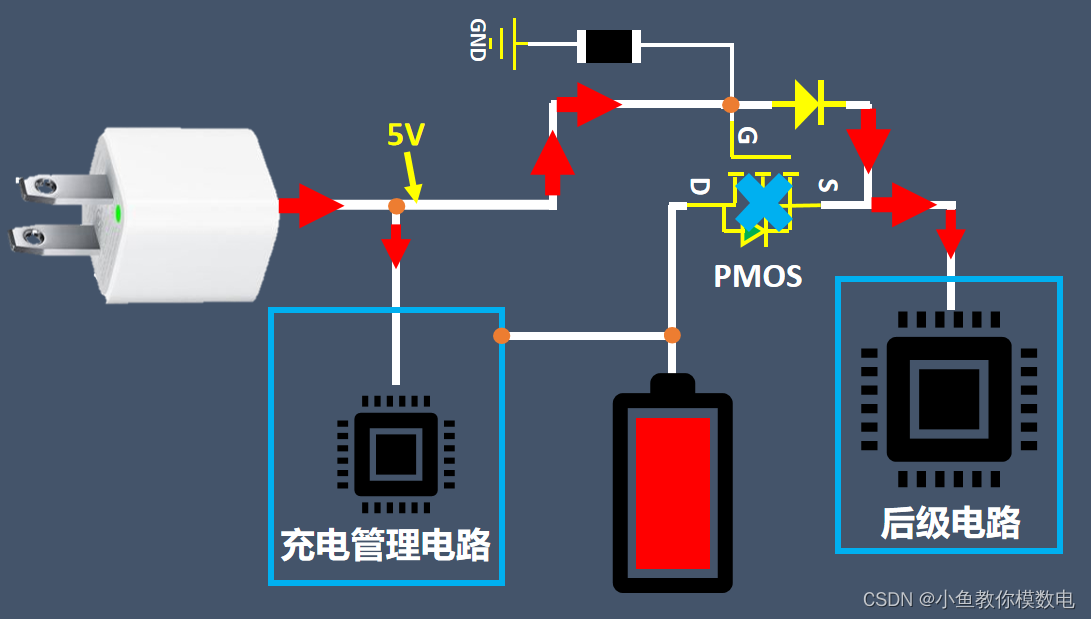
锂电池充电的同时也能放电吗?
大家应该都有这样经历,我们的手机在充电的同时也能边使用,有的同学就会说了,这是因为手机电池在充电的同时也在放电。如果这样想我们可能就把锂电池类比了一个蓄水池,以为它在进水的同时也能出水,其实这个比喻是错误的…...

通信工程考研英语复试专有名词翻译
中文英文频分多址Frequency Division Multiple Access码分多址Code Division Multiple Access时分多址Time Division Multiple Access移动通信mobile communication人工智能artificial intelligence水声通信Middle-Range Uwa Communication正交频分复用Orthogonal frequency di…...
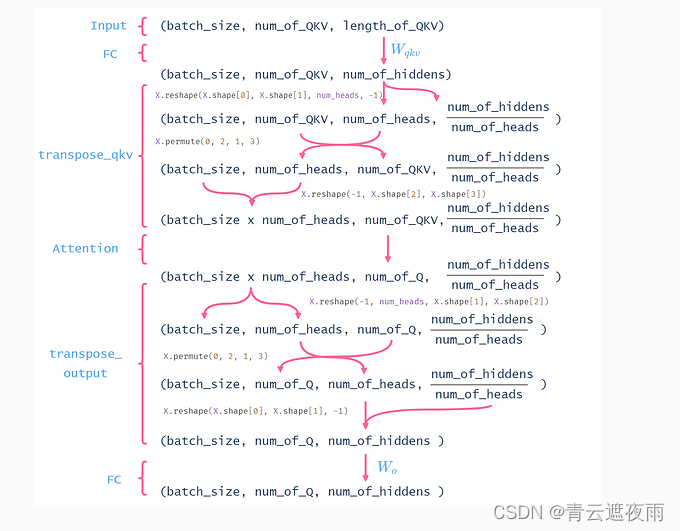
注意力机制(四):多头注意力
专栏:神经网络复现目录 注意力机制 注意力机制(Attention Mechanism)是一种人工智能技术,它可以让神经网络在处理序列数据时,专注于关键信息的部分,同时忽略不重要的部分。在自然语言处理、计算机视觉、语…...

【2023Unity游戏开发教程】零基础带你从小白到超神19——射线检测
文章目录 射线检测从某点发射一条射线从摄像机发射一条射线射线检测 游戏中的红外线,默认肉眼是看不到的,从某个初始点开始,沿着特定的方向发射一条不可见且无限长的射线,通过此射线检测是否有任何模型添加了Collider碰撞器组件。一旦检测到碰撞,停止射线继续发射。 碰撞检…...
内存泄漏和内存溢出的区别
参考答案 内存溢出(out of memory):指程序在申请内存时,没有足够的内存空间供其使用,出现 out of memory。内存泄露(memory leak):指程序在申请内存后,无法释放已申请的内存空间,内存泄露堆积会导致内存被…...

文本三剑客之sed编辑器
文本三剑客:都是按行读取后处理。 grep 过滤行内容。awk 过滤字段。sed 过滤行内容;修改行内容。sed编辑器 sed是一种流编辑器,流编辑器会在编辑器处理数据之前基于预先提供的一组规则来编辑数据流。 sed编辑器可以根据命令来处理数据流中…...
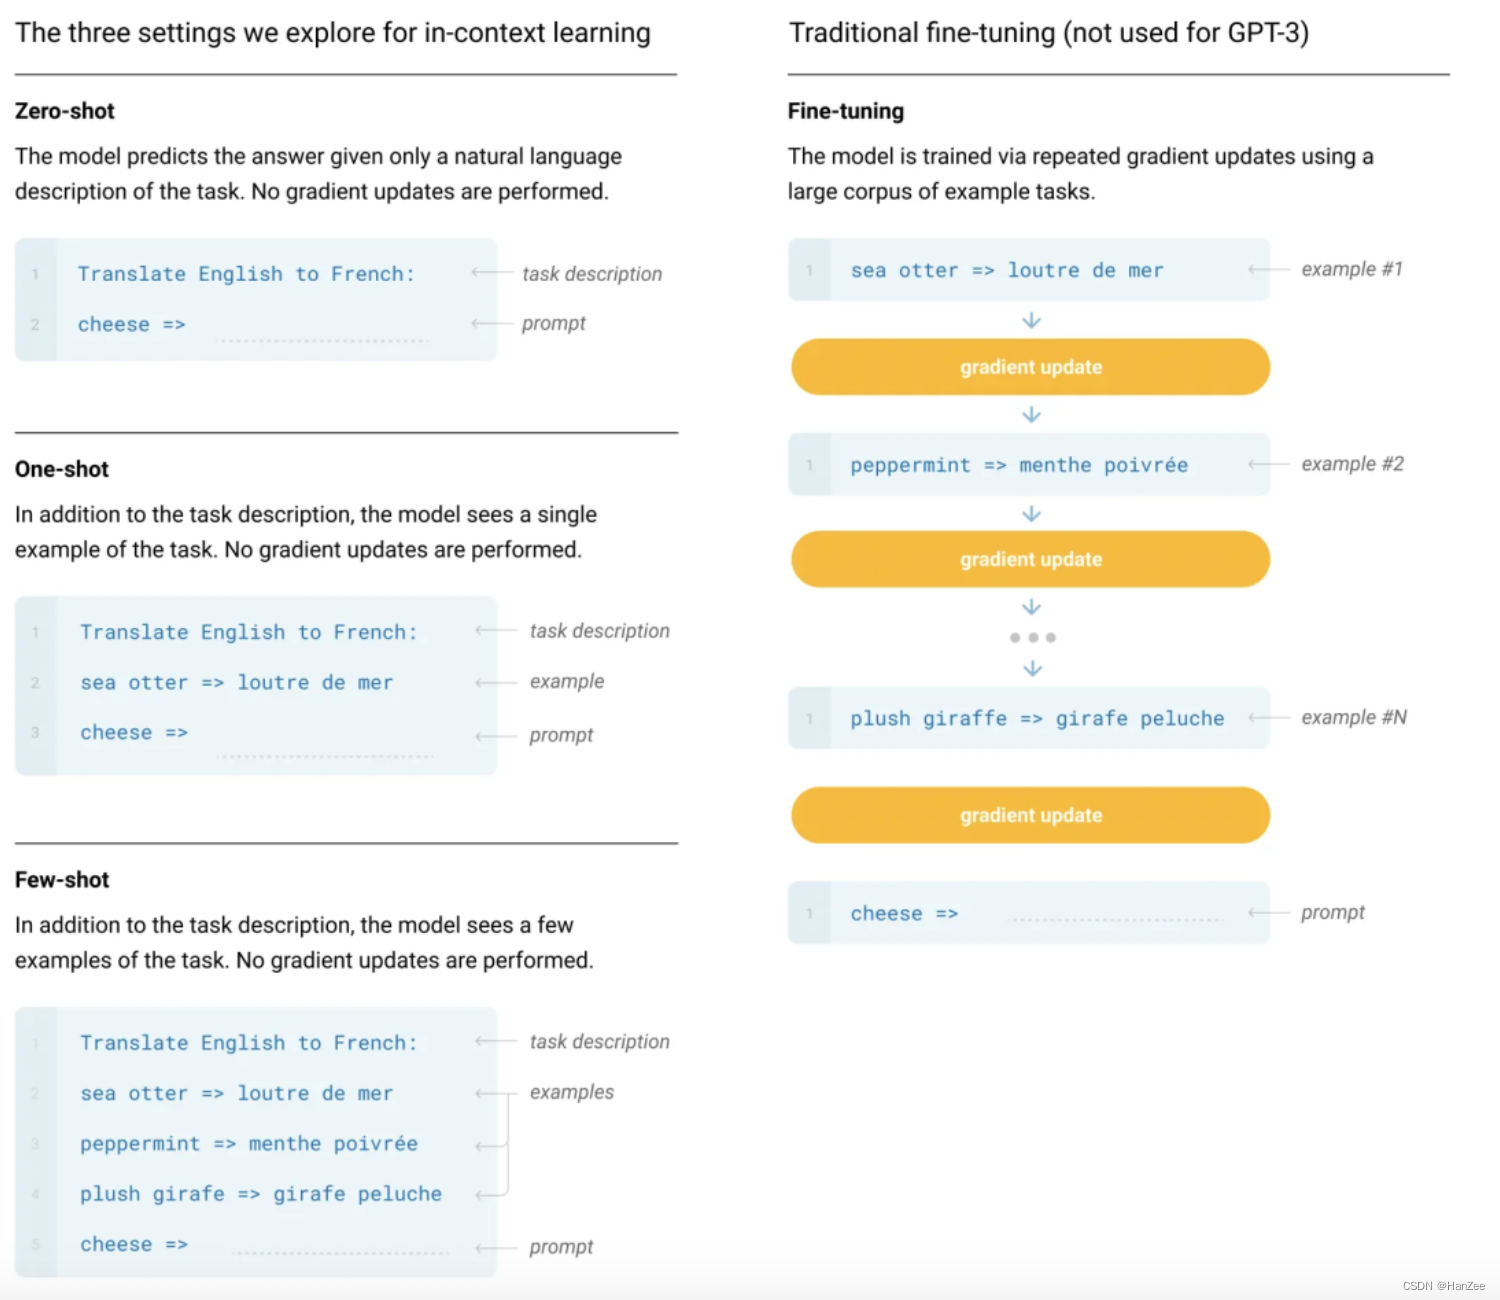
深度学习:GPT1、GPT2、GPT-3
深度学习:GPT1、GPT2、GPT3的原理与模型代码解读GPT-1IntroductionFramework自监督学习微调ExperimentGPT-2IntroductionApproachConclusionGPT-3GPT-1 Introduction GPT-1(Generative Pre-training Transformer-1)是由OpenAI于2018年发布的…...

使用Docker 一键部署SpringBoot和SpringCloud项目
使用Docker 一键部署SpringBoot和SpringCloud项目 1. 准备工作2. 创建Dockerfile3. 创建Docker Compose文件4. 构建和运行Docker镜像5. 验证部署6. 总结Docker是一个非常流行的容器化技术,可以方便地将应用程序和服务打包成容器并运行在不同的环境中。在本篇博客中,我将向您展…...
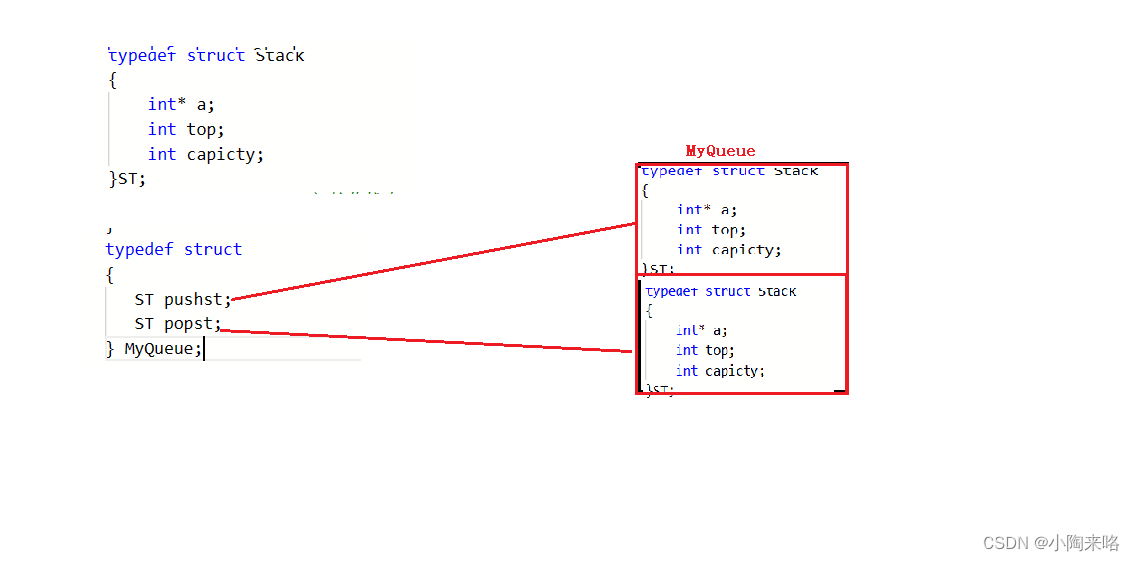
【数据结构】用栈实现队列
💯💯💯 本篇总结利用栈如何实现队列的相关操作,不难观察,栈和队列是可以相互转化的,需要好好总结它们的特性,构造出一个恰当的结构来实现即可,所以本篇难点不在代码思维,…...
[Netty源码] 服务端启动过程 (二)
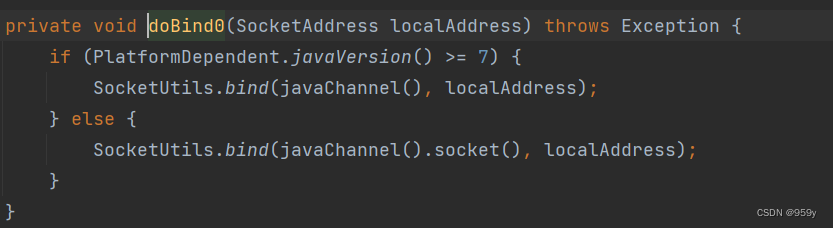
文章目录1.ServerBootstrap2.服务端启动过程3.具体步骤分析3.1 创建服务端Channel3.2 初始化服务端Channel3.3 注册selector3.4 端口绑定1.ServerBootstrap ServerBootstrap引导服务端启动流程: //主EventLoopGroup NioEventLoopGroup master new NioEventLoopGroup(); //从E…...

Week 14
代码源每日一题Div2 106. 订单编号 原题链接:订单编号 思路:这题本来没啥思路,直到获得了某位佬的提示才会做( 我们可以用set来维护一些区间,这些区间为 pair 类型,表示没有使用过的编号,每次…...
 —— SPI相关概念)
STM32单片机学习(27) —— SPI相关概念
文章目录概述SPI通信的核心特性I2C和SPI的简单对比SPI学习的补充说明SPI硬件电路设计SPI的四条通信线SPI通信的片选线低电平选中不支持广播通信SPI通信的时序结构(重点)SPI通信的比特序通信空闲状态,SPI时钟极性采样时机,SPI时钟相…...

别再死记硬背SMO公式了!用Python手写一个SVM分类器,带你一步步拆解SMO核心逻辑
用Python手写SVM分类器:代码驱动理解SMO算法核心在机器学习领域,支持向量机(SVM)以其优秀的分类性能和坚实的数学基础著称。然而,许多学习者在理解其核心算法——序列最小优化(SMO)时,往往被复杂的数学推导所困扰。本文将采用一种…...

小米MIMO最新邀请码
欢迎使用,各得10元体验金...
损坏诊断全解)
半导体元件(二极管/三极管/MOS管/IC)损坏诊断全解
半导体元件(二极管、三极管、MOS 管、集成电路)是 PCB 的核心功能单元,对过压、过流、ESD、高温极度敏感,损坏后直接导致电路功能失效、短路烧板。很多工程师维修时盲目更换芯片,不仅成本高,还易误判。一…...

如何快速批量下载高质量歌词:ZonyLrcToolsX跨平台终极解决方案
如何快速批量下载高质量歌词:ZonyLrcToolsX跨平台终极解决方案 【免费下载链接】ZonyLrcToolsX ZonyLrcToolsX 是一个能够方便地下载歌词的小软件。 项目地址: https://gitcode.com/gh_mirrors/zo/ZonyLrcToolsX 还在为本地音乐库缺少歌词而烦恼吗࿱…...

基于MAX78000的离线鸟类声音识别:边缘AI从数据到部署全流程解析
1. 项目概述:当边缘AI“听懂”鸟鸣在野外生态监测或自家后院观鸟时,你是否有过这样的经历:听到一阵清脆或婉转的鸟鸣,却完全不知道是哪位“歌唱家”在表演?传统的鸟类识别依赖专家经验和图鉴比对,不仅门槛高…...

WebSocket实时通信架构进阶:Room、命名空间与集群部署
WebSocket实时通信架构进阶:Room、命名空间与集群部署 作者:Crown_22 | AI Agent & Hermes Agent 桌面程序开发者 前言 WebSocket已经成为实时应用的标准技术,但大多数教程只停留在"建立连接、发送消息"的基础阶段。在生产环境中,你需要处理Room管理、命名空…...

收藏干货|2026 版企业 AI 落地实操指南,程序员小白入门避坑必备
如今人工智能早已脱离概念炒作阶段,全面扎根企业实际业务场景,成为技术从业者与企业管理者无法回避的发展课题。各行各业都加速布局AI赛道,行业心态也从初期观望试探,彻底转变为实打实的落地攻坚。 不少企业高层主动牵头统筹AI规划…...
)
告别杂乱!用FileMenu Tools 8.4.2一键清理Windows 11右键菜单(附隐藏技巧)
Windows 11右键菜单精简指南:用FileMenu Tools打造高效工作流每次在文件上点击右键时,那个缓慢弹出的冗长菜单是否让你感到烦躁?随着安装的软件越来越多,Windows的右键菜单往往会变得臃肿不堪,严重影响工作效率。今天&…...

Git Bash 中无法启动 Claude Code ?
最近需要在 git bash 中跑 Claude Code 。git bash 是随 git for windows 套件安装的,很久没更新了,结果启动 Claude Code 报错:Warning: no stdin data received in 3s, proceeding without it. If piping from a slow command, redirect st…...