Java:SpringMVC的使用(1)
目录
- 第一章、SpringMVC基本了解
- 1.1 概述
- 1.2 SpringMVC处理请求原理简图
- 第二章、SpringMVC搭建框架
- 1、搭建SpringMVC框架
- 1.1 创建工程【web工程】
- 1.2 导入jar包
- 1.3 编写配置文件
- (1) web.xml注册DispatcherServlet
- (2) springmvc.xml
- (3) index.html
- 1.4 编写请求处理器【Controller|Handler】
- 1.5 准备页面进行,测试
- 第三章 @RequestMapping详解
- 3.1 @RequestMapping注解位置
- 3.2 @RequestMapping注解属性
- 3.3 @RequestMapping支持Ant 风格的路径(了解)
- 第四章 @PathVariable 注解
- 4.1 @PathVariable注解位置
- 4.2 @PathVariable注解作用
- 4.3 @PathVariable注解属性
- 第五章 REST【RESTful】风格CRUD
- 5.1 REST的CRUD与传统风格CRUD对比
- 5.2 REST风格CRUD优势
- 5.3 实现PUT&DELETE提交方式步骤
- 5.4 源码解析HiddenHttpMethodFilter
- 第六章 SpringMVC处理请求数据
- 6.1 处理请求参数
- 6.2 处理请头
- 6.3 处理Cookie信息
- 6.4 使用原生Servlet-API
- 第七章 SpringMVC处理响应数据
- 7.1 使用ModelAndView
- 7.2 使用Model、ModelMap、Map
- 7.3 SpringMVC中域对象
- 第八章 SpringMVC处理请求响应乱码
- 8.1 源码解析CharacterEncodingFilter
- 8.2 处理请求与响应乱码
- 第九章 SpringMVC视图及视图解析器
- 9.1 视图解析器对象【ViewResolver】
- 9.2 视图对象【View】
- 第十章 源码解析SpringMVC工作原理
- 10.1 Controller中方法的返回值问题
- 10.2 视图及视图解析器源码
- 第十一章 视图控制器&重定向&加载静态资源
- 11.1 视图控制器
- 11.2 重定向
- 11.3 加载静态资源
- 11.4 源码解析重定向原理
第一章、SpringMVC基本了解
1.1 概述
-
SpringMVC是Spring子框架
-
SpringMVC是Spring 为【展现层|表示层|表述层|控制层】提供的基于 MVC 设计理念的优秀的 Web 框架,是目前最主流的MVC 框架。
-
SpringMVC是非侵入式:可以使用注解让普通java对象,作为请求处理器【Controller】。
-
SpringMVC是用来代替Servlet
Servlet作用
- 处理请求
- 将数据共享到域中
- 做出响应
- 跳转页面【视图】
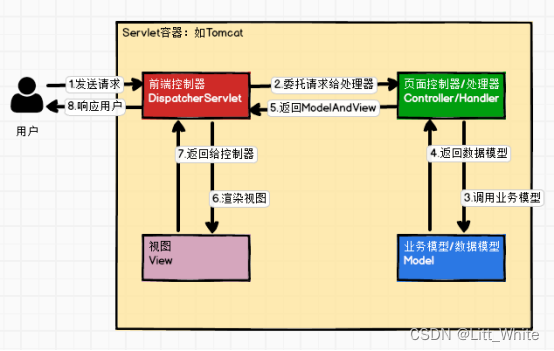
1.2 SpringMVC处理请求原理简图
- 请求
- DispatcherServlet【前端控制器】
- 将请求交给Controller|Handler
- Controller|Handler【请求处理器】
- 处理请求
- 返回数据模型
- ModelAndView
- Model:数据模型
- View:视图对象或视图名
- DispatcherServlet渲染视图
- 将数据共享到域中
- 跳转页面【视图】
- 响应
第二章、SpringMVC搭建框架
1、搭建SpringMVC框架
1.1 创建工程【web工程】
-
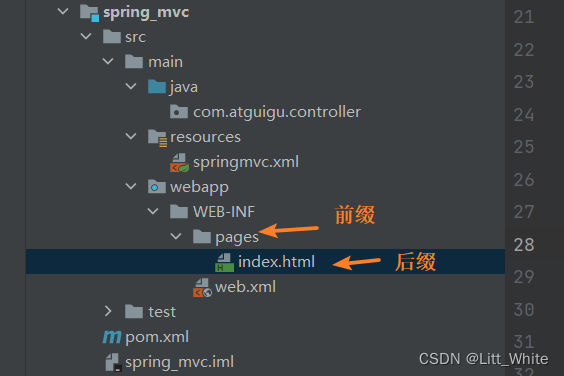
web项目结构
-
web.xml
<?xml version="1.0" encoding="UTF-8"?> <web-app xmlns="http://xmlns.jcp.org/xml/ns/javaee" xmlns:xsi="http://www.w3.org/2001/XMLSchema-instance" xsi:schemaLocation="http://xmlns.jcp.org/xml/ns/javaee http://xmlns.jcp.org/xml/ns/javaee/web-app_4_0.xsd" version="4.0"> </web-app> -
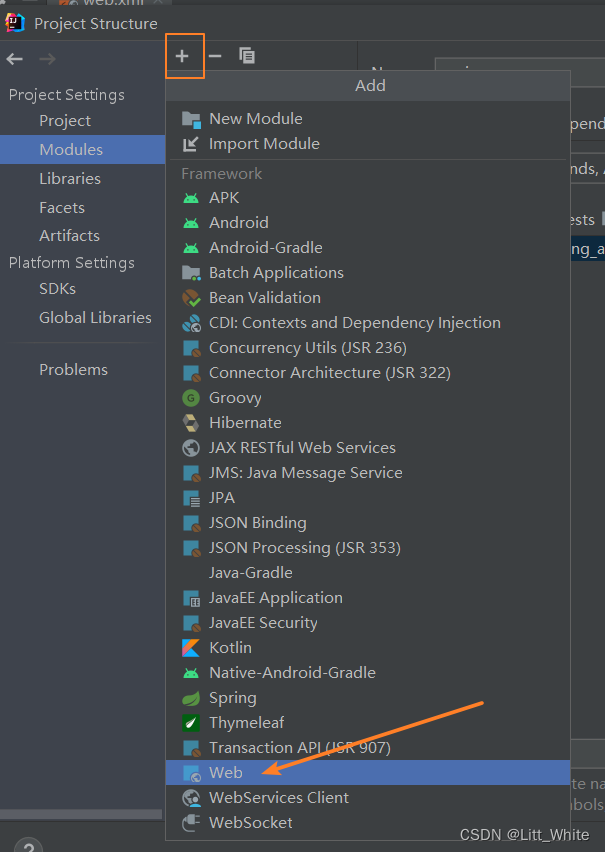
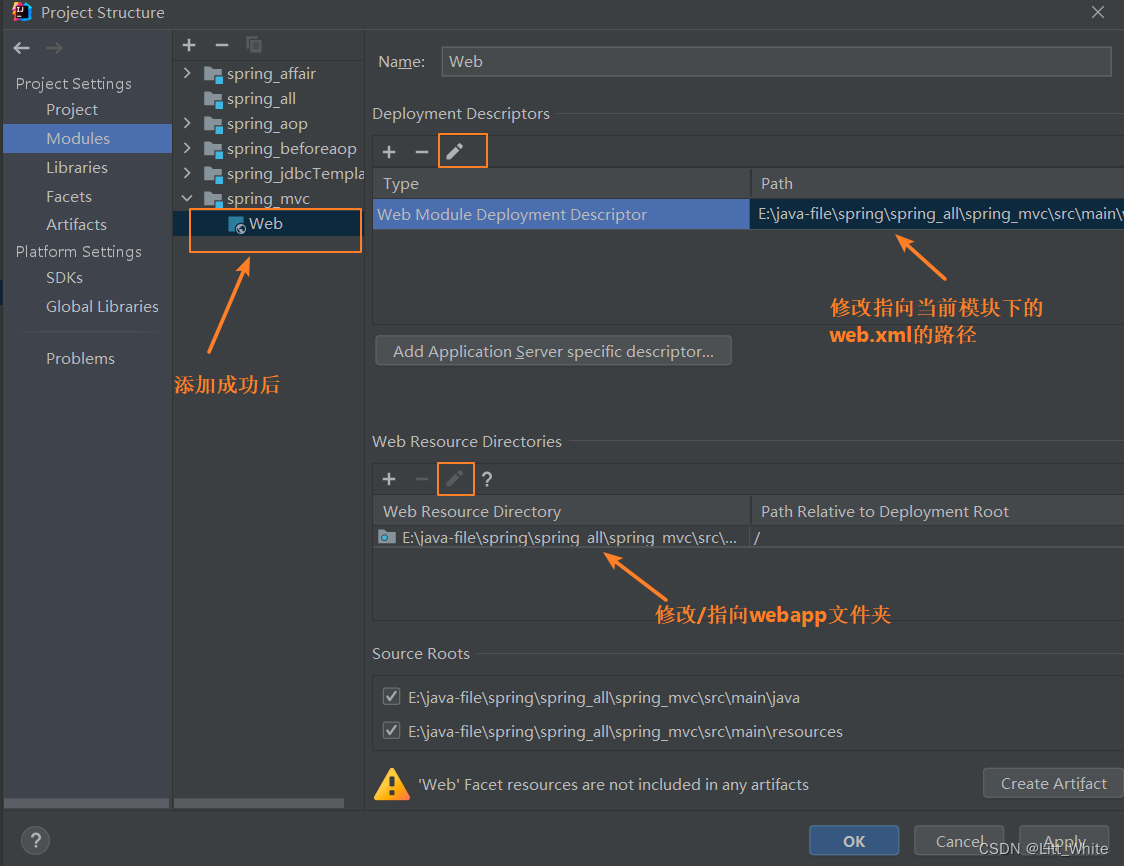
添加web模块
-
添加web模块
1.2 导入jar包
- E:\java-file\spring\spring_all\spring_mvc\pom.xml
<!--spring-webmvc-->
<dependency><groupId>org.springframework</groupId><artifactId>spring-webmvc</artifactId><version>5.3.1</version>
</dependency><!-- 导入thymeleaf与spring5的整合包 -->
<dependency><groupId>org.thymeleaf</groupId><artifactId>thymeleaf-spring5</artifactId><version>3.0.12.RELEASE</version>
</dependency><!--servlet-api-->
<dependency><groupId>javax.servlet</groupId><artifactId>javax.servlet-api</artifactId><version>4.0.1</version><scope>provided</scope>
</dependency>
1.3 编写配置文件
(1) web.xml注册DispatcherServlet
- url配置:/
- init-param(初始化参数):contextConfigLocation,设置springmvc.xml配置文件路径【管理容器对象】
- <load-on-startup>:设置DispatcherServlet优先级【启动服务器时,创建当前Servlet对象】
// src/main/webapp/WEB-INF/web.xml
<?xml version="1.0" encoding="UTF-8"?>
<web-app xmlns="http://xmlns.jcp.org/xml/ns/javaee"xmlns:xsi="http://www.w3.org/2001/XMLSchema-instance"xsi:schemaLocation="http://xmlns.jcp.org/xml/ns/javaee http://xmlns.jcp.org/xml/ns/javaee/web-app_4_0.xsd"version="4.0"><!--    注册DispatcherServlet【前端控制器】--><servlet><servlet-name>DispatcherServlet</servlet-name><servlet-class>org.springframework.web.servlet.DispatcherServlet</servlet-class><!--        设置springmvc.xml配置文件路径【管理容器对象】--><init-param><param-name>contextConfigLocation</param-name><param-value>classpath:springmvc.xml</param-value></init-param><!--        设置DispatcherServlet优先级【启动服务器时,创建当前Servlet对象】--><load-on-startup>1</load-on-startup></servlet><servlet-mapping><servlet-name>DispatcherServlet</servlet-name><url-pattern>/</url-pattern></servlet-mapping></web-app>
(2) springmvc.xml
- 开启组件扫描
- 配置视图解析器【解析视图(设置视图前缀&后缀)】
- 注意:
<property name="prefix" value="/WEB-INF/pages"/>中的pages是可变的,代表的是WEB-INF文件下的文件名
- 注意:
// src/main/resources/springmvc.xml
<!--    - 开启组件扫描-->
<context:component-scan base-package="com.atguigu"></context:component-scan>
<!--    - 配置视图解析器【解析视图(设置视图前缀&后缀)】-->
<bean class="org.thymeleaf.spring5.view.ThymeleafViewResolver">
<!--        配置字符集属性--><property name="characterEncoding" value="UTF-8"/>
<!--        配置模板引擎属性--><property name="templateEngine">
<!--            配置内部bean --><bean class="org.thymeleaf.spring5.SpringTemplateEngine">
<!--                配置模块的解析器属性 --><property name="templateResolver">
<!--                    配置内部bean --><bean class="org.thymeleaf.spring5.templateresolver.SpringResourceTemplateResolver"><!-- 视图前缀 --><property name="prefix" value="/WEB-INF/pages/"/><!-- 视图后缀 --><property name="suffix" value=".html"/>
<!--                        <property name="templateMode" value="HTML5"/>--><!-- 配置字符集 --><property name="characterEncoding" value="UTF-8" /></bean></property></bean></property>
</bean>
(3) index.html
demo演示:
<!DOCTYPE html>
<html lang="en" xmlns:th="http://www.thymeleaf.org">
<head><meta charset="UTF-8"><title>首页</title>
</head>
<body><a th:href="@{/HelloController}">发送请求</a></body>
</html>
1.4 编写请求处理器【Controller|Handler】
- 使用**@Controller**注解标识请求处理器
- 使用**@RequestMapping**注解标识处理方法【URL】
- src/main/java/com/atguigu/controller/HelloController.java
package com.atguigu.controller;import org.springframework.stereotype.Controller;
import org.springframework.web.bind.annotation.RequestMapping;@Controller    // 标识当前类是一个请求处理器类
public class HelloController {/*** 配置url【/】,会映射(跳转)到 WEB-INF/index.html* @return*/@RequestMapping("/")public String toIndex(){//            /WEB-INF/pages/index.html// 物理视图名 = 视图前缀+逻辑视图名+视图后缀// 物理视图名 = "/WEB-INF/pages/" + "index" + ".html"return "index";}
}
1.5 准备页面进行,测试
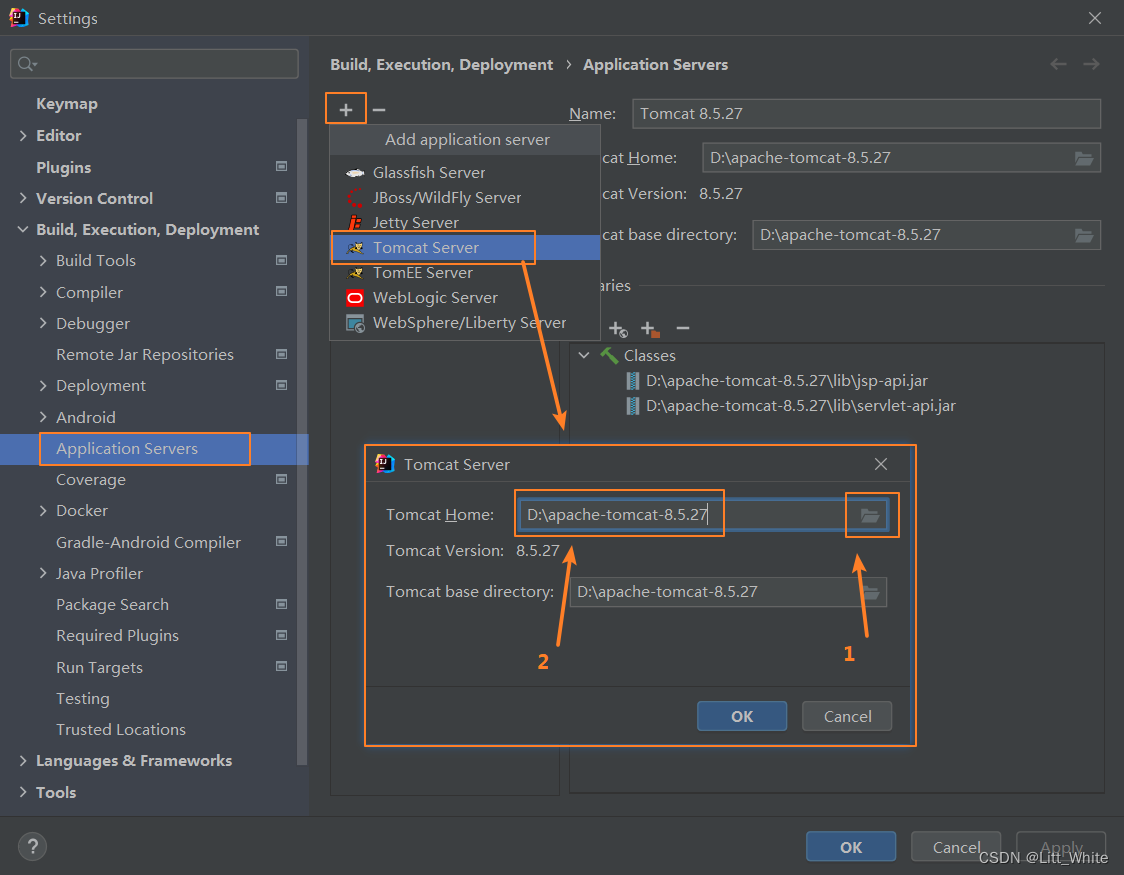
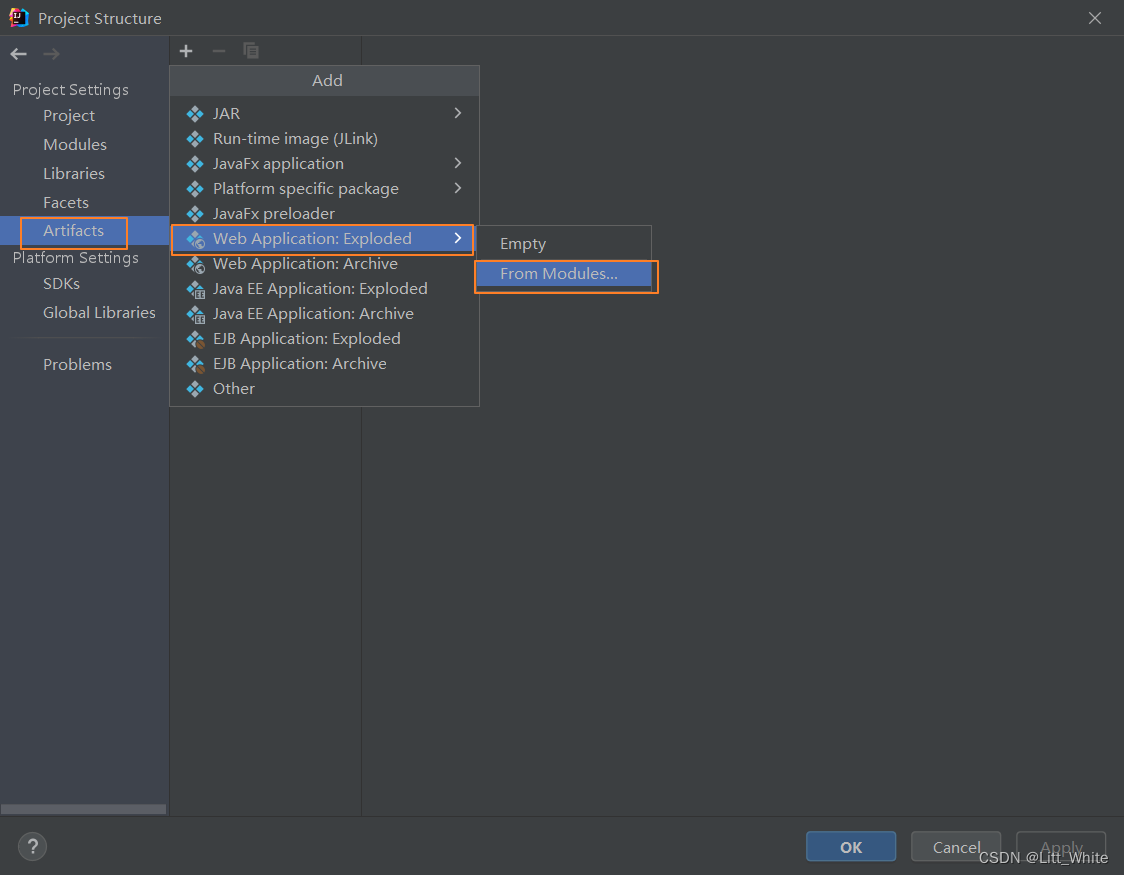
tomcat集成到idea
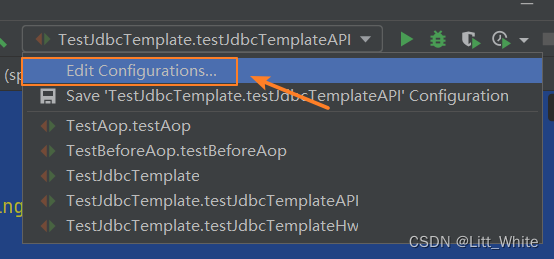
测试

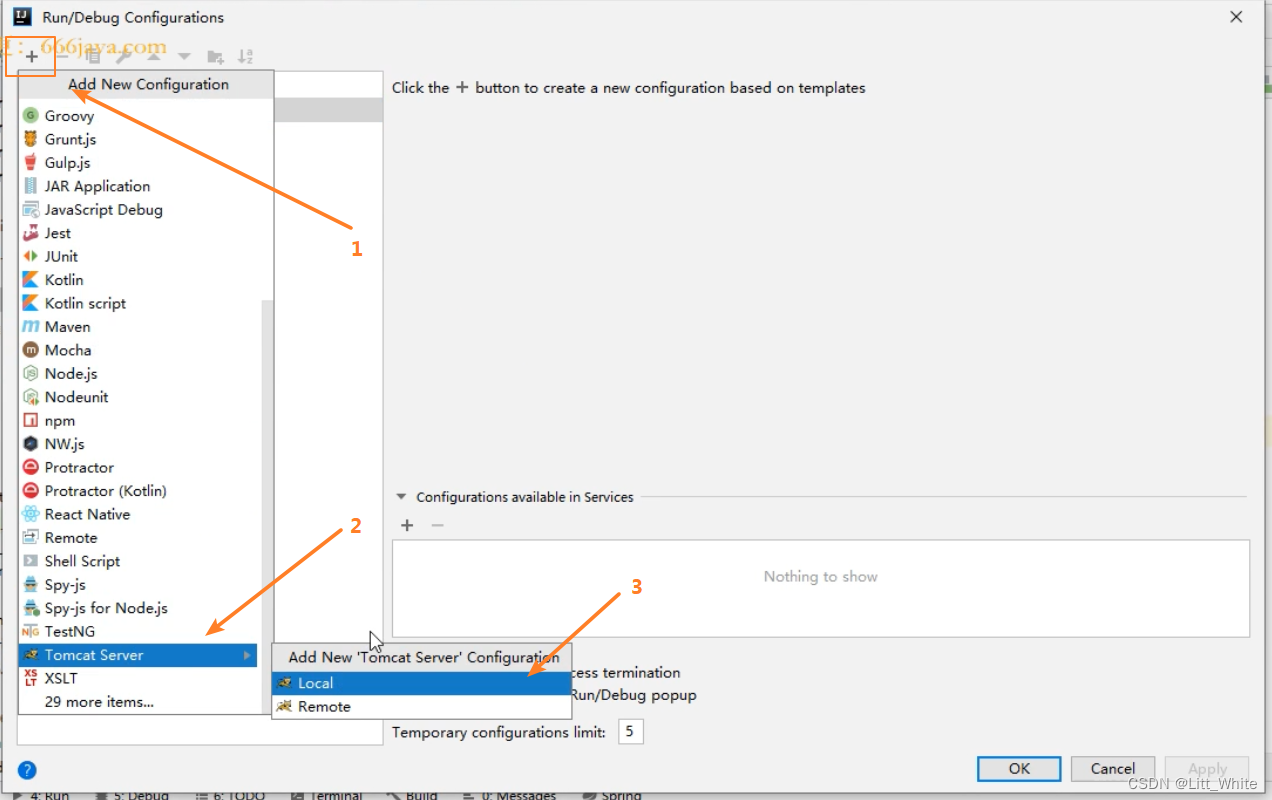
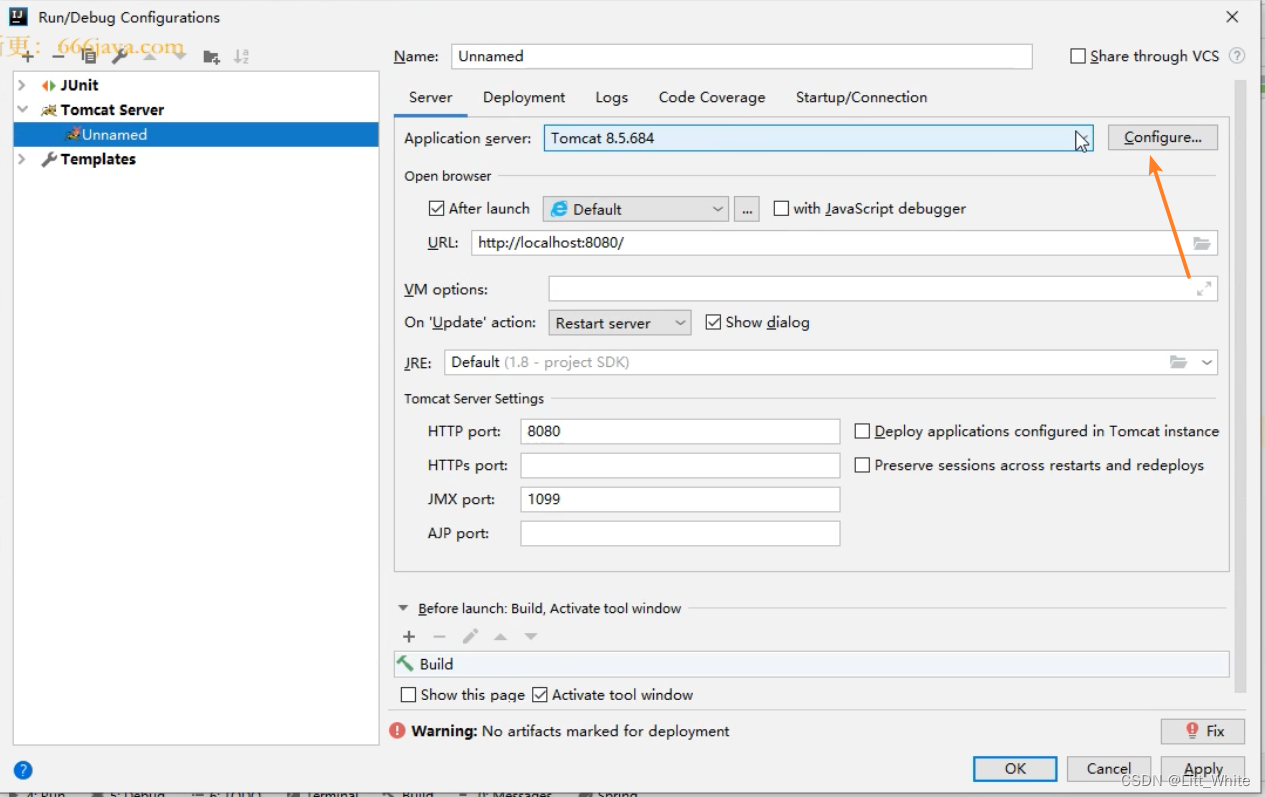
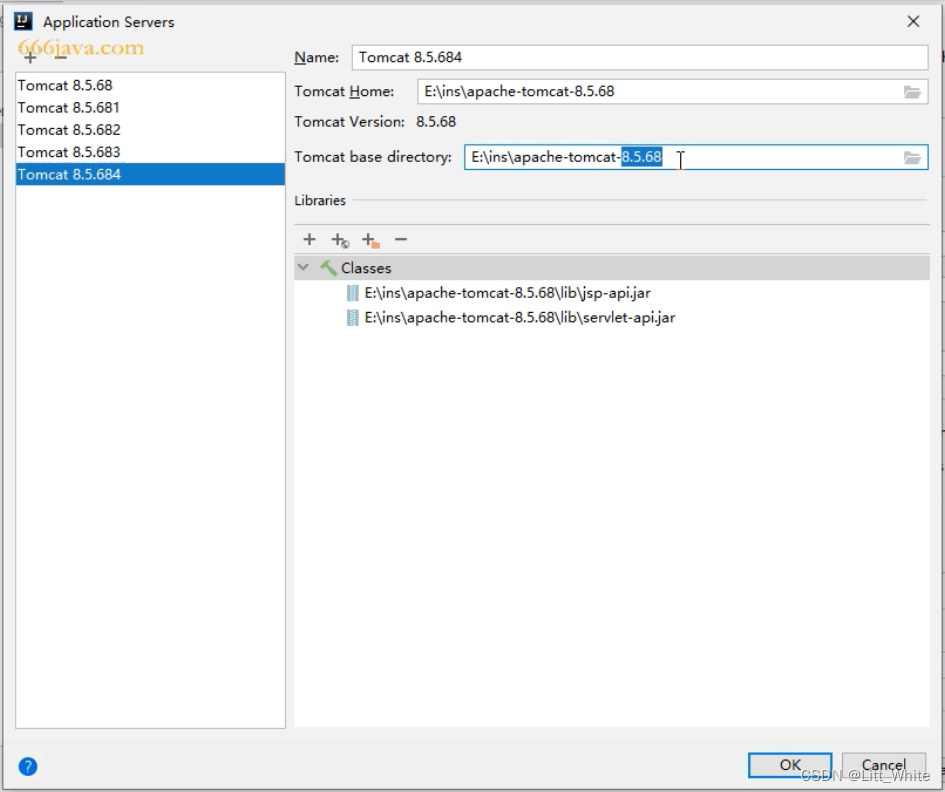
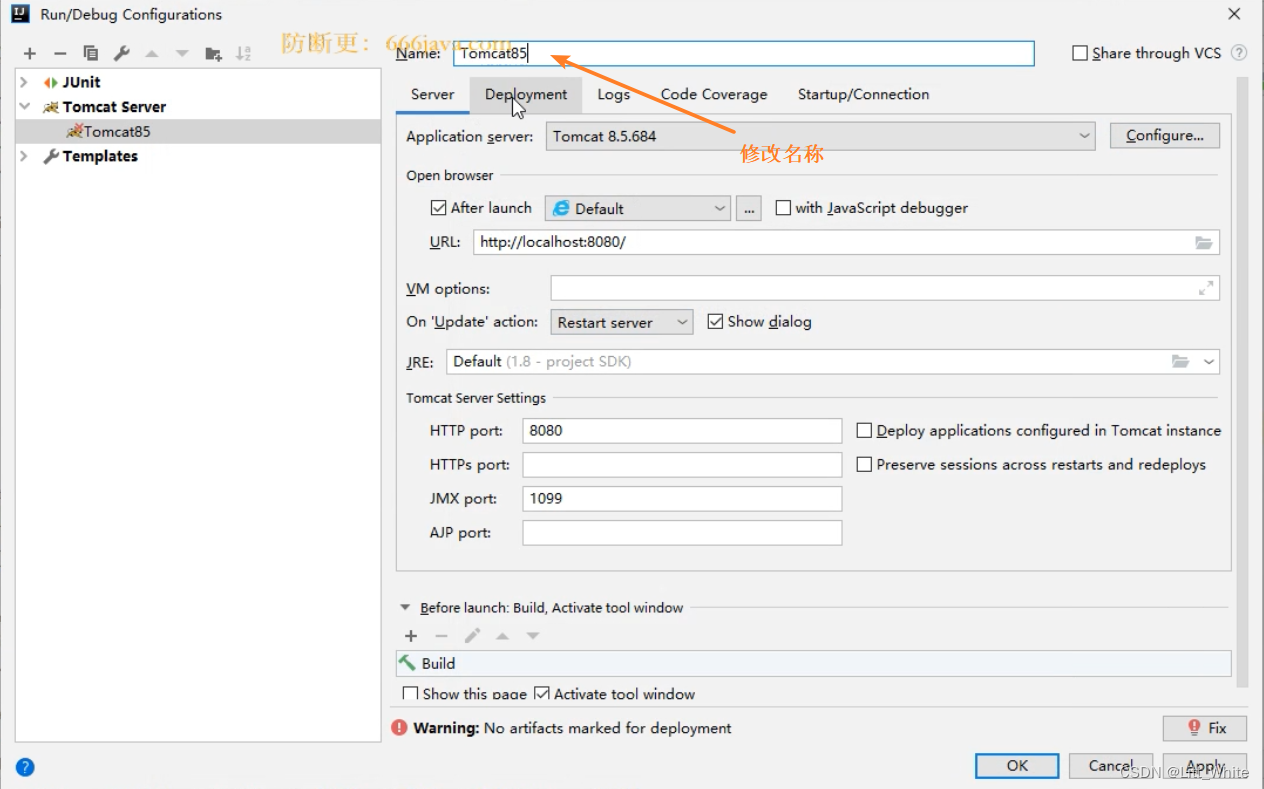
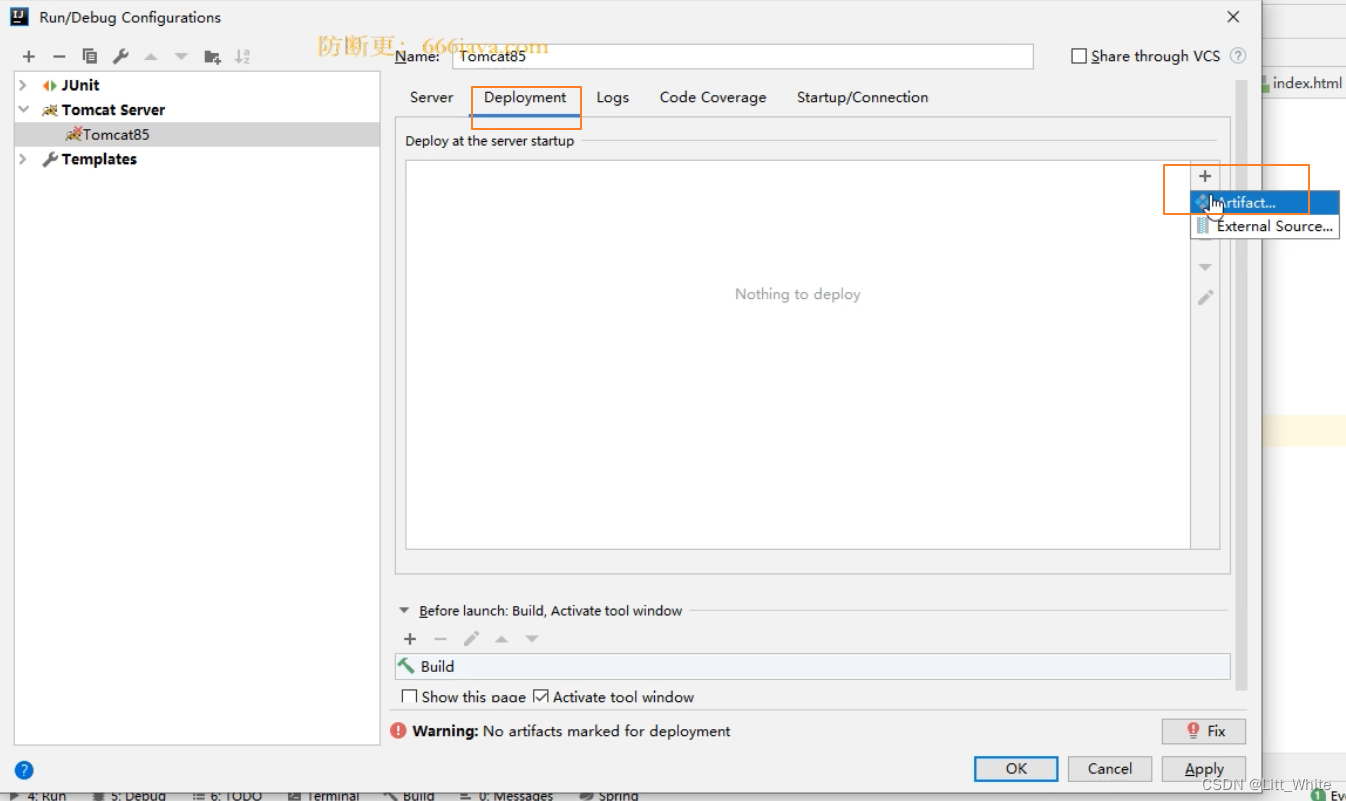
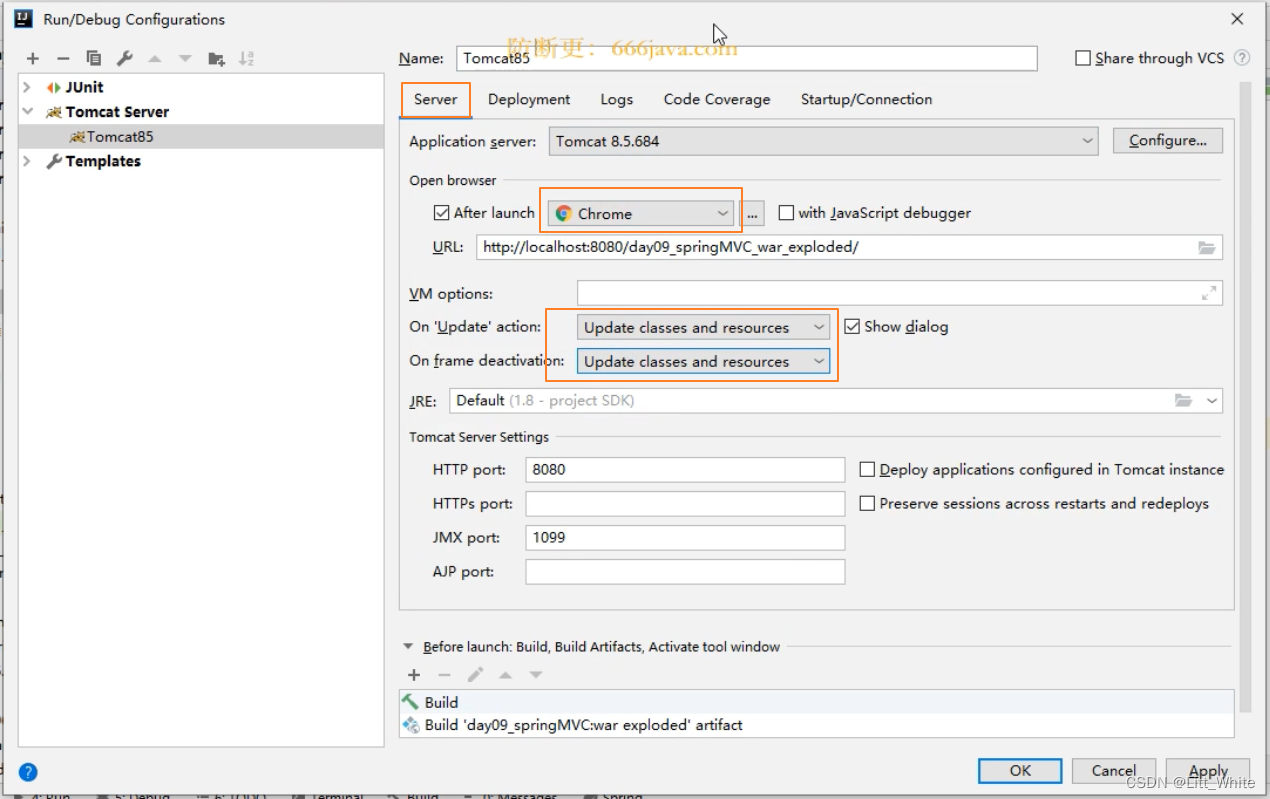

第三章 @RequestMapping详解
@RequestMapping注解作用:为指定的类或方法设置相应URL
3.1 @RequestMapping注解位置
- 书写在类上面
- 作用:为当前类设置映射URL
- 注意:不能单独使用,需要与方法上的@RequestMapping配合使用
- 书写在方法上面
- 作用:为当前方法设置映射URL
- 注意:可以单独使用
注意:当类和类中方法都有
@RequestMapping注解时,此时路径应为/类的RequestMapping路径/方法的RequestMapping路径
3.2 @RequestMapping注解属性
-
value属性
- 类型:String[]
- 作用:设置URL信息
-
path属性
- 类型:String[]
- 作用:与value属性作用一致
-
method属性
-
类型:RequestMethod[]
public enum RequestMethod { GET, HEAD, POST, PUT, PATCH, DELETE, OPTIONS, TRACE } -
作用:为当前URL【类或方法】设置请求方式【POST、DELETE、PUT、GET】
-
注意:
- 默认情况:所有请求方式均支持
- 如请求方式不支持,会报如下错误
- 405【Request method ‘GET’ not supported】
-
-
params
- 类型:String[]
- 作用:为当前URL设置请求参数
- 注意:如设置指定请求参数,但URL中未携带指定参数,会报如下错误
- 400【Parameter conditions “lastName” not met for actual request parameters:】
-
headers
- 类型:String[]
- 作用:为当前URL设置请求头信息
- 注意:如设置指定请求头,但URL中未携带请求头,会报如下错误
- 404:请求资源未找到
-
示例代码
@RequestMapping(value = {"/saveEmp","/insertEmp"},method = RequestMethod.GET,params = "lastName=lisi",headers = "User-Agent=Mozilla/5.0 (Windows NT 10.0; Win64; x64) AppleWebKit/537.36 (KHTML, like Gecko) Chrome/99.0.4844.84 Safari/537.36")
public String saveEmp(){System.out.println("添加员工信息!!!!");return SUCCESS;
}
@RequestMapping(method = RequestMethod.POST)
public @interface PostMapping {}
@RequestMapping(method = RequestMethod.GET)
public @interface GetMapping {}
@RequestMapping(method = RequestMethod.PUT)
public @interface PutMapping {}
@RequestMapping(method = RequestMethod.DELETE)
public @interface DeleteMapping {}
3.3 @RequestMapping支持Ant 风格的路径(了解)
-
常用通配符
a) ?:匹配一个字符
b) *:匹配任意字符
c) **:匹配多层路径
-
示例代码
@RequestMapping("/testAnt/**")
public String testAnt(){System.out.println("==>testAnt!!!");return SUCCESS;
}
第四章 @PathVariable 注解
4.1 @PathVariable注解位置
@Target(ElementType.PARAMETER)
- 书写在参数前面
4.2 @PathVariable注解作用
-
获取URL中占位符参数
-
占位符语法:{}
-
示例代码
<a th:href="@{/EmpController/testPathVariable/1001}">测试PathVariable注解</a><br>/*** testPathVariable* @return*/ @RequestMapping("/testPathVariable/{empId}") public String testPathVariable(@PathVariable("empId") Integer empId){System.out.println("empId = " + empId);return SUCCESS; }
4.3 @PathVariable注解属性
- value属性
- 类型:String
- 作用:设置占位符中的参数名
- name属性
- 类型:String
- 作用:与name属性的作用一致
- required属性
- 类型:boolean
- 作用:设置当前参数是否必须入参【默认值:true】
- true:表示当前参数必须入参,如未入参会报如下错误
- Missing URI template variable ‘empId’ for method parameter of type Integer
- false:表示当前参数不必须入参,如未入参,会装配null值
- true:表示当前参数必须入参,如未入参会报如下错误
第五章 REST【RESTful】风格CRUD
5.1 REST的CRUD与传统风格CRUD对比
-
传统风格CRUD
- 功能 URL 请求方式
- 增 /insertEmp POST
- 删 /deleteEmp?empId=1001 GET
- 改 /updateEmp POST
- 查 /selectEmp?empId=1001 GET
-
REST风格CRUD
- 功能 URL 请求方式
- 增 /emp POST
- 删 /emp/1001 DELETE
- 改 /emp PUT
- 查 /emp/1001 GET
5.2 REST风格CRUD优势
- 提高网站排名
- 排名方式
- 竞价排名
- 技术排名
- 排名方式
- 便于第三方平台对接
5.3 实现PUT&DELETE提交方式步骤
- 注册过滤器HiddenHttpMethodFilter
<!-- 注册过滤器 --><filter><filter-name>HiddenHttpMethodFilter</filter-name><filter-class>org.springframework.web.filter.HiddenHttpMethodFilter</filter-class></filter><filter-mapping><filter-name>HiddenHttpMethodFilter</filter-name> <!-- 所有的请求都需要经过过滤器 --><url-pattern>/*</url-pattern></filter-mapping> - 设置表单的提交方式为POST
- 设置参数:_method=PUT或_method=DELETE
<h3>修改员工--PUT方式提交</h3>
<form th:action="@{/emp}" method="post"><input type="hidden" name="_method" value="PUT"><input type="submit" value="修改员工信息">
</form><h3>删除员工--DELETE方式提交</h3>
<form th:action="@{/emp/1001}" method="post"><input type="hidden" name="_method" value="DELETE"><input type="submit" value="删除员工信息">
</form>
5.4 源码解析HiddenHttpMethodFilter
public static final String DEFAULT_METHOD_PARAM = "_method";private String methodParam = DEFAULT_METHOD_PARAM;@Override
protected void doFilterInternal(HttpServletRequest request, HttpServletResponse response, FilterChain filterChain)throws ServletException, IOException {HttpServletRequest requestToUse = request;if ("POST".equals(request.getMethod()) && request.getAttribute(WebUtils.ERROR_EXCEPTION_ATTRIBUTE) == null) {String paramValue = request.getParameter(this.methodParam);if (StringUtils.hasLength(paramValue)) {String method = paramValue.toUpperCase(Locale.ENGLISH);if (ALLOWED_METHODS.contains(method)) {requestToUse = new HttpMethodRequestWrapper(request, method);}}}filterChain.doFilter(requestToUse, response);
}
/*** Simple {@link HttpServletRequest} wrapper that returns the supplied method for* {@link HttpServletRequest#getMethod()}.*/private static class HttpMethodRequestWrapper extends HttpServletRequestWrapper {private final String method;public HttpMethodRequestWrapper(HttpServletRequest request, String method) {super(request);this.method = method;}@Overridepublic String getMethod() {return this.method;}}
第六章 SpringMVC处理请求数据
使用Servlet处理请求数据
- 请求参数
- String param = request.getParameter();
- 请求头
- request.getHeader();
- Cookie
- request.getCookies();
6.1 处理请求参数
- 默认情况:可以将请求参数名,与入参参数名一致的参数,自动入参【自动类型转换】
<h2>测试SpringMVC处理请求数据</h2>
<h3>处理请求参数</h3>
<a th:href="@{/requestParam1(stuName='zs', stuAge=18)}">测试处理请求参数1</a>
/**
* 获取请求参数
* @return
*/
@RequestMapping("/requestParam1")
public String requestParam1(String stuName,Integer stuAge){System.out.println("stuName = "+ stuName);System.out.println("stuAge = "+ stuAge);return SUCCESS;
}
-
SpringMVC支持POJO入参
-
要求:请求参数名与POJO的属性名保持一致
-
示例代码
<form th:action="@{/saveEmp}" method="POST">id:<input type="text" name="id"><br>LastName:<input type="text" name="lastName"><br>Email:<input type="text" name="email"><br>Salary:<input type="text" name="salary"><br><input type="submit" value="添加员工信息">
</form>
/*** 获取请求参数POJO* @return*/ @RequestMapping(value = "/saveEmp",method = RequestMethod.POST) public String saveEmp(Employee employee){System.out.println("employee = " + employee);return SUCCESS; }
-
-
@RequestParam注解
-
作用:如请求参数与入参参数名不一致时,可以使用@RequestParam注解设置入参参数名
-
属性
- value
- 类型:String
- 作用:设置需要入参的参数名
- name
- 类型:String
- 作用:与value属性作用一致
- required
- 类型:Boolean
- 作用:设置当前参数,是否必须入参
- true【默认值】:表示当前参数必须入参,如未入参会报如下错误
- 400【Required String parameter ‘sName’ is not present】
- false:表示当前参数不必须入参,如未入参,装配null值
- true【默认值】:表示当前参数必须入参,如未入参会报如下错误
- defaultValue
- 类型:String
- 作用:当装配数值为null时,指定当前defaultValue默认值
- value
-
示例代码
<h2>测试SpringMVC处理请求数据</h2>
<h3>处理请求参数</h3>
<a th:href="@{/requestParam1(sName='zs', stuAge=18)}">测试处理请求参数1</a>
/*** 获取请求参数* @return*/ @RequestMapping("/requestParam1") public String requestParam1(@RequestParam(value = "sName",required = false,defaultValue = "zhangsan")String stuName,Integer stuAge){System.out.println("stuName = " + stuName);System.out.println("stuAge = " + stuAge);return SUCCESS; }
-
6.2 处理请头
-
语法:@RequestHeader注解
-
属性
- value
- 类型:String
- 作用:设置需要获取请求头名称
- name
- 类型:String
- 作用:与value属性作用一致
- required
- 类型:boolean
- 作用:【默认值true】
- true:设置当前请求头是否为必须入参,如未入参会报如下错误
- 400【Required String parameter ‘sName’ is not present】
- false:表示当前参数不必须入参,如未入参,装配null值
- true:设置当前请求头是否为必须入参,如未入参会报如下错误
- defaultValue
- 类型:String
- 作用:当装配数值为null时,指定当前defaultValue默认值
- value
-
示例代码
<a th:href="@{/testGetHeader}">测试获取请求头</a>/*** 获取请求头* @return*/ @RequestMapping(value = "/testGetHeader") public String testGetHeader(@RequestHeader("Accept-Language")String al,@RequestHeader("Referer") String ref){System.out.println("al = " + al);System.out.println("ref = " + ref);return SUCCESS; }
6.3 处理Cookie信息
-
语法:@CookieValue获取Cookie数值
-
属性
- value
- 类型:String
- 作用:设置需要获取Cookie名称
- name
- 类型:String
- 作用:与value属性作用一致
- required
- 类型:boolean
- 作用:【默认值true】
- true:设置当前Cookie是否为必须入参,如未入参会报如下错误
- 400【Required String parameter ‘sName’ is not present】
- false:表示当前Cookie不必须入参,如未入参,装配null值
- true:设置当前Cookie是否为必须入参,如未入参会报如下错误
- defaultValue
- 类型:String
- 作用:当装配数值为null时,指定当前defaultValue默认值
- value
-
示例代码
<a th:href="@{/setCookie}">设置Cookie信息</a><br>
<a th:href="@{/getCookie}">获取Cookie信息</a><br>
/*** 设置Cookie* @return*/@RequestMapping("/setCookie")public String setCookie(HttpSession session){ // Cookie cookie = new Cookie();System.out.println("session.getId() = " + session.getId());return SUCCESS;}/*** 获取Cookie* @return*/@RequestMapping("/getCookie")public String getCookie(@CookieValue("JSESSIONID")String cookieValue){System.out.println("cookieValue = " + cookieValue);return SUCCESS;}
6.4 使用原生Servlet-API
- 将原生Servlet相关对象,入参即可
@RequestMapping("/useRequestObject")
public String useRequestObject(HttpServletRequest request){}
第七章 SpringMVC处理响应数据
7.1 使用ModelAndView
-
语法:使用ModelAndView对象作为方法返回值类型,处理响应数据
-
ModelAndView是模型数据与视图对象的集成对象,源码如下
public class ModelAndView {/** View instance or view name String. *///view代表view对象或viewName【建议使用viewName】@Nullableprivate Object view;/** Model Map. *///ModelMap集成LinkedHashMap,存储数据@Nullableprivate ModelMap model;/**设置视图名称*/public void setViewName(@Nullable String viewName) {this.view = viewName;}/*** 获取视图名称*/@Nullablepublic String getViewName() {return (this.view instanceof String ? (String) this.view : null);}/**获取数据,返回Map【无序,model可以为null】*/@Nullableprotected Map<String, Object> getModelInternal() {return this.model;}/*** 获取数据,返回 ModelMap【有序】*/public ModelMap getModelMap() {if (this.model == null) {this.model = new ModelMap();}return this.model;}/*** 获取数据,返回Map【无序】*/public Map<String, Object> getModel() {return getModelMap();}/**设置数据*/public ModelAndView addObject(String attributeName, @Nullable Object attributeValue) {getModelMap().addAttribute(attributeName, attributeValue);return this;}} -
底层实现原理
- 数据共享到request域
- 跳转路径方式:转发
-
示例代码
<h2>测试SpringMVC处理响应数据</h2>
<h3>1、测试响应数据--ModelAndView</h3>
<a th:href="@{/ResponseDataController/testModelAndView}">测试处理请求参数1</a>
<br>
@Controller @RequestMapping("/ResponseDataController") public class ResponseDataController {@RequestMapping("/testModelAndView")public ModelAndView testModelAndView(){ModelAndView mv = new ModelAndView(); // 设置数据mv.addObject("stuName","lisi"); // 设置视图mv.setViewName("response_success");return mv;} }<h2>响应数据--成功页面</h2> stuName:<span th:text="${stuName}"></span>
7.2 使用Model、ModelMap、Map
-
语法:使用Model、ModelMap、Map作为方法入参,处理响应数据
-
示例代码
<h3>2、测试响应数据--ModelOrModelMapOrMap</h3>
<a th:href="@{/ResponseDataController/testModelOrModelMapOrMap}">测试处理响应参数2</a>
<br>
/*** 使用Map、Model、ModelMap处理响应数据* @return*/// @RequestMapping("/testModelOrModelMapOrMap")// public String testModelOrModelMapOrMap(Map<String,Object> map){ 设置数据--Map方式// map.put("stuName","zhangsan");//// return "response_success";// }@RequestMapping("/testModelOrModelMapOrMap")public String testModelOrModelMapOrMap(Model model){// 设置数据--Model/ModelMap方式model.addAttribute("stuName","wangwu");return "response_success";}<h2>响应数据--成功页面</h2> stuName:<span th:text="${stuName}"></span> -
底层实现原理
- 数据共享到request域
- 跳转路径方式:转发
7.3 SpringMVC中域对象
-
SpringMVC封装数据,默认使用request域对象
-
session域的使用
-
方式一
/*** 测试响应数据【其他域对象】* @return*/ @GetMapping("/testScopeResponsedata") public String testScopeResponsedata(HttpSession session){session.setAttribute("stuName","xinlai");return "response_success"; } -
方式二
@Controller
@SessionAttributes(value = "stuName") //将request域中数据,同步到session域中
public class TestResponseData {@RequestMapping("/testSession")public String testSession( Map<String, Object> map ){
//        设置数据--数据在Session域map.put("stuName","sunqi");return "response_success";}
}
-
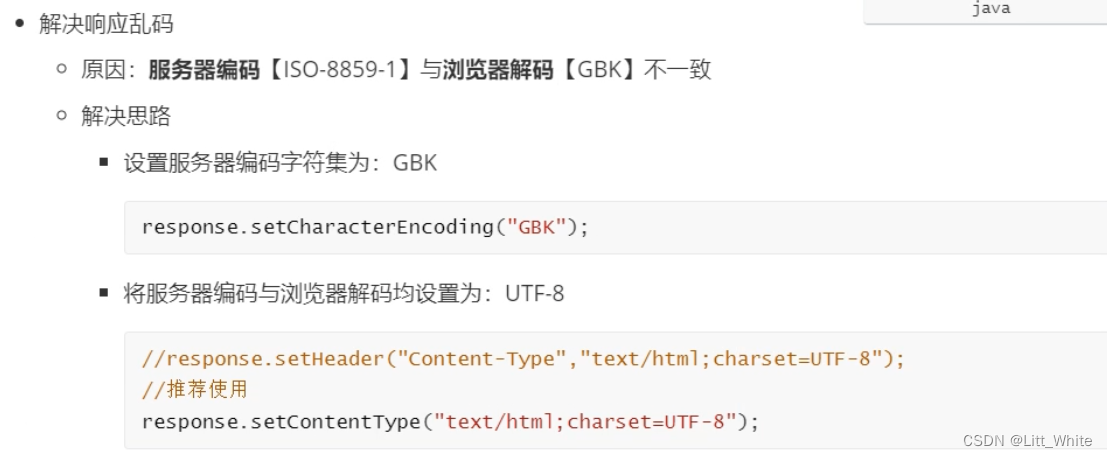
第八章 SpringMVC处理请求响应乱码
JavaWeb解决乱码:三行代码
- 解决POST请求乱码
- 解决GET请求乱码【Tomcat8及以后,自动解决】
- 解决响应乱码
8.1 源码解析CharacterEncodingFilter
public class CharacterEncodingFilter extends OncePerRequestFilter {//需要设置字符集@Nullableprivate String encoding;//true:处理请乱码private boolean forceRequestEncoding = false;//true:处理响应乱码private boolean forceResponseEncoding = false;public String getEncoding() {return this.encoding;}public boolean isForceRequestEncoding() {return this.forceRequestEncoding;}public void setForceResponseEncoding(boolean forceResponseEncoding) {this.forceResponseEncoding = forceResponseEncoding;}public void setForceEncoding(boolean forceEncoding) {// 合并了forceRequestEncoding和forceResponseEncoding this.forceRequestEncoding = forceEncoding;this.forceResponseEncoding = forceEncoding;}@Overrideprotected void doFilterInternal(HttpServletRequest request, HttpServletResponse response, FilterChain filterChain)throws ServletException, IOException {// 字符集String encoding = getEncoding();if (encoding != null) {if (isForceRequestEncoding() || request.getCharacterEncoding() == null) {// 解决请求乱码request.setCharacterEncoding(encoding);}if (isForceResponseEncoding()) {// 解决响应乱码response.setCharacterEncoding(encoding);}}filterChain.doFilter(request, response);}}
8.2 处理请求与响应乱码
-
SpringMVC底层默认处理响应乱码
-
SpringMVC处理请求乱码步骤
- 注册CharacterEncodingFilter
- 注册CharacterEncodingFilter必须是第一Filter位置
- 为CharacterEncodingFilter中属性encoding赋值
- 为CharacterEncodingFilter中属性forceRequestEncoding赋值
- 注册CharacterEncodingFilter
-
示例代码
<!--    必须是第一过滤器位置--><!--    注册CharacterEncodingFilter,解决乱码问题 -->
<filter><filter-name>CharacterEncodingFilter</filter-name><filter-class>org.springframework.web.filter.CharacterEncodingFilter</filter-class><!--   设置初始化的字符集 --><init-param><param-name>encoding</param-name><param-value>UTF-8</param-value></init-param><!--   解决请求及响应乱码 --><init-param><param-name>forceRequestEncoding</param-name><param-value>true</param-value></init-param>
</filter>
<filter-mapping><filter-name>CharacterEncodingFilter</filter-name><url-pattern>/*</url-pattern>
</filter-mapping>
第九章 SpringMVC视图及视图解析器
9.1 视图解析器对象【ViewResolver】
-
概述:SpringMVC中所有的视图解析器对象均实现了ViewResolver接口
-
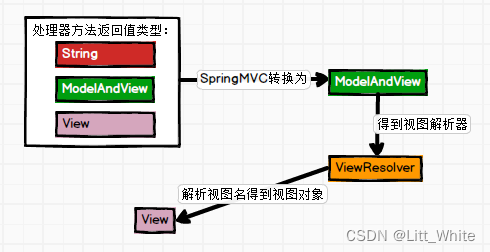
作用:使用ViewResolver,将View从ModelAndView中解析出来
- 在SpringMVC中,无论方法返回的是ModelAndView还是String,最终底层都会封装为ModelAndView
9.2 视图对象【View】
- 概述:SpringMVC中所有的视图对象【View】均实现了view接口
- 作用:视图渲染
- 将数据共享到域中【request,session,application(ServletContext)】
- 跳转路径【转发或重定向】
第十章 源码解析SpringMVC工作原理
10.1 Controller中方法的返回值问题
-
无论方法返回是ModelAndView还是String,最终SpringMVC底层,均会封装为ModelAndView对象
//DispatcherServlet的1061行代码 ModelAndView mv = null; mv = ha.handle(processedRequest, response, mappedHandler.getHandler()); -
SpringMVC解析mv【ModelAndView】
//DispatcherServlet的1078行代码 processDispatchResult(processedRequest, response, mappedHandler, mv, dispatchException); -
ThymeleafView对象中344行代码【SpringMVC底层处理响应乱码】
//computedContentType="text/html;charset=UTF-8" response.setContentType(computedContentType); -
WebEngineContext对象中783行代码【SpringMVC底层将数据默认共享到request域】
this.request.setAttribute(name, value);
10.2 视图及视图解析器源码
-
视图解析器将View从ModelAndView中解析出来
-
ThymeleafViewResolver的837行代码
//底层使用反射的方式,newInstance()创建视图对象
final AbstractThymeleafView viewInstance = BeanUtils.instantiateClass(getViewClass());
-
第十一章 视图控制器&重定向&加载静态资源
11.1 视图控制器
- 作用:如果没有业务逻辑处理,只是单纯的跳转页面,可以通过视图控制器跳转
- 语法:view-controller
- 步骤
- 添加<mvc:view-controller>标签:为指定URL映射html页面
- 添加<mvc:annotation-driven>
- 有20+种功能
- 配置了<mvc:view-controller>标签之后会导致其他请求路径都失效,添加<mvc:annotation-driven>解决
<!-- 添加视图控制器 --><mvc:view-controller path="/" view-name="index"></mvc:view-controller><mvc:view-controller path="/toRestPage" view-name="rest_page"></mvc:view-controller><mvc:view-controller path="/toRequestDataPage" view-name="toRequestDataPage"></mvc:view-controller><mvc:view-controller path="/toResponseDataPage" view-name="toResponseDataPage"></mvc:view-controller><!-- 配置了<mvc:view-controller>标签之后会导致其他请求路径都失效,添加<mvc:annotation-driven>解决 --><mvc:annotation-driven></mvc:annotation-driven>
11.2 重定向
- 语法:
return "redirect: / xxx.html";
11.3 加载静态资源
-
由DefaultServlet加载静态资源到服务器
- 静态资源:html、css、js等资源
- tomcat->conf->web.xml关键代码如下:
<servlet><servlet-name>default</servlet-name><servlet-class>org.apache.catalina.servlets.DefaultServlet</servlet-class><init-param><param-name>debug</param-name><param-value>0</param-value></init-param><init-param><param-name>listings</param-name><param-value>false</param-value></init-param><load-on-startup>1</load-on-startup></servlet> <servlet-mapping><servlet-name>default</servlet-name><url-pattern>/</url-pattern></servlet-mapping> -
发现问题
- DispatcherServlet与DefaultServlet的URL配置均为:/,导致DispatcherServlet中的配置将DefaultServlet配置的/覆盖了【DefaultServlet失效,无法加载静态资源】
-
解决方案
<!--    解决静态资源加载问题-->
<mvc:default-servlet-handler></mvc:default-servlet-handler>
<!-- 添加上述标签,会导致Controller无法正常使用,需要添加mvc:annotation-driven解决 -->
<mvc:annotation-driven></mvc:annotation-driven>
11.4 源码解析重定向原理
-
创建RedirectView对象【ThymeleafViewResolver的775行代码】
// Process redirects (HTTP redirects) if (viewName.startsWith(REDIRECT_URL_PREFIX)) {vrlogger.trace("[THYMELEAF] View \"{}\" is a redirect, and will not be handled directly by ThymeleafViewResolver.", viewName);final String redirectUrl = viewName.substring(REDIRECT_URL_PREFIX.length(), viewName.length());final RedirectView view = new RedirectView(redirectUrl, isRedirectContextRelative(), isRedirectHttp10Compatible());return (View) getApplicationContext().getAutowireCapableBeanFactory().initializeBean(view, REDIRECT_URL_PREFIX); } -
RedirectView视图渲染
-
RedirectView对象URL处理【330行代码】

-
执行重定向【RedirectView的627行代码】

-
相关文章:

Java:SpringMVC的使用(1)
目录第一章、SpringMVC基本了解1.1 概述1.2 SpringMVC处理请求原理简图第二章、SpringMVC搭建框架1、搭建SpringMVC框架1.1 创建工程【web工程】1.2 导入jar包1.3 编写配置文件(1) web.xml注册DispatcherServlet(2) springmvc.xml(3) index.html1.4 编写请求处理器【Controller…...

自动化测试岗位求职简历编写规范+注意事项,让你的简历脱颖而出
目录 前言 1.个人信息 2.教育背景(写最高学历) 3.个人技能(按精通/掌握/熟练/了解层次来写) 4.工作经历 5.工作经验/项目经历 6.自我评价 总结 前言 挑选一个阅读舒适度不错的模板 HR和面试官看的简历多,都是快速阅读,舒适度特别重要;…...
C 字符串
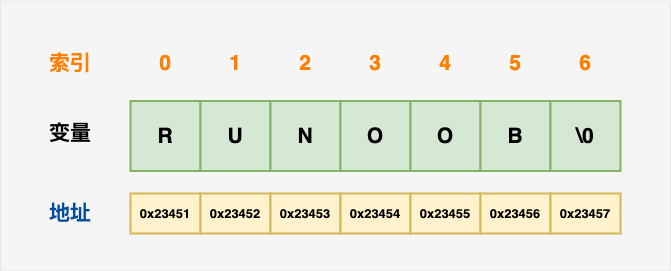
在 C 语言中,字符串实际上是使用空字符 \0 结尾的一维字符数组。因此,\0 是用于标记字符串的结束。空字符(Null character)又称结束符,缩写 NUL,是一个数值为 0 的控制字符,\0 是转义字符&#…...

【每日一题Day115】LC2335装满杯子需要的最短总时长 | 贪心
装满杯子需要的最短总时长【LC2335】 You have a water dispenser that can dispense cold, warm, and hot water. Every second, you can either fill up 2 cups with different types of water, or 1 cup of any type of water. You are given a 0-indexed integer array amo…...

Flink流计算处理-旁路输出
使用Flink做流数据处理时,除了主流数据输出,还自定义侧流输出即旁路输出,以实现灵活的数据拆分。 定义旁路输出标签 首先需要定义一个OutputTag,代码如下: // 这需要是一个匿名的内部类,以便我们分析类型…...
nginx正向代理的配置和使用
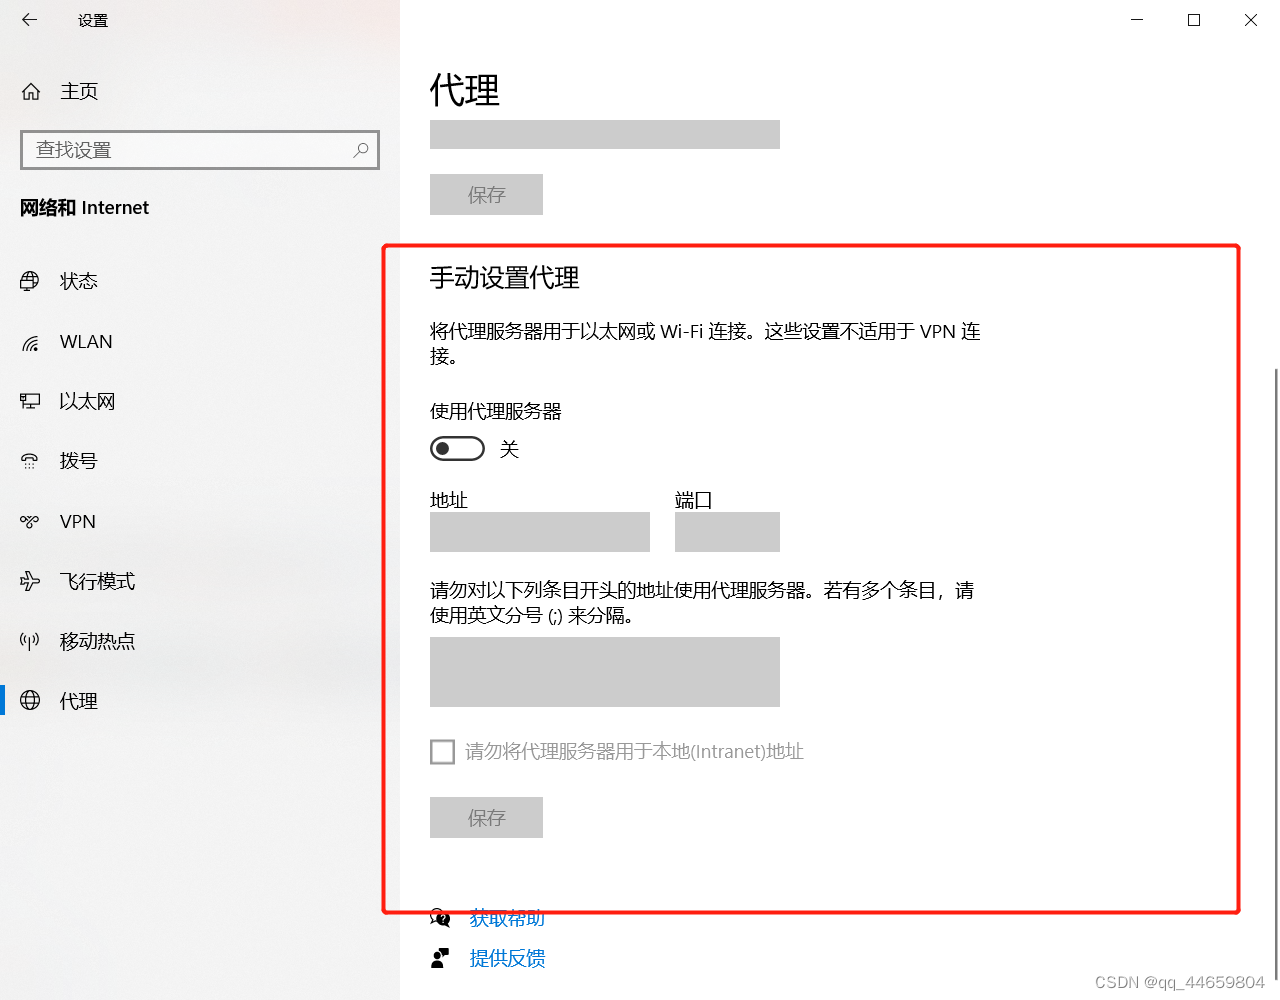
nginx正向代理的配置和使用 nginx正向代理的配置和使用nginx正向代理的配置和使用安装包准备下载nginx安装包下载正向代理模块的包版本与模块对照表部署nginx服务上传nginx包和正向模块包解压,改名安装nginx配置正向代理创建nginx用户检查nginx配置并启动nginx服务所在服务器验…...

Oracle Trace File Analyzer 介绍及简单使用
一、什么是Oracle Trace File Analyzer Oracle Autonomous Health Framework(AHF) 包含 Oracle ORAchk, Oracle EXAchk, and Oracle Trace File Analyzer(TFA). AHF工具包包含了Oracle常用的多种诊断工具,如 ORAchk, Oracle EXAchk, and Oracle Trace File Analyzer…...
面试实战篇 | 快手本地生活,结合项目谈Redis实战项目场景?MySQL InnoDB存储引擎如何工作的?策略模式?
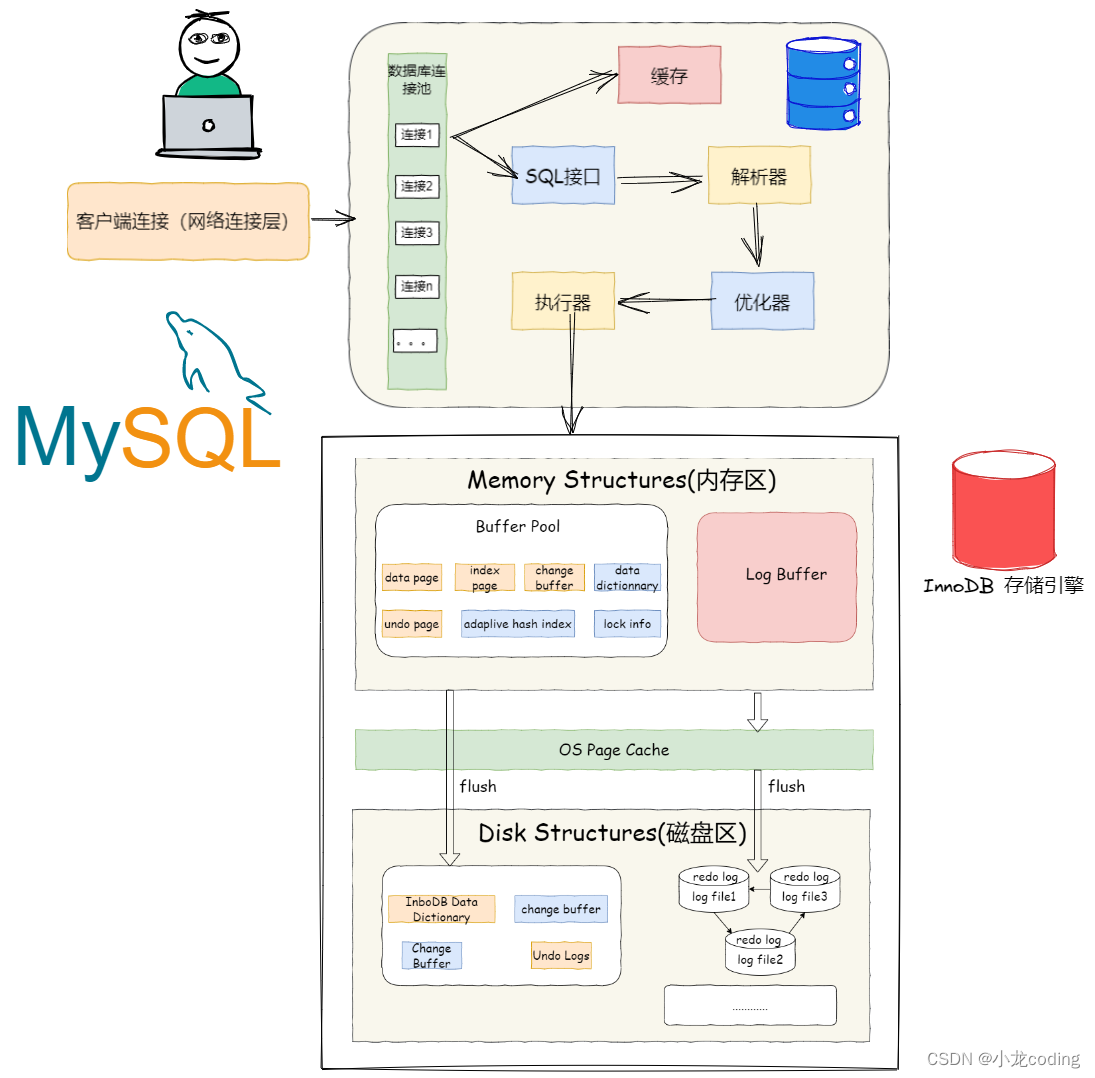
本期是【你好,面试官】系列文章的第21期,持续更新中…。 《你好,面试官》系列目前已经连载20篇了,据说看了这个系列的朋友都拿到了大厂offer~ 你好,面试官 | 你真的理解面向 “对象”?你好,面…...

Hadoop之——WordCount案例与执行本地jar包
目录 一、WordCount代码 (一)WordCount简介 1.wordcount.txt (二)WordCount的java代码 1.WordCountMapper 2.WordCountReduce 3.WordCountDriver (三)IDEA运行结果 (四)Hadoop运行wordcount 1.在HDFS上新建一个文件目录 2.新建一个文件,并上传至该目录下…...
利用git reflog 命令来查看历史提交记录,并使用提交记录恢复已经被删除掉的分支
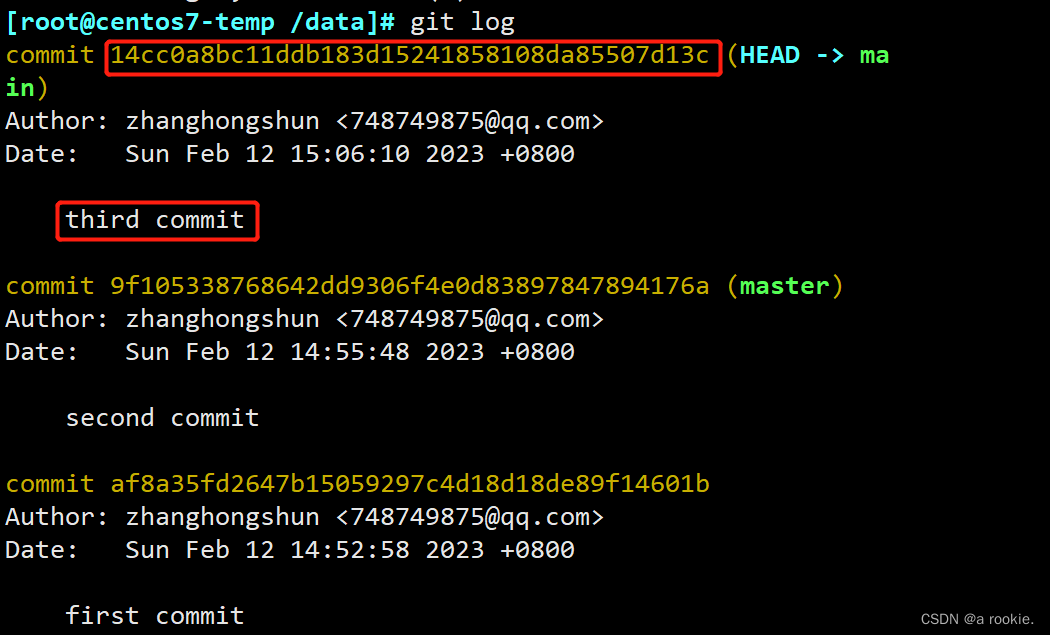
一.问题描述 当我们在操作中手误删除了某个分支,那该分支中提交的内容也没有了,我们可以利用git reflog这个命令来查看历史提交的记录从而恢复被删除的分支和提交的内容 二.模拟问题 1.创建git仓库,并提交一个文件 [rootcentos7-temp /da…...
【软件测试】大厂测试开发你真的了解吗?测试开发养成记......
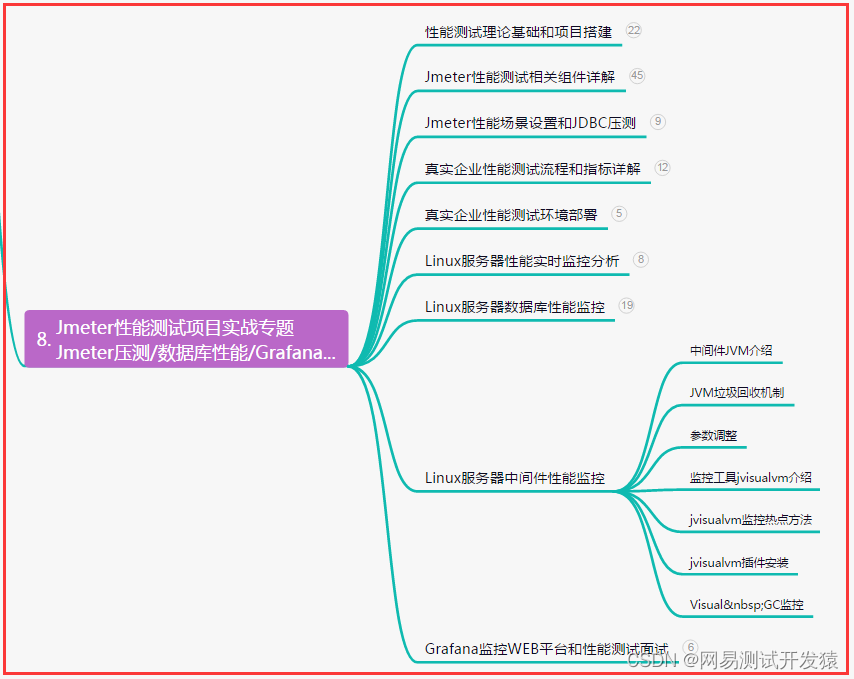
目录:导读前言一、Python编程入门到精通二、接口自动化项目实战三、Web自动化项目实战四、App自动化项目实战五、一线大厂简历六、测试开发DevOps体系七、常用自动化测试工具八、JMeter性能测试九、总结(尾部小惊喜)前言 在一些大公司里&…...
Redis中的hash结构和扩容机制
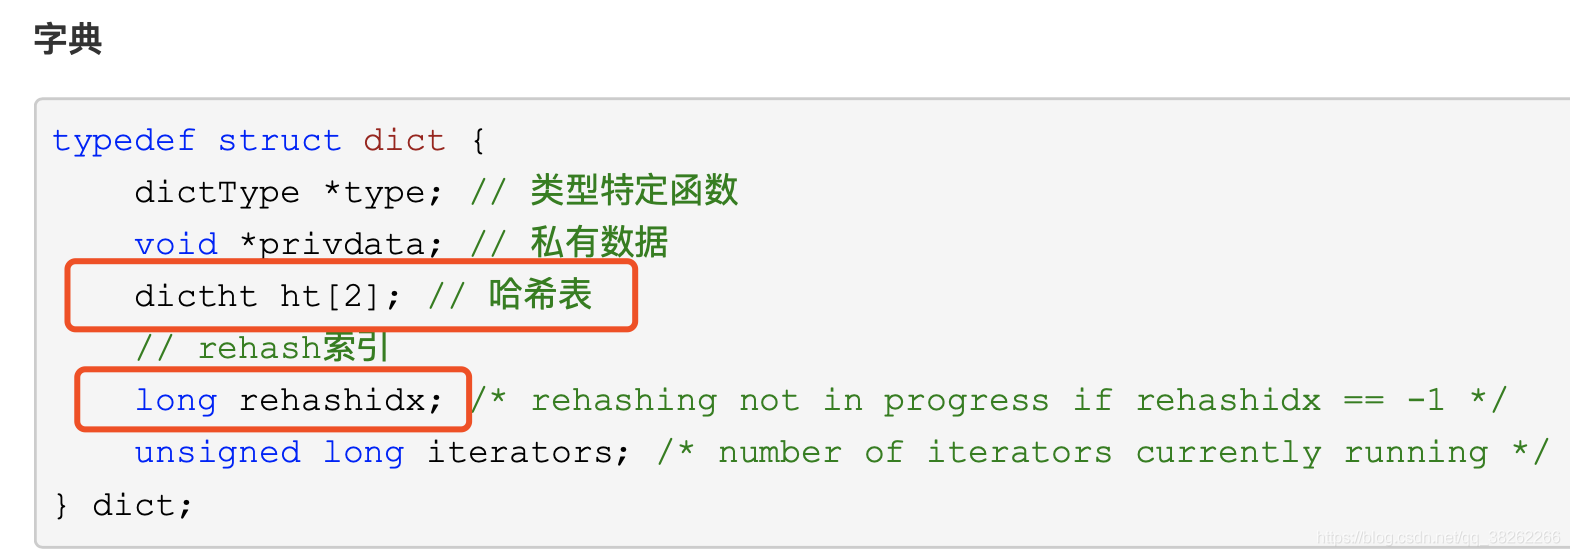
1.rehash原理 hash包含两个数据结构为字典数组ht[0]和ht[1]。其中ht[0]用来存放数据,ht[1]在rehash时使用。 扩容时,ht[1]的大小为第一个大于等于ht[0].used*2的2的幂次方的数; 收缩时,ht[1]的大小为第一个大于等于ht[0].used的…...
【2023.02.08】)
【C++奇技淫巧】前置自增与后置自增的区别(++i,i++)【2023.02.08】
简介 先说i和i的区别,判断语句中if(i)是拿i的值先判断,而后自增;if(i)是先自增i再进行判断。涉及到左值与右值也有点区别,i返回的是右值,i返回的是左值。也就是下面的代码要解释的东西。 #include <iostream>i…...
实战打靶集锦-005-HL
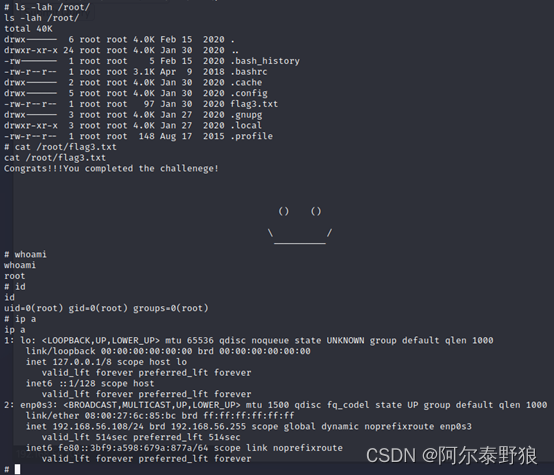
**写在前面:**记录一次曲折的打靶经历。 目录1. 主机发现2. 端口扫描3. 服务枚举4. 服务探查4.1 浏览器访问4.2 目录枚举4.3 探查admin4.4 探查index4.5 探查login5 公共EXP搜索6. 再次目录枚举6.1 探查superadmin.php6.2 查看页面源代码6.3 base64绕过6.4 构建反弹…...
)
铁路系统各专业介绍(车机工电辆)
目录 1 车务段 1.1 职能简介 1.2 路段名单 1.3 岗位级别 2 机务段 2.1 职能简介 2.2 路段名单 2.3 岗位级别 3 工务段 3.1 职能简介 3.2 路段名单 3.3 岗位级别 4 电务段 4.1 职能简介 4.2 路段名单 4.3 岗位级别 5 车辆段 5.1 职能简介 5.2 路段名单 5.3 …...

2/11考试总结
时间安排 7:30–7:50 读题,T1貌似是个 dp ,T2 数据结构,T3 可能是数据结构。 7:50–9:45 T1,点规模非常大,可以达到 1e18 级别,感觉应该没法直接做,考虑每条新增的边的贡献,想到用 …...
Java Set集合
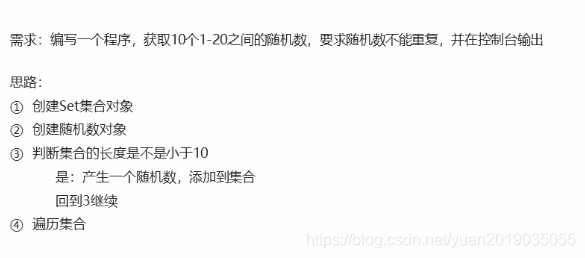
7 Set集合 7.1 Set集合的概述和特点 Set集合的特点 不包含重复元素的集合没有带索引的方法,所以不能使用普通for循环 Set集合是接口通过实现类实例化(多态的形式) HashSet:添加的元素是无序,不重复,无索引…...
【手写 Vuex 源码】第七篇 - Vuex 的模块安装
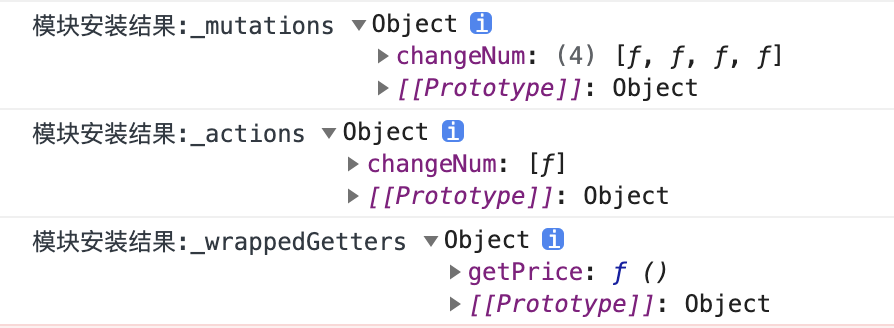
一,前言 上一篇,主要介绍了 Vuex 模块收集的实现,主要涉及以下几个点: Vuex 模块的概念;Vuex 模块和命名空间的使用;Vuex 模块收集的实现-构建“模块树”; 本篇,继续介绍 Vuex 模…...
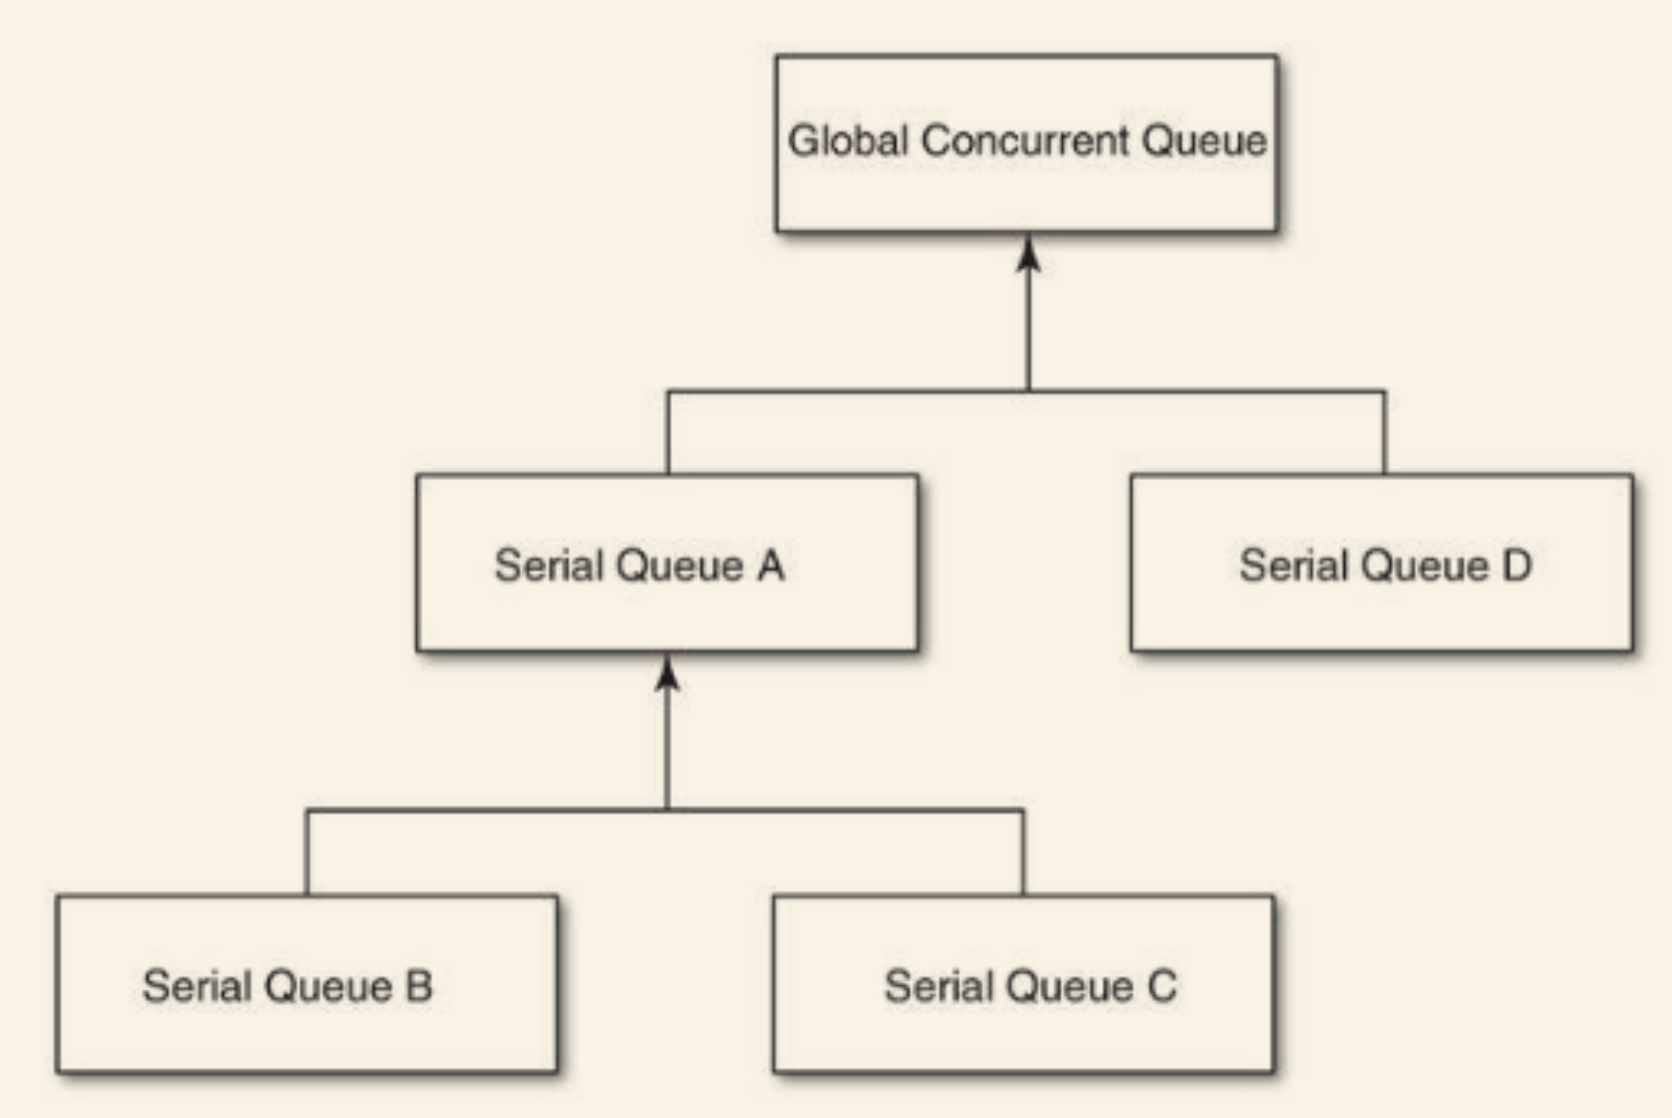
EOC第六章《块与中枢派发》
文章目录第37条:理解block这一概念第38条:为常用的块类型创建typedef第39条:用handler块降低代码分散程度第41条:多用派发队列,少用同步锁方案一:使用串行同步队列来将读写操作都安排到同一个队列里&#x…...
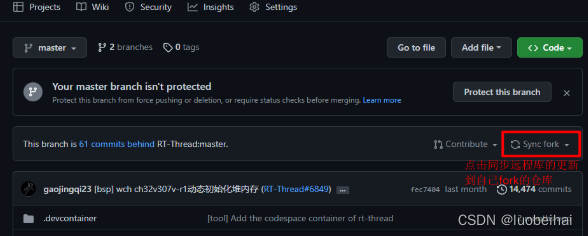
八、Git远程仓库操作——跨团队成员的协作
前言 前面一篇博文介绍了git团队成员之间的协作,现在在介绍下如果是跨团队成员的话,如何协作? 跨团队成员协作,其实就是你不属于那个项目的成员,你没有权限向那个仓库提交代码。但是github还有另一种 pull request&a…...

CTF show Web 红包题第六弹
提示 1.不是SQL注入 2.需要找关键源码 思路 进入页面发现是一个登录框,很难让人不联想到SQL注入,但提示都说了不是SQL注入,所以就不往这方面想了 先查看一下网页源码,发现一段JavaScript代码,有一个关键类ctfs…...
Cesium相机控制)
三维GIS开发cesium智慧地铁教程(5)Cesium相机控制
一、环境搭建 <script src"../cesium1.99/Build/Cesium/Cesium.js"></script> <link rel"stylesheet" href"../cesium1.99/Build/Cesium/Widgets/widgets.css"> 关键配置点: 路径验证:确保相对路径.…...
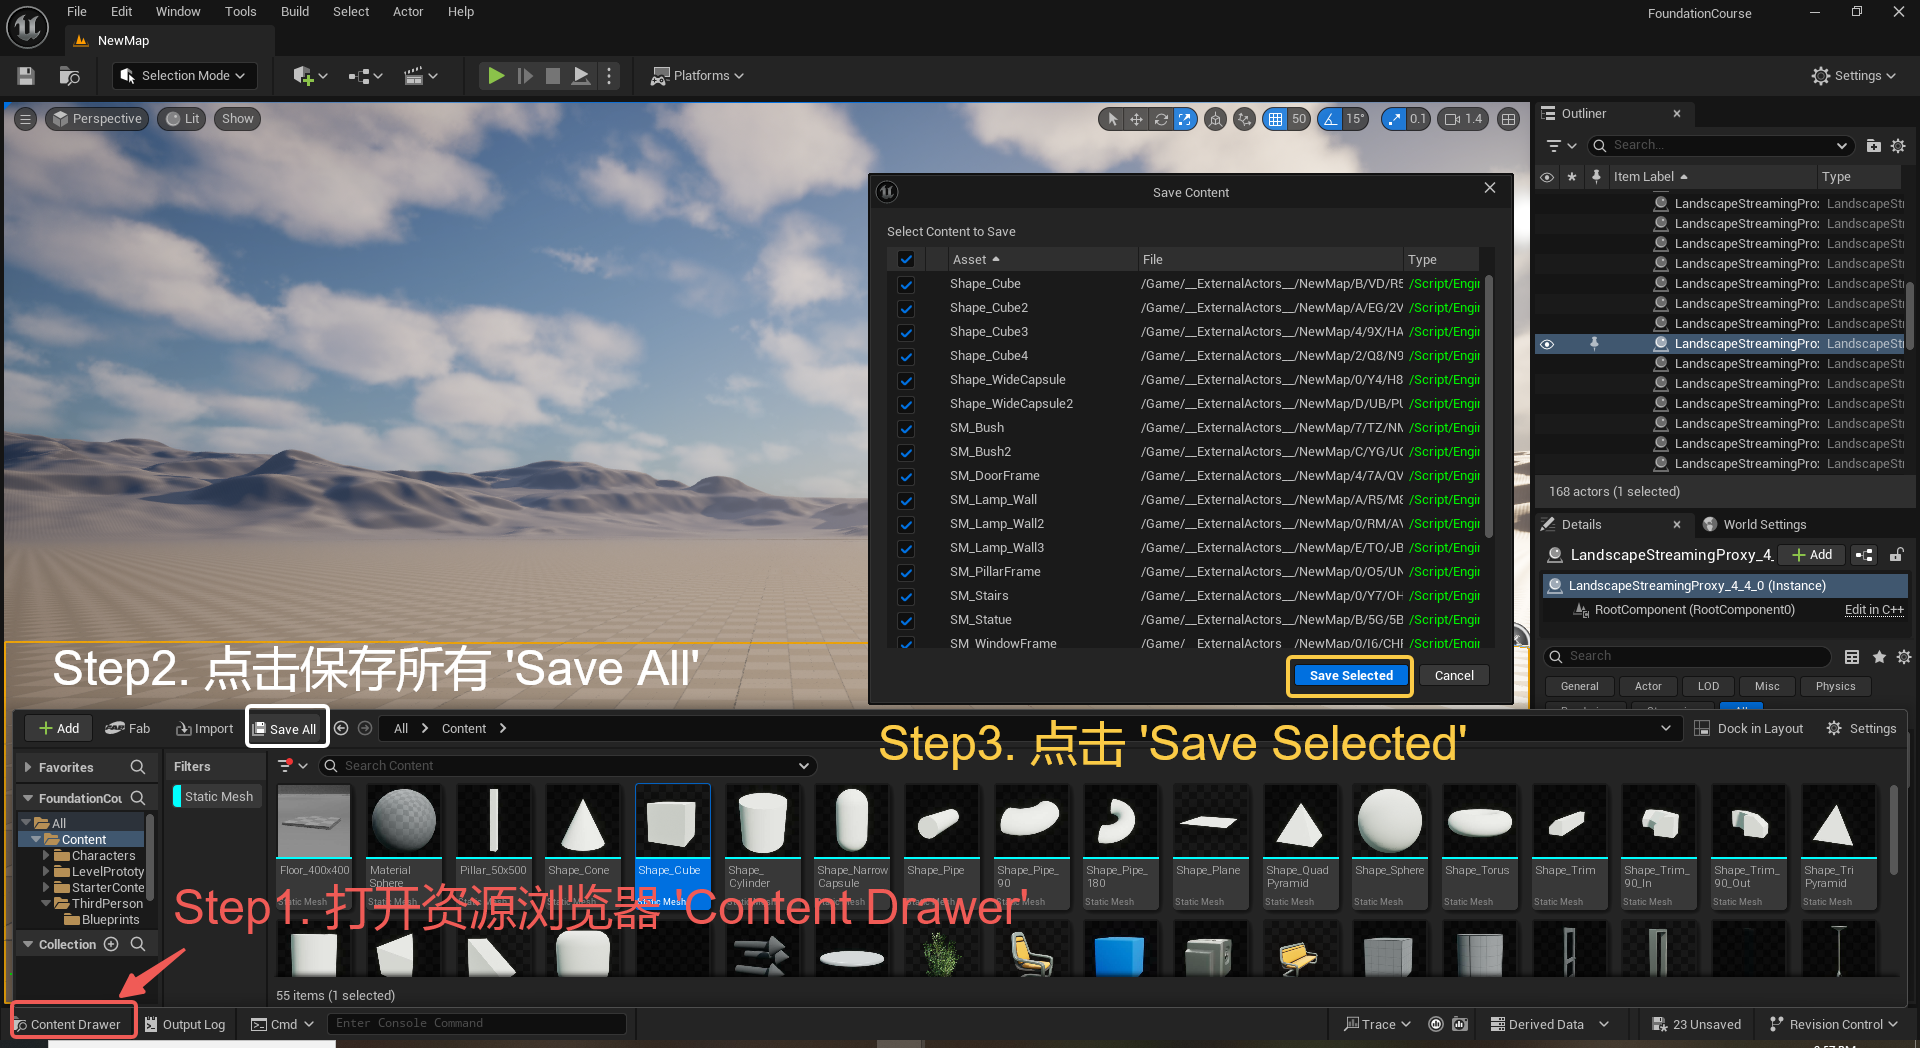
UE5 学习系列(三)创建和移动物体
这篇博客是该系列的第三篇,是在之前两篇博客的基础上展开,主要介绍如何在操作界面中创建和拖动物体,这篇博客跟随的视频链接如下: B 站视频:s03-创建和移动物体 如果你不打算开之前的博客并且对UE5 比较熟的话按照以…...

【解密LSTM、GRU如何解决传统RNN梯度消失问题】
解密LSTM与GRU:如何让RNN变得更聪明? 在深度学习的世界里,循环神经网络(RNN)以其卓越的序列数据处理能力广泛应用于自然语言处理、时间序列预测等领域。然而,传统RNN存在的一个严重问题——梯度消失&#…...
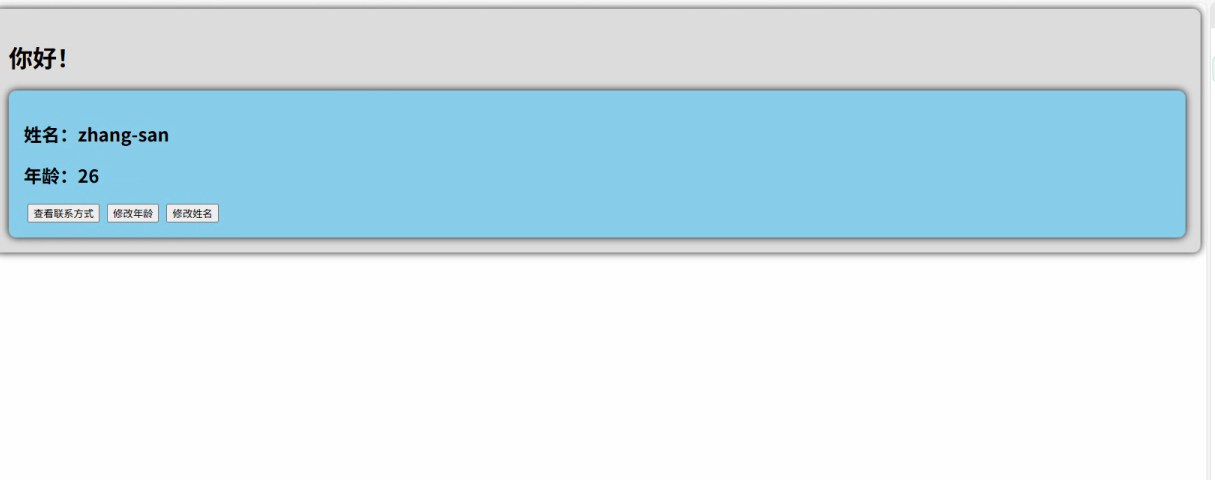
2.Vue编写一个app
1.src中重要的组成 1.1main.ts // 引入createApp用于创建应用 import { createApp } from "vue"; // 引用App根组件 import App from ./App.vue;createApp(App).mount(#app)1.2 App.vue 其中要写三种标签 <template> <!--html--> </template>…...

质量体系的重要
质量体系是为确保产品、服务或过程质量满足规定要求,由相互关联的要素构成的有机整体。其核心内容可归纳为以下五个方面: 🏛️ 一、组织架构与职责 质量体系明确组织内各部门、岗位的职责与权限,形成层级清晰的管理网络…...

【AI学习】三、AI算法中的向量
在人工智能(AI)算法中,向量(Vector)是一种将现实世界中的数据(如图像、文本、音频等)转化为计算机可处理的数值型特征表示的工具。它是连接人类认知(如语义、视觉特征)与…...

学校时钟系统,标准考场时钟系统,AI亮相2025高考,赛思时钟系统为教育公平筑起“精准防线”
2025年#高考 将在近日拉开帷幕,#AI 监考一度冲上热搜。当AI深度融入高考,#时间同步 不再是辅助功能,而是决定AI监考系统成败的“生命线”。 AI亮相2025高考,40种异常行为0.5秒精准识别 2025年高考即将拉开帷幕,江西、…...

AirSim/Cosys-AirSim 游戏开发(四)外部固定位置监控相机
这个博客介绍了如何通过 settings.json 文件添加一个无人机外的 固定位置监控相机,因为在使用过程中发现 Airsim 对外部监控相机的描述模糊,而 Cosys-Airsim 在官方文档中没有提供外部监控相机设置,最后在源码示例中找到了,所以感…...

iview框架主题色的应用
1.下载 less要使用3.0.0以下的版本 npm install less2.7.3 npm install less-loader4.0.52./src/config/theme.js文件 module.exports {yellow: {theme-color: #FDCE04},blue: {theme-color: #547CE7} }在sass中使用theme配置的颜色主题,无需引入,直接可…...


