项目(今日指数之环境搭建)
一 项目架构
1.1 今日指数技术选型
【1】前端技术

【2】后端技术栈
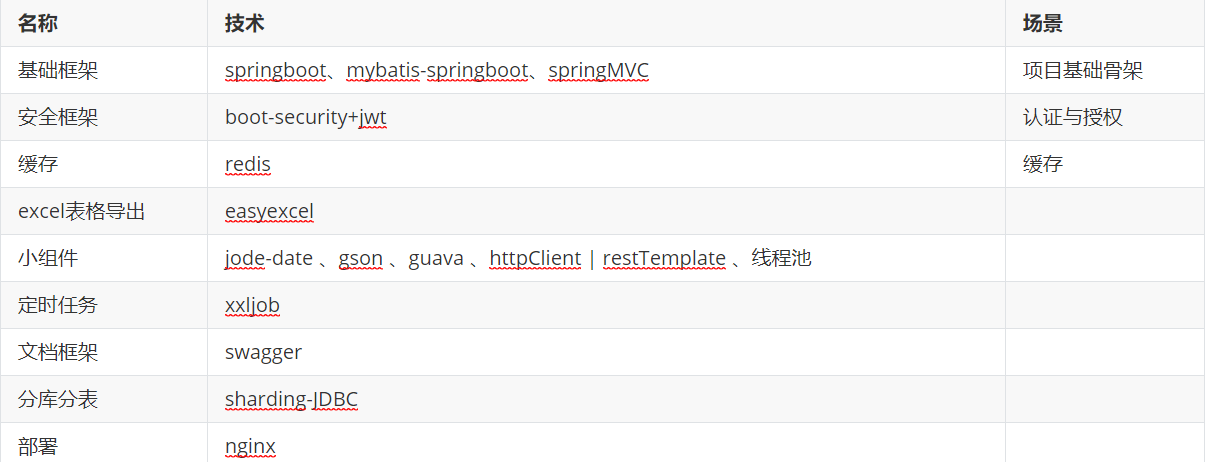
【3】整体概览

1.2 核心业务介绍
【1】业务结构预览
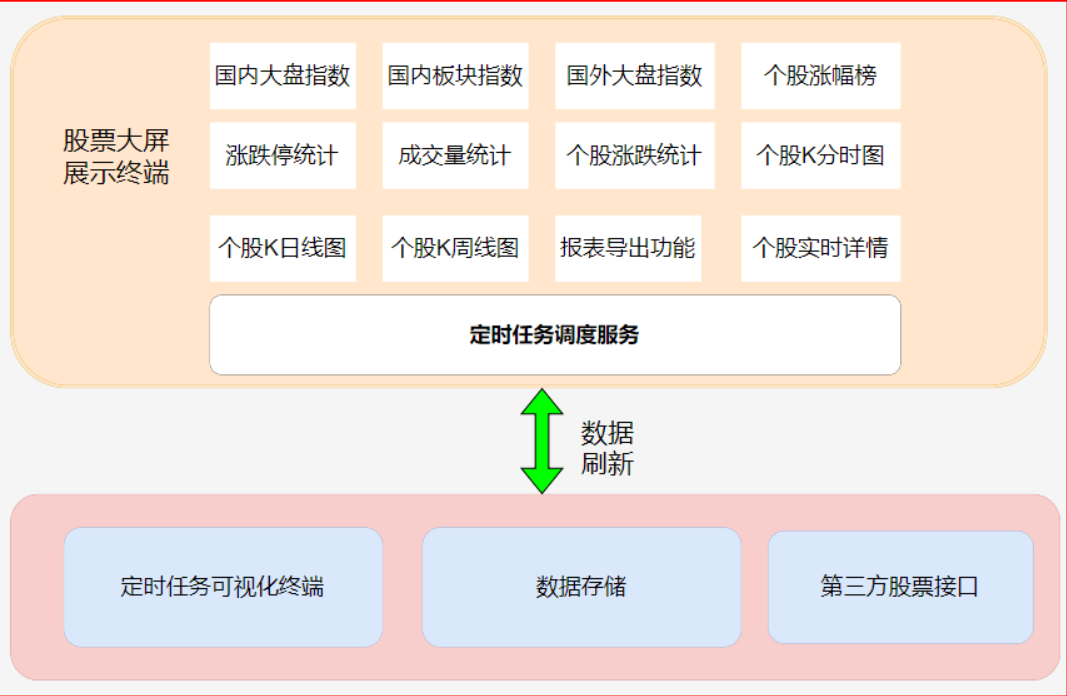
【2】业务结构预览
1.定时任务调度服务XXL-JOB通过RestTemplate+多线程动态拉去股票接口数据,刷入数据库;
2.国内指数服务
3.板块指数服务
4.涨幅榜展示功能
5.涨停跌停数展示功能
6.成交量对比展示功能
7.个股涨停服务展示功能
8.个股详情展示功能包含分时行情、日k线、周K线图等
9.个股描述服务;
10.报表导出服务
二 后端开发环境搭建
开发工具版本要求:

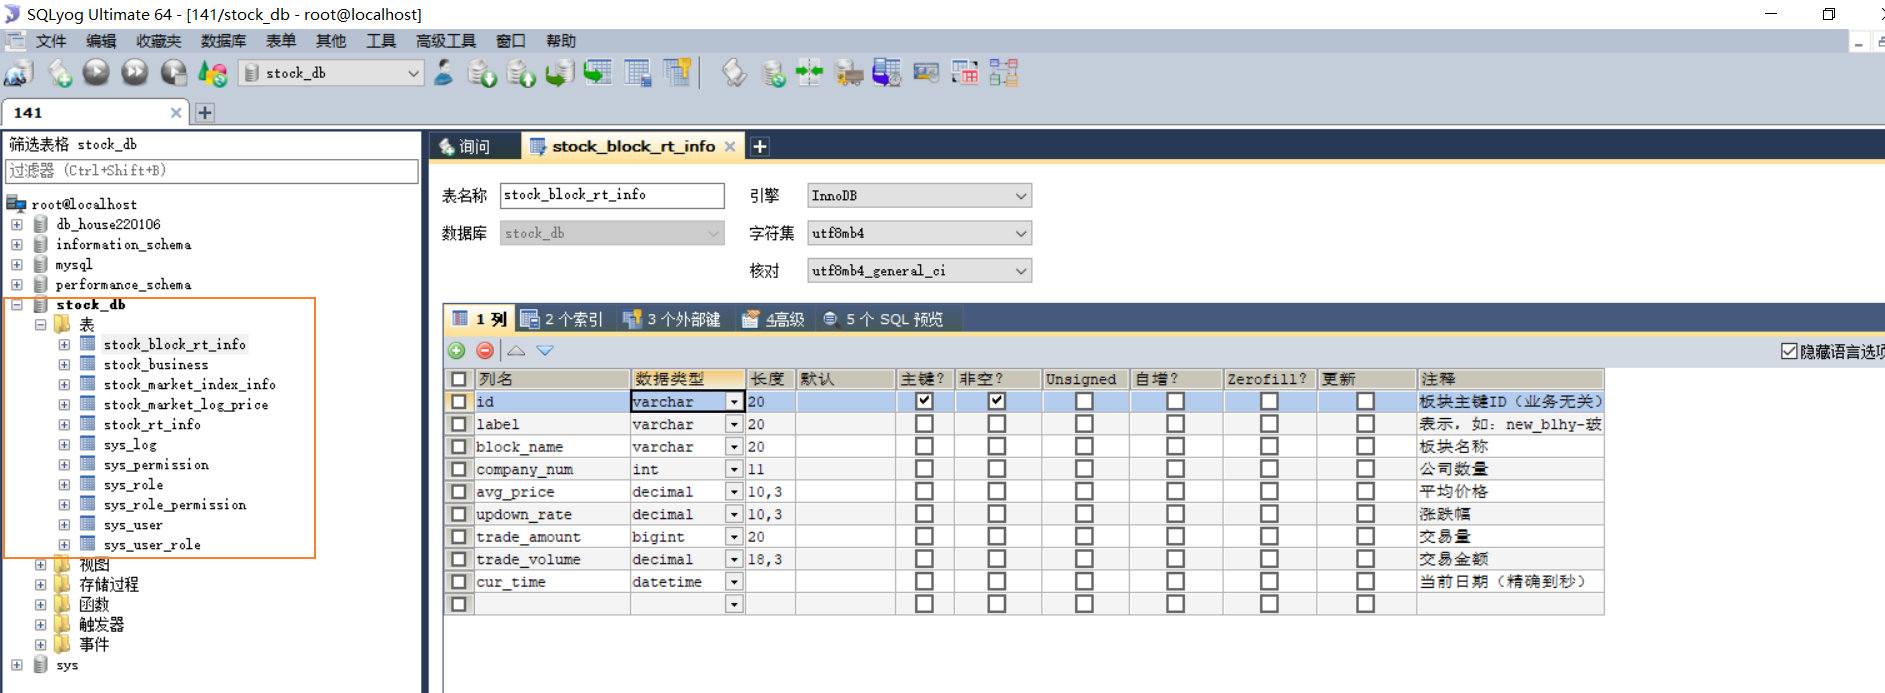
2.1 数据库环境搭建
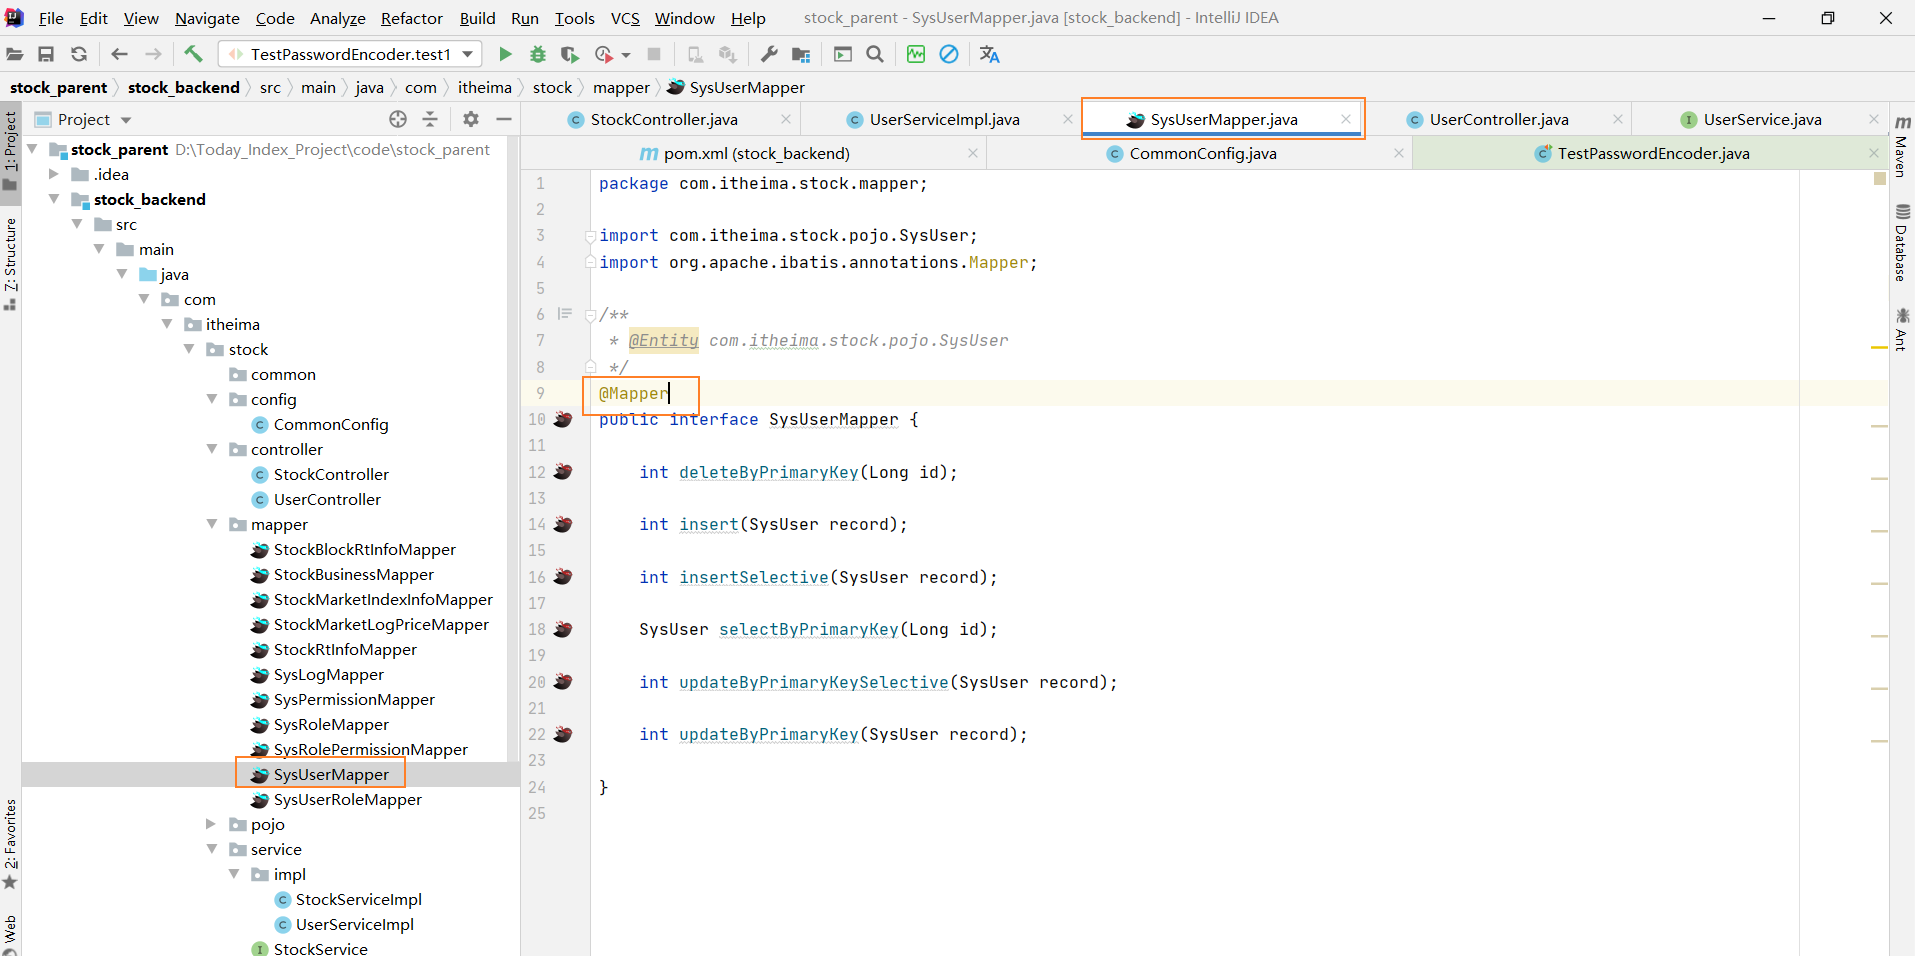
【1】表结构介绍

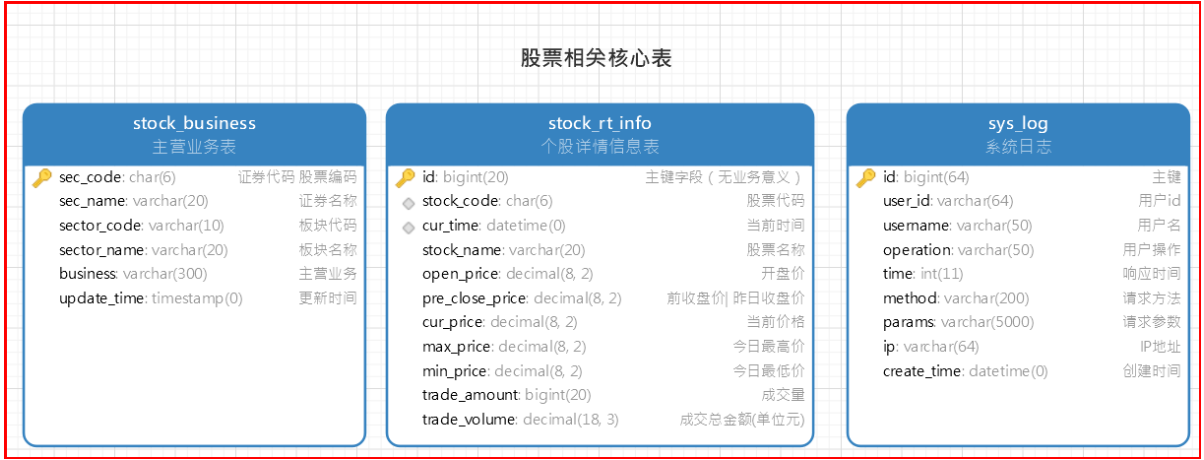

注意事项:后期股票相关的数据量非常庞大,表与表之间尽量不要构建外键约束(提升数据库性能),同时也为后期分库分表准备!
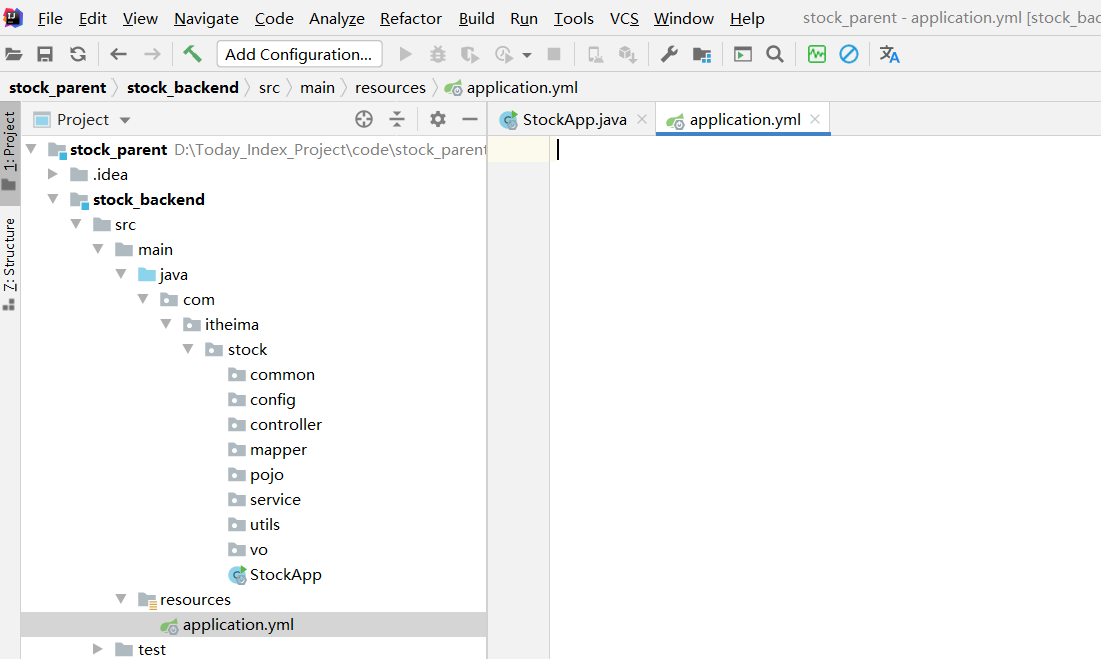
【2】数据导入
因为我边的CentOS7连接不上 所以在这里面 用本地(windoms)运行
数据库可视化选用 SQLyog - 64 bit mysql用的是5.7.24
2.2后端工程搭建
【1】构建stock_parent父工程
创建stock_parent maven工程:
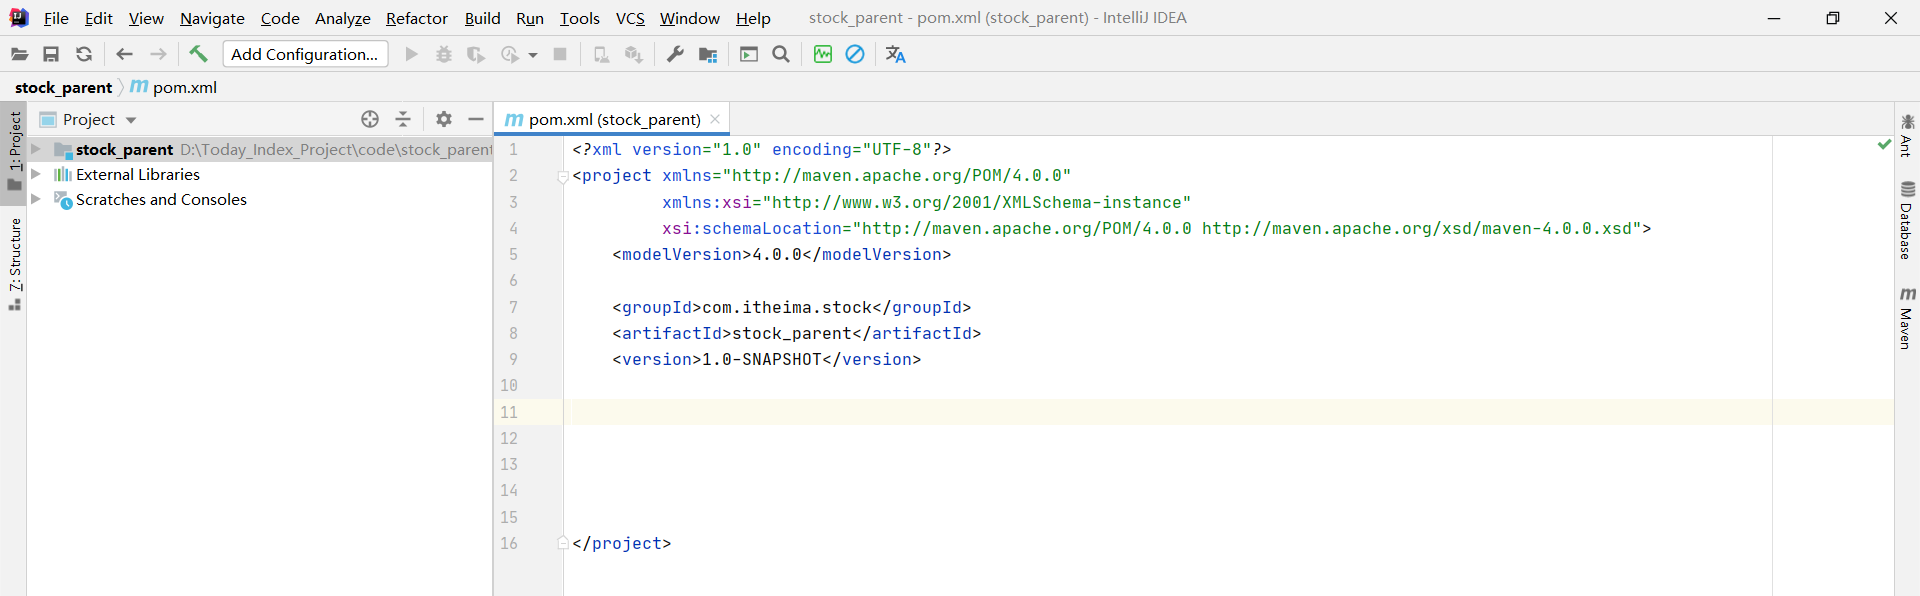
接下来 复制以下maven到pom.xml
<packaging>pom</packaging><properties><!--工程构建的代码格式为UTF-8--><project.build.sourceEncoding>UTF-8</project.build.sourceEncoding><!--编译--><maven.compiler.encoding>UTF-8</maven.compiler.encoding><!--编译原文件--><maven.compiler.source>8</maven.compiler.source><!--生成的编译目录--><maven.compiler.target>8</maven.compiler.target><!--打包时跳过测试--><maven.test.skip>true</maven.test.skip><!--mybatis整合spring-boot场景依赖--><mybatis-spring-boot-starter.version>2.1.4</mybatis-spring-boot-starter.version><!--pagehelper版本--><pagehelper-spring-boot-starter.version>1.2.12</pagehelper-spring-boot-starter.version><!--mysql驱动包--><mysql-driver.version>5.1.49</mysql-driver.version><!--fastjson工具--><fastjson.version>1.2.71</fastjson.version><!--依赖的版本--><springfox-swagger2.version>2.9.2</springfox-swagger2.version><!--druid的场景依赖--><druid-spring-boot-starter.version>1.1.22</druid-spring-boot-starter.version><!--druid的核心依赖--><druid-core-version>1.2.8</druid-core-version><!--分库分表对应的版本--><sharding-jdbc.version>4.0.0-RC1</sharding-jdbc.version><!--jwt--><jjwt.version>0.9.1</jjwt.version><!--easyExcel 报表导入导出--><easyExcel.version>3.0.4</easyExcel.version><!--xxl-job--><xxl-job-core.version>2.3.0</xxl-job-core.version><!--spring-boot版本--><spring-boot.version>2.5.3</spring-boot.version><!--日期小插件--><joda-time.version>2.10.5</joda-time.version><!--google.guava--><google.guava.version>30.0-jre</google.guava.version></properties><!--定义依赖版本锁定--><dependencyManagement><dependencies><!--引入springboot依赖--><dependency><groupId>org.springframework.boot</groupId><artifactId>spring-boot-starter-parent</artifactId><version>${spring-boot.version}</version><type>pom</type><scope>import</scope></dependency><!--引入mybatis场景依赖--><dependency><groupId>org.mybatis.spring.boot</groupId><artifactId>mybatis-spring-boot-starter</artifactId><version>${mybatis-spring-boot-starter.version}</version></dependency><!--pageHelper场景依赖--><dependency><groupId>com.github.pagehelper</groupId><artifactId>pagehelper-spring-boot-starter</artifactId><version>${pagehelper-spring-boot-starter.version}</version></dependency><!--mysql驱动包--><dependency><groupId>mysql</groupId><artifactId>mysql-connector-java</artifactId><version>${mysql-driver.version}</version></dependency><!--shardingjdbc分库分表--><dependency><groupId>org.apache.shardingsphere</groupId><artifactId>sharding-jdbc-spring-boot-starter</artifactId><version>${sharding-jdbc.version}</version></dependency><!--json工具包--><dependency><groupId>com.alibaba</groupId><artifactId>fastjson</artifactId><version>${fastjson.version}</version></dependency><!--druid-boot依赖--><dependency><groupId>com.alibaba</groupId><artifactId>druid-spring-boot-starter</artifactId><version>${druid-spring-boot-starter.version}</version></dependency><!--druid core--><dependency><groupId>com.alibaba</groupId><artifactId>druid</artifactId><version>${druid-core-version}</version></dependency><!--swagger文档依赖--><dependency><groupId>io.springfox</groupId><artifactId>springfox-swagger2</artifactId><version>${springfox-swagger2.version}</version></dependency><dependency><groupId>io.springfox</groupId><artifactId>springfox-swagger-ui</artifactId><version>${springfox-swagger2.version}</version></dependency><!--引入jwt依赖--><dependency><groupId>io.jsonwebtoken</groupId><artifactId>jjwt</artifactId><version>${jjwt.version}</version></dependency><!-- 导出 excel --><dependency><groupId>com.alibaba</groupId><artifactId>easyexcel</artifactId><version>${easyExcel.version}</version></dependency><!--xxl-job定义任务框架支持--><dependency><groupId>com.xuxueli</groupId><artifactId>xxl-job-core</artifactId><version>${xxl-job-core.version}</version></dependency><!--时间小工具--><dependency><groupId>joda-time</groupId><artifactId>joda-time</artifactId><version>${joda-time.version}</version></dependency><!--引入google的工具集--><dependency><groupId>com.google.guava</groupId><artifactId>guava</artifactId><version>${google.guava.version}</version></dependency></dependencies></dependencyManagement><build><pluginManagement><plugins><!--Springboot核心插件--><plugin><groupId>org.springframework.boot</groupId><artifactId>spring-boot-maven-plugin</artifactId><version>${spring-boot.version}</version><configuration><excludes><!--插件运行时排除依赖--><exclude><groupId>org.springframework.boot</groupId><artifactId>spring-boot-configuration-processor</artifactId></exclude></excludes></configuration></plugin><!--打包跳过test --><plugin><groupId>org.apache.maven.plugins</groupId><artifactId>maven-surefire-plugin</artifactId><configuration><skip>${maven.test.skip}</skip></configuration></plugin></plugins></pluginManagement></build>
注意事项:
1.打包方式:pom
2.通过dependencyManagement、pluginManagement锁定开发中的依赖和插件的版本;
接下来 删除父工程的src

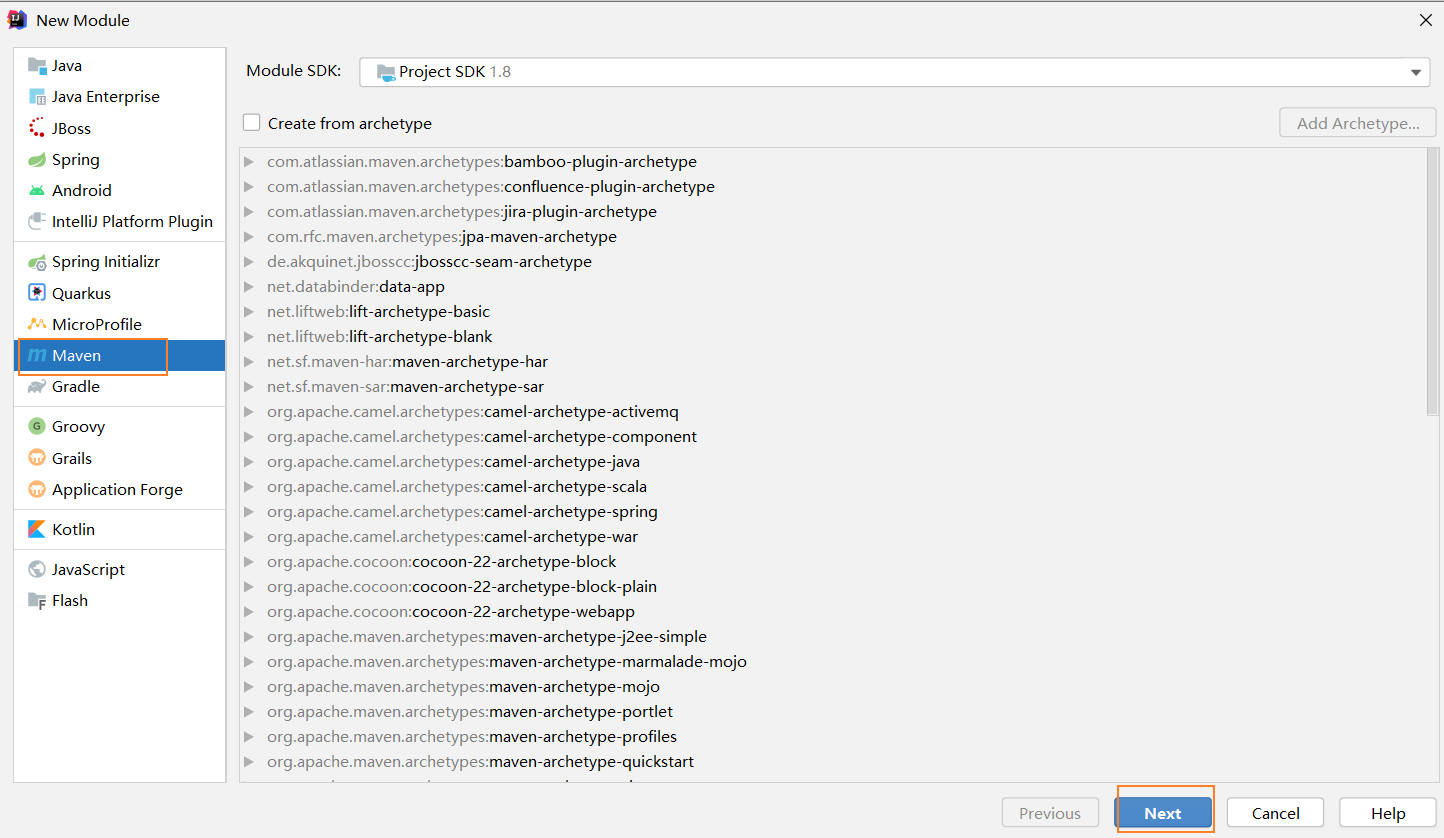
【2】构建stock_backend基础工程
创建stock_parent的maven子工程stock_backend:


【2.1】引入依赖
stock_backend工程被stock_parent父工程聚合,pom配置如下:
<packaging>jar</packaging><artifactId>stock_backend</artifactId><properties><maven.compiler.source>8</maven.compiler.source><maven.compiler.target>8</maven.compiler.target></properties><dependencies><!-- 基本依赖 web的场景依赖--><dependency><groupId>org.springframework.boot</groupId><artifactId>spring-boot-starter-web</artifactId></dependency><!--日志--><dependency><groupId>org.springframework.boot</groupId><artifactId>spring-boot-starter-aop</artifactId></dependency><!--mysql--><dependency><groupId>mysql</groupId><artifactId>mysql-connector-java</artifactId></dependency><!--单元测试--><dependency><groupId>org.springframework.boot</groupId><artifactId>spring-boot-starter-test</artifactId><scope>test</scope></dependency><!--lombok--><dependency><groupId>org.projectlombok</groupId><artifactId>lombok</artifactId><optional>true</optional></dependency><!--mybatis整合spring-boot--><dependency><groupId>org.mybatis.spring.boot</groupId><artifactId>mybatis-spring-boot-starter</artifactId></dependency><!--分页--><dependency><groupId>com.github.pagehelper</groupId><artifactId>pagehelper-spring-boot-starter</artifactId></dependency><!--druid--><dependency><groupId>com.alibaba</groupId><artifactId>druid-spring-boot-starter</artifactId></dependency><!--配置提示--><dependency><groupId>org.springframework.boot</groupId><artifactId>spring-boot-configuration-processor</artifactId><optional>true</optional></dependency><!--时间小工具--><dependency><groupId>joda-time</groupId><artifactId>joda-time</artifactId></dependency></dependencies><build><!--打包名称--><finalName>${project.artifactId}</finalName><plugins><plugin><groupId>org.springframework.boot</groupId><artifactId>spring-boot-maven-plugin</artifactId></plugin><!-- 打包跳过test --><plugin><groupId>org.apache.maven.plugins</groupId><artifactId>maven-surefire-plugin</artifactId></plugin></plugins></build>
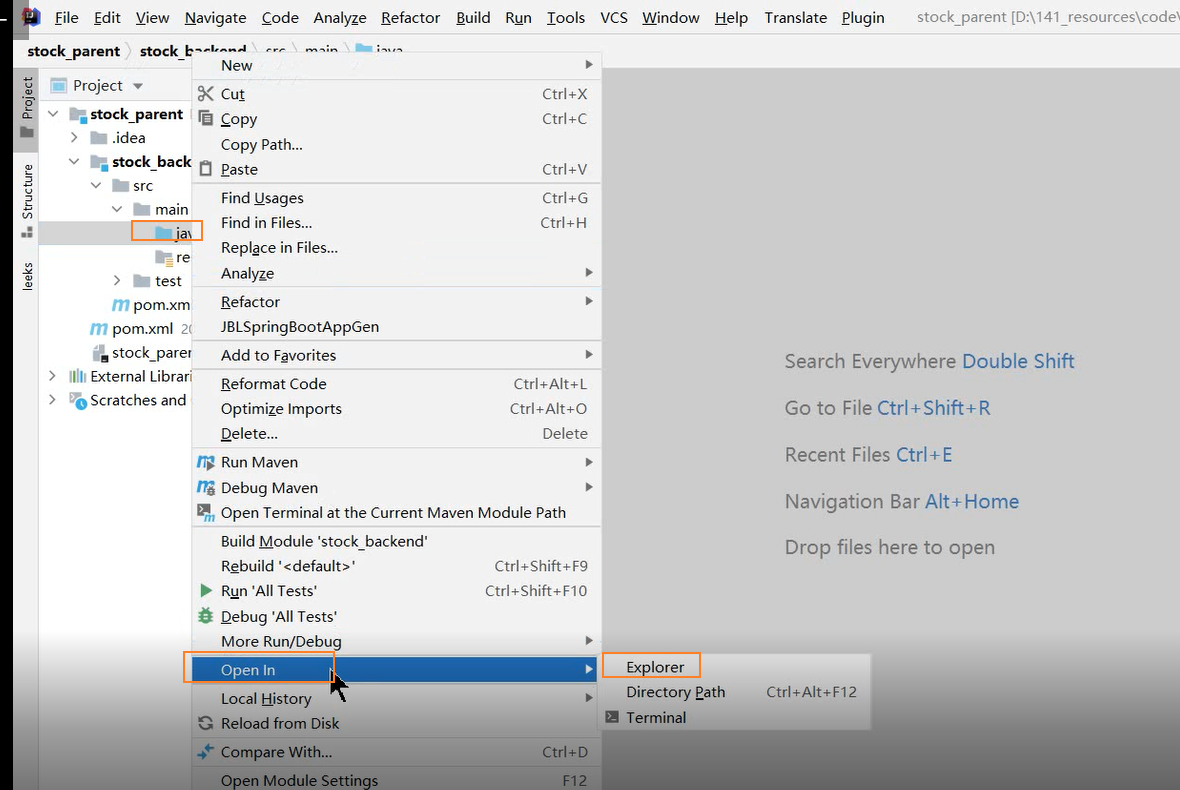
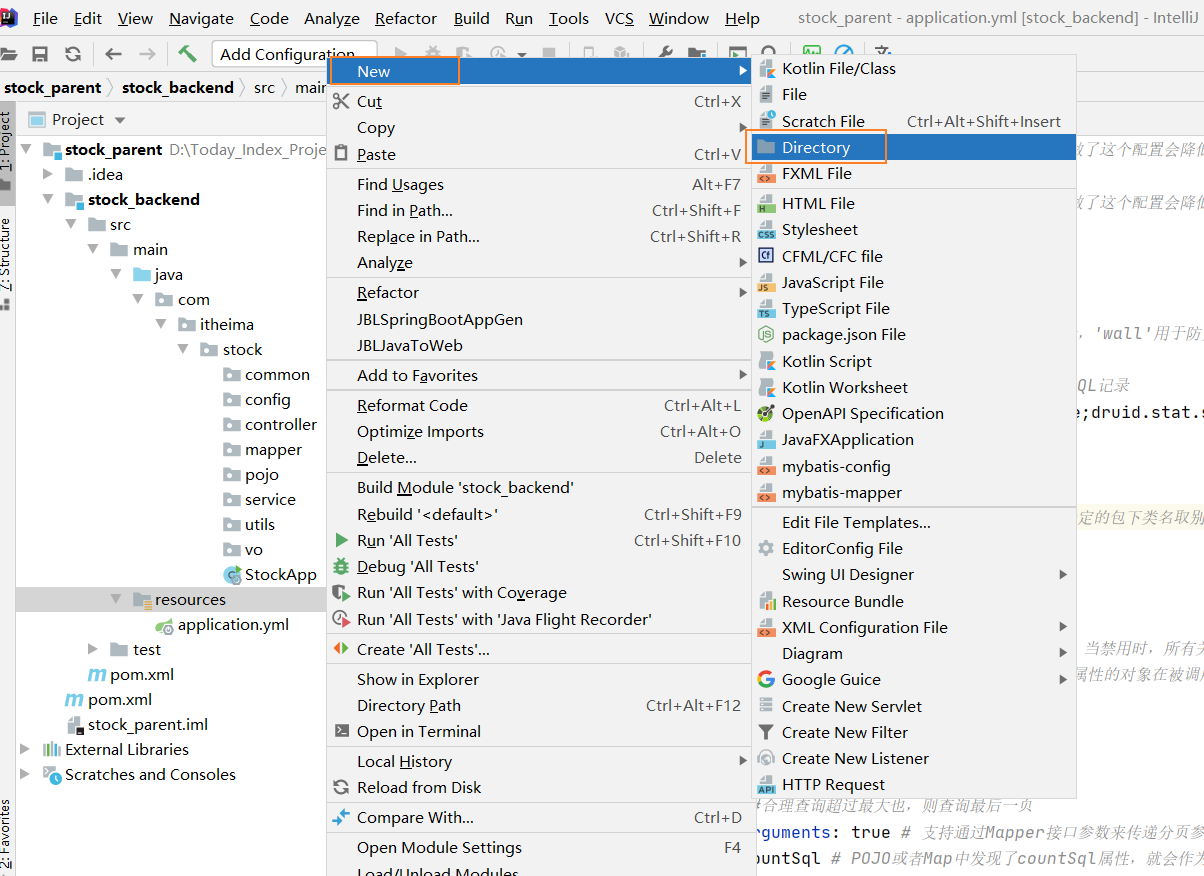
【2.2】创建公共包结构
找到资料中的公共包结构

复制com

进入到项目的物理路径(IntelliJ IDEA 2020.1.3 x64)

不同的idea进行项目物理环境的选项不同

把刚才复制过来的com复制到main/java下面
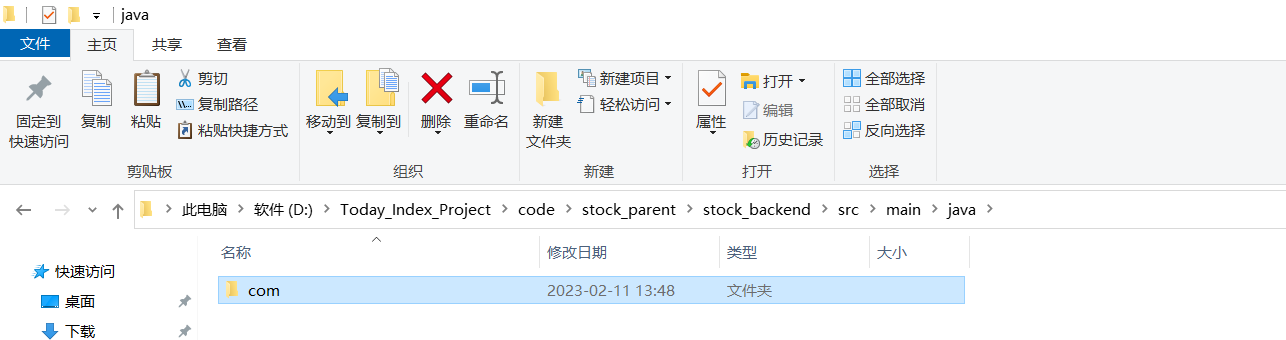
这样就能得到目录结构(里面为空目录) 这样做的目的是不能一次次创建目录结构

【2.3】快速生成yml和main启动类的插件JBL SpringbootAppGen
安装
使用

生成效果
【2.4】配置yml
# web定义
server:port: 8081 #指定当前端口号spring:# 配置mysql数据源datasource:druid:username: rootpassword: rooturl: jdbc:mysql://127.0.0.1:3306/stock_db?useUnicode=true&characterEncoding=UTF-8&allowMultiQueries=true&useSSL=false&serverTimezone=Asia/Shanghaidriver-class-name: com.mysql.jdbc.Driver# 初始化时建立物理连接的个数。初始化发生在显示调用 init 方法,或者第一次 getConnection 时initialSize: 6# 最小连接池数量minIdle: 2# 最大连接池数量maxActive: 20# 获取连接时最大等待时间,单位毫秒。配置了 maxWait 之后,缺省启用公平锁,# 并发效率会有所下降,如果需要可以通过配置 useUnfairLock 属性为 true 使用非公平锁。maxWait: 60000# 配置间隔多久才进行一次检测,检测需要关闭的空闲连接,单位是毫秒timeBetweenEvictionRunsMillis: 60000# 配置一个连接在池中最小生存的时间,单位是毫秒minEvictableIdleTimeMillis: 300000# 用来检测连接是否有效的 sql 因数据库方言而差, 例如 oracle 应该写成 SELECT 1 FROM DUALvalidationQuery: SELECT 1 FROM DUAL# 建议配置为 true,不影响性能,并且保证安全性。申请连接的时候检测,# 如果空闲时间大于 timeBetweenEvictionRunsMillis,执行 validationQuery 检测连接是否有效。testWhileIdle: true# 申请连接时执行 validationQuery 检测连接是否有效,做了这个配置会降低性能。testOnBorrow: false# 归还连接时执行 validationQuery 检测连接是否有效,做了这个配置会降低性能。testOnReturn: false# 是否自动回收超时连接poolPreparedStatements: truemaxPoolPreparedStatementPerConnectionSize: 20# 配置监控统计拦截的filters,去掉后监控界面sql无法统计,'wall'用于防火墙filters: stat,wall# 通过connectProperties属性来打开mergeSql功能;慢SQL记录connectionProperties: druid.stat.mergeSql=true;druid.stat.slowSqlMillis=5000# 配置mybatis
mybatis:type-aliases-package: com.itheima.stock.pojo #指定的包下类名取别名mapper-locations: classpath:mapper/*.xmlconfiguration:map-underscore-to-camel-case: true #开启驼峰映射cache-enabled: false #使全局的映射器启用或禁用缓存。lazy-loading-enabled: false #全局启用或禁用延迟加载。当禁用时,所有关联对象都会即时加载。aggressive-lazy-loading: true #当启用时,有延迟加载属性的对象在被调用时将会完全加载任意属性。否则,每种属性将会按需要加载。# pagehelper配置
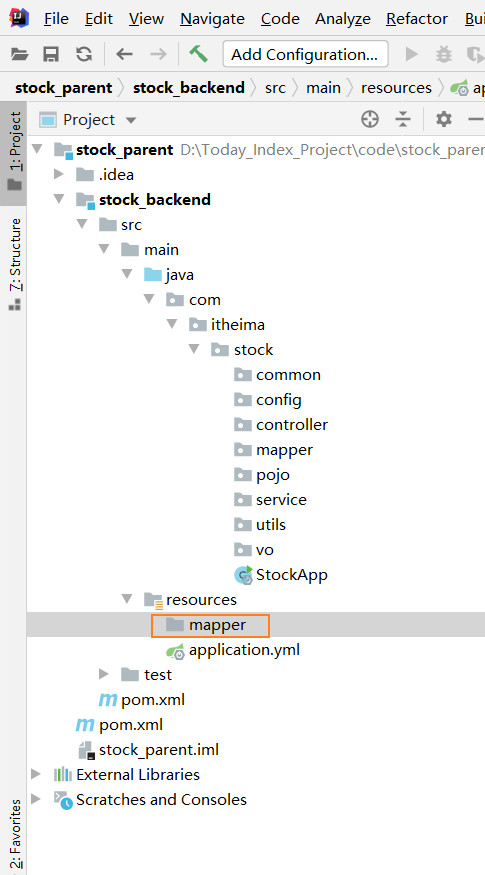
pagehelper:helper-dialect: mysql #指定分页数据库类型(方言)reasonable: true #合理查询超过最大也,则查询最后一页support-methods-arguments: true # 支持通过Mapper接口参数来传递分页参数,默认falseparams: pacount=countSql # POJO或者Map中发现了countSql属性,就会作为count参数使用returnPageInfo: check # always总是返回PageInfo类型,check检查返回类型是否为PageInfo,none返回Page因为上面配置了少了一个mapper 所以我们现 在创建这个包

注意:
第一点
url: jdbc:mysql://127.0.0.1:3306/stock_db?useUnicode=true&characterEncoding=UTF-8&allowMultiQueries=true&useSSL=false&serverTimezone=Asia/Shanghai这里面的url 如果是连接的是linux的 刚要写成Linux上的Ip 如果连接的是本地(win)则url 刚要写成
jdbc:mysql:///数据库名称或jdbc:mysql://localhost:3306/数据库名称jdbc:mysql://127.0.0.1:3306/数据库名称
第二点 本项目用到的mysql为5.7 不是8.0 所以把
driver-class-name: com.mysql.cj.jdbc.Driver 把cj删除补充知识
driver-class-name: com.mysql.cj.jdbc.Driver   mysql8.0
driver-class-name: com.mysql.jdbc.Driver    mysql5.7
第三点 接口扫描
IntelliJ IDEA 2020.1.3 x64版本复制路径写法
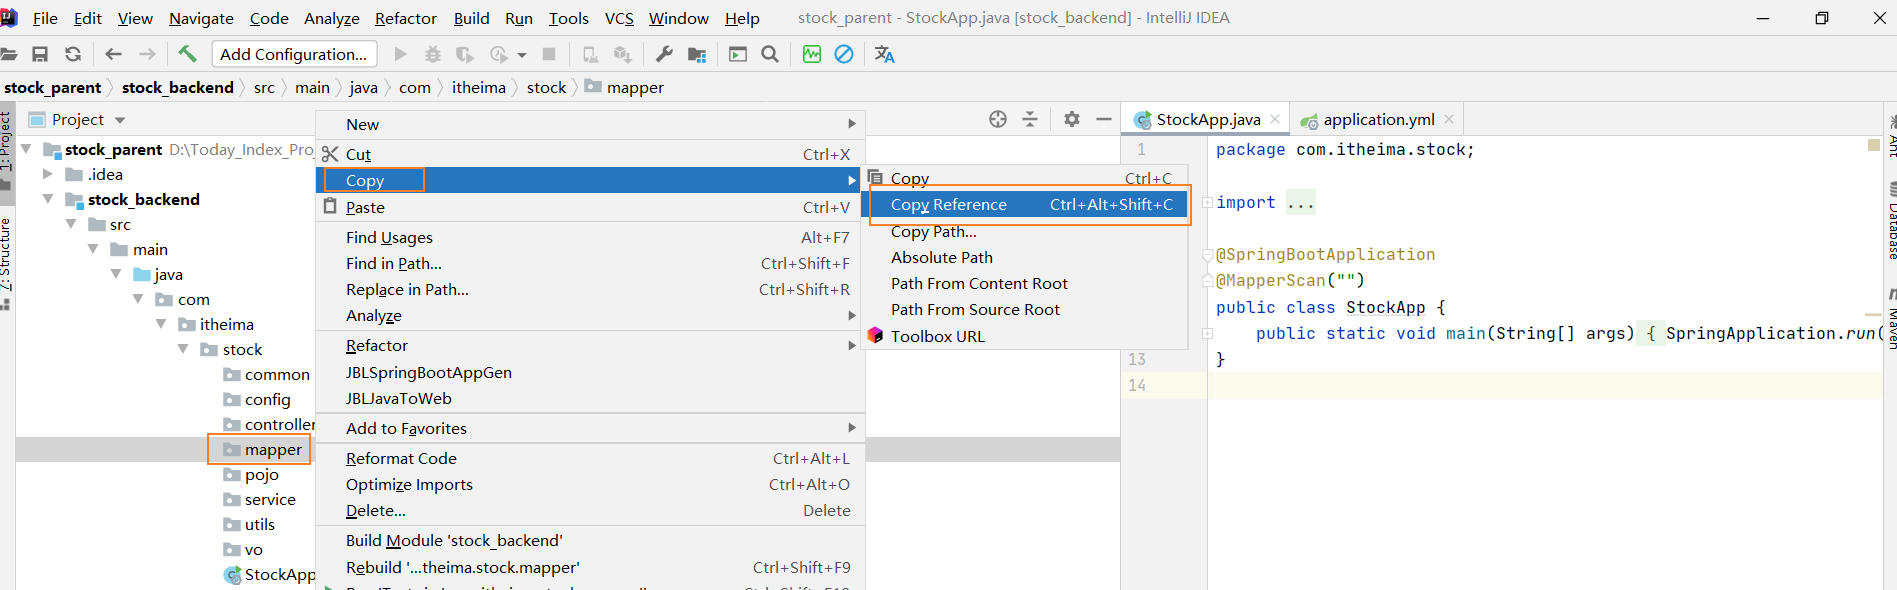
视频中的idea版本复制路径写法


然后把复制过来的路径给放在下图所示
【2.5】定义main启动类
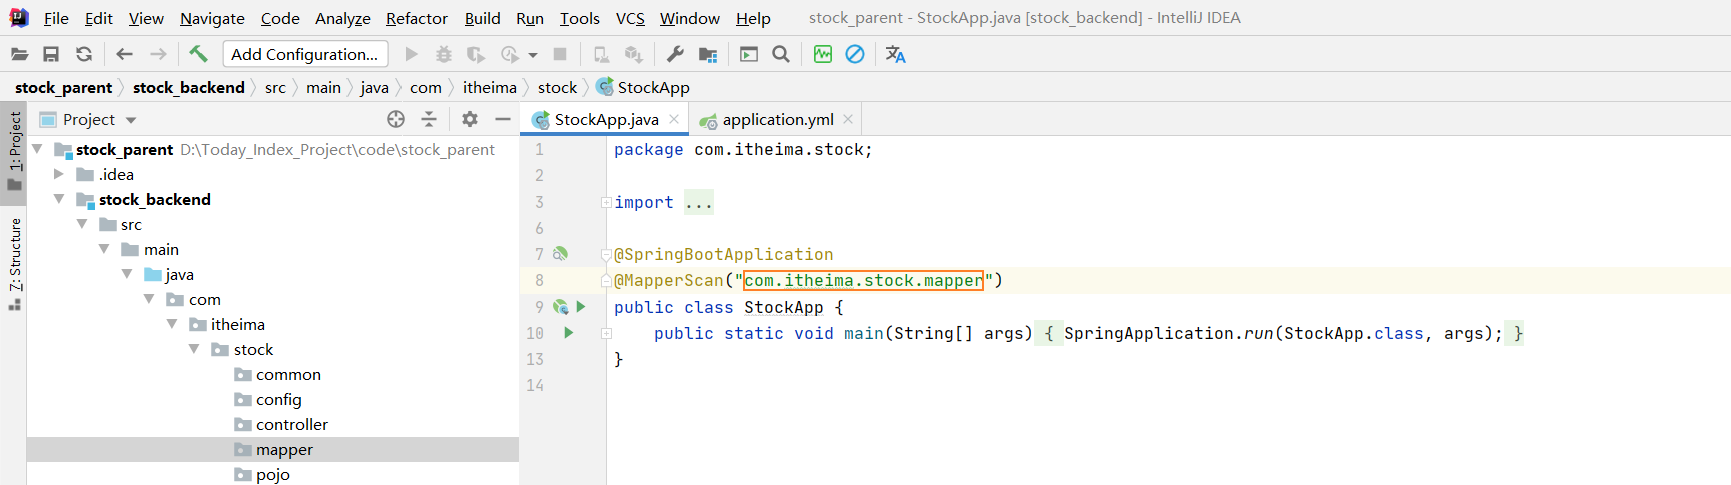
package com.itheima.stock;import org.mybatis.spring.annotation.MapperScan;
import org.springframework.boot.SpringApplication;
import org.springframework.boot.autoconfigure.SpringBootApplication;@SpringBootApplication
@MapperScan("com.itheima.stock.mapper")
public class StockApp {public static void main(String[] args) {SpringApplication.run(StockApp.class, args);}
}
【2.6】定义web测试接口
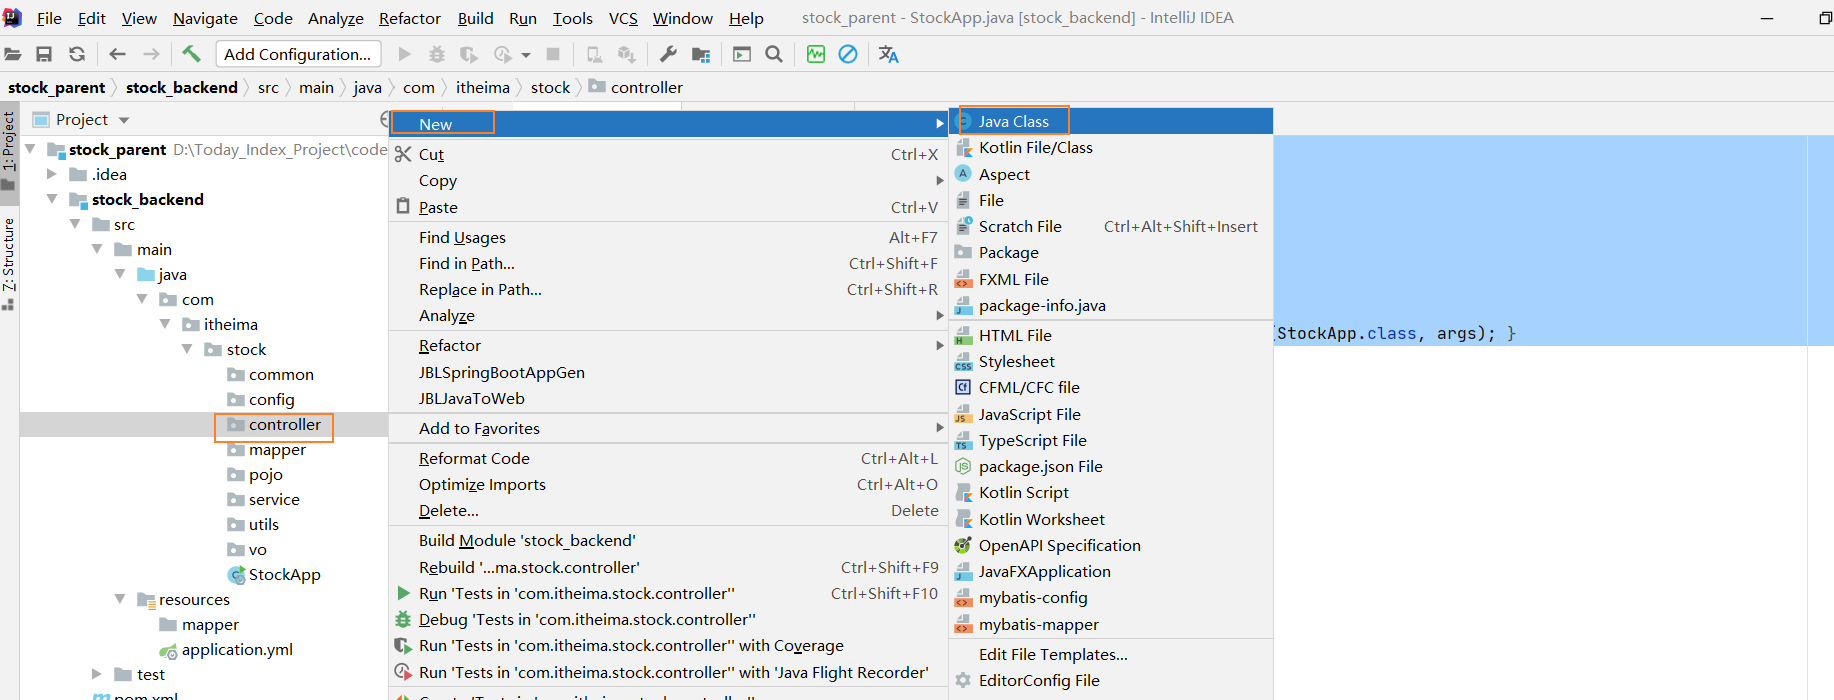
package com.itheima.stock.controller;import org.springframework.web.bind.annotation.GetMapping;
import org.springframework.web.bind.annotation.RequestMapping;
import org.springframework.web.bind.annotation.RestController;@RestController
@RequestMapping("/api")
public class UserController {@GetMapping("/test")public String getName(){return "itheima";}}
启动:
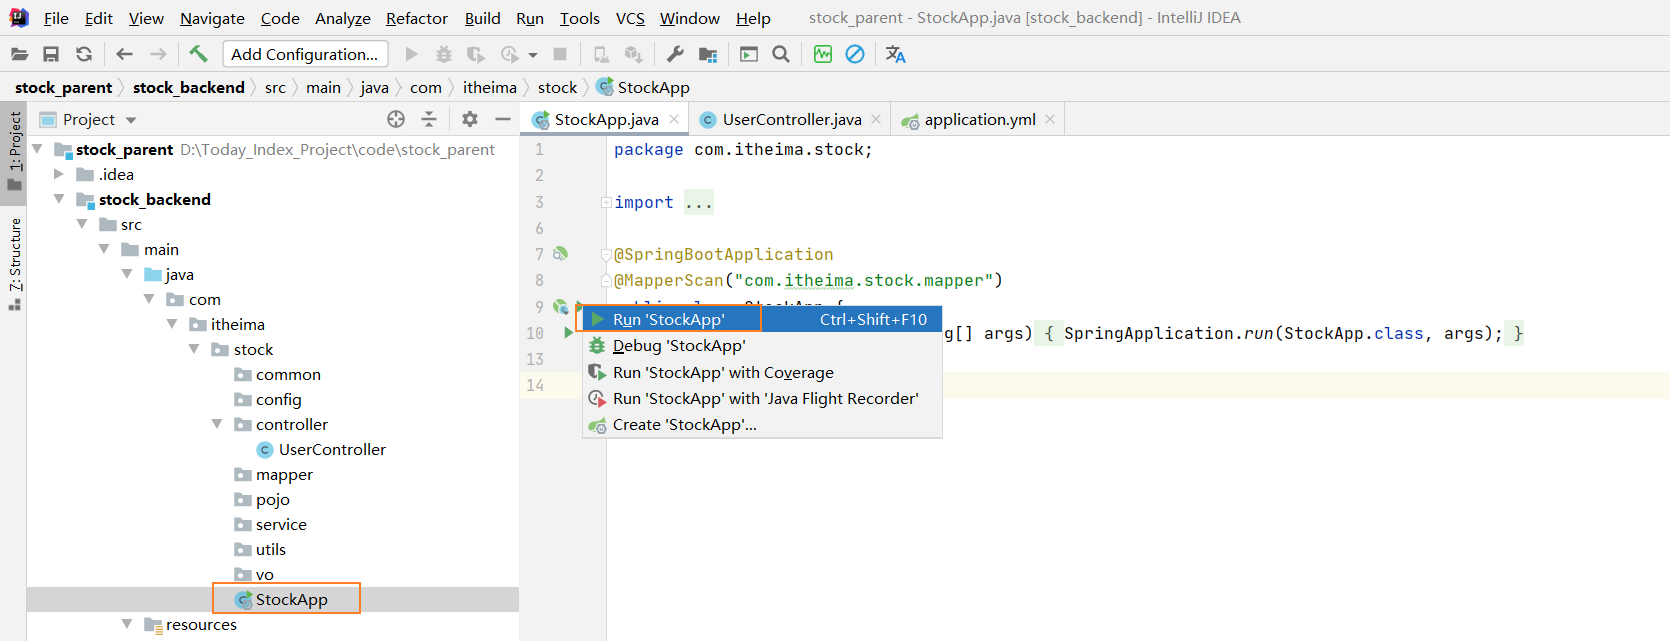
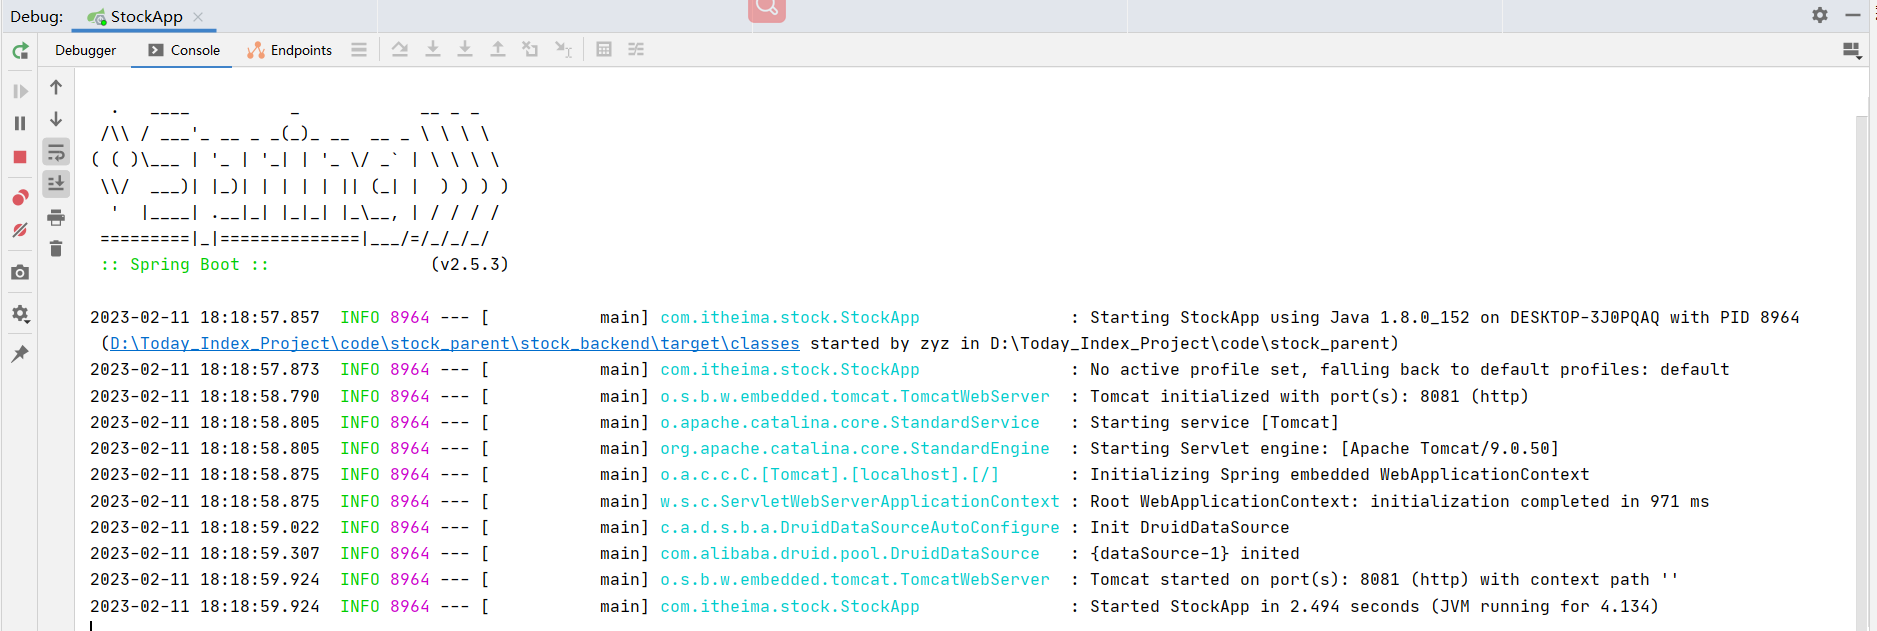
注意:这里面启动时 要注意你连接的mysql是linux的还是本地的 要注意他们的账户和密码否正确
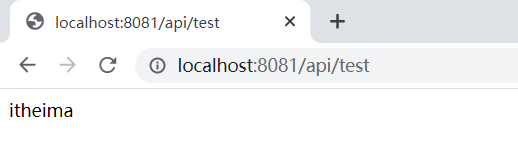
启动成功

在浏览器上测试能够获取到
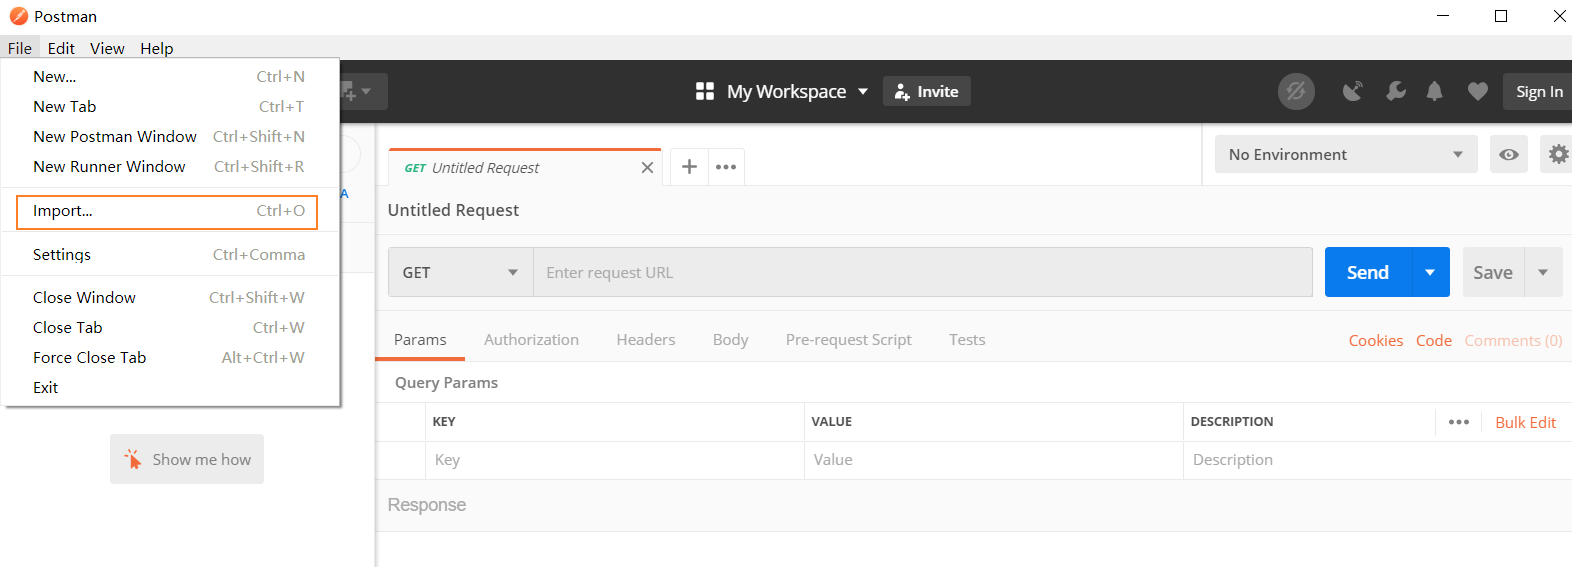
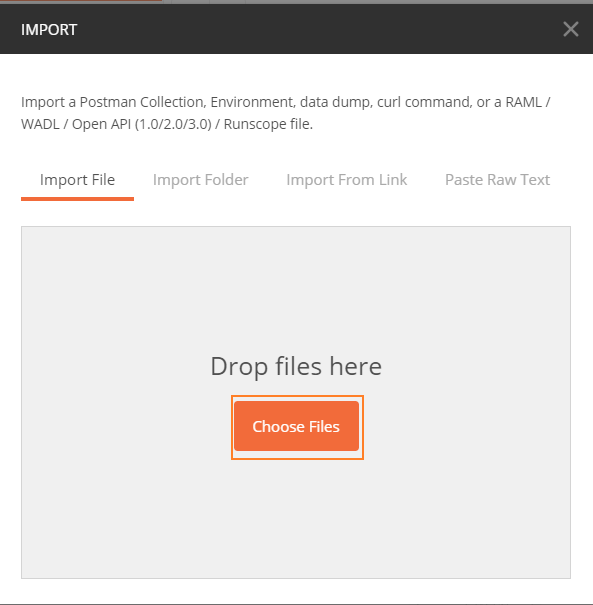
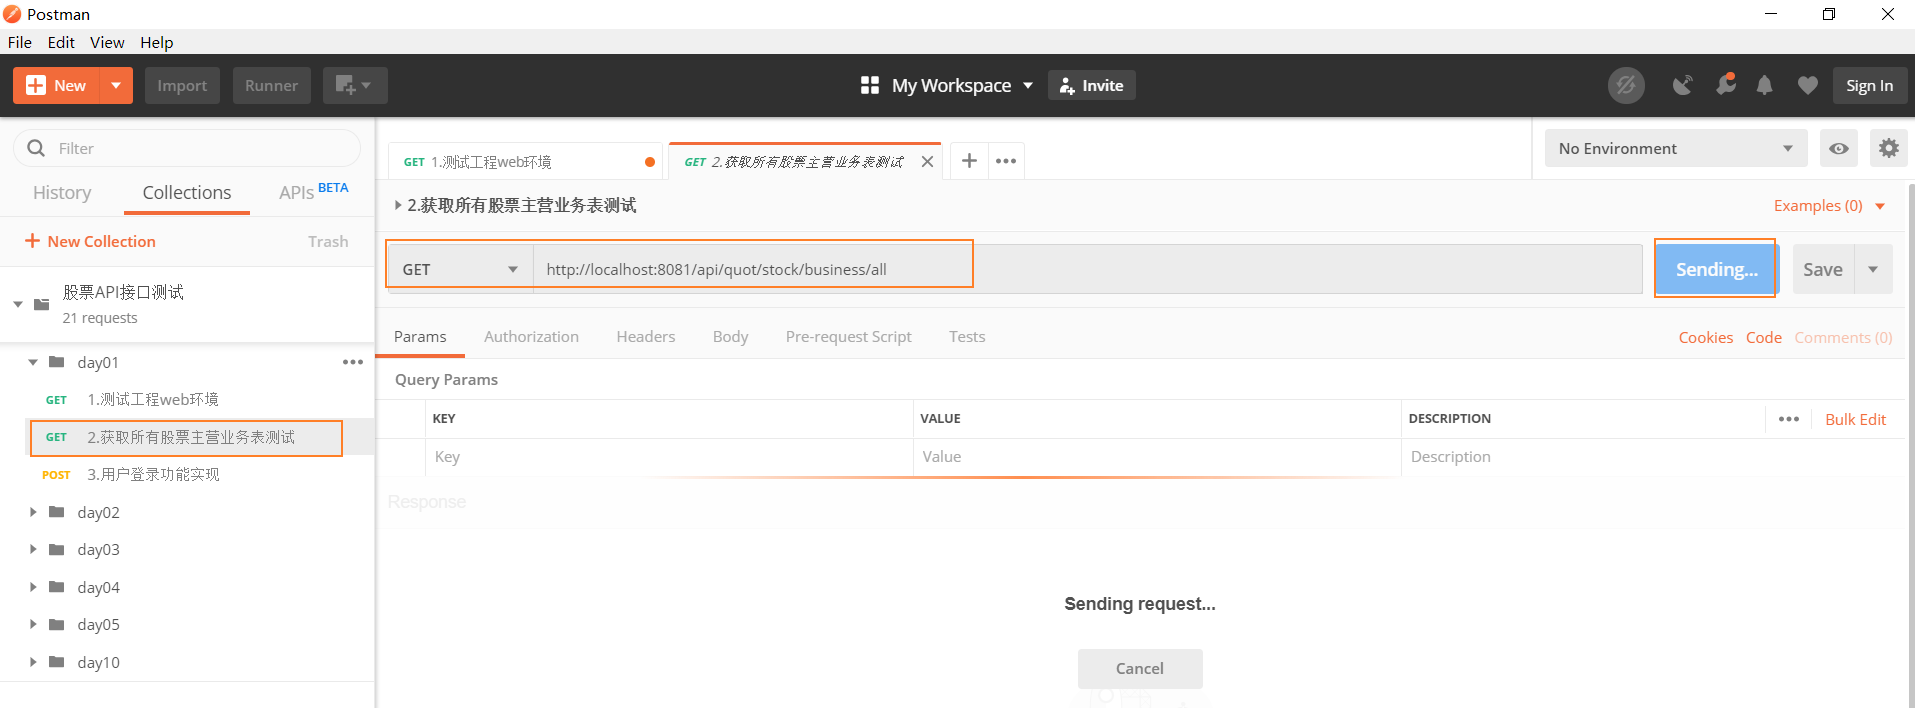
在做接口调试的时候 在这里面建议用postman 因为用浏览器只能用到git
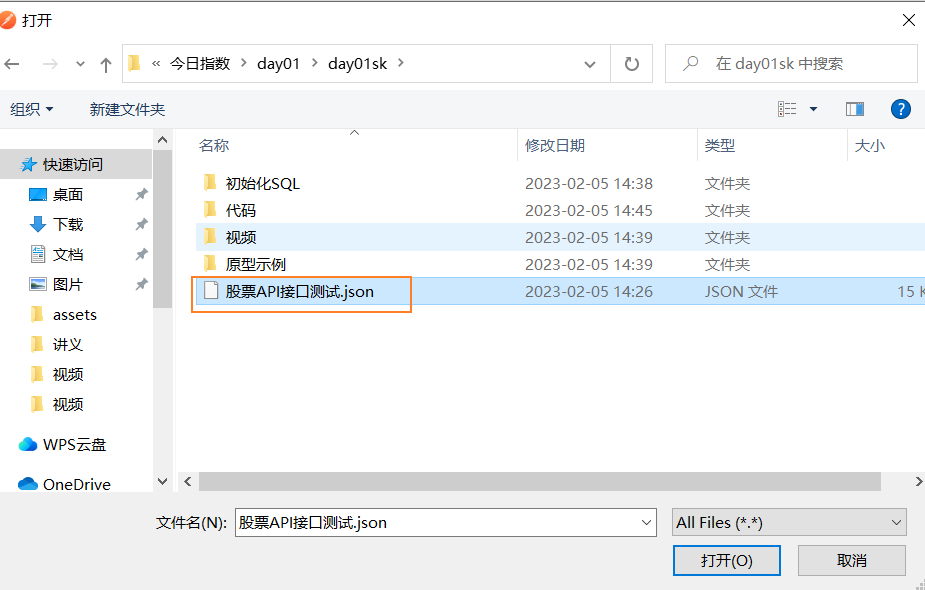
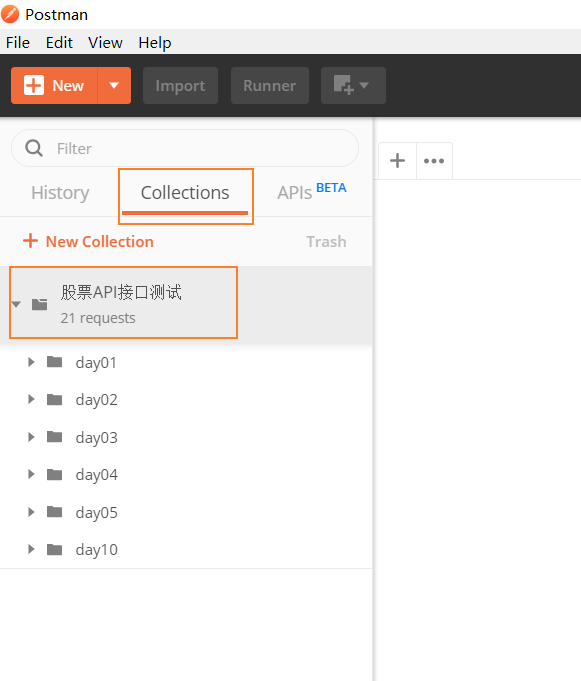
演示使用课程资料中的------股票API接口测试.json
至此,工程基础环境搭建完毕!
2.3 快速构建mybatis业务开发环境
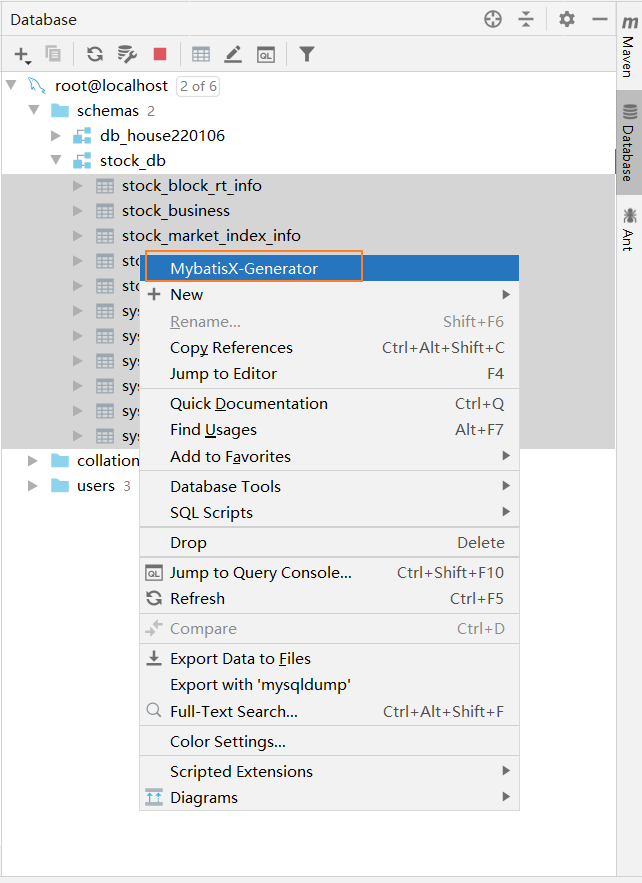
【1】安装插件mybatisX工具

我们可借助mybatisX工具生成基础代码,步骤如下:
第一步:通过idea自带的database组件连接数据库:

全选11张表 点击第一张表 按住Shist 在点击最后一张表
右击
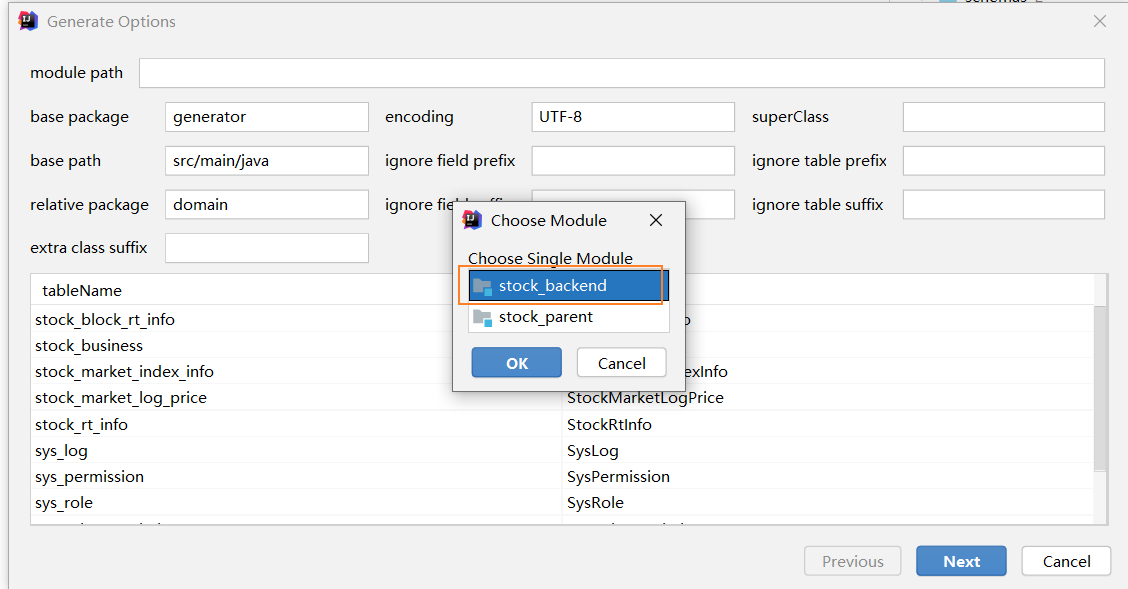
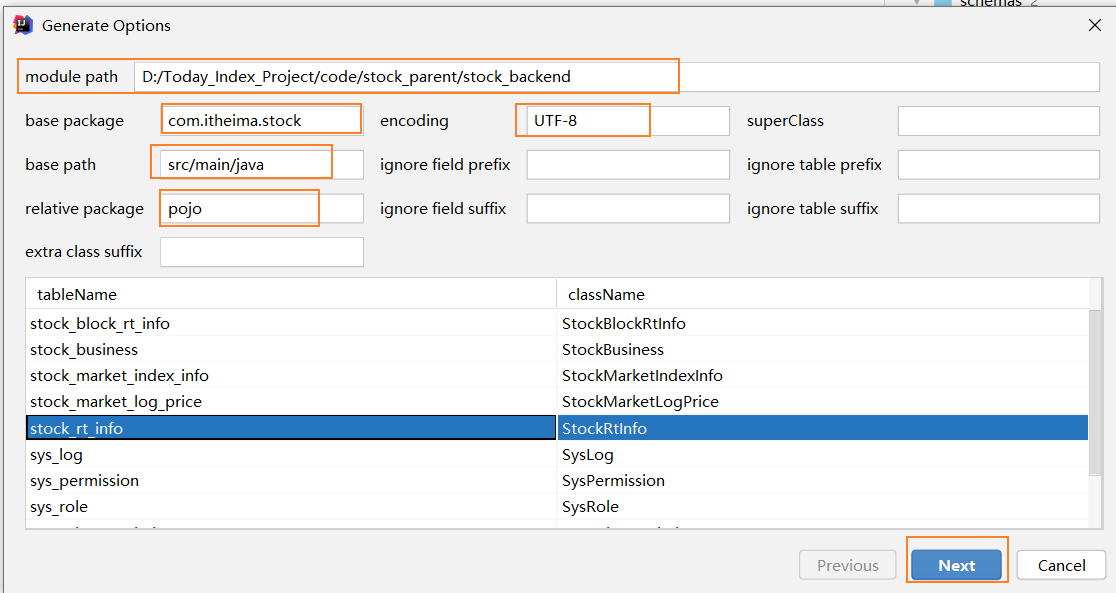
第二步:配置pojo实体类选项


【2】集成mybatis的工程结构

【3】环境整体测试
目的:我们通过一个简单的web接口访问数据库,验证工程搭建情况
接口功能说明:查询所有上市公司主营业务数据
接口url:/api/quot/stock/business/all
【3.1】定义mapper接口方法
StockBusinessMapper接口和xml定义查询所有股票业务信息的接口方法:
List<StockBusiness> findall();
<select id="findall" resultMap="BaseResultMap">select<include refid="Base_Column_List" />from stock_business</select>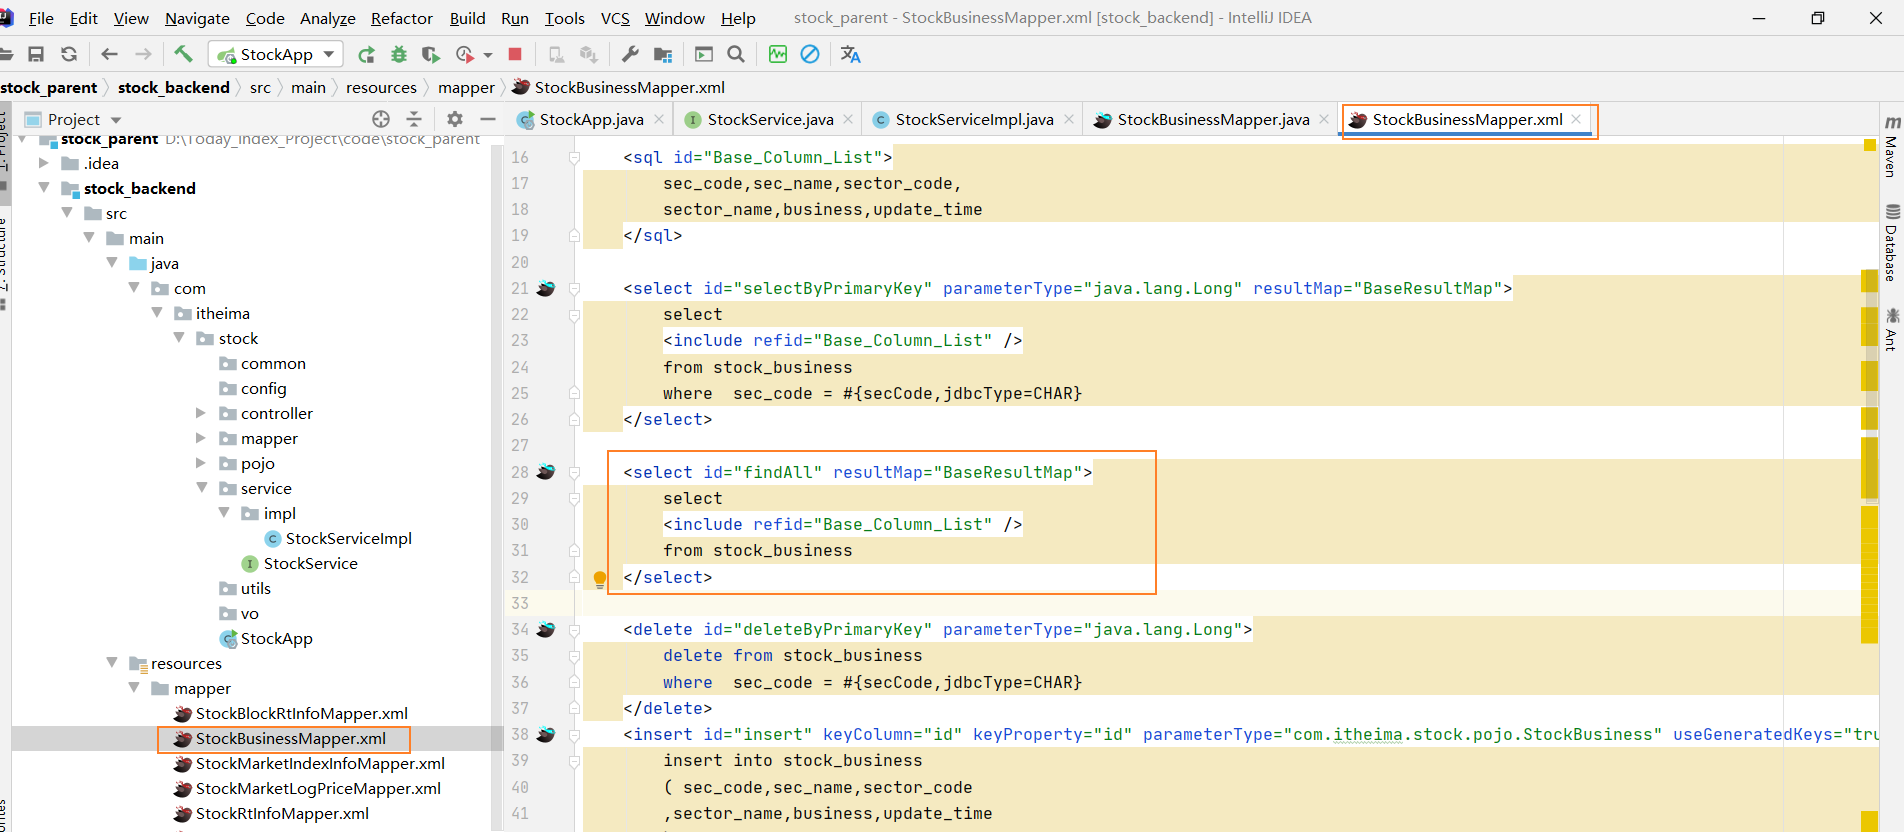
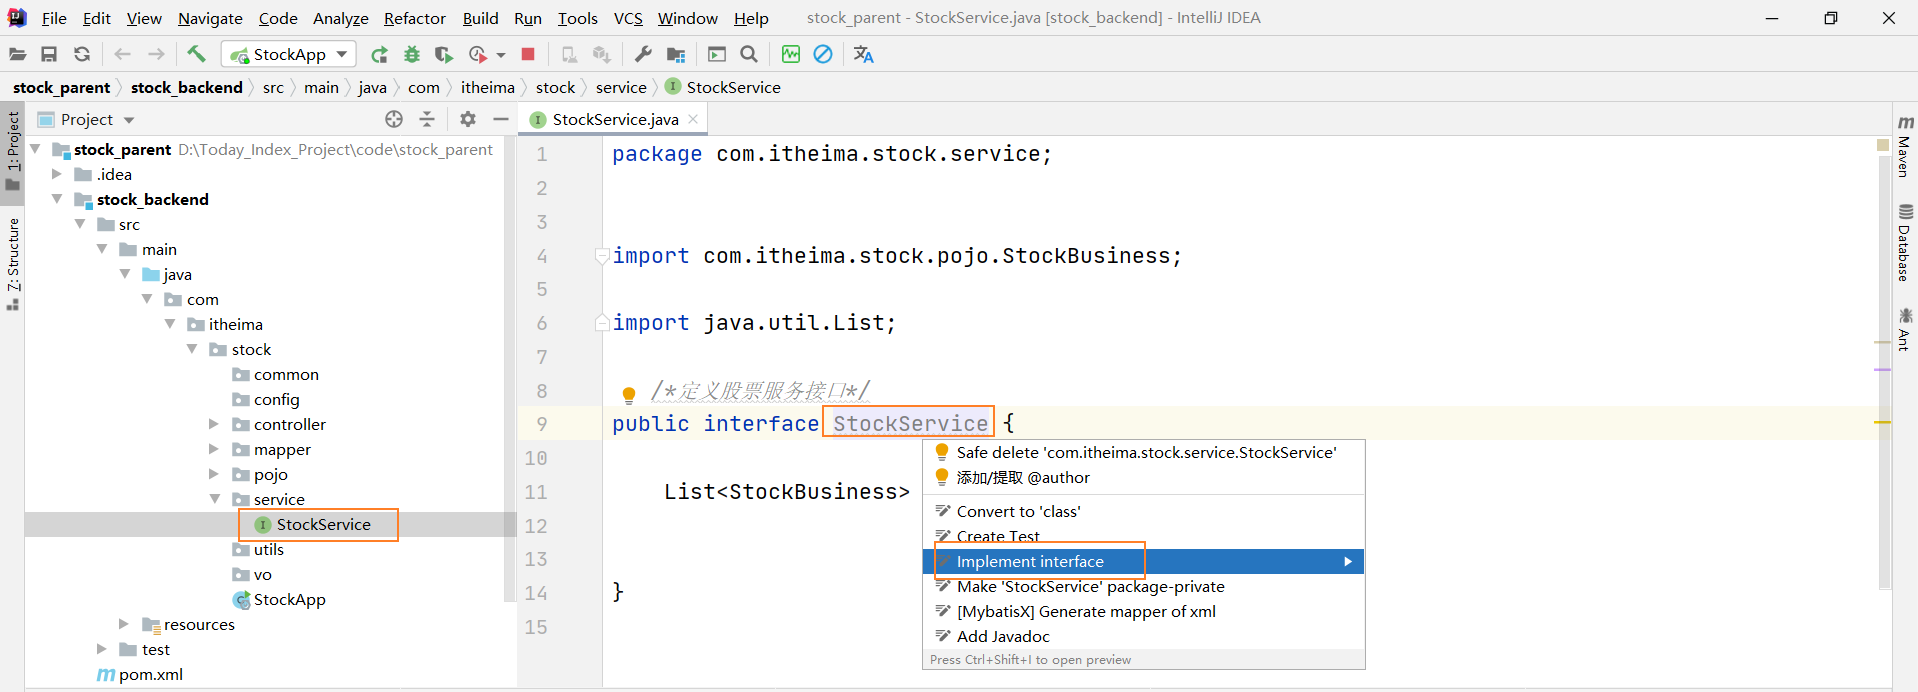
【3.2】定义服务接口及实现
定义服务接口:

package com.itheima.stock.service;import com.itheima.stock.pojo.StockBusiness;
import java.util.List;/*定义股票服务接口*/
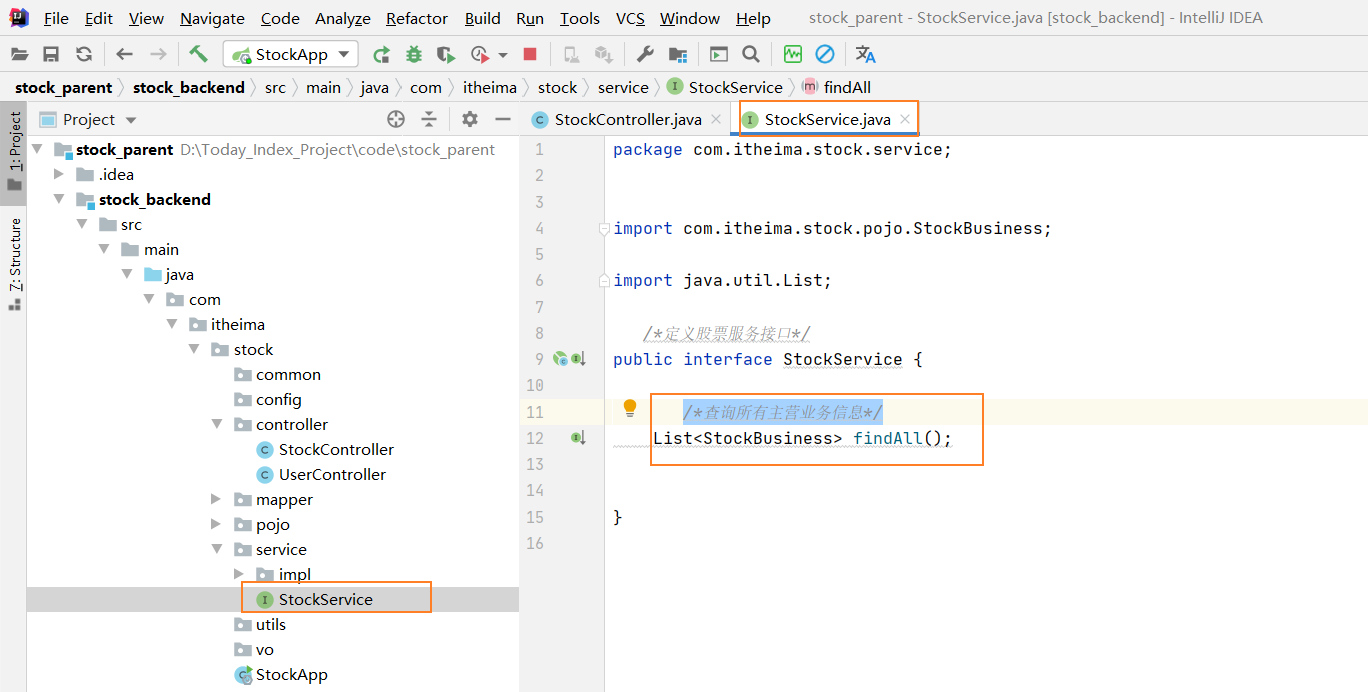
public interface StockService {/*查询所有主营业务信息*/List<StockBusiness> findAll();}
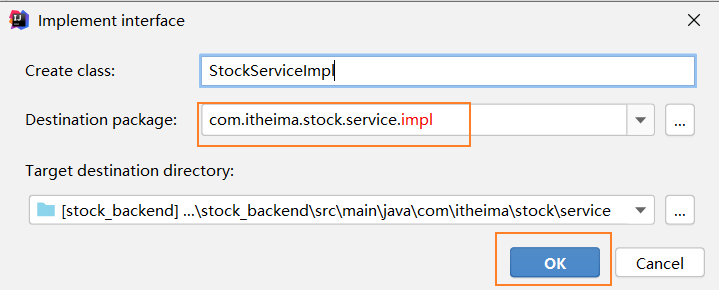
定义服务接口实现:
Alt+Enter


package com.itheima.stock.service.impl;import com.itheima.stock.mapper.StockBusinessMapper;
import com.itheima.stock.pojo.StockBusiness;
import com.itheima.stock.service.StockService;
import org.springframework.beans.factory.annotation.Autowired;
import org.springframework.stereotype.Service;import java.util.List;@Service("stockService")
public class StockServiceImpl implements StockService {@Autowiredprivate StockBusinessMapper stockBusinessMapper;@Overridepublic List<StockBusiness> findAll() {return stockBusinessMapper.findAll();}
}
【3.3】定义web访问接口

package com.itheima.stock.controller;import com.itheima.stock.pojo.StockBusiness;
import com.itheima.stock.service.StockService;
import org.springframework.beans.factory.annotation.Autowired;
import org.springframework.web.bind.annotation.GetMapping;
import org.springframework.web.bind.annotation.RequestMapping;
import org.springframework.web.bind.annotation.RestController;import java.util.List;@RestController
@RequestMapping("/api/quot")
public class StockController {@Autowiredprivate StockService stockService;@GetMapping("/stock/business/all")public List<StockBusiness> findAllBusiness(){return stockService.findAll();}}

【3.4】启动项目测试

成功启动


至此,后台基本开发环境构建完毕!
3.前端开发环境搭建
3.1 前端环境准备
【1】node安装
前端node版本:

详见资料:

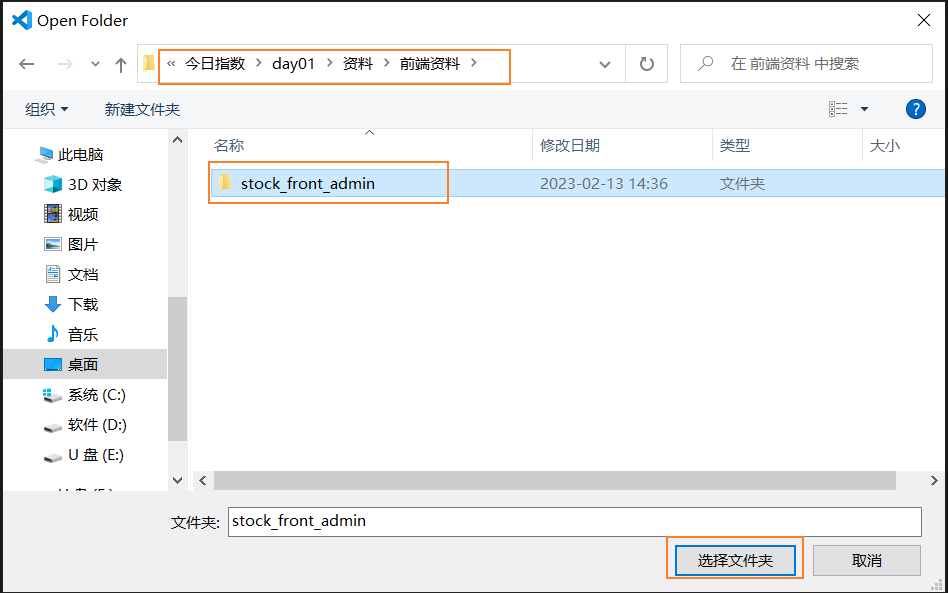
【2】vs导入前端代码
资料:day01\资料\前端资料\stock_front_admin
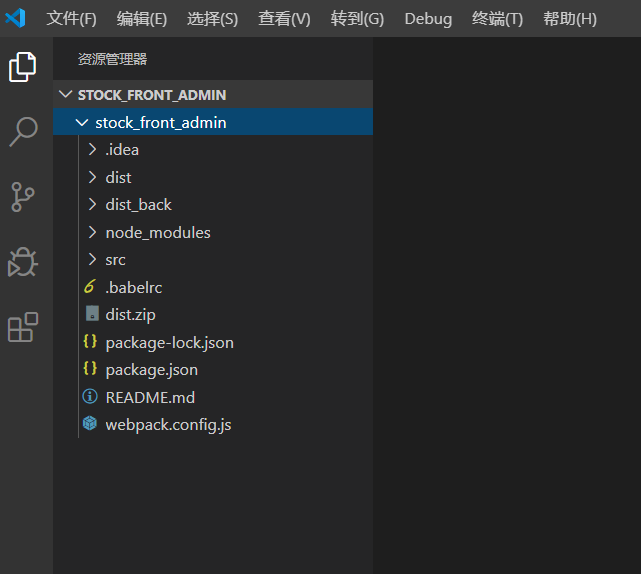
使用vscode打开工程:
效果如下:
【3】前端工程启动
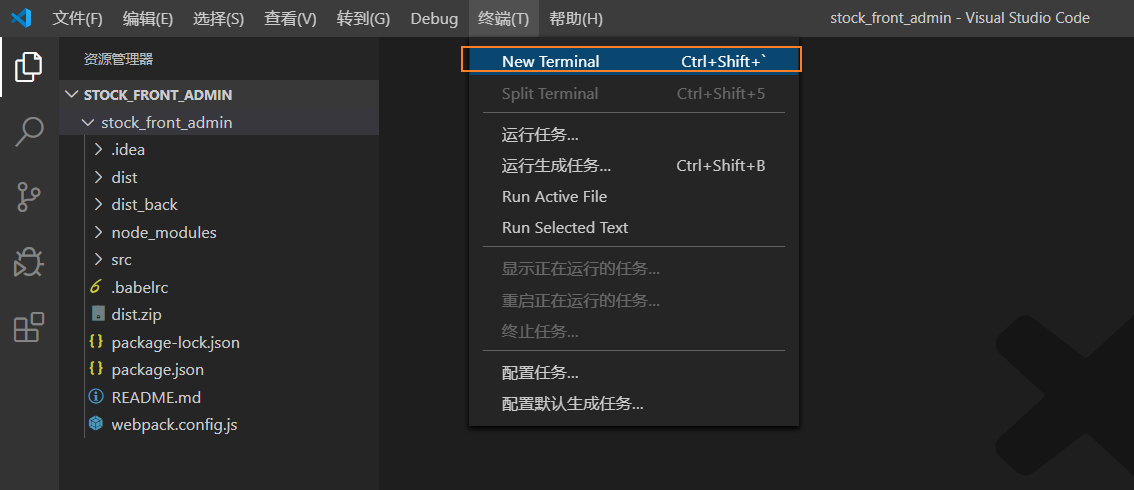


npm run dev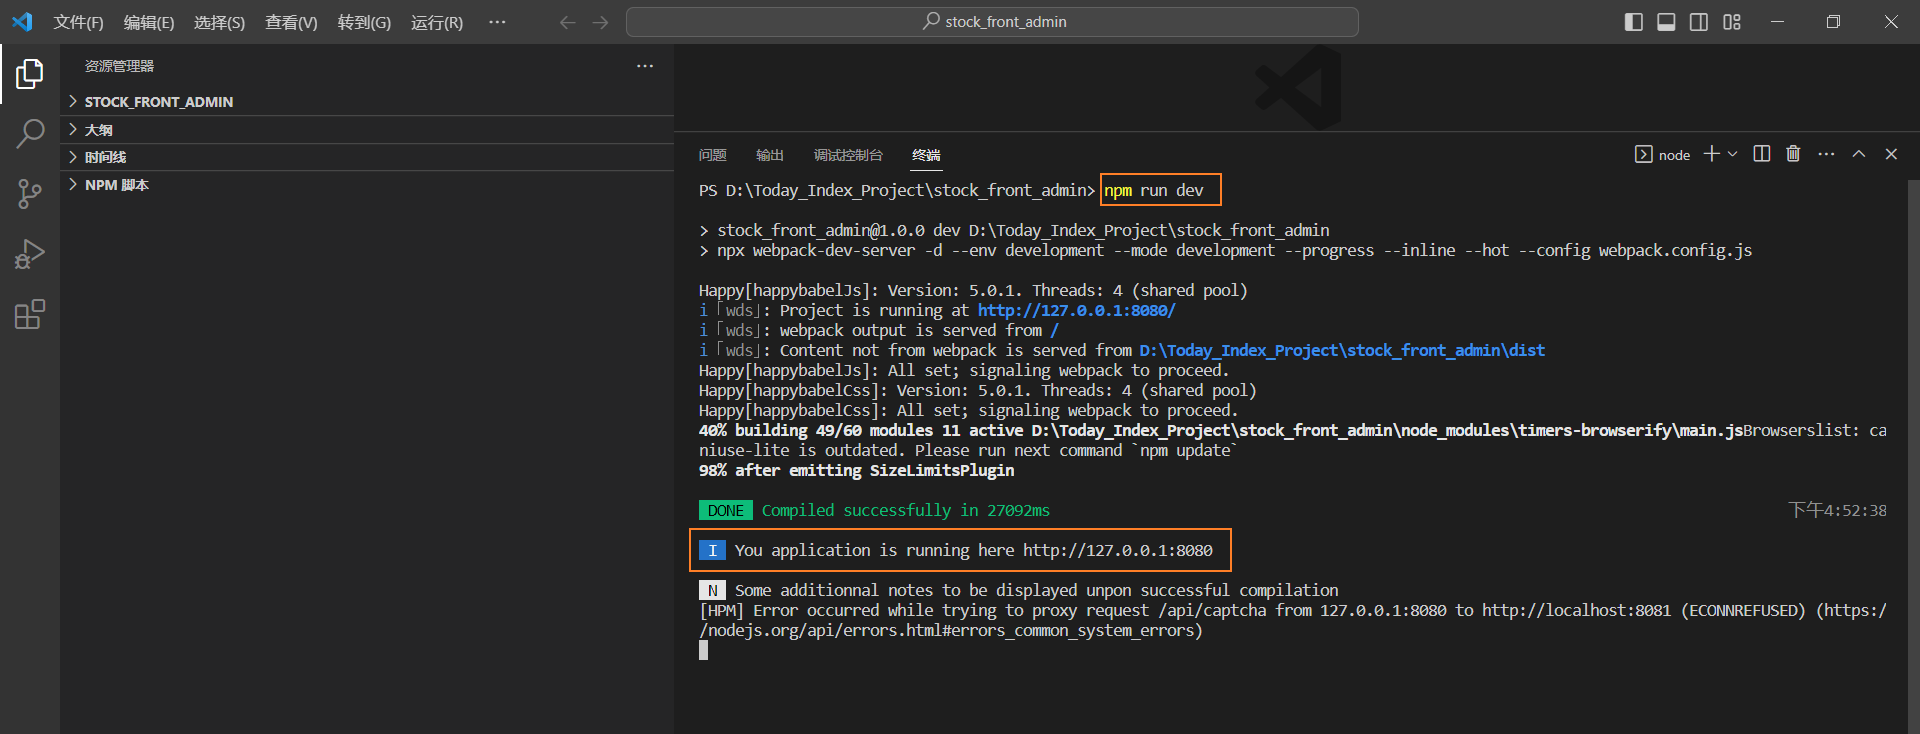
这里面是8080 但是我们后端是8081 所以这里面要注意一下
注意事项:如果启动报错,重新npm install 或者cnpm install
【4】页面效果
3.2 前后端分离跨域问题
在前面的知识中,我们已经了解到项目进行前后端分离后,存在跨域问题,只需在前端进行简单配置,即可解决该问题;
【1】前后端跨域配置
在stock_front_admin\src\settings.js文件下配置跨域:
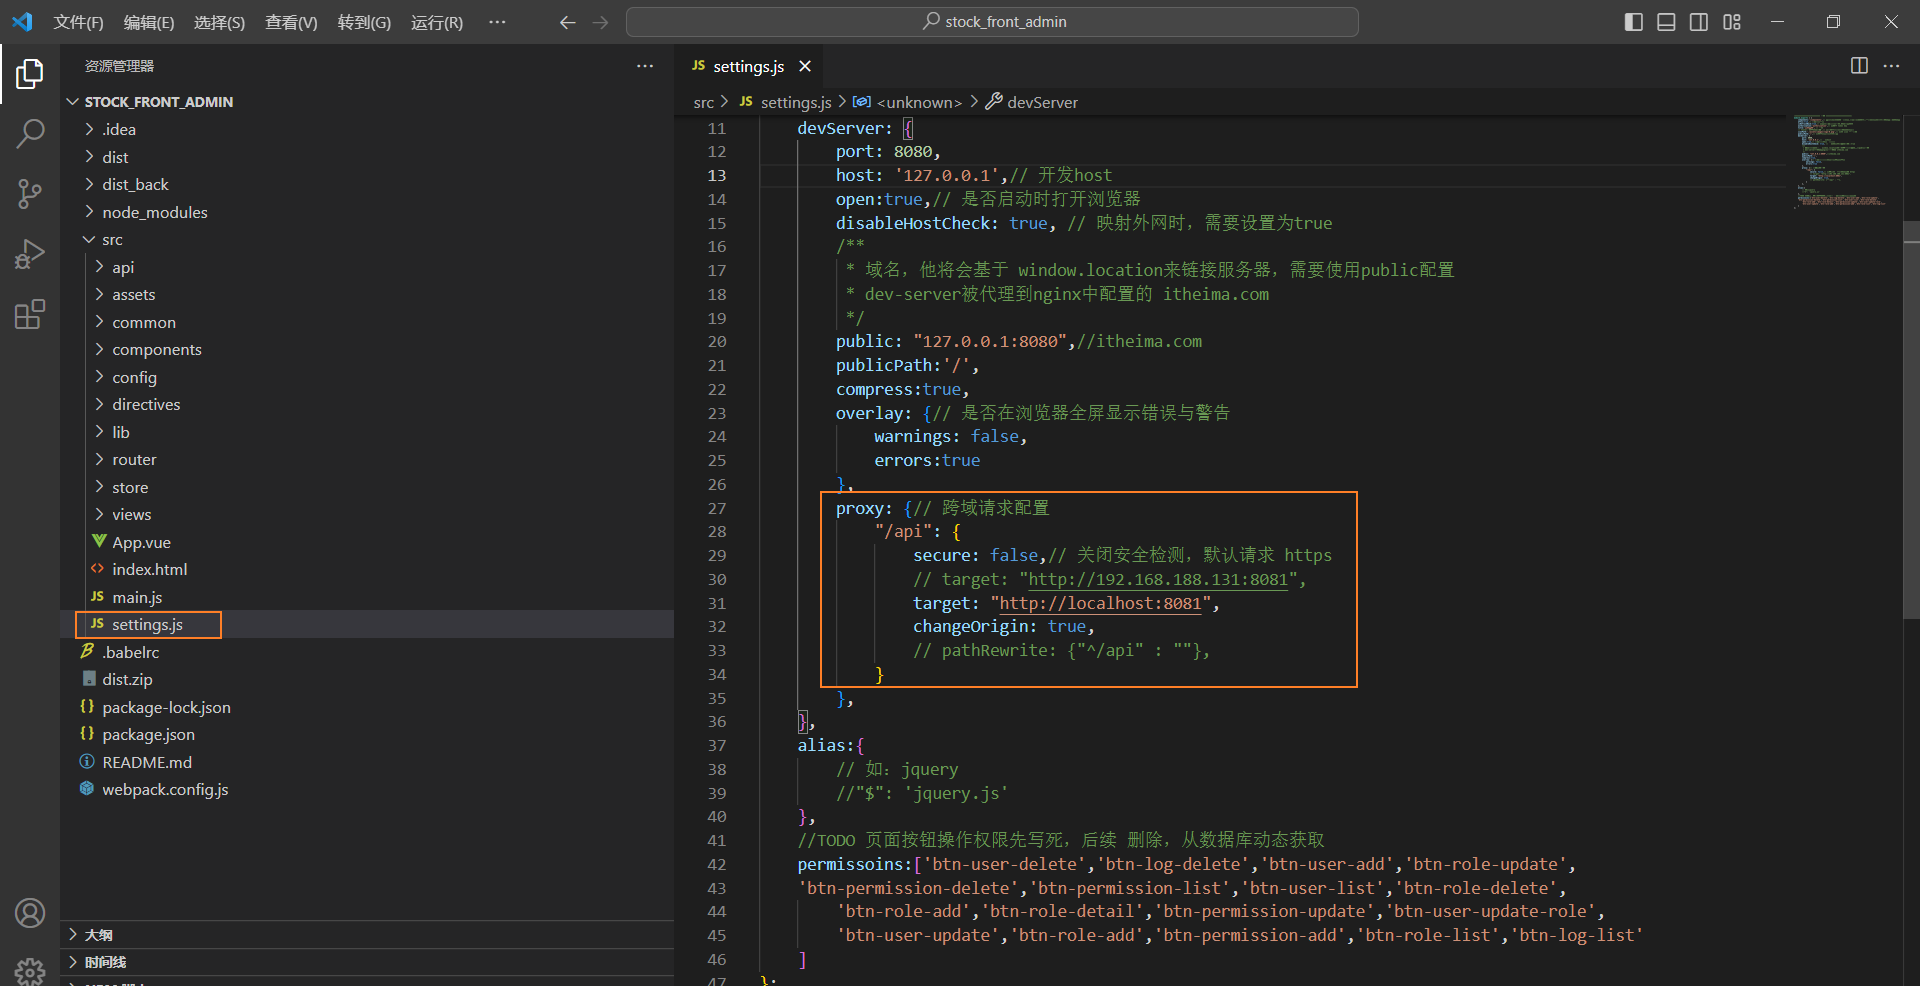
devServer: {port: 8080,host: '127.0.0.1',// 开发hostopen:true,// 是否启动时打开浏览器disableHostCheck: true, // 映射外网时,需要设置为true/*** 域名,他将会基于 window.location来链接服务器,需要使用public配置* dev-server被代理到nginx中配置的 itheima.com*/public: "127.0.0.1:8080",//itheima.compublicPath:'/',compress:true,overlay: {// 是否在浏览器全屏显示错误与警告warnings: false,errors:true},proxy: {// 跨域请求配置"/api": {secure: false,// 关闭安全检测,默认请求 https//target: "http://192.168.188.131:8081",target: "http://localhost:8081",changeOrigin: true,// pathRewrite: {"^/api" : ""},}},},【2】前后端交互数据格式
前端与后端使用json格式进行交互。
4.登录功能实现
4.1 需求分析
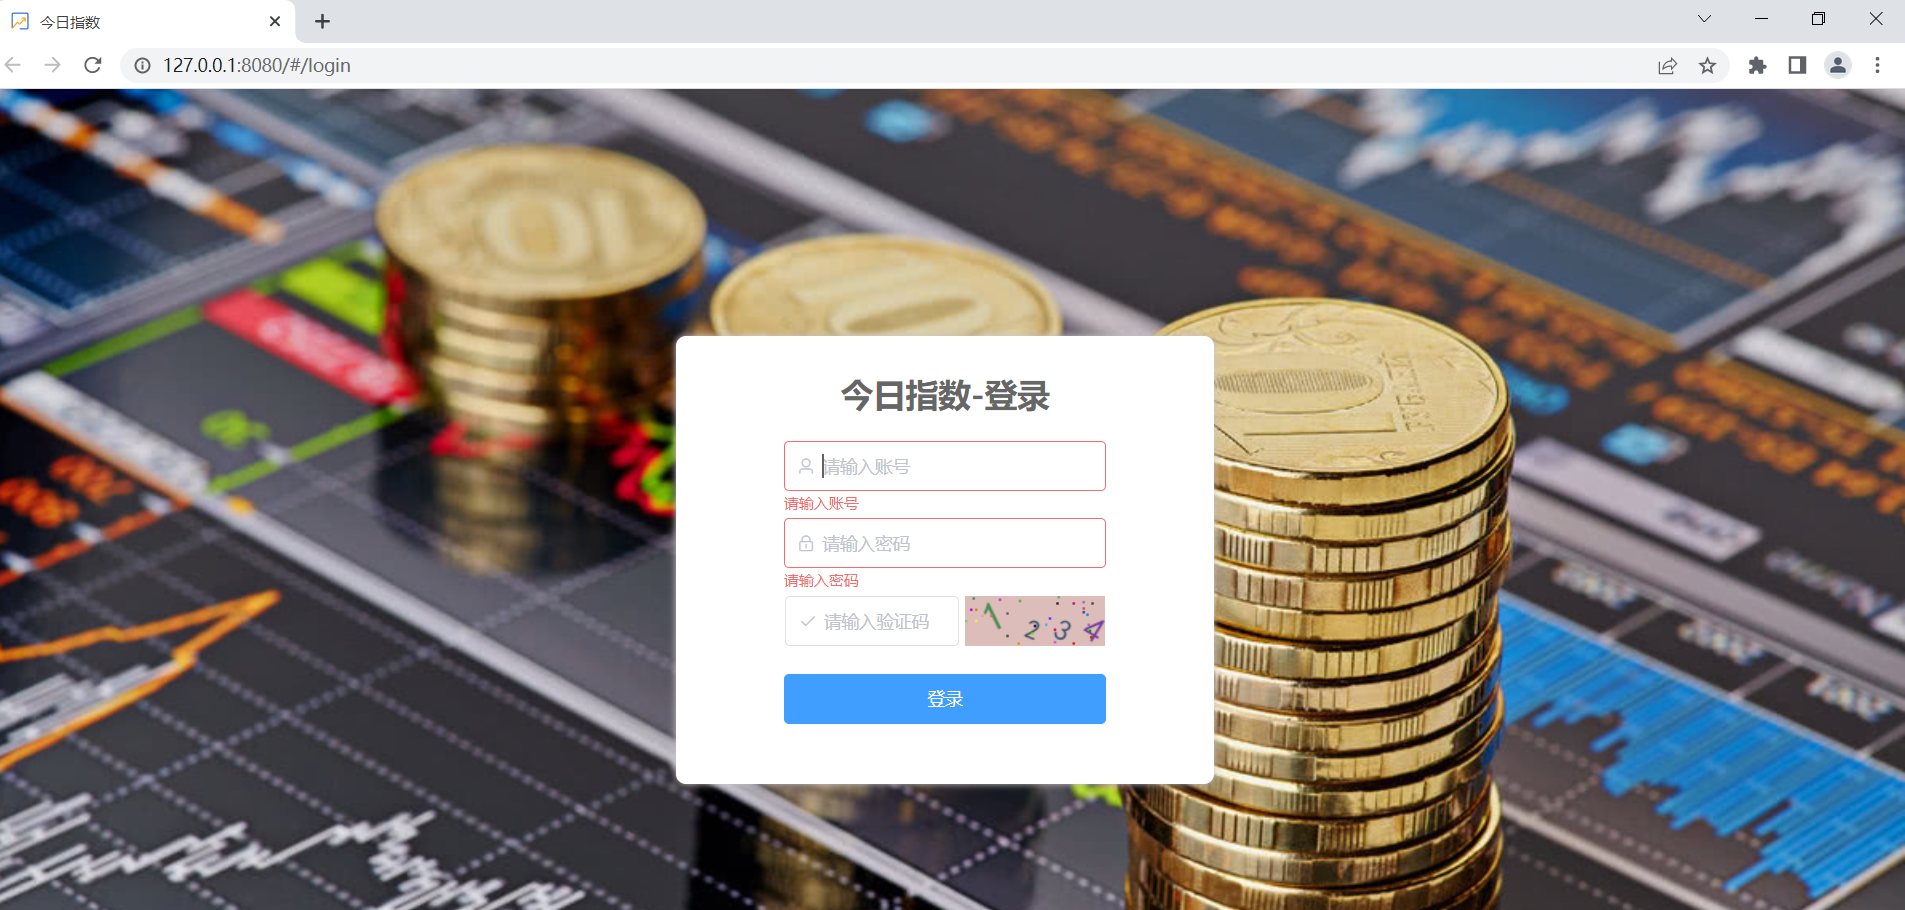
1)页面原型效果
2)相关的表结构
sys_user表如下:

3)访问接口定义
      请求接口:/api/login
请求方式:POST
请求数据示例:{username:'zhangsan',//用户名password:'666',//密码code:'1234' //校验码}
响应数据:{"code": 1,//成功1 失败0"data": {"id":"1237365636208922624","username":"zhangsan","nickName":"xiaozhang","phone":"1886702304"}}
4)封装请求和响应vo
请求vo封装:


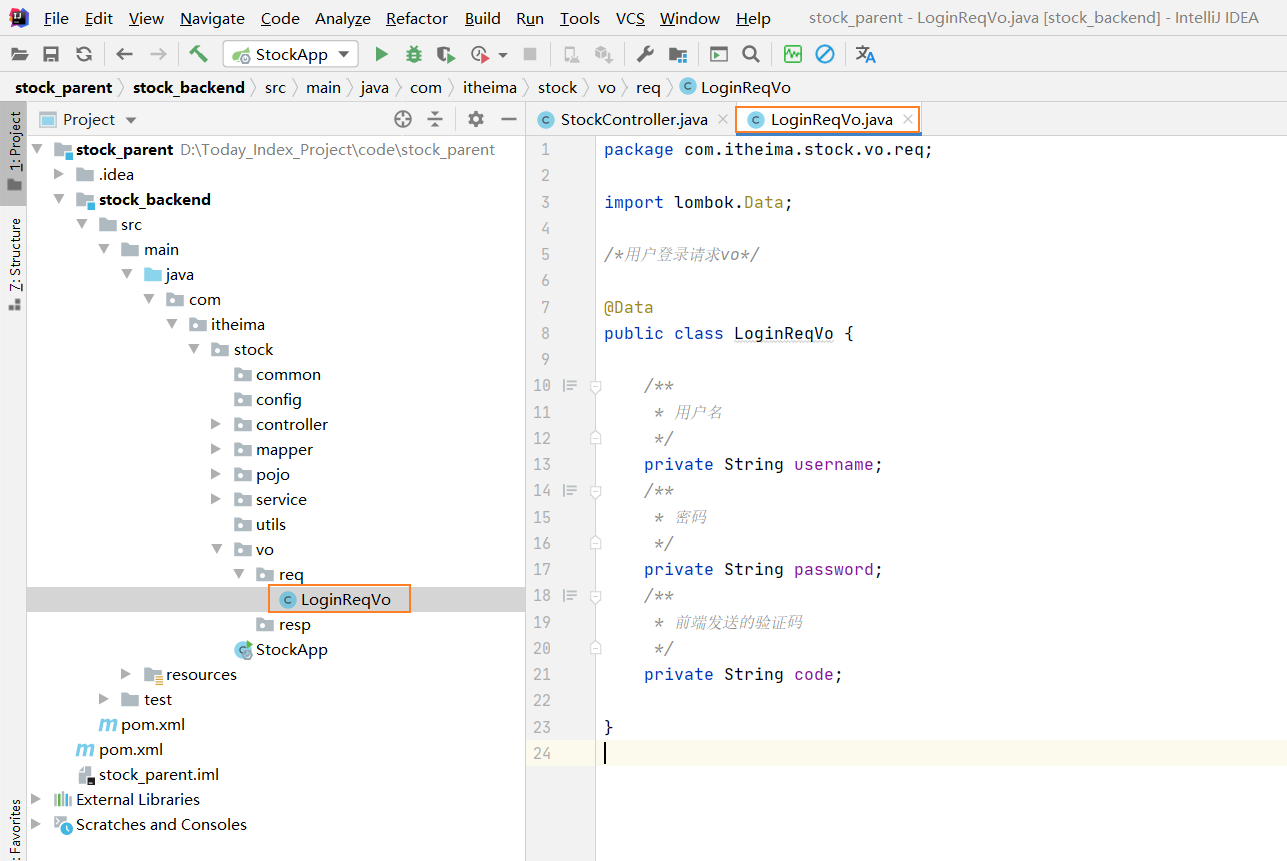
package com.itheima.stock.vo.req;import lombok.Data;/*用户登录请求vo*/@Data
public class LoginReqVo {/*** 用户名*/private String username;/*** 密码*/private String password;/*** 前端发送的验证码*/private String code;}
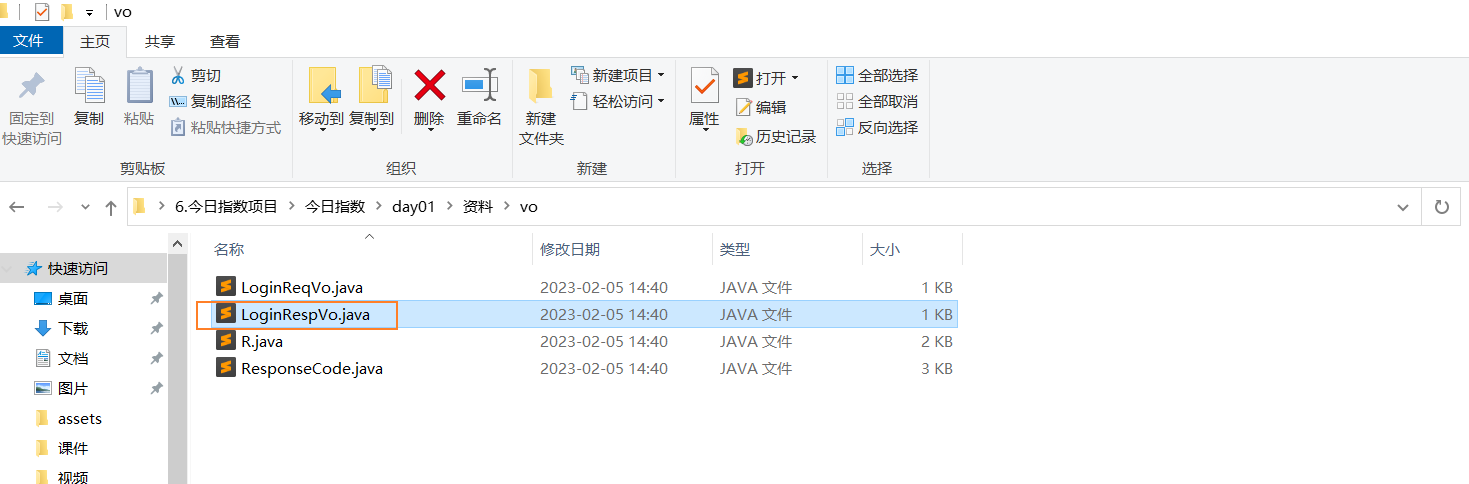
}响应vo:

把资料中的LoginRespVo复制到idea中
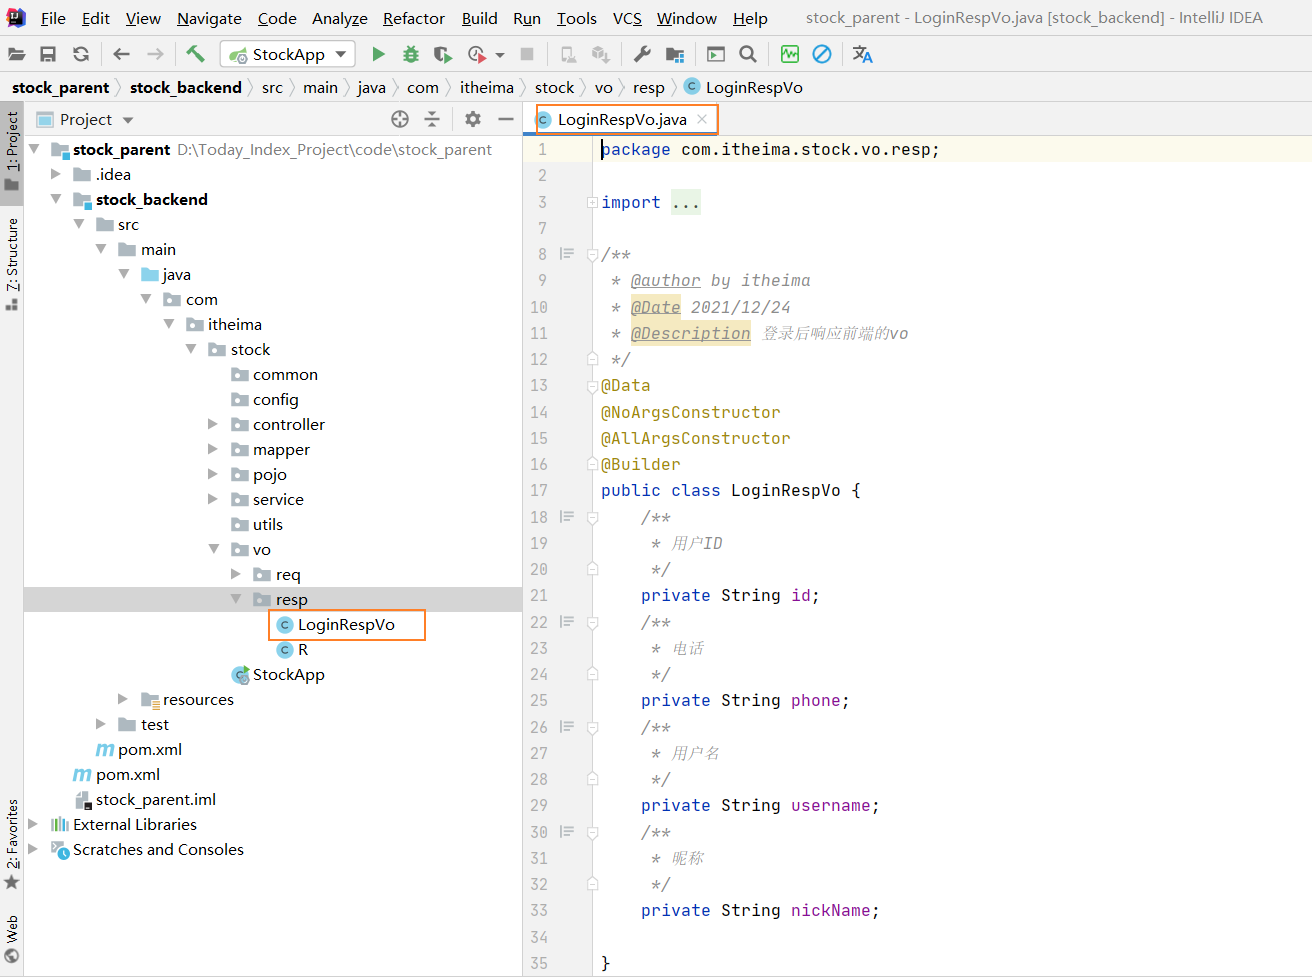
package com.itheima.stock.vo.resp;import lombok.AllArgsConstructor;
import lombok.Builder;
import lombok.Data;
import lombok.NoArgsConstructor;/*** @author by itheima* @Date 2021/12/24* @Description 登录后响应前端的vo*/
@Data
@NoArgsConstructor
@AllArgsConstructor
@Builder
public class LoginRespVo {/*** 用户ID*/private String id;/*** 电话*/private String phone;/*** 用户名*/private String username;/*** 昵称*/private String nickName;}
定义公共响应vo:
把资料中的R复制过来


package com.itheima.stock.vo.resp;import com.fasterxml.jackson.annotation.JsonInclude;import java.io.Serializable;/*** 返回数据类* @param <T>*/
//保证序列化json的时候,如果是null的对象,key也会消失
@JsonInclude(JsonInclude.Include.NON_NULL)
public class R<T> implements Serializable {private static final long serialVersionUID = 7735505903525411467L;// 成功值private static final int SUCCESS_CODE = 1;// 失败值private static final int ERROR_CODE = 0;//状态码private int code;//消息private String msg;//返回数据private T data;private R(int code){this.code = code;}private R(int code, T data){this.code = code;this.data = data;}private R(int code, String msg){this.code = code;this.msg = msg;}private R(int code, String msg, T data){this.code = code;this.msg = msg;this.data = data;}public static <T> R<T> ok(){return new R<T>(SUCCESS_CODE,"success");}public static <T> R<T> ok(String msg){return new R<T>(SUCCESS_CODE,msg);}public static <T> R<T> ok(T data){return new R<T>(SUCCESS_CODE,data);}public static <T> R<T> ok(String msg, T data){return new R<T>(SUCCESS_CODE,msg,data);}public static <T> R<T> error(){return new R<T>(ERROR_CODE,"error");}public static <T> R<T> error(String msg){return new R<T>(ERROR_CODE,msg);}public static <T> R<T> error(int code, String msg){return new R<T>(code,msg);}public int getCode(){return code;}public String getMsg(){return msg;}public T getData(){return data;}
}
定义响应状态枚举:
把资料中的ResponseCode复制到idea中

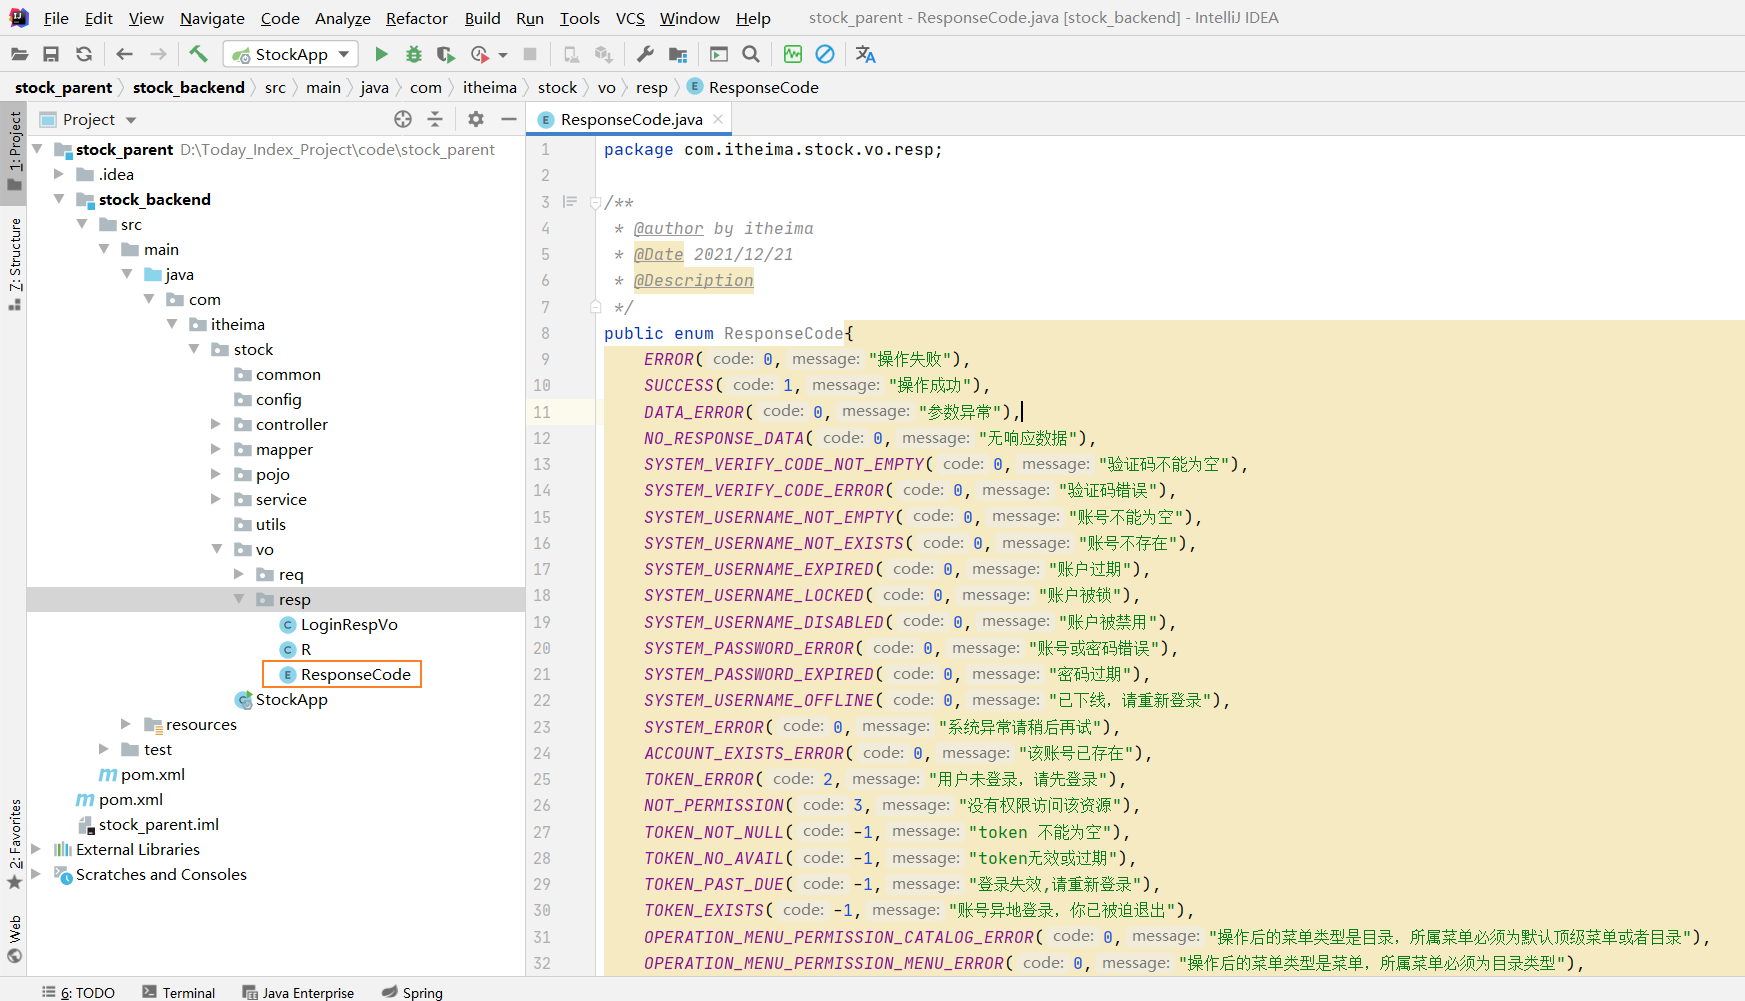
package com.itheima.stock.common.enums;/*** @author by itheima* @Date 2021/12/21* @Description*/
public enum ResponseCode{ERROR(0,"操作失败"),SUCCESS(1,"操作成功"),DATA_ERROR(0,"参数异常"),NO_RESPONSE_DATA(0,"无响应数据"),SYSTEM_VERIFY_CODE_NOT_EMPTY(0,"验证码不能为空"),SYSTEM_VERIFY_CODE_ERROR(0,"验证码错误"),SYSTEM_USERNAME_NOT_EMPTY(0,"账号不能为空"),SYSTEM_USERNAME_NOT_EXISTS(0,"账号不存在"),SYSTEM_USERNAME_EXPIRED(0,"账户过期"),SYSTEM_USERNAME_LOCKED(0,"账户被锁"),SYSTEM_USERNAME_DISABLED(0,"账户被禁用"),SYSTEM_PASSWORD_ERROR(0,"账号或密码错误"),SYSTEM_PASSWORD_EXPIRED(0,"密码过期"),SYSTEM_USERNAME_OFFLINE(0,"已下线,请重新登录"),SYSTEM_ERROR(0,"系统异常请稍后再试"),ACCOUNT_EXISTS_ERROR(0,"该账号已存在"),TOKEN_ERROR(2,"用户未登录,请先登录"),NOT_PERMISSION(3,"没有权限访问该资源"),TOKEN_NOT_NULL(-1,"token 不能为空"),TOKEN_NO_AVAIL(-1,"token无效或过期"),TOKEN_PAST_DUE(-1,"登录失效,请重新登录"),TOKEN_EXISTS(-1,"账号异地登录,你已被迫退出"),OPERATION_MENU_PERMISSION_CATALOG_ERROR(0,"操作后的菜单类型是目录,所属菜单必须为默认顶级菜单或者目录"),OPERATION_MENU_PERMISSION_MENU_ERROR(0,"操作后的菜单类型是菜单,所属菜单必须为目录类型"),OPERATION_MENU_PERMISSION_BTN_ERROR(0,"操作后的菜单类型是按钮,所属菜单必须为菜单类型"),OPERATION_MENU_PERMISSION_URL_NOT_NULL(0,"菜单权限的url不能为空"),OPERATION_MENU_PERMISSION_URL_PERMS_NULL(0,"菜单权限的标识符不能为空"),OPERATION_MENU_PERMISSION_URL_METHOD_NULL(0,"菜单权限的请求方式不能为空"),OPERATION_MENU_PERMISSION_URL_CODE_NULL(0,"菜单权限的按钮标识不能为空"),OPERATION_MENU_PERMISSION_UPDATE(0,"操作的菜单权限存在子集关联不允许变更"),ROLE_PERMISSION_RELATION(0, "该菜单权限存在子集关联,不允许删除"),OLD_PASSWORD_ERROR(0,"旧密码不匹配");private int code;private String message;ResponseCode(int code, String message) {this.code = code;this.message = message;}public int getCode() {return 0;}public String getMessage() {return null;}
}说明:上述的vo对象直接在:今日指数\day01\资料\vo导入即可;
4.2 登录功能开发实现
stock_backend导入依赖资源
<!--apache工具包-->
<dependency><groupId>org.apache.commons</groupId><artifactId>commons-lang3</artifactId>
</dependency>
<!--密码加密和校验工具包-->
<dependency><groupId>org.springframework.security</groupId><artifactId>spring-security-crypto</artifactId>
</dependency>
<!--工具包-->
<dependency><groupId>com.google.guava</groupId><artifactId>guava</artifactId>
</dependency>
配置密码加密服务
package com.itheima.stock.config;import org.springframework.context.annotation.Bean;
import org.springframework.context.annotation.Configuration;
import org.springframework.security.crypto.bcrypt.BCryptPasswordEncoder;
import org.springframework.security.crypto.password.PasswordEncoder;/*定义公共配置类*/@Configuration
public class CommonConfig {/*** 密码加密器   定义密码加密器和解密器 bean* BCryptPasswordEncoder方法采用SHA-256对密码进行加密* @return*/@Beanpublic PasswordEncoder passwordEncoder(){return new BCryptPasswordEncoder();}}

密码加密测试:
登录接口方法定义
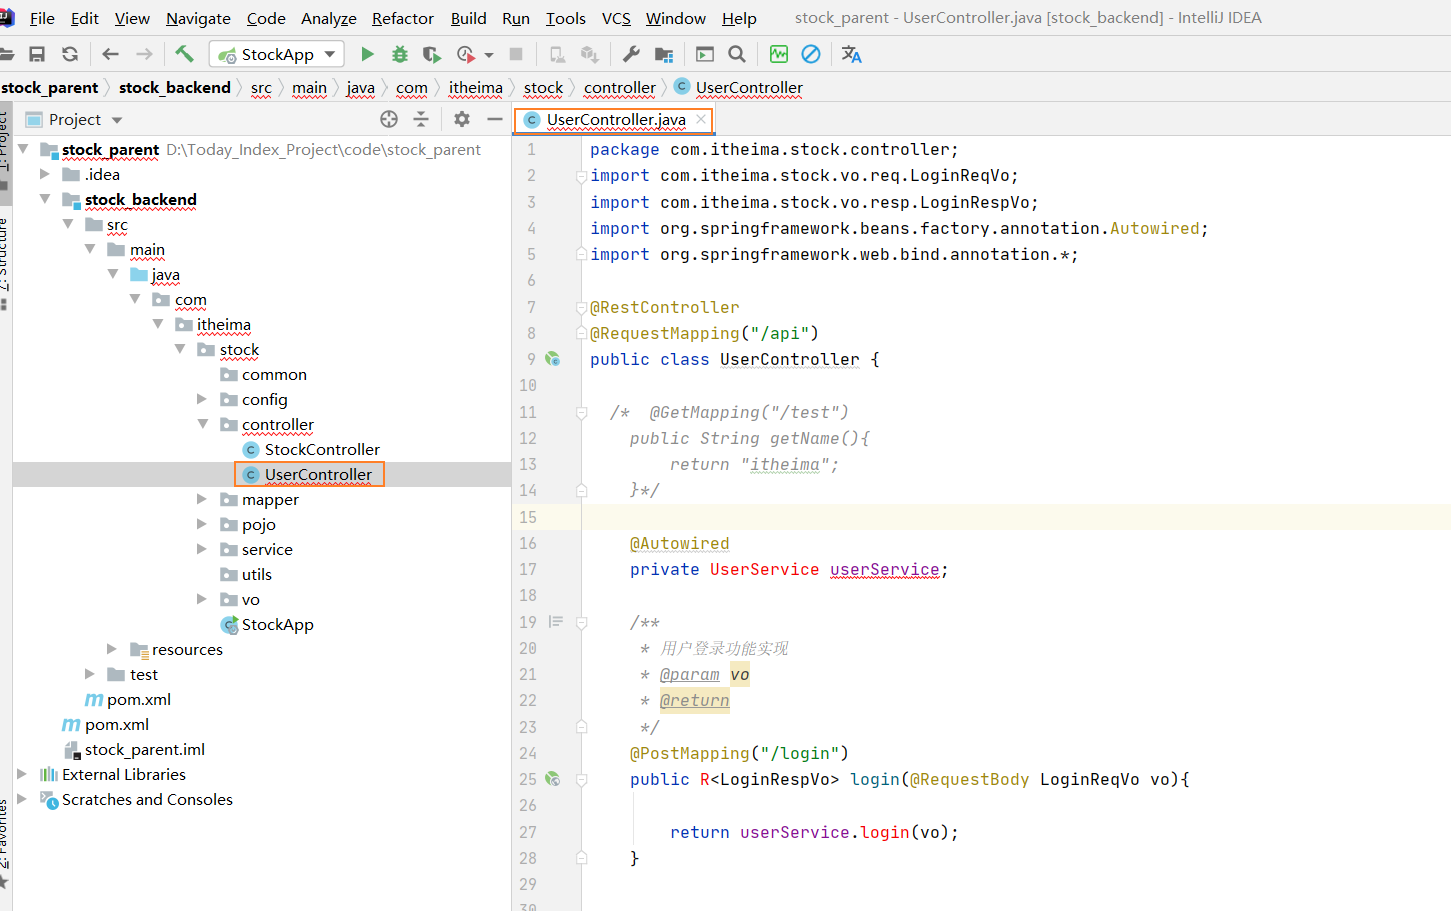
package com.itheima.stock.controller;
import com.itheima.stock.vo.req.LoginReqVo;
import com.itheima.stock.vo.resp.LoginRespVo;
import org.springframework.beans.factory.annotation.Autowired;
import org.springframework.web.bind.annotation.*;@RestController
@RequestMapping("/api")
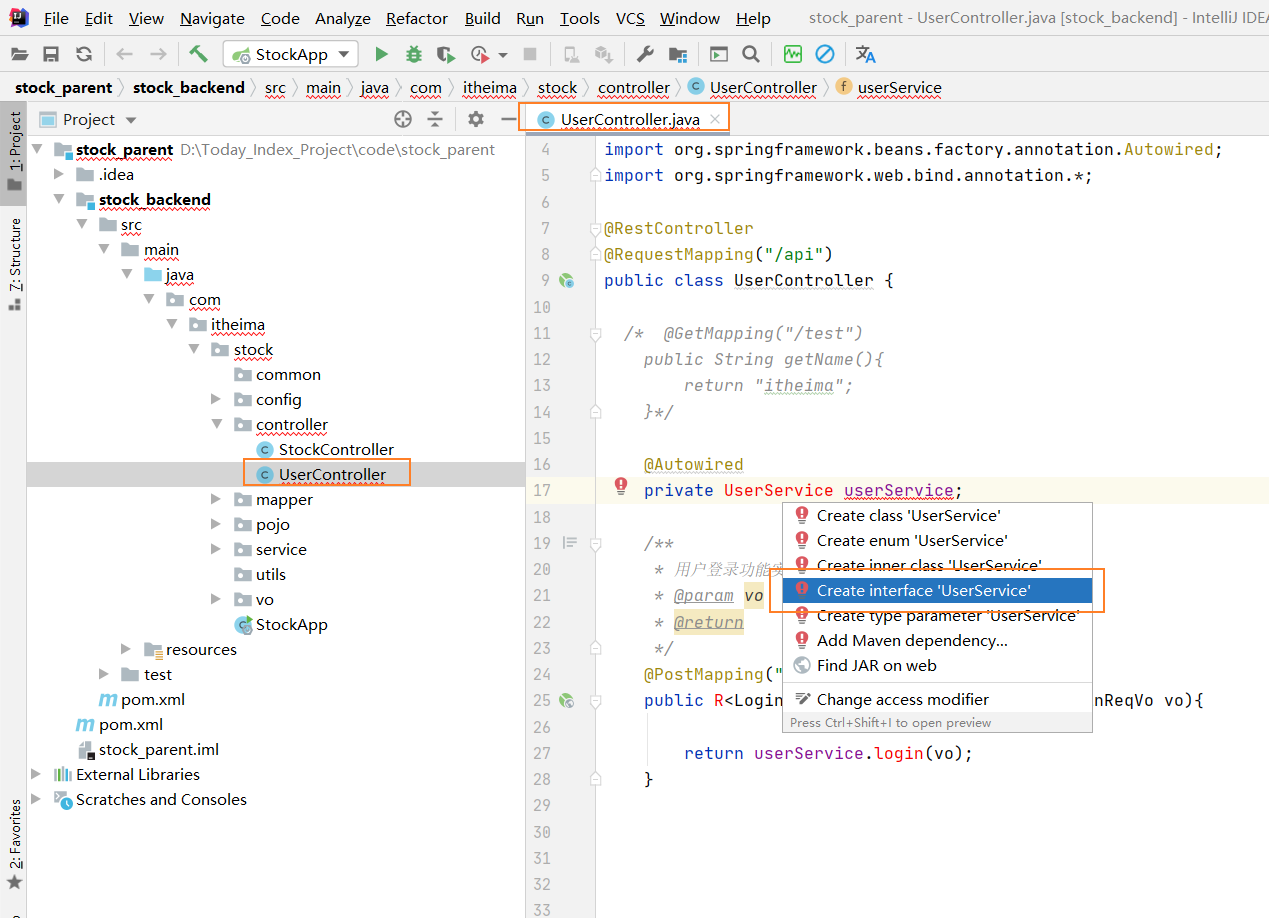
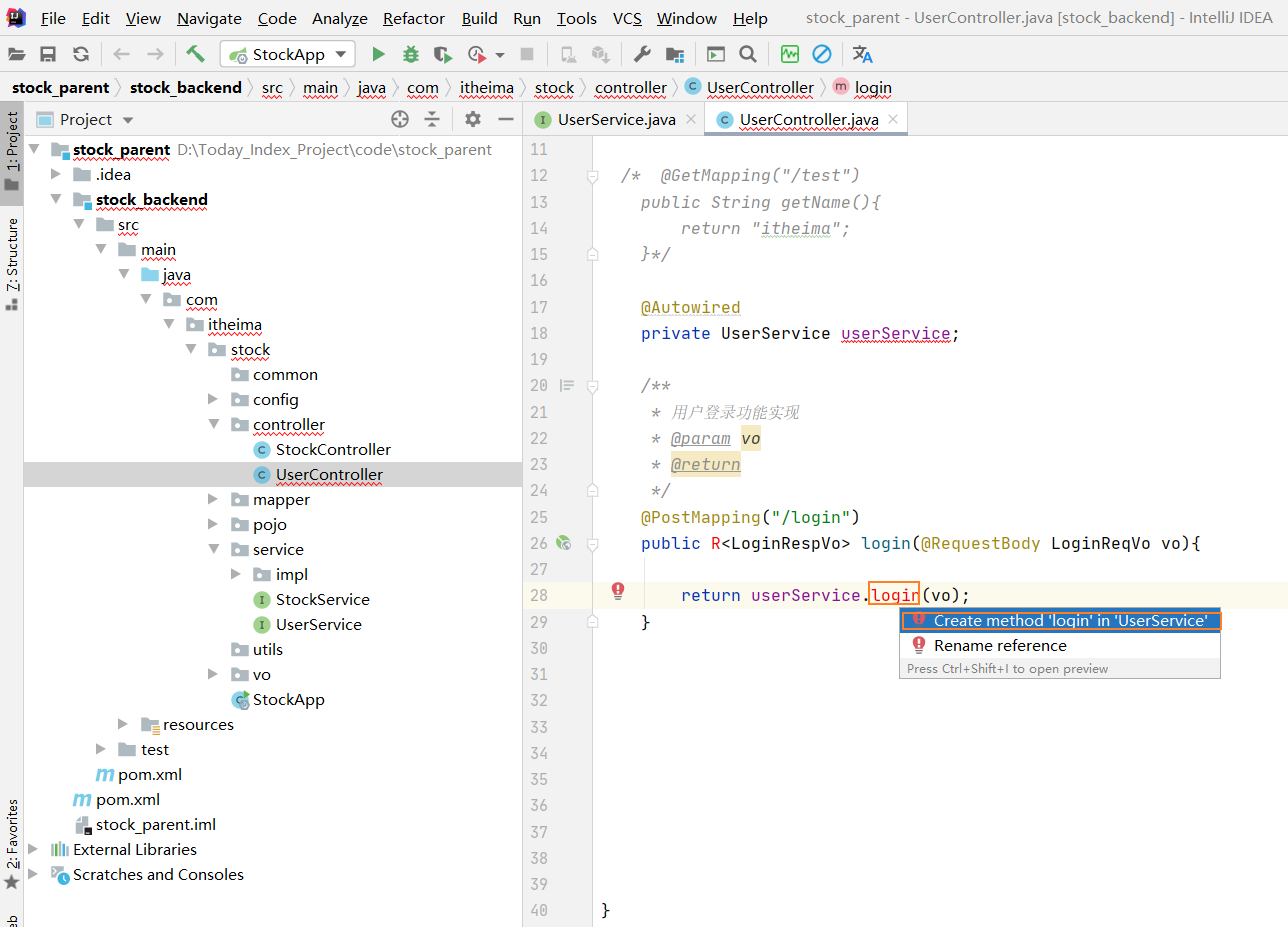
public class UserController {/* @GetMapping("/test")public String getName(){return "itheima";}*/@Autowiredprivate UserService userService;/*** 用户登录功能实现* @param vo* @return*/@PostMapping("/login")public R<LoginRespVo> login(@RequestBody LoginReqVo vo){return userService.login(vo);}}
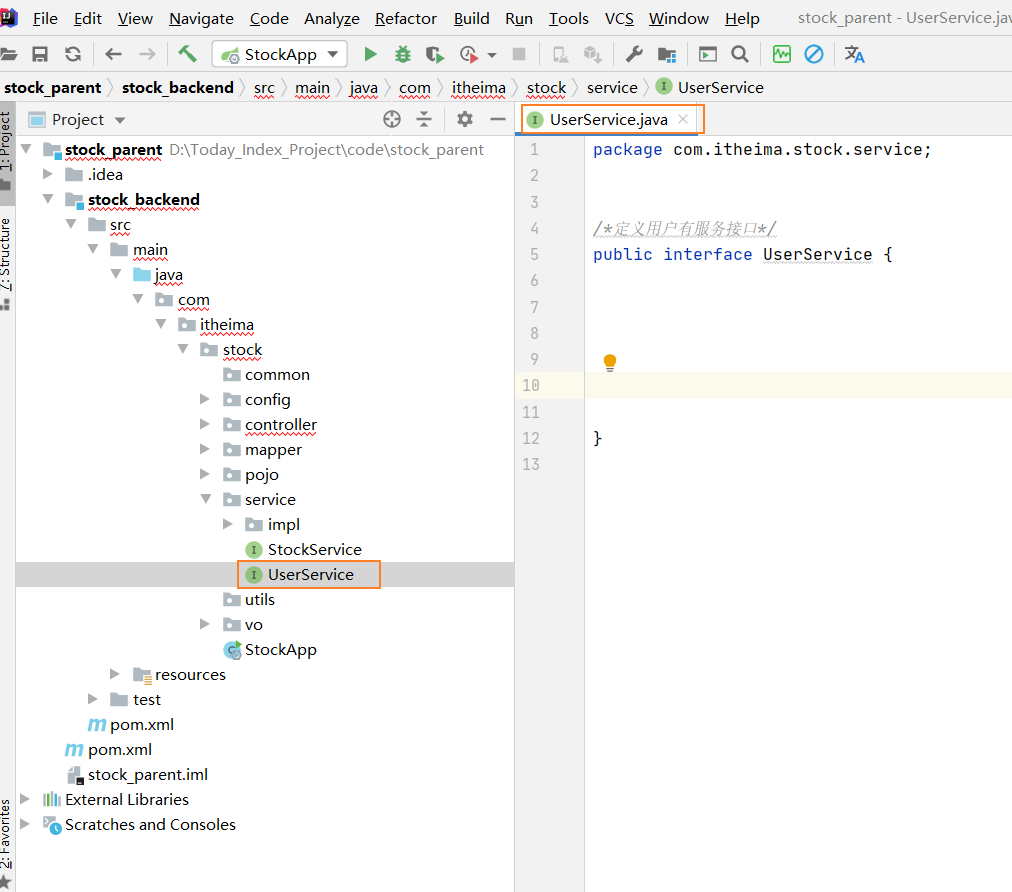
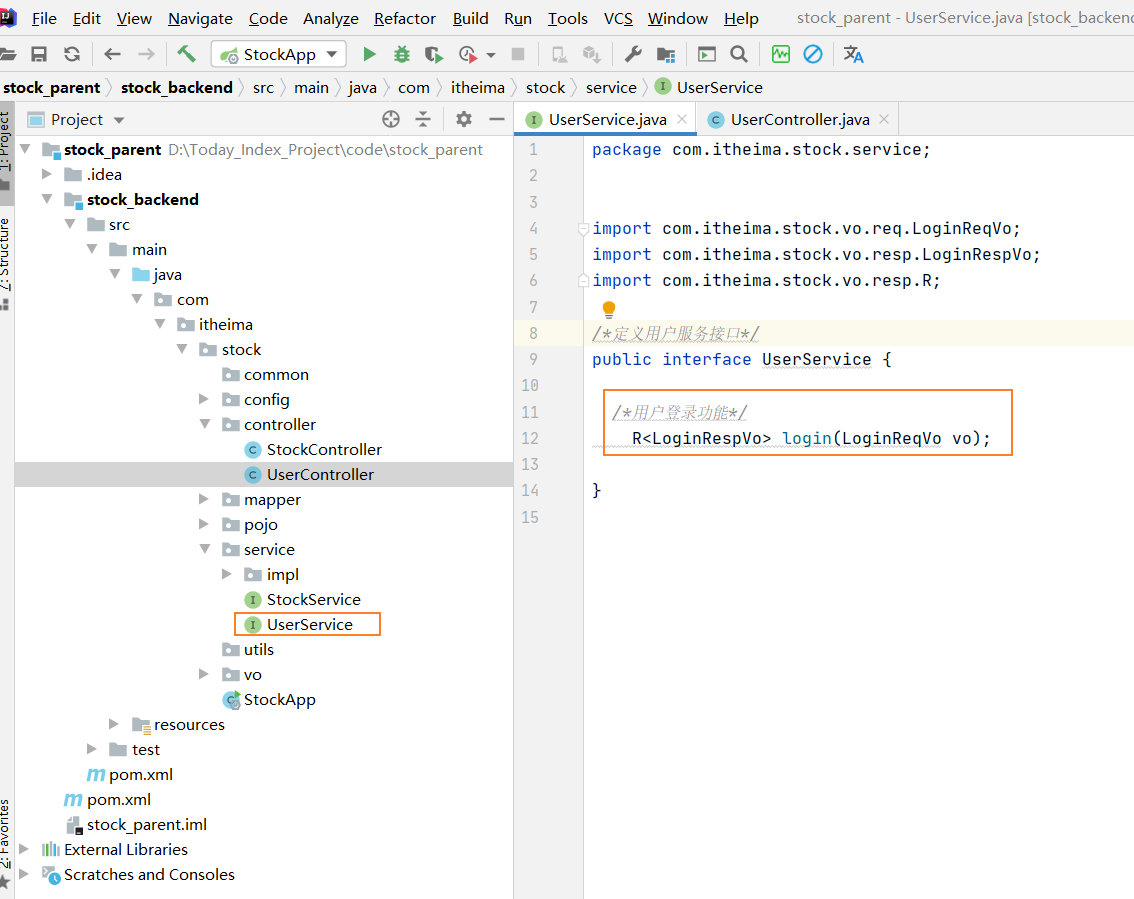
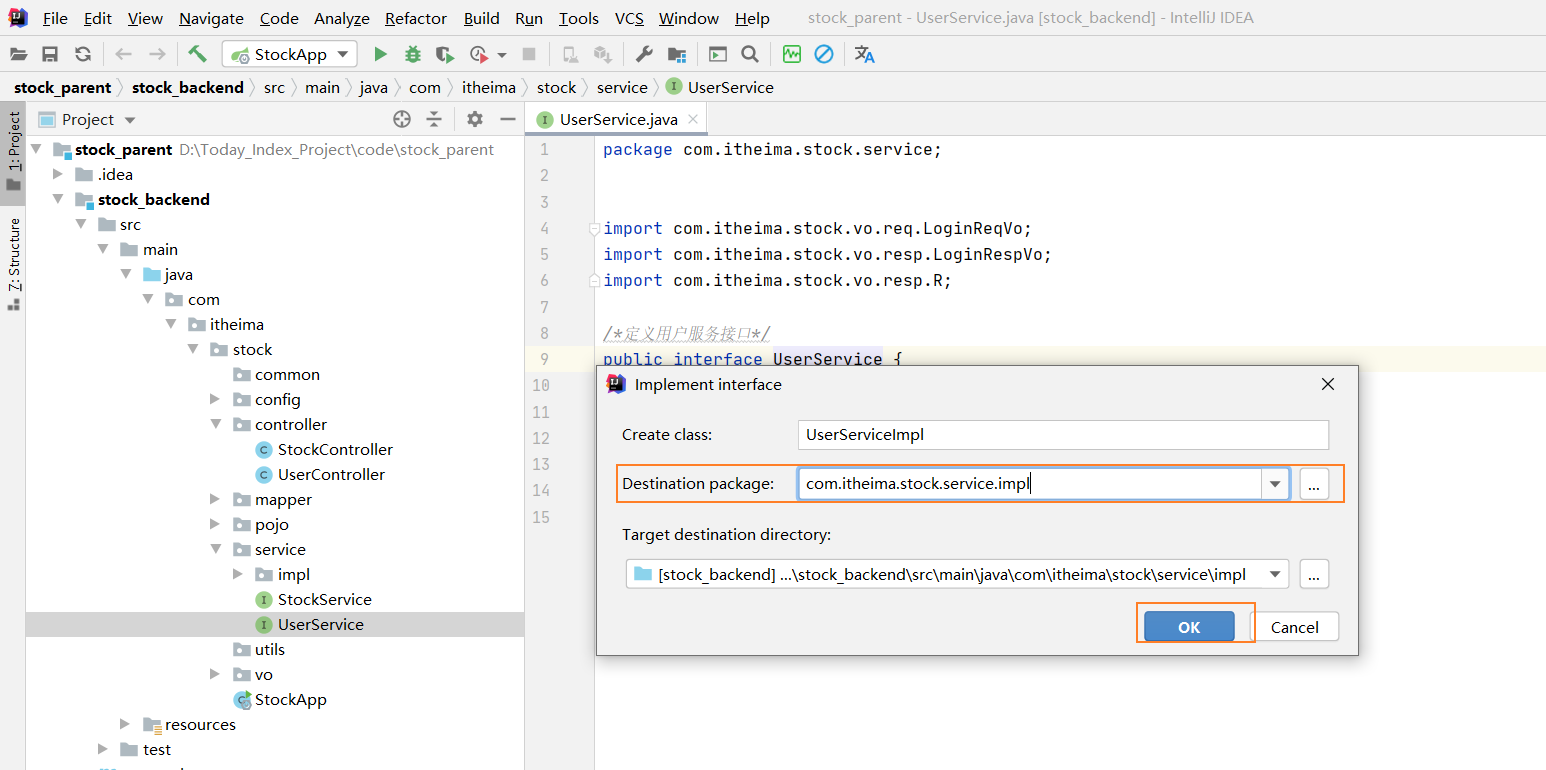
4)定义登录服务接口和实现
服务接口:
Alt+Enter 选择以下图上所示

接口服务实现:
Alt+Enter


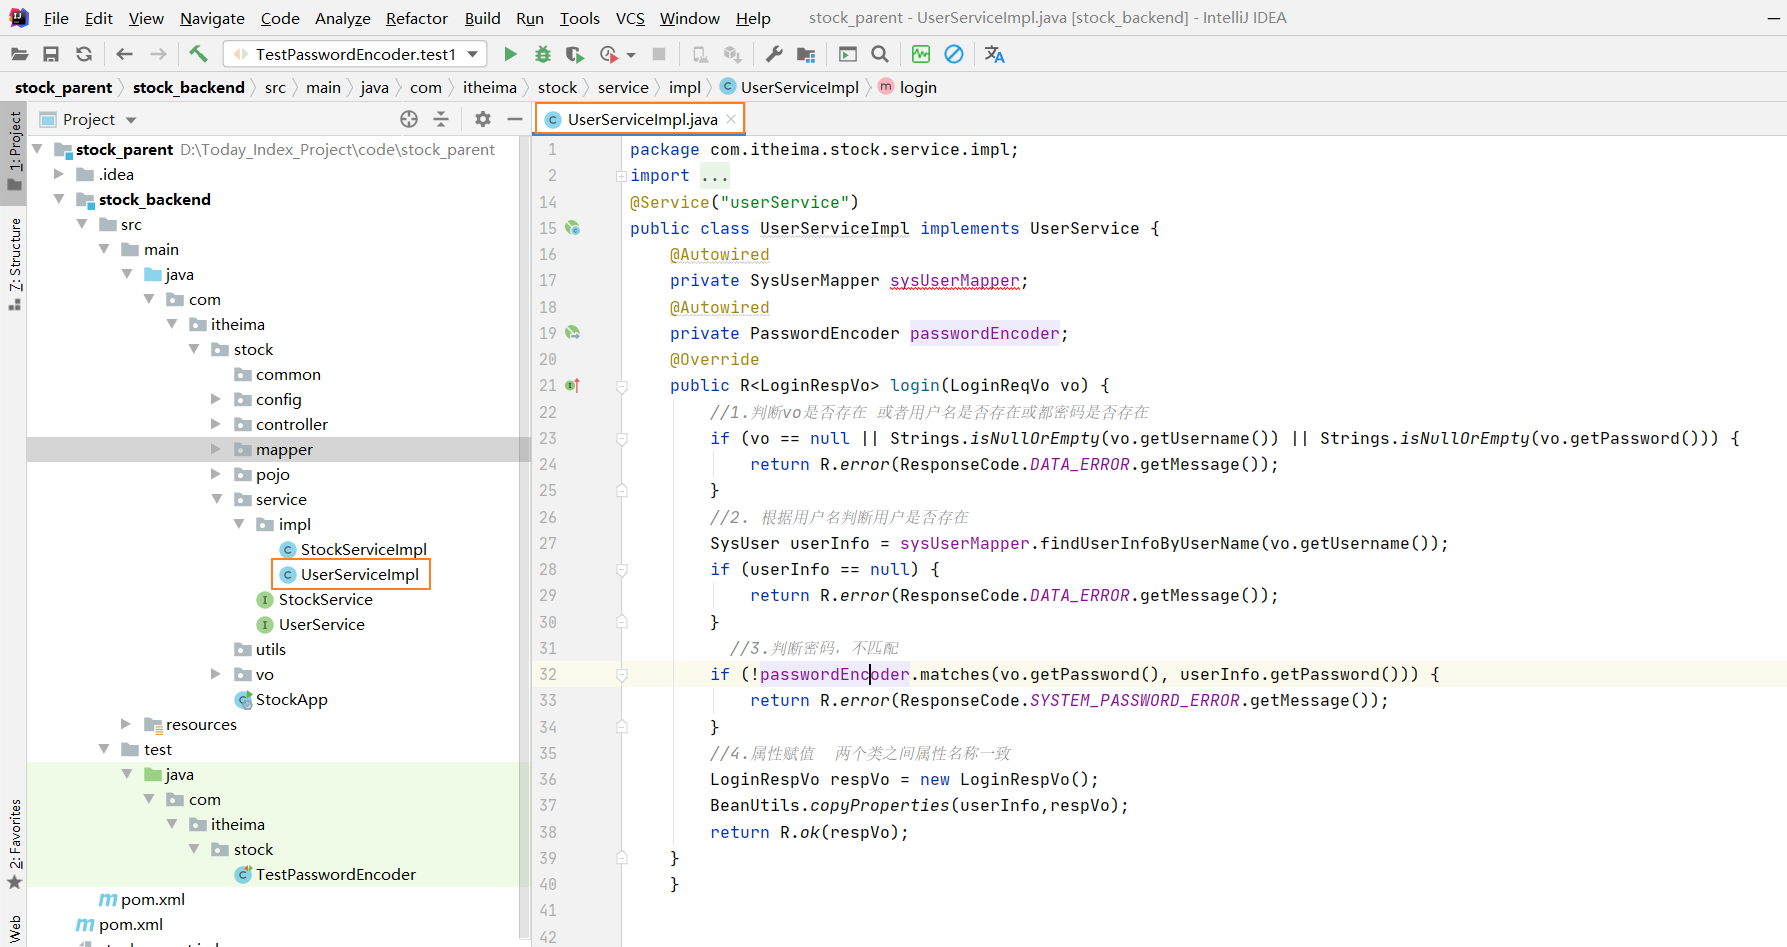
package com.itheima.stock.service.impl;
import com.google.common.base.Strings;
import com.itheima.stock.mapper.SysUserMapper;
import com.itheima.stock.pojo.SysUser;
import com.itheima.stock.service.UserService;
import com.itheima.stock.vo.req.LoginReqVo;
import com.itheima.stock.vo.resp.LoginRespVo;
import com.itheima.stock.vo.resp.R;
import com.itheima.stock.vo.resp.ResponseCode;
import org.springframework.beans.BeanUtils;
import org.springframework.beans.factory.annotation.Autowired;
import org.springframework.security.crypto.password.PasswordEncoder;
import org.springframework.stereotype.Service;
@Service("userService")
public class UserServiceImpl implements UserService {@Autowiredprivate SysUserMapper sysUserMapper;@Autowiredprivate PasswordEncoder passwordEncoder;@Overridepublic R<LoginRespVo> login(LoginReqVo vo) {//1.判断vo是否存在 或者用户名是否存在或都密码是否存在if (vo == null || Strings.isNullOrEmpty(vo.getUsername()) || Strings.isNullOrEmpty(vo.getPassword())) {return R.error(ResponseCode.DATA_ERROR.getMessage());}//2. 根据用户名判断用户是否存在SysUser userInfo = sysUserMapper.findUserInfoByUserName(vo.getUsername());if (userInfo == null) {return R.error(ResponseCode.DATA_ERROR.getMessage());}//3.判断密码,不匹配if (!passwordEncoder.matches(vo.getPassword(), userInfo.getPassword())) {return R.error(ResponseCode.SYSTEM_PASSWORD_ERROR.getMessage());}//4.属性赋值  两个类之间属性名称一致LoginRespVo respVo = new LoginRespVo();BeanUtils.copyProperties(userInfo,respVo);return R.ok(respVo);}}
测试
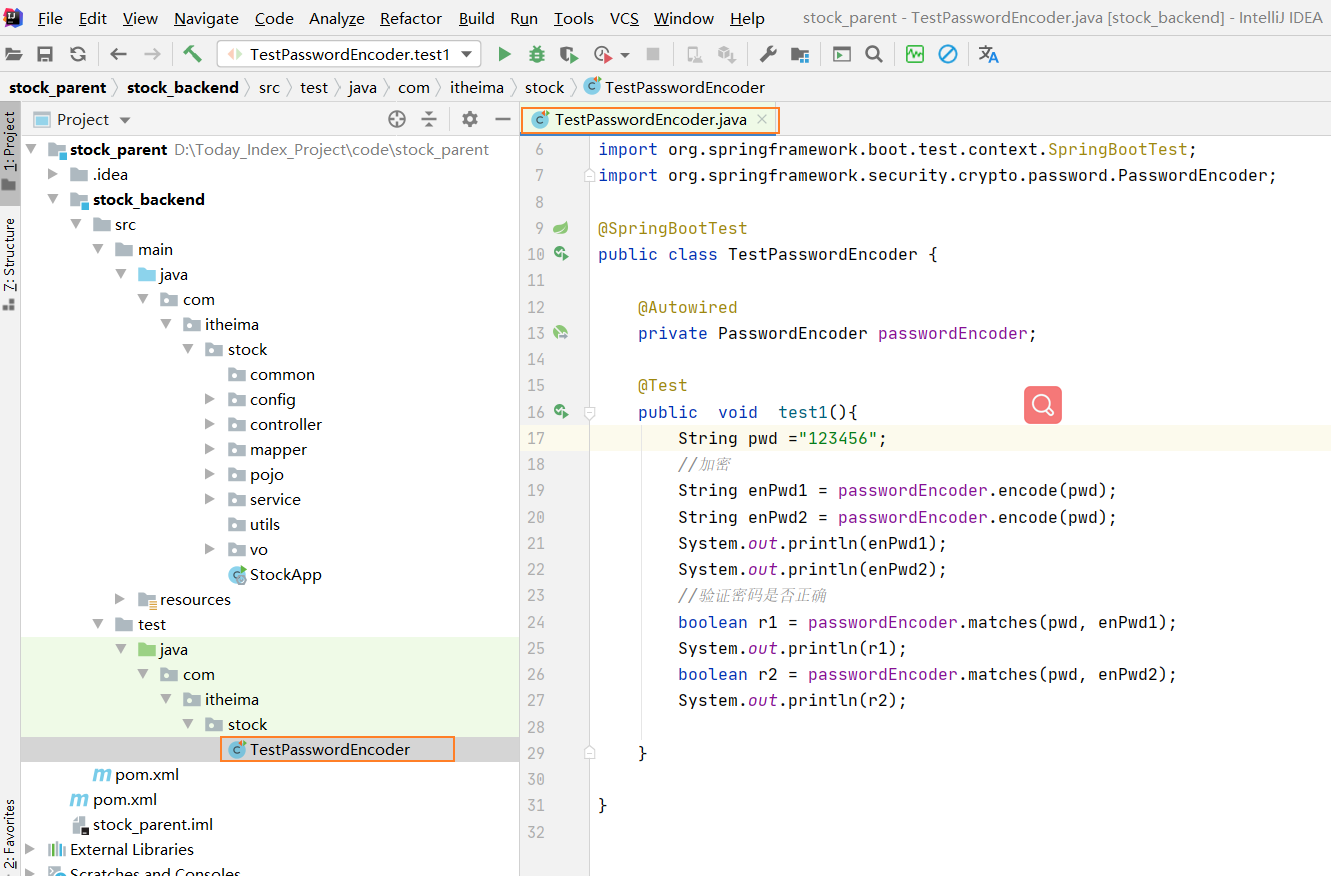
package com.itheima.stock;import org.junit.jupiter.api.Test;
import org.springframework.beans.factory.annotation.Autowired;
import org.springframework.boot.test.context.SpringBootTest;
import org.springframework.security.crypto.password.PasswordEncoder;@SpringBootTest
public class TestPasswordEncoder {@Autowiredprivate PasswordEncoder passwordEncoder;@Testpublic  void  test1(){String pwd ="123456";//加密String enPwd1 = passwordEncoder.encode(pwd);String enPwd2 = passwordEncoder.encode(pwd);System.out.println(enPwd1);System.out.println(enPwd2);//验证密码是否正确boolean r1 = passwordEncoder.matches(pwd, enPwd1);System.out.println(r1);boolean r2 = passwordEncoder.matches(pwd, enPwd2);System.out.println(r2);}}

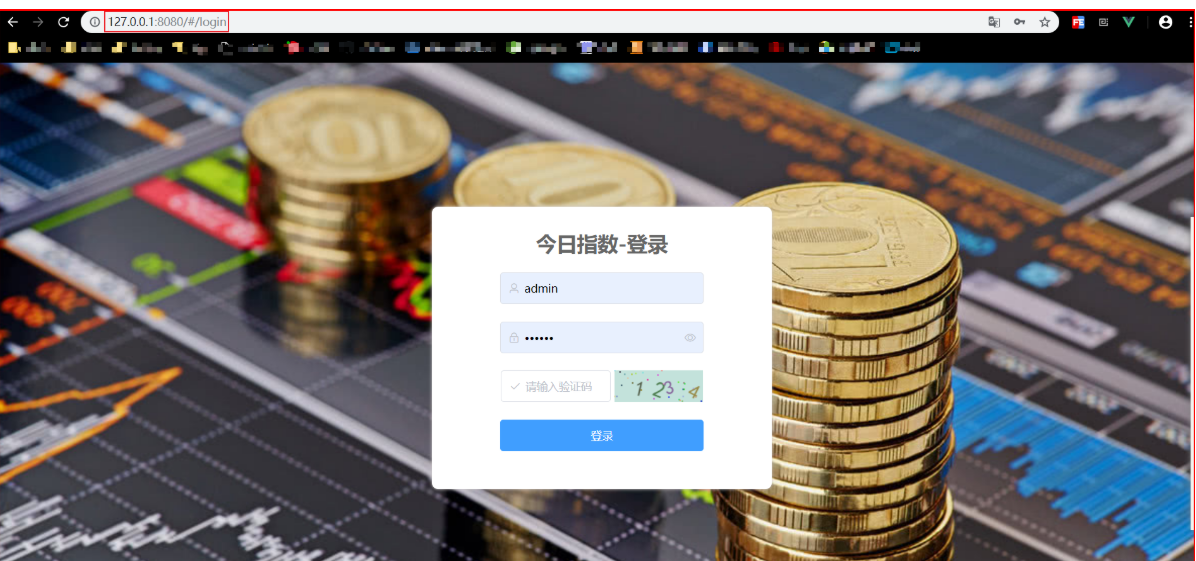
5)Postman测试


相关文章:
项目(今日指数之环境搭建)
一 项目架构1.1 今日指数技术选型【1】前端技术【2】后端技术栈【3】整体概览1.2 核心业务介绍【1】业务结构预览【2】业务结构预览1.定时任务调度服务XXL-JOB通过RestTemplate多线程动态拉去股票接口数据,刷入数据库; 2.国内指数服务 3.板块指数服务 4.…...

PCL 基于投影点密度的建筑物立面提取
目录 一、算法原理1、投影密度理论及方法2、参考文献二、代码实现三、结果展示一、算法原理 1、投影密度理论及方法 将3维坐标点直接垂直投影到水平面上或者将 Z Z Z 值取任意常数,统计和计算水平面任意位置处所含投影点的个数记为...

DDD 参考工程架构
1 背景 不同团队落地DDD所采取的应用架构风格可能不同,并没有统一的、标准的DDD工程架构。有些团队可能遵循经典的DDD四层架构,或改进的DDD四层架构,有些团队可能综合考虑分层架构、整洁架构、六边形架构等多种架构风格,有些在实…...

重建,是2023年的关键词
作者:俞敏洪 来源:老俞闲话(ID:laoyuxianhua) 01 重建,是2023年的关键词 1.重建,是2023年的关键词 2023年,以一种奇特的方式来临。 之所以说奇特,是因为我们谁都没有…...

动手写操作系统-00-环境搭建以及资料收集
文章目录 动手写操作系统内核目标编本教程适合什么样的人?一些简单的要求操作系统的功能环境搭建参考文档:动手写操作系统内核 一直以来想学习linux操作系统,读了很多关于操作系统的书籍,也想自己动手写个OS 目标编 编写一个操作系统内核;能正常的运行自己编写的OS本教程适合…...
【scipy.sparse包】Python稀疏矩阵详解
【scipy.sparse包】Python稀疏矩阵 文章目录【scipy.sparse包】Python稀疏矩阵1. 前言2. 导入包3. 稀疏矩阵总览4. 稀疏矩阵详细介绍4.1 coo_matrix4.2 dok_matrix4.3 lil_matrix4.4 dia_matrix4.5 csc_matrix & csr_matrix4.6 bsr_matrix5. 稀疏矩阵的存取5.1 用save_npz保…...

从写下第1个脚本到年薪30W,我的自动化测试心路历程
我希望我的故事能够激励现在的软件测试人,尤其是还坚持在做“点点点”的测试人。 你可能会有疑问:“我也能做到这一点的可能性有多大?”因此,我会尽量把自己做决定和思考的过程讲得更具体一些,并尽量体现更多细节。 …...
JAVA八股、JAVA面经
还有三天面一个JAVA软件开发岗,之前完全没学过JAVA,整理一些面经...... 大佬整理的:Java面试必备八股文_-半度的博客-CSDN博客 另JAVA学习资料:Java | CS-Notes Java 基础Java 容器Java 并发Java 虚拟机Java IO目录 int和Inte…...
GAN系列基础知识
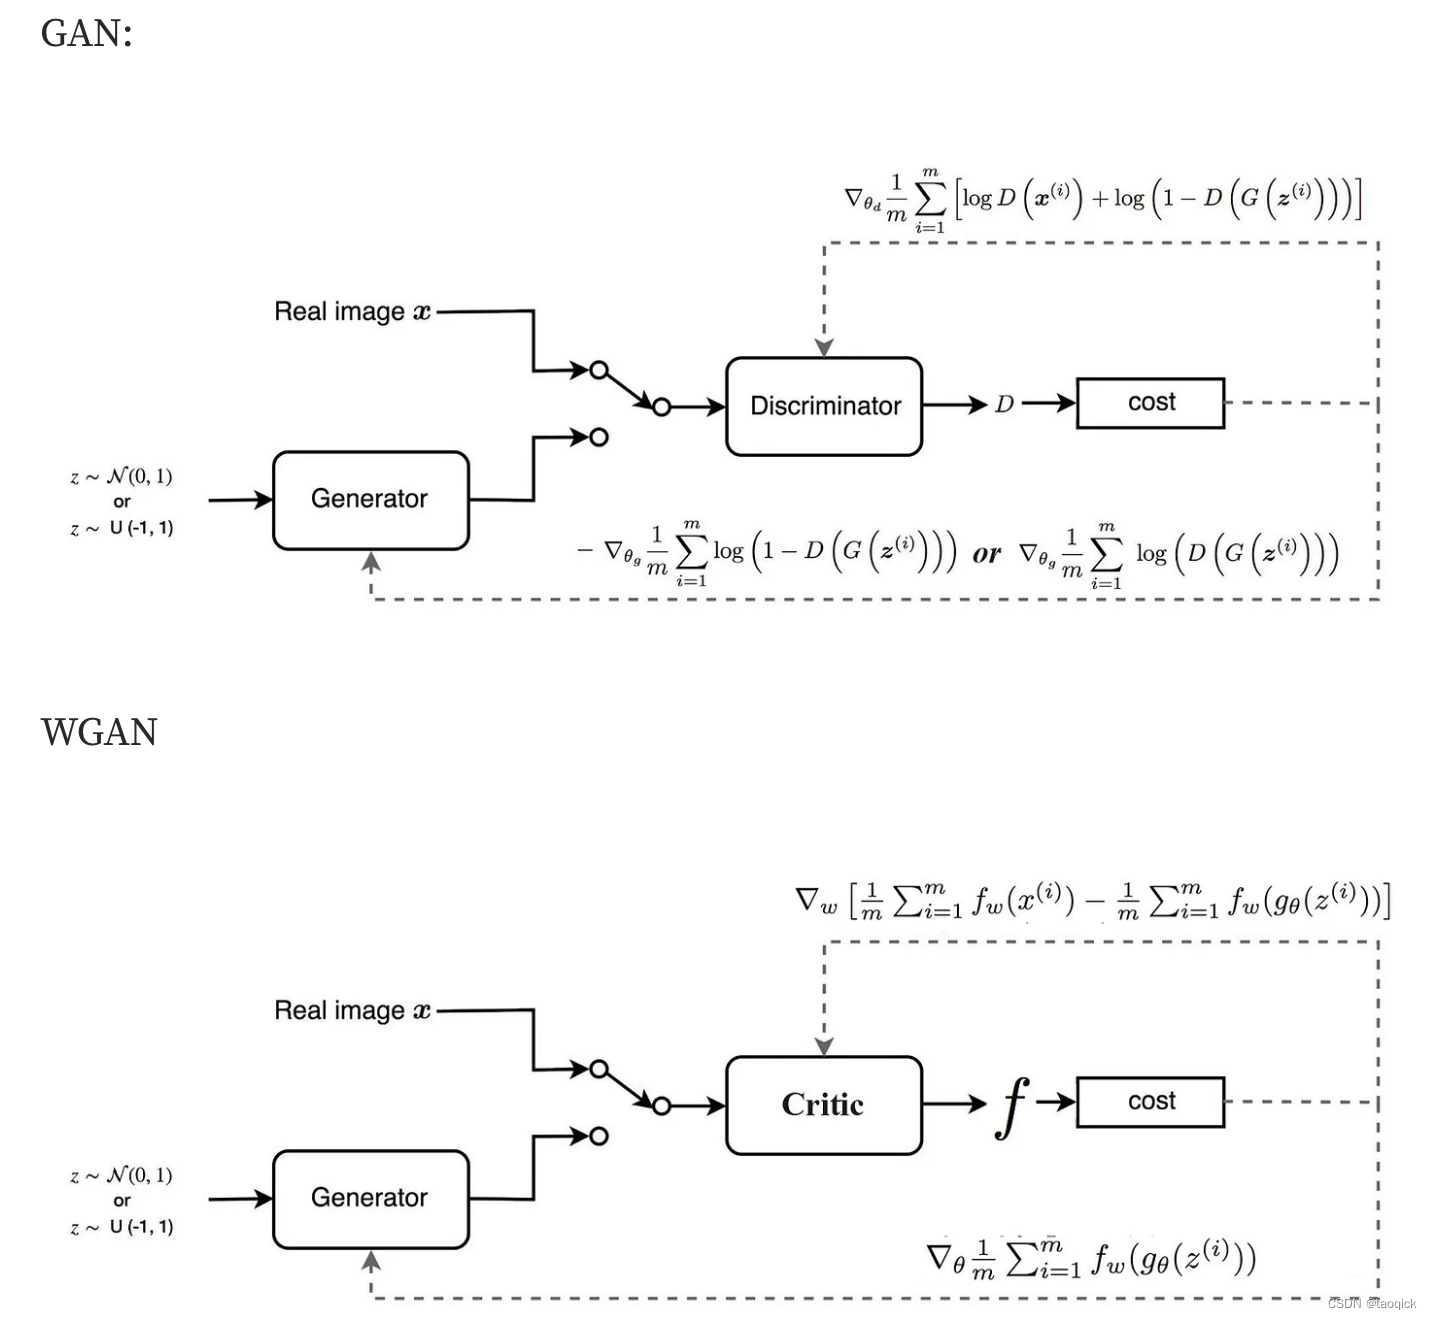
原始值函数 原始GAN的值函数是 minGmaxDV(D,G)Ex∼pdata(x)[logD(x)]Ez∼pz(z)[log(1−D(G(z)))]min_Gmax_DV(D,G) E_{x \sim p_{data}(x)}[logD(x)]E_{z \sim p_{z}(z)} [log(1-D(G(z)))]minGmaxDV(D,G)Ex∼pdata(x)[logD(x)]Ez∼pz(z)[log(1−D(G(z)))] 其中Ex…...
Linux/CenterOS 7.9配置汉化gitlab服务器
1.安装gitlab的依赖项 yum install -y curl openssh-server openssh-clients postfix cronie policycoreutils-python2.启动postfix,并设置为开机启动 systemctl start postfixsystemctl enable postfix3.防火墙和selinux的设置 setenforce 0systemctl stop fire…...

山洪灾害监测预警平台 山洪灾害监测预警系统解决方案 以人为本 科学防御
平升电子山洪灾害监测预警平台 山洪灾害监测预警系统解决方案,集信息采集、传输、分析和预警等功能于一体,实现预警信息及时、准确地上传下达,提升监测预警能力,使可能受灾区域能够及时采取措施,最大程度减少人员伤亡和…...

The Number Of ThreadPoolExecutor
序言整理下Java 线程池中线程数量如何设置的依据巨人肩膀:https://blog.csdn.net/weilaizhixing007/article/details/125955693https://blog.csdn.net/yuyan_jia/article/details/120298564#:~:text%E4%B8%80%E4%B8%AA%E7%BA%BF%E7%A8%8B%E6%B1%A0%E5%A4%84%E7%90%86%E8%AE%A1,…...

Linux(Linux各目录结构详解)
我们知道Linux系统是一个文件系统,它的文件系统就类似windows系统下的磁盘文件系统。 我们连接上一台linux系统的服务器。 输入命令 : ls / 我们可以看到 linux系统的根目录下有这些目录 bin boot data dev etc hbr home lib lib64 lostfoun…...

UART通讯简介
UART全称Universal AsynchronousReceiver/Transmitter,通用异步收发传输器。 一、工作原理 和其它串口一样,数据按照二进制从低位到高位一位一位的传输,能将要传输的数据在串行通信与并行通信之间加以转换,能够灵活地与外部设备进…...

80 90后表示真干不过,部门新来的00后已经把我卷奔溃了,不想干了····
都说00后躺平了,但是有一说一,该卷的还是卷。这不,刚开年我们公司来了个00后,工作没两年,跳槽到我们公司起薪18K,都快接近我了。 后来才知道人家是个卷王,从早干到晚就差搬张床到工位睡觉了。 …...

Python中2.x 与 3.x 版本区别?
Python 的 3.0 版本,常被称为 Python 3000,或简称 Py3k。相对于 Python 的早期版本,这是一个较大的升级。 为了不带入过多的累赘,Python 3.0 在设计的时候没有考虑向下相容。 许多针对早期 Python 版本设计的程式都无法在 P…...

性能指南笔记一
全面的性能 1.好处和效率之间的权衡在增加程序特性的过程 2.数据库永远是瓶颈,分布式系统的整体性能问题 我们当前的性能处于什么百分位? 是不是整体的性能属于下降的? 一开始就考虑可能性很小的性能问题? 3.吞吐量测试 TPS 每秒…...

es数据导入导出
使用elasticdump导入导出数据 一、安装elasticdump 终端中输入 1 npm install elasticdump -g -g表示全局可用,直接在终端输入 elasticdump --version,出现版本信息即表示安装成功,如下 1 2 C:\Users\T470s>elasticdump --version 6.3.3 …...

Python3入门教程||Python3 字符串||Python3 列表
Python3 字符串字符串(string,简写为str)是 Python 中最常用的数据类型之一。我们可以使用引号( 或 " )来创建字符串。创建字符串很简单,只要为变量分配一个值即可。例如:var1 Hello World!var2 "W3Cscho…...

API 的安全性
大家好。今天聊一个很重要但是大部分人不重视的API安全问题。api固有的范围和风险意味着它们需要一种不同的安全方法。应用程序编程接口(api)是现代应用程序的构建模块,它们的使用正在以惊人的速度增长。然而,随着使用的增加,风险也会增加。。…...

SciencePlots——绘制论文中的图片
文章目录 安装一、风格二、1 资源 安装 # 安装最新版 pip install githttps://github.com/garrettj403/SciencePlots.git# 安装稳定版 pip install SciencePlots一、风格 简单好用的深度学习论文绘图专用工具包–Science Plot 二、 1 资源 论文绘图神器来了:一行…...
练习(含atoi的模拟实现,自定义类型等练习)
一、结构体大小的计算及位段 (结构体大小计算及位段 详解请看:自定义类型:结构体进阶-CSDN博客) 1.在32位系统环境,编译选项为4字节对齐,那么sizeof(A)和sizeof(B)是多少? #pragma pack(4)st…...
SCAU期末笔记 - 数据分析与数据挖掘题库解析
这门怎么题库答案不全啊日 来简单学一下子来 一、选择题(可多选) 将原始数据进行集成、变换、维度规约、数值规约是在以下哪个步骤的任务?(C) A. 频繁模式挖掘 B.分类和预测 C.数据预处理 D.数据流挖掘 A. 频繁模式挖掘:专注于发现数据中…...

深入理解JavaScript设计模式之单例模式
目录 什么是单例模式为什么需要单例模式常见应用场景包括 单例模式实现透明单例模式实现不透明单例模式用代理实现单例模式javaScript中的单例模式使用命名空间使用闭包封装私有变量 惰性单例通用的惰性单例 结语 什么是单例模式 单例模式(Singleton Pattern&#…...

高危文件识别的常用算法:原理、应用与企业场景
高危文件识别的常用算法:原理、应用与企业场景 高危文件识别旨在检测可能导致安全威胁的文件,如包含恶意代码、敏感数据或欺诈内容的文档,在企业协同办公环境中(如Teams、Google Workspace)尤为重要。结合大模型技术&…...
(转)什么是DockerCompose?它有什么作用?
一、什么是DockerCompose? DockerCompose可以基于Compose文件帮我们快速的部署分布式应用,而无需手动一个个创建和运行容器。 Compose文件是一个文本文件,通过指令定义集群中的每个容器如何运行。 DockerCompose就是把DockerFile转换成指令去运行。 …...
 自用)
css3笔记 (1) 自用
outline: none 用于移除元素获得焦点时默认的轮廓线 broder:0 用于移除边框 font-size:0 用于设置字体不显示 list-style: none 消除<li> 标签默认样式 margin: xx auto 版心居中 width:100% 通栏 vertical-align 作用于行内元素 / 表格单元格ÿ…...
听写流程自动化实践,轻量级教育辅助
随着智能教育工具的发展,越来越多的传统学习方式正在被数字化、自动化所优化。听写作为语文、英语等学科中重要的基础训练形式,也迎来了更高效的解决方案。 这是一款轻量但功能强大的听写辅助工具。它是基于本地词库与可选在线语音引擎构建,…...

2025季度云服务器排行榜
在全球云服务器市场,各厂商的排名和地位并非一成不变,而是由其独特的优势、战略布局和市场适应性共同决定的。以下是根据2025年市场趋势,对主要云服务器厂商在排行榜中占据重要位置的原因和优势进行深度分析: 一、全球“三巨头”…...

Go语言多线程问题
打印零与奇偶数(leetcode 1116) 方法1:使用互斥锁和条件变量 package mainimport ("fmt""sync" )type ZeroEvenOdd struct {n intzeroMutex sync.MutexevenMutex sync.MutexoddMutex sync.Mutexcurrent int…...