Python基于YOLOv8和OpenCV实现车道线和车辆检测
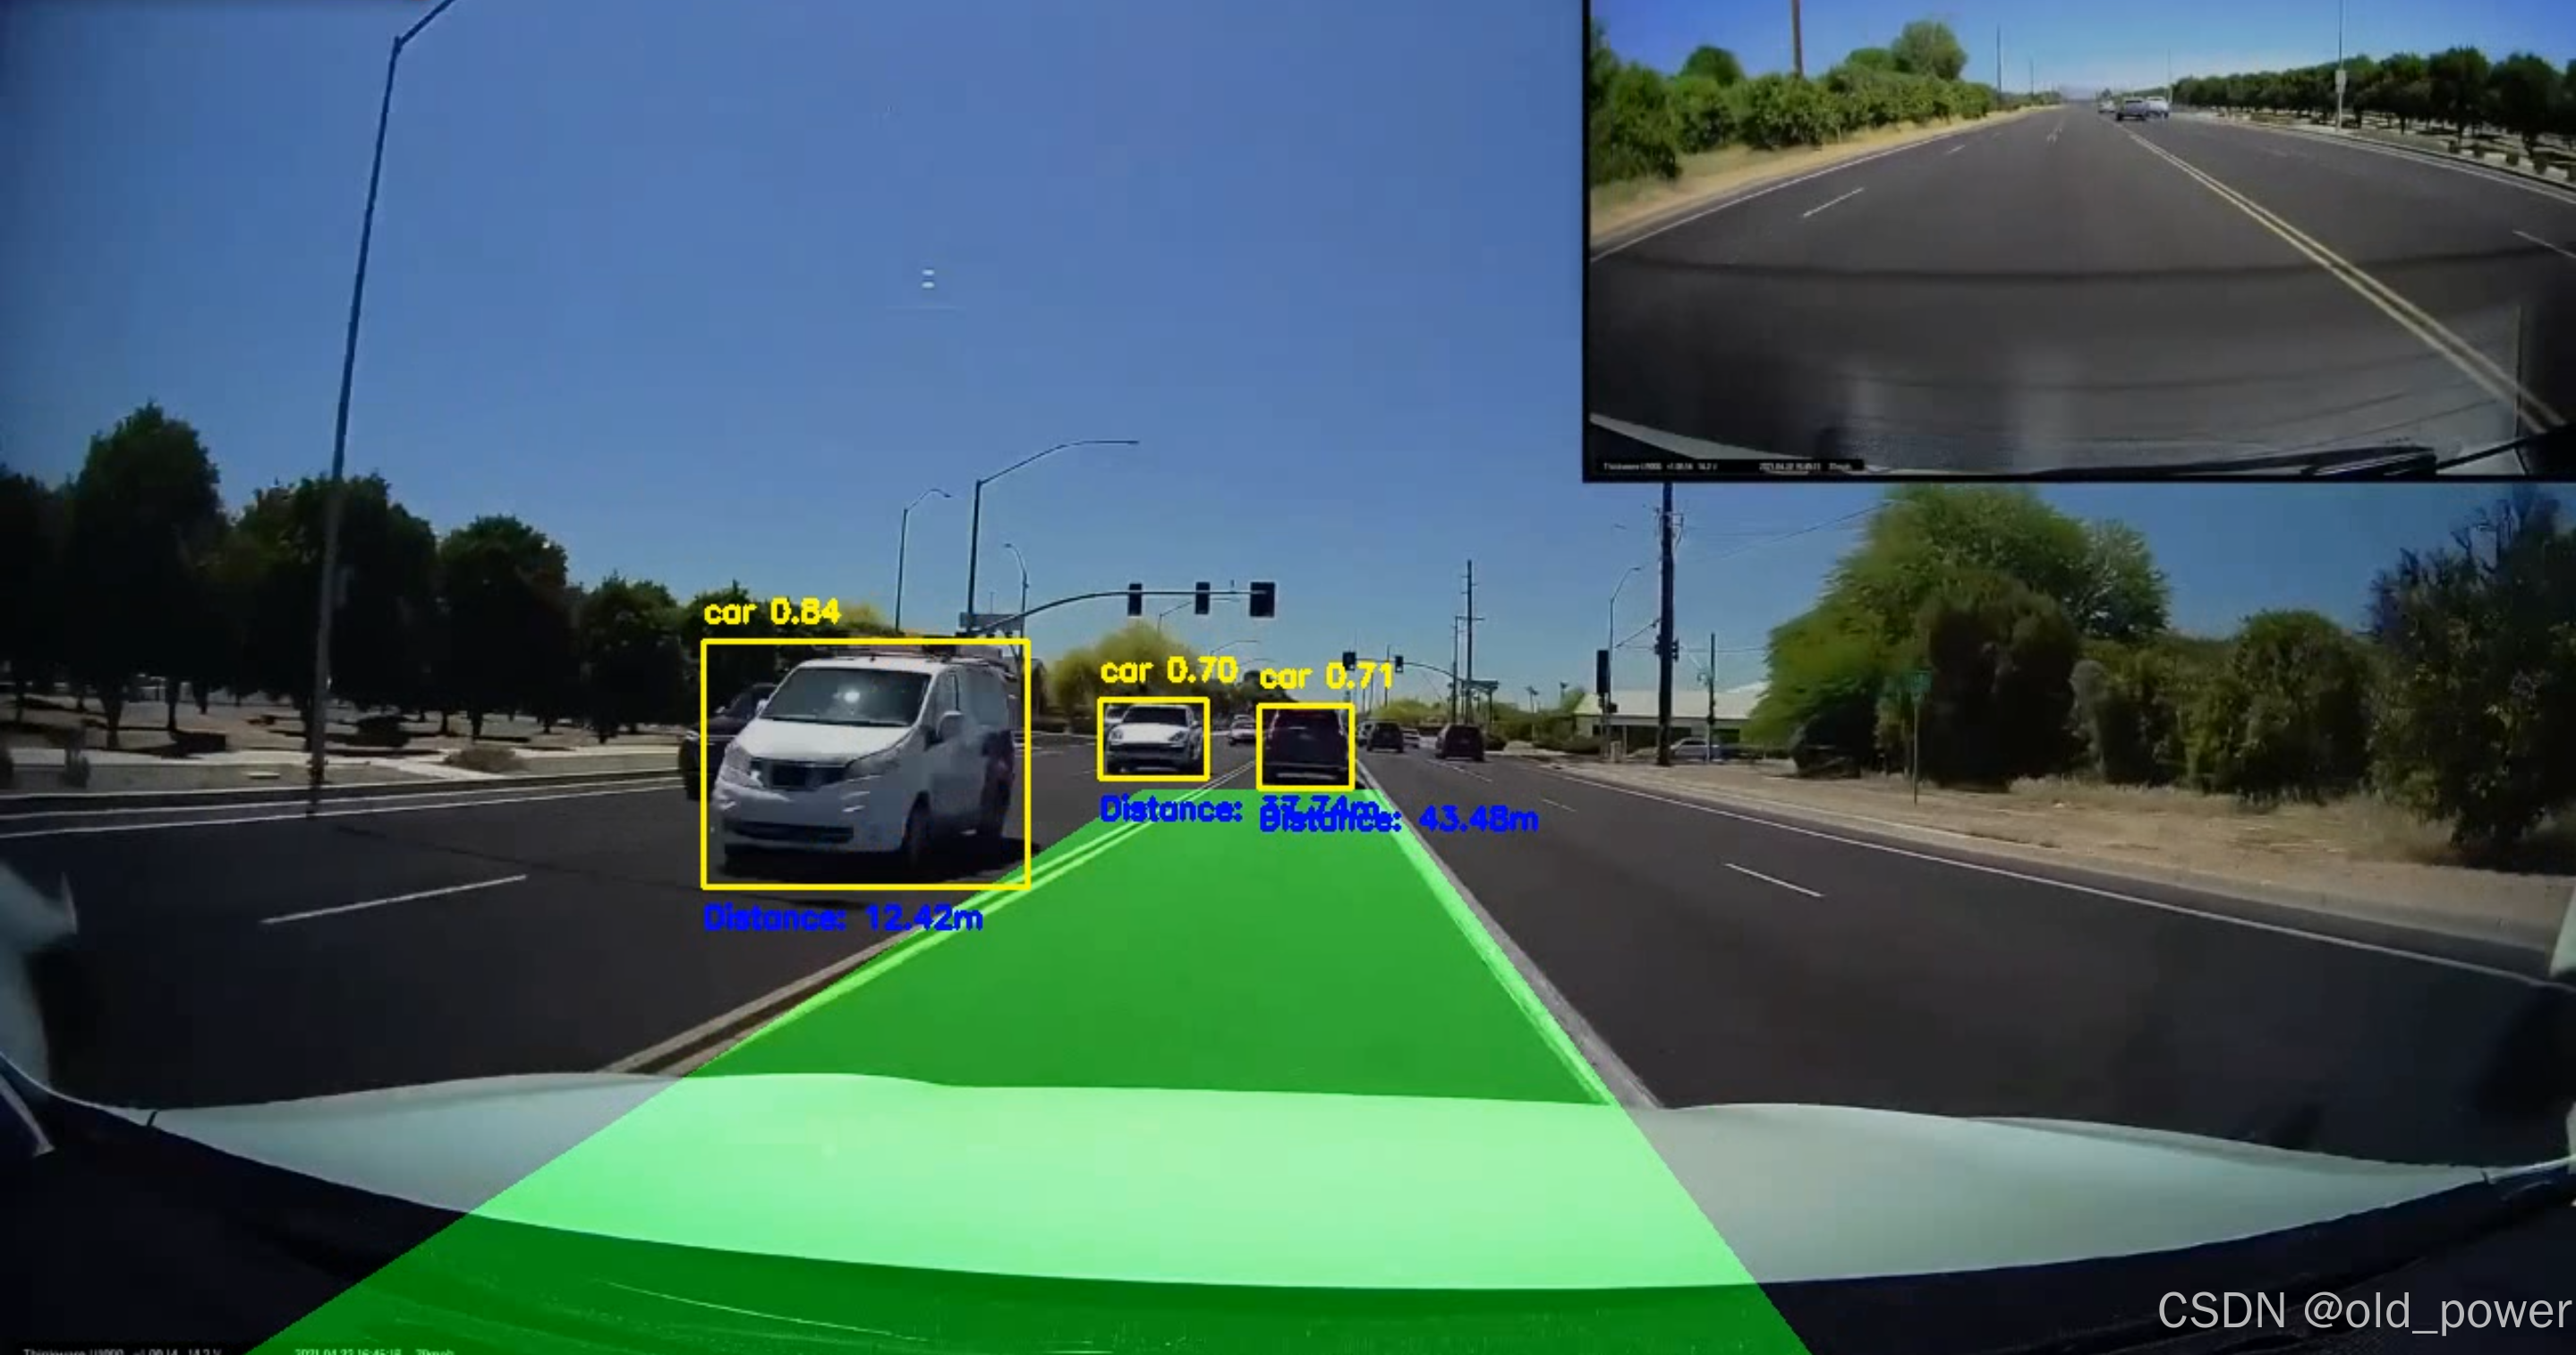
使用YOLOv8(You Only Look Once)和OpenCV实现车道线和车辆检测,目标是创建一个可以检测道路上的车道并识别车辆的系统,并估计它们与摄像头的距离。该项目结合了计算机视觉技术和深度学习物体检测。
1、系统主要功能
- 车道检测:使用边缘检测和霍夫线变换检测道路车道。
- 汽车检测:使用 YOLOv8 模型识别汽车并在汽车周围绘制边界框。
- 距离估计:使用边界框大小计算检测到的汽车与摄像头的距离。
2、环境要求
- OpenCV:用于图像处理和车道检测。
- Ultralytics YOLOv8:用于车辆检测。
- NumPy:用于数组操作。
pip install opencv-python-headless numpy ultralytics
opencv-python 和 opencv-python-headless 区别是 OpenCV 的 Python 包,主要区别在于是否包含 GUI 相关的功能。
opencv-python
- 包含 GUI 功能:支持窗口显示、鼠标事件等图形界面操作。
- 依赖:需要 GUI 库(如 GTK、Qt)支持。
- 适用场景:适用于需要显示图像或与用户交互的环境,如桌面应用。
opencv-python-headless
- 不包含 GUI 功能:去除了窗口显示和用户交互功能。
- 依赖:无需 GUI 库,适合无图形界面的环境。
- 适用场景:适用于服务器或无图形界面的环境,如远程服务器、Docker 容器。
选择建议
- 如果需要显示图像或与用户交互,选择
opencv-python。 - 如果仅需图像处理且无图形界面需求,选择
opencv-python-headless。
3、代码
import cv2
import numpy as np
import math
import time
from ultralytics import YOLO  # YOLOv8 module# Function to mask out the region of interest
def region_of_interest(img, vertices):mask = np.zeros_like(img)match_mask_color = 255cv2.fillPoly(mask, vertices, match_mask_color)masked_image = cv2.bitwise_and(img, mask)return masked_image# Function to draw the filled polygon between the lane lines
def draw_lane_lines(img, left_line, right_line, color=[0, 255, 0], thickness=10):line_img = np.zeros_like(img)poly_pts = np.array([[(left_line[0], left_line[1]),(left_line[2], left_line[3]),(right_line[2], right_line[3]),(right_line[0], right_line[1])]], dtype=np.int32)# Fill the polygon between the linescv2.fillPoly(line_img, poly_pts, color)# Overlay the polygon onto the original imageimg = cv2.addWeighted(img, 0.8, line_img, 0.5, 0.0)return img# The lane detection pipeline
def pipeline(image):height = image.shape[0]width = image.shape[1]region_of_interest_vertices = [(0, height),(width / 2, height / 2),(width, height),]# Convert to grayscale and apply Canny edge detectiongray_image = cv2.cvtColor(image, cv2.COLOR_RGB2GRAY)cannyed_image = cv2.Canny(gray_image, 100, 200)# Mask out the region of interestcropped_image = region_of_interest(cannyed_image,np.array([region_of_interest_vertices], np.int32))# Perform Hough Line Transformation to detect lineslines = cv2.HoughLinesP(cropped_image,rho=6,theta=np.pi / 60,threshold=160,lines=np.array([]),minLineLength=40,maxLineGap=25)# Separating left and right lines based on slopeleft_line_x = []left_line_y = []right_line_x = []right_line_y = []if lines is None:return imagefor line in lines:for x1, y1, x2, y2 in line:slope = (y2 - y1) / (x2 - x1) if (x2 - x1) != 0 else 0if math.fabs(slope) < 0.5:  # Ignore nearly horizontal linescontinueif slope <= 0:  # Left laneleft_line_x.extend([x1, x2])left_line_y.extend([y1, y2])else:  # Right laneright_line_x.extend([x1, x2])right_line_y.extend([y1, y2])# Fit a linear polynomial to the left and right linesmin_y = int(image.shape[0] * (3 / 5))  # Slightly below the middle of the imagemax_y = image.shape[0]  # Bottom of the imageif left_line_x and left_line_y:poly_left = np.poly1d(np.polyfit(left_line_y, left_line_x, deg=1))left_x_start = int(poly_left(max_y))left_x_end = int(poly_left(min_y))else:left_x_start, left_x_end = 0, 0  # Defaults if no lines detectedif right_line_x and right_line_y:poly_right = np.poly1d(np.polyfit(right_line_y, right_line_x, deg=1))right_x_start = int(poly_right(max_y))right_x_end = int(poly_right(min_y))else:right_x_start, right_x_end = 0, 0  # Defaults if no lines detected# Create the filled polygon between the left and right lane lineslane_image = draw_lane_lines(image,[left_x_start, max_y, left_x_end, min_y],[right_x_start, max_y, right_x_end, min_y])return lane_image# Function to estimate distance based on bounding box size
def estimate_distance(bbox_width, bbox_height):# For simplicity, assume the distance is inversely proportional to the box size# This is a basic estimation, you may use camera calibration for more accuracyfocal_length = 1000  # Example focal length, modify based on camera setupknown_width = 2.0  # Approximate width of the car (in meters)distance = (known_width * focal_length) / bbox_width  # Basic distance estimationreturn distance# Main function to read and process video with YOLOv8
def process_video():# Load the YOLOv8 modelmodel = YOLO('weights/yolov8n.pt')# 或者加载官方模型# model = YOLO("yolov8n.pt")  # load an official model# Open the video filecap = cv2.VideoCapture('video/video.mp4')# Check if video opened successfullyif not cap.isOpened():print("Error: Unable to open video file.")return# Set the desired frame ratetarget_fps = 30frame_time = 1.0 / target_fps  # Time per frame to maintain 30fps# Resize to 720p (1280x720)cap.set(cv2.CAP_PROP_FRAME_WIDTH, 1280)cap.set(cv2.CAP_PROP_FRAME_HEIGHT, 720)# Loop through each framewhile cap.isOpened():ret, frame = cap.read()if not ret:break# Resize frame to 720presized_frame = cv2.resize(frame, (1280, 720))# Run the lane detection pipelinelane_frame = pipeline(resized_frame)# Run YOLOv8 to detect cars in the current frameresults = model(resized_frame)# Process the detections from YOLOv8for result in results:boxes = result.boxesfor box in boxes:x1, y1, x2, y2 = map(int, box.xyxy[0])  # Bounding box coordinatesconf = box.conf[0]  # Confidence scorecls = int(box.cls[0])  # Class ID# Only draw bounding boxes for cars with confidence >= 0.5if model.names[cls] == 'car' and conf >= 0.5:label = f'{model.names[cls]} {conf:.2f}'# Draw the bounding boxcv2.rectangle(lane_frame, (x1, y1), (x2, y2), (0, 255, 255), 2)cv2.putText(lane_frame, label, (x1, y1 - 10),cv2.FONT_HERSHEY_SIMPLEX, 0.5, (0, 255, 255), 2)# Estimate the distance of the carbbox_width = x2 - x1bbox_height = y2 - y1distance = estimate_distance(bbox_width, bbox_height)# Display the estimated distancedistance_label = f'Distance: {distance:.2f}m'cv2.putText(lane_frame, distance_label, (x1, y2 + 20),cv2.FONT_HERSHEY_SIMPLEX, 0.5, (255, 0, 0), 2)# Display the resulting frame with both lane detection and car detectioncv2.imshow('Lane and Car Detection', lane_frame)# Limit the frame rate to 30fpstime.sleep(frame_time)# Break the loop when 'q' is pressedif cv2.waitKey(1) & 0xFF == ord('q'):break# Release video capture and close windowscap.release()cv2.destroyAllWindows()# Run the video processing function
process_video()
4、工作原理
4.1 车道线检测 Pipeline
车道线检测包括一下几个步骤:
Step 1: 屏蔽感兴趣区域(ROI)
只处理图像的下半部分(车道线通常是可见的)。
def region_of_interest(img, vertices):mask = np.zeros_like(img)match_mask_color = 255cv2.fillPoly(mask, vertices, match_mask_color)masked_image = cv2.bitwise_and(img, mask)return masked_image
Step 2: 使用Canny进行边缘检测
将图像转换为灰度,并应用Canny边缘检测来突出显示边缘。
gray_image = cv2.cvtColor(image, cv2.COLOR_RGB2GRAY)
cannyed_image = cv2.Canny(gray_image, 100, 200)
Step 3: 霍夫线变换
霍夫线变换用于检测当前车道的线段。
lines = cv2.HoughLinesP(cropped_image,rho=6,theta=np.pi / 60,threshold=160,lines=np.array([]),minLineLength=40,maxLineGap=25
)
4.2 使用YOLOv8进行车辆检测
Step 1: 加载YOLOv8模型
我们使用预训练的YOLOv8模型来检测每一帧中的汽车(或者使用官方提供的模型)。
from ultralytics import YOLO
model = YOLO('weights/yolov8n.pt')
# model = YOLO('yolov8n.pt') #官方提供的模型
Step 2: 绘制边界框
对于每一辆检测到的汽车,绘制边界框,并显示类名(汽车)和置信度分数。
for box in boxes:x1, y1, x2, y2 = map(int, box.xyxy[0])conf = box.conf[0]if model.names[cls] == 'car' and conf >= 0.5:label = f'{model.names[cls]} {conf:.2f}'cv2.rectangle(lane_frame, (x1, y1), (x2, y2), (0, 255, 255), 2)cv2.putText(lane_frame, label, (x1, y1 - 10), cv2.FONT_HERSHEY_SIMPLEX, 0.5, (0, 255, 255), 2)
Step 3:. 距离估计
根据边界框的大小估计到每辆检测到的汽车的距离。
def estimate_distance(bbox_width, bbox_height):focal_length = 1000 # Example focal lengthknown_width = 2.0 # Approximate width of a car (in meters)distance = (known_width * focal_length) / bbox_widthreturn distance
Step 4:. 视频处理 Pipeline
将车道检测、车辆检测和距离估计结合到一个实时视频处理pipeline中。
while cap.isOpened():ret, frame = cap.read()if not ret:breaklane_frame = pipeline(resized_frame)results = model(resized_frame)for result in results:# Draw bounding boxes and estimate distancecv2.imshow('Lane and Car Detection', lane_frame)if cv2.waitKey(1) & 0xFF == ord('q'):break
5、结果
- 项目源码地址:
https://github.com/CityIsBetter/Lane_Detection
相关文章:
Python基于YOLOv8和OpenCV实现车道线和车辆检测
使用YOLOv8(You Only Look Once)和OpenCV实现车道线和车辆检测,目标是创建一个可以检测道路上的车道并识别车辆的系统,并估计它们与摄像头的距离。该项目结合了计算机视觉技术和深度学习物体检测。 1、系统主要功能 车道检测&am…...

代码随想录算法训练营第六十天|KM94.城市间货物运输Ⅰ|KM95.城市间货物运输Ⅱ|KM96.城市间货物运输Ⅲ
94. 城市间货物运输 I 2、Bellman_ford队列优化算法(又名SPFA) SPFA是对Bellman_ford算法的优化,由于Bellman_ford 算法 每次都是对所有边进行松弛,其实是多做了一些无用功。其实只需要对 上一次松弛的时候更新过的节点作为出发节…...

人工智能学习路线全链路解析
一、基础准备阶段(预计 2-3 个月) (一)数学知识巩固与深化 线性代数(约 1 个月): 矩阵基础:回顾矩阵的定义、表示方法、矩阵的基本运算(加法、减法、乘法)&…...

C++语言的学习路线
C语言的学习路线 C是一种强大的高级编程语言,广泛应用于系统软件、游戏开发、嵌入式系统和高性能应用等多个领域。由于其丰富的功能和灵活性,C是一门值得深入学习的语言。本文旨在为初学者制定一条系统的学习路线,帮助他们循序渐进地掌握C语…...
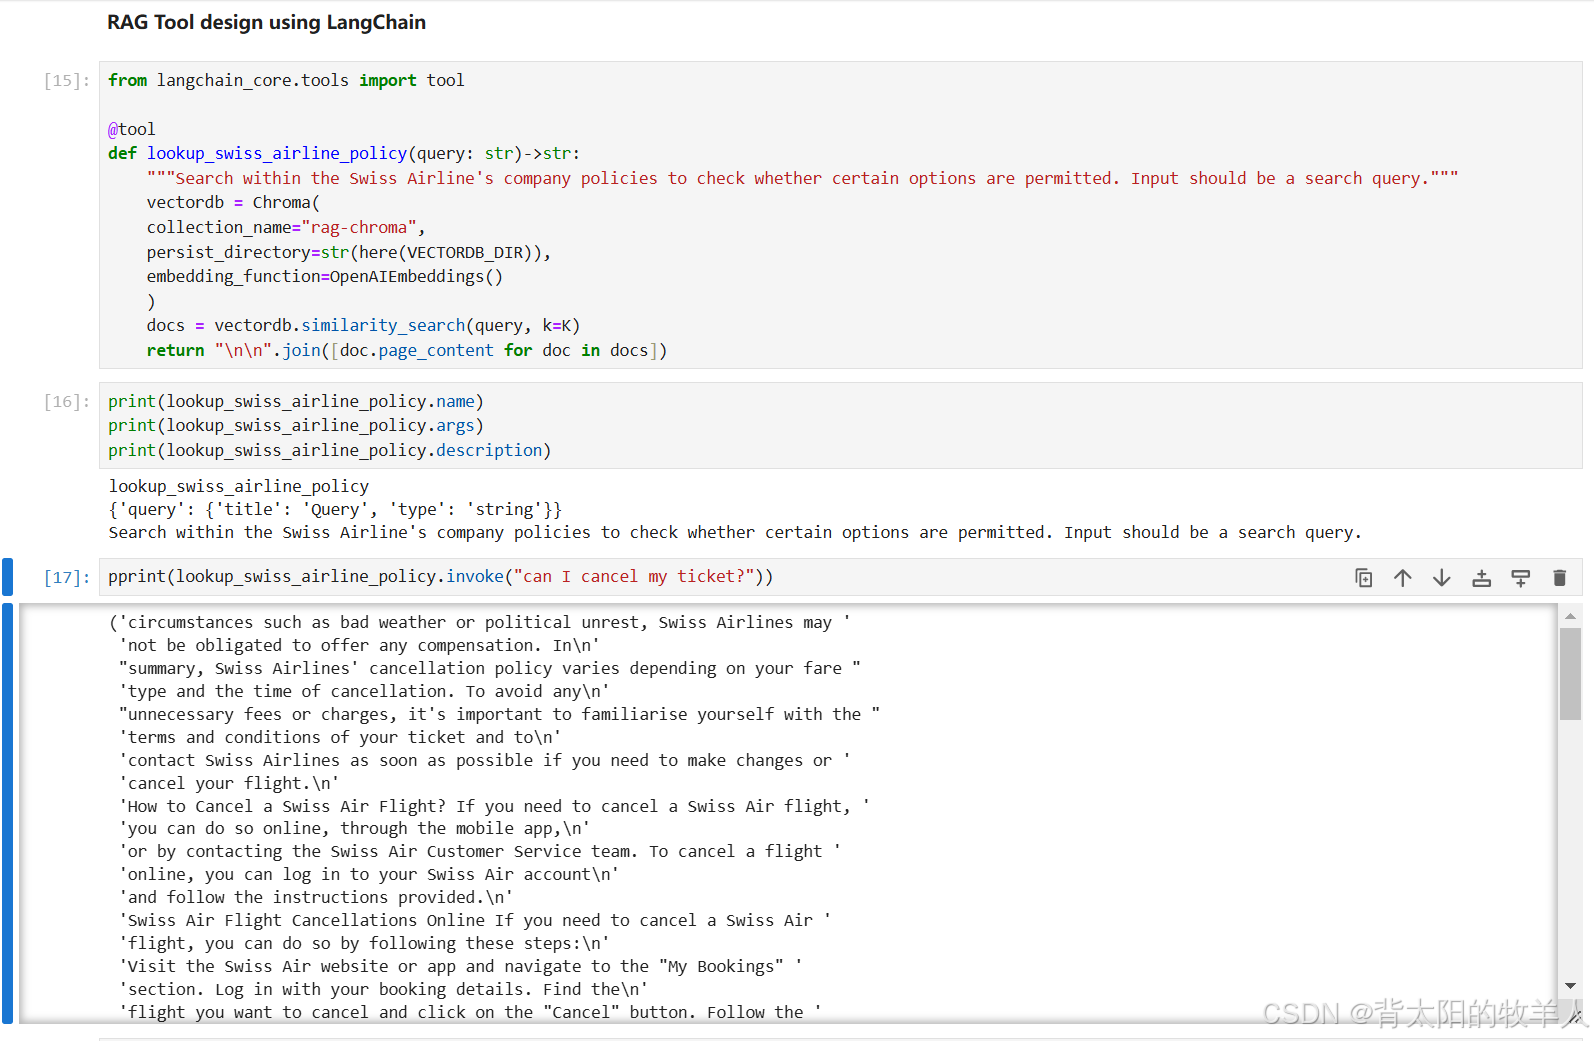
用于与多个数据库聊天的智能 SQL 代理问答和 RAG 系统(3) —— 基于 LangChain 框架的文档检索与问答功能以及RAG Tool的使用
介绍基于 LangChain 框架的文档检索与问答功能,目标是通过查询存储的向量数据库(VectorDB),为用户的问题检索相关内容,并生成自然语言的答案。以下是代码逻辑的详细解析: 代码结构与功能 初始化环境与加载…...
20250110doker学习记录
1.本机创建tts环境。用conda. 0.1安装。我都用的默认,你也可以。我安装过一次,如果修复,后面加 -u bash Anaconda3-2024.10-1-Linux-x86_64.sh等待一会。 (base) ktkt4028:~/Downloads$ conda -V conda 24.9.2学习资源 Conda 常用命令大…...

MPU6050: 卡尔曼滤波, 低通滤波
对于MPU6050(一种集成了三轴加速度计和三轴陀螺仪的惯性测量单元),对加速度值进行卡尔曼滤波,而对角速度进行低通滤波的选择是基于这两种传感器数据的不同特性和应用需求。以下是详细解释: 加速度值与卡尔曼滤波 为什么使用卡尔曼滤波? 噪声抑制: 加速度计信号通常包含…...

C++的标准和C++的编译版本
C的标准和C的编译版本:原理和概念 理解 C标准 和 C编译版本 的关系是学习 C 的一个重要部分。这两者虽然看似相关,但实际上分别涉及了不同的概念和技术。下面将通过层次清晰的解释,帮助新手理解这两个概念的差异、特点及其相互关系。 一、C标…...
python学习笔记—17—数据容器之字符串
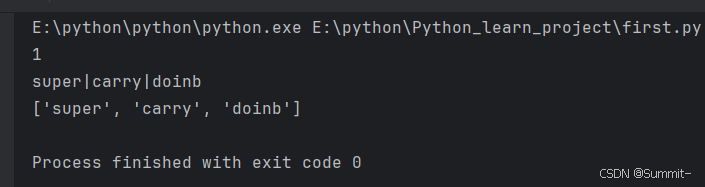
1. 字符串 (1) 字符串能通过下标索引来获取其中的元素 (2) 旧字符串无法修改特定下标的元素 (3) index——查找字符串中任意元素在整个字符串中的起始位置(单个字符或字符串都可以) tmp_str "supercarrydoinb" tmp_position1 tmp_str.index("s") tmp_p…...
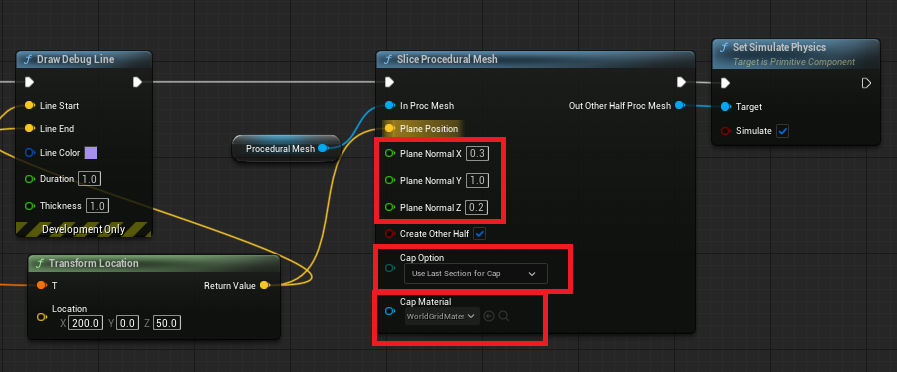
UE5 使用内置组件进行网格切割
UE引擎非常强大,直接内置了网格切割功能并封装为蓝图节点,这项功能在UE4中就存在,并且无需使用Chaos等模块。那么就来学习下如何使用内置组件实现网格切割。 1.配置测试用StaticMesh 对于被切割的模型,需要配置一些参数。以UE5…...

51单片机——串口通信(重点)
1、通信 通信的方式可以分为多种,按照数据传送方式可分为串行通信和并行通信; 按照通信的数据同步方式,可分为异步通信和同步通信; 按照数据的传输方向又可分为单工、半双工和全双工通信 1.1 通信速率 衡量通信性能的一个非常…...
Taro+Vue实现图片裁剪组件
cropper-image-taro-vue3 组件库 介绍 cropper-image-taro-vue3 是一个基于 Vue 3 和 Taro 开发的裁剪工具组件,支持图片裁剪、裁剪框拖动、缩放和输出裁剪后的图片。该组件适用于 Vue 3 和 Taro 环境,可以在网页、小程序等平台中使用。 源码 https:…...
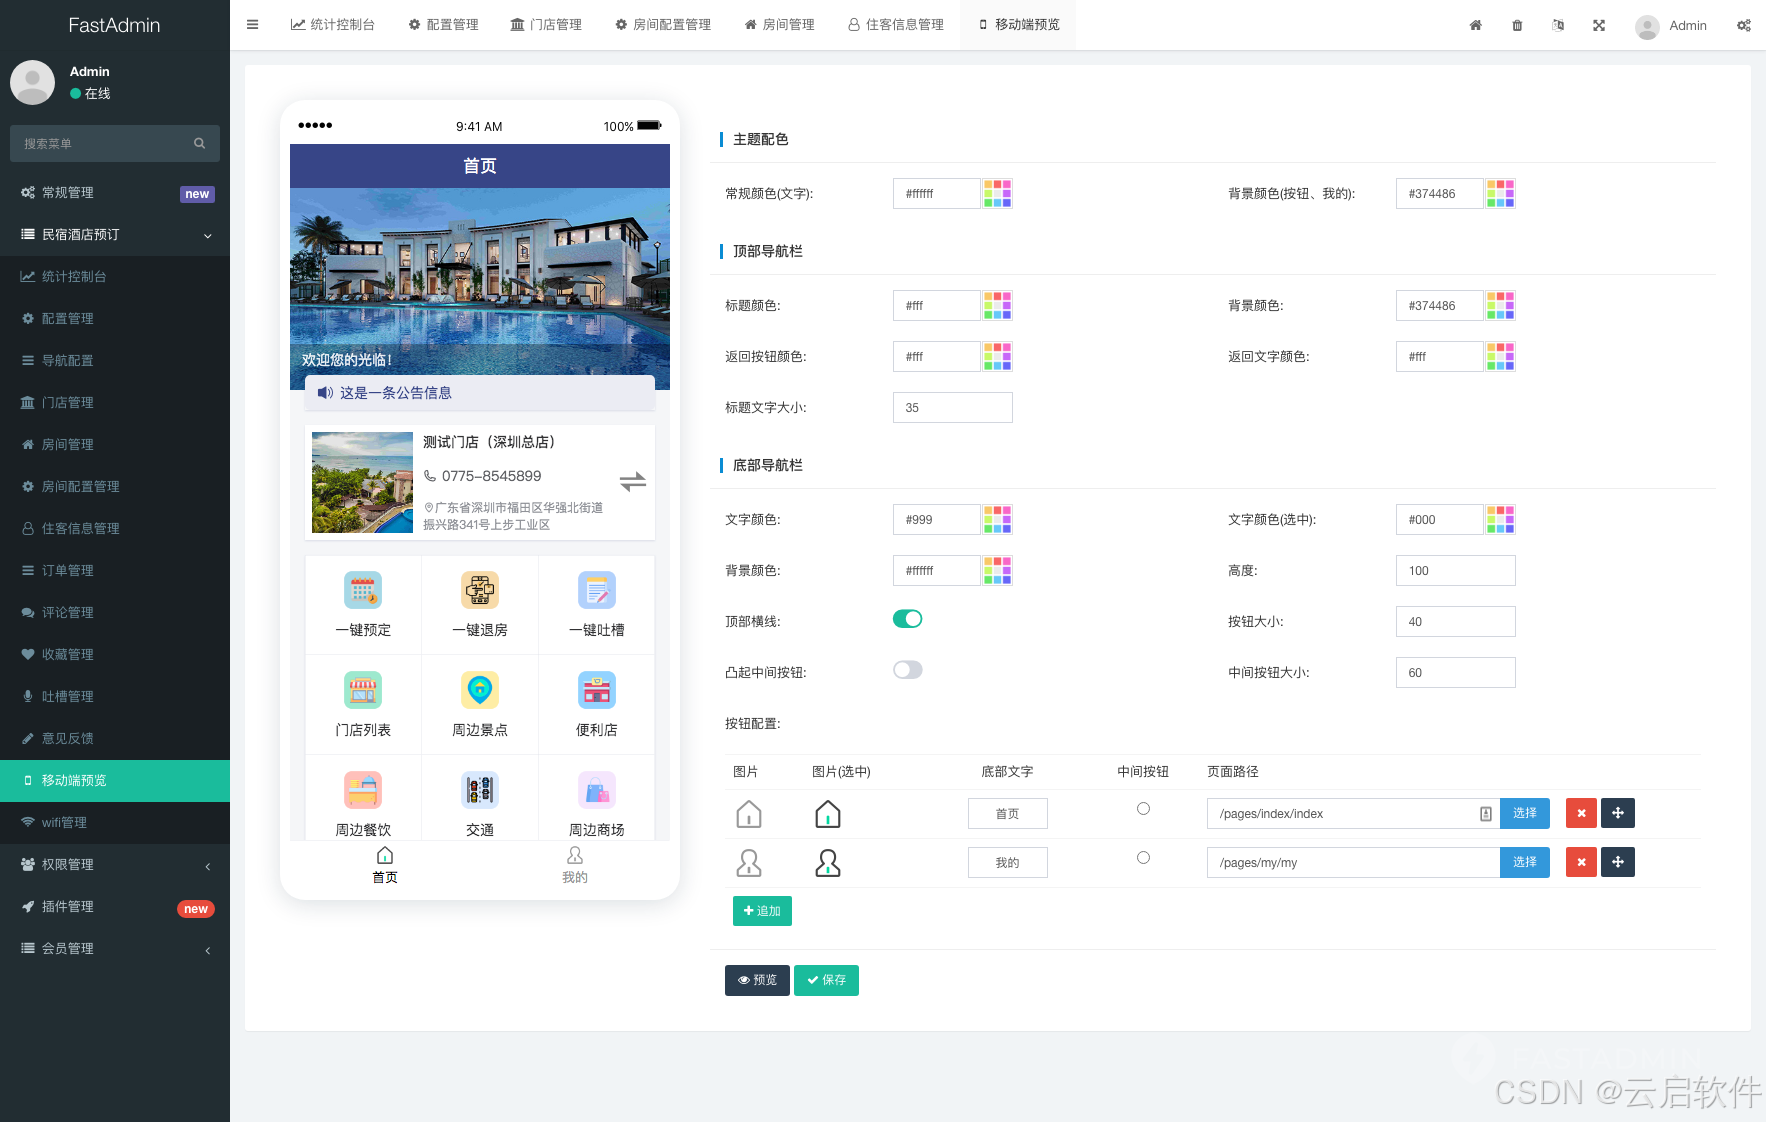
PHP民宿酒店预订系统小程序源码
🏡民宿酒店预订系统 基于ThinkPHPuniappuView框架精心构建的多门店民宿酒店预订管理系统,能够迅速为您搭建起专属的、功能全面且操作便捷的民宿酒店预订小程序。 该系统不仅涵盖了预订、退房、WIFI连接、用户反馈、周边信息展示等核心功能,更…...
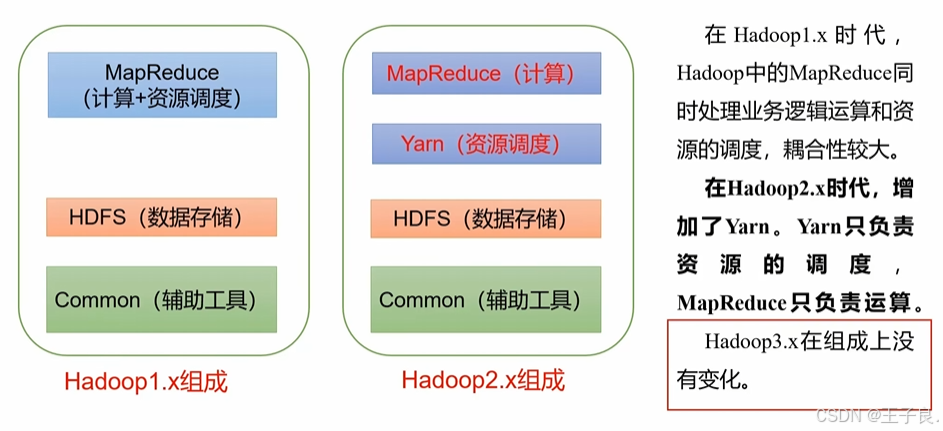
Hadoop3.x 万字解析,从入门到剖析源码
💖 欢迎来到我的博客! 非常高兴能在这里与您相遇。在这里,您不仅能获得有趣的技术分享,还能感受到轻松愉快的氛围。无论您是编程新手,还是资深开发者,都能在这里找到属于您的知识宝藏,学习和成长…...

VUE3 常用的组件介绍
Vue 组件简介 Vue 组件是构建 Vue 应用程序的核心部分,组件帮助我们将 UI 分解为独立的、可复用的块,每个组件都有自己的状态和行为。Vue 组件通常由模板、脚本和样式组成。组件的脚本部分包含了各种配置选项,用于定义组件的逻辑和功能。 组…...

deepin-Wine 运行器合并打包器和添加从镜像提取 DLL 的功能
Wine 运行器是一个图形化工具,旨在简化 Wine 环境的管理和使用。它不仅提供了运行和管理 Wine 容器的功能,还增加了打包器和从镜像提取 DLL 的功能。以下是该工具的详细介绍和使用方法。 一、工具概述 Wine 运行器是一个使用 Python3 的 tkinter 构建的图…...

[大模型]本地离线运行openwebui+ollama容器化部署
本地离线运行Openweb-ui ollama容器化部署 说明安装internet操作内网操作问题线程启动错误最终命令总结说明 最近公司有一个在内网部署一个离线大模型的需求,网络是离线状态,服务器有A100GPU,一开始是想折腾开源chatGML4大模型,因为使用过gml3,所以想着部署gml4应该不难。…...
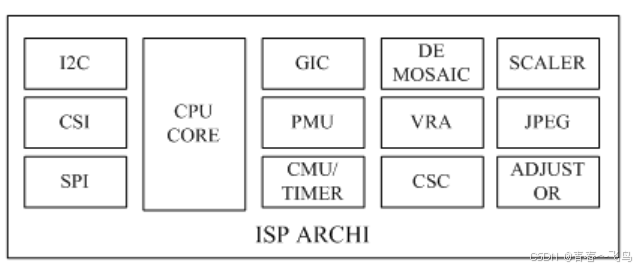
再次梳理ISP的大致流程
前言: 随着智能手机的普及,相机与我们的生活越来越紧密相关。在日常生活中,我们只需要轻轻按下手机上的拍照按钮,就能记录下美好时刻。那么问题来了:从我们指尖按下拍照按钮到一张色彩丰富的照片呈现在我们面前&#x…...
HBuilderX打包ios保姆式教程
1、登录苹果开发者后台并登录已认证开发者账号ID Sign In - Apple 2、创建标识符(App ID)、证书,描述文件 3、首先创建标识符,用于新建App应用 3-1、App的话直接选择第一个App IDs,点击右上角继续 3-2、选择App&#x…...

《解锁鸿蒙系统AI能力,开启智能应用开发新时代》
在当今科技飞速发展的时代,鸿蒙系统以其独特的分布式架构和强大的AI能力,为开发者们带来了前所未有的机遇。本文将深入探讨开发者如何利用鸿蒙系统的AI能力开发更智能的应用,开启智能应用开发的新时代。 鸿蒙系统构筑了15系统级的AI能力&…...
: K8s 核心概念白话解读(上):Pod 和 Deployment 究竟是什么?)
云原生核心技术 (7/12): K8s 核心概念白话解读(上):Pod 和 Deployment 究竟是什么?
大家好,欢迎来到《云原生核心技术》系列的第七篇! 在上一篇,我们成功地使用 Minikube 或 kind 在自己的电脑上搭建起了一个迷你但功能完备的 Kubernetes 集群。现在,我们就像一个拥有了一块崭新数字土地的农场主,是时…...

Vue记事本应用实现教程
文章目录 1. 项目介绍2. 开发环境准备3. 设计应用界面4. 创建Vue实例和数据模型5. 实现记事本功能5.1 添加新记事项5.2 删除记事项5.3 清空所有记事 6. 添加样式7. 功能扩展:显示创建时间8. 功能扩展:记事项搜索9. 完整代码10. Vue知识点解析10.1 数据绑…...
地震勘探——干扰波识别、井中地震时距曲线特点
目录 干扰波识别反射波地震勘探的干扰波 井中地震时距曲线特点 干扰波识别 有效波:可以用来解决所提出的地质任务的波;干扰波:所有妨碍辨认、追踪有效波的其他波。 地震勘探中,有效波和干扰波是相对的。例如,在反射波…...
)
React Native 开发环境搭建(全平台详解)
React Native 开发环境搭建(全平台详解) 在开始使用 React Native 开发移动应用之前,正确设置开发环境是至关重要的一步。本文将为你提供一份全面的指南,涵盖 macOS 和 Windows 平台的配置步骤,如何在 Android 和 iOS…...
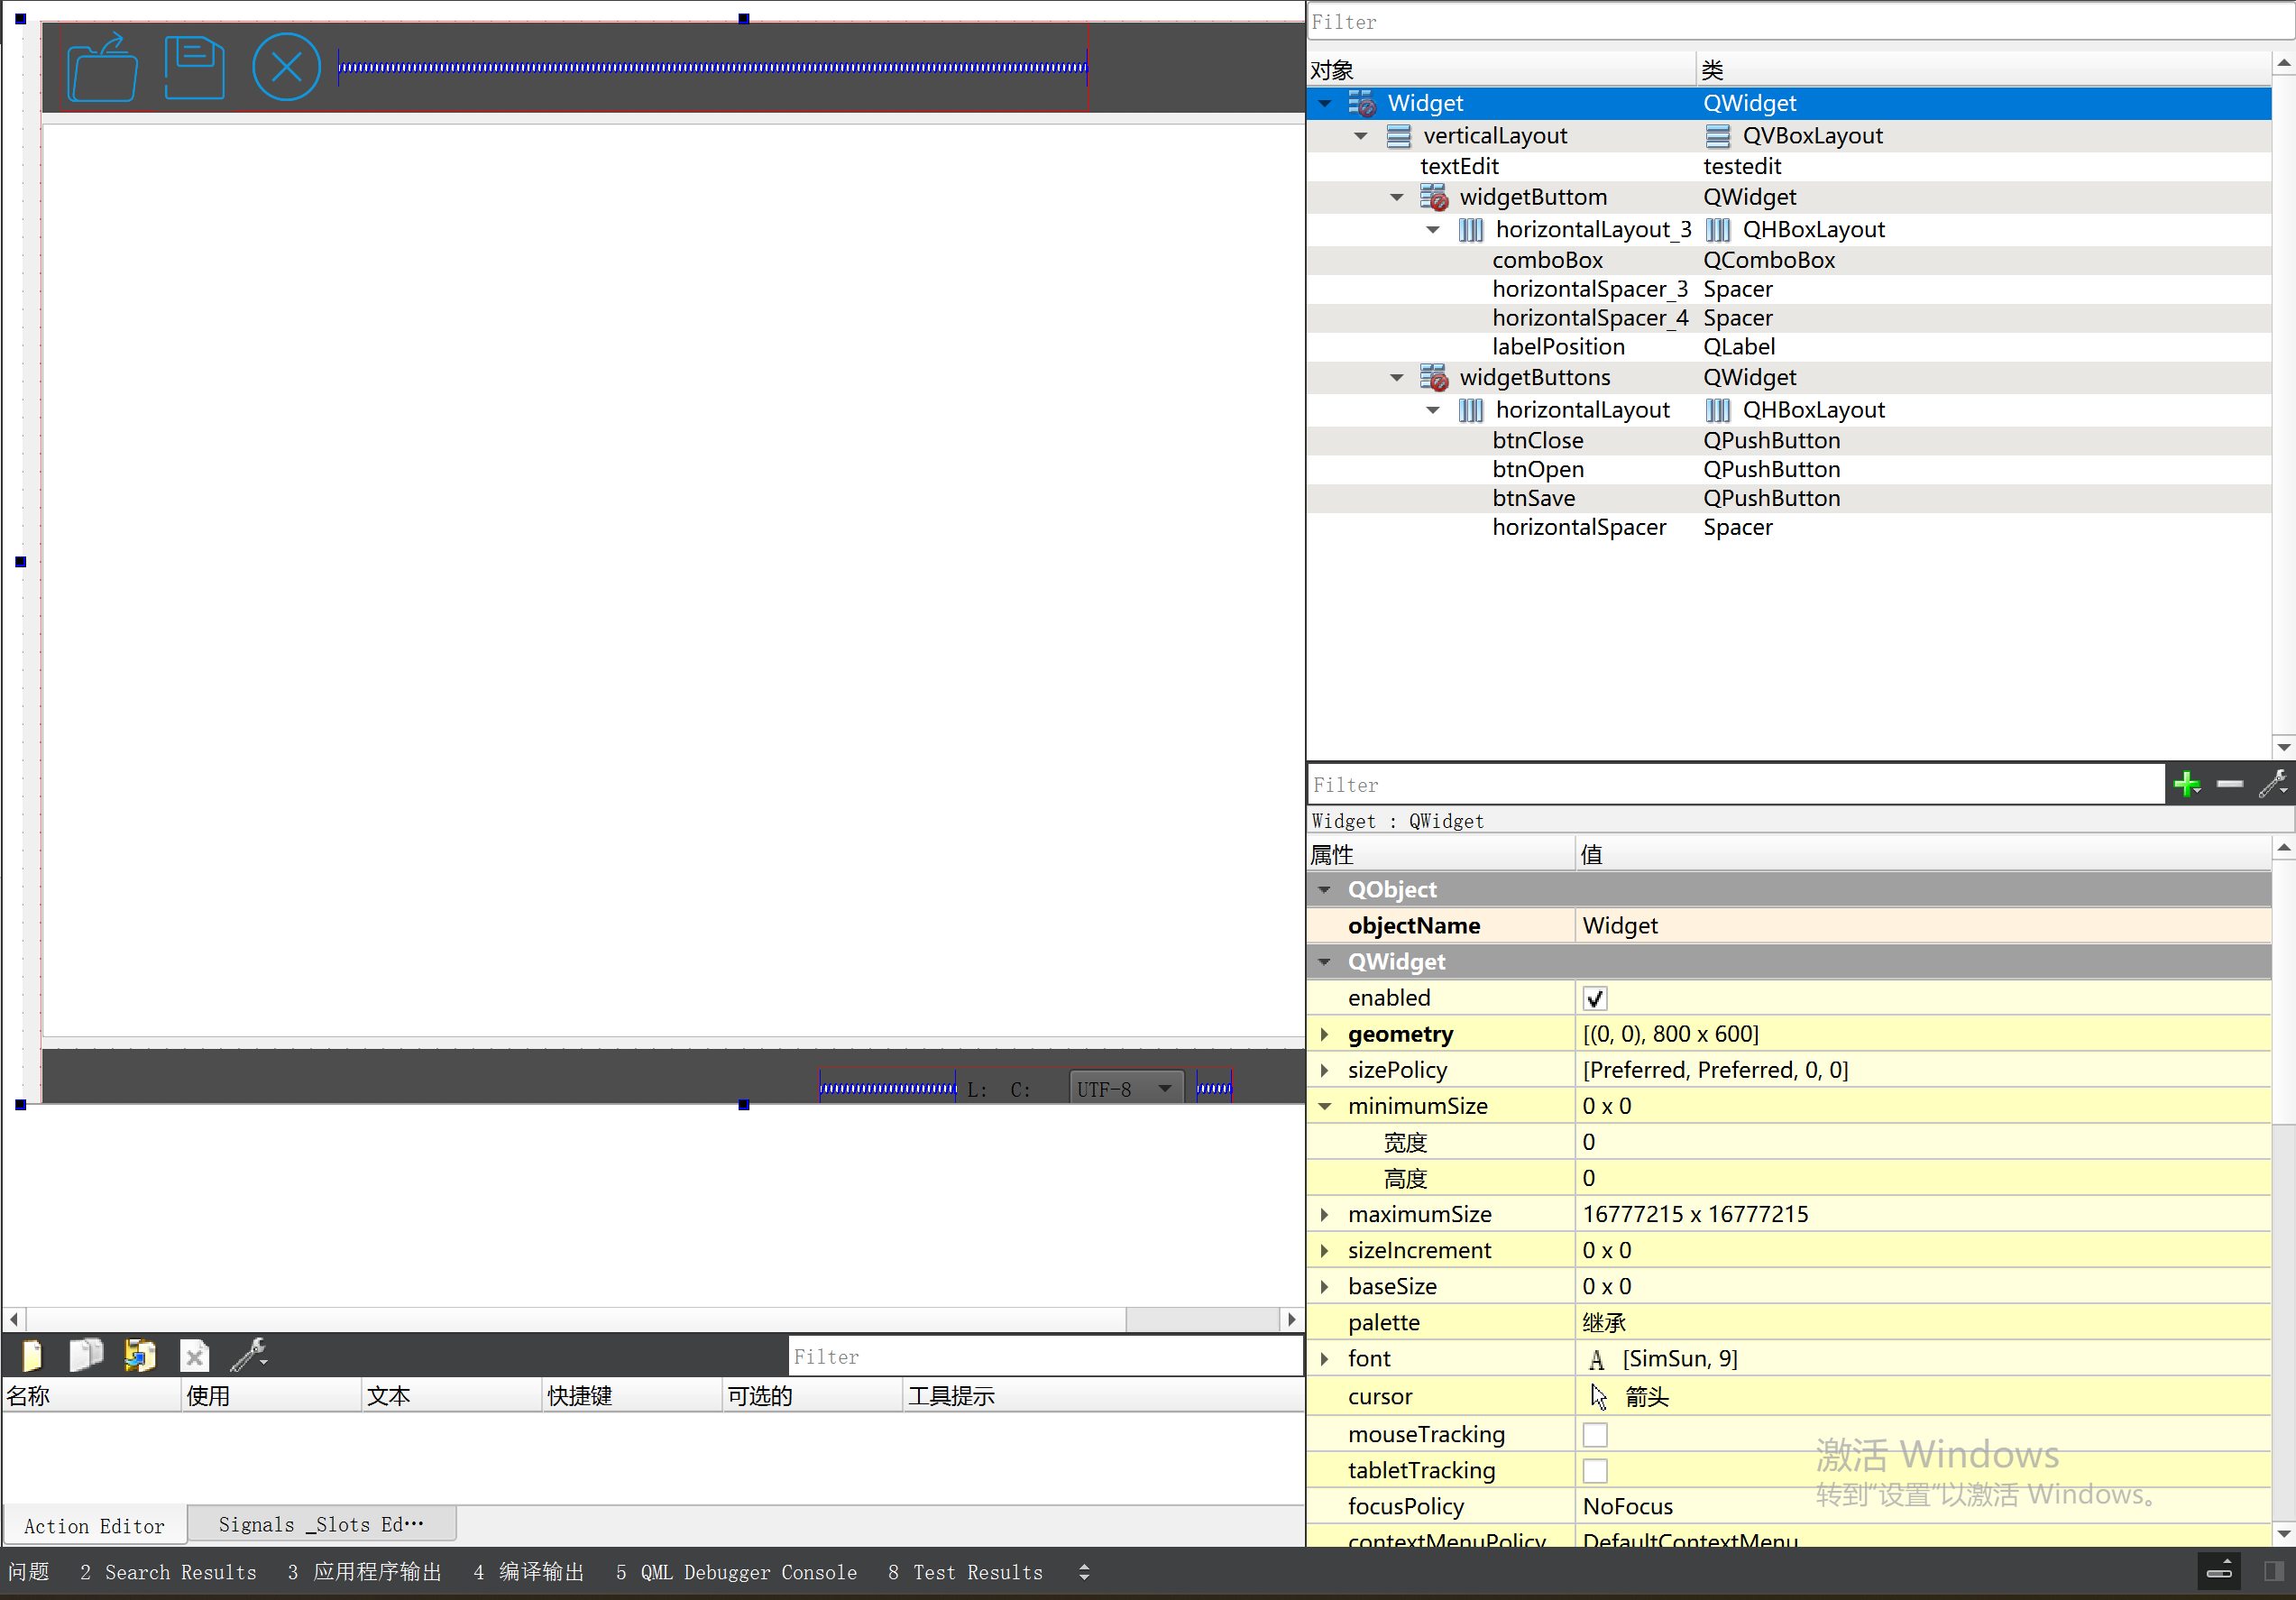
P3 QT项目----记事本(3.8)
3.8 记事本项目总结 项目源码 1.main.cpp #include "widget.h" #include <QApplication> int main(int argc, char *argv[]) {QApplication a(argc, argv);Widget w;w.show();return a.exec(); } 2.widget.cpp #include "widget.h" #include &q…...

什么是EULA和DPA
文章目录 EULA(End User License Agreement)DPA(Data Protection Agreement)一、定义与背景二、核心内容三、法律效力与责任四、实际应用与意义 EULA(End User License Agreement) 定义: EULA即…...

Rust 异步编程
Rust 异步编程 引言 Rust 是一种系统编程语言,以其高性能、安全性以及零成本抽象而著称。在多核处理器成为主流的今天,异步编程成为了一种提高应用性能、优化资源利用的有效手段。本文将深入探讨 Rust 异步编程的核心概念、常用库以及最佳实践。 异步编程基础 什么是异步…...

AI病理诊断七剑下天山,医疗未来触手可及
一、病理诊断困局:刀尖上的医学艺术 1.1 金标准背后的隐痛 病理诊断被誉为"诊断的诊断",医生需通过显微镜观察组织切片,在细胞迷宫中捕捉癌变信号。某省病理质控报告显示,基层医院误诊率达12%-15%,专家会诊…...
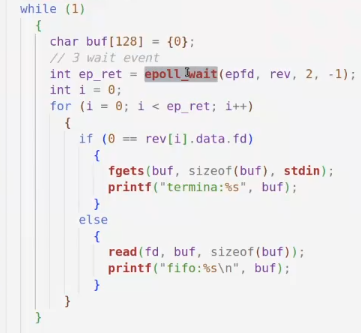
day36-多路IO复用
一、基本概念 (服务器多客户端模型) 定义:单线程或单进程同时监测若干个文件描述符是否可以执行IO操作的能力 作用:应用程序通常需要处理来自多条事件流中的事件,比如我现在用的电脑,需要同时处理键盘鼠标…...

【深度学习新浪潮】什么是credit assignment problem?
Credit Assignment Problem(信用分配问题) 是机器学习,尤其是强化学习(RL)中的核心挑战之一,指的是如何将最终的奖励或惩罚准确地分配给导致该结果的各个中间动作或决策。在序列决策任务中,智能体执行一系列动作后获得一个最终奖励,但每个动作对最终结果的贡献程度往往…...