【宿舍管理系统】注册登录页面的实现(前端)
目录
一.创建一个jsp文件,命名为login.jsp
代码:
1.
2.
3.
4.
5.
6.
编辑
二. 创建一个css文件,并命名为style.css
1.
编辑效果如下:
编辑 代码解析:
2.
效果如下:
代码解析:
3.
效果如下:
代码解析:
4.
效果如下:
代码解析:
5.
效果如下:
编辑
代码解析:
6.
效果如下:
编辑
代码解析:
7.
效果如下:
代码解析:
8.
效果如下:
代码解析:
9.
10.
效果如下:
11.
效果如下:
三.代码
效果图
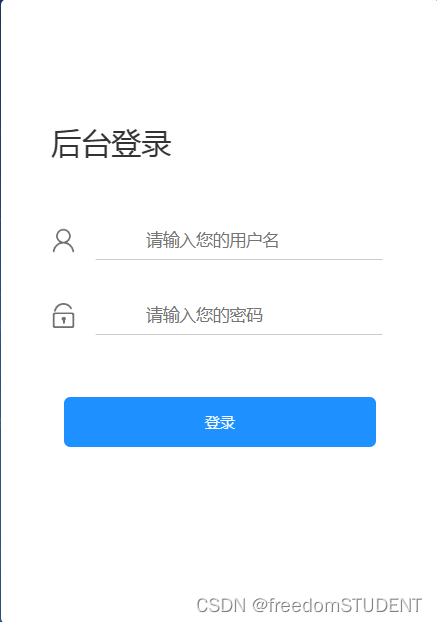
一.创建一个jsp文件,命名为login.jsp
制作如下样本
代码:
<%@ page contentType="text/html;charset=UTF-8" language="java" %>
<html>
<head><title>Title</title>
</head>
<body>
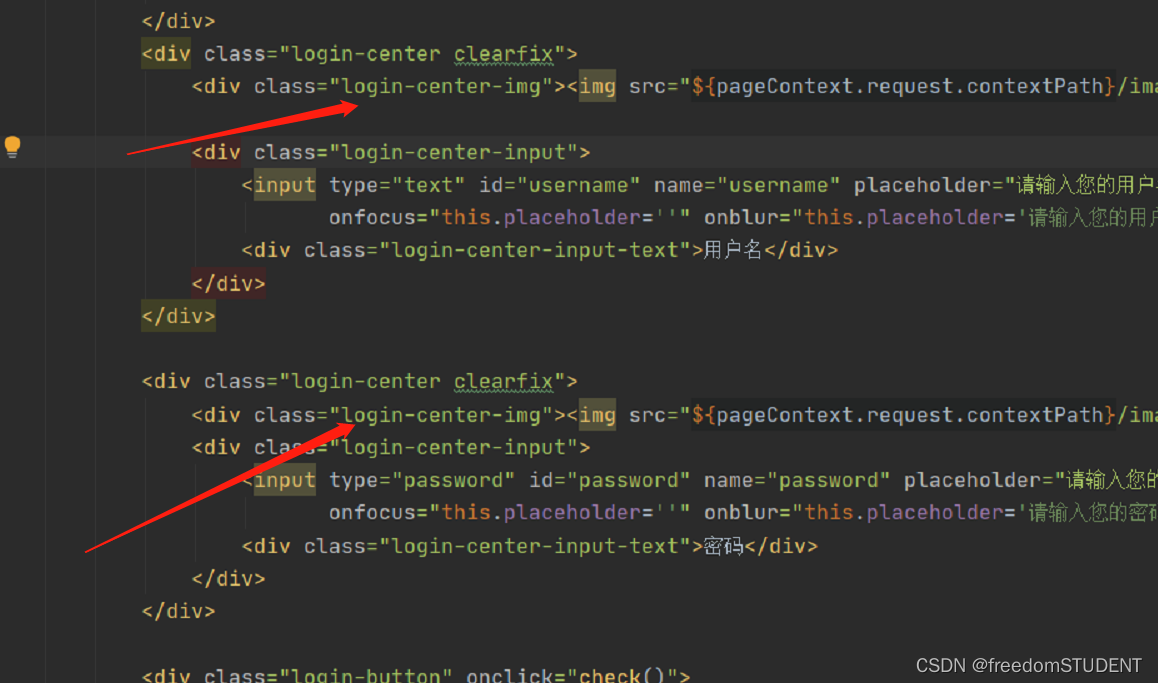
<body>
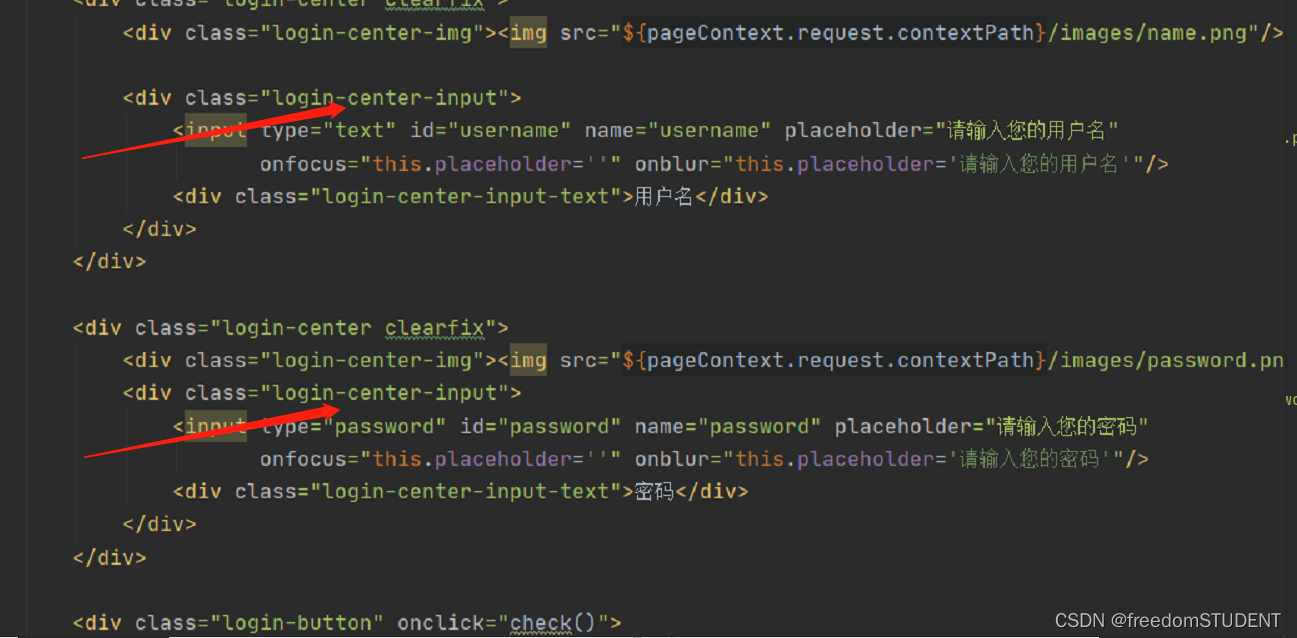
<form action="${pageContext.request.contextPath}/login" name="myform" method="post"><div id="particles-js"><div class="login"><div class="login-top">后台登录</div><div class="login-center clearfix"><div class="login-center-img"><img src="${pageContext.request.contextPath}/images/name.png"/></div><div class="login-center-input"><input type="text" id="username" name="username" placeholder="请输入您的用户名" onfocus="this.placeholder=''" onblur="this.placeholder='请输入您的用户名'"/><div class="login-center-input-text">用户名</div></div></div><div class="login-center clearfix"><div class="login-center-img"><img src="${pageContext.request.contextPath}/images/password.png"/></div><div class="login-center-input"><input type="password" id="password" name="password" placeholder="请输入您的密码" onfocus="this.placeholder=''" onblur="this.placeholder='请输入您的密码'"/><div class="login-center-input-text">密码</div></div></div><div class="login-button" onclick="check()">登录</div><span style="text-align: center;color: red;"><br>       ${msg}</span></div><div class="sk-rotating-plane"></div></div>
</form></body>
此段代码只完成前端页面展示的任务
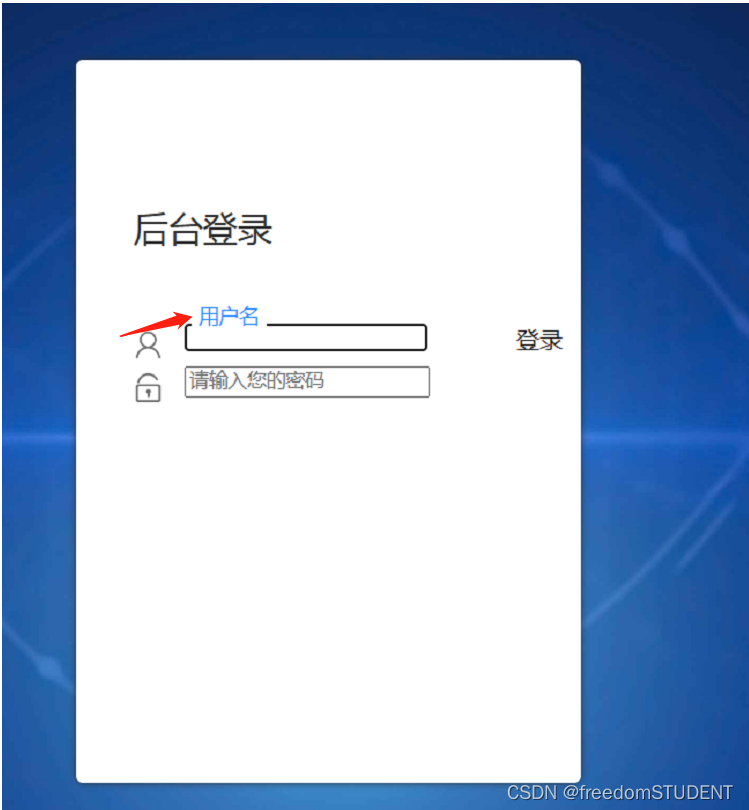
1.
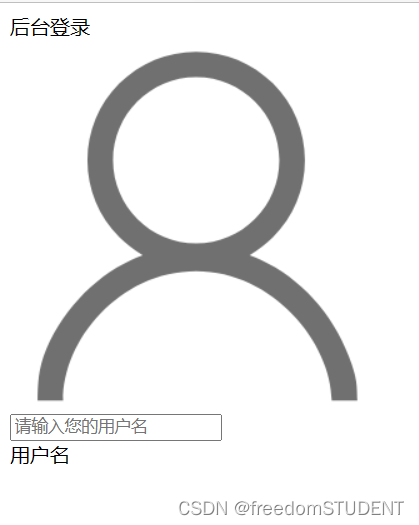
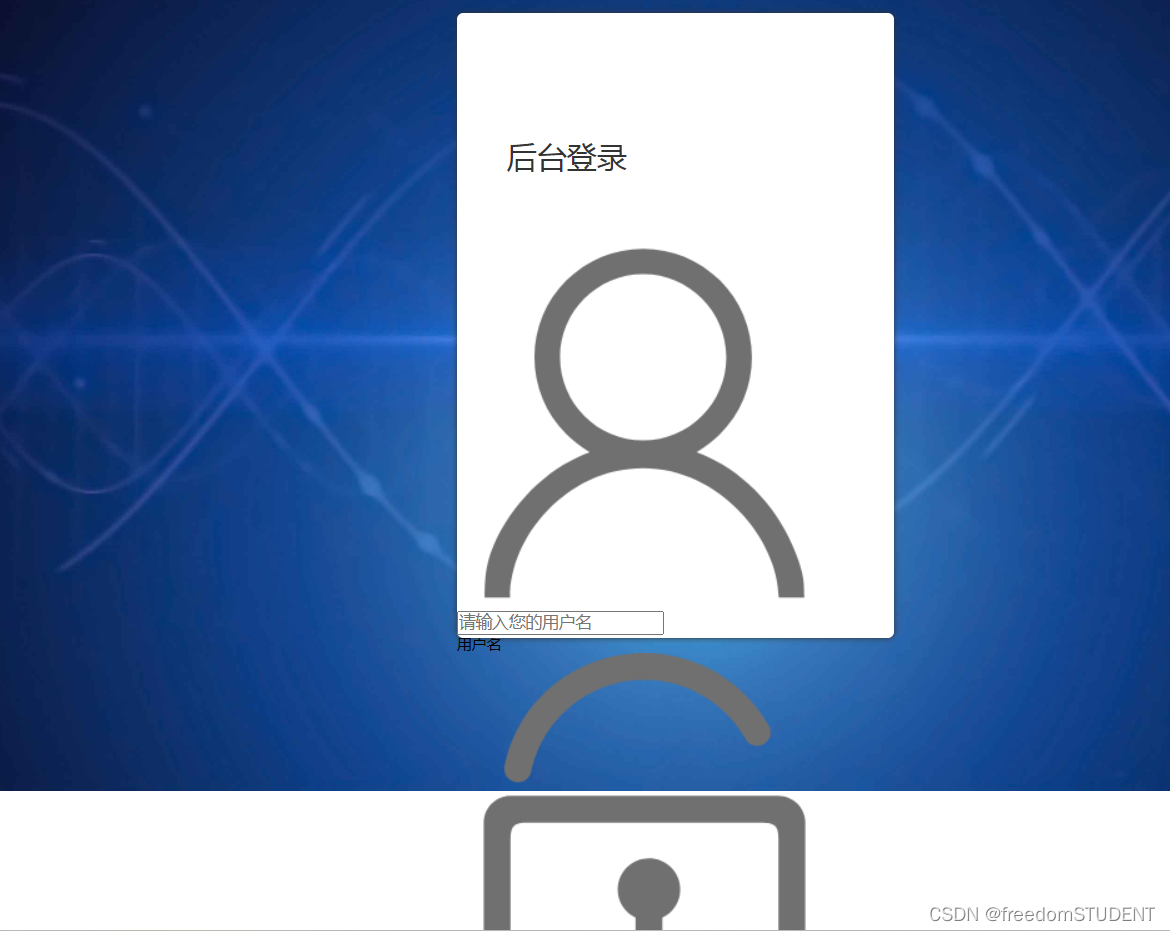
<form action="${pageContext.request.contextPath}/login" name="myform" method="post"><div id="particles-js"><div class="login"><div class="login-top">后台登录</div></div></div>效果如下:
2.
<form action="${pageContext.request.contextPath}/login" name="myform" method="post"><div id="particles-js"><div class="login"><div class="login-top">后台登录</div><div class="login-center clearfix"><div class="login-center-img"><img src="${pageContext.request.contextPath}/images/name.png"/></div></div></div></div>
效果如下:<div class="login-center-img"><img src="${pageContext.request.contextPath}/images/name.png"/></div>
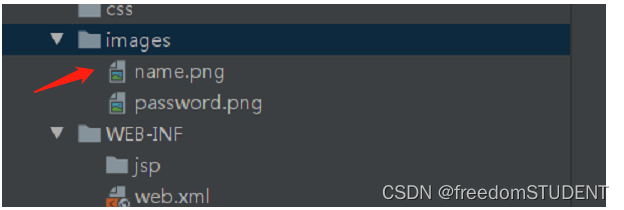
此行代码调用了images文件中的name.png图像
3.
<div id="particles-js"><div class="login"><div class="login-top">后台登录</div><div class="login-center clearfix"><div class="login-center-img"><img src="${pageContext.request.contextPath}/images/name.png"/></div><div class="login-center-input"><input type="text" id="username" name="username" placeholder="请输入您的用户名" onfocus="this.placeholder=''" onblur="this.placeholder='请输入您的用户名'"/><div class="login-center-input-text">用户名</div></div></div></div></div>
<div class="login-center-input">
<input type="text" id="username" name="username" placeholder="请输入您的用户名" οnfοcus="this.placeholder=''" οnblur="this.placeholder='请输入您的用户名'"/>
<div class="login-center-input-text">用户名</div>
</div>
type="text":表示该输入框是一个文本框。
id="username":为该输入框指定了一个唯一的标识符,可以通过该标识符来访问和操作该输入框。
name="username":指定了该输入框的名称,可以在表单提交时将输入框的值与名称一起提交到服务器。
placeholder="请输入您的用户名":该属性为输入框提供了一个提示文本,当用户未输入任何内容时,该文本将显示在输入框中。在这种情况下,它将显示"请输入您的用户名"。
οnfοcus="this.placeholder=''":当用户将焦点放在输入框内时,该代码将清空提示文本,以便用户可以直接输入内容。
οnblur="this.placeholder='请输入您的用户名'":当用户将焦点移出输入框时,如果该输入框中没有输入任何内容,则该代码将重新显示"请输入您的用户名"提示文本。
效果如下:
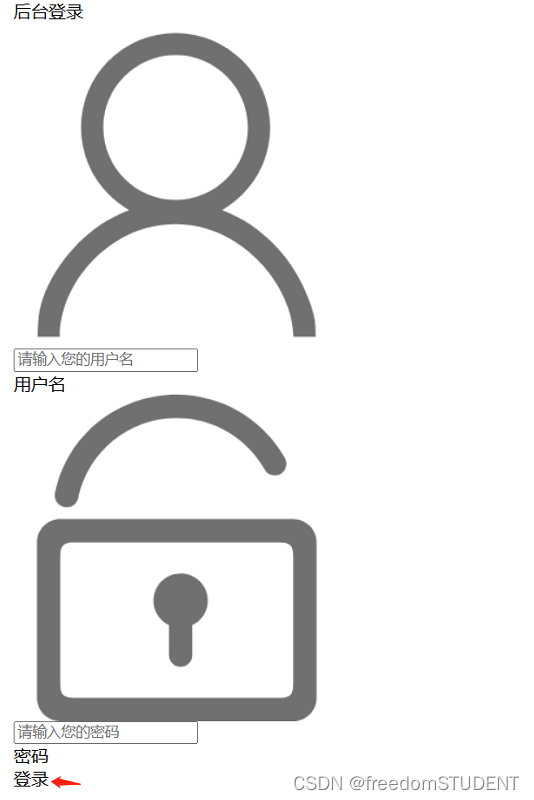
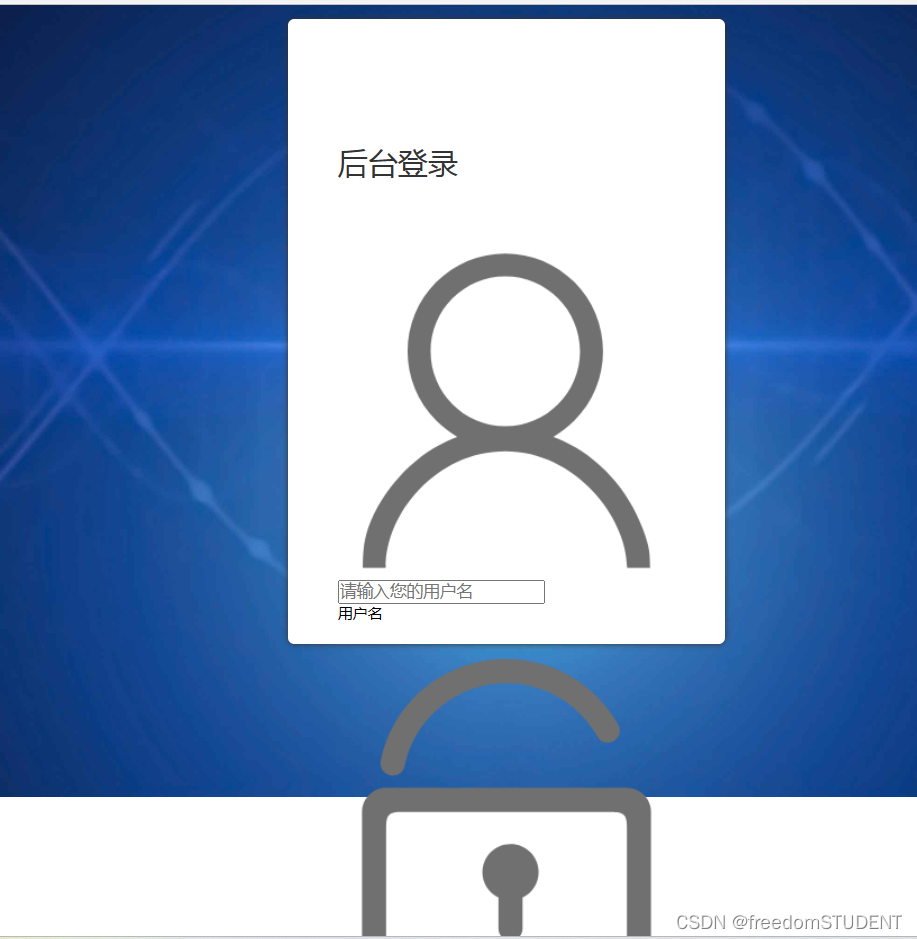
4.
<body>
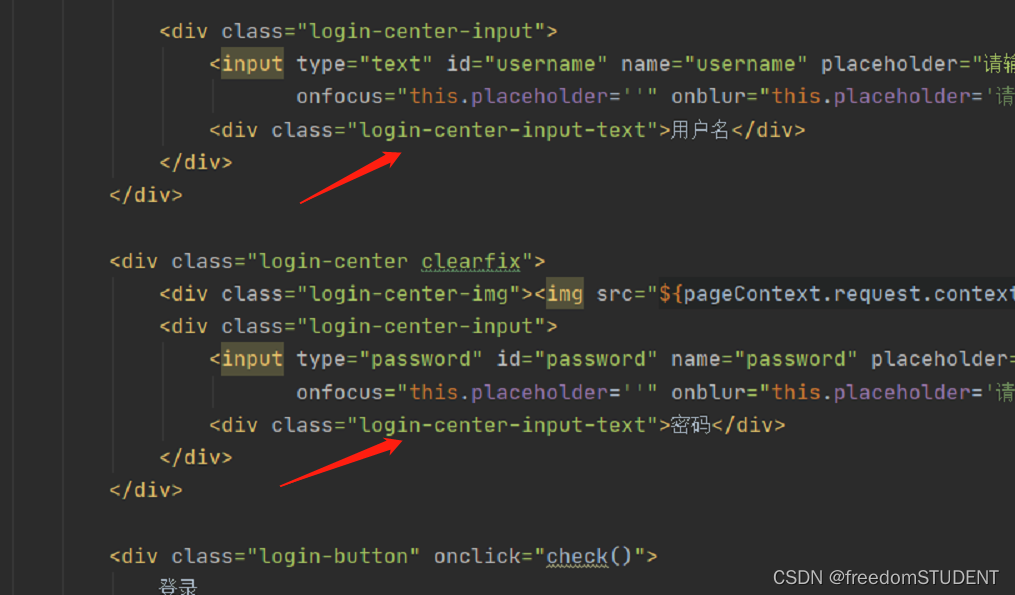
<form action="${pageContext.request.contextPath}/login" name="myform" method="post"><div id="particles-js"><div class="login"><div class="login-top">后台登录</div><div class="login-center clearfix"><div class="login-center-img"><img src="${pageContext.request.contextPath}/images/name.png"/></div><div class="login-center-input"><input type="text" id="username" name="username" placeholder="请输入您的用户名"onfocus="this.placeholder=''" onblur="this.placeholder='请输入您的用户名'"/><div class="login-center-input-text">用户名</div></div></div><div class="login-center clearfix"><div class="login-center-img"><img src="${pageContext.request.contextPath}/images/password.png"/></div><div class="login-center-input"><input type="password" id="password" name="password" placeholder="请输入您的密码"onfocus="this.placeholder=''" onblur="this.placeholder='请输入您的密码'"/><div class="login-center-input-text">密码</div></div></div></div></div>
</form>
<div class="login-center clearfix"><div class="login-center-img"><img src="${pageContext.request.contextPath}/images/password.png"/></div><div class="login-center-input"><input type="password" id="password" name="password" placeholder="请输入您的密码"οnfοcus="this.placeholder=''" οnblur="this.placeholder='请输入您的密码'"/><div class="login-center-input-text">密码</div></div>
</div>
效果如下:

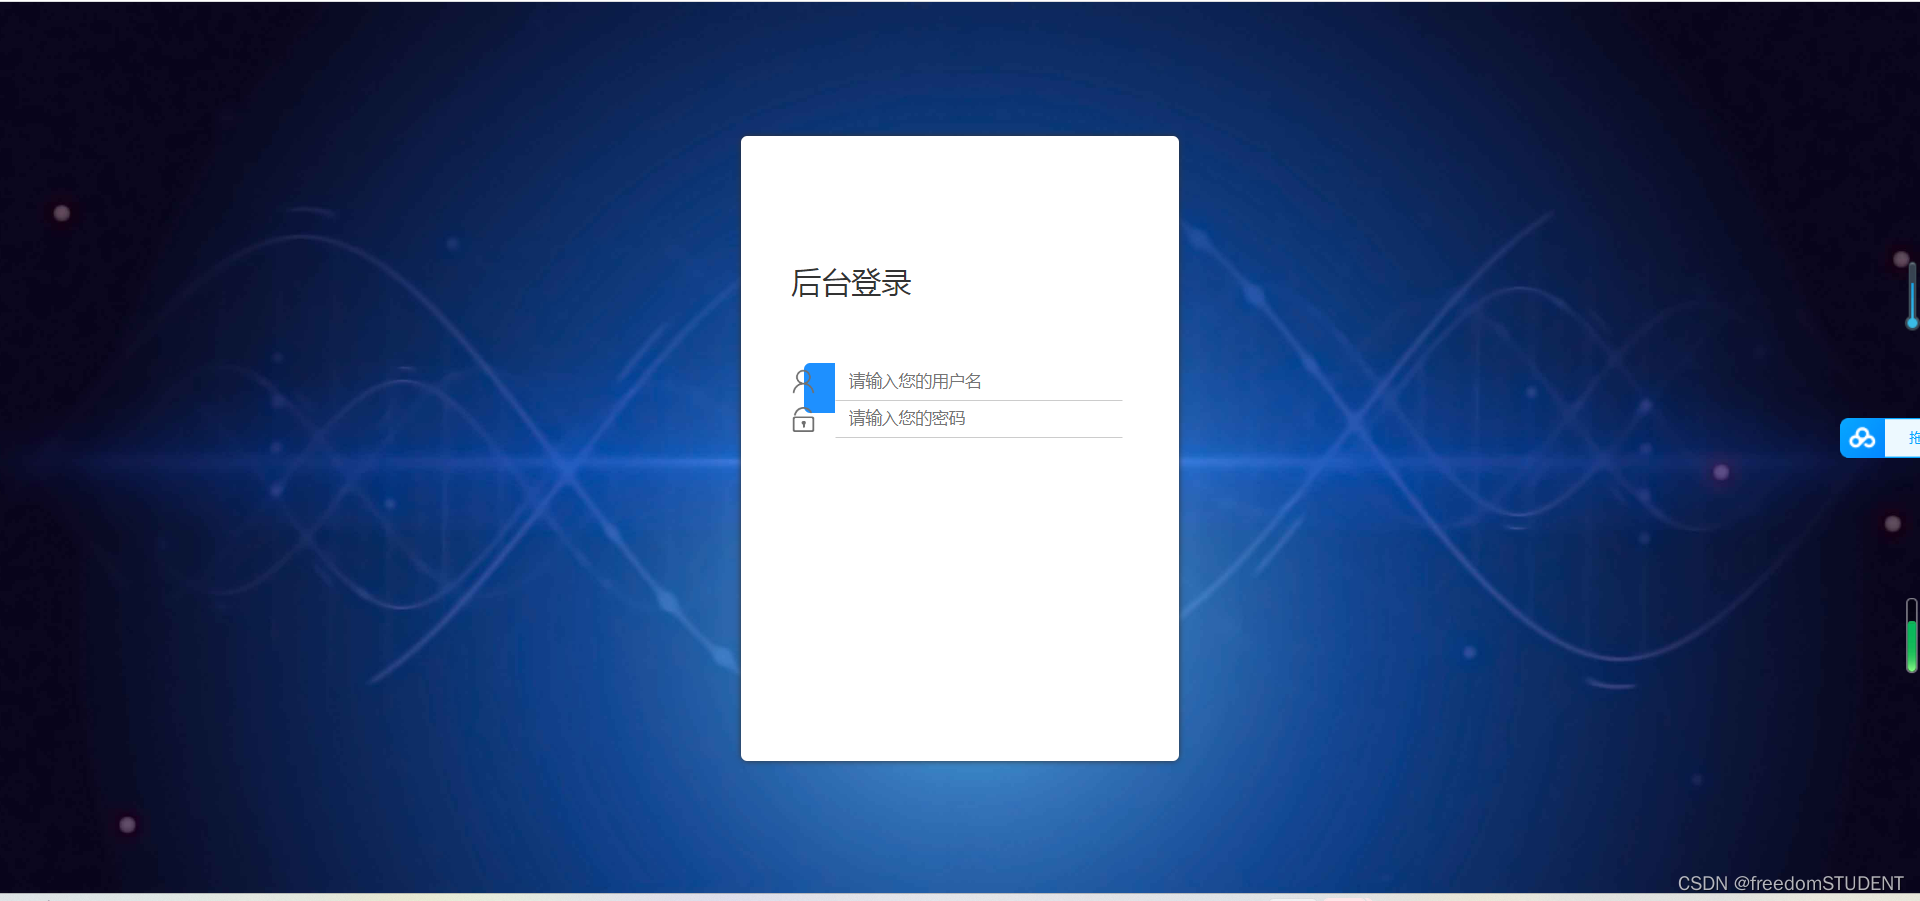
5.
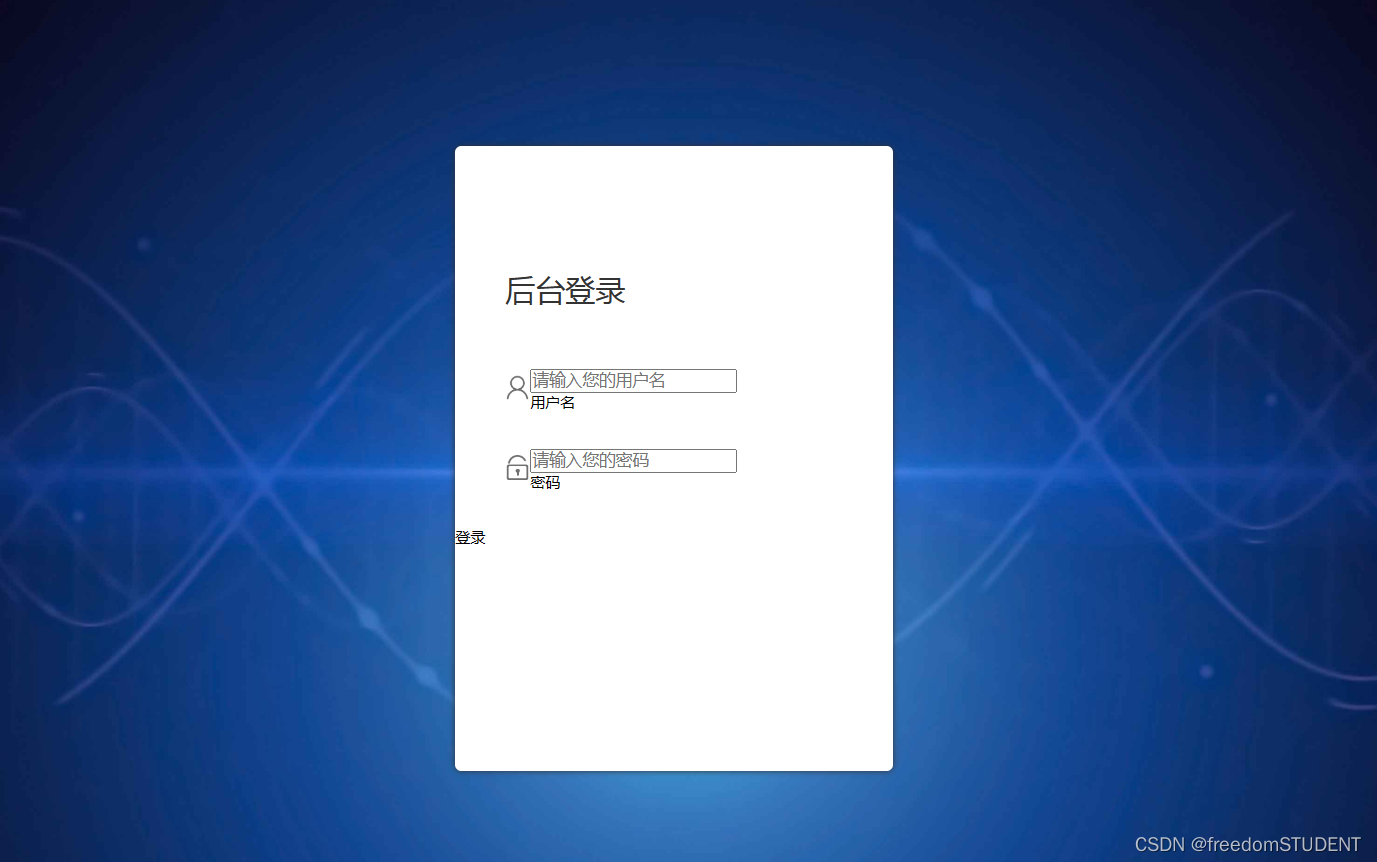
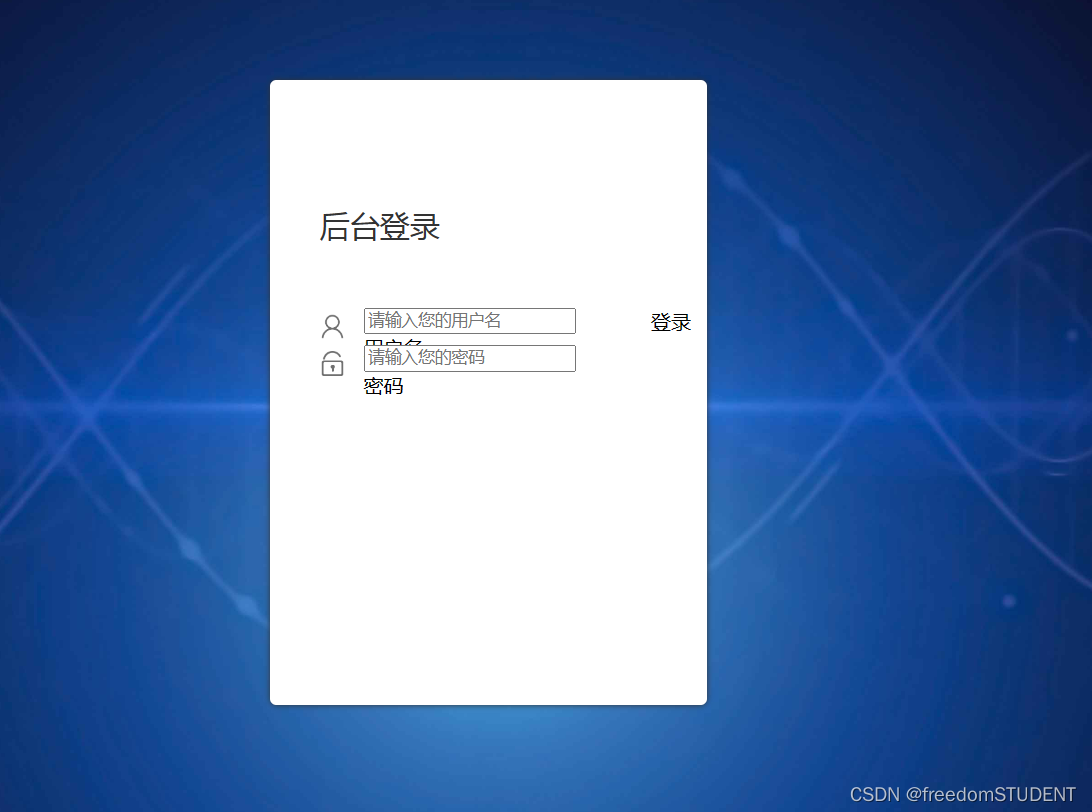
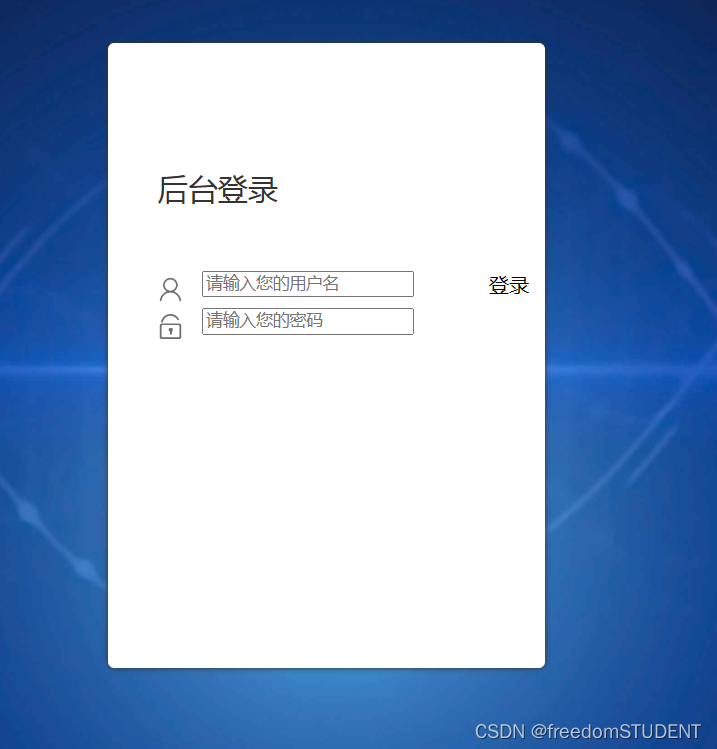
<form action="${pageContext.request.contextPath}/login" name="myform" method="post"><div id="particles-js"><div class="login"><div class="login-top">后台登录</div><div class="login-center clearfix"><div class="login-center-img"><img src="${pageContext.request.contextPath}/images/name.png"/></div><div class="login-center-input"><input type="text" id="username" name="username" placeholder="请输入您的用户名"onfocus="this.placeholder=''" onblur="this.placeholder='请输入您的用户名'"/><div class="login-center-input-text">用户名</div></div></div><div class="login-center clearfix"><div class="login-center-img"><img src="${pageContext.request.contextPath}/images/password.png"/></div><div class="login-center-input"><input type="password" id="password" name="password" placeholder="请输入您的密码"onfocus="this.placeholder=''" onblur="this.placeholder='请输入您的密码'"/><div class="login-center-input-text">密码</div></div></div><div class="login-button" onclick="check()">登录</div></div></div>
</form>
<div class="login-button" οnclick="check()">
登录
</div>
效果如下:
6.

<span style="text-align: center;color: red;"><br>       ${msg}</span>
这段代码是在HTML或其他网页标记语言中使用的,它会在页面上显示一个红色文本(文字颜色为红色)的信息,其中${msg}是一个占位符,表示实际显示的消息将由程序或代码动态生成并填充到此处。通过使用居中对齐样式(text-align: center),文本将被放置在页面的中心位置。如果您使用的是某个Web框架或库,这段代码可能已经被预先定义在其中,并且可以非常方便地在您的项目中使用。
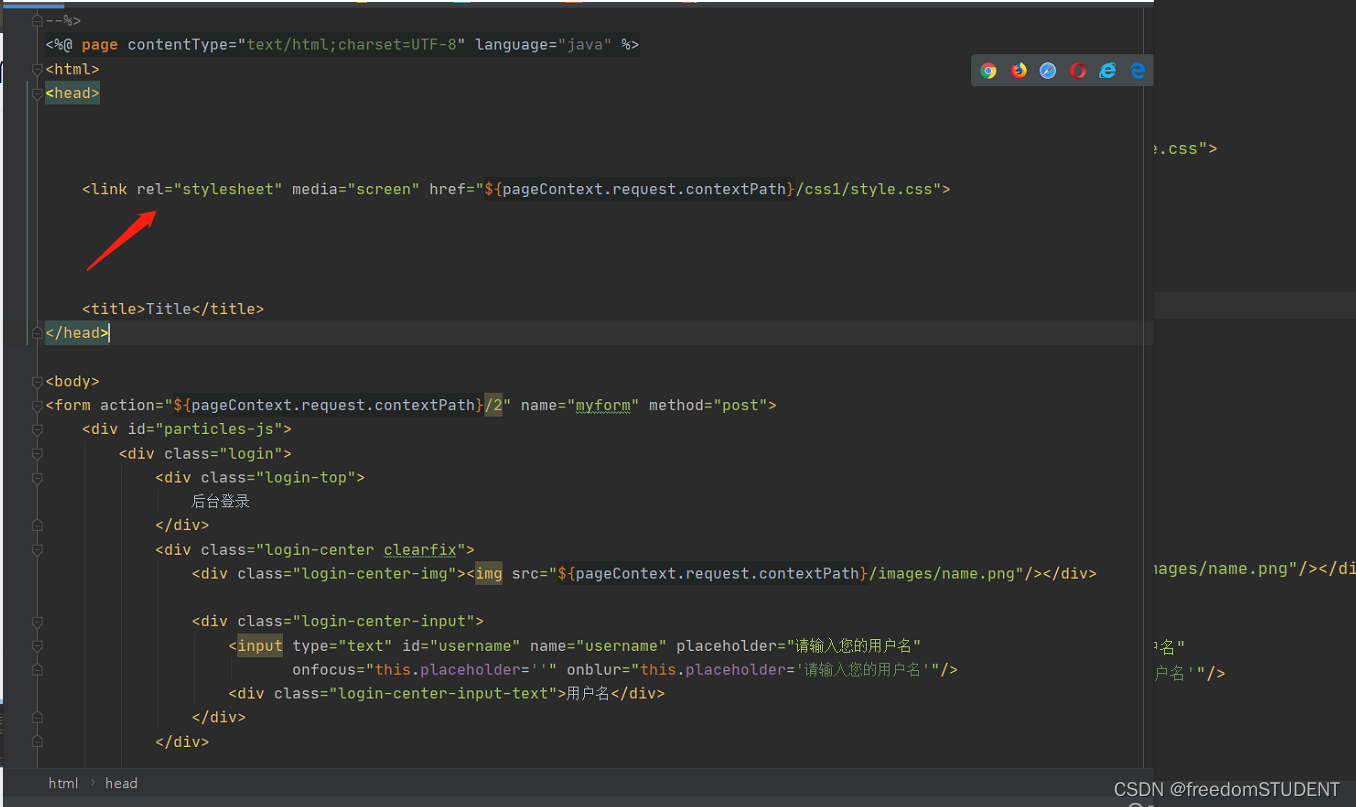
二. 创建一个css文件,并命名为style.css
要使用style.css里的样式,必须在login里添加
<link rel="stylesheet" media="screen" href="${pageContext.request.contextPath}/css1/style.css">
1.
html,body{width:100%;height:100%;
}#particles-js{width: 100%;height: 100%;position: relative;background-image: url(../images/bg.jpg);background-position: 50% 50%;background-size: cover;background-repeat: no-repeat;margin-left: auto;margin-right: auto;
}
此段代码是关于背景图像的样式
对应如下图所示
 效果如下:
效果如下:
 代码解析:
代码解析:
`width: 100%;`: 设置该元素的宽度为 100%。
- `height: 100%;`: 设置该元素的高度为 100%。
- `position: relative;`: 设置该元素在文档流中的定位为相对定位。
- `background-image: url(../images/bg.jpg);`: 设置该元素的背景图片为 `../images/bg.jpg`。
- `background-position: 50% 50%;`: 设置背景图片在元素中水平和垂直方向上的位置为 50%。
- `background-size: cover;`: 设置背景图片按比例缩放以完全覆盖整个元素。
- `background-repeat: no-repeat;`: 禁止背景图片在元素中重复显示。
- `margin-left: auto;`: 设置该元素的左侧外边距为自动。
- `margin-right: auto;`: 设置该元素的右侧外边距为自动。
2.
html,body{width:100%;height:100%;
}#particles-js{width: 100%;height: 100%;position: relative;background-image: url(../images/bg.jpg);background-position: 50% 50%;background-size: cover;background-repeat: no-repeat;margin-left: auto;margin-right: auto;
}.login{z-index: 2;position:absolute;width: 350px;border-radius: 5px;height: 500px;background: white;box-shadow: 0px 0px 5px #333333;top: 50%;left: 50%;margin-top: -250px;margin-left: -175px;transition: all 1s;-moz-transition: all 1s;	/* Firefox 4 */-webkit-transition: all 1s;	/* Safari 和 Chrome */-o-transition: all 1s;	/* Opera */}
.login{z-index: 2;position:absolute;width: 350px;border-radius: 5px;height: 500px;background: white;box-shadow: 0px 0px 5px #333333;top: 50%;left: 50%;margin-top: -250px;margin-left: -175px;transition: all 1s;-moz-transition: all 1s; transition: all 1s; -o-transition: all 1s; }
此行代码对应

效果如下:

代码解析:
- z-index: 2; 控制元素的层级,数值越大越靠前显示。
- position: absolute; 元素的定位方式,这里是绝对定位,相对于父级元素进行定位。
- width:350px; 宽设置为350px- height: 500px; 高设置为500px
- border-radius: 5px; 元素的圆角度数。(效果图中白色盒子四个圆角的度数)
- background: white; 元素的背景颜色。
- box-shadow: 0px 0px 5px #333333; 元素的阴影样式。-top: 50%;
- left: 50%;
- top和left: 元素相对于父级元素的顶部和左侧位置。- margin-top: -250px;
- margin-left: -175px;
- margin-top和margin-left: 元素相对于自身所在位置的上方和左侧的距离,一般用于居中元素。transition: all 1s;
-moz-transition: all 1s;
transition: all 1s;
-o-transition: all 1s;
- transition和-moz-transition和-o-transition: 控制元素变化过程的动画时长和效果。
3.
html,body{width:100%;height:100%;
}#particles-js{width: 100%;height: 100%;position: relative;background-image: url(../images/bg.jpg);background-position: 50% 50%;background-size: cover;background-repeat: no-repeat;margin-left: auto;margin-right: auto;
}.login{z-index: 2;position:absolute;width: 350px;border-radius: 5px;height: 500px;background: white;box-shadow: 0px 0px 5px #333333;top: 50%;left: 50%;margin-top: -250px;margin-left: -175px;transition: all 1s;-moz-transition: all 1s;	/* Firefox 4 */-webkit-transition: all 1s;	/* Safari 和 Chrome */-o-transition: all 1s;	/* Opera */}
.login-top{font-size: 24px;margin-top: 100px;padding-left: 40px;box-sizing: border-box;color: #333333;margin-bottom: 50px;}
.login-top{font-size: 24px;margin-top: 100px;padding-left: 40px;box-sizing: border-box;color: #333333;margin-bottom: 50px;}
此行代码对应
此行代码主要作用于后台登录这四个字上
效果如下:
代码解析:
font-size: 24px; 设置字体大小为24像素。
- margin-top: 100px; 设置该元素的顶部边缘距离它的容器顶部边缘100像素的距离。
- padding-left: 40px; 设置该元素左侧内边距为40像素。
- box-sizing: border-box; 指定元素的盒模型为border-box,也就是指定元素的宽度和高度包括边框(border)和内边距(padding)。
- color: #333333; 设置文本颜色为#333333,即十六进制颜色码之一。
- margin-bottom: 50px; 设置该元素的底部边缘距离它的容器底部边缘50像素的距离。
4.
html,body{width:100%;height:100%;
}#particles-js{width: 100%;height: 100%;position: relative;background-image: url(../images/bg.jpg);background-position: 50% 50%;background-size: cover;background-repeat: no-repeat;margin-left: auto;margin-right: auto;
}.login{z-index: 2;position:absolute;width: 350px;border-radius: 5px;height: 500px;background: white;box-shadow: 0px 0px 5px #333333;top: 50%;left: 50%;margin-top: -250px;margin-left: -175px;transition: all 1s;-moz-transition: all 1s;	/* Firefox 4 */-webkit-transition: all 1s;	/* Safari 和 Chrome */-o-transition: all 1s;	/* Opera */}
.login-top{font-size: 24px;margin-top: 100px;padding-left: 40px;box-sizing: border-box;color: #333333;margin-bottom: 50px;}
.login-center{width: 100%;box-sizing: border-box;padding: 0 40px;margin-bottom: 30px;}
.login-center{width: 100%;box-sizing: border-box;padding: 0 40px;margin-bottom: 30px;}
此段代码的作用起到居中的作用
此段代码如下:

效果如下:
代码解析:
.login-center { width: 100%; // 设置该元素的宽度为100%
box-sizing: border-box; // 定义元素的盒模型为border-box,即元素的border和padding值不会增加元素宽度和高度
padding: 0 40px; // 设置元素内边距为0,左右间距为40px
margin-bottom: 30px; // 设置元素下方的外边距为30px }
5.
html,body{width:100%;height:100%;
}#particles-js{width: 100%;height: 100%;position: relative;background-image: url(../images/bg.jpg);background-position: 50% 50%;background-size: cover;background-repeat: no-repeat;margin-left: auto;margin-right: auto;
}.login{z-index: 2;position:absolute;width: 350px;border-radius: 5px;height: 500px;background: white;box-shadow: 0px 0px 5px #333333;top: 50%;left: 50%;margin-top: -250px;margin-left: -175px;transition: all 1s;-moz-transition: all 1s;	/* Firefox 4 */-webkit-transition: all 1s;	/* Safari 和 Chrome */-o-transition: all 1s;	/* Opera */}
.login-top{font-size: 24px;margin-top: 100px;padding-left: 40px;box-sizing: border-box;color: #333333;margin-bottom: 50px;}
.login-center{width: 100%;box-sizing: border-box;padding: 0 40px;margin-bottom: 30px;}
.login-center-img{width: 20px;height: 20px;float: left;margin-top: 5px;}
.login-center-img>img{width: 100%;}
.login-center-img{width: 20px;height: 20px;float: left;margin-top: 5px;}
.login-center-img>img{width: 100%;}
此行代码对应:
效果如下:
代码解析:
.login-center-img表示该元素的类名;
width: 20px; 表示该元素的宽度为20像素;
height: 20px; 表示该元素的高度为20像素;
float: left; 表示该元素浮动到左侧;
margin-top: 5px; 表示该元素顶部与其上面的元素之间有5像素的间隔。
.login-center-img>img{width: 100%;}作用是将< img >标签的宽度设置为100%。也就是说,< img >标签将会填满其父元素的宽度,而不是保持其原有的宽度。这通常用于确保图像在不同的设备上保持适当的比例和大小以便显示。
6.
html,body{ width:100%;height:100%;
}#particles-js{width: 100%;height: 100%;position: relative;background-image: url(../images/bg.jpg);background-position: 50% 50%;background-size: cover;background-repeat: no-repeat;margin-left: auto;margin-right: auto;
}.login{z-index: 2;position:absolute;width: 350px;border-radius: 5px;height: 500px;background: white;box-shadow: 0px 0px 5px #333333;top: 50%;left: 50%;margin-top: -250px;margin-left: -175px;transition: all 1s;-moz-transition: all 1s;	/* Firefox 4 */-webkit-transition: all 1s;	/* Safari 和 Chrome */-o-transition: all 1s;	/* Opera */}
.login-top{font-size: 24px;margin-top: 100px;padding-left: 40px;box-sizing: border-box;color: #333333;margin-bottom: 50px;}
.login-center{width: 100%;box-sizing: border-box;padding: 0 40px;margin-bottom: 30px;}
.login-center-img{width: 20px;height: 20px;float: left;margin-top: 5px;}
.login-center-img>img{width: 100%;}
.login-center-input{float: left;width: 230px;margin-left: 15px;height: 30px;position: relative;}
login-center-input input{z-index: 2;transition: all 0.5s;padding-left: 10px;color: #333333;width: 100%;height: 30px;border: 0;border-bottom: 1px solid #cccccc;border-top: 1px solid #ffffff;border-left: 1px solid #ffffff;border-right: 1px solid #ffffff;box-sizing: border-box;outline: none;position: relative;}
.login-center-input input:focus{border: 1px solid dodgerblue;}
.login-center-input{
float: left;
width: 230px;
margin-left: 15px;
height: 30px;
position: relative;}
login-center-input input{
z-index: 2;
transition: all 0.5s;
padding-left: 10px;
color: #333333;
width: 100%;
height: 30px;
border: 0;
border-bottom: 1px solid #cccccc;
border-top: 1px solid #ffffff;
border-left: 1px solid #ffffff;
border-right: 1px solid #ffffff;
box-sizing: border-box;
outline: none;position: relative;}
.login-center-input input:focus{border: 1px solid dodgerblue;}
此段代码对应
效果如下:
代码解析:
float: left意味着该元素应该向左浮动,允许其他元素在其右侧排列。
width: 230px指定该元素的宽度为230个像素。
margin-left: 15px将该元素的左侧外边距设置为15个像素,从而在其左侧留出一些空间。
height: 30px指定该元素的高度为30个像素。
position: relative将该元素的定位类型设置为相对定位,这意味着它将相对于其正常位置进行定位,而不是相对于上级元素进行定位。
z-index: 2 - 它决定该元素的堆叠顺序(在其它重叠的元素上下文中),具有更高的 z-index 值将位于具有更低值的元素的上方。
transition: all 0.5s - 它以动画效果过渡了所有样式属性的变化,使得它们更加平滑。
padding-left: 10px - 它设置了该元素的左侧填充。
color: #333333 - 它设置了该元素的文字颜色。
width: 100% - 它设置了该元素的宽度为父元素的宽度。
height: 30px - 它设置了该元素的高度。
border: 0 - 它移除了该元素的默认边框。
border-bottom: 1px solid #cccccc - 它设置了该元素的底部边框为 1 像素宽,颜色为 #cccccc。
border-top: 1px solid #ffffff - 它设置了该元素的上部边框为 1 像素宽,颜色为 #ffffff。
border-left: 1px solid #ffffff - 它设置了该元素的左侧边框为 1 像素宽,颜色为 #ffffff。
border-right: 1px solid #ffffff - 它设置了该元素的右侧边框为 1 像素宽,颜色为 #ffffff。
box-sizing: border-box - 它设置元素框大小包括边框和内边距,但不包括外边距。这意味着该元素的宽度和高度将是指定的内容大小加上边框和填充大小。
outline: none - 它移除了该元素在获得焦点时的默认描边效果。
position: relative - 它设置了该元素的位置方式为相对位置。
.login-center-input input:focus{border: 1px solid dodgerblue;}
其作用是在用户点击一个输入框时,给这个输入框加上一个蓝色的边框。
7.
html,body{ width:100%;height:100%;
}#particles-js{width: 100%;height: 100%;position: relative;background-image: url(../images/bg.jpg);background-position: 50% 50%;background-size: cover;background-repeat: no-repeat;margin-left: auto;margin-right: auto;
}.login{z-index: 2;position:absolute;width: 350px;border-radius: 5px;height: 500px;background: white;box-shadow: 0px 0px 5px #333333;top: 50%;left: 50%;margin-top: -250px;margin-left: -175px;transition: all 1s;-moz-transition: all 1s;	/* Firefox 4 */-webkit-transition: all 1s;	/* Safari 和 Chrome */-o-transition: all 1s;	/* Opera */}
.login-top{font-size: 24px;margin-top: 100px;padding-left: 40px;box-sizing: border-box;color: #333333;margin-bottom: 50px;}
.login-center{width: 100%;box-sizing: border-box;padding: 0 40px;margin-bottom: 30px;}
.login-center-img{width: 20px;height: 20px;float: left;margin-top: 5px;}
.login-center-img>img{width: 100%;}
.login-center-input{float: left;width: 230px;margin-left: 15px;height: 30px;position: relative;}
login-center-input input{z-index: 2;transition: all 0.5s;padding-left: 10px;color: #333333;width: 100%;height: 30px;border: 0;border-bottom: 1px solid #cccccc;border-top: 1px solid #ffffff;border-left: 1px solid #ffffff;border-right: 1px solid #ffffff;box-sizing: border-box;outline: none;position: relative;}
.login-center-input input:focus{border: 1px solid dodgerblue;}
.login-center-input-text{background: white;padding: 0 5px;position: absolute;z-index: 0;opacity: 0;height: 20px;top: 50%;margin-top: -10px;font-size: 14px;left: 5px;color: dodgerblue;line-height: 20px;transition: all 0.5s;-moz-transition: all 0.5s;	/* Firefox 4 */-webkit-transition: all 0.5s;	/* Safari 和 Chrome */-o-transition: all 0.5s;	/* Opera */}
.login-center-input-text{background: white;padding: 0 5px;position: absolute;z-index: 0;opacity: 0;height: 20px;top: 50%;margin-top: -10px;font-size: 14px;left: 5px;color: dodgerblue;line-height: 20px;transition: all 0.5s;-moz-transition: all 0.5s; -webkit-transition: all 0.5s; -o-transition: all 0.5s;}
此段代码作用如下
效果如下:
代码解析:
background:背景颜色为白色。
padding:输入框左右两侧内边距为5像素,上下内边距默认。
position:输入框的定位方式为绝对定位。
z-index:图层的层级为0,即在默认层级显示。
opacity:输入框的不透明度为0,即不可见。
height:输入框的高度为20像素。
top:输入框相对父元素(登录中心)垂直居中对齐。
margin-top:使输入框在垂直方向上以自身高度的一半偏移,来实现完全垂直居中。
font-size:输入框内文字的字号为14像素。
left:输入框距离左边的间距为5像素。
color:输入框内文字的颜色为dodgerblue。
line-height:输入框内文字的行高为20像素,与输入框高度相同。
transition:所有的属性变化都会有0.5秒的过渡动画效果。
-moz-transition:指定火狐浏览器里所有的属性变化都会有0.5秒的过渡动画效果。
-webkit-transition:指定谷歌浏览器里所有的属性变化都会有0.5秒的过渡动画效果。
-o-transition:指定欧朋浏览器里所有的属性变化都会有0.5秒的过渡动画效果。
8.
html,body{ width:100%;height:100%;
}#particles-js{width: 100%;height: 100%;position: relative;background-image: url(../images/bg.jpg);background-position: 50% 50%;background-size: cover;background-repeat: no-repeat;margin-left: auto;margin-right: auto;
}.login{z-index: 2;position:absolute;width: 350px;border-radius: 5px;height: 500px;background: white;box-shadow: 0px 0px 5px #333333;top: 50%;left: 50%;margin-top: -250px;margin-left: -175px;transition: all 1s;-moz-transition: all 1s;	/* Firefox 4 */-webkit-transition: all 1s;	/* Safari 和 Chrome */-o-transition: all 1s;	/* Opera */}
.login-top{font-size: 24px;margin-top: 100px;padding-left: 40px;box-sizing: border-box;color: #333333;margin-bottom: 50px;}
.login-center{width: 100%;box-sizing: border-box;padding: 0 40px;margin-bottom: 30px;}
.login-center-img{width: 20px;height: 20px;float: left;margin-top: 5px;}
.login-center-img>img{width: 100%;}
.login-center-input{float: left;width: 230px;margin-left: 15px;height: 30px;position: relative;}
login-center-input input{z-index: 2;transition: all 0.5s;padding-left: 10px;color: #333333;width: 100%;height: 30px;border: 0;border-bottom: 1px solid #cccccc;border-top: 1px solid #ffffff;border-left: 1px solid #ffffff;border-right: 1px solid #ffffff;box-sizing: border-box;outline: none;position: relative;}
.login-center-input input:focus{border: 1px solid dodgerblue;}
.login-center-input-text{background: white;padding: 0 5px;position: absolute;z-index: 0;opacity: 0;height: 20px;top: 50%;margin-top: -10px;font-size: 14px;left: 5px;color: dodgerblue;line-height: 20px;transition: all 0.5s;-moz-transition: all 0.5s;	/* Firefox 4 */-webkit-transition: all 0.5s;	/* Safari 和 Chrome */-o-transition: all 0.5s;	/* Opera */}
.login-center-input input:focus~.login-center-input-text{top: 0;z-index: 3;opacity: 1;margin-top: -15px;}
.login-center-input input:focus~.login-center-input-text{top: 0;z-index: 3;opacity: 1;margin-top: -15px;}
效果如下:
代码解析:
.login-center-input input:focus~.login-center-input-text{top: 0;z-index: 3;opacity: 1;margin-top: -15px;}当一个输入表单获得焦点时(例如,用户点击或按Tab键进入该表单),对于其相邻的类名为.login-center-input-text的元素,做以下操作:
把该元素的位置定位在输入框顶部(top: 0)。
在其他元素上方使其显示(z-index: 3)。
将其不透明度设置为1(opacity: 1),以便用户可以看到其内容。
将其上方的间距设置为-15像素(margin-top: -15px),以抵消文本移动而产生的留白。
9.
html,body{ width:100%;height:100%;
}#particles-js{width: 100%;height: 100%;position: relative;background-image: url(../images/bg.jpg);background-position: 50% 50%;background-size: cover;background-repeat: no-repeat;margin-left: auto;margin-right: auto;
}.login{z-index: 2;position:absolute;width: 350px;border-radius: 5px;height: 500px;background: white;box-shadow: 0px 0px 5px #333333;top: 50%;left: 50%;margin-top: -250px;margin-left: -175px;transition: all 1s;-moz-transition: all 1s;	/* Firefox 4 */-webkit-transition: all 1s;	/* Safari 和 Chrome */-o-transition: all 1s;	/* Opera */}
.login-top{font-size: 24px;margin-top: 100px;padding-left: 40px;box-sizing: border-box;color: #333333;margin-bottom: 50px;}
.login-center{width: 100%;box-sizing: border-box;padding: 0 40px;margin-bottom: 30px;}
.login-center-img{width: 20px;height: 20px;float: left;margin-top: 5px;}
.login-center-img>img{width: 100%;}
.login-center-input{float: left;width: 230px;margin-left: 15px;height: 30px;position: relative;}
.login-center-input input{z-index: 2;transition: all 0.5s;padding-left: 10px;color: #333333;width: 100%;height: 30px;border: 0;border-bottom: 1px solid #cccccc;border-top: 1px solid #ffffff;border-left: 1px solid #ffffff;border-right: 1px solid #ffffff;box-sizing: border-box;outline: none;position: relative;}
.login-center-input input:focus{border: 1px solid dodgerblue;}
.login-center-input-text{background: white;padding: 0 5px;position: absolute;z-index: 0;opacity: 0;height: 20px;top: 50%;margin-top: -10px;font-size: 14px;left: 5px;color: dodgerblue;line-height: 20px;transition: all 0.5s;-moz-transition: all 0.5s;	/* Firefox 4 */-webkit-transition: all 0.5s;	/* Safari 和 Chrome */-o-transition: all 0.5s;	/* Opera */}
.login-center-input input:focus~.login-center-input-text{top: 0;z-index: 3;opacity: 1;margin-top: -15px;}
.login-button{cursor: pointer;width: 250px;text-align: center;height: 40px;line-height: 40px;background-color: dodgerblue;border-radius: 5px;margin: 0 auto;margin-top: 50px;color: white;}
.login-button{cursor: pointer;width: 250px;text-align: center;height: 40px;line-height: 40px;background-color: dodgerblue;border-radius: 5px;margin: 0 auto;margin-top: 50px;color: white;}
用于设置登录按钮的样式。其中,设置了按钮的宽度、高度、行高、背景颜色、圆角等属性,并将按钮居中显示在页面上方。使用了"cursor: pointer"属性,使得鼠标悬停在上按钮时会变成手型,增强用户体验。同时,设置了文字按钮的颜色为白色。

10.
html,body{ width:100%;height:100%;
}.js-count-particles{font-size: 1.1em;
}#stats,
.count-particles{-webkit-user-select: none;margin-top: 5px;margin-left: 5px;
}#stats{border-radius: 3px 3px 0 0;overflow: hidden;
}.count-particles{border-radius: 0 0 3px 3px;
}#particles-js{width: 100%;height: 100%;position: relative;background-image: url(../images/bg.jpg);background-position: 50% 50%;background-size: cover;background-repeat: no-repeat;margin-left: auto;margin-right: auto;
}body{margin:0;padding:0;}.login{z-index: 2;position:absolute;width: 350px;border-radius: 5px;height: 500px;background: white;box-shadow: 0px 0px 5px #333333;top: 50%;left: 50%;margin-top: -250px;margin-left: -175px;transition: all 1s;-moz-transition: all 1s;	/* Firefox 4 */-webkit-transition: all 1s;	/* Safari 和 Chrome */-o-transition: all 1s;	/* Opera */}
.login-top{font-size: 24px;margin-top: 100px;padding-left: 40px;box-sizing: border-box;color: #333333;margin-bottom: 50px;}
.login-center{width: 100%;box-sizing: border-box;padding: 0 40px;margin-bottom: 30px;}
.login-center-img{width: 20px;height: 20px;float: left;margin-top: 5px;}
.login-center-img>img{width: 100%;}
.login-center-input{float: left;width: 230px;margin-left: 15px;height: 30px;position: relative;}
.login-center-input input{z-index: 2;transition: all 0.5s;padding-left: 10px;color: #333333;width: 100%;height: 30px;border: 0;border-bottom: 1px solid #cccccc;border-top: 1px solid #ffffff;border-left: 1px solid #ffffff;border-right: 1px solid #ffffff;box-sizing: border-box;outline: none;position: relative;}
.login-center-input input:focus{border: 1px solid dodgerblue;}
.login-center-input-text{background: white;padding: 0 5px;position: absolute;z-index: 0;opacity: 0;height: 20px;top: 50%;margin-top: -10px;font-size: 14px;left: 5px;color: dodgerblue;line-height: 20px;transition: all 0.5s;-moz-transition: all 0.5s;	/* Firefox 4 */-webkit-transition: all 0.5s;	/* Safari 和 Chrome */-o-transition: all 0.5s;	/* Opera */}
.login-center-input input:focus~.login-center-input-text{top: 0;z-index: 3;opacity: 1;margin-top: -15px;}
.login-button{cursor: pointer;width: 250px;text-align: center;height: 40px;line-height: 40px;background-color: dodgerblue;border-radius: 5px;margin: 0 auto;margin-top: 50px;color: white;}
body{margin:0;padding:0;}
body中元素的边距和内边距为0。这样可以让整个页面的内容紧贴着浏览器窗口显示,不会有额外的空白区域
效果如下:
背景图像完全覆盖了网页页面
11.
html,body{ width:100%;height:100%;
}.js-count-particles{font-size: 1.1em;
}#stats,
.count-particles{-webkit-user-select: none;margin-top: 5px;margin-left: 5px;
}#stats{border-radius: 3px 3px 0 0;overflow: hidden;
}.count-particles{border-radius: 0 0 3px 3px;
}#particles-js{width: 100%;height: 100%;position: relative;background-image: url(../images/bg.jpg);background-position: 50% 50%;background-size: cover;background-repeat: no-repeat;margin-left: auto;margin-right: auto;
}body{margin:0;padding:0;}
.clearfix:after{visibility:hidden;display: block;font-size:0;content:" ";clear:both;height:0;}.login{z-index: 2;position:absolute;width: 350px;border-radius: 5px;height: 500px;background: white;box-shadow: 0px 0px 5px #333333;top: 50%;left: 50%;margin-top: -250px;margin-left: -175px;transition: all 1s;-moz-transition: all 1s;	/* Firefox 4 */-webkit-transition: all 1s;	/* Safari 和 Chrome */-o-transition: all 1s;	/* Opera */}
.login-top{font-size: 24px;margin-top: 100px;padding-left: 40px;box-sizing: border-box;color: #333333;margin-bottom: 50px;}
.login-center{width: 100%;box-sizing: border-box;padding: 0 40px;margin-bottom: 30px;}
.login-center-img{width: 20px;height: 20px;float: left;margin-top: 5px;}
.login-center-img>img{width: 100%;}
.login-center-input{float: left;width: 230px;margin-left: 15px;height: 30px;position: relative;}
.login-center-input input{z-index: 2;transition: all 0.5s;padding-left: 10px;color: #333333;width: 100%;height: 30px;border: 0;border-bottom: 1px solid #cccccc;border-top: 1px solid #ffffff;border-left: 1px solid #ffffff;border-right: 1px solid #ffffff;box-sizing: border-box;outline: none;position: relative;}
.login-center-input input:focus{border: 1px solid dodgerblue;}
.login-center-input-text{background: white;padding: 0 5px;position: absolute;z-index: 0;opacity: 0;height: 20px;top: 50%;margin-top: -10px;font-size: 14px;left: 5px;color: dodgerblue;line-height: 20px;transition: all 0.5s;-moz-transition: all 0.5s;	/* Firefox 4 */-webkit-transition: all 0.5s;	/* Safari 和 Chrome */-o-transition: all 0.5s;	/* Opera */}
.login-center-input input:focus~.login-center-input-text{top: 0;z-index: 3;opacity: 1;margin-top: -15px;}
.login.active{-webkit-animation: login-small 0.8s ; animation: login-small 0.8s ;animation-fill-mode:forwards;-webkit-animation-fill-mode:forwards}
.login-button{cursor: pointer;width: 250px;text-align: center;height: 40px;line-height: 40px;background-color: dodgerblue;border-radius: 5px;margin: 0 auto;margin-top: 50px;color: white;}
.clearfix:after{visibility:hidden;display: block;font-size:0;content:" ";clear:both;height:0;}
用于一个创建清除浮动的类。通过在元素上添加这个类,可以清除元素的中浮动,防止对后续元素造成影响。其中,使用了伪元素":after"来插入一个空格,达到清除浮动的效果。
效果如下:
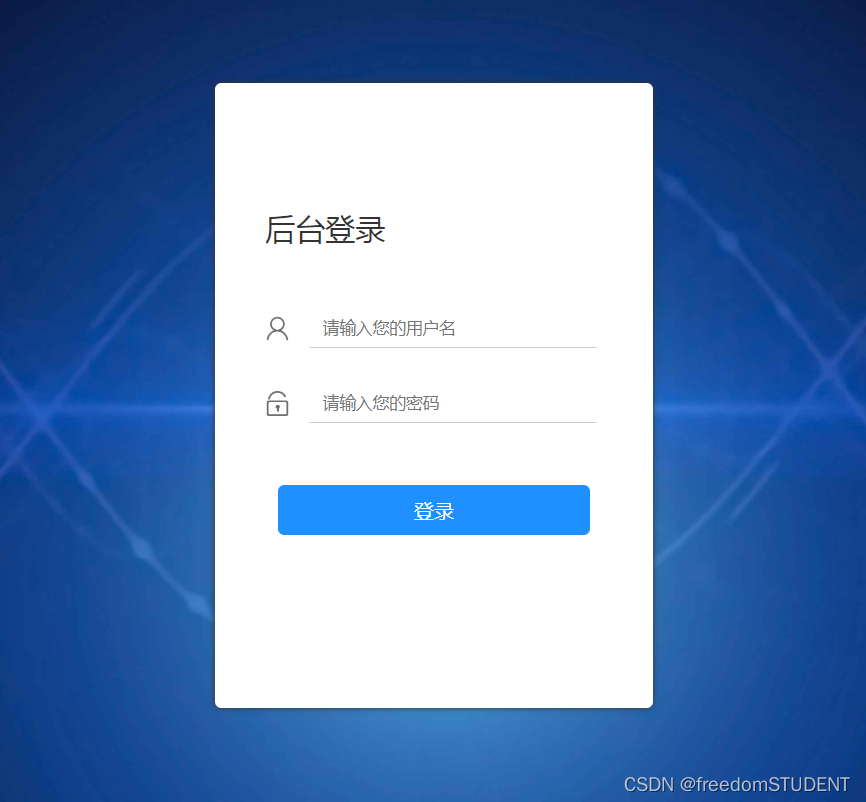
三.代码
相关文件,图像下载:
https://download.csdn.net/download/m0_67930426/87902949?spm=1001.2014.3001.5503
login.jsp
<%--Created by IntelliJ IDEA.User: 23502Date: 2023/6/3Time: 18:18To change this template use File | Settings | File Templates.
--%>
<%@ page contentType="text/html;charset=UTF-8" language="java" %>
<html>
<head><link rel="stylesheet" media="screen" href="${pageContext.request.contextPath}/css1/style.css"><title>Title</title>
</head><body>
<form action="${pageContext.request.contextPath}/2" name="myform" method="post"><div id="particles-js"><div class="login"><div class="login-top">后台登录</div><div class="login-center clearfix"><div class="login-center-img"><img src="${pageContext.request.contextPath}/images/name.png"/></div><div class="login-center-input"><input type="text" id="username" name="username" placeholder="请输入您的用户名"onfocus="this.placeholder=''" onblur="this.placeholder='请输入您的用户名'"/><div class="login-center-input-text">用户名</div></div></div><div class="login-center clearfix"><div class="login-center-img"><img src="${pageContext.request.contextPath}/images/password.png"/></div><div class="login-center-input"><input type="password" id="password" name="password" placeholder="请输入您的密码"onfocus="this.placeholder=''" onblur="this.placeholder='请输入您的密码'"/><div class="login-center-input-text">密码</div></div></div><div class="login-button" onclick="check()">登录</div><span style="text-align: center;color: red;"><br>       ${msg}</span></div><div class="sk-rotating-plane"></div></div>
</form></body>
</html>style.css
html,body{ width:100%;height:100%;
}.js-count-particles{font-size: 1.1em;
}#stats,
.count-particles{-webkit-user-select: none;margin-top: 5px;margin-left: 5px;
}#stats{border-radius: 3px 3px 0 0;overflow: hidden;
}.count-particles{border-radius: 0 0 3px 3px;
}#particles-js{width: 100%;height: 100%;position: relative;background-image: url(../images/bg.jpg);background-position: 50% 50%;background-size: cover;background-repeat: no-repeat;margin-left: auto;margin-right: auto;
}body{margin:0;padding:0;}
.clearfix:after{visibility:hidden;display: block;font-size:0;content:" ";clear:both;height:0;}.login{z-index: 2;position:absolute;width: 350px;border-radius: 5px;height: 500px;background: white;box-shadow: 0px 0px 5px #333333;top: 50%;left: 50%;margin-top: -250px;margin-left: -175px;transition: all 1s;-moz-transition: all 1s;	/* Firefox 4 */-webkit-transition: all 1s;	/* Safari 和 Chrome */-o-transition: all 1s;	/* Opera */}
.login-top{font-size: 24px;margin-top: 100px;padding-left: 40px;box-sizing: border-box;color: #333333;margin-bottom: 50px;}
.login-center{width: 100%;box-sizing: border-box;padding: 0 40px;margin-bottom: 30px;}
.login-center-img{width: 20px;height: 20px;float: left;margin-top: 5px;}
.login-center-img>img{width: 100%;}
.login-center-input{float: left;width: 230px;margin-left: 15px;height: 30px;position: relative;}
.login-center-input input{z-index: 2;transition: all 0.5s;padding-left: 10px;color: #333333;width: 100%;height: 30px;border: 0;border-bottom: 1px solid #cccccc;border-top: 1px solid #ffffff;border-left: 1px solid #ffffff;border-right: 1px solid #ffffff;box-sizing: border-box;outline: none;position: relative;}
.login-center-input input:focus{border: 1px solid dodgerblue;}
.login-center-input-text{background: white;padding: 0 5px;position: absolute;z-index: 0;opacity: 0;height: 20px;top: 50%;margin-top: -10px;font-size: 14px;left: 5px;color: dodgerblue;line-height: 20px;transition: all 0.5s;-moz-transition: all 0.5s;	/* Firefox 4 */-webkit-transition: all 0.5s;	/* Safari 和 Chrome */-o-transition: all 0.5s;	/* Opera */}
.login-center-input input:focus~.login-center-input-text{top: 0;z-index: 3;opacity: 1;margin-top: -15px;}
.login.active{-webkit-animation: login-small 0.8s ; animation: login-small 0.8s ;animation-fill-mode:forwards;-webkit-animation-fill-mode:forwards}
.login-button{cursor: pointer;width: 250px;text-align: center;height: 40px;line-height: 40px;background-color: dodgerblue;border-radius: 5px;margin: 0 auto;margin-top: 50px;color: white;}
相关文章:
【宿舍管理系统】注册登录页面的实现(前端)
目录 一.创建一个jsp文件,命名为login.jsp 代码: 1. 2. 3. 4. 5. 6. 编辑 二. 创建一个css文件,并命名为style.css 1. 编辑效果如下: 编辑 代码解析: 2. 效果如下: 代码解析࿱…...
 言简意赅傻瓜式写法)
python写入excel,(二) 言简意赅傻瓜式写法
xlrd限制条数,openpyxl 上限较高,所以推荐这种写法 import openpyxl # openpyxl引入模块 def write_to_excel(path: str, sheetStr, info, data): # 实例化一个workbook对象 workbook openpyxl.Workbook() # 激活一个sheet …...
:北京卷II)
我用ChatGPT写2023高考语文作文(六):北京卷II
2023年 北京卷 II 适用地区:北京 舞台上,戏曲演员有登场亮相的瞬间。生活中也有许多亮相时刻:国旗下的讲话,研学成果的汇报,新产品的发布……每一次亮相,都受到众人关注;每一次亮相,…...
Vue中如何进行图表绘制
Vue中如何进行图表绘制 数据可视化是Web应用中非常重要的一部分,其中图表绘制是其中的重要环节。Vue作为一款流行的前端框架,提供了很多优秀的图表库,以满足不同业务场景下的需求。本文将介绍如何在Vue中进行图表绘制,包括使用Vu…...

【Soft-prompt Tuning for Large Language Models to Evaluate Bias 论文略读】
Soft-prompt Tuning for Large Language Models to Evaluate Bias 论文略读 INFORMATIONAbstract1 Introduction2 Related work3 Methodology3.1 Experimental setup 4 Results5 Discussion & Conclusion总结A Fairness metricsB Hyperparmeter DetailsC DatasetsD Prompt …...

Qt 定时器与定时事件
一、定时器 在头文件.h中进行声明: private slots:void timeOut(); // 定时器超时槽函数在.cpp中进行实现相应的功能: // 构造函数 Widget::Widget(QWidget *parent) :QWidget(parent),ui(new Ui::Widget) {ui->setupUi(this);// 创建一个新的定时…...
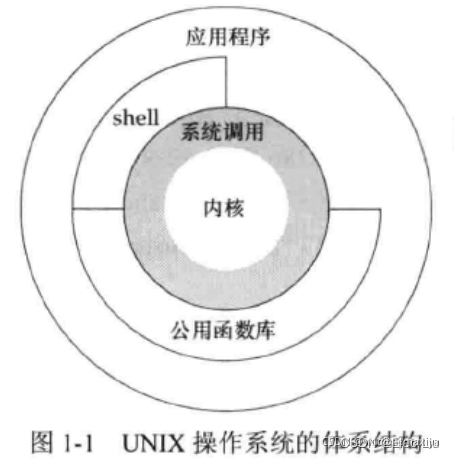
《UNUX环境高级编程》(1)UNIX基础
1、引言 2、UNIX体系结构 操作系统 一种软件,控制计算机硬件资源,提供程序运行环境。操作系统包含了内核和一些其他软件(如shell、公用函数库、应用程序等)。例如Linux就是GNU操作系统的内核,因此也称为GNU/Linux操作…...

MATLAB 入门之旅摘要
matlab官方基础课程,重温或者入门都是不错的选择。 MATLAB 入门之旅 MATLAB 入门之旅 | 自定进度在线课程 - MATLAB & Simulink 基本语法 示例说明x pi使用等号 () 创建变量。 左侧 (x) 是变量的名称,其值为右侧 (pi) 的值。y sin(-5)您可以使用括…...

chatgpt赋能python:Python小数运算:解决精度问题的最佳实践
Python小数运算:解决精度问题的最佳实践 在进行小数运算时,Python是一种十分常用的语言,但在进行小数运算时,由于二进制和十进制之间的转换不完全,可能会导致一些精度问题。为了避免这些问题,让我们一起了…...

Linux 安装Docker完整教程(六)
文章目录 背景一、Docker简介二、docker desktop 和 docker engin 区别三、Linux 安装Docker1. 安装docker的前置条件:2. 查看Docker版本3. 检查是否安装过Docker4. Docker自动化安装 (不想自带化安装的可跳过本步骤,选择手动安装)5. Docker手动安装&…...
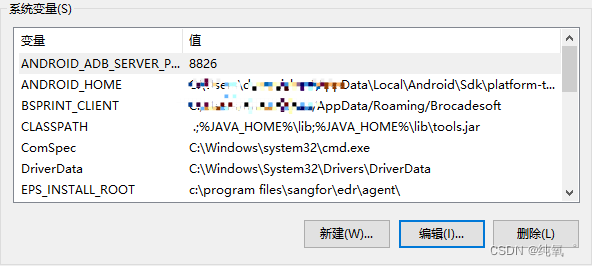
手机连接adb 相关问题汇总
目录 关于端口占用问题1 关于修改adb 端口配置问题2 方法3 方法4 关于端口占用问题1 转载链接:https://www.jianshu.com/p/902a89b06271 报错信息: error: no device/emulators found error: device still connecting 解决方案: 重启…...

MySQL数据相关操作
一、介绍 MySQL数据操作: DML 在MySQL管理软件中,可以通过SQL语句中的DML语言来实现数据的操作,包括 使用INSERT实现数据的插入 UPDATE实现数据的更新 使用DELETE实现数据的删除 使用SELECT查询数据以及。 二、插入数据INSERT 1. 插入完整…...
 等级考试试卷(四级))
2023年5月青少年软件编程(Python) 等级考试试卷(四级)
青少年软件编程(Python) 等级考试试卷(四级)2023.6 分数: 100 题数: 38 一、 单选题(共 25 题, 共 50 分) 1.下列程序段的运行结果是? ( ) def s(n): if n0: …...
Python selenium自动化测试模型图解
1、线性测试 优势:每一个脚本都是完整独立的,每一个脚本对应一个测试用例 缺点:开发成本高,会有重复操作重复脚本;维护成本也高,修改重复操作的脚本时,要逐一进行修改。 2、模块化驱动测试 …...
【详解】篮球记分牌硬件及代码
篮球记分牌设计 1 系统设计1.1 设计任务 1.2 性能指标要求1.2 设计思路及设计框图1.2.1设计思路1.2.2总体设计框图1.2.3电路原理图1.2.3 PCB布线图 2 主要程序模块的设计及原理2.1 外部中断0 2.2 菜单2.3 两队比分及两队犯规次数显示及修改2.3.1选择功能2.3.2修改功能2.3.3显示…...
FreeRTOS实时操作系统(二)系统文件代码学习
文章目录 前言系统配置任务创建任务创建删除实践 前言 接着学习正点原子的FreeRTOS教程,涉及到一些详细的系统内文件代码 系统配置 可以通过各种的宏定义来实现我们自己的RTOS配置(在FreeRTOSconfig.h) “INCLUDE”:配置API函数…...

分布式驱动电动汽车定速巡航控制
目录 前言 1. 电机模型 1.1电机数学模型 1.2 电机传递函数模型 2. 控制器设计...

如何启动和关闭分布式集群
分布式集群是由多个节点组成的系统,可以提供高性能、高可用、高扩展的数据处理能力。本文介绍如何启动和关闭一个包含hadoop、zookeeper、hbase和spark的分布式集群。 目录 启动顺序 关闭顺序 启动和关闭hadoop 启动hadoop 关闭hadoop 查看网页 启动和关闭z…...
WLAN基本概述及简单组网配置
WLAN概述 WLAN即Wireless LAN(无线局域网),是指通过无线技术构建的无线局域网络。WLAN广义上是指以无线电波、激光、红外线等无线信号来代替有线局域网中的部分或全部传输介质所构成的网络。 家庭WLAN产品: 家庭Wi-Fi路由器:通过把有线网络信号转换成无线信号,供家庭电…...

响应式Web设计单元测试
响应式Web设计单元测试 一. 单选题 (共8题,40.0分)二. 多选题 (共5题,25.0分)三. 判断题 (共7题,35.0分) 一. 单选题 (共8题,40.0分) …...
)
C++26合约编程落地难点全突破(从预处理宏到运行时检查的7层验证机制)
更多请点击: https://intelliparadigm.com 第一章:C26合约编程落地难点全突破(从预处理宏到运行时检查的7层验证机制) C26 引入的合约(contracts)机制虽已通过 WG21 投票进入草案,但其实际落地…...

如何用ezdxf解决CAD数据批量处理的工程挑战:从手动操作到自动化流水线
如何用ezdxf解决CAD数据批量处理的工程挑战:从手动操作到自动化流水线 【免费下载链接】ezdxf Python interface to DXF 项目地址: https://gitcode.com/gh_mirrors/ez/ezdxf 在工程设计领域,CAD图纸的批量处理一直是个技术痛点。传统的手工操作不…...

MAgent多智能体强化学习平台:从原理到实战的完整指南
1. 项目概述:从单智能体到多智能体世界的桥梁如果你玩过《星际争霸》或者《文明》这类策略游戏,一定对“微操”和“宏观运营”这两个词不陌生。在游戏里,你控制的不是一个单位,而是一整个军团,每个单位都有自己的行动逻…...

基于Java的LangChain4j智能客服实战:从零搭建企业级对话系统
告别“答非所问、越聊越懵”,用Java生态原生的AI框架让客服系统真正“听得懂、记得住、扩得快”。 一、传统客服系统的三大问题 在帮某金融客户做智能客服升级时,我第一次切身体会到传统客服系统的困境。用户问完“我的订单呢?”,紧跟着问“发货了吗?”,机器人却仿佛失忆…...

深入解析Claude Code:AI编程助手核心架构与工程实践
1. 项目概述与核心价值最近在深入研究AI编程助手领域,特别是那些能够真正理解代码上下文、执行复杂任务并自主学习的智能体(Agent)。在这个过程中,我系统性地拆解了市面上一个非常热门的项目——Claude Code。这不仅仅是一个简单的…...
收藏这一篇就够了)
从零到精通:AI大模型学习路线全解析!AI大模型学习路线(非常详细)收藏这一篇就够了
本文提供了一份详尽的AI大模型学习路线,涵盖了数学与编程基础、机器学习入门、深度学习深入、大模型探索以及进阶应用等方面。文章推荐了丰富的学习资源,包括经典书籍、在线课程和实践项目,帮助读者系统地学习和掌握AI大模型技术。同时&#…...
视觉AI终于“开窍“了!谷歌扔了20年的钥匙,何恺明联手引爆Transformer革命
4月25日讯 科技圈今日迎来重大突破——谷歌DeepMind联合何恺明、谢赛宁、Jonathan T. Barron等全球顶尖学者,正式发布视觉AI领域的颠覆性成果"Vision Banana"。这一成果被业界称为计算机视觉的"哥白尼革命"。过去二十年,计算机视觉领…...
:LLM辅助日志聚类+异常模式自学习实录)
VSCode日志分析进入智能时代(2026正式版首发解读):LLM辅助日志聚类+异常模式自学习实录
更多请点击: https://intelliparadigm.com 第一章:VSCode日志分析进入智能时代(2026正式版首发解读) VSCode 2026 正式版首次集成原生 Log Intelligence Engine(LIE),将日志分析从“人工翻查”…...

zmq源码分析之IO线程绑定时机
文章目录核心流程详细代码分析1. Socket 创建入口2. IO 线程选择3. IO 线程选择逻辑4. Session 创建与绑定5. 连接建立时的 IO 线程绑定6. Session 与 IO 线程关联完整绑定流程技术要点1. IO 线程选择策略2. 绑定机制3. 线程安全总结核心流程 用户创建 socket 到绑定 IO 线程的…...

10个常见排版问题解决方案:TypographyHandbook 终极指南
10个常见排版问题解决方案:TypographyHandbook 终极指南 【免费下载链接】TypographyHandbook A concise, referential guide on best web typographic practices. 项目地址: https://gitcode.com/gh_mirrors/ty/TypographyHandbook TypographyHandbook 是一…...