kubeadm部署k8sv1.24使用cri-docker做为CRI
目的
测试使用cri-docker做为containerd和docker的中间层垫片。
规划
| IP | 系统 | 主机名 |
|---|---|---|
| 10.0.6.5 | ubuntu 22.04.3 jammy | master01.kktb.org |
| 10.0.6.6 | ubuntu 22.04.3 jammy | master02.kktb.org |
| 10.0.6.7 | ubuntu 22.04.3 jammy | master03.kktb.org |
配置
步骤:
- 系统优化 禁用swap,设置ip_forward hosts地址配置 等
- 配置docker源
- 配置kubernetes源
- kubeadm初始化
- 取消master节点的污点
由于在局域网中配置了代理,所以不使用国内源。
配置hosts地址
[root@master02 ~]#grep master /etc/hosts
10.0.6.5 master01.kktb.org
10.0.6.6 master02.kktb.org
10.0.6.7 master03.kktb.org
# 这样get node出来的节点名是主机名
[root@master01 ~]#kubectl get node
NAME                STATUS   ROLES           AGE   VERSION
master01.kktb.org   Ready    control-plane   35m   v1.24.3
master02.kktb.org   Ready    control-plane   28m   v1.24.3
master03.kktb.org   Ready    control-plane   22m   v1.24.3
docker
for pkg in docker.io docker-doc docker-compose podman-docker containerd runc; do sudo apt-get remove $pkg; done
sudo install -m 0755 -d /etc/apt/keyringsapt-get install -y apt-transport-https ca-certificates curlcurl -fsSL https://download.docker.com/linux/ubuntu/gpg | sudo gpg --dearmor -o /etc/apt/keyrings/docker.gpg
sudo chmod a+r /etc/apt/keyrings/docker.gpgecho   "deb [arch="$(dpkg --print-architecture)" signed-by=/etc/apt/keyrings/docker.gpg] https://download.docker.com/linux/ubuntu \
"$(. /etc/os-release && echo "$VERSION_CODENAME")" stable" |   sudo tee /etc/apt/sources.list.d/docker.list > /dev/null
apt-cache madison docker-ce | awk '{ print $3 }'
VERSION_STRING=5:20.10.24~3-0~ubuntu-jammy
apt-get install docker-ce=$VERSION_STRING docker-ce-cli=$VERSION_STRING containerd.io docker-buildx-plugin docker-compose-plugin
docker run hello-world
查看当前的cgroup驱动是不是systemd,不是的话要更改
[root@master03 ~]#docker info |grep -i driverStorage Driver: overlay2Logging Driver: json-fileCgroup Driver: systemd
kubernetes源
curl -fsSL https://pkgs.k8s.io/core:/stable:/v1.24/deb/Release.key | sudo gpg --dearmor -o /etc/apt/keyrings/kubernetes-apt-keyring.gpgecho 'deb [signed-by=/etc/apt/keyrings/kubernetes-apt-keyring.gpg] https://pkgs.k8s.io/core:/stable:/v1.28/deb/ /' | sudo tee /etc/apt/sources.list.d/kubernetes.listapt update
配置组件
apt install -y kubeadm=1.24.3-1.1 kubelet=1.24.3-1.1 kubectl=1.24.3-1.1
配置cri-docker中间层
curl -LO https://github.com/Mirantis/cri-dockerd/releases/download/v0.3.0/cri-dockerd_0.3.0.3-0.ubuntu-jammy_amd64.deb
dpkg -i cri-dockerd_0.3.0.3-0.ubuntu-jammy_amd64.deb
systemctl status cri-docker.service
kubeadm初始化集群
列出需要的镜像
[root@master01 ~]#kubeadm config images list
I0917 08:39:15.852977  207252 version.go:255] remote version is much newer: v1.28.2; falling back to: stable-1.24
k8s.gcr.io/kube-apiserver:v1.24.17
k8s.gcr.io/kube-controller-manager:v1.24.17
k8s.gcr.io/kube-scheduler:v1.24.17
k8s.gcr.io/kube-proxy:v1.24.17
k8s.gcr.io/pause:3.7
k8s.gcr.io/etcd:3.5.3-0
k8s.gcr.io/coredns/coredns:v1.8.6
拉取镜像
[root@master01 ~]#kubeadm config images pull --kubernetes-version=v1.24.0 --cri-socket unix:///run/cri-dockerd.sock
[config/images] Pulled k8s.gcr.io/kube-apiserver:v1.24.0
[config/images] Pulled k8s.gcr.io/kube-controller-manager:v1.24.0
[config/images] Pulled k8s.gcr.io/kube-scheduler:v1.24.0
[config/images] Pulled k8s.gcr.io/kube-proxy:v1.24.0
[config/images] Pulled k8s.gcr.io/pause:3.7
[config/images] Pulled k8s.gcr.io/etcd:3.5.3-0
[config/images] Pulled k8s.gcr.io/coredns/coredns:v1.8.6
初始化集群
[root@master01 ~]#kubeadm init --control-plane-endpoint="master01.kktb.org" --kubernetes-version=v1.24.0 --pod-network-cidr=10.244.0.0/16 --service-cidr=10.96.0.0/12 --token-ttl=0 --cri-socket unix:///run/cri-dockerd.sock --upload-certs
逐个参数解释
init 初始化集群
reset 重置集群,如果创建集群失败可以执行此命令重置集群
--control-plane-endpoint 控制平面的节点,可以是IP地址也可以是主机名,主机名要配置到hosts文件中,不然解析失败
--kubernetes-version 安装的k8s集群版本,跟配置的apt 源和拉取的镜像版本要保持一致
--pod-network-cidr 集群中的pod的网段
--service-cidr 集群中service的网段
--token-ttl 加入集群的token过期时间 0 表示永远不过期,不安全
--cri-socket 指定集群调用的cri的socket路径
输出
[init] Using Kubernetes version: v1.24.0
# 执行安装前检查
[preflight] Running pre-flight checks[WARNING SystemVerification]: missing optional cgroups: blkio
# 拉取启动集群所需要的镜像 这要花费一段时间 取决于你的网络连接
[preflight] Pulling images required for setting up a Kubernetes cluster
[preflight] This might take a minute or two, depending on the speed of your internet connection
# 也可以在安装集群前使用Kubeam config images pull提前拉取镜像
[preflight] You can also perform this action in beforehand using 'kubeadm config images pull'
# 使用的证书文件夹
[certs] Using certificateDir folder "/etc/kubernetes/pki"
# 生成集群ca证书和key
[certs] Generating "ca" certificate and key
# 生成apiserver证书
[certs] Generating "apiserver" certificate and key
# apiserver服务的证书地址已签发,service名称和IP是xxx
[certs] apiserver serving cert is signed for DNS names [kubernetes kubernetes.default kubernetes.default.svc kubernetes.default.svc.cluster.local master01.kktb.org] and IPs [10.96.0.1 10.0.6.5]
[certs] Generating "apiserver-kubelet-client" certificate and key
[certs] Generating "front-proxy-ca" certificate and key
[certs] Generating "front-proxy-client" certificate and key
[certs] Generating "etcd/ca" certificate and key
[certs] Generating "etcd/server" certificate and key
# etcd的service证书和dns解析名字
[certs] etcd/server serving cert is signed for DNS names [localhost master01.kktb.org] and IPs [10.0.6.5 127.0.0.1 ::1]
[certs] Generating "etcd/peer" certificate and key
[certs] etcd/peer serving cert is signed for DNS names [localhost master01.kktb.org] and IPs [10.0.6.5 127.0.0.1 ::1]
[certs] Generating "etcd/healthcheck-client" certificate and key
[certs] Generating "apiserver-etcd-client" certificate and key
# 生成serviceaccount的私钥和公钥
[certs] Generating "sa" key and public key
# kubeconfig集群密钥的文件夹
[kubeconfig] Using kubeconfig folder "/etc/kubernetes"
[kubeconfig] Writing "admin.conf" kubeconfig file
[kubeconfig] Writing "kubelet.conf" kubeconfig file
[kubeconfig] Writing "controller-manager.conf" kubeconfig file
[kubeconfig] Writing "scheduler.conf" kubeconfig file
[kubelet-start] Writing kubelet environment file with flags to file "/var/lib/kubelet/kubeadm-flags.env"
# kubelet服务配置文件
[kubelet-start] Writing kubelet configuration to file "/var/lib/kubelet/config.yaml"
[kubelet-start] Starting the kubelet
# 使用的清单文件夹
[control-plane] Using manifest folder "/etc/kubernetes/manifests"
# 创建k8s集群的关键服务的静态pod
[control-plane] Creating static Pod manifest for "kube-apiserver"
[control-plane] Creating static Pod manifest for "kube-controller-manager"
[control-plane] Creating static Pod manifest for "kube-scheduler"
# 创建惊天pod etcd的部署文件位置
[etcd] Creating static Pod manifest for local etcd in "/etc/kubernetes/manifests"
# 等待kubelet服务启动控制节点的静态pod 从/etc/xxx目录
[wait-control-plane] Waiting for the kubelet to boot up the control plane as static Pods from directory "/etc/kubernetes/manifests". This can take up to 4m0s
# apiclient检查所有的控制平面节点的健康状态用时
[apiclient] All control plane components are healthy after 24.002949 seconds
# 在kube-system 命名空间中使用configmap资源类型存储配置信息kubeadm-config
[upload-config] Storing the configuration used in ConfigMap "kubeadm-config" in the "kube-system" Namespace
[kubelet] Creating a ConfigMap "kubelet-config" in namespace kube-system with the configuration for the kubelets in the cluster
# 存储证书
[upload-certs] Storing the certificates in Secret "kubeadm-certs" in the "kube-system" Namespace
[upload-certs] Using certificate key:
1df01c66c2f92b14360bcaf893f6b3f6a5921fa65a6b080d9423a8362243f487
# 标记master01节点未控制平面节点并添加label标签
[mark-control-plane] Marking the node master01.kktb.org as control-plane by adding the labels: [node-role.kubernetes.io/control-plane node.kubernetes.io/exclude-from-external-load-balancers]
# 添加控制平面节点禁止调度污点
[mark-control-plane] Marking the node master01.kktb.org as control-plane by adding the taints [node-role.kubernetes.io/master:NoSchedule node-role.kubernetes.io/control-plane:NoSchedule]
[bootstrap-token] Using token: zcg7j7.zti8f568uzi9k6hn
[bootstrap-token] Configuring bootstrap tokens, cluster-info ConfigMap, RBAC Roles
# 配置rbac role-based access control 基于角色的访问控制密钥获取节点
[bootstrap-token] Configured RBAC rules to allow Node Bootstrap tokens to get nodes
[bootstrap-token] Configured RBAC rules to allow Node Bootstrap tokens to post CSRs in order for nodes to get long term certificate credentials
[bootstrap-token] Configured RBAC rules to allow the csrapprover controller automatically approve CSRs from a Node Bootstrap Token
[bootstrap-token] Configured RBAC rules to allow certificate rotation for all node client certificates in the cluster
[bootstrap-token] Creating the "cluster-info" ConfigMap in the "kube-public" namespace
[kubelet-finalize] Updating "/etc/kubernetes/kubelet.conf" to point to a rotatable kubelet client certificate and key
# 应用 必要的插件 coredns kube-proxy
[addons] Applied essential addon: CoreDNS
[addons] Applied essential addon: kube-proxy
# 控制平面初始化完成
Your Kubernetes control-plane has initialized successfully!To start using your cluster, you need to run the following as a regular user:
# 配置kubeconfig文件到当前用户的家目录中mkdir -p $HOME/.kubesudo cp -i /etc/kubernetes/admin.conf $HOME/.kube/configsudo chown $(id -u):$(id -g) $HOME/.kube/configAlternatively, if you are the root user, you can run:
# root用户可以运行export KUBECONFIG=/etc/kubernetes/admin.conf
# 部署网络插件
You should now deploy a pod network to the cluster.
Run "kubectl apply -f [podnetwork].yaml" with one of the options listed at:https://kubernetes.io/docs/concepts/cluster-administration/addons/You can now join any number of the control-plane node running the following command on each as root:
# 在其他控制平面节点使用下面的命令将节点添加到集群kubeadm join master01.kktb.org:6443 --token zcg7j7.zti8f568uzi9k6hn \--discovery-token-ca-cert-hash sha256:23d1070adacf75c3f79b577d966afe0286c9a06bc77dc25a8fd766487935fb94 \--control-plane --certificate-key 1df01c66c2f92b14360bcaf893f6b3f6a5921fa65a6b080d9423a8362243f487
# 默认证书在两个小时删除,可以使用如下命令重新生成证书
Please note that the certificate-key gives access to cluster sensitive data, keep it secret!
As a safeguard, uploaded-certs will be deleted in two hours; If necessary, you can use
"kubeadm init phase upload-certs --upload-certs" to reload certs afterward.
# 在工作节点worker 添加主机到集群中
Then you can join any number of worker nodes by running the following on each as root:kubeadm join master01.kktb.org:6443 --token zcg7j7.zti8f568uzi9k6hn \--discovery-token-ca-cert-hash sha256:23d1070adacf75c3f79b577d966afe0286c9a06bc77dc25a8fd766487935fb94
配置网络插件flannel,安装时候用了flannel中默认的pod和svc的地址段,所以直接apply就行无需更改任何内容
[root@master01 ~]#kubectl apply -f https://raw.githubusercontent.com/flannel-io/flannel/master/Documentation/kube-flannel.yml
namespace/kube-flannel created
clusterrole.rbac.authorization.k8s.io/flannel created
clusterrolebinding.rbac.authorization.k8s.io/flannel created
serviceaccount/flannel created
configmap/kube-flannel-cfg created
daemonset.apps/kube-flannel-ds created
其他master节点加入集群
kubeadm join master01.kktb.org:6443 --token zcg7j7.zti8f568uzi9k6hn --discovery-token-ca-cert-hash sha256:23d1070adacf75c3f79b577d966afe0286c9a06bc77dc25a8fd766487935fb94 --control-plane --certificate-key 1df01c66c2f92b14360bcaf893f6b3f6a5921fa65a6b080d9423a8362243f487 --cri-socket unix:///run/cri-dockerd.sock
[root@master01 ~]#kubectl get pod -o wide
NAME                       READY   STATUS    RESTARTS   AGE     IP           NODE                NOMINATED NODE   READINESS GATES
demoapp-78b49597cf-5f5dc   1/1     Running   0          9m44s   10.244.0.2   master01.kktb.org   <none>           <none>
demoapp-78b49597cf-fmqn8   1/1     Running   0          9m44s   10.244.0.3   master01.kktb.org   <none>           <none>
允许master节点参与调度
[root@master01 ~]#kubectl taint node master01.kktb.org node-role.kubernetes.io/master-
node/master01.kktb.org untainted
[root@master01 ~]#kubectl taint node master01.kktb.org node-role.kubernetes.io/control-plane-
node/master01.kktb.org untainted
# 一次允许所有的master节点允许调度
[root@master01 ~]#kubectl taint nodes --all node-role.kubernetes.io/control-plane-
[root@master01 ~]#kubectl taint nodes --all node-role.kubernetes.io/master-
创建pod测试
[root@master01 ~]#kubectl create deployment demoapp --image=ikubernetes/demoapp:v1.0 --replicas=2
验证其他节点也能被调度
[root@master01 ~]#kubectl scale deployment demoapp --replicas 3
deployment.apps/demoapp scaled
[root@master01 ~]#kubectl scale deployment demoapp --replicas 6
[root@master01 ~]#kubectl get pod -o wide
NAME                       READY   STATUS    RESTARTS   AGE   IP           NODE                NOMINATED NODE   READINESS GATES
demoapp-78b49597cf-5f5dc   1/1     Running   0          10m   10.244.0.2   master01.kktb.org   <none>           <none>
demoapp-78b49597cf-dgcdz   1/1     Running   0          16s   10.244.2.3   master03.kktb.org   <none>           <none>
demoapp-78b49597cf-fmqn8   1/1     Running   0          10m   10.244.0.3   master01.kktb.org   <none>           <none>
demoapp-78b49597cf-j94ts   1/1     Running   0          16s   10.244.1.4   master02.kktb.org   <none>           <none>
demoapp-78b49597cf-k8mkw   1/1     Running   0          16s   10.244.1.5   master02.kktb.org   <none>           <none>
demoapp-78b49597cf-sq6vz   1/1     Running   0          24s   10.244.2.2   master03.kktb.org   <none>           <none>
相关文章:

kubeadm部署k8sv1.24使用cri-docker做为CRI
目的 测试使用cri-docker做为containerd和docker的中间层垫片。 规划 IP系统主机名10.0.6.5ubuntu 22.04.3 jammymaster01.kktb.org10.0.6.6ubuntu 22.04.3 jammymaster02.kktb.org10.0.6.7ubuntu 22.04.3 jammymaster03.kktb.org 配置 步骤: 系统优化 禁用sw…...
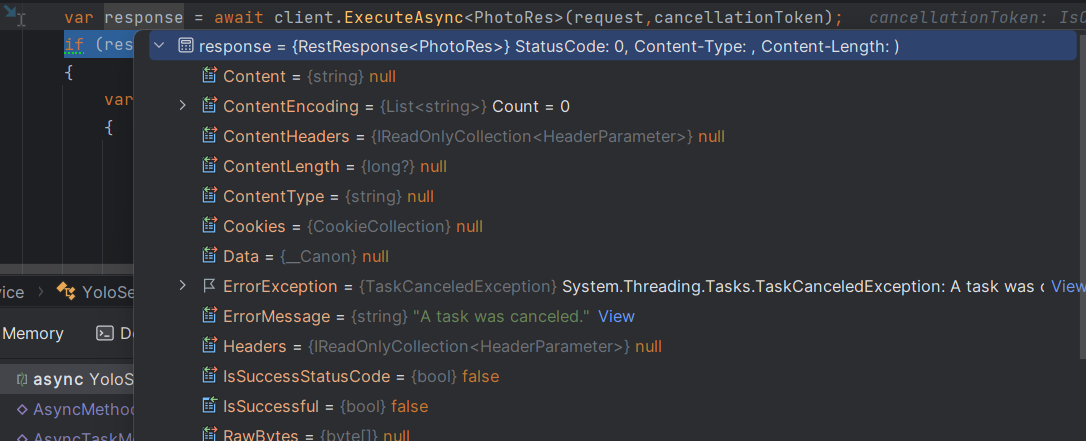
在c#中使用CancellationToken取消任务
目录 🚀介绍: 🐤简单举例 🚀IsCancellationRequested 🚀ThrowIfCancellationRequested 🐤在控制器中使用 🚀通过异步方法的参数使用cancellationToken 🚀api结合ThrowIfCancel…...
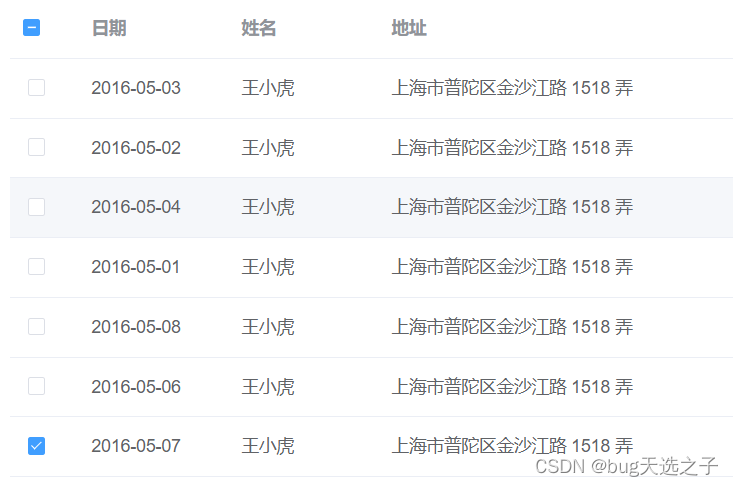
【项目经验】:elementui多选表格默认选中
一.需求 在页面刚打开就默认选中指定项。 二.方法Table Methods toggleRowSelection用于多选表格,切换某一行的选中状态,如果使用了第二个参数,则是设置这一行选中与否(selected 为 true 则选中)row, selected 详细…...

外星人入侵游戏-(创新版)
🌈write in front🌈 🧸大家好,我是Aileen🧸.希望你看完之后,能对你有所帮助,不足请指正!共同学习交流. 🆔本文由Aileen_0v0🧸 原创 CSDN首发🐒 如…...
HTML 学习笔记(基础)
它是超文本标记语言,由一大堆约定俗成的标签组成,而其标签里一般又有一些属性值可以设置。 W3C标准:网页主要三大部分 结构:HTML表现:CSS行为:JavaScript <!DOCTYPE html> <html lang"zh-…...

最小二乘法
Least Square Method 1、相关的矩阵公式2、线性回归3、最小二乘法3.1、损失函数(Loss Function)3.2、多维空间的损失函数3.3、解析法求解3.4、梯度下降法求解 1、相关的矩阵公式 P r e c o n d i t i o n : ξ ∈ R n , A ∈ R n ∗ n i : σ A ξ σ ξ…...

使用stelnet进行安全的远程管理
1. telnet有哪些不足? 2.ssh如何保证数据传输安全? 需求:远程telnet管理设备 用户定义需要在AAA模式下: 开启远程登录的服务:定义vty接口 然后从R2登录:是可以登录的 同理R3登录: 在R1也可以查…...

python 二手车数据分析以及价格预测
二手车交易信息爬取、数据分析以及交易价格预测 引言一、数据爬取1.1 解析数据1.2 编写代码爬1.2.1 获取详细信息1.2.2 数据处理 二、数据分析2.1 统计分析2.2 可视化分析 三、价格预测3.1 价格趋势分析(特征分析)3.2 价格预测 引言 本文着眼于车辆信息,结合当下较…...
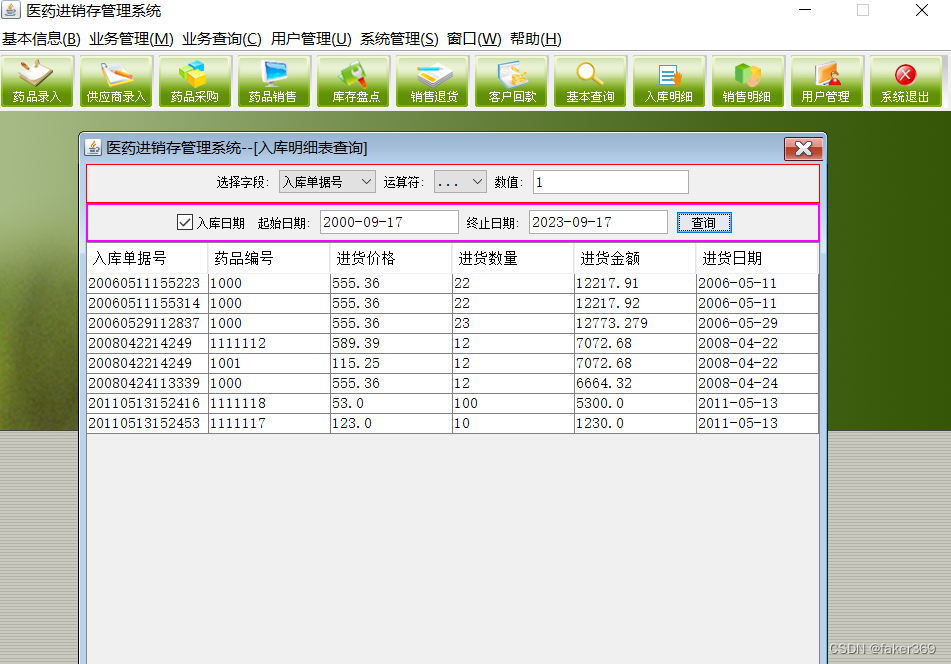
JAVA医药进销存管理系统(附源码+调试)
JAVA医药进销存管理系统 功能描述 (1)登录模块:登录信息等存储在数据库中 (2)基本信息模块:分为药品信息模块、客户情况模块、供应商情况模块; (3)业务管理模块&#x…...

H5 <blockquote> 标签
主要应用于:内容引用 标签定义及使用说明 <blockquote> 标签定义摘自另一个源的块引用。 浏览器通常会对 <blockquote> 元素进行缩进。 提示和注释 提示:如果标记是不需要段落分隔的短引用,请使用 <q>。 HTML 4.01 与 H…...
nginx配置指南
nginx.conf配置 找到Nginx的安装目录下的nginx.conf文件,该文件负责Nginx的基础功能配置。 配置文件概述 Nginx的主配置文件(conf/nginx.conf)按以下结构组织: 配置块功能描述全局块与Nginx运行相关的全局设置events块与网络连接有关的设置http块代理…...

【数据结构】优先级队列(堆)
文章目录 💐1. 优先级队列1.1 概念 💐2.堆的概念及存储方式2.1 什么是堆2.2 为什么要用完全二叉树描述堆呢?2.3 为什么说堆是在完全二叉树的基础上进行的调整?2.4 使用数组还原完全二叉树 💐3. 堆的常用操作-模拟实现3…...
前端笔试2
1.下面哪一个是检验对象是否有一个以自身定义的属性? foo.hasOwnProperty("bar")bar in foo foo["bar"] ! undefinedfoo.bar ! null 解析: bar in foo 检查 foo 对象是否包含名为 bar 的属性,但是这个属性可以是从原型链继承来的&a…...

LeetCode:66.加一
66.加一 来源:力扣(LeetCode) 链接: https://leetcode.cn/problems/plus-one/description/ 给定一个由 整数 组成的 非空 数组所表示的非负整数,在该数的基础上加一。 最高位数字存放在数组的首位, 数组中每个元素只存储单个数字。 你可以假设除了整数 0 之外,这个整数…...

Redis 常用命令
目录 全局命令 1)keys 2)exists 3) del(delete) 4)expire 5)type SET命令 GET命令 MSET 和 MGET命令 其他SET命令 计数命令 redis-cli,进入redis 最核心的命令:我们这里只是先介绍 set 和 get 最简单的操作…...
用于字符和字符串的区别)
Integer.valueOf()用于字符和字符串的区别
LeetCode 17 电话号码的字母组合 先贴代码 class Solution {List<String> result new ArrayList<>();String temp new String("");Integer num;public List<String> letterCombinations(String digits) {dfs(digits, 0);return result;} publi…...
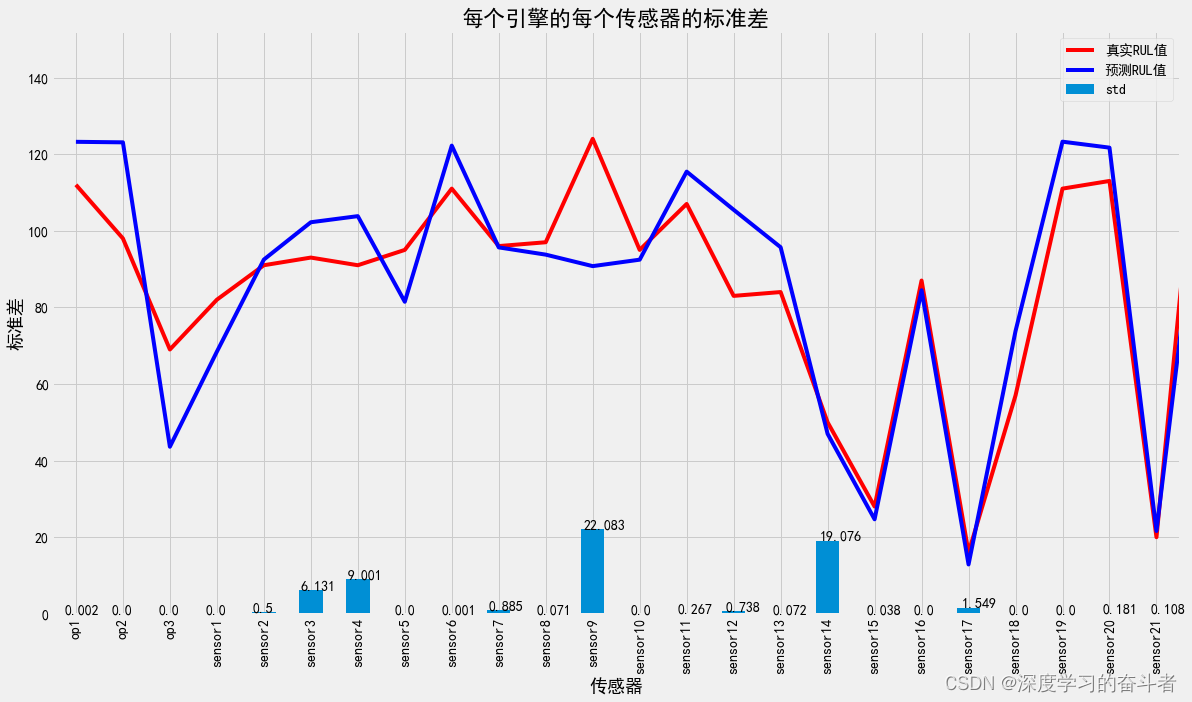
机械寿命预测(基于NASA C-MAPSS数据的剩余使用寿命RUL预测,Python代码,CNN_LSTM模型,有详细中文注释)
1.效果视频:机械寿命预测(NASA涡轮风扇发动机剩余使用寿命RUL预测,Python代码,CNN_LSTM模型,有详细中文注释)_哔哩哔哩_bilibili 环境库版本: 2.数据来源:https://www.nasa.gov/int…...
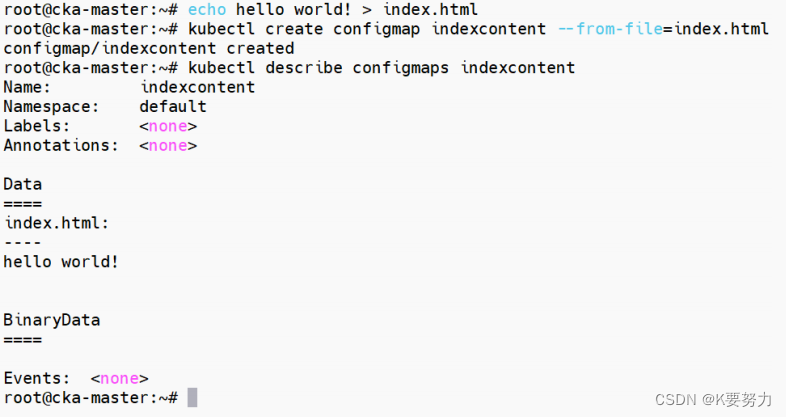
ConfigMaps-1
文章目录 主要内容一.使用 YAML 文件创建1.在data节点创建了一些键值:代码如下(示例): 2.解释 二.使用命令行创建1.创建了一个名为 person 的键值:代码如下(示例): 2.解释3.创建了一个 index.html 文件&…...

docker上安装es
安装docker 1 安装docker依赖 yum install -y yum-utils2 设置docker仓库镜像地址 yum-config-manager --add-repo http://mirrors.aliyun.com/docker-ce/linux/centos/docker-ce.repo3 安装制定版本的docker yum -y install docker-ce-20.10.17-3.el74 查看是否安装成功 y…...
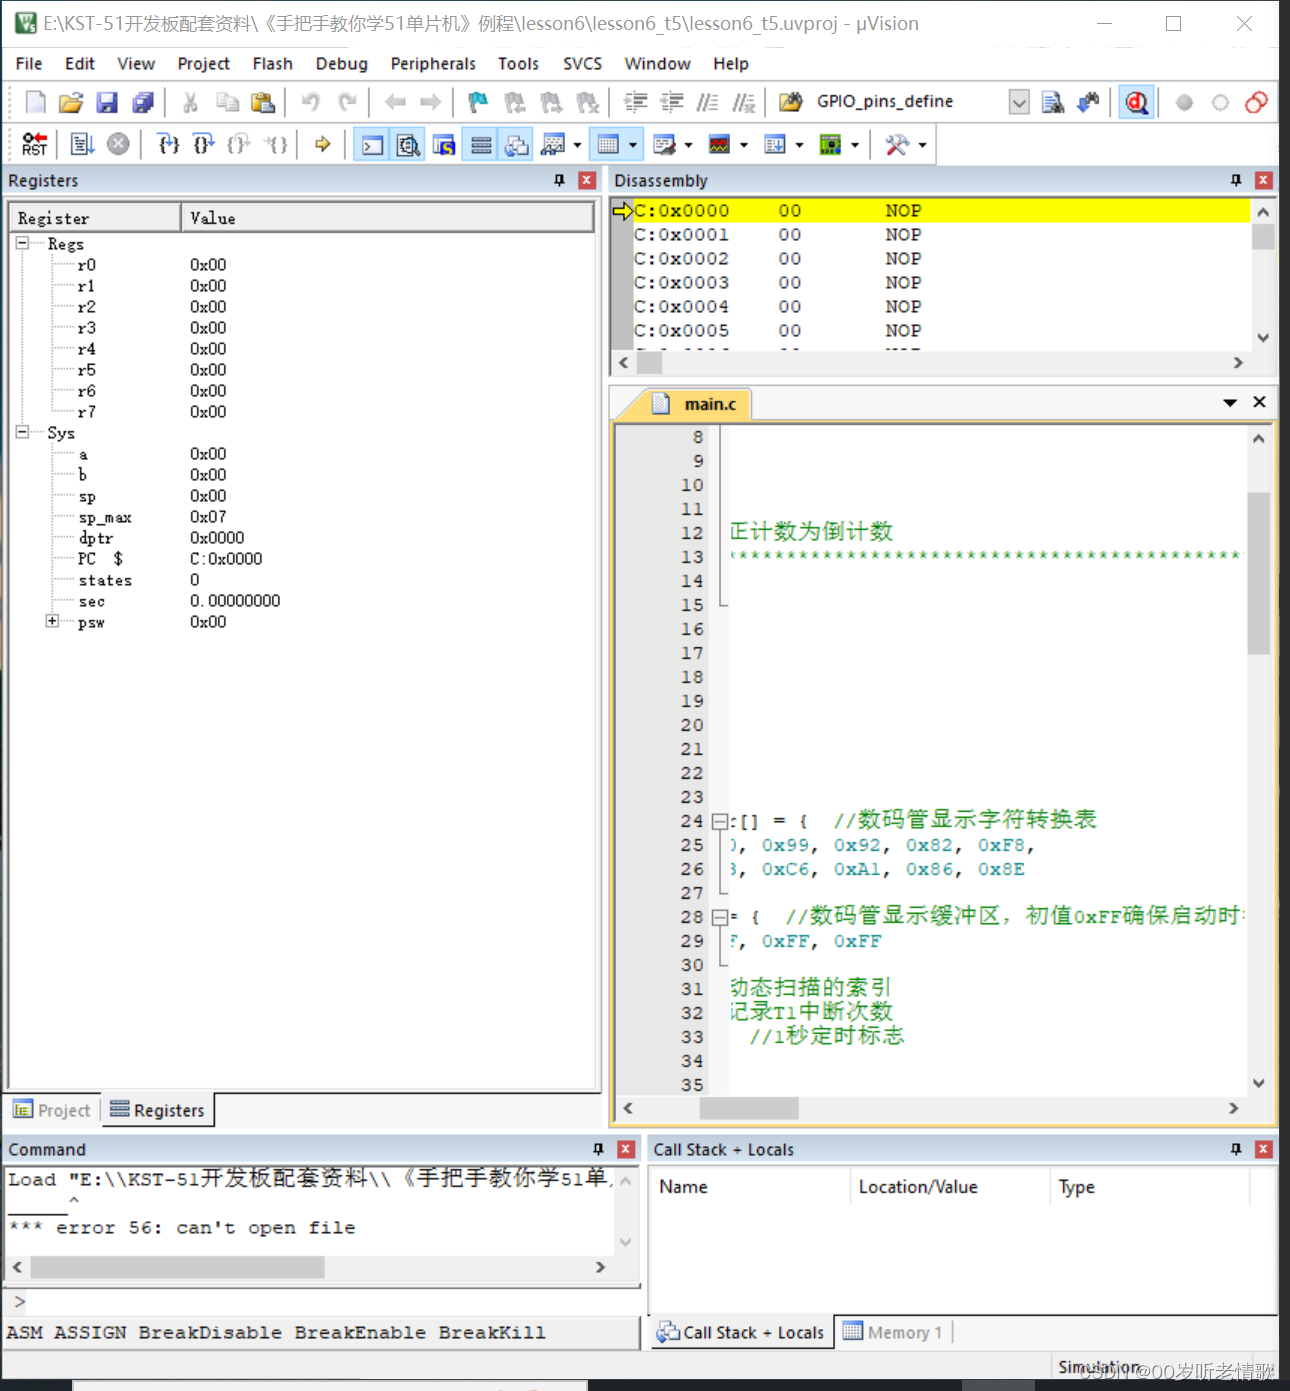
#循循渐进学51单片机#c语言基础和流水灯实现#not.3
1、熟练掌握二进制、十进制和十六进制的转换方法。 多少进制就是多少之间相加,比如十六进制就是十六一次一加;二进制转化十六进制,分成四个一组。 2、C语言变量类型与取值范围,for、while等基本语句的用法。 for、while等基本语句…...

RK3399 DRM显示框架实战:从零开始搭建多图层视频播放器
RK3399 DRM显示框架实战:从零构建多图层视频播放器 在智能终端设备开发领域,如何高效实现多媒体内容的叠加显示一直是工程师们面临的挑战。想象一下,当我们需要在教育平板上同时播放教学视频、展示动态课件和实时标注内容时,传统的…...

Go语言的Kubernetes编排实践
Go语言的Kubernetes编排实践 1. Kubernetes简介 Kubernetes(简称K8s)是一个开源的容器编排平台,用于自动化容器的部署、扩展和管理。它提供了强大的容器编排能力,使应用程序能够在分布式环境中高效运行。 1.1 Kubernetes的核心概念…...

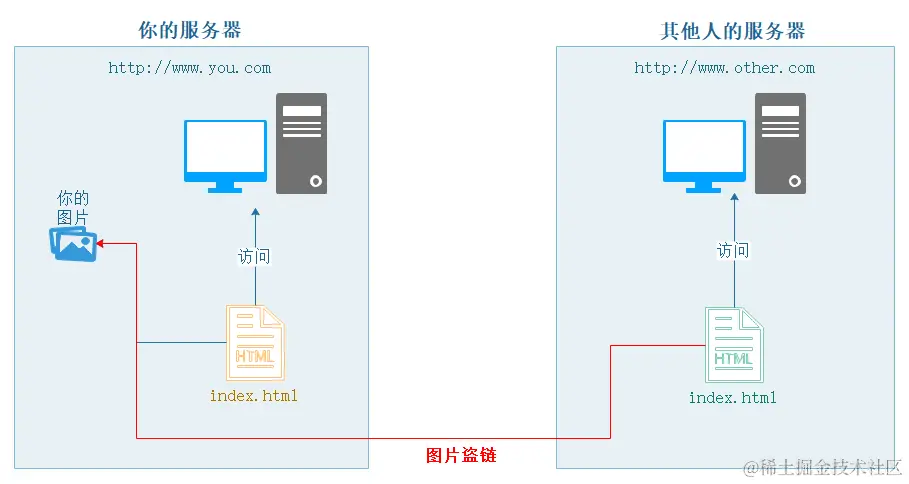
终极音乐解析方案:music-api如何免费打通四大平台音频资源壁垒
终极音乐解析方案:music-api如何免费打通四大平台音频资源壁垒 【免费下载链接】music-api 各大音乐平台的歌曲播放地址获取接口,包含网易云音乐,qq音乐,酷狗音乐等平台 项目地址: https://gitcode.com/gh_mirrors/mu/music-api…...

别再只认M1卡了!沁恒CH58x读取NDEF Type2标签的完整数据解析指南
沁恒CH58x深度解析NDEF Type2标签:从字节到可读信息的完整指南 当你第一次用沁恒CH58x系列芯片成功读取到NFC Forum Type2标签的原始数据时,面对那44个数据块和一堆十六进制数字,是否感到无从下手?本文将带你深入Type2标签的数据结…...

从B站收藏夹到本地硬盘:3步掌握BiliTools高效下载管理
从B站收藏夹到本地硬盘:3步掌握BiliTools高效下载管理 【免费下载链接】BiliTools A cross-platform bilibili toolbox. 跨平台哔哩哔哩工具箱,支持下载视频、番剧等等各类资源 项目地址: https://gitcode.com/GitHub_Trending/bilit/BiliTools 还…...

教师必备:用CosyVoice快速制作带语音讲解的理工科课件
教师必备:用CosyVoice快速制作带语音讲解的理工科课件 作为一名理工科教师,你是否曾为制作多媒体课件而烦恼?尤其是那些布满复杂公式的数学、物理、工程学课件,想要为每个公式配上专业的语音讲解,却面临两大难题&…...

Comsol仿真:三相电力变压器电磁场与电路耦合计算,精确预测高低压绕组电压电流分布及磁通密度分布
comsol三相电力变压器电磁场和电路耦合计算,可以得到变压器高低压绕组电压电流分布以及变压器磁通密度分布,今天我们来聊聊如何在COMSOL中模拟三相电力变压器的电磁场和电路耦合计算。通过这个模拟,我们可以得到变压器高低压绕组的电压电流分…...

2026届学术党必备的六大AI写作网站推荐榜单
Ai论文网站排名(开题报告、文献综述、降aigc率、降重综合对比) TOP1. 千笔AI TOP2. aipasspaper TOP3. 清北论文 TOP4. 豆包 TOP5. kimi TOP6. deepseek 削减AIGC率,这意味着要去降低文本之中,那些可被辨别为系人工智能生成…...

RePKG高效资源处理工具完全指南:从功能解析到实战应用
RePKG高效资源处理工具完全指南:从功能解析到实战应用 【免费下载链接】repkg Wallpaper engine PKG extractor/TEX to image converter 项目地址: https://gitcode.com/gh_mirrors/re/repkg 功能探秘:RePKG如何解决游戏资源处理难题?…...

分人群AI建站工具解决方案:中小企、创业者、外贸人、创作者怎么选?
分人群AI建站工具解决方案:中小企、创业者、外贸人、创作者怎么选?同样是找“AI建站工具”,一个个体摄影师和一个初创公司老板,心里的需求清单可能完全不同。这篇内容我们就来对不同人群,分别给出适合的建站思路和工具…...