OpenStack云平台搭建(5) | 部署Nova
目录
1、登录数据库配置
2、安装nova
3、计算节点上安装nova
4、在controller节点上
nova组件是用来建虚拟机的(功能:负责响应虚拟机创建请求、调度、销毁云主机)
nova主要组成:
- (1).nova api service------安装在controller节点:接受和相应客户端发送的请求,nova-api负责接收和响应终端用户由管虚拟机和云硬盘的请求。就是说我想在openstack中创建个虚拟机(创建虚拟机最终在nova中完成),我发出的请求就被nova-api接收并发送到nova中去,然后在进行下一步具体操作,nova-api是整个nova的入口。它接收用户请求,将指令发送到消息队列,由相应的服务执行相关的指令消息,他提供了openstack API,亚马逊EC2 API,以及管理员控制API。
- (2)nova-api-metadata service:接受从实例元数据发来的请求,该服务通常于nova-network服务在对主机模式下运行,也就说由多个nova节点才会用得到
- (3)nova compute------安装在compute节点:是nova组件中最核心的服务,它实现了管理虚拟机的功能,实现了在计算节点上创建,启动,暂停,关闭,和删除虚拟机。
- (4)nova Scheduler:主要起到调度作用,假如现在又多台nova计算节点,当用户发起创建虚拟机的请求时,nova Scheduler会决定把虚拟机创建放在那个计算节点上。
- (5)nova conductor:主要提供数据查询功能,提供nova compute和Database之间的交互数据,那为啥nova compute不直接去访问数据库呢?只是为防止nova compute被攻击后,数据库就会不安全,所以需要有nova conductor去调度
1、登录数据库配置
1.Use the database access client to connect to the database server as the root user(登录数据库)
[root@controller ~]# mysql -p
Enter password:
Welcome to the MariaDB monitor.  Commands end with ; or \g.
Your MariaDB connection id is 18
Server version: 10.3.20-MariaDB MariaDB ServerCopyright (c) 2000, 2018, Oracle, MariaDB Corporation Ab and others.Type 'help;' or '\h' for help. Type '\c' to clear the current input statement.MariaDB [(none)]>
2.Create the nova_api, nova, and nova_cell0 databases((数据库里创建nova-api)
MariaDB [(none)]> CREATE DATABASE nova_api;
Query OK, 1 row affected (0.001 sec)MariaDB [(none)]> CREATE DATABASE nova;
Query OK, 1 row affected (0.002 sec)MariaDB [(none)]>  CREATE DATABASE nova_cell0;
Query OK, 1 row affected (0.001 sec)
3.Grant proper access to the databases(授权)
MariaDB [(none)]> GRANT ALL PRIVILEGES ON nova_api.* TO 'nova'@'%' \IDENTIFIED BY '123';
Query OK, 0 rows affected (0.002 sec)MariaDB [(none)]> GRANT ALL PRIVILEGES ON nova.* TO 'nova'@'%' \IDENTIFIED BY '123';
Query OK, 0 rows affected (0.001 sec)MariaDB [(none)]> GRANT ALL PRIVILEGES ON nova_cell0.* TO 'nova'@'%' \IDENTIFIED BY '123';
Query OK, 0 rows affected (0.002 sec)
退出数据库
MariaDB [(none)]> quit
Bye
[root@controller ~]#
4.Create the Compute service credentials:Create the nova user:(创建用户)
[root@controller ~]# openstack user create --domain default --password nova nova
+---------------------+----------------------------------+
| Field               | Value                            |
+---------------------+----------------------------------+
| domain_id           | default                          |
| enabled             | True                             |
| id                  | 7327ef20d28648ec9c90d640eb1be7aa |
| name                | nova                             |
| options             | {}                               |
| password_expires_at | None                             |
+---------------------+----------------------------------+
5.Add the admin role to the nova user(增加用户)
[root@controller ~]# openstack role add --project service --user nova admin
6.Create the nova service entity(创建服务)
[root@controller ~]# openstack service create --name nova \--description "OpenStack Compute" compute
+-------------+----------------------------------+
| Field       | Value                            |
+-------------+----------------------------------+
| description | OpenStack Compute                |
| enabled     | True                             |
| id          | acdb20889c2f40059e9d3476cde870eb |
| name        | nova                             |
| type        | compute                          |
+-------------+----------------------------------+
7.Create the Compute API service endpoints:
[root@controller ~]# openstack endpoint create --region RegionOne \compute public http://controller:8774/v2.1
+--------------+----------------------------------+
| Field        | Value                            |
+--------------+----------------------------------+
| enabled      | True                             |
| id           | 6de5e77e358a43b3bb5a60f50051abab |
| interface    | public                           |
| region       | RegionOne                        |
| region_id    | RegionOne                        |
| service_id   | acdb20889c2f40059e9d3476cde870eb |
| service_name | nova                             |
| service_type | compute                          |
| url          | http://controller:8774/v2.1      |
+--------------+----------------------------------+
[root@controller ~]# openstack endpoint create --region RegionOne \compute internal http://controller:8774/v2.1
+--------------+----------------------------------+
| Field        | Value                            |
+--------------+----------------------------------+
| enabled      | True                             |
| id           | ac25b43c9dd5492b825731be6c05ba28 |
| interface    | internal                         |
| region       | RegionOne                        |
| region_id    | RegionOne                        |
| service_id   | acdb20889c2f40059e9d3476cde870eb |
| service_name | nova                             |
| service_type | compute                          |
| url          | http://controller:8774/v2.1      |
+--------------+----------------------------------+
[root@controller ~]# openstack endpoint create --region RegionOne \compute admin http://controller:8774/v2.1
+--------------+----------------------------------+
| Field        | Value                            |
+--------------+----------------------------------+
| enabled      | True                             |
| id           | edc99daa899a4ee299034360b3ed7796 |
| interface    | admin                            |
| region       | RegionOne                        |
| region_id    | RegionOne                        |
| service_id   | acdb20889c2f40059e9d3476cde870eb |
| service_name | nova                             |
| service_type | compute                          |
| url          | http://controller:8774/v2.1      |
+--------------+----------------------------------+
2、安装nova
1.Install the packages:
[root@controller ~]# yum install openstack-nova-api openstack-nova-conductor openstack-nova-novncproxy openstack-nova-scheduler -y2.修改/etc/nova/nova.conf
[root@controller ~]# cp /etc/nova/nova.conf{,.bak}
[root@controller ~]# grep -Ev "^$|#" /etc/nova/nova.conf.bak > /etc/nova/nova.conf
[root@controller ~]# vi /etc/nova/nova.conf
[DEFAULT]
transport_url = rabbit://openstack:123@controller:5672/
my_ip = 10.0.0.10
use_neutron = true
firewall_driver = nova.virt.firewall.NoopFirewallDriver
log_file = /var/log/nova/nova.log
[api]
auth_strategy = keystone
[api_database]
connection = mysql+pymysql://nova:123@controller/nova_api
[barbican]
[cache]
[cinder]
[compute]
[conductor]
[console]
[consoleauth]
[cors]
[database]
connection = mysql+pymysql://nova:123@controller/nova
[devices]
[ephemeral_storage_encryption]
[filter_scheduler]
[glance]
[guestfs]
[healthcheck]
[hyperv]
[ironic]
[key_manager]
[keystone]
[keystone_authtoken]
www_authenticate_uri = http://controller:5000/
auth_url = http://controller:5000/
memcached_servers = controller:11211
auth_type = password
project_domain_name = Default
user_domain_name = Default
project_name = service
username = nova
password = nova
[libvirt]
[metrics]
[mks]
[neutron]
[notifications]
[database]
connection = mysql+pymysql://nova:123@controller/nova
[devices]
[ephemeral_storage_encryption]
[filter_scheduler]
[conductor]
[console]
[consoleauth]
[cors]
[database]
connection = mysql+pymysql://nova:123@controller/nova
[devices]
[ephemeral_storage_encryption]
[filter_scheduler]
[glance]
api_servers = http://controller:9292
[guestfs]
[healthcheck]
[hyperv]
[ironic]
[key_manager]
[keystone]
[keystone_authtoken]
www_authenticate_uri = http://controller:5000/
auth_url = http://controller:5000/
memcached_servers = controller:11211
auth_type = password
project_domain_name = Default
user_domain_name = Default
project_name = service
username = nova
password = nova
[libvirt]
[metrics]
[mks]
[neutron]
[notifications]
[osapi_v21]
[oslo_concurrency]
lock_path = /var/lib/nova/tmp
[oslo_messaging_amqp]
[DEFAULT]
transport_url = rabbit://openstack:123@controller:5672/
my_ip = 10.0.0.10
use_neutron = true
firewall_driver = nova.virt.firewall.NoopFirewallDriver
[api]
auth_strategy = keystone
[api_database]
connection = mysql+pymysql://nova:123@controller/nova_api
[barbican]
[cache]
[cinder]
[compute]
[conductor]
[console]
[consoleauth]
[cors]
[database]
connection = mysql+pymysql://nova:123@controller/nova
[devices]
[ephemeral_storage_encryption]
[filter_scheduler]
[glance]
api_servers = http://controller:9292
[guestfs]
[healthcheck]
[hyperv]
[ironic]
[key_manager]
[keystone]
[keystone_authtoken]
www_authenticate_uri = http://controller:5000/
auth_url = http://controller:5000/
memcached_servers = controller:11211
auth_type = password
project_domain_name = Default
user_domain_name = Default
project_name = service
username = nova
password = nova
[libvirt]
[metrics]
[mks]
[neutron]
[notifications]
[osapi_v21]
[oslo_concurrency]
lock_path = /var/lib/nova/tmp
[oslo_messaging_amqp]
[oslo_messaging_kafka]
[oslo_messaging_notifications]
[oslo_messaging_rabbit]
[oslo_middleware]
[oslo_policy]
[pci]
[placement]
region_name = RegionOne
project_domain_name = Default
project_name = service
auth_type = password
user_domain_name = Default
auth_url = http://controller:5000/v3
username = placement
password = placement
[powervm]
[privsep]
[profiler]
[quota]
[rdp]
[remote_debug]
[scheduler]
[serial_console]
[service_user]
[spice]
[upgrade_levels]
[vault]
[vendordata_dynamic_auth]
[vmware]
[vnc]
enabled = true
server_listen = $my_ip
server_proxyclient_address = $my_ip
[workarounds]
[wsgi]
[xenserver]
[xvp]
[zvm]
3.同步数据库
[root@controller ~]# su -s /bin/sh -c "nova-manage api_db sync" nova
[root@controller ~]# su -s /bin/sh -c "nova-manage cell_v2 map_cell0" nova
[root@controller ~]# su -s /bin/sh -c "nova-manage cell_v2 create_cell --name=cell1 --verbose" nova
2e46e668-cfaf-4034-b6a8-154dc925c12d
[root@controller ~]# su -s /bin/sh -c "nova-manage db sync" nova
/usr/lib/python2.7/site-packages/pymysql/cursors.py:170: Warning: (1831, u'Duplicate index `block_device_mapping_instance_uuid_virtual_name_device_name_idx`. This is deprecated and will be disallowed in a future release')result = self._query(query)
/usr/lib/python2.7/site-packages/pymysql/cursors.py:170: Warning: (1831, u'Duplicate index `uniq_instances0uuid`. This is deprecated and will be disallowed in a future release')result = self._query(query)
[root@controller ~]# su -s /bin/sh -c "nova-manage cell_v2 list_cells" nova
+-------+--------------------------------------+------------------------------------------+-------------------------------------------------+----------+
|  Name |                 UUID                 |              Transport URL               |               Database Connection               | Disabled |
+-------+--------------------------------------+------------------------------------------+-------------------------------------------------+----------+
| cell0 | 00000000-0000-0000-0000-000000000000 |                  none:/                  | mysql+pymysql://nova:****@controller/nova_cell0 |  False   |
| cell1 | 2e46e668-cfaf-4034-b6a8-154dc925c12d | rabbit://openstack:****@controller:5672/ |    mysql+pymysql://nova:****@controller/nova    |  False   |
+-------+--------------------------------------+------------------------------------------+-------------------------------------------------+----------+
4.Start the Compute services and configure them to start when the system boots:
[root@controller ~]# systemctl enable \openstack-nova-api.service \openstack-nova-scheduler.service \openstack-nova-conductor.service \openstack-nova-novncproxy.service
Created symlink from /etc/systemd/system/multi-user.target.wants/openstack-nova-api.service to /usr/lib/systemd/system/openstack-nova-api.service.
Created symlink from /etc/systemd/system/multi-user.target.wants/openstack-nova-scheduler.service to /usr/lib/systemd/system/openstack-nova-scheduler.service.
Created symlink from /etc/systemd/system/multi-user.target.wants/openstack-nova-conductor.service to /usr/lib/systemd/system/openstack-nova-conductor.service.
Created symlink from /etc/systemd/system/multi-user.target.wants/openstack-nova-novncproxy.service to /usr/lib/systemd/system/openstack-nova-novncproxy.service.
5.做一个重启脚本
[root@controller ~]# vi nova-restart.sh#!/bin/bash
systemctl restart     openstack-nova-api.service     openstack-nova-scheduler.service     openstack-nova-conductor.service     openstack-nova-novncproxy.service
[root@controller ~]# bash nova-restart.sh
然后再计算节点上配置
3、计算节点上安装nova
1.Install the packages(安装nova包)
[root@computer ~]# yum install openstack-nova-compute -y2.修改/etc/nova/nova.conf配置
[root@computer ~]# yum install openstack-nova-compute -y^C
[root@computer ~]# cp /etc/nova/nova.conf{,.bak}
[root@computer ~]# grep -Ev "^$|#" /etc/nova/nova.conf.bak > /etc/nova/nova.conf
[root@computer ~]# vi /etc/nova/nova.conf
[DEFAULT]
enabled_apis = osapi_compute,metadata
transport_url = rabbit://openstack:123@controller
compute_driver=libvirt.LibvirtDriver
my_ip = 192.168.124.89
use_neutron = true
firewall_driver = nova.virt.firewall.NoopFirewallDriver
log_file = /var/log/nova/nova-compute.log
[api]
auth_strategy = keystone
[api_database]
[barbican]
[cache]
[cinder]
[compute]
[conductor]
[console]
[consoleauth]
[cors]
[database]
[devices]
[ephemeral_storage_encryption]
[filter_scheduler]
[glance]
[guestfs]
[healthcheck]
[hyperv]
[ironic]
[key_manager]
[keystone]
[keystone_authtoken]
www_authenticate_uri = http://controller:5000/
auth_url = http://controller:5000/
memcached_servers = controller:11211
auth_type = password
project_domain_name = Default
user_domain_name = Default
project_name = service
username = nova
password = nova
[libvirt]
[metrics]
[DEFAULT]
enabled_apis = osapi_compute,metadata
transport_url = rabbit://openstack:123@controller
compute_driver=libvirt.LibvirtDriver
my_ip = 192.168.124.89
use_neutron = true
firewall_driver = nova.virt.firewall.NoopFirewallDriver
[api]
auth_strategy = keystone
[api_database]
[barbican]
[cache]
[cinder]
[compute]
[conductor]
[console]
[consoleauth]
[cors]
[database]
[devices]
[ephemeral_storage_encryption]
[filter_scheduler]
[glance]
api_servers = http://controller:9292
[guestfs]
[healthcheck]
[hyperv]
[ironic]
[key_manager]
[keystone]
[keystone_authtoken]
www_authenticate_uri = http://controller:5000/
auth_url = http://controller:5000/
memcached_servers = controller:11211
auth_type = password
project_domain_name = Default
user_domain_name = Default
project_name = service
username = nova
password = nova
[libvirt]
[metrics]
[mks]
[neutron]
[notifications]
[osapi_v21]
[oslo_concurrency]
lock_path = /var/lib/nova/tmp
[oslo_messaging_amqp]
[oslo_messaging_kafka]
[oslo_messaging_notifications]
[oslo_messaging_rabbit]
[oslo_middleware]
[oslo_policy]
[pci]
[placement]
region_name = RegionOne
project_domain_name = Default
project_name = service
auth_type = password
user_domain_name = Default
auth_url = http://controller:5000/v3
username = placement
password = placement
[powervm]
[privsep]
[profiler]
[quota]
[rdp]
[remote_debug]
[scheduler]
[serial_console]
[service_user]
[spice]
[upgrade_levels]
[vault]
[vendordata_dynamic_auth]
[vmware]
[vnc]
enabled = true
server_listen = 0.0.0.0
server_proxyclient_address = $my_ip
novncproxy_base_url = http://192.168.124.88:6080/vnc_auto.html
[workarounds]
[wsgi]
[xenserver]
[xvp]
[zvm]
3.启动服务
[root@computer ~]# systemctl enable libvirtd.service openstack-nova-compute.service
Created symlink from /etc/systemd/system/multi-user.target.wants/openstack-nova-compute.service to /usr/lib/systemd/system/openstack-nova-compute.service.
[root@computer ~]# systemctl start libvirtd
[root@computer ~]# systemctl start libvirtd.service openstack-nova-compute.service
4、在controller节点上
1.在controller节点上(查看有没有计算节点)
[root@controller ~]# openstack compute service list --service nova-compute
+----+--------------+----------+------+---------+-------+----------------------------+
| ID | Binary       | Host     | Zone | Status  | State | Updated At                 |
+----+--------------+----------+------+---------+-------+----------------------------+
|  9 | nova-compute | computer | nova | enabled | up    | 2023-02-10T15:15:29.000000 |
+----+--------------+----------+------+---------+-------+----------------------------+
2.发现计算节点
[root@controller ~]# su -s /bin/sh -c "nova-manage cell_v2 discover_hosts --verbose" nova
Found 2 cell mappings.
Skipping cell0 since it does not contain hosts.
Getting computes from cell 'cell1': 87c82cc2-68f4-41d2-8427-5c959215ef1d
Checking host mapping for compute host 'computer': 833f408b-d646-483e-80eb-6f67c390fd43
Creating host mapping for compute host 'computer': 833f408b-d646-483e-80eb-6f67c390fd43
Found 1 unmapped computes in cell: 87c82cc2-68f4-41d2-8427-5c959215ef1d
3.配置自动发现节点
[root@controller ~]# vi /etc/nova/nova.conf[scheduler]
discover_hosts_in_cells_interval = 300
nova部署完成
相关文章:
 | 部署Nova)
OpenStack云平台搭建(5) | 部署Nova
目录 1、登录数据库配置 2、安装nova 3、计算节点上安装nova 4、在controller节点上 nova组件是用来建虚拟机的(功能:负责响应虚拟机创建请求、调度、销毁云主机) nova主要组成: (1).nova api service------安装在controlle…...

【重要】2023年上半年有三AI新课程规划出炉,讲师持续招募中!
2023年正式起航,想必大家都已经完全投入到了工作状态中,有三AI平台今年将在已有内容的基础上,继续进行新课程开发,本次我们来介绍今年上半年的课程计划,以及新讲师招募计划。2023年新上线课程我们平台的课程当前分为两…...
【正点原子FPGA连载】第八章UART串口中断实验 摘自【正点原子】DFZU2EG_4EV MPSoC之嵌入式Vitis开发指南
1)实验平台:正点原子MPSoC开发板 2)平台购买地址:https://detail.tmall.com/item.htm?id692450874670 3)全套实验源码手册视频下载地址: http://www.openedv.com/thread-340252-1-1.html 第八章UART串口中…...
【云原生】解读Kubernetes三层网络方案
在上一篇文章中,我以网桥类型的 Flannel 插件为例,为你讲解了 Kubernetes 里容器网络和 CNI 插件的主要工作原理。不过,除了这种模式之外,还有一种纯三层(Pure Layer 3)网络方案非常值得你注意。其中的典型…...
elasticsearch8.3.2搭建部署
Elasticsearch8.3.2搭建部署详细步骤 0.过往文章 ES-6文章: Elasticsearch6.6.0部署、原理和使用介绍: https://blog.csdn.net/wt334502157/article/details/119515730 ES-7文章: Elasticsearch7.6.1部署、原理和使用介绍: https://blog.csdn.net/wt…...
MySQL_InnoDB引擎
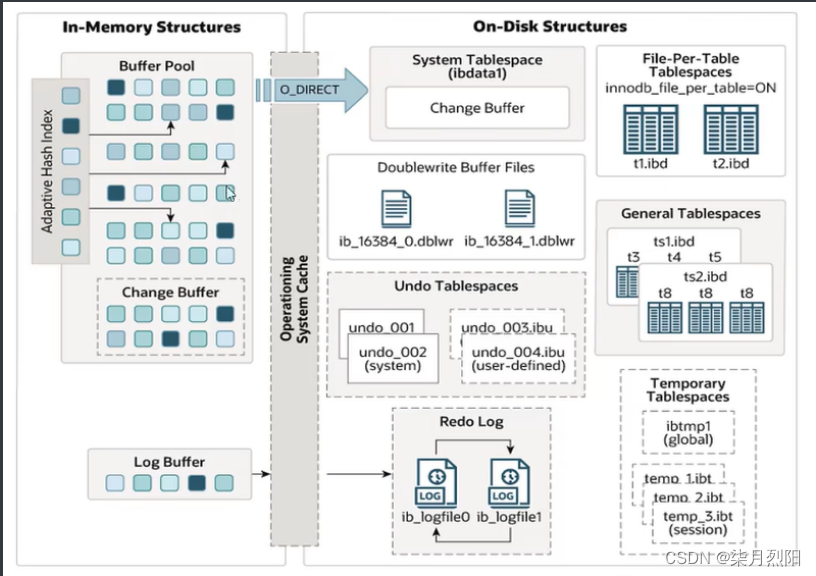
InnoDB引擎 逻辑存储结构 表空间(ibd文件),一个mysql实例可以对应多个表空间,用于存储记录、索引等数据。 段,分为数据段(Leaf node segment)、索引段(Non-leaf node segment)、回滚段(Rollba…...
json-server使用
文章目录json-server使用简介安装json-server启动json-server操作创建数据库查询数据增加数据删除数据修改数据putpatch配置静态资源静态资源首页资源json-server使用 简介 github地址 安装json-server npm install -g json-server启动json-server json-server --watch db…...
)
实现mint操作(参考pancake)
区块链发展越来越好,nft已经火了很久,今天写一下如何用js、web3js、调用合约,实现mint nft。简单的调用://引入一些依赖 (根据需要,有一些是其他功能的) import useActiveWeb3React from ./web3…...

Linux进程信号
目录 一、认识信号 1.1 生活角度的信号 1.2 技术角度的信号 1.3 信号的发送与记录 1.4 常见信号处理方式 二、产生信号 2.1 通过终端按键产生信号(核心转储) 2.2 通过系统函数向进程发送信号 2.2.1 kill()函数 2.2.2 raise()函数 2.2.3 abort()函数 2.3 因软件条件…...

1.7 Web学生管理系统
1.定义通讯协议基于前面介绍过的 FLask Web 网站 与 urlib 的访问网站的方法,设计一个综合应用实例。它是一个基于 Web 的学生记录管理程序。学生的记录包括 id(学号) 、name(姓名) 、grade(成绩),服务器的作用是建立与维护一个Sqllite 的学生数据库 stu…...

前端教学视频分享(视频内容与市场时刻保持紧密相连,火热更新中。。。)
⚠️获取公众号 本次要想大家推荐一下本人的公众号,在微信中搜索公众号 李帅豪在对话框中输入前端视频四个字即可立即获取所有视频,不收费无广告!!! 本公众号收集了近两年来前端最新最优秀的学习视频,涵盖…...
Docker-consul的容器服务更新与发现
一.Consul概述1.1 什么是服务注册与发现服务注册与发现是微服务架构中不可或缺的重要组件。起初服务都是单节点的,不保障高可用性,也不考虑服务的压力承载,服务之间调用单纯的通过接口访问。直到后来出现了多个节点的分布式架构,起…...

Java笔记-线程中断
线程的中断 1.应用场景: 假设从网络下载一个100M的文件,如果网速很慢,用户等得不耐烦,就可能在下载过程中点“取消”,这时,程序就需要中断下载线程的执行。 2.常用中断线程的方法: 1.使用标…...

js中的自调用表达式
自调用表达式 由函数表达式创建的函数可以自调用,称之为自调用表达式。 语法 由函数表达式创建函数: const myFn function () {let a 100console.log(a);return a } myFn() //调用后执行,输出100表达式后面紧跟 ( ) 则会自动调用: const myFn fu…...

Python操作的5个坏习惯,你中了几个呢?
很多文章都有介绍怎么写好 Python,我今天呢相反,说说写代码时的几个坏习惯。有的习惯会让 Bug 变得隐蔽难以追踪,当然,也有的并没有错误,只是个人觉得不够完美。 注意:示例代码在 Python 3.6 环境下编写 …...
---线程间共享数据)
C++并发与多线程编程(3)---线程间共享数据
主要内容:共享数据带来的问题使用互斥量保护数据数据保护的替代方案共享数据带来的问题当涉及到共享数据时,问题可能是因为共享数据修改所导致。如果共享数据是只读的,那么只读操作不会影响到数据,更不会涉及对数据的修改…...

洞察:2022年医疗行业数据安全回顾及2023年展望
过去的2022年,统筹安全与发展,在医疗信息化发展道路中,数据安全不可或缺。这一年,实施五年多的《网络安全法》迎来首次修改,《数据安全法》、《个人信息保护法》实施一周年,配套的《数据出境安全评估办法》…...

多传感器融合定位十五-多传感器时空标定(综述)
多传感器融合定位十五-多传感器时空标定1. 多传感器标定简介1.1 标定内容及方法1.2 讲解思路2. 内参标定2.1 雷达内参标定2.2 IMU内参标定2.3 编码器内参标定2.4 相机内参标定3. 外参标定3.1 雷达和相机外参标定3.2 多雷达外参标定3.3 手眼标定3.4 融合中标定3.5 总结4. 时间标…...

开发微服务电商项目演示(三)
一,nginx动静分离第1步:通过SwitchHosts新增二级域名:images.zmall.com第2步:将本次项目的易买网所有静态资源js/css/images复制到nginx中的html目录下第3步:在nginx的核心配置文件nginx.conf中新增二级域名images.zma…...

C/C++排序算法(二) —— 选择排序和堆排序
文章目录前言1. 直接选择排序🍑 基本思想🍑 具体步骤🍑 具体步骤🍑 动图演示🍑 代码实现🍑 代码升级🍑 特性总结2. 堆排序🍑 向下调整算法🍑 任意树调整为堆的思想&#…...

3D Face HRN代码详解:app.py核心逻辑+start.sh启动脚本逐行注释
3D Face HRN代码详解:app.py核心逻辑start.sh启动脚本逐行注释 1. 项目概述与核心功能 3D Face HRN是一个基于深度学习的高精度人脸三维重建系统,它能够从单张2D人脸照片中还原出完整的三维面部结构和纹理信息。这个系统采用了阿里巴巴ModelScope社区的…...

Ubuntu系统SMBus Host Controller报错全面解析与修复指南
1. 从一次“开不了机”的恐慌说起:SMBus报错到底是什么? 那天早上,我像往常一样按下Ubuntu电脑的开机键,准备开始一天的工作。屏幕亮起,熟悉的GRUB引导菜单一闪而过,紧接着,一行刺眼的黄字跳了出…...

Day 3 面试算法练习:二叉树层序遍历
核心思路:利用队列,根左右的顺序循环出队入队时间复杂度:o(n)from collections import dequeclass TreeNode:def __init__(self, val0, leftNone, rightNone):self.val valself.left leftself.right rightdef level_order(root):if root i…...

SPIRAN ART SUMMONER创新研究:基于ControlNet的精确构图控制
SPIRAN ART SUMMONER创新研究:基于ControlNet的精确构图控制 探索AI绘画的精准控制新境界,让创意不再受限于随机生成 1. 核心能力概览 SPIRAN ART SUMMONER结合ControlNet技术,为AI图像生成带来了前所未有的精确控制能力。传统的文生图模型虽…...

企业系统数据孤岛最有效的解决方法是什么?
在企业信息化建设的进程中,随着业务规模的扩张,ERP、CRM、SRM、MES以及各类SaaS应用相继上线。这些系统在各自领域提升了业务效率,但也导致了数据分散存储、标准不一的“数据孤岛”现象。数据孤岛不仅阻碍了信息的自由流动,更导致…...

3分钟实现本地图片秒搜:ImageSearch从入门到精通
3分钟实现本地图片秒搜:ImageSearch从入门到精通 【免费下载链接】ImageSearch 基于.NET8的本地硬盘千万级图库以图搜图案例Demo和图片exif信息移除小工具分享 项目地址: https://gitcode.com/gh_mirrors/im/ImageSearch 副标题:献给摄影爱好者与…...

拥有资产,而非出售时间:这才是致富的唯一捷径!
一、财富与赚钱1. 财富不是钱,而是能在你不工作时仍然赚钱的资产。 解释:真正的财富是股票、公司股权、知识产权、软件等可以持续产生价值的东西,而不是一次性的工资收入。2. 想致富就要拥有股权,而不是只出售时间。 解释…...

关于 git
修改远程仓库的URL:git remote set-url origin <新仓库地址>...

Synergy服务端显示异常解决办法
第一个问题是服务端不能成功运行,一直显示正在启动: 错误代码: [2020-10-26T19:24:05] INFO: starting new process [2020-10-26T19:24:05] INFO: drag and drop enabled synergys.exe: no configuration available [2020-10-26T19:24:06] ER…...
)
VMware Workstation 16 Pro下RHEL8安装全流程:从ISO到桌面环境(附常见问题解决)
在VMware Workstation 16 Pro上优雅部署RHEL 8:一份面向开发者的深度配置指南 对于需要在本地构建稳定、可控的Linux开发或测试环境的工程师而言,在虚拟机中部署一个企业级的操作系统是日常工作流中至关重要的一环。Red Hat Enterprise Linux 8ÿ…...