小白零基础--CPP多线程
进程
- 进程就是运行中的程序
- 线程=进程中的进程
1、C++11 Thread线程库基础
#include <iostream>
#include <thread>
#include<string>void printthread(std::string msg){std::cout<<msg<<std::endl;for (int i = 0; i < 1000; i++){std::cout<<"my  "<<i<<std::endl;}return;
}int main(){//std::thread t(入口)//1、创建线程std::thread t(printthread,"hello thread");//2、保证等待线程结束,主线程在结束// t.join();//3、分离线程//t.detach();//4、joinable 判断是否可以调用joinbool isjoin = t.joinable();if(isjoin){t.join();}std::cout<<"over"<<std::endl;system( "pause");return 0;
}
2、线程函数中的数据未定义错误
2.1 临时变量
错误例子
#include <iostream>
#include <thread>void foo(int& x){x+=1;
}int main(){//std::thread t(foo,1);t.join();system( "pause");return 0;
}
正确方案
#include <iostream>
#include <thread>void foo(int& x){x+=1;
}int main(){//int i=1;std::thread t(foo,std::ref(i));t.join();std::cout<<i<<std::endl;system( "pause");return 0;
}
2.2 传递指针/引用指向局部变量
2.1 的 i 在 main中,那要是不在呢?
#include <iostream>
#include <thread>std::thread t;
void foo(int& x){x+=1;
}void externi(){int i=1;t=std::thread (foo,std::ref(i));
}int main(){//externi();t.join();system( "pause");return 0;
}
会报错
那怎么办呢?
#include <iostream>
#include <thread>std::thread t;int i=1;
void foo(int& x){x+=1;
}void externi(){t=std::thread (foo,std::ref(i));
}int main(){//externi();t.join();std::cout<<i<<std::endl;system( "pause");return 0;
}
2.3 参数被提前手动释放
智能指针
#include <iostream>
#include <thread>
#include <memory>class  myclass
{
private:/* data */
public:void foo(){std::cout<<"mememem"<<std::endl;}
};int main(){std::shared_ptr<myclass> a=std::make_shared<myclass> ();std::thread t(&myclass::foo,a);system( "pause");return 0;
}
2.4 类的private函数
友元
#include <iostream>
#include <thread>
#include <memory>class  myclass
{
private:friend void foo_thread();void foo(){std::cout<<"mememem"<<std::endl;}
public:};
void foo_thread(){std::shared_ptr<myclass> a=std::make_shared<myclass> ();std::thread t(&myclass::foo,a);t.join();
}
int main(){foo_thread();system( "pause");return 0;
}
3互斥量
3.1数据共享–数据竞争问题
#include <iostream>
#include <thread>int a = 0;
void func(){for (int i = 0; i < 1000000; i++){a+=1;}}
int main(){std::thread t1(func);std::thread t2(func);t1.join();t2.join();std::cout<<a<<std::endl;system( "pause");return 0;
}
3.2 互斥锁
#include <iostream>
#include <thread>
#include <mutex>
int a = 0;std::mutex mt;
void func(){for (int i = 0; i < 1000000; i++){ mt.lock();a+=1;mt.unlock();}}
int main(){std::thread t1(func);std::thread t2(func);t1.join();t2.join();std::cout<<a<<std::endl;system( "pause");return 0;
}
3.3 理解线程安全
4互斥量死锁
4.1 死锁的概念
#include <iostream>
#include <thread>
#include <mutex>
using   namespace std;mutex m1,m2;
void func1(){for (int i = 0; i < 100000; i++){ m1.lock();m2.lock();m1.unlock();m2.unlock();}}
void func2(){for (int i = 0; i < 100000; i++){ m1.lock();m2.lock();m2.unlock();m1.unlock();}
}
int main(){thread t1(func1);thread t2(func2);t1.join();t2.join();cout<<"over<<"<<endl;system( "pause");return 0;
}
4.2 解决方案
5 lock_guard 和 std::unique_lock
5.1 lock_guard
#include <iostream>
#include <thread>
#include <mutex>
using   namespace std;
int a=0;
mutex m1;
void func1(){for(int i=0;i<10000;i++){lock_guard<mutex> gm(m1);a++;}
}int main(){thread t1(func1);t1.join();cout<<a<<endl;system( "pause");return 0;
}
5.2 std::unique_lock
#include <iostream>
#include <thread>
#include <mutex>
using   namespace std;
int a=0;
mutex m1;
void func1(){for(int i=0;i<10000;i++){unique_lock<mutex> gm(m1);a++;}
}int main(){thread t1(func1);t1.join();cout<<a<<endl;system( "pause");return 0;
}
6 call_once
6.1 单例模式
6.2 例子:日志类
#include <iostream>
#include <thread>
#include <mutex>
using   namespace std;
class Log{
public:Log(){};Log(const Log& log)=delete;Log &operator =(const Log& log)=delete;static Log& GetInstance(){static Log  log;//懒汉模式return log;//饿汉模式/**static Log   *log=nullptr;if(!log) log = new Log;return *log;*/}void PrintLog(string msg){cout << __TIME__ <<" " <<msg<<endl;}
};int main(){Log::GetInstance().PrintLog("error");system( "pause");return 0;
}
6.3 call_once
#include <iostream>
#include <thread>
#include <mutex>
#include <vector>using namespace std;// 需要一次性初始化的共享资源
class DatabaseConfig {
private:string serverAddress;int port;DatabaseConfig() : serverAddress("127.0.0.1"), port(3306) {cout << "数据库配置初始化完成!" << endl;}public:static DatabaseConfig& getInstance() {static once_flag initFlag;static DatabaseConfig* instance = nullptr;call_once(initFlag, []() {instance = new DatabaseConfig();});return *instance;}void showConfig() {cout << "Server: " << serverAddress << ":" << port << endl;}
};// 多线程测试函数
void threadTask(int id) {this_thread::sleep_for(chrono::milliseconds(100 * id));auto& config = DatabaseConfig::getInstance();cout << "线程" << id << "获取配置:";config.showConfig();
}int main() {vector<thread> threads;// 创建10个线程竞争访问for(int i = 0; i < 10; ++i) {threads.emplace_back(threadTask, i);}// 等待所有线程完成for(auto& t : threads) {t.join();}system("pause");return 0;
}
- 合理使用 call_once 可以让多线程代码更简洁、更安全,尤其适合需要一次性初始化的场景
7 condition_variable
7.1 生产者-消费者模式概述
生产者-消费者模式是多线程编程中经典的同步问题,需要满足以下条件:
- 生产者线程生成数据并放入共享缓冲区。
- 消费者线程从缓冲区取出数据并处理。
- 同步要求:
- 缓冲区满时,生产者等待消费者消费数据。
- 缓冲区空时,消费者等待生产者生产数据。
7.2 核心组件
- 共享缓冲区:通常使用队列(
std::queue)实现。 - 互斥锁(
std::mutex):保护对缓冲区的并发访问。 - 条件变量(
std::condition_variable):not_full:生产者等待缓冲区非满。not_empty:消费者等待缓冲区非空。
7.3实现代码
#include <iostream>
#include <queue>
#include <thread>
#include <mutex>
#include <condition_variable>
#include <chrono>using namespace std;const int BUFFER_SIZE = 5;       // 缓冲区容量
queue<int> buffer;               // 共享缓冲区
mutex mtx;                       // 互斥锁
condition_variable not_full;     // 缓冲区非满条件
condition_variable not_empty;    // 缓冲区非空条件// 生产者函数
void producer(int id) {for (int i = 0; i < 10; ++i) {unique_lock<mutex> lock(mtx);// 如果缓冲区满,等待消费者消费not_full.wait(lock, [] { return buffer.size() < BUFFER_SIZE; });// 生产数据int data = id * 100 + i;buffer.push(data);cout << "生产者 " << id << " 生产数据: " << data << endl;lock.unlock();not_empty.notify_one();  // 通知消费者this_thread::sleep_for(chrono::milliseconds(100));}
}// 消费者函数
void consumer(int id) {for (int i = 0; i < 10; ++i) {unique_lock<mutex> lock(mtx);// 如果缓冲区空,等待生产者生产not_empty.wait(lock, [] { return !buffer.empty(); });// 消费数据int data = buffer.front();buffer.pop();cout << "消费者 " << id << " 消费数据: " << data << endl;lock.unlock();not_full.notify_one();   // 通知生产者this_thread::sleep_for(chrono::milliseconds(200));}
}int main() {thread producers[2];thread consumers[3];// 启动2个生产者线程for (int i = 0; i < 2; ++i) {producers[i] = thread(producer, i);}// 启动3个消费者线程for (int i = 0; i < 3; ++i) {consumers[i] = thread(consumer, i);}// 等待所有线程结束for (auto& t : producers) t.join();for (auto& t : consumers) t.join();return 0;
}
7.4 代码解析
-
共享资源保护:
- 所有对缓冲区的操作(
push、pop)均在互斥锁mtx的保护下进行。 - 使用
unique_lock自动管理锁的生命周期。
- 所有对缓冲区的操作(
-
条件变量的使用:
- 生产者等待条件:
not_full.wait(lock, predicate)
当缓冲区满时(buffer.size() >= BUFFER_SIZE),生产者线程阻塞,直到消费者消费数据后通过not_full.notify_one()唤醒。 - 消费者等待条件:
not_empty.wait(lock, predicate)
当缓冲区空时(buffer.empty()),消费者线程阻塞,直到生产者生产数据后通过not_empty.notify_one()唤醒。
- 生产者等待条件:
-
通知机制:
- 生产者生产数据后调用
not_empty.notify_one(),唤醒一个等待的消费者。 - 消费者消费数据后调用
not_full.notify_one(),唤醒一个等待的生产者。
- 生产者生产数据后调用
7.5 运行结果示例
生产者 0 生产数据: 0
消费者 0 消费数据: 0
生产者 1 生产数据: 100
消费者 1 消费数据: 100
生产者 0 生产数据: 1
消费者 2 消费数据: 1
...
(输出将展示生产与消费的交替过程)
7.6 关键点总结
-
防止虚假唤醒:
条件变量的wait必须配合谓词(如buffer.size() < BUFFER_SIZE)使用,确保即使被意外唤醒也能重新检查条件。 -
资源管理:
unique_lock在wait时自动释放锁,唤醒后重新获取锁。- 使用
notify_one而非notify_all,减少不必要的线程竞争。
-
死锁避免:
- 确保在调用
notify_one前释放锁(通过lock.unlock())。 - 避免在持有锁时进行耗时操作(如示例中的
sleep_for在锁外执行)。
- 确保在调用
7.7 扩展场景
-
多生产者和多消费者:
当前代码已支持多个生产者和消费者,通过调整线程数量即可验证。 -
动态缓冲区大小:
可将BUFFER_SIZE设为动态值,根据需求调整。 -
复杂数据类型:
将queue<int>替换为自定义数据类型队列,实现更复杂的生产-消费逻辑。
此实现完整展示了如何利用condition_variable实现线程安全的生产者-消费者模式,可直接用于实际项目中的任务队列、线程池等场景。
8 跨平台线程池
#include <vector>
#include <queue>
#include <memory>
#include <thread>
#include <mutex>
#include <condition_variable>
#include <future>
#include <functional>
#include <stdexcept>class ThreadPool {
public:// 构造函数,启动指定数量的工作线程ThreadPool(size_t threads = std::thread::hardware_concurrency()): stop(false) {for(size_t i = 0; i < threads; ++i)workers.emplace_back([this] {for(;;) {std::function<void()> task;{std::unique_lock<std::mutex> lock(this->queue_mutex);this->condition.wait(lock,[this]{ return this->stop || !this->tasks.empty(); });if(this->stop && this->tasks.empty())return;task = std::move(this->tasks.front());this->tasks.pop();}task();}});}// 将任务添加到任务队列,返回一个future以便获取结果template<class F, class... Args>auto enqueue(F&& f, Args&&... args) -> std::future<typename std::result_of<F(Args...)>::type> {using return_type = typename std::result_of<F(Args...)>::type;auto task = std::make_shared< std::packaged_task<return_type()> >(std::bind(std::forward<F>(f), std::forward<Args>(args)...));std::future<return_type> res = task->get_future();{std::unique_lock<std::mutex> lock(queue_mutex);// 不允许在停止线程池后添加新任务if(stop)throw std::runtime_error("enqueue on stopped ThreadPool");tasks.emplace([task](){ (*task)(); });}condition.notify_one();return res;}// 析构函数,等待所有任务完成并停止所有线程~ThreadPool() {{std::unique_lock<std::mutex> lock(queue_mutex);stop = true;}condition.notify_all();for(std::thread &worker : workers)worker.join();}private:std::vector<std::thread> workers;     // 工作线程集合std::queue<std::function<void()>> tasks; // 任务队列std::mutex queue_mutex;               // 任务队列互斥锁std::condition_variable condition;    // 条件变量bool stop;                            // 停止标志
};// 使用示例
int main() {ThreadPool pool(4); // 创建4个工作线程// 提交多个任务到线程池std::vector<std::future<int>> results;for(int i = 0; i < 8; ++i) {results.emplace_back(pool.enqueue([i] {std::this_thread::sleep_for(std::chrono::seconds(1));return i*i;}));}// 获取任务结果for(auto && result : results)std::cout << result.get() << ' ';std::cout << std::endl;return 0;
}
9 异步并发 async future packaged task promise
#include <iostream>
#include <future>
#include <thread>
#include <chrono>
#include <vector>int compute(int x) {std::this_thread::sleep_for(std::chrono::seconds(1)); // 模拟耗时操作return x * x;
}int main() {// 使用 std::async 启动多个异步任务std::vector<std::future<int>> futures;for (int i = 1; i <= 5; ++i) {futures.push_back(std::async(std::launch::async, compute, i));}// 获取所有任务的结果for (auto& future : futures) {std::cout << "Result: " << future.get() << std::endl;}// 使用 std::packaged_task 手动控制任务执行std::packaged_task<int(int)> task(compute);std::future<int> future = task.get_future();std::thread t(std::move(task), 10);t.join(); // 等待线程完成std::cout << "Packaged Task Result: " << future.get() << std::endl;return 0;
}
10 原子操作atomic
#include <iostream>
#include <thread>
#include <atomic>
using namespace std;atomic<int> a(0); // 使用 atomic<int> 替代普通 intvoid func1() {for (int i = 0; i < 10000; i++) {a++; // 原子操作,无需额外的互斥锁}
}int main() {thread t1(func1);t1.join();cout << a << endl; // 输出最终结果system("pause");return 0;
}
相关文章:

小白零基础--CPP多线程
进程 进程就是运行中的程序线程进程中的进程 1、C11 Thread线程库基础 #include <iostream> #include <thread> #include<string>void printthread(std::string msg){std::cout<<msg<<std::endl;for (int i 0; i < 1000; i){std::cout<…...

利用deepseek参与软件测试 基本架构如何 又该在什么环节接入deepseek
利用DeepSeek参与软件测试,可以考虑以下基本架构和接入环节: ### 基本架构 - **数据层** - **测试数据存储**:用于存放各种测试数据,包括正常输入数据、边界值数据、异常数据等,这些数据可以作为DeepSeek的输入&…...
大模型微调技术总结及使用GPU对VisualGLM-6B进行高效微调
1. 概述 在深度学习中,微调(Fine-tuning)是一种重要的技术,用于改进预训练模型的性能。在预训练模型的基础上,针对特定任务(如文本分类、机器翻译、情感分析等),使用相对较小的有监…...

WPF进阶 | WPF 样式与模板:打造个性化用户界面的利器
WPF进阶 | WPF 样式与模板:打造个性化用户界面的利器 一、前言二、WPF 样式基础2.1 什么是样式2.2 样式的定义2.3 样式的应用 三、WPF 模板基础3.1 什么是模板3.2 控件模板3.3 数据模板 四、样式与模板的高级应用4.1 样式继承4.2 模板绑定4.3 资源字典 五、实际应用…...
Java 大视界 -- Java 大数据在自动驾驶中的数据处理与决策支持(68)
💖亲爱的朋友们,热烈欢迎来到 青云交的博客!能与诸位在此相逢,我倍感荣幸。在这飞速更迭的时代,我们都渴望一方心灵净土,而 我的博客 正是这样温暖的所在。这里为你呈上趣味与实用兼具的知识,也…...
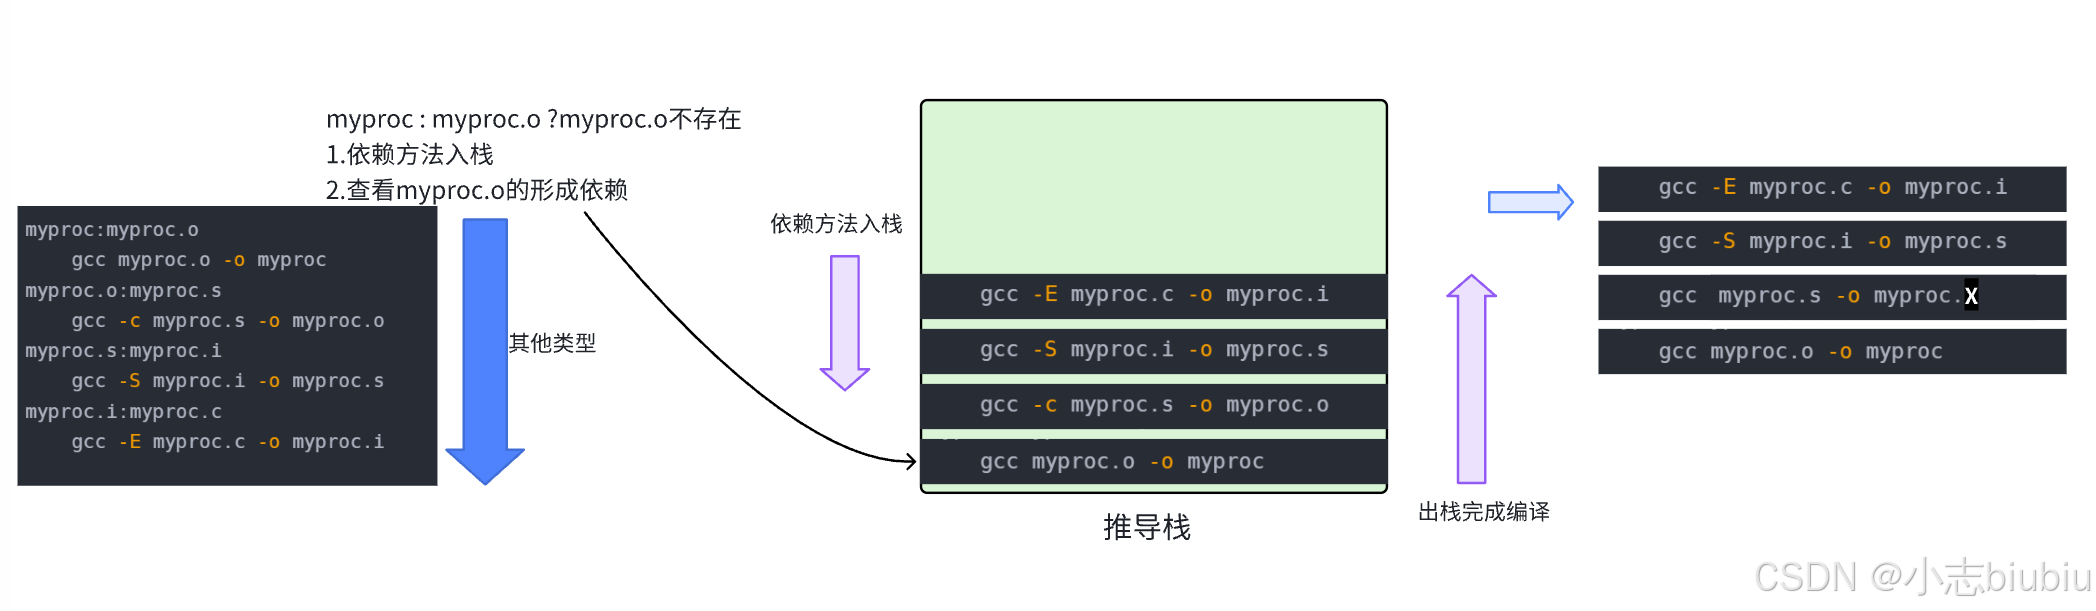
自动化构建-make/Makefile 【Linux基础开发工具】
文章目录 一、背景二、Makefile编译过程三、变量四、变量赋值1、""是最普通的等号2、“:” 表示直接赋值3、“?” 表示如果该变量没有被赋值,4、""和写代码是一样的, 五、预定义变量六、函数**通配符** 七、伪目标 .PHONY八、其他常…...

python学opencv|读取图像(五十二)使用cv.matchTemplate()函数实现最佳图像匹配
【1】引言 前序学习了图像的常规读取和基本按位操作技巧,相关文章包括且不限于: python学opencv|读取图像-CSDN博客 python学opencv|读取图像(四十九)原理探究:使用cv2.bitwise()系列函数实现图像按位运算-CSDN博客…...
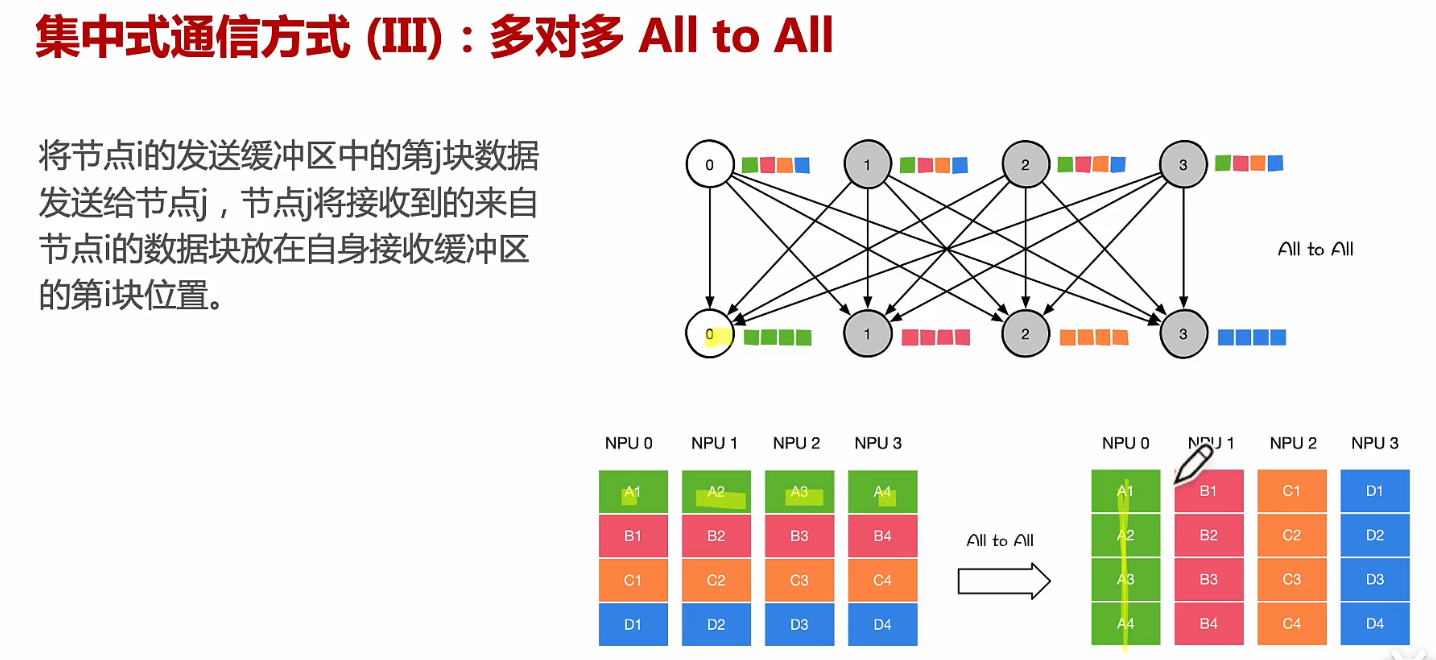
通信方式、点对点通信、集合通信
文章目录 从硬件PCIE、NVLINK、RDMA原理到通信NCCL、MPI原理!通信实现方式:机器内通信、机器间通信通信实现方式:通讯协调通信实现方式:机器内通信:PCIe通信实现方式:机器内通信:NVLink通信实现…...

TCP编程
1.socket函数 int socket(int domain, int type, int protocol); 头文件:include<sys/types.h>,include<sys/socket.h> 参数 int domain AF_INET: IPv4 Internet protocols AF_INET6: IPv6 Internet protocols AF_UNIX, AF_LOCAL : Local…...

OpenAI 实战进阶教程 - 第七节: 与数据库集成 - 生成 SQL 查询与优化
内容目标 学习如何使用 OpenAI 辅助生成和优化多表 SQL 查询了解如何获取数据库结构信息并与 OpenAI 结合使用 实操步骤 1. 创建 SQLite 数据库示例 创建数据库及表结构: import sqlite3# 连接 SQLite 数据库(如果不存在则创建) conn sq…...

Apache Iceberg数据湖技术在海量实时数据处理、实时特征工程和模型训练的应用技术方案和具体实施步骤及代码
Apache Iceberg在处理海量实时数据、支持实时特征工程和模型训练方面的强大能力。Iceberg支持实时特征工程和模型训练,特别适用于需要处理海量实时数据的机器学习工作流。 Iceberg作为数据湖,以支持其机器学习平台中的特征存储。Iceberg的分层结构、快照…...
QT交叉编译环境搭建(Cmake和qmake)
介绍一共有两种方法(基于qmake和cmake): 1.直接调用虚拟机中的交叉编译工具编译 2.在QT中新建编译套件kits camke和qmake的区别:CMake 和 qmake 都是自动化构建工具,用于简化构建过程,管理编译设置&…...
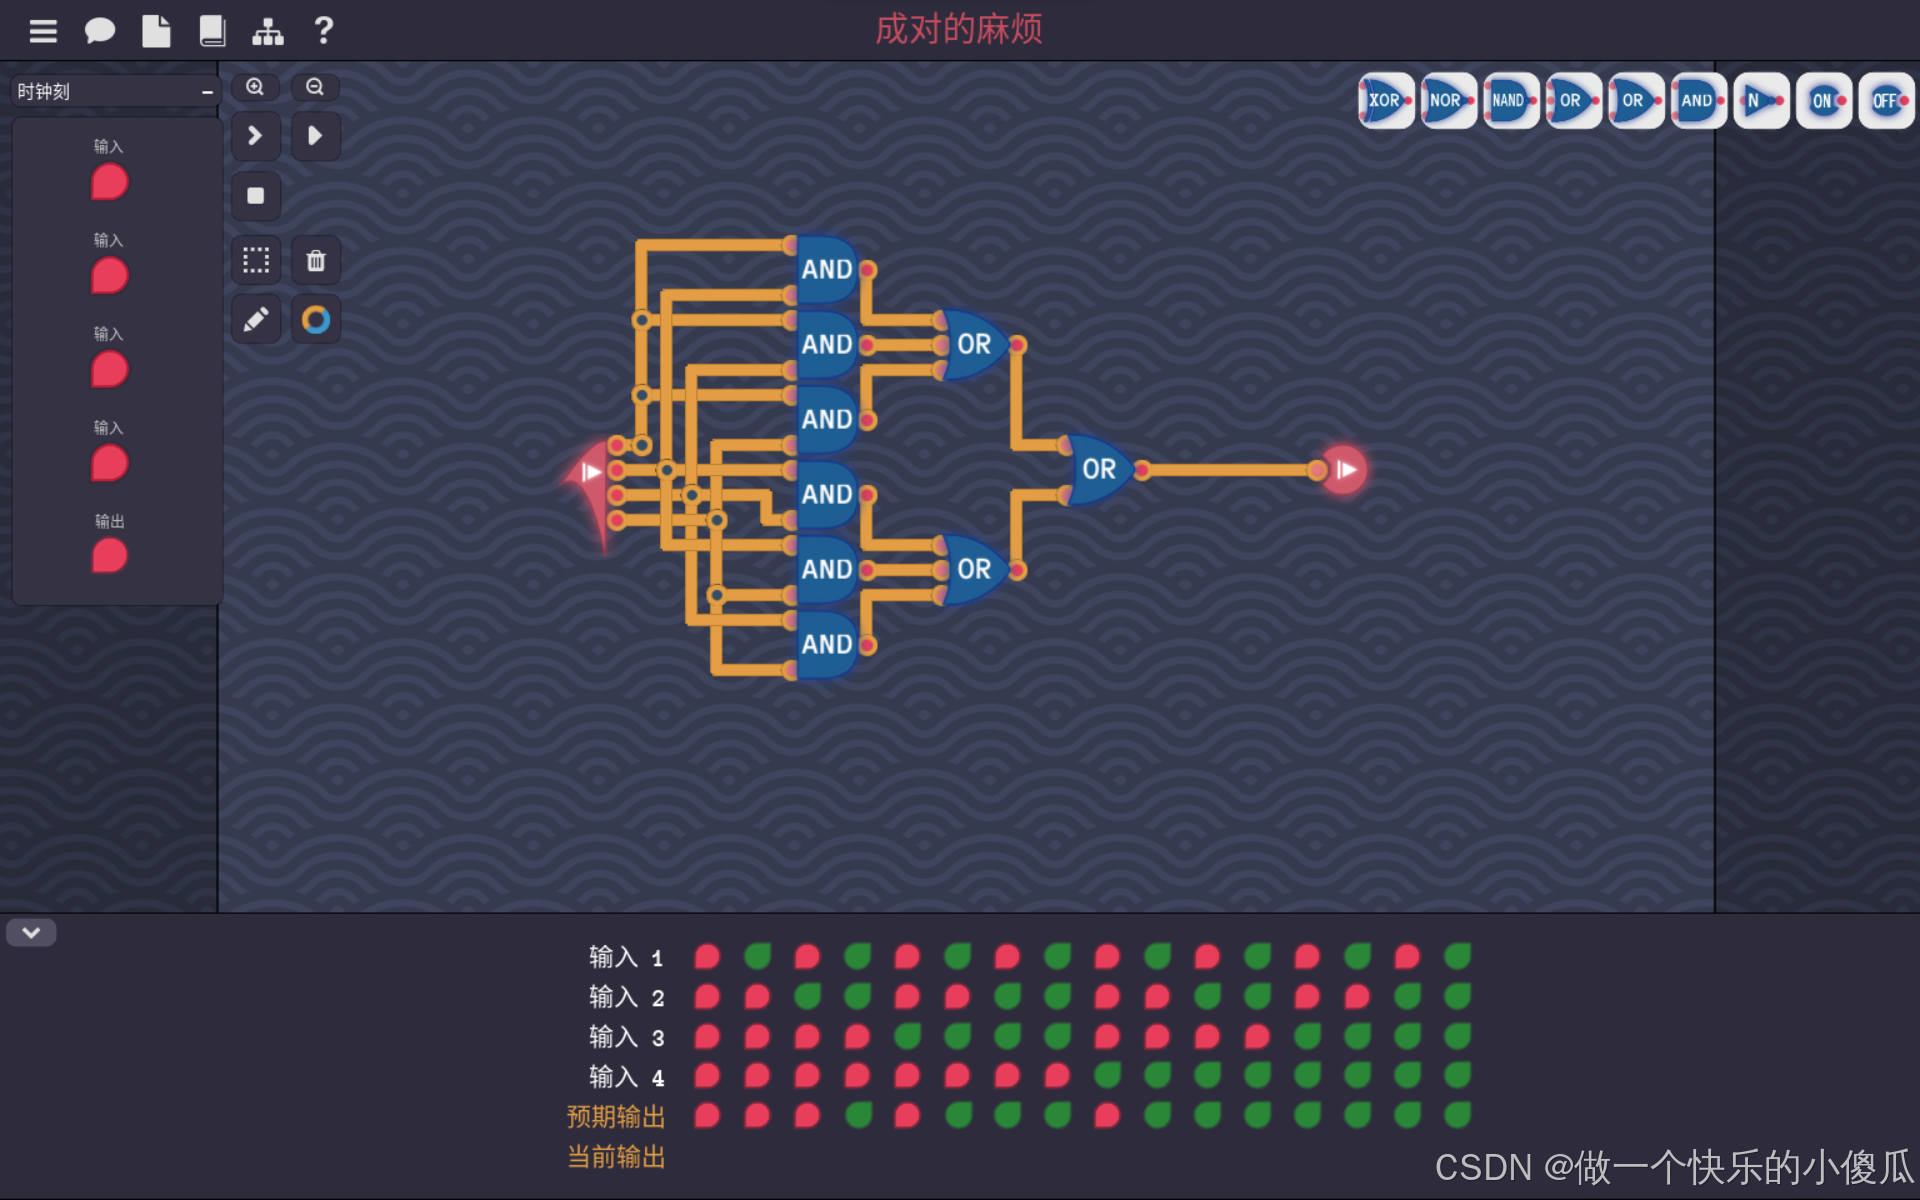
Turing Complete-成对的麻烦
这一关是4个输入,当输入中1的个数大于等于2时,输出1。 那么首先用个与门来检测4个输入中,1的个数是否大于等于2,当大于等于2时,至少会有一个与门输出1,所以再用两级或门讲6个与门的输出取或,得…...

寒假刷题Day20
一、80. 删除有序数组中的重复项 II class Solution { public:int removeDuplicates(vector<int>& nums) {int n nums.size();int stackSize 2;for(int i 2; i < n; i){if(nums[i] ! nums[stackSize - 2]){nums[stackSize] nums[i];}}return min(stackSize, …...
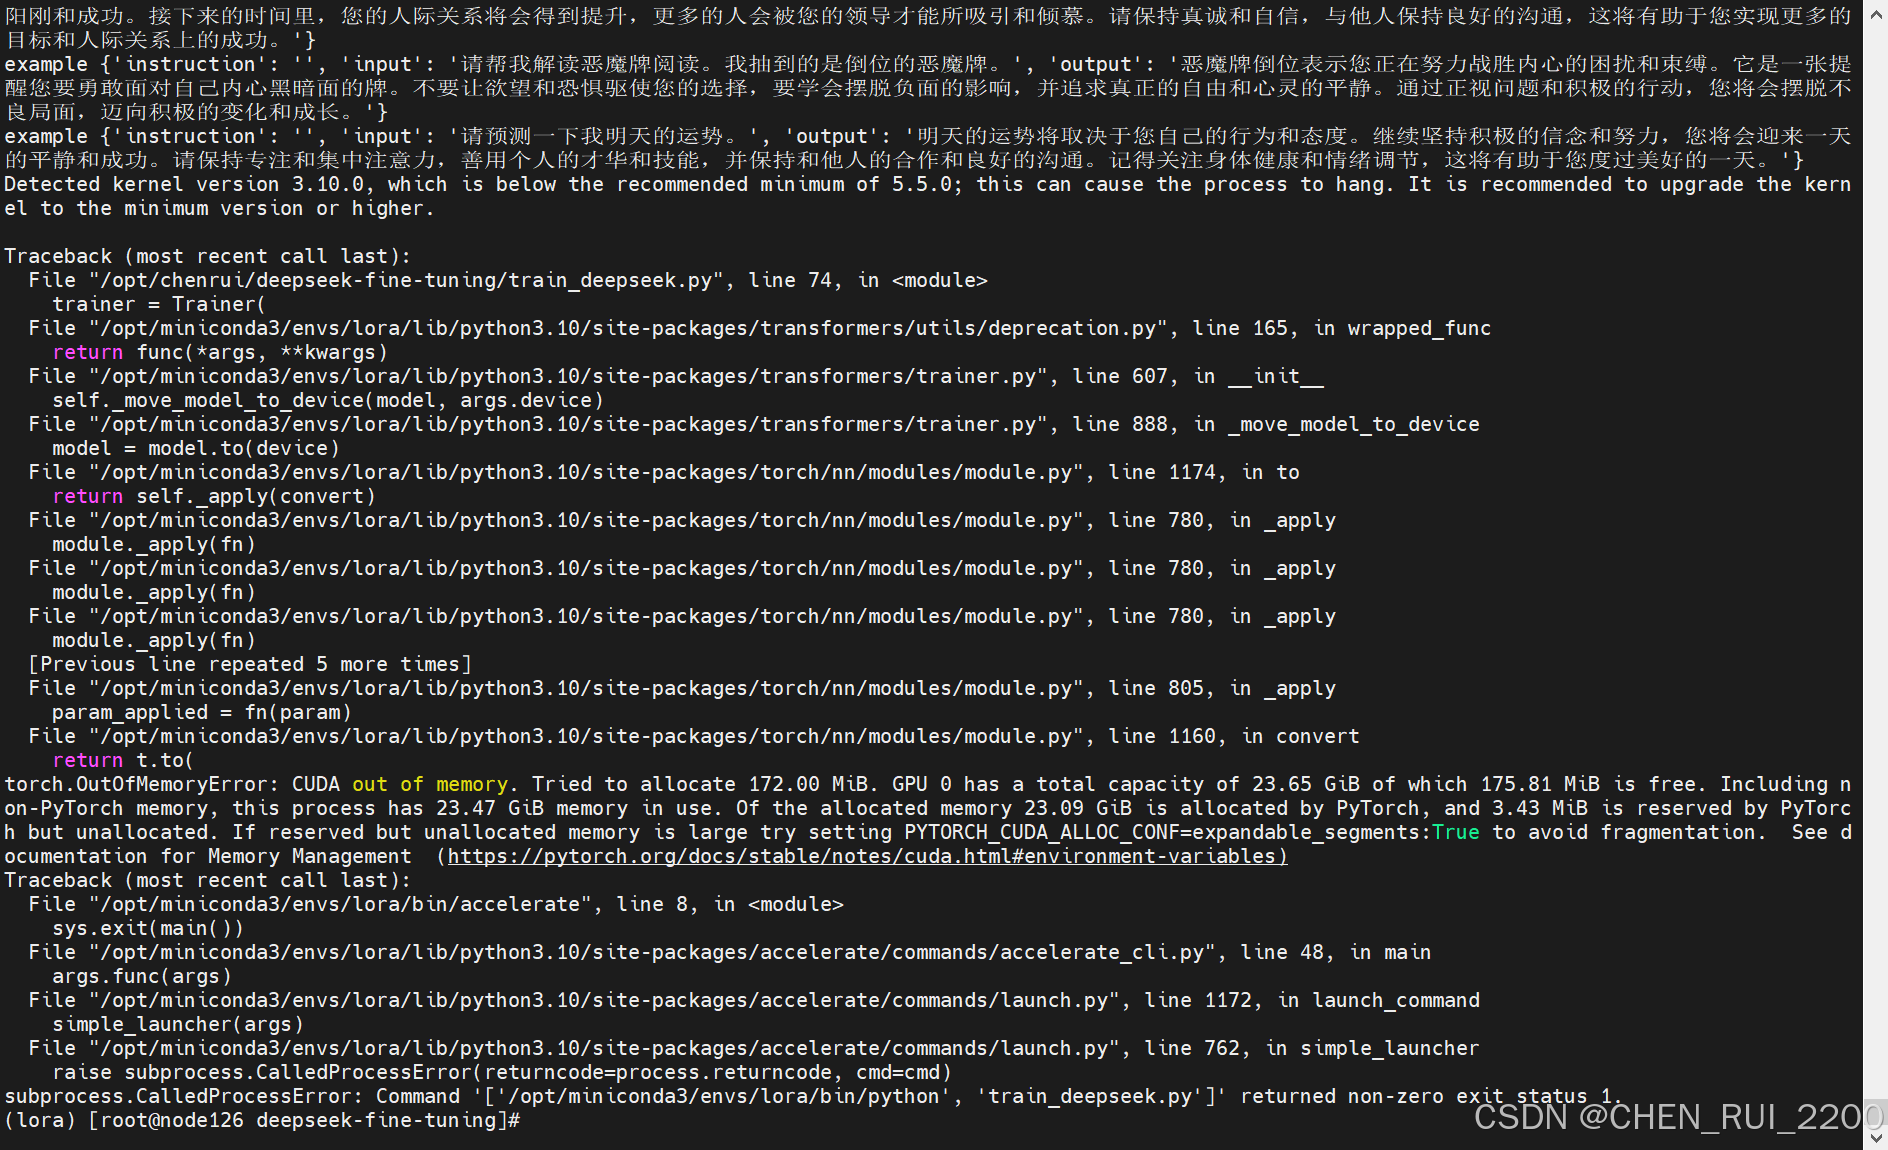
deepseek 本地化部署和小模型微调
安装ollama 因为本人gpu卡的机器系统是centos 7, 直接使用ollama会报 所以ollama使用镜像方式进行部署, 拉取镜像ollama/ollama 启动命令 docker run -d --privileged -v ollama:/root/.ollama -p 11434:11434 --name ollama ollama/ollama 查看ollama 是否启动…...

【Java异步编程】基于任务类型创建不同的线程池
文章目录 一. 按照任务类型对线程池进行分类1. IO密集型任务的线程数2. CPU密集型任务的线程数3. 混合型任务的线程数 二. 线程数越多越好吗三. Redis 单线程的高效性 使用线程池的好处主要有以下三点: 降低资源消耗:线程是稀缺资源,如果无限…...

makailio-alias_db模块详解
ALIAS_DB 模块 作者 Daniel-Constantin Mierla micondagmail.com Elena-Ramona Modroiu ramonaasipto.com 编辑 Daniel-Constantin Mierla micondagmail.com 版权 © 2005 Voice Sistem SRL © 2008 asipto.com 目录 管理员指南 概述依赖 2.1 Kamailio 模块 2.2 外…...
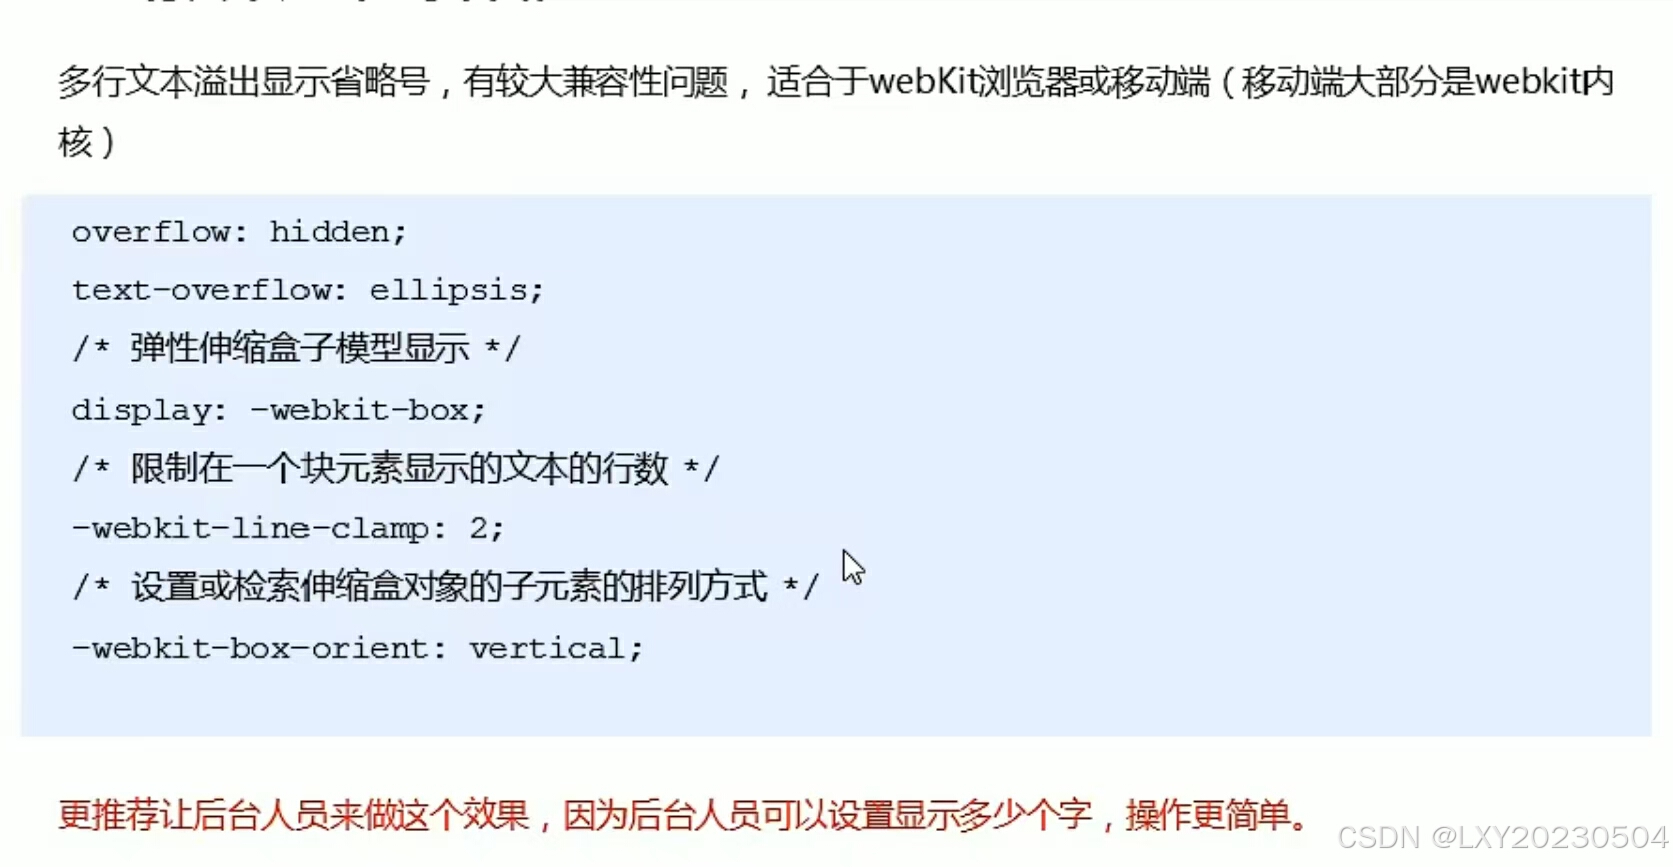
文字显示省略号
多行文本溢出显示省略号...

[LeetCode] 字符串完整版 — 双指针法 | KMP
字符串 基础知识双指针法344# 反转字符串541# 反转字符串II54K 替换数字151# 反转字符串中的单词55K 右旋字符串 KMP 字符串匹配算法28# 找出字符串中第一个匹配项的下标#459 重复的子字符串 基础知识 字符串的结尾:空终止字符00 char* name "hello"; …...

从零开始部署Dify:后端与前端服务完整指南
从零开始部署Dify:后端与前端服务完整指南 一、环境准备1. 系统要求2. 项目结构 二、后端服务部署1. 中间件启动(Docker Compose)2. 后端环境配置3. 依赖安装与数据库迁移4. 服务启动 三、前端界面搭建1. 环境配置2. 服务启动 四、常见问题排…...
【网络安全产品大调研系列】2. 体验漏洞扫描
前言 2023 年漏洞扫描服务市场规模预计为 3.06(十亿美元)。漏洞扫描服务市场行业预计将从 2024 年的 3.48(十亿美元)增长到 2032 年的 9.54(十亿美元)。预测期内漏洞扫描服务市场 CAGR(增长率&…...
C# 类和继承(抽象类)
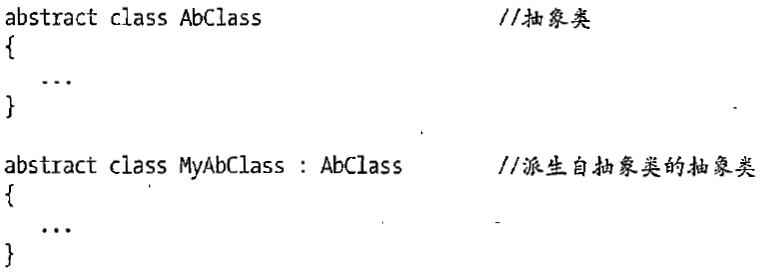
抽象类 抽象类是指设计为被继承的类。抽象类只能被用作其他类的基类。 不能创建抽象类的实例。抽象类使用abstract修饰符声明。 抽象类可以包含抽象成员或普通的非抽象成员。抽象类的成员可以是抽象成员和普通带 实现的成员的任意组合。抽象类自己可以派生自另一个抽象类。例…...

CRMEB 框架中 PHP 上传扩展开发:涵盖本地上传及阿里云 OSS、腾讯云 COS、七牛云
目前已有本地上传、阿里云OSS上传、腾讯云COS上传、七牛云上传扩展 扩展入口文件 文件目录 crmeb\services\upload\Upload.php namespace crmeb\services\upload;use crmeb\basic\BaseManager; use think\facade\Config;/*** Class Upload* package crmeb\services\upload* …...

ABAP设计模式之---“简单设计原则(Simple Design)”
“Simple Design”(简单设计)是软件开发中的一个重要理念,倡导以最简单的方式实现软件功能,以确保代码清晰易懂、易维护,并在项目需求变化时能够快速适应。 其核心目标是避免复杂和过度设计,遵循“让事情保…...
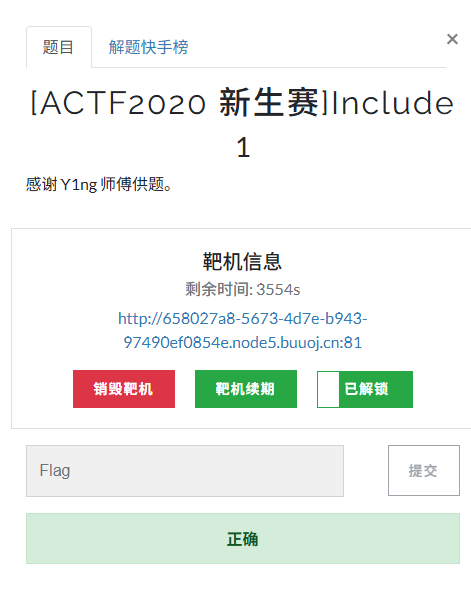
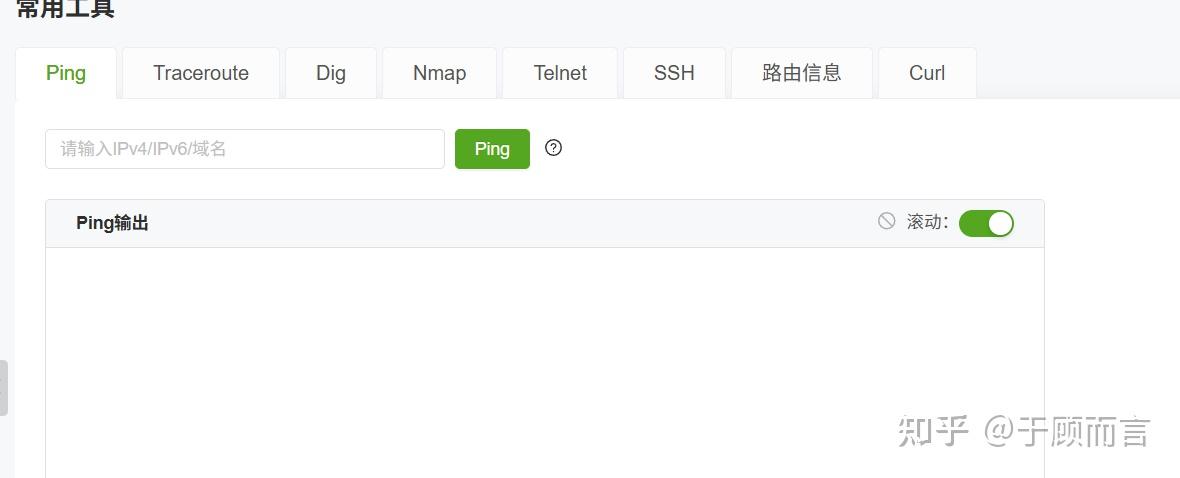
[ACTF2020 新生赛]Include 1(php://filter伪协议)
题目 做法 启动靶机,点进去 点进去 查看URL,有 ?fileflag.php说明存在文件包含,原理是php://filter 协议 当它与包含函数结合时,php://filter流会被当作php文件执行。 用php://filter加编码,能让PHP把文件内容…...

API网关Kong的鉴权与限流:高并发场景下的核心实践
🔥「炎码工坊」技术弹药已装填! 点击关注 → 解锁工业级干货【工具实测|项目避坑|源码燃烧指南】 引言 在微服务架构中,API网关承担着流量调度、安全防护和协议转换的核心职责。作为云原生时代的代表性网关,Kong凭借其插件化架构…...
软件工程 期末复习
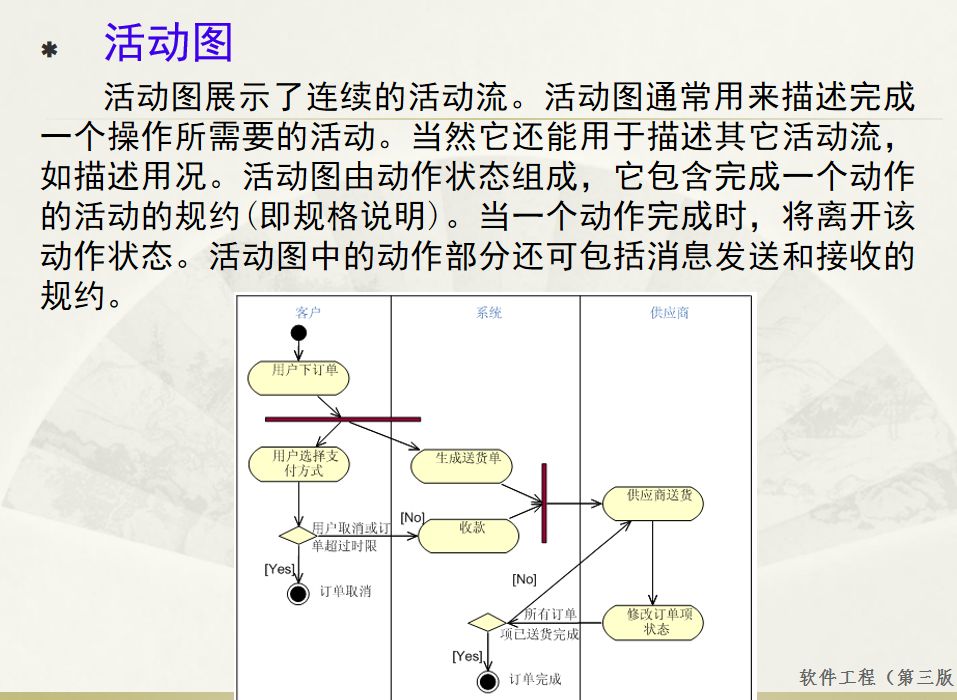
瀑布模型:计划 螺旋模型:风险低 原型模型: 用户反馈 喷泉模型:代码复用 高内聚 低耦合:模块内部功能紧密 模块之间依赖程度小 高内聚:指的是一个模块内部的功能应该紧密相关。换句话说,一个模块应当只实现单一的功能…...

spring Security对RBAC及其ABAC的支持使用
RBAC (基于角色的访问控制) RBAC (Role-Based Access Control) 是 Spring Security 中最常用的权限模型,它将权限分配给角色,再将角色分配给用户。 RBAC 核心实现 1. 数据库设计 users roles permissions ------- ------…...
Android写一个捕获全局异常的工具类
项目开发和实际运行过程中难免会遇到异常发生,系统提供了一个可以捕获全局异常的工具Uncaughtexceptionhandler,它是Thread的子类(就是package java.lang;里线程的Thread)。本文将利用它将设备信息、报错信息以及错误的发生时间都…...
大模型——基于Docker+DeepSeek+Dify :搭建企业级本地私有化知识库超详细教程
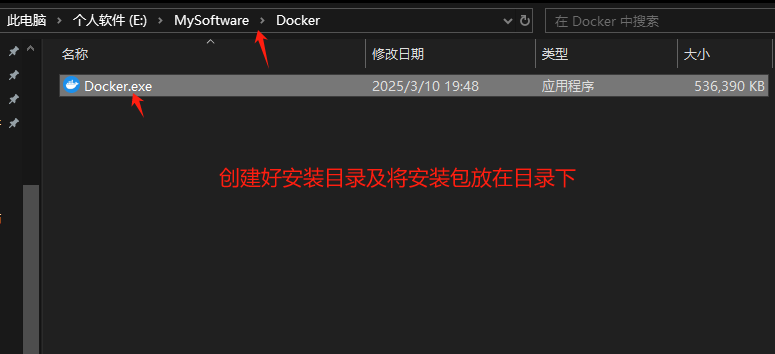
基于Docker+DeepSeek+Dify :搭建企业级本地私有化知识库超详细教程 下载安装Docker Docker官网:https://www.docker.com/ 自定义Docker安装路径 Docker默认安装在C盘,大小大概2.9G,做这行最忌讳的就是安装软件全装C盘,所以我调整了下安装路径。 新建安装目录:E:\MyS…...